


 Loading...
Thank you for purchasing this Factory Service Manual CD/DVD from servicemanuals4u.com.
Please check out our eBay auctions for more great deals on Factory Service Manuals:
servicemanuals4u
ThinkPad® R40 Series
Service and Troubleshooting Guide
ThinkPad® R40 Series
Service and Troubleshooting Guide
Note
Before using this information and the product it supports, be sure to read the general information under Appendix A, “Important safety instructions”, on page 47, Appendix B, “Wireless related information”, on page 53, Appendix C, “Warranty information”, on page 55, and Appendix D, “Notices”, on page 69.
DANGER
vTo avoid electric shock hazard, connect and disconnect cables appropriately when installing, moving or opening the covers of this product or attached devices. Use the power cord with a properly grounded outlet.
vDo not leave the base of your computer in contact with your lap or any part of your body for an extended period when the computer is functioning or when the battery is charging. Your computer dissipates some heat during normal operation. This heat is a function of the level of system activity and battery charge level. Extended contact with your body, even through clothing, could cause discomfort or, eventually, a skin burn.
vTo reduce the risk of electric shock, do not use your computer in or near water.
vTo avoid electric shock, do not use your computer with the telephone cable connection during an electrical storm. Do not connect the cable to or disconnect it from the telephone outlet on the wall during an electrical storm.
vStore packing materials safely out of the reach of children to prevent the risk of suffocation from plastic bags.
vThe battery pack contains a small amount of harmful substances. There is danger of an explosion if the battery pack is incorrectly replaced, exposed to fire or water, short-circuited or disassembled. Keep the battery pack away from children and do not put it in trash that is disposed of in landfills.
vTo reduce the risk of fire, use only No. 26 AWG or thicker telephone cable.
vThe fluorescent lamp in the LCD contains mercury. Do not put it in trash that is disposed of in landfills. Rough handling or dropping the computer can cause the LCD to break and the internal fluid to get into your eyes or on your hands. Immediately wash the affected areas with water. If symptoms persist, seek medical care.
vDo not disassemble the optical storage drive unit, as this might result in hazardous radiation exposure.
vAvoid direct eye exposure with the laser beam contained in some drives.
First Edition (January 2003)
The following paragraph does not apply to the United Kingdom or any country where such provisions are inconsistent with local law:
INTERNATIONAL BUSINESS MACHINES CORPORATION PROVIDES THIS PUBLICATION ″AS IS″ WITHOUT WARRANTY OF ANY KIND, EITHER EXPRESS OR IMPLIED, INCLUDING, BUT NOT LIMITED TO, THE IMPLIED WARRANTIES OF NON-INFRINGEMENT, MERCHANTABILITY OR FITNESS FOR A PARTICULAR PURPOSE. Some states do not allow disclaimer of express or implied warranties in certain transactions, therefore, this statement may not apply to you.
This information could include technical inaccuracies or typographical errors. Changes are periodically made to the information herein; these changes will be incorporated in new editions of the publication. IBM may make improvements and/or changes in the product(s) and/or the program(s) described in this publication at any time without notice.
IBM may use or distribute any of the information you supply in any way it believes appropriate without incurring any obligation to you.
© Copyright International Business Machines Corporation 2003. All rights reserved.
US Government Users Restricted Rights – Use, duplication or disclosure restricted by GSA ADP Schedule Contract with IBM Corp.

Important Notice for Users
Important Regulatory Notice for Users
The ThinkPad R40 computer complies with the radio frequency and safety standards of any country or region in which it has been approved for wireless use. You are requested to install and use your ThinkPad computer in strict accordance with the local RF regulations. Before you use the ThinkPad R40 computer, please find and read “Regulatory Notice for ThinkPad R40 Series,” the notice that supplements this Service and Troubleshooting Guide. The notice is included in the package with this publication.
Information about hard disk capacity
Instead of providing a recovery CD or a Windows® CD with your computer, IBM® provides simpler methods of accomplishing the tasks typically associated with these CDs. The files and programs for these alternative methods are on your hard disk, which eliminates having to locate misplaced CDs and problems associated with using an incorrect CD version.
The complete backup of all the files and programs that IBM preinstalled on your computer resides in a hidden section, or partition, of the hard disk. Although hidden, the backups in the partition consume hard disk space. Therefore, when checking the capacity of your hard disk according to Windows® you might note that the total capacity of the disk appears to be smaller than anticipated. This discrepancy is explained by the contents of the hidden partition.
For more information about recovering your hard disk to the original preinstalled contents refer to your on-system help source, Access IBM. Press the blue Access IBM button or click the Access IBM icon on your desktop, and then browse the Learn section for various topics that cover backing up and recovering.
© Copyright IBM Corp. 2003 |
iii |
iv ThinkPad® R40 Series Service and Troubleshooting Guide
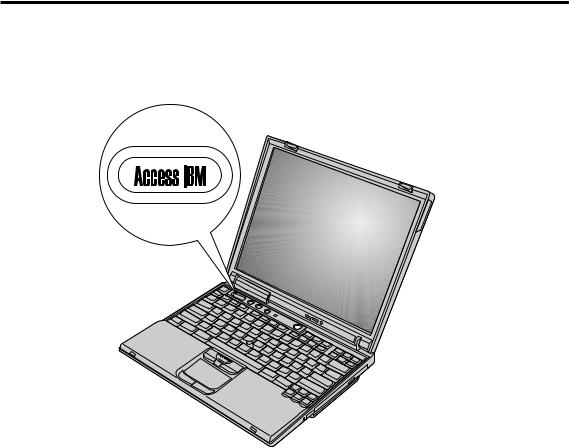
Finding information with Access IBM
The blue Access IBM button can help you in many situations when your computer is working normally; and even when it is not. At your desktop, press the Access IBM button to open Access IBM. Access IBM is your on-board computer help center that brings you informative illustrations and easy-to-follow instructions for getting started and staying productive. You can also use the Access IBM button to interrupt the startup sequence of your computer and start the Access IBM Predesktop Area. If Windows® does not start correctly, press the Access IBM button during the startup sequence of your computer and start the Access IBM Predesktop Area. Use this area to run diagnostics, restore your backups (assuming you have made backups using IBM Rapid Restore PC), restore to factory contents (ie, what was there when you received your computer), start a utility that enables you to change your startup sequence, and get essential system information, and start the IBM BIOS Setup Utility where you can check and change BIOS settings.
Press the Access IBM button to open the application that brings all of IBM’s resources to you. On the next page, you will see the Welcome page of Access
© Copyright IBM Corp. 2003 |
v |
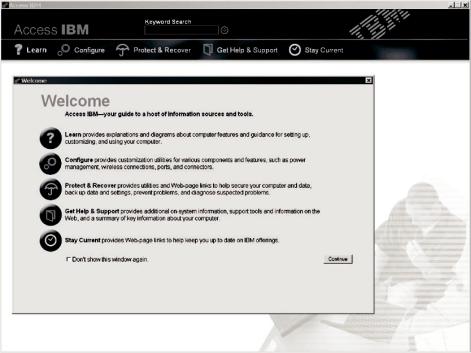
IBM that explains what each part of Access IBM holds to help you.
vi ThinkPad® R40 Series Service and Troubleshooting Guide
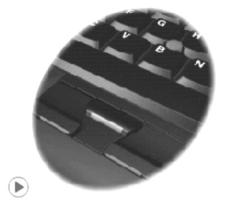
Some of the topics in your help system contain brief video clips that show you how to perform certain tasks, such as replacing your battery, inserting a PC Card, or upgrading your memory. Click play button to watch the video clip.
Finding information with Access IBM vii
viii ThinkPad® R40 Series Service and Troubleshooting Guide

Contents
Important Notice for Users. . . . . . |
. iii |
Getting help by fax . . . . . . . . |
. |
43 |
|
Important Regulatory Notice for Users . . |
. iii |
Calling IBM . . . . . . . . . . . |
. |
43 |
|
Information about hard disk capacity. . . |
. iii |
Getting help around the world . . . . . |
. 45 |
||
Finding information with Access IBM . . |
. v |
Appendix A. Important safety instructions |
|
47 |
|
|
|
|
Modem safety information . . . . . . |
. 50 |
|
Chapter 1. Overview of your new ThinkPad |
|
|
Laser compliance statement . . . . . . |
. |
51 |
computer . . . . . . . . . . . . . 1 |
|
|
|
||
Your ThinkPad at a glance . . . . . . |
. |
2 |
Appendix B. Wireless related information |
|
53 |
Features . . . . . . . . . . . . . |
. |
3 |
Wireless Interoperability . . . . . . . |
. |
53 |
Specifications . . . . . . . . . . . |
. |
5 |
Usage environment and your Health . . . |
. |
53 |
Caring for your ThinkPad computer . . . |
. 7 |
|
|
|
|
|
|
|
Appendix C. Warranty information . . . |
. 55 |
|
Chapter 2. Solving computer problems . |
. 11 |
Warranty Period . . . . . . . . . |
. |
55 |
|
Diagnosing problems . . . . . . . . |
. |
12 |
Warranty service and support . . . . . |
. |
56 |
Troubleshooting . . . . . . . . . . |
. |
13 |
Before you call for service . . . . . |
. |
56 |
Error messages . . . . . . . . . |
. |
13 |
Calling for service . . . . . . . . |
. |
57 |
Errors without messages . . . . . . |
. 16 |
IBM Statement of Limited Warranty |
|
|
|
A password problem . . . . . . . |
. |
18 |
Z125-4753–06 08/2000. . . . . . . . |
. |
57 |
A power switch problem . . . . . . |
. |
18 |
Part 1 - General Terms . . . . . . |
. |
57 |
Keyboard problems . . . . . . . |
. 18 |
Part 2 - Country-unique Terms . . . . |
. 60 |
||
UltraNav™ problems . . . . . . . |
. |
19 |
|
|
|
Standby or hibernation problems . . . |
. 20 |
Appendix D. Notices. . . . . . . . |
. |
69 |
|
Computer screen problems . . . . . |
. |
24 |
Processing date data . . . . . . . . |
. |
69 |
Battery problems . . . . . . . . |
. |
26 |
References to the Web site addresses . . . |
. |
70 |
Hard disk drive problems . . . . . |
. |
27 |
Electronic emission notices . . . . . . |
. |
70 |
Startup problems . . . . . . . . |
. |
27 |
Telecommunication notices . . . . . . |
. |
71 |
Other problems . . . . . . . . . |
. |
30 |
Fax Branding . . . . . . . . . |
. |
72 |
Starting IBM BIOS Setup Utility . . . . |
. 32 |
Industry Canada requirements . . . . . |
. 73 |
||
Recovering pre-installed software . . . . |
. |
34 |
Notice for Australia . . . . . . . . |
. |
74 |
Upgrading the hard disk drive . . . . . |
. 35 |
Notice for New Zealand . . . . . . . |
. 75 |
||
Replacing the battery . . . . . . . . |
. |
37 |
Notice for European Union countries. . . |
. |
77 |
Install a memory module . . . . . . |
. |
38 |
Product notice requirements . . . . . |
. 78 |
|
Chapter 3. Getting help and service from |
|
|
Environmental notices for Japan . . . . |
. 78 |
|
|
|
Trademarks . . . . . . . . . . . |
. |
79 |
|
IBM. . . . . . . . . . . . . . . 41 |
|
|
|
||
Getting help and service . . . . . . . |
. |
42 |
Index . . . . . . . . . . . . . |
. |
93 |
Getting help on the Web . . . . . . . |
. |
42 |
|
|
|
© Copyright IBM Corp. 2003 |
ix |
x ThinkPad® R40 Series Service and Troubleshooting Guide

Chapter 1. Overview of your new ThinkPad computer
Your ThinkPad at a glance |
. . . . |
. |
. |
. |
2 |
Specifications . . . . . . . . . |
. |
. |
. |
5 |
Features . . . . . . . |
. . . . |
. |
. |
. |
3 |
Caring for your ThinkPad computer . |
. |
. |
. |
7 |
© Copyright IBM Corp. 2003 |
1 |

Your ThinkPad at a glance
Your ThinkPad at a glance
Front view
Rear view
2 ThinkPad® R40 Series Service and Troubleshooting Guide

Features
Features
Processor
vIntel® Mobile Pentium® 4 Processor-M
vIntel® Mobile Celeron® Processor
vIntel® Pentium® M Processor
Memory
vBuilt-in: 128 MB, 256 MB or 512 MB, depending on the model
vMaximum: 1024 MB
Storage device
v 2.5-inch hard disk drive: 20 GB, 40 GB or 60 GB, depending on the model
Display
The color display uses TFT technology:
vSize: 13.3 inch, 14.1 inch, or 15.0 inch
vResolution:
–LCD: Up to 1400-by-1050, depending on the model
–External monitor: Up to 2048-by-1536
vBrightness control
Keyboard
v87-key, 88-key, or 92-key
vUltraNav™ (TrackPoint® and touch pad) or TrackPoint® only, depending on the model
vFn key function
vAccess IBM button
vVolume control buttons
vThinkLight™ (on some models)
vForward and Back keys
Chapter 1. Overview of your new ThinkPad computer 3
Features
Diskette drive - available on selected models
To get the best performance from your diskette drives, use high-quality diskettes (such as IBM diskettes) that meet or exceed the following standards:
v1-MB, 3.5-inch, unformatted diskette:
–ANSI (American National Standards Institute) X3.137
–ISO (International Standards Organization) 8860
–ECMA (European Computer Manufacturers Association) 100
v2-MB, 3.5-inch, unformatted diskette:
–ANSI X3.171
–ISO 9529
–ECMA 125
External interface
vParallel connector (IEEE 1284A)
vExternal-monitor connector
vPC Card slot (Type II, or Type III PC Card)
vStereo Headphone jack
vMicrophone jack
vS-Video out connector (on some models)
v2 Universal Serial Bus (USB 2.0) connectors (on some models)
v2 Universal Serial Bus (USB 1.1) connectors (on some models)
vInfrared port (on some models)
vRJ11 telephone connector (available if the modem feature is installed)
vRJ45 Ethernet connector
vUltrabay™ Plus or Optical storage drive in the fixed bay, depending on the model
vPort Replicate connector (on some models)
vIEEE 1394 port (on some models)
vIntegrated Bluetooth feature (on some models)
vIntegrated Microphone
vIntegrated wireless LAN (IEEE 802.11b) feature (on some models)
vIntegrated wireless LAN (IEEE 802.11a/b) feature (on some models)
4 ThinkPad® R40 Series Service and Troubleshooting Guide

Specifications
Specifications
Size
With a 13.3 or 14.1–inch display:
vWidth: 313 mm (12.3 in.)
vDepth: 254 mm (10.0 in.)
vHeight: 38.8 mm (1.53 in.)
With a 15.0–inch display:
vWidth: 329 mm (13.0 in.)
vDepth: 267.5 mm (10.5 in.)
vHeight: 40.5 mm (1.59 in.)
Environment
vMaximum altitude without pressurization: 3048 m (10,000 ft)
vTemperature
–At altitudes up to 2438 m (8000 ft)
-Operating with no diskette: 5° to 35°C (41° to 95°F)
-Operating with a diskette: 10° to 35°C (50° to 95°F)
-Not operating: 5° to 43°C (41° to 110°F)
–At altitudes above 2438 m (8000 ft)
-Maximum operating temperature, 31.3°C (88° F)
Note: When you charge the battery pack, its temperature must be at least 10°C (50°F).
vRelative humidity:
–Operating with no diskette in the drive: 8% to 95%
–Operating with a diskette in the drive: 8% to 80%
Heat output
v 72 W (246 Btu/hr) maximum
Power source (ac adapter)
vSine-wave input at 50 to 60 Hz
vInput rating of the ac adapter: 100-240 V ac, 50 to 60 Hz
Battery pack (depending on the model)
v8 cell Lithium-ion (Li-Ion) battery pack
–Nominal voltage: 14.4 V dc
–Capacity: 4.0 AH
Chapter 1. Overview of your new ThinkPad computer 5
Specifications
v6 cell Lithium-ion (Li-Ion) battery pack
–Nominal voltage: 14.4 V dc
–Capacity: 2.0 AH
6 ThinkPad® R40 Series Service and Troubleshooting Guide

Caring for your ThinkPad computer
Caring for your ThinkPad computer
Though your computer is designed to function reliably in normal work environments, you need to use common sense in handling it. By following these important tips, you will get the most use and enjoyment out of your computer.
Important tips:
Be careful about where and how you work
vDo not leave the base of your computer in contact with your lap or any part of your body for an extended period when the computer is functioning or when the battery is charging. Your computer dissipates some heat during normal operation. This heat is a function of the level of system activity and battery charge level. Extended contact with your body, even through clothing, could cause discomfort or, eventually, a skin burn.
vPlace liquids away from your computer to avoid spills, and keep your computer away from water (to avoid the danger of electrical shock).
vStore packing materials safely out of the reach of children to prevent the risk of suffocation from plastic bags.
vKeep your computer away from magnets, activated cellular phones, electrical appliances, or speakers (within 13cm/5 in).
vAvoid subjecting your computer to extreme temperatures (below 5°C/41°F or above 35°C/95°F).
Be gentle with your computer
vAvoid placing any objects (including paper) between the display and the keyboard or the palm rest.
vDo not drop, bump, scratch, twist, hit, vibrate, push or place heavy objects on your computer, display, or external devices.
vYour computer display is designed to be opened and used at an angle slightly greater than 90 degrees. Do not open the display beyond 180 degrees, as this might damage the computer hinge.
Carry your computer properly
vBefore moving your computer, be sure to remove any media, turn off attached devices, and disconnect cords and cables.
vBe sure your computer is in standby or hibernation mode, or turned off, before moving it. This will prevent damage to the hard disk drive and data loss.
vWhen picking up your open computer, hold it by the bottom. Do not pick up or hold your computer by the display.
Chapter 1. Overview of your new ThinkPad computer 7
Caring for your ThinkPad computer
vUse a quality carrying case that provides adequate cushion and protection. Do not pack your computer in a tightly packed suitcase or bag.
Handle storage media and drives properly
vAvoid inserting diskettes at an angle and attaching multiple or loose diskette labels, as these can lodge in the drive.
vIf your computer comes with a CD, DVD, or CD-RW/DVD drive, do not touch the surface of a disc or the lens on the tray.
vWait until you hear the CD or DVD click into the center pivot of the CD, DVD, or CD-RW/DVD drive before closing the tray.
vWhen installing your hard disk, diskette, CD, DVD, or CD-RW/DVD drive, follow the instructions shipped with your hardware, and apply pressure only where needed on the device. See Access IBM, your on-board help system, for information on replacing your hard disk drive (open Access IBM by pressing the Access IBM button.).
Take care in setting passwords
vRemember your passwords. If you forget a supervisor or hard disk password, IBM will not reset it, and you might have to replace your system board or hard disk drive.
Other important tips
vYour computer modem might use only an analog telephone network, or public-switched telephone network (PSTN). Do not connect the modem to a PBX (private branch exchange) or any other digital telephone extension line because this could damage your modem. Analog phone lines are often used in homes, while digital phone lines are often used in hotels or office buildings. If you are not sure which kind of phone line you are using, contact your telephone company.
vYour computer might have both an Ethernet connector and a modem connector. If so, be sure to connect your communication cable to the correct one, so your connector is not damaged. See Access IBM, your on-board help system, for information on the location of these connectors (press the Access IBM button to open Access IBM).
vRegister your ThinkPad products with IBM (refer to the Web page: www.ibm.com/pc/register). This can help authorities return your computer to you if it is lost or stolen. Registering your computer also enables IBM to notify you about possible technical information and upgrades.
vOnly an authorized IBM ThinkPad repair technician should disassemble and repair your computer.
vDo not modify or tape the latches to keep the display open or closed.
vTake care not to turn your computer over while the ac adapter is plugged in. This could break the adapter plug.
8 ThinkPad® R40 Series Service and Troubleshooting Guide
Caring for your ThinkPad computer
vTurn off your computer if you are replacing a device in a device bay, or else verify that the device is warm-or hot-swappable.
vIf you exchange drives in your computer, reinstall the plastic bezel faces (if supplied).
vStore your external and removable hard disk, diskette, CD, DVD, and CD-RW/DVD drives in the appropriate containers or packaging when they are not being used.
Cleaning your computer
Occasionally clean your computer as follows:
vUse a soft cloth moistened with non-alkaline detergent to wipe the exterior of the computer.
vAvoid spraying cleaner directly on the display or the keyboard.
vGently wipe the display with a soft, dry cloth. If you see a scratch-like mark on your display, it might be a stain transferred from the keyboard or the TrackPoint stick when the cover was pressed from the outside. Wipe or dust the stain gently with a soft, dry cloth. If the stain remains, moisten a soft, lint-free cloth with water that does not contain impurities, wring out as much of the water as you can, and then wipe the display again. Be sure to dry the display before closing it.
Chapter 1. Overview of your new ThinkPad computer 9
Caring for your ThinkPad computer
10 ThinkPad® R40 Series Service and Troubleshooting Guide

Chapter 2. Solving computer problems
Diagnosing problems . . . . . . |
. |
. |
. |
12 |
Battery problems . . . . . . . . |
. |
26 |
Troubleshooting . . . . . . . . |
. |
. |
. |
13 |
Hard disk drive problems . . . . . |
. |
27 |
Error messages . . . . . . . |
. |
. |
. |
13 |
Startup problems . . . . . . . . |
. |
27 |
Errors without messages . . . . |
. |
. |
. |
16 |
Other problems . . . . . . . . . |
. |
30 |
A password problem . . . . . |
. |
. |
. 18 |
Starting IBM BIOS Setup Utility . . . . |
. 32 |
||
A power switch problem . . . . |
. |
. |
. 18 |
Recovering pre-installed software . . . . |
. 34 |
||
Keyboard problems . . . . . |
. |
. |
. 18 |
Upgrading the hard disk drive . . . . . |
. 35 |
||
UltraNav™ problems . . . . . |
. |
. |
. |
19 |
Replacing the battery . . . . . . . . |
. |
37 |
Standby or hibernation problems . |
. |
. |
. 20 |
Install a memory module . . . . . . |
. 38 |
||
Computer screen problems . . . |
. |
. |
. 24 |
|
|
|
|
© Copyright IBM Corp. 2003 |
11 |

Solving computer problems
Diagnosing problems
If you have a problem with your computer, you can test it by using PC-Doctor® for Windows®. To run PC-Doctor for Windows, do as follows:
1.Click Start.
2.Move the cursor to All Programs (in Windows other than Windows® XP,
Programs) and then to PC-Doctor for Windows.
3.Click PC-Doctor.
4.Choose one of test, from either the Device Categories or the Test Scripts.
Attention
Running any tests may take up to several minutes or longer. Make sure you have time to run the entire test; do not interrupt the test while it is running.
The System Test of the Test Scripts runs some tests of critical hardware components, but it does not run all of the diagnostic tests in PC-Doctor for Windows. If PC-Doctor for Windows reports that all of the tests in the System Test have been run and that it has found no problems, consider running more of the tests in PC-Doctor for Windows.
If you are preparing to contact IBM for support, be sure to print the test log so that you can rapidly provide information to the help technician.
12 ThinkPad® R40 Series Service and Troubleshooting Guide

Solving computer problems
Troubleshooting
If you do not find your problem here, refer to Access IBM, your on-board help system. Open Access IBM by pressing the Access IBM button. The following section only describes problems that might prevent you from accessing this help system.
Error messages
Notes:
1.In the charts, x can be any character.
2.The version of PC-Doctor referred to here is PC-Doctor for Windows.
Message |
Solution |
|
|
0175: Bad CRC1, stop |
The EEPROM checksum is not correct (block #6). Have the computer |
POST task |
serviced. |
|
|
0176: System Security - |
This message is displayed if you remove the Security Chip and reinstall it, |
The System has been |
or install a new one. To clear the error, enter the IBM BIOS Setup Utility. If |
tampered with. |
this does not solve the problem, have the computer serviced. |
|
|
0177: Bad SVP data, stop |
Checksum of the supervisor password in the EEPROM is not correct. The |
POST task. |
system board should be replaced. Have the computer serviced. |
|
|
0182: Bad CRC2. Enter |
Checksum of the CRC2 setting in the EEPROM is not correct. Go to IBM |
BIOS Setup and load |
BIOS Setup Utility. Press F9 and then Enter to load the default setting. Press |
Setup defaults. |
F10 and then Enter to restart the system. |
|
|
0185: Bad startup |
Checksum of the startup sequence setting in the EEPROM is not correct. Go |
sequence settings. Enter |
to IBM BIOS Setup Utility. Press F9 and then Enter to load the default |
BIOS Setup and load |
setting. Press F10 and then Enter to restart the system. |
Setup defaults. |
|
|
|
0187: EAIA data access |
The access to EEPROM is failed. Have the computer serviced. |
error |
|
|
|
0188: Invalid RFID |
The EEPROM checksum is not correct (block # 0 and 1). The system board |
serialization information |
should be replaced, and the box serial number needs to be reinstalled. Have |
area. |
the computer serviced. |
|
|
0189: Invalid RFID |
The EEPROM checksum is not correct (block # 4 and 5). The system board |
configuration |
should be replaced, and the UUID needs to be reinstalled. Have the |
information area |
computer serviced. |
|
|
0190: Critical low-battery |
The computer turned off because the battery is low. Connect the ac adapter |
error |
to the computer and charge the battery, or replace the battery with a fully |
|
charged one. |
|
|
0199: System Security - |
This message is displayed if you enter a wrong supervisor password more |
IBM Security password |
than three times. Confirm the supervisor password and try again. To clear |
retry count exceeded. |
the error, enter the IBM BIOS Setup Utility. |
|
|
Chapter 2. Solving computer problems 13
Solving computer problems
Message |
Solution |
|
|
01C8: More than one |
Remove either a Modem Mini-PCI Card or a Modem Daughter Card, |
modem devices are |
otherwise press Esc to ignore the warning message. If it does not solve this |
found. Remove one of |
problem, have the computer serviced. |
them. Press <Esc> to |
|
continue. |
|
|
|
01C9: More than one |
Your ThinkPad computer has a built-in Ethernet feature, and you cannot |
Ethernet devices are |
add another such feature by installing an Ethernet device such as a |
found. Remove one of |
Mini-PCI Ethernet Card or an Ethernet Daughter Card. If this error message |
them. Press <Esc> to |
is displayed, remove the Ethernet device that you installed. Otherwise press |
continue. |
Esc to ignore the warning message. If this does not solve the problem, have |
|
the computer serviced. |
|
|
0200: Hard disk error |
The hard disk is not working. Make sure that the hard disk drive is attached |
|
firmly. Run the IBM BIOS Setup Utility; then make sure the hard disk drive |
|
is not disabled in the Startup menu. |
|
|
021x: Keyboard error |
Make sure that there are no objects placed on the keyboard, or if you have |
|
one, the external keyboard. Turn off the computer, and turn off all attached |
|
devices. Turn on the computer first; then turn on the attached devices. |
|
If you still see the same error code, do the following: |
|
If an external keyboard is connected, do the following: |
|
v Turn off the computer and disconnect the external keyboard; then turn on |
|
the computer. Make sure that the built-in keyboard operates correctly. If it |
|
does, have the external keyboard serviced. |
|
v Make sure that the external keyboard is connected to the correct |
|
connector. |
|
Test the computer by using PC-Doctor. |
|
v If the computer stops during the test, have the computer serviced. |
0230: Shadow RAM error |
The shadow RAM failed. Test your computer’s memory with PC-Doctor. If |
|
you added a memory module just before turning the computer on, reinstall |
|
it. Then test the memory with PC-Doctor. |
|
|
0231: System RAM error |
The system RAM failed. Test your computer’s memory with PC-Doctor. If |
|
you added a memory module just before turning the computer on, reinstall |
|
it. Then test the memory with PC-Doctor. |
|
|
0232: Extended RAM |
The extended RAM failed. Test your computer’s memory with PC-Doctor. If |
error |
you have increased memory just before turning the computer on, reinstall it. |
|
Then test the memory with PC-Doctor. |
|
|
0250: System battery |
The backup battery, which is used to preserve the configuration information, |
error |
such as the date and time, while the computer is turned off, is depleted. |
|
Replace the battery and run IBM BIOS Setup Utility to verify the |
|
configuration. If you still have a problem, have the computer serviced. |
|
|
14 ThinkPad® R40 Series Service and Troubleshooting Guide
|
Solving computer problems |
|
|
Message |
Solution |
|
|
0251: System CMOS |
The system CMOS might have been corrupted by an application program. |
checksum bad |
The computer uses the default settings. Run IBM BIOS Setup Utility to |
|
reconfigure the settings. If you still see the same error code, have the |
|
computer serviced. |
|
|
0260: System timer error |
Have the computer serviced. |
|
|
0270: Real time clock |
Have the computer serviced. |
error |
|
|
|
0271: Date and time error |
Neither the date nor the time is set in the computer. Set the date and time, |
|
using the IBM BIOS Setup Utility. |
|
|
0280: Previous boot |
Your computer was previously unable to complete the boot process. |
incomplete |
Turn the computer off; then turn it on to start the IBM BIOS Setup Utility. |
|
|
|
Verify the configuration and then restart the computer either by choosing |
|
the Exit Saving Changes option under the Restart item or by pressing F10. |
|
If you still see the same error code, have the computer serviced. |
|
|
02D0: System cache error |
The cache is disabled. Have the computer serviced. |
|
|
02F4: EISA CMOS not |
Have the computer serviced. |
writable |
|
|
|
02F5: DMA test failed |
Have the computer serviced. |
|
|
02F6: Software NMI |
Have the computer serviced. |
failed |
|
|
|
02F7: Fail-safe timer NMI |
Have the computer serviced. |
failed |
|
|
|
1802: Unauthorized |
The Mini-PCI network card is not supported on this computer. Remove it. |
network card is plugged |
|
in - Power off and |
|
remove the miniPCI |
|
network card. |
|
|
|
The power-on password |
A power-on password or a supervisor password is set. Type the password |
prompt |
and press Enter to use the computer. If the power-on password is not |
|
accepted, a supervisor password might have been set. Type the supervisor |
|
password and press Enter. If you still see the same error message, have the |
|
computer serviced. |
|
|
The hard disk password |
A hard disk password is set. Type the password and press Enter to use the |
prompt |
computer. |
|
If you still see the same error message, have the computer serviced. |
|
|
Chapter 2. Solving computer problems 15
Solving computer problems
Message |
Solution |
|
|
|
|
Hibernation error |
The system configuration changed between the time your computer entered |
|
|
hibernation mode and the time it left this mode, and your computer cannot |
|
|
resume normal operation. |
|
|
v Restore the system configuration to what it was before your computer |
|
|
entered hibernation mode. |
|
|
v If the memory size has been changed, re-create the hibernation file. |
|
Operating system not |
Verify the following: |
|
found. |
v The hard disk drive is correctly installed. |
|
|
v A startable diskette is in the diskette drive |
|
|
If you still see the same error message, check the boot sequence, using the |
|
|
IBM BIOS Setup Utility. |
|
|
|
|
Fan error |
The cooling fan has failed. Have the computer serviced. |
|
|
|
|
EMM386 Not Installed — |
Edit C:\CONFIG.SYS and change a line from |
|
Unable to Set Page |
device=C:\WINDOWS\EMM386.EXE RAM |
|
Frame Base Address. |
||
|
||
|
to |
|
|
device=C:\WINDOWS\EMM386.EXE NOEMS |
|
|
and save this file. |
|
|
|
|
CardBus Configuration |
Go to the IBM BIOS Setup Utility. Press F9 and then Enter to load the |
|
Error —Device Disabled |
default setting. |
|
|
Press F10 and then Enter to restart the system. |
|
|
|
|
Thermal sensing error |
The thermal sensor is not functioning correctly. Have the computer serviced. |
|
|
|
Errors without messages
Problem: When I turn on the machine, nothing appears on the screen and the machine does not beep while starting up.
Note: If you are not sure whether you heard any beeps, turn off the computer; then turn it on again, and listen again. If you are using an external monitor, refer to“Computer screen problems” on page 24
Solution: If a power-on password is set, press any key to display the power-on password prompt, and then type the correct password and press Enter.
If the power-on password prompt does not appear, the brightness level might be set to minimum brightness. Adjust the brightness level by pressing the Fn+Home.
16 ThinkPad® R40 Series Service and Troubleshooting Guide
Solving computer problems
If the screen still remains blank, make sure that:
vThe battery is installed correctly.
vThe ac adapter is connected to the computer and the power cord is plugged into a working electrical outlet.
vThe computer power is on. (Turn on the power switch again for confirmation.)
If these items are properly set, and the screen remains blank, have the computer serviced.
Problem: When I turn on the machine, nothing appears on the screen, but I hear two or more beeps.
Solution: Make sure that the memory card is installed correctly. If it is, but the screen is still blank, and you hear five beeps, have the computer serviced.
If you hear 4 cycles of 4 beeps each, the Security Chip has a problem. Have the computer serviced.
Problem: When I turn on the machine, only a white cursor appears on a blank screen.
Solution: Reinstall your operating system, and turn on the computer. If you still see only the cursor on the screen, have the computer serviced.
Problem: My screen goes blank while the computer is on.
Solution: Your screen saver or power management may be enabled. Touch the TrackPoint or the touch pad, or press a key to exit the screen saver, or press the power switch to resume from standby or hibernation.
Problem: The DOS full-screen looks smaller.
Solution: If you use a DOS application that supports only 640x480 resolution (VGA mode), the screen image might look slightly distorted or appear smaller than the display size. This is to maintain compatibility with other DOS applications. To expand the screen image to the same size as the actual screen, start the ThinkPad Configuration Program and click LCD; then select the Screen expansion function. (The image might still look slightly distorted.)
Note: If your computer has a screen expansion function, you can use the Fn+F8 keys to expand the screen image. But you can not use this function in Windows® 2000 environment.
Chapter 2. Solving computer problems 17
Loading...