


 Loading...
Ibm THINKPAD X60, THINKPAD X23, THINKPAD X30, THINKPAD X40, THINKPAD X41 Manual
...ThinkPad® X Series
Service and Troubleshooting Guide

Note
Before using this information and the product it supports, be sure to read the general information under “Appendix A. Important safety instructions” on page 43, “Appendix B. Warranty Information” on Page 49, “Appendix C. Notices” on page 63, and “Appendix D. Wireless Regulatory Information” on page 77.
DANGER
vTo avoid electric shock hazard, connect and disconnect cables appropriately when installing, moving or opening the covers of this product or attached devices. Use the power cord with a properly grounded outlet.
vDo not leave the base of your computer in contact with your lap or any part of your body for an extended period when the computer is functioning or when the battery is charging. Your computer dissipates some heat during normal operation. This heat is a function of the level of system activity and battery charge level. Extended contact with your body, even through clothing, could cause discomfort or, eventually, a skin burn.
vTo reduce the risk of electric shock, do not use your computer in or near water.
vTo avoid electric shock, do not use your computer with the telephone cable connection during an electrical storm. Do not connect the cable to or disconnect it from the telephone outlet on the wall during an electrical storm.
vStore packing materials safely out of the reach of children to prevent the risk of suffocation from plastic bags.
vThe battery pack contains a small amount of harmful substances. There is danger of an explosion if the battery pack is incorrectly replaced, exposed to fire or water, short-circuited or disassembled. Keep the battery pack away from children and do not put it in trash that is disposed of in landfills.
vTo reduce the risk of fire, use only No. 26 AWG or thicker telephone cable.
vThe fluorescent lamp in the LCD contains mercury. Do not put it in trash that is disposed of in landfills. Rough handling or dropping the computer can cause the LCD to break and the internal fluid to get into your eyes or on your hands. Immediately wash the affected areas with water. If symptoms persist, seek medical care.
vDo not disassemble the optical storage drive unit, as this might result in hazardous radiation exposure.
vAvoid direct eye exposure with the laser beam contained in some drives.
First Edition (Dec 2001)
The following paragraph does not apply to the United Kingdom or any country where such provisions are inconsistent with local law:
INTERNATIONAL BUSINESS MACHINES CORPORATION PROVIDES THIS PUBLICATION “AS IS” WITHOUT WARRANTY OF ANY KIND, EITHER EXPRESS OR IMPLIED, INCLUDING, BUT NOT LIMITED TO, THE IMPLIED WARRANTIES OF NON-INFRINGEMENT, MERCHANTABILITY OR FITNESS FOR A PARTICULAR PURPOSE. Some states do not allow disclaimer of express or implied warranties in certain transactions, therefore, this statement may not apply to you.
This information could include technical inaccuracies or typographical errors. Changes are periodically made to the information herein; these changes will be incorporated in new editions of the publication. IBM may make improvements and/or changes in the product(s) and/or the program(s) described in this publication at any time without notice.
IBM may use or distribute any of the information you supply in any way it believes appropriate without incurring any obligation to you.
© Copyright International Business Machines Corporation 2001. All rights reserved.
US Government Users Restricted Rights – Use, duplication or disclosure restricted by GSA ADP Schedule Contract with IBM Corp.

Important Notice for Users
The FCC RF Safety Requirement
When you use a Bluetooth option or wireless PCMCIA card in your ThinkPad X Series computer, please make sure of the following:
1.Visit the IBM site at www.ibm.com/pc/qtechinfo/MIGR-39377.html and confirm the updated list of RF option devices that have been approved to cooperate with the integrated wireless feature.
2.When you use any other RF option device that is not listed on the IBM site, all other wireless features including the integrated transmitter in your ThinkPad computer are required to be turned off.
3.Users are requested to follow the RF Safety instructions on wireless option devices that are included in the RF option device’s user’s manual.
See ’Appendix D. Wireless Regulatory Information’ on page 77 for more details.
© Copyright IBM Corp. 2001 |
iii |
iv ThinkPad® X Series Service and Troubleshooting Guide

Finding information with Access ThinkPad
Find answers to your questions about your computer and view IBM Web sites by pressing the ThinkPad Button shown in the previous illustration to open Access ThinkPad, your on-board computer help center.
4
5
1 |
2 |
3 |
© Copyright IBM Corp. 2001 |
v |

Learn about the many features of your ThinkPad computer. ThinkPad Features provides a visual display of your computer and components.
Once you are familiar with the hardware features of your system use the Tools and Tips category to get the most out of those features like Wireless Networking, Maximizing your battery life, etc... Click Access Help to open a comprehensive help system offering information such as how to change or upgrade the memory in your computer.
Visit these IBM Web sites to join an interactive community of ThinkPad users, download new backgrounds, purchase accessories, or get online support.
Keyword Search provides a quick way to search information in Access Help.
You can view information about your system such as model number in System Details and change the look of your application through Personalize.
vi ThinkPad® X Series Service and Troubleshooting Guide
Whenever you have a question about your computer, or wish to view IBM Web sites, simply press the ThinkPad button to open Access ThinkPad.
Access ThinkPad includes a comprehensive, on-board help and information center for your computer. It travels with you, eliminating the need to carry reference manuals.
Find information about your ThinkPad computer and its features by using the search function. For direct access to help and support, tips from other mobile users, and information about accessories, software, and upgrades, visit the IBM Web site.
View help topics to learn how to:
vUse your computer hardware features
vConnect to the internet or a local network
vSet up a projector for your presentation
vUse passwords and other security features
vInstall, remove and recover software
vUpgrade your system
vExtend the life of your battery
vTroubleshoot problems
vContact IBM for service and support
vPerform many other tasks
Click one of the Internet buttons to join an interactive ThinkPad Web community, or to directly access information about accessories and software updates, small business offerings, and help and support.
Finding information with Access ThinkPad vii
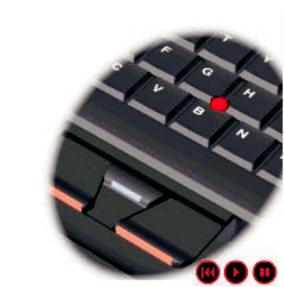
Some of the topics in your help system contain brief video clips that show you how to perform certain tasks, such as replacing your battery, inserting a PC card, or upgrading your memory. Use the controls shown to play, pause, and rewind the video clip.
viii ThinkPad® X Series Service and Troubleshooting Guide

Contents
Important Notice for Users. . . . . . . iii
The FCC RF Safety Requirement . . . . . iii
Finding information with Access ThinkPad v
Chapter 1. Overview of your new ThinkPad computer . . . . . . . . . . . . . 1
Your ThinkPad at a glance . . . . . . . 2 Features . . . . . . . . . . . . . . 3 Specifications . . . . . . . . . . . . 4 Caring for your ThinkPad computer . . . . 5
Chapter 2. Solving computer problems |
. |
|
. 9 |
Diagnosing problems . . . . . . . |
. |
. |
10 |
Troubleshooting . . . . . . . . . . . 11 |
|||
Error messages . . . . . . . . |
. |
. |
11 |
Errors without messages . . . . . |
. |
. |
14 |
A password problem . . . . . . |
. |
. 15 |
|
A power switch problem . . . . . |
. |
. 16 |
|
Keyboard problems . . . . . . |
. |
. |
16 |
Infrared port problems . . . . . |
. |
. |
17 |
TrackPoint problems . . . . . . |
. |
. |
18 |
Standby or hibernation problems . . |
. |
. 19 |
|
Computer screen problems . . . . |
. |
. 22 |
|
Battery problems . . . . . . . |
. |
. |
23 |
Hard disk drive problems . . . . |
. |
. 24 |
|
Software problems . . . . . . . |
. |
. |
24 |
Bluetooth problem . . . . . . . |
. |
. |
25 |
Other problems . . . . . . . . . |
. |
. |
25 |
Starting BIOS Setup Utility . . . . . |
. |
. |
27 |
Recover pre-installed software . . . . |
. |
. |
28 |
Backing up your system . . . . . . |
. |
. |
29 |
Backing up your registry . . . . . |
. |
. |
29 |
Replacing the hard disk drive . . . . |
. |
. |
31 |
Replacing the battery . . . . . . . |
. |
. |
33 |
Install a memory module . . . . . |
. |
. 34 |
|
Chapter 3. Getting help and service from
IBM. . . . . . . . . . . . . . . 37
Getting help and service . . . . . . . . 38 Getting help on the Web . . . . . . . . 38
Getting help by fax . . . . . . . . |
. |
39 |
Calling IBM . . . . . . . . . . . |
. |
39 |
Getting help around the world . . . . . |
. 41 |
|
Appendix A. Important safety instructions |
|
43 |
Modem safety information . . . . . . |
. 45 |
|
Laser compliance statement . . . . . . |
. |
46 |
Appendix B. Warranty information . . . |
. 49 |
|
Warranty period . . . . . . . . . |
. |
49 |
Warranty service and support . . . . . |
. 49 |
|
Before you call for service . . . . . |
. |
50 |
Calling for service . . . . . . . . |
. |
50 |
IBM Statement of Limited Warranty |
|
|
Z125-4753-06 8/2000 . . . . . . . . |
. |
50 |
Part 1 - General Terms . . . . . . |
. |
50 |
Part 2 - Country-unique Terms . . . . |
. 54 |
|
Appendix C. Notices. . . . . . . . |
. |
63 |
Notices. . . . . . . . . . . . . . 63 |
||
Processing date data . . . . . . . |
. |
64 |
Trademarks . . . . . . . . . . . 64 |
||
Electronic emission notices . . . . . |
. |
65 |
Telecommunication notices . . . . . |
. 66 |
|
Notice for Australia . . . . . . . |
. |
69 |
Notice for New Zealand Users . . . . |
. 69 |
|
Notice for European Union countries. . . 74 |
||
Wireless Interoperability . . . . . . |
. |
76 |
Usage environment and your Health . . . 76 |
||
Appendix D. Wireless Regulatory
information . . . . . . . . . . . . 77
USA - Federal Communications Commission (FCC) . . . . . . . . . . . . . . 77 Canada - Industry Canada (IC). . . . . . 78 Europe - CE Declaration of Conformity . . . 78 Notice for Users in Singapore . . . . . . 83 Trademarks . . . . . . . . . . . . 83
Index . . . . . . . . . . . . . . 85
© Copyright IBM Corp. 2001 |
ix |
x ThinkPad® X Series Service and Troubleshooting Guide
Chapter 1. Overview of your new ThinkPad computer
Your ThinkPad at a glance |
. . . . |
. |
. |
. |
2 |
Specifications . . . . . . . . . |
. |
. |
. |
4 |
Features . . . . . . . |
. . . . |
. |
. |
. |
3 |
Caring for your ThinkPad computer . |
. |
. |
. |
5 |
© Copyright IBM Corp. 2001 |
1 |
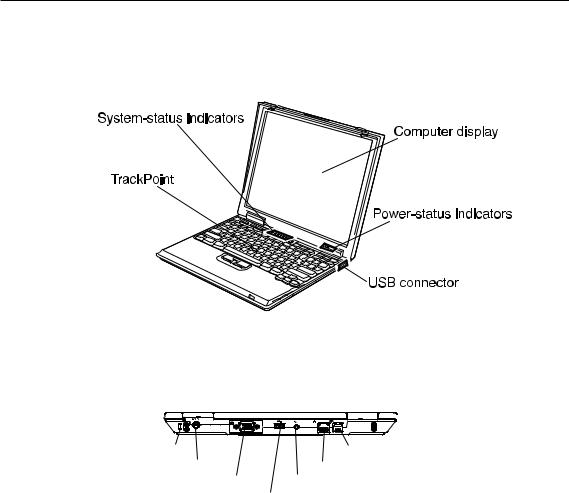
Your ThinkPad at a glance
Your ThinkPad at a glance
Front view
Rear view
Security keyhole |
Modem connector |
Power jack |
Ethernet connector |
Monitor connector |
Stereo line-in jac k |
USB connector
2 ThinkPad® X Series Service and Troubleshooting Guide

Your ThinkPad at a glance
Features
Processor
Intel® Mobile PentiumIII-M Processor
Memory
Built-in: 128MB
Maximum:
640MB for 128MB memory
Storage devices
2.5-inch hard disk drive
Display
The color display uses TFT technology
1.XGA
v Up to 1024-by-768 resolution on the 12.1-inch LCD
vUp to 1600-by-1200 resolution on an external monitor
vBrightness control
Keyboard
85-key, 86-key, or 90-key TrackPoint® pointing device
Fn key function
ThinkPad Button
Volume buttons
Chapter 1. Overview of your new ThinkPad computer 3

Your ThinkPad at a glance
External interface
External-monitor connector
PC Card slot (Type I, Type II, Type II Plus)
Type II Compact Flash slot
Headphone jack, Microphone jack (supports a condenser microphone with the type of connector that is shown circled in the following illustration)
Line-in jack
Universal Serial Bus (USB) connector
Telephone connector (available if the modem Mini-PCI Card or the Combo Mini-PCI Card is installed)
Ethernet connector (available if the Ethernet Mini-PCI Card or the Combo Mini-PCI Card is installed)
UltraPort connector to support an optional IBM digital camera
UltraBase X2 connector
IrDA port
Wireless LAN Interface
Specifications
Size
With a 12.1-inch display:
–Width: 279.4 mm
–Depth: 226.8 mm
–Height: 24.9-30.2 mm
Environment
Temperature (at altitudes less than 2438 m (8000 ft.)):
– Operating: 5°C to 35°C (41°F to 95°F)
4 ThinkPad® X Series Service and Troubleshooting Guide

Your ThinkPad at a glance
– Non-operating: -20°C to 60°C (-4°F to 140°F)
Note: When you charge the battery pack, its temperature must be at least 10°C (50°F).
Relative humidity:
–Operating: 8% to 90%
–Non-operating: 5% to 95%
Maximum altitude: 3048 m (10,000 ft.) in unpressurized conditions
– Maximum temperature at 3048 m (10,000 ft.): 31°C (88°F)
Electrical (AC Adapter)
Sine-wave input, at 50 to 60 Hz is required
The input rating of the AC Adapter: 100-240 V ac, 50/60 Hz
Lithium-ion battery pack
Nominal voltage |
Capacity |
14.4 V dc |
1.8 AH |
10.8 V dc |
3.9 AH |
Caring for your ThinkPad computer
Though your computer is designed to function reliably in normal work environments, you need to use common sense in handling it. By following these important tips, you will get the most use and enjoyment out of your computer.
Important tips:
Be careful about where and how you work
vDo not leave the base of your computer in contact with your lap or any part of your body for an extended period when the computer is functioning or when the battery is charging. Your computer dissipates some heat during normal operation. This heat is a function of the level of system activity and battery charge level. Extended contact with your body, even through clothing, could cause discomfort or, eventually, a skin burn.
vPlace liquids away from your computer to avoid spills, and keep your computer away from water (to avoid the danger of electrical shock).
vStore packing materials safely out of the reach of children to prevent the risk of suffocation from plastic bags.
vKeep your computer away from magnets, activated cellular phones, electrical appliances, or speakers (within 13cm/5 in).
Chapter 1. Overview of your new ThinkPad computer 5
Caring for your ThinkPad computer
vAvoid subjecting your computer to extreme temperatures (below 5°C/41°F or above 35°C/95°F).
Be gentle with your computer
vAvoid placing any objects (including paper) between the display and the keyboard or under the keyboard.
vDo not drop, bump, scratch, twist, hit, vibrate, push or place heavy objects on your computer, display, or external devices.
vYour computer display is designed to be opened and used at an angle slightly greater than 90 degrees. Do not open the display beyond 135 degrees, as this might damage the computer hinge.
Carry your computer properly
vBefore moving your computer, be sure to remove any media, turn off attached devices, and disconnect cords and cables.
vBe sure your computer is in standby or hibernation mode, or turned off, before moving it. This will prevent damage to the hard disk drive and data loss.
vWhen picking up your open computer, hold it by the bottom. Do not pick up or hold your computer by the display.
vUse a quality carrying case that provides adequate cushion and protection. Do not pack your computer in a tightly packed suitcase or bag.
Handle storage media and drives properly
vIf your computer comes with a diskette drive, avoid inserting diskettes at an angle and attaching multiple or loose diskette labels, as these can lodge in the drive.
vIf your computer comes with a CD or DVD drive, do not touch the surface of a CD or the lens on the CD or DVD tray.
vWait until you hear the CD or DVD click into the center pivot of the CD or DVD drive before closing the CD or DVD tray.
vWhen installing your hard disk, diskette, CD, or DVD drive, follow the instructions shipped with your hardware, and apply pressure only where needed on the device. See Access ThinkPad, your on-board help system, for information on replacing your hard disk drive (open Access ThinkPad by pressing the ThinkPad button).
Take care in setting passwords
vRemember your passwords. If you forget a supervisor or hard disk password, IBM will not reset it, and you might have to replace your system board or hard disk drive.
Other important tips
6 ThinkPad® X Series Service and Troubleshooting Guide
Caring for your ThinkPad computer
vYour computer modem might use only an analog telephone network, or public-switched telephone network (PSTN). Do not connect the modem to a PBX (private branch exchange) or any other digital telephone extension line because this could damage your modem. Analog phone lines are often used in homes, while digital phone lines are often used in hotels or office buildings. If you are not sure which kind of phone line you are using, contact your telephone company.
vYour computer might have both an Ethernet connector and a modem connector. If so, be sure to connect your communication cable to the correct one, so your connector is not damaged. See Access ThinkPad, your on-board help system, for information on the location of these connectors (press the ThinkPad button to open Access ThinkPad).
vRegister your ThinkPad products with IBM (refer to the Web page: www.pc.ibm.com/register). This can help authorities return your computer to you if it is lost or stolen. Registering your computer also enables IBM to notify you about possible technical information and upgrades.
vOnly an authorized IBM ThinkPad repair technician should disassemble and repair your computer.
vDo not modify or tape the latches to keep the display open or closed.
vTake care not to turn your computer over while the ac adapter is plugged in. This could break the adapter plug.
vTurn off your computer if you are replacing a device in a device bay, or else verify that the device is warmor hot-swappable.
vIf you exchange drives in your computer, reinstall the plastic bezel faces (if supplied).
vStore your external and removable hard disk, diskette, CD, and DVD drives in the appropriate containers or packaging when they are not being used.
Cleaning your computer
Occasionally clean your computer as follows:
vUse a soft cloth moistened with nonalkaline detergent to wipe the exterior of the computer.
vAvoid spraying cleaner directly on the display or the keyboard.
vGently wipe the display with a dry, soft cloth.
Chapter 1. Overview of your new ThinkPad computer 7
Caring for your ThinkPad computer
8 ThinkPad® X Series Service and Troubleshooting Guide

Chapter 2. Solving computer problems
Diagnosing problems . . . . . . . |
. |
. |
10 |
Hard disk drive problems . |
. |
. . . |
. |
24 |
Troubleshooting . . . . . . . . . |
. |
. |
11 |
Software problems . . . . |
. |
. . . |
. |
24 |
Error messages . . . . . . . . |
. |
. |
11 |
Bluetooth problem . . . . |
. |
. . . |
. |
25 |
Errors without messages . . . . . |
. |
. |
14 |
Other problems . . . . . . |
. |
. . . |
. |
25 |
A password problem . . . . . . |
. |
. |
15 |
Starting BIOS Setup Utility . . |
. |
. . . |
. |
27 |
A power switch problem . . . . . |
. |
. |
16 |
Recover pre-installed software . |
. |
. . . |
. |
28 |
Keyboard problems . . . . . . |
. |
. |
16 |
Backing up your system . . . |
. |
. . . |
. |
29 |
Infrared port problems . . . . . |
. |
. |
17 |
Backing up your registry . . |
. |
. . . |
. |
29 |
TrackPoint problems . . . . . . |
. |
. |
18 |
Replacing the hard disk drive . |
. |
. . . |
. |
31 |
Standby or hibernation problems . . |
. |
. |
19 |
Replacing the battery . . . . |
. |
. . . |
. |
33 |
Computer screen problems . . . . |
. |
. 22 |
Install a memory module . . |
. |
. . . |
. 34 |
||
Battery problems . . . . . . . |
. |
. |
23 |
|
|
|
|
|
© Copyright IBM Corp. 2001 |
9 |

Solving computer problems
Diagnosing problems
If you have a problem with your computer, you can test it by using PC-Doctor® for Windows®. To run PC-Doctor for Windows, do as follows:
1.Click Start.
2.Move the cursor to Programs(in Windows XP, All Programs) and then to
PC-Doctor for Windows.
3.Click PC-Doctor for Windows.
4.Choose either the Run Quick Test Set or the Run Normal Test Set.
Attention
Running the Quick Test set can take 10 minutes or longer. Make sure you have time to run the entire test; do not interrupt the test while it is running.
The Quick Test set runs many tests of critical hardware components, but it does not run all of the diagnostic tests in PC-Doctor for Windows. If PC-Doctor for Windows reports that all of the tests in the Quick Test set have been run and that it has found no problems, consider running more of the tests.
If you are preparing to contact IBM for support, be sure to print the test log so that you can rapidly provide information to the help technician.
10 ThinkPad® X Series Service and Troubleshooting Guide
Solving computer problems
Troubleshooting
If you do not find your problem here, refer to Access ThinkPad, your on-board help system. Open Access ThinkPad by pressing the ThinkPad button. The following section only describes problems that might prevent you from accessing this help system.
Error messages
Note:
1.In the charts, x can be any character.
2.The version of PC-Doctor referred to here is PC-Doctor for Windows.
Message |
Solution |
|
|
0175: Bad CRC1, stop |
The EEPROM checksum is not correct (block #6). Have the computer |
POST task |
serviced. |
|
|
0187: EAIA data access |
The access to EEPROM failed. Have the computer serviced. |
error |
|
|
|
0188: Invalid RFID |
The EEPROM checksum is not correct (block # 0 and 1, or block # 6). The |
serialization information |
system board should be replaced, and the box serial number needs to be |
area or bad CRC2. |
reinstalled. Have the computer serviced. |
|
|
0189: Invalid RFID |
The EEPROM checksum is not correct (block # 4 and 5). The system board |
configuration |
should be replaced, and the UUID needs to be reinstalled. Have the |
information area |
computer serviced. |
|
|
0190: Critical low-battery |
The computer turned off because the battery is low. Connect the ac adapter |
error |
to the computer and charge the battery, or replace the battery with a fully |
|
charged one. |
|
|
0193: RF antenna has |
The RFID antenna that you installed has been removed. Enter the |
been removed |
supervisor password to return your computer to the normal operation. |
|
|
0194: The computer is |
The computer has been carried through the security portal gate. Enter the |
carried through the |
supervisor password to return your computer to the normal operation. |
security gate |
|
|
|
0195: Security hardware |
The Security Chip has been attached to or replaced on your computer. Open |
tamper detected |
the BIOS Setup Utility (using the supervisor password), and clear the |
|
Security Chip. Refer to Setting the Security Chip in the Access ThinkPad, |
|
your on-board help system. If it does not solve this problem, have the |
|
computer serviced. |
|
|
0196: Security hardware |
The Security Chip has been removed from your computer. Open the BIOS |
removed |
Setup Utility (using the supervisor password), and clear the Security Chip. |
|
Refer to Setting the Security Chip in the Access ThinkPad, your on-board |
|
help system. If it does not solve this problem, have the computer serviced. |
|
|
0197: Invalid Remote |
The remote configuration for the Security Chip has failed. Confirm the |
change requested |
operation and try again. |
|
|
Chapter 2. Solving computer problems 11
Solving computer problems
Message |
Solution |
|
|
01C9: More than one |
Remove either an Ethernet Mini-PCI Card or an Ethernet Daughter Card. |
Ethernet devices are |
Otherwise, press Esc to ignore the warning message. If it does not solve this |
found. Remove one of |
problem, have the computer serviced. |
them. Press Esc to |
|
continue. |
|
|
|
0200: Hard disk error |
The hard disk is not working. Make sure that the hard disk drive is attached |
|
firmly. Run the BIOS Setup Utility; then make sure the hard disk drive is |
|
not disabled in the Startup menu. |
|
|
021x: Keyboard error |
Make sure that there are no objects placed on the keyboard, or if you have |
|
one, the external keyboard. Turn off the computer, and turn off all attached |
|
devices. Turn on the computer first; then turn on the attached devices. |
|
If you still see the same error code, do the following: |
|
If an external keyboard is connected, do the following: |
|
v Turn off the computer and disconnect the external keyboard; then turn on |
|
the computer. Make sure that the built-in keyboard operates correctly. If it |
|
does, have the external keyboard serviced. |
|
v Make sure that the external keyboard is connected to the correct |
|
connector. |
|
Test the computer, using PC-Doctor. |
|
v If the computer stops during the test, have the computer serviced. |
0230: Shadow RAM error |
The shadow RAM failed. Test your computer’s memory with PC-Doctor. If |
|
you added a memory module just before turning the computer on, reinstall |
|
it. Then test the memory with PC-Doctor. |
|
|
0231: System RAM error |
The system RAM failed. Test your computer’s memory with PC-Doctor. If |
|
you added a memory module just before turning the computer on, reinstall |
|
it. Then test the memory with PC-Doctor. |
|
|
0232: Extended RAM |
The extended RAM failed. Test your computer’s memory with PC-Doctor. If |
error |
you have increased memory just before turning the computer on, reinstall it. |
|
Then test the memory with PC-Doctor. |
|
|
0250: System battery |
The system battery is depleted. This battery is used to preserve the |
error |
configuration information, such as the date and time, while the computer is |
|
turned off. Replace the battery and run IBM BIOS Setup Utility to verify the |
|
configuration. If you still have a problem, have the computer serviced. |
|
|
0251: System CMOS |
The system CMOS might have been corrupted by an application program. |
checksum bad |
The computer uses the default settings. Run IBM BIOS Setup Utility to |
|
reconfigure the settings. If you still see the same error code, have the |
|
computer serviced. |
|
|
0260: System timer error |
Have the computer serviced. |
|
|
0270: Real time clock |
Have the computer serviced. |
error |
|
|
|
12 ThinkPad® X Series Service and Troubleshooting Guide
|
Solving computer problems |
|
|
Message |
Solution |
|
|
0271: Date and time error |
Neither the date nor the time is set in the computer. Set the date and time, |
|
using the IBM BIOS Setup Utility. |
|
|
0280: Previous boot |
Your computer was previously unable to complete the boot process. |
incomplete |
Turn the computer off; then turn it on to start the IBM BIOS Setup Utility. |
|
|
|
Verify the configuration and then restart the computer either by choosing |
|
the Exit Saving Changes option under the Restart item or by pressing F10. |
|
If you still see the same error code, have the computer serviced. |
|
|
02D0: System cache error |
The cache is disabled. Have the computer serviced. |
|
|
02F4: EISA CMOS not |
Have the computer serviced. |
writable |
|
|
|
02F5: DMA test failed |
Have the computer serviced. |
|
|
02F6: Software NMI |
Have the computer serviced. |
failed |
|
|
|
02F7: Fail-safe timer NMI |
Have the computer serviced. |
failed |
|
|
|
The power-on password |
A power-on password or a supervisor password is set. Type the password |
prompt |
and press Enter to use the computer. If the power-on password is not |
|
accepted, a supervisor password might have been set. Type the supervisor |
|
password and press Enter. If you still see the same error message, have the |
|
computer serviced. |
|
|
The hard disk password |
A hard disk password is set. Type the password and press Enter to use the |
prompt |
computer. |
|
If you still see the same error message, have the computer serviced. |
|
|
Hibernation error |
The system configuration changed between the time your computer entered |
|
hibernation mode and the time it left this mode, and your computer cannot |
|
resume normal operation. |
|
v Restore the system configuration to what it was before your computer |
|
entered hibernation mode. |
|
v If the memory size has been changed, re-create the hibernation file. |
Operating system not |
Verify the following: |
found. |
v The hard disk drive is correctly installed. |
|
v A startable diskette is in the diskette drive |
|
If the same error message is still displayed, check the boot sequence, using |
|
the IBM BIOS Setup Utility. |
|
|
Fan error |
The cooling fan has failed. Have the computer serviced. |
|
|
Chapter 2. Solving computer problems 13
Solving computer problems
Message |
Solution |
|
|
|
|
EMM386 Not Installed — |
Edit C:\CONFIG.SYS and change a line from |
|
Unable to Set Page |
device=C:\WINDOWS\EMM386.EXE RAM |
|
Frame Base Address. |
||
|
||
|
to |
|
|
device=C:\WINDOWS\EMM386.EXE NOEMS |
|
|
and save this file. |
|
|
|
|
CardBus Configuration |
Press F1 to go to the IBM BIOS Setup Utility. Press F9 and then Enter to |
|
Error —Device Disabled |
load the default setting. |
|
|
Press F10 and then Enter to restart the system. |
|
|
|
Errors without messages
Problem: When I turn on the machine, nothing appears on the screen and the machine does not beep while starting up.
Note: If you are not sure whether you heard any beeps, turn off the computer; then turn it on again, and listen again.
Solution: If a power-on password is set, press any key to display the power-on password prompt, and then type the correct password and press Enter.
If the power-on password prompt does not appear, the brightness level might be set to minimum brightness. Adjust the brightness level by pressing the Fn+Home.
If the screen still remains blank, make sure that:
vThe battery is installed correctly.
vThe ac adapter is connected to the computer and the power cord is plugged into a working electrical outlet.
vThe computer power is on. (Turn on the power switch again for confirmation.)
If these items are properly set, and the screen remains blank, have the computer serviced.
Problem: When I turn on the machine, nothing appears on the screen, but I hear two or more beeps or a continuous beep while starting up.
Solution: If you are using Ethernet:
v Make sure that the Ethernet cable is connected firmly.
14 ThinkPad® X Series Service and Troubleshooting Guide
Solving computer problems
v Contact your network administrator.
If the screen is still blank, and the beeps do not stop, have the computer serviced.
Problem: When I turn on the machine, only a white cursor appears on a blank screen
Solution: Reinstall your operating system, and turn on the computer. If you still see only the cursor on the screen, have the computer serviced.
Problem: My screen goes blank while the computer is on.
Solution: Your screen saver or power management may be enabled. Move the TrackPoint or press a key to exit the screen saver, or press the power switch to resume from standby or hibernation.
Problem: The DOS full-screen looks smaller.
Solution: If you use a DOS application that supports only 640x480 resolution (VGA mode), the screen image might look slightly distorted or appear smaller than the display size. This is to maintain compatibility with other DOS applications. To expand the screen image to the same size as the actual screen, start the ThinkPad Configuration Program and click LCD; then select the Screen expansion function. (The image might still look slightly distorted.)
Note: If your computer has a screen expansion function, you can use the Fn+F8 keys to expand the screen image.
A password problem
Problem: I forgot my password.
Solution: If you forget your power-on password, you have to take your computer to an IBM reseller or marketing representative to have the password canceled.
If you forget your hard disk password, IBM will not reset your password or recover data from the hard disk. You must take your computer to an IBM reseller or an IBM marketing representative to have the hard disk drive replaced. Proof of purchase is required, and a fee will be charged for parts and service.
If you forget your supervisor password, IBM will not reset your password. You must take your computer to an IBM reseller or IBM marketing representative to have the system board replaced. Proof of purchase is required, and a fee will be charged for parts and service.
Chapter 2. Solving computer problems 15
Solving computer problems
A power switch problem
Problem: The system does not respond, and you cannot turn off the computer.
Solution: Turn off the computer by pressing and holding the power switch for 4 seconds or more. If the computer is still not reset, remove the ac adapter and the battery.
Keyboard problems
Problem: The cursor does not move after the computer returns from one of the power management modes.
Solution: Make sure you followed the instructions correctly when you installed Windows with the Advanced Power Management (APM) option.
Problem: Some or all of the keys on the keyboard do not work.
Solution: If the problem occurred immediately after the computer returned from standby mode, enter the power-on password if any is set.
If an external keyboard is connected, the numeric keypad on your computer does not work. Use the numeric keypad on the external keyboard.
If an external numeric keypad or a mouse is connected:
1.Turn off the computer.
2.Remove the external numeric keypad or the mouse.
3.Turn on the computer and try using the keyboard again.
If the keyboard problem is resolved, carefully reconnect the external numeric keypad, external keyboard, or mouse, making sure that you have seated the connectors properly.
If any keys on the keyboard still do not work, have the computer serviced.
Problem: A number appears when you type a letter.
Solution: The numeric lock function is on. To disable it, press and hold Shift; then press NumLk.
Problem: Some or all of the keys on the external numeric keypad do not work.
Solution: Make sure that the external numeric keypad is correctly connected to the computer.
Problem: Some or all of the keys on the external keyboard do not work.
16 ThinkPad® X Series Service and Troubleshooting Guide
Solving computer problems
Solution:
vMake sure that the keyboard cable is correctly connected to the computer.
vIf you are using the keyboard/mouse cable, make sure that the cable is correctly connected to the computer, and that the keyboard cable is connected to the correct side of the keyboard/mouse cable.
vIf you are using the docking station or the port replicator, make sure that the keyboard cable is correctly connected to the keyboard connector.
If these connections are correct, disconnect the external keyboard from the computer and make sure that the built-in keyboard operates properly. If the built-in keyboard works, there is a problem with either the cable or the keyboard. Try using a different keyboard/mouse cable or external keyboard.
Infrared port problems
Problem: Your computer cannot communicate with other devices through the infrared port.
Solution: Make sure that:
vThe communication speeds are the same.
vThe infrared ports are clean.
vNo objects are between the computer and the communicating device.
vThe distance and angle between your computer and the device are within the specified ranges.
vYou are not operating under direct sunlight.
vThe infrared port is directly facing the other communication port.
vThe communication application running on your computer is compatible with that running on the other computer. Refer to the application manuals for more information.
Problem: Incorrect data is sent between your computer and a communicating device.
Solution: Make sure that:
vThe distance and angle between your computer and the device are within the ranges.
vThe communication speeds are the same.
vThere are no other devices that radiate infrared rays, such as remote-controlled devices or wireless headphones, near your computer or the communicating device.
vYou are not operating under direct sunlight.
vNo fluorescent lamps are near your computer or the communicating device.
Chapter 2. Solving computer problems 17
Solving computer problems
Problem: You cannot use DMA channels for both the parallel connector and the infrared port.
Solution: If you enable ECP and choose DMA3 (the default value) for the parallel connector, you might be asked whether you want to disable DMA for the infrared port. To use DMA channels for both the parallel and infrared ports, do the following:
1.Click OK to disable DMA for the infrared port.
2.Close a parallel port panel.
3.Click the Infrared device button to open the infrared panel.
4.Choose DMA0 or DMA1 for the infrared port on the panel.
5.If you see the panel asked whether you want to disable DMA for an audio device, click OK.
TrackPoint problems
Problem: The cursor drifts when the computer is turned on or after it resumes normal operation.
Solution: The cursor might drift when you are not using the TrackPoint during normal operation. This is a normal characteristic of the TrackPoint and is not a defect. Cursor drifting might occur for several seconds under the following conditions:
vWhen the computer is turned on.
vWhen the computer resumes normal operation.
vWhen the TrackPoint is pressed for a long time.
vWhen the temperature changes.
Problem: The cursor does not work for a while after the settings in the Mouse Properties window have been changed.
Solution: This is a normal characteristic of the cursor. Wait several seconds until the cursor returns to the normal state.
Problem: The mouse or pointing device does not work.
Solution: Make sure that the TrackPoint is enabled in the ThinkPad Configuration Program, and then try using the TrackPoint. If the TrackPoint works, the error might be due to the mouse.
Make sure that the mouse or pointing-device cable is securely connected to the computer.
If your mouse is incompatible with the IBM® PS/2® mouse, disable the TrackPoint, using the ThinkPad Configuration Program.
18 ThinkPad® X Series Service and Troubleshooting Guide
Solving computer problems
Note: For more information, see the manual supplied with the mouse.
Problem: The mouse buttons do not work.
Solution: Change the mouse driver to Standard PS/2 Port Mouse, and then reinstall IBM PS/2 TrackPoint. Drivers are provided in the C:\IBMTOOLS\DRIVERS directory on your hard disk drive. If your hard disk drive does not contain device drivers, refer to the ThinkPad Service & Support Web site. To access this Web site, open Access ThinkPad by pressing the ThinkPad button, then click the Service & Support image on the right of the screen.
Problem: The scrolling or magnifying glass function does not work.
Solution: Check the mouse driver in Device Manager window, and make sure that the IBM PS/2 TrackPoint driver is installed.
Standby or hibernation problems
Problem: The computer returns from standby mode unexpectedly by disconnecting a device from the USB connector or carring your computer with a USB device (especially a USB mouse) connected.
Solution: Your computer is enabled to return from standby mode when detecting any activity on a device attached to the USB connector. Make sure to disconnect a device from the USB connector in advance or disable this function to prevent this problem.
Problem: The computer enters standby mode automatically.
Solution: If the processor reaches a temperature that is too high, the computer automatically enters standby mode to allow the computer to cool and to protect the processor and other internal components.
Problem: The computer enters standby mode immediately after Power-On Selftest (POST) (the standby indicator light turns on).
Solution: Make sure that:
vThe battery is charged.
vThe operating temperature is within the acceptable range. Refer to “Specifications” in this Guide.
If these items are correct, have the computer serviced.
Problem: The critical low-battery error message is displayed, and the computer immediately turns off.
Chapter 2. Solving computer problems 19
Solving computer problems
Solution: The battery power is getting low. Connect the ac adapter to the computer, or replace the battery with a fully charged one.
Problem: When you take action to return from standby mode, the computer display remains blank.
Solution: Check whether an external monitor was disconnected while the computer was in standby mode. Do not disconnect the external monitor while the computer is in standby mode or hibernation mode. If no external monitor is attached when the computer resumes, the computer display remains blank and output is not displayed. This restriction does not depend on the resolution value. Press Fn+F7 to bring up the computer display.
Problem: The computer does not return from standby mode, or the standby indicator stays on and the computer does not work.
Solution: The computer automatically enters standby or hibernation mode when the battery is depleted. Connect the ac adapter to the computer; then press Fn.
Problem: Your computer does not enter standby or hibernation mode.
Solution: Check whether any option has been selected that would disable your computer from entering standby or hibernation mode.
Problem: The computer does not enter standby mode as set by the timer under Windows 98 or Windows NT®.
Solution:
For Windows 98:
The generic CD-ROM or DVD-ROM driver for Windows 98 accesses the internal CD-ROM or DVD-ROM drive every 3 seconds to see whether a CD-ROM is inserted there. This prevents your computer from entering standby mode even after a timeout. To enable the computer to enter standby mode, do the following:
1.Click Start.
2.Move the cursor to Settings and Control Panel.
3.Click Control Panel, and then double-click System.
4.Click the Device Manager tab.
5.Click the + mark of CD-ROM.
6.Double-click the name of the CD-ROM or DVD-ROM.
7.Click the Settings tab.
20 ThinkPad® X Series Service and Troubleshooting Guide
Loading...