


DS3000 Storage Manager Demo Guide
Storage Manager 2.17
Demo Guide Revision 1.0
January 17, 2007
DS3000 Storage Manager Software Demo Guide |
- 1 - |
Overview
•Getting Started
•Exploring the DS3000 Storage Manager o Tab Screen Views
•Putting Together an Effective Demo
•Scenarios
o Scenario 1: Limited IT Expertise and Time
oScenario 2: Newly Added Drives to be Configured
oScenario 3: Increasing Data Protection
oScenario 4: Adding Capacity
•Premium License Feature Scenarios
oScenario 1: Sharing Data
oScenario 2: Improving Service Levels with Hot Backups
oScenario 3: Relocating Data
•Advanced Features and Manual Functions
oManual Hot Spare Configuration
o Manual Drive Configuration
o Media Scan Settings
o Command Line Interface
DS3000 Storage Manager Software Demo Guide |
- 2 - |
Disclaimer
The intent of the DS3000 Storage Managers Demo software and this Demo Guide document is to provide IBM field sales and support personnel, IBM Business Partners, and their resellers, distributors and integrators a tool for illustrating the features, functions and power of the DS3000 Storage Manager software.
At the time these tools are released and internally distributed, there were only minor errors that do not result in intentional misrepresentation of the DS3000 Storage Manager or DS3000 disk systems capability. However, the Demo is neither tested, nor updated, nor maintained to the extent of the actual products offered for sale or other customer use. As a result, certain features and functionality may not behave as they would in a production release of DS3000 Storage Manager.
Technical questions should be verified through official published documents, support resources, or directed to appropriate Systems Engineers, field support or customer service personnel.
DS3000 Storage Manager Software Demo Guide |
- 3 - |
Getting Started
Audience
Welcome to the DS3000 Storage Manager Demo Guide.
The audience for this demo guide is technically-oriented members of the sales community who hope to understand more about how the DS3000 Storage Manager works. This guide is also for members of Field Sales wishing to use this tool to demonstrate capabilities of the DS3000 disk systems.
Background Information
The DS3000 Storage Manager Software Demo is designed for use in testing environments as a standalone simulator of DS3000 Storage Manager’s functions.
To prevent accidental access or corruption of critical data, the Storage Manager Demo does not have the ability to access actual storage disk systems.
Prerequisites
The Storage Manager Demo program runs on Windows 2003 or XP environments. Other environments have not been tested nor are they approved for use.
Terminology
Before we begin our journey though the DS3000 Storage Manager, there is some terminology you may not be familiar with. We will provide you with a short summary of these terms.
Array: A set of physical drives logically grouped together with an assigned RAID level. Arrays can vary in the number of drives to meet required data protection, capacity, or performance requirements (the more physical drives in an array, the higher the performance capability of the array).
FlashCopy: This feature provides the ability to create a point-in-time image of a logical drive. It is very useful for as a data source for backup applications.
Host-to-Logical-Drive-Mappings: When there are several hosts and many logical drives to associate to these hosts, Host-to-Logical-Drive-Mappings are utilized to configure a set of logical drives to each host server. We use the partitioning feature to assist in this process
Logical Drive: This is the basic storage unit that is created on the DS3000 and presented to a host server. It is synonymous with LUN and is a drive letter (H: for example) in Windows environments.
Partition: This premium feature logically divides a single disk system into multiple systems by defining which host or host group can access each logical drive. This enables a range of hosts with different capacity, performance, or data protection demands to effectively share a single storage system.
Storage subsystem: This term will be used interchangeably with disk system. Both refer to the DS3000 series disk systems which are managed by the DS3000 Storage Manager
VolumeCopy: This feature provides the ability to create an independent copy of another logical drive or FlashCopy. This term is also used interchangeably with logical drive copy.
DS3000 Storage Manager Software Demo Guide |
- 4 - |
Loading the Software
The Storage Manager Demo program is available from a variety of sources including
CDs
IBM Internal Sales Kit:
http://w3- 1.ibm.com/sales/systems/portal/_s.155/254?navID=f220s240&geoID=All&prodID=Disk&docID=ds30 00sk.skit&docType=SalesKit&skCat=DocumentType)
External PartnerWorld Kit: http://www-
1.ibm.com/partnerworld/sales/systems/myportal/_s.155/307?navID=f220s240&geoID=All&prodID=Di sk&docID=ds3000sk.skit&docType=SalesKit&skCat=DocumentType
The Demo is zip file with the following name SMdemo_217_G506.zip. Unzip this file into a folder of your choice. Within this folder will be the DEMO folder. Simply navigate there and execute the batch file named Start_Demo.bat.
And you are ready to go!
__________________________________________________________________________________
Note: When the installation of the Storage Manager Demo is completed, go to the directory where the demo was installed and execute the Start_Demo.bat batch file.
__________________________________________________________________________________
DS3000 Storage Manager Software Demo Guide |
- 5 - |
Exploring the DS3000 Storage Manager Demo
Executing the Start_Demo.bat initiates a Java session with the Storage Manager Demo program. You’ll see the following screens – the DS3000 Storage Manager splash screen identifying the Storage Manager Demo followed by the Enterprise Management Window screens:
DS3000 Storage Manager Software Demo Guide |
- 6 - |

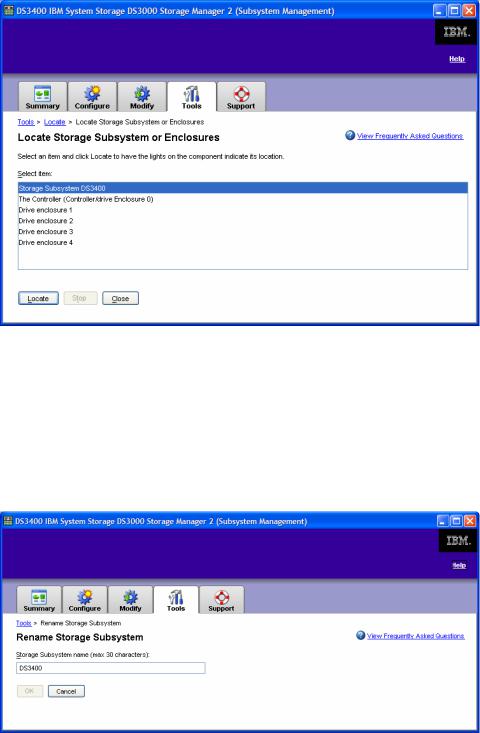
The Enterprise Management Window Task Assistant is a series of wizards that helps you install and manage your new DS3000 disk system. The Task Assistant helps with common tasks such as:
Add Storage Subsystems
Name/Rename Storage Subsystems
Configure Alerts
Manage a Storage Subsystem
Feel free to explore the Task Assistant. You can auto-discover the storage subsystems by selecting
Add Storage Subsystem from the Task Assistant, or closing the Task Assistant window and clicking on the leftmost icon button in the Enterprise Management Window.
__________________________________________________________________________________
Note: In subsequent Demo sessions, the storage subsystems may not need to be rediscovered. However, if the subsystem status is “unresponsive,” simply delete the systems and rediscover them.
__________________________________________________________________________________
In the right panel of the Enterprise Management window, you will see two preconfigured storage systems: 1) the DS3400, and 2) the DS3200.
With two systems, you can select the appropriate subsystem as the basis to demonstrate features:,
1)The DS3400 is ideal for an in-depth exploration of the DS3000 Storage Manager feature set. Nothing is pre-defined for the subsystem, so it can serve as a basis for configuring all the arrays, logical drives and host-to-volume mappings,
2)The DS3200 is suitable for a comprehensive tour of the DS3000 Storage Manager features. It includes a number of defined arrays and logical drives.
Both configurations include a total of 48 SAS drives and 3 EXP3000 drive trays. In addition, all premium features, FlashCopy, Volume Copy and partitioning, are enabled.
It is important to note that the DS3400 and DS3200 are identical in their functionality. The features and tasks presented in the Demo guide can be used interchangeably.
DS3000 Storage Manager Software Demo Guide |
- 7 - |

Tab Bar Screen Views
For this initial exploration of the Storage Manager Demo, we will use the DS3400 disk system configuration.
Select the DS3400 system by double-clicking it in the right panel. This displays the DS3000 Subsystem Management window (SMW).
The SMW provides access to most components and functions of the DS3000 series disk systems.
There are five tabs in the SMW view
DS3000 Storage Manager Software Demo Guide |
- 8 - |

The Summary tab provides access to: o Initial Setup Tasks link
oRecovery Guru - This is the automatic discovery tool for systems problems
oHardware components profile and drive location
oLocate arrays and logical drives - Drive group(ings) and disk system targets (LUNS)
oHost and mappings - The attachment of LUNs to servers
oInformation center and online help
•The Configure tab provides access to:
oConfigure host access – Automatic or manual
o Create host group – A group of servers or cluster o Automatic storage configuration
o Configure Hot Spares
o Create logical drives (including FlashCopy logical drives) o Create host-to-logical drive mappings – Server to LUN
• The Modify tab provides access to:
oEdit host topology - Servers using LUNs
oRename or delete logical drives
oAdd free capacity - Drive space available in the arrays and not yet assigned to a logical-drive)
oChange logical drive ownership (preferred path) - Route from/to server and disk system
oModify FlashCopy logical drives - Drive used for FlashCopy
oManage logical drive copies - Premium feature of VolumeCopy or logical drive copy
oEdit host-to-logical drive mappings
•The Tools tab provides access to:
oRename storage subsystem
o Set or change password
o Change media scan settings - System data block check done in the background
oTurn on indicator lights for various components to identify them physically (e.g. locate a drive)
oView/enable premium features
oChange enclosure ID numbers - Identification number assigned to a expansion unit
oSynchronize controller clocks
oChange controller network configuration - Set IP address information
oReset battery age - Days until battery replacement should be made
oInherit system settings – Leverage already existing array configurations
•The Support tab provides troubleshooting and maintenance access to:
oRecover from failure
o View event log
o Gather support information
o View storage subsystem profile o Download firmware
o Manage controllers o View online help
DS3000 Storage Manager Software Demo Guide |
- 9 - |
Putting Together an Effective Demo
Selecting a disk system for their organization can be a difficult decision for customers. It is also not always clear what criteria or requirements are behind their selection process. The DS3000 Storage Manager Demo is one means for you to understand your customers buying criteria. This Demo leads to open discussion with your customer as you go through the simulator together. By reviewing with them what they are likely to experience with the DS3000 disk systems and DS3000 Storage Manager, you can work with them to define what features are most important to them and why.
An effective way to win over the prospect is to provide training to the eventual administrators and managers of the IBM DS3000 disk systems. This will show the ease of use of the DS3000 Storage Manager as well as address any of their concerns about learning a new software system. Stressing the task-oriented user interface and its simplicity, this training can be tailored to the specific needs of the group you are training:
Initial set-up and configuration
Basic operations for their particular environment
Advanced premium features for when they need them
Specific operations for growing their disk system
Application specific tips and techniques
This course is best held as an interactive exchange of “How do I…?” topics and exercises that provide best practices for common tasks that DS3000 Storage Manager offers.
This strategy has been used successfully on numerous occasions in parallel with the pre and post sales process. It’s an excellent vehicle to train, practice, and sell.
DS3000 Storage Manager Software Demo Guide |
- 10 - |
Scenarios
The following sections will provide some scenarios for you to engage with your customers and how to address a specific business issue utilizing the DS3000 Storage Manager functions. As well, you may decide to highlight some of the features you have found in addition to the demo guide and develop your own scenarios.
Scenario 1 – “This is my first external storage system. What do I do?”
Initial Setup Tasks dialog box
The DS3000 Storage Manager’s Initial Setup Tasks dialog box provides step-by-step instructions on setting up a DS3000 disk system. As a task-based user interface, it provides a more obvious starting point to setting-up and managing the disk system.
The Initial Setup Tasks window offers a step-by- step process of tasks directing users to complete an initial configuration. It pops up automatically when the SMW is first brought up, or can be launched by selecting Perform Initial Setup Tasks from the summary tab of the SMW.
The steps listed as initial setup tasks include:
1.Locate the storage subsystem
2.Rename the storage subsystem
3.Set a storage subsystem password
4.Configure host access
5.Configure storage subsystem
In this scenario we will cover each step in the initial setup tasks list.
DS3000 Storage Manager Software Demo Guide |
- 11 - |
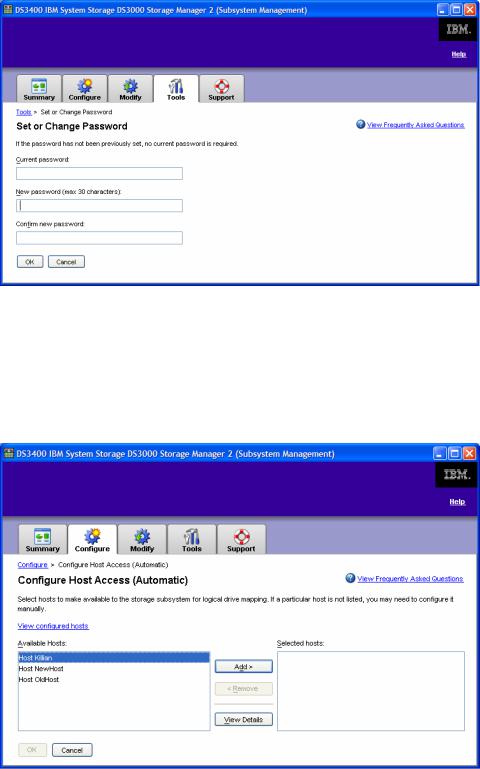
Step 1. Locate the Disk System
This optional step helps locate the subsystem if it’s in a data center or room with other systems. Click on Locate the Storage Subsystem, which will take you to the following screen:
From this screen, select an item and click on Locate to have the lights on the DS3000 disk system indicate its location. This allows you to locate the physical location of the disk system in your network. The disk system can then be identified with a label.
Step 2. Rename the Storage Subsystem
This optional step allows you to rename the subsystem. Click on Rename the Storage Subsystem, which will take you to the following screen.
Enter the new subsystem name and click OK.
DS3000 Storage Manager Software Demo Guide |
- 12 - |
Step 3: Set a Storage Subsystem password
This optional step allows you to set a password for the subsystem, so that unauthorized users can not make changes. Click on Set a Storage Subsystem Password, which will take you to the following screen.
Enter and confirm the new password, then click OK.
Step 4. Configure Host Access
This step allows you to provide one or more hosts access the subsystem. Select Configure Host Access, which will direct you to the following window.
DS3000 Storage Manager Software Demo Guide |
- 13 - |
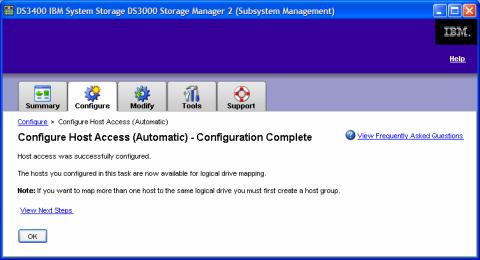
After selecting the appropriate host, click Add and then OK. You will then receive confirmation of host access.
__________________________________________________________________________________
Note: In the Demo, several hosts have been pre-configured for access.
__________________________________________________________________________________
Step 5. Configuration Storage Subsystem
This step has multiple options. The Automatic (Simple) option is the quickest and easiest, but provides the least amount of control over the configuration. The Manual (Advanced) option, which still provides some automated assistance, provides more control over the configuration and will be preferred in nearly every situation. This scenario will cover the automatic option. The Manual (Advanced) option, Create Logical Drives, will be covered in Scenario 2.
Automatic (Simple)
Expand the Automatic (Simple) option under Configure the Storage Subsystem and select Step 1: Automatic Configuration. This will bring you to the Automatic Configuration window where you will simply choose a RAID level and click Finish. Storage Manager will then configure the entire subsystem into multiple arrays based on the selected RAID level and create a single logical drive within each array.
________________________________________________________________________________
Note: Users that wish to define the number of drives in each array, and the number and size of the logical drives in each array, should use the “Create Logical Drives” option.
________________________________________________________________________________
DS3000 Storage Manager Software Demo Guide |
- 14 - |
 Loading...