


IBM storage products
Installation guide
Ultrastar 18ES
Multi-mode SE/LVD
Models: DNES-309170
DNES-318350

IBM storage products
Table of contents
Introduction . . . . . . . . . . . . . . . . . . . . . . . . . . . . . . . . . . . . . . . . . . . . . . . . . . . . . . . . . . . . . . . Page 3 Hardware description . . . . . . . . . . . . . . . . . . . . . . . . . . . . . . . . . . . . . . . . . . . . . . . . . . . . . . . . Page 4 Hard disk drive handling guide . . . . . . . . . . . . . . . . . . . . . . . . . . . . . . . . . . . . . . . . . . . . . . . . Page 5 Hard disk drive installation flow chart . . . . . . . . . . . . . . . . . . . . . . . . . . . . . . . . . . . . . . . . . . . Page 6 Step 1: Installation checklist . . . . . . . . . . . . . . . . . . . . . . . . . . . . . . . . . . . . . . . . . . . . . . . . . . Page 7 Step 2: Prepare for installation . . . . . . . . . . . . . . . . . . . . . . . . . . . . . . . . . . . . . . . . . . . . . . . . Page 8 Step 3: Jumper Settings . . . . . . . . . . . . . . . . . . . . . . . . . . . . . . . . . . . . . . . . . . . . . . . . . . . . . . Page 9 Step 4: Mounting . . . . . . . . . . . . . . . . . . . . . . . . . . . . . . . . . . . . . . . . . . . . . . . . . . . . . . . . . . Page 12 Step 5: Connectors . . . . . . . . . . . . . . . . . . . . . . . . . . . . . . . . . . . . . . . . . . . . . . . . . . . . . . . . . Page 13 Step 6: Complete physical installation . . . . . . . . . . . . . . . . . . . . . . . . . . . . . . . . . . . . . . . . . Page 14 Step 7: Installation and configuration . . . . . . . . . . . . . . . . . . . . . . . . . . . . . . . . . . . . . . . . . . Page 14 Step 8: FDISK . . . . . . . . . . . . . . . . . . . . . . . . . . . . . . . . . . . . . . . . . . . . . . . . . . . . . . . . . . . . . Page 17 Step 9: Formatting . . . . . . . . . . . . . . . . . . . . . . . . . . . . . . . . . . . . . . . . . . . . . . . . . . . . . . . . . Page 19 Step 10: Operating system installation . . . . . . . . . . . . . . . . . . . . . . . . . . . . . . . . . . . . . . . . . Page 19 Appendix . . . . . . . . . . . . . . . . . . . . . . . . . . . . . . . . . . . . . . . . . . . . . . . . . . . . . . . . . . . . . . . . . Page 20 Glossary . . . . . . . . . . . . . . . . . . . . . . . . . . . . . . . . . . . . . . . . . . . . . . . . . . . . . . . . . . . . . . . . . Page 26
|
Page 2 |
IBM Technical Group Support Center |
version 1.1 |
|
25L17811G10 |

IBM storage products
Introduction
This manual was prepared to help you install your IBM Ultrastar 18ES hard drive in most computer systems. If you do not feel comfortable installing this drive yourself, contact a qualified installer to assist you.
International Business Machines Corporation provides this publication "AS IS" without warranty of any kind, either express or implied, including, but not limited to, the implied warranties of merchantability or fitness for a particular purpose. Some states do not allow disclaimers of express or implied warranties in certain transactions. Therefore, this statement may not apply to you.
This publication could include technical inaccuracies or typographical errors. Product data and specifications are subject to change without notice. Changes are periodically made to the information herein; these changes will be incorporated in new editions of the publication. IBM may make improvements or changes in the products or the program described in this publication at any time.
This publication may contain reference to or information about IBM products (machines and programs), programming, or services that are not available in your country. Such references or information must not be construed to mean that IBM intends to make available such IBM products, programming, or services in your country.
Product description data contained herein represents IBM’s design objectives and is provided for comparison among IBM products; actual results may vary based on a variety of factors. Except as explicitly stated in the Warranty section of this Guide, the product data contained herein does not constitute a warranty. Questions regarding IBM warranty terms or the methodology used to derive data should be referred to an IBM representative.
Technical information about IBM hard disk drive products can be obtained via the Internet at:
http://www.ibm.com/harddrive
or by calling the IBM Hard Disk Drive Technical Support Center at 888.426.5214.
© Copyright International Business Machines Corporation 1999. All rights reserved. Note to US Government Users - Documentation related to restricted rights - Use, duplication, or disclosure is subject to restrictions set forth in GSA ADP Schedule Contract with IBM Corp.
IBM is a registered trademark of the International Business Machines Corporation. The following are also trademarks or registered trademarks of the International Business Machines Corporation in the United States, other countries, or both: Ultrastar and OS/2. Any other products or trademarks are the property of their respective owners.
|
Page 3 |
IBM Technical Group Support Center |
version 1.1 |
|
25L17811G10 |

IBM storage products
Hardware description
The Ultrastar 18ES is available in various models with the following options:
!Capacity of 18 or 9GB
!50, 68, or 80 pin connectors
!50 pin SCSI connectors use the SCSI A connector.
!68 pin SCSI connectors use the SCSI P connector.
!80 pin SCSI connectors use the SCA-2 connector
Capacity |
Model |
SCSI Pins/Connector Type |
SCSI Electrical Signal Type |
9GB |
DNES-309170 |
50 / Unitized Connector |
Ultra SCSI |
9GB |
DNES-309170 |
68 / Unitized Connector |
Ultra SCSI |
9GB |
DNES-309170 |
68 / Unitized Connector |
Low Voltage Differential (Ultra2) |
9GB |
DNES-309170 |
80 / SCA-2 |
Low Voltage Differential (Ultra2) |
18GB |
DNES-318350 |
50 / Unitized Connector |
Ultra SCSI |
18GB |
DNES-318350 |
68 / Unitized Connector |
Ultra SCSI |
18GB |
DNES-318350 |
68 / Unitized Connector |
Low Voltage Differential (Ultra2) |
18GB |
DNES-318350 |
80 / SCA-2 |
Low Voltage Differential (Ultra2) |
These drives offer an advanced LVD interface that supports transfer rates of up to 80 MB/sec. To take advantage of the higher transfer rate of 80 MB/sec, your computer will need to have a controller that supports the LVD interface. If you have a SCSI controller that does not support this interface, the drive will still function, but will be limited to data transfer speeds significantly lower than 80MB/sec due to the lower speed of your controller. If you have a slower controller, you may wish to purchase an LVD controller card to take advantage of Ultrastar’s 80 MB/sec data transfer rate. An LVD controller card will fit into any available slot in your computer. To determine if your current controller card is LVD, check the documentation that came with your controller or contact the controller manufacturer.
If you currently have single-ended wide SCSI drives and a non-LVD controller, you may still attach the LVD model Ultrastar 18ES to the existing cable. If you choose to replace your non-LVD controller with an LVD model, in most cases, single-ended wide SCSI drives can be attached to the same bus with an LVD drive. However, there are some LVD controllers that do not support single-ended wide SCSI drives. Check the documentation that came with your controller or contact the manufacturer to ensure that your LVD controller will support single-ended wide SCSI drives.
The Ultrastar 18ES family is ideal use by video producers and movie editors. These drives are designed to work with MMX systems. Compatibility listings are included in the appendix. Before you begin installation, please read the “Hard disk drive handling guide” on the following page.
|
Page 4 |
IBM Technical Group Support Center |
version 1.1 |
|
25L17811G10 |

IBM storage products
Hard disk drive handling guide
These notes are designed to provide a simple overview of the need for caution when handling a disk drive.
Disk drives can be easily damaged by electrical static shock or rough handling. In order to minimize the risk of damage to a disk drive, it is essential that the drive be handled while resting on a cushioned surface (which is electrostatically safe). Examples of static-safe mats available at the time of this printing are 3M's 8210 table mat and 3M's "First Touch" computer pad.
Great care should be taken when handling disk drives. Do not bump them against any object. When attaching brackets or mounting the drive in the computer, be very careful. It is very easy to unintentionally cause shocks which exceed specifications.
Please note that the capacity of each disk drive to withstand electrical or mechanical shock varies according to its design. The IBM Hard Disk Drive Technical Support Center can advise you on the suitability of your Ultrastar drive for a specific application.
Damage incurred to a drive might not be immediately evident and could cause the drive to fail months later.
|
Page 5 |
IBM Technical Group Support Center |
version 1.1 |
|
25L17811G10 |
IBM storage products
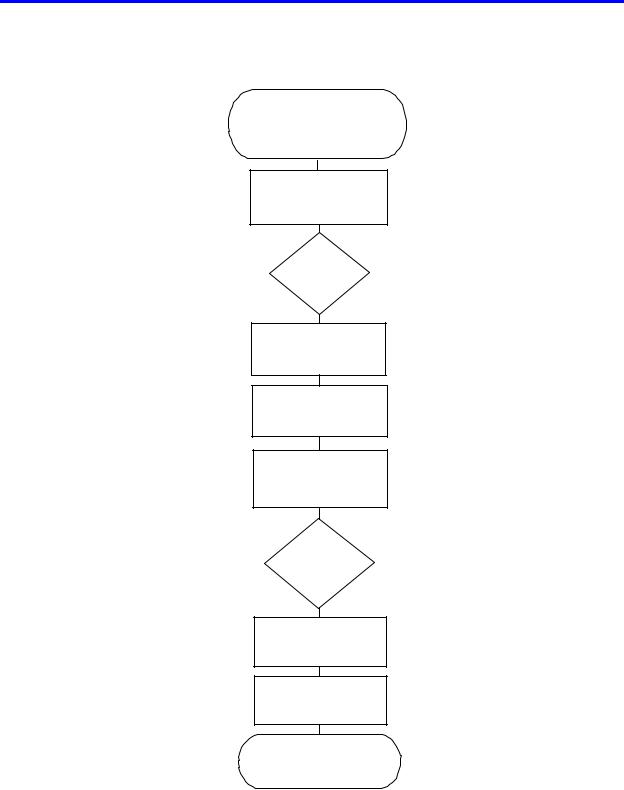
Hard disk drive installation flow chart
Step 1 Installation checklist/assemble
needed equipment Page 7
Step 2
Prepare for installation
Page 8
Step 3 Jumper settings Page 9
Step 4
Mounting the drive
Page 12
Step 5
Connectors
Page 13
Step 6 Complete physical installation
Page 14
Step 7
Installation and
configuration
Page 14
Step 8
FDISK
Page 17
Step 9
Formatting
Page 19
Step 10
Operating system installation
Page 19
|
Page 6 |
IBM Technical Group Support Center |
version 1.1 |
|
25L17811G10 |
IBM storage products
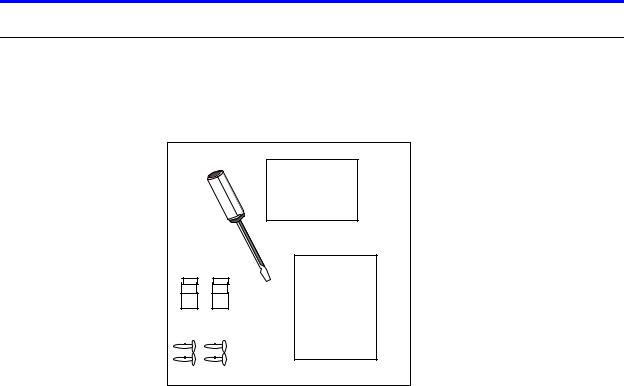
Step 1: Installation checklist
To install the Ultrastar drive you may need the following items, depending on your computer’s components:
!The installation kit (as shown in the diagram below) containing the Ultrastar drive, 4 mounting screws, and any related publications. Save the box the drive came in.
Screwdriver |
|
|
Hard Drive |
|
Installation |
|
Guide |
Jumpers |
|
Screws |
Installation Guide |
|
!The documentation that came with your computer or storage enclosure.
!A small, flat-blade screwdriver.
!A SCSI controller, which is either built-in or an adapter inside your computer, and any related documentation.
!Mounting brackets, if required for your computer. Contact your place of purchase if you are not certain if mounting brackets are required.
!A bootable DOS diskette. (See the section entitled Making a bootable diskette in the appendix.)
!If you are replacing an older internal drive with the new Ultrastar drive and want to copy all of the files from the older drive to the new drive, you may need additional software. (See the section entitled Drive copy in the Appendix.)
Page 7
IBM Technical Group Support Center |
version 1.1 |
25L17811G10

IBM storage products
Step 2: Prepare for installation
Begin by backing up your existing drive to avoid any loss of data during installation. (See the section entitled Backup and Restore in the Appendix.) After completing the backup, shut down as normal.
Opening your computer
!Turn the system off.
!Unplug the power cord from the wall outlet.
!Remove all cables from the back of your computer, labeling them if necessary.
!Remove the cover from your computer. (Consult your user's guide for instructions if needed.)
Unpackaging your hard drive
!If available, use an ESD (Electronic Static Discharge) wrist strap while handling your drive.
!If an ESD wrist strap is not available, discharge static electricity by establishing a common voltage between your body and the hard drive. Simultaneously touch the hard drive in its antistatic bag and an unpainted metal surface on the outside of your computer system with your bare hands.
!Remove the drive from the antistatic package that it was shipped in. Handle the drive only by the sides and avoid excessive movement until the drive has been mounted.
!Do not touch the main computer chip board.
!Do not drop the drive. A drop from only 1/4 inch could permanently damage your hard drive.
!Place the drive carefully on a static free area.
!Record the following information:
Drive Model ________________ |
Date of Purchase_________________ |
Drive |
P/N __________________ |
Place of Purchase_________________ |
Serial # |
____________________ |
|
|
Note:Do not low-level format your drive! IBM drives are low-level formatted by the manufacturer and reformatting may cause permanent damage to your drive and your system. (See the section entitled Utilities in the Appendix.)
|
Page 8 |
IBM Technical Group Support Center |
version 1.1 |
|
25L17811G10 |

IBM storage products
Step 3: Jumper settings
The jumper settings are found on the hard drive on the opposite end of the interface connector (see diagram page 12). They are physical settings that must be changed for different uses of a hard drive. As shown below, there are two option jumper blocks located on the card of 50 and 68 pin models of the Ultrastar 18ES. 80 pin models have only one option jumper block.
SCSI ID Jumpers
Each SCSI device will need to have its own SCSI ID. You can use ID 0 through ID 15, reserving ID 7 for your controller card. Follow the table below to set an ID on your SCSI drive.
Bit 3 |
Bit 2 |
Bit 1 |
Bit 0 |
Address |
off |
off |
off |
off |
0 |
off |
off |
off |
on |
1 |
off |
off |
on |
off |
2 |
off |
off |
on |
on |
3 |
off |
on |
off |
off |
4 |
off |
on |
off |
on |
5 |
off |
on |
on |
off |
6 |
off |
on |
on |
on |
7* |
on |
off |
off |
off |
8 |
on |
off |
off |
on |
9 |
on |
off |
on |
off |
10 |
on |
off |
on |
on |
11 |
on |
on |
off |
off |
12 |
on |
on |
off |
on |
13 |
on |
on |
on |
off |
14 |
on |
on |
on |
on |
15 |
*Reserved for controller card
|
SCSI address determination |
|
Page 9 |
IBM Technical Group Support Center |
version 1.1 |
|
25L17811G10 |
 Loading...