


 Loading...
Dear customer!
Thank you for purchasing our product. For safety, it is strongly recommended to read this manual carefully before connecting, operating and/or adjusting the product and keep the manual for reference in the future.
Table of contents
Table of contents ............................................................................................................................................ |
2 |
Important safeguards ...................................................................................................................................... |
3 |
Installation/Connections ................................................................................................................................. |
4 |
Panel controls ................................................................................................................................................. |
7 |
General operations.......................................................................................................................................... |
9 |
Digital tuner operations ................................................................................................................................ |
13 |
Disc operations............................................................................................................................................. |
16 |
MP3 overview .............................................................................................................................................. |
19 |
Anti-Theft System ........................................................................................................................................ |
21 |
Handling discs.............................................................................................................................................. |
22 |
Cleaning ....................................................................................................................................................... |
22 |
Troubleshooting guide .................................................................................................................................. |
23 |
Specification ................................................................................................................................................ |
24 |
2

Important safeguards
·Read carefully through this manual to familiarize yourself with this high-quality sound system.
·Disconnect the vehicle's negative battery terminal while mounting and connecting the unit.
·When replacing the fuse, be sure to use one with an identical amperage rating. Using a fuse with a higher amperage rating may cause serious damage to the unit.
·DO NOT attempt to disassemble the unit. Laser beams from the optical pickup are dangerous to the eyes.
·Make sure that pins or other foreign objects do not get inside the unit; they may cause malfunctions, or create safety hazards such as electrical shock or laser beam exposure.
·If you have parked the car for a long time in hot or cold weather, wait until the temperature in the car becomes normal before operating the unit.
·DO NOT open covers and do not repair yourself. Consult the dealer or an experienced technician for help.
·Make sure you disconnect the power supply and aerial if you will not be using the system for a long period or during a thunderstorm.
·Make sure you disconnect the power supply if the system appears to be working incorrectly, is making an unusual sound, has a strange smell, has smoke emitting from it or liquids have got inside it. Have a qualified technician check the system.
·The unit is designed for negative terminal of the battery, which is connected to the vehicle metal. Please confirm it before installation.
·Do not allow the speaker wires to be shorted together when the unit is switched on. Otherwise it may overload or burn out the power amplifier.
·Do not install the detachable panel before connecting the wire.
Note:
·In addition to normal audio CD, this unit can play CD-R and CD-R/W disc that contain audio tracks as well; however, depending on the conditions of the recording equipment, recording program or the CD-R as well as CD-R/W disc itself, some CD-R or CD-R/W may not play.
·When making music CD with CD-R or CD-R/W disc, too high recording speed may result in poor signal quality and therefore, it is recommendable to select 24x or lower speed for CD-R recording and 4x or lower speed for CD-R/W recording.
3
Installation/Connections
First complete the electrical connections, and then check them for correctness.
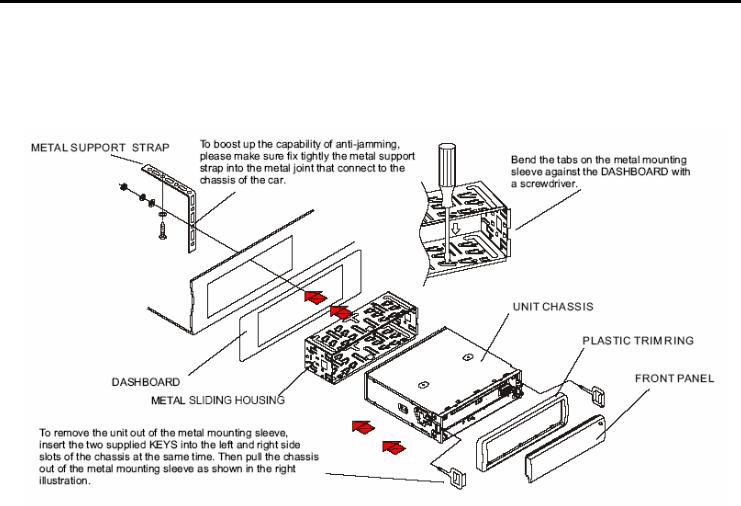
Installation way
It is an anti-theft installation way. The chassis wear a metal sliding housing. Please have the wiring connection of the power supply, speakers and antenna as for the requirement of the manual, and then install the metal sliding housing into the car according to the diagram.
4

5
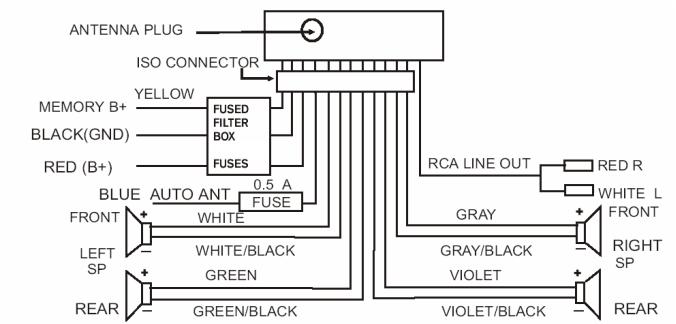
Speaker connection
0.5A&10A
Notes:
·In spite of having any kinds of speaker system, must use 4 ohms impedance of speaker to reduce the distortion during high volume level.
·Prohibit to make the conductors of auto antenna and ground touch with each other.
6

5.BND button
Press it repeatedly to select your desired radio band during RADIO mode.
6.OPEN button
Press it to flip down the front panel and you can insert the disc into the CD compartment or press the EJ button to eject the disc from the disc compartment.
7.9/: buttons
In disc mode press it to go to previous/next track. Press and hold to start fast backward/forward playback. Release to start normal playback.
8.CLK button
Press it to set the time.
9.MU button
Press the button to eliminate or resume the sound immediately.
10.PRESET STATION [1-6] buttons; PLAY/PAUSE/TOP, INT, RPT, RDM buttons
In MP3/WMA mode 5 and 6 buttons are assigned as 10 TRACK up/down when normal play.
11.A.P button
Press this button to activate Auto-storage function or Preset memory scan function.
12.PWR button
Press any button except the OPEN button to turn on the unit, press PWR button to turn off the unit.
13.PTY (Program Type) button
Press it to turn the PTY function ON or OFF.
14.TA (Traffic Announcement) button
Press it to turn the TA function ON or OFF.
15.AF (Alternative Frequencies) button
Press it to turn the AF function ON or OFF.
8

General operations
Reset the unit
Operating the unit for the first time or after replacing the car battery, you must reset the unit.
Press OPEN button and remove the front panel, then press the RESET button on the inner panel to restore the unit to the original factory settings.
Power button
Press any button (except OPEN button) to turn on the unit.
Press POWER button to turn off the unit.
Mode setting
Press the MOD button to change playing mode in a sequence: RADIO => CD (if there is a disc in unit).
Volume control
Rotate the VOL knob to adjust volume level.
Turning the sound off
When the power is on press the MU button to turn the sound off. Press it again or rotate VOL knob to turn the sound on.
LOUD mode
Press and hold for 2 seconds the TA button to choose LOUD function ON or OFF.
When the volume is in half level and the Loud mode is ON, it will enhance the bass sound effect immediately.
9
Setting the clock
·To show the time:
-In Radio mode when RDS data is received press the CLK button to select the mode: PS NAME => FREQUENCY => PTY => CLOCK.
-In Radio mode when RDS data is not received press the CLK button to select the item: FREQUENCY => PTY NONE => CLOCK.
-In Disc mode: Press the CLK button shortly to display time for 5 seconds.
·To adjust the time:
-In Clock mode press the CLK button and hold for 2 seconds. Time will start blinking.
-Rotate the VOL knob clockwise to adjust minute.
-Rotate the VOL knob anticlockwise to adjust hour.
-Press CLK button again to save setting.
Setting the sound characteristics
Press shortly and repeatedly the SEL button to select the audio setting: VOL => BASS => TREBLE => BALANCE => FADER.
Rotate the VOL knob to adjust each setting.
Note:
·If turning off the power all the settings of each mode will be saved.
·If you don’t adjust VOL knob within 3 seconds after selecting the desired setting, the unit will automatically return to the current mode being displayed.
10
Setting other characteristics
Press and hold for 2 seconds the SEL button to enter the setting mode.
Press the SEL button or : button to select the setting: EQ => CLK 12H/24H => CT => STEREO => LO/DX => AREA => VOL PGM => BEEP => CLK ON => SEEK RDS => TA SEEK => TA VOL => MASK => REG. Rotate the VOL knob to set the setting. Press SEL to confirm the setting.
-EQ mode: rotate the VOL knob to choose the equalizer mode: OFF, FLAT, CLAS, ROCK, POP.
-CLK 12H/24H: rotate the VOL knob to choose the time mode: 12H or 24H.
-CT mode: rotate the VOL knob clockwise to set minutes, anticlockwise to set hour.
-STEREO mode: rotate the VOL knob to choose the mode: Stereo or Mono.
-LO/DX mode: rotate the VOL knob to choose tuner sensitivity local or distant.
-AREA mode: rotate the VOL knob to choose the area: Europe, Latin, OIRT (option), Austria, Asia, USA.
-VOL PGM mode: VOL PGM 12 will be displayed by default. Rotate the VOL knob to adjust the VOL PGM value. If this value is more than the current volume value, the current volume value will be reserved. If the current volume value is more than this value, the current volume value will not be reserved and next time you turn on the unit the volume level will be equal to the VOL PGM value.
-BEEP mode: rotate the VOL knob to choose BEEP ON or OFF mode.
-CLK ON mode: rotate the VOL knob to choose CLK ON or OFF mode. When CLK is ON, when the power is off the time will be on display.
-SEEK RDS mode: rotate the VOL knob to choose RDS or ALL. If ALL is selected during the Seek RDS tuning mode or AF Search mode, the unit will stop at all radio station including Non RDS station regardless AF and TA is switches on. If RDS is selected and the AF is on during the Seek RDS tuning mode or AF Search mode, the unit will stop at only RDS station.
-TA SEEK mode: rotate the VOL knob to choose TA SEEK or TA ALARM.
TA seek: when newly tuned station does not receive TP information for 60 seconds, the radio retunes to next station which has not the same station (PI) as the last station, but has the TP information.
11
When TP information gets lost at the current station for retune time which is set by retune time (40 seconds), the radio start to retune to next same PI station. When same PI station does not catch in 1 cyclic search, the radio retunes to next station with TP information.
TA alarm: when this mode is selected, any automatic retune mode is not activated. Only double beep sound (ALARM) is output.
When newly tuned station does not have TP information for 40 seconds, double beep comes out and the display will show LOST TP TA, but the retune mode won’t be activated.
-TA VOL mode: rotate the VOL knob to adjust the TA volume level: 0-40. When TA function is activated, if a TA program is tuned in at the volume level set regardless of the volume of the other source at the time.
The default level is 18.
Note: when the unit tuned into a TA program, the volume level increase/decrease gradually from the system volume.
-REG mode: rotate the VOL knob to choose REG ON (LOCAL) or OFF (DISTANT) mode. Local mode improves reception in some areas where the signal is too strong.
If ON is selected when the AF search or PI seek, it will be implemented to station which have all PI codes are the same as current station. If OFF is selected when AF search or PI seek, the regional code in the format PI code is ignored, and a regional station will be possible received.
-MASK mode: rotate the VOL knob to choose MASK DPI or MASK ALL mode MASK DPI mode: Only the AF which has different program identification is masked.
MASK ALL mode: The AF which has different program identification and NO RDS signal with high field strength is masked.
12

Digital tuner operations
Note: RDS (Radio Data System) service availability varies with areas. Please understand if RDS service is not available in your area, the following service is not available, either.
Band selection
Press the BND button to select a band: FM1, FM2, FM3, AM1, AM2. Display will show the wave band, frequency.
Automatic/ Manual tuning
Automatic tuning: Press the 9/: button to start auto searching the station. When the : button is pressed, the station is sought in the direction of higher frequencies. If the 9 button is pressed, the station is sought in the direction of lower frequencies. It will play when finds the station.
Manual tuning: Press and hold for 2 seconds the 9/: button to start manual searching the station. If during 5 seconds there is no operation the unit will go to auto mode automatically.
Auto store
You can store up to a total of 30 radio stations in the memory (18 FM, 12 AM), manually or automatically.
·To store a station:
-Select a band (if needed)
-Select a station by 9/:.
-Hold a Preset button (1-6) which you want to store the station for at least 2 seconds.
·To recall a station:
-Select a band (if needed)
-Press a Preset button (1-6) briefly to recall the stored station.
Preset scan function
Press the A.P button to scan all preset stations in the memory of the current band and stay on each memory stations
13
for about 5 seconds. To stop preset scan, press this button again.
Auto memory store function
Press the A.P button on the panel and hold for 2 seconds to enter auto store mode. The radio will automatically store the 6 strongest available stations to the 6 preset memories of the current band. To stop auto store, press this button again.
RDS function
There are the PI, PS, TP, PTY, TA, AF DATA.
PI: Program Identification Code – for identifying code.
PS: Program Service Name Broadcast – station name data expressed in alphanumerically character. TP: Traffic Program Identification – for traffic information broadcasting station.
TA: Traffic Announcement Identification – showing traffic information is being transmitted or not. AF: Alternative frequencies – frequency list of broadcasting station transmitting the same program.
TA (Traffic Announcement) function
Press the AF button briefly to switch on/ off mode. When the mode is on symbol “AF” will appear on the display. If the symbol is blinking, the mode is on, but there is no RDS signal.
Note: The tuner will return to Alternative Frequencies whenever the reception signals getting worse.
“Alarm” will be displayed when an emergency broadcasting is received. Meanwhile sound output level will be adjusted to the preset output level automatically when the volume control is set at minimum.
PTY (Program Type) function
Press the PTY button to enter PTY mode.
Rotate VOL knob to select the music type the PTY program: NEWS, AFFAIRS, INFO, SPORT, EDUCATE, DRAMA, CULTURE, SCIENCE, VARIED, POP M, ROCK M, EAST M, LIGHT M, CLASSIC, OTHER M,
14
WEATHER, FINANCE, CHILDREN, SOCIAL, RELIGION, PHONE IN, TRAVEL, LEISURE, JAZZ M, COUNTRY M, NATION M, OLDIES M, FOLK M, DOCUMENT, TEST, ALARM.
Note: While selecting PTY engagement, its selection is implement by preset button as described in notes.
When PTY is selected press the SEL button, the radio starts to search corresponding PTY information and stops of the corresponding PTY information is detected. If corresponding PTY information is not found, normal radio reception is resumed.
AF (Alternative Frequencies) function
Press the TA button briefly to select the TA mode on/ off. Traffic announcement interrupts CD play or radio listening when broadcast. To interrupt traffic announcement press the TA button short without switching off the TA mode. The set will return to the previous operating mode.
EON (Enhanced Other Networks)
Press the AF button and hold for 2 seconds to turn the EON function on.
When EON data is received, the EON indicator lights and the TA and AF functions are enhanced. TA: Traffic information can be received from the current station or stations in other network.
AF: The frequency list of preset RDS stations is updated by EON data. EON enables the radio to make fuller use of RDS information. It constantly updates the AF list of preset stations, including the one that currently tuned into. If you preset a station around the area at your home, you will later be able to receive the same station at an alternative frequency, or any other station serving the same program, EON also keeps track of locally available TP stations for quick reception.
15
Loading...