


Hyundai H-ALMS2-07H/I, H-ALMS2-09H/I, H-ALMS2-12H/I, H-ALMS2-18H/I, H-ALMO2-16H2/O User Manual [ru]
...Электрический кондиционер RU воздуха
Cплит-система (мульти сплит-система)
Руководство по эксплуатации Гарантийный талон
Electric air conditioner |
|
Multi-split system |
EN |
Instruction manual |
|
Warranty card |
|
Модели / Models
Внутренний блок
Indoor unit
Наружный блок
Outdoor unit
H-ALMS2-07H/I H-ALMS2-09H/I H-ALMS2-12H/I H-ALMS2-18H/I
H-ALMO2-16H2/O H-ALMO2-18H2/O H-ALMO2-24H3/O H-ALMO2-28H4/O H-ALMO2-36H4/O H-ALMO2-42H5/O
www.hyundai-hvac.com
2. |
|
|
Electric air conditioner (split system) |
|||
|
CONTENTS |
|
|
|||
|
|
|
||||
|
1.Important information |
|
3 |
|||
|
2.Safeguards |
|
3 |
|||
3. |
Technical characteristics |
|
4 |
|||
|
|
|||||
4. |
Delivery set |
|
8 |
|||
|
|
|||||
5. |
Appliance description |
|
8 |
|||
|
|
|||||
6. |
Remote control |
|
11 |
|||
|
|
|||||
5. |
Indicators on display panel |
|
12 |
|||
|
|
|||||
5. |
Maintenance |
|
15 |
|||
|
|
|||||
|
|
|
|
|
|
|
EN
Electric air conditioner (split system) |
|
3. |
|
1. IMPORTANT INFORMATION
The appliance is designed for air cooling in domestic premises. The manufacturer reserves the right to introduce changes in design, configuration and processing of the article with a view to improve its properties without any prior notification of customers. There may be some misprints in text and digital notations of the present manual.
If after reading of this manual you have any questions concerning work and operation of the appliance, please, refer to a shop assistant or to a specialized service center for further explanations.
The article has a label with all the needed technical data and other useful information about the appliance. Use the appliance only for its intended purpose indicated in this manual.
2. SAFEGUARDS
1. |
Don’t try to install the conditioner by yourself. Call for a qualified installation specialist. |
|
2. |
While using the air conditioner, it is necessary to observe several precautions. Incorrect operation |
|
|
due to ignoring of precautions may result in personal injury of a user and other people, as well as |
|
|
in damaging of their property. |
|
3. |
The electric appliance should be under observation while operated, especially if there are any |
|
|
children near it. |
|
4. |
Don’t pass your fingers or foreign objects through an air outlet grille of indoor and outdoor units, |
|
|
since it may result in a trauma caused by a revolving fan. |
|
5. |
Don’t let children turn the conditioner on by themselves. Children may turn the conditioner on |
|
|
only under the care of adults. |
EN |
6. |
Don’t try to repair the conditioner by yourself. Internal units of the conditioner carry a voltage and |
|
|
it is life-threatening! For repair of the appliance refer to an authorized service center. |
|
7.Don’t use the appliance if it is faulty, or if it was dropped or damaged.
8.Don’t open a front panel of the appliance during its work.
9.Don’t dismantle and modify the appliance.
10.Unplug the conditioner immediately, if it emits strange odours or smoke.
11.Don’t splash and pour water and other liquids on the conditioner.
12.Always unplug the conditioner during a lighting storm.
13.Always unplug the conditioner, when it is not used.
14.Beforecleaningandmaintenanceoftheconditionerunplugit.Cleaningandmaintenanceshould be performed in accordance with instructions of this manual.
15.To ensure the effective work of the conditioner, operate it in environment described in the present manual.
16.Don’t use dangerous chemicals for cleaning of the appliance and don’t let them on the appliance.
17.When removing an air filter, don’t touch metal parts of the appliance.
18.To avoid overheating and risk of flash fire, as well as damage of internal electric network, don’t change the length of a power cord and don’t connect the appliance via extension cords.
19.To avoid electrical hazards, damaged power cord must be changed only at authorized service centers qualified professionals.
20.To avoid risk of electric shock, do not place the power cord near a heater and flammable or combustible substances.
21.Do not start or stop the unit by connecting or disconnecting electrical power.
22.To avoid electric shock, a damaged power cord should be replaced only in authorized service centers by qualified specialists.
23.To avoid electric shock, don’t place the power cord near heating appliances and flammable or combustible substances.
24.Don’t start and stop the appliance by power-up and down.
25.Don’t press the buttons of the remote control board by anything but your fingers.
26.Don’t use the appliance for purposes not intended by this user manual.
4. |
|
Electric air conditioner (split system) |
3.TECHNICAL CHARACTERISTICS
EN
Indoor unit |
H-ALMS2-07H/I H-ALMS2-09H/I H-ALMS2-12H/I H-ALMS2-18H/I |
|
|
Capacity
(cooling) BTU (kW)
Capacity (heating) BTU (kW)
Rated power consumption (cooling) W
Rated power consumption (heating) W
Power supply, V/Hz
Rated power current (cooling/ heating) A
Air circulation (indoor unit) m3/h
Noise level (indoor unit) dB(A)
Refrigerant
Energy efficiency (cooling/ heating)
Electrical protection class
Degree of protection against moisture (indoor unit)
Degree of protection against moisture (outdoor unit)
Max. refrigerant pipe length, m
Refrigerant piping, Liquid side/ Gas side, (inch)
Maximum difference in level, m
Capacity of draining, L/d
Filling of Freon, g
Operating temperature range: cooling, °C
Operating temperature range: heating, °C
Net weight, indoor unit (kg)
Gross weight, indoor unit (kg)
Net dimensions, indoor unit (mm)
Packing dimensions, indoor unit (mm)
7000 (2,05) |
9000 (2,64) |
12000 (3,52) |
18000 (5,28) |
8000 (2,34) |
10000 (2,93) |
13000 (3,81) |
19000 (5,57) |
48 |
48 |
48 |
34 |
48 |
48 |
48 |
34 |
220-240~/50 |
220-240~/50 |
220-240~/50 |
220-240~/50 |
0,21/ 0,21 |
0,21/ 0,21 |
0,21/ 0,21 |
0,15/ 0,15 |
520/420/340 |
530/430/390 |
620/540/440 |
620/540/440 |
40/35/31 |
40/35/31 |
40/35/31 |
40/35/31 |
R410A |
R410A |
R410A |
R410A |
A/A |
A/A |
A/A |
A/A |
I class |
I class |
I class |
I class |
IPX0 |
IPX0 |
IPX0 |
IPX0 |
IPХ4 |
IPХ4 |
IPХ4 |
IPХ4 |
- |
- |
- |
- |
1/4”/3/8” |
1/4”/3/8” |
1/4”/3/8” |
1/4”/1/2” |
- |
- |
- |
- |
19,2 |
24 |
28,8 |
43,2 |
- |
- |
- |
- |
+17 ~ +32 |
+17 ~ +32 |
+17 ~ +32 |
+17 ~ +32 |
0 ~ +30 |
0 ~ +30 |
0 ~ +30 |
0 ~ +30 |
7,3 |
7,3 |
7,3 |
9 |
9,8 |
9,8 |
9,8 |
12,2 |
800x188x275 |
715x188x250 |
800x188x275 |
940x205x275 |
865x265x350 |
775x260x324 |
865x265x350 |
1015x265x350 |

Electric air conditioner (split system) |
|
5. |
|
Outdoor unit |
H-ALMO2-16H2/O |
H-ALMO2-18H2/O |
|
|
|
Capacity |
14000 (4,10) |
18000 (5,28) |
(cooling) BTU (kW) |
|
|
Capacity |
15000 (4,40) |
19000 (5,57) |
(heating) BTU (kW) |
|
|
Rated power consumption |
1200 |
1645 |
(cooling) W |
|
|
Rated power consumption |
1160 |
1542 |
(heating) W |
|
|
Power supply, V/Hz |
220-240~/50 |
220-240~/50 |
Rated power current (cooling/ |
5,22/5,04 |
7,15/6,70 |
heating) A |
|
|
Air circulation (outdoor unit) |
- |
- |
m3/h |
|
|
Noise level (outdoor unit) |
52 |
57 |
dB(A) |
|
|
Refrigerant |
R410A |
R410A |
Energy efficiency (cooling/ |
A/A |
A/A |
heating) |
|
|
Electrical protection class
Degree of protection against moisture (indoor unit)
Degree of protection against moisture (outdoor unit)
Max. refrigerant pipe length, m
Refrigerant piping, Liquid side/ Gas side, (inch)
Maximum difference in level, m
Capacity of draining, L/d
Filling of Freon, g
Operating temperature range: cooling, °C
Operating temperature range: heating, °C
Net weight, outdoor unit (kg)
Gross weight, outdoor unit (kg)
Net dimensions, outdoor unit (mm)
Packing dimensions, outdoor unit (mm)
I class |
I class |
||
IPX0 |
IPX0 |
||
IPХ4 |
IPХ4 |
||
40 |
(Max. length for all rooms) |
40 |
(Max. length for all rooms) |
25 |
(Max. length for one |
25 |
(Max. length for one |
indoor unit) |
indoor unit) |
||
1/4+3/8 |
1/4+3/8 |
||
10 |
|
10 |
|
--
1700 |
1450 |
-15 ~ +50 |
-15 ~ +50 |
-15 ~ +24 |
-15 ~ +24 |
30,5 |
36 |
|
|
33.5 |
39 |
|
|
800x333x554 |
800x333x554 |
|
|
920x390x615 |
920x390x615 |
|
EN
6. |
|
Electric air conditioner (split system) |
EN
Outdoor unit |
H-ALMO2-24H3/O |
H-ALMO2-28H4/O |
|
|
|
Capacity (cooling) BTU (kW)
Capacity (heating) BTU (kW)
Rated power consumption (cooling) W
Rated power consumption (heating) W
Power supply, V/Hz
Rated power current (cooling/ heating) A
Air circulation (outdoor unit) m3/h
Noise level (outdoor unit) dB(A)
Refrigerant
Energy efficiency (cooling/ heating)
Electrical protection class
Degree of protection against moisture (indoor unit)
Degree of protection against moisture (outdoor unit)
Max. refrigerant pipe length, m
Refrigerant piping, Liquid side/ Gas side, (inch)
Maximum difference in level, m
Capacity of draining, L/d
Filling of Freon, g
Operating temperature range: cooling, °C
Operating temperature range: heating, °C
Net weight, outdoor unit (kg)
Gross weight, outdoor unit (kg)
Net dimensions, outdoor unit (mm)
Packing dimensions, outdoor unit (mm)
21000 (6,15) |
28000 (8,21) |
22500 (6,59) |
30000 (8,79) |
1917 |
2273 |
1782 |
2435 |
220-240~/50 |
220-240~/50 |
8,33/7,75 |
9,88/10,59 |
--
52 |
|
52 |
|
R410A |
R410A |
||
A/A |
A/A |
||
I class |
I class |
||
IPX0 |
IPX0 |
||
IPХ4 |
IPХ4 |
||
60 |
(Max. length for all rooms) |
80 |
(Max. length for all rooms) |
30 |
(Max. length for one |
35 |
(Max. length for one |
indoor unit) |
indoor unit) |
||
1/4+3/8 |
1/4+3/8 |
||
10 |
|
10 |
|
--
1700 |
1450 |
-15 ~ +50 |
-15 ~ +50 |
-15 ~ +24 |
-15 ~ +24 |
47 |
67.6 |
50.2 |
73.4 |
845x363x702 |
946x410x810 |
965x395x765 |
1090x500x875 |
Electric air conditioner (split system) |
|
7. |
|
Outdoor unit |
H-ALMO2-36H4/O |
H-ALMO2-42H5/O |
|
|
|
Capacity |
36000 (10,55) |
42000 (12,31) |
(cooling) BTU (kW) |
|
|
Capacity |
38000 (11,14) |
42000 (12,31) |
(heating) BTU (kW) |
|
|
Rated power consumption |
3291 |
3822 |
(cooling) W |
|
|
Rated power consumption |
3093 |
3372 |
(heating) W |
|
|
Power supply, V/Hz |
220-240~/50 |
220-240~/50 |
Rated power current (cooling/ |
14,31/13,45 |
16,62/14,66 |
heating) A |
|
|
Air circulation (outdoor unit) |
- |
- |
m3/h |
|
|
Noise level (outdoor unit) |
58 |
58 |
dB(A) |
|
|
Refrigerant
Energy efficiency (cooling/ heating)
Electrical protection class
Degree of protection against moisture (indoor unit)
Degree of protection against moisture (outdoor unit)
Max. refrigerant pipe length, m
Refrigerant piping, Liquid side/ Gas side, (inch)
Maximum difference in level, m
Capacity of draining, L/d
Filling of Freon, g
Operating temperature range: cooling, °C
Operating temperature range: heating, °C
Net weight, outdoor unit (kg)
Gross weight, outdoor unit (kg)
Net dimensions, outdoor unit (mm)
Packing dimensions, outdoor unit (mm)
R410A |
R410A |
||
A/A |
A/A |
||
I class |
I class |
||
IPX0 |
IPX0 |
||
IPХ4 |
IPХ4 |
||
80 |
(Max. length for all rooms) |
80 |
(Max. length for all rooms) |
35 |
(Max. length for one |
35 |
(Max. length for one |
indoor unit) |
indoor unit) |
||
1/4+3/8 |
1/4+3/8 |
||
10 |
|
10 |
|
--
1700 |
1450 |
-15 ~ +50 |
-15 ~ +50 |
-15 ~ +24 |
-15 ~ +24 |
70 |
76 |
75 |
81 |
946x410x810 |
946x410x810 |
1090x500x875 |
1090x500x875 |
EN
8.
4. DELIVERY SET
Electric air conditioner (split system)
Complete set of air conditioner (split system) includes: Conditioner unit for indoor installation -1 piece (in one box)** Conditioner unit for outdoor installation -1 piece ***
Remote control board -1 piece (for each indoor unit) Batteries for remote control board - 2 pcs.
User manual -1 piece Guarantee slip -1 piece
Packing of indoor-installation unit -1 piece Packing of outdoor-installation unit -1 piece
**quantity of indoor units depends on purchased set.
***always one outdoor unit for one or several indoor units, in one complete set.
Attention!
EN
The maximum quantity of indoor units for one outdoor unit: H-ALMO2-16H2/O - 2 indoor units
H-ALMO2-18H2/O - 2 indoor units H-ALMO2-24H3/O - 3 indoor units H-ALMO2-28H4/O - 4 indoor units H-ALMO2-36H4/O - 4 indoor units H-ALMO2-42H5/O - 5 indoor units
5. MULTI SPLIT SYSTEM DC INVERTER (WALL INDOOR TYPE)
APPLIANCE DESCRIPTION
3 |
11 |
10 |
2 |
|
7 |
|
8 |
|
1 |
4 |
|
|
9 |
|
|
|
6 5
Fig. 1
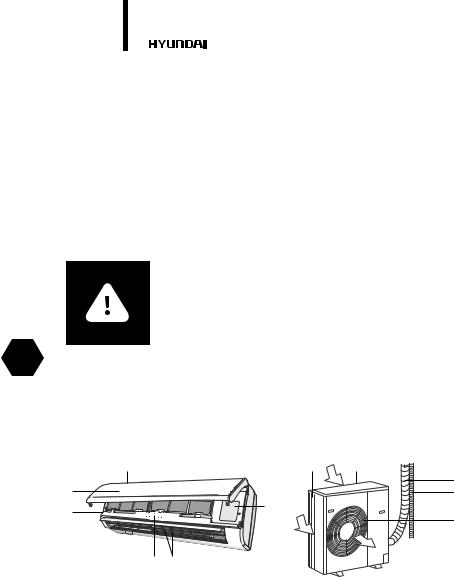
The conditioner consists of indoor (one or several) and outdoor units connected by pipelines. The conditioner may be controlled from a remote control board or from an indoor unit control panel.
1.Conditioner unit for indoor installation.
2.Front panel.
3.Air-intake grille of the indoor unit.
4.Control panel (start/stop button, mode selection button) if there is no remote control board.
5.Blinds (deflectors) for distribution of treated air.
6.Air outlet of the indoor unit.
7.Copper tube for gas (freon), connection line*.
Electric air conditioner (split system) |
|
9. |
|
8.Tube for condensate removal*.
9.Air-outlet grille of the outdoor unit.
10.Conditioner unit for outdoor installation.
11.Air-intake grilles of the outdoor unit.
* not supplied
APPLIANCE CONTROL
|
|
|
|
|
|
|
|
|
EN |
|
|
|
|
|
|
|
|
|
|
|
|
|
|
|
|
|
|
|
|
|
|
|
|
|
|
|
|
|
|
|
|
|
|
|
|
|
|
|
|
|
|
|
|
|
|
|
|
|
|
|
|
|
|
|
|
|
|
|
|
|
|
|
|
|
|
|
|
|
|
|
|
|
|
|
|
|
|
|
|
|
|
|
|
|
|
|
|
|
|
|
|
|
|
|
|
|
|
|
|
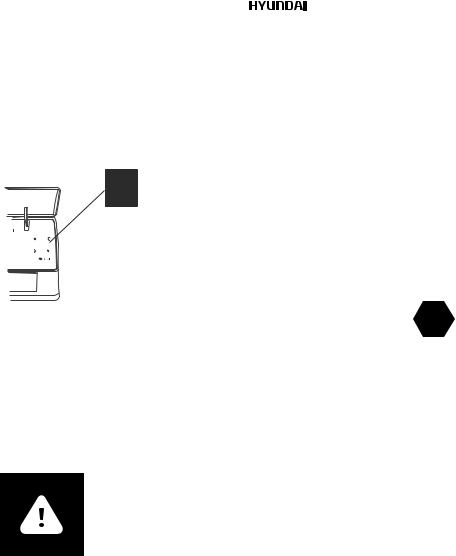
Fig. 2. Description of indoor unit control panel |
|||||||||
The conditioner may be controlled from a remote control board or from an indoor unit control panel.
If the remote control board is lost or cannot be used at the moment, you may use a control button «on/off» located behind the front panel.
For that, open the front panel carefully by pulling it from the left and right.
1.Press this button once to activate the automatic mode.
2.Press this button again within 5 sec after the first pressing to switch the air conditioner to the forced cooling mode.
3.Close the front panel.
Caution!
Use this button only in case of extreme necessity. Use the remote controller, whenever possible.
The front panel of air conditioner there is a display that shows the current temperature and defined, and indicators * display modes and settings: power, night mode, temperature, timer, compressor operation (see Fig. 3**).
The front panel of the conditioner comprises a display showing specified and current temperature, as well as indicators* reflecting modes and parameters of work: power supply, sleep mode, temperature, timer, compressor operation (see Fig. 3**).
* Presence of this function depends on the delivery lot.

10. |
|
Electric air conditioner (split system) |
Fig. 3
EN
1 |
2 |
3 |
4 |
5 |
1.Indicator Ionizer
2.Indicator dry
3.Indicator temperature
4.Indicator on/off
5.Indicator timer
Electric air conditioner (split system) |
|
11. |
|
6. REMOTE CONTROL
1 |
2 |
|
9 |
3 |
8 |
4 |
10 |
5 |
12 |
|
13 |
6 |
14 |
|
7 |
EN
Fig. 4
11
1. TEMP Button ↓:
Push this button to decrease the indoor temperature setting.
2. TEMP Button ↑:
Push this button to increase the indoor temperature setting .
3. MODE Selection Button:
Each time the button is pressed, the operation mode is shift ed in the direction of the arrow: AUTO -> COOL -> DRY -> HEAT -> FAN
4. SWING Button:
Push this switch button to activate auto swing feature of the horizontal louver. Push it again to stop.
5. RESET Button:
When you press the recessed RESET button, all current settings are cancelled and the control will return to the initial settings.
6. AIR DIRECTION Button:
Press this button to change the swing angle of the louver. The swing angle of the louver is 6o for each press. When the louver swing at a certain angle which
would aff ect the cooling and heating eff ect of the air conditioner, it would automatically change the swing direction . No symbol will appear in the display area when press this button. (Not applicable to units without this function).
7.LEDDISPLAYButton:
Press this button to clear the digit display in the air conditioner, press it again to activate it (Not available for the units without LED display window).
8. FAN SPEED Button:
Used to select the Fan Speed in four stepsAUTOЎLOW ЎMED or HIGH. Each time the button is pressed, the fan speed mode is shift ed.
12. |
|
Electric air conditioner (split system) |
9. ON/OFF Button:
Push this button to start operation, push the button again to stop operation.
10. TIMER ON Button:
Press this button to initiate the auto-on time sequence. Each press will increase the auto-timed setting in 30 minutes increments. When the setting time displays 10, each press will increase the auto-timed setting 60 minutes increments. To cancel the auto-timed program, simply adjust the auto-on time to 0.0.
11. SLEEP Button:
Press this button to go into the Energy-Saving operation mode. Press it again to cancel. This function is only can be used on COOL, HEAT and AUTO mode and maintain the most comfortable temperature for you.
12. TIMER OFF Button:
Press this button to initiate the auto-off time sequence. Each press will increase the auto-timed setting in 30 minutes increments. When the setting time displays 10, each press will increase the auto-timed setting 60 minutes increments. To cancel the auto-timed program, simply adjust the auto-off time to 0.0.
13. LOCK Button:
When you press the recessed LOCK button, all current settings are locked in and the remote controller does not accept any operation except that of the LOCK. Press again to cancel the LOCK mode.
14. TURBO Button:
Active/Disable Turbo function. Turbo function enables the unit to reach the preset temperature at cooling or heating operation in the shortest time(if the indoor unit does not support this function, there is no corresponding operation happened when pressing this button.)
EN
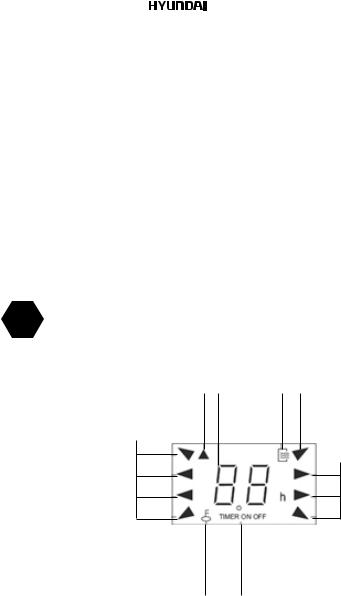
7. INDICATORS ON DISPLAY PANEL
2 |
1 |
3 |
4 |
4
7
Fig. 5
5 6

Electric air conditioner (split system) |
|
13. |
|
1.DIGITALDISPLAYarea:
This area will show the set temperature and, if in the TIMER mode, will show the ON and OFF settings of the TIMER. If in the FAN mode, nothing is appeared.
2. TRANSMISSION Indicator:
This indicator flashes one time when remote controller transmits signals to the indoor unit.
3. ON/OFF Indicator:
This symbol appears when the unit is turned on by the remote controller, and disappear when the unit is turned off.
4. OPERATION MODE Indicator:
When press the MODE button, it shows the current operating mode -- “AUTO”, “COOL”,”DRY”, “HEAT”(Cooling only model without) ,or “FAN” mode.
5. LOCK Indicator:
LOCK display is displayed by pushing the LOCK button. Push the LOCK button to clear display.
6.TIMERDISPLAYIndicator:
This display area shows the settings of the TIMER. That is, if only the starting time of operation is set, it will display the TIMER ON. If only the turning off time of operation is set, it will display the TIMER OFF. If both operations are set, it will show TIMER ON-OFF which indicates you have chosen to set both the starting time and off time.
7. FAN SPEED Indicator:
Press the FAN SPEED button to select the desired fan speed setting (Auto-Low-Med-High). You selection will be displayed in the LCD window except the Auto fan speed.
Operating the Remote Controller
Install/Replace Batteries
The Remote Controller uses two dry batteries(LR03X2).
1. To install the batteries, slide the back cover of the battery compartment and install the batter- EN ies according the direction (+and -)shown on the Remote Controller.
2. To replace the old batteries, use the same method as mentioned above.
AUTOMATIC OPERATION
1.Use the MODE button to select AUTO.
2.Push the TEMP button to set the desired room temperature .
The most comfortable temperature settings are between 21 C to 28 C.
3.Push the ON/OFF button to start the air conditioner. The OPERATION lamp on the display panel of the indoor unit lights. The
FAN SPEED is automatically set and there are no fan speed indicators shown on the display panel of the remote controller.
4.Push the ON/OFF button again to stop the unit operation.
NOTE
1.In the AUTO mode, the air conditioner can logically choose the mode of COOL, FAN and HEAT by sensing the difference between the actual ambient room temperature and the set temperature on the remote controller.
2.If the AUTO mode is not comfortable for you, the desired mode can be selected manually.
COOL/ HEAT and FAN Operation
1.If the AUTO mode is not comfortable, you may manually over-ride the settings by using COOL, HEAT or FAN modes.
2.Push the TEMP button to set the desired room temperature. Ў When in COOLING mode, the most comfortable settings are 21C
or above. When in HEATING mode, the most comfortable Ў settings are 28C or b elow.
3.Push the FAN SPEED to select the FAN mode of AUTO, HIGH,
MED or LOW.
4. Push the ON/OFF button, the operation lamp lights and the air conditioner start to operate as your settings. Push the ON/OFF button again to stop this unit operation.

14. |
|
Electric air conditioner (split system) |
EN
NOTE
The FAN mode can not be used to control the temperature.
While in this mode, only steps 1Ў3 and 4 may be performed.
DRY Operation
1.Push the MODE button to select DRY.
2.Push the TEMP button to set the desired temperature from Ў Ў 17C to 30C.
3.Push the ON/OFF button, the OPERATION lamp lights and the air conditioner starts to operate in DRY mode at LOW fan speed. Push the ON/OFF button again to stop this unit operation.
NOTE
Due to the difference of the set temperature of the unit and the actual indoor temperature, the Air Conditioner when in DRY mode will automatically operate many times without running the COOL and FAN mode.
TIMER Operation
Push TIMER ON button to set the autoon time and TIMER OFF button to set the auto-off time.
1. To set the starting time.
1.1Push the TIMER ON button, then the remote controller shows TIMER ON , the last set time for the starting operation and the
signal “h” will be shown on the DIGITAL DISPLAY area. You are now ready to reset the time to START the operation.
1.2Push the TIMER ON button again to set desired unit start time.
1.3 After setting the TIMER ON ,there will be a one-half second
delay before the remote controller transmits the signal to the air conditioner. Then, after approximately another 2 seconds, the signal “h” disappears and the set temperature will re-appear on the digital display.
2. To set the stopping time.
2.1Push the TIMER OFF button and the remote controller will show TIMER OFF, the last set time for the stopping operation and the signal “h” will be shown on the DIGITAL DISPLAY area. You are now ready to reset the time of the STOP operation.
2.2Push the TIMER OFF button again to set the time you want to stop the operation.
2.3After setting the TIMER OFF ,there will be a one-half second delay before the remote controller transmits the signal to the air conditioner. Then, after approximately another 2 seconds, the signal “h” disappears and the set temperature will re-appear on the digital display.

Electric air conditioner (split system) |
|
15. |
|
8. MAINTENANCE
•Before cleaning unplug the conditioner.
•Cleaning of the indoor unit and remote control board:
•Indoor unit and remote control board should be cleaned with a dry soft cloth.
•If the indoor unit is too unclean, moisten the cloth with cold water.
•It is prohibited to clean the remote control board with moist cloth.
•In order to avoid the damage of paint or details of the conditioner, do not clean it with brushes and do not leave them on the surface of indoor unit.
•In order to avoid the damage of surface or deformation of the conditioner details, do not clean it with petrol, solvents, cleaning powders or other chemically active substances.
•Before a sustained interruption in the conditioner work:
•Turn the conditioner on for several hours in the FAN mode. It will allow you to dry its inner
•cavities
•Unplug the conditioner. Remove the batteries from the remote control board. Checks before starting:
•Make sure that an air filter is installed.
•Make sure that air inlet and outlet grilles of the outdoor unit are not blocked by foreign objects.
•Cleaning of air filter
•Air filter cleans the air entering the conditioner from dust and foreign particles. If the filter is contaminated, the conditioner capacity decreases sharply.
•If the conditioner is operated permanently, the filter should be cleaned once per two weeks.
•If the conditioner is installed in a room with dusty atmosphere, then the air filter should be cleaned more often.
•To remove the filter, open the indoor unit panel.
•Remove air filters. Clean the filter with a vacuum cleaner or rinse it in clean water. If the filter is contaminated heavily, clean it with a soft brush and wash in diluted washing solution, then dry it in a cool place.
•While cleaning the filter with the vacuum cleaner, hold it with contaminated surface up. While
washing the filter in water, hold it with contaminated surface down.
•Do not dry the filter in the sun or near a fire.
•Set the air filter to initial position and close the panel.
EN
16. |
|
|
Electric air conditioner (split system) |
|||
|
Содержание |
|
|
|||
|
|
|
|
|||
1. |
Важная информация |
|
17 |
|||
2. |
Меры предосторожности |
|
17 |
|||
3. |
Технические характеристики |
|
18 |
|||
4. |
Комплект поставки |
|
22 |
|||
5. |
Описание прибора |
|
22 |
|||
6. |
Пульт дистанционного управления |
|
25 |
|||
7. |
Индикаторы на жк дисплее |
|
27 |
|||
8. |
Уход и обслуживание |
|
29 |
|||
9. |
Гарантийный талон |
|
32 |
|||
|
|
|
|
|
|
|
EN
 Loading...