


H-MS1113
DVD MICRO SYSTEM
DVD
Instruction manual
1
Table of content |
|
Table of content........................................................................................................................................ |
2 |
For your attention ..................................................................................................................................... |
3 |
Features .................................................................................................................................................... |
4 |
Accessories............................................................................................................................................... |
5 |
Disk features............................................................................................................................................. |
7 |
Front panel and Rear panel illustrations .................................................................................................. |
10 |
Connection ............................................................................................................................................. |
12 |
System Setup .......................................................................................................................................... |
14 |
Play ........................................................................................................................................................ |
18 |
Troubleshooting...................................................................................................................................... |
23 |
Specifications ......................................................................................................................................... |
24 |
2

For your attention
PLEASE READ THROUGH THE MANUAL CAREFULLY BEFORE CONNECTION AND OPERATION.
WARNING:
TO REDUCE THE RISK OF FIRE, ELECTRIC SHOCK OR PRODUCT DAMAGE, DO NOT EXPOSE THIS APPARATUS TO RAIN, MOISTURE, DRIPPING OR SPLASHING AND THAT NO OBJECTS FILLED WITH LIQUIDS, SUCH AS VASE, SHALL BE PLACED ON THE APPARATUS.
CAUTION!
DO NOT INSTALL, OR PLACE THIS UNIT, IN A BOOKCASE, BUILD-IN CABINET OR IN ANOTHER CONFINED SPACE. ENSURE THE UNIT IS WELL VENTILATED. TO PRIVENT RISK OF ELECTRIC SHOCK OF FIRE HAZARD DUE TO OVERHEATING, ENSURE THAT CURTAINS AND ANY OTHER MATERIALS DO NOR OBSTRUCT THE VENTILATION VENTS.
DO NOT OBSTRUCT THE UNIT’S VENTILATION CLOSING WITH NEWSPAPERS, TABLECLOTHS, CURTAINS, AND SIMILAR ITEMS.
DO NOT PLACE SOURCES OF NAKED FLAMES, SUCH AS LIGHTED CANDLES, ON THE UNIT.
DO NOT EXPOSE THIS UNIT TO DIRECT SUNLIGHT.
DISPOSE OF BATTERIES IN AN ENVIRONMENTALLY FRIENDLY MANNER.
Voltage: Use current source with voltage ~220 V, otherwise grid overload may arise, which can entail fire. Don’t use constant-current source.
Supply-line cord protection: Make sure that the cord is right connected and does not have any damage. Incorrected attachment and damage of cord may cause fire and electrical shock.
Service: Do not try to eliminate breakages by your own. Should the sound is out, the indicator does not light, the smoke appears or any other troubles take place, which were not mentioned in this manual, please, call your dealer or service center.
WARNING:
DO NOT OPEN COVERS AND DO NOT REPAIR YOURSELF. REFER SERVICING TO QUALIFIED PERSONEL.
The lightning flash is intended to alert the user to the presence of dangerous voltage within the product's enclosure, and touching the inner parts may result in a risk of electric shock to persons.
The exclamatory mark is intended to alert the user to the presence of important operating instructions.
To reduce the risk of electric shock or fire, do not open the cover. Refer servicing to qualified service personnel.
This mark indicates this unit belongs to class 1 laser product. The laser beam may produce radiation harm to the directly touching human body.
3
Features
Thank you for purchasing our DVD Micro System. Please go through this manual carefully before connection and operation. Please keep this manual for future reference.
Hyundai DVD Micro System is a new generation micro system, which can produce high quality video and audio. Its performance is much better than that of any previous home video playing equipment, it will give you the uppermost enjoyment!
Built in Dolby AC-3, LPCM etc. digital audio decoder.
Hi-fi, 96kHz/24bit audio digital processor.
Software intelligent upgrade
Support of MPEG4 Standart: playback of digital video compressed in DivX 3.11, DivX 4.12, DivX5.11, DivX Pro, XviD (Note: Some files cannot be played due to software features).
High-resolution component video output, support future video equipment
Professional digital Karaoke function
Wide range FM/AM Tuner
Coaxial digital audio output
Multi surround sound field effects
Super compatible with DVD/DVD-R/-RW/DVD+R/+RW/HDCD/SVCD/VCD/DVCD/
CD-R/-RW/MP3/WMA/MPEG4/KODAK PICTURE CD.
Latest the forth generation servo, decoding on single-chip technology, high reliability and stability and super error correction.
USB slot
4
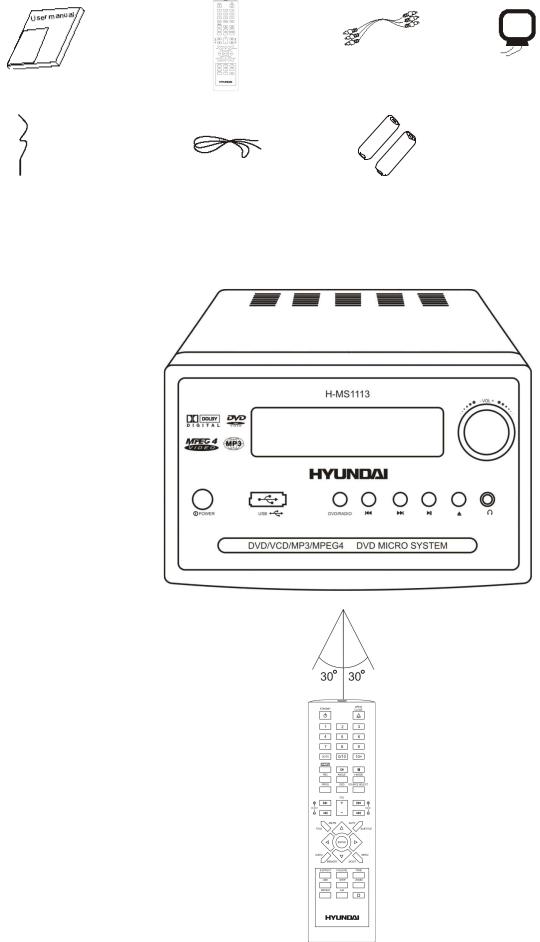
Accessories |
|
|
|
Instructions manual |
Remote control |
A/V cable |
AM antenna |
FM antenna |
Speaker connect cable |
Batteries AAA 1.5V |
Insert the batteries into the cell box. Points the remote control at remote sensor within 8 metres and within 30 degree at left or right side.
Take the battery out of the controller if it is not used for a long time
5

Accessories
This unit can play the following types of discs
Type of disc |
Symbol |
Contents |
DVD |
|
Audio+Video |
|
|
|
SVCD |
|
Audio+Video |
|
|
|
MP3 |
|
Audio |
|
|
|
Video-CD |
|
Audio+Video |
(VCD) |
|
|
|
|
|
|
|
|
CD-DA |
|
Audio |
|
|
|
Kodak Picture |
|
JPEG Photo CD |
CD |
|
|
|
|
|
|
|
|
MPEG 4 |
|
Audio+Video |
|
|
|
6

Disk features
Features for DVD disc
Different DVD discs have different combination of features, this is because of the different design created by the order and manufacturer, the following symbols indicate some features of the DVD disc.
Regional code and the video output system |
5.1 sound channel output |
Dolby digital surround |
Hiding subtitle |
DTS digital cinema surround |
Two channel stereo |
Subtitle |
Restriction |
Audio track |
|
Video aspect ratio |
|
Parental lock |
|
Angle
7

Handling discs
When holding discs, please hold it by its rim.
When holding discs, be sure the label side should be upwards
Do not grasp the non-label side of the disc.
Disc storage
Never store disc in the place with high temperature, strong light or humidity.
Put the disc back to the case after playback.
Cleaning
Wipe the discs from time using a soft cloth. Always wipe from the center towards the edge.
Do not use daily used detergent to clean the disc.
Protect discs against any fingerprint, do not stick or white anything on the surface of the disc.
8

About Disc Terms
Title
Generally, pictures or music compressed on a DVD are divided into several sections that is “TITLE”
Chapter
The smaller section unit of picture or music in a DVD under the title, usually one title is comprised of one or more chapters and each of them is numbered for easy searching. But some discs may not have a recording chapter.
Track
A segment of picture or music on a SVCD VCD or CD. Each track is numbered for searching
Scene
VCD with playback control function, on which active and stillness picture divided into certain portion is called scene, and every scene will be showed on screen menu with a scene number, that can be easily found while on playing. A scene usually is formed with one or several tracks
PBC function ( SVCD,VCD)
If a SVCD or a VCD is played a content menu may be showed on screen, this is what we Called “Play back control “ viz. PBC function.
|
Disc sort |
|
Functions |
|
|
|
|
|
|
VCD |
without |
PBC |
Exhibiting both music and images. |
|
function (1.1 version) |
|
|||
|
|
|||
|
|
|
|
|
SVCD/VCD with |
PBC |
Besides VCD picture playing on screen menu can be used for PBC |
||
playback, and if stillness function is made in a disc it also can be |
||||
function (2.0 version) |
|
|||
|
played with high definition. |
|||
|
|
|
||
|
|
|
|
|
9

Front panel and Rear panel illustrations
Front panel buttons
1.Power
2.Disc loader
3.USB slot
4.Display
5.DVD/Radio
6.Prev
7.Next
8.Play/Pause
9.Open/Close
10.Headphone
11.Master vol
Rear panel
1.Speaker output
2.Video output
3.VGA
4.S-video output
5.Audio output
6.Coaxial digital output
7.SCART
8.Component Y, Cb/Pb, Cr/Pr
9.Antenna FM
10.Mic vol
11.Mic jack
12.Antenna AM
10
Remote Control reference guide
1.Standby button (STANDBY)
2.Numbered buttons (1-9, 0)
3.Button to select title, chapter, track time to play (GOTO)
4.Setup button (SETUP)
5.Switch on or off PBC function (PBC)
6.Angle button (ANGLE)
7.Button to enter program menu (PROG)
8.Volume button (VOL)
9.Search button SEARCH (F.FWD/REW)
10.TITLE/FM/AM buttons (TITLE/FM/AM)
11.Cursor buttons
12.Audio/Memory button (AUDIO/MEMORY)
13.Surround sound button (S EFFECT)
14.USB button
15.Repeat button REPEAT
16.A-B repeat button (A-B)
17.Open/Close buttons (OPEN/CLOSE)
18.Numbered button (0/10)
19.Button to select the track which number is 10 or more (10+)
20.Play/pause button
21.Switching-off sound button
22.Video-mode button (V-MODE)
23.Source select button (SOURCE SELECT)
24.OSD button (OSD)
25.Radio button RADIO (PREV/NEXT)
26.Subtitle/Auto buttons (SUBTITLE/AUTO)
27.ENTER button
28.Menu/Mono/Stereo button (MENU/MO/ST)
29.Choice the channel button (CH-LEVEL)
30.Tone button (TONE)
31.Zoom button (ZOOM)
32.Step button (STEP)
33.Stop button (STOP)
11
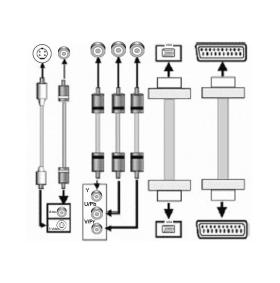
Connection
Connection to a television with output signal of progressive scanning
Before connection
Disconnect the AC power supply cord.
Refer to the television’s instructions
If your TV set with progressive scanning equipped Y Pb Pr input, you can use for connecting Y Pb Pr video output of Micro System. Please push SETUP button on the remote control, enter into MENU, choose VIDEO SETUP PAGE position, and then active P-RGB (P- YUV) to switch Micro System into a mode of the image with progressive scanning.
S-Video |
Y U/Pb V/Pr VGA |
SCART |
Video |
Input |
Input |
Video and |
Component |
VGA |
SCART |
S-Video |
video output |
output |
output |
Connection to a television
Set DOWNMIX by menu ANALOG AUDIO SETUP PAGE in the position LT/RT, STEREO, 3D SURROUND.
You will be able to connect Micro System to the TV set with S-Video and SCART cables if your TV set equipped with S-Video and SCART outputs.
You will be able to connect Micro System to the TV set with Composite video cable if your TV set equipped with Composite output. (RGB output by SCART and Y Cb CR output cannot be used at the same time).
If AV Output of Micro System connected to TV set, then connect MIXED AUDIO OUT with TV AUDIO IN
12
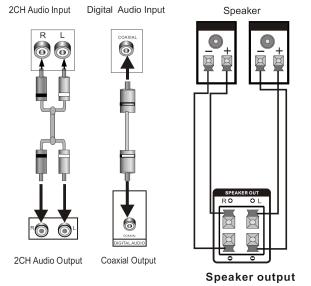
Audio connection system
Two types of audio output systems: analog audio and digital audio. The analogue audio is 2 channel, the digital audio is outputted from the coaxial, and sound quality is much better than the analogue audio. Digital audio includes coaxial output.
2 CH output
Use a pair of audio cable (red for right/white for left) to connect the audio input of the TV or AV amplifier to the audio output of this unit.
Coaxial Digital Audio
Use the special coaxial cable to connect the coaxial output of this unit to the coaxial input of power amplifier.
Speaker output
Use the specified cable in the accessories to connect this unit to the input of sound boxes.
Note:
The physical connection should accord to the audio output setup of this unit. Please refer to Audio Setup in System Setup.
Connection of FM/AM antenna
If you would like that the device find the radio stations, please press SOURCE SELECT button, to change into Radio system.
Note: When you connect frame AM antenna please connect sense and ground wires to the necessary cutoff points into the rear panel.
13
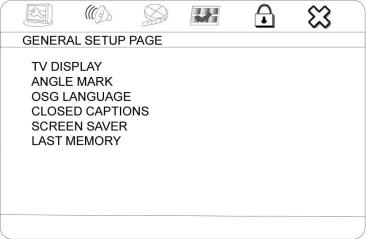
System Setup
Press SETUP button, screen show setup page. In setup mode, press SETUP key again to quit the setup page.
Press direction key to the desired item, press ENTER to confirm.
(1)Some setup items are concerning the present modes. The items in gray can't be set up.
(2)The setup is memorized and kept after power off.
General Setup Page
TV Display
4:3 Panscan: When the unit connects to the normal TV set, the wide-screen image shows on the full screen, but some part is cut off.
4:3 LetterBox: When the unit connects to the normal TV set, the wide-screen image shows and black bars appear on the top and bottom of screen.
16:9 Wide Screen, Wide Squeeze: Use this item when the unit is connected with the wide screen TV set.
ANGLE MARK
It will show the ANGLE mark when playing DVD disc with multi-angle view if selecting ON
OSD LANGUAGE
Select on-screen display language
CLOSED CAPTIONS
This function doesn't work when the disc without caption. If the caption is OFF, press SUBTITLE
key on the remote controller to make caption on. The default setup is CAPTION ON.
SCREEN SAVER
If the SCREEN SAVER is set ON and the unit is switched on without a disc playing for several
minutes, a moving picture appears on the screen, and the unit will go to standby mode after 20 minutes. You can press STANDBY key on the remote controller to wake it up.
LAST MEMORY
When this function is on, the unit can memorize the time elapsed from the last time you played the disc. Then at the next playing, it will resume playing from the memorized time.
14

Audio Setup Page
ANALOG AUDIO SETUP
DOWNMIX
LT/RT: The audio out is Left and Right channels format even if the original sound is 5.1CH
format.
STEREO :The audio out format is stereo even if the original sound is 5.1CH format.
DIGITAL AUDIO SETUP
DIGITAL OUTPUT
SPDIF OFF: no digital signal out (coaxial output off), only analog audio output. ALL: digital signal output in the original format recorded in the disc.
PCM ONLY: digital signal output in the decoded PCM form.
LPCM OUTPUT
Select PCM frequency at 48 kHz or 96 kHz
Note: some amplifier don't support 96 kHz sampling and cause coaxial output abnormal. The initial factory setup is 48 kHz.
DOLBY DIGITAL SETUP
DUAL MONO
You can choose the following sound modes: STEREO, L-MONO, R-MONO, MIX-MONO.
DYNAMIC
If watching large dynamic scope movie program at night, to select this mode you can reduce the volume to a very low level, at the same time, to keep the fine details sounds. In this case, this doesn't disturb the family and keep the quality sounds.
HDCD
You can select the digital filter Off, 1x, 2x. The initial factory setup is 1x.
KARAOKE SETUP
Turn off or on the microphone input and adjust echo level.
15
 Loading...