


GENESIS COUPE(BK) > 2010 > G 2.0 DOHC > General Information
General Information > General Information > General Information Identification Number Locations
Identification Number Description
Vehicle Identification Number
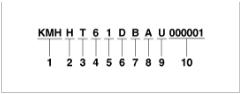
1.World Manufacturer Identifier (WMI)
-KMF : Commercial vehicle (Van)
-KMH : Passenger vehicle or MPV(Multipurpose Passenger Vehicle)/SUV(Sports Utility Vehicle)/RV(Recreational Vehicle)
-KMJ : Van
-KM8 : MPV/SUV/RV (For U.S.A, Canada, Mexico)
2.Vehicle line
-H : GENESIS COUPE
3.Model & Series
-L : Low grade (L)
-M : Middle-Low grade (GL)
-N : Middle grade (GLS, JSL, TAX)
-P : Middle-High grade (GDS)
-R : High grade (HGS, TOP)
4.Body/Cabin type, Gross Vehicle Weight Rating KMF (Commercial vehicle / Van)
Except U.S.A, Canada, Mexico, Gulf Cooperation Council, China
-X : Standard Cabin / Semi-Bonnet
-Y : Double Cabin / Bonnet
-Z : Super Cabin / Box
For U.S.A, Canada, Mexico, Gulf Cooperation Council, China
-3 : Standard Cabin Class-E 4×2 / Semi-Bonnet Class-E 4×2
-4 : Standard Cabin Class-E 4×4 / Semi-Bonnet Class-E 4×4
-5 : Standard Cabin Class-F 4×2 / Semi-Bonnet Class-F 4×2
-6 : Standard Cabin Class-F 4×4 / Semi-Bonnet Class-F 4×4
-7 : Double Cabin Class-E 4×2 / Bonnet Class-E 4×2
-8 : Double Cabin Class-E 4×4 / Bonnet Class-E 4×4
-9 : Double Cabin Class-F 4×2 / Bonnet Class-F 4×2
-0 : Double Cabin Class-F 4×4 / Bonnet Class-F 4×4
-A : Super Cabin Class-E 4×2 / Box Class-E 4×2
-B : Super Cabin Class-E 4×4 / Box Class-E 4×4
-C : Super Cabin Class-F 4×2 / Box Class-F 4×2
-D : Super Cabin Class-F 4×4 / Box Class-F 4×4
KMH
-1 : Limousine
-2 : Sedan - 2 door
-3 : Sedan - 3 door
-4 : Sedan - 4 door
-5 : Sedan - 5 door
-6 : Coupe
-7 : Convertible
-8 : Wagon
-9 : Commercial Van
-0 : Pick-Up
KMJ
-1 : Box
-2 : Bonnet
-3 : Semi-Bonnet KM8
-1 : Wagon 4×2 Class-A
-2 : Wagon 4×2 Class-B
-3 : Wagon 4×2 Class-C
-4 : Wagon 4×2 Class-D
-5 : Wagon 4×2 Class-E
-6 : Wagon 4×2 Class-F
-7 : Wagon 4×2 Class-G
-A : Wagon 4×4 Class-A
-B : Wagon 4×4 Class-B
-C : Wagon 4×4 Class-C
-D : Wagon 4×4 Class-D
-E : Wagon 4×4 Class-E
-F : Wagon 4×4 Class-F
-G : Wagon 4×4 Class-G
5.Restraint system, Brake system KMH, KM8
Except U.S.A, Canada, Mexico
-0 : Both side - None
-1 : Both side - Active belt
-2 : Both side - Passive belt For U.S.A, Canada, Mexico
Code Sea belt |
Front air bag |
Knee air bag |
|
Side air bag |
|
Curtain air bag |
||||||
|
|
|
|
|
|
|
|
|
|
|
||
Driver's |
Passenger's |
Driver's |
Passenger's |
1st row |
|
2nd row |
3rd row |
1st row |
2nd row |
3rd row |
||
|
|
|
||||||||||
|
ż |
ż |
ż |
|
|
ż |
|
|
|
ż |
ż |
|
A |
× |
× |
× |
× |
× |
|||||||
|
ż |
ż |
ż |
|
|
|
|
|
|
|
|
|
B |
× |
× |
× |
× |
× |
× |
× |
× |
||||
|
|
|
|
|
|
|
|
|
|
|
|
|
C |
ż |
ż |
ż |
× |
× |
ż |
× |
× |
ż |
ż |
ż |
|
|
ż |
ż |
ż |
|
|
ż |
|
ż |
|
ż |
ż |
|
D |
× |
× |
|
× |
× |
|||||||
|
ż |
ż |
|
|
|
|
|
|
|
|
|
|
E |
× |
× |
× |
× |
× |
× |
× |
× |
× |
|||
|
ż |
ż |
ż |
|
|
ż |
|
|
|
|
|
|
F |
× |
× |
× |
× |
× |
× |
× |
|||||
|
ż |
|
|
|
|
|
|
|
|
|
|
|
N |
× |
× |
× |
× |
× |
|
× |
× |
× |
× |
× |
|
|
|
|
|
|
|
|
|
|
|
|
|
|
KMJ
Except U.S.A, Canada, Mexico
-7 : Hydraulic brake system
-8 : Pneumatic brake system
-9 : Mixed brake system
For U.S.A, Canada, Mexico
-X : Hydraulic brake system
-Y : Pneumatic brake system
-Z : Mixed brake system KMF
Except U.S.A, Canada, Mexico
-7 : Hydraulic brake system
-8 : Pneumatic brake system
-9 : Mixed brake system
For U.S.A, Canada, Mexico
|
|
|
|
|
|
Restraint system |
|
|
|
|
|
|
Brake system |
|
|||
Code |
Sea |
|
Front air bag |
Knee air bag |
Side air bag |
Curtain air bag |
|
|
|
|
|||||||
|
|
|
|
|
|||||||||||||
|
|
|
|
|
|
1st |
2nd |
3rd |
1st |
2nd |
3rd |
Hydrauric Pneumatic Mixed |
|||||
|
belt |
|
Driver's |
|
Passenger's |
Driver's |
Passenger's |
||||||||||
|
|
|
row |
row |
row |
row |
row |
row |
|
|
|
|
|||||
|
|
|
|
|
|
|
|
|
|
|
|
||||||
|
ż |
|
|
|
|
|
|
|
|
|
|
|
|
ż |
|
|
|
X |
× |
× |
× |
× |
× |
× |
× |
× |
× |
× |
- |
- |
|||||
|
ż |
|
ż |
|
|
|
|
|
|
|
|
|
|
ż |
|
|
|
V |
|
× |
× |
× |
× |
× |
× |
× |
× |
× |
- |
- |
|||||
|
ż |
|
ż |
|
ż |
|
|
|
|
|
|
|
|
ż |
|
|
|
W |
|
|
× |
× |
× |
× |
× |
× |
× |
× |
|
- |
- |
||||
|
|
|
|
|
|
|
|
|
|
|
|
|
|
|
|
|
|
6.Engine type
-D : Gasoline engine 2.0
-H : Gasoline engine 3.8
7.Check digit or Driver’s side & Transmission
Except U.S.A, Canada, Mexico, Gulf Cooperation Council, China, Yemen
-A : LHD & MT
-B : LHD & AT
-C : LHD & MT+Transfer
-D : LHD & AT+Transfer
-E : LHD & CVT
-L : RHD & MT
-M : RHD & AT
-N : RHD & MT+Transfer
-S : RHD & AT+Transfer
-T : RHD & CVT
For U.S.A, Canada, Mexico, Gulf Cooperation Council, China, Yemen
-Check digit : 0 ~ 9, ×
8.Production year
-A : 2010, B : 2011, C : 2012, D : 2013 …
9.Plant of production
-A : Asan (Korea)
-C : Cheonju (Korea)
-U : Ulsan (Korea)
10.Vehicle production sequence number - 000001 ~ 999999
Paint Code
Code |
|
Color |
NAA |
|
Ceramic White |
NBA |
|
Space Black |
NCA |
|
Sleek Silver |
NDA |
|
Gray Titanum |
NEA |
|
Blue Diamond |
NFA |
|
Dynamic Yellow |
NGA |
|
Super Red |
NHA |
|
Blue Sapphire |
NJA |
|
Lime Green |
|
||
|
|
|
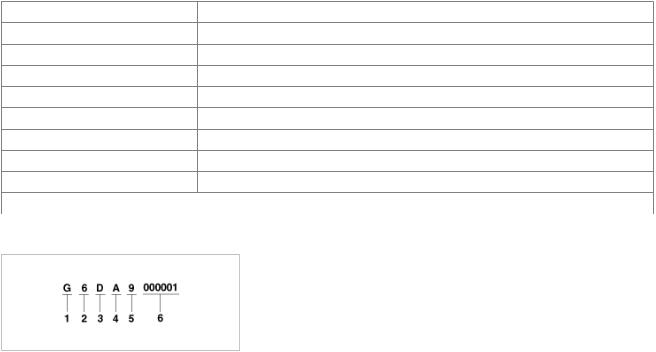
Engine Number
1.Engine fuel
-G : Gasoline
2.Engine range
-4 : 4 cycle 4 cylinder
-6 : 4 cycle 6 cylinder
3.Engine development order
-D : Lamda engine
-K : Theta engine
4.Engine capacity
-A : Lamda 3778 cc
-D : Theta - 2, 1998 cc
5.Production year
-9 : 2009, A : 2010, B : 2011, C : 2012, D : 2013 …
6.Engine production sequence number
- 000001 ~ 999999
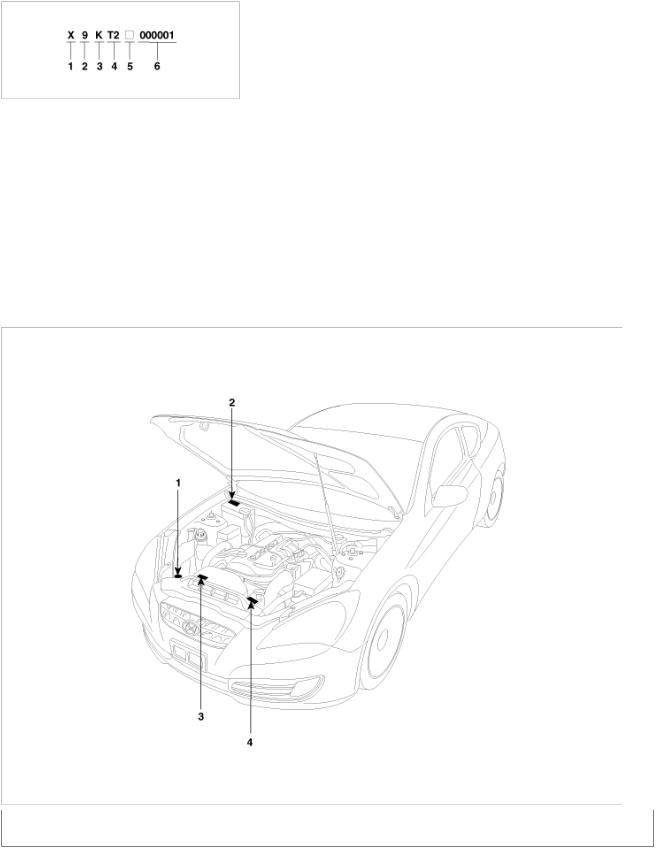
Transaxle Number
Automatic
1.Model
-X : A5SR1
2.Production year
-9 : 2009, A : 2010, B : 2011, C : 2012, D : 2013 …
3.Vehicle Line
-K : BK
4.Detailed chassification
-T2 : Theta 2.0 TCI
5.Spare
6.Transaxle production sequence number
-000001 ~ 999999
Warning / Caution Label Locations
1. |
Radiator Cap Caution |
3. |
Fan Caution |
2. |
Battery Caution |
4. |
Coolant Level Caution |
|
|
|
|

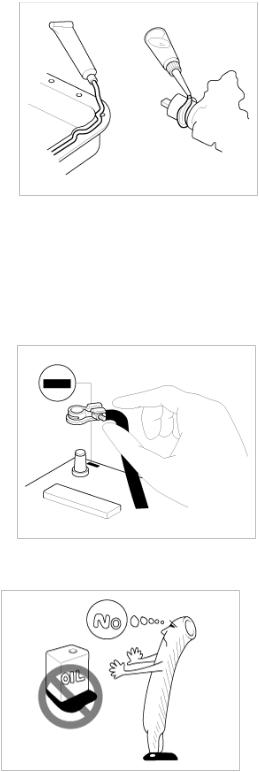
Battery Caution Label Describtion
Warning / Caution Label (Cont'd)
A.
Keep lighted cigarettes and all other flames or sparks away from the battery.
B.
Wear eye protection when charging or working near a battery. Always provide ventilation when working in an enclosed space.
•When lifting a plastic-cased battery, excesive pressure on acid to leak resulting in personal injury. Lift with a battery carrier or with your hands on opposite corners.
•Never attempt to change the battery when the battery cables are connected.
•The electrical ignition system works with high voltage.
Never touch these components with the engine running or the ignition switched on.
C.
Keep batteries out of the reach of children because batteries contain highly corrosive SULFURIC ACID. Do not allow battery acid to contact your skin, eyes, clothing or paint finish.
D.
If any electrolyte gets into your eyes, flush your eyes with clean water for at least 15 minutes and get immediate medical attention. If possible, continue to apply water with a sponge or cloth until medical attention is received.
If electrolyte gets on your skin, throughly wash the contacted area. If you feel a pain or a burning sensation, get medical attention immediately.
E.
Always read the following instructions carefully when handing a battery.
F.
Hydrogen, which is a highly combustible gas, is always presents in battery cells and may explode if ignited.
G.
An improperly disposed battery can be harmful to the environment and human health.
Always confirm local regurations for battery disposal.

Handling And Storage The Battery
Battery Itself
Battery on Vehicle
•Batteries should be stored in cool, dry (27 degrees Celsius) places and out of direct sunlight.
•MF batteries are tightly sealed to prevent acid leakage.
However, tilting the battery to an angle of 45 degrees can cause acid to leak through the vents on the sides. Therefore, batteries should always be stored in their upright positions. Prevent placing any aqueous or solid (i.e. conductors) bodies on top of the battery.
•It is extremely dangerous to use tools, such as hammers, on the battery terminals when connecting cables to the mounted battery.
•When storing the vehicle for long periods of time, make sure to remove the memory fuse at junction box to prevent natural discharging.
•Also, run the engine for battery charging within 1 month if the memory fuse wasn't removed from the start of vehicle storing.
If the memory fuse was removed, run the engine for battery charging within 3 months from the start of vehicle storing.
After reconnecting or recharging a discharged battery, the ESP OFF indicator may illuminate.
In this case, turn the handle half way to the left and right whilst the ignition switch is in the ON position. Then, restart the engine after the ignition is OFF.
The ESP OFF indicator may turn OFF.
If the ESP OFF indicator does not turn OFF, have the system checked refering to DTC. (Refer to the BR group.)
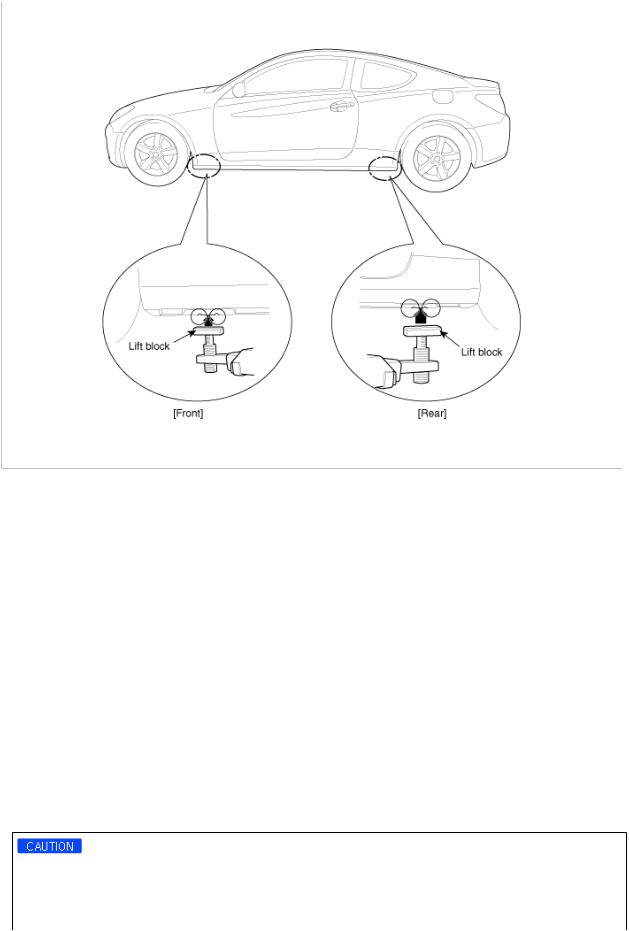
Lift And Support Points
When heavy rear components such as suspension, fuel tank, spare tire, tailgate and trunk lid are to be removed, place additional weight in the luggage area before hoisting. When substatial weight is removed from the rear of the vehicle, the center of gravity may change and cam cause the vehicle to tip forward on the hoist.
•Since each tire/wheel assembly weights approximately 30lbs (14kg), placing the front wheels in the luggage area can assist with the weight distribution.
•Use the same support points to support the vehicle on safety stands.
1.Place the lift blocks under the support points as shown in the illustration.
2.Raise the hoist a few inches (centimeters) and rock the vehicle to be sure it is firmly supported.
3.Raise the hoist to full height to inspect the lift points for secure support.
Towing
If the vehicle needs to be towed, call a professional towing service. Never tow vehicle with just a rope or chain. It is very dangerous.
Emergency Towing
There are three popular methods of towing a vehicle :
-The operator loads the vehicle on the back of truck. This is best way of transporting the vehicle.
-The tow truck uses two pivoting arms that go under the tires of the driving axle and lift them off the ground. the other two wheels remain on the ground.
-The tow truck uses metal cables with hooks on the ends. These hooks go around parts of the frame or suspension, and the cables lift that end of the vehicle off the ground. The vehicle's suspension and body can be seriously damaged if this method of towing is attempted.
If the vehicle cannot be transported by flat-bed, should be towed with the wheels of the drivig axle off the ground and do the following :
Manual Transaxle
•Release the parking brake.
•Shift the Transaxle to neutral Automatic Transaxle
•Release the parking brake.
•Start the engine.
•Shift to [D] position, then [N] position.
•Turn off the engine.
•The vehicle equipped with full-time 4WD should be only transported on a flat-bed.
•Improper towing preparation will damage the transaxle. follow the above procedure exactly. If you cannot shift the transaxle or start the engine(automatic transaxle), your vehicle must be transported on a flatbed.
•It is the best to tow vehicle no farther than 30km (19miles), and keep the speed below 50km/h (30mph). (For the fulltime 4WD vehicle, limit the towing to 1.5km (1mile) and 15km/h (10mph)
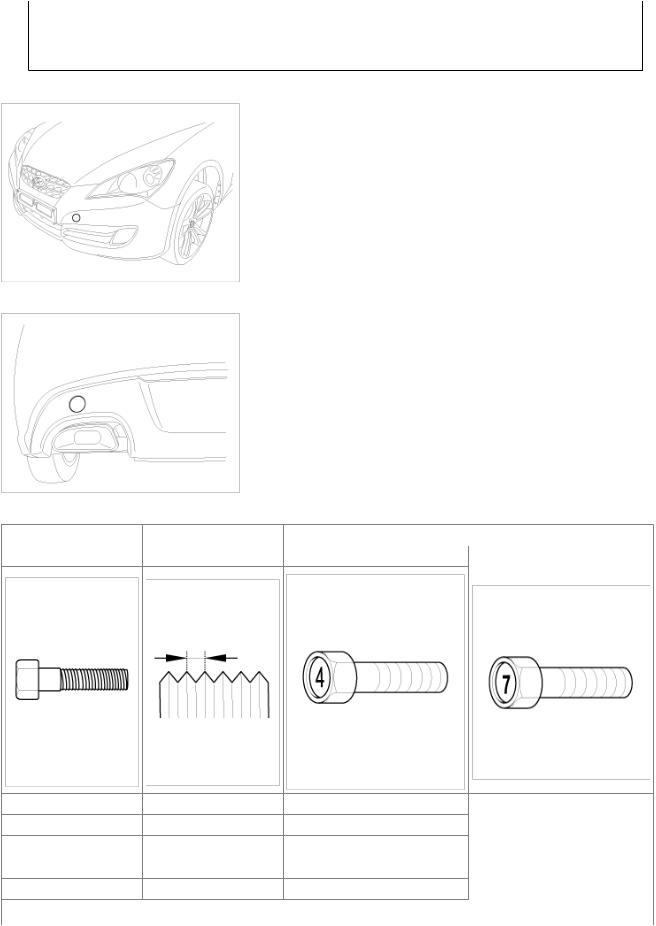
•Trying to lift or tow your vehicle by the bumpers will cause serious damage. The bumpers are not designed to support the vehicle's weight.
Front :
Rear :
Tightening Torque Table Of Standard Parts
Bolt niminal diameter |
Pich (mm) |
Torque Nm (kg.cm, lb.ft) |
||
|
|
|||
(mm) |
Head Mark 4 |
Head Mark 7 |
||
|
||||
|
|
|||
|
|
|
|
|
M5 |
0.8 |
3 |
~ 4 (30 ~ 40, 2.2 ~ 2.9) |
5 ~ 6 |
(50 |
~ 60, 3.6 ~ 4.3) |
|
|
|
|
|
|
|
|
|
M6 |
1.0 |
5 |
~ 6 (50 ~ 50, 3.6 ~ 4.3) |
9 ~ 11 |
(90 |
~ 110, 6.5 ~ 8.0) |
|
|
|
|
|
|
|||
M8 |
1.25 |
12 |
~ 15 (120 ~ 150, 9 ~ 11) |
20 ~ 25 (200 ~ 250, 14.5 ~ 18.0 ) |
|||
|
|
|
|
|
|||
M10 |
1.25 |
25 ~ 30 (250 ~ 300, 18 ~ 22) |
30 |
~ 50 (300 ~ 500, 22 ~ 36) |
|||
|
|
|
|
|
|||
M12 |
1.25 |
35 ~ 45 (350 ~ 450, 25 ~ 33) |
60 |
~ 80 (600 ~ 800, 43 ~ 58) |
|||
|
|
|
|
|
|||
M14 |
1.5 |
75 ~ 85 (750 ~ 850, 54 ~ 61) |
120 |
~ 140 (1,200 ~ 1,400, 85 ~ |
|||
|
|
|
|
|
|
|
|
|
|
|
100) |
|
|
|
|
M16 |
1.5 |
110 ~ 130 (1,100 ~ 1,300, 80 ~ 94) |
180 ~ 210 (1,800 ~ 2,100, 130 ~ |
|
|
|
150) |
|
|
|
|
M18 |
1.5 |
160 ~ 180 (1,600 ~ 1,800, 116 ~ |
260 ~ 300 (2,600 ~ 3,000, 190 ~ |
|
|
130) |
215) |
|
|
|
|
M20 |
1.5 |
220 ~ 250 (2,200 ~ 2,500, 160 ~ |
360 ~ 420 (3,600 ~ 4,200, 260 ~ |
|
|
180) |
300) |
|
|
|
|
M22 |
1.5 |
290 ~ 330 (2,900 ~ 3,300, 210 ~ |
480 ~ 550 (4,800 ~ 5,500, 350 ~ |
|
|
240) |
400) |
|
|
|
|
M24 |
1.5 |
360 ~ 420 (3,600 ~ 4,200, 260 ~ |
610 ~ 700 (6,100 ~ 7,000, 440 ~ |
|
|
300) |
505) |
|
|
|
|
- The torques shown in the table are standard values under the following conditions :
• Nuts and bolts are made of galvanized steel bar.
• Galvanized plain steel washers are inserted.
• All nuts, bolts and plain washers are dry.
- The torques shown in the table are not applicable :
• When spring washers, toothed washers and the like are inserted.
• If plastic parts are fastened.
• If self-tapping screws or self-locking nuts are used.
• If threads and surfaces are coated with oil.
- If you reduce the torques in the table to the percentage indicated below, under the following conditions, if will be the standard value.
• If spring washers are used : 85%
• If threads and bearing surfaces are stained with oil : 85%
General Service Information
Protection Of The Vehicle
Always be sure to cover fenders, seats, and floor areas before starting work.
The support rod must be inserted into the hole near the edge of the hood whenever you inspect the engine compartment to prevent the hood from falling and causing possible injury.
Make sure that the support rod has been released prior to closing the hood. Always check to be sure the hood is firmly latched before driving the vehicle.
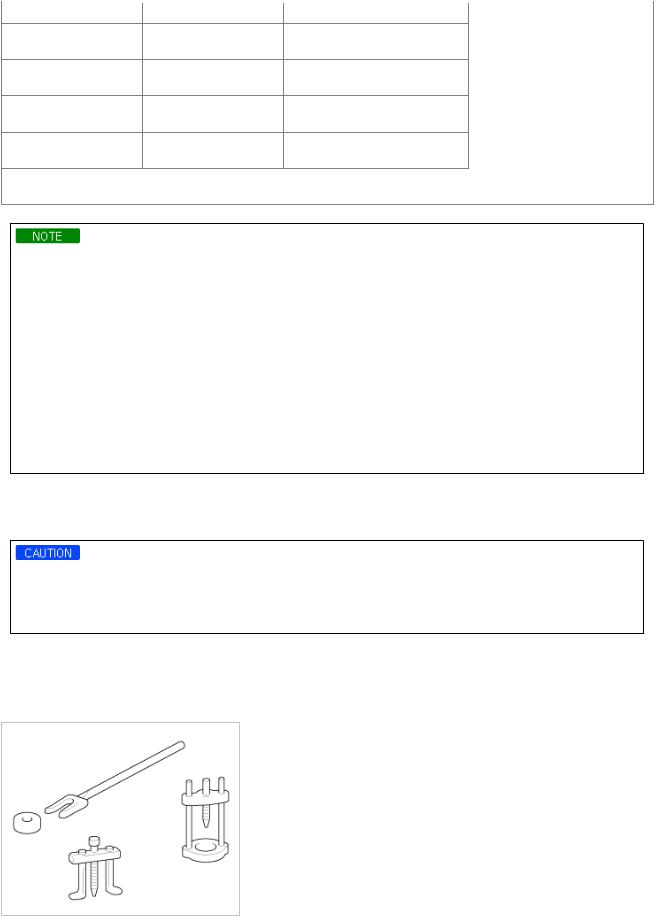
Preparation Of Tools And Mesuring Equipment
Be sure that all necessary tools and measuring equipment are available starting work.
Special Tools
Use special tools when they are required.
Removal Of Parts
First find the cause of the problem and then determine whether removal or disassembly before starting the job.
Disassembly
If the disassembly procedure is complex, requiring many parts to be disassembled, all parts should be disassembled in a way that will not affect their performance or external appearance.
1.Inspection of parts
Each part, when removed, should be carefully on suspected for malfunction, deformation, damage, and other problems.
2.Arrangement of parts
All disassembled parts should be carefully arranged for effective reassembly.
Be sure to separate and correctly identify the parts to be replaced from those that will be used again.
3.Cleaning parts for reuse
All parts to be used again should be carefully and thoroughly cleaned by an appropriate method.
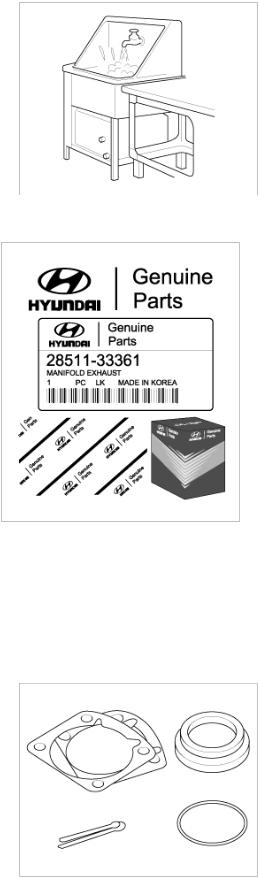
Parts
When replacing parts, use HYUNDAI genuine parts.
Replacement
Standard values, such as torques and certain adjustments, must be strictly observed in the reassembly of all parts. If removed, the following parts should always be replaced with new ones.
1.Oil seals
2.Gaskets
3.O-rings
4.Lock washers
5.Cotter pins (split pins)
6.Plastic nuts
Depending on their location.
7.Sealant should be applied to gaskets.
8.Oil should be applied to the moving components of parts.
9. Specified oil or grease should be applied to the prescribed locations (oil seals, etc) before assembly.
Adjustment
Use gauges and testers to adjust correctly the parts to standard values correctly.
Electrical System
1.Be sure to disconnect the battery cable from the negative (-) terminal of the battery.
2.Never pull on the wires when disconnecting connectors.
3.Locking connectors will click when the connector is secure.
4.Handle sensors and relays carefully. Be careful not to drop them against other parts.
Ruber Parts And Tubes
Always prevent gasoline or from touching rubber parts or tubing.
Measuring Body Dimensiongs
1.Basically, all measurements in this manual are taken with a tracking gauge.
2.When a measuring tape is used, check to be sure there is no elongation, twisting or bending.
3.For measuring dimensions, both projected dimensions and actual - measurement dimensions are used in this manual.
Dimensions Projected
1. These are the dimensions measured when the measurement points are projected from the vehicle's surface, and are the
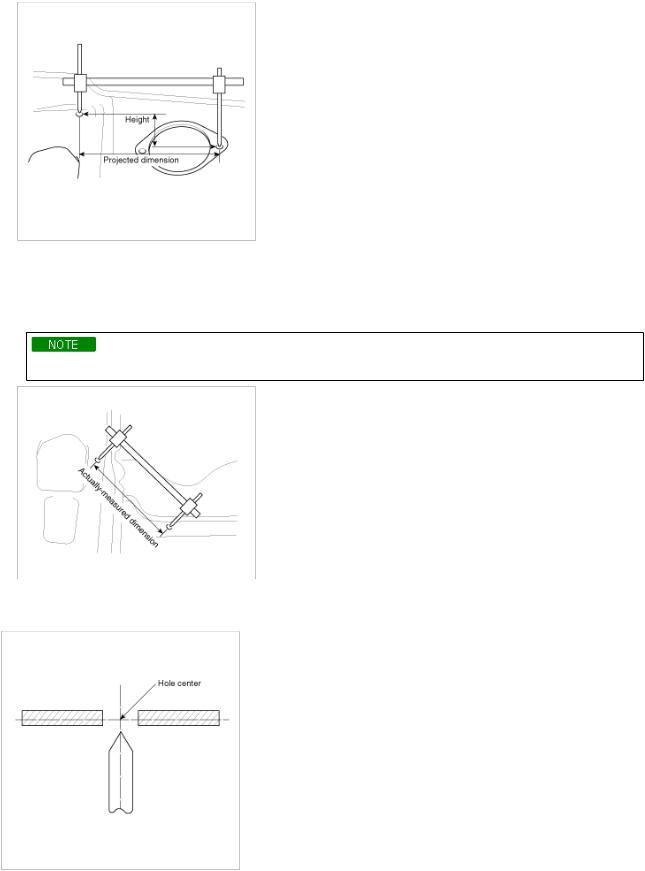
reference dimensions used for used for body alterations.
2.If the length of the tracking gauge probes is adjustable, measure it by lengthening one of two probes as long as the different value in height of the two surface.
Measuring Actual Dimensions
1.These dimensions indicate the actual linear distance between measurement points, and are used as the reference dimensions when a tracking gauge is used for measurement.
2.First adjust both probes to the same length (A=A') before measurement.
Check the probes and gauge itself to make sure there is no free play.
Measurement Point
Measurements should be taken at the center of the hole.

Checking Cables And Wires
1.Check the terminal for tightness.
2.Check terminals and wires for corrosion from battery electrolyte, etc.
3.Check terminals and wires for open circuits.
4.Check wire insulation and coating for damage, cracks and degrading.
5.Check the conductive parts of terminals for contact with other metallic parts (vehicle body and other parts).
6.Check grounded parts to verify that there is complete continuity between their attaching bolt(s) and the vehicle's body.
7.Check for incorrect wiring.
8.Check that the wiring is so clamped to the prevent contact with sharp corners of the vehicle body, etc. or hot parts (exhaust manifold, etc.)
9.Check that the wiring is clamped firmly to provide enough clearance from the fan pulley, fan belt and other rotating or moving parts.
10.Check that the wiring has a little space so that it can vibrate between fixed and moving parts such as the vehicle body and the engine.
Check Fuses
A blade type fuse test taps provided to allow checking the fuse itself without removing if from the fuse box. The fuse is good if the test lamp lights up when one lead is connected to the test taps (one at a time) and the other lead is grounded. (Turn the ignition switch so that the fuse circuit becomes operative)
Serivicing The Electrical System
1. Prior to servicing the electrical system, be sure to turn off the ignition switch and disconnect the battery ground cable.
In the course of MFI or ELC system diagnosis, when the battery cable is removed, any diagnostic trouble code retained by the computer will be cleared. There fore, if necessary, read the diagnostic before removing the battery cable.
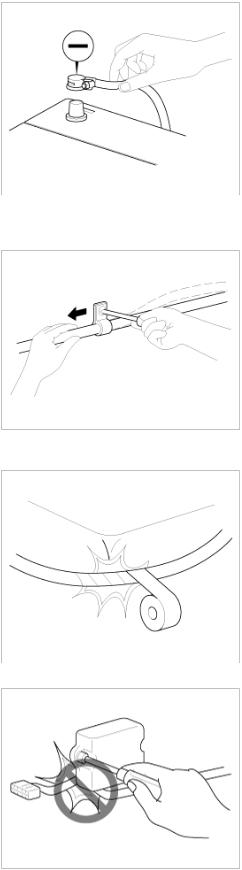
2.Attach the wiring harnesses with clamps so that there is no slack. However, for any harness which passes the engine or other vibrating parts of the vehicle, allow some slack within a range that does not allow the engine vibrations to cause the harness to come into contact with any of the surrounding parts and then secure the harness by using a clamp.
3.If any section of a wiring harness interferes with the edge of a parts, or a corner, wrap the section of the harness with tape or something similar in order to protect if from damage.
4. When installing any parts, be careful not to pinch or damage any of the wiring harness.
5. Never throw relays, sensors or electrical parts, or expose them to strong shock.
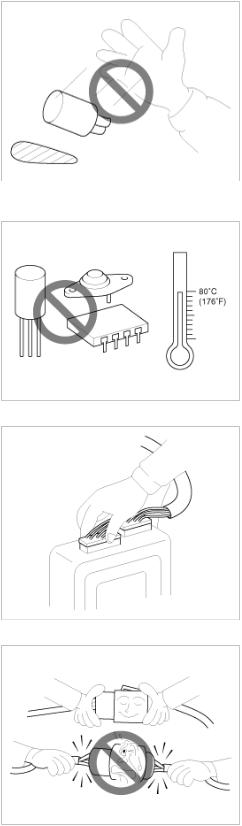
6.The electronic parts used in the computer, relays, etc. are readily damaged by heat. If there is a need for service operations that may cause the temperature to exceed 80°C (176°F), remove the electronic parts before hand.
7. Loose connectors cause problems. Make sure that the connectors are always securely fastened.
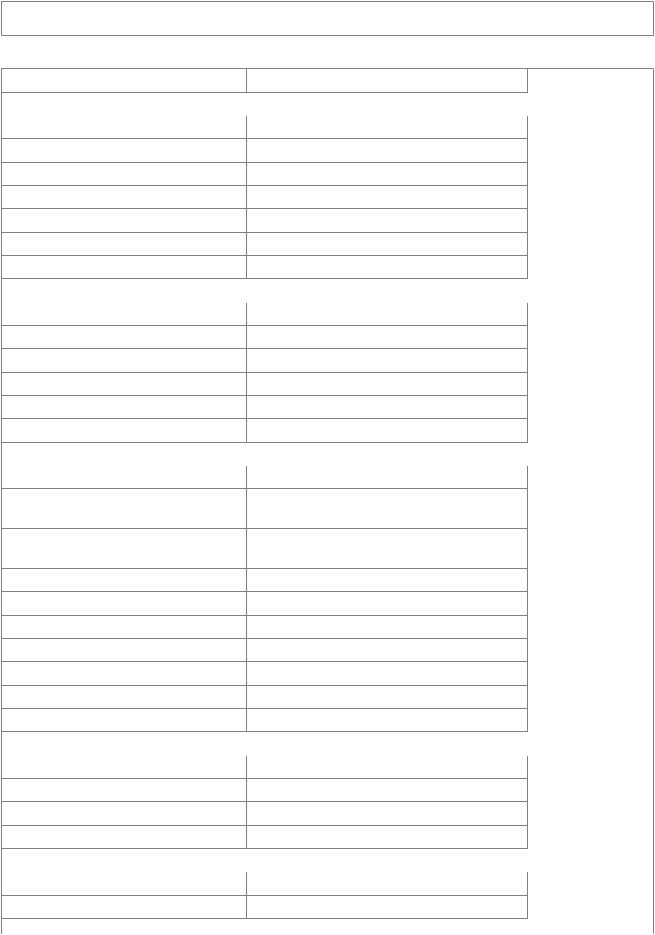
8. When disconnecting a connector, be sure to grip only the connector, not the wires.
9. Disconnect connector which have catches by pressing in the direction of the arrows shown the illustration.
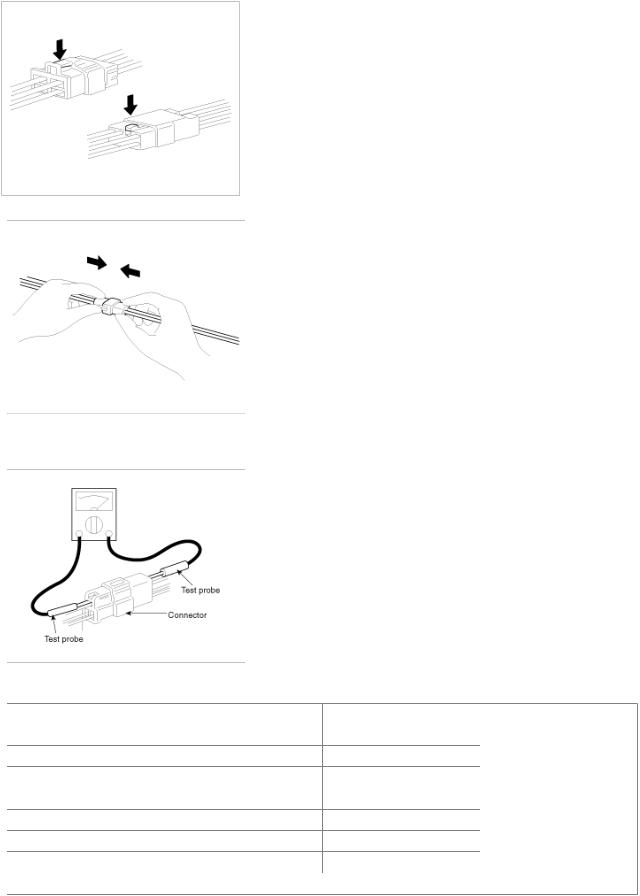
10. Connect connectors which have catches by inserting the connectors until they make a clicking sound.
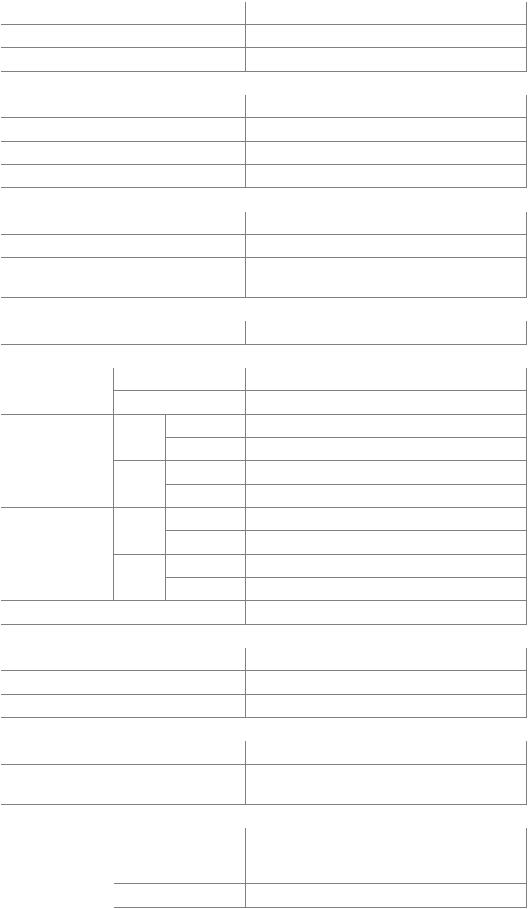
11.When using a circuit tester to check continuity or voltage on connector terminals, insert the test probe into the harness side. If the connector is a sealed connector, insert the test probe through the hole in the rubber cap until contacts the terminal, being careful not to damage the insulation of the wires.
12.To avoid overloading the wiring, take the electrical current load of the optional equipment into consideration, and determine the appropriate wire size.
Noeminal size |
SAE gauge No. |
Permissible current |
||
|
|
|||
In engine compartment |
Other areas |
|||
|
|
|||
|
|
|
|
|
0.3mm² |
AWG 22 |
- |
5A |
|
|
|
|
|
|
0.5mm² |
AWG 20 |
7A |
13A |
|
|
|
|
|
|
0.85mm² |
AWG 18 |
9A |
17A |
|
|
|
|
|
|
1.25mm² |
AWG 16 |
12A |
22A |
|
|
|
|
|
|
2.0mm² |
AWG 14 |
16A |
30A |
|
|
|
|
|
|
3.0mm² |
AWG 12 |
21A |
40A |
|
|
|
|
|
|
5.0mm² |
AWG 10 |
31A |
54A |
|
|
|
|
|
|

Precautions For Catalytic Converter
If a large amount of unburned gasolined gasoline flow into the converter, it may overheat and create a fire hazard. To prevent this observe the following precations and explain them to your customer.
1.Use only unleaded gasoline.
2.Do not run the engine while the car is at rest for a long time. Avoid running the engine at fast idle for more than 10minutes and idle speed for more than 20 minutes.
3.Avoid start-jump tests. Do start-jumps only when absolutely necessary. Perform this test as rapidly as possible and, while testing, never race the engine.
4.Do not measure engine compression for and extended time. Engine compression tests must be made as rapidly as possible.
5.Avoid coasting with the ignition turned and during prolonged braking.
6.Do not dispose of used catalytic converter together with parts contaminated with gasoline or oil.
GENESIS COUPE(BK) >2010 > G 2.0 DOHC > Engine Mechanical System > General Information > Specifications
Specifications
Description |
Specifications |
Limit |
General |
|
|
|
|
|
|
|
|
Type |
In-line, Double Overhead Camshaft |
|
Number of cylinder |
4 |
|
|
||
Bore |
86mm (3.385in) |
|
|
||
Stroke |
86mm (3.385in) |
|
|
||
Total displacement |
1998cc (121.92cu.in.) |
|
|
||
Compression ratio |
9.4 : 1 |
|
|
||
Firing order |
1-3-4-2 |
|
|
||
Valve timing |
|
|
|
|
|
|
|
|
Intake valve |
|
|
Opens (ATDC / BTDC) |
ATDC 11° ~ BTDC 34° |
|
|
||
Closes (ABDC) |
ABDC 67° ~ 22° |
|
|
||
Exhaust |
|
|
|
|
|
Opens (BBDC) |
BBDC 54° ~ 14° |
|
|
||
Closes (ATDC) |
ATDC -10° ~ 30° |
|
|
||
Valve |
|
|
|
|
|
|
|
|
Valve length |
|
|
|
|
|
Intake |
113.18mm (4.4559in.) |
112.93mm |
|
|
(4.4460in) |
|
|
|
Exhaust |
105.79mm (4.1649in.) |
105.59mm |
|
|
(4.1570in) |
Stem O.D. |
|
|
|
|
|
Intake |
5.465 ~ 5.480mm (0.2151 ~ 0.2157in.) |
|
|
||
Exhaust |
5.458 ~ 5.470mm (0.2149 ~ 0.2153in.) |
|
|
||
Face angle |
45.25° ~ 45.75° |
|
|
||
Margin |
|
|
|
|
|
Intake |
1.02mm (0.0401in.) |
|
|
||
Exhaust |
1.09mm (0.0429in.) |
|
|
||
Valve stem to valve guide clearance |
|
|
|
|
|
|
|
|
Intake |
0.020 ~ 0.047mm (0.00078 ~ 0.00185in.) |
0.07mm (0.00275in.) |
|
|
|
Exhaust |
0.030 ~ 0.054mm (0.00118 ~ 0.00212in.) |
0.09mm (0.00354in.) |
Valve guide |
|
|
|
|
|
Length |
|
|
|
|
|
MLA |
|
|
|
|
|
|
|
|
MLA outer diameter |
31.964 ~ 31.980mm (1.2584 ~ 1.2590in.) |
|
Cylinder head tappet bore inner diameter |
32.000 ~ 32.025mm (1.2598 ~ 1.2608in.) |
|
|
||
|
|
|
|
|
|
MLA to tappet bore clearance |
0.020 |
~ 0.061mm (0.0008 ~ 0.0024in.) |
0.07mm (0.0027in.) |
Valve seat |
|
|
|
|
|
|
|
|
|
|
|
Width of seat contact |
|
|
|
Intake |
1.16 |
~ 1.46mm (0.0457 ~ 0.0575in.) |
|
|
|||
Exhaust |
1.35 |
~ 1.65mm (0.0531 ~ 0.0649in.) |
|
|
|||
Seat angle |
|
44.75° ~ 45.10° |
|
|
|
||
Valve guide |
|
|
|
|
|
|
|
|
|
|
|
Length |
43.8 |
~ 44.2mm (1.7244 ~ 1.7401in.) |
|
Inner diameter |
5.500 |
~ 5.512mm (0.2165 ~ 0.2170in.) |
|
|
|||
Valve spring |
|
|
|
|
|
|
|
|
|
|
|
Free length |
|
47.44mm (1.8677in.) |
|
Load |
19.0 ± 0.6kg/35.0mm (41.88 ± 1.32lb/1.3779in.) |
|
|
|
|||
Square |
39.8 ± 1.2kg/26.0mm (87.74 ± 2.64lb/1.0236in.) |
|
|
|
|||
|
|
1.5° MAX. |
|
|
|
|
|
Valve clearance |
|
|
|
|
|
|
|
|
|
|
|
Cold (20°C[68°F]) |
|
|
|
|
|
|
|
Intake |
0.17 |
~ 0.23mm (0.0067 ~ 0.0090in.) |
0.10 ~ 0.30mm |
|
|
|
(0.0039 ~ 0.0118in.) |
|
|
|
|
Exhaust |
0.27 |
~ 0.33mm (0.0106 ~ 0.0129in,) |
0.20 ~ 0.40mm |
|
|
|
(0.0078 ~ 0.0157in.) |
Cylinder head |
|
|
|
|
|
|
|
|
|
|
|
Flatness of gasket surface |
|
Max. 0.05mm (0.0019in.) |
|
Flatness of manifold mounting surface |
|
Max. 0.10mm (0.0039in.) |
|
|
|
||
Cylinder block |
|
|
|
|
|
|
|
|
|
|
|
Cylinder bore |
86.00 |
~ 86.03mm (3.3853 ~ 3.3871in.) |
|
Out-of-round and taper of cylinder bore |
Less than 0.05mm (0.0019in.) |
|
|
|
|||
Clearance with piston |
0.015 |
~ 0.035mm (0.0005 ~ 0.0013in.) |
|
|
|||
(To set limits to new parts) |
|
|
|
Piston |
|
|
|
|
|
|
|
|
|
|
|
O.D (To set limits to new parts) |
87.975 |
~ 88.005mm (3.4635 ~ 3.4647in.) |
|
Ring groove width |
|
|
|
|
|
|
|
|
|
|
|
No.1 |
1.235 |
~ 1.250mm (0.0486 ~ 0.0492in.) |
1.26mm (0.0496in.) |
|
|
|
|
No.2 |
1.230 |
~ 1.250mm (0.0484 ~ 0.0492in.) |
1.26mm (0.0496in.) |
|
|
|
|
Oil ring |
2.01 |
~ 2.03mm (0.0791 ~ 0.0799in.) |
2.05mm (0.0807in.) |
Piston ring |
|
|
|
|
|
|
|
|
|
|
|
Side clearance |
|
|
|
|
|
|
|
No.1 |
0.05 |
~ 0.08mm (0.0019 ~ 0.0031in.) |
0.1mm (0.004in.) |
|
|
|
|
No.2 |
0.04 |
~ 0.08mm (0.0015 ~ 0.0031in.) |
0.1mm (0.004in.) |
|
|
|
|
Oil ring |
0.06 |
~ 0.13mm (0.0023 ~ 0.0051in.) |
0.2mm (0.008in.) |
End gap |
|
|
|
|
|
|
|
|
|
|
|
|
|
|
|
No.1 |
|
|
0.15 |
~ 0.30mm (0.0059 ~ 0.0118in.) |
0.6mm (0.0236in.) |
|
|
|
|
|
|
No.2 |
|
|
0.37 |
~ 0.52mm (0.0145 ~ 0.0204in.) |
0.7mm (0.0275in.) |
|
|
|
|
|
|
Oil ring side rail |
|
|
0.20 |
~ 0.70mm (0.0078 ~ 0.0275in.) |
0.8mm (0.0315in.) |
Piston pin |
|
|
|
|
|
|
|
|
|
|
|
|
|
|
|
|
|
Piston pin outer diameter |
|
21.997 |
~ 22.000mm (0.8660 ~ 0.8661in.) |
|
|
Piston pin hole inner diameter |
22.030 |
~ 22.070mm (0.8673 ~ 0.8688in.) |
|
||
|
|||||
Piston pin hole clearance |
|
0.003 |
~ 0.010mm (0.0001 ~ 0.0004in.) |
|
|
|
|
||||
Connecting rod small end inner diameter |
22.005 |
~ 22.011mm (0.8663 ~ 0.8666in.) |
|
||
|
|||||
Connecting rod |
|
|
|
|
|
|
|
|
|
|
|
|
|
|
|
|
|
Bend |
|
|
|
0.05mm (0.0020in.) or less |
|
Twist |
|
|
|
0.1mm (0.004in.) or less |
|
|
|
|
|
||
|
|
|
|
||
Connecting rod big end to crankshaft side |
0.100 ~ 0.250mm (0.0039 ~ 0.010in.) |
0.35mm (0.0138in.) |
|||
clearance |
|
|
|
|
|
Connecting rod bearing |
|
|
|
|
|
|
|
|
|
||
|
|
|
|
|
|
Oil clearance (To seat limits to new parts) |
0.025 |
~ 0.043mm (0.0009 ~ 0.0016in.) |
0.05mm ( 0.0078in.) |
||
Camshaft |
|
|
|
|
|
|
|
|
|
|
|
|
|
|
|
|
|
Cam height |
Intake |
|
|
43.80mm (1.7244in.) |
|
|
Exhaust |
|
|
45.00mm (1.7716in.) |
|
|
|
|
|
||
Journal O.D |
Intake |
No.1 |
|
30mm (1.1811in.) |
|
|
|
||||
|
|
No.2, 3, 4, 5 |
|
24mm (0.9449in.) |
|
|
|
|
|
||
|
Exhaust No.1 |
|
36mm (1.4173in.) |
|
|
|
|
|
|||
|
|
No.2, 3, 4, 5 |
|
24mm (0.9449in.) |
|
|
|
|
|
||
|
|
|
|
|
|
Bearing oil |
Intake |
No.1 |
0.022 |
~ 0.057mm (0.0008 ~ 0.0022in.) |
0.09mm (0.0035in.) |
clearance |
|
|
|
|
|
|
No.2, 3, 4, 5 |
0.045 |
~ 0.082mm (0.0017 ~ 0.0032in.) |
0.12mm (0.0047in.) |
|
|
|
||||
|
Exhaust No.1 |
0 ~ 0.032mm (0 ~ 0.0012in.) |
|
||
|
|
||||
|
|
|
|
|
|
|
|
No.2, 3, 4, 5 |
0.045 |
~ 0.082mm (0.0017 ~ 0.0032in.) |
0.12mm (0.0047in.) |
|
|
|
|
|
|
End play |
|
|
0.04 |
~ 0.16mm (0.0015 ~ 0.0062in.) |
0.20mm (0.0047in.) |
Crankshaft |
|
|
|
|
|
|
|
|
|
|
|
|
|
|
|
|
|
Pin O.D. |
|
|
47.954 |
~ 47.972mm (1.8879 ~ 1.8886in.) |
|
Journal O.D. |
|
|
51.942 |
~ 51.960mm (2.0449 ~ 2.0456in.) |
|
|
|
|
|||
End play |
|
|
0.07 |
~ 0.25mm (0.0027 ~ 0.0098in.) |
|
|
|
|
|||
Crankshaft bearing |
|
|
|
|
|
|
|
|
|
||
|
|
|
|
|
|
Oil clearance |
|
|
0.020 |
~ 0.038mm (0.0007 ~ 0.0014in.) |
|
Cooling method |
|
|
Water-cooled, pressurized. Forced circulation |
|
|
|
|
|
|||
|
|
|
|
with water pump |
|
Engine oil |
|
|
|
|
|
|
|
|
|
|
|
|
|
|
|
|
|
|
|
|
|
|
When replacing a |
|
Total |
|
5.9L (6.23US qt, 5.19lmp qt) |
short engine or a |
|
Oil quantity |
|
|
|
|
block assembly |
|
|
|
|
|
|
|
Oil pan |
|
5.0L (5.28US qt, 4.41lmp qt) |
|
|
|
|
|
|
|
|
|
|
|
|
|
|
Drain and refill |
5.3L (5.60US qt, 4.66lmp qt) |
Including oil filter |
|
|
|
|
|
|
|
Satisfy the |
|
Classification |
API SL, SM or above |
requirement of the |
|
ILSAC GF3, GF4 or above |
API or ILSAC |
||
Oil grade |
|||
|
|
||
|
|
classification. |
|
SAE viscosity grade |
5W-20, 5W-30, 5W-40 |
|
|
|
|||
|
|
|
|
|
|
Oil temperature in oil |
|
Oil pressure (at 1000rpm) |
127kPa (1.3kg/cm², 18.49psi) or above |
pan : 110±2°C |
|
|
|
(230±36°F) |
|
Radiator |
|
|
|
|
|
||
|
|
|
|
Type |
Pressurized corrugated fin type |
|
|
Radiator cap |
|
|
|
|
|
||
|
|
|
|
Main valve opening pressure |
83 ~ 110kpa (12 ~ 16psi, 0.83 ~ 1.1kg/cm²) |
|
|
Vacuum valve opening pressure |
-7kpa (-100psi, -0.07kg/cm²) or less |
|
|
|
|||
Thermostat |
|
|
|
|
|
||
|
|
|
|
Type |
Wax pellet type with jiggle valve |
|
|
Valve opening temperature |
82°C (177°F) |
|
|
|
|||
Full-opening temperature |
95°C (201°F) |
|
|
|
|||
Coolant pump |
Centrifugal type impeller |
|
|
|
|||
Drive belt |
|
|
|
|
|
||
|
|
|
|
Type |
V-ribbed belt |
|
|
Engine coolant temperature sensor |
|
|
|
|
|
||
|
|
|
|
Type |
Heat-sensitive thermistor type |
|
|
Resistance |
2.31 ~ 2.59K at 20°C (68°F) |
|
|
|
|||
Air cleaner |
|
|
|
|
|
||
|
|
|
|
Type |
Dry type |
|
|
Element |
Paper type |
|
|
|
|||
Exhaust pipe |
|
|
|
|
|
||
|
|
|
|
Muffler |
Expansion resonance type |
|
|
|
|
|
|
Suspension system |
Rubber hangers |
|
|
|
|
|
Service Standrds
Standard value
Antifreeze |
Mixture ratio of anti-freeze in coolant |
|
|
ETHYLENE GLYCOL BASE FOR ALUMINUM |
50% |
|
|
Tightening Torques
Item |
N.m |
kgf.m |
lb-ft |
Ladder frame bolt (M8 x 55) |
23.5 ~ 27.4 |
2.4 ~ 2.8 |
17.4 ~ 20.2 |
Oil pump bolt (BSM) |
8.8 + 16.6 + 25.5 |
0.9 + 1.7 + 2.6 |
6.5 + 12.3 + 18.8 |
Timing chain cover bolt (M8) |
18.6 ~ 22.5 |
1.9 ~ 2.3 |
13.7 ~ 16.6 |

Timing chain cover bolt (M6) |
7.8 |
~ 9.8 |
0.8 |
~ 1.0 |
5.8 |
~ 7.2 |
Oil pan bolt |
9.8 ~ 11.8 |
1.0 |
~ 1.2 |
7.2 |
~ 8.7 |
|
Engine support bracket bolt (LH/RH) |
49.0 |
~ 63.7 |
5.0 |
~ 6.5 |
36.1 |
~ 47.0 |
Camshaft bearing cap bolt (M6) |
10.8 |
~ 12.7 |
1.1 |
~ 1.3 |
7.9 |
~ 9.4 |
Camshaft bearing cap bolt (M8) |
27.4 |
~ 31.4 |
2.8 |
~ 3.2 |
20.3 |
~ 23.1 |
Cylinder head bolt |
(32.4~36.3) + |
(3.3~3.7) + (90~95°) |
(23.9~26.8) + |
|||
|
(90~95°) + (90~95°) |
+ (90~95°) |
(90~95°) + (90~95°) |
|||
Engine hanger bolt |
27.5 |
~ 31.4 |
2.8 |
~ 3.2 |
20.3 |
~ 23.1 |
Cylinder head cover bolt |
7.8 |
~ 9.8 |
0.8 |
~ 1.0 |
5.8 |
~ 7.2 |
Crankshaft pulley bolt |
166.6 |
~ 176.4 |
17.0 |
~ 18.0 |
122.9 |
~ 130.1 |
Connecting rod bearing cap bolt |
(17.7~21.6) + |
(1.8~2.2) + (88~92°) |
(13.0~15.9) + |
|||
|
(88~92°) |
|
|
(88~92°) |
||
Main bearing cap bolt |
14.7 + (27.5~31.4) + |
1.5 + (2.8~3.2) + |
10.8 + (20.3~23.1) + |
|||
|
(120~125°) |
(120~125°) |
(120~125°) |
|||
Flywheel bolt |
117.6 |
~ 127.4 |
12.0 |
~ 13.0 |
86.8 |
~ 93.9 |
Drive plate bolt |
117.6 |
~ 127.4 |
12.0 |
~ 13.0 |
86.8 |
~ 93.9 |
Timing chain tensioner bolt |
9.8 ~ 11.8 |
1.0 |
~ 1.2 |
7.2 |
~ 8.7 |
|
Timing chain tensioner arm bolt |
9.8 ~ 11.8 |
1.0 |
~ 1.2 |
7.2 |
~ 8.7 |
|
Timing chain guide bolt |
9.8 ~ 11.8 |
1.0 |
~ 1.2 |
7.2 |
~ 8.7 |
|
OCV bolt |
9.8 ~ 11.8 |
1.0 |
~ 1.2 |
7.2 |
~ 8.7 |
|
CVVT bolt |
53.9 |
~ 63.7 |
5.5 |
~ 6.5 |
39.7 |
~ 47.0 |
BSM chain tensioner arm bolt |
9.8 ~ 11.8 |
1.0 |
~ 1.2 |
7.2 |
~ 8.7 |
|
BSM chain guide bolt |
9.8 ~ 11.8 |
1.0 |
~ 1.2 |
7.2 |
~ 8.7 |
|
BSM chain tensioner bolt |
9.8 ~ 11.8 |
1.0 |
~ 1.2 |
7.2 |
~ 8.7 |
|
Water pump bolt |
18.6 |
~ 23.5 |
1.9 |
~ 2.4 |
13.7 |
~ 17.4 |
P/S pump bracket bolt |
19.6 |
~ 23.5 |
2.0 |
~ 2.4 |
14.5 |
~ 17.4 |
Tensioner ASSY intergrated bracket bolt |
39.2 |
~ 44.1 |
4.0 |
~ 4.5 |
28.9 |
~ 32.5 |
Water temp. control nut |
18.6 |
~ 23.5 |
1.9 |
~ 2.4 |
13.7 |
~ 17.4 |
Water inlet pipe nut |
18.6 |
~ 23.5 |
1.9 |
~ 2.4 |
13.7 |
~ 17.4 |
Water temp. control bolt |
14.7 |
~ 19.6 |
1.5 |
~ 2.0 |
10.8 |
~ 14.4 |
Oil level gauge assembly bolt |
7.8 ~ 11.8 |
0.8 |
~ 1.2 |
5.8 |
~ 8.7 |
|
Ignition coil bolt |
3.9 |
~ 5.9 |
0.4 |
~ 0.6 |
2.9 |
~ 4.3 |
Intake manifold bolt |
18.6 |
~ 27.4 |
1.9 |
~ 2.8 |
13.7 |
~ 20.2 |
Intake manifold nut |
18.6 |
~ 27.4 |
1.9 |
~ 2.8 |
13.7 |
~ 20.2 |
Intake manifold stay bolt |
18.6 |
~ 23.5 |
1.9 |
~ 2.4 |
13.7 |
~ 17.4 |
Exhaust manifold heat protector bolt |
18.6 |
~ 27.4 |
1.9 |
~ 2.8 |
13.7 |
~ 20.2 |
Exhaust manifold nut |
49.0 |
~ 53.9 |
5.0 |
~ 5.5 |
36.1 |
~ 39.7 |
Exhaust manifold stay bolt (M8) |
18.6 |
~ 27.4 |
1.9 |
~ 2.8 |
18.6 |
~ 20.2 |
Exhaust manifold stay bolt (M10) |
49.0 |
~ 53.9 |
5.0 |
~ 5.5 |
36.1 |
~ 39.8 |
Muffler bolt |
39.2 |
~ 58.8 |
4.0 |
~ 6.0 |
28.9 |
~ 43.4 |
Crankshaft position sensor bolt |
3.9 |
~ 5.9 |
0.4 ~ 0.6 |
2.9 |
~ 4.3 |
||
Oxygen sensor |
39.2 |
~ 49.0 |
4.0 ~ 5.0 |
28.9 |
~ 36.1 |
||
Knock sensor |
16.7 |
~ 25.5 |
1.7 ~ 2.6 |
12.3 |
~ 18.8 |
||
Camshaft position sensor |
3.9 |
~ 5.9 |
0.4 ~ 0.6 |
2.9 |
~ 4.3 |
||
Oil pressure switch |
7.8 ~ 11.8 |
0.8 ~ 1.2 |
5.8 |
~ 8.7 |
|||
Oil filter |
|
~ 15.7 |
|
1.2 ~ 1.6 |
|
8.7 ~ 11.6 |
|
11.8 |
|
|
|||||
|
|
|
|
|
|
|
|
GENESIS COUPE(BK) >2010 > G 2.0 DOHC > Engine Mechanical System > General Information > Repair procedures
Compression Pressure Inspection
If the there is lack of power, excessive oil consumption or poor fuel economy, measure the compression pressure.
1.Warm up and stop engine.
Allow the engine to warm up to normal operating temperature.
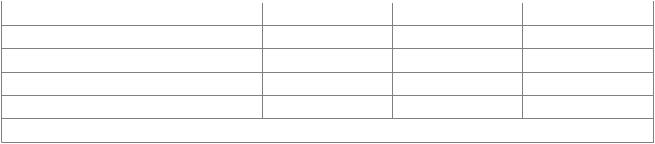
2.Disconnect the injector connectors (A), ignition coil connectors (B) and ignition coils.
3.Remove spark plugs.
Using a 16mm plug wrench, remove the 4 spark plugs.
4.Check cylinder compression pressure.
A. Insert a compression gauge into the spark plug hole.
B.Fully open the throttle.
C.While cranking the engine, measure the compression pressure.
Always use a fully charged battery to obtain engine speed of 200 rpm or more.
D. Repeat steps (a) through (c) for each cylinder.
This measurement must be done in as short a time as possible.
Compression pressure :
1,283kPa (13.0kgf/cm², 185psi)
Minimum pressure :
1,135kPa (11.5kgf/cm², 164psi)
Difference between each cylinder :
100kPa (1.0kgf/cm², 15psi) or less
E.If the cylinder compression in 1 or more cylinders is low, pour a small amount of engine oil into the cylinder through the spark plug hole and repeat steps (a) through (c) for cylinders with low compression.
•If adding oil helps the compression, it is likely that the piston rings and/or cylinder bore are worn or damaged.
•If pressure stays low, a valve may be sticking or seating is improper, or there may be leakage past the gasket.
5.Reinstall spark plugs.
6.Connect the injector connectors and ignition coil connectors.
Valve Clearance Inspection And Adjustment
Inspect and adjust the valve clearance when the engine is cold (Engine coolant temperature : 20°C (68°F)) and cylinder head is installed on the cylinder block.
1.Remove the cylinder head cover. (Refer to Timing system)
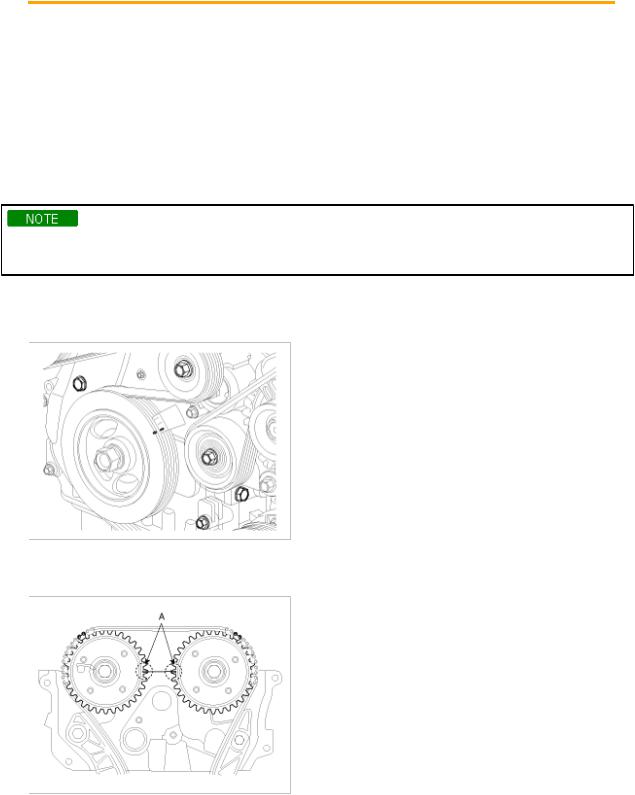
2.Set No.1 cylinder to TDC/compression.
A. Turn the crankshaft pulley and align its groove with the timing mark "T" of the lower timing chain cover.
B.Check that the mark (A) of the camshaft timing sprockets are in straight line on the cylinder head surface as shown in the illustration.
If not, turn the crankshaft one revolution (360°)
3.Inspect the valve clearance.
A. Check only the valve indicated as shown. [No. 1 cylinder : TDC/Compression] measure the valve clearance.

·Using a thickness gauge, measure the clearance between the tappet and the base circle of camshaft. ·Record the out-of-specification valve clearance measurements. They will be used later to determine the required replacement adjusting tappet.
Valve clearance
Specification
Engine coolant temperature : 20°C [68°F]
Limit
Intake : 0.10 ~ 0.30mm (0.0039 ~ 0.0118in.)
Exhaust : 0.20 ~ 0.40mm (0.0079 ~ 0.0157in.)
B.Turn the crankshaft pulley one revolution (360°) and align the groove with timing mark "T" of the lower timing chain cover.
C.Check only valves indicated as shown. [NO. 4 cylinder : TDC/compression]. Measure the valve clearance.
4.Adjust the intake and exhaust valve clearance.
A.Set the No.1 cylinder to the TDC/compression.
B.Marks on the timing chain and camshaft timing sprockets.
C.Remove the service hole bolt(A) of the timing chain cover.
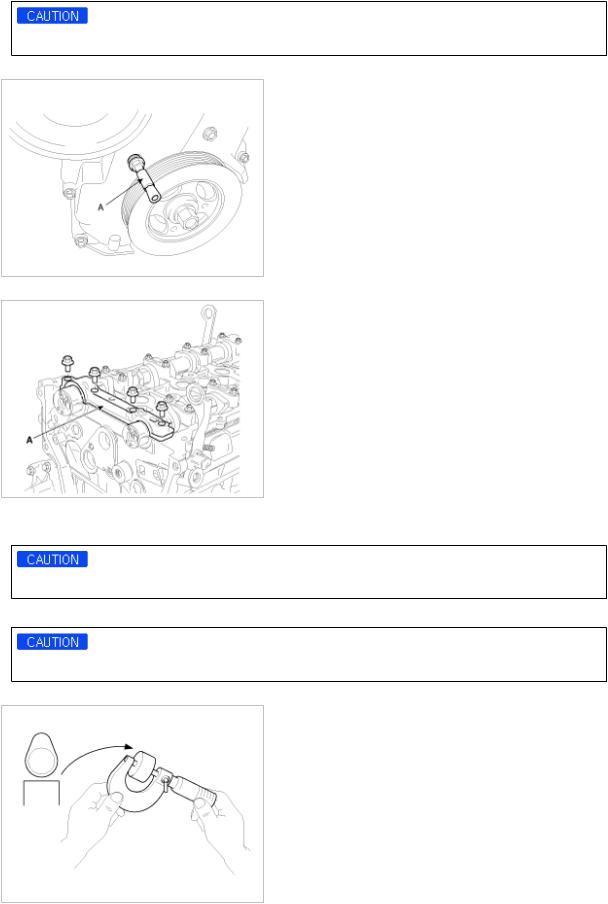
The bolt must not be reused once it has been assembled.
D. Insert the SST(A) (09240-2G000) in the service hole of the timing chain cover and release the ratchet.
E. Remove the front camshaft bearing cap(A).
F.Remove the exhaust camshaft bearing cap and exhaust camshaft.
G.Remove the intake camshaft bearing cap and intake camshaft.
When disconnect the timing chain from the camshaft timing sprocket, hold the timing chain. H. Tie down timing chain so that it dosen't move.
Be careful not to drop anything inside timing chain cover.
I. Measure the thickness of the removed tappet using a micrometer.

J.Calculate the thickness of a new tappet so that the valve clearance comes within the specified value.
Valve clearance (Engine coolant temperature : 20°C)
T : Thickness of removed tappet A : Measured valve clearance N : Thickness of new tappet
Intake : N = T + [A - 0.20mm(0.0079in.)] Exhaust : N = T + [A-0.30mm (0.0118in.)]
K.Select a new tappet with a thickness as close as possible to the calculated value.
Shims are available in 47size increments of 0.015mm (0.0006in.) from 3.00mm (0.118in.) to 3.690mm (0.1452in.)
L.Place a new tappet on the cylinder head.
M.Hold the timing chain, and install the intake camshaft and timing sprocket assembly.
N.Align the matchmarks on the timing chain and camshaft timing sprocket.
O.Install the intake and exhaust camshaft.
P.Install the front bearing cap.
Q.Install the sevice hole bolt.
Tightening torque :
11.8 ~ 14.7N.m (1.2 ~ 1.5kgf.m, 8.7 ~ 10.8lb-ft)
R.Turn the crankshaft two turns in the operating direction(clockwise) and realign crankshaft sprocket and camshaft sprocket timing marks(A).
S.Recheck the valve clearance.
Valve clearance (Engine coolant temperature : 20°C)
[Specification]
Intake : 0.17 ~ 0.23mm (0.0067 ~ 0.0090in.) Exhaust : 0.27 ~ 0.33mm (0.0106 ~ 0.0129in.)
 Loading...