


 Loading...
User Guide
© 2014 Hewlett-Packard Development Company, L.P.
Microsoft, Windows, and Windows Vista are either trademarks or registered trademarks of Microsoft Corporation in the United States and/or other countries.
The only warranties for HP products and services are set forth in the express warranty statements accompanying such products and services. Nothing herein should be construed as constituting an additional warranty. HP shall not be liable for technical or editorial errors or omissions contained herein. This document contains proprietary information that is protected by copyright. No part of this document may be photocopied, reproduced, or translated to another language without the prior written consent of Hewlett-Packard Company.
First Edition (July 2014)
Document Part Number: 774235-001
1

Chapter 1. Introduction
1.1 Features
Multilingual OSD adjustment
Compatible with IBM VGA, extended VGA, VESA VGA, SVGA, XGA, and WXGA modes
Wide range of applicable voltages (AC 100-240V 50/60Hz ) enables direct use without any setting.
Plug-and-play VESA DDC1/ 2B Standard.
1.2 Check list
Please make sure the following items are included with your LCD monitor;  The monitor (and the pedestal)
Stand
Power cord
VGA cable
Documentation
Setup poster
Warranty
If any of these items are missing, please contact your dealer for technical support and customer service.
Note: Be sure to save original box and all packing materials for future transport.
2
Chapter 2. Installation
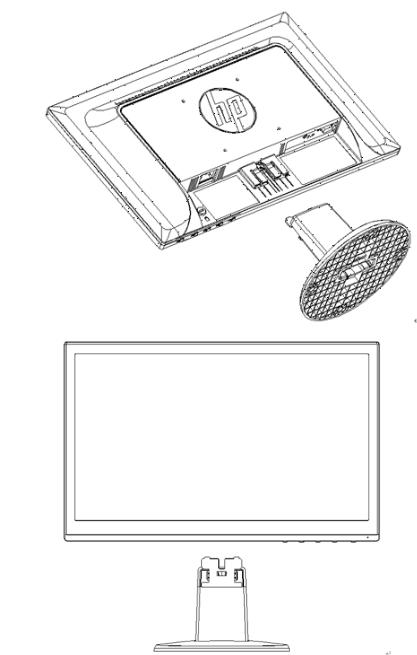
2.1 Install the pedestal
Follow the steps illustrated below to install the pedestal for your model.
Note: The following illustrations are for reference. Your model may have a different bezel, back cover and stand.
46.99 cm/18.5” Models
3
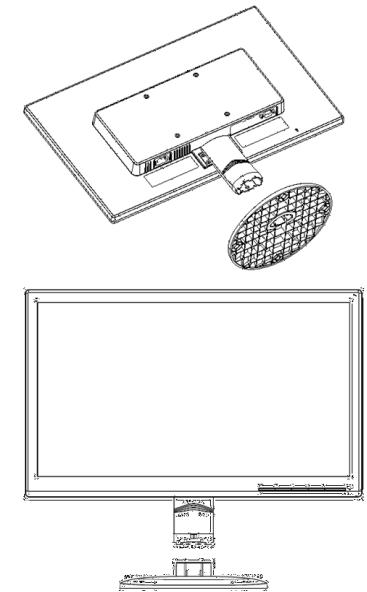
49.403 cm/19.45” Models
2.2 Connect your monitor to your computer
1.Power off and unplug your computer.
2.Connect the 15-pin ends of the signal cable to the VGA port of your monitor and the VGA OUT jack on the back of your computer. Secure the cable by tightening the screws on both ends of the signal cable.
3.Connect one end of the power cord to the monitor, then connect the other end of the power cords to the nearest electrical outlet.
WARNING! To reduce the risk of electric shock or damage to the equipment:
•Do not disable the power cord grounding plug. The grounding plug is an important safety feature.
•Plug the power cord into a grounded (earthed) electrical outlet that is easily accessible
at all times.
•Disconnect power from the equipment by unplugging the power cord from the electrical outlet.
•For your safety, do not place anything on power cords or cables. Arrange them so that no one may
4
accidentally step on or trip over them. Do not pull on a cord or cable. When unplugging from the electrical outlet, grasp the cord by the plug.
4.Power on your computer and monitor. If your monitor displays an image, the installation has been successfully done. If the monitor does not display any image, check all the connections.
Cautions: 1. For installation, complete the signal cord connection before plugging the power cord into the electrical outlet to avoid damaging the monitor.
2.During installation, support the front frame with your hand at its center of gravity to avoid dropping and damaging the monitor.
1 |
2 |
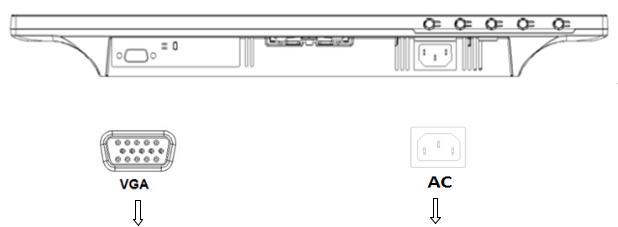
Overview of the ports of the monitor:
1.VGA signal input
2.AC power supply input
2.3Disconnect the pedestal for shipping
46.99 cm/18.5” Models
Press the clip button on the display head and remove the pedestal from the stand.
Note: The following illustrations are for reference. Your model may have a different bezel, back cover and stand.
5

49.403 cm/19.45” Models
Press the clip button on the pedestal and remove the pedestal from the stand.
6
Loading...