


 Loading...
COLOR LASERJET PRO MFP
User Guide
OK
X
M176 |
M177 |

HP Color LaserJet Pro MFP M176, M177
User Guide
Copyright and License
© 2013 Copyright Hewlett-Packard
Development Company, L.P.
Reproduction, adaptation, or translation without prior written permission is prohibited, except as allowed under the copyright laws.
The information contained herein is subject to change without notice.
The only warranties for HP products and services are set forth in the express warranty statements accompanying such products and services. Nothing herein should be construed as constituting an additional warranty. HP shall not be liable for technical or editorial errors or omissions contained herein.
Edition 1, 10/2013
Part number: CF548-90908
Trademark Credits
Adobe®, Acrobat®, and PostScript® are trademarks of Adobe Systems Incorporated.
Apple and the Apple logo are trademarks of Apple Computer, Inc., registered in the U.S. and other countries. iPod is a trademark of Apple Computer, Inc. iPod is for legal or rightholderauthorized copying only. Don't steal music.
Bluetooth is a trademark owned by its proprietor and used by Hewlett-Packard Company under license.
Microsoft®, Windows®, Windows® XP, and Windows Vista® are U.S. registered trademarks of Microsoft Corporation.

Table of contents
1 Product introduction ..................................................................................................................................... |
1 |
Product comparison .............................................................................................................................................. |
2 |
Product views ........................................................................................................................................................ |
4 |
Product front view ............................................................................................................................... |
4 |
Product back view ............................................................................................................................... |
5 |
Control panel overview .......................................................................................................................................... |
6 |
LCD control-panel layout (M176n model) .......................................................................................... |
6 |
Touchscreen control-panel layout (M177fw model) .......................................................................... |
7 |
Control-panel Home screen ................................................................................................................ |
8 |
2 Paper trays ................................................................................................................................................. |
11 |
Supported paper sizes and types ........................................................................................................................ |
12 |
Supported paper sizes ...................................................................................................................... |
12 |
Supported paper types ..................................................................................................................... |
13 |
Load the input tray .............................................................................................................................................. |
15 |
3 Print ........................................................................................................................................................... |
19 |
Print tasks (Windows) .......................................................................................................................................... |
20 |
How to print (Windows) ..................................................................................................................... |
20 |
Manually print on both sides (Windows) .......................................................................................... |
20 |
Print multiple pages per sheet (Windows) ....................................................................................... |
22 |
Select the paper type (Windows) ...................................................................................................... |
25 |
Additional printing information ........................................................................................................ |
26 |
Print tasks (Mac OS X) .......................................................................................................................................... |
27 |
How to print (Mac OS X) ..................................................................................................................... |
27 |
Manually print on both sides (Mac OS X) .......................................................................................... |
27 |
Print multiple pages per sheet (Mac OS X) ....................................................................................... |
28 |
Select the paper type (Mac OS X) ...................................................................................................... |
28 |
Additional printing information ........................................................................................................ |
28 |
Web-based printing ............................................................................................................................................. |
30 |
HP ePrint ............................................................................................................................................ |
30 |
ENWW |
iii |
HP ePrint software ............................................................................................................................ |
30 |
AirPrint ............................................................................................................................................... |
31 |
Set up HP Wireless Direct Printing (touchscreen models only) .......................................................................... |
32 |
4 Copy ........................................................................................................................................................... |
33 |
Make a copy ......................................................................................................................................................... |
34 |
Copy on both sides (duplex) ................................................................................................................................ |
35 |
Optimize copy quality .......................................................................................................................................... |
36 |
5 Scan ........................................................................................................................................................... |
37 |
Scan by using the HP Scan software (Windows) ................................................................................................. |
38 |
Scan by using the HP Scan software (Mac OS X) ................................................................................................. |
39 |
6 Fax ............................................................................................................................................................. |
41 |
Connect and configure the product for fax ......................................................................................................... |
42 |
Connect the product .......................................................................................................................... |
42 |
Configure the product ....................................................................................................................... |
43 |
Configure fax time, date, and header ............................................................................. |
43 |
Control panel ................................................................................................ |
43 |
HP Fax Setup Wizard (Windows) .................................................................. |
44 |
Configure for stand-alone fax ........................................................................................ |
44 |
Configure for an answering machine ............................................................................. |
44 |
Configure for an extension phone .................................................................................. |
44 |
Install the HP Fax software (Windows, optional) ............................................................................. |
45 |
Send a fax ............................................................................................................................................................ |
46 |
Send a fax by dialing manually from the product control panel ...................................................... |
46 |
Send a fax from the HP software (Windows) .................................................................................... |
46 |
Create, edit, and delete speed-dial entries ......................................................................................................... |
47 |
Create and edit speed-dial entries .................................................................................................... |
47 |
Delete speed-dial entries .................................................................................................................. |
47 |
7 Manage the product ..................................................................................................................................... |
49 |
Change the product connection type (Windows) ................................................................................................ |
50 |
Use HP Web Services applications (touchscreen models only) .......................................................................... |
51 |
HP Device Toolbox (Windows) ............................................................................................................................. |
52 |
HP Utility for Mac OS X ......................................................................................................................................... |
54 |
Open the HP Utility ............................................................................................................................ |
54 |
HP Utility features ............................................................................................................................. |
54 |
Product security features .................................................................................................................................... |
56 |
Set or change the product password ................................................................................................ |
56 |
iv |
ENWW |
Lock the product ............................................................................................................................... |
57 |
Economy settings ................................................................................................................................................ |
58 |
Print with EconoMode ....................................................................................................................... |
58 |
Configure the Sleep/Auto Off After setting ...................................................................................... |
58 |
A <Color> cartridge is low or <Color> cartridge is very low message displays on the product control panel .. |
60 |
Enable or disable the Very Low settings .......................................................................................... |
60 |
Replace the toner cartridge ................................................................................................................................. |
62 |
Replace the imaging drum .................................................................................................................................. |
66 |
8 Solve problems ........................................................................................................................................... |
71 |
Control panel help system (touchscreen models only) ...................................................................................... |
72 |
Restore the factory-set defaults ........................................................................................................................ |
73 |
Solve paper feed or jam problems ...................................................................................................................... |
74 |
The product does not pick up paper ................................................................................................. |
74 |
The product picks up multiple sheets of paper ................................................................................ |
74 |
Frequent or recurring paper jams ..................................................................................................... |
74 |
Prevent paper jams ........................................................................................................................... |
75 |
Clear jams from the input tray ............................................................................................................................ |
76 |
Clear jams in the output bin ................................................................................................................................ |
78 |
Clear jams in the document feeder ..................................................................................................................... |
80 |
Improve print quality ........................................................................................................................................... |
82 |
Print from a different software program ......................................................................................... |
82 |
Set the paper-type setting for the print job ..................................................................................... |
82 |
Check the paper-type setting (Windows) ....................................................................... |
82 |
Check the paper-type setting (Mac OS X) ....................................................................... |
83 |
Check the toner-cartridge status ...................................................................................................... |
83 |
Calibrate the product to align the colors .......................................................................................... |
84 |
Print a cleaning page ......................................................................................................................... |
84 |
Perform additional print quality troubleshooting ............................................................................ |
85 |
Print the print quality page ............................................................................................ |
85 |
Interpret the print quality page ...................................................................................... |
85 |
Inspect the toner cartridge for damage ........................................................................................... |
86 |
Check the paper and printing environment ...................................................................................... |
86 |
Use paper that meets HP specifications ........................................................................ |
86 |
Check the product environment ..................................................................................... |
87 |
Check the EconoMode settings ......................................................................................................... |
87 |
Adjust color settings (Windows) ....................................................................................................... |
87 |
Improve copy and scan quality ............................................................................................................................ |
89 |
Check the scanner glass for dirt and smudges ................................................................................. |
89 |
Check the paper settings .................................................................................................................. |
89 |
Check the image adjustment settings .............................................................................................. |
90 |
ENWW |
v |
Optimize for text or pictures ............................................................................................................. |
90 |
Edge-to-edge copying ...................................................................................................................... |
91 |
Clean the pickup rollers and separation pad in the document feeder ............................................. |
91 |
Improve fax image quality .................................................................................................................................. |
93 |
Check the scanner glass for dirt or smudges ................................................................................... |
93 |
Check the send-fax resolution setting ............................................................................................. |
93 |
Check the lightness/darkness setting .............................................................................................. |
93 |
Check the Error Correction setting .................................................................................................... |
94 |
Check the Fit-to-Page setting ........................................................................................................... |
94 |
Clean the pickup rollers and separation pad in the document feeder ............................................. |
94 |
Send to a different fax machine ....................................................................................................... |
95 |
Check the sender's fax machine ........................................................................................................ |
95 |
Solve wired network problems ........................................................................................................................... |
96 |
Poor physical connection .................................................................................................................. |
96 |
The computer is using the incorrect IP address for the product ...................................................... |
96 |
The computer is unable to communicate with the product ............................................................. |
96 |
The product is using incorrect link and duplex settings for the network ........................................ |
97 |
New software programs might be causing compatibility problems ................................................ |
97 |
The computer or workstation might be set up incorrectly .............................................................. |
97 |
The product is disabled, or other network settings are incorrect ................................................... |
97 |
Solve wireless network problems ....................................................................................................................... |
98 |
Wireless connectivity checklist ......................................................................................................... |
98 |
The product does not print after the wireless configuration completes ......................................... |
99 |
The product does not print, and the computer has a third-party firewall installed ....................... |
99 |
The wireless connection does not work after moving the wireless router or product ................... |
99 |
Cannot connect more computers to the wireless product ............................................................... |
99 |
The wireless product loses communication when connected to a VPN .......................................... |
99 |
The network does not appear in the wireless networks list ............................................................ |
99 |
The wireless network is not functioning ........................................................................................ |
100 |
Perform a wireless network diagnostic test .................................................................................. |
100 |
Reduce interference on a wireless network ................................................................................... |
100 |
Solve fax problems ............................................................................................................................................ |
102 |
Check the hardware setup .............................................................................................................. |
102 |
Faxes are sending slowly ................................................................................................................ |
103 |
Fax quality is poor ........................................................................................................................... |
104 |
Fax cuts off or prints on two pages ................................................................................................ |
104 |
9 Parts, supplies, and accessories .................................................................................................................. |
105 |
Order parts, accessories, and supplies ............................................................................................................. |
106 |
Customer self-repair parts ................................................................................................................................ |
106 |
Accessories ........................................................................................................................................................ |
106 |
vi |
ENWW |
Index ........................................................................................................................................................... |
107 |
ENWW |
vii |
viii |
ENWW |
1 Product introduction
●Product comparison
●Product views
●Control panel overview
Go to www.hp.com/support/ljMFPM176series or www.hp.com/support/ljMFPM177series for HP's allinclusive help for your product:
●Solve problems.
●Download software updates.
●Join support forums.
●Find warranty and regulatory information.
You can also go to www.hp.com/support for Worldwide support and other HP products.
ENWW |
1 |

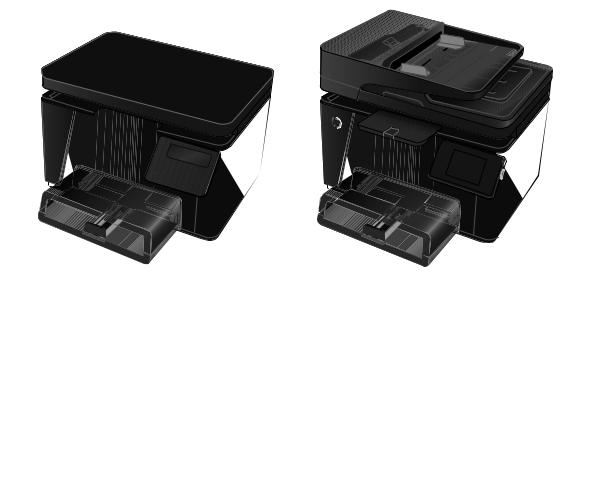
Product comparison
Paper handling |
Tray 1 (150-sheet capacity) |
|
Standard output bin (50-sheet |
|
capacity) |
|
Manual duplex printing |
Supported operating systems |
Windows 8, 32-bit |
|
Windows XP, 32-bit |
|
Windows Vista, 32-bit and 64-bit |
|
Windows 7, 32-bit and 64-bit |
|
Windows 2003 Server, 32-bit and |
|
64-bit |
|
Windows 2008 Server, 32-bit and |
|
64-bit |
|
Mac OS X v10.6.8 and later |
|
Linux |
Supported print drivers |
The HP PCLmS print driver is |
|
included on the in-box CD as the |
|
default print driver. |
Connectivity |
Hi-Speed USB 2.0 |
|
10/100/1000 Ethernet LAN |
|
connection |
|
Wireless network connection |
Memory |
128 MB RAM |
Control-panel display |
2-line LCD |
|
Color graphical touchscreen |
Prints up to 16 A4-size pages per |
|
|
minute (ppm) or 17 Letter-size |
|
ppm monochrome and 4 ppm color |
Copy |
Copy resolution is 300 dpi scan, |
|
600 dpi print |
|
Flatbed scanner supports page |
|
sizes up to 215.9 mm (8.5 in) wide |
|
and 297 mm (11.7 in) long |
|
Document feeder speed is 7.4 ppm |
Scan |
Scan resolution is 300 dpi, 600 dpi, |
|
or 1200 dpi |
|
Flatbed scanner supports page |
|
sizes up to 215.9 mm (8.5 in) wide |
|
and 297 mm (11.7 in) long |
M176n |
M177fw |
CF547A |
CZ165A |
2 Chapter 1 Product introduction |
ENWW |

M176n |
M177fw |
CF547A |
CZ165A |
|
Document feeder speed is 7.4 ppm |
Fax |
V.34 with two RJ-11 fax ports |
|
Approximately 500 pages of fax |
|
storage, with four days of power- |
|
fail recovery |
ENWW |
Product comparison 3 |
Product views
Product front view
2 |
7 |
1
OK
X
3
4
5
6
1Output bin
2Scanner
3Power on/off button
4Control panel
5Dust cover
6Input tray
7Document feeder
4 Chapter 1 Product introduction |
ENWW |
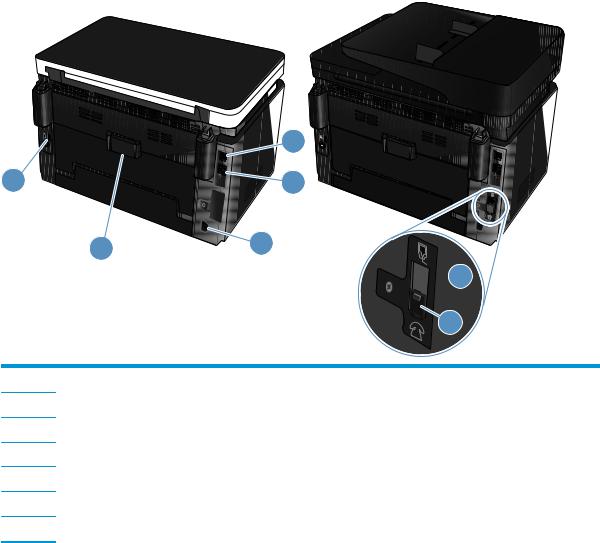
Product back view
|
1 |
5 |
2 |
4 |
3 |
 6
6
7
1Hi-Speed USB 2.0
2Ethernet port
3Power connection
4Rear door (provides access for clearing jams)
5Slot for cable-type security lock
6Fax "line in" port for attaching the fax phone line to the product
7Telephone "line out" port for attaching an extension phone, answering machine, or other devices
ENWW |
Product views 5 |

Control panel overview
LCD control-panel layout (M176n model)
16
15
14  13
13


 12
12

1 2
 3
3
OK

 4
4
X
5
11 |
|
10 |
|
|
9 |
8 |
7 |
6 |
|
|
|
|
|
||||
|
|
|
|
|
||||
1 |
Control panel display |
|
|
Provides information about the product; use the menus on the display to establish |
||||
|
|
|
|
|
|
|
|
product settings |
|
|
|
|
|
||||
2 |
Power On/Off button |
|
|
Turns the product on or off |
||||
|
|
|
|
|
|
|||
3 |
OK button |
|
|
|
Acknowledges a setting or confirms an action to proceed |
|||
|
|
|
|
|
|
|||
4 |
Arrow buttons |
|
|
|
Navigates the menus and adjusts certain settings |
|||
|
|
|
|
|
|
|||
5 |
Cancel |
button |
|
|
Cancels a print job whenever the attention light is blinking or exits the control panel |
|||
|
|
|
|
|
|
|
|
menus |
|
|
|
|
|
|
|
||
6 |
Copy Menu |
|
|
button |
|
Opens the copy settings menu |
||
|
|
|||||||
|
|
|
||||||
|
|
|
||||||
|
|
|
|
|||||
7 |
Lighter/Darker button |
|
Controls the brightness or darkness of a copy |
|||||
|
|
|
|
|
||||
8 |
Number of Copies |
button |
|
Sets the number of copies for the current copy job |
||||
|
|
|
|
|
|
|||
9 |
Back |
button |
|
|
Returns to the previous screen |
|||
|
|
|
|
|
|
|
|
|
10 |
Color copy |
button |
|
Starts a color copy job |
||||
|
|
|
||||||
|
|
|
|
|
|
|
|
|
11 |
Black and white copy |
|
|
Starts a black and white copy job |
||||
|
|
|
|
|||||
|
button |
|
|
|
|
|
|
|
|
|
|
|
|
|
|
|
|
12 |
ePrint |
|
|
|
button |
|
Opens the Web Services menu |
|
|
|
|
|
|
|
|||
|
|
|
|
|||||
13 |
Rotate toner cartridges |
|
Rotates the toner cartridge carousel |
|||||
|
button |
|
|
|
|
|
|
|
|
|
|
|
|
|
|||
14 |
Setup |
button |
|
|
Opens the Setup menu |
|||
|
|
|
|
|
|
|||
15 |
Attention light |
|
|
|
Indicates a problem with the product, view the display for a message |
|||
|
|
|
|
|
|
|||
16 |
Ready light |
|
|
|
Indicates that the product is ready or is processing a job |
|||
|
|
|
|
|
|
|
|
|
6 Chapter 1 Product introduction |
ENWW |
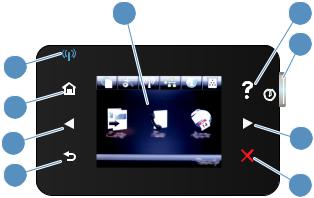
Touchscreen control-panel layout (M177fw model)
|
1 |
|
2 |
||
|
9 |
|
|
3 |
|
|
|
|
|
|
|
|
8 |
|
|
|
|
|
7 |
|
|
|
4 |
|
6 |
|
|
|
|
|
|
|
5 |
||
|
|
|
|
||
|
|
|
|||
1 |
Touchscreen display |
Provides access to the product features and indicates the current status of the product |
|||
|
|
|
|||
2 |
Help button and light |
Provides access to the control-panel help system |
|||
|
|
|
|||
3 |
Power On/Off button |
Turns the product on or off |
|||
|
|
|
|||
4 |
Right arrow button and light |
Moves the cursor to the right or moves the display to the next screen |
|||
|
|
|
NOTE: |
This button illuminates only when the current screen can use this feature. |
|
|
|
|
|||
5 |
Cancel button and light |
Clears settings, cancels the current job, or exits the current screen |
|||
|
|
|
NOTE: |
This button illuminates only when the current screen can use this feature |
|
|
|
|
|||
6 |
Back button and light |
Returns to the previous screen |
|||
|
|
|
NOTE: |
This button illuminates only when the current screen can use this feature. |
|
|
|
|
|||
7 |
Left arrow button and light |
Moves the cursor to the left or moves the display to the previous screen |
|||
|
|
|
NOTE: |
This button illuminates only when the current screen can use this feature. |
|
|
|
|
|||
8 |
Home button and light |
Provides access to the Home screen |
|||
|
|
|
|||
9 |
Wireless light |
Indicates the wireless network is enabled; the light blinks while the product is establishing a |
|||
|
|
|
connection to the wireless network |
||
|
|
|
|
|
|
ENWW |
Control panel overview 7 |

Control-panel Home screen
The Home screen provides access to the product features, and it indicates the product status.


 NOTE: Depending on the product configuration, the features on the Home screen can vary. The layout might also be reversed for some languages.
1 |
2 |
3 |
4 |
5 |
6 |
10 |
7 |
|
|
|
9 |
8 |
|
|
|
||
|
|
|
||
1 |
Web Services button |
Provides quick access to HP Web Services features, including HP ePrint |
||
|
|
HP ePrint is a tool that prints documents by using any email enabled device to send them to |
||
|
|
the product’s email address. |
|
|
|
|
|
|
|
2 |
Setup button |
Provides access to the main menus |
|
|
|
|
|
||
3 |
Wireless button |
Provides access to the Wireless menu and wireless status information |
||
|
|
NOTE: |
When you are connected to a wireless network, this icon changes to a set of signal |
|
|
|
strength bars. |
|
|
|
|
NOTE: |
This button does not display when the product is connected to a wired network. |
|
|
|
|
||
4 |
Network button |
Provides access to network settings and information. From the network settings screen, you |
||
|
|
can print the Network Summary page. |
|
|
|
|
NOTE: This button displays only when the product is connected to a network. |
||
|
|
|
||
5 |
Information button |
Provides product status information. From the status summary screen, you can print the |
||
|
|
Configuration Report page. |
|
|
|
|
|
||
6 |
Supplies button |
Provides information about supplies status. From the supplies summary screen, you can |
||
|
|
print the Supplies Status page. |
|
|
|
|
|
|
|
8 Chapter 1 Product introduction |
ENWW |

7 |
Apps button |
Provides access to the Apps menu to print directly from Web applications that you have |
|
|
downloaded from the HP Connected Web site at www.hpconnected.com |
|
|
|
8 |
Product status |
Indicates whether the product is ready or is processing a job |
|
|
|
9 |
Fax button |
Provides access to the fax features |
|
|
|
10 |
Copy button |
Provides access to the copy features |
|
|
|
ENWW |
Control panel overview 9 |
10 Chapter 1 Product introduction |
ENWW |
2 Paper trays
●Supported paper sizes and types
●Load the input tray
Go to www.hp.com/support/ljMFPM176series or www.hp.com/support/ljMFPM177series for HP's allinclusive help for your product:
●Solve problems.
●Download software updates.
●Join support forums.
●Find warranty and regulatory information.
You can also go to www.hp.com/support for Worldwide support and other HP products.
ENWW |
11 |

Supported paper sizes and types
●Supported paper sizes
●Supported paper types
Supported paper sizes
 NOTE: To obtain the best results, select the correct paper size and type in the print driver before printing.
Size |
Dimensions |
|
|
Letter |
216 x 279 mm (8.5 x 11 in) |
|
|
Legal |
216 x 356 mm (8.5 x 14 in) |
|
|
Executive |
184 x 267 mm (7.3 x 10.5 in) |
|
|
Oficio 8.5 x 13 |
216 x 330 mm (8.5 x 13 in) |
|
|
4x6 |
102 x 152 mm (4 x 6 in) |
|
|
5x8 |
127.0 x 203.2 mm (5.0 x 8.0 in) |
|
|
A4 |
210 x 297 mm (8.3 x 11.7 in) |
|
|
A5 |
148 x 210 mm (5.8 x 8.3 in) |
|
|
A6 |
105 x 148 mm (4.1 x 5.8 in) |
|
|
B5 (JIS) |
182 x 257 mm (7.2 x 10.1 in) |
|
|
10x15cm |
100 x 150 mm (3.9 x 5.9 in) |
|
|
16K |
184 x 260 mm (7.2 x 10.3 in) |
|
|
16K |
195 x 270 mm (7.7 x 10.6 in) |
|
|
16K |
197 x 273 mm (7.8 x 10.8 in) |
|
|
Japanese Postcard |
100 x 148 mm (3.9 x 5.8 in) |
Postcard (JIS) |
|
|
|
Double Japanese Postcard Rotated |
200 x 148 mm (7.9 x 5.8 in) |
D Postcard (JIS) |
|
|
|
Envelope #10 |
105 x 241 mm (4.1 x 9.5 in) |
|
|
Envelope Monarch |
98 x 191 mm (3.9 x 7.5 in) |
|
|
Envelope B5 |
176 x 250 mm (6.9 x 9.8 in) |
|
|
Envelope C5 |
162 x 229 mm (6.4 x 9 in) |
|
|
Envelope DL |
110 x 220 mm (4.3 x 8.7 in) |
|
|
Custom |
76 x 127 mm to 216 x 356 mm (3.0 x 5.0 in to 8.5 x 14 in) |
|
|
12 Chapter 2 Paper trays |
ENWW |

Supported paper types
The product supports the following paper types:
 NOTE: To obtain the best results, select the correct paper size and type in the print driver before printing.
●Plain
●Labels
●Letterhead
●Envelope
●Preprinted
●Prepunched
●Colored
●Bond
●Recycled
●Rough
●HP EcoSMART Lite
●HP LaserJet 90g
●HP Color Laser Matte 105g
●HP Premium Choice Matte 120g
●HP Brochure Matte 150g
●HP Cover Matte 200g
●HP Matte Photo 200g
●HP Premium Presentation Glossy 120g
●HP Brochure Glossy 150g
●HP Tri-fold Brochure Glossy 150g
●HP Brochure Glossy 200g
●HP Brochure Glossy 200g (faster printing)
●HP Brochure Glossy 200g (higher gloss)
●Light 60–74g
●Intermediate 85-95g
●Midweight 96–110g
●Heavy 111–130g
●Extra Heavy 131–175g
ENWW |
Supported paper sizes and types 13 |
●Mid-Weight Glossy 96-110g
●Heavy Glossy 111-130g
●Extra Heavy Glossy 131-175g
●Card Glossy 176-220g
●Color Laser Transparency
●Heavy Envelope
●Heavy Rough
●HP Tough Paper
14 Chapter 2 Paper trays |
ENWW |
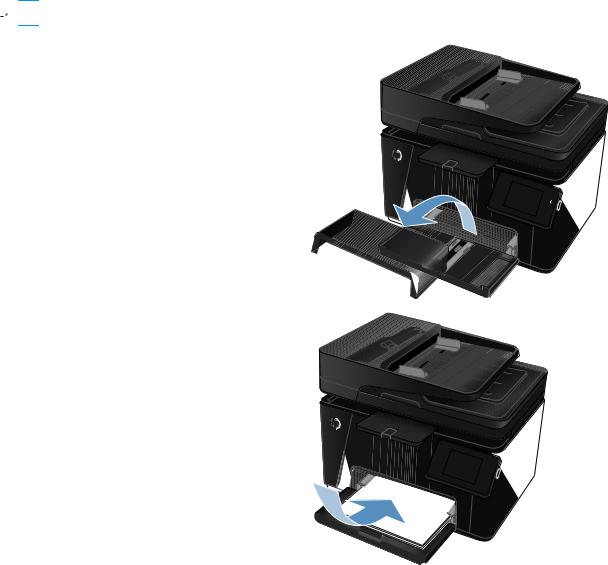
Load the input tray
 NOTE: The input tray has a maximum capacity of 150 sheets.
1.Remove the dust cover from the tray.
2.Load the paper into the tray. Make sure that the
paper fits under the tabs and below the maximum-height indicators.
NOTE: For information about the paper orientation for different types of paper, see Table 2-1 Input tray paper orientation on page 16.
ENWW |
Load the input tray 15 |

3.Adjust the paper guides so that they lightly touch
the paper stack but do not bend the paper.
4.Reinstall the dust cover on the tray.
Table 2-1 Input tray paper orientation
Paper type |
Duplex mode |
Paper size |
Image orientation |
How to load paper |
|
|
|
|
|
Preprinted or letterhead |
1-sided printing |
Any compatible paper |
Portrait |
Face-up |
|
|
size |
|
Top edge leading into the product |
|
|
|
|
16 Chapter 2 Paper trays |
ENWW |

Table 2-1 Input tray paper orientation (continued)
Paper type |
Duplex mode |
Paper size |
Image orientation |
How to load paper |
|
|
|
|
|
|
2-sided printing |
Any compatible paper |
Portrait |
Face-down |
|
|
size |
|
Top edge leading into the product |
|
|
|
|
Prepunched |
1- or 2-sided printing |
Any compatible paper |
Portrait |
Face-up |
|
|
size |
|
Holes toward the left of the product |
|
|
|
|
Envelopes |
1-sided printing |
Any compatible |
Short edge of the |
|
|
envelope size |
envelope feeding into |
|
|
|
the product |
Face-up
Top edge toward the right of the tray, postage end entering the product last
ENWW |
Load the input tray 17 |
18 Chapter 2 Paper trays |
ENWW |

3 Print
●Print tasks (Windows)
●Print tasks (Mac OS X)
●Web-based printing
●Set up HP Wireless Direct Printing (touchscreen models only)
Go to www.hp.com/support/ljMFPM176series or www.hp.com/support/ljMFPM177series for HP's allinclusive help for your product:
●Solve problems.
●Download software updates.
●Join support forums.
●Find warranty and regulatory information.
You can also go to www.hp.com/support for Worldwide support and other HP products.
ENWW |
19 |

Print tasks (Windows)
●How to print (Windows)
●Manually print on both sides (Windows)
●Print multiple pages per sheet (Windows)
●Select the paper type (Windows)
●Additional printing information
How to print (Windows)
The following procedure describes the basic printing process for Windows.
1.From the software program, select the Print option.
2.Select the product from the list of printers, and then click or tap the Properties or Preferences button to open the print driver.
 NOTE: The name of the button varies for different software programs.
3.Click or tap the tabs in the print driver to configure the available options.
4.Click or tap the OK button to return to the Print dialog box. Select the number of copies to print from this screen.
5.Click or tap the OK button to print the job.
Manually print on both sides (Windows)
1.From the software program, select the Print option.
2.Select the product from the list of printers, and then click or tap the Properties or Preferences button to open the print driver.
NOTE: The name of the button varies for different software programs.
20 Chapter 3 Print |
ENWW |
Loading...