

Page 1

Chapter 5 Problem solving 82
Problem solving
5
Overview
This section will help you to troubleshoot and solve printer problems.
“Clearing jams” on
page 83
“Understanding printer
messages” on page 103
“Correcting output
quality problems” on
page 123
“Determining printer
problems” on page 132
“Checking the printer
configuration” on
page 153
Occasionally, paper can jam during printing. This section will help you to locate paper jams,
properly clear them from the printer, and solve repeated jams.
Many different messages can appear on the printer control panel display. Some messages tell
the current printer status, such as INITIALIZING. Other messages require action, such as
CLOSE FRONT DOOR. Most of these messages are self-explanatory. However, some messages
indicate a problem with the printer, or require further action or description. This section lists
these types of messages and tells you what to do if a message persists.
The printer should produce print jobs of the highest quality. If print jobs do not appear sharp
and clear, if defects such as lines, specks, or smears appear on the page, or if paper is
wrinkled or curled, use this section to troubleshoot and solve the print quality problem.
Before you can eliminate a printer problem, you must understand the location of the problem.
Use the tables in this section to determine the printer problem, and then follow the
corresponding troubleshooting suggestions.
From the printer, you can print information pages, which give details about the printer and its
configuration.
Overview
Page 2

Chapter 5 Problem solving 83
Clearing jams
If the printer control panel displays a paper jam message, look for paper in the locations indicated in the
following graphic. You might need to look for paper in locations other than indicated in the paper jam message.
If the location of the paper jam is not obvious, look first in the front door area.
After looking at the graphic, you can go to the procedure for clearing the jam. When clearing jams, be very
careful not to tear the paper. If a small piece of paper is left in the printer, it could cause additional jams. If
jams are a recurring problem, see “Solving repeated paper jams” on page 102.
Note Loose toner might remain in the printer after a paper jam and cause output quality problems. These
should clear up within a few pages.
Clearing jams
Page 3

Chapter 5 Problem solving 84
Jam locations
Fac e-u p bi n
Front door and
print cartridge area
Optional output device
Duplexer (inside
the printer)
Left door
(behind output
accessory)
Tray 2 and Tray 3
Optional Tray 4
Standard output bin
(Face-down bin)
Optional Tray 1
Right door
Vertical transfer door
Clearing jams
Page 4

Chapter 5 Problem solving 85
Clearing jams from the input tray areas
To clear jams in optional Tray 1
1 Check for paper in the optional Tray 1 area, and remove any
paper from this area. Carefully check to be sure you have
removed all pieces of torn paper.
2 Open and close the right door to reset the printer.
1
2
Clearing jams
Page 5
Chapter 5 Problem solving 86
To clear jams inside the right door
1 Open the right door.
1
2 Check for paper in the right door area, and remove any paper
from this area. Carefully check to be sure you have removed all
pieces of torn paper.
3 Open the jam access cover. Pull out and lift the green tab.
4 Remove any paper from this area by pulling it out of the printer.
5 Push the green lever down to original position.
6 Close the right door.
3
5
Clearing jams
Page 6

Chapter 5 Problem solving 87
To clear jams in Trays 2 and 3
1 Open the tray until it stops.
1
2 Check for paper in the tray area, and remove any paper from this
area. Carefully check to be sure you have removed all pieces of
torn paper.
3 Close the tray.
4 Open and close the right door to reset the printer.
2
3
Clearing jams
Page 7
Chapter 5 Problem solving 88
To clear jams in optional Tray 4
1 Open optional Tray 4.
1
2 Check for paper in the tray area, and remove any paper from this
area. Carefully check to be sure you have removed all pieces of
torn paper.
3 Close optional Tray 4.
4 Open and close the right door to reset the printer.
3
4
Clearing jams
Page 8

Chapter 5 Problem solving 89
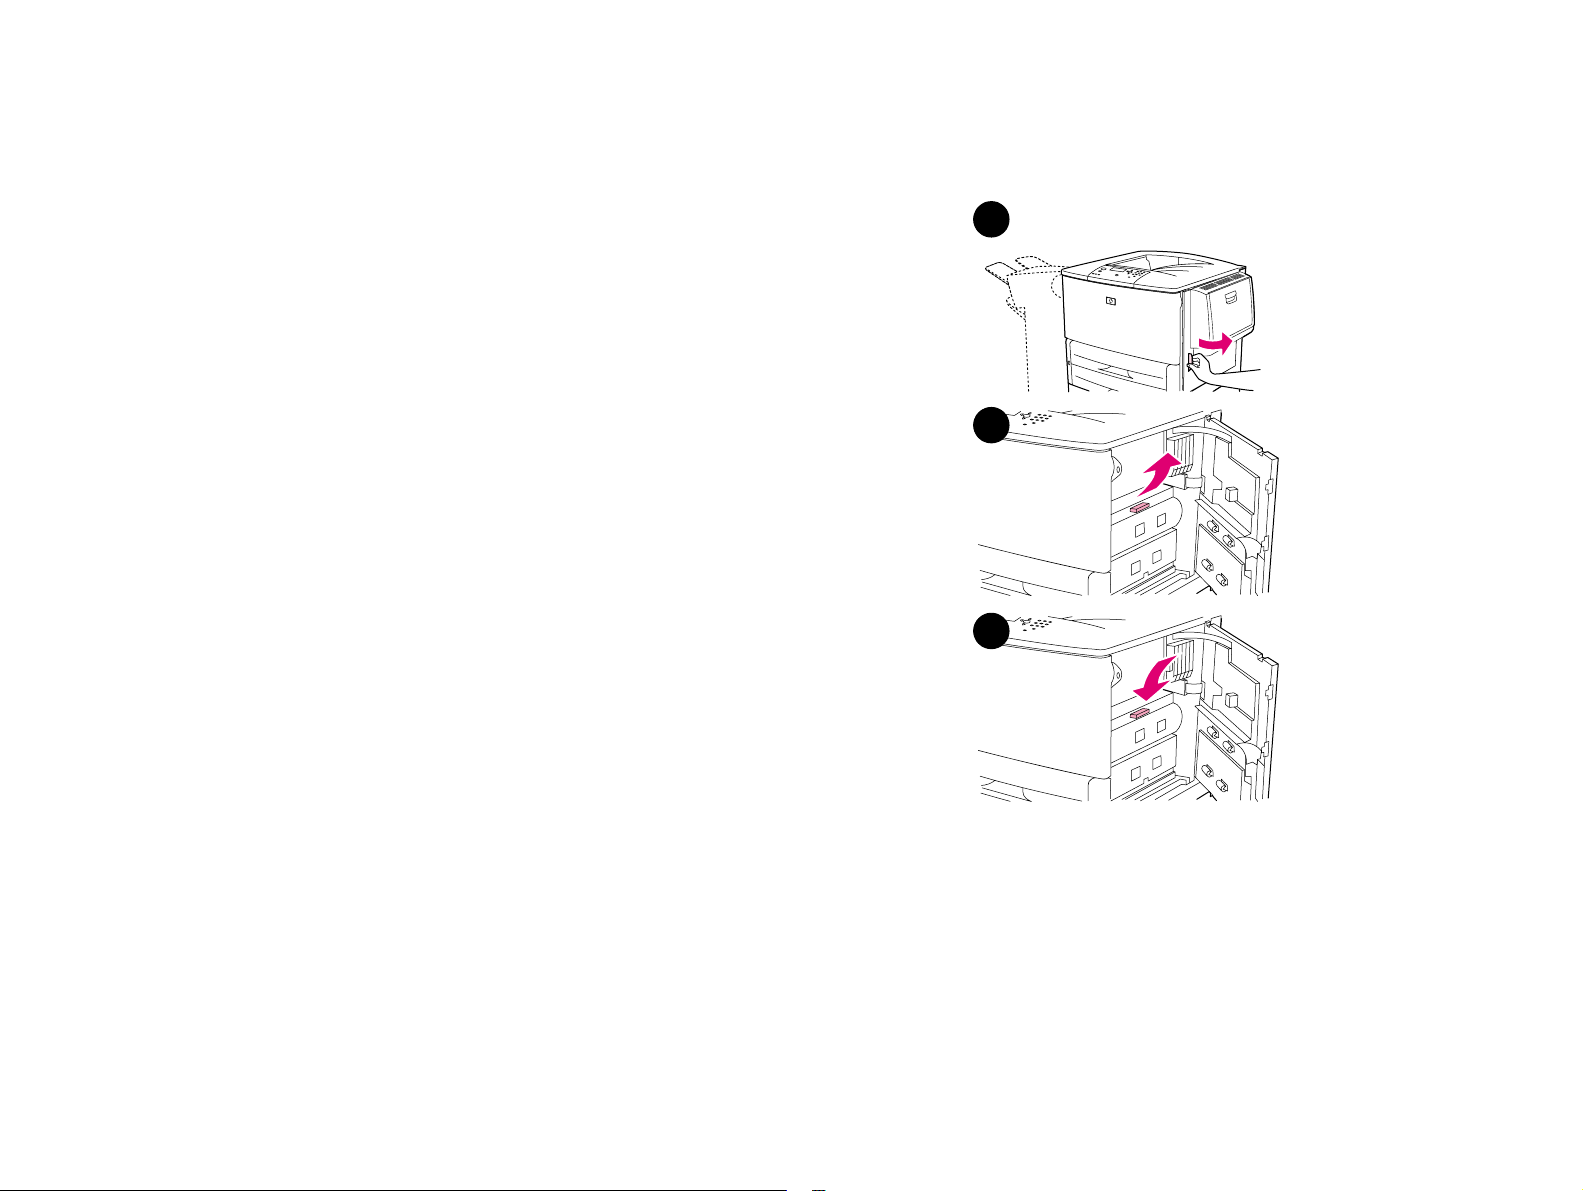
Clearing jams from the duplex printing accessory (duplexer)
To clear jams in the duplex printing accessory
1 If an optional output device is installed, slide it away from the
printer to access the left door.
2 Open the left door and carefully pull out any paper from area.
WARNING! Avoid touching the adjacent fusing area. It can be HOT.
1
3 Remove the duplex printing accessory by pressing the green
lever and pulling the unit out until it stops.
4 Remove any paper by lifting the two green levers in the duplex
printing accessory.
5 Open the front door.
2
3
5
Clearing jams
Page 9

Chapter 5 Problem solving 90
6 Check for paper in the duplex printing accessory area, and
remove any paper by pulling it out of the printer. Be careful not
to tear the paper.
7 Reinstall the duplex printing accessory by sliding it back into the
slot until it locks into place.
8 Close all open doors. If an optional output device is installed,
push it back into place.
6
7
Clearing jams
Page 10

Chapter 5 Problem solving 91
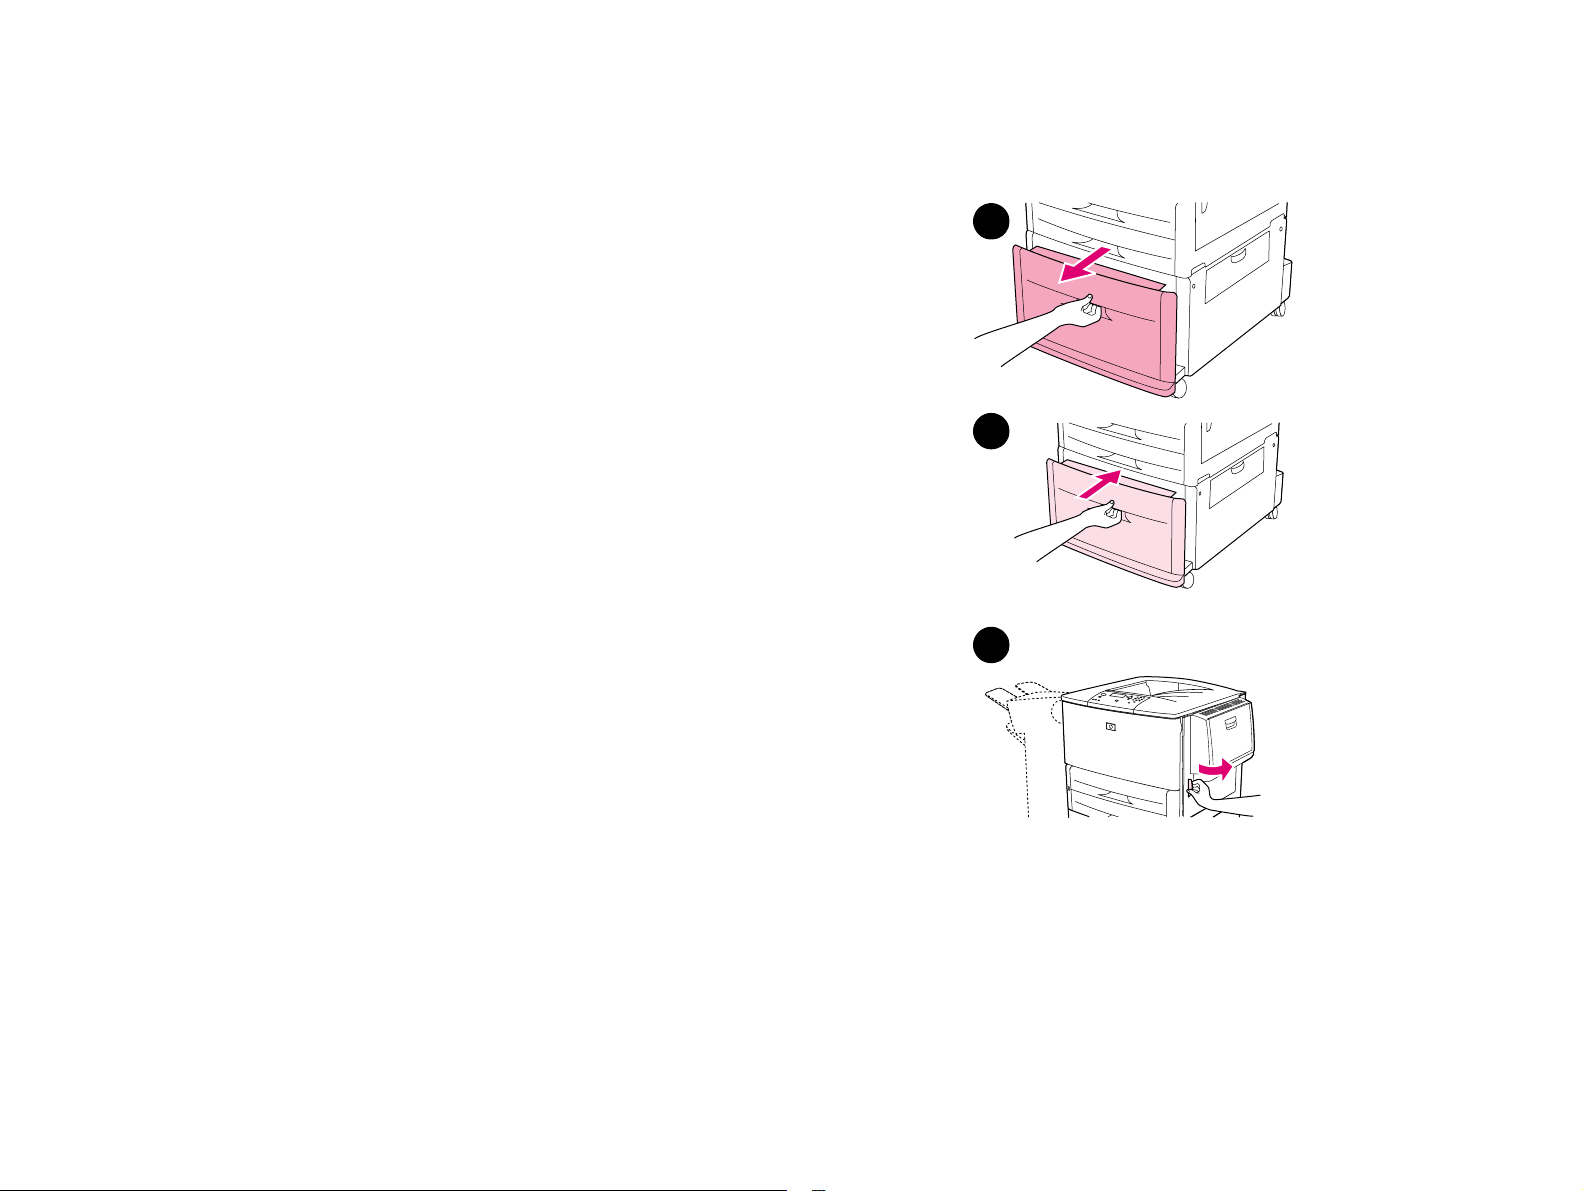
Clearing jams from the output areas
To clear jams in the standard output bin
1 If the jam extends into the output area, slowly and carefully pull
the paper straight out of the printer so that it does not tear.
2 Open the left door and carefully pull out any paper from area. (If
an optional output device is installed, first move it away from the
printer to access the left door.)
3 Close all open doors. If an optional output device is installed,
push it back into place.
1
2
Clearing jams
Page 11

Chapter 5 Problem solving 92
To clear jams in the left door (fuser area)
1 If an optional output device is installed, slide it away from the
printer to access the left door.
2 Open the left door.
WARNING!
Avoid touching the adjacent fusing area. It can be HOT.
1
3 Remove any jammed or damaged paper from this area by pulling
it out of the printer.
4 Press down on the green tab and carefully check for paper. Be
sure to remove all pieces of torn paper.
5 Close the left door. If an optional output device is installed, push
it back into place.
2
4
5
Clearing jams
Page 12
Chapter 5 Problem solving 93
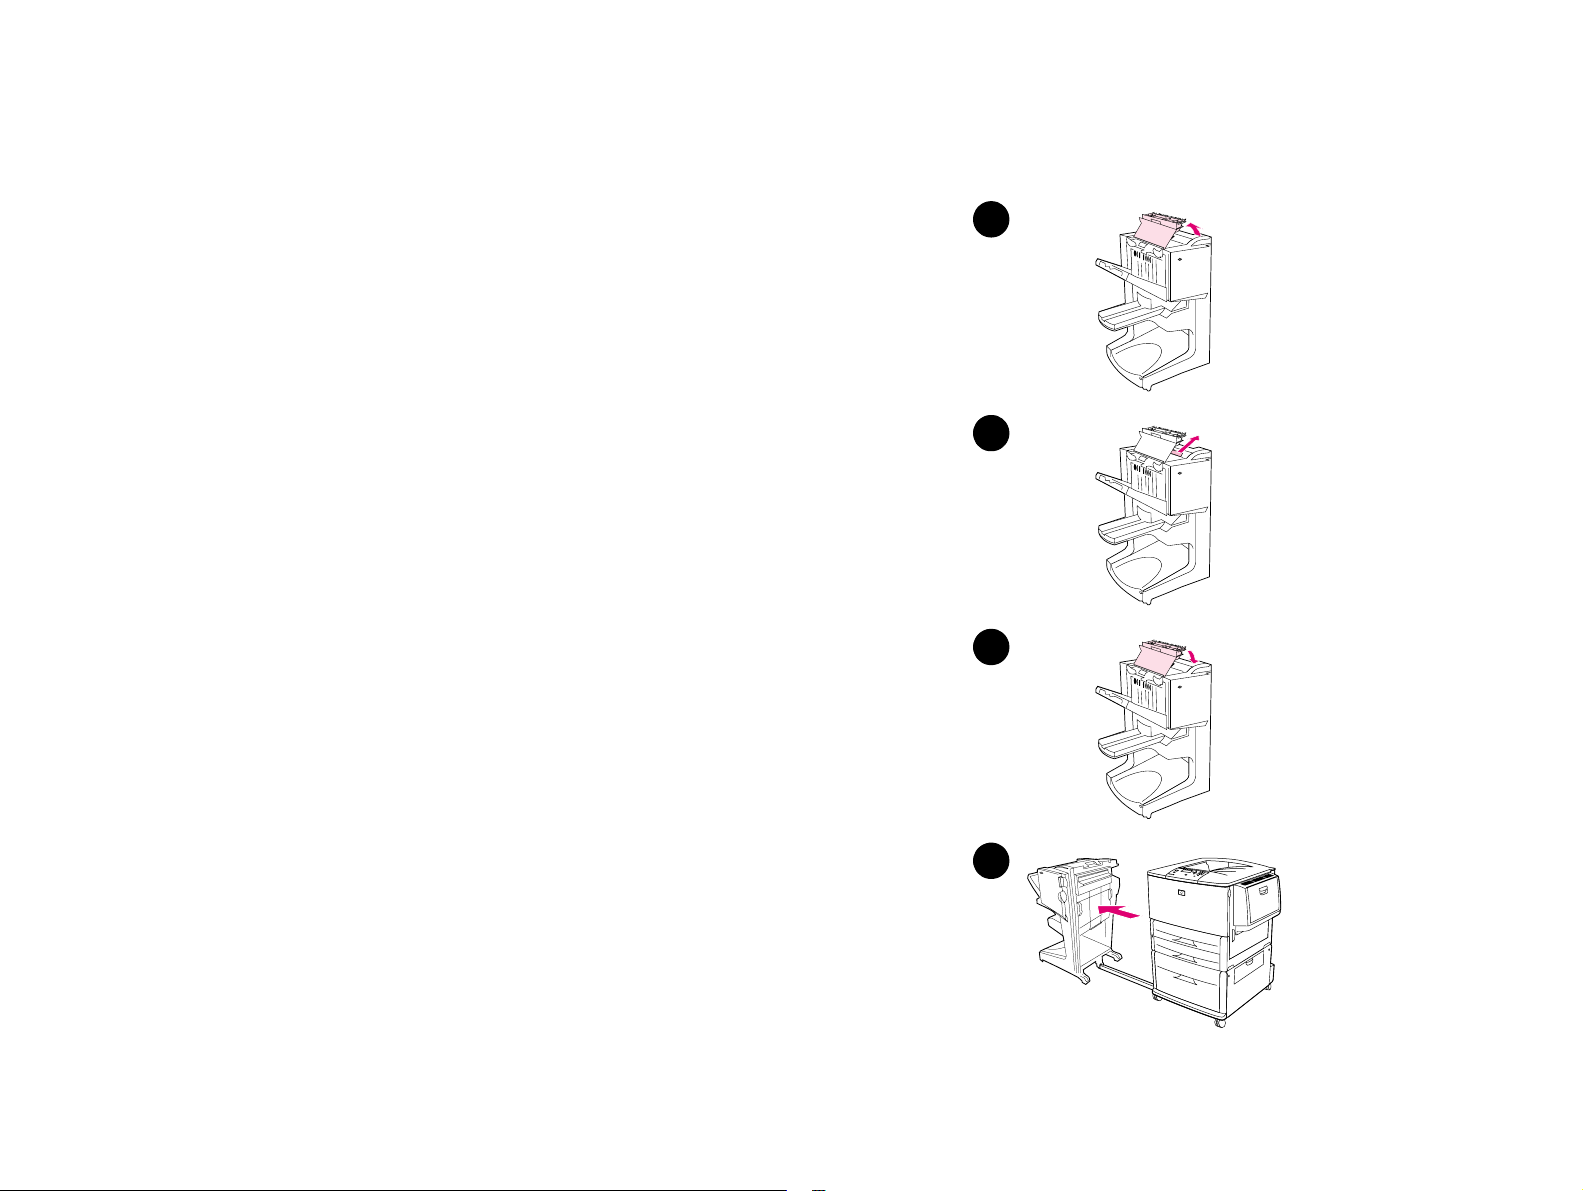
To clear jams in the multifunction finisher
1 Open the finisher cover.
1
2 Slowly and carefully pull the paper straight out of the finisher so
that it does not tear.
3 Close the finisher cover.
4 Move the finisher away from the printer.
2
3
Clearing jams
4
Page 13
Chapter 5 Problem solving 94
5 Carefully remove any paper from the printer output area.
5
6 Carefully remove any paper from the finisher input area.
7 Open the stapler-unit door.
8 To clear a booklet jam, turn the bottom green knob clockwise to
remove the booklet.
6
7
Clearing jams
8
Page 14

Chapter 5 Problem solving 95
9 Close the stapler-unit door.
9
10 Reattach the finisher.
10
Clearing jams
Page 15

Chapter 5 Problem solving 96
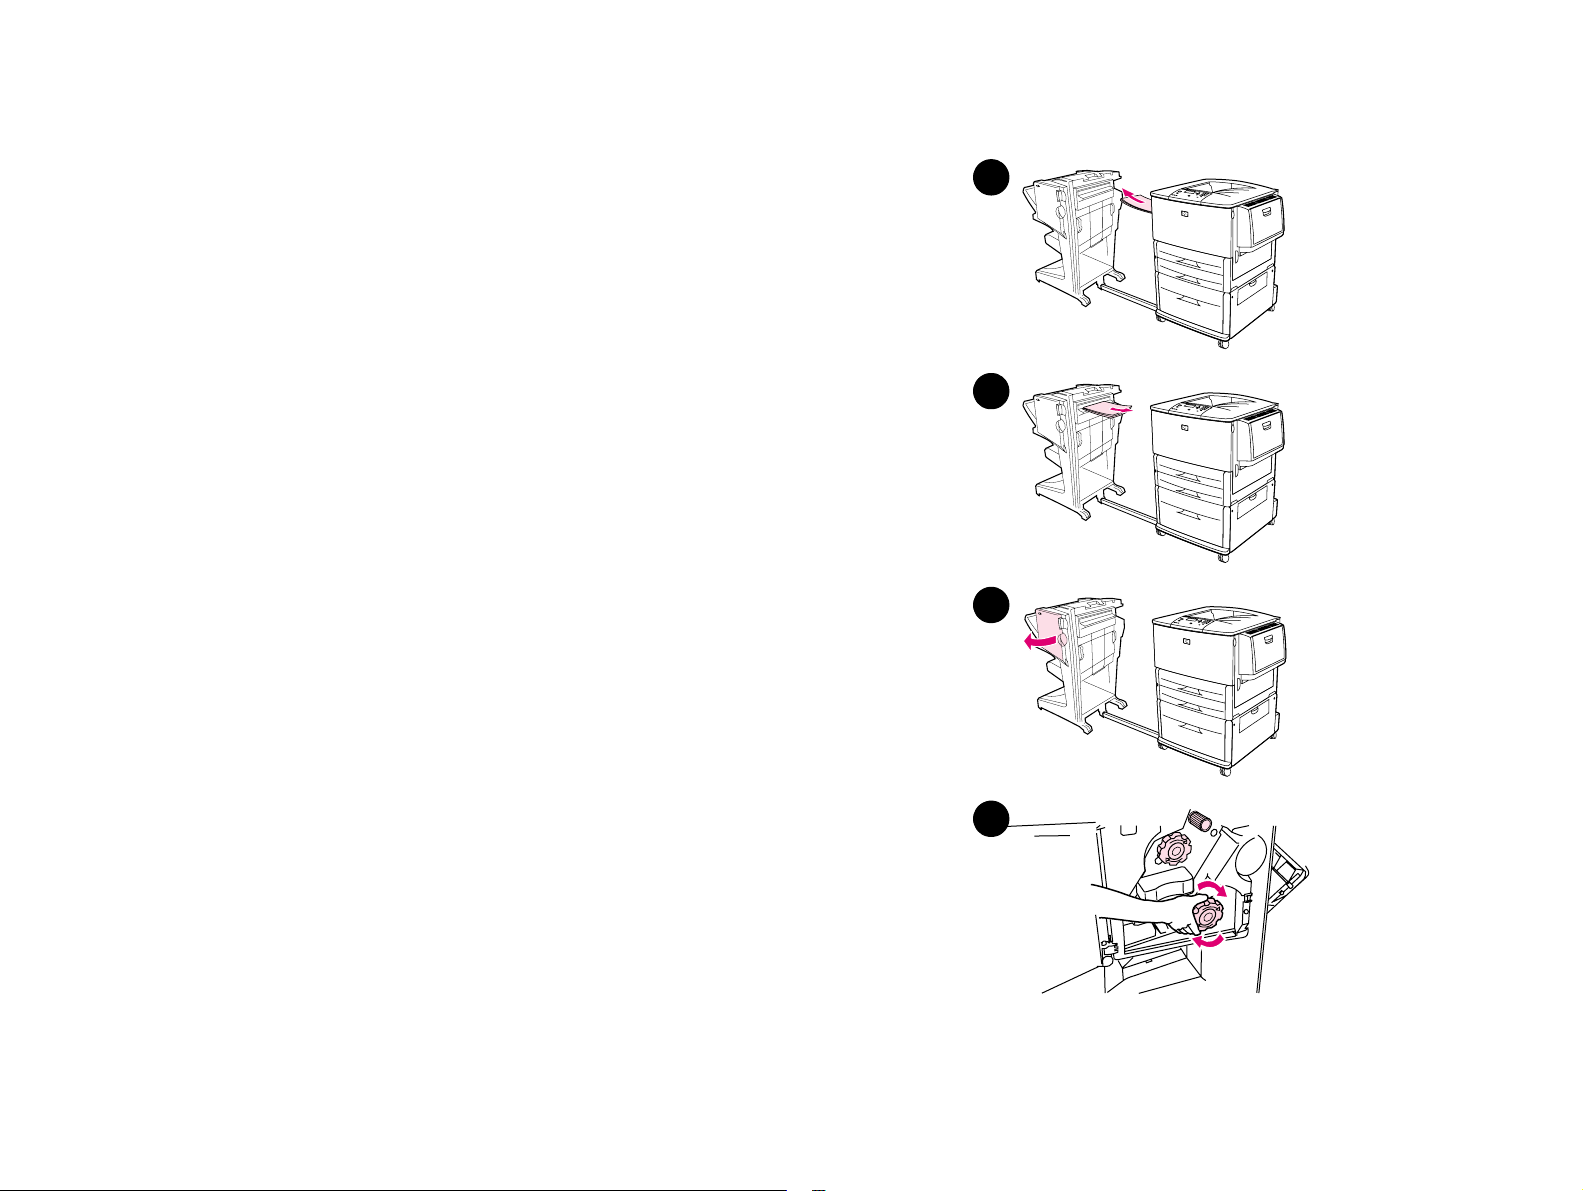
To clear a staple jam from the optional stapler/stacker
Note
The message JAM INSIDE STAPLER displays on the control panel.
1 Slide the stapler/stacker away from the printer.
2 Open the stapler unit door.
3 On the staple cartridge, squeeze the tabs together and pull the
cartridge out.
4 Pull the cartridge lever up.
1
2
3
Clearing jams
4
Page 16
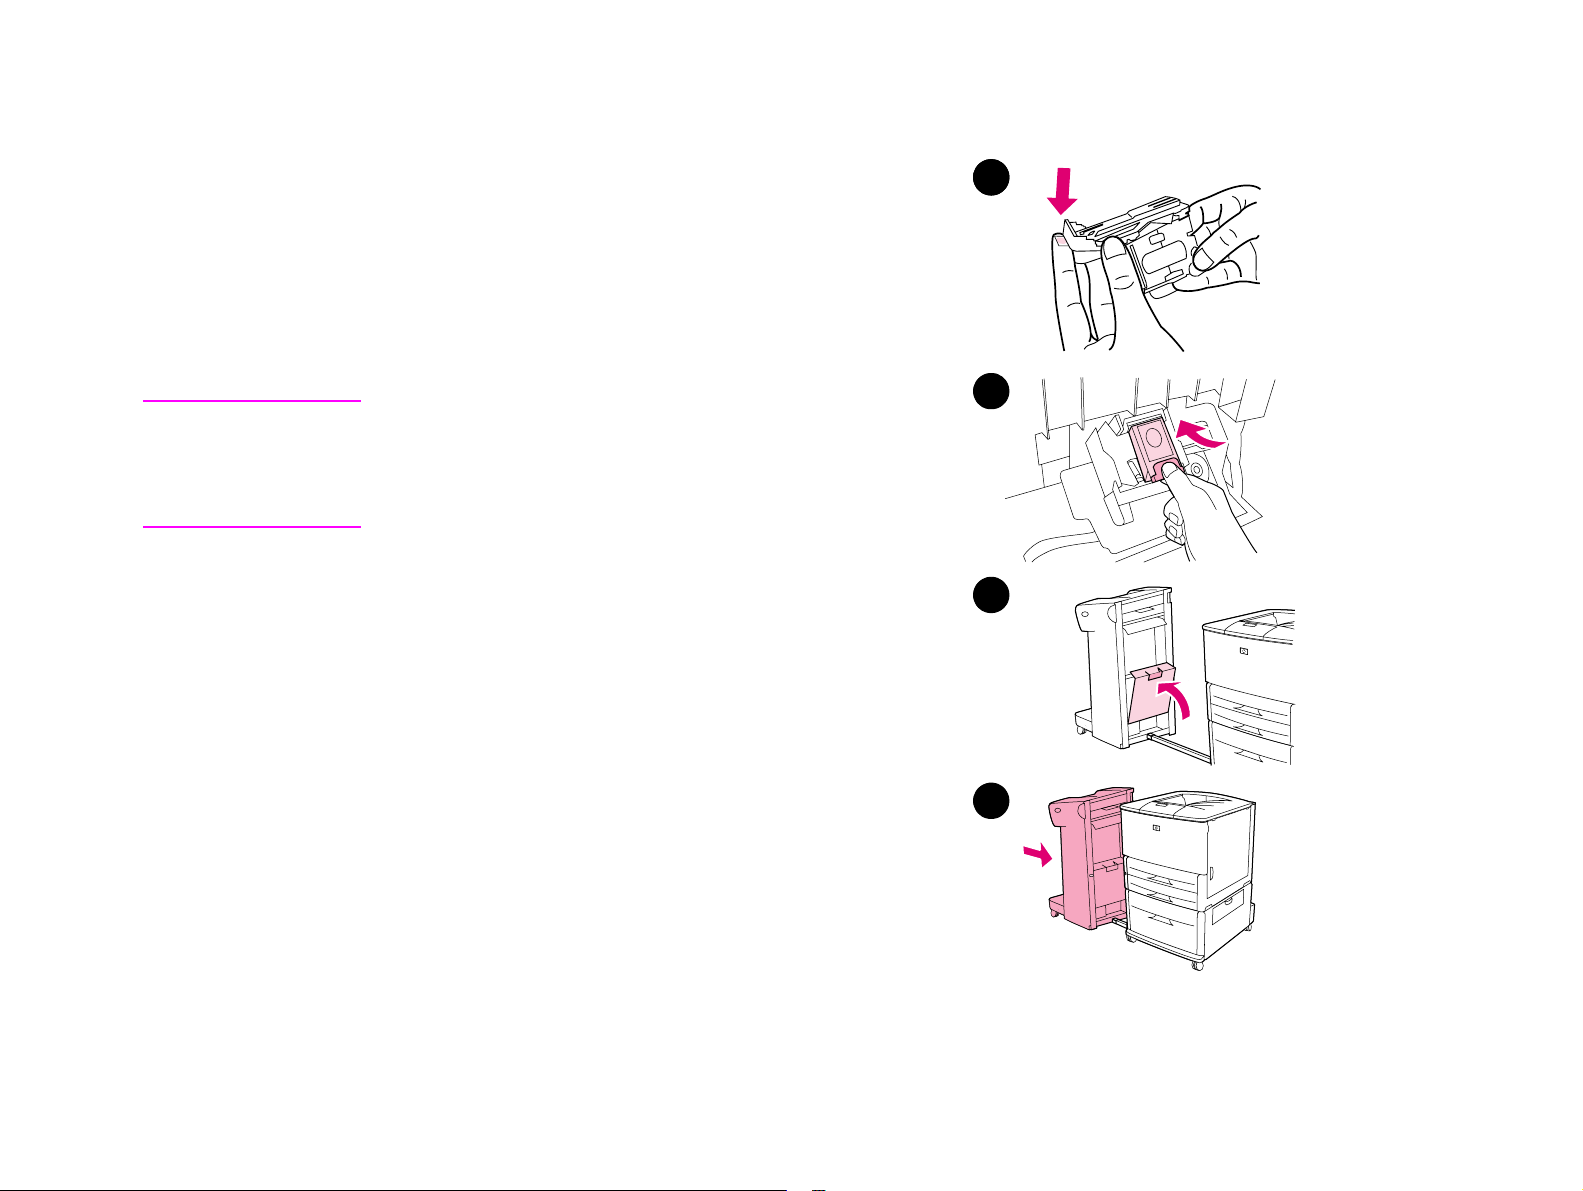
Chapter 5 Problem solving 97
5 Remove the jammed staple.
76
6 Push the cartridge lever down.
7 Insert the staple cartr idge so that it snaps into place.
8 Close the stapler unit door.
9 Reattach the stapler/stacker to the printer.
7
Note The stapler needs to reload after clearing a staple jam, so the
first few documents (no more than five) might not be stapled.
If a print job is sent and the stapler is jammed or is out of
staples, the job will still print as long as the path to the output
bin is not blocked.
8
Clearing jams
9
Page 17

Chapter 5 Problem solving 98
To clear a staple jam from the multifunction finisher
1 Open the stapler-unit door.
1
2 Slide the stapler-unit toward you.
3 Tur n the large green knob until the blue dot appears in the
window of the stapler unit.
4 Tur n the small green knob at the top of the stapler unit
counterclockwise until the staple cartridge moves to the left of
the stapler unit.
2
CAUTION The blue dot must appear in the window of the stapler unit
before you remove the staple cartridge. If you try to remove
the staple cartridge before the blue dot appears in the
window, you could damage the finisher.
3
Clearing jams
4
Page 18

Chapter 5 Problem solving 99
5 Remove the staple cartridge.
5
6 Pull up on the lever labeled with a green dot.
7 Remove the damaged staple.
8 Press down on the level labeled with a green dot.
6
8
Clearing jams
Page 19

Chapter 5 Problem solving 100
9 Reinstall the staple cartridge.
9
10 Slide the stapler unit into the finisher.
11 Close the stapler-unit door.
10
11
Clearing jams
Page 20
Chapter 5 Problem solving 101
In rare instances, a staple jam might occur in the upper half of the
stapler head.
1 Follow steps 1 through 4 for clearing a staple jam from the
multifunction finisher (see page 98
2 Locate the damaged staple at the back of the stapler unit, and
then remove the staple.
3 Follow steps 10 through 11 for clearing a staple jam from the
multifunction finisher (see page 98
).
).
2
Clearing jams
Page 21

Chapter 5 Problem solving 102
Solving repeated paper jams
Situation Solution
General repeated
paper jam problems
1. Check to see that paper is correctly loaded in the trays and that all width guides are correctly set
(See “Printing tasks” on page 30).
2. Make sure that the paper tray is set for the size of paper installed and that the tray is not
overloaded with paper.
3. Tr y turning over the stack of paper in the tray. If you are using prepunched or letterhead paper,
try printing from optional Tray 1.
4. Do not use previously printed paper or torn, worn, or irregular paper. For recommended paper
and other paper for your printer, see the introduce guide on the product CD, or go to
www.hp.com/cposupport/
5. Check the paper specifications. (See the introduce guide on the product CD, or got to
www.hp.com/cposupport/
occur.
6. Printer might be dirty. Clean the printer as described in the introduce guide on the product CD, or
go to www.hp.com/cposupport/
7. Check that all damaged or jammed paper is removed from printer.
.
.) If paper is outside of the recommended specifications, problems can
.
Note If paper jams continue, contact your HP-authorized service provider. (See the HP Customer Care
section in the introduce guide on the product CD, or go to www.hp.com/cposupport/.)
Clearing jams
Page 22

Chapter 5 Problem solving 103
Understanding printer messages
Printer messages appear on the printer control panel display to relay the normal status of the printer (such as
Processing Job), or an error condition (such as Close Front Door) that needs attention. “Resolv ing control
panel messages” on page 104 lists messages that require attention, or that might raise questions. Messages
are listed in alphabetical order, with numeric messages at the end of the list. Not all messages are listed,
because some (such as Ready) are self-explanatory.
Note Some printer messages are affected by the AUTO CONTINUE and CLEARABLE WARNINGS settings in the
CONFIGURE DEVICE menu, System Setup submenu, in the printer control panel (See “Syst em setup
submenu” on page 186).
Using the printer online help system
This printer features an online help system on the control panel that provides instructions for resolving most
printer errors. Certain control panel messages alternate with instructions about accessing the online help
system.
Whenever a ? appears in an error message or a message alternates with FOR HELP PRESS ?, press the key
to view the help and use and to scroll through the message.
To exit the online help system, press .
If a message persists
z Some messages (e.g. requests to load a tray or a message that a previous print job is still in the printer
memory) allow you to press to print, or to press C
message.
z If a message persists after performing all of the recommended actions, contact an HP-authorized service
or support provider. (See the introduce guide on the product CD, or go to www.hp.com/cposupport/
Understanding printer messages
ANCEL JOB to clear the job and eliminate the
.)
Page 23

Chapter 5 Problem solving 104
Resolving control panel messages
Message Explanation or recommended action
ACCESS DENIED
MENUS LOCKED
BAD DUPLEXER
CONNECTION
BAD TRAY 1 CONNECTION Optional Tray 1 is not connected properly to the printer.
<BINNAME> FULL The specified output bin is full.
CANCELLING...
<JOBNAME>
CARTRIDGE FAILURE Cartridge is loaded and shipping protection strip cannot be fully removed.
The printer control panel function you are trying to access has been locked to prevent
unauthorized access.
See your network administrator.
The duplex printing accessory is not connected properly to the printer.
Tur n the printer off and reinstall the duplex printing accessory.
Tur n the printer off and reinstall optional Tray 1.
Empty the bin to continue printing.
The printer is cancelling a job. The message continues while the job is stopped, the paper path
is flushed, and any remaining incoming data on the active data channel is received and
discarded.
Return the cartridge for a new one. (See the introduce guide on the product CD, or go to
www.hp.com/cposupport/
.)
Understanding printer messages
Page 24
Chapter 5 Problem solving 105
Message Explanation or recommended action
CARTRIDGE LOW - xxxx
PAGES ESTIMATED
To continue press
CARTRIDGE OUT
REPLACE CARTRIDGE
CHECKING PAPER
PATH
CHECKING PRINTER The engine is performing an internal test.
CHOSEN PERSONALITY
NOT AVAILABLE
alternates with
READY
CLEARING PAPER FROM
PRINTER
The message first appears when about eight percent of toner is remaining in the cartridge
(about 2,400 pages remaining for the 30,000-page cartridge at five percent coverage).
Depending on how the printer is configured, it will either continue to print or it will stop. If the
printer stops, you can resume printing by pressing for each job. You might want to have a
replacement cartridge available. See “Print cart ridge conditions” on page 79 for more
information.
Drum in print car tridge is zero.
Order new authentic HP print cartridge (C8543X).
The engine is rotating its rollers to check for possible paper jams.
A print job requested a printer language (personality) that does is not available with this printer.
The job will not print and will be cleared from memory.
Print the job using a driver for a different printer language, or add the requested language to the
printer (if available).
The printer jammed or was turned on and paper is detected in a wrong location. The printer is
automatically attempting to eject the pages.
If possible, use the progress bar at the bottom of the display.
CLOSE FRONT DOOR ON
LEFT ACCESSORY
Understanding printer messages
The stapler door on the multifunction finisher is open, or it is not closed properly.
Close the stapler door properly.
Page 25

Chapter 5 Problem solving 106
Message Explanation or recommended action
CLOSE TOP COVER ON
LEFT ACCESSORY
CLOSE FRONT OR LEFT
DOOR
CLOSE RIGHT DOOR The right door is open and must be closed for printing to continue.
DETECTABLE SIZE
IN TRAY xx
Move switch to
standard
DIFFERENT PAPER SIZES
IN JOB
DISK DEVICE
FAILURE
alternates with
READY
The top cover on the multifunction finisher is open, or is not closed properly.
Close the top cover properly.
The front or left doors are open and must be closed for printing to continue.
A tray is loaded with standard size paper, and the switch in the tray is set to custom.
Move the switch to the "standard" position.
Different paper sizes are used for a single job in the multifunction finisher.
Verify that all pages in the job are configured for the same size paper.
The EIO hard disk had a critical failure and can no longer be used.
Reseat the EIO hard disk. If the message continues, replace it with a new EIO hard disk.
DISK FILE
OPERATION FAILED
alternates with
READY
Understanding printer messages
The requested operation could not be performed. You might have attempted an illegal operation,
such as trying to download a file to a nonexistent directory.
Page 26

Chapter 5 Problem solving 107
Message Explanation or recommended action
DISK FILE
SYSTEM IS FULL
alternates with
READY
DISK IS
WRITE PROTECTED
alternates with
READY
EIO DISK x
NOT FUNCTIONAL
EIO DISK x
SPINNING UP
EVENT LOG EMPTY The user is attempting to view an empty event log by selecting SHOW EVENT LOG from the control
Delete files from the EIO hard disk and then try again. HP Web JetAdmin can be used to delete
files and fonts.
The disk device is protected, and no new files can be written to it.
The EIO hard disk is not working correctly.
Remove the EIO hard disk from the slot (a slot number will replace the X) indicated.
Reseat the EIO hard disk. If the message continues, replace it with a new EIO hard disk.
The EIO hard disk in slot x is spinning up its platter.
panel.
FLASH DEVICE
FAILURE
alternates with
READY
Understanding printer messages
The flash DIMM had a critical failure and can no longer be used.
Remove the flash DIMM and replace it with a new one.
Page 27

Chapter 5 Problem solving 108
Message Explanation or recommended action
FLASH FILE OPERATION
FAILED
alternates with
READY
FLASH FILE
SYSTEM IS FULL
alternates with
READY
FLASH IS
WRITE PROTECTED
alternates with
READY
INCORRECT PIN The wrong PIN is entered.
INSERT OR
CLOSE TRAY x
The requested operation could not be performed. You might have attempted an illegal operation,
such as trying to download a file to a non-existent directory.
Delete files from the flash DIMM. Use HP LaserJet Resource Manager to download or delete
files and fonts. (See the software help for more information.)
The flash file is protected, and no new files can be written to it.
Return to the previous screen and reenter the PIN.
The specified tray must be inserted or closed for printing to continue.
INSTALL BOOKLET BIN The booklet bin for the multifunction finisher is not installed properly.
Install the booklet bin properly. See the use guide that came with the finisher for more
information.
Understanding printer messages
Page 28

Chapter 5 Problem solving 109
Message Explanation or recommended action
INSTALL CARTRIDGE The print cartridge has been removed or has been installed incorrectly. It must be replaced or
reinstalled correctly for printing to continue.
INSTALL CONNECTION
UNIT
LOAD TRAY xx
alternates with
To use another tray
press .
MANUALLY FEED
[TYPE] [SIZE]
alternates with
To continue press .
MEMORY FULL
STORED DATA LOST
MEMORY SETTINGS
CHANGED
Connection unit is not installed in the right access door of the printer to allow printing from the
optional input device.
A job is sent that requires a specific type and size that is not available.
Load the requested paper into optional Tray 1.
Press to use a type and size that is available in another tray.
Load the requested paper into optional Tray 1.
To override the message, press if the desired paper is available in another tray.
Press to use a type and size that is available in another tray.
There is no available memory in the printer. The current job might not print correctly, and some
resources (such as downloaded fonts) might have been deleted.
You might want to add more memory to the printer (See “Printer memory and expansion” on
page 197).
Indicates the resource saving or I/O buffering settings were changed by the printer because it
did not have enough memory to use the previous settings. This usually occurs after removing
memory from the printer, adding a duplex printing accessory, or adding a printer language.
You might want to change memory settings for I/O buffering and resource saving (although
default settings are usually best), or add more memory to the printer (See “Pr inter memor y and
expansion” on page 197).
Understanding printer messages
Page 29

Chapter 5 Problem solving 110
Message Explanation or recommended action
MEMORY SHORTAGE
JOB CLEARED
alternates with
READY
The printer did not have enough free memory to print the entire job. The remainder of the job
will not print and will be cleared from memory.
Press to continue.
Change the resource saving setting from the printer control panel (See “Control panel menus”
on page 172) or add more memory to the printer (See “Pr inter memory and expansion” on
page 197).
MEMORY SHORTAGE PAGE
SIMPLIFIED
alternates with
READY
The printer had to compress the job in order to fit it in available memory. Some data loss might
have occurred.
Press to continue.
The print quality of these pages might not be acceptable. Reduce the complexity of these pages
and reprint them.
You might want to add more memory to the printer (See “Printer memory and expansion” on
page 197).
NO JOB TO CANCEL The C
Message is displayed for approximately two seconds before the printer is returned to the
READY state.
ANCEL JOB key was pressed, but there is no active job or buffered data to cancel.
NON-HP CARTRIDGE
DETECTED
The printer has detected that the cartridge is not a genuine HP cartridge, and the message is
displayed for approximately 30 seconds before the printer is returned to the READY state. If you
think you purchased an HP print cartridge, call the HP fraud hotline (1-877-219-3183, toll-free in
North America). Any printer repair required as a result of using a non-HP print cartridge is not
covered under the printer warranty.
Understanding printer messages
Page 30

Chapter 5 Problem solving 111
Message Explanation or recommended action
PERFORM PRINTER
MAINTENANCE
RAM DISK DEVICE
FAILURE
alternates with
READY
RAM DISK FILE
OPERATION FAILED
alternates with
READY
RAM DISK FILE
SYSTEM IS FULL
alternates with
READY
The printer has passed its prescribed printed page threshold between maintenance procedures.
To ensure optimum print quality, the printer prompts you to perform routine maintenance every
350,000 pages. To order a Printer Maintenance Kit, see the introduce guide on the product CD,
or go to www.hp.com/cposupport/.
The RAM disk had a critical failure and can no longer be used.
Tur n the printer off, and then turn the printer on to clear the message.
The requested operation could not be performed. You might have attempted an illegal operation,
such as trying to download a file to a non-existent directory.
Delete files and then try again, or turn the printer off, and then turn the printer on to delete all
files on the device. (Delete files using HP LaserJet Resource Manager or another software
utility. See the software help for more information.)
If the message persists, increase the size of the RAM disk. Change the RAM disk size from the
Configuration menu in the printer control panel (See “System setup submenu” on page 186).
RAM DISK
IS WRITE PROTECTED
alternates with
READY
RESEND UPGRADE There is an error in the printer firmware flash. Resend a valid firmware image.
Understanding printer messages
The RAM disk is protected, and no new files can be written to it.
Page 31

Chapter 5 Problem solving 112
Message Explanation or recommended action
ROM DISK DEVICE
FAILURE
alternates with
READY
ROM DISK FILE
OPERATION FAILED
alternates with
READY
ROM DISK FILE SYSTEM
IS FULL
alternates with
READY
ROM DISK IS WRITE
PROTECTED
ROTATE PAPER
IN TRAY xx
The ROM disk had a critical failure and can no longer be used.
Tur n the printer off, and then turn the printer on to clear the message.
The requested operation could not be performed. You might have attempted an illegal operation,
such as trying to download a file to a non-existent directory.
Delete files and then try again, or turn the printer off, and then turn the printer on to delete all
files on the device. (Delete files using HP LaserJet Resource Manager or another software
utility. See the software help for more information.)
If the message persists, increase the size of the ROM disk. Change the ROM disk size from the
Configuration menu in the printer control panel (See “System setup submenu” on page 186).
The ROM disk is protected, and no new files can be written to it.
Tray xx is loaded with Letter or A4 paper in the por trait orientation, but the job that used the
tray did not specify booklet making.
alternates with
SIZE MISMATCH
TRAY xx=[SIZE]
Understanding printer messages
Tray xx has letter (or A4) but needs to be rotated.
Tray xx is loaded with paper that is longer or shorter in the feed direction than the size
configured for the tray.
Page 32

Chapter 5 Problem solving 113
Message Explanation or recommended action
STAPLER LOW
ON STAPLES
STAPLER OUT OF
STAPLES
TRAY xx CONTAINS
UNKNOWN MEDIA
TRAY xx EMPTY
alternates with
READY
TRAY xx OPEN
alternates with
READY
TRAY xx
SIZE=*SELECTED SIZE
alternates with
The stapler device is running out of staples and needs to be refilled.
The stapler device is out of staples and needs to be refilled.
The printer cannot sense what type of media is in the specified tray (xx).
Load the empty tray (xx) to clear the message.
If you do not load the specified tray, the printer will continue printing from the next available tray,
and the message will continue to display.
The specified tray is open or is not closed completely.
The custom switch is in the "standard" position, and a value from the menu is selected.
To change, move
switch in tray x
TYPE MISMATCH
TRAY x=[TYPE]
Understanding printer messages
The system detected an overhead transparency in the paper path coming from the tray (xx).
Page 33

Chapter 5 Problem solving 114
Message Explanation or recommended action
UNABLE TO
MOPY JOB
UNABLE TO
STORE JOB
UNSUPPORTED SIZE
IN TRAY xx
USE [TYPE]
[SIZE] FROM
TRAY N INSTEAD?
WAIT FOR PRINTER
TO REINITIALIZE
xx.y PRINTER ERROR
To continue
press
A mopy job cannot be mopied because of a memory, disk, or configuration problem.
Only one copy will be produced.
If job name is unknown, insert UNTITLED.
A job cannot be stored on the printer because of a memory, disk, or configuration problem.
If job name is unknown, insert UNTITLED.
A sent job has a specified size that is not supported by the printer.
If the requested paper size or type is not available, the printer asks if it should use a different
paper size or type.
Select a size or type from a different tray.
The RAM disk setting has been changed before the printer is automatically rebooted. This
change will not take effect until the printer reinitializes.
If you change the mode of the external device, turn the printer off, turn the pr inter on, and wait
for the printer to reinitialize.
A printer error which can be cleared by pressing in the printer control panel has occurred.
Understanding printer messages
Page 34

Chapter 5 Problem solving 115
Message Explanation or recommended action
13.xy.zz JAM IN
[LOCATION]
20 INSUFFICIENT
MEMORY
To continue press
21 PAGE TOO
COMPLEX
alternates with
To continue press
22 EIO x
BUFFER OVERFLOW
Remove jammed paper from the specified location (See “Clearing jams” on page 83).
Open and close the front door to clear the message.
If the message persists after all jams have been cleared, a sensor might be stuck or broken.
Contact an HP-authorized service or support provider. (See the introduce guide on the product
CD, or go to www.hp.com/cposupport/
The printer received more data than can fit in its available memory. You might have tried to
transfer too many macros, soft fonts, or complex graphics.
Press to print the transferred data (some data might be lost), then simplify the print job or
install additional memory (See “Printer memory and expansion” on page 197).
The page formatting process was not fast enough for the printer.
Press to print the transferred data. (Some data might be lost.)
The page protection item appears in the CONFIGURE DEVICE - DEFAULTS - EVENTS menu, and
should be set to ON to print the page. When the page is successfully printed, PAGE
PROTECT=ON, should be set back to AUTO (See “System setup submenu” on page 186).
If this message appears often, simplify the print job.
Too much data was sent to the EIO card in the specified slot (x). An improper communications
protocol might be in use.
.)
Press to print the transferred data. (Some data might be lost.)
Check the host configuration. If this message persists, contact an HP-authorized service or
support provider. (See the introduce guide on the product CD, or go to
www.hp.com/cposupport/
Understanding printer messages
.)
Page 35

Chapter 5 Problem solving 116
Message Explanation or recommended action
22 PARALLEL I/O
BUFFER OVERFLOW
alternates with
To continue press
22 SERIAL I/O
BUFFER OVERFLOW
40 BAD SERIAL
TRANSMISSION
40 EIO x BAD
TRANSMISSION
Too much data was sent to the parallel port.
Check for a loose cable connection, and be sure to use a high-quality cable. (See the introduce
guide on the product CD, or go to www.hp.com/cposupport/
might be missing pin connections or might otherwise not conform to the IEEE-1284
specification.)
This error can occur if the driver you are using is not IEEE-1284 compliant. For best results, use
the HP driver that came with the printer (See “Printer drivers” on page 20).
Press to clear the error message. (Data will be lost.)
If this message persists, contact an HP-authorized service or support provider. (See the
introduce guide on the product CD, or go to www.hp.com/cposupport/
The printer serial buffer has overflowed during a busy state.
Press to print the transferred data. (Some data might be lost.)
A serial data error (parity, framing, or line overrun) occurred during the reception of data from
the computer.
Press to clear the error message and continue printing.
The connection between the printer and the EIO card in the specified slot has been broken.
Press to clear the error message and continue printing.
.) (Some non-HP parallel cables
.)
41.x PRINTER ERROR
alternates with
To continue press
Understanding printer messages
A temporary printing error occurred.
Tur n the printer off, then turn the printer on.
If this message persists, contact an HP-authorized service or support provider. (See the
introduce guide on the product CD, or go to www.hp.com/cposupport/
.)
Page 36

Chapter 5 Problem solving 117
Message Explanation or recommended action
41.3 UNEXPECTED SIZE
TRAY xx
alternates with
To change size press
41.5 UNEXPECTED TYPE
TRAY xx
alternates with
To change type press
49.xxxxx A critical fir mware error has occurred.
50.x FUSER ERROR A fuser error has occurred.
A tray (xx) is loaded with paper that is longer or shorter in the feed direction than the size
configured for the tray.
Press to get to TRAY xx SIZE=. Reconfigure the size in a tray so the printer will use a tray
with the size required for the print job.
If the error does not clear, turn the printer off, then turn the printer on.
If this message persists, contact an HP-authorized service or support provider. (See the
introduce guide on the product CD, or go to www.hp.com/cposupport/
The tray (xx) is loaded with paper that is not the same type configured for the tray.
Press to get to TRAY xx TYPE=. Reconfigure the type in a tray so the printer will use a tray
with the type required for the print job.
If the error does not clear, turn the printer off, then turn the printer on.
If this message persists, contact an HP-authorized service or support provider. (See the
introduce guide on the product CD, or go to www.hp.com/cposupport/
If this message persists, contact an HP-authorized service or support provider. (See the
introduce guide on the product CD, or go to www.hp.com/cposupport/
.)
.)
.)
If this message persists, contact an HP-authorized service or support provider. (See the
introduce guide on the product CD, or www.hp.com/cposupport/
Understanding printer messages
.)
Page 37

Chapter 5 Problem solving 118
Message Explanation or recommended action
51.x
PRINTER ERROR
alternates with
To continue cycle
power
52.x
PRINTER ERROR
alternates with
To continue cycle
power
53.xy.zz
PRINTER ERROR
A temporary printing error occurred.
Tur n the printer off, then turn the printer on.
If this message persists, contact an HP-authorized service or support provider. (See the
introduce guide on the product CD, or www.hp.com/cposupport/
A temporary printing error occurred.
Tur n the printer off, then turn the printer on.
If this message persists, contact an HP-authorized service or support provider. (See the
introduce guide on the product CD, or www.hp.com/cposupport/
There is a problem with the printer memory. The DIMM that caused the error will not be used.
Values of x, y, and zz are as follows:
x = DIMM type
0 = ROM
1 = RAM
y = Device location
0 = Internal memory (ROM or RAM)
1 to 4 = DIMM slots 1, 2, 3, or 4
.)
.)
zz = Error number
You might need to reseat or replace the specified DIMM.
Tur n the printer off, and then replace the DIMM that caused the error.
If this message persists, contact an HP-authorized service or support provider. (See the
introduce guide on the product CD, or go to www.hp.com/cposupport/
Understanding printer messages
.)
Page 38

Chapter 5 Problem solving 119
Message Explanation or recommended action
55.xx PRINTER
ERROR
alternates with
To continue press
56.x
PRINTER ERROR
alternates with
To continue cycle
power
57.x
PRINTER ERROR
58.x
PRINTER ERROR
alternates with
To continue cycle
power
A temporary printing error occurred.
Press .
If the error does not clear, turn the printer off, then turn the printer on.
If this message persists, contact an HP-authorized service or support provider. (See the
introduce guide on the product CD, or go to www.hp.com/cposupport/
A temporary printing error occurred.
Tur n the printer off, then turn the printer on.
If this message persists, contact an HP-authorized service or support provider. (See the
introduce guide on the product CD, or go to www.hp.com/cposupport/
A temporary printing error occurred.
Tur n the printer off, then turn the printer on.
If this message persists, contact an HP-authorized service or support provider. (See the
introduce guide on the product CD, or go to www.hp.com/cposupport/
A temporary printing error occurred.
Tur n the printer off, then turn the printer on.
If this message persists, contact an HP-authorized service or support provider. (See the
introduce guide on the product CD, or go to www.hp.com/cposupport/
.)
.)
.)
.)
Understanding printer messages
Page 39

Chapter 5 Problem solving 120
Message Explanation or recommended action
59.x
PRINTER ERROR
alternates with
To continue cycle
power
60.x
PRINTER ERROR
62.x
PRINTER ERROR
64
PRINTER ERROR
alternates with
To continue cycle
power
A temporary printing error occurred.
Tur n the printer off, then turn the printer on.
If this message persists, contact an HP-authorized service or support provider. (See the
introduce guide on the product CD, or go to www.hp.com/cposupport/
An obstruction prevents the tray specified by xx from lifting paper properly for feeding.
If this message persists, contact an HP-authorized service or support provider. (See the
introduce guide on the product CD, or go to www.hp.com/cposupport/
There is a problem with the printer memory. The x value refers to the location of the problem:
0 = Internal memory
1 to 4 = DIMM slots 1, 2, 3, or 4
You might need to replace the specified DIMM.
To continue press .
If this message persists, contact an HP-authorized service or support provider. (See the
introduce guide on the product CD, or go to www.hp.com/cposupport/
A scan buffer error occurred.
Tur n the printer off, and then turn the printer on.
If this message persists, contact an HP-authorized service or support provider. (See the
introduce guide on the product CD, or go to www.hp.com/cposupport/
.)
.)
.)
.)
Understanding printer messages
Page 40

Chapter 5 Problem solving 121
Message Explanation or recommended action
68.x PERMANENT
STORAGE ERROR
alternates with
To continue press
68.x PERMANENT
STORAGE FULL
alternates with
To continue press
68.x PERMANENT
STORAGE WRITE FAIL
An error occurred in the printer nonvolatile memory (NVRAM), and one or more printer settings
has been reset to its factory default.
Printing can continue, but there might be some unexpected functions because an error occurred
in permanent storage.
Pressing should clear the message.
If this message persists, contact an HP-authorized service or support provider. (See the
introduce guide on the product CD, or go to www.hp.com/cposupport/
The printer NVRAM is full. Some settings saved in the NVRAM might have been reset to the
factory defaults.
Printing can continue, but there might be some unexpected functions because an error occurred
in permanent storage.
Pressing should clear the message.
If this message persists, contact an HP-authorized service or support provider. (See the
introduce guide on the product CD, or go to www.hp.com/cposupport/
The printer NVRAM is failing to write.
Printing can continue, but there might be some unexpected functions because an error occurred
in permanent storage.
Pressing should clear the message.
.)
.)
If this message persists, contact an HP-authorized service or support provider. (See the
introduce guide on the product CD, or go to www.hp.com/cposupport/
Understanding printer messages
.)
Page 41

Chapter 5 Problem solving 122
Message Explanation or recommended action
69.x
PRINTER ERROR
A temporary printing error occurred.
Tur n the printer off, reseat the duplex printing accessory, and then turn the printer on.
If this message persists, contact an HP-authorized service or support provider. (See the
.)
79.xxxx
PRINTER ERROR
introduce guide on the product CD, or go to www.hp.com/cposupport/
A critical hardware error occurred.
Tur n the printer off, and then turn the printer on.
If the message persists, contact an HP-authorized service or support provider. (See the
introduce guide on the product CD, or go to www.hp.com/cposupport/
.)
8x.yyyy The EIO accessory card in slot x has encountered a critical error as specified by yyyy.
81 SERVICE (xxx) This message is used when errors occur while testing the printer at the manufacturing site.
Understanding printer messages
Page 42

Chapter 5 Problem solving 123
Correcting output quality problems
Use the examples in the image defect table to determine which print quality problem you are experiencing,
then see the corresponding reference pages to troubleshoot.
Note The examples below depict letter-size paper that has passed through the printer long-edge first. (If the
paper has passed through the printer short-edge first, lines and repeating defects will run vertically
rather than horizontally.)
Image defect table
See “Light print
or fade” on
page 125
Correcting output quality problems
See “Specks” on
page 125
See “Dropouts”
on page 125
See “Lin es” on
page 125
Page 43

Chapter 5 Problem solving 124
Image defect table
See “Gray
background” on
page 126
See “Misformed
characters” on
page 127
See “Toner
smear” on
page 126
See “Page sk ew”
on page 128
See “Loose
toner” on
page 127
See “Curl or
wave” on
page 128
See “Repeating
defects” on
page 127
See “Wrinkles or
creases” on
page 128
Correcting output quality problems
Page 44

Chapter 5 Problem solving 125
Light print or fade
z The print cartridge might be low. Replace the print cartridge.
z Maintenance might be due. Check this by printing a copy of the supplies status page (see “Supplies status
page” on page 156). If maintenance is due, order and install the printer maintenance kit. (See the
introduce guide on the product CD, or go to www.hp.com/cposupport/
z The print cartridge might be almost empty. Replace the print cart ridge.
.)
Specks
Specks might appear on a page after a jam has been cleared.
z Print a few more pages to see if the problem corrects itself.
z If specks occur frequently, set your printer up to automatically run a cleaning page (see “Using the printer
cleaning page” on page 80).
z Clean the inside of the printer (see the introduce guide on the product CD, or go to
www.hp.com/cposupport/
cleaning page” on page 80).
z Try using a different type of paper.
) and run a manual cleaning page to clean the fuser (see “Using the printer
z Check for print cartridge leaks. If the print car tridge is leaking, replace it.
Dropouts
z Make sure that the environmental specifications for the printer are being met (see “Environmental product
stewardship program” on page 218).
z If the paper is rough and the toner easily rubs off, either try changing the fuser mode to High 1 or High 2,
or try using a smoother paper.
z Try using a different paper type.
Lines
z Print a few more pages to see if the problem corrects itself.
Correcting output quality problems
Page 45

Chapter 5 Problem solving 126
z Clean the inside of the printer (see the introduce guide on the product CD, or go to
www.hp.com/cposupport/
) and run a manual cleaning page to clean the fuser (see “Using the printer
cleaning page” on page 80).
z Replace the print cartridge.
z Maintenance might be due. Check this by printing a copy of the supplies status page (see “Supplies status
page” on page 156). If maintenance is due, order and install the printer maintenance kit. (See the
introduce guide on the product CD, or go to www.hp.com/cposupport/
.)
Gray background
z Do not use paper that has already been run through the printer.
z Print a few more pages to see if the problem corrects itself.
z Turn over the stack of paper in the tray. Also, try rotating the paper 180°.
z At the printer control panel, use the Print quality menu to decrease the toner density setting (see “Print
quality submenu” on page 184).
z Make sure that the environmental specifications for the printer are being met (see “Environmental product
stewardship program” on page 218).
z Replace the print cartridge.
Toner smear
Also see “Loose toner” on page 127.
z Print a few more pages to see if the problem corrects itself.
z Try using a different type of paper.
z Make sure that the environmental specifications for the printer are being met (see “Environmental product
stewardship program” on page 218).
z Clean the inside of the printer (see the introduce guide on the product CD, or go to
www.hp.com/cposupport/
cleaning page” on page 80).
z Maintenance might be due. Check this by printing a copy of the supplies status page (see “Supplies status
page” on page 156). If maintenance is due, order and install the printer maintenance kit. (See the
introduce guide on the product CD, or go to www.hp.com/cposupport/
Correcting output quality problems
) and run a manual cleaning page to clean the fuser (see “Using the printer
.)
Page 46

Chapter 5 Problem solving 127
z Replace the print cartridge.
Loose toner
Loose toner, in this context, is defined as toner that can be rubbed off the page.
z If paper is heavy or rough, try using a high fuser mode so that toner fuses more completely onto the
paper. At the printer control panel, use CONFIGURE FUSER MODE MENU in the Paper handling menu
(see “Paper handling menu” on page 176).
z If you have observed a rougher texture on one side of your paper, try printing on the non-rough side.
z Make sure that the environmental specifications for the printer are being met (see “Environmental product
stewardship program” on page 218).
z Make sure that paper type and quality meet HP specifications (see “Specifications” on page 164).
z Maintenance might be due. Check this by printing a copy of the supplies status page (see “Supplies status
page” on page 156). If maintenance is due, order and install the printer maintenance kit. (See the
introduce guide on the product CD, or go to www.hp.com/cposupport/
.)
Repeating defects
z Print a few more pages to see if the problem corrects itself.
z If the distance between defects is 38 mm (1.5 in) or 94 mm (3.76 in), the print cartridge might need to be
replaced.
z Clean the inside of the printer (see the introduce guide on the product CD, or go to
www.hp.com/cposupport/
cleaning page” on page 80).
z Maintenance might be due. Check this by printing a copy of the supplies status page (see “Supplies status
page” on page 156). If maintenance is due, order and install the printer maintenance kit. (See the
introduce guide on the product CD, or go to www.hp.com/cposupport/
Misformed characters
z Print a few more pages to see if the problem corrects itself.
z Make sure that the environmental specifications for the printer are being met (see “Environmental product
stewardship program” on page 218).
Correcting output quality problems
) and run a manual cleaning page to clean the fuser (see “Using the printer
.)
Page 47

Chapter 5 Problem solving 128
z Maintenance might be due. Check this by printing a copy of the supplies status page (see “Supplies status
page” on page 156). If maintenance is due, order and install the printer maintenance kit. (See the
introduce guide on the product CD, or go to www.hp.com/cposupport/
.)
Page skew
z Print a few more pages to see if the problem corrects itself.
z Verify that there are no torn pieces of paper inside the printer.
z Make sure that paper is loaded correctly, all adjustments have been made, and the paper is under the
corner tabs (see “Or ienting media” on page 31).
z Turn over the stack of paper in the tray. Also, try rotating the paper 180°.
z Make sure that paper type and quality meet HP specifications (see “Specifications” on page 164).
z Make sure that the environmental specifications for the printer are being met (see “Environmental product
stewardship program” on page 218).
Curl or wave
z Turn over the stack of paper in the tray. Also, try rotating the paper 180°.
z Make sure that paper type and quality meet HP specifications (see “Specifications” on page 164).
z Make sure that the environmental specifications for the printer are being met (see “Environmental product
stewardship program” on page 218).
z Try printing to a different output bin.
z If media is lightweight and smooth, try using a low fuser mode to reduce the heat in the fusing process. At
the printer control panel, use CONFIGURE FUSER MODE MENU on the Paper handling menu to do this (see
“Paper handling menu” on page 176).
Wrinkles or creases
z Print a few more pages to see if the problem corrects itself.
z Make sure that the environmental specifications for the printer are being met (see “Environmental product
stewardship program” on page 218).
z Turn over the stack of paper in the tray. Also, try rotating the paper 180°.
Correcting output quality problems
Page 48

Chapter 5 Problem solving 129
z Make sure that paper is loaded correctly, all adjustments have been made, and the paper is under the
corner tabs (see “Or ienting media” on page 31).
z Make sure that paper type and quality meet HP specifications (see “Specifications” on page 164).
z If envelopes are creasing, try storing envelopes so that they lie flat.
Correcting output quality problems
Page 49

Chapter 5 Problem solving 130
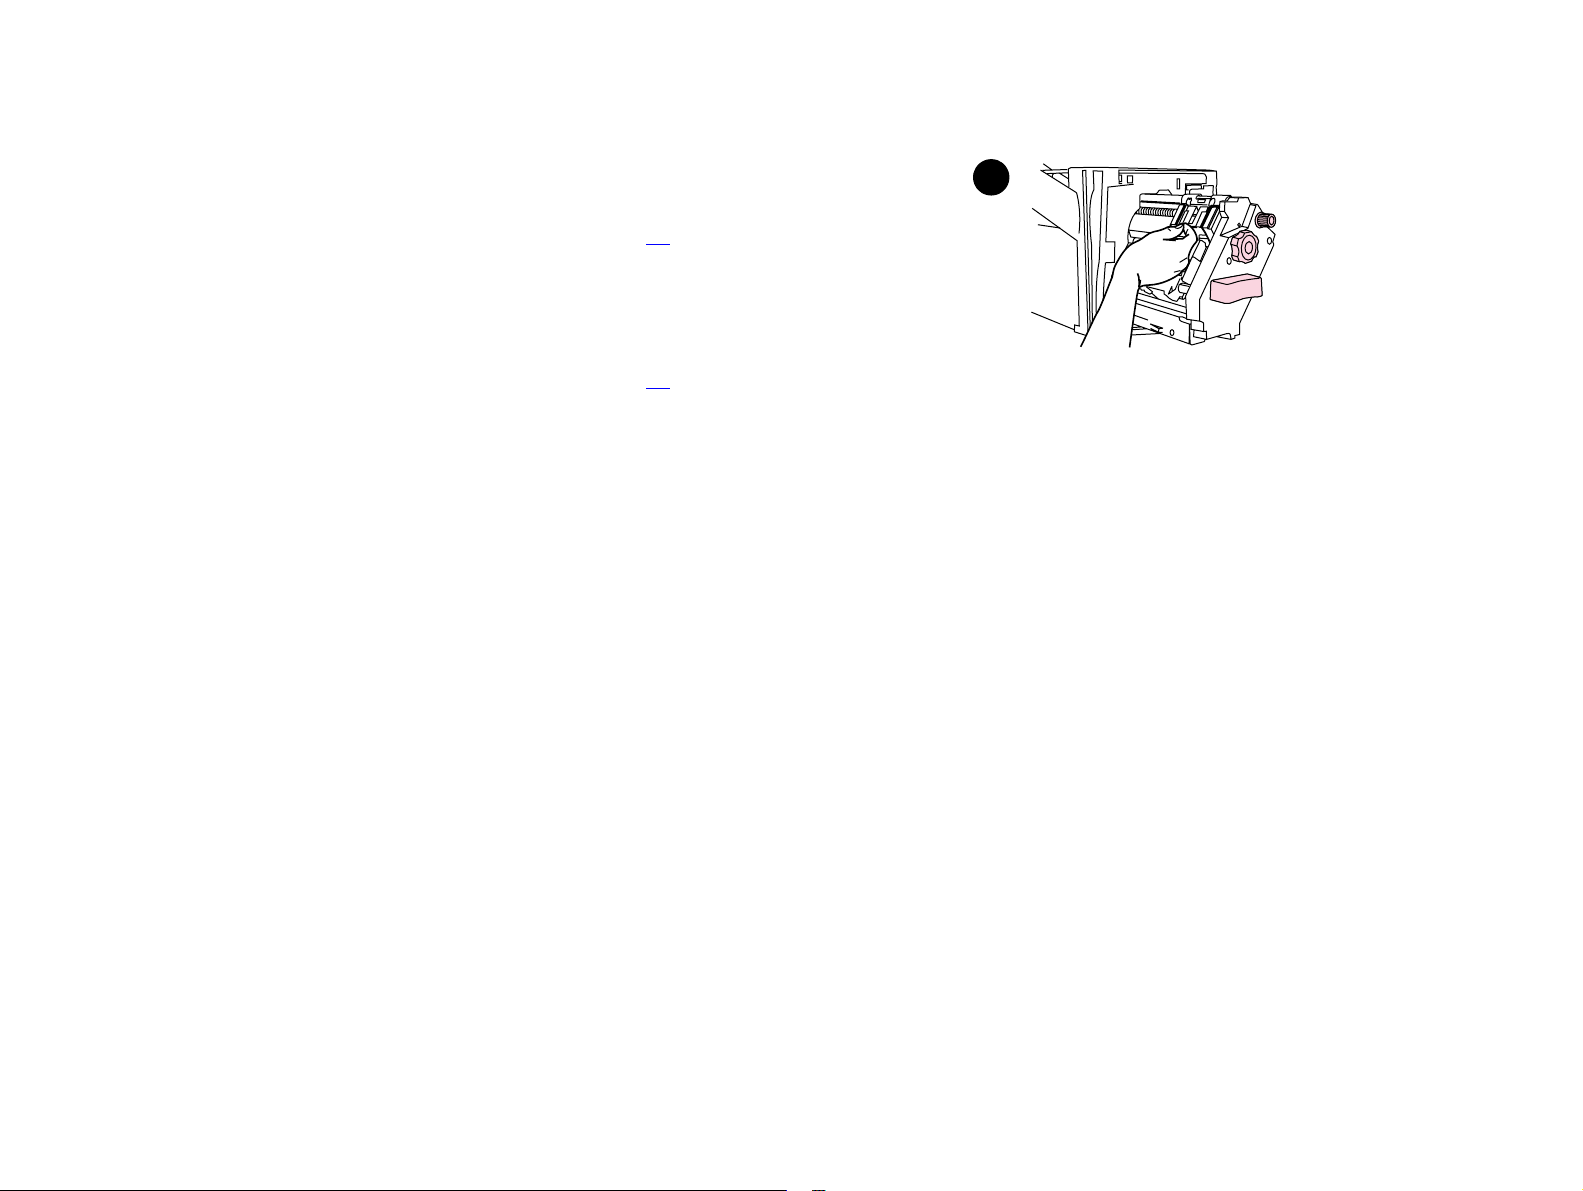
Preventing wrinkles on envelopes
If envelopes are wrinkled when printed, first ensure that you are using supported types of envelopes. Then,
use the following procedure to move the fuser levers to the higher position while printing the envelopes.
To prevent wrinkles on envelopes
1 Open the left door (If an optional output device is installed, first
slide it away from the printer).
WARNING!
Avoid touching the adjacent fusing area. It can be HOT.
2 Locate and lift up the two blue levers.
1
3 Close the left door.
When finished printing the envelopes, return the fuser levers to the
down position for standard paper types.
CAUTION
Failure to return levers in the down position for standard paper types
might result in poor print quality.
Correcting output quality problems
2
Page 50

Chapter 5 Problem solving 131
Detecting printer problems
Troubleshooting checklist
z Print job on custom paper does not fit correctly
z Problems with the stapler/stacker
z Problems with the multifunction finisher
Note For more information about an optional HP output device, see the use guide that came with the device.
Correcting output quality problems
Page 51

Chapter 5 Problem solving 132
Determining printer problems
Situation Solution
A printer cover is open. Firmly close the printer doors (left, front, and right).
Correct size of paper is not
loaded.
Display is blank, and internal fans
are not running.
Messages appear in the display. See “Understanding printer messages” on page 103.
Paper is jammed in the printer. Check for paper jams (See “Clear ing jams” on page 83).
Paper tray is out of paper. Load paper. (See the introduce guide on the product CD, or go to
Printer display is in the wrong
language or displays unfamiliar
characters.
Printer is not turned on. Press the printer control button to turn the printer on (button in).
Check paper trays to be sure the correct sizes are loaded as configured. Also, check
that guides are set correctly.
Make sure that the printer power is on. Press all the keys to see if one is stuck;
contact your HP-authorized service representative if this does not work.
www.hp.com/cposupport/
Reconfigure the control panel display language. See the start guide, or press
while simultaneously pushing the power switch ON. Hold until SELECT LANGUAGE
appears, then release . Use and to select the desired language. Press
to save your selection. The control panel display will indicate the printer is ready to
use. If the new language does not appear in the display, you might not have pressed
to save your new selection.
.)
Printer is not working at all. Plug the AC power cord firmly into the grounded power receptacle and into the
printer. (Be sure the power source is energized.)
Correcting output quality problems
Page 52

Chapter 5 Problem solving 133
Situation Solution
Printer is turned on, but internal
fans are not running.
Make sure the line voltage is correct for the printer power configuration. (See the
plate next to the power receptacle on the back of your printer for voltage
requirements.) If you are using a power strip and its voltage is not within
specification, plug the printer directly into the power receptacle.
Printer voltage is not correct. Make sure line voltage is in the correct range. (See the product label next to the
power receptacle on the back of the printer for voltage requirements.)
Correcting output quality problems
Page 53

Chapter 5 Problem solving 134
Software, computer, and printer interface problems
Situation Solution
A page fails to print. Set PRINT PS ERRORS=ON, and then send the job again to print a PS error page. If this
does not identify the problem, try turning off Resource Saving and I/O Buffering or
try installing more memory (See “PCL or PS font list” on page 159).
A page prints with clipped
margins.
A PS error page prints.
A text listing of PS commands
prints instead of your PS print job.
Attempted to use a disk-resident
font, but the printer substituted a
different font.
If the page margins are clipped, you might have to print the page at 300-dpi resolution
or install more memory. Also try turning off Resource Saving and I/O Buffering.
z Make sure the print job is a PS job.
z Check to see whether your program expected you to send a setup or PS header
file to the printer.
z Check the printer setup in your software application to make sure that the printer
is selected.
z Check cable connections to ensure that they are secure.
z Reduce the complexity of the graphic.
z Add available memory by turning on Resource Saving.
The control panel PERSONALITY=AUTO setting might have been confused by a
nonstandard PS code. Check the PERSONALITY setting to see if it is set to PS or PCL. If
it is set to PCL, set it to PERSONALITY=AUTO. If it is set to AUTO, set it to PS for this print
job only. When the job has pr inted, return the setting to AUTO.
If you are using PCL, print the PCL Font Page, and verify that the font is on the disk.
If you are using PS, print the PS Font Page and make sure that the font is on the disk.
If the font is not on the disk, use the HP Resource Manager or the Macintosh-based
HP LaserJet utility to download the font.
Correcting output quality problems
Page 54

Chapter 5 Problem solving 135
Situation Solution
Auto setup did not automatically
set up the printer.
z Set up the printer manually by selecting Configure.
z Select an alternate PPD (See “Selecting an alternate PPD” on page 149).
z The PPD might have been renamed. If so, select the renamed PPD (See
“Selecting an alter nate PPD” on page 149).
z A network queue might be present.
Blank pages print.
Cannot access Tray 2 or 3, or
optional Tray 4.
Cannot clear MANUALLY FEED
[TYPE] [SIZE] message.
z Tur n the printer off and then back on.
z Make sure the printer cartridge is installed properly.
Make sure that the paper tray guides are adjusted correctly for the paper size you are
using. (See the introduce guide on the product CD, or go to
www.hp.com/cposupport/
z A previous print job might still be in the printer buffer.
z Make sure that optional Tray 1 has the correct paper size loaded. (See the
introduce guide on the product CD, or go to www.hp.com/cposupport/
.)
.)
Computer software problem. Check that your computer is working correctly by printing from a program you know
works, or by printing a plain text file to see if the problem is with your program or with
your printer driver. (For example, C:\dir>LPTn where n is the number of the
computer port the printer is connected to, for example LPT1.) To print the page, you
might have to send a form feed command from your computer.
Correcting output quality problems
Page 55

Chapter 5 Problem solving 136
Situation Solution
Connection cannot be established
or seems to take longer than
usual.
Control panel settings, such as
RESOLUTION or ORIENTATION, do
not work or are ignored.
Data from a previous print job is
still in the printer buffer.
z Use a device that is IRDA-compliant; look for an IRDA symbol on the device, or
see the computer user guide for IRDA specifications.
z Make sure that the operating system on your computer includes a FIR driver and
that your program uses a compatible driver. (Note that complex pages take longer
to print.)
z Position the HP Fast InfraRed Receiver within the range of operation described in
“Printing a job using FIR” on page 72, and make sure that no object is blocking the
connection. (This object could be a hand, paper, books, or even bright light.)
z Make sure that the two IR ports are clean (free from dirt and grease).
z Make sure that no bright light is shining directly into either IR port. Bright light of
any kind (sunlight, incandescent light, fluorescent light, or light from an infrared
remote control, such as those used for TVs and VCRs) shining directly into one of
the IR ports might cause interference.
z Position the portable device closer to the FIR port on the printer.
Software commands override control panel settings (See “Using control panel menus”
on page 15 for information about how your program works with control panel
settings).
z Make sure that you are using the correct printer driver.
z A complex print job might still be processing.
z Make sure the printer is not paused. Make sure the control panel reads
PROCESSING JOB.
z Pull out the print cartridge and check for paper. Reseat the print cartridge.
z Open Trays 2 and 3. Make sure that the appropriate paper is inserted. (See the
introduce guide on the product CD, or go to www.hp.com/cposupport/
.) Close the
trays.
Correcting output quality problems
Page 56

Chapter 5 Problem solving 137
Situation Solution
Data is missing, but there are no
printer messages.
Data light is flashing, but nothing
prints.
Disk failure
EIO x DISK
NOT FUNCTIONING
z Check your software application to be sure the print file contains no errors.
z Check your cable to make sure it is securely connected to both the printer and the
computer.
z Your parallel printer cable might be defective. Use a high-quality cable. (See the
introduce guide on the product CD, or go to www.hp.com/cposupport/
for an HP
cable part number.)
z Check your network connection.
z Make sure that you are using the correct printer driver.
z A complex print job might still be processing.
z Make sure the printer is not paused. Make sure the control panel reads
PROCESSING JOB.
z Pull out the print cartridge and check for paper. Reseat the print cartridge.
z Open Trays 2 and 3. Make sure that the appropriate paper is loaded. (See the
introduce guide on the product CD, or go to www.hp.com/cposupport/
.) Close the
trays.
Tur n the printer off and make sure that the EIO hard disk is inserted correctly and is
securely fastened. If the control panel message continues to be displayed, the EIO
hard disk needs to be replaced.
Disk is not initialized
DISK x NOT
INITIALIZED
Disk is write-protected
DISK IS
WRITE PROTECTED
Correcting output quality problems
Use the Windows-based HP Resource Manager or the Macintosh-based HP LaserJet
Utility to initialize the disk.
Fonts and forms cannot be stored on the disk when the disk is write-protected. Use
the Windows-based HP Resource Manager or the Macintosh-based HP LaserJet
Utility to remove the write protection from the disk.
Page 57

Chapter 5 Problem solving 138
Situation Solution
Driver might not be set up to print
on both sides of the paper.
Make sure that the option to print on both sides of the paper is properly configured in
the driver.
Duplex printing accessory jams. Make sure that you are using the suppor ted paper weights and sizes. (See the
FIR port status indicator does not
light up.
introduce guide on the product CD, or go to www.hp.com/cposupport/
z Make sure that the printer is in READY mode and that the FIR port you are printing
from is IRDA-compliant and within the range of operation described in “Printing a
.)
job using FIR” on page 72.
z Make sure that the HP Fast InfraRed receiver is properly connected to the printer.
z Run the printer Self Test. Make sure that FIR POD (IRDA Compliant) is printed
under Installed Personalities and Options.
First page takes much longer to
print than following pages.
z Make sure that the printer displays READY.
z Set the PowerSave feature for a longer time period (See “Configuration page” on
page 155). If a page takes longer to print due to complex formatting commands,
changing the PowerSa ve setting might not improve print speed. You might want to
simplify the page.
Garbled pages print, there are
overprints, or only a portion of a
page prints.
z Make sure that your program is configured for the correct printer.
z Replace the printer interface (I/O) cable with a cable you know works to see if the
cable is defective.
z Your parallel printer cable might be defective. Use a high-quality cable. (See the
introduce guide on the product CD, or go to www.hp.com/cposupport/
for an HP
cable part number.)
z Set the PERSONALITY item in the Configuration menu to AUTO (See
“PERSONALITY=AUTO” on page 186). The printer might have been set to PCL, and a
PS job was sent to the printer, or vice versa.
z Data sent to the printer might be corrupt. Try sending another file to see if it prints.
Correcting output quality problems
Page 58

Chapter 5 Problem solving 139
Situation Solution
General operation problems. For general paper operation information, see “Pr inting tasks” on page 30.
General repeated stapler jam
problems.
Job has been properly sent, but
the printer will not print.
Job has incorrect fonts.
Job is not sent to the desired
printer.
z Check to see that the job to be stapled is less than five mm (.08 inch) thick.
z Stapler might have some trapped staple wires that are obstructing the magazine.
Remove loose staples and paper dust from the inside of the stapler (See “To clear
a staple jam from the optional stapler/stacker” on page 96).
If the connection is broken before the entire print job has been transmitted to the
printer (printing has not yet started), the printer might not print any of the job. Press
C
ANCEL JOB to clear the printer memory. Then, reposition the portable device within
the range of operation described in “Pr inting a job using FIR” on page 72, and print
the job again.
z If you are printing an .EPS file, try downloading the fonts contained in the .EPS file
to the printer before printing. Use the HP LaserJet Utility (See “Software for
Macintosh computers” on page 24).
z If the document is not printing with New York, Geneva, or Monaco fonts, go into
the Page Se tu p dialog box, and select Options to deselect substituted fonts.
Another printer with the same or similar name might have received the print job. Make
sure that the printer name matches the name selected in the Chooser (See “Selecting
an alternate PPD” on page 149).
Correcting output quality problems
Page 59

Chapter 5 Problem solving 140
Situation Solution
Job prints in Courier (the printer
default font) instead of the font
you requested.
Job prints on the wrong side of the
paper.
Job was not duplexed.
z The requested typeface is not available in the printer or is not present on the disk.
Use a font download utility to download the desired font.
z Fonts downloaded to memory are lost when the printer is turned off. They are also
lost if Resource Saving is not used, and a personality switch is performed to print
a PCL job. Disk fonts are not affected by PCL jobs or by turning the printer off.
z Print a PS Font Page to verify that the font is available. If a disk font appears to be
missing, it might be because a software utility was used to delete the font,
because the disk was re-initialized, or because the disk drive is not installed
correctly. Pr int a configuration page to verify that the disk drive is installed and is
functioning correctly.
z Print a Disk Directory to help identify available fonts.
z Make sure you have loaded the paper correctly. (See the introduce guide on the
product CD, or go to www.hp.com/cposupport/
z If you are printing one-sided copies, load paper into optional Tray 1 with the side to
.)
be printed facing up. Load paper in Trays 2, 3, and optional Tray 4 with the side to
be printed facing down.
z If you are printing two-sided copies, load paper into optional Tray 1 with the first
side to be printed facing down. Load paper in Trays 2, 3, and optional Tray 4 with
the first side to be printed facing up.
z Print a configuration page to ensure that the duplex printing accessory is installed
properly (See “Configuration page” on page 155).
z Make sure the duplex printing accessory has been configured in the printer driver.
z Make sure that the software is not overriding the printer driver setting.
Correcting output quality problems
Page 60

Chapter 5 Problem solving 141
Situation Solution
Job was not stapled. Jobs sent to the stapler might not be stapled for one or more of the following reasons:
z One-page jobs will not be stapled.
z The stapler is out of staples and AUTO CONTINUE is set to ON.
z The wrong size or type of paper was used for the job.
z More than 50 pages were sent to the stapler, exceeding its capacity.
z The stapler has bent or broken staples in the stapler head.
z A staple jam was recently cleared (up to two sequential jobs might not be stapled).
z The job was sent to a bin other than the stapler bin because the wrong size or type
of paper was used for the job.
z The interface cable to the stapler unit might be defective or not connected
properly.
Job went to a different location
than was expected.
Last page did not print and the
Data light is on.
Correcting output quality problems
The wrong size or type of paper was used for the job. (See the introduce guide on the
product CD, or go to www.hp.com/cposupport/
z Make sure that you are using the correct printer driver.
z Complex print job might still be processing.
z Printer might be waiting for the end of a file that did not come with the job. Press
.)
to send it.
z Make sure the printer is not paused. Make sure the control panel reads
PROCESSING JOB.
z Pull out the print cartridge and check for paper. Reseat the print cartridge.
z Open Trays 2 and 3. Make sure that the appropriate paper is loaded. (See the
introduce guide on the product CD, or go to www.hp.com/cposupport/
.) Close the
trays.
Page 61

Chapter 5 Problem solving 142
Situation Solution
LOAD TRAY x
[TYPE] [SIZE] paper size
message
Network or shared printer
problems.
Load the requested paper size, or press to print on a size already loaded. The
printer has a job in the buffer and is waiting to print on the correct paper size.
Set the paper type in the control panel (See “Control panel menus” on page 172).
Check for network or shared printer problems by connecting your computer directly to
the printer and printing from a program you know works. If you suspect network
problems, check with your network administrator or consult the network
documentation that came with your printer network cards.
Optional Tray 4 will not work. The power cord is not firmly plugged in to both the printer and the power receptacle.
Remove and reconnect the power cord.
Paper is loaded into optional
Tray 1, and the control panel
Load the correct paper in the tray. (See the introduce guide on the product CD, or go
to www.hp.com/cposupport/
.) If the correct paper is already loaded, press .
displays a load or manual feed
message.
Paper is not going to the correct
output location.
z Verify that the correct output bin is selected in the printer driver. For more
information about changing printer driver settings, see the online help.
z The paper does not meet the specifications for the output bin (See the introduce
guide on the product CD, or go to www.hp.com/cposupport/
).
Paper jams and paper-feeding
problems.
Correcting output quality problems
z See “To clear jams in Trays 2 and 3” on page 87 or “To clear jams in optional Tray
4” on page 88.
z Ensure that paper specifications are within recommended range. (See the
introduce guide on the product CD, or go to www.hp.com/cposupport/
z Make sure the paper guides are adjusted properly and are not skewed. (See the
introduce guide on the product CD, or go to www.hp.com/cposupport/
z Perform preventive maintenance if requested by the printer.
.)
.)
Page 62

Chapter 5 Problem solving 143
Situation Solution
Paper size adjustment and
See the introduce guide on the product CD, or go to www.hp.com/cposupport/
.
installation.
Printer does not recognize the
duplex printing accessory.
z Print a configuration page to ensure that the duplex printing accessory is installed
properly (See “Configuration page” on page 155).
z Tur n the printer off. Remove and reinstall the unit. Tur n the printer on.
z Make sure that the duplex printing accessory has been configured in the printer
driver.
Printer does not recognize the
hard disk.
Printer does not recognize
optional Tray 4.
Tur n the printer off and verify that the hard disk is inserted correctly and is securely
fastened.
z Make sure you selected optional Tray 4 in the printer driver (See “Helpful printer
software for increased printing flexibility” on page 17).
z Tur n the printer off and then back on.
z Make sure the power cord is plugged into optional Tray 4 (See “Cabling
configurations” on page 148).
z If the printer still does not recognize optional Tray 4, contact your dealer or
authorized HP service provider.
Printer does not recognize stapler. Check the cable to the stapler. Make sure it is properly connected at both ends (See
“Cabling configurations” on page 148).
Correcting output quality problems
Page 63

Chapter 5 Problem solving 144
Situation Solution
Printer draws paper from the
wrong tray.
z Be sure your program is selecting the correct paper size or type.
z Make sure that the driver for your program is correctly installed, configured, and
capable of requesting the desired paper size and type.
z The size of paper requested is not loaded in the tray selected. The printer draws
paper from the next default tray that contains the correct size. Load the correct
paper in the tray and make sure the tray is adjusted correctly. Load the tray with
enough paper to complete the print job.
z If you selected Tray 2, 3, or optional Tray 4 and did not turn the printer off when
installing it, the printer does not recognize it and draws paper from the next default
tray source. Tur n the printer off, then back on, and the printer will recognize the
tray.
Printer interface problems. Print a configuration page from the printer control panel to verify that the interface
configurations shown on the printout match those on the host computer (See
“Configuration page” on page 155).
Printer is paused. Press P
AUSE/RESUME. The printer control panel should display READY and the Ready
light should be lit. Resume printing.
Printer is off or not connected to
an active power source.
Make sure that all power cables are firmly plugged in to both the printer components
and an active power source. Make sure the printer is on.
Printer is ready, but not receiving
data (the Data light does not
blink).
Correcting output quality problems
z Check for loose I/O cable connections at the printer and computer or network port.
z Tr y your I/O cable on a system that you know works.
z Check that the correct interface cable was selected and is securely connected to
both the printer and the computer. If the cable is not correctly configured, see the
start guide for configuration information.
z If connected to a network, print a Jetdirect configuration page to check for
interface or network problems (See “Configuration page” on page 155).
Page 64

Chapter 5 Problem solving 145
Situation Solution
Printer is usually slow to respond.
z Printer speed is highly dependent on how your software application is set up,
which printer driver you are using, and how much traffic is on the network. See the
start guide for configuration information.
z You might need to add more memory (See “Installing memory” on page 200).
Printer port problem. Check that your computer port is configured and working properly. One way to check
this is to connect another printer to that port on your computer and print from a
program you know works.
Printer prints only part of a page
or document.
The connection has been broken during transmission. If you move the portable device
during transmission, the connection can be broken. IRDA-compliant devices are
designed to recover from temporary connection interruptions. You have up to 40
seconds to re-establish the connection (depending on the portable device being
used).
Printer prints wrong fonts or
for m ats.
z The font is not present in the printer and must be downloaded from your program,
or the proper font DIMM must be installed. Check your program to make sure the
correct printer driver has been installed and configured. To verify that the font you
want is available, print a PS or PCL font list (See “Information menu” on
page 175).
z Your software selected a substitute font for one that is not available in the printer.
(See your software program manual for more information about font selection.)
Correcting output quality problems
Page 65

Chapter 5 Problem solving 146
Situation Solution
Printing stops in the middle of the
job.
z Check the control panel display for an error message.
z If you are on a network, make sure the computer is correctly configured and that
there is not a network problem (see your network administrator).
z Check the line voltage to make sure that it is steady and within printer
specifications. (See the introduce guide on the product CD, or go to
www.hp.com/cposupport/
z Check the time-out setting in your network application. You might need to increase
.) Tur n the printer off and then back on.
it.
z If you are trying to copy a file to the printer from the DOS prompt, use the copy
command COPY [filename] LPTn /B printer por t, such as LPT1 (where n is the
port number).
Note
To output the page, you might have to send a form feed command from the computer.
PS print job will not print. Check the configuration in the PostScript tab of Windows. Check that Protocol is set
to AppleTalk and that Binary Data is not selected.
Software is selecting the wrong
port.
The control panel and driver are
not set to the same paper size.
Check your operating system port settings to be sure the print job is being sent to the
correct port (for example, LPT1).
Make sure that the custom paper size defined from the control panel and the custom
paper size defined in the driver are the same.
The file you are trying to print
might not have the option to print
on both sides of the paper turned
on.
Correcting output quality problems
Make sure that the option to print on both sides of the paper is configured in the
driver.
Page 66

Chapter 5 Problem solving 147
Situation Solution
The FIR status indicator turns off
during transmission.
The Macintosh computer is not
communicating with the printer.
The printer driver icon does not
appear in the Chooser.
The connection might have been broken. Press C
ANCEL JOB to clear the printer
memory. Then, reposition the portable device within the range of operation described
in “Printing a job using FIR” on page 72, and print the job again.
z Make sure the printer control panel displays READY.
z Make sure the correct printer driver is selected in the left half of the Chooser.
Then make sure that the desired printer name is selected (highlighted) on the right
half of the Chooser. There will be an icon next to the printer name after the driver
has been set up and configured with the PPD.
z If the printer resides on a network with multiple zones, make sure the correct zone
is selected in the AppleTalk Zones box in the Chooser.
z Make sure the correct printer has been selected in the Chooser by printing a
configuration page (See “Configuration page” on page 155). Make sure the name
of the printer displayed on the configuration page matches the printer in the
Chooser.
z Make sure AppleTalk is ac tive. (Select this in the Chooser or in the AppleTalk
control panel, whichever is applicable for your OS version.)
z Make sure the computer and printer are on the same network. From Control
Panels in the Apple menu, select the Network (or the AppleTalk) control panel
and then choose the correct network (for example, LocalTalk or EtherTalk).
Make sure the Apple LaserWriter 8 Chooser extension resides in the Extensions
folder. If it is not present anywhere on your system, you can obtain the driver from
your Macintosh OS system software CD, from Apple Computer, Inc., or see the
introduce guide on the product CD, or go to www.hp.com/cposupport/
.
Type has been specified as labels,
transparencies, or envelopes.
Correcting output quality problems
z Make sure that the media type can be printed on both sides. (See the introduce
guide on the product CD, or go to www.hp.com/cposupport/
z Change the media type to the proper media type for printing on both sides.
.)
Page 67

Chapter 5 Problem solving 148
Cabling configurations
Correcting output quality problems
Page 68

Chapter 5 Problem solving 149
Selecting an alternate PPD
This section, which only applies to Macintosh users, explains how to select an alternate PPD.
To select an alternate PPD
1 Open the Chooser from the Apple menu.
2 Click the LaserWriter 8 icon.
3 If you are on a network with multiple zones, select the zone in the AppleTalk Zones box where the printer
is located.
4 Click the printer name you want to use in the Select a PostScript Printer box. (Double-clicking will
immediately generate the next few steps.)
5 Click Setup. (This button might read Create for first-time setup.)
6 Click Select PPD.
7 Find the desired PPD in the list and click Select. If the desired PPD is not listed, choose one of the
following options:
Select a PPD for a printer with similar features.
Select a PPD from another folder.
Select the generic PPD by clicking Use Generic. The generic PPD allows you to print, but limits your
access to printer features.
8 In the Setup dialog box, click Select, and then click OK to return to the Chooser.
Note If you manually select a PPD, an icon might not appear next to the selected printer in the Select a
PostScript Printer box. In the Chooser, click Setup, click Printer Info, and then click Update Info to bring
up the icon.
9 Close the Chooser.
Correcting output quality problems
Page 69

Chapter 5 Problem solving 150
Renaming the printer
If you are going to rename the printer, do this before selecting the printer in the Chooser. If you rename the
printer after selecting it in the Chooser, you will have to go back into the Chooser and reselect it.
Use the Printer Name feature in the HP LaserJet Utility settings to rename the printer.
Correcting output quality problems
Page 70

Chapter 5 Problem solving 151
Communicating with an optional HP Jetdirect print server
If the printer contains an optional HP Jetdirect internal print server, and you cannot communicate with the
printer over the network, verify the operation of the print server. Check the Jetdirect Configuration Page for the
message I/O CARD READY. (To print a configuration page, press 22 for five seconds while the printer is idle.)
For troubleshooting information, see the HP Jetdirect administrator’s guide.
HP Jetdirect 610N 10/100TX Print Server
If the printer contains an optional HP Jetdirect 10/100TX print server, check to see that the print server was
able to link to the network. (If you have a different HP Jetdirect print server, see the guide that came with it.)
z Check the link-speed indicators (10 or 100) on the print server. If both are off, the printer server failed to
link to the network.
z Check the HP Jetdirect configuration page. The message LOSS OF CARRIER ERROR indicates that the print
server failed to link to the network.
The HP Jetdirect 10/100TX print server might require up to 10 seconds to establish a link to the network. If the
print server failed to link, verify that all cables are correctly connected. If all cables are correctly connected,
but the print server still fails to link, follow the steps below to reconfigure the print server:
Correcting output quality problems
Page 71

Chapter 5 Problem solving 152
1 Use the EIO menu to manually set the link speed (10 or 100 Mbps) and communication mode (full or
half-duplex) so that they match the network. (See “EIO submenu” on page 190). For example, if the port
on the network switch is set for 100TX full-duplex operation, you must set the print server for 100TX
full-duplex operation.
2 Tur n the printer off and back on and check the print server operation. If the print server fails to link, try a
different network cable.
Correcting output quality problems
Page 72

Chapter 5 Problem solving 153
Checking the printer configuration
From the printer control panel, you can print pages that give details about the printer and its current
configuration. The following information pages are described here:
z Menu map
z Configuration page
z Supplies status page
z Usage page
z PCL or PS font list
z File directory page
z Jetdirect
z Event log
z Paper path test
Use this procedure to print these information pages. Then, see the specific sections below for more
information about each page.
To print an information page
1 Press .
2 Use or to scroll to Information and press .
3 Use or to scroll to the information page you want and press .
Note To print a configuration page, press 22 on the numeric keypad. To print a menu map, press 21 on the
numeri c keypad.
Checking the printer configuration
Page 73

Chapter 5 Problem solving 154
Menu map
To see the current settings for the menus and items available in the control panel, print a control panel menu
map. Many of these values can be overridden from the printer driver or program. You might want to store the
menu map near the printer for reference.
The content of the menu map varies, depending on the options currently installed in the printer. For a
complete list of control panel items and possible values, see “Control panel menus” on page 172. To change a
control panel setting, see “Control panel menus” on page 172.
Checking the printer configuration
Page 74

Chapter 5 Problem solving 155
Configuration page
Use the configuration page to view current printer settings, to help troubleshoot printer problems, or to verify
installation of optional accessories, such as memory (DIMMs), paper trays, and printer languages.
Note If an HP Jetdirect print server is installed, an HP Jetdirect configuration page will print out as well.
The configuration page contains the following information:
1
2
3
1 Printer Information lists the serial number, HP JetSend IP addresses, page counts, and other information
for the printer.
2 Event Log lists the number of entries in the log, the maximum number of entries viewable, and the last
three entries. The second page of the event log is the manufacturer’s page. This page contains
information that might assist HP Customer Care representatives in solving possible printer problems.
3 Installed Personalities and Options lists all printer languages that are installed (such as PCL and PS), and
lists options that are installed in each DIMM slot and EIO slot.
4
5
6
Checking the printer configuration
Page 75

Chapter 5 Problem solving 156
4Memory lists the printer memory information, PCL Driver Work Space (DWS), and I/O buffering and
Resource Saving information.
5Security lists the status of the printer control panel lock, control panel password, and disk drive.
6 Paper Trays and Options lists the size settings for all trays and lists optional paper-handling accessories
that are installed.
Note Numbers in the sample printout match the numbers in the printer messages. (See the introduce guide
on the product CD, or go to www.hp.com/cposupport/
depending on the options currently installed in the printer.
.) The content of the configuration page varies,
Supplies status page
Use the supplies status page to obtain inf ormation about the toner cartridge installed in the printer , the amount of toner left
in the toner cartridge, and the number of pages and jobs that have been processed. The page also lets you know when
you should schedule the next preventative maintenance.
The supplies status page contains the following information:
Checking the printer configuration
Page 76

Chapter 5 Problem solving 157
1
1 Supplies website is the local website for ordering supplies through the Internet.
2 Cartridge Information indicates the amount of toner available in the print car tridge, estimated pages
remaining for the amount of toner left in the cartr idge, total number of pages and jobs processed, print
cartridge manufacture date and serial number, and how to recycle HP print cartr idges.
3 Other Supplies Information indicates the percentage of the maintenance kit has been used and the HP
part numbers.
4 Printer Information lists total printer page count, preventative maintenance interval, pages until next
maintenance should be performed, and serial number of the printer.
Usage page
2
3
4
Use the usage page to obtain information about the page sizes and number of pages printed.
The usage page contains the following information:
Checking the printer configuration
Page 77

Chapter 5 Problem solving 158
1
2
3
Checking the printer configuration
Page 78

Chapter 5 Problem solving 159
1 Product Name and Printer Name indicate the series of HP LaserJet printer in use.
2Usage Totals indicates types of pages that have been printed, the number of single-sided pages printed,
the number of duplexed pages printed, and the total number of pages printed.
3 Coverage indicates the amount of toner used on a page.
PCL or PS font list
Use the font lists to see which fonts are currently installed in the printer. (The font lists also show which fonts
are resident on a hard disk or flash DIMM.)
The PS font list shows the PS fonts installed, and gives a sample of those fonts. The following describes the
information that can be found on the PCL font list:
z Font gives the font names and samples.
z Pitch/Point indicates the pitch and point size of the font.
z Escape Sequence (a PCL 5e programming command) is used to select the designated font. (See the
legend at the bottom of the font list page.)
Note For step-by-step instructions about using printer commands to select a font with MS-DOS programs,
see “Common PCL 5e pr inter commands” on page 212.
z Font # is the number used to select fonts from the printer control panel (not the software application). Do
not confuse the font # with the font ID, described below. The number indicates the DIMM slot where the
font is stored.
SOFT: Downloaded fonts that stay resident in the printer until other fonts are downloaded to replace
them or until the printer is turned off.
INTERNAL: Fonts that permanently reside in the printer.
z Font ID is the number you assign to soft fonts when you download them through software.
Checking the printer configuration
Page 79

Chapter 5 Problem solving 160
File directory page
The file directory page contains the following information:
1
1 Disk Information indicates the disk model number, serial number, capacity, available free space, and
whether you might write to the disk.
2 File Size column indicates the size of each file under the Directory/File Name column. If a director y is
listed on the line, then Directory appears in this column, and its path is listed in the Directory/File Name
column.
3 Directory/File Name indicates the name of the file. Files in a subdirectory are listed right after the directory
line. The files are not necessarily listed in alphabetic order.
Checking the printer configuration
2
3
Page 80

Chapter 5 Problem solving 161
Jetdirect page
The Jetdirect page contains the following information:
1
2
3
1 HP Jetdirect Configuration indicates the printer status, model number, hardware firmware version, port
select, port configuration, auto negotiation, manufacturing identification, and manufactured date.
2Network Status indicates the total packets received, unicast packets received, bad packets received,
framing errors received, total packets transmitted, unsendable packets, transmit collisions, and transmit
late collisions.
3 Protocol Information indicates the status for TCP/IP, IPX/SPX, Novell/NetWare, AppleTalk, and
DLC/LLC.
Checking the printer configuration
Page 81

Chapter 5 Problem solving 162
Event log page
The first page of the event log contains the following information:
1
2
3
1 Current Page Count indicates the number of pages printed from the printer.
2 Number indicates the order in which the errors occurred. The last error to occur has the highest number.
3Error indicates the internal error code for each error.
4 Page Count indicates the number of pages printed from the printer when the error occurred.
5 Serial Number indicates the serial number of the printer.
6 Description or Personality indicates whether the error occurred due to a problem within a printer
personality or due to a printer jam.
The second page of the event log is the manufacturing page. This page contains information that might assist
HP Customer Care representatives in solving possible printer problems.
4
5
6
Checking the printer configuration
Page 82

Chapter 5 Problem solving 163
To print an event log
1 Press .
2 Use or to scroll to Configure Device and press .
3 Use or to scroll to Diagnostics and press .
4 Use or to scroll to Print Event Log and press .
Printing a paper path test
The paper path test can be used to verify that various paper paths are working properly or to troubleshoot
problems with tray configuration.
To print a paper path test
1 Press .
2 Use or to scroll to Configure Device and press .
3 Use or to scroll to Diagnostics and press .
4 Use or to scroll to Set Paper Path Test and press .
5 Use or to select the input tray you want to test, the output bin, the duplex printing accessory (if
available), and number of copies, pressing after you set the value for each. After selecting the last
option, the paper path test automatically starts.
Printing a paper path test
 Loading...