

Page 1

hp LaserJet 9000mfp
hp LaserJet 9000Lmfp
start
inicio
início
lea esto primero
Page 2

Page 3

hp LaserJet 9000mfp
hp LaserJet 9000Lmfp
English
Start
Page 4

© Copyright Hewlett-Packard
Company 2002
All Rights Reserved.
Reproduction, adaptation, or
translation without prior written
permission is prohibited, except
as allowed under the copyright
laws.
Publication number
Q2622-90902
Edition 1, 12/2002
Warranty
The information contained in
this document is subject to
change without notice.
Hewlett-Packard makes no
warranty of any kind with
respect to this information.
HEWLETT-PACKARD
SPECIFICALLY DISCLAIMS
THE IMPLIED WARRANTY OF
MERCHANTABILITY AND
FITNESS FOR A PARTICULAR
PURPOSE.
Hewlett-Packard shall not be
liable for any direct, indirect,
incidental, consequential, or
other damage alleged in
connection with the furnishing or
use of this information.
Trademark Credits
Microsoft
Windows
Windows Me
XP
, MS Windows,
, Windows NT,
are U.S. registered
, and Windows
trademarks of Microsoft
Corporation.
All other products mentioned
herein may be trademarks of
their respective companies.
Hewlett-Packard Company
11311 Chinden Boulevard
Boise, Idaho 83714 U.S.A.
Page 5

Product Setup
Contents
Introduction . . . . . . . . . . . . . . . . . . . . . . . . . . . . . . . . . . . . . . . . . . . 4
Where to look for information . . . . . . . . . . . . . . . . . . . . . . . . . . . . . 5
Installation checklist . . . . . . . . . . . . . . . . . . . . . . . . . . . . . . . . . . . . 6
Prepare product location . . . . . . . . . . . . . . . . . . . . . . . . . . . . . . . . . 7
Check package contents. . . . . . . . . . . . . . . . . . . . . . . . . . . . . . . . . 9
Remove internal packaging. . . . . . . . . . . . . . . . . . . . . . . . . . . . . . 10
Identify product parts. . . . . . . . . . . . . . . . . . . . . . . . . . . . . . . . . . . 11
Position the product. . . . . . . . . . . . . . . . . . . . . . . . . . . . . . . . . . . . 12
Install the print cartridge . . . . . . . . . . . . . . . . . . . . . . . . . . . . . . . . 14
Install accessories. . . . . . . . . . . . . . . . . . . . . . . . . . . . . . . . . . . . . 16
Load trays 1, 2, 3, and 4 . . . . . . . . . . . . . . . . . . . . . . . . . . . . . . . . 17
Change the control panel overlays . . . . . . . . . . . . . . . . . . . . . . . . 22
Connect product cables. . . . . . . . . . . . . . . . . . . . . . . . . . . . . . . . . 24
Connect power cords. . . . . . . . . . . . . . . . . . . . . . . . . . . . . . . . . . . 26
Configure the control panel display language . . . . . . . . . . . . . . . . 28
Configure digital sending. . . . . . . . . . . . . . . . . . . . . . . . . . . . . . . . 29
Print the configuration . . . . . . . . . . . . . . . . . . . . . . . . . . . . . . . . . . 30
Install software . . . . . . . . . . . . . . . . . . . . . . . . . . . . . . . . . . . . . . . 31
Installing Windows printing software . . . . . . . . . . . . . . . . . . 32
Installing Macintosh printing software . . . . . . . . . . . . . . . . . 33
Verify product setup. . . . . . . . . . . . . . . . . . . . . . . . . . . . . . . . . . . . 34
Customer support . . . . . . . . . . . . . . . . . . . . . . . . . . . . . . . . . . . . . 36
Warranty and regulatory information . . . . . . . . . . . . . . . . . . . . . . . 37
Hewlett-Packard limited warranty statement . . . . . . . . . . . . 37
Limited warranty for print cartridge life. . . . . . . . . . . . . . . . . 39
HP software license terms. . . . . . . . . . . . . . . . . . . . . . . . . . 40
FCC regulations. . . . . . . . . . . . . . . . . . . . . . . . . . . . . . . . . . 42
Safety information . . . . . . . . . . . . . . . . . . . . . . . . . . . . . . . . 44
Declaration of Conformity . . . . . . . . . . . . . . . . . . . . . . . . . . . . . . . 46
English
ENWW
Contents 3
Page 6

Introduction
Congratulations on your purchase of the HP LaserJet 9000mfp*
(product number C8523A) or HP La serJet 9000Lmfp (product n umber
Q2622A). The product comes standard with:
•
128 MB random access memory (RAM)
•
copying, digital sending, and wide-format printing capabilities
•
wide-format printing
•
two 500-sheet trays (Tray 2 and Tray 3)
•
a 100-sheet multipurpose tray (Tray 1)
•
a 2000-sheet input tray (Tray 4)
•
an HP Jetdirect print server
•
a duplex printing accessory (for printing on both sides of paper)
The product featur es an in te r a ctive touch screen on the control panel
graphical display. You must choose one of the three paper handling
devices: the 3000-sheet stacker, the 3000-sheet stapler/stacker, or
the multifunction finisher.
Note The product requires an optional tok en ring card to connect to a tok en
ring network.
*Multifunction Peripheral
4 Product Setup
ENWW
Page 7

Where to look for information
Start guide
This guide contains information about
unpacking and installing your product.
Introduce guide
This guide contains information about
performing basic copying, sending, and
printing tasks. Introduce is available on
the CD-ROM that came with the
product. If you would like a hard copy,
use your product to print the introduce
guide.
English
ENWW
Use guide
This guide contains detailed information
about using and troubleshooting and is
available on the World Wide Web at
http://www.hp .com/support/lj9000. If you
would like a hard copy, use your product
to print the use guide.
Where to look for information 5
Page 8

Installation checklist
This guide will help you set up and install your new product. For
proper installation, please complete each sectio n in or de r.
•
Unpack the product steps 1 through 5
•
Install the product steps 6 through14
•
Install printing software step 15
•
Verify product setup step 16
WARNING! To avoid injury, do not attempt to lift the product. The prod uct has been
designed to roll on wheels.
6 Product Setup
ENWW
Page 9

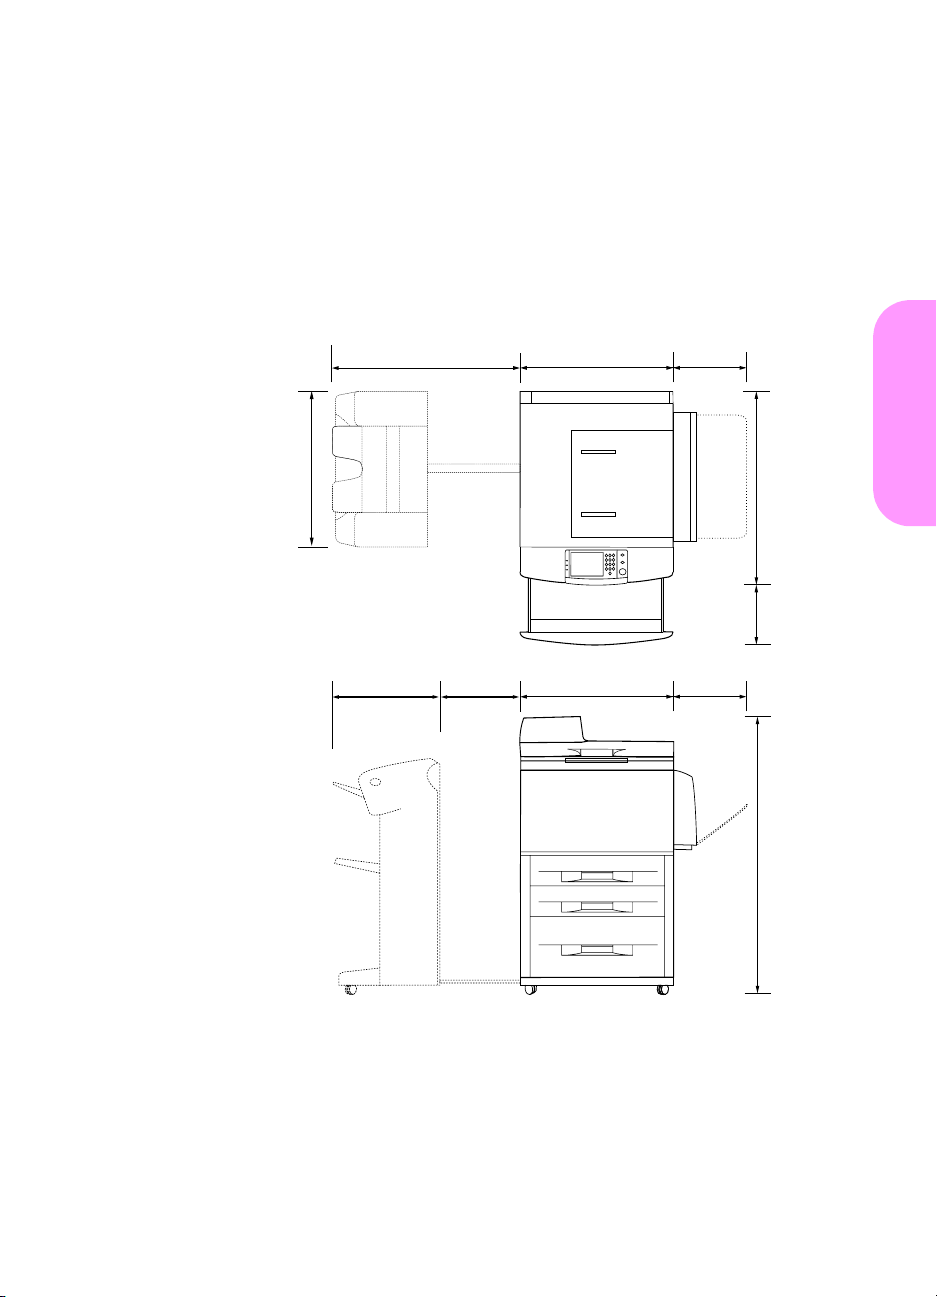
Step 1 Prepare product location
Product size
Prepare a location for the product that allows for these physical and
environmental requirements:
635.0 mm
(25.0 in)
635.0 mm
(25.0 in)
762 mm (30 in)
(20 in)
508 mm
)
n
i
5
.
1
2
(
m
m
1
.
1
3
5
1177.3 mm
(46.0 in)
529.6 mm
(20.5 in)
647.7 mm
(25.5 in)
641.4 mm
(25.3 in)
641.4 mm
(25.3 in)
English
ENWW
1219.2 mm (48.0 in)
HP LaserJet 9000mfp dimensions (top and side views)
Prepare product location 7
Page 10

Location requirements for the product
•
A level area on the floor.
•
Space allowance around the
product.
•
A well-ventilated room.
•
No exposure to direct
sunlight or chemicals,
including ammonia-based
cleaning solutions.
•
Adequate power supply
(15 A, 110 V, or 220 V circuit
located near the product). A
dedicated 15 A circuit is
recommended.
•
A stable environment—no
abrupt temperature or
humidity changes.
•
Relative humidity 20
percent to 80 percent.
•
Room temperature 10° C to
32.5 ° C (50° F to 91° F).
8 Product Setup
ENWW
Page 11

Step 2 Check package contents
high speed copy connect cable
control panel overlays
MFP product
standoffs
product software
CD-ROM
English
power cords
ADF output
print cartridge
ENWW
Quick Reference Poster
Package contents
Start guide
Check package contents 9
Page 12

Step 3 Remove internal packaging
1 To remove the product from the box, follow the instructions
printed on the box.
WARNING! This product weighs appro ximately 143.2 kg (315 lb). HP recommends
that the product be rolled on its wheels rather than be lifted.
2 Remove the or ange shipping loc k from the e xterior of the product,
and remove any cardboard or styrofoam material that is not
orange.
3 Remove the protective film from the control panel graphical
display. (See Step 4, “Identify product parts.”)
4 Open the left door and remove the two packing fuser assembly
spacers. Orange tape connects fuser assembly spacers to the
outside of the left door. Remove the orange tape that runs from
the fuser assembly shipping locks to the outside of the door.
Close the door after removing the fuser assembly spacers and
the tape.
5 Open each tray, remove the orange shipping locks and any other
orange packing material, and then close the trays.
6 Remove all orange packing material and any orange tape from
the automatic document feeder (ADF) door.
7 Remove all orange packing material and any orange tape from
the glass.
Note Save all packing material. You might need it to repack the product at
another time.
10 Product Setup
ENWW
Page 13

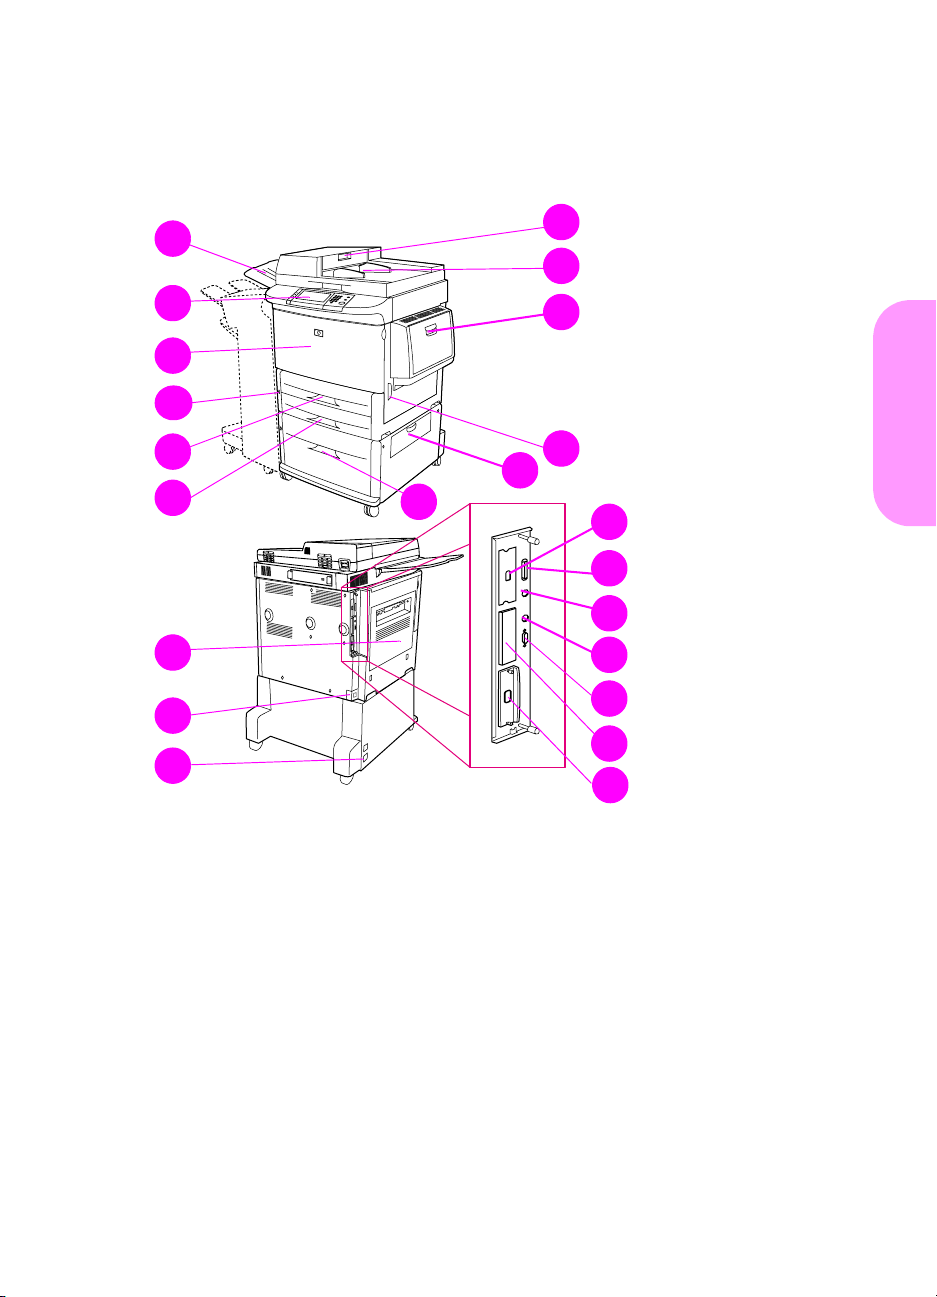
Step 4 Identify product parts
The following illustrations show the location and names of the primary product parts.
10
1
11
2
12
3
4
5
13
14
6
15
16
17
18
7
19
20
8
21
9
22
English
Product parts (front and back views)
1 ADF output
2 Control panel
3 Front door
4 Power button
5 Tray 2
6 Tray 3
7 Left door
8 Power-cord connector
ENWW
9 Tray 4 power-cord
connector
10 ADF door
11 ADF
12 Tray 1
13 Right door
14 Transfer door
15 Tray 4
16 High speed copy
connect connector
17 Parallel connector
18 Foreign interface
harness connector
(AUX)
19 HP Fast InfraRed
Connect (FIR)
20 HP JetLink connector
(Accessory)
21 EIO slot
22 HP Jetdirect printer
server connector
Identify product parts 11
Page 14

Step 5 Position the product
1
2
1 Unlock the front wheels of the
product, and roll the product to its
permanent location. Leave space to
walk behind the product.
2 Push the locking tabs on the front
wheels to the lock position. Only the
front wheels lock.
3 Locate the bag with the standoffs,
and then attach them to the product.
Note
The standoffs ensure that your product
cannot be pushed up against the wall.
3
12 Product Setup
ENWW
Page 15

4
4 Move the scanner carriage shipping
lock to the right.
5 Attach the ADF output.
English
5
ENWW
Position the product 13
Page 16

Step 6 Install the print cartridge
Note If you get toner on your clothing, wipe it off with a dry cloth and wash
the clothing in cold water. Hot water sets toner into fabric.
1
2
3
1 Before removing the print cartridge
from its packaging, set the print
cartridge on a sturdy surface. Gently
slide the print cartridge out of the
packaging.
CAUTION
To prevent dama ge to the print cartridge,
use two hands when handling the
cartridge.
2 Open the front door of the product.
3 Rotate the green lever downward to
the unlock position.
4 Hold the cartridge so that the arrow
is on the left side of the cartridge.
Position t he cartridge as shown, with
the arrow on the left side pointing
toward the product, and align the
cartridge with the printing guides.
Slide the cartridge into the product
as far as it will go.
4
14 Product Setup
Note
The print cartridge has an internal pull
tab. The product automatically removes
the pull tab after the print cartridge is
installed.
ENWW
Page 17

5
5 Press the button on the green lever,
and turn the lever clockwise to the
lock position.
6 Close the front door.
English
6
ENWW
Install the print cartridge 15
Page 18

Step 7 Install accessories
Install the accessories that you purchased. Use the installation
instructions that are packaged with the paper-handling accessories.
See Step 10, “Connect product cables,” for inf ormation on connecting
the HP Fast InfraRed connect.
.
Multifunction finisher
HP Fast InfraRed
3000-sheet stapler/stacker
Accessories
Note See the online use guide for information about ordering accessories.
16 Product Setup
connect (FIR)
3000-sheet stacker
ENWW
Page 19
Step 8 Load trays 1, 2, 3, and 4
1
2
2
This section describes how to load A4or Letter-size paper. For instructions on
loading and configuring other sizes and
types of media, see the introduce guide
that came on the CD-ROM.
CAUTION
To avoid a jam, never open a tray while
the product is printing from that tray.
English
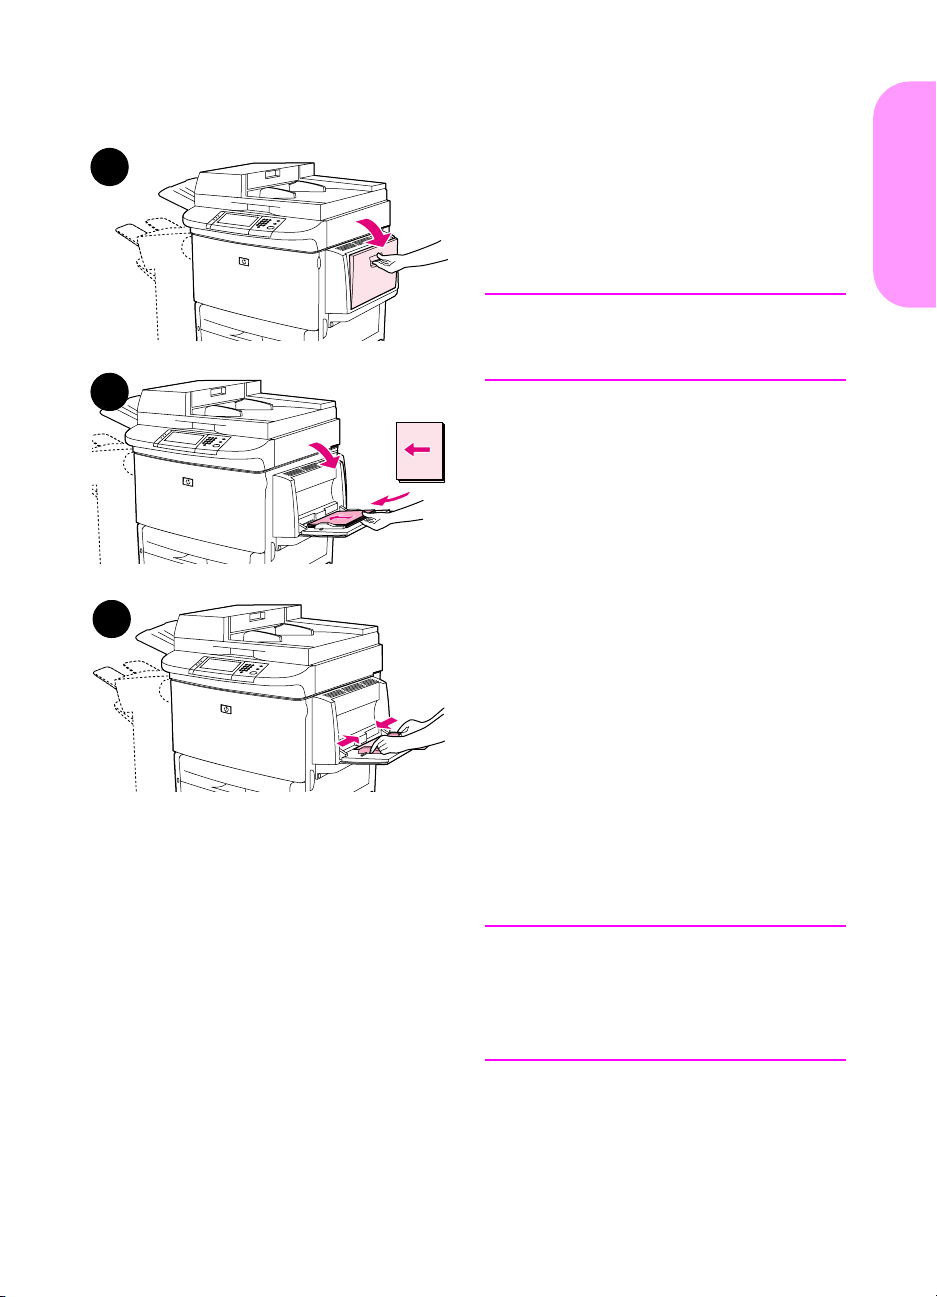
To load Tray 1
Tray 1 is a multipurpose tray that holds
up to 100 sheets of standard-size paper
or 10 envelopes. The product will pull
paper from Tray 1 first (d efault tray). See
the use guide for information about how
to change this default.
3
Tray 1 provides a con v en ient w a y to print
envelope s, transparencies, custom-size
paper, or other types of media without
having to unload the other trays.
1 Open Tray 1.
ENWW
2 Load A4- or Letter-size paper with
the long edge leading into the
product.
3 Adjust the paper guides so that they
lightly touch the paper stack, but do
not bend the paper.
Note
Make sure the paper fits under the tabs
on the guides and not above the load
level indicators.
Load trays 1, 2, 3, and 4 17
Page 20
1
2
3
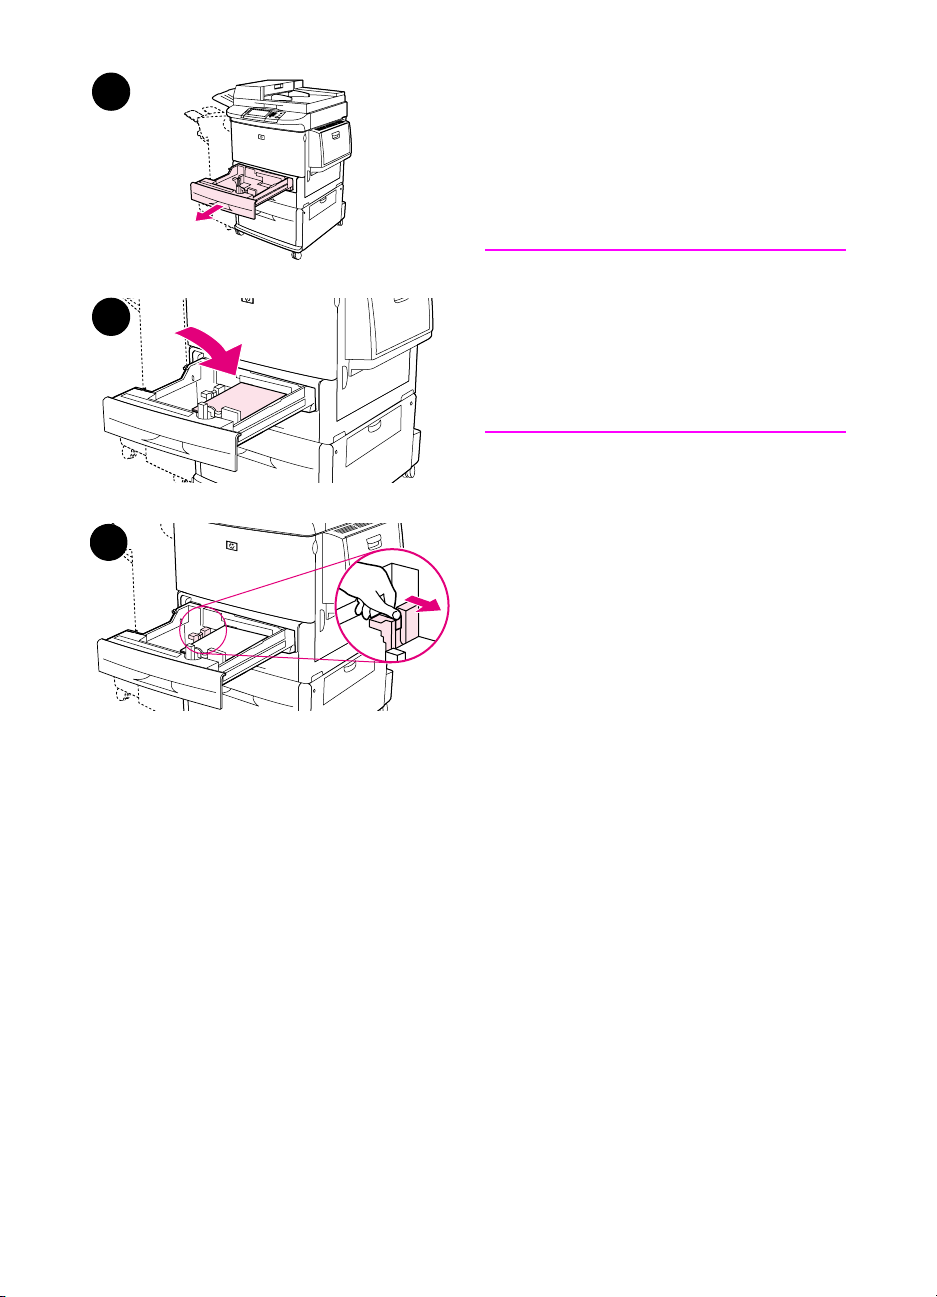
To load Tray 2 and Tray 3
1 Pull Tray 2 open until it stops.
2 Load about 100 sheets of A4- or
Letter-size paper with the short edge
of the paper leading into the produ ct.
Note
For single-sided printing of letterhead or
preprinted paper, the side to be printed
on should be down. For double-sided
printing of letterhead or preprinted
paper, the first side to be printed on
should be up.
3 Adjust the left (Y) paper guide by
squeezing the tab on the guide and
sliding it to the mark for A4- or
Letter-size paper.
18 Product Setup
ENWW
Page 21
4
6
4 Adjust the front (X) paper guide by
squeezing the tab on the guide and
sliding it to the mark for A4- or
Letter-size paper.
5 Load the remaining paper (up to 500
sheets), if desired.
6 Push the tray in until it stops.
7 Repeat steps 1 through 6 to load
Tray 3.
English
ENWW
Load trays 1, 2, 3, and 4 19
Page 22

1
2
3
To load Tray 4
1 Pull Tray 4 open until it stops.
2 Load about 100 sheets of A4- or
Letter-size paper with the short edge
of the paper leading into the produ ct.
Note
For single-sided printing of letterhead or
preprinted paper, the side to be printed
on should be down. For double-sided
printing of letterhead or preprinted
paper, the first side to be printed on
should be up.
3 Adjust the left (Y) paper guide by
squeezing the tab on the guide and
sliding it to the mark for A4- or
Letter-size paper.
20 Product Setup
ENWW
Page 23
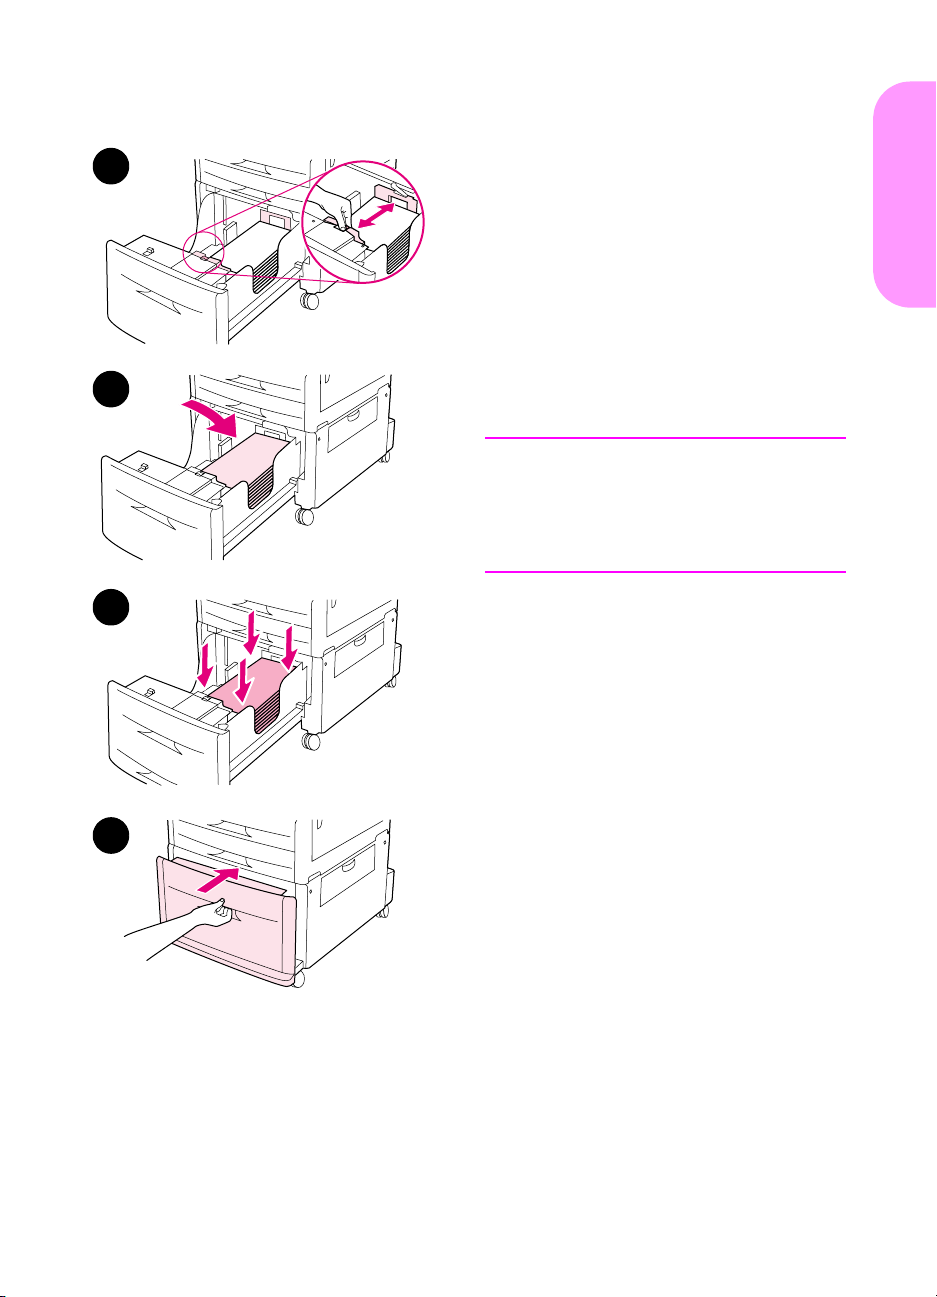
4
5
4 Adjust the front (X) paper guide by
squeezing the tab on the guide and
sliding it to the mark for A4- or
Letter-size paper.
5 Load the remaining paper (up to
2000 sheets), if desired.
6 Press down on all four corners of
the paper stack to ensure the
paper rests flat in the tray,
without bending.
CAUTION
Never store paper or other items in the
area to the left of the paper guides.
Doing so can permanently damage the
tray.
English
6
7 Push the tray in until it stops.
7
ENWW
Load trays 1, 2, 3, and 4 21
Page 24

Step 9 Change the control panel overlays
1
2
The control panel comes either with
English overlays installed or with no
overlays. If necessary, use the procedure
below to change the control panel
overlays.
1 Locate the two control panel
overlays.
2 Insert a small, flat-bladed
screwdriver or other thin, narrow
device in the slot at the top edge of
one of the overlays.
3 Lift the overlay up and backward to
move it away from the product.
3
22 Product Setup
ENWW
Page 25

4
4 Position the new overlay over the
control panel. Align the ends of the
overlay with the holes on the control
panel and slide the overlay in.
5 Snap the overlay firmly onto the
control panel. Ensure that the
overlay is flat against the control
panel.
English
5
6 Repeat steps 2 through 5 to change
the second overlay.
ENWW
Change the control panel overlays 23
Page 26

Step 10 Connect product cables
r
The product can connect to a computer using a parallel cable, or to
the network using the HP Jetdirect print server. Connection to a token
ring network is available through an optional token ring card.
Parall el connector
(Parallel)
High speed copy
connect connector
Foreign interface
harness (AUX)
(optional)
HP Fast InfraRed
Connect (FIR)
(optional)
HP JetLink connecto
(Accessory) (for
accessories)
Location of interface ports
24 Product Setup
HP Jetdirect print
server RJ-45
connector
ENWW
Page 27
Connecting to Ethernet 10/100Base-TX
network
Use the RJ-45 connector to connect the product to an Ethernet 10/
100Base-TX network. HP Jetdirect print servers are available for
many different network connections.
English
1
2
1 Locate the power button on the front
of the product. Make sure the
product is turned off (button out).
2 Connect a twisted-pair network
cable to the RJ-45 connector on the
HP Jetdirect print server installed in
the product.
3 Connect the other end of the cable
to the network.
3
ENWW
Connect product cables 25
Page 28

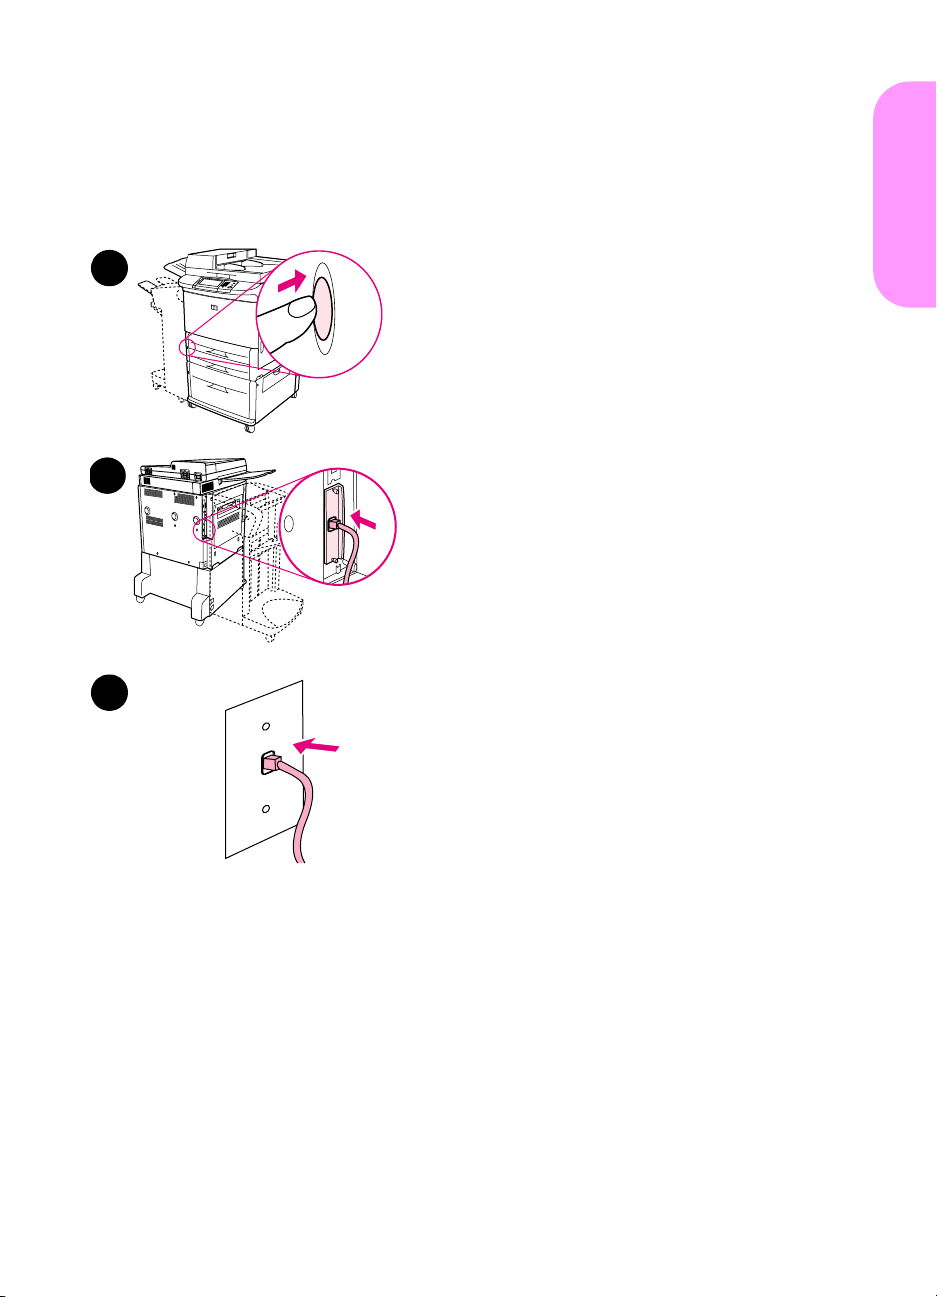
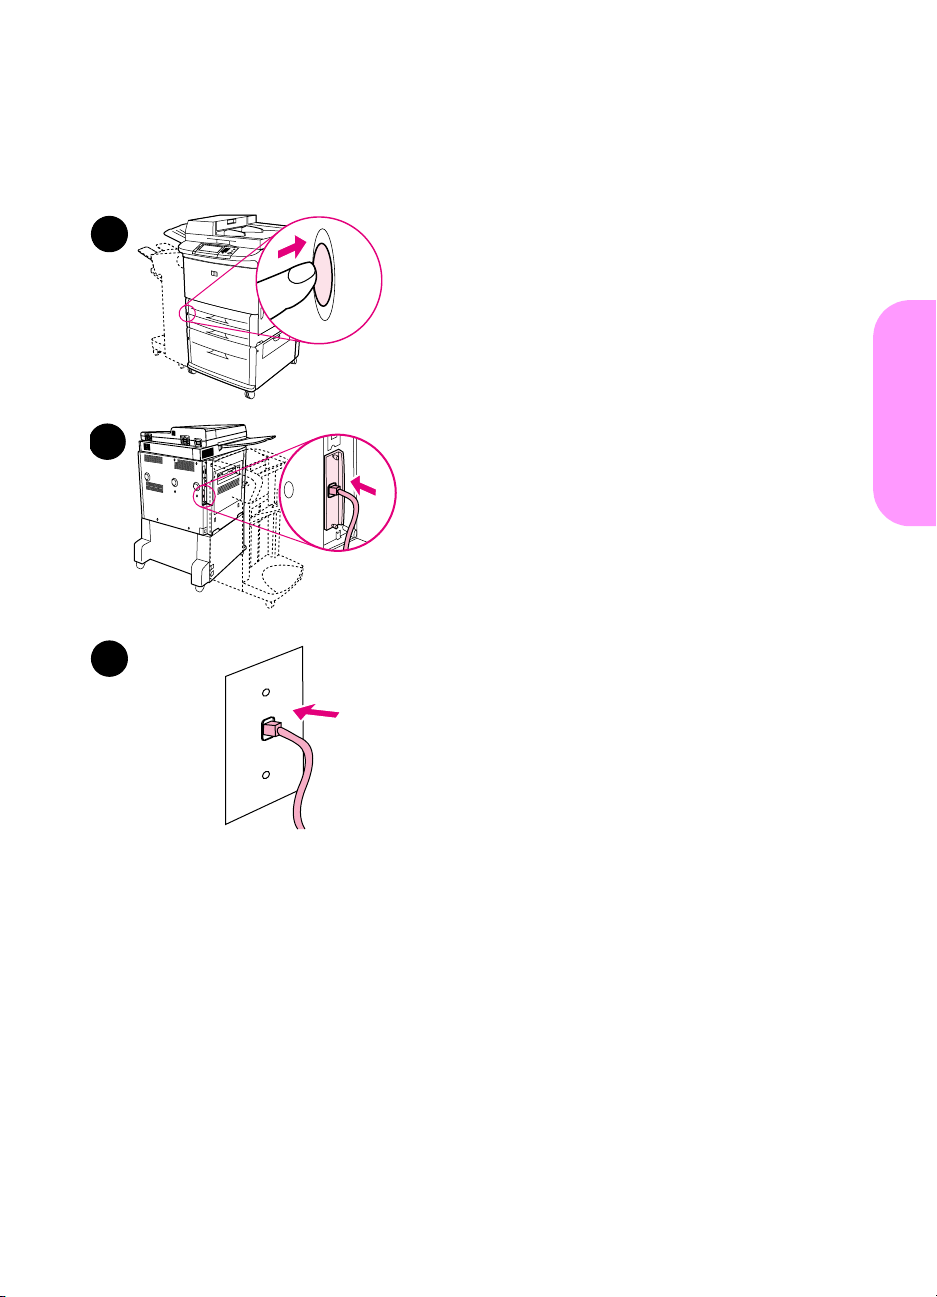
Step 11 Connect power cords
This section describes how to connect the power cord. HP
recommends connecting the power cord to a surge protector.
1
2
3
1 Locate the power button on the front
of the product. Make sure the
product is turned off (button out).
CAUTION
Do not connect the product power cord
to the power-cord connector on
Tray 4. That connector is designed t o
connect paper output devices such as
the multifunction finisher to Tray 4.
2 Connect the power cords to the
product power cord connector and to
the Tray 4 connector. Then connect
the power cords to an adequate AC
outlet.
Note
For best performance, a dedicated 15 A
outlet is recommended.
3 Connect the high speed copy
connect cable to the copy processor
board. Be sure to run the cable
under the standoff.
4
26 Product Setup
4 Press the power button to turn the
product on (button in). Afte r the
product warms up, a prompt will
appear asking you to configure your
control panel display languag e. (See
Step 12, “Configure the control panel
display language.”)
ENWW
Page 29

5
5 Check that the light on the output
device is solid green. Also make
sure that the light on Tray 4 is solid
green. If the light is amber, flashing,
or off, see the use guide that can be
downloaded from
http://www.hp.com/support/lj9000.
English
ENWW
Connect power cords 27
Page 30

Step 12 Configure the control panel display
language
By default, the control panel on the product displays messages in
English. If necessary, set the product to display messages and print
configuration pages in another supported language.
Note When the product is turned on for the fi rst time, y ou ha v e the option to
set the language to display messages in many different languages.
To configure the control panel language
On the touch screen of the graphical display:
1 Touch Menu.
2 Touch Configure Device.
3 Touch System Setup.
4 Touch Language.
.
5 Touch your language, and then touch S
TART
28 Product Setup
ENWW
Page 31

Step 13 Configure digital sending
To configure digital sending, you m u st kn ow the Internet Protocol (IP)
address of the Simple Mail Transfer Protocol (SMTP) server on your
network. The product uses the SMTP se rver IP address to send email messages to other computers.
Optionally, you can have access to a Lightweight Directory Access
Protocol (LDAP) server. LDAP servers hold e-mail addresses and
names, and enable you to associate names (John Smith) with e-mail
addresses (jsmith@hp.com).
Note If you do not know the IP address of the SMTP or LDAP servers on
your network, you will need to ask your netw ork or e-mail administrator
for this information.
On the touch screen of the graphical display:
1 Touch Menu.
2 Touch Configure Device.
3 Touch Copy/Send.
4 You can touch AutoDiscover to let the product search for the
SMTP address, and then go to step 7. Otherwise, proceed to
step 5.
5 Locate SMTP Address on the screen, and then touch the first
box.
English
6 Using the numeric keypad, select the first digit of the IP address
of the SMTP server. Continue touching each box and se lecting
the digits until you ha ve entered the entire IP address.
7 Touch OK.
Note For additional inf ormation about finding the IP addresses of the SMTP
and LDAP servers, and for alternate procedures for configuring the
product for digital sending, see the user guide.
ENWW
Configure digital sending 29
Page 32

Step 14 Print the configuration
Print the configuration to mak e sure the pr oduct is oper ating correctl y
and that the accessories are installed correctly.
On the touch screen of the graphical display:
1 Touch Menu.
2 Touch Information.
3 Touch Print Configuration.
30 Product Setup
ENWW
Page 33

Step 15 Install software
The product comes with software on a CD-ROM. The drivers on this
CD-ROM must be installed to take advantage of the product featur es.
If you do not have access to a CD-ROM drive, you can download the
software from the Internet at http://www.hp.com/support/lj9000.
Depending on the configuration of Windows-driven computers, the
installation program for the software auto matically checks the
computer for Internet access and provides an option to obtain the
latest software from the Internet.
Note Product installation software for UNIX (HP-UX, Sun Solaris) networks
is available for download at http://www.hp.co m/support/net_printing.
English
ENWW
Install software 31
Page 34

Installing Windows printing software
This section describes how to install Windows printing software. The
software is supported on Windows 95, Windows 98, Windo ws NT 4.0,
Windows 2000, and Windo ws Me.
1 Close all running programs.
2 Insert the CD-ROM into the CD-ROM drive. Depending on the
computer configuration, the installation program may
automatically run. If the program does not run automatically: On
the Start menu, click Run. Type x:setup (where X is the letter of
the CD-ROM drive), and click OK.
3 Follow the instructions on the computer screen.
32 Product Setup
ENWW
Page 35

Installing Macintosh printing software
This section describes how to install Macintosh printing software.
1 Quit all running applications.
2 Insert the CD-ROM into the CD-ROM drive.
3 Double-click the HP LaserJet Installers folder.
4 Choose whether to install the OS 8 and 9 versions or the OS X
version. Double-click the appropriate installer.
OS 8 and 9
1 Double-click the Installer icon for the desired language and follow
the instructions on the screen.
2 Open the Chooser from the Apple menu.
3 Click the LaserWriter 8 icon. If the icon is not there, consult your
Mac OS Help for troubleshooting information or contact
HP Customer Care (see the introduce guide that came on the
CD-ROM).
4 If you are on a netw ork with multiple zo nes , select the z one in th e
AppleTalk Zones box where the product is located. If this is
unknown, ask your network administrator.
English
ENWW
5 Double-click the desired printer. An icon should appear.
6 Close the Chooser by clicking the Go-Away (Close) box in the
upper-left corner.
OS X
1 Open the Print Center.
2 Select Add Printer.
3 Select the connection type from the list at the to p of the window.
4 Select the product from the list of printers and click Add.
5 Close the Print Center by clicking the Go-Away (Close) box in the
upper-left corner.
Install software 33
Page 36

Step 16 Verify product setup
To verify that the product has been se t up corre ctly to co p y, send, and
print, follow the steps below.
To verify copying
1 Place a one-page document face down on the glass.
.
2 Press S
If the document does not copy correctly, check your product
installation. For additional information, see the online use guide at
http://www.hp.com/support/lj9000.
To verify sending
1 Place a one-page document face down on the glass.
2 On the touch screen of the graphical display, touch Send
Options.
Note If you cannot gain access to Send Options, check your product
installation and configuration. F or additional info rmation, see the online
use guide.
TART
3 Touch From: and then enter your name using the touch screen
4 Touch OK.
5 Touch To: and then enter your own e-mail address.
6 Touch OK.
7 Press S
The product sends the document to you as an e-mail attachment.
If the document does not send correctly, check your product
installation and configuration. For additional information, see the
online use guide.
34 Product Setup
keyboard.
TART
.
ENWW
Page 37

To verify printing
1 Open a program of your choice. Open or create a simple
document.
2 Select the HP LaserJet 9000mfp or HP LaserJet 9000Lmfp as
your printer.
3 Print the document.
If the document prints, printing setup is complete.
If the document does not print correctly, check your product
installation and configuration. For additional information, see the
online use guide.
English
ENWW
Verify product setup 35
Page 38

Customer support
For additional information regarding the product, see the introduce
guide on the CD-ROM or the use guide at
http://www.hp.com/support/lj9000.
36 Product Setup
ENWW
Page 39

Warranty and regulatory information
Hewlett-Packard limited warranty statement
HP PRODUCT DURATION OF WARRANTY
HP LaserJet 9000mfp
HP LaserJet 9000Lmfp
1 HP warrants HP hardware, accessories, and supplies against
defects in materials and workmanship for the period specified
above. If HP receives notice of such defects during the warranty
period, HP will, at its option, either repair or replace products
which prove to be defective. Replacement products may be eithe r
new or like-new.
2 HP warrants that HP software will not fail to execute its
programming instructions, for the period specified above, due to
defects in material and workmanship when properly installed and
used. If HP receives notice of such defects during the warranty
period, HP will replace software media which does not execute its
programming instructions due to such defects.
3 HP does not warrant that the operation of HP products will be
uninterrupted or error free. If HP is unable, within a reasonable
time, to repair or replace an y product t o a condition as w arra nted,
customer will be entitled to a refund of the purchase price upon
prompt return of the product.
1 year, on-site
English
ENWW
4 HP products may contain rem anuf actured parts equivalent t o new
in performance or may have been subject to incidental use.
5 The warranty period begins on the date of the delivery or on the
date of installation if installed by HP. If customer schedules or
delays HP installation more than 30 days after delivery, warranty
begins on the 31st day from de livery.
6 Warran ty doe s no t apply to defects resulting from (a) improper or
inadequate maintenance or calibration, (b) software, interfacing,
parts or supplies not supplied by HP, (c) unauthorized
modification or misuse, (d) operation outside of the published
environmental specifications for the product, or (e) improper site
preparation or maintenance.
Warranty and regulatory information 37
Page 40

7 TO THE EXTENT ALLOWED BY LOCAL LAW, THE ABOVE
WARRANTIES ARE EXCLUSIVE AND NO O THER WARRANTY,
WHETHER WRITTEN OR ORAL, IS EXPRESSED OR IMPLIED
AND HP SPECIFICALLY DISCLAIMS THE IMPLIED
WARRANTIES OR CONDITIONS OF MERCHANTABILITY,
SATISFACTORY QUALITY, AND FITNESS FOR A PARTICULAR
PURPOSE.
8 TO THE EXTENT ALLOWED BY LOCAL LAW, THE REMEDIES
IN THIS WARRANTY STATEMENT ARE THE CUSTOMER’S
SOLE AND EXCLUSIVE REMEDIES. EXCEPT AS INDICATED
ABOVE, IN NO EVENT WILL HP OR ITS SUPPLIERS BE
LIABLE FOR LOSS OF DATA OR FOR DIRECT, SPECIAL,
INCIDENTAL, CONSEQUENTIAL (INCLUDING LOST PROFIT
OR DATA), OR OTHER DAMAGE, WHETHER BASED IN
CONTRACT, TORT, OR OTHERWISE.
9 FOR CONSUMER TRANSACTIONS IN AUSTRALIA AND NEW
ZEALAND; THE WARRANTY TERMS CONTAINED IN THIS
STATEMENT, EXCEPT TO THE EXTENT LAWFULLY
PERMITTED , DO NO T EXCLUDE, RESTRICT OR MODIFY AND
ARE IN ADDITION TO THE MANDATORY STATUTOR Y RIGHTS
APPLICABLE TO THE SALE OF THIS PRODUCT TO YOU.
Service during and after the warranty period
•
•
•
38 Product Setup
If product hardware fails during the warranty period, contact an
HP-authorized service or support provider.
If product hardware fails after the warranty period, and you have
an HP Maintenance Agreement or HP SupportPack, request
service as specified in the agreement.
If you do not have an HP Maintenance Agreement or HP
SupportPack, contact an HP-authorized service or support
provider.
ENWW
Page 41

Limited warranty for print cartridge life
Note The warranty below applies to the print cartridge that came with this
product.
This HP Print Cartridge is warranted to be free from defects in
materials and workmanship for cartridge life (which is indicated by a
product control panel cartridge end of life message).
HP will, at HP’s option, either replace products which prove to be
defective or refund your purchase price.
The warranty does not cover cartridges which have been refilled, are
emptied, abused, misused, or tampered with in any way.
This limited warranty gives you specific legal rights. You may have
other rights which vary from state to state, province to province, and
country/region to country/region.
To the extent allowed by applicable law, in no event shall HewlettPac kard Compan y be liab le f or an y incidental, co nsequential, sp ecial,
indirect, punitive, or exemplary damages or lost profits from any
breach of this warranty or otherwise.
English
ENWW
Warranty and regulatory information 39
Page 42

HP software license terms
ATTENTION: USE OF THE SOFTWARE IS SUBJECT TO THE HP
SOFTWARE LICENSE TERMS SET FORTH BELOW. USING THE
SOFTWARE INDICATES YOUR ACCEPTANCE OF THESE
LICENSE TERMS. IF YOU DO NOT ACCEPT THESE LICENSE
TERMS, YOU MAY RETURN THE SOFTWARE FOR A FULL
REFUND. IF THE SOFTWARE IS BUNDLED WITH ANOTHER
PRODUCT, YOU MAY RETURN THE ENTIRE UNUSED PRODUCT
FOR A FULL REFUND.
The following L icense Terms govern your use of the accompanying
Software unless you have a separate signed agreement with HP.
License grant
HP grants you a license to Use one copy of the Software. “Use”
means storing, loading, installing, executing, or displaying the
Software. You may not modify the Software or disable any licensing or
control features of the Software. If the Software is licensed for
“concurrent use”, you may not allow more than the maximum number
of authorized users to Use the Software concurrently.
Ownership
The Software is owned and copyrighted by HP or its third party
suppliers. Your license confers no title to, or ownership in, the
Software and is not a sale of any rights in the Software. HP’s third
party suppliers may protect their rights in the event of any violation of
these License Terms.
Copies and adaptations
You may only mak e cop ies or ada ptat ions o f th e Sof tware for archival
purposes or when copying or adaptation is an essential step in the
authorized Use of the Software. You must reproduce all copyright
notices in the original Software on all copies or adaptations. You may
not copy the Software onto any public network.
No disassembly or decryption
You may not disassemble or decompile the Software unless HP’s
prior written consent is obtained. In some jurisdictions, HP’s consent
may not be required for limited disassembly or decompilation. Upon
request, you will provide HP with reasonably detailed information
regarding any disassemb ly or decompilation. You may not decrypt the
Software unless decryption is a necessary part of the operation of the
Software.
40 Product Setup
ENWW
Page 43

Transfer
Your license will automatically terminate upon any transfer of the
Software. Upon tr ansfer, you must deliver the Software, including any
copies and related documentation , to th e transferee. The transferee
must accept these License Terms as a condition to the transfer.
Termination
HP may terminate your license upon notice for failure to comply with
any of these License Terms. Upon termination, you must immediately
destroy the Software, together with all copies, adaptations, and
merged portions in any form.
Export requirements
You may not export or reexport the Software or any copy or
adaptation in violation of any applicable laws or regulations.
U.S. government restricted rights
The Software and any accompanying documentation have been
dev eloped entirely at private expense. They are delivered and
licensed as “commercial computer software” as defined in DFARS
252.227-7013 (Oct 1988), DFARS 252.211-7015 (May 1991), or
DFARS 252.227-7014 (Jun 1995), as a “commercial item” as defined
in FAR 2.101 (a), or as “Restricted computer software” as defined in
FAR 52.227-19 (Jun 1987) (or any equivalent agency regulation or
contract clause), whichever is applicable. You have only those rights
provided for such Sof tw are and an y accompan ying document ation b y
the applicable FAR or DFARS clause or the HP standard software
agreement for the product involved.
English
ENWW
Warranty and regulatory information 41
Page 44

FCC regulations
This equipment has been tested and found to comply with the limits
for a Class A digital device, pursuant to part 15 of the FCC Rules.
These limits are designed to provide reasonable protection against
harmful interference when the equipment is oper ated in a commer cial
environment. This equipment generates, uses, and can radiate radio
frequency energy and, if not installed and used in accordance with
the instruction manual, may cause harmful interference to radio
communications. Operation of this equipment in a residential area is
likely to cause harmful interference in which case the user will be
required to correct the interf e rence at his own expense . Modif icati ons
not expressly approved by HP could void the user's authority to
operate the equipment under FCC rules.
42 Product Setup
ENWW
Page 45

Canadian DOC regulations
Complies with Canadian EMC Class A requirements.
Conforme á la classe A des normes canadiennes de compatibilité
électromagnétique CEM.
VCCI statement (Japan)
VCCI class A product
Korean EMI statement
English
ENWW
Taiwan EMI statement
Warranty and regulatory information 43
Page 46

Safety information
Laser safety
The Center for Devices and Radiological Health (CDRH) of the U.S.
Food and Drug Administration has implemented regulations for laser
products manufactured since August 1, 1976. Compliance is
mandatory for products marketed in the United States . This pro duct is
certified as a “Class 1” laser product under the U.S. Department of
Health and Human Services (DHHS) Radiation Performance
Standard according to the Radiation Control f or Health and Saf ety Act
of 1968. Since radiation emitted inside this product is completely
confined within protective housings and external covers, the laser
beam cannot escape during any phase of normal user operation.
WARNING! Using controls, making adjustments, or performing procedures other
than those specified in this manual ma y result in exposure to hazardous
radiation.
Product information sheet
The Toner Product Information Sheet can be obtained by calling the
U.S. HP FIRST (Fax Information Retrieval Support Technology) at
(1) (800) 333-1917. International customers should see the customer
support flyer that is included with the product.
Laser Statement for Finland
Luokan 1 laserlaite
Klass 1 Laser Apparat
HP LaserJet 9000mfp/HP LaserJet 9000Lmfp laserkirjoitin on
käyttäjän kannalta turvallinen luokan 1 laserlaite. Normaalissa
käytössä kirjoittimen suojakotelointi estää lasersäteen pääsyn laitteen
ulkopuolelle. Laitteen turvallisuusluokka on määritetty standardin EN
60825-1 (1994) mukaisesti.
Varoitus!
Laitteen käyttäminen muulla kuin käyttöohjeessa mainitulla tavalla
saattaa altistaa käyttäjän turvallisuusluokan 1 ylittävälle
näkymättömälle lasersäteilylle.
44 Product Setup
ENWW
Page 47

Varning!
Om apparaten används på annat sätt än i bruksanvisning
specificerats, kan användaren utsättas för osynlig laserstrålning, som
överskrider gränsen för laserklass 1.
HUOLTO
HP LaserJet 9000mfp/HP LaserJet 9000Lmfp -kirjoittimen sisällä ei
ole käyttäjän huollettavissa olevia kohteita. Laitteen saa avata ja
huoltaa ainoastaan sen huoltamiseen koulutettu henkilö. Tällaiseksi
huoltotoimenpiteeksi ei katsota väriainekasetin vaihtamista,
paperiradan puhdistusta tai muita käyttäjän käsikirjassa lueteltuja,
käyttäjän tehtäväksi tarkoitettuja ylläpitotoimia, jotkavoidaan suorittaa
ilman erikoistyökaluja.
Varo!
Mikäli kirjoittimen suojakotelo avataan, olet alttiina näkymättömälle
lasersäteilylle laitteen ollessa toiminnassa. Älä katso säteeseen.
English
ENWW
Warranty and regulatory information 45
Page 48

Declaration of Conformity
according to ISO/IEC Guide 22 and EN 45014
Manufacturer’s Name: Hewlett-Packard Company
Manufacturer’s
Address:
declares, that the product
Product Name: LaserJet 9000 MFP Printer, including Duplexing- and Multi Purpose Paper
Model Numbers: C8523A, Q2458A, Q2622A and Q2623A Printer,
Product Options: ALL
conforms to the following Product Specifications:
SAFETY: IEC 60950:1991+A1 +A2 +A3 +A4 / EN60950:1992+A1 +A2 +A3 +A4 +A11
IEC 60825-1:1993 + A1 / EN 60825-1:1994 + A11 (Class 1 Laser/LED Product)
GB4943-1995
EMC:
CISPR 22:1993 + A1 + A2 / EN 55022:1994 + A1 + A2 Class A
EN 61000-3-2:1995 / A14
EN 61000-3-3:1995
EN 55024:1998
11311 Chinden Boulevard
Boise, Idaho 83714-1021, USA
Input Accessory
Including : C8532A, C8568A
1*
FCC Title 47 CFR, Part 15 Class A
2
/ ICES-003, Issue 3 / GB9254-1998
AS / NZS 3548:1995 + A1 + A2
Supplementary Information:
The product herewith complies with the requirements of the EMC Directive 89/336/EEC and the Low
Voltage Directive 73/23/EEC, and carries the CE-Marking accordingly
1) The product was tested in a typical configuration with Hewlett-P ackard P ersonal Computer Systems.
2) This Device complies with Part 15 of the FCC Rules. Operation is subject to the following two
Conditions:
(1) this device may not cause harmful interference, and
(2) this device must accept any interf erence received, including interference that may cause undesired
operation
*) The product includes LAN (Local Area Network) options. When the interface cable is attached to
LAN connectors, the product meets the requirements of EN55022 Class A in which case the follo wing
applies: "Warning - This is a class A product. In a domestic environment this product may cause
radio interference in which case the user may be required to take adequate measures".
3) The model number may include an additional suffix letter "R".
Boise, Idaho USA
22 August, 2002
For Regulatory Topics Only:
Australia Contact: Product Regulations Manager, Hewlett-Packard Australia Ltd., 31-41 Joseph Street, Blackburn,
Victoria 3130, Australia.
European Contact: Your Local Hewlett-Packard Sales and Service Office or Hewlett-Packard Gmbh,
Department HQ-TRE / Standards Europe, Herrenberger Straße 130, D-71034 Bõblingen (FAX: +49-7031-14-3143)
USA Contact: Pr oduct Regulations Manager , Hewlett-P ackard Company, PO Box 15, Mail Stop 160, Boise, Idaho 83707-
0015 (Phone: 208-396-6000)
46 Product Setup
ENWW
Page 49

Declaration of Conformity
according to ISO/IEC Guide 22 and EN 45014
Manufacturer’s Name: Hewlett-Packard Company
English
Manufacturer’s
Address:
declares, that the product
Product Name: 2000-sheet Feeding Paper Input Accessory for the HP LaserJet 9000 Printer
Model Numbers: C8531A
Product Options: ALL
conforms to the following Product Specifications:
SAFETY: IEC 60950:1991+A1:1992+A2:1993+A3:1995+A4:1996 /
EMC: CISPR 22:1997 / EN 55022:1998 Class B
Supplementary Information:
The product herewith complies with the requirements of the EMC Directive 89/336/EEC and the Low
Voltage Directive 73/23/EEC, and carries the CE-Marking accordingly.
1) The product was tested in a typical configuration with Hewlett-P ackard P ersonal Computer Systems.
2) This Device complies with Part 15 of the FCC Rules. Operation is subject to the following two
Conditions:
(1) this device may not cause harmful interference, and
(2) this device must accept any interf erence received, including interference that may cause undesired
operation
Australia Contact: Product Regulations Manager, Hewlett-Packard Australia Ltd., 31-41 Joseph Street, Blackburn,
Victoria 3130, Australia
European Contact: Your Local Hewlett-Packard Sales and Service Office or Hewlett-Packard Gmbh, Department HQTRE / Standards Europe, Herrenberger Straße110-140, D-71034 Böblingen (FAX: +49-7031-14-3143)
USA Contact: Pr oduct Regulations Manager , Hewlett-P ackard Company, PO Box 15, Mail Stop 160, Boise, Idaho 837070015 (Phone: 208-396-6000)
EN 60950:1992+A1:1993 + A2:1993 + A3:1995 + A4:1997 + A11:1997
EN 55024:1998
IEC 61000-3-2:1995/EN 61000-3-2:1995+A14:2000
IEC 61000-3-3:1994/EN 61000-3-3:1995
FCC Title 47 CFR, Part 15 Class B
AS / NZS 3548:1995
11311 Chinden Boulevard
Boise, Idaho 83714-1021, USA
Family
1
2
/ ICES-003, Issue 3
Hewlett-Packard Company
Boise, Idaho USA
Apr. 16, 2001
ENWW
Declaration of Conformity 47
Page 50

Declaration of Conformity
according to ISO/IEC Guide 22 and CEN/CENELEC EN 45014
Manufacturer’s Name: Hewlett-Packard Company
Manufacturer’s
Address:
Montemorelos 299, Guadalajara Jalisco, 45060
Mexico
declares, that the product
Product Name: 3000-sheet Stacker
Model Numbers: C8084A
Product Options: N/A
conforms to the following Product Specifications:
SAFETY: IEC 950: 1991+A1+A2+A3+A4 / EN 60950: 1992+A1+A2+A3+A4+A11
IEC 825-1:1993/EN 60825-1:1994 Class 1 (Laser/LED)
UL1950, Third edition.
EMC: CISPR 22:1997/EN55022:1998 Class A
1)
EN55024:1998
IEC61000-3-2:1998/EN 61000-3-2:1995
IEC61000-3-3:1994/EN61000-3-3:1995
2)
FCC Title 47 CFR, Part 15 Class A
AS/NZS 3548:1992/CISPR 22:1993 Class A
/ICES-003, Issue 2
1)
Additional Information:
The product herewith complies with the requirements of the EMC Directive 89/336/EEC and the Low
Voltage Directive 73/23/EEC, and carries the CE-Marking accordingly.
1) The product was tested in a typical configuration with Hewlett-P ackard P ersonal Computer Systems.
2) This Device complies with Part 15 of the FCC Rules. Operation is subject to the following two
Conditions:
(1) this device may not cause harmful interference, and
(2) this device must accept any interf erence received, including interference that may cause undesired
operation.
Hewlett-Packard Company
Guadalajara, Jalisco, MEXICO
October 16, 2000
Australia Contact: Product Regulations Manager, Hewlett-Packard Australia Ltd., 31-41 Joseph Street, Blackburn,
Victoria 3130, Australia
European Contact: Your Local Hewlett-Packard Sales and Service Office or Hewlett-Packard Gmbh, Department HQTRE / Standards Europe, Herrenberger Straße110-140, D-71034 Böblingen (FAX: +49-7031-14-3143)
USA Contact: Pr oduct Regulations Manager , Hewlett-P ackard Company, PO Box 15, Mail Stop 160, Boise, Idaho 837070015 (Phone: 208-396-6000)
48 Product Setup
ENWW
Page 51

Declaration of Conformity
according to ISO/IEC Guide 22 and CEN/CENELEC EN 45014
Manufacturer’s Name: Hewlett-Packard Company
English
Manufacturer’s
Address:
Montemorelos 299, Guadalajara Jalisco, 45060
Mexico
declares, that the product
Product Name: 3000-sheet Stapler/Stacker
Model Numbers: C8085A
Product Options: N/A
conforms to the following Product Specifications:
SAFETY: IEC 950:1991+A1+A2+A3+A4 / EN 60950:1992+A1+A2+A3+A4+A11
IEC 825-1:1993/EN60825-1:1994 Class 1 (Laser/LED)
UL1950, Third Edition
EMC: CISPR 22:1997 / EN 55022:1998 Class B
1
EN 55024:1998
IEC 61000-3-2:1998/EN 61000-3-2:1995
IEC 61000-3-3:1994/EN 61000-3-3:1995
2
FCC Title 47 CFR, Part 15 Class B
AS / NZS 3548:1992/CISPR 22:1993 Class B
/ ICES-003, Issue 3
1
Additional Information:
The product herewith complies with the requirements of the EMC Directive 89/336/EEC and the Low
Voltage Directive 73/23/EEC, and carries the CE-Marking accordingly.
1) The product was tested in a typical configuration with Hewlett-P ackard P ersonal Computer Systems.
2) This Device complies with Part 15 of the FCC Rules. Operation is subject to the following two
Conditions:
(1) this device may not cause harmful interference, and
(2) this device must accept any interf erence received, including interference that may cause undesired
operation.
Hewlett-Packard Company
Guadalajara, Jalisco, MEXICO
October 16, 2000
Australia Contact: Product Regulations Manager, Hewlett-Packard Australia Ltd., 31-41 Joseph Street, Blackburn,
Victoria 3130, Australia
European Contact: Your Local Hewlett-Packard Sales and Service Office or Hewlett-Packard Gmbh, Department HQTRE / Standards Europe, Herrenberger Straße110-140, D-71034 Böblingen (FAX: +49-7031-14-3143)
USA Contact: Pr oduct Regulations Manager , Hewlett-P ackard Company, PO Box 15, Mail Stop 160, Boise, Idaho 837070015 (Phone: 208-396-6000)
ENWW
Declaration of Conformity 49
Page 52

Declaration of Conformity
according to ISO/IEC Guide 22 and CEN/CENELEC EN 45014
Manufacturer’s Name: Hewlett-Packard Company
Manufacturer’s
Address:
Montemorelos 299, Guadalajara Jalisco, 45060
Mexico
declares, that the product
Product Name: HP Multifunction Finisher
Model Numbers: C8088A, C8088B
Product Options: N/A
conforms to the following Product Specifications:
SAFETY: IEC 950:1991+A1+A2+A3+A4 / EN 60950:1992+A1+A2+A3+A4+A11
IEC 825-1:1993/EN60825-1:1994 Class 1 (Laser/LED)
UL1950, Third Edition
EMC: CISPR 22:1997 / EN 55022:1998 Class B
1
EN 55024:1998
IEC 61000-3-2:1998/EN 61000-3-2:1995
IEC 61000-3-3:1994/EN 61000-3-3:1995
2
FCC Title 47 CFR, Part 15 Class B
AS / NZS 3548:1992/CISPR 22:1993 Class B
/ ICES-003, Issue 3
1
Additional Information:
The product herewith complies with the requirements of the EMC Directive 89/336/EEC and the Low
Voltage Directive 73/23/EEC, and carries the CE-Marking accordingly.
1) The product was tested in a typical configuration with Hewlett-P ackard P ersonal Computer Systems.
2) This Device complies with Part 15 of the FCC Rules. Operation is subject to the following two
Conditions:
(1) this device may not cause harmful interference, and
(2) this device must accept any interf erence received, including interference that may cause undesired
operation.
Hewlett-Packard Company
Guadalajara, Jalisco, MEXICO
May 8, 2001
Australia Contact: Product Regulations Manager, Hewlett-Packard Australia Ltd., 31-41 Joseph Street, Blackburn,
Victoria 3130, Australia
European Contact: Your Local Hewlett-Packard Sales and Service Office or Hewlett-Packard Gmbh, Department HQTRE / Standards Europe, Herrenberger Straße110-140, D-71034 Böblingen (FAX: +49-7031-14-3143)
USA Contact: Pr oduct Regulations Manager , Hewlett-P ackard Company, PO Box 15, Mail Stop 160, Boise, Idaho 837070015 (Phone: 208-396-6000)
50 Product Setup
ENWW
Page 53

hp LaserJet 9000mfp
hp LaserJet 9000Lmfp
Español
Inicio
Page 54

© Copyright Hewlett-Packard
Company 2002
Reservados todos los derechos.
Queda prohibida la
reproducción, adaptación
o traducción sin previa
autorización por escrito,
excepto en aquellos casos en
que lo permitan las leyes de
copyright.
Número de publicación
Q2622-90902
Edition 1, 12/2002
Garantía
La información contenida en
este documento está sujeta
a cambios sin previo aviso.
Hewlett-Packard no ofrece
garantías de ningún tipo con
respecto a esta información.
HEWLETT-PACKARD
RENUNCIA EXPRESAMENTE
A LA GARANTÍA IMPLÍCIT A DE
COMERCIABILIDAD E
IDONEIDAD PARA UN FIN
PART ICULA R.
Hewlett-Packard no se hará
responsable de los daños
directos, indirectos, incidentales
y consecuenciales, o de
cualquier otro daño que pueda
estar relacionado con el
suministro o uso de este
material.
Avisos de marcas
comerciales
Microsoft
Windows
Windows Me
, MS Windows,
, Windows NT,
y Windows XP
son marcas comerciales
registradas en EE.UU. de
Microsoft Corporation.
Todos los demás productos
mencionados aquí son marcas
comerciales de sus respectivas
compañías.
Hewlett-Packard Company
11311 Chinden Boulevard
Boise, Idaho 83714 EE.UU.
Page 55

Configuración
del equipo
Contenido
Introducción. . . . . . . . . . . . . . . . . . . . . . . . . . . . . . . . . . . . . . . . . . 54
Dónde buscar información. . . . . . . . . . . . . . . . . . . . . . . . . . . . . . . 55
Lista de comprobación de la instalación . . . . . . . . . . . . . . . . . . . . 56
Prepare el lugar destinado al equipo. . . . . . . . . . . . . . . . . . . . . . . 57
Verifique el contenido de la caja . . . . . . . . . . . . . . . . . . . . . . . . . . 59
Quite el embalaje interno . . . . . . . . . . . . . . . . . . . . . . . . . . . . . . . 60
Identifique los componentes del equipo . . . . . . . . . . . . . . . . . . . . 61
Coloque el equipo . . . . . . . . . . . . . . . . . . . . . . . . . . . . . . . . . . . . . 62
Instale el cartucho de impresión . . . . . . . . . . . . . . . . . . . . . . . . . . 64
Instale los accesorios . . . . . . . . . . . . . . . . . . . . . . . . . . . . . . . . . . 66
Cargue las bandejas 1, 2, 3 y 4. . . . . . . . . . . . . . . . . . . . . . . . . . . 67
Cambie las plantillas del panel de control. . . . . . . . . . . . . . . . . . . 72
Conecte los cables del equipo . . . . . . . . . . . . . . . . . . . . . . . . . . . 74
Conecte los cables de alimentación eléctrica . . . . . . . . . . . . . . . . 76
Configure el idioma de la pantalla del panel de control. . . . . . . . . 78
Configure el envío digital. . . . . . . . . . . . . . . . . . . . . . . . . . . . . . . . 79
Imprima la configuración. . . . . . . . . . . . . . . . . . . . . . . . . . . . . . . . 80
Instale el software . . . . . . . . . . . . . . . . . . . . . . . . . . . . . . . . . . . . . 81
Instalación del software de impresión para Windows . . . . . 82
Instalación del software de impresión para Macintosh . . . . 83
Verifique la configuración del equipo. . . . . . . . . . . . . . . . . . . . . . . 84
Asistencia al cliente. . . . . . . . . . . . . . . . . . . . . . . . . . . . . . . . . . . . 86
Garantía e información sobre normativas . . . . . . . . . . . . . . . . . . . 87
Declaración de garantía limitada de Hewlett-Packard. . . . . 87
Garantía limitada durante la vida útil de los cartuchos
de impresión . . . . . . . . . . . . . . . . . . . . . . . . . . . . . . . . . . . . 89
Términos de la licencia de software de HP . . . . . . . . . . . . . 90
Normativa de la FCC. . . . . . . . . . . . . . . . . . . . . . . . . . . . . . 92
Información de seguridad . . . . . . . . . . . . . . . . . . . . . . . . . . 94
Declaración de conformidad . . . . . . . . . . . . . . . . . . . . . . . . . . . . . 96
Español
ESWW
Contenido 53
Page 56

Introducción
Enhorabuena por la compra de la impresora HP LaserJet 9000mfp*
(referencia C8523A) o la impresora HP LaserJet 9000Lmfp
(referencia Q2622A). El producto se suministra, como opción
estándar, con:
•
•
•
•
•
•
•
•
El equipo presenta una pantalla táctil interactiv a en la pantalla g ráfica
del panel de control. Debe seleccionar uno de los tres dispositivos
siguientes de manejo del papel: la apiladora para 3.000 hojas, la
grapadora/apiladora para 3.000 hojas o el dispositivo de acabados
multifunción.
memoria de acceso aleatorio de 128 MB (RAM)
funciones de impresión en formato ancho, envío digital y copia
impresión en formato ancho
dos bandejas para 500 hojas (bandeja 2 y bandeja 3)
una bandeja multifunción para 100 hojas (bandeja 1)
una bandeja de entrada para 2.000 hojas (bandeja 4)
un servidor de impresión HP Jetdirect
un accesorio de impresión a doble cara (para imprimir en ambos
lados del papel)
Nota
54 Configuración del equipo
Para co nect ar el equipo a un a re d Token Ring, necesitará una tarjeta
Token Ring opcional.
*Periférico multifunción
ESWW
Page 57

Dónde buscar información
Guía de inicio
Esta guía contiene información sobre
cómo desempaquetar e instalar el
equipo.
Guía de introducción
Esta guía contiene información sobre
cómo realizar las tareas básicas de
impresión, envío y copia. La guía de
introducción se encuentra disponible en
el CD que se proporciona con el equi po.
Si desea realizar una copia impresa de
la guía de introducción, utilice el equipo
para hacerla.
Español
ESWW
Guía de uso
Esta guía contiene información
detallada sobre cómo utilizar el equipo
ysobre cómo solucionar problemas.
Se encuentra disponible en la
dirección de Internet
http://www.hp.com/support/lj9000.
Si desea realizar una copia impresa de
la guía de uso, utilice el equipo para
hacerla.
Dónde buscar información 55
Page 58

Lista de comprobación de la instalación
Esta guía le ayudará a configurar e instalar el equipo nuevo. Para
realizar una instalación correcta, siga en orden estas secciones.
•
Desempaquete el equipo pasos 1 a 5
•
Instale el equipo pasos 6 a 14
•
Instale el software
de impresión
•
Verifique la configuración
del equipo
paso 15
paso 16
ADVERTENCIA
Para evitar daños, no le vante el equipo . El equipo se ha diseñado para
ser transportado mediante ruedas.
56 Configuración del equipo
ESWW
Page 59
Paso 1 Prepare el lugar destinado al equipo
Tamaño del equipo
Prepare un sitio que permita que el equipo cumpla con los requisitos
físicos y ambientales siguientes:
)
.
g
l
u
p
5
,
1
(2
m
m
1
,
1
3
5
1.177,3 mm
(46,0 pulg.)
529,6 mm
(20,5 pulg.)
647,7 mm
(25,5 pulg.)
641,4 mm
(25,3 pulg.)
641,4 mm
(25,3 pulg.)
635,0 mm
(25,0 pulg.)
635,0 mm
(25,0 pulg.)
762 mm (30 pulg.)
508 mm
(20 pulg.)
1.219,2 mm (48 pulg.)
Español
ESWW
Dimensiones del equipo HP LaserJet 9000mfp
(vistas lateral y superior)
Prepare el lugar destinado al equipo 57
Page 60

Requisitos para la colocación del equipo
•
Una zona elevada del suelo.
•
Espacio libre alrededor del
equipo.
•
Una habitación bien
ventilada.
•
Que no haya exposición
directa a la luz del sol o a
productos químicos,
incluidos los productos de
limpieza que contengan
amoniaco.
•
Una fuente de alimentación
eléctrica apropiada (circuito
de 15 A, de 110 V o 220 V,
situado cerca del equipo).
Se recomienda utilizar un
circuito de 15 A exclusiv o.
•
Un entorno estable (sin
cambios bruscos de
temperatura o humedad).
•
Humedad relativa del 20 al
80 por ciento.
•
Temperatura de la
habitación de 10 a 32,5 ºC
(50 a 91 ºF)
58 Configuración del equipo
ESWW
Page 61

Paso 2 Verifique el contenido de la caja
cables de alimentación
eléctrica
conector para la función de
copia de alta velocidad
plantillas del panel de control
equipo MFP
salida del ADF
topes
CD-ROM de
software del equipo
cartucho de impresión
Español
ESWW
Póster de referencia rápida
Contenido del paquete
Guía de inicio
Verifique el contenido de la caja 59
Page 62

Paso 3 Quite el embalaje interno
1 Para sacar el equipo de la caja, siga las instrucciones que hay
impresas en ella.
ADVERTENCIA
Nota
Este equipo pesa apro ximadamente 143,2 kg (315 lb). HP recomienda
utilizar las ruedas del equipo para su transporte en lugar de levantarlo.
2 Retire el cierre naranja del e xterior del equipo, así como el cartón
y otros elementos de protección que no sean de ese color.
3 Retire la película protectora de la pantalla gráfica del panel de
control. (Consulte el paso 4, “Identifique los componentes del
equipo”.)
4 Abra la puerta de la izquierda y retire los dos espaciadores de
embalaje del fusor . La cinta naranja conect a los espaciadores del
fusor con el exterior de la puerta izquierda. Retire la cinta naranja
del fusor que contiene los cierres del e xte rior de la puerta. Cierre
la puerta después de extraer los espaciadores del fusor y la
cinta.
5 Abra cada bandeja, quite los cierres naranjas y demás material
de embalaje de este color y cierre la bandeja.
6 Quite todo el material de embalaje y la cinta naranja de la puerta
del alimentador automático de documentos (ADF).
7 Retire todo el material de embalaje y la cinta naranja del cristal.
Guarde todo el material de embalaje. Puede que necesite volver a
empaquetar el equipo en un futuro.
60 Configuración del equipo
ESWW
Page 63
Paso 4 Identifique los componentes del equipo
Las ilustraciones siguientes muestran la posición y los nombres de los componentes
más importantes del equipo:
1
2
3
4
5
6
7
8
9
10
11
12
Español
13
14
15
16
17
18
19
20
21
22
Componentes del equipo (vistas delantera y posterior)
1 Salida del ADF
2 Panel de control
3 Puerta delantera
4 Botón de encendido
5 Bandeja 2
6 Bandeja 3
7 Puerta izquierda
8 Conector del cable de
impresión
9 Conector del cable de
alimentación de la
bandeja 4
ESWW
10 Cubierta del ADF
11 ADF
12 Bandeja 1
13 Puerta derecha
14 Puerta de
transferencia
15 Bandeja 4
16 Conector para la
función de copia de
alta velocidad
Identifique los componentes del equipo 61
17 Conector paralelo
18 Conector del arnés de
interfaz exterior (AUX)
19 Conexión Fast InfraRed
de HP (FIR)
20 Conector de HP JetLink
(accesorio)
21 Ranura EIO
22 Conector del servidor de
impresión HP Jetdirect
Page 64

Paso 5 Coloque el equipo
1
2
1 Desbloquee las ruedas delanteras
del equipo y transpórtelo a su
posición definitiva. Deje espacio
para poder moverse por detrás del
equipo.
2 Empuje las lengúetas de las ruedas
frontales hasta la posición de
bloqueo. Sólo se bloquean las
ruedas frontales.
3 Busque la bolsa con los topes
ycolóquelos en el equipo.
Nota
Los topes garantizan que el equipo, al ser
empujado contra la pared, no la toque.
3
62 Configuración del equipo
ESWW
Page 65

4
4 Mueva el cierre del carro del
escáner hacia la derecha.
5 Conecte la salida del ADF.
5
Español
ESWW
Coloque el equipo 63
Page 66

Paso 6 Instale el cartucho de impresión
Nota
1
2
3
Si el tóner cae en su ropa, límpielo con un paño seco y lave la ropa en
agua fría. El agua caliente fija el tóner en el tejido.
1 Antes de quitar el cartucho de
impresión de su embalaje, colóquelo
en una superficie firme. Saque con
cuidado el cartucho de impresión de
su embalaje.
PRECAUCIÓN
Para evitar que el cartucho de impresión
se dañe, utilice las dos manos para
manejarlo.
2 Abra la puerta delantera del equipo.
3 Gire la palanca verde hasta la
posición de apertura.
4 Sostenga el cartucho de modo que
la flecha esté en su parte izquierda.
Coloque el cartucho tal y como se
muestra, con la flecha del lado
izquierdo apuntando hacia el equipo
y alineado con las guías de
impresión. Introduzca el cartucho en
el equipo tanto como pueda.
4
64 Configuración del equipo
Nota
El cartucho de impresión tiene una
lengüeta de extracción interna. Una vez
instalado el cartucho, el equipo quitará
automáticamente la lengüeta de
extracción.
ESWW
Page 67

5
5 Pulse el botón de la palanca verde
ygírela en el sentido de las agujas
del reloj hasta la posición de cierre.
6 Cierre la puer ta dela nt era.
Español
6
ESWW
Instale el cartucho de impresión 65
Page 68

Paso 7 Instale los accesorios
Instale los accesorios que ha adquirido. Utilice las instrucciones de
instalación provistas con los accesorios para manejo del papel.
Consulte el paso 10, “Conecte los cables del equipo”, para obtener
información sobre cómo realizar la conexión Fast InfraRed de HP.
Dispositivo de acabados
multifunción
Grapadora/apiladora para
3.000 hojas
Accesorios
Nota
66 Configuración del equipo
Consulte la guía de uso en línea para obtener información sobre
solicitud de accesorios.
Conexión Fast InfraRed
de HP (FIR)
Apiladora para
3.000 hojas
ESWW
Page 69

Paso 8 Cargue las bandejas 1, 2, 3 y 4
1
2
2
Esta sección describe cómo cargar papel
tamaño A4 o Carta. Para recibir
instrucciones sobre cómo cargar
y configurar otros tamaños y tipos de
soportes de impresión, consulte la guía de
introducción que se proporciona en el CD .
PRECAUCIÓN
Para evitar atascos de papel no abra
nunca la bandeja cuando el equipo
imprima desde ésta.
Español
Para cargar la bandeja 1
La bandeja 1 es una bandeja
multifunción con capacidad para un total
de 100 hojas de papel de tamaño
estándar o para 10 sobres. El equipo
3
extraerá primero el papel desde la
bandeja 1 (bandeja predeterminada).
Consulte la guía de uso para obtener
más información sobre cómo cambiar
este valor predeterminado.
La bandeja 1 es de gran utilidad para
imprimir sobres, transparencias,
tamaños de papel personalizados u otros
tipos de soportes de impresión sin tener
que descargar el resto de las bandejas.
ESWW
1 Abra la bandeja 1.
2 Cargue papel tamaño Carta o A4
con el borde largo apuntando hacia
el equipo.
3 Ajuste las guías de papel para que
toquen levemente la pila de papel,
sin curvarlo.
Nota
Compruebe que el papel se ajuste a las
pestañas de las guías y no sobrepase
los indicadores de nivel de carga.
Cargue las bandejas 1, 2, 3 y 4 67
Page 70

1
Para cargar las bandejas 2 y 3
1 Tire de la bandeja 2 hasta que se
detenga.
2 Cargue aproximada mente 100 hojas
de papel de tamaño Carta o A4 con
el borde corto del papel mirando
hacia el equipo.
2
Nota
Para realizar impresiones por una sola
cara de papel preimpreso o con
membrete, la cara que vaya a imprimir
debe estar boca abajo. Para realizar
impresiones por las dos caras de papel
preimpreso o con membrete, la primera
cara que vaya a imprimir debe estar
boca arriba.
3
3 Ajuste la guía de papel izquierda (Y)
pulsando la pestaña de la guía y
deslizándola hacia la marca para
papel de tamaño A4 o Carta.
68 Configuración del equipo
ESWW
Page 71

4
6
4 Ajuste la guía de papel delantera (X)
pulsando la pestaña de la guía y
deslizándola hacia la marca para
papel de tamaño A4 o Carta.
5 Si lo desea, cargue el papel restante
(hasta 500 hojas).
6 Empuje la bandeja hasta que llegue
al final.
7 Repita los pasos del 1 al 6 para
cargar la bandeja 3.
Español
ESWW
Cargue las bandejas 1, 2, 3 y 4 69
Page 72

1
Para cargar la bandeja 4
1 Tire de la bandeja 4 hasta que se
detenga.
2 Cargue aproximada mente 100 hojas
de papel de tamaño Carta o A4 con
el borde corto del papel mirando
hacia el equipo.
2
Nota
Para realizar impresiones por una sola
cara de papel preimpreso o con
membrete, la cara que vaya a imprimir
debe estar boca abajo. Para realizar
impresiones por las dos caras de papel
preimpreso o con membrete, la primera
cara que vaya a imprimir debe estar
boca arriba.
3
3 Ajuste la guía de papel izquierda (Y)
pulsando la pestaña de la guía y
deslizándola hacia la marca para
papel de tamaño A4 o Carta.
70 Configuración del equipo
ESWW
Page 73

4
5
4 Ajuste la guía de papel delantera (X)
pulsando la pestaña de la guía y
deslizándola hacia la marca para
papel de tamaño A4 o Carta.
5 Si lo desea, cargue el papel restante
(hasta 2.000 hojas).
6 Presione las cuatro esquinas de
la pila de papel para asegurarse
de que el papel se encuentre
plano sobre la bandeja, sin
dobleces.
PRECAUCIÓN
No almacene papel u otros artículos en
la zona de la izquierda de las guías de
papel. Si lo hace, puede causar daños
a la bandeja.
Español
6
7 Empuje la bandeja hasta que llegue
al final.
7
ESWW
Cargue las bandejas 1, 2, 3 y 4 71
Page 74

Paso 9 Cambie las plantillas del panel de control
1
2
El panel de control viene con plantillas
en inglés, o sin ellas. Si lo desea, utilice
el procedimiento que sigue para cambiar
las plantillas del panel de control.
1 Busque las dos plantillas del panel
de control.
2 Inserte un destornillador peque ño
y plano, u otro dispositivo estrecho
y delgado, en la ranura del borde
superior de una de las plantillas.
3 Leva nte con cuidado la plantilla y tire
hacia atrás para sacarla del equipo.
3
72 Configuración del equipo
ESWW
Page 75

4
5
4 Coloque la nueva plantilla sobre el
panel de control. Alinee los
extremos de la plantilla con los
orificios del panel de control
ycolóquela de nuevo.
5 Encaje la plantilla firmemente en
el panel de control. Verifique que
la plantilla quede bien ajustada en
el panel de control.
6 Repita los pasos del 2 al 5 para
cambiar la segunda plantilla.
Español
ESWW
Cambie las plantillas del panel de control 73
Page 76

Paso 10 Conecte los cables del equipo
El equipo se puede conectar al sistema mediante un cable paralelo,
o a la red mediante un servidor de impresión HP Jetdirect. La
conexión a una red Token Ring se puede llevar a cabo mediante
una tarjeta Token Ring opcional.
Conector paralelo
(Paralelo)
Conector para la función
de copia de alta
velocidad
Arnés de interfaz exterior
(AUX) (opcional)
Conexión Fast InfraRed
de HP (FIR) (opcional)
Conector de HP JetLink
(accesorio) (para
accesorios)
Situación de los puertos de la interfaz
74 Configuración del equipo
Conector RJ-45 del
servidor de impresión
HP Jetdirect
ESWW
Page 77
Conexión a la red Ethernet 10/100Base-TX
Utilice el conector RJ-45 para conectar el equipo a una red Ethernet
10/100 Base-TX. Los servidores HP Jetdirect disponen de dif erent es
conexiones a red.
1
2
1 Busque el botón de encendido en la
parte delantera del equipo. Verifique
que el equipo esté apagado
(posición de apagado).
2 Conecte el cable de red doble
retorcido al conector RJ-45 del
servidor de impresión HP Jetdirect
instalado en el equipo.
3 Conecte el otro extremo del cable
a la red.
Español
3
ESWW
Conecte los cables del equipo 75
Page 78

Paso 11 Conecte los cables de alimentación
eléctrica
Esta sección describe cómo conectar el cable de alimentación
eléctrica. HP recomienda conectar el cable de alimenta ción eléctrica
a un protector contra sobretensione s.
1
2
3
1 Busque el botón de encendido en la
parte delantera del equipo. Verifique
que el equipo esté apagado
(posición de apagado).
PRECAUCIÓN
No conecte el cable de alimentación
del equipo al conector del cable de
alimentación de la bandeja 4. Este
conector está diseñado para conectar
a la bandeja 4 dispositivos de salida de
papel, como el dispositivo de acabados
multifunción.
2 Conecte los cables de alimentación
al conector del cable de alimentación
del equipo y al conector de la
bandeja 4. A continuación, conecte
los cables de alimentación a una
toma de corriente alterna adecuada.
Nota
Par a obtener un rendimiento óptimo, se
recomienda utilizar una toma de 15 A.
4
76 Configuración del equipo
3 Conecte el conector para la función
de copia de alta velocidad para la
función de copia a la tarjeta del
procesador de copia. Compruebe
que el cable se introduzca bajo el
tope.
4 Pulse el botón de encendido para
activar el equipo (botón hacia
dentro). Después de encender el
equipo, aparecerá un indicador que
le pedirá que configure el idioma de
la pantalla del panel de control.
ESWW
Page 79

(Consulte el paso 12, “Configure el
idioma de la pantalla del panel de
control”.)
5
5 Compruebe que la luz del dispositivo
de salida sea verde. Compruebe
también que la luz en la bandeja
4 sea de color verde y no pa rpadee.
Si la luz es ámbar, parpadea o está
apagada, consulte la guía de uso,
que se puede descargar desde la
dirección de Internet
http://www.hp.com/support/lj9000.
Español
ESWW
Conecte los cables de alimentación eléctrica 77
Page 80

Paso 12 Configure el idioma de la pantalla
del panel de control
De manera predeterminada, el panel de control del equipo muestra
sus mensajes en inglés. Si es necesario, configure el equipo para
que muestre los mensajes y las páginas de configuración de
impresión en los otros idiomas admitidos.
Nota
Cuando el equipo se encienda por primera vez, tien e la posibilidad de
configurar los mensajes en div ersos idiomas.
Para configurar el idioma del panel de control
En la pantalla táctil del visor gráfico:
1 Toque Menú.
2 Toque Configurar dispositivo.
3 Toque Configuración del sistema.
4 Toque Idioma.
.
5 Toque el idioma deseado y, a continuación, I
NICIO
78 Configuración del equipo
ESWW
Page 81

Paso 13 Configure el envío digital
Para con f igurar el envío digital, deber á saber la dirección IP (Int ernet
Protocol) del servidor SMTP (Simple Mail Transfer Protocol) de la red.
El equipo utiliza la dirección IP del servidor SMTP para enviar
mensajes de correo electrónico a otros sistemas.
De manera opcional, podrá tener acceso a un servidor de protocolo
LDAP (Lightweight Directory Access Protocol). Los servidores LDAP
almacenan nombres y direcciones de correo electrónico y le permiten
asociar nombres (José López) a direcciones de correo electrónico
(jlopez@hp.com).
Español
Nota
Nota
Si no sabe la dirección IP de los servidores SMTP o LDAP de la red,
deberá pedir esta información al administrador de correo electrónico
o al administrador de red.
En la pantalla táctil del visor gráfico:
1 Toque Menú.
2 Toque Configurar dispositivo.
3 Toque Copia/Enviar.
4 Puede tocar Descubrir automáticamente, dejar que el equipo
busque la dirección SMTP y seguir con el p aso 7. De lo contra rio ,
proceda con el paso 5.
5 Busque Dirección SMTP en la pantalla y toque el primer cuadro.
6 Mediante el teclado numérico, seleccione el primer dígito de la
dirección IP del servidor SMTP. Siga tocando cada cuadro y
seleccionando los dígitos hasta que haya introducido toda la
dirección IP.
7 Toque Aceptar.
Para obtener más información sobre cómo encontrar las direcciones
IP de los servidores SMTP o LDAP y sobre proced imientos alternativos
para configurar el producto par a e n v íos digitales, consulte la guía del
usuario.
ESWW
Configure el envío digital 79
Page 82

Paso 14 Imprima la configuración
Imprima la configuración para asegurarse de que el equipo esté
funcionando correctamente y de que los accesorios estén bien
instalados.
En la pantalla táctil del visor gráfico:
1 Toque Menú.
2 Toque Información.
3 Toque Imprimir configuración.
80 Configuración del equipo
ESWW
Page 83

Paso 15 Instale el software
El equipo viene con el software en un CD. Los controladores de este
CD deben estar instalados para aprovechar al máximo las
posibilidades del equipo.
Si no tiene acceso a una unidad de CD-ROM, puede descargar
el software desde la dirección de Internet
http://www.hp.com/support/lj9000.
Según la configuración de los sistemas con Window s, el prog rama de
instalación para el software comprobará automáticamente el acceso
a Internet del sistema y le ofrecerá la opción de obtener el último
software desde Internet.
Español
Nota
El software de instalación del equipo para redes UNIX (HP-UX, Sun
Solaris) se encuentra disponible en la dirección
http://www.hp.com/support/net_printing.
ESWW
Instale el software 81
Page 84

Instalación del software de impresión para
Windows
Esta sección describe cómo instalar el software de impresión para
Windows. El softw are es compatible con Windows 95, Windows 98,
Windows NT 4.0, Windows 2000 y Windows Me.
1 Cierre todos los programas que estén abiertos.
2 Inserte el CD en la unidad de CD-ROM. Según la configuración
del sistema, quizá el programa de instalación se ejecute
automáticamente. Si el programa no se ejecuta automáticamente:
En el menú Inicio, seleccione Ejecutar. Escriba x:setup (X es la
letra de la unidad de CD-ROM) y seleccione Aceptar.
3 Siga las instrucciones de la pantalla del sistema.
82 Configuración del equipo
ESWW
Page 85

Instalación del software de impresión para
Macintosh
Esta sección describe cómo instalar el software de impresión para
Macintosh.
1 Salga de todas las aplicaciones abiertas.
2 Inserte el CD en la unidad de CD-ROM.
3 Efectúe una doble selección en la carpeta HP LaserJet Installers.
4 Seleccione las versiones OS 8 y 9 o la versión OS X que vaya
ainstalar. Efectúe una doble selección en el instalador correcto.
OS 8 y 9
1 Efectúe una dob le selección en el icono Inst aller para seleccionar
el idioma y siga las instrucciones de la pantalla.
2 Abra el Selector desde el menú Apple.
3 Seleccione el icono LaserWriter 8. Si el icono no está, consulte
la Ayuda de Mac OS para obtener información sobre cómo
solucionar problemas o póngase en contacto con la Atención
al cliente de HP (consulte la guía de introducción que se
proporciona en el CD).
Español
ESWW
4 Si está en una red con varias zonas, seleccione la zona del
cuadro Zonas de AppleTalk donde se encuentre el equipo. Si no
sabe cuál es, pregunte al administrador de red.
5 Efectúe una dob le selección en la impresor a deseada. Apare cerá
un icono.
6 Cierre el Selector pulsando en el cuadro Cerrar situado en la
esquina superior izquierda.
OS X
1 Abra el centro de impresión.
2 Seleccione Agregar impresora.
3 Seleccione el tipo de conexión de la lista situada en la parte
superior de la ventana.
4 Seleccione el equipo de la lista de impresoras y Agregar.
5 Cierre el Centro de impresión pulsando en el cuadro Cerrar
situado en la esquina superior izquierda.
Instale el software 83
Page 86

Paso 16 Verifique la configuración del equipo
Para verificar que el equipo se haya configurado correctamente para
copiar, enviar e imprimir, siga estos pasos.
Para verificar la función de copia
1 Coloque un documento de una página boca abajo en el cristal.
.
2 Pulse I
Si el documento no se copia correctamente , compruebe la instalación
del equipo. Para obtener más información, consulte la guía de uso en
línea en http://www.hp.com/support/lj9000.
Para verificar la función de envío
1 Coloque un documento de una página boca abajo en el cristal.
2 En la pantalla táctil del visor gráfico, toque Opciones de envío.
NICIO
Nota
Si no puede tener acceso a las opciones de envío, compruebe la
configuración e instalación del equipo . Par a obtener más inf ormación,
consulte la guía de uso.
3 Toque De: y escriba su nombre con el teclado de la pantalla
táctil.
4 Toque Aceptar.
5 Toque A: y escriba su propia dirección de correo electrónico.
6 Toque Aceptar.
.
7 Pulse I
El equipo enviará el documento a su dirección de correo electrónico
como documento adjunto.
Si el documento no se envía correctamente, compruebe la
configuración e instalación del equipo . Par a obtener más inf ormación,
consulte la guía de uso.
NICIO
84 Configuración del equipo
ESWW
Page 87

Para verificar la función de impresión
1 Abra el programa que desee. Abra o cree un documento sencillo.
2 Seleccione HP LaserJet 9000mfp o HP LaserJet 9000Lmfp como
su impresora.
3 Imprima el documento.
Si el documento se imprime, la configuración de la impresión habrá
finalizado.
Si el documento no se imprime correctamente, compruebe la
configuración e instalación del equipo . Par a obtener más inf ormación,
consulte la guía de uso.
Español
ESWW
Verifique la configuración del equipo 85
Page 88

Asistencia al cliente
Para obtener información adicional sobre el equipo, consulte la guía
de introducción en el CD o la guía de uso en
http://www.hp.com/support/lj9000.
86 Configuración del equipo
ESWW
Page 89

Garantía e información sobre normativas
Declaración de garantía limitada de Hewlett-Packard
EQUIPO DE HP DURACIÓN DE LA GARANTÍA
HP LaserJet 9000mfp
HP LaserJet 9000Lmfp
1 HP garantiza que el hardware, los ac cesorios y los suministros
de HP no tendrán defectos de materiales y fabricación durante
el periodo anteriormente especificado. Si se informa a HP acerca
de tales defectos dur ante el periodo de garantía, HP decidirá
reparar o sustituir los productos siempre que se demuestre que
son defectuosos. Los productos de recambio pueden ser nuevos
o seminuevos.
2 HP le garantiza que el software de HP no dejar á de ejecutar sus
instrucciones de programación, durante el periodo especificado
anteriormente, debido a defectos en los materiales y la mano de
obra, cuando se instale y utilice correctamente. Si HP recibe
notificación de dichos defectos durante el periodo de garantía,
HP sustituirá los soportes del software que no ejecuten las
instrucciones de programación debido a dichos defectos.
3 HP no garantiza que el funcionamiento de sus productos s er á
ininterrumpido o sin errores. Si HP no puede, en un periodo
razonable, reparar o sustituir algún producto sujeto a una de las
condiciones de la garantía, el cliente tendrá derecho a un
reembolso del precio de compra tras la devolución inmedia ta
del producto.
1 año, in situ
Español
ESWW
4 Los productos de HP pueden contener piezas reutilizadas
equivalentes a las nuevas en rendimiento o que puedan haber
estado sometidas a un uso incidental.
5 El periodo de garantía empieza en la fecha de entrega, o en la
fecha de instalación si HP ha instalado el producto. Si el cliente
programa o prorroga la instalación de HP más de 30 días
después de la entrega, la garantía empezará el día 31 a partir de
dicha entrega.
6 La garantía no cubre defectos a causa de (a) mantenimiento
o calibración indebida o inadecuada, (b) software, interfaces,
piezas o suministros que no sean de HP, (c) modificaciones no
Garantía e información sobre normativas 87
Page 90

autorizadas o uso indebido, (d) funcionamiento fuera de las
especificaciones ambientales publicadas para el producto, o
(e) preparación o mantenimiento indebido del sitio.
7 SEGÚN EL ALCANCE PERMITIDO POR LAS LEYES
LOCALES, LAS ANTERIORES GARANTÍAS EXCLUYEN
TODAS LAS OTRAS GARANTÍAS, ESCRITAS U ORALES,
EXPRESAS O IMPLÍCITAS, Y HP ESPECÍFICAMENTE NIEGA
LAS GARANTÍAS O CONDICIONES IMPLÍCITAS DE
COMERCIABILIDAD, CALIDAD SATISFACTORIA E IDONEIDAD
PARA UN FIN ESPECÍFICO.
8 HASTA EL PUNTO PERMITIDO POR LA LEGISLACIÓN LOCAL,
LAS ACCIONES DE ESTA DECLARACIÓN DE GARANTÍA SON
LAS ACCIONES ÚNICAS Y EXCLUSIVAS DEL CLIENTE.
EXCEPTO LO INDICADO ANTERIORMENTE, EN NINGÚN
CASO HP O SUS PROVEEDORES SERÁN RESPONSABLES
DE LA PÉRDIDA DE DATOS O DE LOS DAÑOS DIRECTOS,
ESPECIALES, INCIDENTALES, CONSECUENCIALES
(INCLUIDA LA PÉRDIDA DE BENEFICIOS O DE DATOS) O DE
CUALQUIER OTRO DAÑO, YA ESTÉ BASADO EN CONTRATO,
RESPONSABILIDAD EXTRACONTRACTUAL O DE
CUALQUIER OTRA MANERA.
9 PARA TRANSACCIONES DE CLIENTES EN AUSTRALIA Y
NUEVA ZELANDA, LOS TÉRMINOS DE ESTA DECLARACIÓN
DE GARANTÍA, EXCEPTO HASTA EL PUNTO LEGALMENTE
PERMITIDO, NO EXCLUYEN, RESTRINGEN NI MODIFICAN
LOS DERECHOS ESTATUTARIOS OBLIGATORIOS
APLICABLES A LA VENTA DE ESTE PRODUCTO A DICHOS
CLIENTES.
Servicio técnico durante y después del periodo de
garantía
•
Si el hardware del equipo falla durante el periodo de garantía,
póngase en contacto con un proveedor de asistencia o servicio
autorizado por HP.
•
Si el hardware del equipo falla después del periodo de garantía
y tiene un acuerdo de mantenimiento de HP o el HP
SupportPack, solicite el servicio según lo especificado en el
acuerdo.
•
Si no cuenta con un contrato de mantenimiento o con el
HP SupportPack, llame a un proveedor de servicio técnico
o asistencia autorizado por HP.
88 Configuración del equipo
ESWW
Page 91

Garantía limitada durante la vida útil de los
cartuchos de impresión
Nota
La anterior garantía es aplicable al cartucho de impresión que viene
con este equipo.
Se garantiza que este cartucho de impresión de HP está libre de
defectos en los materiales y en la mano de obra durante su periodo
de vida (que se indica mediante un mensaje de cartucho agotado en
el panel de control del equipo).
HP, a su elección, sustituirá los productos que demuestren estar
defectuosos o devolverá el importe de su compra.
La garantía no cubre los cartuchos que se hayan relle nado, vaciado,
maltratado, utilizado inadecuadamente o manipulado de alguna
forma.
Esta garantía le otorga derechos legales específicos. Es posible que
le correspondan otros derechos, los cuales pueden variar según el
país/región, el estado o la provincia.
Hasta el punto permitido por la legislación aplicable, en ningún
caso Hewlett-Packard Company será responsable de los daños
incidentales, consecuenciales, especiales, indirectos, punitivos
o ejemplares, o de las pérdidas de beneficios derivadas de la
violación de esta garantía, etc.
Español
ESWW
Garantía e información sobre normativas 89
Page 92

Términos de la licencia de software de HP
ATENCIÓN: EL USO DEL SOFTWARE ESTÁ SUJETO A LOS
TÉRMINOS DE LA LICENCIA DE PRODUCTOS DE SOFTWARE
DE HP QUE SE ESTABLECEN A CONTINUACIÓN. EL USO DEL
SOFTWARE INDICA QUE ACEPTA LOS TÉRMINOS DE DICHA
LICENCIA. SI NO ACEPTA LAS CONDICIONES DE ESTA
LICENCIA, PUEDE DEVOLVER EL SOFTWARE PARA OBTENER
EL REEMBOLSO DE LA TOTALIDAD DEL IMPORTE PAGADO.
SI EL SOFTWARE SE SUMINISTRA JUNTO CON OTRO
PRODUCTO, PUEDE DEVOLVER LA TOTALIDAD DEL
PRODUCTO NO UTILIZADO PARA OBTENER EL REEMBOLSO
DE LA TOTALIDAD DEL IMPORTE PAGADO.
A menos que el usuario final disponga de un acuerdo f irmado aparte
con HP, los términos de licencia siguientes establecerán las
condiciones de uso del software al que acompañan.
Otorgamiento de la licencia
HP le concede una licencia de uso para una copia del software. Por
“uso” se entiende almacenar, cargar, instalar, ejecutar o visualizar
el software. El usuario final no tiene derecho a modificar el software
ni a inhabilitar ninguna de sus características de licencia o control.
Si la licencia del software permite el “uso simultáneo”, no deberá
permitir que un número mayor al de l máximo de usuarios autorizados
utilice el software simultáneamente.
Propiedad
El software pertenece a HP o a terceros proveedores, a quienes
corresponden los derechos de autor (copyright). La licencia no le
confiere ni título ni propiedad sobre el software y no representa la
venta de ningún derecho en cuanto al software. Los terceros
proveedores de HP podrán proteger sus derechos en el caso de
violaciones de los términos de la licencia.
Copias y adaptaciones
Sólo puede hacer copias o adaptaciones del software para
archivarlas, o cuando la copia o la adaptación sean un paso esencial
del uso autorizado del software. Debe reproducir todos los avisos del
copyright del software original en todas las copias o adaptaciones.
No puede copiar el software en una red pública.
90 Configuración del equipo
ESWW
Page 93

Prohibido desensamblar o decodificar
El software no se debe desensamblar ni decompilar, a menos que se
haya obt enido la autorización pre via por escrito de HP. Es posible que
en algunas jurisdicciones no sea necesario obtener la autorización
de HP para desensamblar o decompilar el software de forma
limitada. Si HP se lo solicita, el usuario final deberá facilitar
información razonablemente detallada acerca de cualquier
desensamblaje o decompilación que haya realizado. No debe
decodificar el software a menos que sea un aspecto necesario para
su funcionamiento.
Transferencia
La licencia se terminará automáticamente cuando se produzca
cualquier transfe rencia del software. Si transfiere el software, deberá
entregarlo, junto con cualquier copia que haya hecho y la
documentación correspondiente, al tercero que lo recibirá.
El cesionario deberá aceptar los términos de esta licencia como
condición previa a la transferencia.
Rescisión
En caso de incumplimiento de cualquiera de los términos de esta
licencia, HP podrá rescindir la licencia, previa notificación al respecto .
En caso de rescisión, tendrá que destruir inmediatamente el softwa re
y todas las copias, adaptaciones y partes del software que haya
incorporado en otras aplicaciones.
Español
ESWW
Requisitos de exportación
No puede exportar ni reexportar el software, ni ninguna copia
o adaptación, si con ello incumple alguna ley o normativa vigente.
Derechos restringidos del gobierno de Estados Unidos
El software y la documentación adjunta se ha n de sa rr olla do
únicamente con capital privado. Se entregan y se les proporciona
licencia como “software comercial de computadoras” tal como se
define en DFARS 252.227-7013 (octubre 1988), DFARS 252.2117015 (mayo 1991) o DFARS 252.227-7014 (junio 1995), como
“artículo comercial” tal como se define en FAR 2.101(a), o como
“software restringido de computadoras” tal como se define en FAR
52.227-19 (junio 1987) (o cualquier cláusula de contrato o normativa
de agencia equivalente) , según lo aplicable. Se le otorgan solamente
los derechos que la cláusula FAR o DFARS correspondiente, o el
contrato de licencia estándar de HP, establecen para el tipo de
software y la documentación que acompaña al pr oducto en cuestión.
Garantía e información sobre normativas 91
Page 94

Normativa de la FCC
Este equipo se ha sometido a pruebas y se certifica que cumple con
los límites de un dispositivo digital de Clase A, de conformidad con la
parte 15 de las normas FCC. Estos límites se han establecido para
proporcionar un grado razonable de protección contra interferencias
perjudiciales si se utiliza el equipo en un entorno comercial. Este
equipo genera, utiliza y puede emitir energía de frecuencia de radio y
puede causar interferencias perjudiciales en las comunicaciones por
radio , si no se instala ni se utiliza según se indica en el manual de
instrucciones. Es probable que este equipo emita interferencias
perjudiciales si se utiliza en una zona residencial, en cuyo caso el
usuario deberá costear la corrección de la interferencia. Las
modificaciones que no hayan sido aprobadas expresamente por HP
podrán anular el derecho del usuario a utilizar este equipo bajo las
normas FCC.
92 Configuración del equipo
ESWW
Page 95
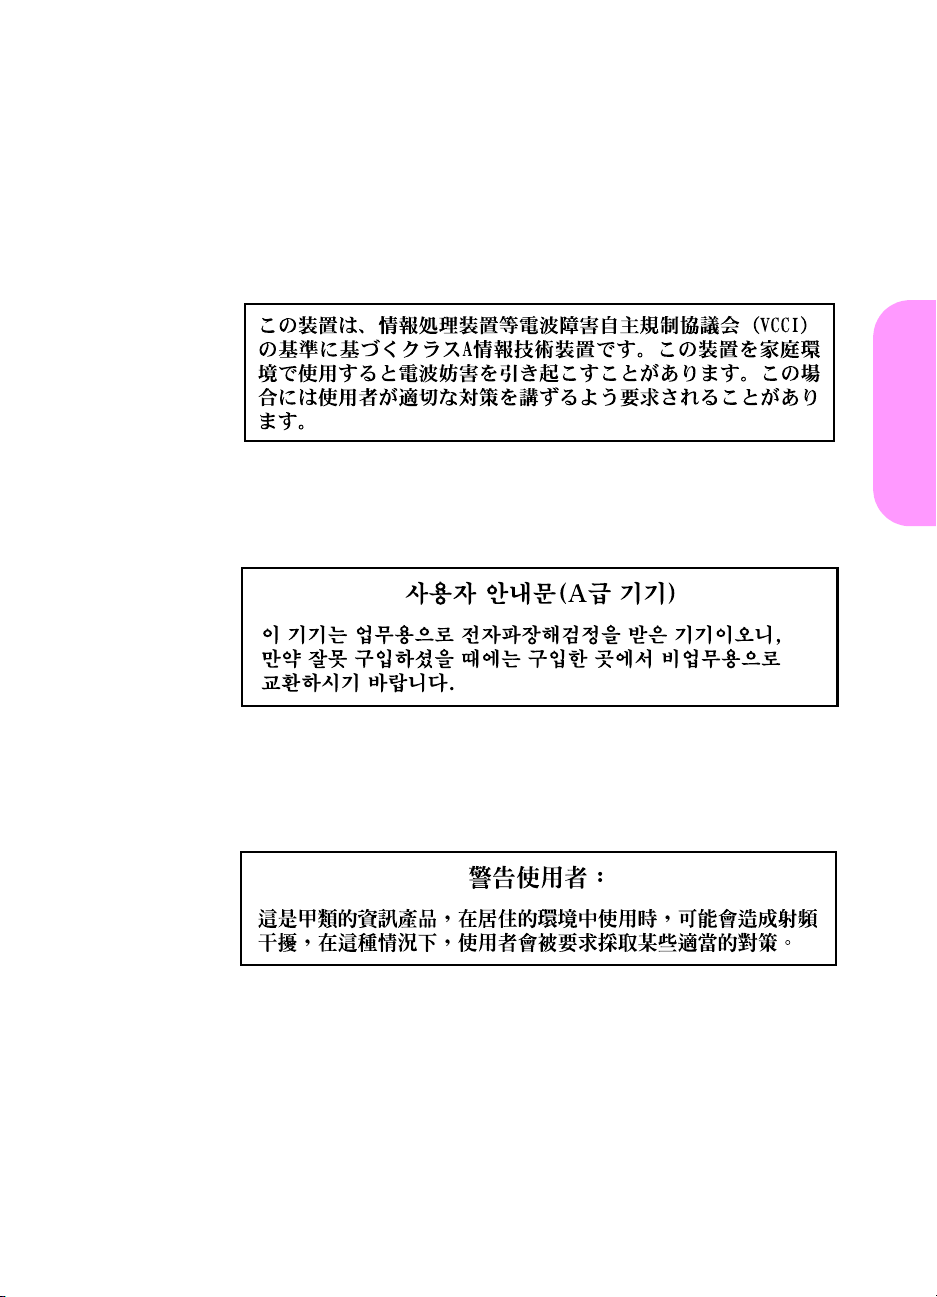
Normas DOC para Canadá
Cumple con los requisitos EMC clase A de Canadá.
Conforme à la classe A des normes canadiennes de compatibilité
électromagnétique CEM.
Declaración VCCI (Japón)
Equipo VCCI de clase A
Declaración EMI de Corea
Español
ESWW
Declaración EMI de Taiwán
Garantía e información sobre normativas 93
Page 96

Información de seguridad
Seguridad de láser
El Centro de Dispositivos y Salud Radiológica (CDRH) de la Dirección
de Alimentación y Fármacos de EE.UU. ha aplicado una normativa
para los productos láser fabricados a partir del 1 de agosto de 1976,
de cumplimiento obligatorio para los produ ctos comercializados en
Estados Unidos. Este equipo está certificado como un equipo láser de
“Clase 1” según el Nivel de Rendimiento de Radiaciones del Minist erio
de Sanidad y Servicios Sociales (DHHS), de acuerdo con la Ley sobre
el Control de Radiaciones para la Salud y Seguridad de 1968. Dado
que la radiación que emite este equipo está totalmente confinada en
el interior de carcasas y cubiertas externas protectoras, el haz láser
no puede alcanzar el exterior del equipo dur ante n inguna de las fases
de una utilización normal por parte de los usuarios.
ADVERTENCIA
El uso de controles, el cambio de ajustes o la ejecución de
procedimientos distintos de los especificados en este manual pueden
dar lugar a la exposición a radiaciones peligrosas.
Hoja de información del equipo
La hoja de información del tóner se puede obtener llamando en
EE.UU. a HP FIRST (Fax Information Retrieval Support Technology)
al (1) (800) 333-1917. Los clientes internacionales deben consultar el
folleto de asistencia que acompaña al producto.
Declaración láser para Finlandia
Luokan 1 laserlaite
Klass 1 Laser Apparat
HP LaserJet 9000mfp/HP LaserJet 9000Lmfp laserkirjoitin on
käyttäjän kannalta turvallinen luokan 1 laserlaite. Normaalissa
käytössä kirjoittimen suojakotelointi estää lasersäteen pääsyn
laitteenulkopuolelle. Laitteen turvallisuusluokka on määritetty
standardin EN 60825-1 (1994) mukaisesti.
Varoitus!
Laitteen käyttäminen muulla kuin käyttöohjeessa mainitulla tavalla
saattaa altistaa käyttäjän turvallisuusluokan 1 ylittävälle
näkymättömälle lasersäteilylle.
94 Configuración del equipo
ESWW
Page 97

Varning!
Om apparaten används på annat sätt än i bruksanvisning
specificerats, kan användaren utsättas för osynlig laserstrålning, som
överskrider gränsen för laserklass 1.
HUOLTO
HP LaserJet 9000mfp/HP LaserJet 9000Lmfp -kirjoittimen sisällä ei
ole käyttäjän huollettavissa olevia kohteita. Laitteen saa avata ja
huoltaa ainoastaan sen huoltamiseen koulutettu henkilö. Tällaiseksi
huoltotoimenpiteeksi ei katsota väriainekasetin vaihtamista,
paperiradan puhdistusta tai muita käyttäjän käsikirjassa lueteltuja,
käyttäjän tehtäväksi tarkoitettuja ylläpitotoimia, jotkavoidaan suorittaa
ilman erikoistyökaluja.
Varo!
Mikäli kirjoittimen suojakotelo avataan, olet alttiina näkymättömälle
lasersäteilylle laitteen ollessa toiminnassa. Älä katso säteeseen.
Español
ESWW
Garantía e información sobre normativas 95
Page 98

Declaración de conformidad
Acorde con ISO/IEC Guía 22 y EN 45014
Nombre del fabricante: Hewlett-Packard Company
Dirección del fabricante: 11311 Chinden Boulevard
declara que el producto
Nombre del producto: La impresora LaserJet 9000 MFP incluye impresión a doble cara y un
Números de modelo: Impresoras C8523A, Q2458A, Q2622A y Q2623A,
Opciones de producto: TODAS
Cumple las siguientes especificaciones de producto:
SEGURIDAD: IEC 60950:1991+A1 +A2 +A3 +A4 / EN60950:1992+A1 +A2 +A3 +A4 +A11
IEC 60825-1:1993 + A1 / EN 60825-1:1994 + A11 (Producto Láser/LED Clase 1)
GB4943-1995
EMC:
CISPR 22:1993 + A1 + A2 / EN 55022:1994 + A1 + A2 Clase A
EN 61000-3-2:1995 / A14
EN 61000-3-3:1995
EN 55024:1998
Boise, Idaho 83714-1021, EE.UU.
accesorio de entrada de papel multifunción
entre las que se incluyen : C8532A, C8568A
1*
FCC Título 47 CFR, Parte 15 Clase A
2
/ ICES-003, Edición 3 / GB9254-1998
AS / NZS 3548:1995 + A1 + A2
Información adicional:
El presente producto cumple con los requisitos de la Directiva EMC 89/336/EEC y de la Directiva de
baja tensión 73/23/EEC y conlleva por lo tanto la garantía de la CE.
1) El producto se ha probado en configuraciones típicas de sistemas informáticos personales HewlettPackard.
2) Este dispositivo cumple con la Parte 15 de la normativa FCC. Su utilización está sujeta a las dos
condiciones siguientes:
(1) este dispositivo no debe causar interferencias peligrosas, y
(2) este dispositivo debe aceptar cualquier interferencia recibida, incluidas las que puedan causar un
funcionamiento no deseado
*) El producto incluye opciones de red de área local (LAN). Si el cable de interfaz está conectado a los
conectores LAN, el producto cumple los requisitos de EN55022 Clase A en cuyo caso se aplica lo
siguiente: "Advertencia: este es un producto de clase A. En un entorno doméstico este producto
puede provocar interferencias de radio en cuyo caso puede que se solicite al usuario que tome las
medidas oportunas”.
3) El número del modelo puede incluir un sufijo "R" adicional.
Boise, Idaho EE.UU.
22 de agosto de 2002
Sólo para los temas sobre normativas:
Representante en Australia: Product Regulations Manager, Hewlett-Packard Australia Ltd., 31-41 Joseph Street,
Blackburn, Victoria 3130, Australia.
Representante en Europa: Oficina de servicios y venta de Hewlett-Packard de la zona o GmbH de Hewlett-Packard,
Department HQ-TRE / Standards Europe, Herrenberger Straße 130, D-71034 Bõblingen (FAX: +49-7031-14-3143)
Representante en EE.UU.: Product Regulations Mana ger , He wlett-P ac kard Company, PO Box 15, Mail Stop 160, Boise,
Idaho, 83707-0015 (Teléfono: 208-396-6000)
96 Configuración del equipo
ESWW
Page 99

Declaración de conformidad
Acorde con ISO/IEC Guía 22 y EN 45014
Nombre del fabricante: Hewlett-Packard Company
Dirección del fabricante: 11311 Chinden Boulevard
declara que el producto
Nombre del producto: Accesorio de entrada de papel alimentador de 2.000 hojas para la familia
Números de modelo: C8531A
Opciones de producto: TODAS
Cumple las siguientes especificaciones de producto:
SEGURIDAD: IEC 60950:1991+A1:1992+A2:1993+A3:1995+A4:1996 /
EMC: CISPR 22:1997 / EN 55022:1998 Clase B
Información adicional:
El presente producto cumple con los requisitos de la Directiva EMC 89/336/EEC y de la Directiva de
baja tensión 73/23/EEC y conlleva por lo tanto la garantía de la CE.
1) El producto se ha probado en configuraciones típicas de sistemas informáticos personales HewlettPackard.
2) Este dispositivo cumple con la Parte 15 de la normativa FCC. Su utilización está sujeta a las dos
condiciones siguientes:
(1) este dispositivo no debe causar interferencias peligrosas, y
(2) este dispositivo debe aceptar cualquier interferencia recibida, incluidas las que puedan causar un
funcionamiento no deseado
Representante en Australia: Product Regulations Manager, Hewlett-Packard Australia Ltd., 31-41 Joseph Street,
Blackburn, Victoria 3130, Australia
Representante en Europa: Oficina de servicios y venta de Hewlett-Packard de la zona o GmbH de Hewlett-Packard,
Department HQ-TRE/Standards Europe, Herrenberger Straße 110-140, D-71034 Böblingen (FAX: +49-7031-14-3143)
Representante en EE.UU.: Product Regulation s Manager, Hewlett-Packard Company, PO Box 15, Mail Stop 160, Boise,
Idaho, 83707-0015 (Teléfono: 208-396-6000)
EN 60950:1992+A1:1993 + A2:1993 + A3:1995 + A4:1997 + A11:1997
EN 55024:1998
IEC 61000-3-2:1995/EN 61000-3-2:1995+A14:2000
IEC -3-31994:1995/EN 61000-361000:1995
FCC Título 47 CFR, Parte 15 Clase B
AS / NZS 3548:1995
Boise, Idaho 83714-1021, EE.UU.
de impresoras HP LaserJet 9000
1
2
/ ICES-003, Edición 3
Hewlett-Packard Company
Boise, Idaho, EE.UU.
16 de abril de 2001
Español
ESWW
Declaración de conformidad 97
Page 100

Declaración de conformidad
Acorde con ISO/IEC Guía 22 y CEN/CENELEC EN 45014
Nombre del fabricante: Hewlett-Packard Company
Dirección del fabricante: Montemorelos 299, Guadalajara Jalisco, 45060
México
declara que el producto
Nombre del producto: Apiladora para 3.000 hojas
Números de modelo: C8084A
Opciones de producto: N/D
Cumple las siguientes especificaciones de producto:
SEGURIDAD: IEC 950: 1991+A1+A2+A3+A4/EN 60950: 1992+A1+A2+A3+A4+A11
IEC 825-1:1993/EN 60825-1:1994 Clase 1 (Láser/LED)
UL1950, Tercera edición.
EMC: CISPR 22:1997/EN55022:1998 Clase A
1)
EN55024:1998
IEC61000-2-2:1998/EN 61000-3-3:1995
IEC61000-3-3:1994/EN61000-3-3:1995
2)
FCC Título 47 CFR, Parte 15 Clase A
AS/NZS 3548:1992/CISPR 22:1993 Clase A
/ICES-003, Edición 2
1)
Información adicional:
El presente producto cumple con los requisitos de la Directiva EMC 89/336/EEC y de la Directiva de
baja tensión 73/23/EEC y conlleva por lo tanto la garantía de la CE.
1) El producto se ha probado en configuraciones típicas de sistemas informáticos personales HewlettPackard.
2) Este dispositivo cumple con la Parte 15 de la normativa FCC. Su utilización está sujeta a las dos
condiciones siguientes:
(1) este dispositivo no debe causar interferencias peligrosas, y
(2) este dispositivo debe aceptar cualquier interferencia recibida, incluidas las que puedan causar un
funcionamiento no deseado.
Hewlett-Packard Company
Guadalajara, Jalisco, MÉXICO
16 de octubre de 2000
Representante en Australia: Product Regulations Manager, Hewlett-Packard Australia Ltd., 31-41 Joseph Street,
Blackburn, Victoria 3130, Australia
Representante en Europa: Oficina de servicios y venta de Hewlett-Packard de la zona o GmbH de Hewlett-Packard,
Department HQ-TRE/Standards Europe, Herrenberger Straße 110-140, D-71034 Böblingen (FAX: +49-7031-14-3143)
Representante en EE.UU.: Product Regulation s Manager, Hewlett-Packard Company, PO Box 15, Mail Stop 160, Boise,
Idaho, 83707-0015 (Teléfono: 208-396-6000)
98 Configuración del equipo
ESWW
 Loading...