

Page 1
hp LaserJet 9000mfp
hp LaserJet 9000Lmfp
start
start
aloitus
innføring
inledning
Page 2

Page 3

hp LaserJet 9000mfp
hp LaserJet 9000Lmfp
English
Start
Page 4

© Copyright Hewlett-Packard
Company 2002
All Rights Reserved.
Reproduction, adaptation, or
translation without prior written
permission is prohibited, except
as allowed under the copyright
laws.
Publication number
Q2622-90904
Edition 1, 12/2002
Warranty
The information contained in
this document is subject to
change without notice.
Hewlett-Packard makes no
warranty of any kind with
respect to this information.
HEWLETT-PACKARD
SPECIFICALLY DISCLAIMS
THE IMPLIED WARRANTY OF
MERCHANTABILITY AND
FITNESS FOR A PARTICULAR
PURPOSE.
Hewlett-Packard shall not be
liable for any direct, indirect,
incidental, consequential, or
other damage alleged in
connection with the furnishing or
use of this information.
Trademark Credits
Microsoft
Windows
Windows Me
XP
, MS Windows,
, Windows NT,
are U.S. registered
, and Windows
trademarks of Microsoft
Corporation.
All other products mentioned
herein may be trademarks of
their respective companies.
Hewlett-Packard Company
11311 Chinden Boulevard
Boise, Idaho 83714 U.S.A.
Page 5

Product Setup
Contents
Introduction . . . . . . . . . . . . . . . . . . . . . . . . . . . . . . . . . . . . . . . . . . . 4
Where to look for information . . . . . . . . . . . . . . . . . . . . . . . . . . . . . 5
Installation checklist . . . . . . . . . . . . . . . . . . . . . . . . . . . . . . . . . . . . 6
Prepare product location . . . . . . . . . . . . . . . . . . . . . . . . . . . . . . . . . 7
Check package contents. . . . . . . . . . . . . . . . . . . . . . . . . . . . . . . . . 9
Remove internal packaging. . . . . . . . . . . . . . . . . . . . . . . . . . . . . . 10
Identify product parts. . . . . . . . . . . . . . . . . . . . . . . . . . . . . . . . . . . 11
Position the product. . . . . . . . . . . . . . . . . . . . . . . . . . . . . . . . . . . . 12
Install the print cartridge . . . . . . . . . . . . . . . . . . . . . . . . . . . . . . . . 14
Install accessories. . . . . . . . . . . . . . . . . . . . . . . . . . . . . . . . . . . . . 16
Load trays 1, 2, 3, and 4 . . . . . . . . . . . . . . . . . . . . . . . . . . . . . . . . 17
Change the control panel overlays . . . . . . . . . . . . . . . . . . . . . . . . 22
Connect product cables. . . . . . . . . . . . . . . . . . . . . . . . . . . . . . . . . 24
Connect power cords. . . . . . . . . . . . . . . . . . . . . . . . . . . . . . . . . . . 26
Configure the control panel display language . . . . . . . . . . . . . . . . 28
Configure digital sending. . . . . . . . . . . . . . . . . . . . . . . . . . . . . . . . 29
Print the configuration . . . . . . . . . . . . . . . . . . . . . . . . . . . . . . . . . . 30
Install software . . . . . . . . . . . . . . . . . . . . . . . . . . . . . . . . . . . . . . . 31
Installing Windows printing software . . . . . . . . . . . . . . . . . . 32
Installing Macintosh printing software . . . . . . . . . . . . . . . . . 33
Verify product setup. . . . . . . . . . . . . . . . . . . . . . . . . . . . . . . . . . . . 34
Customer support . . . . . . . . . . . . . . . . . . . . . . . . . . . . . . . . . . . . . 36
Warranty and regulatory information . . . . . . . . . . . . . . . . . . . . . . . 37
Hewlett-Packard limited warranty statement . . . . . . . . . . . . 37
Limited warranty for print cartridge life. . . . . . . . . . . . . . . . . 39
HP software license terms. . . . . . . . . . . . . . . . . . . . . . . . . . 40
FCC regulations. . . . . . . . . . . . . . . . . . . . . . . . . . . . . . . . . . 42
Safety information . . . . . . . . . . . . . . . . . . . . . . . . . . . . . . . . 44
Declaration of Conformity . . . . . . . . . . . . . . . . . . . . . . . . . . . . . . . 46
English
ENWW
Contents 3
Page 6

Introduction
Congratulations on your purchase of the HP LaserJet 9000mfp*
(product number C8523A) or HP La serJet 9000Lmfp (product n umber
Q2622A). The product comes standard with:
•
128 MB random access memory (RAM)
•
copying, digital sending, and wide-format printing capabilities
•
wide-format printing
•
two 500-sheet trays (Tray 2 and Tray 3)
•
a 100-sheet multipurpose tray (Tray 1)
•
a 2000-sheet input tray (Tray 4)
•
an HP Jetdirect print server
•
a duplex printing accessory (for printing on both sides of paper)
The product featur es an in te r a ctive touch screen on the control panel
graphical display. You must choose one of the three paper handling
devices: the 3000-sheet stacker, the 3000-sheet stapler/stacker, or
the multifunction finisher.
Note The product requires an optional tok en ring card to connect to a tok en
ring network.
*Multifunction Peripheral
4 Product Setup
ENWW
Page 7
Where to look for information
Start guide
This guide contains information about
unpacking and installing your product.
Introduce guide
This guide contains information about
performing basic copying, sending, and
printing tasks. Introduce is available on
the CD-ROM that came with the
product. If you would like a hard copy,
use your product to print the introduce
guide.
English
ENWW
Use guide
This guide contains detailed information
about using and troubleshooting and is
available on the World Wide Web at
http://www.hp .com/support/lj9000. If you
would like a hard copy, use your product
to print the use guide.
Where to look for information 5
Page 8

Installation checklist
This guide will help you set up and install your new product. For
proper installation, please complete each sectio n in or de r.
•
Unpack the product steps 1 through 5
•
Install the product steps 6 through14
•
Install printing software step 15
•
Verify product setup step 16
WARNING! To avoid injury, do not attempt to lift the product. The pr oduct has been
designed to roll on wheels.
6 Product Setup
ENWW
Page 9
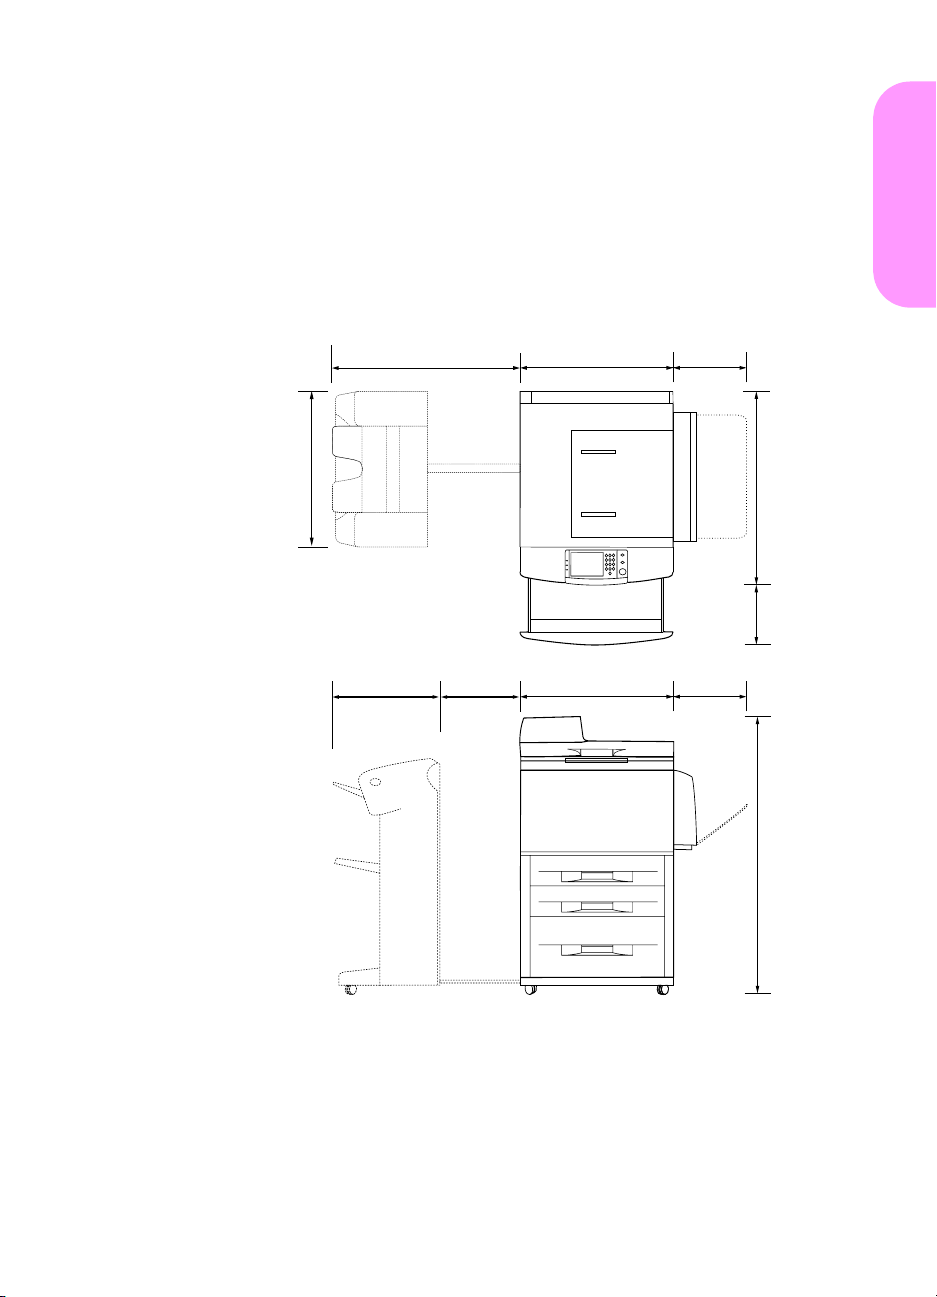
Step 1 Prepare product location
Product size
Prepare a location for the product that allows for these physical and
environmental requirements:
635.0 mm
(25.0 in)
635.0 mm
(25.0 in)
762 mm (30 in)
(20 in)
508 mm
)
n
i
5
.
1
2
(
m
m
1
.
1
3
5
1177.3 mm
(46.0 in)
529.6 mm
(20.5 in)
647.7 mm
(25.5 in)
641.4 mm
(25.3 in)
641.4 mm
(25.3 in)
English
ENWW
1219.2 mm (48.0 in)
HP LaserJet 9000mfp dimensions (top and side views)
Prepare product location 7
Page 10

Location requirements for the product
•
A level area on the floor.
•
Space allowance around the
product.
•
A well-ventilated room.
•
No exposure to direct
sunlight or chemicals,
including ammonia-based
cleaning solutions.
•
Adequate power supply
(15 A, 110 V, or 220 V circuit
located near the product). A
dedicated 15 A circuit is
recommended.
•
A stable environment—no
abrupt temperature or
humidity changes.
•
Relative humidity 20
percent to 80 percent.
•
Room temperature 10° C to
32.5 ° C (50° F to 91° F).
8 Product Setup
ENWW
Page 11
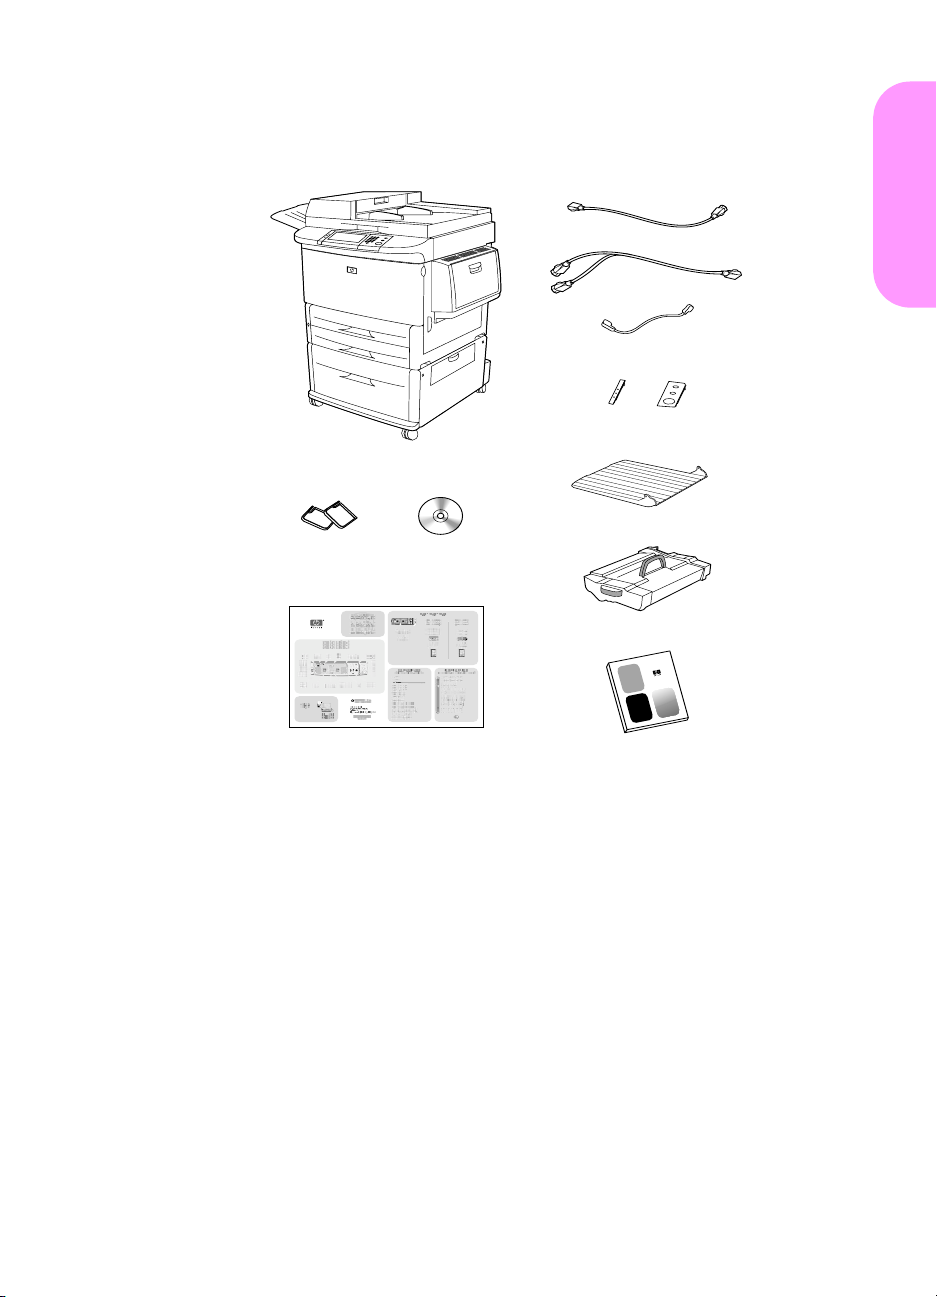
Step 2 Check package contents
high speed copy connect cable
control panel overlays
MFP product
standoffs
product software
CD-ROM
English
power cords
ADF output
print cartridge
ENWW
Quick Reference Poster
Package contents
Start guide
Check package contents 9
Page 12

Step 3 Remove internal packaging
1 To remove the product from the box, follow the instructions
printed on the box.
WARNING! This product weighs appro ximately 143.2 kg (315 lb). HP recommends
that the product be rolled on its wheels rather than be lifted.
2 Remove the or ange shipping loc k from the e xterior of the product,
and remove any cardboard or styrofoam material that is not
orange.
3 Remove the protective film from the control panel graphical
display. (See Step 4, “Identify product parts.”)
4 Open the left door and remove the two packing fuser assembly
spacers. Orange tape connects fuser assembly spacers to the
outside of the left door. Remove the orange tape that runs from
the fuser assembly shipping locks to the outside of the door.
Close the door after removing the fuser assembly spacers and
the tape.
5 Open each tray, remove the orange shipping locks and any other
orange packing material, and then close the trays.
6 Remove all orange packing material and any orange tape from
the automatic document feeder (ADF) door.
7 Remove all orange packing material and any orange tape from
the glass.
Note Save all packing material. You might need it to repack the product at
another time.
10 Product Setup
ENWW
Page 13
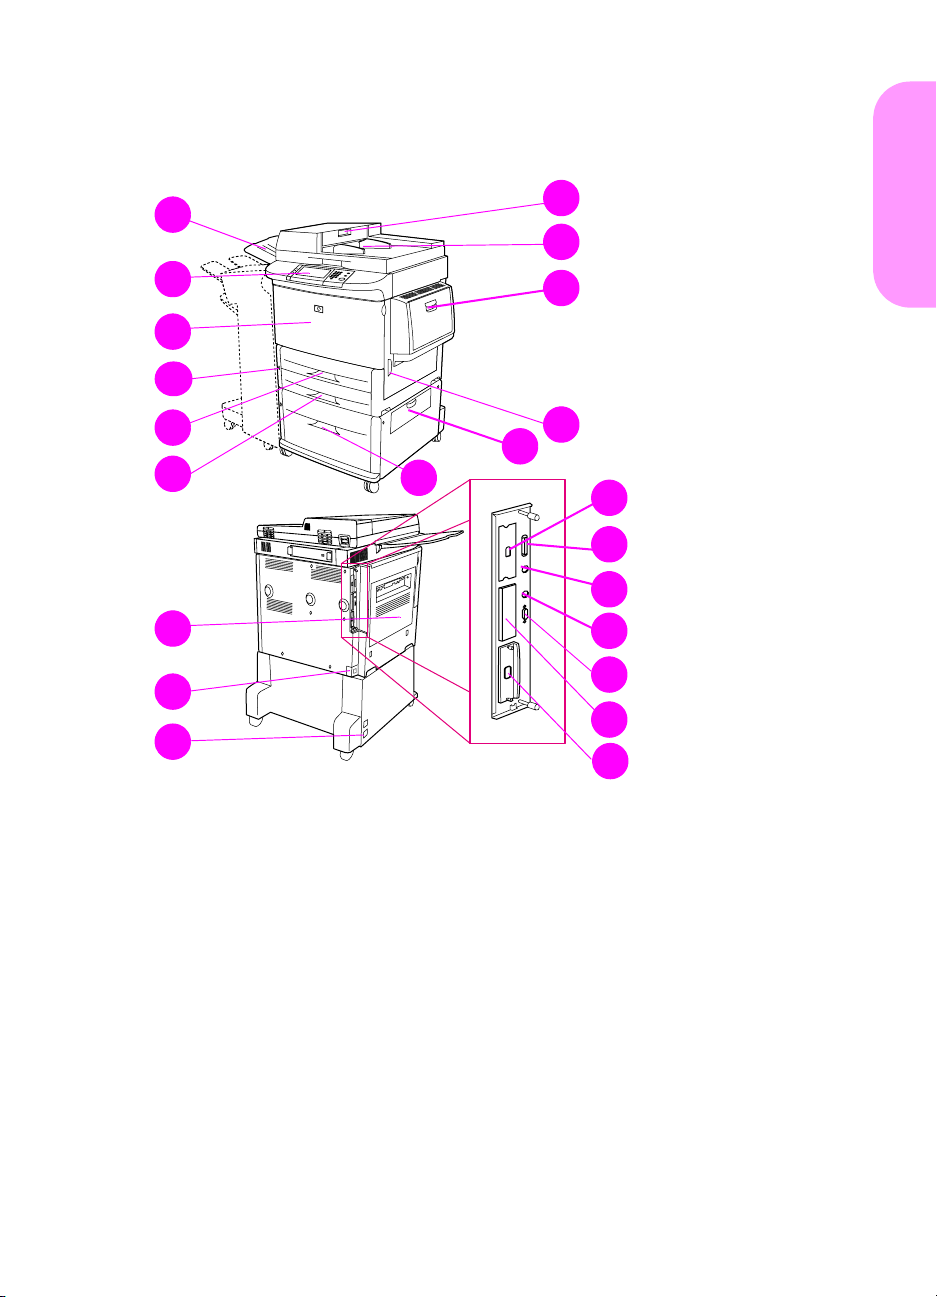
Step 4 Identify product parts
The following illustrations show the location and names of the primary product parts.
10
1
11
2
12
3
4
5
13
14
6
15
16
17
18
7
19
20
8
21
9
22
English
Product parts (front and back views)
1 ADF output
2 Control panel
3 Front door
4 Power button
5 Tray 2
6 Tray 3
7 Left door
8 Power-cord connector
ENWW
9 Tray 4 power-cord
connector
10 ADF door
11 ADF
12 Tray 1
13 Right door
14 Transfer door
15 Tray 4
16 High speed copy
connect connector
17 Parallel connector
18 Foreign interface
harness connector
(AUX)
19 HP Fast InfraRed
Connect (FIR)
20 HP JetLink connector
(Accessory)
21 EIO slot
22 HP Jetdirect printer
server connector
Identify product parts 11
Page 14
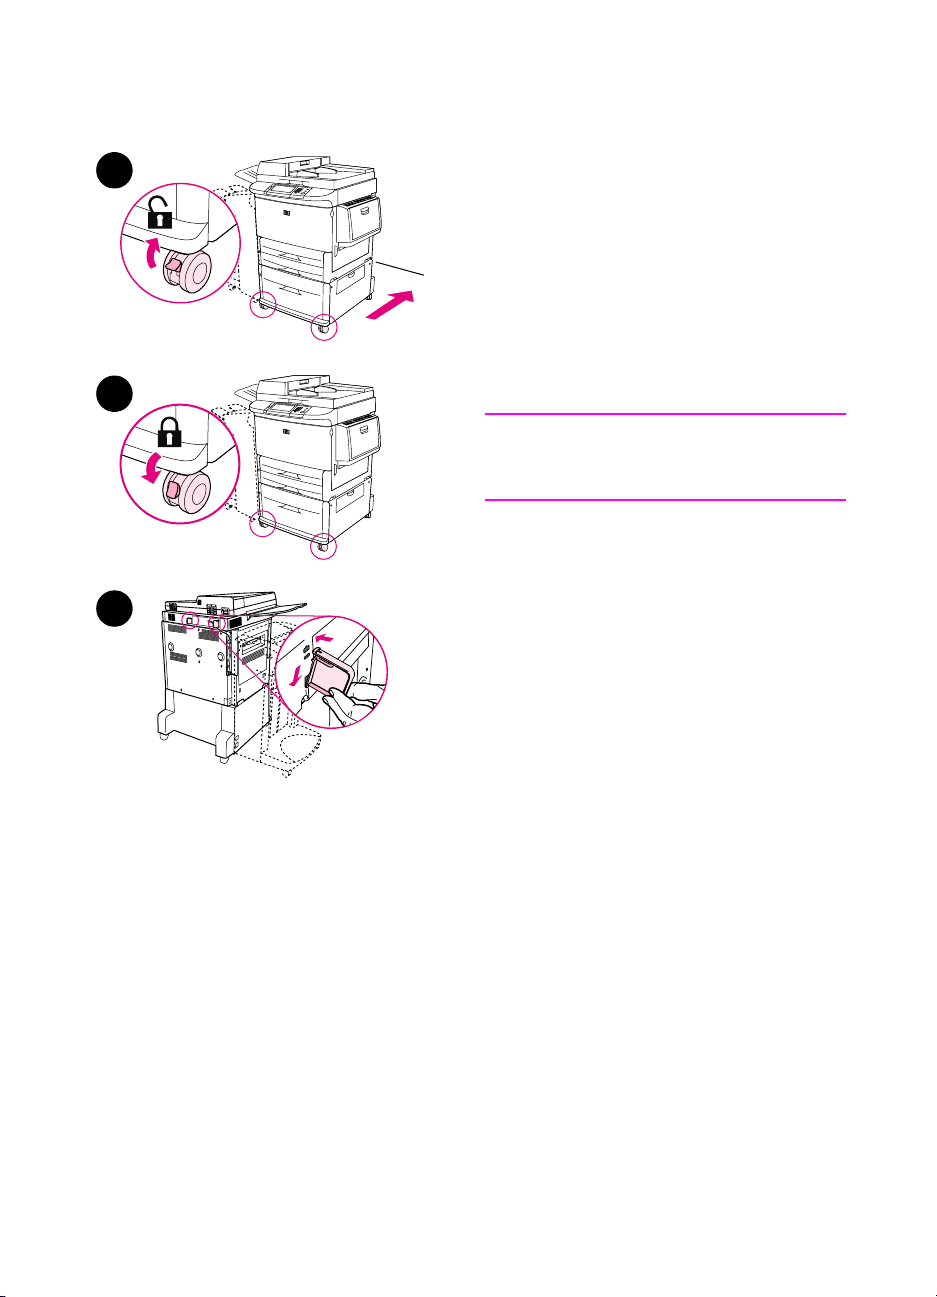
Step 5 Position the product
1
2
1 Unlock the front wheels of the
product, and roll the product to its
permanent location. Leave space to
walk behind the product.
2 Push the locking tabs on the front
wheels to the lock position. Only the
front wheels lock.
3 Locate the bag with the standoffs,
and then attach them to the product.
Note
The standoffs ensure that your product
cannot be pushed up against the wall.
3
12 Product Setup
ENWW
Page 15
4
4 Move the scanner carriage shipping
lock to the right.
5 Attach the ADF output.
English
5
ENWW
Position the product 13
Page 16
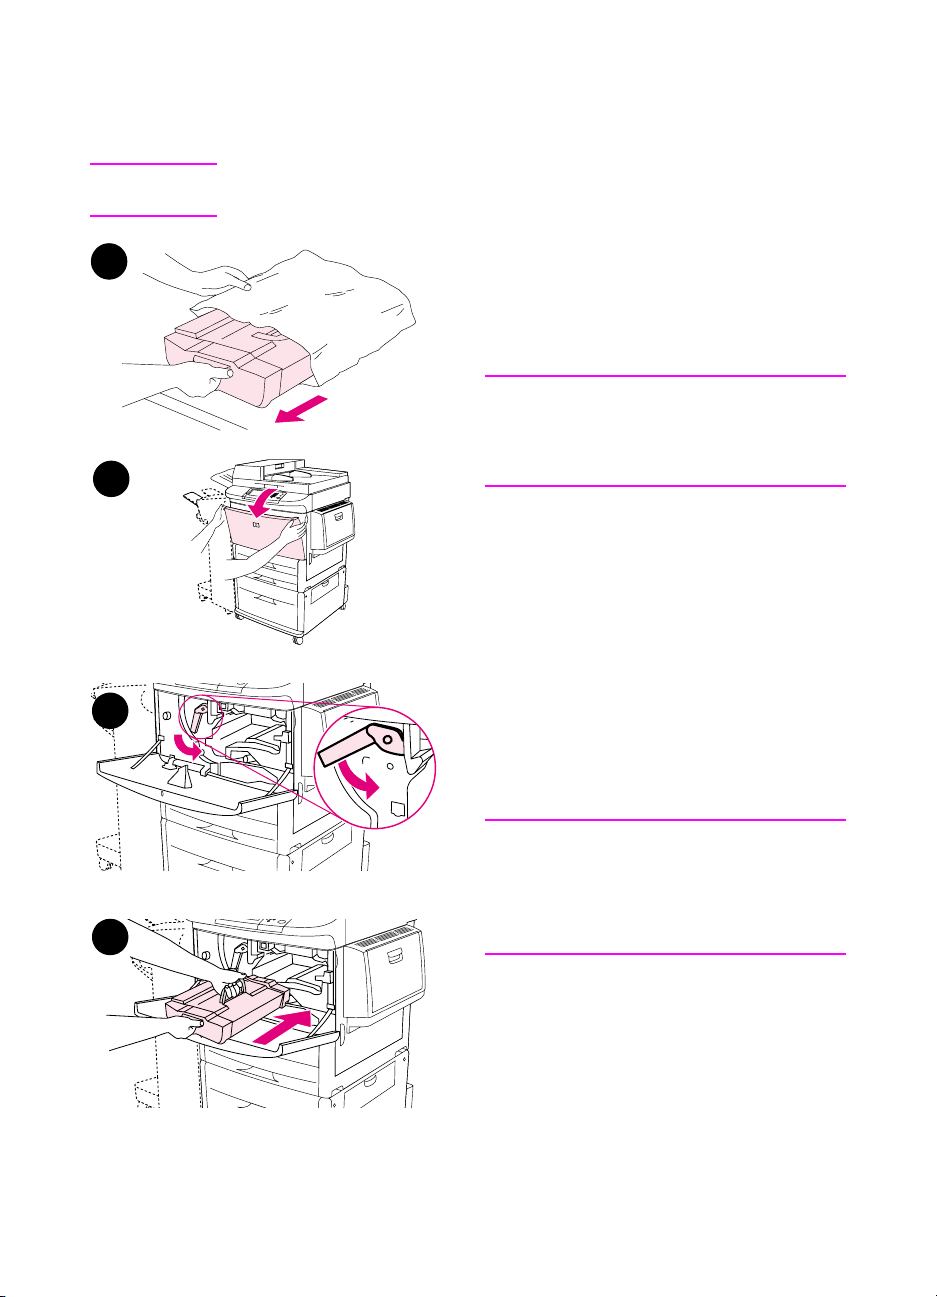
Step 6 Install the print cartridge
Note If you get toner on your clothing, wipe it off with a dry cloth and wash
the clothing in cold water. Hot water sets toner into fabric.
1
2
3
1 Before removing the print cartridge
from its packaging, set the print
cartridge on a sturdy surface. Gently
slide the print cartridge out of the
packaging.
CAUTION
To prevent dama ge to the print cartridge,
use two hands when handling the
cartridge.
2 Open the front door of the product.
3 Rotate the green lever downward to
the unlock position.
4 Hold the cartridge so that the arrow
is on the left side of the cartridge.
Position t he cartridge as shown, with
the arrow on the left side pointing
toward the product, and align the
cartridge with the printing guides.
Slide the cartridge into the product
as far as it will go.
4
14 Product Setup
Note
The print cartridge has an internal pull
tab. The product automatically removes
the pull tab after the print cartridge is
installed.
ENWW
Page 17

5
5 Press the button on the green lever,
and turn the lever clockwise to the
lock position.
6 Close the front door.
English
6
ENWW
Install the print cartridge 15
Page 18
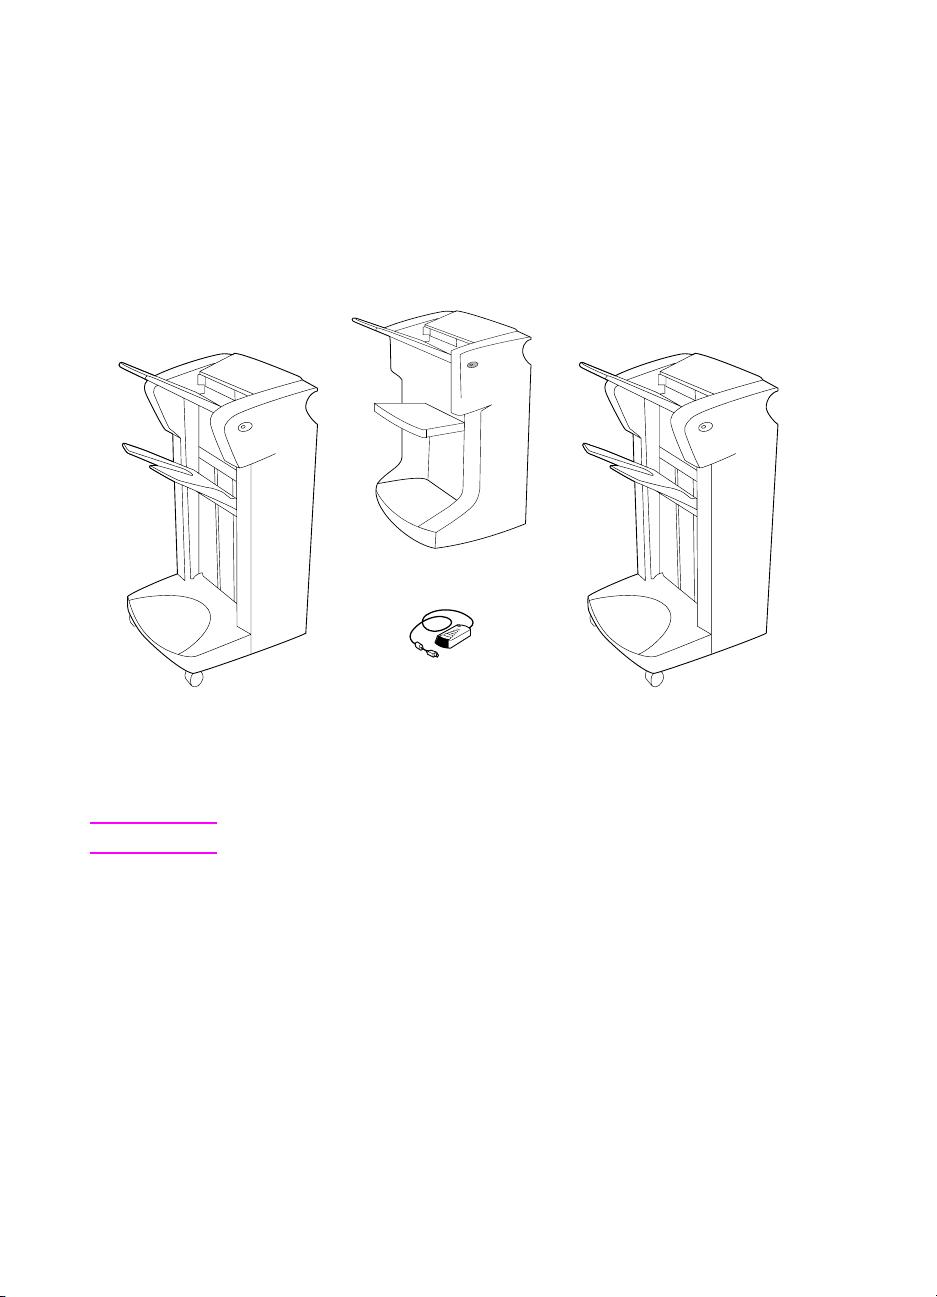
Step 7 Install accessories
Install the accessories that you purchased. Use the installation
instructions that are packaged with the paper-handling accessories.
See Step 10, “Connect product cables,” for inf ormation on connecting
the HP Fast InfraRed connect.
.
Multifunction finisher
HP Fast InfraRed
3000-sheet stapler/stacker
Accessories
Note See the online use guide for information about ordering accessories.
16 Product Setup
connect (FIR)
3000-sheet stacker
ENWW
Page 19
Step 8 Load trays 1, 2, 3, and 4
1
2
2
This section describes how to load A4or Letter-size paper. For instructions on
loading and configuring other sizes and
types of media, see the introduce guide
that came on the CD-ROM.
CAUTION
To avoid a jam, never open a tray while
the product is printing from that tray.
English
To load Tray 1
Tray 1 is a multipurpose tray that holds
up to 100 sheets of standard-size paper
or 10 envelopes. The product will pull
paper from Tray 1 first (d efault tray). See
the use guide for information about how
to change this default.
3
Tray 1 provides a con v en ient w a y to print
envelope s, transparencies, custom-size
paper, or other types of media without
having to unload the other trays.
1 Open Tray 1.
ENWW
2 Load A4- or Letter-size paper with
the long edge leading into the
product.
3 Adjust the paper guides so that they
lightly touch the paper stack, but do
not bend the paper.
Note
Make sure the paper fits under the tabs
on the guides and not above the load
level indicators.
Load trays 1, 2, 3, and 4 17
Page 20
1
2
3
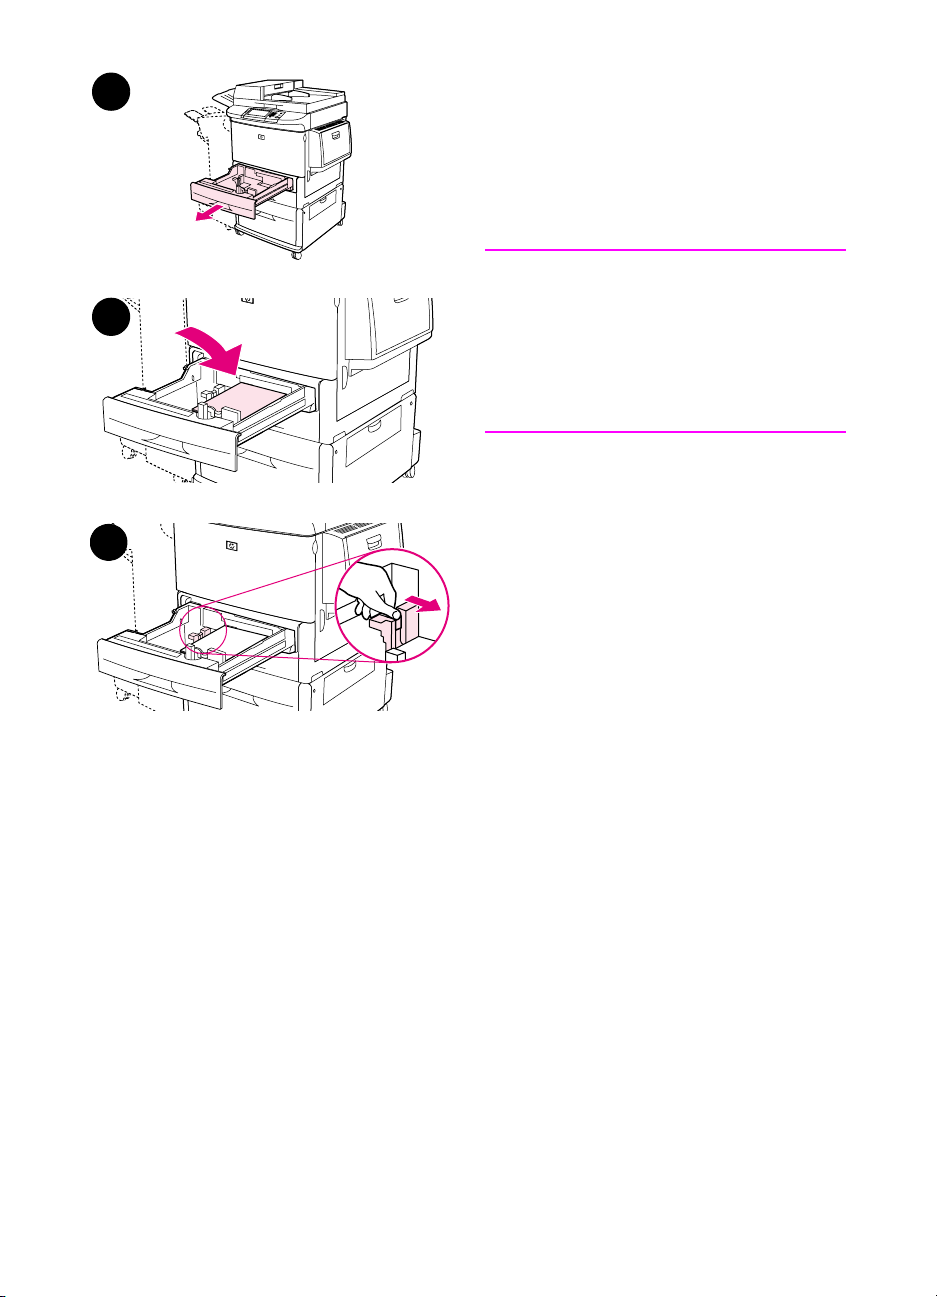
To load Tray 2 and Tray 3
1 Pull Tray 2 open until it stops.
2 Load about 100 sheets of A4- or
Letter-size paper with the short edge
of the paper leading into the produ ct.
Note
For single-sided printing of letterhead or
preprinted paper, the side to be printed
on should be down. For double-sided
printing of letterhead or preprinted
paper, the first side to be printed on
should be up.
3 Adjust the left (Y) paper guide by
squeezing the tab on the guide and
sliding it to the mark for A4- or
Letter-size paper.
18 Product Setup
ENWW
Page 21

4
6
4 Adjust the front (X) paper guide by
squeezing the tab on the guide and
sliding it to the mark for A4- or
Letter-size paper.
5 Load the remaining paper (up to 500
sheets), if desired.
6 Push the tray in until it stops.
7 Repeat steps 1 through 6 to load
Tray 3.
English
ENWW
Load trays 1, 2, 3, and 4 19
Page 22
1
2
3
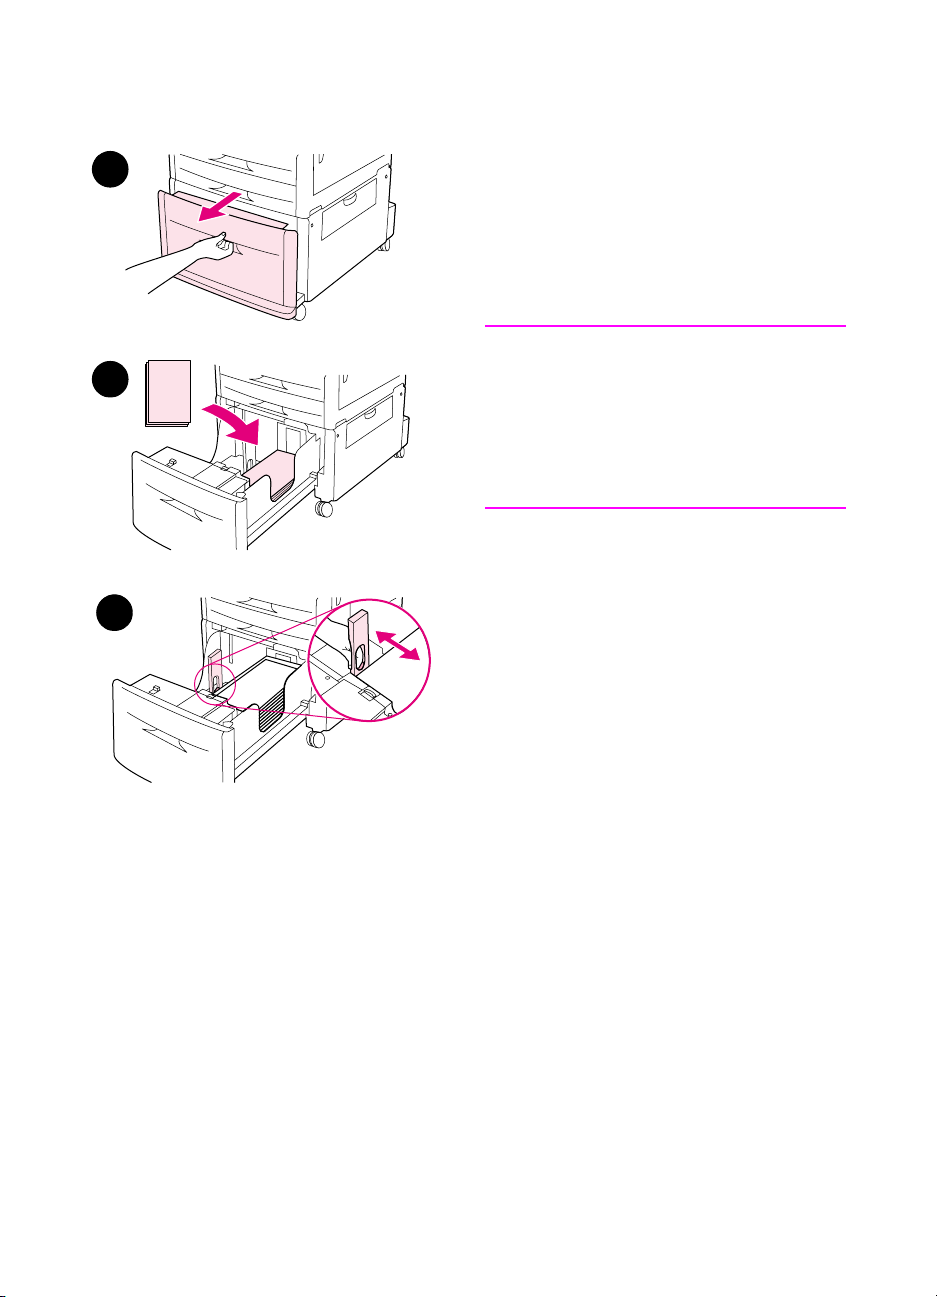
To load Tray 4
1 Pull Tray 4 open until it stops.
2 Load about 100 sheets of A4- or
Letter-size paper with the short edge
of the paper leading into the produ ct.
Note
For single-sided printing of letterhead or
preprinted paper, the side to be printed
on should be down. For double-sided
printing of letterhead or preprinted
paper, the first side to be printed on
should be up.
3 Adjust the left (Y) paper guide by
squeezing the tab on the guide and
sliding it to the mark for A4- or
Letter-size paper.
20 Product Setup
ENWW
Page 23

4
5
4 Adjust the front (X) paper guide by
squeezing the tab on the guide and
sliding it to the mark for A4- or
Letter-size paper.
5 Load the remaining paper (up to
2000 sheets), if desired.
6 Press down on all four corners of
the paper stack to ensure the
paper rests flat in the tray,
without bending.
CAUTION
Never store paper or other items in the
area to the left of the paper guides.
Doing so can permanently damage the
tray.
English
6
7 Push the tray in until it stops.
7
ENWW
Load trays 1, 2, 3, and 4 21
Page 24
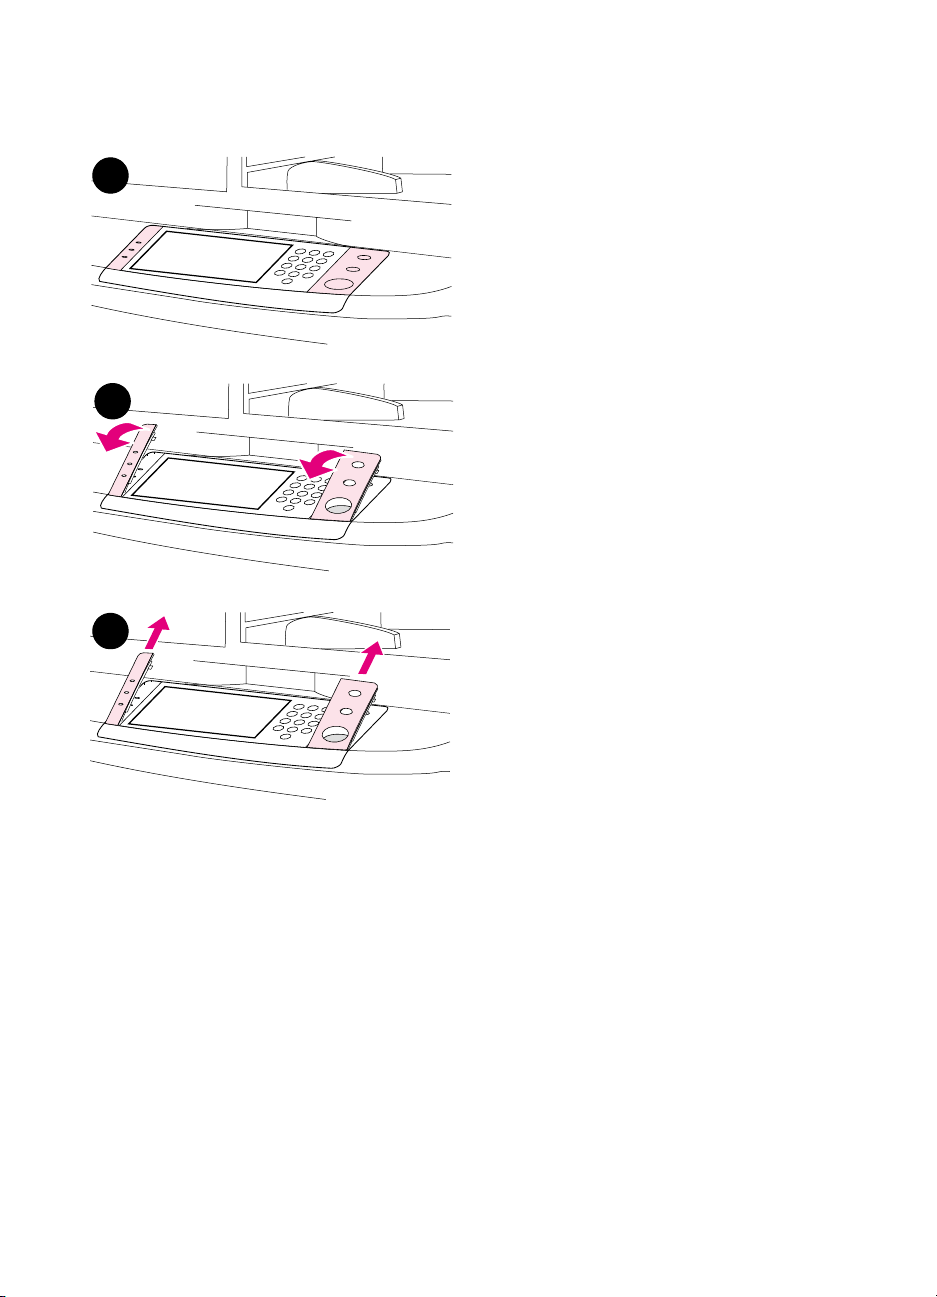
Step 9 Change the control panel overlays
1
2
The control panel comes either with
English overlays installed or with no
overlays. If necessary, use the procedure
below to change the control panel
overlays.
1 Locate the two control panel
overlays.
2 Insert a small, flat-bladed
screwdriver or other thin, narrow
device in the slot at the top edge of
one of the overlays.
3 Lift the overlay up and backward to
move it away from the product.
3
22 Product Setup
ENWW
Page 25
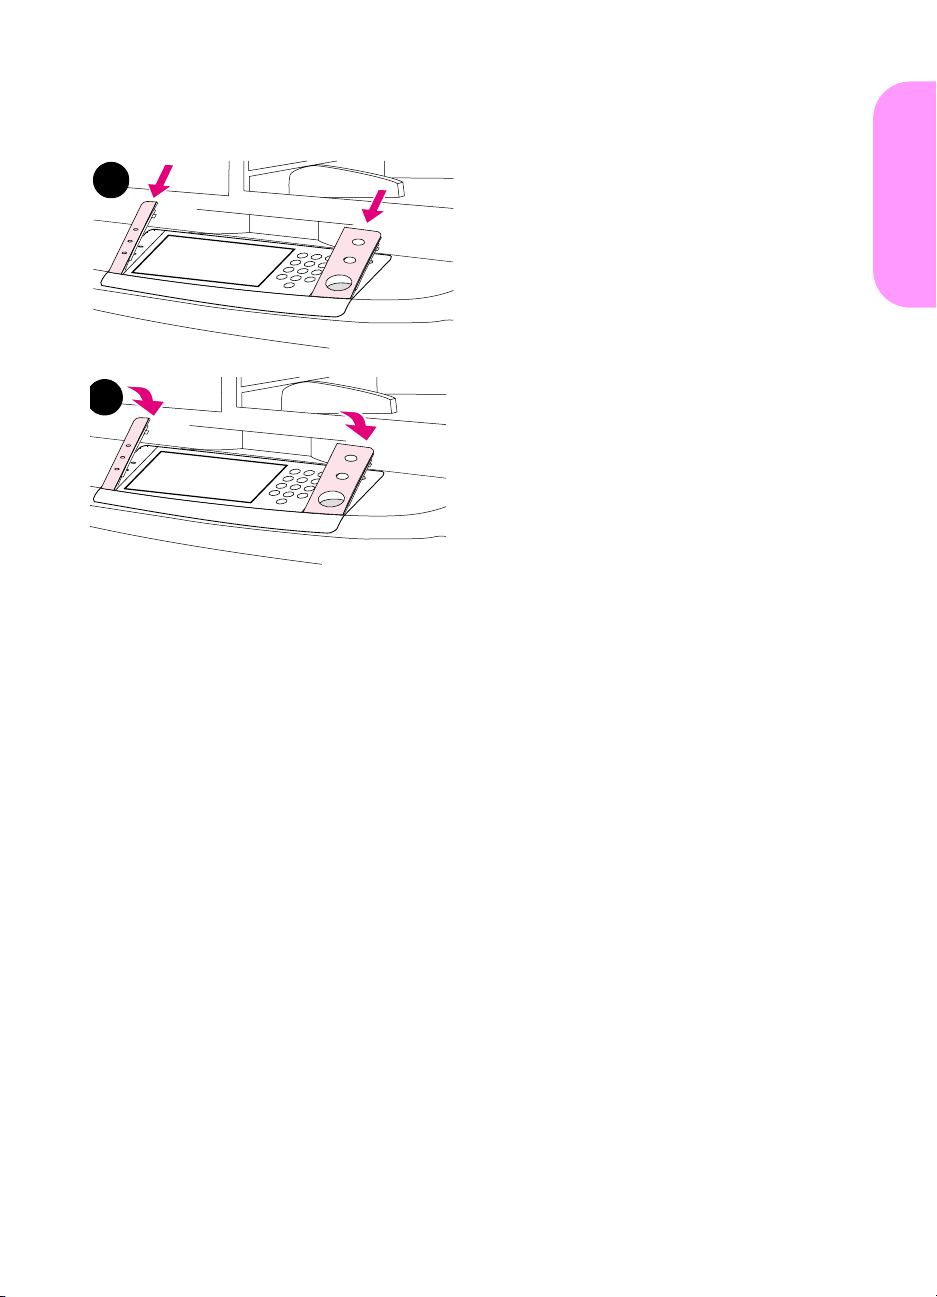
4
4 Position the new overlay over the
control panel. Align the ends of the
overlay with the holes on the control
panel and slide the overlay in.
5 Snap the overlay firmly onto the
control panel. Ensure that the
overlay is flat against the control
panel.
English
5
6 Repeat steps 2 through 5 to change
the second overlay.
ENWW
Change the control panel overlays 23
Page 26
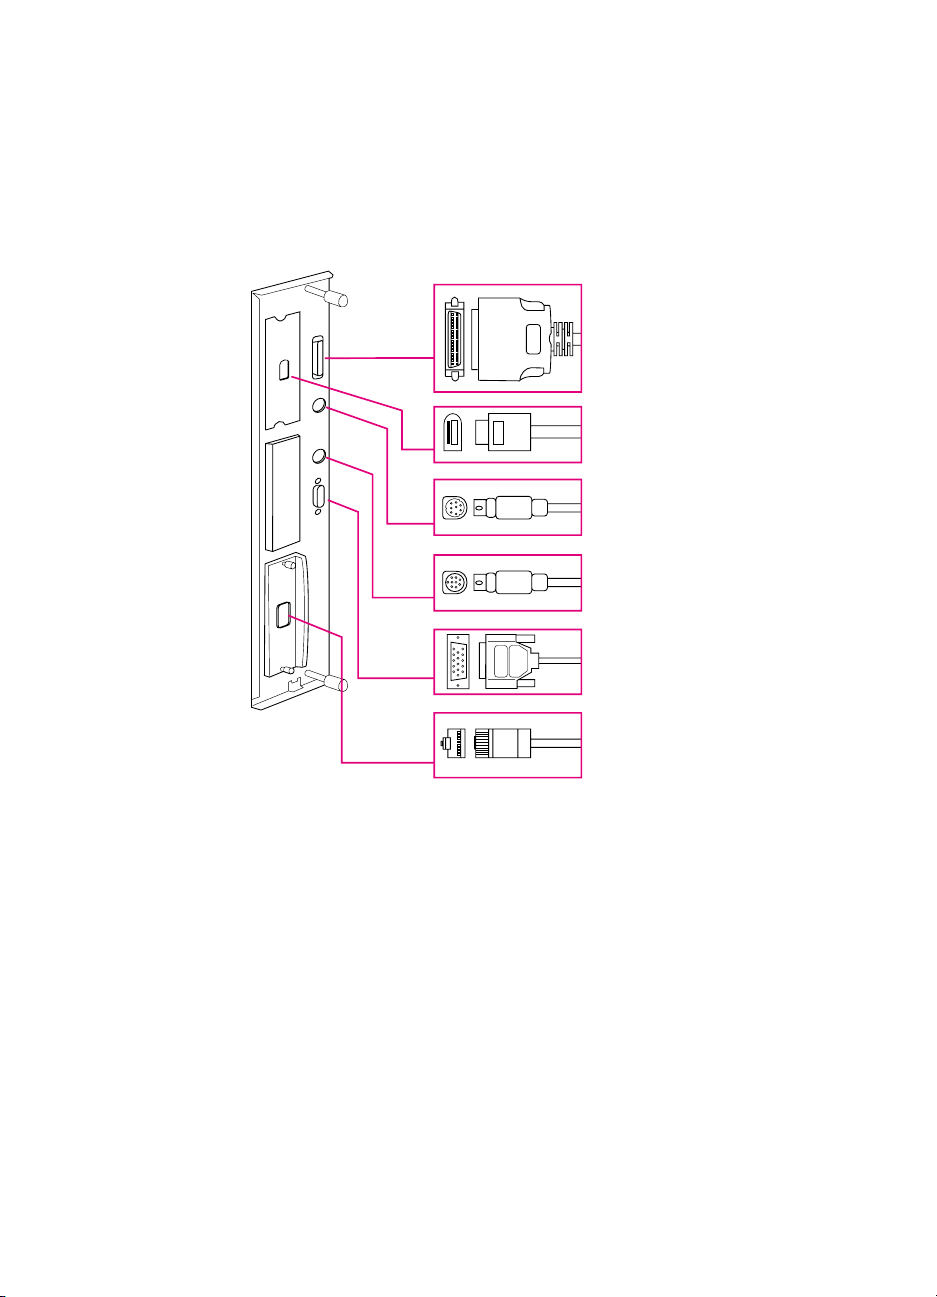
Step 10 Connect product cables
r
The product can connect to a computer using a parallel cable, or to
the network using the HP Jetdirect print server. Connection to a token
ring network is available through an optional token ring card.
Parall el connector
(Parallel)
High speed copy
connect connector
Foreign interface
harness (AUX)
(optional)
HP Fast InfraRed
Connect (FIR)
(optional)
HP JetLink connecto
(Accessory) (for
accessories)
Location of interface ports
24 Product Setup
HP Jetdirect print
server RJ-45
connector
ENWW
Page 27
Connecting to Ethernet 10/100Base-TX
network
Use the RJ-45 connector to connect the product to an Ethernet 10/
100Base-TX network. HP Jetdirect print servers are available for
many different network connections.
English
1
2
1 Locate the power button on the front
of the product. Make sure the
product is turned off (button out).
2 Connect a twisted-pair network
cable to the RJ-45 connector on the
HP Jetdirect print server installed in
the product.
3 Connect the other end of the cable
to the network.
3
ENWW
Connect product cables 25
Page 28
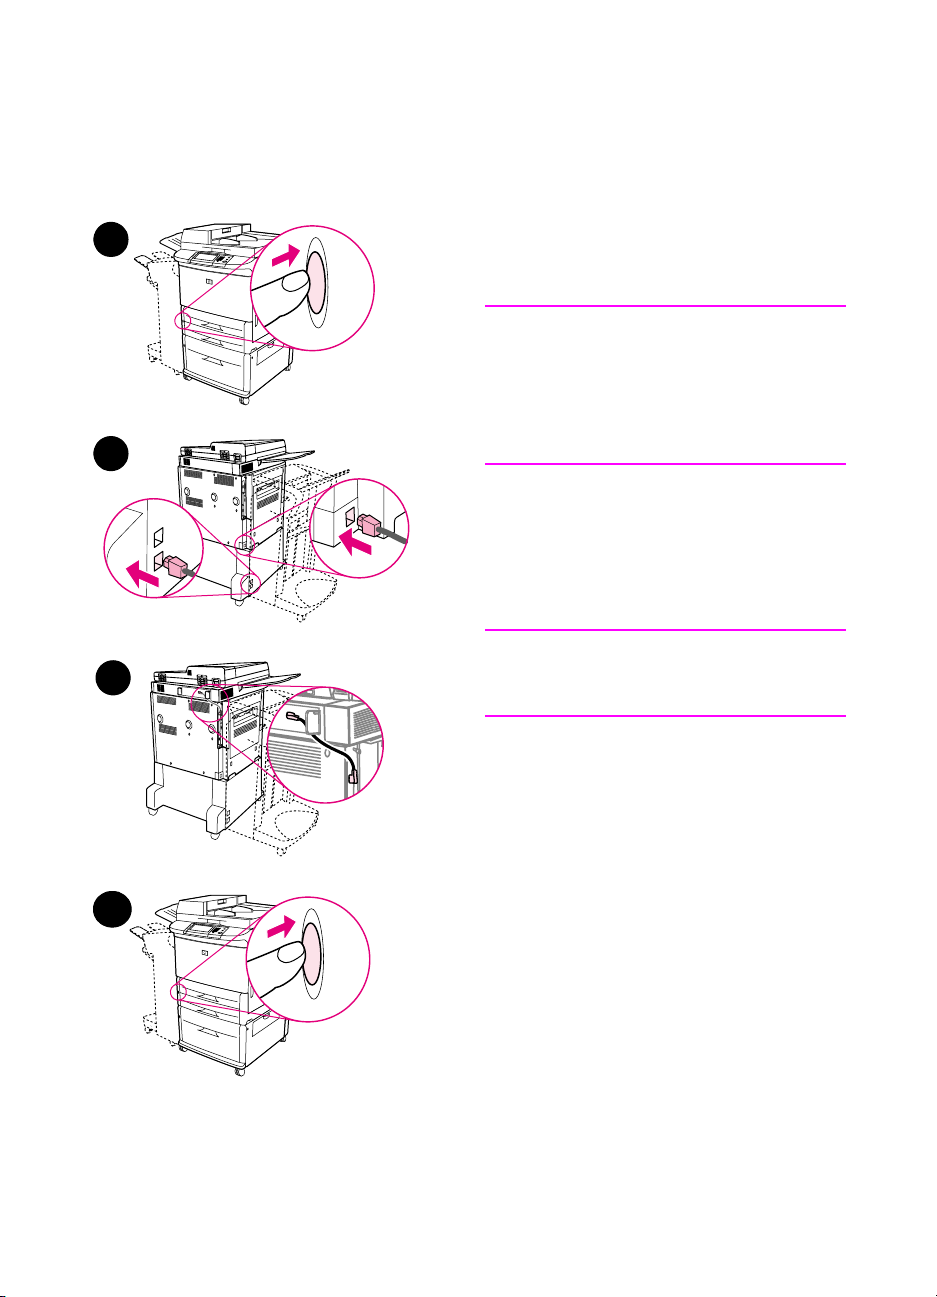
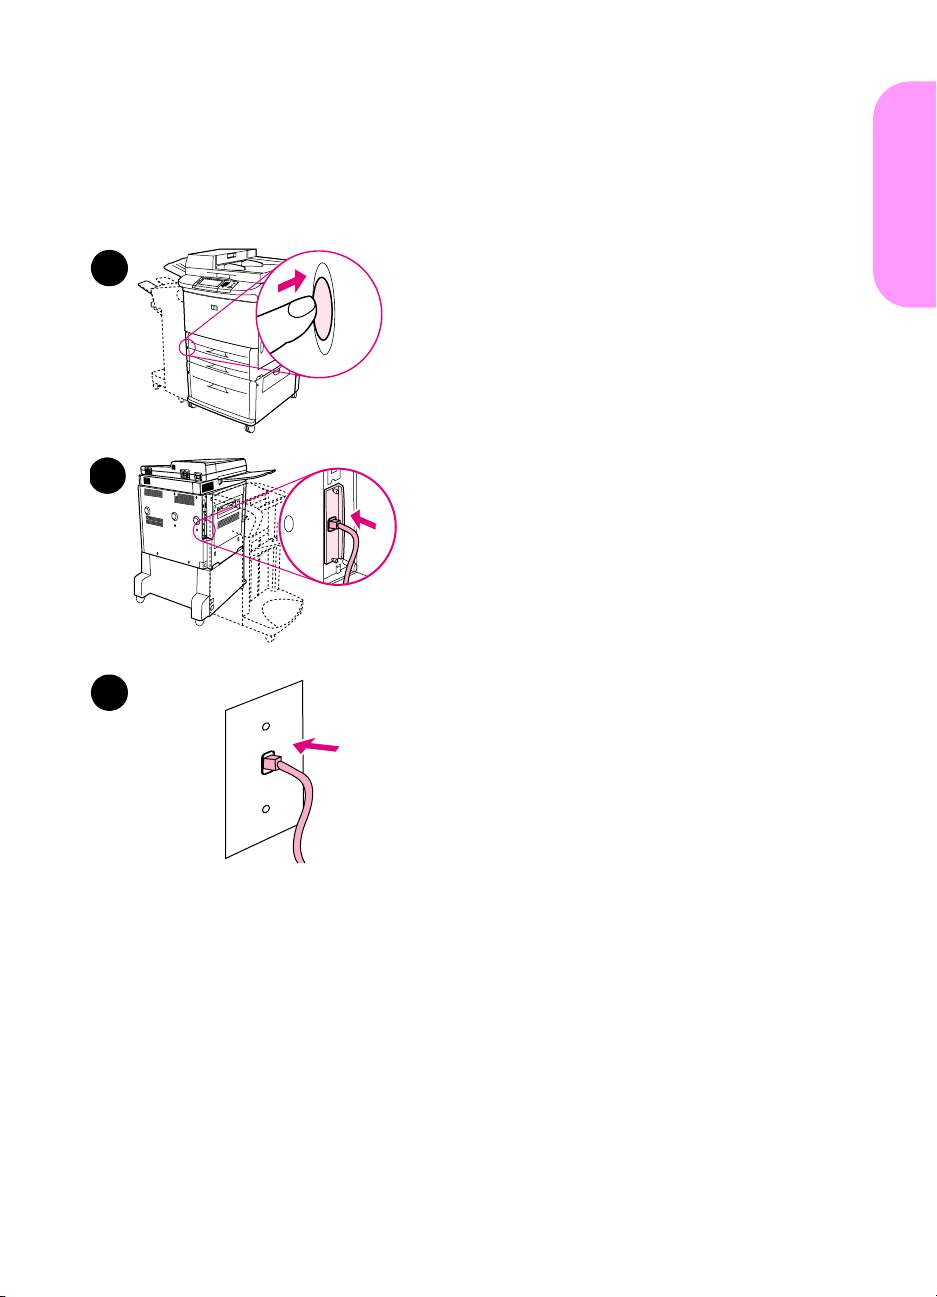
Step 11 Connect power cords
This section describes how to connect the power cord. HP
recommends connecting the power cord to a surge protector.
1
2
3
1 Locate the power button on the front
of the product. Make sure the
product is turned off (button out).
CAUTION
Do not connect the product power cord
to the power-cord connector on
Tray 4. That connector is designed to
connect paper output devices such as
the multifunction finisher to Tray 4.
2 Connect the power cords to the
product power cord connector and to
the Tray 4 connector. Then connect
the power cords to an adequate AC
outlet.
Note
For best performance, a dedicated 15 A
outlet is recommended.
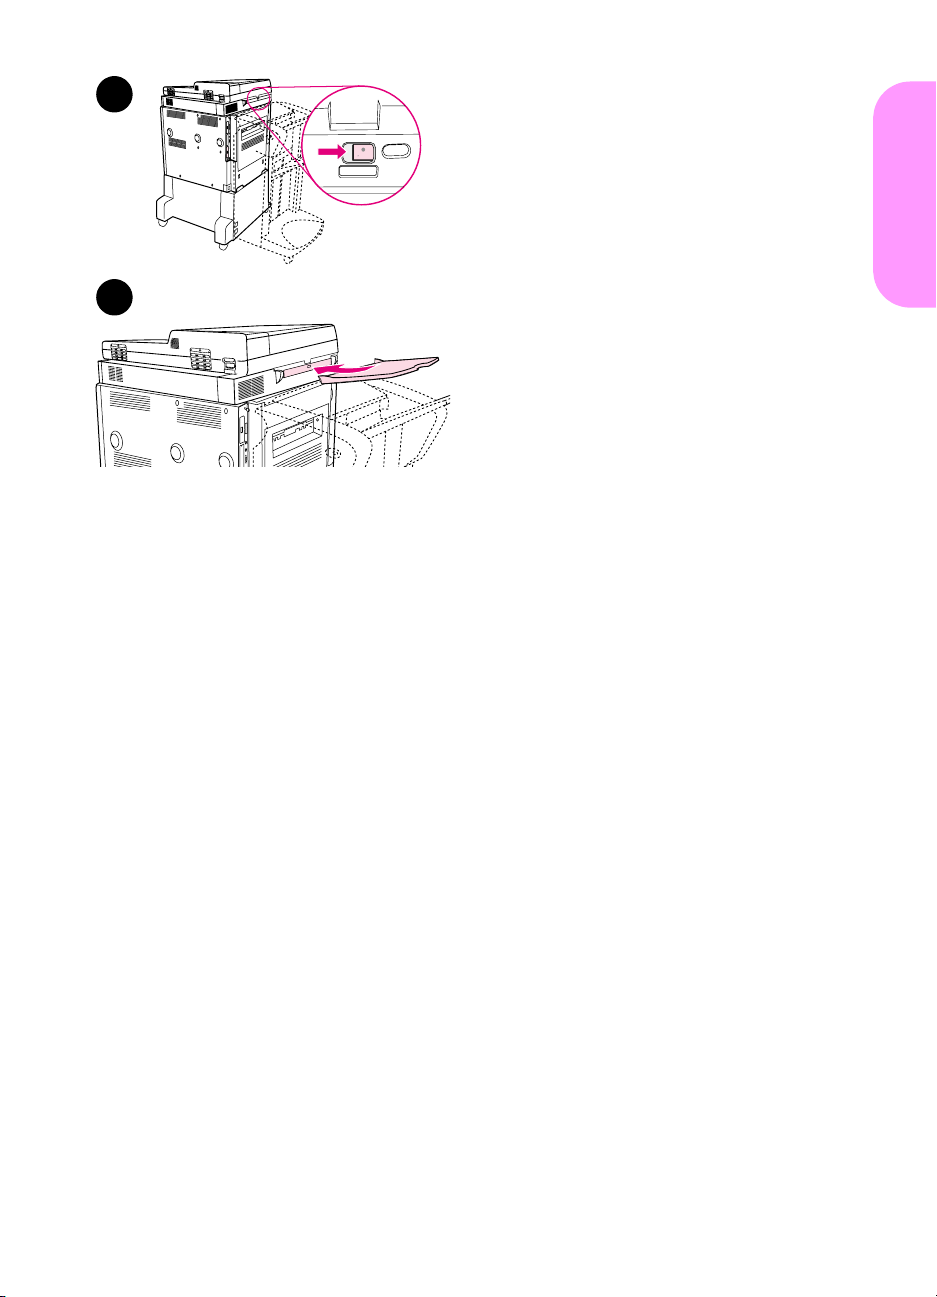
3 Connect the high speed copy
connect cable to the copy processor
board. Be sure to run the cable
under the standoff.
4
26 Product Setup
4 Press the power button to turn the
product on (button in). Afte r the
product warms up, a prompt will
appear asking you to configure your
control panel display languag e. (See
Step 12, “Configure the control panel
display language.”)
ENWW
Page 29

5
5 Check that the light on the output
device is solid green. Also make
sure that the light on Tray 4 is solid
green. If the light is amber, flashing,
or off, see the use guide that can be
downloaded from
http://www.hp.com/support/lj9000.
English
ENWW
Connect power cords 27
Page 30

Step 12 Configure the control panel display
language
By default, the control panel on the product displays messages in
English. If necessary, set the product to display messages and print
configuration pages in another supported language.
Note When the product is turned on for the fi rst time, y ou ha v e the option to
set the language to display messages in many different languages.
To configure the control panel language
On the touch screen of the graphical display:
1 Touch Menu.
2 Touch Configure Device.
3 Touch System Setup.
4 Touch Language.
.
5 Touch your language, and then touch S
TART
28 Product Setup
ENWW
Page 31

Step 13 Configure digital sending
To configure digital sending, you m u st know the Internet Protocol (IP)
address of the Simple Mail Transfer Protocol (SMTP) server on your
network. The product uses the SMTP se rver IP address to send email messages to other computers.
Optionally, you can have access to a Lightweight Directory Access
Protocol (LDAP) server. LDAP servers hold e-mail addresses and
names, and enable you to associate names (John Smith) with e-mail
addresses (jsmith@hp.com).
Note If you do not know the IP address of the SMTP or LDAP servers on
your network, you will need to ask your netw ork or e-mail administrator
for this information.
On the touch screen of the graphical display:
1 Touch Menu.
2 Touch Configure Device.
3 Touch Copy/Send.
4 You can touch AutoDiscover to let the product search for the
SMTP address, and then go to step 7. Otherwise, proceed to
step 5.
5 Locate SMTP Address on the screen, and then touch the first
box.
English
6 Using the numeric keypad, select the first digit of the IP address
of the SMTP server. Continue touching each box and selecting
the digits until you ha ve entered the entire IP address.
7 Touch OK.
Note For additional inf ormation about finding the IP addresses of the SMTP
and LDAP servers, and for alternate procedures for configuring the
product for digital sending, see the user guide.
ENWW
Configure digital sending 29
Page 32

Step 14 Print the configuration
Print the configuration to mak e sure the pr oduct is oper ating correctl y
and that the accessories are installed correctly.
On the touch screen of the graphical display:
1 Touch Menu.
2 Touch Information.
3 Touch Print Configuration.
30 Product Setup
ENWW
Page 33

Step 15 Install software
The product comes with software on a CD-ROM. The drivers on this
CD-ROM must be installed to take advantag e of the product features.
If you do not have access to a CD-ROM drive, you can download the
software from the Internet at http://www.hp.com/support/lj9000.
Depending on the configuration of Windows-driven computers, the
installation program for the software automat ically checks the
computer for Internet access and provides an option to obtain the
latest software from the Internet.
Note Product installation software for UNIX (HP-UX, Sun Solaris) networks
is available for download at http://www.hp.com/support/net_printing.
English
ENWW
Install software 31
Page 34

Installing Windows printing software
This section describes how to install Windows printing software. The
software is supported on Windows 95, Windows 98, Windo ws NT 4.0,
Windows 2000, and Windo ws Me.
1 Close all running programs.
2 Insert the CD-ROM into the CD-ROM drive. Depending on the
computer configuration, the installation program may
automatically run. If the program does not run automatically: On
the Start menu, click Run. Type x:setup (where X is the letter of
the CD-ROM drive), and click OK.
3 Follow the instructions on the computer screen.
32 Product Setup
ENWW
Page 35

Installing Macintosh printing software
This section describes how to install Macintosh printing software.
1 Quit all running applications.
2 Insert the CD-ROM into the CD-ROM drive.
3 Double-click the HP LaserJet Installers folder.
4 Choose whether to install the OS 8 and 9 versions or the OS X
version. Double-click the appropriate installer.
OS 8 and 9
1 Double-click the Installer icon for the desired language and follow
the instructions on the screen.
2 Open the Chooser from the Apple menu.
3 Click the LaserWriter 8 icon. If the icon is not there, consult your
Mac OS Help for troubleshooting information or contact
HP Customer Care (see the introduce guide that came on the
CD-ROM).
4 If you are on a netw ork with multiple zo nes , select the z one in th e
AppleTalk Zones box where the product is located. If this is
unknown, ask your network administrator.
English
ENWW
5 Double-click the desired printer. An icon should appear.
6 Close the Chooser by clicking the Go-Away (Close) box in the
upper-left corner.
OS X
1 Open the Print Center.
2 Select Add Printer.
3 Select the connection type from the list at the to p of the window.
4 Select the product from the list of printers and click Add.
5 Close the Print Center by clicking the Go-Away (Close) box in the
upper-left corner.
Install software 33
Page 36

Step 16 Verify product setup
To verify that the product has been se t up cor rectly to copy, send, and
print, follow the steps below.
To verify copying
1 Place a one-page document face down on the glass.
.
2 Press S
If the document does not copy correctly, check your product
installation. For additional information, see the online use guide at
http://www.hp.com/support/lj9000.
To verify sending
1 Place a one-page document face down on the glass.
2 On the touch screen of the graphical display, touch Send
Options.
Note If you cannot gain access to Send Options, check your product
installation and configuration. F or additional info rmation, see the online
use guide.
TART
3 Touch From: and then enter your name using the touch screen
4 Touch OK.
5 Touch To: and then enter your own e-mail address.
6 Touch OK.
7 Press S
The product sends the document to you as an e-mail attachment.
If the document does not send correctly, check your product
installation and configuration. For additional information, see the
online use guide.
34 Product Setup
keyboard.
TART
.
ENWW
Page 37

To verify printing
1 Open a program of your choice. Open or create a simple
document.
2 Select the HP LaserJet 9000mfp or HP LaserJet 9000Lmfp as
your printer.
3 Print the document.
If the document prints, printing setup is complete.
If the document does not print correctly, check your product
installation and configuration. For additional information, see the
online use guide.
English
ENWW
Verify product setup 35
Page 38

Customer support
For additional information regarding the product, see the introduce
guide on the CD-ROM or the use guide at
http://www.hp.com/support/lj9000.
36 Product Setup
ENWW
Page 39

Warranty and regulatory information
Hewlett-Packard limited warranty statement
HP PRODUCT DURATION OF WARRANTY
HP LaserJet 9000mfp
HP LaserJet 9000Lmfp
1 HP warrants HP hardware, accessories, and supplies against
defects in materials and workmanship for the period specified
above. If HP receives notice of such defects during the warranty
period, HP will, at its option, either repair or replace products
which prove to be defective. Replacement products may be eit her
new or like-new.
2 HP warrants that HP software will not fa il to execute its
programming instructions, for the period specified above, due to
defects in material and workmanship when properly installed and
used. If HP receives notice of such defects during the warranty
period, HP will replace software media which does not execute its
programming instructions due to such defects.
3 HP does not warrant that the operation of HP products will be
uninterrupted or error free. If HP is unable, within a reasonable
time, to repair or replace an y product t o a condition as w arra nted,
customer will be entitled to a refund of the purchase price upon
prompt return of the product.
1 year, on-site
English
ENWW
4 HP products may contain rem anuf actured parts equivalent t o new
in performance or may have been subject to incidental use.
5 The warranty period begins on the date of the delivery or on the
date of installation if installed by HP. If customer schedules or
delays HP installation more than 30 days after delivery, warranty
begins on the 31st day from de livery.
6 Warran ty doe s no t apply to defects resulting from (a) improper or
inadequate maintenance or calibration, (b) software, interfacing,
parts or supplies not supplied by HP, (c) unauthorized
modification or misuse, (d) operation outside of the published
environmental specifications for the product, or (e) improper site
preparation or maintenance.
Warranty and regulatory information 37
Page 40

7 TO THE EXTENT ALLOWED BY LOCAL LAW, THE ABOVE
WARRANTIES ARE EXCLUSIVE AND NO O THER WARRANTY ,
WHETHER WRITTEN OR ORAL, IS EXPRESSED OR IMPLIED
AND HP SPECIFICALLY DISCLAIMS THE IMPLIED
WARRANTIES OR CONDITIONS OF MERCHANTABILITY,
SATISFACTORY QUALITY, AND FITNESS FOR A PARTICULAR
PURPOSE.
8 TO THE EXTENT ALLOWED BY LOCAL LAW, THE REMEDIES
IN THIS WARRANTY STATEMENT ARE THE CUSTOMER’S
SOLE AND EXCLUSIVE REMEDIES. EXCEPT AS INDICATED
ABOVE, IN NO EVENT WILL HP OR ITS SUPPLIERS BE
LIABLE FOR LOSS OF DATA OR FOR DIRECT, SPECIAL,
INCIDENTAL, CONSEQUENTIAL (INCLUDING LOST PROFIT
OR DATA), OR OTHER DAMAGE, WHETHER BASED IN
CONTRACT, TORT, OR OTHERWISE.
9 FOR CONSUMER TRANSACTIONS IN AUSTRALIA AND NEW
ZEALAND; THE WARRANTY TERMS CONTAINED IN THIS
STATEMENT, EXCEPT TO THE EXTENT LAWFULLY
PERMITTED , DO NO T EXCLUDE, RESTRICT OR MODIFY AND
ARE IN ADDITION TO THE MANDATORY STATUTORY RIGHTS
APPLICABLE TO THE SALE OF THIS PRODUCT TO YOU.
Service during and after the warranty period
•
•
•
38 Product Setup
If product hardware fails during the warranty period, contact an
HP-authorized service or support provider.
If product hardware fails after the warranty period, and you have
an HP Maintenance Agreement or HP SupportPack, request
service as specified in the agreement.
If you do not have an HP Maintenance Agreement or HP
SupportPack, contact an HP-authorized service or support
provider.
ENWW
Page 41

Limited warranty for print cartridge life
Note The warranty below applies to the print cartridge that came with this
product.
This HP Print Cartridge is warranted to be free from defects in
materials and workmanship for cartridge life (which is indicated by a
product control panel cartridge end of life message).
HP will, at HP’s option, either replace products which prove to be
defective or refund your purchase price.
The warranty does not cover cartridges which have been refilled, are
emptied, abused, misused, or tampered with in any way.
This limited warranty gives you specific legal rights. You may have
other rights which vary from state to state, province to province, and
country/region to country/region.
To the extent allowed by applicable law, in no event shall HewlettPac kard Compan y be liab le f or an y incidental, co nsequential, sp ecial,
indirect, punitive, or exem plary damages or lost profits from any
breach of this warranty or otherwise.
English
ENWW
Warranty and regulatory information 39
Page 42

HP software license terms
ATTENTION: USE OF THE SOFTWARE IS SUBJECT TO THE HP
SOFTWARE LICENSE TERMS SET FORTH BELOW. USING THE
SOFTWARE INDICATES YOUR ACCEPTANCE OF THESE
LICENSE TERMS. IF YOU DO NOT ACCEPT THESE LICENSE
TERMS, YOU MAY RETURN THE SOFTWARE FOR A FULL
REFUND. IF THE SOFTWARE IS BUNDLED WITH ANOTHER
PRODUCT, YOU MAY RETURN THE ENTIRE UNUSED PRODUCT
FOR A FULL REFUND.
The following L icense Terms govern your use of the accompanying
Software unless you have a separate signed agreement with HP.
License grant
HP grants you a license to Use one copy of the Software. “Use”
means storing, loading, installing, executing, or displaying the
Software. You may not modify the Software or disable any licensing or
control features of the Software. If the Software is licensed for
“concurrent use”, you may not allow more than the maximum numbe r
of authorized users to Use the Software concurrently.
Ownership
The Software is owned and copyrighted by HP or its third party
suppliers. Your license confers no title to, or ownership in, the
Software and is not a sale of any rights in the Software. HP’s third
party suppliers may protect their rights in the event of any violation of
these License Terms.
Copies and adaptations
You may only make copies or adaptations of the Software for archival
purposes or when copying or adaptation is an essential step in the
authorized Use of the Software. You must reproduce all copyright
notices in the original Software on all copies or adaptations. You may
not copy the Software onto any public network.
No disassembly or decryption
You may not disassemble or decompile the Software unless HP’s
prior written consent is obtained. In some jurisdictions, HP’s consent
may not be required for limited disassembly or decompilation. Upon
request, you will provide HP with reasonably detailed information
regarding any disassemb ly or decompilation. You may not decrypt the
Software unless decryption is a necessary part of the operation of the
Software.
40 Product Setup
ENWW
Page 43

Transfer
Your license will automatically terminate upon any transfer of the
Software. Upon tr ansfer, you must deliver the Software, including any
copies and related documentation , to th e transferee. The transferee
must accept these License Terms as a condition to the transfer.
Termination
HP may terminate your license upon notice for failure to comply with
any of these License Terms. Upon termination, you must immediately
destroy the Software, together with all copies, adaptations, and
merged portions in any form.
Export requirements
You may not export or reexport the Software or any copy or
adaptation in violation of any applicable laws or regulations.
U.S. government restricted rights
The Software and any accompanying documentation have been
dev eloped entirely at private ex pense. They are delivered and
licensed as “commercial computer software” as defined in DFARS
252.227-7013 (Oct 1988), DFARS 252.211-7015 (May 1991), or
DFARS 252.227-7014 (Jun 1995), as a “commercial item” as defined
in FAR 2.101 (a), or as “Restricted computer software” as defined in
FAR 52.227-19 (Jun 1987) (or any equivalent agency regulation or
contract clause), whichever is applicable. You have only those rights
provided for such Sof tw are and an y accompan ying document ation b y
the applicable FAR or DFARS clause or the HP standard software
agreement for the product involved.
English
ENWW
Warranty and regulatory information 41
Page 44

FCC regulations
This equipment has been tested and found to comply with the limits
for a Class A digital device, pursuant to part 15 of the FCC Rules.
These limits are designed to provide reasonable protection against
harmful interference when the equipment is oper ated in a commer cial
environment. This equipment generates, uses, and can radiate radio
frequency energy and, if not installed and used in accordance with
the instruction manual, may cause harmful interference to radio
communications. Operation of this equipment in a residential area is
likely to cause harmful interference in which case the user will be
required to correct the interf e rence at his own expense . Modif ications
not expressly approved by HP could void the user's authority to
operate the equipment under FCC rules.
42 Product Setup
ENWW
Page 45

Canadian DOC regulations
Complies with Canadian EMC Class A requirements.
Conforme á la classe A des normes canadiennes de compatibilité
électromagnétique CEM.
VCCI statement (Japan)
VCCI class A product
Korean EMI statement
English
ENWW
Taiwan EMI statement
Warranty and regulatory information 43
Page 46

Safety information
Laser safety
The Center for Devices and Radiological Health (CDRH) of the U.S.
Food and Drug Administration has implemented regulations for laser
products manufactured since August 1, 1976. Compliance is
mandatory for products marketed in the United States . This pro duct is
certified as a “Class 1” laser product under the U.S. Department of
Health and Human Services (DHHS) Radiation Performance
Standard according to the Radiation Control f or Health and Saf ety Act
of 1968. Since radiation emitted inside this product is completely
confined within protective housings and external covers, the laser
beam cannot escape during any phase of normal user operation.
WARNING! Using controls, making adjustments, or performing procedures other
than those specified in this manual ma y result in exposure to hazardous
radiation.
Product information sheet
The Toner Product Information Sheet can be obtained by calling the
U.S. HP FIRST (Fax Information Retrieval Support Technology) at
(1) (800) 333-1917. International customers should see the customer
support flyer that is included with the product.
Laser Statement for Finland
Luokan 1 laserlaite
Klass 1 Laser Apparat
HP LaserJet 9000mfp/HP LaserJet 9000Lmfp laserkirjoitin on
käyttäjän kannalta turvallinen luokan 1 laserlaite. Normaalissa
käytössä kirjoittimen suojakotelointi estää lasersäteen pääsyn laitteen
ulkopuolelle. Laitteen turvallisuusluokka on määritetty standardin EN
60825-1 (1994) mukaisesti.
Varoitus!
Laitteen käyttäminen muulla kuin käyttöohjeessa mainitulla tavalla
saattaa altistaa käyttäjän turvallisuusluokan 1 ylittävälle
näkymättömälle lasersäteilylle.
44 Product Setup
ENWW
Page 47

Varning!
Om apparaten används på annat sätt än i bruksanvisning
specificerats, kan användaren utsättas för osynlig laserstrålning, som
överskrider gränsen för laserklass 1.
HUOLTO
HP LaserJet 9000mfp/HP LaserJet 9000Lmfp -kirjoittimen sisällä ei
ole käyttäjän huollettavissa olevia kohteita. Laitteen saa avata ja
huoltaa ainoastaan sen huoltamiseen koulutettu henkilö. Tällaiseksi
huoltotoimenpiteeksi ei katsota väriainekasetin vaihtamista,
paperiradan puhdistusta tai muita käyttäjän käsikirjassa lueteltuja,
käyttäjän tehtäväksi tarkoitettuja ylläpitotoimia, jotkavoidaan suorittaa
ilman erikoistyökaluja.
Varo!
Mikäli kirjoittimen suojakotelo avataan, olet alttiina näkymättömälle
lasersäteilylle laitteen ollessa toiminnassa. Älä katso säteeseen.
English
ENWW
Warranty and regulatory information 45
Page 48

Declaration of Conformity
according to ISO/IEC Guide 22 and EN 45014
Manufacturer’s Name: Hewlett-Packard Company
Manufacturer’s
Address:
declares, that the product
Product Name: LaserJet 9000 MFP Printer, including Duplexing- and Multi Purpose Paper
Model Numbers: C8523A, Q2458A, Q2622A and Q2623A Printer,
Product Options: ALL
conforms to the following Product Specifications:
SAFETY: IEC 60950:1991+A1 +A2 +A3 +A4 / EN60950:1992+A1 +A2 +A3 +A4 +A11
IEC 60825-1:1993 + A1 / EN 60825-1:1994 + A11 (Class 1 Laser/LED Product)
GB4943-1995
EMC:
CISPR 22:1993 + A1 + A2 / EN 55022:1994 + A1 + A2 Class A
EN 61000-3-2:1995 / A14
EN 61000-3-3:1995
EN 55024:1998
11311 Chinden Boulevard
Boise, Idaho 83714-1021, USA
Input Accessory
Including : C8532A, C8568A
1*
FCC Title 47 CFR, Part 15 Class A
2
/ ICES-003, Issue 3 / GB9254-1998
AS / NZS 3548:1995 + A1 + A2
Supplementary Information:
The product herewith complies with the requirements of the EMC Directive 89/336/EEC and the Low
Voltage Directive 73/23/EEC, and carries the CE-Marking accordingly
1) The product was tested in a typical configuration with Hewlett-P ackard P ersonal Computer Systems.
2) This Device complies with Part 15 of the FCC Rules. Operation is subject to the following two
Conditions:
(1) this device may not cause harmful interference, and
(2) this device must accept any interf erence received, including interference that may cause undesired
operation
*) The product includes LAN (Local Area Network) options. When the interface cable is attached to
LAN connectors, the product meets the requirements of EN55022 Class A in which case the follo wing
applies: "Warning - This is a class A product. In a domestic environment this product may cause
radio interference in which case the user may be required to take adequate measures".
3) The model number may include an additional suffix letter "R".
Boise, Idaho USA
22 August, 2002
For Regulatory Topics Only:
Australia Contact: Product Regulations Manager, Hewlett-Packard Australia Ltd., 31-41 Joseph Street, Blackburn,
Victoria 3130, Australia.
European Contact: Your Local Hewlett-Packard Sale s and Service Office or Hewlett-Packard Gmbh,
Department HQ-TRE / Standards Europe, Herrenberger Straße 130, D-71034 Bõblingen (FAX: +49-7031-14-3143)
USA Contact: Pr oduct Regulations Manager , Hewlett-P ackard Company, PO Box 15, Mail Stop 160, Boise, Idaho 83707-
0015 (Phone: 208-396-6000)
46 Product Setup
ENWW
Page 49

Declaration of Conformity
according to ISO/IEC Guide 22 and EN 45014
Manufacturer’s Name: Hewlett-Packard Company
English
Manufacturer’s
Address:
declares, that the product
Product Name: 2000-sheet Feeding Paper Input Accessory for the HP LaserJet 9000 Printer
Model Numbers: C8531A
Product Options: ALL
conforms to the following Product Specifications:
SAFETY: IEC 60950:1991+A1:1992+A2:1993+A3:1995+A4:1996 /
EMC: CISPR 22:1997 / EN 55022:1998 Class B
Supplementary Information:
The product herewith complies with the requirements of the EMC Directive 89/336/EEC and the Low
Voltage Directive 73/23/EEC, and carries the CE-Marking accordingly.
1) The product was tested in a typical configuration with Hewlett-P ackard P ersonal Computer Systems.
2) This Device complies with Part 15 of the FCC Rules. Operation is subject to the following two
Conditions:
(1) this device may not cause harmful interference, and
(2) this device must accept any interf erence received, including interference that may cause undesired
operation
Australia Contact: Product Regulations Manager, Hewlett-Packard Australia Ltd., 31-41 Joseph Street, Blackburn,
Victoria 3130, Australia
European Contact: Your Local Hewlett-Packard Sale s and Service Office or Hewlett-Packard Gmbh, Department HQTRE / Standards Europe, Herrenberger Straße110-140, D-71034 Böblingen (FAX: +49-7031-14-3143)
USA Contact: Pr oduct Regulations Manager , Hewlett-P ackard Company, PO Box 15, Mail Stop 160, Boise, Idaho 837070015 (Phone: 208-396-6000)
EN 60950:1992+A1:1993 + A2:1993 + A3:1995 + A4:1997 + A11:1997
EN 55024:1998
IEC 61000-3-2:1995/EN 61000-3-2:1995+A14:2000
IEC 61000-3-3:1994/EN 61000-3-3:1995
FCC Title 47 CFR, Part 15 Class B
AS / NZS 3548:1995
11311 Chinden Boulevard
Boise, Idaho 83714-1021, USA
Family
1
2
/ ICES-003, Issue 3
Hewlett-Packard Company
Boise, Idaho USA
Apr. 16, 2001
ENWW
Declaration of Conformity 47
Page 50

Declaration of Conformity
according to ISO/IEC Guide 22 and CEN/CENELEC EN 45014
Manufacturer’s Name: Hewlett-Packard Company
Manufacturer’s
Address:
Montemorelos 299, Guadalajara Jalisco, 45060
Mexico
declares, that the product
Product Name: 3000-sheet Stacker
Model Numbers: C8084A
Product Options: N/A
conforms to the following Product Specifications:
SAFETY: IEC 950: 1991+A1+A2+A3+A4 / EN 60950: 1992+A1+A2+A3+A4+A11
IEC 825-1:1993/EN 60825-1:1994 Class 1 (Laser/LED)
UL1950, Third edition.
EMC: CISPR 22:1997/EN55022:1998 Class A
1)
EN55024:1998
IEC61000-3-2:1998/EN 61000-3-2:1995
IEC61000-3-3:1994/EN61000-3-3:1995
2)
FCC Title 47 CFR, Part 15 Class A
AS/NZS 3548:1992/CISPR 22:1993 Class A
/ICES-003, Issue 2
1)
Additional Information:
The product herewith complies with the requirements of the EMC Directive 89/336/EEC and the Low
Voltage Directive 73/23/EEC, and carries the CE-Marking accordingly.
1) The product was tested in a typical configuration with Hewlett-P ackard P ersonal Computer Systems.
2) This Device complies with Part 15 of the FCC Rules. Operation is subject to the following two
Conditions:
(1) this device may not cause harmful interference, and
(2) this device must accept any interf erence received, including interference that may cause undesired
operation.
Hewlett-Packard Company
Guadalajara, Jalisco, MEXICO
October 16, 2000
Australia Contact: Product Regulations Manager, Hewlett-Packard Australia Ltd., 31-41 Joseph Street, Blackburn,
Victoria 3130, Australia
European Contact: Your Local Hewlett-Packard Sale s and Service Office or Hewlett-Packard Gmbh, Department HQTRE / Standards Europe, Herrenberger Straße110-140, D-71034 Böblingen (FAX: +49-7031-14-3143)
USA Contact: Pr oduct Regulations Manager , Hewlett-P ackard Company, PO Box 15, Mail Stop 160, Boise, Idaho 837070015 (Phone: 208-396-6000)
48 Product Setup
ENWW
Page 51

Declaration of Conformity
according to ISO/IEC Guide 22 and CEN/CENELEC EN 45014
Manufacturer’s Name: Hewlett-Packard Company
English
Manufacturer’s
Address:
Montemorelos 299, Guadalajara Jalisco, 45060
Mexico
declares, that the product
Product Name: 3000-sheet Stapler/Stacker
Model Numbers: C8085A
Product Options: N/A
conforms to the following Product Specifications:
SAFETY: IEC 950:1991+A1+A2+A3+A4 / EN 60950:1992+A1+A2+A3+A4+A11
IEC 825-1:1993/EN60825-1:1994 Class 1 (Laser/LED)
UL1950, Third Edition
EMC: CISPR 22:1997 / EN 55022:1998 Class B
1
EN 55024:1998
IEC 61000-3-2:1998/EN 61000-3-2:1995
IEC 61000-3-3:1994/EN 61000-3-3:1995
2
FCC Title 47 CFR, Part 15 Class B
AS / NZS 3548:1992/CISPR 22:1993 Class B
/ ICES-003, Issue 3
1
Additional Information:
The product herewith complies with the requirements of the EMC Directive 89/336/EEC and the Low
Voltage Directive 73/23/EEC, and carries the CE-Marking accordingly.
1) The product was tested in a typical configuration with Hewlett-P ackard P ersonal Computer Systems.
2) This Device complies with Part 15 of the FCC Rules. Operation is subject to the following two
Conditions:
(1) this device may not cause harmful interference, and
(2) this device must accept any interf erence received, including interference that may cause undesired
operation.
Hewlett-Packard Company
Guadalajara, Jalisco, MEXICO
October 16, 2000
Australia Contact: Product Regulations Manager, Hewlett-Packard Australia Ltd., 31-41 Joseph Street, Blackburn,
Victoria 3130, Australia
European Contact: Your Local Hewlett-Packard Sale s and Service Office or Hewlett-Packard Gmbh, Department HQTRE / Standards Europe, Herrenberger Straße110-140, D-71034 Böblingen (FAX: +49-7031-14-3143)
USA Contact: Pr oduct Regulations Manager , Hewlett-P ackard Company, PO Box 15, Mail Stop 160, Boise, Idaho 837070015 (Phone: 208-396-6000)
ENWW
Declaration of Conformity 49
Page 52

Declaration of Conformity
according to ISO/IEC Guide 22 and CEN/CENELEC EN 45014
Manufacturer’s Name: Hewlett-Packard Company
Manufacturer’s
Address:
Montemorelos 299, Guadalajara Jalisco, 45060
Mexico
declares, that the product
Product Name: HP Multifunction Finisher
Model Numbers: C8088A, C8088B
Product Options: N/A
conforms to the following Product Specifications:
SAFETY: IEC 950:1991+A1+A2+A3+A4 / EN 60950:1992+A1+A2+A3+A4+A11
IEC 825-1:1993/EN60825-1:1994 Class 1 (Laser/LED)
UL1950, Third Edition
EMC: CISPR 22:1997 / EN 55022:1998 Class B
1
EN 55024:1998
IEC 61000-3-2:1998/EN 61000-3-2:1995
IEC 61000-3-3:1994/EN 61000-3-3:1995
2
FCC Title 47 CFR, Part 15 Class B
AS / NZS 3548:1992/CISPR 22:1993 Class B
/ ICES-003, Issue 3
1
Additional Information:
The product herewith complies with the requirements of the EMC Directive 89/336/EEC and the Low
Voltage Directive 73/23/EEC, and carries the CE-Marking accordingly.
1) The product was tested in a typical configuration with Hewlett-P ackard P ersonal Computer Systems.
2) This Device complies with Part 15 of the FCC Rules. Operation is subject to the following two
Conditions:
(1) this device may not cause harmful interference, and
(2) this device must accept any interf erence received, including interference that may cause undesired
operation.
Hewlett-Packard Company
Guadalajara, Jalisco, MEXICO
May 8, 2001
Australia Contact: Product Regulations Manager, Hewlett-Packard Australia Ltd., 31-41 Joseph Street, Blackburn,
Victoria 3130, Australia
European Contact: Your Local Hewlett-Packard Sale s and Service Office or Hewlett-Packard Gmbh, Department HQTRE / Standards Europe, Herrenberger Straße110-140, D-71034 Böblingen (FAX: +49-7031-14-3143)
USA Contact: Pr oduct Regulations Manager , Hewlett-P ackard Company, PO Box 15, Mail Stop 160, Boise, Idaho 837070015 (Phone: 208-396-6000)
50 Product Setup
ENWW
Page 53

hp LaserJet 9000mfp
hp LaserJet 9000Lmfp
Dansk
Start
Page 54

© Copyright Hewlett-Packard
Company 2002
Alle rettigheder forbeholdes.
Reproduktion, tilpasning eller
oversættelse uden forudgående
skriftlig tilladelse er ikke tilladt
ud over det, som er tilladt
igældende lov om ophavsret.
Publikationsnummer
Q2622-90904
Edition 1, 12/2002
Garanti
Oplysningerne i dette dokument
kan ændres uden forudgående
varsel.
Hewlett-Packard giver ingen
garanti med hensyn til disse
oplysninger. HEWLETTPACKARD FRASKRIVER SIG
ETHVERT STILTIENDE
ANSVAR FOR SALGBARHED
OG EGNETHED TIL ET
BESTEMT FORMÅL.
Hewlett-Packard påtager sig
intet ansvar for direkte, indirekte
eller hændelige skader samt
følgeskader eller andre skader,
som er opstået i forbindelse
med leveringen eller brugen af
disse oplysninger.
Varemærker
Microsoft
Windows
Windows Me
, MS Windows,
, Windows NT,
og Windows XP
er varemærker registreret i USA
og tilhørende Microsoft
Corporation.
Alle andre produkter, der er
angivet heri, kan være
varemærker tilhørende deres
respektive ejere.
Hewlett-Packard Company
11311 Chinden Boulevard
Boise, Idaho 83714 U.S.A.
Page 55

Produktinstallation
Indhold
Indledning . . . . . . . . . . . . . . . . . . . . . . . . . . . . . . . . . . . . . . . . . . . 54
Her finder du oplysningerne . . . . . . . . . . . . . . . . . . . . . . . . . . . . . 55
Kontrolliste til installation. . . . . . . . . . . . . . . . . . . . . . . . . . . . . . . . 56
Forberedelse af produktets placering . . . . . . . . . . . . . . . . . . . . . . 57
Kontrol af pakkens indhold . . . . . . . . . . . . . . . . . . . . . . . . . . . . . . 59
Fjernelse af den indvendige emballage. . . . . . . . . . . . . . . . . . . . . 60
Identifikation af produktdele . . . . . . . . . . . . . . . . . . . . . . . . . . . . . 61
Placering af produktet . . . . . . . . . . . . . . . . . . . . . . . . . . . . . . . . . . 62
Installation af tonerkassetten. . . . . . . . . . . . . . . . . . . . . . . . . . . . . 64
Installation af ekstraudstyr. . . . . . . . . . . . . . . . . . . . . . . . . . . . . . . 66
Ilægning af papir i bakke 2, 3 og 4 . . . . . . . . . . . . . . . . . . . . . . . . 67
Udskiftning af kontrolpanelets overlay. . . . . . . . . . . . . . . . . . . . . . 72
Tilslutning af produktkabler . . . . . . . . . . . . . . . . . . . . . . . . . . . . . . 74
Tilslutning af strømkabler. . . . . . . . . . . . . . . . . . . . . . . . . . . . . . . . 76
Konfiguration af det sprog, der vises på kontrolpanelet. . . . . . . . . 78
Konfiguration af digital afsendelse. . . . . . . . . . . . . . . . . . . . . . . . . 79
Udskrivning af konfigurationen . . . . . . . . . . . . . . . . . . . . . . . . . . . 80
Installation af software. . . . . . . . . . . . . . . . . . . . . . . . . . . . . . . . . . 81
Installation af Windows-udskrivningssoftware. . . . . . . . . . . 82
Installation af Macintosh-udskrivningssoftware . . . . . . . . . . 83
Bekræftelse af produktinstallation . . . . . . . . . . . . . . . . . . . . . . . . . 84
Kundesupport . . . . . . . . . . . . . . . . . . . . . . . . . . . . . . . . . . . . . . . . 86
Garanti og lovmæssige oplysninger . . . . . . . . . . . . . . . . . . . . . . . 87
Hewlett-Packards erklæring om begrænset garanti . . . . . . 87
Begrænset garanti for tonerkassettens levetid . . . . . . . . . . 89
HP-softwarelicensvilkår . . . . . . . . . . . . . . . . . . . . . . . . . . . . 90
FCC-regulativer . . . . . . . . . . . . . . . . . . . . . . . . . . . . . . . . . . 92
Sikkerhedsoplysninger . . . . . . . . . . . . . . . . . . . . . . . . . . . . 94
Overensstemmelseserklæring. . . . . . . . . . . . . . . . . . . . . . . . . . . . 96
Dansk
DAWW
Indhold 53
Page 56

Indledning
Tillykke med din HP LaserJet 9000mfp* (produktnummer C8523A)
eller din HP LaserJet 9000Lmfp (produktn ummer Q2622A). Produktet
leveres som standard med:
•
•
•
•
•
•
•
•
Produktet indeholder en interaktiv touch screen på kontrolpanelets
grafiske displa y. Du skal vælge én af de tre papirhåndteringsenheder:
stackeren til 3000 ark, hæfteenheden/stackeren til 3000 ark eller den
multifunktionelle finisher.
128 MB RAM (random access memory)
mulighed for kopiering, digital afsendelse og bredt udskriftformat
bredt udskriftsformat
to bakker til 500 ark (bakke 2 og bakke 3)
en multifunktionsbakke til 100 ark (bakke 1)
en inputbakke til 2000 ark (bakke 4)
en HP Jetdirect-printserver
et dupleksudskrivningsudstyr (for udskrivning på begge sider af
papiret)
Bemærk! Produktet kræver et v a lgfrit tok en ring-k ort for at for at kunne tilsluttes
til et token ring-netværk.
*Multifunktionelle ydre enheder
54 Produktinstallation
DAWW
Page 57

Her finder du oplysningerne
vejledning Start
Denne vejledning indeholder oplysninger
om udpakning og opsætning af printeren.
vejledning Introduktion
Denne vejledning indeholder oplysninger
om udførelse af almindelige kopierings-,
afsendelses- og udskrivningsopgaver.
Introduktion findes på den cd-rom, der
blev leveret med produktet. Hvis du
ønsker en papirudgav e, kan du udskrive
vejledningen introduktion på printeren.
Dansk
DAWW
vejledning Brug
Denne vejledning indeholder yderligere
oplysninger om brug og fejlfinding og er
tilgængelig på Internettet på
http://www.hp.com/support/lj9000.
Hvis du ønsker en papirudgave, kan du
udskrive vejledningen brug på printeren.
Her finder du oplysningerne 55
Page 58

Kontrolliste til installation
Denne vejledning kan hjælpe dig med at opstille og installere det nye
produkt. Du bør gennemføre afsnittene i den anførte r ækkefølge for at
sikre korrekt installation.
•
Udpakning af produktet trin 1 til 5
•
Installation af produktet trin 6 til 14
•
Installation af udskrivningssoftware trin 15
•
Bekræftelse af produktinstallation trin 16
ADVARSEL! For at undgå skader, bør du ikke løfte produktet. Produktet er udviklet
til at køre på hjul.
56 Produktinstallation
DAWW
Page 59

Trin 1 Forberedelse af produktets placering
Produktstørrelse
Forbered en placering til produktet, s å følgende fysiske og
miljømæssige krav overholdes:
m
m
1
,
1
3
5
1.177,3 mm
529,6 mm
647,7 mm
641,4 mm
641,4 mm
635,0 mm
635,0 mm
Dansk
762 mm
508 mm
1.219,2 mm
DAWW
HP LaserJet 9000mfps dimensioner (set ovenfra og fra siden)
Forberedelse af produktets placering 57
Page 60

Placeringskrav til printer en
•
Et plant gulvareal.
•
Der skal være plads rundt
om enheden.
•
Et lokale med god
ventilation.
•
Må ikke udsættes for di rekte
sollys eller kemikalier,
herunder salmiakbaserede
rengøringsmidler.
•
Korrekt strømforsyning
(15 A, 110 V eller 220 Vkredsløb placeret i
nærheden af produktet).
Et dedikeret 15 A-kredsløb
anbefales.
•
Et stabilt klima – ingen store
udsving i temperatur eller
luftfugtighed.
•
Relativ luftfugtighed på 20 til
80 procent.
•
Rumtemparaturer 10° C til
32,5 ° C.
58 Produktinstallation
DAWW
Page 61

Trin 2 Kontrol af pakkens indhold
strømkabler
Tilslutningskabel for
højhastighedskopiering
kontrolpanel-overlay
MFP-produkt
ADF-output
afstandsstykker
produktsoftwarecd-rom
tonerkassette
Dansk
DAWW
Kort funktionsoversigt
Pakkens indhold
vejledning start
Kontrol af pakkens indhold 59
Page 62

Trin 3 Fjernelse af den indvendige emballage
1 Produktet fjernes fra boksen ved at følge den vejledning, der er
trykt på boksen.
ADVARSEL! Dette produkt vejer ca. 143,2 kg. HP anbefaler, at produktet køres på
hjulene, frem for at det løftes.
2 Fjern den orange transportlås fra produktet, og fjern eventuelle
pap- eller flamingostykker, som ikke er orange.
3 Fjern den beskyttende film fra det grafiske display på
kontrolpanelet. (Se Trin 4, “Identifikation af produktdele”).
4 Åbn dækslet i venstre side, og fjern de to afstandsstykke r mellem
fikseringsenhederne. Fikseringsenhedens afstandsstykker er
fastgjort til ydersiden af venstre dæksel med orange tape. Fjern
den orange tape, der går fra fikseringsenhedens transportlåse til
ydersiden af dækslet. Luk dækslet, når du har fjernet
fikseringsenhedens afstandsstykker og tapen.
5 Åbn hver bakke, fjern de orange transportlåse og alt andet
emballagemateriale, og luk derefter skufferne.
6 Fjern alt orange emballagemateriale og orange tape fra den
dækslet til den automatisk dokumentføder (ADF).
7 Fjern alt orange emballagemateriale og tape fra glasset.
Bemærk! Gem al emballagen. Du kan få brug for at pakke produktet ind igen.
60 Produktinstallation
DAWW
Page 63

Trin 4 Identifikation af produktdele
Følgende illustrationer viser placeringen af og navnene på de vigtigste produktdele.
1
2
3
4
5
6
7
8
9
10
11
12
Dansk
13
14
15
16
17
18
19
20
21
22
Produktdele (set forfra og bagfra)
1 ADF-outputbakke
2 Kontrolpanel
3 Frontdæksel
4 Strømafbryder
5 Bakke 2
6 Bakke 3
7 Venstre dæksel
8 Strømkabelstik
DAWW
9 Strømkabelstik til
bakke 4
10 ADF-dæksel
11 ADF
12 Bakke 1
13 Højre dæksel
14 Overføringsdæksel
15 Bakke 4
16 Tilslutningsstik for
højhastighedskopiering
17 Parallelstik
18 AUX-stik
19 HP FIR-stik (Fast
InfraRed)
20 HP JetLink-stik
(ekstraudstyr)
21 EIO-stik
22 HP Jetdirect-
printserverstik
Identifikation af produktdele 61
Page 64

Trin 5 Placering af produktet
1
2
1 Lås produktets forreste hjul op, og
rul derefter produktet hen til dets
permanente placering. Gør plads til,
at du kan gå bag ved produktet.
2 Placer låsetappene på de forreste
hjul i låst position. Kun de forreste
hjul låses.
3 Find posen med afstandsstykker, og
sæt dem på produktet.
Bemærk!
Afstandsstykker sikrer, at produktet ikke
kan skubbes op mod væggen.
3
62 Produktinstallation
DAWW
Page 65

4
4 Flyt scannervognens transportlås til
højre.
5 Vedhæft ADF-outputbakken.
5
Dansk
DAWW
Placering af produktet 63
Page 66

Trin 6 Installation af tonerkassetten
Bemærk! Hvis du får toner på tøjet, skal du tørre det af med en tør klud og vaske
tøjet i koldt vand. Varmt vand får toneren til at sætte sig fast i stoffet.
1
1 Inden du fjerner tonerkassetten fra
indpakningen, skal du placere den på
et fast underlag. Tag tonerkassetten
forsigtigt ud af indpakningen.
FORSIGTIG!
Brug begge hænder, når du håndterer
tonerkassetten, så du undgår at
beskadige den.
2
2 Åbn frontdækslet på produktet.
3 Drej det grønne håndtag nedad til
ulåst position.
4 Hold kassetten, så pilen er på v enstre
side af kassetten. Placer kassetten
som vist med pilen i venstre side
pegende mod produktet, og juster
kassetten i forhold til printerstyrene.
3
Skub kassetten ind i produktet, til den
ikke kan komme længere.
Bemærk!
Tonerkassetten har en intern træktap.
Produktet fjerner automatisk træktappen,
når tonerkassetten er installeret.
4
64 Produktinstallation
DAWW
Page 67

5
5 Tryk på knappen på det grønne
håndtag, og drej håndtaget med uret
til låst position.
6 Luk frontdækslet.
Dansk
6
DAWW
Installation af tonerkassetten 65
Page 68

Trin 7 Installation af ekstraudstyr
Installer det ekstraudstyr , du har købt. Følg de installationsanvisninger,
der fulgte med ekstraudstyret til papirhåndtering. Yderligere
oplysninger om tilslutning af HP FIR-stik (Fast InfraRed), finder du
i Trin 10, “Tilslutning af produktkabler”.
multifunktionel finisher
HP FIR-stik (Fast InfraRed)
hæfteenhed/stacker
til 3000 ark
Ekstraudstyr
Bemærk! Se onlinevejledningen brug for at få oplysninger om bestilling af
ekstraudstyr.
66 Produktinstallation
stacker til 3000 ark
DAWW
Page 69

Trin 8 Ilægning af papir i bakke 2, 3 og 4
1
2
2
I dette afsnit beskrives, hvordan du
lægger A4- eller Letter-papir i bakkerne.
Anvisninger til ilægning og konfiguration
af andre størrelser papir og andre medier
finder du i vejledningen introduktion, der
findes på cd-rom’en.
FORSIGTIG!
Åbn aldrig en bakke, mens produktet
udskriver fra den, da det kan forårsage
papirstop.
Dansk
Sådan ilægges papir i bakke 1
Bakke 1 er en multifunktionsbakke,
der kan indeholde op til 100 ark papir
i standardpapirformat eller 10 kon volutter.
Produktet henter først papir fra bakke 1
3
(standardbakke). Se vejlednin gen brug
for at få oplysninger om, hvordan du
ændrer denne standard.
Bakke 1 giver mulighed for nem
udskrivning af konvolutter, transparenter
og papir i specialformat eller andre
medietyper, uden at du behøver at
tømme de andre bakker.
DAWW
1 Åbn bakke 1.
2 Læg A4- eller Letter-papir med den
lange kant først i produktet.
3 Tilpas papirstyrene, så de berører
papirstakken, men ikk e bøjer papiret.
Bemærk!
Kontroller, at papiret passer til tappene
på papirstyrene og ikke er over
indikatorerne for papirniveau.
Ilægning af papir i bakke 2, 3 og 4 67
Page 70

1
Sådan lægges papir i bakke 2
og bakke 3
1 Træk bakke 2 ud, til den ikke kan
komme længere.
2 Ilæg ca. 100 ark A4- eller Letter-papir
med den korte kant først i produktet.
Bemærk!
2
3
Hvis der kun skal udskrives på den ene
side af brevpapiret eller det fortrykte
papir, skal den side, der skal udskrives
på, vende nedad. Hvis der skal udskrives
på begge sider af brevpapiret eller det
fortrykte papir, skal den side, der skal
udskrives på først, vende opad.
3 Juster venstre (Y) papirstyr ved at
trykke på tappen på styret og
skubbe styret ind til mærket for A4eller Letter-papir.
68 Produktinstallation
DAWW
Page 71

4
6
4 Juster det forreste (X) papirstyr ved
at trykke på tappen på styret og
skubbe styret ind til mærket for A4eller Letter-papir.
5 Ilæg evt. det resterende papir (op til
500 ark).
6 Skub bakken ind, til den ikke kan
komme længere.
7 Gentag trin 1 til og med 6 for at
lægge papir i bakke 3.
Dansk
DAWW
Ilægning af papir i bakke 2, 3 og 4 69
Page 72

1
2
3
Sådan ilægges papir i bakke 4
1 Træk bakke 4 ud, til den ikke kan
komme længere.
2 Ilæg ca. 100 ark A4- eller Letter-papir
med den korte kan først i produkt et.
Bemærk!
Hvis der kun skal udskrives på den ene
side af brevpapiret eller det fortrykte
papir, skal den side, der skal udskrives
på, vende nedad. Hvis der skal udskrives
på begge sider af brevpapiret eller det
fortrykte papir, skal den side, der skal
udskrives på først, vende opad.
3 Juster venstre (Y) papirstyr ved at
trykke på tappen på styret og
skubbe styret ind til mærket for A4eller Letter-papir.
70 Produktinstallation
DAWW
Page 73

4
5
4 Juster det forreste (X) papirstyr ved
at trykke på tappen på styret og
skubbe styret ind til mærket for A4eller Letter-papir.
5 Ilæg evt. det resterende papir (op til
2000 ark).
6 Tryk ned på alle fire hjørner af
stakken for at sikre, at papiret ligger
fladt i bakken og ikke buer.
FORSIGTIG!
Opbevar aldrig papir eller andet til
venstre for papirstyrene. Dette kan
skade bakken permanent.
7 Skub bakken ind, til den ikke kan
komme længere.
Dansk
6
7
DAWW
Ilægning af papir i bakke 2, 3 og 4 71
Page 74

Trin 9 Udskiftning af kontrolpanelets overlay
1
2
Kontrolpanelet leveres en ten med
overlay på engelsk eller intet overlay.
Brug nedenstående procedure til evt. at
skifte kontrolpanelets overlay.
1 Find kontrolpanelets to o verlay.
2 Stik en skruetrækker eller en anden
smal, flad genstand ind i sprækken
ved overlayenes øverste kant.
3 Løft overlayet op og tilbage for at
fjerne det fra produktet.
3
72 Produktinstallation
DAWW
Page 75

4
4 Placer det nye overlay på kontrol-
panelet. Juster kanterne af ov erla y et
efter hullerne i kontrolpanelet, og
skub overlayet på plads.
5 Klik overlayet fast på kontrolpanelet.
Kontroller, at overlayet ligger fla dt på
kontrolpanelet.
6 Gentag trin 2 til og med 5 for a t skifte
det andet overlay.
Dansk
5
DAWW
Udskiftning af kontrolpanelets overlay 73
Page 76

Trin 10 Tilslutning af produktkabler
Produktet kan tilsluttes til en computer ved hjælp af et parallelkabel
eller til et netværk ved hjælp af en HP Jetdirect-printserver. Printeren
kan tilsluttes et Token Ring-netværk ved hjælp af et Token Ring-kort.
Parallelstik
(Parallel)
Tilslutningsstik for
højhastighedskopiering
AUX-stik
(valgfrit)
HP FIR-stik (Fast
InfraRed) (valgfrit)
HP JetLink-stik
(til ekstraudstyr)
Placering af grænsefladeporte
74 Produktinstallation
HP Jetdirect-printserver
RJ-45-stik
DAWW
Page 77

Tilslutning til Ethernet 10/100Base TX-netværk
Brug RJ-45-stikket til at tilslutte produktet til et Ethernet 10/100-BaseTX-netværk. HP Jetdirect-printservere kan bruges i mange forskellige
netværksforbindelser.
1
2
1 Find strømafbryderen på produktets
forside. Kontroller, at produktet er
slukket (knappen skal være ude).
2 Tilslut et parsnoet netværkskabel
til RJ-45-stikket i HP Jetdirectprintserver, der er installeret
i produktet.
3 Tilslut den anden ende af kablet til
netværket.
Dansk
3
DAWW
Tilslutning af produktkabler 75
Page 78

Trin 11 Tilslutning af strømkabler
I dette afsnit beskrives, hvordan strømkablet tilsluttes. HP anbefaler,
at strømkablet tilsluttes en overspændingsafleder.
1
2
3
1 Find strømafbryderen på produktets
forside. Kontroller, at produktet er
slukket (knappen skal være ude).
FORSIGTIG!
Tilslut ikke produktets strømkabel til
strømkabelstikket til bakke 4. Dette stik er
udviklet til brug for papiroutputenheder,
f.eks. den m ultifu nktionelle finisher til
bakke 4.
2 Tilslut strømkablerne til produktets
stik og stikket til bakke 4. Tilslut
derefter strømkablerne til den
relevante stikkontakt.
Bemærk!
For at opnå den bedste ydeevne
anbefales en dedikeret 15 A-stikkontakt.
3 Tilslut Tilslutningskabel for
højhastighedskopiering til
kopimaskinens processorkort. Sørg
for, at kablet er placeret under
afstandsstykket.
4
76 Produktinstallation
4 Tryk på strømafbryderen for at
tænde produktet (knappen skal
være inde). Når produktet er
opvarmet, bliver du bedt om at
konfigurere kontrolpanelets
displaysprog. (Se trin 12
“Konfiguration af kontrolpanelets
displaysprog”.)
DAWW
Page 79

5
5 Kontroller, at indikatoren på
udskriftsenheden lyser vedvarende
grønt. Kontroller også, at indikatoren
på bakke 4 lyser vedvarende grønt.
Hvis indikatoren lyser gult, blinker
eller er slukket, skal du se
vejledningen brug, som kan hentes
på
http://www.hp.com/support/lj9000.
Dansk
DAWW
Tilslutning af strømkabler 77
Page 80

Trin 12 Konfiguration af det sprog, der vises på
kontrolpanelet
Som standard vises meddelelserne på produktets kontrolpanel på
engelsk. Hvis det er nødvendigt kan du indstille produktet til at vise
meddelelser og udskrive konfigurationssider på et andet sprog.
Bemærk! Første gang der tændes for produktet, får du mulighed for at vælge
mellem mange forskellige sprog, som meddelelser skal vises på.
Sådan konfigureres kontrolpanelets sprog
På det grafiske displays touch screen:
1 Tryk på Menu.
2 Tryk på Konfigurer enhed.
3 Tryk på Systemkonfig.
4 Tryk på Sprog.
.
5 Tryk på dit sprog og derefter på S
TART
78 Produktinstallation
DAWW
Page 81

Trin 13 Konfiguration af digital afsendelse
Hvis du vil konfigurere digital afsendelse, skal du kende IP-adressen
på SMTP-serveren på netværket. Produktet bruger SMTP-serverens
IP-adresse til at sende e-mail-meddelelser til andre computere.
Du kan få adgang til en LDAP-server (Lightweight Directory Access
Protocol). LD AP-servere indeholder e-mail-adresser o g -navne og gør
det muligt at knytte navne (Jens Sørensen) til e-mail-adresser
(jsørensen@hp.com).
Bemærk! Hvis du ikke kender SMTP- eller LDAP-serverens IP-a dresse på
netværket, skal du kontakte netværks- eller e-mail-administratoren.
På det grafiske displays touch screen:
1 Tryk på Menu.
2 Tryk på Konfigurer enhed.
3 Tryk på Kopier /send.
4 Du kan trykke på Automatisk registrering for at få produktet til
at søge efter SMTP-adressen og derefter gå til trin 7. Ellers gå til
trin 5:
5 Find SMTP-adresse på skærmen, og tryk derefter på den første
boks.
6 Du skal vælge det første ciffer i SMTP-serverens IP-adresse ved
hjælp af det numeriske tastatur. Fortsæt med at trykke på hver
boks og vælge cifrene, indtil du har indtastet hele IP-adressen.
7 Tryk på OK.
Bemærk! I brugervejledningen kan du finde yderligere oplysninger om, hv ordan
du finder IP-adresserne på SMTP- og LDAP-serverne, samt
oplysninger om andre procedurer for konfigurering af produktet til
digital afsendelse.
Dansk
DAWW
Konfiguration af digital afsendelse 79
Page 82

Trin 14 Udskrivning af konfigurationen
Udskriv konfigurationen for at kontrollere, at produkt et fungerer
korrekt, og at ekstr audstyret er installeret korrekt.
På det grafiske displays touch screen:
1 Tryk på Menu.
2 Tryk på Oplysninger.
3 Tryk på Udskriv konfiguration.
80 Produktinstallation
DAWW
Page 83

Trin 15 Installation af software
Produktet leveres med softwaren på en cd-rom. Printerdriverne på
cd-rom’en skal være installeret, for at du kan udnytte produktets
funktioner.
Hvis du ikke har adgang til et cd-rom-drev, kan du hente
udskrivningssoftware fra Internettet på
http://www.hp.com/support/lj9000.
Afhængigt af konfigurationen af Windows-styrede computerer
kontrollerer installationsprogrammet til softwaren automatisk, om
computeren har adgang til Internettet og giver mulighed for at hente
den seneste software fra Internettet.
Bemærk! Produktinstallationssoftware til UNIX-netværk (HPUX, Sun Solaris)
kan hentes på http://www.hp.com/support/net_printing.
Dansk
DAWW
Installation af software 81
Page 84

Installation af Windows-udskrivningssoftware
Dette afsnit beskriver, hvordan Windows-udskrivningssoftware
installeres. Softwaren understøttes på Windows 95, Windows 98,
Windows NT 4.0, Windows 2000 og Windows Me.
1 Luk alle kørende programmer.
2 Sæt cd-rom’en i cd-rom-drevet. Afhængigt af computerens
konfiguration, køres installationsprogrammet muligvis automatisk.
Gør følgende, hvis programmet ikke køres automatisk: Klik på
Kør i menuen Start. Skriv x:setup (hvor X er cd-rom-drevets
bogstav), og klik på OK.
3 Følg anvisningerne på computerskærmen.
82 Produktinstallation
DAWW
Page 85

Installation af Macintosh-udskrivningssoftware
I dette afsnit beskrives, hvordan Macintosh-udskrivningssoftware
installeres.
1 Luk alle kørende programmer.
2 Sæt cd-rom’en i cd-rom-drevet.
3 Dobbeltklik på mappen HP LaserJet Installers.
4 Vælg, om du vil installere OS 8- og 9-versionerne eller OS X-
versionen. Dobbeltklik på det relevante installationsprogram.
OS 8 og 9
1 Dobbeltklik på Installer-ikonet for det ønskede sprog, og følg
anvisningerne på skærmen.
2 Åbn Vælger fra Apple-menuen.
3 Klik på LaserWriter 8-symbolet. Hvis symbolet ikke er der , skal du
se efter oplysninger om fejlfinding i hjælpen til Mac OS eller
kontakte HP Customer Care (se vejledningen introduktion, som
findes på cd-rom’en).
4 Hvis du er på et netværk med flere zoner , skal du vælge den z one
i feltet AppleTalk-zoner, hvor produktet findes. Hvis denne er
ukendt, kan du spørge netværksadministratoren.
5 Dobbeltklik på den ønskede printer. Der vises et symbol.
6 Luk Vælger ved at klikke på lukkefeltet i det øverste ven stre
hjørne.
OS X
1 Åbn Udskriftscenter.
2 Vælg Tilføj printer.
3 Vælg tilslutningstypen på listen øverst i vinduet.
Dansk
DAWW
4 Vælg produktet på listen over printere, og klik på Tilføj.
5 Luk Print Center ved at klikke på lukkefeltet i det øverste venstre
hjørne.
Installation af software 83
Page 86

Trin 16 Bekræftelse af produktinstallation
Hvis du vil bekræfte, om produktet er installeret korrekt, så det kan
kopiere, sende og udskrive, skal du følge trinene nedenfor.
Sådan bekræftes kopiering
1 Placer et ensidet dokument med forsiden ned mod glasset.
.
2 Tryk på S
Hvis dokumentet ikke kopieres korrekt, skal du kontrollere
produktinstallationen. Yderligere oplysninger finder du
i onlinevejledningen brug på http://www.hp.com/support/lj9000.
Sådan bekræftes afsendelse
1 Placer et ensidet dokument med forsiden ned mod glasset.
2 Tryk på Afs endelsesindstillinger på det grafiske displays touch
screen.
Bemærk! Hvis du ikke kan få adgang til Afsendelsesindstillinger, skal du
kontrollere produktinstallat ionen og konfigurationen. Yderligere
oplysninger finder du i onlinevejledningen brug.
TART
3 Tryk på Fra:, og indtast derefter dit navn ved hjælp af touch
screen-tastaturet.
4 Tryk på OK.
5 Tryk på Til:, og indtast din e-mail-adresse.
6 Tryk på OK.
7 Tryk på S
Produktet sender dokumentet til dig som en vedhæftet fil.
Hvis dokumentet ikke sendes korrekt, skal du kontrollere
produktinstallationen og -konfigurationen. Yderligere oplysninger
finder du i onlinevejledningen brug.
84 Produktinstallation
TART
.
DAWW
Page 87

Sådan bekræftes udskrivning
1 Åbn et vilkårligt program. Åbn eller opret et simpelt dokument.
2 Marker HP LaserJet 9000mfp eller HP LaserJet 9000Lmfp som
din printer.
3 Udskriv dokumentet.
Hvis dokumentet udskrives, er printerinstallationen gennemført.
Hvis dokumentet ikke udskrives korrekt, skal du kontrollere
produktinstallationen og -konfigurationen. Yderligere oplysninger
finder du i onlinevejledningen brug.
Dansk
DAWW
Bekræftelse af produktinstallation 85
Page 88

Kundesupport
Yderligere oplysninger om produktet finder du i vejledningen
introduktion på cd-rom’en eller i vejledningen brug på
http://www.hp.com/support/lj9000.
86 Produktinstallation
DAWW
Page 89

Garanti og lovmæssige oplysninger
Hewlett-Packards erklæring om begrænset garanti
HP-PRODUKT GARANTIENS VARIGHED
HP LaserJet 9000mfp
HP LaserJet 9000Lmfp
1 HP-hardware, -tilbehør og -forbrugsvarer garanteres at være fri for
fejl i materialer og udførelse i den periode, der er angivet ovenfor.
Hvis HP underrettes om sådanne defekter i garantiperioden, vil HP,
efter eget valg, enten reparere eller erstatte produkter , der viser sig
at være defekte. Erstatningsprodukter kan enten være nye eller
som nye.
2 HP garanterer, at der ikke vil opstå fejl i HP-softwaren under
udførelsen af programmeringsinstruktioner i den ovenfor
specificerede periode på grund af defekter i materialer og
udførelse, når den installeres og bruges korrekt. Hvis HP
underrettes om sådanne def ekter i garantiperioden, vil HP erstat te
det softwaremedie, som ikk e udfører programmeringsinstruktioner
på grund af sådanne def e kter.
3 HP garanterer ikke, at HP-produkternes drift vil foregå fejlfrit og
uden afbrydelser. Hvis HP ikke er i stand til, inden for en rimelig
tid, at reparere eller erstatte et produkt, således at det opnår en
tilstand, der kan ydes garanti for, har kunden ret til at få
købsprisen refunderet ved øjeblikkelig returnering af produktet.
4 HP-produkter kan indeholde renoverede dele, der i ydelse svarer
til nye dele, eller dele, som kan have været genstand for tilfældig
brug.
1 år, på stedet
Dansk
DAWW
5 Garantiperioden træder i kraft på leveringsdatoen eller på
installationsdatoen, hvis installationen udføres af HP. Hvis kunden
udskyder eller forsink er HP-installationen i mere end 30 dage efter
leve ring, træder garantien i kraft den 31. dag efter leveringen.
6 Garantien dækker ikke defekter, som skyldes (a) forke rt eller
mangelfuld vedligeholdelse eller kalibrering, (b) software,
tilslutningsudstyr, dele eller forbrugsvarer, som ikke er fra HP,
(c) uautoriseret modifikation eller misbrug, (d) drift i et miljø, der
ikke overholder de angivne specifikationer for produktet, eller
(e) forkert klargøring eller vedligeholdelse af placeringsstedet.
Garanti og lovmæssige oplysninger 87
Page 90

7 I DET OMFANG LOKAL LOVGIVNING TILLADER DET, ER DE
OVENNÆVNTE GARANTIER EKSKLUSIVE, OG DER GIVES
INGEN ANDEN GARANTI, HVERKEN SKRIFTLIGT ELLER
MUNDTLIGT, UDTRYKKELIGT ELLER UNDERFORSTÅET,
OG HP FRASKRIVER SIG UDTRYKKELIGT DE
UNDERFORSTÅEDE GARANTIER ELLER BETINGELSER OM
SALGBARHED, TILFREDSSTILLENDE KVALITET OG
EGNETHED TIL ET BESTEMT FORMÅL.
8 I DET OMFANG, LOKAL LOVGIVNING TILLADER DET, ER
RETSMIDLERNE I DENNE GARANTIERKLÆRING KUNDENS
ENESTE OG EKSKLUSIVE RETSMIDLER. UNDTAGEN, SOM
INDIKERET HERO VER, ER HP ELLER HPS LEVERANDØRER
UNDER INGEN OMSTÆNDIGHEDER ANSVARLIGE FOR TAB
AF DATA ELLER FOR DIREKTE, SÆRSKILT
DOKUMENTEREDE, HÆNDELIGE SKADER ELLER
FØLGESKADER (HERUNDER TAB AF FORTJENESTE ELLER
DATA) ELLER ANDEN SKADE, HVADENTEN DER ER T ALE OM
ET KONTRAKTSRETLIGT FORHOLD, EN SKADEVOLDENDE
HANDLING ELLER ANDET.
9 KUNDETRANSAKTIONER I ØSTRIG OG NEW ZEALAND:
GARANTIVILKÅRENE I DENNE ERKLÆRING,
EKSKLUDERER, BEGRÆNSER ELLER MODIFICERER IKKE,
MED UNDTAGELSE AF DET OMFANG LOVEN TILLADER, DE
UFRAVIGELIGE LOVBESTEMTE RETTIGHEDER, SOM ER
GÆLDENDE FOR SALGET AF DETTE PRODUKT, MEN ER
ITILLÆG HERTIL.
Service under og efter garantiperioden
•
Hvis der opstår fejl på produkthardwaren i garantiperioden, skal
du kontakte en autoriseret HP-service- eller supportleve randør.
•
Hvis der opstår fejl på produkthardwaren efter garantiperiodens
udløb, og du har en HP-vedligeholdelsesaftale eller HP-
supportpakke, skal du bestille service i henhold til aftalen.
•
Hvis du ikke har en HP-vedligeholdelsesaftale eller HP-
supportpakke, skal du kontakte en autoriseret HP-service- eller
supportleverandør.
88 Produktinstallation
DAWW
Page 91

Begrænset garanti for tonerkassettens levetid
Bemærk! Garantien nedenfor gælder den tonerkassette, der fulgte med dette
produkt.
Denne HP-tonerkassette er garanteret fri for fejl i materialer og
udførelse i kassettens levetid (som angives via en meddelelse på
kontrolpanelet).
HP vil, efter eget valg, erstatte defekte produkter eller refundere
købsprisen.
Garantien dækker ikke tonerkassetter, der er genopfyldt, tømt,
misbrugt, brugt forkert eller på nogen måde er ændret.
Denne begrænsede garanti giver dig særlige juridiske rettigheder. Du
kan også have andre rettigheder, der varierer fra stat til stat, fra
provins til provins og fra land/område til land/område.
I det omfang gældende lovgivning gør det muligt, kan
Hewlett-Packard Company i intet tilfælde blive holdt ansvarlig for
nogen hændelige skader, følgeskader, særskilt dokumenterede
skader, indirekte skader eller pønalerstatning eller driftstab ved brud
på denne garanti eller på anden vis.
Dansk
DAWW
Garanti og lovmæssige oplysninger 89
Page 92

HP-softwarelicensvilkår
VIGTIGT: BRUG AF DENNE SOFT WARE ER UNDERLAGT
VILKÅRENE I HP-SOFTWARELICENS SOM ANGIVET NEDENFOR.
BRUGEN AF DENNE SOFTWARE ER ENSBETYDENDE MED
ACCEPT AF DISSE VILKÅR. HVIS DU IKKE KAN ACCEPTERE
DISSE LICENSBETINGELSER, SKAL DU RETURNERE
SOFTWARE N MO D FU LD REFUS ION A F KØBESUMMEN. HVIS
SOFTWA REN SÆLGE S SAMMEN MED ET ANDET PRODUK T,
KAN DU RETURNERE HELE DET UBENYTTEDE PRODUKT MOD
FULD REFUSION AF KØBESUMMEN.
Følgend e Licensvilkår angiver retningslinjerne for brugen af den
medfølgende Software, medmin dre du har en særskilt, underskrevet
aftale med HP.
Licens
HP giver dig licens til at bruge én kopi af softwaren. “Brug” betyder
opbevaring, indlæsning, installation, eksekvering eller fremvisning af
softwaren. Du må ikke ændre softwaren eller deaktivere nogen af
softwarens licens- eller kont rolfunktioner . Hvis softwarelicensen
gælder “samtidig brug”, må du højst give det maksimalt tilladte antal
autoriserede brugere adgang til at bruge Softwaren samtidigt.
Ejerskab
Softwaren tilhører HP e ller dennes tred jepartslev eran dører, som også
er indehaver af kopirettighederne. Med din licens overdrages der
ingen rettigheder til eller ejerskab af soft waren, og den er ikke et salg
af rettighederne til softwaren. HPs tredjepartsleverandører kan
beskytte deres rettigheder til softwaren mod krænkelser af disse
Licensvilkår.
Kopier og tilpasninger
Du må kun kopiere eller tilpasse softw aren med henb lik på arkivering,
eller hvis kopieringen eller tilpasningen er et nødvendigt trin i den
autoriserede brug af softwaren. Du skal angive alle meddelelser om
ophavsrettigheder i den originale software i alle kopier eller
tilpasninger. Du må ikke kopiere softwaren til et offentligt netværk.
Ingen demontering eller dekryptering
Softwaren må ikke demonteres eller dekompileres uden HPs
forudgående skriftlige tilladelse. I visse retskredse er HPs samtykke
ikke påkrævet i forbindelse med begrænset demontering eller
dekompilering. På anmodning skal brugeren give HP rimeligt
detaljerede oplysninger om eventuel demontering eller
dekompilering. Du må ikke dekryptere softwaren, medmindre
dekrypteringen er en nødvendig del af betjeningen af softwaren.
90 Produktinstallation
DAWW
Page 93

Overførsel
Denne licens ophører automatisk ved enhver overdragelse af
softwaren. Ved overdragelsen skal du levere softw aren, herunder alle
kopier og tilhørende dokumentation til den person, licensen
overdrages til. Som en betingelse for overdragelsen skal denne
person desuden acceptere disse Licensvilkår.
Ophør
HP kan ophæve denne licens ved overtrædelse af Licensvilkårene.
Ved ophøret skal du straks destruere softwaren tillige med samtlige
kopier, tilpasninger og inkorporerede dele uanset formen.
Eksportregler
Du må ikke eksportere eller geneksportere softwaren eller en kopi
eller tilpasning heraf, der er i strid med gældende lovgivning og
bestemmelser.
Begrænsede rettigheder for den amerikanske regering
Denne software med tilhørende dokumentation er udviklet
udelukkende for private midler. Den leveres og licensieres som
“kommerciel computersoftware”, som beskrevet i DFARS 252.227-
7013 (okt. 1988), DFARS 252.211-7015 (maj 1991) eller DFARS
252.227-7014 (jun. 1995), som e n “k o mmerciel v a re” som beskrevet i
FAR 2.101 (a) eller som “Aftalemæssigt begrænset
computersoftware” som beskrevet i FAR 52.2 2 7- 19 (j un . 19 87 ) (e ller
tilsvarende off entligt regulat iv eller kontr aktklausul), hvilk en end måtte
være gældende. Du har kun de rettigheder til en sådan softw a re med
tilhørende dokumentation, som gives af den gældende FAR- eller
DFARS-klausul eller HP-standardsoftwareaftale for det pågældende
produkt.
Dansk
DAWW
Garanti og lovmæssige oplysninger 91
Page 94

FCC-regulativer
Dette udstyr er blevet testet og overholder grænserne for en digital
enhed i Klasse A ifølge afsnit 15 i FCC-bestemmelserne. Disse
grænser er fastsat for at yde rimelig beskyttelse mod skadelig
interferens, når udstyret betjenes i et arbejdsmiljø. Dette udstyr
genererer, bruger og kan udstråle radiofrekvensenergi og kan, hvis
det ikke installeres og bruges i henhold til instruktionsvejledningen,
forårsage skadelig interferens i r adio k o mmun ikation. Ved betjening af
udstyret i et beboelsesområde kan der opstå skadelig interferens.
Hvis dette er tilfældet, påhviler det brugeren at korrigere denne
interferens for egen regning. Ændringer, der ikke udtrykkeligt er
godkendt af HP, kan gøre brugerens tilladelse til at anvende udstyret
under FCC-bestemmelserne ugyldig.
92 Produktinstallation
DAWW
Page 95

Canadiske DOC-regulativer
Overholder de candiske EMC Klasse A-krav.
Conforme à la classe A des normes canadiennes de compatibilité
électromagnétique (CEM).
VCCI-erklæring (Japan)
VCCI Klasse A-produkt
Koreansk EMI-erklæring
Dansk
DAWW
EMI-erklæring for Taiwan
Garanti og lovmæssige oplysninger 93
Page 96

Sikkerhedsoplysninger
Lasersikkerhed
Center for Devices and Radiological Health (CDRH) i den
amerikanske Food and Drug Administrat ion har implementeret
direktiver vedrørende laserprodukter, som er fremstillet efter
1. august 1976. Produkter, der markedsføres i USA, skal ov erholde
disse direktiver. Dette produkt er certificeret som et “Klasse 1”
laserprodukt under U.S. Department of Health and Human Services
(DHHS) Radiation Performance Standard ifølge Radiation Control for
Health and Safety Act of 1968. Eftersom stråling, som udsendes inde
i printeren, er fuldstændig indelukket i beskyttende kabinetter og
yderdæksler, kan der ikke slippe laserstråler ud under normal
betjening.
ADVARSEL! Brug af kontroller, justeringsændringer eller udførelse af procedurer
ud over dem, der er specificeret i denne håndbog, kan resultere
iudsættelse for farlig udstråling.
Produktoplysningsark
Toneroplysningsarket kan erhverves ved et opkald til U.S. HP FIRST
(Fax Inf ormation Retrieval Support Technology) på (1) (800) 333-1917.
Internationale kunder bør læse den brochure om kundesupport, som
følger med produktet.
Erklæring om lasersikkerhed gældende for Finland
Luokan 1 laserlaite
Klass 1 Laser Apparat
HP LaserJet 9000mfp/HP LaserJet 9000Lmfp laserkirjoitin on
käyttäjän kannalta turvallinen luokan 1 laserlaite. Normaalissa
käytössä kirjoittimen suojakotelointi estää lasersäteen pääsyn laitteen
ulkopuolelle. Laitteen turvallisuusluokka on määritetty standardin
EN 60825-1 (1994) mukaisesti.
Varoitus!
Laitteen käyttäminen muulla kuin käyttöohjeessa mainitulla tavalla
saattaa altistaa käyttäjän turvallisuusluokan 1 ylittävälle
näkymättömälle lasersäteilylle.
94 Produktinstallation
DAWW
Page 97

Varning!
Om apparaten används på annat sätt än i bruksanvisning
specificerats, kan användaren utsättas för osynlig laserstrålning,
som överskrider gränsen för laserklass 1.
HUOLTO
HP LaserJet 9000mfp/HP LaserJet 9000Lmfp -kirjoittimen sisällä ei
ole käyttäjän huollettavissa olevia kohteita. Laitteen saa avata ja
huoltaa ainoastaan sen huoltamiseen koulutettu henkilö. Tällaiseksi
huoltotoimenpiteeksi ei katsota väriainekasetin vaihtamista,
paperiradan puhdistusta tai muita käyttäjän käsikirjassa lueteltuja,
käyttäjän tehtäväksi tarkoitettuja ylläpitotoimia, jotka voidaan
suorittaa ilman erikoistyökaluja.
Varo!
Mikäli kirjoittimen suojakotelo avataan, olet alttiina näkymättömälle
lasersäteilylle laitteen ollessa toiminnassa. Älä katso säteeseen.
Dansk
DAWW
Garanti og lovmæssige oplysninger 95
Page 98

Overensstemmelseserklæring
ifølge ISO/IEC-vejledning 22 og EN 45014
Producentens navn: Hewlett-Packard Company
Producentens adresse: 11311 Chinden Boulevard
erklærer, at produktet
Produktnavn: LaserJet 9000 MFP-printer med dupleksenhed og tilbehør til
Modelnummer: C8523A, Q2458A, Q2622A og Q2623A printer,
Tilbehør: ALT
overholder følgende produktspecifikationer:
SIKKERHED: IEC 60950:1991+A1 +A2 +A3 +A4 / EN60950:1992+A1 +A2 +A3 +A4 +A11
IEC 60825-1:1993 + A1 / EN 60825-1:1994 + A11 (Klasse 1 Laser/LED-produkt)
GB4943-1995
EMC:
CISPR 22:1993 + A1 + A2 / EN 55022:1994 + A1 + A2 Klasse A
EN 61000-3-2:1995 / A14
EN 61000-3-3:1995
EN 55024:1998
Boise, Idaho 83714-1021, USA
multifunktionspapir-input
inklusiv: C8532A, C8568A
1*
FCC-benævnelse 47 CFR, Afsnit 15 Klasse A
2
/ ICES-003, Stykke 3 / GB9254-1998
AS / NZS 3548:1995 + A1 + A2
Supplerende oplysninger:
Produktet overholder krav ene i EMC-direktiv 89/336/EEC og lavspændingsdirektiv 73/23/EEC og bærer
CE-mærket i overensstemmelse hermed
1) Produktet er testet i en typisk konfiguration med Hewlett-Packard pc-systemer
2) Denne enhed overholder Afsnit 15 i FCC-bestemmelserne. Brug er underlagt følgende to betingelser:
(1) dette udstyr må ikke foråsage skadelige forstyrrelser og
(2) dette udstyr skal acceptere enhver modtagen forstyrrelse, inklusive forstyrrelser, som kan
forsårsage uønsket drift
*) Produktet omfatter muligheder for LAN (Local Area Network). Når interfacekab let er tilsluttet til LAN-
stik, overholder produktet krav ene til EN55022 Klasse A. I så fald gælder følgende: "Advarsel - dette
er et klasse A-produkt. I beboelsesområder kan dette produkt forårsage radiointerferens, og i sådanne
tilfælde skal brugeren træffe de nødvendige forholdsregler".
3) Produktnummeret kan indeholde det ekstra suffiksbogstav "R".
Boise, Idaho, USA
22.08.02
Kun for lovgivningsmæssige emner:
Kontakt i Australie n: Product Regulations Manager, Hewlett-Packard Australia Ltd., 31-41 Joseph Street, Blackburn,
Victoria 3130, Australien.
Kontakt i Europa: Det lokale Hewlett-Packard salgs- og servicekontor eller Hewlett-Packard Gmbh,
Department HQ-TRE / Standards Europe, Herrenberger Straße 130, D-71034 Bõblingen (Fax: +49-7031-14-3143)
Kontakt i USA: Product Regulations Manager, Hewlett-Packard Company, PO Box 15 Mail Stop 160, Boise, Idaho
83707-0015 (Telefon: 208-396-6000)
96 Produktinstallation
DAWW
Page 99

Overensstemmelseserklæring
ifølge ISO/IEC-vejledning 22 og EN 45014
Producentens navn: Hewlett-Packard Company
Producentens adresse: 11311 Chinden Boulevard
erklærer, at produktet
Produktnavn: 2000-sheet Feeding Paper Input Accessory til HP LaserJet 9000-
Modelnummer: C8531A
Tilbehør: ALT
overholder følgende produktspecifikationer:
SIKKERHED: IEC 60950:1991+A1:1992+A2:1993+A3:1995+A4:1996 /
EMC: CISPR 22:1997 / EN 55022:1998 Klasse B
Supplerende oplysninger:
Produktet overholder krav ene i EMC-direktiv 89/336/EEC og lavspændingsdirektiv 73/23/EEC og bærer
CE-mærket i overensstemmelse hermed.
1) Produktet er testet i en typisk konfiguration med Hewlett-Packard pc-systemer
2) Denne enhed overholder Afsnit 15 i FCC-bestemmelserne. Brug er underlagt følgende to betingelser:
(1) dette udstyr må ikke foråsage skadelige forstyrrelser og
(2) dette udstyr skal acceptere enhver modtagen forstyrrelse, inklusive forstyrrelser, som kan
forsårsage uønsket drift
Kontakt i Australie n: Product Regulations Manager, Hewlett-Packard Australia Ltd., 31-41 Joseph Street, Blackburn,
Victoria 3130, Australien
Kontakt i Europa:Det lokale Hewlet t-Pac kard salgs- og servicekontor eller Hewlett-P ackard Gmbh, Department HQ-TRE
/ Standards Europe, Herrenberger Straße 110-140, D-71034 Böblingen (FAX: +49-7031-14-3143)
Kontakt i USA: Product Regulations Manager, Hewlett-Packard Company, PO Box 15 Mail Stop 160, Boise, Idaho
8370-0015 (Telefon: 208-396-6000)
EN 60950:1992+A1:1993 + A2:1993 + A3:1995 + A4:1997 + A11:1997
EN 55024:1998
IEC 61000-3-2:1995/EN 61000-3-2:1995+A14:2000
IEC 61000-3-3:1994/EN 61000-3-3:1995
FCC-benævnelse 47 CFR, Afsnit 15 Klasse B
AS / NZS 3548:1995
Boise, Idaho 83714-1021, USA
printerfamilien
Hewlett-Packard Company
Boise, Idaho, USA
16. april 2001
1
2
/ ICES-003, Stykke 3
Dansk
DAWW
Overensstemmelseserklæring 97
Page 100

Overensstemmelseserklæring
ifølge ISO/IEC-vejledning 22 og CEN/CENELEC EN 45014
Producentens navn: Hewlett-Packard Company
Producentens adresse: Montemorelos 299, Guadalajara Jalisco, 45060
Mexico
erklærer, at produktet
Produktnavn: Stacker til 3000 ark
Modelnummer: C8084A
Tilbehør: ikke gældende
overholder følgende produktspecifikationer:
SIKKERHED: IEC 950: 1991+A1+A2+A3+A4 / EN 60950: 1992+A1+A2+A3+A4+A11
IEC 825-1:1993/EN 60825-1:1994 Klasse 1 (Laser/LED)
UL1950, tredje udgave.
EMC: CISPR 22:1997/EN55022:1998 Klasse A
1)
EN55024:1998
IEC61000-2-2:1998/EN 61000-3-3:1995
IEC61000-3-3:1994/EN61000-3-3:1995
2
FCC-benævnelse 47 CFR, Afsnit 15 Klasse A
AS/NZS 3548:1992/CISPR 22:1993 Klasse A
/ ICES-003, Stykke 2
1)
Yderligere oplysninger:
Produktet overholder krav ene i EMC-direktiv 89/336/EEC og lavspændingsdirektiv 73/23/EEC og bærer
CE-mærket i overensstemmelse hermed.
1) Produktet er testet i en typisk konfiguration med Hewlett-Packard pc-systemer
2) Denne enhed overholder Afsnit 15 i FCC-bestemmelserne. Brug er underlagt følgende to betingelser:
(1) dette udstyr må ikke foråsage skadelige forstyrrelser og
(2) dette udstyr skal acceptere enhver modtagen forstyrrelse, inklusive forstyrrelser, som kan
forsårsage uønsket drift.
Hewlett-Packard Company
Guadalajara, Jalisco, MEXICO
16 oktober 2000
Kontakt i Australie n: Product Regulations Manager, Hewlett-Packard Australia Ltd., 31-41 Joseph Street, Blackburn,
Victoria 3130, Australien
Kontakt i Europa:Det lokale Hewlet t-Pac kard salgs- og servicekontor eller Hewlett-P ackard Gmbh, Department HQ-TRE
/ Standards Europe, Herrenberger Straße 110-140, D-71034 Böblingen (FAX: +49-7031-14-3143)
Kontakt i USA: Product Regulations Manager, Hewlett-Packard Company, PO Box 15 Mail Stop 160, Boise, Idaho
83707-0015 (Telefon: 208-396-6000)
98 Produktinstallation
DAWW
 Loading...