

Page 1

hp LaserJet 8150
getting started guide
leitfaden zur inbetriebnahme
guía de instalación inicial
guide de mise en marche
guida introduttiva
beknopte handleiding
guia de primeiros passos
Page 2

Page 3

HP LaserJet 8150, 8150 N,
8150 DN, 8150 HN, and
8150 MFP Printers
English
Getting Started Guide ________
Page 4

© Copyright Hewlett-Packard
Company 2000
All Rights Reserved.
Reproduction, adaptation, or
translation without prior written
permission is prohibited, except
as allowed under the copyright
laws.
Publication number
C4265-90903
First Edition, October 2000
Warranty
The information contained in
this document is subject to
change without notice.
Hewlett-Packard makes no
warranty of any kind with
respect to this information.
HEWLETT-PACKARD
SPECIFICALLY DISCLAIMS
THE IMPLIED WARRANTY OF
MERCHANTABILITY AND
FITNESS FOR A PARTICULAR
PURPOSE.
Hewlett-Packard shall not be
liable for any direct, indirect,
incidental, consequential, or
other damage alleged in
connection with the furnishing or
use of this information.
Trademark Credits
Acrobat is a trademark of Adobe
Systems Incorporated.
PostScript is a trademark of
Adobe Systems Incorporated
which may be registered in
certain jurisdictions.
Arial, Monotype, and Times
New Roman, are U.S. registered
trademarks of the Monotype
Corporation.
CompuServe is a U.S.
trademark of CompuServe, Inc.
Helvetica, Palatino, Times, and
Times Roman are trademarks of
Linotype AG and/or its
subsidiaries in the U.S. and
other countries.
Microsoft, MS Windows,
Windows and Windows NT are
U.S. registered trademarks of
Microsoft Corporation.
TrueType is a U.S. trademark of
Apple Computer, Inc.
E
NERGY STAR
is a U.S.
registered service mark of the
U.S. EPA.
Hewlett-Packard Company
11311 Chinden Boulevard
Boise, Idaho 83714 U.S.A.
Page 5

Contents
Installation Checklist . . . . . . . . . . . . . . . . . . . . . . . . . . . . . . . . . . . .7
Step 1 Prepare Printer Location . . . . . . . . . . . . . . . . . . . . . . . .8
Step 2 Check Package Contents . . . . . . . . . . . . . . . . . . . . . .10
Step 3 Remove Internal Packaging . . . . . . . . . . . . . . . . . . . .11
Step 4 Locate Printer Parts . . . . . . . . . . . . . . . . . . . . . . . . . .12
Step 5 Install Accessories . . . . . . . . . . . . . . . . . . . . . . . . . . .13
Step 6 Install Toner Cartridge. . . . . . . . . . . . . . . . . . . . . . . . .14
Step 7 Load Trays 2 and 3. . . . . . . . . . . . . . . . . . . . . . . . . . .16
Step 8 Load Tray 1 (Optional) . . . . . . . . . . . . . . . . . . . . . . . .18
Step 9 Attach Power Cord . . . . . . . . . . . . . . . . . . . . . . . . . . .20
Step 10 Install or Change the Control Panel
Overlay (Optional) . . . . . . . . . . . . . . . . . . . . . . . . . . . . . .21
Step 11 Configure the Control Panel Display
Language (Optional). . . . . . . . . . . . . . . . . . . . . . . . . . . . .22
Step 12 Test the Printer . . . . . . . . . . . . . . . . . . . . . . . . . . . . .24
Step 13 Connect Printer Cables. . . . . . . . . . . . . . . . . . . . . . .25
Step 14 Install Printing Software . . . . . . . . . . . . . . . . . . . . . .28
Step 15 Verify Printer Setup. . . . . . . . . . . . . . . . . . . . . . . . . .31
FCC Regulations. . . . . . . . . . . . . . . . . . . . . . . . . . . . . . . . . . . . . .32
English
EN
Contents iii
Page 6

iv Contents
EN
Page 7
Printer Setup
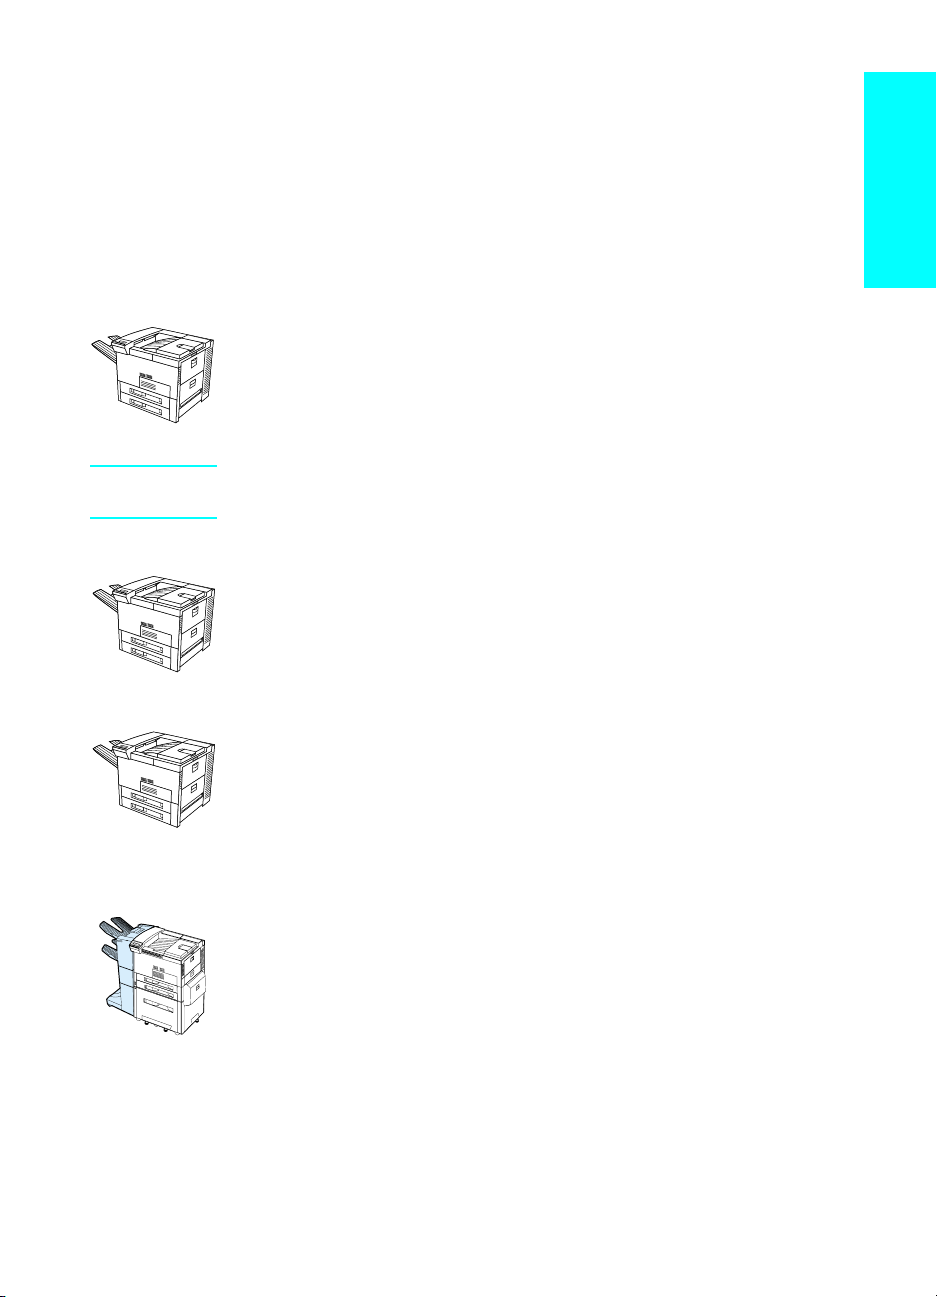
Congratulations on your purchase of the HP LaserJet 8150 series
printer! This printer is available in five configurations:
HP LaserJet 8150 printer
The HP LaserJet 8150 printer (product number C4265A) comes
standard with 32 MB RAM, wide format printing, two 500-sheet trays,
and a 100-sheet multipurpose tray.
Note The HP LaserJet 8150 requires an optional EIO card to
connect to a Macintosh.
HP LaserJet 8150 N printer
The HP LaserJet 8150 N printer (product number C4266A) comes
standard with 32 MB RAM, wide format printing, two 500-sheet trays,
a 100-sheet multipurpose tray, and an HP JetDirect EIO print server.
English
EN
HP LaserJet 8150 DN printer
The HP LaserJet 8150 DN printer (product number C4267A) come s
standard with 32 MB RAM, wide format printing, two 500-sheet trays,
a 100-sheet multipurpose tray, an HP JetDirect EIO print server, and
a duplexer (for printing on both sides of paper).
HP LaserJet 8150 HN printer
The HP LaserJet 8150 HN printer (product number C4269A) comes
standard with 32 MB RAM, wide format printing, two 500-sheet trays,
a 100-sheet multipurpose tray, a 2000-sheet input tray (tray 4), a
3000-sheet stacker, an HP JetDirect EIO print server, and a duplexer
(for printing on both sides of paper).
5
Page 8

HP LaserJet 8150 MFP printer
The HP LaserJet 8150 MFP printer (product number C426 8A) comes
standard with 64 MB RAM, wide format printing, hard disk, two
500-sheet trays, a 100-sheet multipurpose tray, a 2000-sheet input
tray (tray 4), a 3000-sheet St apler/Stacker, an HP JetDirect EIO print
server, a duplexer (for printing on both sides of paper), a copy
connect EIO board, and an HP Digital Copy.
6 Printer Setup
EN
Page 9

Installation Checklist
This guide will help you set up and install the new printer. For proper
installation, please complete each section in order:
●
Unpack the printer steps 1-4
●
Install the printer steps 5-12
●
Connect the printer cables step 13
●
Install printing software step 14
●
Verify printer setup step 15
WARNING! The printer is heavy. HP recommends that four people move it.
Note To learn about all the features and capabilities of the printer, see the
printer user guide and the help menus in the printer drivers (available
after you install the printing software and online user guide).
English
EN
Installation Checklist 7
Page 10
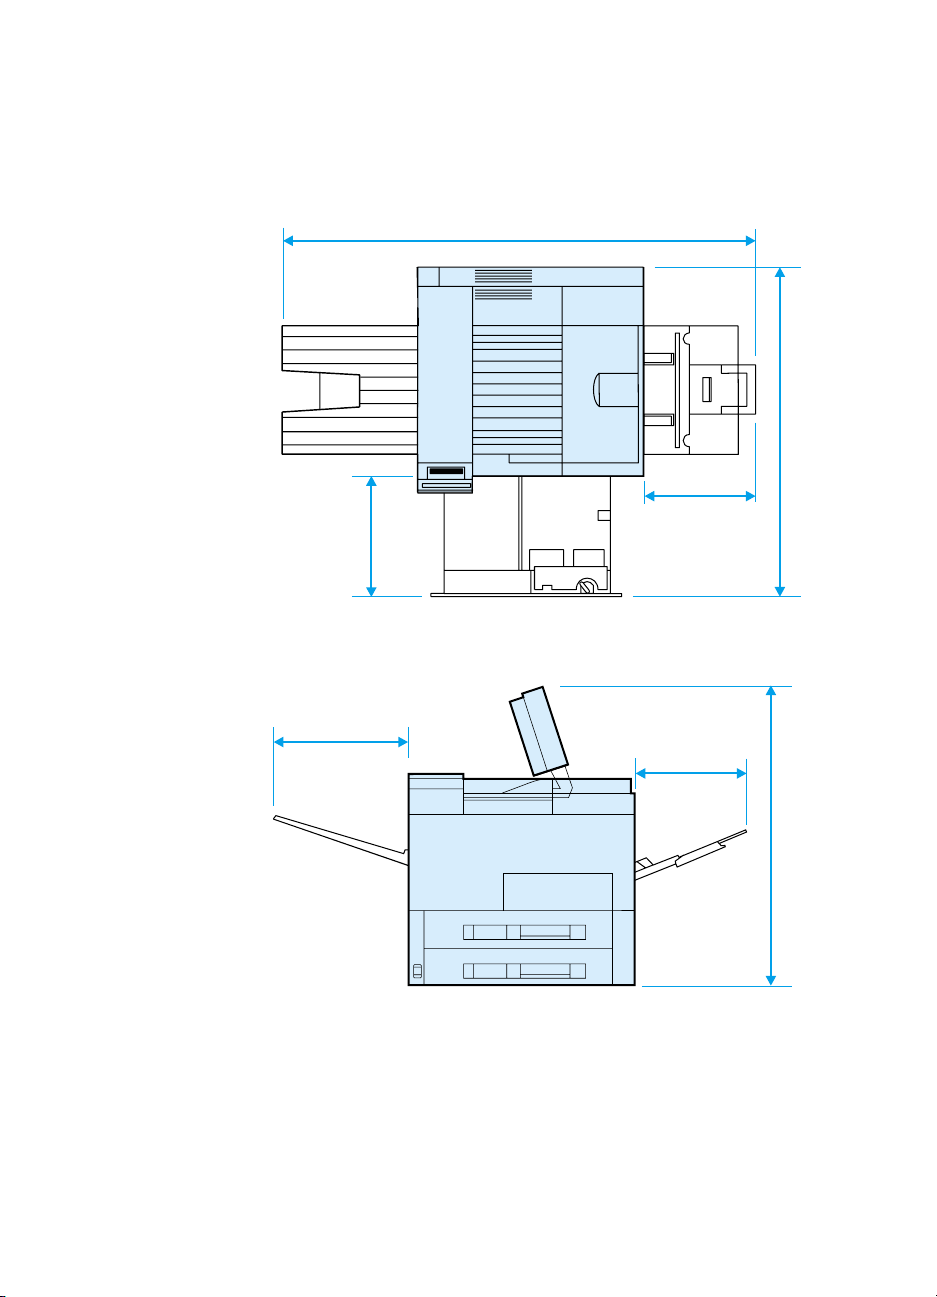
Step 1 Prepare Printer Location
Printer Size
46.75 in (1187 mm)
35 in (889 mm)
14.5 in
(368 mm)
13.75 in
(350 mm)
HP LaserJet 8150 Printer Dimensions (Top and Side Views)
11.5 in
(292 mm)
11.5 in
(292 mm)
29.5 in (749 mm)
8 Printer Setup
EN
Page 11

Location requirements for the printer
●
A sturdy, level surface for
placement
● Space allowance around the
printer
●
A well ventilated room
●
No exposure to direct sunlight
or chemicals, including
ammonia-based cleaning
solutions
●
Adequate power supply
●
A stable environment—no
abrupt temperature or humidity
changes
●
Relative humidity 20% to 80%
●
Room temperature 50° to 91° F
(10° to 32.5° C)
Printer Weight (without toner cartridge)
●
HP LaserJet 8150 and 8150 N printers: 51 kg (112 lbs)
●
HP LaserJet 8150 DN printer: 54 kg (120 lbs)
●
HP LaserJet 8150 HN printer: 113 kg (249 lbs)
●
HP LaserJet 8150 MFP printer: 136 kg (300 lbs)
English
EN
Prepare Printer Location 9
Page 12
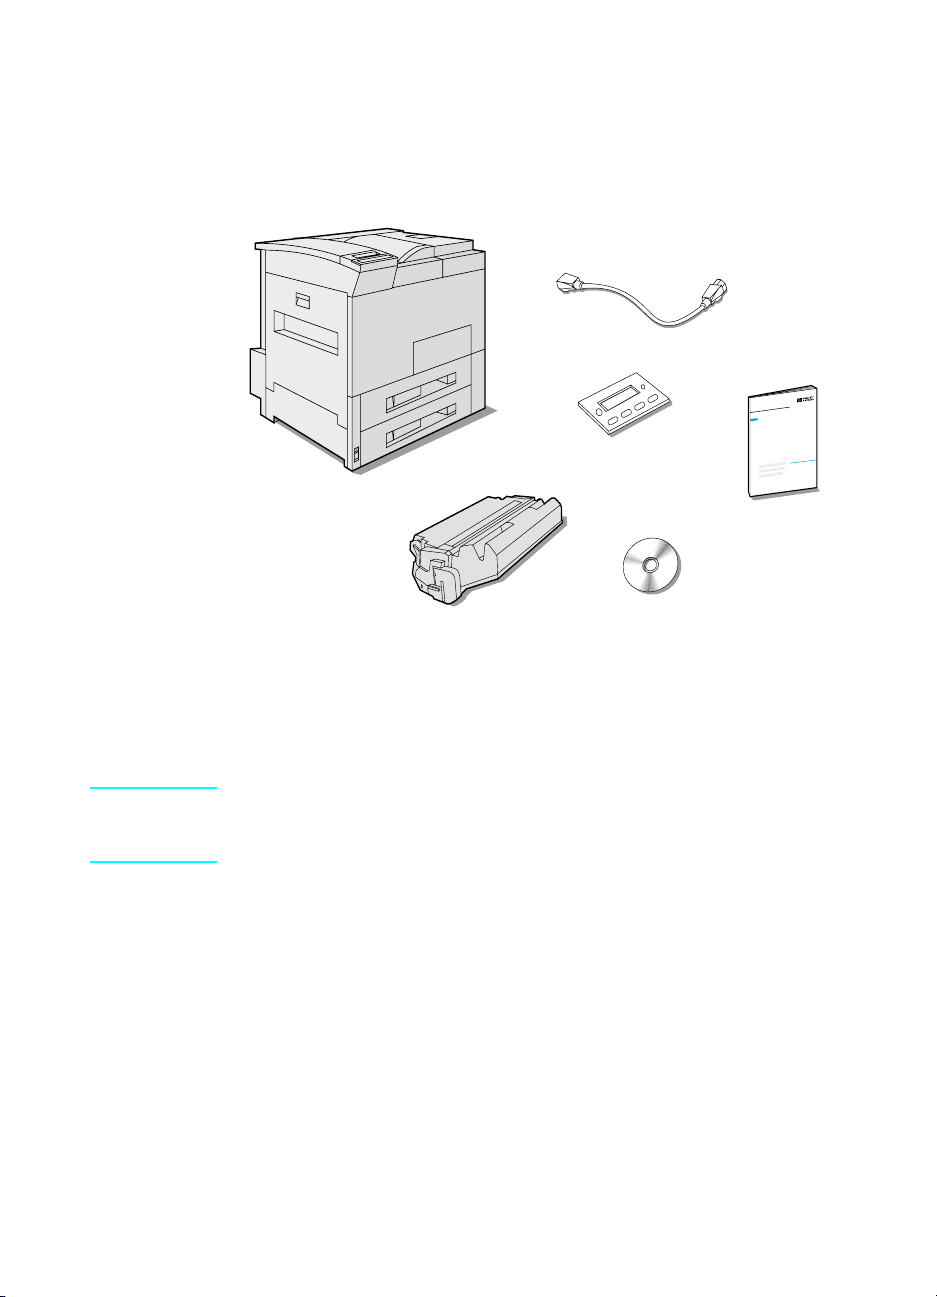
Step 2 Check Package Contents
Power Cord
Printer
Control
Panel
Overlay
Printer
Documentation
Toner
Cartridge
Package Contents
Note A printer parallel interface cable is only included with the
HP LaserJet 8150 base printer. See the printer user guide for
ordering information.
Printer Software
CD-ROM
10 Printer Setup
EN
Page 13
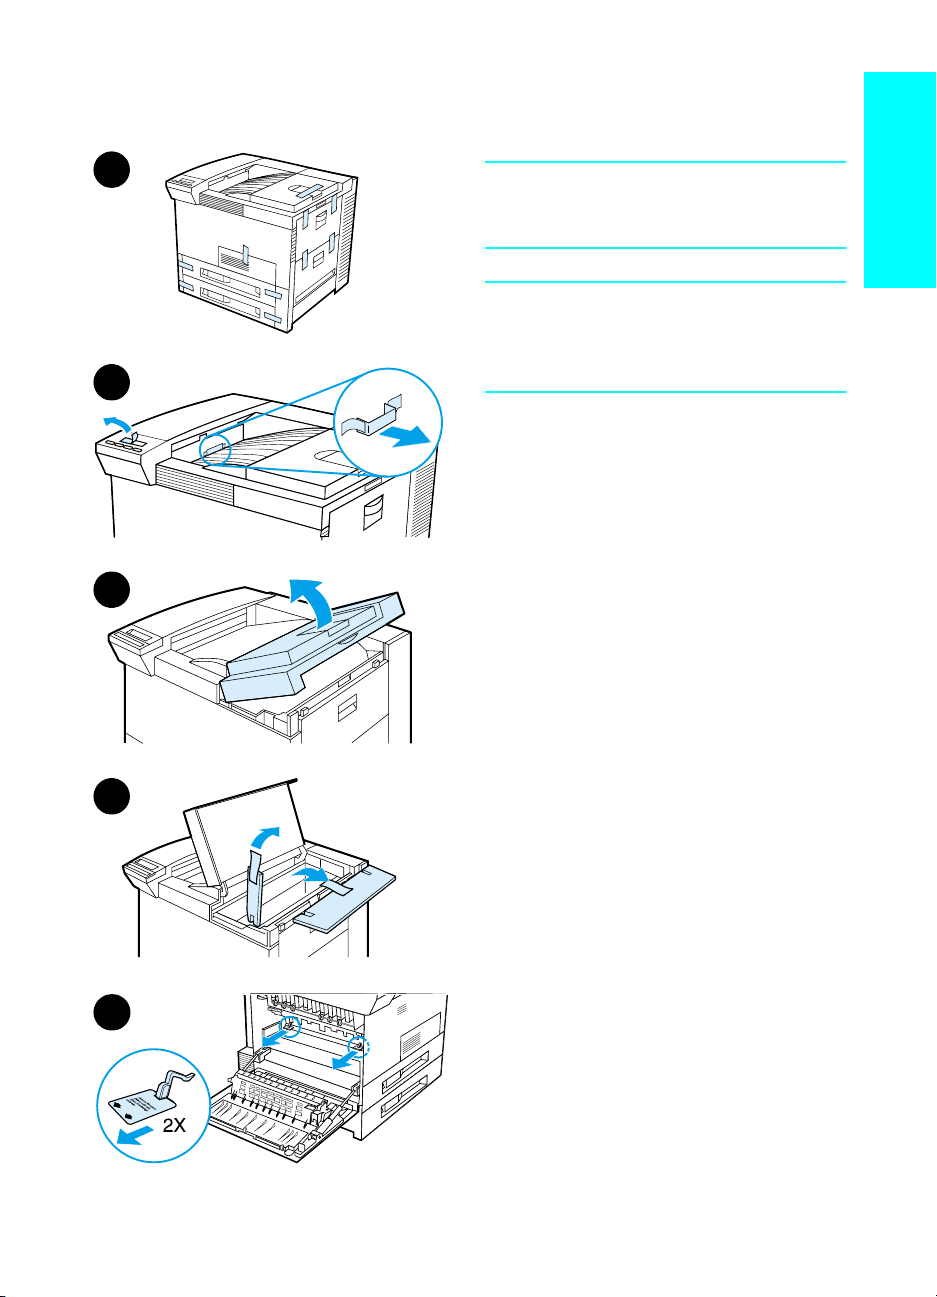
Step 3 Remove Internal Packaging
1
2
Note
Save all pac kin g material. You ma y nee d
to repack the printer at a later date.
WARNING!
This printer weighs approximately 51 kg
(112 lbs). HP recommends that four
people move it.
1 Remove all ex ternal packing tape
from the printer.
2 Remove packing material from
standard output bin and protective
film from display.
3 Open the top cover.
English
3
4 Remove packing material and tape
and close top cover.
5 Open the left-side door and remove
the two packing spacers. Close the
door.
EN
4
5
Remove Internal Packaging 11
Page 14
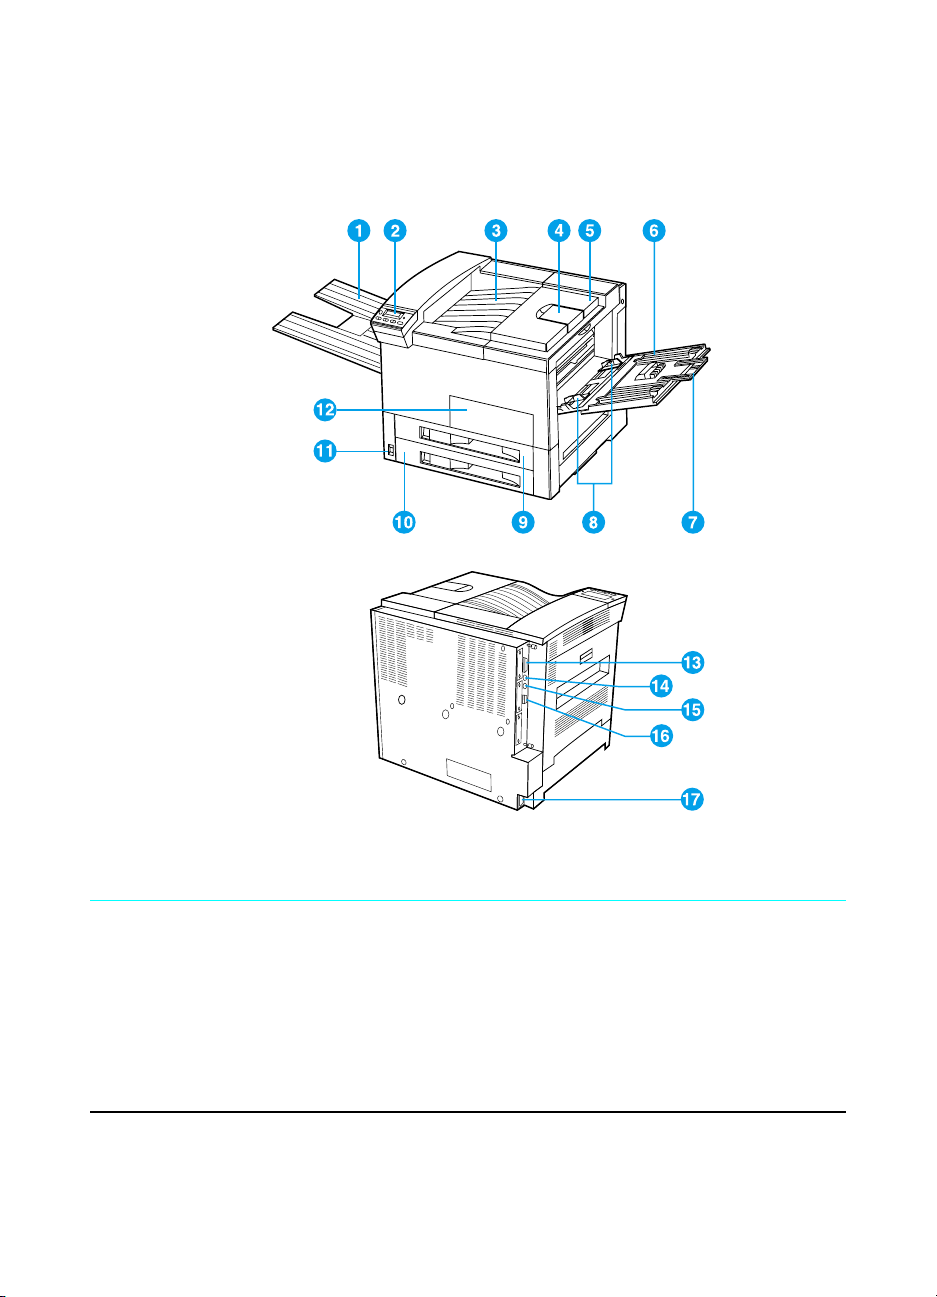
Step 4 Locate Printer Parts
The following illustrations give the location and names of the
important printer parts.
Printer Parts (front and rear views)
1
Face-up Bin
2
Control Panel
3
Standard Output Bin
(Face-down)
4
Adjustable Paper Stop
5
Top Cover
12 Printer Setup
6
Tray 1 (multipurpose)
7
Tray 1 extensions
8
Tray 1 paper width guides
9
Tray 2
10
Tray 3
11
Power Switch
12
Front Door
13
Parallel Cable Connector
14
Foreign Interface Harness
(AUX)
15
HP Fast InfraRed
Connect (FIR)
16
C-Link Connector
17
Po w e r Cord Connector
EN
Page 15
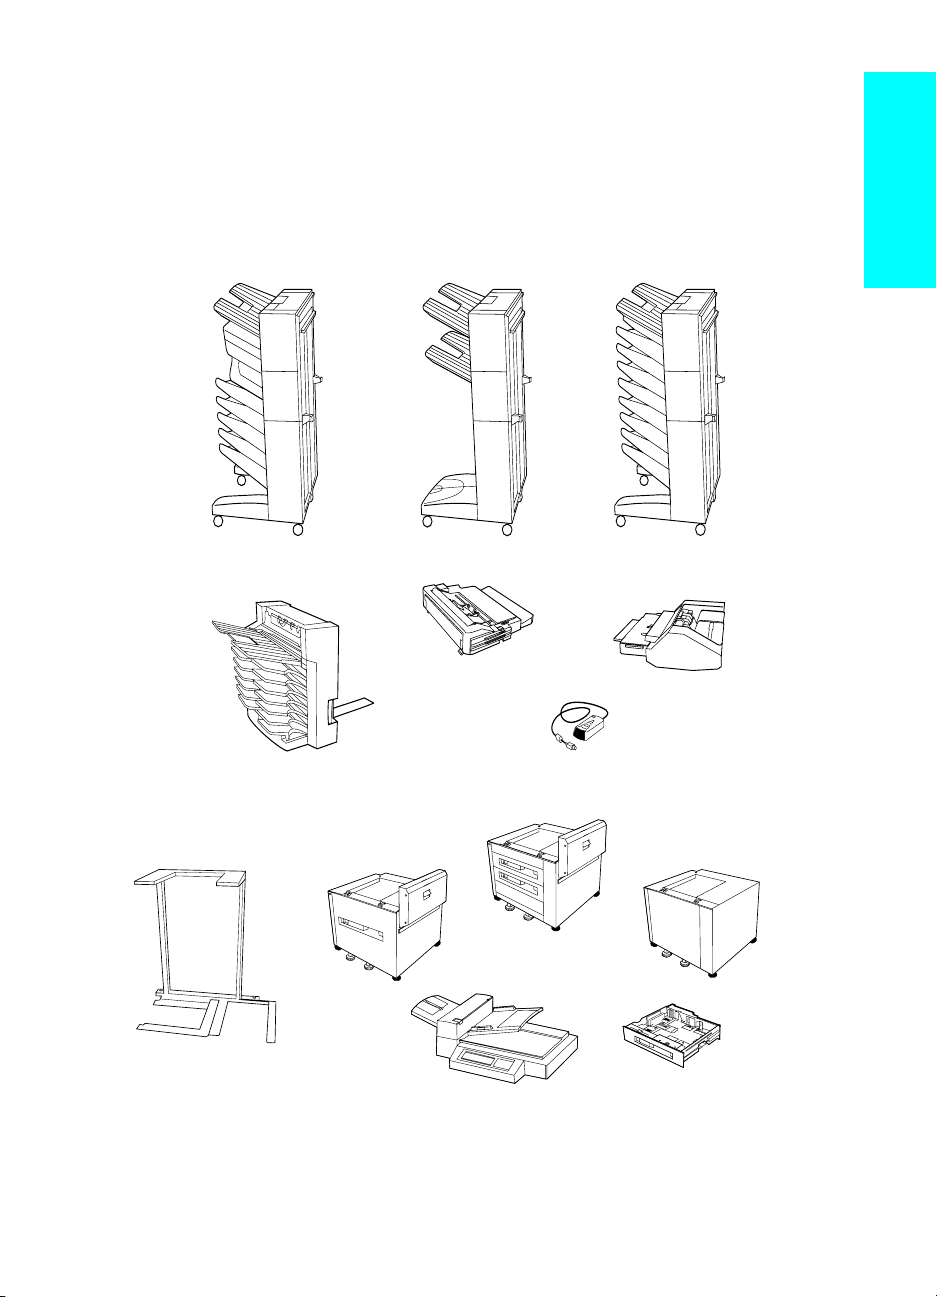
Step 5 Install Accessories
Install any accessories that you have purchased with the printer. Use
the installation instructions that are packaged with the accessories.
Multibin Mailbox
(5-Bin with Stapler)
3000-sheet Stapler/Stacker
or 3000-sheet Stacker
English
Multibin Mailbox
(8-Bin)
7-bin Tabletop
Mailbox
HP Digital Copy Stand
EN
2000-sheet
Input Tray
HP LaserJet MFP Upgrade Kit
Optional Accessories
Duplexer
Envelope
Feeder
HP Fast InfraRed
Connect
Printer Stand
2 x 500-sheet
Input Tray
Custom Paper
Tray
Install Accessories 13
Page 16

Step 6 Install Toner Cartridge
1
1 Open the printer’s top cover.
2 Remove the toner cartridge from its
packaging. (Save packaging for
possible cartridge storage.)
Note
To prevent damage to the toner
cartridge, do not expose it to light for
more than a few minutes.
3 Rotate the cartridge and gently
shake it from side to side to
distribute the toner evenly inside the
cartridge.
4 Locate the sealing tape tab on the
end of the cartridge. Carefully bend
the tab back and forth until it
separates from the cartridge.
Continued on the next page.
14 Printer Setup
EN
Page 17
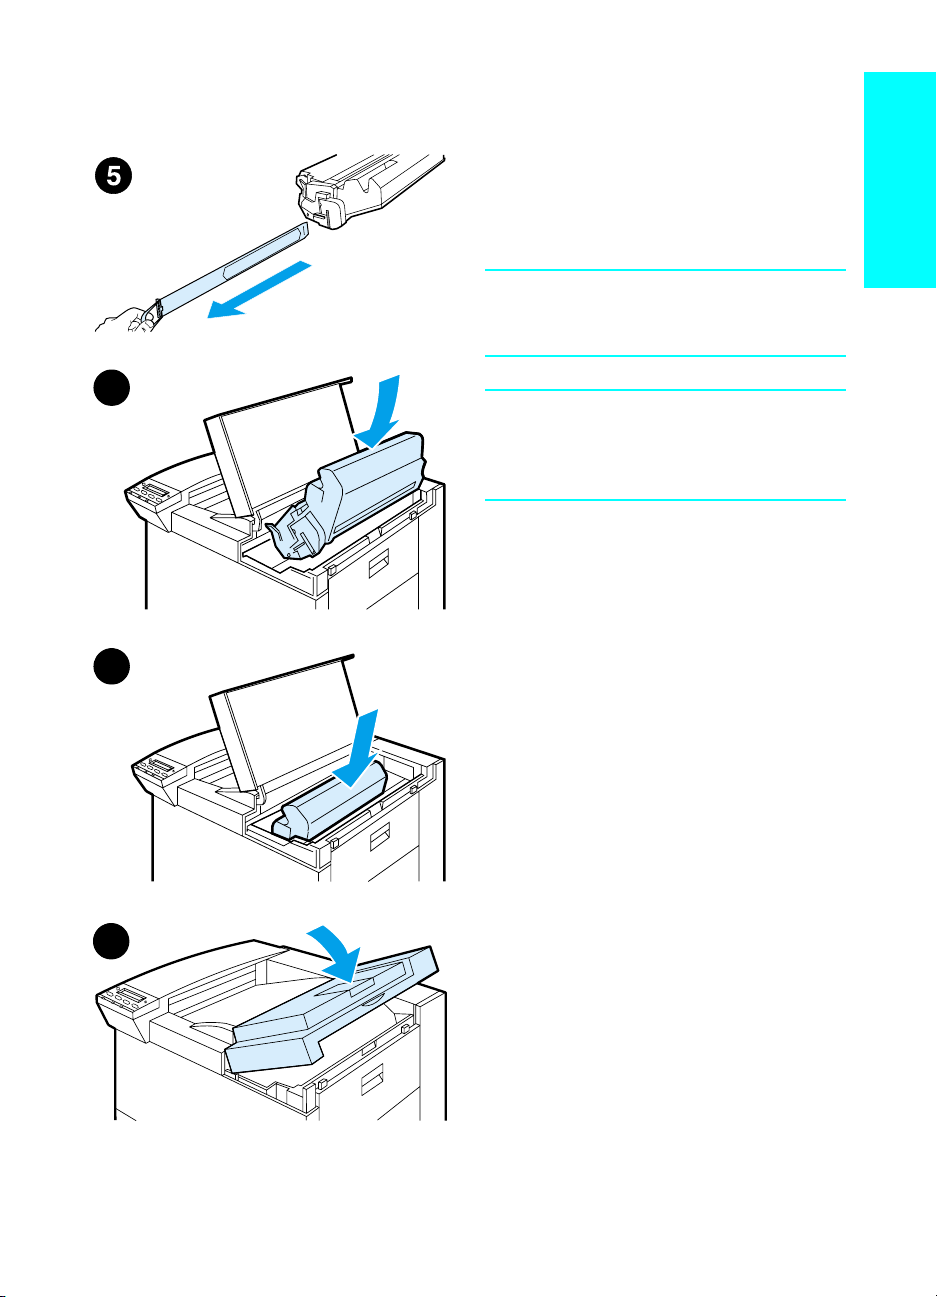
5 Firmly pull the tab straight out from
the cartridge to remove the entire
length of tape. Avoid touching any
black toner on t he tape.
Note
If the tab separates from the tape, grasp
the tape and pull it out of the cartridge.
English
6
Note
If toner gets on your clothing, wipe it off
with a dry cloth and wash clothing in cold
water. (Hot water sets toner into fabric.)
6 Position the cartridge as shown with
the arrow pointing into the printer.
7 Slide the cartridge into the printer as
far as it will go.
7
8 Close the top cover.
8
EN
Install Toner Cartridge 15
Page 18

Step 7 Load Trays 2 and 3
1
2
3
4
Note
To avoid a paper jam, never open the
tray while it is in use.
The paper size setting is set to a default
size at the factory. For example, the
default for the United States is lettersize, while in Europe it is A4. If you
would like to use a dif ferent d efault pa per
size, reconfigure the paper tray setting.
1 Open Tray 2 until it stops.
2 Remove the packing spacer and
tape.
3 If you wish to load paper that is
different than the default size, turn
the paper guide to the mark that
indicates the size of paper you are
loading.
4 Turn the paper guide to the locked
position.
5 Adjust the left paper guide by
pushing in, then lifting up and out.
Continued on the next page.
5
16 Printer Setup
EN
Page 19
6
7
8
9
6 Position the guide over the
appropriate lines marked in the tray.
Press the guide into the rear slot and
then lower down into the front slot.
Be sure the guide is not skewed.
7 Insert up to 500 sheets of paper into
the tray. Do not fill the input tray
above the paper fill marks on the
guide.
a Load Letter or A4 paper with the
top of the page toward the rear of
the tray and with the side-to-beprinted down for single-sided
printing.
For two-side d printing , load the
top of the page toward the rear of
the tray and with the first side-tobe-printed up.
b Load short-edge fed media with
the top of the page toward the
right side of the tray an d with the
side-to-be-printed down for singlesided printing.
For two-sided printing, loa d media
with the top of the page to ward the
left side of the tray and with the
first side-to-be-printed up.
English
EN
8 Make sure the paper size tab is set
correctly.
9 Slide the tray back into the printer.
If you wish to select your paper by type
rather than tra y (source), see y our online
user guide.
If you wish to print on paper sizes larger
than letter or A4, adjust the paper stop
guide on the Standard Output Bin (Facedown). (See your online user guide for
instructions.)
Load Trays 2 and 3 17
Page 20
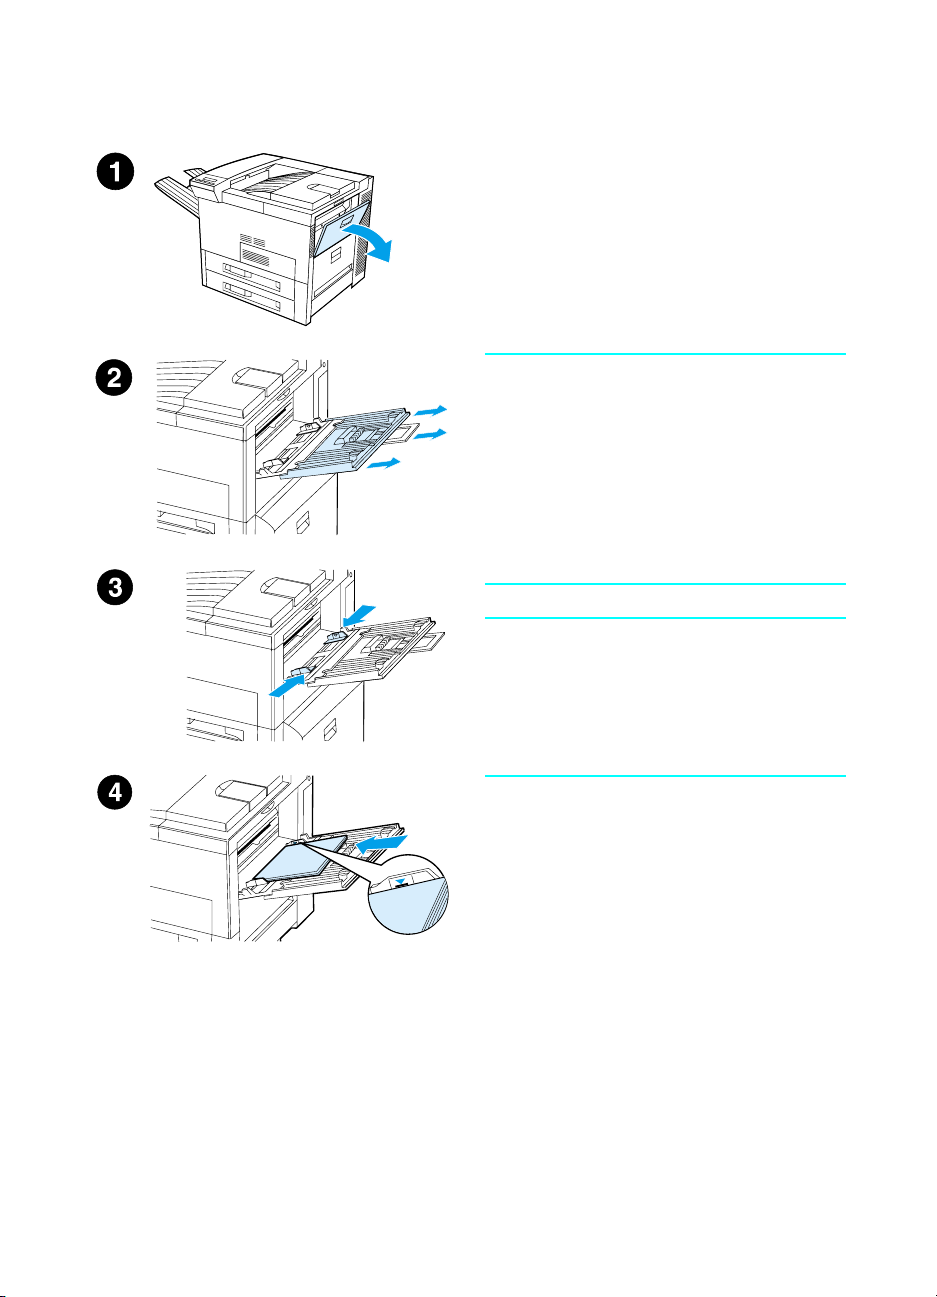
Step 8 Load Tray 1 (Optional)
Tray 1 is a multi-purpose tray and holds
up to 100 sheets of paper or 10
envelopes.
Tray 1 provides a con v enient way to print
envelope s, transparencies, custom-size
paper, labels, or other types of media
without having to unload the other trays.
CAUTION
To avoid a paper jam, never add or
remove paper from Tray 1 while the
printer is printing.
To avoid damaging the printer, print
labels, envelopes, and transparencies
from Tray 1 only. Send them to th e Faceup Bin, do not print them on both sides,
and remove t hem promptly.
Note
Paper loaded in Tray 1 will be printed first
unless the Tray 1 setting is chang ed from
the printer control panel. To change the
order in which trays will be printed from,
see your online user guide.
18 Printer Setup
1 Open Tray 1.
2 Pull out the tray extension, if needed
for the paper size you are printing.
3 Slide the paper width guides to the
appropriate size marked on the tray.
4 Place paper into the tray without
stacking it above the paperfill mark.
Continued on next page.
EN
Page 21

5 Paper loading differs by size:
a Load Letter or A4 paper with the
top of the page toward the rear of
the printer and with the side-to-beprinted up for single-sided
printing.
For two-sided printing, load paper
with the top of the page to ward the
rear of the printer and with the first
side-to-be-printed down.
b Load short-edge fed media with
the top of the page toward the
printer and with the side-to-beprinted up for single-sided
printing.
For two-sided printing, loa d media
with the top of the page a wa y from
the printer and with the first sideto-be-printed down.
Note
Paper heavier than 28 lb (105 g/m
should be printed from Tray 1 to the
Face-up Bin to avoid curl.
2
English
)
EN
Load Tray 1 (Optional) 19
Page 22
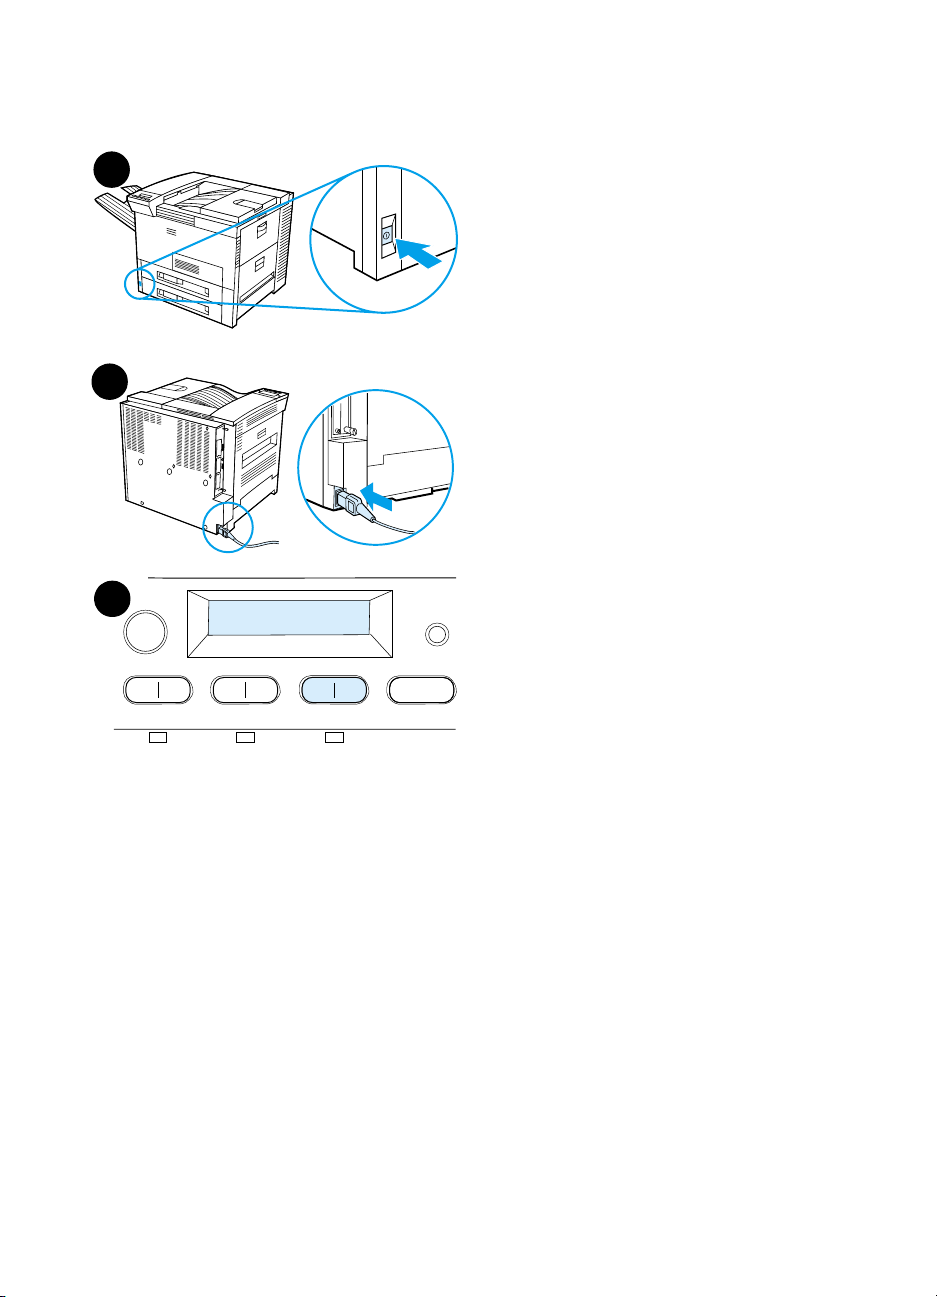
Step 9 Attach Power Cord
1
2
3
READY
1 Locate the power switch on the front
of the printer. Make sure the printer
is turned off.
2 Connect the power cord to the
printer and a grounded power strip
or an AC outlet.
3 Turn the printer on. After the printer
warms up, the READY
should appear on the control panel
display and the Ready light should
remain on. If the READY
does not appear, see the problem
solving chapter in the online user
guide.
message
message
20 Printer Setup
EN
Page 23
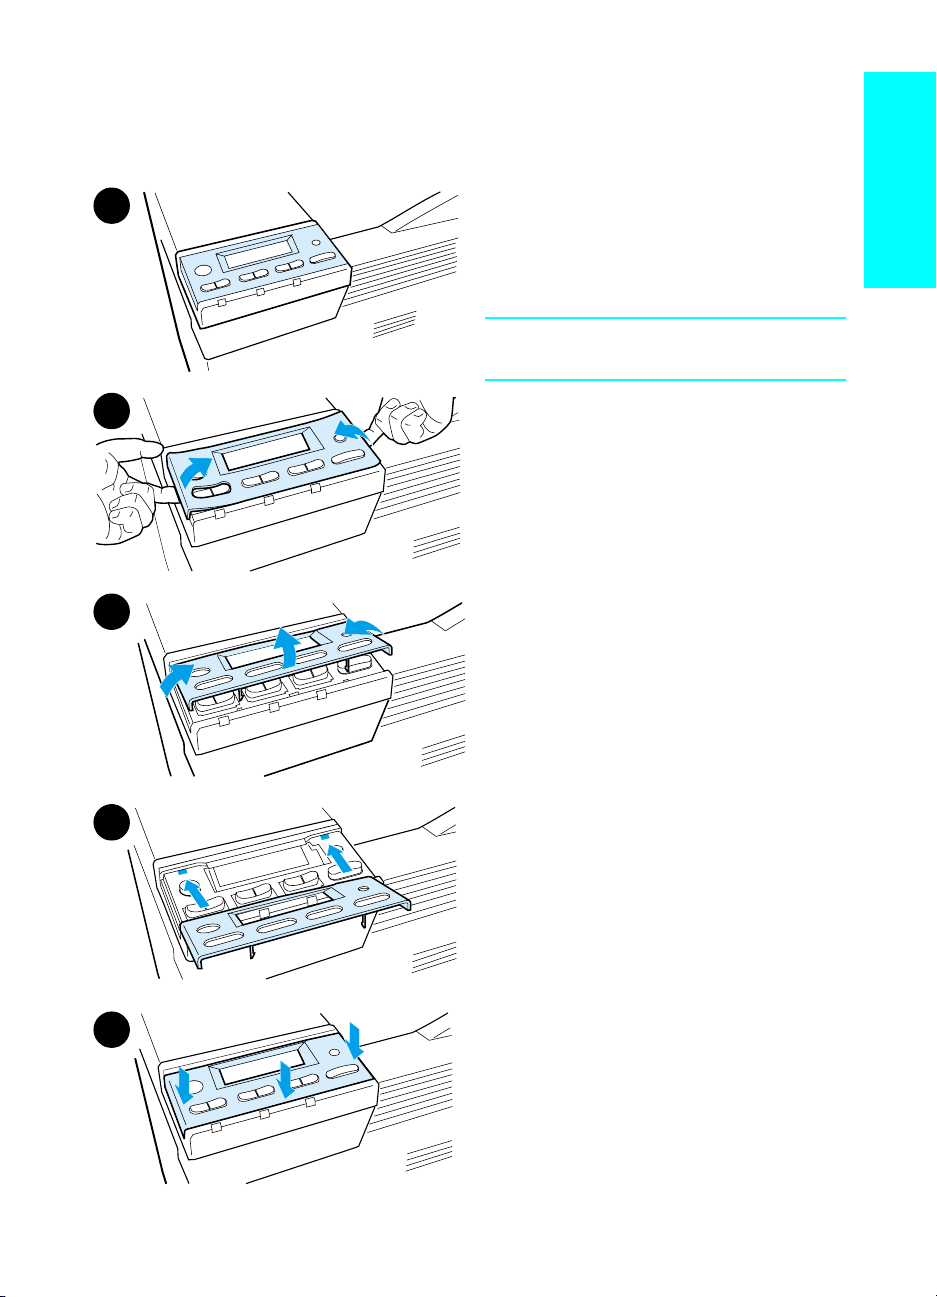
Step 10 Install or Change the Control Panel
Overlay (Optional)
1
2
3
To change the overlay to a language
other than English:
1 Locate the overlay y ou wish to install
and remove it from its bag.
Note
Make certain the power switch is off.
2 Gently lift up on each side of the
installed overlay.
3 Insert your thumbnail or a thin, rigid
object in front of the overlay and
press toward the back of the printer.
Lift to remove.
4 To install the new overlay, position it
over the cont ro l panel, r ear -sid e firs t.
5 Snap the overlay firmly onto the
control panel. Ensure that the
overlay is flat.
English
EN
4
5
Install or Change the Control Panel Overlay (Optional) 21
Page 24
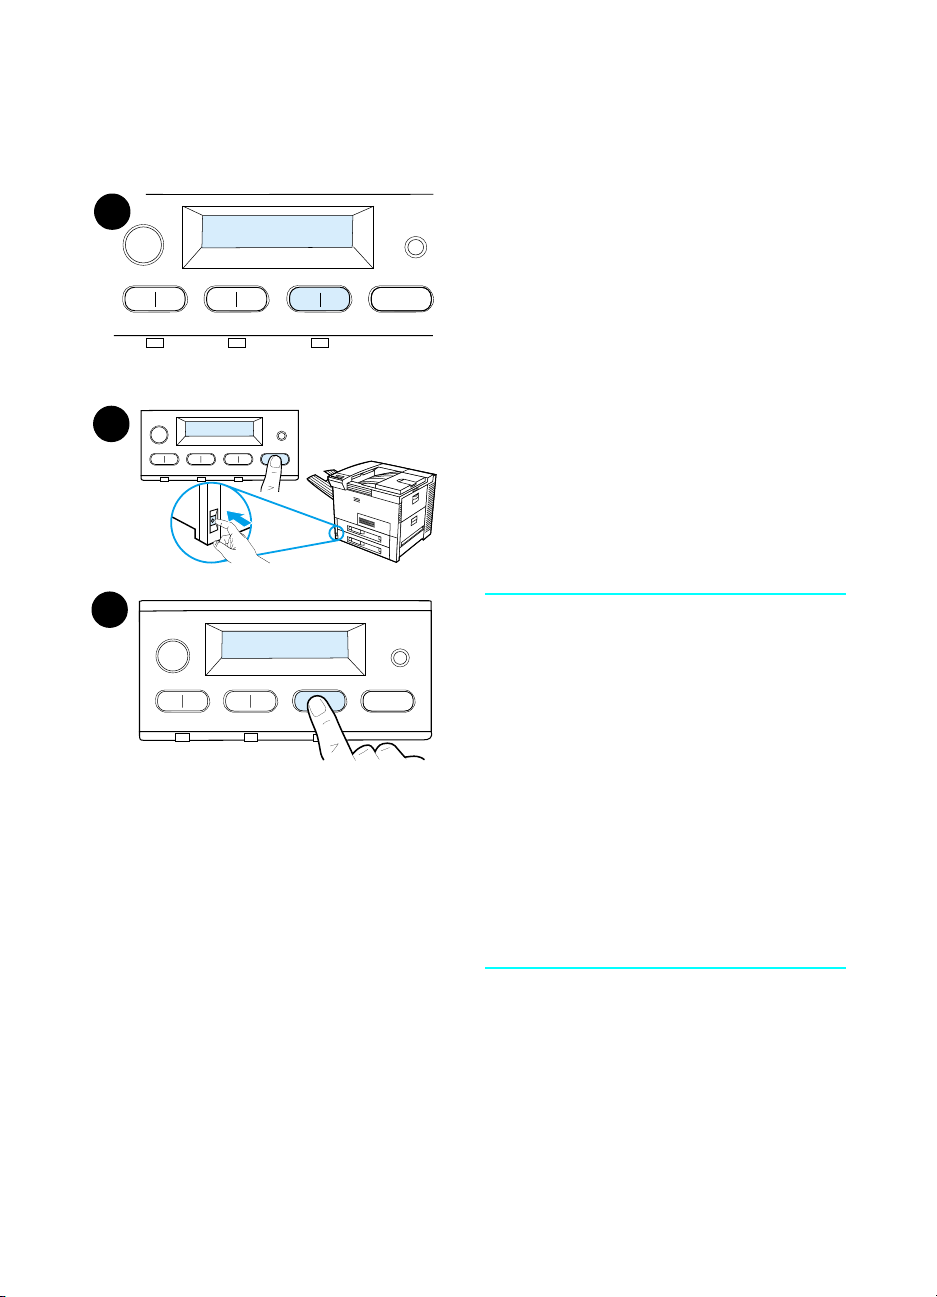
Step 11 Configure the Control Panel Display
Language (Optional)
1
ENTER LANGUAGE
=ENGLISH
Use the printer control panel to set the
printer to display printer messages and
print configuration pages in the language
of your choice.
1 When you turn the printer on for the
first time, wait until ENTER LANGUAGE
= ENGLISH appears. To change the
display language go to step 2, or to
choose English go to step 4.
2
2 If ENTER LANGUAGE = ENGLISH did
not appear, press and hold S
ELECT
while simultaneously pushing the
power switch ON. Hold S
ELECT
until
SELECT LANGUAGE appears, then
release S
3
ENTER LANGUAGE
=ENGLISH
Note
Only -V
ALUE
+, S
active while the display language is
. Go to step 3.
ELECT
ELECT
, and GO are
being configured. All other keys are
ignored.
If you press Go without selecting a
language, the printer will bring itself
online and all subsequent messages will
be displayed in English. However, since
no display language was selecte d, the
ENTER LANGUAGE = ENGLISH message
will reappear (after the power-on self
test) every time the printer is turned on
until you select a language.
22 Printer Setup
3 When ENTER LANGUAGE=ENGLISH
+ repeatedly
displays, press - V
ALUE
until the desired setting appears.
Continued on next page.
EN
Page 25
4
ENTER LANGUAGE
=ENGLISH
Note
For Japanese, Turkish, Czech,
Hungarian, and Polish, language
selection will change the default symbol
set for the specific language. For all
English
other languages, the default symbol set
is set to PC-8.
5
ENTER LANGUAGE
=ENGLISH
4 Press S
An asterisk (*) appears next to the
to save the selection.
ELECT
selection in the display, indicating
that it is now the defa ult.
. The control panel display
5 Press G
O
will indicate the printer is ready to
use.
Note
If the new language does not appear in
the display, you may not have pressed
S
to save your new selection.
ELECT
EN
Configure the Control Panel Display Language (Optional) 23
Page 26
Step 12 Test the Printer
1
READY
Print a configuration page to make sure
the printer is operating correctly.
1 Make sure the printer is on and the
READY message is displayed.
until the display reads
2 Press M
ENU
INFORMATION MENU.
until the display reads
3 Press I
2
INFORMATION MENU
PRINT CONFIGURATION.
4 Press S
TEM
ELECT
to print the
configuration page.
5 The configuration page shows the
printer’s current configuration.
Note
An HP JetDirect network configuration
3
PRINT
CONFIGURATION
page will also print for printers with
network cards installed.
4
PRINT
CONFIGURATION
5
24 Printer Setup
EN
Page 27
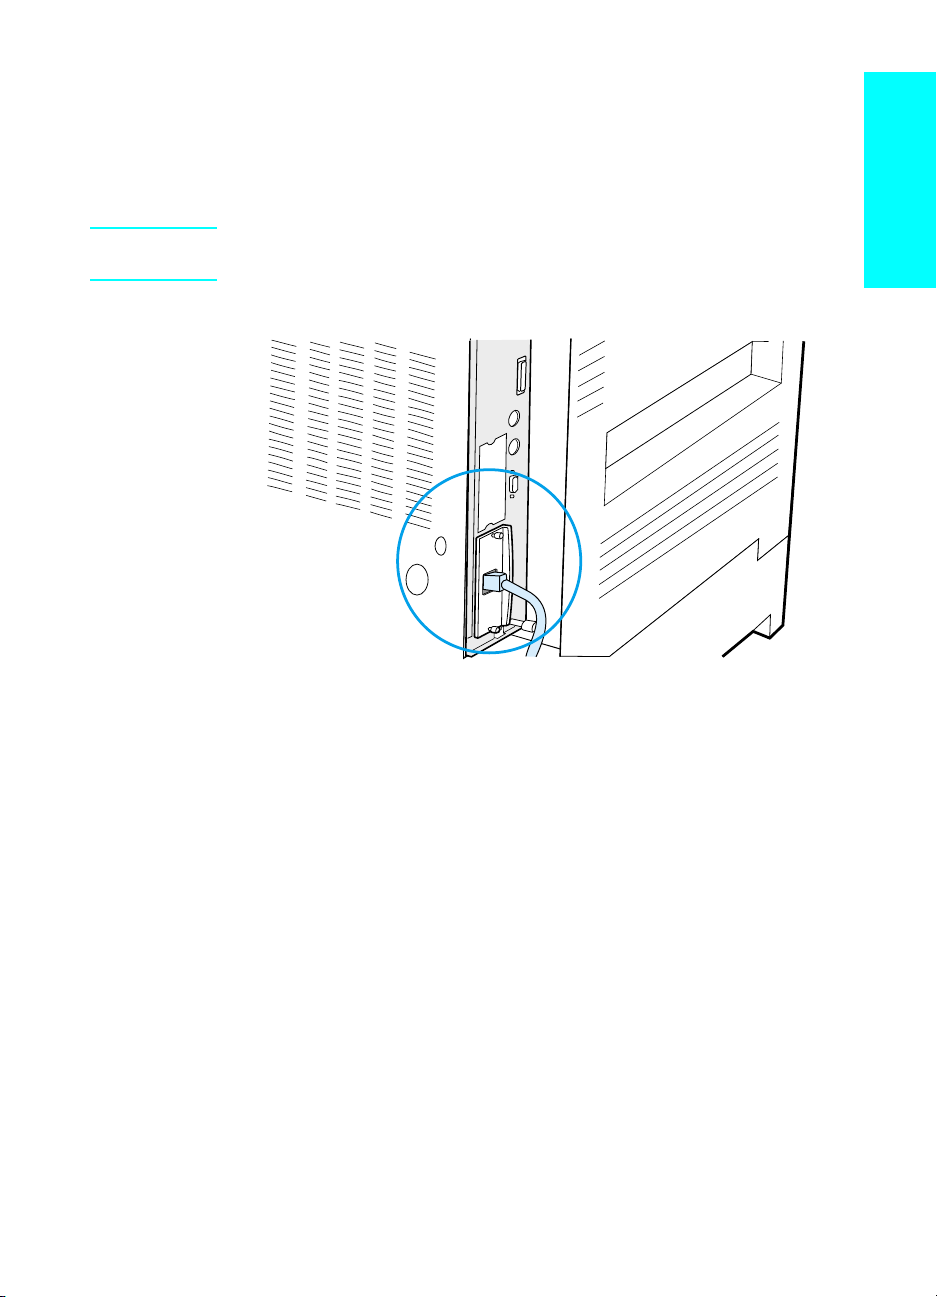
Step 13 Connect Printer Cables
For printers equipped with an optional HP JetDirect EIO Print Server,
a twisted-pair network cable connection is provided through a 10/
100Base-TX (RJ-45) connector. Connection to an Apple LocalTalk
network is available through an optional LocalTalk card. The printer
also has a port for HP Fast InfraRed Connect.
English
Parallel
Connector
RJ-45
Connector
Foreign Interf ace
Harness (AUX)
(Optional)
EN
HP Fast InfraRed
Connect (FIR)
(Optional)
C-Link
Connector
Location of Interface Ports
Connect Printer Cables 25
Page 28
Connecting Parallel Cable
To ensure reliability, use an IEEE-1284 bi-directional C-type parallel
cable. (These cables are clearly marked with “IEEE-1284.”) Only
IEEE-1284 cables support all of the printer’s advanced features.
1
2
3
1 Make sure the printer and your
computer are turned off.
Note
The cable should install easily. If
installation is difficult, check the cable
orientation.
2 Connect the parallel cable to the
printer parallel port. Press the
locking release levers in while
connecting the cable.
3 Connect the other end of the cable
to the proper connector on the
computer.
Note
See your online user guide for
information on ordering IEEE-1284
parallel cables.
26 Printer Setup
EN
Page 29
Connecting to Ethernet 10/100Base-TX
Network
Use the RJ-45 port to connect the printer to an Ethernet 10/100BaseTX network.
CAUTION Make sure the printer power is turned off before connecting to the
RJ-45 port.
English
EN
Ethernet 10/100Base-TX Network Interface Cable Connection
●
Connect a twisted-pair network cable to the RJ-45 port on the
HP JetDirect EIO Print Server.
●
Connect the other end of the cable to the network.
Connect Printer Cables 27
Page 30

Step 14 Install Printing Software
The printer comes with printing software on a CD-ROM. The printer
drivers on this CD-R OM must be installed t o take full adv antage of the
printer features . If your computer does not have a CD-ROM driv e , b ut
you have access to one, you can copy the printing software from the
CD-ROM onto diskettes for installation on your computer.
If you do not have access to a CD-R OM driv e , go to www.hp.com and
download the drivers, or call HP to order diskettes. The most recent
drivers are available on the Internet. Depending on the configuration
of Windows-driven compu ters, the installation program for the printer
software automatically checks the computer for Internet access to
obtain the latest software.
Note Printer installation software for UNIX (HP-UX, Sun Solaris) networks is
available for download at http://www.hp.com/support/net_printing.
For configura tion and management using your web browser, use
HP Web JetAdmin. For information on HP Web JetAdmin, go to
http://www.hp.com/go/webjetadmin.
See the HP Customer Care pages at the front of the printer user
guide for more information.
28 Printer Setup
EN
Page 31

Installing Windows Printing Software (CD)
For Windows 9x, Windows NT 4.0, and Windows 2000
1 Close all running applications.
2 Insert the CD-ROM into the CD-ROM drive. (Depending on the
computer configuration, the installation program may
automatically start.)
3 Click Start.
4 Click Run.
5 Type D:\SETUP (or the appropriate drive directory letter) in the
command line box and click OK.
6 Follow the instructions on the computer screen.
For Windows 3.1x and Windows 3.11
1 Close all running applications.
2 Insert the CD-ROM into the CD-ROM drive.
3 In the Windows Program Manager screen, click the File menu.
4 Click Run.
English
5 Type D:\SETUP (or the appropriate drive directory letter) in the
command line box and click OK.
6 Follow the instructions on the computer screen.
Installing Network Software
Note If the printer is to be used on a network, install and configure the
network operating system software on the network administrator’s
system before individual users install the printing software.
Use HP Web JetAdmin to configure your printer with your web
browser. For information on using HP Web JetAdmin, see HP’s web
site at http://www.hp.com/go/webjetadmin.
EN
Install Printing Software 29
Page 32

Installing Macintosh Printing Software
1 Close all running applications.
2 Insert the CD-ROM into the CD-ROM drive.
3 Double-click the Installer icon and follo w the instructions on the
screen.
4 Open the Chooser from the Apple menu.
5 Click the LaserWriter 8 icon. If the icon is not there, contact
HP Customer Care (see the front pages of your user guide) or
contact Apple Computer, Inc.
6 If you are on a netw ork with multiple zo nes , select the z one in th e
AppleTalk Zones box where the printer is located. If this is
unknown, ask your network administrator.
7 Double-click the desired printer. An icon should appear.
8 Close the Chooser by clicking the Go-Away (Close) box in the
upper left corner.
30 Printer Setup
EN
Page 33

Step 15 Verify Printer Setup
The easiest way to verify that the installation has been completed
successfully is to print a document from a software application.
1 Open a software application of your choice and open or create a
simple document.
2 Make sure the correct printer name appears.
3 Print the document.
If the document prints, installation is complete. If nothing prin ts or if
the document does not print correctly, see the problem solving
chapter in the printer’s online user guide.
Congratulations, the printer setup is complete!
English
EN
Verify Printer Setup 31
Page 34

FCC Regulations
This equipment has been tested and found to comply with the limits
for a Class B digital device, pursuant to Part 15 of the FCC rules.
These limits are designed to provide reasonable protection against
harmful interference in a residential installation. This equipment
generates, uses, and can radiate radio frequency energy. If this
equipment is not installed and used in accordance with the
instructions, it may cause harmful interference to radio
communications. How e ver, there is no guarantee that interference will
not occur in a particular installation. If this equipment does cause
harmful interference to radio or television reception, which can be
determined by turning the equipment off and on, the user is
encouraged to try to correct the interference by one or more of the
following measures:
●
Reorient or relocate the receiving antenna.
●
Increase separation between equipment and receiver.
●
Connect equipment to an outlet on a circuit different from that to
which the receiver is located.
●
Consult your dealer or an experienced radio/TV technician.
Note Any changes or modifications to the printer that are not expressly
approved by HP could void the user’s authority to operate this
equipment.
Use of a shielded interface ca ble is required to comply with the Class B
limits of Part 15 of FCC rules.
Note The HP LaserJet 8150 MFP, or any model of HP LaserJet 8150 printer
with an HP Digital Copy attached, complies with Class A limits.
For more regulatory information, see the online user guide for this
printer.
32 Printer Setup
EN
Page 35

Druckermodelle HP LaserJet 8150,
8150 N, 8150 DN, 8150 HN und
8150 MFP
Deutsch
Leitfaden zur
Inbetriebnahme______________
Page 36

© Copyright Hewlett-Packard
Company 2000
Alle Rechte vorbehalten. Jede
Vervielfältigung, Adaptation
oder Übersetzung ohne
vorherige schriftliche
Genehmigung ist untersagt,
außer im Rahmen der
Urheberrechtsgesetze.
Teilebestellnummer
C4265-90903
Erste Ausgabe, Oktober 2000
Gewährleistung
Die in diesem Dokument
enthaltenen Informationen
können ohne vorherige
Ankündigung geändert werden.
Hewlett-Packard erteilt keine
Gewährleistung irgendwelcher
Art hinsichtlich dieser
Informationen.
HEWLETT-PACKARD
LEHNT INSBESONDERE
DIE STILLSCHWEIGENDE
GEWÄHRLEISTUNG DER
MARKTFÄHIGKEIT UND
EIGNUNG FÜR EINEN
BESTIMMTEN ZWECK AB.
Hewlett-Packard ist nicht für
irgendwelche direkten,
indirekten, Neben-, Folgeoder andere Schäden im
Zusammenhang mit der
Bereitstellung oder V erwendung
dieser Informationen haftbar.
Warenzeichen
Acrobat ist ein Warenzeichen
von Adobe Systems
Incorporated.
PostScript ist ein W arenz eichen
von Adobe Systems
Incorporated, das in bestimmten
Gerichtsbezirken eingetragen
sein kann.
Arial, Monotype und Times New
Roman sind in den USA
eingetragene Warenzeichen der
Monotype Corporation.
CompuServe ist ein Warenzeichen in den USA von
CompuServe, Inc.
Helvetica, Palatino, Times und
Times Roman sind Warenzeichen der Linotype AG und/
oder ihrer Tochtergesellschaften
in den USA und anderen
Ländern.
Microsoft, MS Windows,
Windows und Windows NT sind
in den USA eingetragene
Warenzeichen der Microsoft
Corporation.
TrueType ist ein Warenzeichen
in den USA von Apple
Computer, Inc.
E
NERGY STAR
ist ein in
den USA eingetragenes
Servicekennzeichen der USUmweltschutzbehörde (EPA ).
Hewlett-Packard Company
11311 Chinden Boulevard
Boise, Idaho 83714 U.S.A.
Page 37

Inhalt
Prüfliste für die Installation . . . . . . . . . . . . . . . . . . . . . . . . . . . . . . .7
Schritt 1 Vorbereiten des Drucker-Standorts. . . . . . . . . . . . . .8
Schritt 2 Überprüfen des Packungsinhalts. . . . . . . . . . . . . . .10
Schritt 3 Entfernen des inneren Verpackungsmate rials. . . . .11
Schritt 4 Identifizieren der Druckerkomponenten. . . . . . . . . .12
Schritt 5 Installieren des Zubehörs . . . . . . . . . . . . . . . . . . . .13
Schritt 6 Installation der Tonerpatrone. . . . . . . . . . . . . . . . . .14
Schritt 7 Laden der Fächer 2 und 3. . . . . . . . . . . . . . . . . . . .16
Schritt 8 Laden von Fach 1 (Optional). . . . . . . . . . . . . . . . . .19
Schritt 9 Anschließen des Netzkabels . . . . . . . . . . . . . . . . . .21
Schritt 10 Installieren oder Austauschen der
Bedienfeldschablone (Optional) . . . . . . . . . . . . . . . . . . . .22
Schritt 11 Konfigurieren der Anzeigesprache des Bedienfelds
(Optional) . . . . . . . . . . . . . . . . . . . . . . . . . . . . . . . . . . . . .23
Schritt 12 Testen des Druckers . . . . . . . . . . . . . . . . . . . . . . .25
Schritt 13 Anschließen der Druckerkabel . . . . . . . . . . . . . . .26
Schritt 14 Installieren der Druckersoftware . . . . . . . . . . . . . .29
Schritt 15 Überprüfen der Druckereinrichtung . . . . . . . . . . . .31
FCC-Bestimmungen . . . . . . . . . . . . . . . . . . . . . . . . . . . . . . . . . . .32
Deutsch
GE
Inhalt iii
Page 38

iv Inhalt
GE
Page 39

Druckereinrichtung
Wir freuen uns, daß Sie sich für einen HP LaserJet-Drucker der
Modellserie 8150 entschieden haben! Dieser Drucker ist in den
folgenden fünf Konfigurationen erhältlich:
HP LaserJet 8150
Der HP LaserJet 8150 (Teilenummer C4265A) wird standardmäßig
mit 32 MB RAM, Breitformatdruck, zwei Zufuhrfächern für je 500 Blatt
und einem Mehrzweckfach für 100 Blatt geliefert.
Hinweis Zum Anschluß des HP LaserJet 8150 an einen Macintosh-Computer
ist eine optional erhältliche EIO-Karte erforderlich.
HP LaserJet 8150 N
Der HP LaserJet 8150 N (Teilenummer C4266A) wird standardm äßig
mit 32 MB RAM, Breitformatdruck, zwei Zufuhrfächern für je
500 Blatt, einem Mehrzweckfach für 100 Blatt und einem
HP JetDirect EIO-Druckserver geliefert.
Deutsch
GE
HP LaserJet 8150 DN
Der HP LaserJet 8150 DN (Teilenummer C4267A) wird
standardmäßig mit 32 MB RAM, Breitformatdruck, zwei
Zufuhrfächern für je 500 Blatt, einem Mehrzweckfach für 100 Blatt,
einem HP JetDirect EIO-Druckserver und einem Duplexer (für
beidseitigen Druck) geliefert.
HP LaserJet 8150 HN
Der HP LaserJet 8150 HN (Teilenummer C4269A) wird standardmäßig
mit 32 MB RAM, Breitformatdruck, zwei Zufuhrfächern für je 500 Blatt,
einem Mehrzweckfach für 100 Blatt, einem Zufuhrfach für 2000 Blatt
(Fach 4), einer Stapeleinheit für 3000 Blatt, einem HP JetDirect EIODruckserver und einem Duplexer (für beidseitigen Druck) geliefert.
5
Page 40

HP LaserJet 8150 MFP
Der HP LaserJet 8150 MFP (Teilenummer C4268A) wird
standardmäßig mit 64 MB RAM, Breitformatdruck, Festplatte, zwei
Zufuhrfächern für je 500 Blatt, einem Mehrzweckfach für 100 Blatt,
einem Zufuhrfach für 2000 Blatt (Fach 4), einer Stapeleinheit mit
Hefter für 3000 Blatt, einem HP JetDirect EIO-Druckserver, einem
Duplexer (für beidseitigen Druck), einer Copy Connect EIO-Karte
und einem HP Digital Copy geliefert.
6 Druckereinrichtung
GE
Page 41

Prüfliste für die Installation
Diese Anleitung hilft Ihnen bei der Einrichtung und Installation
Ihres neuen Druckers. Gehen Sie bitte in der angegebenen
Reihenfolge vor:
●
Auspacken des Druckers Schritte 1-4
●
Installieren des Druckers Schritte 5-12
●
Anschließen der Druckerkabel Schritt 13
●
Installieren der Drucker-Software Schritt 14
●
Überprüfen der Druckereinrichtung Schritt 15
WARNUNG! Der Drucker ist schwer. Wir empfehlen, den Druck er mit Hilfe von vier
Personen zu bewegen.
Hinweis Ausführliche Informationen zu den Merkmalen und Funktionen des
Druckers finden Sie im Benutzerhandbuch des Druckers und in den
Hilfemenüs der Druckertreiber. (Sie stehen nach der Installation der
Druckersoftware und des Online-Benutze rhandbuchs zur Verfügung.)
Deutsch
GE
Prüfliste für die Installation 7
Page 42

Schritt 1 Vorbereiten des Drucker-Standorts
Größe des Druckers
1187 mm (46,75 Zoll)
889 mm (35 Zoll)
368 mm
(14,5 Zoll)
350 mm
(13,75 Zoll)
Abmessungen des HP LaserJet 8150
(Ansicht von oben und von der Seite)
292 mm
(11,5 Zoll)
292 mm
(11,5 Zoll)
749 mm (29,5 Zoll)
8 Druckereinrichtung
GE
Page 43

Standortanforderungen für den Drucker
●
Eine stabile, ebene Fläche zum
Aufstellen
●
Genügend Freiraum auf allen
Seiten des Druckers
●
Ein gut belüfteter Raum
●
Keine Einwirkung von direktem
Sonnenlicht oder von
Chemikalien, einschließlich
ammoniakhaltiger Reinigungslösungen
●
Ausreichende
Stromversorgung
●
Gleichbleibende Temperatur
und Luftfeuchtigkeit
●
Relative Luftfeuchtigkeit
zwischen 20 % und 80 %
●
Umgebungstemperatur 10° bis
32,5° C (50° bis 91° F)
Gewicht des Druckers (ohne Tonerpatronen)
●
HP LaserJet 8150 und 8150 N: 51 kg (112 lb)
●
HP LaserJet 8150 DN: 54 kg (120 lb)
●
HP LaserJet 8150 HN: 113 kg (249 lb)
●
HP LaserJet 8150 MFP: 136 kg (300 lb)
Deutsch
GE
Vorbereiten des Drucker-Standorts 9
Page 44

Schritt 2 Überprüfen des Packungsinhalts
Netzkabel
Bedienfeld-
Drucker
schablone
DruckerDokumentation
Tonerpatrone
Packungsinhalt
Hinweis Ein paralleles Druckerkabel ist nur im Lieferumf ang des
HP LaserJet 8150-Basisdruckers enthalten. Bestellinformationen
entnehmen Sie bitte dem Benutzerhandbuch des Druckers.
DruckerSoftware-CD
10 Druckereinrichtung
GE
Page 45

Schritt 3 Entfernen des inneren
Verpackungsmaterials
1
2
3
Hinweis
Heben Sie das gesamte Verpackungsmaterial sorgfältig auf für den Fall, daß
Sie den Drucker zu einem späteren
Zeitpunkt wieder einpacken müssen.
WARNUNG!
Der Drucker wiegt 51 kg (112 lb). Wir
empfehlen, den Drucker mit Hilfe von
vier Personen zu bewegen.
1 Entfernen Sie alle äußeren
Verpackungsbänder vom Drucker.
2 Entfernen Sie das Verpackungs-
material aus dem StandardAusgabef ach und die Schutzfolie v on
der Anzeige.
3 Öffnen Sie die obere Abdeckung.
4 Entfernen Sie das Verpackungs-
material und das Verpackungsband,
und schließen Sie die Abdeckung
wieder.
Deutsch
GE
4
5 Öffnen Sie die linke Seiten-
abdeckung, und entfernen Sie
die beiden Abstandhalter. Schließen
Sie die Klappe dann wieder.
5
Entfernen des inneren Verpackungsmaterials 11
Page 46

Schritt 4 Identifizieren der
Druckerkomponenten
Die folgenden Ab bildungen zeigen die Bezeichnungen und P ositionen
der wichtigen Komponenten des Druckers.
Druckerkomponenten (Vorder- und Rückansicht)
1
Fach „Druckseite oben“
2
Bedienfeld
3
Standard-Ausgabefach
(Druckseite unten)
4
Einstellbarer
Papieranschlag
5
Obere Abdeckung
12 Druckereinrichtung
6
Fach 1 (Mehrzweckfach)
7
Fach 1, Verlängerungen
8
Fach 1, PapierQuerführungen
9
Fach 2
10
Fach 3
11
Netzschalter
12
Vordere Abdeckung
13
Parallelkabelanschluß
14
Kabelsatz für
Fremdschnittstelle (AUX)
15
HP Fast InfraRedAnschluß (FIR)
16
C-Link-Anschluß
17
Netzkabelanschluß
GE
Page 47

Schritt 5 Installieren des Zubehörs
Installieren Sie alle zum Drucker gehörenden Zubehörteile, die Sie
erworben haben. Befolgen Sie hierzu die mit den Zubehörteilen
gelieferten Installationsanweisungen.
Multibin-Mailbox (5 Fächer
und Hefteinheit)
Tabletop-Mailbox
mit 7 Fächern
3000-Blatt-Stapeleinheit mit Hefter
oder 3000-Blatt-Stapeleinheit
Duplexer
HP Fast InfraRedAnschluß
Multibin-Mailbox
(8 Fächer)
Deutsch
Umschlagzuführung
HP Digital Copy-Stand
GE
2000-BlattZufuhrfach
HP LaserJet MFPAktualisierungssatz
Optionales Zubehör
Druckerstand
2 Zufuhrfächer
für je 500 Blatt
Fach für
Sonderformate
Installieren des Zubehörs 13
Page 48

Schritt 6 Installation der Tonerpatrone
1
1 Öffnen Sie die obere Abdeckung des
Druckers.
2 Nehmen Sie die Tonerpatrone aus
ihrer Verpackung heraus. (Heben
Sie die Verpackung zur etwaigen
späteren Wiederverwendung auf.)
Hinweis
Setzen Sie die Tonerpatrone höchstens
ein paar Minuten dem Licht aus, um
Schäden zu vermeiden.
3 Drehen Sie die Patrone hin und
her und schütteln Sie sie vorsichtig,
um den Toner in der Patrone
gleichmäßig zu verteilen.
4 Biegen Sie die Lasche des
Versiegelungsbands der Patrone
vorsichtig hin und her, bis sie sich
von der Patrone löst.
Weiter auf der nächsten Seite.
14 Druckereinrichtung
GE
Page 49

5 Ziehen Sie die Lasche mit festem
Zug von der Patrone weg, um das
gesamte Band zu entfernen.
Vermeiden Sie den Kontakt mit
ev entuell am Band haftende m Toner.
Hinweis
Sollte sich die Lasche vom Band lösen,
greifen Sie nach dem Band selbst, und
6
ziehen Sie es aus der Patrone.
Deutsch
Hinweis
Sollte versehentlich Toner auf Ihre
Kleidung gelangen, wischen Sie ihn mit
einem trockenen Tuch ab und waschen
Sie das Kleidungsstück in ka ltem
Wasser. (Heißes Wasser fixiert den
Toner im Gewebe!)
7
6 Legen Sie die Patrone so in den
Drucker ein, wie in der Abbildung
durch den Pfeil angezeigt.
7 Schieben Sie die Patrone so weit
wie möglich in den Drucker hinein.
8 Schließen Sie die obere Abdeckung.
8
GE
Installation der Tonerpatrone 15
Page 50

Schritt 7 Laden der Fächer 2 und 3
1
2
3
4
Hinweis
Um Papierstaus zu vermeiden, darf
ein Fach niemals bei laufendem
Druckvorgang geöffnet werden.
Das Papierformat wird werkseitig auf ein
Standardformat eingestellt. In den USA
ist das Standardformat beispielsweise
„Letter“, in Europa DIN A4. Falls Sie ein
anderes Standardformat verwenden
möchten, können Sie die
Papierfacheinstellung neu k onf igurieren.
1 Öffnen Sie Fach 2 bis zum
Anschlag.
2 Entfernen Sie den Abstandhalter
und das Verpackungsband.
3 Wenn Sie Papier einlegen möchten,
das vom Standardformat abweicht,
stellen Sie die Papierführung auf
die Größe des gewünschten
Papiers ein.
4 Drehen Sie den P apierführungs-
schalter in die Sperrposition.
5
16 Druckereinrichtung
5 Zum Verändern der Position der
Papierführung auf der linken Seite
schieben Sie die Papierführung in
Richtung Drucker und heben sie
dann nach oben heraus.
Weiter auf der nächsten Seite.
GE
Page 51

6
6 Plazieren Sie die Papie rführung über
den entsprechenden Markierungslinien im Fach. Drücken Sie die
Führung in den hinteren Schlitz, und
lassen Sie sie dann in den vorderen
Schlitz hinab. Achten Sie darauf,
daß die Führung gerade sitzt.
7
8
7 Legen Sie bis zu 500 Blatt Papier in
das Fach ein. Das Zufuhrfach darf
nur bis zur Papierhöhenmarkierung
an der Papierführung gefüllt werden.
a Legen Sie beim einseitigen
Drucken US Letter- oder A4Papier mit de m oberen Seitenrand
zur Rückseite des Fachs und mit
der zu bedruckenden Seite nach
unten in das F ach ein.
Beim beidseitigen Drucken
müssen Sie das Papier mit dem
oberen Seitenrand zur Rückseite
des Fachs und mit der ersten zu
bedruckenden Seite nach oben in
das Fach einlegen.
b Quer zugeführtes Papier legen
Sie beim einseitigen Drucken mit
dem oberen Rand zur rechten
Seite des Fachs und mit der
zu bedruckenden Seite nach
unten ein.
Beim beidseitigen Drucken legen
Sie das Papier mit dem oberen
Rand zur linken Seite des
Fachs u nd mit der ersten zu
bedruckenden Seite nach
oben ein.
Deutsch
GE
8 Achten Sie darauf, daß der
Papierformatstreifen richtig
eingestellt ist.
Weiter auf der nächsten Seite.
Laden der Fächer 2 und 3 17
Page 52

9
9 Schieben Sie das Fach wieder in
den Drucker.
Falls Sie das zu bedruckende Papier
lieber nach Typ statt nach Fach (Quelle)
auswählen möchten, finden Sie
hierzu Anleitungen im OnlineBenutzerhandbuch.
Falls Sie Papierformate bedrucken
möchten, die größer als A4 sind, muß
die Position des Papieranschlags im
Standard-Ausgabefach (Fach
„Druckseite unten“) entsprechend
geändert werden. (Anleitungen hierzu
finden Sie im Online-Benutzerhandbuch.)
18 Druckereinrichtung
GE
Page 53

Schritt 8 Laden von Fach 1 (Optional)
Fach 1 ist ein Meh rzweckfach für
maximal 100 Blatt Papier oder
10 Umschläge.
Mit Fach 1 haben Sie die Möglichkeit,
Umschläge, Transparentfolien, Sonderpapierformate, Etiketten und andere
Materialien zu bedrucken, ohne v orh er die
anderen Papierfächer leeren zu müssen.
ACHTUNG
Um Papierstaus zu vermeiden, während
des Druckens kein Papier in Fach 1
einlegen oder aus dem Fach nehmen.
Um Schäden am Drucker zu vermeiden,
dürfen Etiketten, Umschläge und
Transparentfolien nur über F ach 1
zugeführt werden. Außerdem sollten
sie zum Fach „Druckseite oben” geleitet,
nicht beidseitig bedruckt und unmittelbar
nach dem Drucken herausgenommen
werden.
Deutsch
GE
Hinweis
Das in Fach 1 eingelegte Papier wird als
erstes bedruckt, wenn die Einstellung für
Fach 1 nicht vom Bedienfeld des
Druckers aus geändert wird. Wenn Sie
die Reihenfolge ändern möchten, in der
das Papier von den verschiedenen
Fächern aus eingezogen wird, lesen Sie
bitte die entsprechenden Abschnitte im
Benutzerhandbuch des Druckers.
1 Öffnen Sie Fach 1.
2 Ziehen Sie die Fachverlängerung
heraus, sofern dies für das zu
bedruckende Papierformat
erforderlich ist.
Weiter auf der nächsten Seite.
Laden von Fach 1 (Optional) 19
Page 54

3 Schieben Sie die Papier-
Querführungen an die
entsprechenden Markierungen
im Fach.
4 Legen Sie das Papier in das Fach
ein und achten Sie darauf, daß der
Papierstapel nicht höher als die
Papierhöhenmarkierung ist.
5 Wie Papier eingelegt wird, hängt
vom Papierformat ab:
a Legen Sie beim einseitigen
Drucken US Letter- oder A4Papier mit de m oberen Seitenrand
zur Rückseite des Druckers und
mit der zu bedruckenden Seite
nach oben in den Drucker ein.
Beim beidseitigen Drucken
müssen Sie das Papier mit dem
oberen Seitenrand zur Rückseite
des Druckers und mit der ersten
zu bedruckenden Seite nach
unten in den Drucker einlegen .
b Quer zugeführtes Papier legen
Sie beim einseitigen Drucken mit
dem oberen Seitenrand zum
Drucker und mit der zu
bedruckenden Seite nach
oben ein.
Beim beidseitigen Drucken legen
Sie das Papier mit dem oberen
Seitenrand vom Drucker weg und
mit der ersten zu bedruckenden
Seite nach unten ein.
20 Druckereinrichtung
Hinweis
Papier mit einem Flächengewicht von
mehr als 105 g/m
2
(28 lb) sollte von
Fach 1 aus gedruckt und in das
Ausgabefach „Druckseite oben“ geleitet
werden, um eine Krümmung zu
vermeiden.
GE
Page 55

Schritt 9 Anschließen des Netzkabels
1
2
3
BEREIT
1 Der Netzschalter befindet sich vo rne
am Drucker. Vergewissern Sie sich,
daß der Drucker ausgeschaltet ist.
2 Stecken Sie das Netzkabel in den
Drucker und in eine geerdete
Steckdose oder Stromleiste.
3 Schalten Sie den Drucker ein.
Nachdem der Drucker w armgelaufen
ist, sollte die Meldung BEREIT auf
dem Bedienfeld erscheinen und
die Bereitschafts-LED leuchten.
Erscheint die Meldung BEREIT nicht,
lesen Sie bitte das Kapitel zur
Fehlerbehebung im
Benutzerhandbuch.
Deutsch
GE
Anschließen des Netzkabels 21
Page 56

Schritt 10 Installieren oder Austauschen der
Bedienfeldschablone (Optional)
1
2
3
Wenn Sie die Bedienfeldschablone in
einer anderen Sprache als Englisch
benötigen:
1 Suchen Sie die gewünschte
Schablone aus und nehmen
Sie sie aus ihrer Hülle.
Hinweis
Vergewissern Sie sich, daß der
Netzschalter ausgeschaltet ist.
2 Heben Sie die installierte Schablone
vorsichtig an den Seiten an.
3 Schieben Sie einen Fingernagel
oder einen anderen dünnen, nicht
biegsamen Gegenstand vorne unter
die Schablone, und drücken Sie sie
nach oben und hinten. Heben Sie
die Schablone ab.
4 Setzen Sie die neue Schablone mit
der hinteren Seite zuerst in das
Bedienfeld ein.
4
5
22 Druckereinrichtung
5 Lassen Sie die Schablone fest im
Bedienfeld einrasten. Vergewissern
Sie sich, daß sie flach aufliegt.
GE
Page 57

Schritt 11 K onfigurieren der Anzeigesprache des
Bedienfelds (Optional)
1
ENTER LANGUAGE
=ENGLISCH
Die Sprache für die Anzeige von
Druckernachrichten und
Druckkonfigurationsseiten k önnen Sie je
nach Bedarf über das Bedienfeld des
Druckers einstellen.
1 Warten Sie beim ersten Einschalten
des Druckers, bis die Meldung ENTER
LANGUAGE = ENGLISCH erscheint.
Befolgen Sie Schritt 2, um die
2
Anzeigesprache zu ändern, Schritt
Deutsch
4, um Englisch auszuwählen.
2 Falls die Meldung ENTER LANGUAGE =
ENGLISCH nicht angezeigt wird,
drücken Sie auf A
USWÄHLEN
, halten
Sie die Taste gedrückt, und schalten
Sie gleichzeitig den Netzschalter
ein. Halten Sie A
USWÄHLEN
gedrückt,
bis die Meldung SELECT LANGUAGE
erscheint. Lassen Sie dann die T aste
A
USWÄHLEN
los und fahren Sie mit
Schritt 3 fort.
Hinweis
Während der Konfiguration der
Anzeigesprache sind nur die Tasten
-W
ERT
+, A
USWÄHLEN
und S
TART
aktiv.
Alle anderen Tasten werden ignoriert.
GE
Wenn Sie auf S
drücken, ohne
TART
eine Sprache auszuwählen, wird der
Drucker von selbst aktiviert und alle
darauffolgenden Nachrichten werden
in Englisch angezeigt. Da jedoch keine
Anzeigesprache ausgewählt wurde , wird
die Meldung ENTER LANGUAGE = ENGLISCH
weiterhin bei jedem Einschalten des
Druckers (nach dem Selbsttest)
angezeigt, bis Sie eine Sprache
auswählen.
Weiter auf der nächsten Seite.
Konfigurieren der Anzeigesprache des Bedienfelds (Optional) 23
Page 58

3
ENTER LANGUAGE
=ENGLISCH
3 Wenn die Meldung SPRACHE ANGEBEN
= ENGLISCH angezeigt wird, drücken
+, bis die
Sie so oft auf -W
ERT
gewünschte Einstellung erscheint.
Hinweis
Bei Japanisch, Türkisch, Tschechisch,
4
ENTER LANGUAGE
=DEUTSCH
Ungarisch und Polnisch wird durch die
Sprachauswahl das für die jeweilige
Sprache festgelegte Standardsymbol
geändert. Für alle anderen Sprachen
lautet das festgelegte Standardsymbol
PC-8.
4 Drücken Sie auf A
5
SPRACHE ANGEBEN
=DEUTSCH
Auswahl zu speichern. Die Auswahl
in der Anzeige wird mit einem
Sternchen (*) versehen und so
USWÄHLEN
um die
als neue Standardeinstellung
gekennzeichnet.
5 Drücken Sie auf S
TART
. Die
Bedienfeldanzeige meldet dann,
daß der Drucker startbereit ist.
Hinweis
Sollte die neue Sprache nicht in der
Anzeige erscheinen, haben Sie
möglicherweise vergessen, auf
A
USWÄHLEN
zu drücken, um Ihre
Auswahl zu speichern.
24 Druckereinrichtung
GE
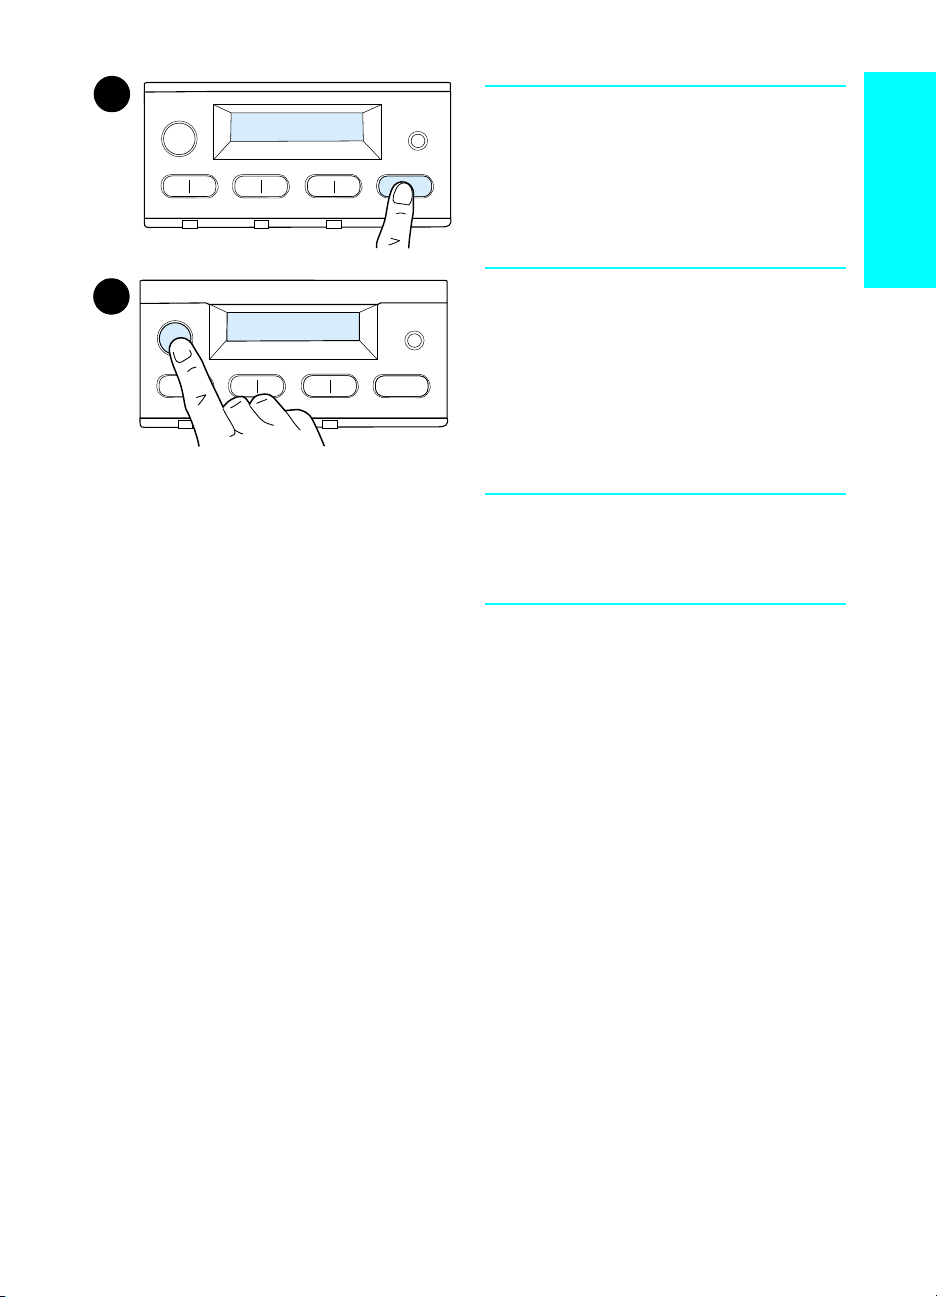
Page 59

Schritt 12 Testen des Druckers
1
BEREIT
Drucken Sie eine Ko nfigurationsseite
aus, um festzustellen, ob der Drucker
ordnungsgemäß funktioniert.
1 Vergewissern Sie sich, daß der
Drucker eingeschaltet ist und die
Meldung BEREIT in der Anzeige
erscheint.
2 Drücken Sie so oft auf die Taste
2
INFORMATIONSMENÜ
3 Drücken Sie so oft auf die Taste
, bis INFORMATIONSMENÜ in der
ENÜ
M
Anzeige erscheint.
, bis KONFIGURATION DRUCKEN
PTION
O
Deutsch
in der Anzeige erscheint.
4 Drücken Sie auf A
USWÄHLEN
, um die
Konfigurationsseite zu drucken.
3
KONFIGURATION
DRUCKEN
5 Die Konfigur ationsseite gibt die
aktuelle Konfiguration des
Druckers an.
Hinweis
Für Drucker mit installierter
Netzwerkkarte wird außerdem
eine HP JetDirect-NetzwerkKonfigurationsseite gedruckt.
4
KONFIGURATION
DRUCKEN
GE
5
Testen des Druckers 25
Page 60

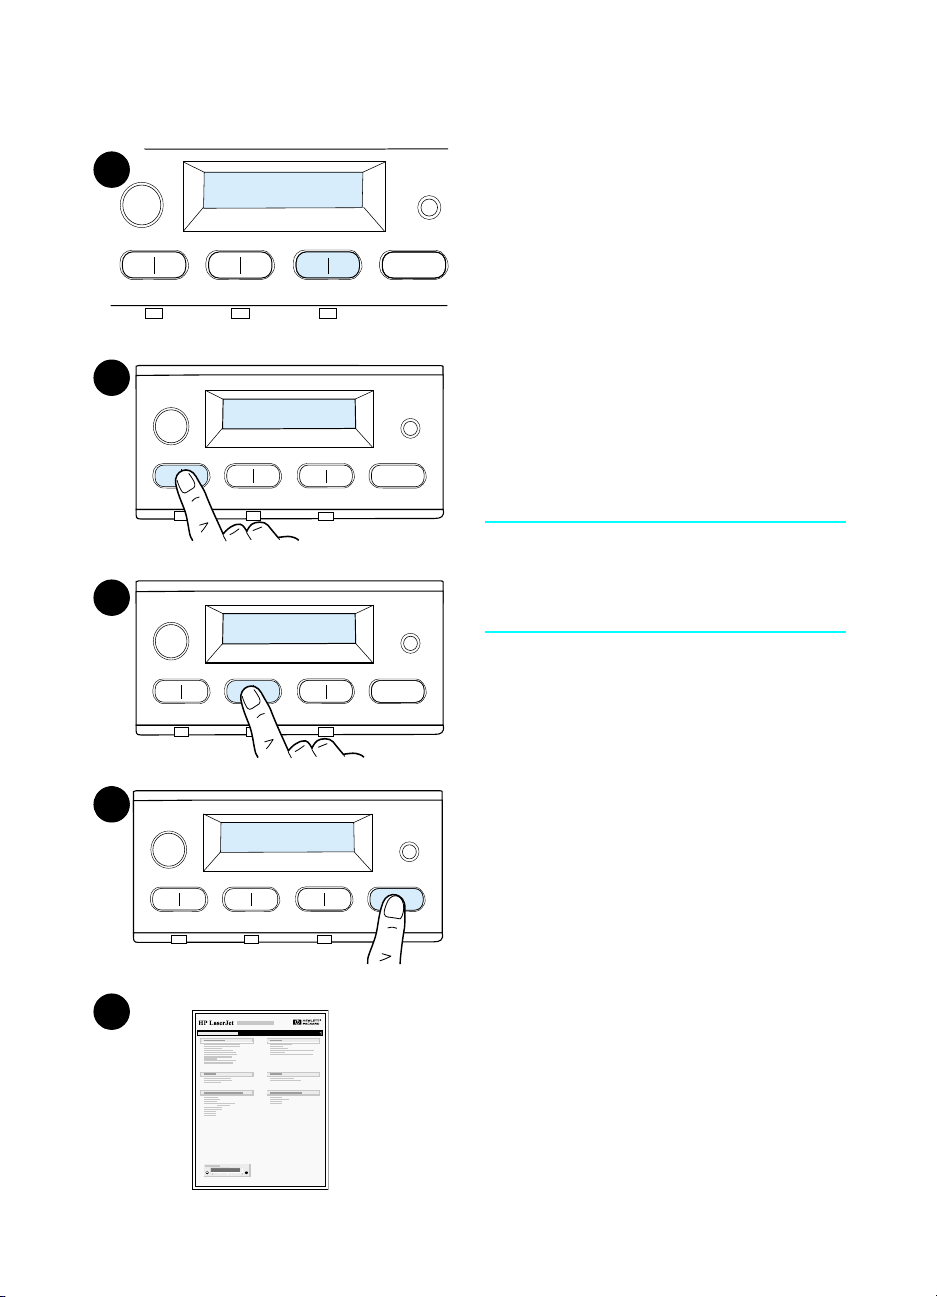
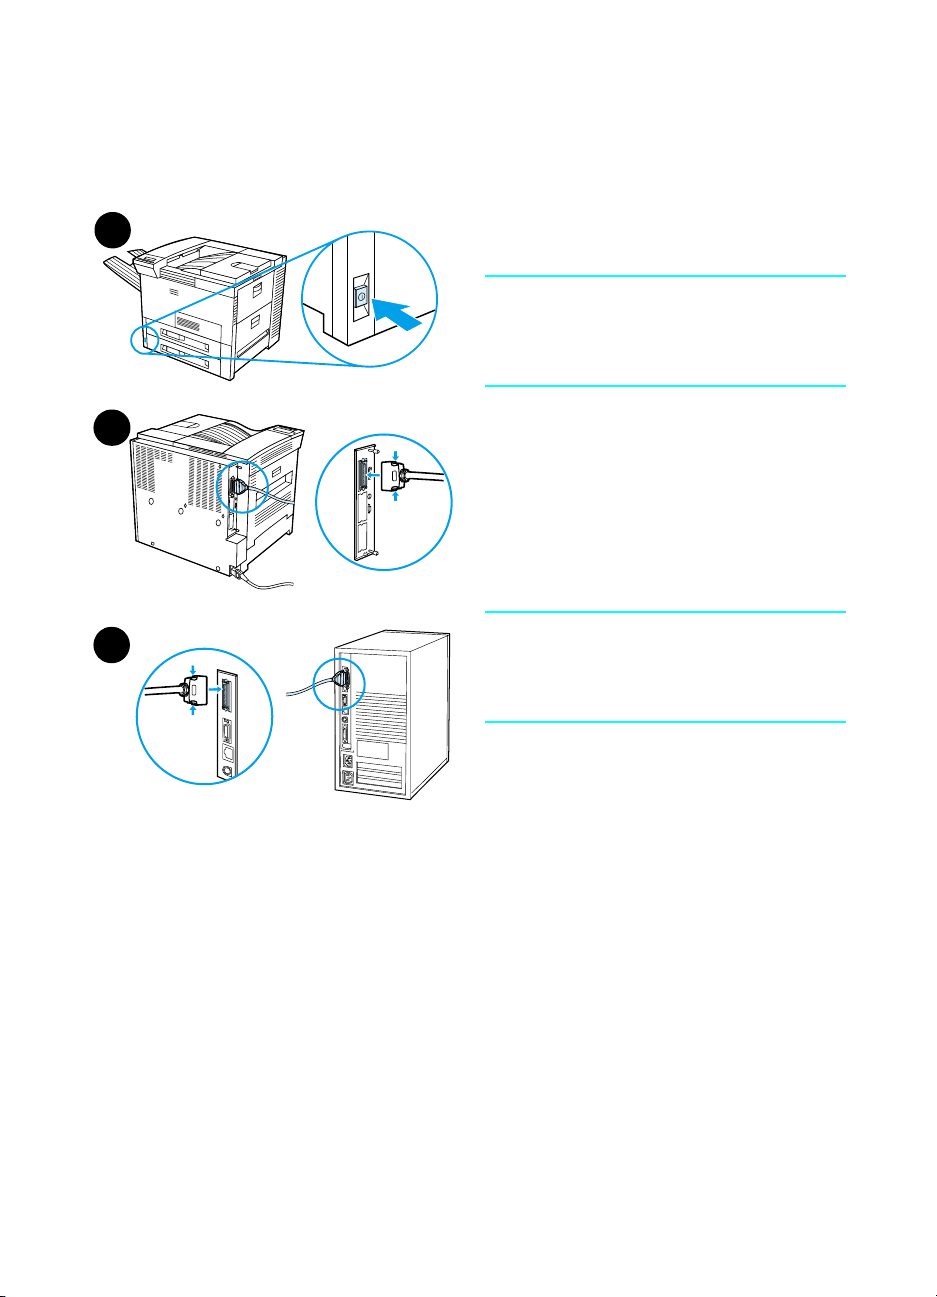
Schritt 13 Anschließen der Druckerkabel
Bei Druckern, die mit einem optionalen HP JetDirect EIODruckserver ausgerüstet sind, wird über einen 10/100Base-TX (RJ-
45)-Anschluß eine Netzwerk-Paarkabelverbindung bereitgestellt. Die
V erbindu ng zu einem Apple LocalTalk-Netzwerk ist über eine optional
erhältliche LocalTalk-Karte möglich. Der Drucker besitzt außerdem
eine Buchse für einen HP Fast InfraRed-Anschluß.
Parallelanschluß
RJ-45-Anschluß
Kabelsatz für
Fremdschnittstelle (AUX)
(optional)
Schnittstellenanschlüsse
26 Druckereinrichtung
HP Fast InfraRedAnschluß (FIR)
(optional)
C-LinkAnschluß
GE
Page 61

Anschließen des Parallelkabels
Um Zuverlässigkeit zu gewährleisten, sollten Sie ein bidirektionales
Parallelkabel vom Typ C nach IEEE-1284 benutzen. (Diese Kabel
tragen den Vermerk „IEEE-1284“.) Nur derart beschriftete IEEE1284-Kabel unterstützen die fortgeschrittenen Funktionen des
Druckers.
1
2
3
1 Vergewissern Sie sich, daß der
Drucker und der Computer ausgeschaltet sind.
Hinweis
Das Kabel sollte einfach zu installieren
sein. Ist dies nicht der Fall, sehen Sie
nach, ob Sie den Stecker richtig
ausgerichtet haben.
2 Schließen Sie das Parallelkabel an
den Parallelanschluß des Druckers
an. Drücken Sie die Entriegelungshebel zusammen, wenn Sie den
Stecker einstecken.
3 Stecken Sie das andere Ende des
Kabels in den entsprechenden
Anschluß des Computers.
Hinweis
Informationen zur Bestellung von IEEE1284-Parallelkabeln finden Sie im
Online-Benutzerhandbuch.
Deutsch
GE
Anschließen der Druckerkabel 27
Page 62

Anschluß an ein Ethernet 10/100Base-TX-Netzwerk
Benutzen Sie die RJ-45-Buchse, um den Drucker an ein
Ethernet 10/100Base-TX- Net zwerk anzuschließen.
ACHTUNG Achten Sie darauf, daß der Drucker ausgeschaltet ist, während Sie ihn
an die RJ-45-Buchse anschließen.
Anschluß des Schnittstellenkabels für ein
Ethernet 10/100Base-TX-Netzwerk
●
Schließen Sie ein paarverseiltes Netzwerkkabel an die RJ-45Buchse des HP JetDirect EIO-Druckser vers an.
●
Schließen Sie das andere Ende des Kabels an das Netzwerk an.
28 Druckereinrichtung
GE
Page 63

Schritt 14 Installieren der Druckersoftware
Im Lieferumfang des Druckers ist eine CD-ROM mit der Druckersoftware enthalten. Die Druckertreiber auf dieser CD-ROM müssen
installiert werden, damit Sie die Druckerfunktionen voll ausnutzen
können. Falls Ihr Computer nicht mit einem CD-ROM-Laufwerk
ausgestattet ist, Sie jedoch Zugang zu einem solchen Laufwerk
haben, können Sie die Druckersoftware auf Diske tten kopieren und
diese dann zur Installation auf Ihrem Computer verwenden.
Wenn Sie keinen Zugang zu einem CD-ROM-Lauf werk haben,
können Sie die Treiber über die Website www.hp.com herunterladen
oder bei HP Disketten bestellen. Die neuesten Treiber können Sie
vom Internet herunterladen. Je nach K onfiguration der unter Windows
laufenden Computer überprüft das Installationsprogramm der
Druckersoftware den Computer automatisch auf Zugang zum
Internet, damit Sie dort die neueste Software herunterladen können.
Hinweis Druckerinstallationssoftware für UNIX (HP-UX, Sun Solaris)-
Netzwerke können Sie im Internet über
http://www.hp.com/support/net_printing herunterladen.
Zur Konfiguration und Verwaltung des Druckers mit Hilfe Ihres WebBrowsers können Sie HP Web JetAdmin verwenden. Informationen zu
HP Web JetAdmin finden Sie im Internet unter
http://www.hp.com/go/webjetadmin.
Deutsch
GE
Weitere Informationen erhalten Sie auf den Seiten zum
HP-Kundenservice am Anfang des Drucker-Benutzerhandbuchs.
Installieren der Windows-Drucker software (CD)
Für Windows 9x, Windows NT 4.0 und Windows 2000
1 Schließen Sie alle laufenden Anwendungen.
2 Legen Sie die CD-ROM in das CD-ROM-Laufwerk ein. (Je nach
Konfiguration des Computers wird das Installationsprogramm
automatisch gestartet.)
3 Klicken Sie auf Start.
4 Klicken Sie auf Ausführen.
5 Geben Sie D:\SETUP (bzw. den entsprechenden Buch staben für
das Laufwerk) in das Befehlszeilenfeld ein und klick en Sie auf OK.
6 Befolgen Sie die Anweisung en auf dem Bildschirm.
Installieren der Druckersoftware 29
Page 64

Für Windows 3.1x und Windows 3.11
1 Schließen Sie alle laufenden Anwendungen.
2 Legen Sie die CD-ROM in das CD-ROM-Lauf werk ein.
3 Klicken Si e im Windows-Pr ogramm-Manager auf das MenüDatei.
4 Klicken Sie auf Ausführen.
5 Geben Sie D:\SETUP (bzw. den entsprechenden Buch staben für
das Laufwerk) in das Befehlszeilenfeld ein und klick en Sie auf OK.
6 Befolgen Sie die Anweisung en auf dem Bildschirm.
Installieren der Netzwerk-Software
Hinweis Falls der Drucker in einem Netzwerk eingesetzt werden soll, muß die
Software des Netzwerk-Druckersystems auf dem System des
Netzwerk-Verwalters installiert und konfiguriert sein, bevor die
einzelnen Benutzer die Druckersoftware installieren können.
Mit Hilfe von HP Web JetAdmin können Sie den Drucker über I hren
Web-Browser konfigurieren. Informationen zur Verwendung von
HP Web JetAdmin finden Sie in der Website von HP unter
http://www.hp.com/go/webjetadmin.
Installieren der Macintosh-Druckersoftware
1 Schließen Sie alle laufenden Anwendungen.
2 Legen Sie die CD in das CD-ROM-Laufwerk ein.
3 Doppelklicken Sie auf da s Symbol Aktualisierer und folgen
Sie den Anweisungen auf dem Bildschirm.
4 Öffnen Sie die Auswahl im Menü Apple.
5 Klicken Sie auf das Symbol LaserWriter 8. Falls das Symbol
nicht vorhanden ist, setzen Sie sich bitte mit dem HP-Kundenservice
(siehe erste Seiten des Benutzerhandbuchs) oder mit Apple
Computer, Inc. in Verbindung.
6 Falls Sie sich in einem Netzwerk mit mehreren Zonen befinden,
wählen Sie im Feld AppleTalk Zonen die Zone, in der sich der
Drucker befindet. Falls Sie nicht wissen, in welcher Zone sich der
Drucker befindet, w enden Sie sich an Ihren Netzwerk-Verwalter.
7 Doppelklicken Sie auf de n gewünschten Drucker. Es sollte ein
Symbol erscheinen.
8 Schließen Sie die Auswahl, indem Sie auf das Schließf eld in der
oberen linken Ecke klicken.
30 Druckereinrichtung
GE
Page 65

Schritt 15 Überprüfen der Druckereinrichtung
Sie können am einfachsten überprüfen, ob die Druckerinstallation
korrekt durchgeführt wurde, indem Sie ein Dokument von einer
Software-Anwendung aus drucken.
1 Öffnen Sie eine beliebige Software-Anwendung und öffnen oder
erstellen Sie ein einfaches Doument.
2 Vergewissern Sie sich, daß der korrekte Name des Druckers
erscheint.
3 Drucken Sie das Dokument.
Wenn das Dokument richtig ausgedruckt wird, ist die Druckerinstallation
abgeschlossen. Wenn nichts gedruckt oder das Dokument nicht
richtig ausgedruckt wird, lesen Sie im Online-Benutzerhandbuch des
Druckers das Kapitel zur Fehlerbehebung.
Herzlichen Glückwunsch! Die Installation des Druckers ist
abgeschlossen!
Deutsch
GE
Überprüfen der Druckereinrichtung 31
Page 66

FCC-Bestimmungen
Dieses Gerät wurde typengeprüft und entspricht laut Abschnitt 15 der
Bestimmungen der US-Funk- und Fernmeldebehörde (Federal
Communications Commission, FCC) den Grenzwerten für
Digitalgeräte der Klasse B. Diese Bestimmungen dienen dazu, in
Wohngebieten einen angemessenen Schutz gegen Funkstörungen
zu gewährleisten. Dieses Gerät erzeugt und verwendet HF-Energie
und strahlt diese u. U. auch ab. Wird das Gerät entgeg en den
Anweisungen des Herstellers installiert und/oder verwendet, kann es
Funkstörungen verursachen. Bei bestimmten Installationen ist das
Auftreten von Störungen jedoch nicht auszuschließen. Sollte dieses
Gerät den Empfang von Funk- und Fernsehsendungen stören
(feststellbar durch Ein- und Ausschalten des Geräts), können zur
Behebung der Störung folgende Maßnahmen einzeln oder
zusammen eingesetzt werden:
●
Verlegen oder Neuausrichten der Empfangsantenne;
●
Aufstellen des Geräts in größerer Entfernung vom Empfänger;
●
Anschließen des Geräts an eine andere Steckdose, so daß
Drucker und Empfänger an verschiedene Stromkreise
angeschlossen sind;
●
gegebenenfalls kann der Fachhändler oder ein erfahrener Funk-
und Fernsehtechniker weitere Ratschläge geben.
Hinweis Änderungen und Modifikationen, die ohne die ausdrückliche
schriftliche Genehmigung von He wlett-Packard v orgenommen wurden,
können zum Erlöschen der Betriebsberechtigung für das Gerät führen.
Zur Einhaltung der Grenzwerte für Geräte der Klasse B gemäß
Abschnitt 15 der FCC-Bestimmungen muß ein abgeschirmtes
Schnittstellenkabel verwendet werden.
Hinweis Der HP LaserJet 8150 MFP und alle Modelle des HP LaserJet 8150
mit angeschlossenem HP Digital Copy arbeiten innerhalb der
Grenzwerte der Klasse A.
Weitere Informationen zu behördlichen Bestimmungen finden Sie im
Online-Benutzerhandbuch dieses Druckers.
32 Druckereinrichtung
GE
Page 67

Impresoras HP LaserJet 8150,
8150 N, 8150 DN, 8150 HN
y8150MFP
Español
Guía de instalación inicial _____
Page 68

© Copyright Hewlett-Packard
Company, 2000
Reservados todos los derechos.
Queda prohibida la
reproducción, adaptación o
traducción sin permiso previo
y por escrito, excepto en los
términos de la legislación de
derechos de propiedad
intelectual.
Número de publicación
C4265-90903
Primera edición, octubre 2000
Garantía
La información contenida en
este documento está sujeta
a cambios sin previo aviso.
Hewlett-Packard no ofrece
garantía de ninguna clase con
respecto a esta información.
HEWLETT-PACKARD
RECHAZA LA GARANTÍA
IMPLÍCITA DE
COMERCIABILIDAD E
IDONEIDAD PARA UN FIN
ESPECÍFICO.
Hewlett-Packard no será
responsable de ningún
supuesto daño directo, indirecto
o como consecuencia del
suministro o del uso de esta
información.
Reconocimiento de marcas
PostScript es una marca
comercial de Adobe Systems
Incorporated que puede estar
registrada en determinadas
jurisdicciones.
Arial, Monotype y Times
New Roman son marcas
registradas de Monotype
Corporation, en los EE.UU.
CompuServe es una marca
comercial de CompuServe, Inc.,
en los EE.UU.
Helvetica, Palatino, Times
y Times Roman son marcas
comerciales de Linotype AG
y sus filiales, en los EE.UU.
y en otros países.
Microsoft, MS Windows,
Windows y Windows NT
son marcas registradas de
Microsoft Corporation, en
los EE.UU.
TrueType es una marca
comercial de Apple Computer,
Inc., en los EE.UU.
E
NERGY STAR
es una marca
registrada de servicio de
la Agencia de Protección
del Medio Ambiente de
EE.UU. (EPA).
Hewlett-Packard Company
11311 Chinden Boulevard
Boise, Idaho 83714 U.S.A.
Page 69

Contenido
Lista de comprobación para la instalación . . . . . . . . . . . . . . . . . . .7
Paso 1 Prepare el emplazamiento de la impresora . . . . . . . . .8
Paso 2 Compruebe el contenido del embalaje. . . . . . . . . . . .10
Paso 3 Retire el embalaje interior . . . . . . . . . . . . . . . . . . . . .11
Paso 4 Identifique los componentes de la impresora. . . . . . .12
Paso 5 Instale los accesorios. . . . . . . . . . . . . . . . . . . . . . . . .13
Paso 6 Instale el cartucho de tóner . . . . . . . . . . . . . . . . . . . .14
Paso 7 Ponga papel en las bandejas 2 y 3 . . . . . . . . . . . . . .16
Paso 8 Ponga papel en la bandeja 1 (opcional). . . . . . . . . . .19
Paso 9 Conecte el cable de alimentación eléctrica . . . . . . . .21
Paso 10 Instale o cambie la plantilla del panel de control
(opcional) . . . . . . . . . . . . . . . . . . . . . . . . . . . . . . . . . . . . .22
Paso 11 Cambie el idioma del panel de control (opcional) . .23
Paso 12 Pruebe la impresora. . . . . . . . . . . . . . . . . . . . . . . . .25
Paso 13 Conecte los cables de la impresora . . . . . . . . . . . . .26
Paso 14 Instale el software de impresión. . . . . . . . . . . . . . . .29
Paso 15 Verifique la insta lación de la impresora . . . . . . . . . .32
Normas de la FCC. . . . . . . . . . . . . . . . . . . . . . . . . . . . . . . . . . . . .33
Español
SP
Contenido iii
Page 70

iv Contenido
SP
Page 71

Instalación de
la impresora
¡Enhorabuena: ha comprado una impresora HP LaserJet serie 8150!
Esta impresora está disponible en cin co configuraciones:
Impresora HP LaserJet 8150
La impresora HP LaserJet 8150 (número de producto C4265A) se
distribuye de fábrica con 32 MB de memoria RAM, dos bandejas para
500 hojas y una bandeja multipropósito para 100 hojas, y puede
imprimir en papel de formato ancho.
Nota Se necesita una tarjeta EIO opcional para conectar la impresora
HP LaserJet 8150 a un ordenador Macintosh.
Impresora HP LaserJet 8150 N
La impresora HP LaserJet 8150 N (número de producto C4266A) se
distribuye de fábrica con 32 MB de memoria RAM, dos bandejas para
500 hojas, una bandeja multipropósito para 100 hojas y un servidor
de impresión HP JetDirect EIO, y puede imprimir en papel de
formato ancho.
Impresora HP LaserJet 8150 DN
La impresora HP LaserJet 8150 DN (número de producto C426 7A)
se distribuye de fábrica con 32 MB de mem o ria RAM, dos bandejas
para 500 hojas, una bandeja multipropósito para 100 hojas, un
servidor de impresión HP JetDirect EIO y una unidad de impresión a
doble cara, y puede imprimir en papel de formato ancho.
Español
SP
5
Page 72

Impresora HP LaserJet 8150 HN
La impresora HP LaserJet 8150 HN (número de producto C4269A)
se distribuye de fábrica con 32 MB de mem o ria RAM, dos bandejas
para 500 hojas, una bandeja multipropósito para 100 hojas, una
bandeja de entrada para 2000 hojas (bandeja 4), un apilador para
3000 hojas, un servidor de impresión HP JetDirect EIO y una unidad
de impresión a doble cara, y puede imprimir en papel de formato
ancho.
Impresora HP LaserJet 8150 MFP
La impresora HP LaserJet 8150 MFP (número de producto C4268A)
se distribuye de fábrica con 64 MB de memoria RAM, un disco duro,
dos bandejas para 500 hojas, una bandeja multipropósito para
100 hojas, una bandeja de entrada para 2000 hojas (bandeja 4),
un apilador/grapadora para 3000 hojas, un servidor de impresión
HP JetDirect EIO, una unidad de impresión a doble car a, una tarjeta
de conexión EIO para copia y un módulo HP Digital Copy, y
puede imprimir en papel de formato ancho.
6 Instalación de la impresora
SP
Page 73

Lista de comprobación para la instalación
Esta guía le ayudará a instalar y configurar su nueva impresora.
Para realizar una instalación correcta, lleve a cabo todos los pasos
detallados a continuación, en el orden en que aparecen:
●
Desembale la impresora pasos 1-4
●
Instale la impresora pasos 5-12
●
Conecte los cables de la impresora paso 13
●
Instale el software de impresión paso 14
●
Verifique la configuración de la
impresora
¡ADVERTENCIA!La impresora es pesada. HP recomienda que su traslado sea
realizado entre cuatro personas.
Nota Para obtener información detallada acerca de todas las
características y funciones de la impresora, consulte la guía del
usuario y los menús de ayuda de los controladores (podrá acceder
a ellos una vez ha y a instalado el sof tware de im presión y la guía del
usuario en línea).
paso 17
Español
SP
Lista de comprobación para la instalación 7
Page 74

Paso 1 Prepare el emplazamiento de la
1.187
impresora
Tamaño de la impresora
mm
889 mm
368 mm
350 mm
Dimensiones de la impresora HP LaserJet 8150
(vistas superior y lateral)
292 mm
292 mm
749 mm
8 Instalación de la impresora
SP
Page 75

Requisitos para el emplazamiento de la impresora
●
Una superficie plana y firme
●
Suficiente espacio alrededor
de la impresora
●
Una sala con buena ventilación
●
Sin exposición a luz solar
directa o a productos químicos,
incluidos líquidos de limpieza
basados en amoníaco
●
Una toma de corriente
adecuada
●
Un entorno estable y sin
cambios bruscos de
temperatura o de humedad
●
Una humedad relativa entre el
20 y el 80%
●
Una temperatura ambiente
entre 10 y 32,5°C
Peso de la impresora (sin cartucho de tóner)
●
Impresoras HP LaserJet 8150 y 8150 N: 51 kg
●
Impresora HP LaserJet 8150 DN: 54 kg
●
Impresora HP LaserJet 8150 HN: 113 kg
●
Impresora HP LaserJet 8150 MFP: 136 kg
Español
SP
Prepare el emplazamiento de la impresora 9
Page 76

Paso 2 Compruebe el contenido del embalaje
Cable de
alimentación eléctrica
Plantilla
Impresora
del panel
de control
Documentación
de la impresora
Cartucho
de tóner
Contenido del embalaje
Nota Sólo la impresora base HP LaserJet 8150 incluye un cable de int erfaz
paralelo. En la guía del usuario de la impresora se incluy e información
para pasar pedidos.
CD ROM con el
software de impresión
10 Instalación de la impresora
SP
Page 77

Paso 3 Retire el embalaje interior
1
2
3
4
Nota
Guarde todo el material de embalaje.
Es posible que tenga que utilizarlo para
embalar la impresora más adelante.
¡ADVERTENCIA!
La impresora pesa aproximadamente
51 kg. HP recomienda que su traslado
sea realizado entre cuatro personas.
1 Quite toda la cinta del exterior de la
impresora.
2 Quite el material de embalaje de la
bandeja de salida estándar, así
como la película protectora de la
pantalla.
3 Abra la cubierta superior.
4 Quite el material y la cinta de
embalaje y cierre la cubierta
superior.
5 Abra la puerta lateral izquierda,
quite los dos espaciadores de
embalaje y vuelva a cerrar la puerta.
Español
SP
5
Retire el embalaje interior 11
Page 78

Paso 4 Identifique los componentes de la
impresora
Las siguientes figuras identifican los componentes más importantes
de la impresora, así como su situación en la misma.
Componentes de la impresora (vistas delantera y posterior)
1
Bandeja boca arriba
2
Panel de control
3
Bandeja de salida
estándar (boca abajo)
4
Tope de papel ajustable
5
Cubierta super ior
6
Bandeja 1
(multipropósito)
7
8
9
10
11
12
12 Instalación de la impresora
Extensiones de la
bandeja 1
Guías de anchura de la
bandeja 1
Bandeja 2
Bandeja 3
Interruptor de encendido
Puerta delantera
13
Conector del cable
paralelo
14
Conector de interfaz
externa (AUX)
15
HP Fast InfraRed
Connect (FIR) (conexión
rápida por infrarrojos)
16
Conector C-Link
17
Conector del cable de
alimentación
SP
Page 79

Paso 5 Instale los accesorios
Instale los accesorios que hay a adquirido con la impresora. Sírvase
de las instrucciones de instalación que se suministran con los
accesorios.
Buzón de múltiples bandejas
(5 con grapadora)
Buzón de
sobremesa de
7 bandejas
Apilador/grapadora para
3000 hojas o grapadora para
3000 hojas
Unidad de impresión
a doble cara
HP Fast InfraRed
Connect
Buzón de múltiples
bandejas (8)
Español
Alimentador de
sobres
Plataforma de
HP Digital Copy
SP
Bandeja de entrada
para 2000 hojas
Conjunto de actualización de
HP LaserJet MFP
Accesorios opcionales
Soporte de la
impresora
2 bandejas de entrada
para 500 hojas
Bandeja para
papel de tamaño
especial
Instale los accesorios 13
Page 80

Paso 6 Instale el cartucho de tóner
1
1 Abra la cubierta superior de la
impresora.
2 Extraiga el cartucho de tóner de su
embalaje (conser ve el embalaje por
si necesita almacenar el cartucho).
Nota
Para evitar daños al cartucho de tóner,
procure no dejarlo expuesto a la luz
directa más de unos minutos.
3 Gire el cartucho y agítelo
suavemente hacia los lados para
conseguir una distribución uniforme
del tóner en su interior.
4 Busque la lengüeta de la cinta
selladora en el extremo del
cartucho, y dóblela con cuidado
hacia delante y hacia atrás hasta
que se desprenda del cartucho.
Sigue en la próxima página.
14 Instalación de la impresora
SP
Page 81

5 Tire de la lengüeta firmemente para
extraer toda la cinta del cartucho.
Evite tocar los restos del tóner negro
que hay en la cinta.
Nota
En el caso de que la lengüeta se
desprenda de la cinta, tire de la cinta
para extraerla del cartucho.
6
Nota
Si se mancha la ropa con tóner, quítelo
con un paño seco y lave la ropa en agua
fría. El agua caliente fija el tóner en la
tela.
6 Sitúe el cartucho como se muestra
en la ilustración, con la flecha
orientada hacia la impresora.
Español
7
7 Introduzca el cartucho en la
impresora hasta el fondo.
8 Cierre la cubierta superior.
SP
8
Instale el cartucho de tóner 15
Page 82

Paso 7 Ponga papel en las bandejas 2 y 3
1
2
3
Nota
Para evitar atascos, no abra nunca
la bandeja durante la impresión.
La impresora fue configurada en la
fábrica para utilizar un determinado
tamaño de papel por omisión. La opción
predeterminada para los EE.UU. es el
tamaño Letter, mientras que para
Europa es A4. Si quiere utilizar otro
tamaño, cambie la configuración de
la bandeja para papel.
1 Abra la bandeja 2 completamente.
2 Quite el espaciador y la cinta de
embalaje.
3 Si desea poner papel de un tamaño
distinto al predeterminado, gire la
guía del papel hasta la marca que
indica el tamaño de papel deseado.
4 Coloque la guía del papel en la
posición de bloqueo.
4
5
16 Instalación de la impresora
5 Ajuste la guía izquierda del papel
presionándola hacia dentro y luego
levantándola.
Sigue en la próxima página.
SP
Page 83

6
7
8
6 Coloque la guía encima de las
líneas deseadas, en la bandeja. A
continuación, inserte la guía en la
ranura posterior y luego en la
delantera. Asegúrese de que la guía
no quede torcida.
7 Ponga un máximo de 500 hojas de
papel en la bandeja. No llene la
bandeja de entrada por encima de la
marca que indica el límite máximo.
a En el caso de papel de tamaño
Letter o A4, póngalo con el borde
superior de la página orientado
hacia la parte posterior de la
bandeja y el lado de impresión
hacia abajo para imprimir en una
sola cara.
Para imprimir en las dos caras,
ponga el papel con el borde
superior de la página orientado
hacia la parte posterior de la
bandeja y el lado que desea
imprimir primero hacia arriba.
Español
SP
b En el caso de sustratos
alimentados por el borde corto,
póngalos con el borde superior de
la página orientado hacia el lado
derecho de la bandeja y el lado de
impresión hacia abajo para
imprimir en una sola cara.
Para imprimir en las dos caras,
ponga los sustratos con el borde
superior orientado hacia el lado
izquierdo de la bandeja y el lado
que desea imprimir primero hacia
arriba.
8 Asegúrese de que la lengüeta del
tamaño de papel esté en la posición
correcta.
Sigue en la próxima página.
Ponga papel en las bandejas 2 y 3 17
Page 84

9
9 Introduzca la bandeja en la
impresora.
Consulte la guía del usuario en línea si
prefiere seleccionar el papel por t amaño,
en lugar de seleccionarlo de acuerdo
con la bandeja (origen).
Si desea imprimir en papel de tamaño
superior a Letter o A4, ajuste el tope de
la guía del papel en la bandeja de salida
estándar (boca abajo). Consulte la guía
del usuario en línea para obtener
instrucciones.
18 Instalación de la impresora
SP
Page 85

Paso 8 Ponga papel en la bandeja 1 (opcional)
La bandeja 1 es una bandeja
multipropósito con una capacidad de
hasta 100 hojas de papel o 10 sobres.
La bandeja 1 es adecuada para imprimir
sobres, transpar encias, papel de tamaño
especial, etiquetas u otros sustratos sin
necesidad de vaciar las demás
bandejas.
CUIDADO
Para que no se produzcan atascos de
papel, no añada ni retire nunca el papel
de la bandeja 1 durante la impresión.
Para no dañar la impresora, imprima las
etiquetas, sobres y transparencias
desde la bandeja 1 solamente. En víelos
a la bandeja de salida boca arriba, no
los imprima por ambas caras y retírelos
tan pronto como salgan de la impresora.
Español
SP
Nota
La impresora retirará el papel de la
bandeja 1 en primer lugar, a no ser que
se cambie la configuración en el panel
de control. Consulte la guía del usuario
de la impresora para obtener instrucciones acerca de cómo cambiar el orden
en que se toma el papel de las bandejas.
1 Abra la bandeja 1.
2 Extraiga el extensor de la bandeja, si
el tamaño del papel lo exige.
3 Ajuste las guías de la anchura del
papel al tamaño deseado en la
bandeja.
4 Pong a papel en la bandeja sin que
exceda la marca que indica el límite
máximo.
Sigue en la próxima página.
Ponga papel en la bandeja 1 (opcional) 19
Page 86

5 La manera de poner el papel varía
según su tamaño:
a En el caso de papel de tamaño
Letter o A4, póngalo con el borde
superior de la página orientado
hacia la parte posterior de la
impresora y el lado de impresión
hacia arriba para imprimir en una
sola cara.
Para imprimir en las dos caras,
ponga el papel con el borde
superior de la página orientado
hacia la parte posterior de la
impresora y el lado que desea
imprimir primero hacia abajo.
b En el caso de sustratos
alimentados por el borde corto,
póngalos con el borde superior
de la página orientado hacia la
impresora y el lado de impresión
hacia arriba para imprimir en una
sola cara.
Para imprimir en las dos caras,
ponga los sustratos con el borde
superior alejado de la impresora y
el lado que desea imprimir
primero hacia abajo.
20 Instalación de la impresora
Nota
Para evitar que se enrolle, el papel
superior a 105 g/m
2
se debe imprimir
desde la bandeja 1 y enviar a la bandeja
boca arriba.
SP
Page 87

Paso 9 Conecte el cable de alimentación
eléctrica
1
2
3
PREPARADA
1 Localice el interruptor de corriente
en la parte delantera de la
impresora. Compruebe que la
impresora esté apagada.
2 Conecte un extremo del cable de
alimentación eléctrica a la impresora
y el otro a una regleta de conexio nes
con toma a tierra o a una toma de
corriente alterna.
3 Encienda la impresora. Una vez
finalizado el proceso de
calentamiento, a parecerá el
mensaje PREPARADA en la pantalla
del panel de control. El indicador
luminoso Preparada deberá
permanecer encendido. Si el
mensaje PREPARADA no aparece,
consulte el capítulo sobre resolución
de problemas en la guía del usuario.
Español
SP
Conecte el cable de alimentación eléctrica 21
Page 88

Paso 10Instale o cambie la plantilla del panel de
control (opcional)
1
Para cambiar el idioma de la plantilla a
otro que no sea inglés:
1 Busque la plantilla que desea
instalar y sáquela de su bolsa.
Nota
Asegúrese de que la impresora esté
apagada.
2
2 Levante la plantilla cuidadosamente
por ambos lados.
3 Inserte la uña o un objeto rígido
y fino debajo de la parte delantera
de la plantilla y haga presión hacia
arriba. Levante la plantilla para
separarla de la impresora.
3
4 Para instalar la nueva plantilla,
sitúela encima del panel de control,
colocando primero la parte posterior.
5 Aplique presión sobre la plantilla
para que encaje en su sitio.
Asegúrese de que quede plana.
4
5
22 Instalación de la impresora
SP
Page 89

Paso 11Cambie el idioma del panel de control
(opcional)
1
ENTER LANGUAGE
=ENGLISH
2
Utilice el panel de control de la
impresora para definir los mensajes de
la pantalla e imprimir las páginas de
configuración en el idioma que desee.
1 Cuando encienda la impresora por
primera vez, espere hasta que
aparezca ENTER LANGUAGE =
ENGLISH. Para cambiar el idioma,
proceda con el paso 2; para elegir
español, proceda con el paso 4.
2 Si no aparece ENTER LANGUAGE =
ENGLISH, pulse y mantenga
pulsado el botón S
Simultáneamente, apague la
impresora y vuelva a encenderla.
Mantenga pulsado el botón
S
ELECCIONAR
el mensaje SELECT LANGUAGE y
luego suelte el botón S
Proceda con el paso 3.
Nota
Sólo las teclas -V
y C
ONTINUAR
configuración del idioma. Todas las
demás teclas están inactivas.
están activas durante la
ELECCIONAR
hasta que aparezca
ELECCIONAR
+, S
ALOR
ELECCIONAR
.
.
Español
SP
Si pulsa Continuar sin seleccionar el
idioma, la impresora se colocará en
línea y todos los mensajes aparecerán
en inglés. Sin embargo, dado que no se
ha seleccionado ningún idioma para la
pantalla, volverá a aparecer el mensaje
ENTER LANGUAGE = ENGLISH (después de
la prueba de autocomprobación) cada
vez que se encienda la impresora, hasta
que seleccione un idioma.
Sigue en la próxima página.
Cambie el idioma del panel de control (opcional) 23
Page 90

3
ENTER LANGUAGE
=ENGLISH
3 Cuando aparezca ENTER
LANGUAGE=ENGLISH, pulse - V
repetidas veces hasta que aparezca
ALOR
+
el idioma deseado.
Nota
En el caso de japonés, turco, checo,
húngaro y polaco, al seleccionar el
4
ENTER LANGUAGE
=ESPAÑOL
idioma se cambiará el conjunto de
caracteres predeterminado
correspondiente al idioma específico.
Para todos los demás idiomas, el
conjunto de símbolos predeterminado
es PC-8.
4 Pulse S
5
INTRDUCIR IDIOMA
=ESPAÑOL
selección. Aparecerá un asteri s c o
(*) al lado de la selección en la
pantalla, para indicar que es el
ELECCIONAR
para guardar la
nuevo valor predeterminado.
5 Pulse C
ONTINUAR
. La pantalla del
panel de control indicará que la
impresora está preparada para
su uso.
Nota
Si el nuevo idioma no aparece en la
pantalla, es posible que no ha y a pulsado
el botón S
ELECCIONAR
para guardar el
cambio.
24 Instalación de la impresora
SP
Page 91

Paso 12Pruebe la impresora
1
PREPARADA
Imprima una página de configuración
para cerciorarse de que la impresor a
funciona correctamente.
1 Asegúrese de que la impresora está
encendida y que aparece el mensaje
PREPARADA.
EN
2 Pulse el botón M
Ú hasta que
en la pantalla aparezca MENÚ
2
MENÚ INFORMACIÓN
INFORMACIÓN.
3 Pulse la tecla E
LEMENTO
hasta que
en la pantalla aparezca IMPRIMIR
CONFIGURACIÓN.
4 Pulse la tecla S
ELECCIONAR
para
imprimir la página de configuración
de la impresora.
5 Esta página muestra la configura-
3
IMPRIMIR
CONFIGURACIÓN
ción actual de la impresora.
Nota
Español
En el caso de una impresora con una
tarjeta de red instalada, también se
imprimirá una página de configuración
de red HP JetDirect.
SP
4
IMPRIMIR
CONFIGURACIÓN
5
Pruebe la impresora 25
Page 92

Paso 13Conecte los cables de la impresora
Con las impresoras equipadas con un servidor de impresión opcional
HP JetDirect EIO se suministra un cable de par trenzado para
conexión a la red mediante un conector 10/100Base-TX (RJ-45). La
impresora se puede conectar a una red Loca lTalk de Apple mediante
una tarjeta LocalTalk opcional. La impresora también dispone de un
puerto HP Fast InfraRed Connect.
Conector
paralelo
Conector
RJ-45
Conexión de interfaz
externa (AUX)
(opcional)
Ubicación de los puertos de interfaz
26 Instalación de la impresora
HP Fast InfraRed
Connect (FIR)
(opcional)
Conector
C-Link
SP
Page 93

Conecte el cable paralelo
Para garantizar una comunicación fiable, utilice un cable paralelo
bidireccional tipo C que cumpla con la norma IEEE-1284 (este ti po de
cable lleva la marca “IEEE-1284” claramente visible). Solamente los
cables IEEE-1284 soportan todas las funciones avanzadas de la
impresora.
1
2
1 Asegúrese de que la impresora
y el ordenador estén apagados.
Nota
Debe poder instalar el cable fácilmente.
Si resulta difícil, compruebe su
orientación.
2 Conecte el cable paralelo al puerto
paralelo de la impresora. Ejerza
presión sobre las palancas de
liberación mientras conecta el cable .
3 Conecte el otro extremo del cable al
conector correspondiente en el
ordenador.
Español
3
Nota
Consulte la guía del usuario en línea
para obtener información acerca de
cómo pedir un cable paralelo
IEEE-1284.
SP
Conecte los cables de la impresora 27
Page 94

Conexión a una red Ethernet 10/100Base-TX
Utilice el puerto RJ-45 para conectar la impresora a una red Ethernet
10/100Base-TX.
CUIDADO Asegúrese de que la impresora esté apagada antes de conectar el
cable de la red al puerto RJ-45.
Conexión del cable de i nterfaz a una red Et hernet 10/1 00Base-TX
●
Conecte un cable de red de par trenzado al puerto RJ-45 en el
servidor de impresión HP JetDirect EIO.
● Conecte el otro extremo del cable a la red.
28 Instalación de la impresora
SP
Page 95

Paso 14Instale el software de impresión
Con la impresora se suministra un CD R OM qu e contiene el sof tw are
de impresión. Es necesario instalar los controladores que se incluyen
en este CD ROM para apro vechar plenam ente todas las funciones de
la impresora. Si su ordenador no está equipado con una unidad de
CD ROM, pero usted tiene acceso a una, podr á copiar el software de
impresión desde el CD ROM a disquetes, par a luego instalarlo en el
ordenador.
Si no tiene acceso a una unidad de CD ROM, vaya al sitio Web
www.hp.com y descargue los controladores, o bien póngase en
contacto con HP para pedir disquetes. Encontrará los controladores
más recientes en Internet. Según la configuración de los ordenadores
que ejecutan Windows, el programa de instalación revisa el
ordenador automáticamente para determinar si existe o no una
conexión a Internet que permita obtener el software más recient e.
Nota El software de instalación de la impresor a para redes UNIX (HP-UX,
Sun Solaris) puede obtenerse en
http://www.hp.com/support/net_printing.
Par a poder configurar y gestionar la impresora con su examinador
Web , utilice HP Web JetAdmin. Para obtener más información sobre
HP Web JetAdmin, vaya a http://www.hp.com/go/webjetadmin.
Español
SP
Para obtener más información, consulte las páginas del Centro
de atención al cliente de HP, al principio de la guía del usuario de
la impresora.
Instale el software de impresión 29
Page 96

Instalación del software de impresión de Windows (CD ROM)
Para Windows 9x, Windows NT 4.0, y Windows 2000
1 Cierre todas las aplicaciones.
2 Inserte el CD ROM en la unidad correspondiente. (Según la
configuración del ordenador, es posible qu e el programa de
instalación se ejecute automáticamente.)
3 Haga clic en Inicio.
4 Haga clic en Ejecutar.
5 Teclee D:\SETUP (o la letra de la unidad respectiv a) en el cuad ro
de la línea de comando y haga clic en Aceptar.
6 Siga las instrucciones que aparecen en la p antall a del ordenad or.
Para Windows 3.1x y Windows 3.11
1 Cierre todas las aplicaciones.
2 Inserte el CD ROM en la unidad correspondiente.
3 En la pantalla del Administrador de programas de Windows
haga clic en el menú Archivo.
4 Haga clic en Ejecutar.
5 Teclee D:\SETUP (o la letra de la unidad respectiv a) en el cuad ro
de la línea de comando y haga clic en Aceptar.
6 Siga las instrucciones que aparecen en la p antall a del ordenad or.
Instalación del software de red
Nota Si la impresora se utilizará en una red, instale y configure el software
para el sistema operativ o de red en el equipo del administ rador de la
red, antes de que los usuarios instalen el software de impresión en
sus equipos individuales.
Utilice HP Web JetAdmin para configurar la impresora mediante su
examinador Web. Para más información acerca de cómo utilizar
HP Web JetAdmin, consulte la página de HP en la siguiente
dirección: http://www.hp.com/go/webjetadmin.
30 Instalación de la impresora
SP
Page 97

Instalación del software de impresión para Macintosh
1 Cierre todas las aplicaciones.
2 Inserte el CD ROM en la unidad correspondiente.
3 Haga doble clic en el icono Instalador y siga las instrucciones
que aparecen en la pantalla.
4 Abra el Selector en el menú Apple.
5 Haga clic en el icono LaserWriter 8. Si el icono no aparece,
póngase en contacto con el Centro de atención al cliente de
HP (consulte las páginas al principio de la guía del usu ario)
opóngase en contacto con Apple Computer, Inc.
6 Si está conectado a una red con varias zonas, en el cuadro
Zonas AppleTalk, seleccione la zona donde está ubicada la
impresora. Si no sabe en qué zona está la impresora, consulte
con el administrador de red.
7 Haga doble clic en la impresora que desee utilizar. Debería
aparecer un icono.
8 Cierre el Selector haciendo doble clic en el cuadro de cierre
de la esquina superior izquierda.
Español
SP
Instale el software de impresión 31
Page 98

Paso 15Verifique la instalación de la impresora
El método más fácil de determinar si la instalación ha sido realizada
con éxito, consiste en imprimir un documento desde una aplicación
de software.
1 Abra una aplicación y, a continuación, abra o cree un do cu mento
sencillo.
2 Asegúrese de que aparece el nombre de la impresora correcta.
3 Imprima el documento.
Si el documento se imprime, significa que la instalación está
completa. Si no sale nada impreso o si el documento no se imprime
correctamente, consulte el capítulo sobre resolución de problemas en
la guía del usuario en línea de la impresora.
¡Enhorabuena! La impresora está instalada correctamente.
32 Instalación de la impresora
SP
Page 99

Normas de la FCC
Este equipo ha sido sometido a pruebas y se ha demostrado que
cumple con los límites establecidos para los dispositivos digitales de
Clase B, de acuerdo con lo dispuesto en el Apartado 15 de las
normas de la FCC (Comisión Federal de Comunicaciones) de
EE.UU. Dichos límites tienen como propósito proporcionar un grado
razonab le de protección contra las interf erencias perjudiciales en una
instalación residencial. Este equipo genera, utiliza y puede emitir
energía de radiofrecuencia. Si no se instala y utiliza de acuerdo con
las instrucciones proporcionadas, podría interferir adversamente con
las comunicaciones de radio. Sin embargo , no existe garantía a lgun a
de que no se producirán interferencias en una instalación específica.
Si este equipo interfiere adversament e con la recepción de señales
de radio o de tele visión, lo cual se puede establecer apagando y
volviendo a encender el equipo, se insta al usuario a que intente
eliminar dicha interferencia tomando una o más de las siguientes
medidas:
●
Cambiando la orientación o la posición de la antena receptora.
●
Aumentando la separación entre el equipo y el aparato receptor.
●
Enchufando el equipo en una toma de corriente que forme parte
de un circuito distinto al circuito en el cual está conectado el
receptor.
●
Solicitando ayuda al distribuidor o a un técnico experto en radio
ytelevisión.
Español
Nota Cualquier cambio o modificación que se realice en la impresor a que
no haya sido aprobado expresamente por HP, podría invalidar el
derecho del usuario a utilizar este equipo.
Es obligatorio utilizar un cable de interfaz blindado para cumplir
con los límites establecidos para los dispositivos de Clase B en
el Apartado 15 de las normas de la FCC.
Nota La impresora HP LaserJet 8150 MFP, así como cualquier modelo de
impresora HP LaserJet 8150 con un módulo HP Digital Copy
instalado, cumple con los límites de Clase A.
Si desea más info rmación reglamentaria, consulte la guía del usuario
en línea de esta impresora.
SP
Normas de la FCC 33
Page 100

34 Instalación de la impresora
SP
 Loading...