

Page 1
getting started guide
hp LaserJet 2200
Page 2

hp LaserJet 2200 series printers
English
Getting Started Guide
Page 3

Copyright Information
Copyright Hewlett-Packard
Company 2001
All Rights Reserved.
Reproduction, adaptation,
or translation without prior
written permission is prohibited,
except as allowed under the
copyright laws.
Part Number: C7058-90977
First Edition: October 2001
Warranty
The information contained in
this document is subject to
change without notice.
Hewlett-Packard makes no
warranty of any kind with
respect to this information.
HEWLETT-PACKARD
SPECIFICALLY DISCLAIMS
THE IMPLIED WARRANTY
OF MERCHANTABILITY
AND FITNESS FOR A
PARTICULAR PURPOSE.
Hewlett-Packard shall not be
liable for any direct, indirect,
incidental, consequential,
or other damage alleged in
connection with the furnishing
or use of this information.
Trademark Credits
Microsoft
and Windows NT
®
, Windows®,
®
are
U.S. registered trademarks
of Microsoft Corporation.
All other products mentioned
herein may be trademarks of
their respective companies.
Page 4

Contents
HP Customer Care (Service and Support) . . . . . . . . . . . . . . . . . . . . . . . . . . . . . . 2
Introduction . . . . . . . . . . . . . . . . . . . . . . . . . . . . . . . . . . . . . . . . . . . . . . . . . . . . . . 3
Step 1: Check Package Contents . . . . . . . . . . . . . . . . . . . . . . . . . . . . . . . . . . . . . 4
Step 2: Locate Printer Parts . . . . . . . . . . . . . . . . . . . . . . . . . . . . . . . . . . . . . . . . .5
Step 3: Install Toner Cartridge. . . . . . . . . . . . . . . . . . . . . . . . . . . . . . . . . . . . . . . . 6
Step 4: Load Media into the Trays . . . . . . . . . . . . . . . . . . . . . . . . . . . . . . . . . . . . 7
Tray 2 or Optional 250-Sheet Tray 3 . . . . . . . . . . . . . . . . . . . . . . . . . . . . . . . 7
Optional 500-Sheet Tray 3 . . . . . . . . . . . . . . . . . . . . . . . . . . . . . . . . . . . . . . . 8
Step 5: Connect Printer Cable. . . . . . . . . . . . . . . . . . . . . . . . . . . . . . . . . . . . . . . . 9
Step 6: Attach Power Cord . . . . . . . . . . . . . . . . . . . . . . . . . . . . . . . . . . . . . . . . . 11
Step 7: Install Printer Software . . . . . . . . . . . . . . . . . . . . . . . . . . . . . . . . . . . . . . 12
Windows Installation. . . . . . . . . . . . . . . . . . . . . . . . . . . . . . . . . . . . . . . . . . . 13
Macintosh Installation . . . . . . . . . . . . . . . . . . . . . . . . . . . . . . . . . . . . . . . . . . 17
Network Installation . . . . . . . . . . . . . . . . . . . . . . . . . . . . . . . . . . . . . . . . . . . 18
Step 8: Record and Store Important Information. . . . . . . . . . . . . . . . . . . . . . . . . 20
If You Have Problems . . . . . . . . . . . . . . . . . . . . . . . . . . . . . . . . . . . . . . . . . . . . . 21
If You Have Installation Problems. . . . . . . . . . . . . . . . . . . . . . . . . . . . . . . . . 21
If You Have Any Other Problems . . . . . . . . . . . . . . . . . . . . . . . . . . . . . . . . . 21
Specifications . . . . . . . . . . . . . . . . . . . . . . . . . . . . . . . . . . . . . . . . . . . . . . . . . . . 22
Regulatory Information . . . . . . . . . . . . . . . . . . . . . . . . . . . . . . . . . . . . . . . . . . . . 24
FCC Regulations . . . . . . . . . . . . . . . . . . . . . . . . . . . . . . . . . . . . . . . . . . . . . 24
Laser Safety Statement . . . . . . . . . . . . . . . . . . . . . . . . . . . . . . . . . . . . . . . . 24
Declaration of Conformity . . . . . . . . . . . . . . . . . . . . . . . . . . . . . . . . . . . . . . . 25
English
ENWW
Contents
1
Page 5

HP Customer Care (Service and Support)
Your purchase is backed by HP Customer Care – outstanding service,
support, and online training. Here are some ways to contact us:
z
World Wide Web
http://www.hp.com/support/lj2200 (English Only)
http://www2.hp.com (Europe)
Note For warranty terms and additional HP Customer Care information,
see your electronic user guide, located on the HP LaserJet 22 00 CD.
2
ENWW
Page 6

Introduction
Congratulations on your purchase of the HP LaserJet 2200 series
printer!
HP LaserJet 2200d
The HP LaserJet 2200d printer is a 19 pages-per-minute (ppm) laser
printer (19 ppm with letter-size paper/18 ppm with A4-size pap er) that
comes with a built-in 250-sheet tray (Tray 2), and a built-in duplexer,
for automatically printing on both sides of paper. It has parallel, Fast
Infrared (FIR), and universal serial bus (USB) ports. 8 MB of Random
Access Memory (RAM) are standard, and the pr inter is expandable,
with 1 available Enhanced Input Output (EIO) slot for connecting to a
network, and 2 Dual In-line Memory Module (DIMM) slots for adding
fonts and memory.
HP LaserJet 2200dt
The HP LaserJet 2200dt printer is the same as the 2200d model,
with an additional 250-sheet tray (Tray 3).
HP LaserJet 2200dn
The HP LaserJet 2200dn printer is the same as the 2200d mo del,
except that the printer is designed for network users. It comes with
a full-featured HP Jetdirect EIO print server card (J4169A) for
connecting to a 10/100 Base-TX network.
English
ENWW
HP LaserJet 2200dtn
The HP LaserJet 2200dtn printer is the same as the 2200d model,
with an additional 500-sheet tray (Tray 3) that supports letter and A4
sizes. The printer is designed for network users and comes with a
full-featured HP Jetdirect EIO print server card (J4169A) for
connecting to a 10/100 Base-TX network.
HP LaserJet 2200
The HP LaserJet 2200 printer is the same as the 2200d model, but
with manual rather than automatic duplexing. Availability of this
product will vary depending on your location.
The illustrations in this guide will be based on the HP LaserJet 2200d
base printer model unless otherwise stated.
Introduction
3
Page 7
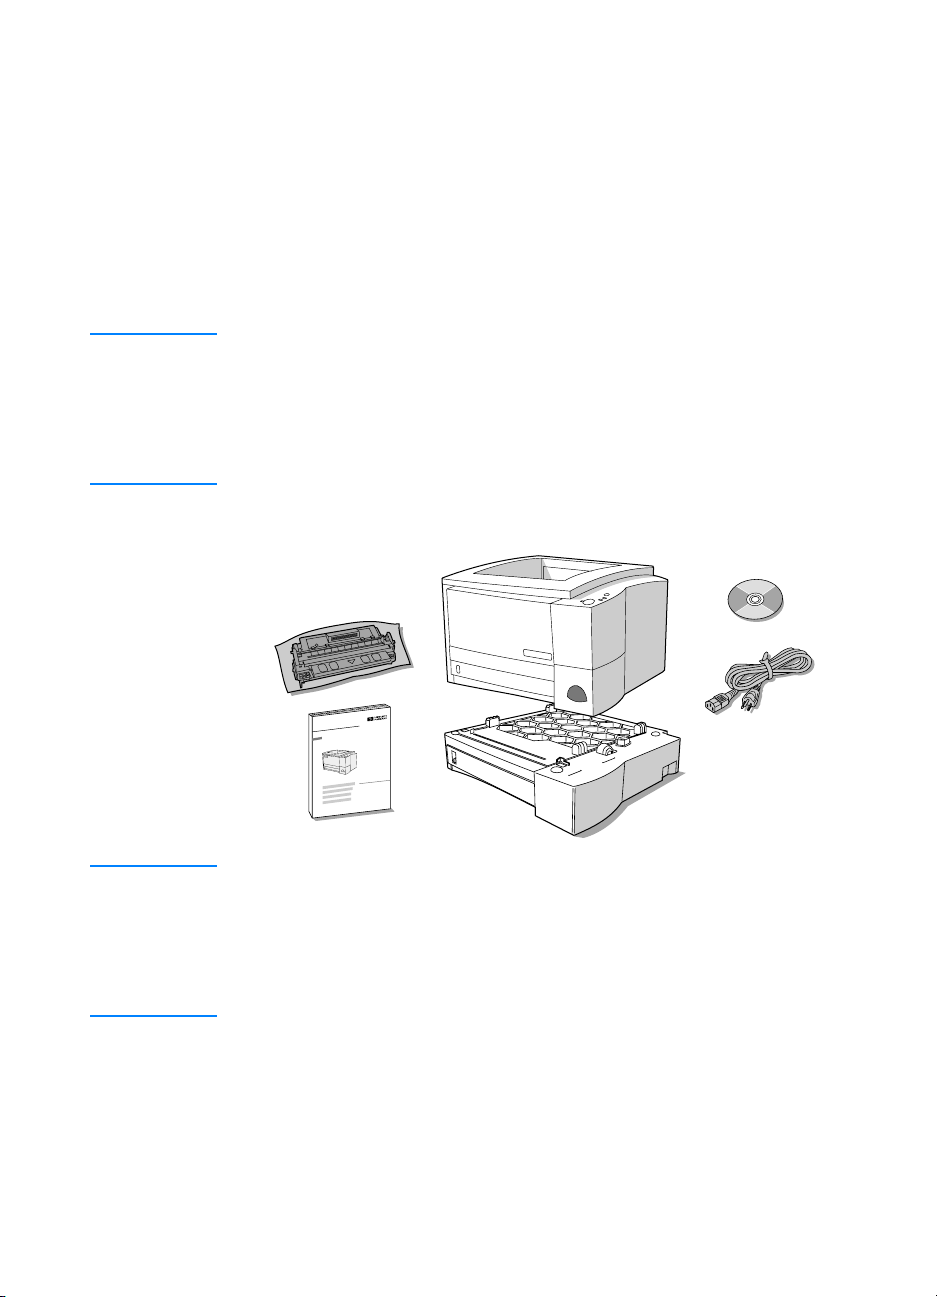
Step 1: Check Package Contents
Toner Cartridge
HP LaserJet 2200 CD
Power Cord
Printer
Optional Paper Tray
Getting Started Guide
Here is what comes in the box. If anything is missing, talk to your
HP dealer or call HP Customer Support (see page 2).
Your electronic user guide is located on the HP LaserJet 2200 CD.
You can access the user guide directly from the CD; you can print the
entire user guide; and during the printer so ftware installa tion, you can
install the user guide on your computer (this is hi ghly recommended ).
Note At this time, install any accessories that you have purchased with the
printer. (This may include an optional paper tray.)
If you purchased an HP Jetdirect EIO print server card separately
from your printer, then you will need to install it now. Follow the
instructions provided with the print server card.
Figure 1 HP LaserJet 2200 series package contents
Note Printer cables are not included with the printer, for more information
about obtaining the correct printer ca ble, see “Step 5: Connect Printe r
Cable” on page 9.
An HP Jetdirect EIO print server card (J4169A) comes installed in the
HP LaserJet 2200dn and 2200dtn printers.
4
ENWW
Page 8
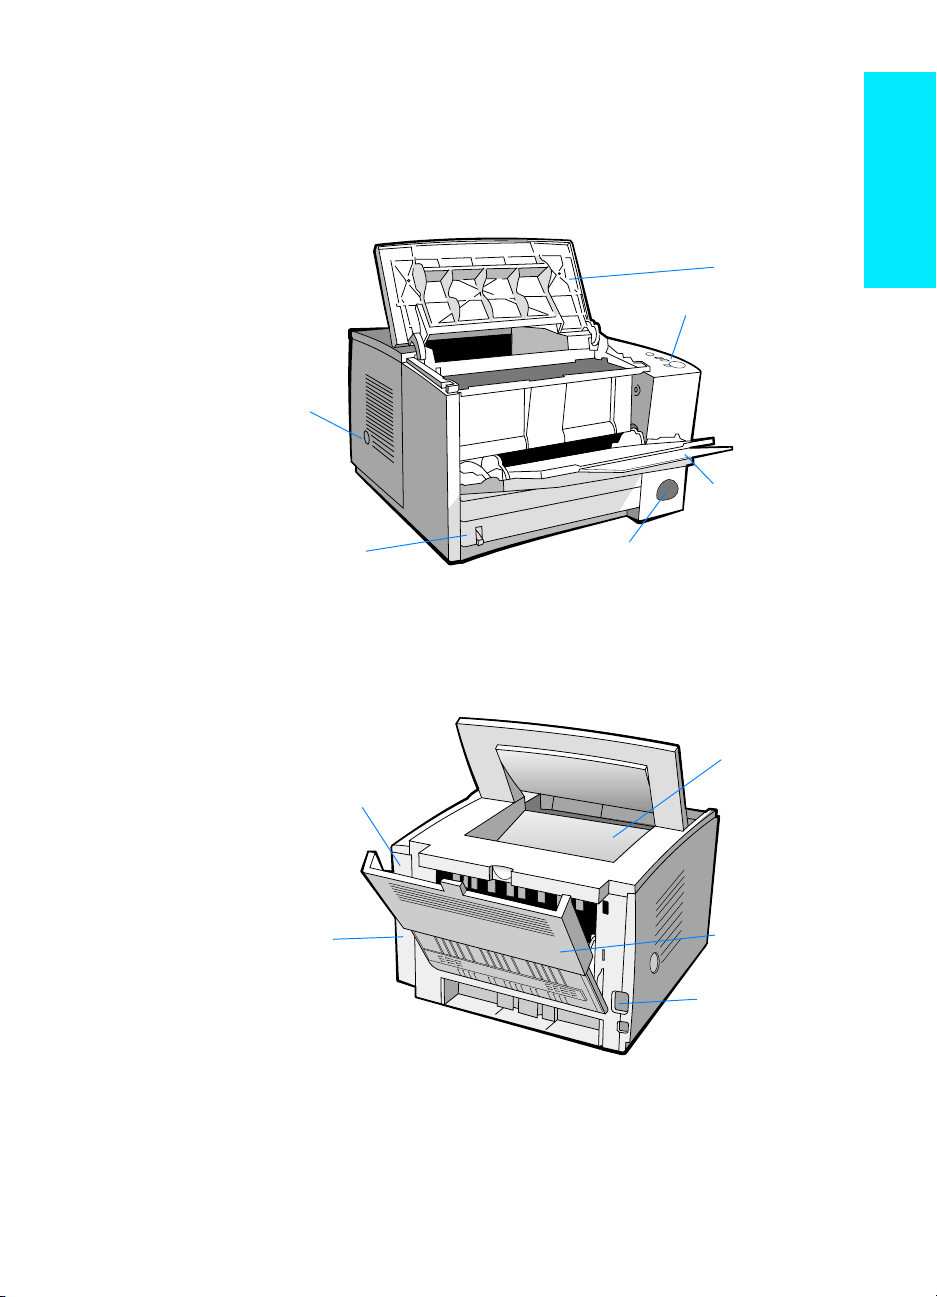
Step 2: Locate Printer Parts
FIR port
Top cover
Tray 1
(with extender)
JOB C
ANCEL
button,
and status lights)
Power switch
Tray 2
Control panel
(G
O
button,
Rear output bin
Interface
cable door
2 DIMM slots
Power connector
Top output bin
(with extender)
1 EIO slot and
The following illustrations give the location and names of important
printer parts.
Figure 2 Printer parts (front view)
Figure 3 Printer parts (back view)
English
ENWW
Step 2: Locate Printer Parts
5
Page 9
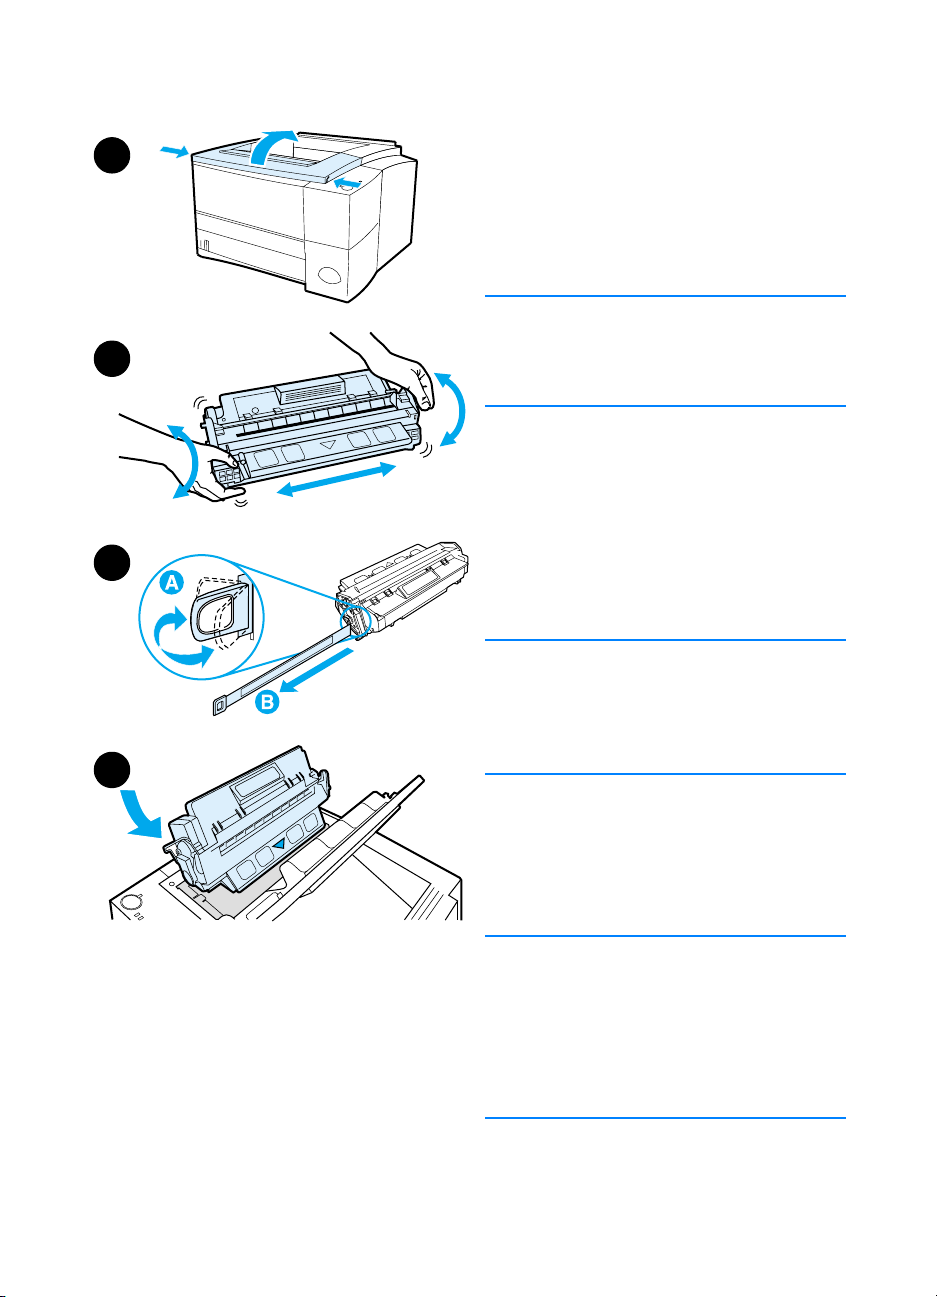
Step 3: Install Toner Cartridge
1 Open the printer’s top cover.
1
2
3
4
2 Remove the toner cartridge from its
packaging. Rotate the cartridge and
gently shake it from side to side to
distribute the toner evenly inside
the cartridge.
CAUTION
To prevent damage to the toner
cartridge, do not expose it to light for
more than a few minutes.
3 Locate the sealing tape tab on the
end of the cartridge. Carefully bend
the tab back and forth until it
separates from the cartridge. Firmly
pull the tab straight out from the
cartridge to remove the entire length
of tape. Avoid touching any black
toner on the tape.
Note
If toner gets on your clothing or hands,
wipe it off with a dry cloth and wash
clothing in cold water. (Hot water sets
toner into fabric.)
6
4 Position the cartridge as shown with
the arrow pointing into the printer.
Slide the cartridge into the printer as
far as it will go and close the top
cover.
Note
Hewlett-Packard Company cannot
recommend use of non-HP toner
cartridges, either new, refilled, or
remanufactured. Because they are no t
HP products, HP cannot influence their
design or control their quality.
ENWW
Page 10
Step 4: Load Media into the Trays
1
2
3
4
Note
To learn how to print envelopes or other
special media from Tray 1, see your
electronic user guide, located on the
HP LaserJet 220 0 CD.
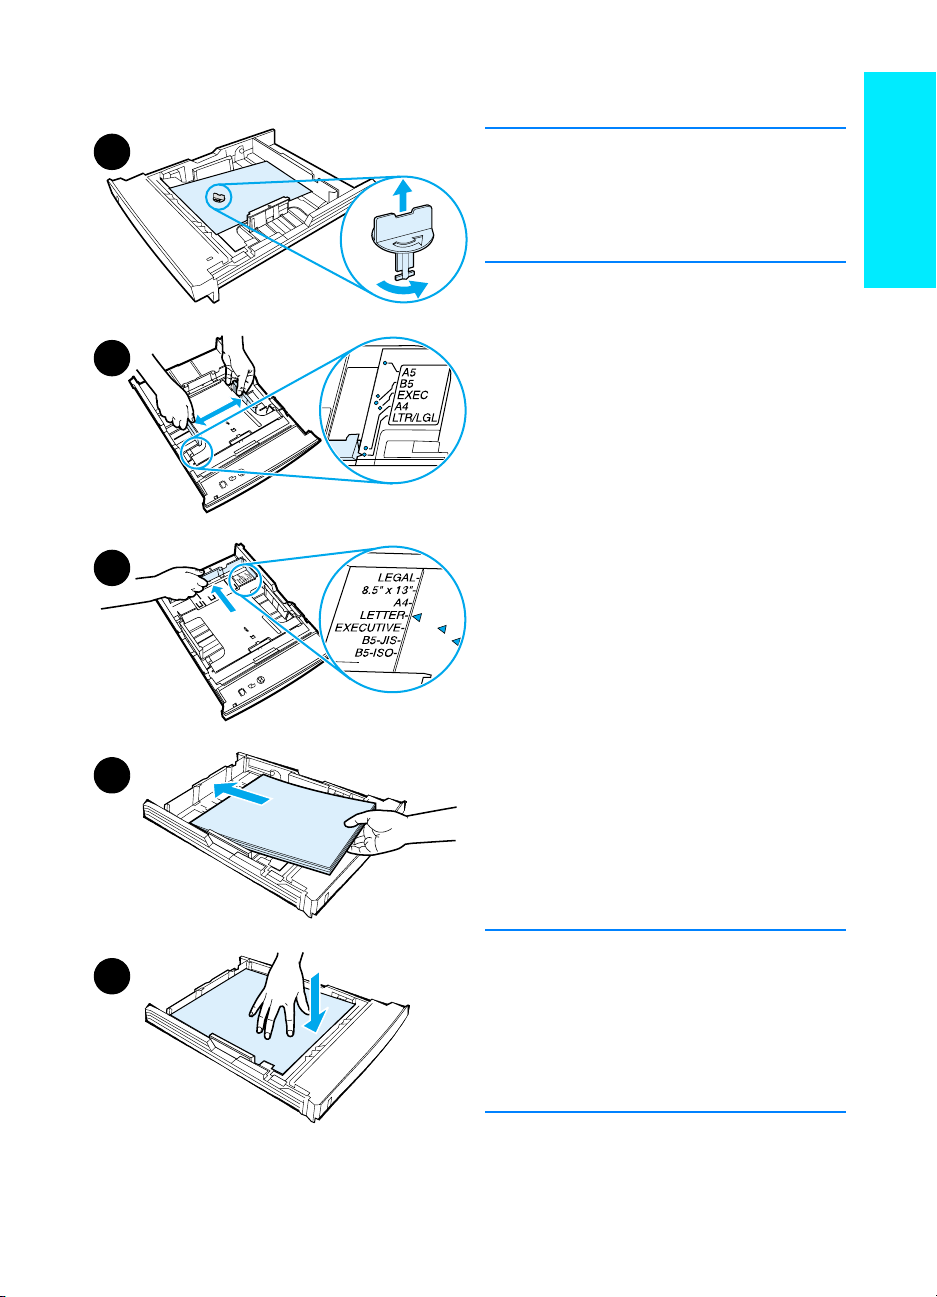
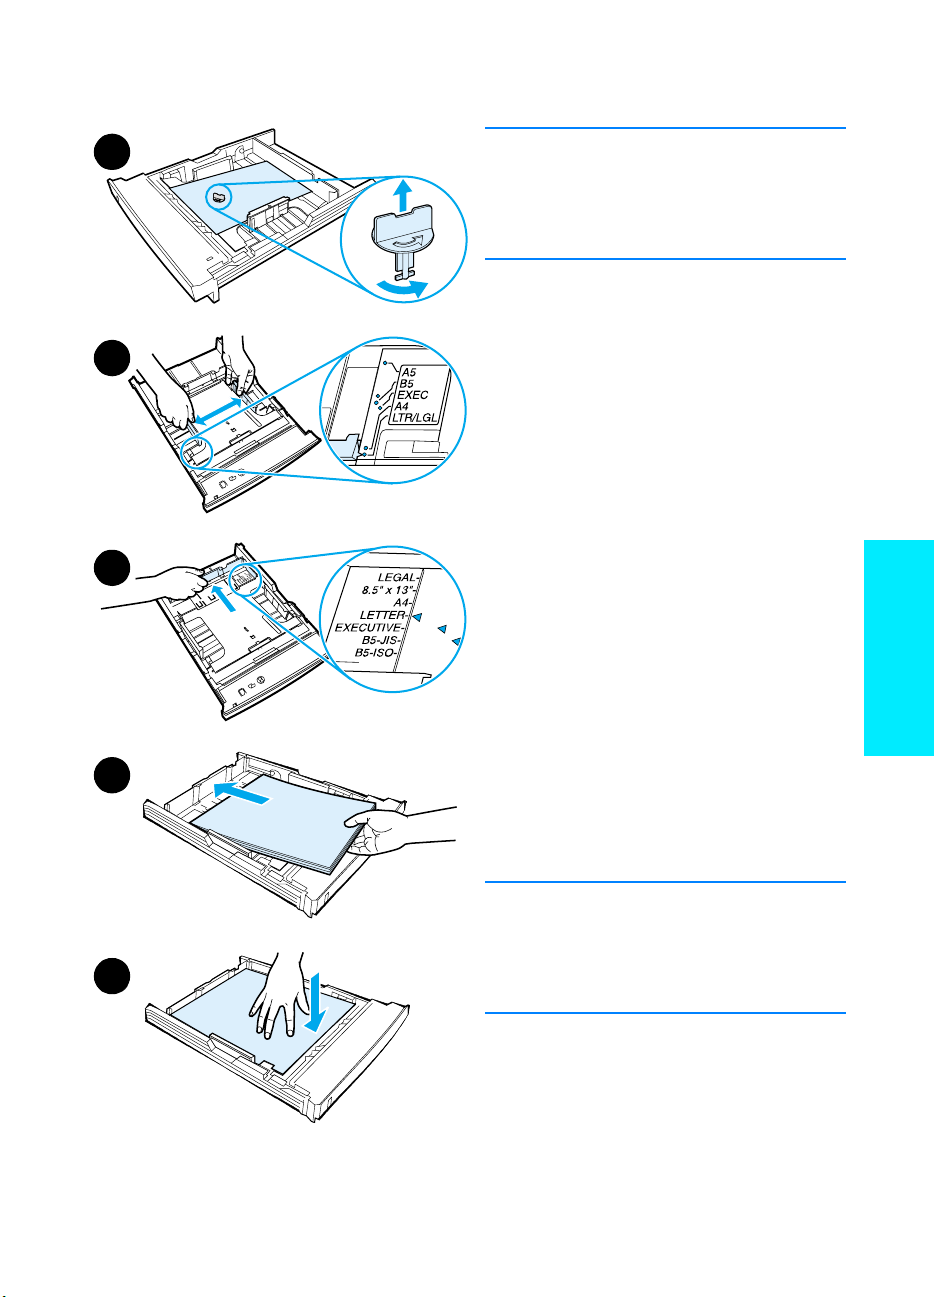
Tray 2 or Optional 250-Sheet Tray 3
Pull the desired tray out of the printer
1
and locate the orange plastic
packaging piece that is holding down
the tray. Turn it cou nter -clo ck wise
and lift up to remove.
Move the side width guides outward
2
to match the desired paper size.
On the rear paper length guide,
3
press on the blue tab and adjust it
so the pointer matches the desired
paper size.
Add the media and make sure it is flat
4
in the tray at all four corners. Keep
the media below the height tabs on
the paper length guide in the rear of
the tray.
English
5
ENWW
Push down on the metal paper lift
5
plate to lock it in place.
Slide the tray back into the printer.
6
Note
Whenever you remove a 250-sheet tray
from the printer, always push down the
metal paper lift plate before you put it
back. The metal paper lift plate will
release and lift the paper up when you
push the tray into the printer.
Step 4: Load Media into the Trays
7
Page 11
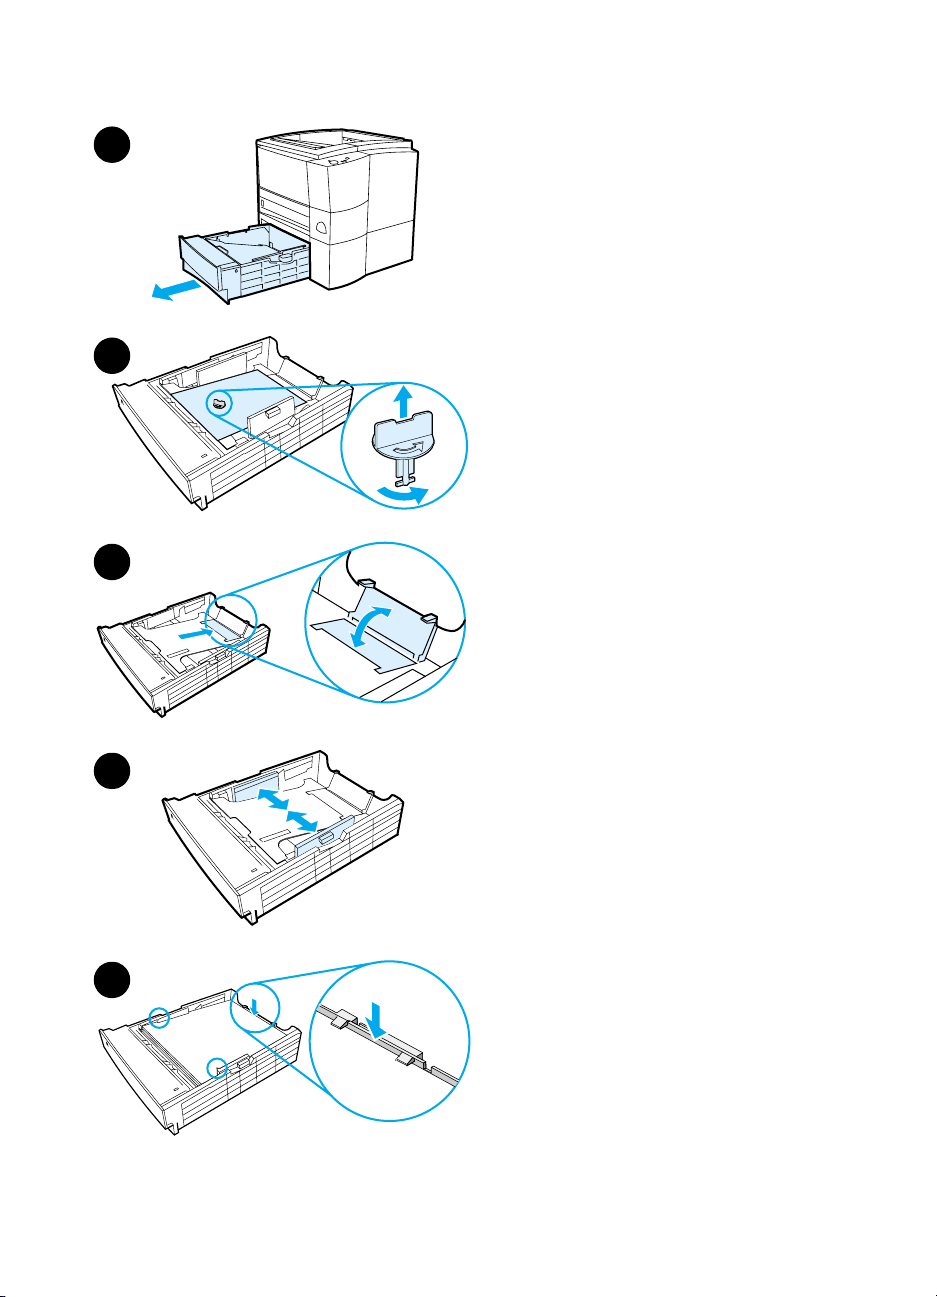
Optional 500-Sheet Tray 3
1
2
3
1 Pull the tray out of the printer.
2 Locate the orange plastic packaging
piece that is holding down the tray.
Turn it counter-clockwise and lift up
to remove.
3 To adjust for letter-size paper, pull up
on the rear stop, or to adjust for
A4-size paper, push the rear paper
stop down.
4 For letter-size paper, move the side
width guides outward as far as
possible, or for A4-size paper, move
the side width guides inward as far
as possible.
5 Add the media and make sure that
it is flat in the tray. Keep the media
below the hooks on the side and rear
of the tray.
6 Slide the tray back into the printer.
4
5
8
ENWW
Page 12

Step 5: Connect Printer Cable
Parallel Cable USB Cable Network Cable
The HP LaserJet 2200 series printer has two p orts for connecti ng the
printer directly to your computer: parallel and USB. The HP La serJet
2200dn and 2200dtn printers come with an HP Jetdirect EIO print
server card that includes a network cable port. You can purchase an
HP Jetdirect EIO print server card for the other HP LaserJet 2200
series printers. For ordering information, see your electronic user
guide (located on the HP LaserJet 2200 CD), or contact your local
HP dealer.
Printer cables are not included with the printer. You will need to obtain
one of the following cables:
For connecting your printer directly to your computer via the
z
parallel port, you need to obtain an IEEE-1284B parallel cable.
For connecting your printer directly to your computer via the
z
USB port, you need to obtain a USB cable. (The USB cable is
compatible with Windows 98/2000/Millennium/XP or Macintosh.
If you have a different operating system on your computer,
connect a parallel or network cable.)
If you want to connect to a network, you will need to obtain a
z
network cable.
To install your printer successfully, it is important that you know which
cable you are installing and follow the instructions for that type of
installation. If you are not sure which cable you have, refer to the
figure below.
English
Figure 4 Cable overview
ENWW
Step 5: Connect Printer Cable
9
Page 13
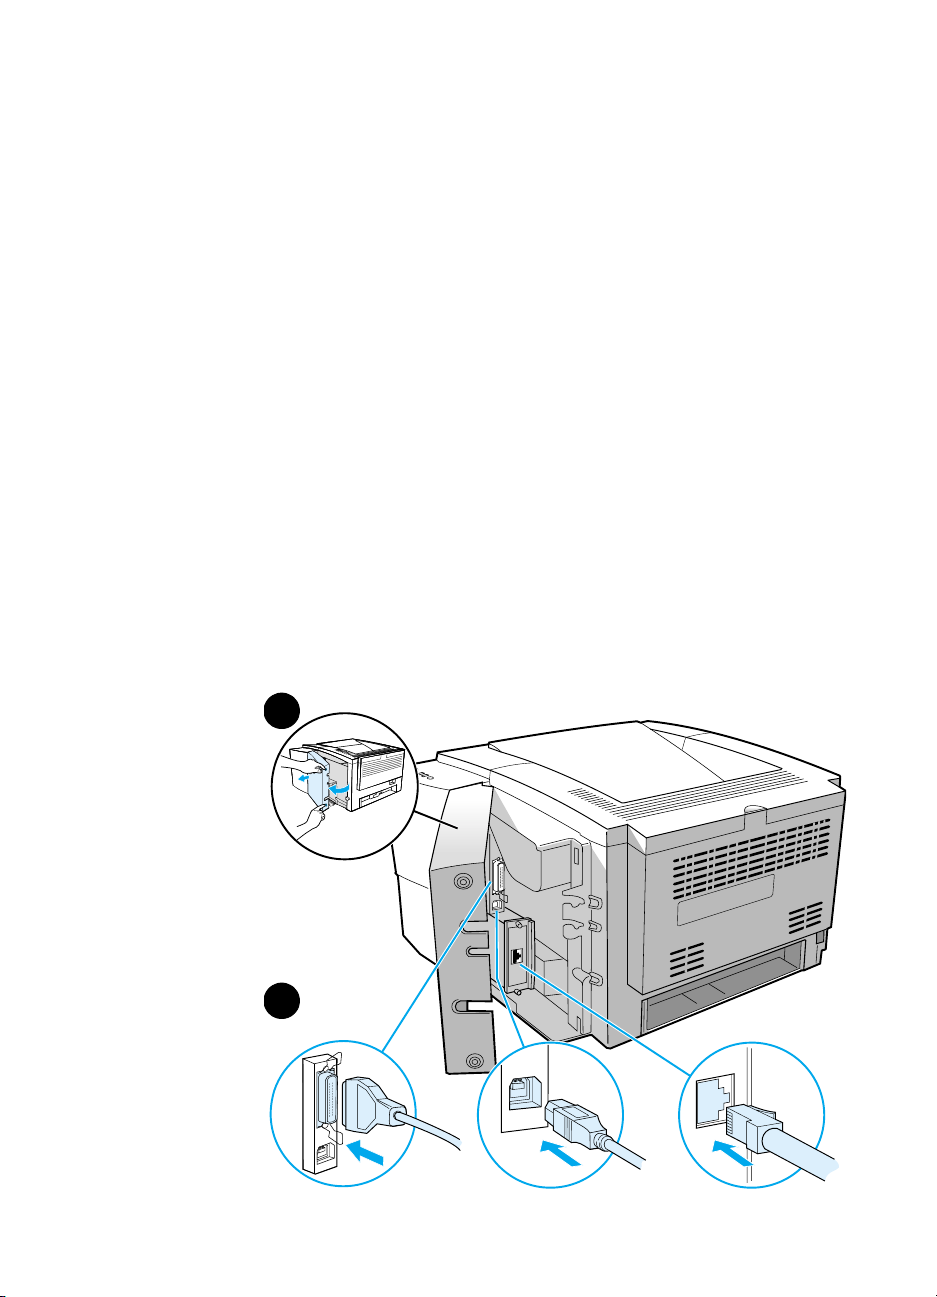
To connect your printer cable:
1 Locate the interface cable door, at the rear of the printer (see the
figure below). Open the interface cable door by pressing on the
release tabs and swinging the door to the side.
2 Connect the parallel, USB, or network cable to the correct port:
• To connect a parallel cable to the parallel port, first turn off
your computer (this is recommended, but not required). Snap
the wire clips in place to secure the cable to the printer. The
cable should install easily. If installation is difficult, check the
cable orientation. Connect the other end of the cable to the
proper connector on the computer.
• To connect a USB cable to the USB port, connect the
square end of the USB cable to the USB port on your printer.
Connect the rectangular end of the USB cable to any a vailable
USB port on your computer.
• To connect a network cable to an Ether net 10/100 Base-TX
network port, connect a twisted-pair network cable to the port
on the HP Jetdirect EIO print server. Connect the other end of
the cable to the network.
3 Close the interface cable door.
Figure 5 Connect parallel, USB, or network cable
1
press the
relea se
tab s
2
Parallel Cable
10
Network Cable
USB Cable
ENWW
Page 14
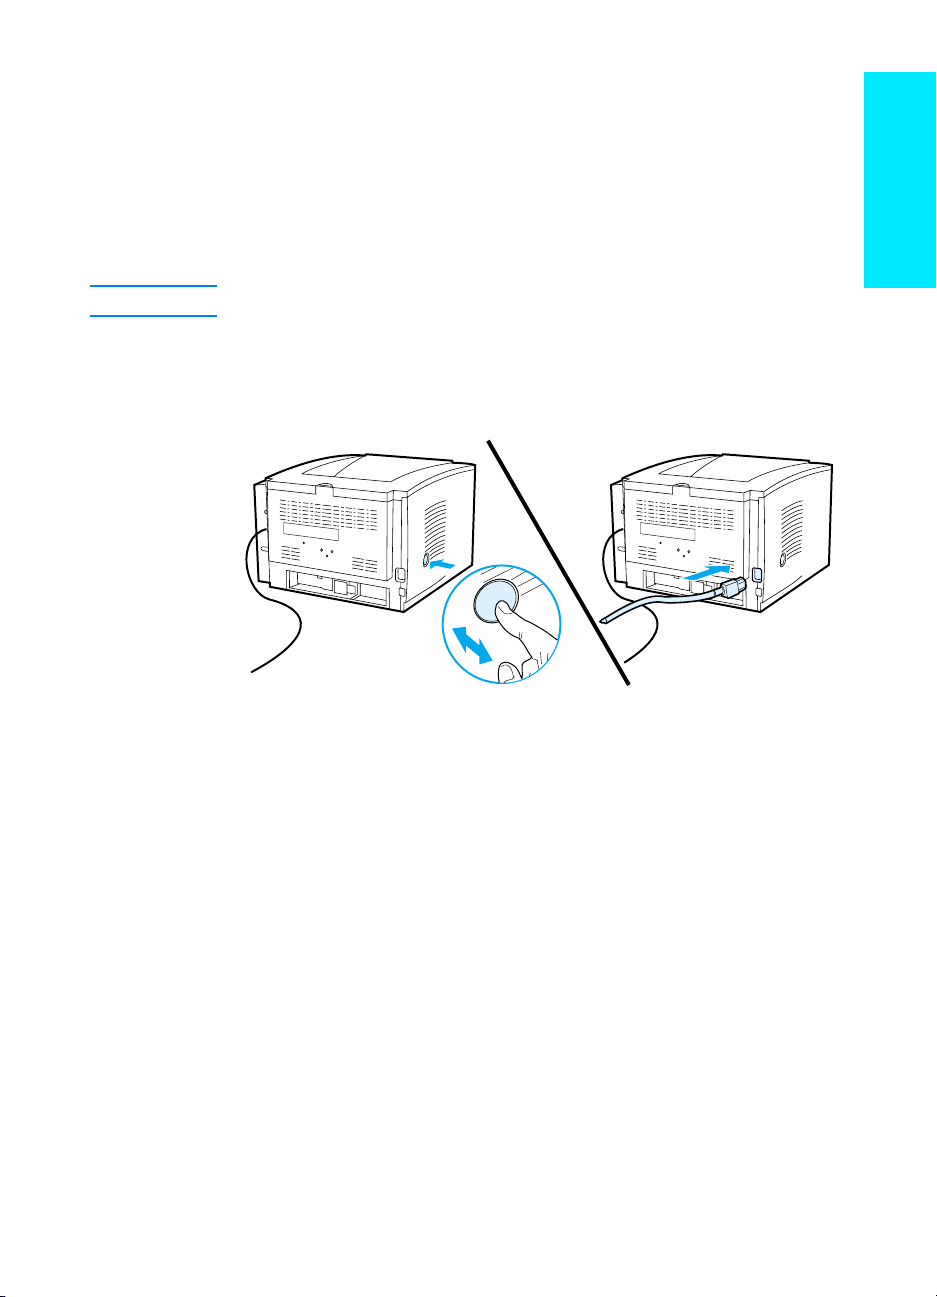
Step 6: Attach Power Cord
Locate the power switch on the side of the printer and make sure
1
the printer is turned off.
Connect the power cord to the printer and a grounded power strip
2
or an AC outlet.
English
Note
Figure 6 Attach power cord
Use only the power cord provided with the product.
Turn the printer on.
3
ENWW
Step 6: Attach Power Cord
11
Page 15

Step 7: Install Printer Software
The printer comes with helpful software, including printer drivers and
optional software. For easy printer setup and access to the full range
of printer features, it is strongly advised that you install the software
provided.
Before you install the software, make sure you have followed the
instructions in “Step 5: Connect Printer Cable” and “Step 6: Attach
Power Cord”.
For more information about printer software components and features,
see your electronic user guide, located on the HP LaserJet 2200 CD.
Note HP software is not available in all languages.
Check the ReadMe file provided on the HP LaserJet 2200 CD for
additional software included and supported languages. The most
recent drivers, additional drivers, and other software are available
from the Internet and other sources. If you do not have access to the
Internet, see your electronic user guide (located on the HP LaserJet
2200 CD) for information on how to obtain the most recent software .
12
The HP LaserJet 2200 series printer comes with printer software for
the following operating systems:
z
Microsoft Windows 3.1x (driver only), 95, 98, 2000, Millennium,
NT 4.0, and XP. For installation instructions, go to page 13.
z
Macintosh System 7.5.5 and above. For installation instructions,
go to page 17.
For software installation on a networked Windows computer,
see “Network Installation” on page 18.
ENWW
Page 16

Windows Installation
There are different Windows installation methods, depending on the
type of cable you connected:
If you connected a parallel cable, see the section below.
z
If you connected a USB cable, go to page 15.
z
If you connected a network cable, go to pa ge 18 .
z
If You Connected a Parallel Cable
English
Note
Windows 3.1x
(driver only)
The following software installation instructions assume that your computer was turned
OFF during “Step 5: Connect Printer Cable” and “Step 6: Attach Power Cord”. If your
computer was ON during these steps, and has not been restarted, the printer software
can still be installed, but the steps will be slightly different than below. Use the
Windows NT 4.0 instructio ns on page 14 for your installation.
Turn your computer on and quit any open programs.
1
Follow the steps for your Windows version:
2
Select Main, Control Panel, Printers.
a
In the Printers window, click Add. In the drop-down menu, select Install
b
Unlisted or Updated Printer, then click Install.
Place the HP LaserJet 2200 CD in the CD-ROM drive.
c
Click Browse. Browse to “D:\English\Drivers\Win3x” (where D is the letter of
d
your CD-ROM drive). Select “oemsetup.inf” and click OK.
Select the HP LaserJet 2200 series driver. Click OK.
e
Close all windows and then restart your computer.
f
To verify that the installation has been completed successfully, open a
g
software application of your choice and open or create a simple document.
Make sure the correct printer name appears, and print the document.
h
If the document prints correctly, installation is complete. Continue to Step 8
i
on page 20. (If nothing prints or if the document does not print correctly, see
“If You Have Problems” on page 21.)
Windows 95
ENWW
The “Update Device Driver Wizard” window should appear on the
a
computer display.
Place the HP LaserJet 2200 CD in the CD-ROM drive.
b
Depending on the version of Windows 95:
c
• Click Next> (if available) and then skip to step 3 below.
- or -
• Click OK and then continue to step d below.
On the line provided, type D:\9xME_LPT (where D is the letter of your
d
CD-ROM drive), and then click OK.
Step 7: Install Printer Software
13
Page 17

Windows 98
a The “Add New Hardware Wizard” window should appear on the
computer display. Click Next>.
b Select “Search for the best driver for your device. (Recommended)”
and then click Next>.
c Click the boxes as needed so that there is a check mark next to “Specify a
location:” (and NO check marks next to “Floppy disk drives” and “CD-ROM
drive”).
d Place the HP LaserJet 2200 CD in the CD-ROM drive.
e Under “Specify a location:”, type
your CD-ROM drive). Click Next>.
D:\9xME_LPT
(where D is the letter of
Windows
2000 and
Windows XP
Windows
Millennium
Windows
NT 4.0
a The “Found New Hardware Wizard” window should appear on the
computer display. Click Next>.
b Select “Search for a suitable driver for my device (recommended)” and then
click Next>.
c Under “Optional search locations:”, click the locations as needed so that
there is a check mark next to “Specify a location:” (and NO check marks
next to “Floppy disk drives” and “CD-ROM drives”). Click Next>.
d Place the HP LaserJet 2200 CD in the CD-ROM drive.
e Under “Copy manufacturer’s files from:”, type
letter of your CD-ROM drive) and then click OK.
f The Wizard should display a window indicating that it has found the driver;
click Next>.
a The “Add New Hardware Wizard” window should appear on the
computer display.
b Select “Specify the location of the driver (Advanced)” and then click Next>.
c Select “Search for the best driver for your device. (Recommended)” and
then click the boxes as needed so that there is a check mark next to
“Specify a location:” (and NO check mark next to “Removable Media”).
d Place the HP LaserJet 2200 CD in the CD-ROM drive.
e Under “Specify a location:”, type
your CD-ROM drive). Click Next>.
To install the software on Windows NT 4.0, you must have administrator privileges
(on start and restart).
a Place the HP LaserJet 2200 CD in the CD-ROM drive.
b When the welcome screen appears, follow the directions on the screen.
If the welcome screen does not appear: click Start, click Run, type
D:\SETUP
c Click the button next to Install Printer.
(where D is the letter of your CD-ROM drive), and then click OK.
D:\9xME_LPT
D:\2000_XP
(where D is the letter of
(where D is the
14
3 Follow the instructions on the screen to install the software.
ENWW
Page 18

Note
Before installation is complete, make sure that there is a check mark next to “Print a
test page” (when the prompt appears).
In Windows 2000, if the “Found New Hardware Wizard” window reappears before
installation is complete, click Cancel.
Click Finish.
4
If you are prompted to restart your computer, click Y es. The test page should print
5
after your computer restarts. If you are not prompted to restart your computer, a
test page should print immediately. (If you have Windows NT 4.0 you do not need
to restart your computer.)
If the test page printed correctly, installation is complete. Continue to “Step 8:
6
Record and Store Important Information” on page 20. (If nothing prints or if the
test page does not print correctly, see “If You Have Problems” on page 21.)
If You Connected a USB Cable
English
Note
Windows 98
Windows 3.1x, 95, and NT 4.0 do not support USB cable connections. The following
instructions are for computers running Windows 98, 2000, or Millennium. If you want to
connect a USB cable to your Macintosh, see “Macintosh Installation” on page 17.
If your computer is off, turn it on now. Quit any open programs.
1
Follow the steps for your Windows version:
2
The “Add New Hardware Wizard” window should appear on the
a
computer display. Click Next>.
Select “Search for the best driver for your device. (Recommended)”
b
and then click Next>.
Click the boxes as needed so that there is a check mark next to
c
“Specify a location:” (and NO check marks next to “Floppy disk drives”
and “CD-ROM drive”).
Place the HP LaserJet 2200 CD in the CD-ROM drive.
d
Under “Specify a location:”, type D:\98ME_USB (where D is the letter of
e
your CD-ROM drive). Click Next>.
ENWW
Step 7: Install Printer Software
15
Page 19

Windows
2000 and
Windows XP
a The “Found New Hardware Wizard” window should appear on the
computer display. Click Next>.
b Select “Search for a suitable driver for my device (recommended)” and then
click Next>.
c Under “Optional search locations:”, click the locations as needed so that
there is a check mark next to “Specify a location:” (and NO check marks
next to “Floppy disk drives” and “CD-ROM drives”). Click Next>.
d Place the HP LaserJet 2200 CD in the CD-ROM drive.
e Under “Copy manufacturer’s files from:”, type
letter of your CD-ROM drive) and then click OK.
f The Wizard should display a window indicating that it has found the driver;
click Next>.
D:\2000_XP
(where D is the
Windows
Millennium
Note Before installation is complete, make sure that there is a check mark next to
a The “Add New Hardware Wizard” window should appear on the
computer display.
b Select “Specify the location of the driver (Advanced)” and then click Next>.
c Select “Search for the best driver for your device. (Recommended)” and
then click the boxes as needed so that there is a check mark next to
“Specify a location:” (and NO check mark next to “Removable Media”).
d Place the HP LaserJet 2200 CD in the CD-ROM drive.
e Under “Specify a location:”, type
your CD-ROM drive). Click Next>.
3 Follow the instructions on the screen to install the software.
“Print a test page” (when the prompt appears).
In Windows 2000, if the “Found New Hardware Wizard” window reappears before
installation is complete, click Cancel.
4 Click Finish.
5 If you are prompted to restart your computer, click Yes. The test page should
print after your computer restarts. If you are not prompted to restart your
computer, a test page should print immediately.
D:\98ME_USB
(where D is the letter of
16
6 If the test page printed correctly, installation is complete. Continue to “Step 8:
Record and Store Important Information” on page 20. (If nothing prints or if the
test page does not print correctly, see “If You Have Problems” on page 21.)
ENWW
Page 20

Macintosh Installation
Note
Note
The Apple LaserWriter 8 driver must be installed to use the PPD. Use the
Apple LaserWriter 8 driver that came with your Macintosh.
Before beginning installation, turn off virus protection.
Run the install program by placing the HP LaserJet 2200 CD in the CD-ROM
1
drive. The installation window will appear on the desktop.
Select the correct language and double-click the installer icon.
2
Follow the on-screen instructions.
3
The HP LaserJet 2200 CD contains software for many languages. Once you select the
installation language and double-click Install in the desired language, the installation
screen will appear in that language.
To verify that the installation has been completed successfully, open a software
4
application of your choice and open or create a simple document.
Make sure the correct printer name appears, and print the document.
5
If the document prints correctly, installation is complete. Continue to “Step 8:
6
Record and Store Important Information” on page 20. (If nothing prints or if the
document does not print correctly, see “If You Have Problems” on page 21.)
If You Connected a USB Cable
English
ENWW
Open Apple’s Desktop Printer Utility.
1
Select “Printer (USB)” and click OK.
2
Under USB Printer Selection, click Change.
3
Select the HP LaserJet 2200 printer and click OK.
4
Under “PPD” click Auto Setup.
5
Make sure you save your changes before you close the window.
6
Step 7: Install Printer Software
17
Page 21

Network Installation
The software on the HP LaserJet 2200 CD supports network
installation with Novell NetWare 3.2, 4.x, and 5.x or a Microsoft
network (except Windows 3.1x). For network installation on other
operating systems, go to http://www.hp.com/support/net_printing.
Note The HP Jetdirect print server included with the HP LaserJet 2200dn
or 2200dtn printer has a 10/100 Base-TX network port. If yo u need an
HP Jetdirect print server with another type of network port, see your
electronic user guide (located on the HP LaserJet 2200 CD) for
ordering information, or contact your local HP dealer.
Before You Install the Printer Software
z
To make sure that the HP Jetdirect print server is configured
correctly for the network, print the self test/configuration pages
(when the printer’s Ready light is on, press and release the G
and J
OB CANCEL
buttons simultaneously). On the second page
look for “Hardware Address” followed by a 12-digit number.
You may need this hardware address number to complete
network installation.
z
If you are installing the software on Windows NT 4.0,
Windows 2000, or Novell NetWare, make sure you have
administrator privileges.
Windows installation will walk you through the following:
O
18
z
Connecting your printer to a Novell NetW are server. (Answer Yes
when prompted from the Novell Server Detecte d scr ee n. )
z
Connecting your printer to a networked Windows print server.
(Follow the “Client Setup” path from the Network Setup screen.)
z
Connecting your printer directly to the network without going
through a print server. (Follow the “Server or Peer to Peer” path
from the Network Setup screen.)
z
Connecting your printer to a network, when you ar e no t sur e
which method is right for you. (Follow the “Help me to determine
which setup is right for me” path from the Network Setup screen.)
ENWW
Page 22

To Install the Printer Software
Note
Note
The following instructions are for Windows computers only. If you connected a network
cable to your Macintosh, see “Macintosh Installation” on page 17.
Place the HP LaserJet 2200 CD in the CD-ROM drive.
1
When the welcome screen appears, follow the directions on the screen.
2
If the welcome screen does not appear: click Start, click Run, type D:\SETUP
(where D is the letter of your CD-ROM drive), and then click OK.
Click the button next to Install Printer and then follow the instructions on the
3
screen to install the software.
Before installation is complete, make sure that there is a check mark next to
“Print a test page” (when the prompt appears).
In Windows 2000, if the “Found New Hardware Wizard” window reappears before
installation is complete, click Cancel.
Click Finish.
4
If the test page printed correctly, installation is complete. Continue to “Step 8:
5
Record and Store Important Information” on page 20. (If nothing prints or if the
test page does not print correctly, see “If You Have Problems” on page 21.)
Network Printer Management Software
English
ENWW
For individual network printer management, use the Embedded
z
Web Server, included in your HP Jetdirect EIO print server card.
For network printer management in commercial and enterprise
z
environments, you may want to install HP Web JetAdmin. This
software is not available on the HP LaserJet 2200 CD, but you
can download HP Web JetAdmin from the web site listed below.
For more information about the HP Jetdirect Embedded Web Server
or HP Web JetAdmin, go to http://www.hp.com/go/webjetadmin, or
see your electronic user guide, located on the HP LaserJet 22 00 CD.
Step 7: Install Printer Software
19
Page 23

Step 8: Record and Store Important Information
1 When you have finished the software installation, return the
HP LaserJet 2200 CD to its case, and keep it handy for future
use.
2 If you ever need to contact HP Customer Care (Service and
Support), you will need the product model number and serial
number, located on the back of the HP LaserJet 2200 product.
Take a moment now to record this information on the inside of
this guide’s cover.
3 Because you will also need the date of purchase, HP
recommends stapling your dated sales receipt or proof of
purchase to this guide’s cover.
Congratulations, the printer setup is complete!
We recommend that you keep this getting started guide handy for
future reference.
20
ENWW
Page 24

If You Have Problems
If You Have Installation Problems
Use the following list to resolve problems you may have installing
your printer:
Make sure your printer is on and all connections are firm.
1
Ensure that no ot he r pe rip he r als ar e co nn e cte d to the prin ter
cable. For parallel connections, make sure your cable is
IEEE-1284B compliant.
Exit any software programs and turn off the computer and the
2
printer. Turn on the printer and then turn on the computer.
Close any virus protection programs that are running on your
3
computer . (Right-click the virus protection program icon in the
taskbar status area, and then click Disable.)
Uninstall the printer software using the instructions in your
4
electronic user guide, located on the HP LaserJet 2200 CD.
Try the installation process again.
5
If you get a message that two-wa y communication is not working,
6
click OK and continue with the rest of the installation.
English
Note
ENWW
If You Have Any Other Problems
To resolve any other problems you may have with your printer, refer
to your electronic user guide, located on the HP LaserJet 2200 CD.
For information about contacting HP Customer Care, see page 2.
To identify and troubleshoot control panel light messages, use the
control panel simulator. For more information, see your electronic
user guide, located on the HP LaserJet 2200 CD.
If You Have Problems
21
Page 25

Specifications
Note For media specifications and additional printer specifications, please refer to your
Printer
Specifications HP LaserJet 2200
Height
Width
Depth (body)
electronic user guide, located on the HP LaserJet 2200 CD.
Location requirements for the HP LaserJet 2200 series printer:
z
A sturdy, level surface for placement
z
Space allowance around the printer
z
A well ventilated room
z
No exposure to direct sunlight or chemicals, including ammonia based
cleaning solutions
z
Adequate power supply
z
A stable environment—no abrupt temperature or humidity changes
z
Relative humidity 10% to 80%
z
Room temperature 15° to 32.5° C (59° to 89° F)
HP LaserJet 2200
with Optional Tr ay 3
(250-sheet)
255 mm (10.0 in.) 334 mm (13.2 in.) 395 mm (15.6 in.)
405 mm (16.0 in.) 405 mm (16.0 in.) 405 mm (16.0 in.)
435 mm (17.1 in.) 435 mm (17.1 in.) 435 mm (17.1 in.)
HP LaserJet 2200
with Optional Tray 3
(500-sheet)
Weight
(with toner cartridge)
22
14.0 kg (29.0 lbs) 17.1 kg (35.9 lbs) 18.7 kg (39.4 lbs)
ENWW
Page 26

Electrical Specifications 110-Volt Models 220-Volt Models
Power Requirements
Minimum recommended circuit capacity
for typical product
Average Power Consumption (Watts) (HP LaserJet 2200 series printer)
PowerSave default activation time is 15 minutes.
Values are subject to change. See http://www.hp.com/support/lj2200 for current information.
WARNING!
Power requirements are based on the region where the printer is sold. Do not convert
operating voltages. This may damage the printer and void the product warranty.
100-127V (+/- 10%)
50/60 Hz (+/- 3 Hz)
5.0 Amps 2.5 Amps
Printing (18 PPM) = 400 W
Standby = 12 W
PowerSave = 12 W
Off = 0 W
220-240V (+/- 10%)
50/60 Hz (+/- 3 Hz)
Printing (18 PPM) = 400 W
Standby = 12 W
PowerSave = 12 W
Off = 0 W
Environmental Specifications Operating Printing Storage/Standby
Temperature
(printer and toner cartridge)
Relative humidity
15° to 32.5° C
(59° to 89° F)
10% to 80% 10% to 90%
-20° to 40° C
(-4° to 104° F)
English
Acoustic Emissions
(HP LaserJet 2200) Bystander Position Declared Per ISO 9296
Printing (18 PPM) L
PowerSave Essentially inaudible
= 51 dB(A)
pAm
Sound Power Declared Per ISO 9296
Printing (18 PPM) L
PowerSave Essentially inaudible
You may wish to place printers with sound power equal to or greater than 6.3 bels in a separate room or cubicle.
Values are subject to change. See http://www.hp.com/support/lj2200 for current information.
ENWW
= 6.6 bels(A)
WAd
Specifications
23
Page 27

Regulatory Information
Note For additional regulatory information, please refer to Appendix A of your electronic
user guide, located on the HP LaserJet 2200 CD.
FCC Regulations
This equipment has been tested and found to comply with the limits for a Class B digital
device, pursuant to Part 15 of the FCC rules. These limits are designed to provide
reasonable protection against harmful interference in a residential installation. This
equipment generates, uses, and can radiate radio frequency energy. If this equipment
is not installed and used in accordance with the instructions, it may cause harmful
interference to radio communications. However, there is no guarantee that interference
will not occur in a particular installation; the presence of interference can be determined
by turning the equipment off and on. If this equipment does cause harmful interference
to radio or television communications, the user is encouraged to try to correct the
interference by one or more of the following measures:
z
Reorient or relocate the receiving antenna.
z
Increase distance between equipment and receiver.
z
Connect equipment to an outlet on a circuit different from that to which the
receiver is located.
z
Consult your dealer or an experienced radio/television technician.
Note Any changes or modifications to the printer that are not expressly approved by HP
could void the user’s authority to operate this equipment.
Use of a shielded interface cable is required to comply with the Class B limits of Part 15
of FCC rules.
Laser Safety Statement
The Center for Devices and Radiological Health (CDRH) of the U.S. Food and Drug
Administration has implemented regulations for laser products manufactured since
August 1, 1976. Compliance is mandatory for products marketed in the United States.
The printer is certified as a “Class 1” laser product under the U.S. Department of Health
and Human Services (DHHS) Radiation Performance Standard according to the
Radiation Control for Health and Safety Act of 1968.
Since radiation emitted inside the printer is completely confined within protective
housings and external covers, the laser beam cannot escape during any phase of
normal user operation.
WARNING! Using controls, making adjustments, or performing procedures other than those
specified in the user guide may result in exposure to hazardous radiation.
24
ENWW
Page 28

Declaration of Conformity
according to ISO/IEC Guide 22 and EN 45014
Manufacturer's Name:
Manufacturer's Address:
declares, that the product
Product Name:
Model Number:
Product Options:
conforms to the following Product Specifications:
Safety: IEC 60950:1991+A1+A2+A3+A4 / EN 60950:1992+A1+A2+A3+A4+A11
IEC 60825-1:1993+A1 / EN 60825-1:1994+A11 (Class 1 Laser/LED Product)
EMC: CISPR 22:1997 / EN 55022:1998 Class B
EN 61000-3-2:1995
EN 61000-3-3:1995
EN 55024:1998
FCC Title 47 CFR, Part 15 Class B2 / ICES-002, Issue 2
AS / NZS 3548:1995
Supplementary Information:
The product herewith complies with the requirements of the EMC Directive 89/336/EEC and the
Low Voltage Directive 73/23/EEC, and carries the CE-marking accordingly.
1) The product was tested in a typical configuration with Hewlett-Packard Personal Computer
Systems.
2) This Device complies with Part 15 of the FCC Rules. Operation is subject to the following two
conditions: (1) this device may not cause harmful interference, and (2) this de vice must accept any
interference received, including interference that may cause undesired operation.
3) Product exhibits Class A operation when connected to Local Area Network (LAN) cables using print
server accessories.
* C4793A is the Optional 250-sheet Input Tray.
** C7065A is the Optional 500-sheet Input Tray.
Hewlett-Packard Company
11311 Chinden Boulevard
Boise, Idaho 83714-1021, USA
HP LaserJet 2200d, 2200dt, 2200dn, 2200dtn, 2200
C7058A, C7059A, C7063A, C7061A, C4793A*, C7065A**,
C7064A
ALL
1
English
Boise, Idaho USA
April 6, 2000
For regulatory topics only:
Australia Contact: Product Regulations Manager, Hewlett-Packard Australia Ltd.,
European Contact: Your Local Hewlett-Packard Sales and Service Office or Hewlett-Packard
USA Contact: Product Regulations Manager, Hewlett-Packard Company, PO Box 15,
ENWW
31-41 Joseph Street, Blackburn, Victoria 3130, Australia
GmbH, Department HQ-TRE / Standards Europe, Herrenberger Straße
110-140, D-71034 Böblingen (FAX: +49-7031-14-3143)
Mail Stop 160, Boise, ID 83707-0015 (Phone: 208-396-6000)
Regulatory Information
25
Page 29

26
ENWW
Page 30

HP LaserJet 2200 系列打印机
简体中文
入门指南
Page 31

版权信息
版权所有 Hewlett-Packard
Company 2001
保留所有权利。 除非版权法允
许,否则,事先未经书面许可,
不得进行复制、改编或翻译。
部件号: C7058-90977
2001 年 10 月第 1 版
担保
本文档信息如有更改,恕不另行
通知。
Hewlett-Packard 对本信息不做
任何形式的担保。
HEWLETT-PACKARD
明确声
明,对针对特定目的的适销性和
适用性不做任何隐含担保。
Hewlett-Packard 对于任何直接
损失、间接损失、偶发损失、
连带损失或因提供或使用本信
息所引起的其它损失,一概不
予负责。
商标权
Microsoft
Windows NT
®
、
Windows®和
®
是 Microsoft
Corporation 在美国的注册商标。
其中提到的所有其它产品可能是
其各自所属公司的商标。
Page 32

目录
目录 . . . . . . . . . . . . . . . . . . . . . . . . . . . . . . . . . . . . . . . . . . . . . . . . . . . . . . . . . . 1
HP 客户支持 (服务和支持) . . . . . . . . . . . . . . . . . . . . . . . . . . . . . . . . . . . . . . . 2
简介 . . . . . . . . . . . . . . . . . . . . . . . . . . . . . . . . . . . . . . . . . . . . . . . . . . . . . . . . . . 3
第 1 步:检查包装内的物品 . . . . . . . . . . . . . . . . . . . . . . . . . . . . . . . . . . . . . . . . 4
第 2 步:确定各打印机部件的位置 . . . . . . . . . . . . . . . . . . . . . . . . . . . . . . . . . . . 5
第 3 步:安装硒鼓 . . . . . . . . . . . . . . . . . . . . . . . . . . . . . . . . . . . . . . . . . . . . . . . 6
第 4 步:将介质装入纸盘 . . . . . . . . . . . . . . . . . . . . . . . . . . . . . . . . . . . . . . . . . . 7
纸盘 2 或可选 250 页纸盘 3 . . . . . . . . . . . . . . . . . . . . . . . . . . . . . . . . . . . . . 7
可选 500 页纸盘 3 . . . . . . . . . . . . . . . . . . . . . . . . . . . . . . . . . . . . . . . . . . . . 8
第 5 步:连接打印机电缆 . . . . . . . . . . . . . . . . . . . . . . . . . . . . . . . . . . . . . . . . . . 9
第 6 步:连接电源线 . . . . . . . . . . . . . . . . . . . . . . . . . . . . . . . . . . . . . . . . . . . . . . 11
第 7 步:安装打印机软件 . . . . . . . . . . . . . . . . . . . . . . . . . . . . . . . . . . . . . . . . . 12
Windows 安装 . . . . . . . . . . . . . . . . . . . . . . . . . . . . . . . . . . . . . . . . . . . . . . 13
Macintosh 安装 . . . . . . . . . . . . . . . . . . . . . . . . . . . . . . . . . . . . . . . . . . . . . 17
网络安装 . . . . . . . . . . . . . . . . . . . . . . . . . . . . . . . . . . . . . . . . . . . . . . . . . . 18
第 8 步:记录和存储重要信息 . . . . . . . . . . . . . . . . . . . . . . . . . . . . . . . . . . . . . 20
如果您有问题 . . . . . . . . . . . . . . . . . . . . . . . . . . . . . . . . . . . . . . . . . . . . . . . . . . 21
如果您有安装问题 . . . . . . . . . . . . . . . . . . . . . . . . . . . . . . . . . . . . . . . . . . . 21
如果您有任何其它问题 . . . . . . . . . . . . . . . . . . . . . . . . . . . . . . . . . . . . . . . . 21
规格 . . . . . . . . . . . . . . . . . . . . . . . . . . . . . . . . . . . . . . . . . . . . . . . . . . . . . . . . . 22
规则信息 . . . . . . . . . . . . . . . . . . . . . . . . . . . . . . . . . . . . . . . . . . . . . . . . . . . . . . 24
FCC 规则 . . . . . . . . . . . . . . . . . . . . . . . . . . . . . . . . . . . . . . . . . . . . . . . . . . 24
激光安全声明 . . . . . . . . . . . . . . . . . . . . . . . . . . . . . . . . . . . . . . . . . . . . . . . 24
合格声明 . . . . . . . . . . . . . . . . . . . . . . . . . . . . . . . . . . . . . . . . . . . . . . . . . . 25
简体中文
ZHCN 目录 1
Page 33

客户支持 (服务和支持)
HP
HP 客户支持以其出色的服务、支持和在线培训为您的购买提供支持。
可通过以下几种方式与我们联系:
z
World Wide Web
http://www.hp.com/support/lj2200 (仅限英语)
http://www2.hp.com (欧洲)
注 有关担保条款和其它 HP 客户支持信息,请参见 HP LaserJet 2200
光盘中的电子用户指南。
2 ZHCN
Page 34

简介
祝贺您购买了 HP LaserJet 2200 系列打印机!
HP LaserJet 2200d
HP LaserJet 2200d 打印机的打印速度为 19 页 / 分钟 (ppm) (对于
Letter 打印纸来说为 19 ppm,对于 A4 打印纸来说为 18 ppm)。 它 配
有一个内置 250 页纸盘 (纸盘 2)和一个自动在纸上双面打印的内置
双面打印器。本打印机具有并口、 Fast Infrared (FIR) 端口和通用串行
总线 (USB) 端口。其标准的随机存取内存 (RAM) 为 8 MB。可升级本
打印机,它有 1 个用于连接到网络的增强输入输出 (EIO) 插槽,有 2
个用于添加字体和内存的双列直插式内存模块 (DIMM) 插槽。
HP LaserJet 2200dt
HP LaserJet 2200dt 打印机与 2200d 型号相同,另配有一个 250 页纸
盘(纸盘3)。
HP LaserJet 2200dn
HP LaserJet 2200dn 打印机是为网络用户设计的,除此之外,它与
2200d 型号相同。它附带一个全功能的 HP Jetdirect EIO 打印服务器
卡 (J4169A),用于连接到 10/100 Base-TX 网络。
HP LaserJet 2200dtn
HP LaserJet 2200dtn 打印机与 2200d 型号相同,另配有一个支持
Letter 和 A4 打印纸的 500 页纸盘 (纸盘 3)。该打印机是为网络
用户设计的,它附带一个全功能的 HP Jetdirect EIO 打印服务器卡
(J4169A),用于连接到 10/100 Base-TX 网络。
HP LaserJet 2200
HP LaserJet 2200 打印机与 2200d 型打印机相同,但可进行手动双面
打印,而不是自动双面打印。该产品的供货情况随地方不同而异。
简体中文
除非另有说明,否则,本指南是根据 HP LaserJet 2200d 基本打印机
型号进行说明的。
ZHCN 简介 3
Page 35

第1步:检查包装内的物品
以下是包装盒内的物品。如有漏缺,请与 HP 经销商联系或给 HP
客户支持部门打电话 (请参见第 2 页)。
电子用户指南在 HP LaserJet 2200 光盘中。您可以直接通过该光盘
访问用户指南;可以打印整个用户指南;在安装打印机软件的过程
中,可以在计算机上安装该用户指南 (极力推荐您这样做)。
注 此时,安装打印机所有已购附件。(这可能包括一个可选纸盘。)
如果您单独购买了 HP Jetdirect EIO 打印服务器卡,现在就需要安
装。根据打印服务器卡提供的说明安装。
图
1 HP LaserJet 2200
硒鼓
入门指南
系列打印机包装内的物品
打印机
HP LaserJet 2200
电源线
可选纸盘
光盘
注 打印机电缆不包括在打印机中,有关获得正确的打印机电缆的详细信
息,请参见第 9 页的 “第 5 步:连接打印机电缆”。
在 HP LaserJet 2200dn 和 2200dtn 打印机中装有 HP Jetdirect EIO
打印服务器卡 (J4169A)。
4 ZHCN
Page 36

第2步:确定各打印机部件的位置
以下图示列出打印机重要部件的位置和名称。
图
图
2
3
打印机部件 (前视图)
电源开关
纸盘
2
打印机部件 (后视图)
1个EIO
2个DIMM
插槽和
插槽
FIR
顶盖
端口
控制面板
(“执行”按钮、
“取消作业”按钮
和状态指示灯)
纸盘
1
(带有延伸板)
顶出纸槽
简体中文
接口电缆门
后出纸槽
(带有延伸板)
ZHCN 第 2 步:确定各打印机部件的位置 5
电源接头
Page 37

第3步:安装硒鼓
1
1 打开打印机的顶盖。
2 从包装内取出硒鼓。旋转碳粉盒并
轻轻地左右摇晃,使碳粉在盒内均匀
分布。
小心
为防止损坏硒鼓,不要将其暴露在光线下
数分钟。
2
3
4
3 找到碳粉盒侧端的密封胶带拉环。小
心地来回折扭该拉环,直到拉环与碳
粉盒分开。用力将该拉环拉离碳粉
盒,以移去整个密封胶带。不要接触
到密封胶带上的任何黑色碳粉。
注
如果碳粉弄到衣服或手上,请用干布擦
拭并用冷水冲洗。(热水会使碳粉渗入纤
维中。)
4 按如图所示 (箭头指向打印机)的方
向放置碳粉盒。将碳粉盒滑入打印机
中,直到滑到头为止,盖上顶盖。
注
Hewlett-Packard Company 并不建议使
用任何非 HP 硒鼓,不管是新硒鼓、重新
灌装的硒鼓还是改制的硒鼓。因为它们不
是 HP 产品, HP 无法影响它们的设计或
控制它们的质量。
6 ZHCN
Page 38

第4步:将介质装入纸盘
1
2
3
注
要了解如何利用纸盘 1 打印信封或其它
特殊介质,请参见 HP LaserJet 2200
光盘中的电子用户指南。
纸盘2或可选
1 将所需纸盘从打印机中拉出,找到
压住该纸盘的橙色塑料包装件。逆时
针旋转该包装件,然后将其提起并
移去。
2 向外移动侧面的纸宽导架,使其与所
需的纸张大小相匹配。
3 在后部的纸长导架上,按蓝色压片进
行调整,使指针与所需的纸张大小相
匹配。
4 添加介质并确保介质的四个角在纸盘
内完全平整。使介质低于纸盘后部纸
长导架上的纸高压片。
5 向下压金属打印纸提升板使其锁定就
位。
250
页纸盘
3
简体中文
6 将纸盘重新滑入打印机中。
4
注
从打印机中取出 250 页纸盘后,一定要
先向下推金属打印纸提升板,然后再将其
放回。将纸盘推入打印机后,金属打印纸
提升板将释放并提升打印纸。
5
ZHCN 第 4 步:将介质装入纸盘 7
Page 39

可选
500
页纸盘
3
1
2
3
1 将纸盘从打印机中拉出。
2 找到压住纸盘的橙色塑料包装件。逆
时针旋转该包装件,然后将其提起并
移去。
3 要调整为使用 Letter 打印纸,向上拉
后部的挡板,若要调整为使用 A4 打
印纸,向下压后部的挡板。
4 对于 Letter 打印纸,尽可能向外移侧
面的纸宽导架,对于 A4 打印纸,尽
可能向里移侧面的纸宽导架。
5 添加介质并确保将介质平放在纸盘
中。使介质低于纸盘侧面和后部的
挂钩。
6 将纸盘重新滑入打印机中。
4
5
8 ZHCN
Page 40

第5步:连接打印机电缆
HP LaserJet 2200 系列打印机有两个将打印机直接连接到计算机的端
口:并口和 USB 端口。 HP LaserJet 2200dn 和 2200dtn 打印机带有
一个 HP Jetdirect EIO 打印服务器卡,该卡包含一个网络电缆端口。
您可以购买其它 HP LaserJet 2200 系列打印机的 HP Jetdirect EIO 打
印服务器卡。有关订购信息,请参见 HP LaserJet 2200 光盘中的电子
用户指南,或与当地 HP 经销商联系。
打印机中不包括打印机电缆。您将需要获得以下电缆中的一种:
z 要通过并口将打印机直接连接到计算机上,则需要获得
IEEE-1284B 并行电缆。
z 要通过 USB 端口将打印机直接连接到计算机上,则需要获得
USB 电缆。(USB 电缆与 Windows 98/2000/Millennium/XP 或
Macintosh 兼容。如果计算机上安装的是其它操作系统,
请使用并行电缆或网络电缆。)
z 如果要连接到网络上,需要获得网络电缆。
要成功安装打印机,有一点很重要,那就是弄清楚要安装哪种电缆并
根据该类型电缆的安装说明操作。如果您不清楚使用的是哪种电缆,
请参考下图。
简体中文
图
4
电缆概述
并行电缆
电缆 网络电缆
USB
ZHCN 第 5 步:连接打印机电缆 9
Page 41

要连接打印机电缆:
在打印机的后部找到接口电缆门 (请参见下图)。按释放压片并
1
将接口电缆门推到一侧,即可打开该门。
将并行电缆、 USB 电缆或网络电缆连接到相应的端口:
2
• 要将并行电缆连接到并口,先关闭计算机 (最好关闭计算机,
但不是必需的)。卡紧电缆夹,将电缆牢固地连接到打印机上。
电缆的安装应该很容易。如果不易安装,请检查电缆的方向是
否正确。将电缆的另一端连接到计算机的相应接头上。
• 要将
USB
电缆连接到
端口,将 USB 电缆的方头连接到
USB
打印机的 USB 端口。将 USB 电缆的扁头连接到计算上任何可
用的 USB 端口。
• 要将网络电缆连接到
Ethernet 10/100 Base-TX
网络端口,将
双绞网络电缆连接到 HP Jetdirect EIO 打印服务器上的端口。
将电缆的另一端连接到网络上。
关闭接口电缆门。
3
图
5
连接并行电缆、
1
按释放
按释放
按释放按释放
压片
压片
压片压片
2
并行电缆
并行电缆
并行电缆并行电缆
电缆或网络电缆
USB
USB 电缆
电缆
电缆电缆
网络电缆
网络电缆
网络电缆网络电缆
10 ZHCN
Page 42

第6步:连接电源线
找到打印机的侧面的电源开关,确保打印机处于关闭状态。
1
将电源线连接到打印机和一个接地的接线板或 AC 电源插座上。
2
注 只使用本产品附带的电源线。
打开打印机。
3
图
6
连接电源线
简体中文
ZHCN 第 6 步:连接电源线 11
Page 43

第7步:安装打印机软件
本打印机附带了一些有用的软件,包括打印机驱动程序和可选软件。
为了非常方便地设置打印机并使用打印机的所有功能,最好安装所提
供的软件。
安装软件之前,请确保已按照 “第 5 步:连接打印机电缆”和
“第 6 步:连接电源线”中的说明操作。
有关打印机软件组件和功能的详细信息,请参见 HP LaserJet 2200 光
盘中的电子用户指南。
注 HP 软件并非各种语言的版本都有。
检查 HP LaserJet 2200 光盘中的 ReadMe 文件,以查看其中包含的
其它软件和支持的语言。通过 Internet 和其它来源可获得最新的驱动
程序、其它驱动程序和其它软件。如果不能访问 Internet,请参见
HP LaserJet 2200 光盘中的电子用户指南,查看如何获得最新软件的
信息。
HP LaserJet 2200 系列打印机附带以下操作系统的打印机软件:
z Microsoft Windows 3.1x (仅驱动程序)、95、 98、 2000、 ME、
NT 4.0 和 XP。有关安装说明,请参阅第 13 页。
z Macintosh System 7.5.5 及更高版本。有关安装说明,请转到第
17 页。
有关在网络上的 Windows 计算机中安装软件的说明,请参见第 18 页
的 “网络安装”。
12 ZHCN
Page 44

Windows
安装
Windows 安装方法有多种,这取决于连接的电缆类型:
z 如果连接的是并行电缆,请参见以下部分。
z 如果连接的是 USB 电缆,请转到第 15 页。
z 如果连接的是网络电缆,请转到第 18 页。
如果连接的是并行电缆
注注注注 使用以下软件安装说明的前提是:在 “第 5 步:连接打印机电缆”和 “第 6 步:连接
Windows 3.1x
(只提供驱动
程序)
Windows 95
电源线”过程中计算机处于关闭状态。如果在这些步骤中计算机处于开启状态,且尚未
重启,则仍可以安装打印机软件,但是安装步骤会与下述步骤稍有不同。使用第 14 页
的 Windows NT 4.0 说明安装。
1 打开计算机,退出所有打开的程序。
2 执行以下步骤中适合于您所使用的 Windows 版本的步骤:
a 选择 “主群组”、“控制面板”、“打印机”。
b 在 “打印机”窗口中,单击 “添加”。从下拉菜单中选择 “安装未列出的
或已更新的打印机”,然后单击 “安装”。
c 将 HP LaserJet 2200 光盘放在光驱中。
d 单击 “浏览”。浏览到 “D:\English\Drivers\Win3x”(其中 D 是光驱盘
符)。选择 “oemsetup.inf”然后单击 “确定”。
e 选择 HP LaserJet 2200 系列驱动程序。单击 “确定”。
f 关闭所有窗口,然后重启计算机。
g 要验证是否成功地完成了安装,任意打开一个软件应用程序,然后打开或新
建一个简单文档。
h 确保出现的打印机名称正确无误,然后打印该文档。
i 如果该文档打印正确,则表明安装已完成。继续进行第 20 页的第 8 步。(如
果未打印或文档打印不正确,请参见第 21 页的 “如果您有问题”。)
a 计算机屏幕上应出现 “更新设备驱动程序向导”窗口。
b 将 HP LaserJet 2200 光盘放在光驱中。
c 根据 Windows 95 的版本选择以下某个步骤:
• 单击 “下一步 >”(如果可用),然后跳到下面的第 3 步。
-或-
• 单击 “确定”,然后继续执行下面的步骤 d。
d 在所提供的行中,键入 D:\9xME_LPT (其中 D 是光驱盘符),然后单击
“确定”。
简体中文
ZHCN 第 7 步:安装打印机软件 13
Page 45

Windows 98
a 计算机屏幕上应出现 “添加新硬件向导”窗口。单击 “下一步 >”。
b 选择 “搜索设备的最佳驱动程序。(推荐)”,然后单击 “下一步 >”。
c 单击相应的框,以便选中 “指定位置:”复选框 (且未选中 “软驱”和
“光驱”复选框)。
d 将 HP LaserJet 2200 光盘放在光驱中。
e 在 “指定位置:”下,键入 D:\9xME_LPT (其中 D 是光驱盘符)。单击
“下一步 >”。
Windows
2000 和
Windows XP
Windows
Millennium
Windows
NT 4.0
a 计算机屏幕上应出现 “发现新硬件向导”窗口。单击 “下一步 >”。
b 选择 “搜索适于我的设备的驱动程序 (推荐)”,然后单击 “下一步 >”。
c 在 “可选的搜索位置:”下,单击相应的位置,以便选中 “指定一个位
置:”。(且未选中 “软盘驱动器”和 “CD-ROM 驱动器”)。单击 “下一
步 >”。
d 将 HP LaserJet 2200 光盘放在光驱中。
e 在“Copy manufacturer 抯 files from (复制厂商文件自):”,键入
D:\2000_XP (此处 D 是您的 CD-ROM 驱动器的字母),然后单击 “确
定”。
f 该向导应显示一个表明已找到驱动程序的窗口;单击 “下一步 >”。
a 计算机屏幕上应出现 “添加新硬件向导”窗口。
b 选择 “指定驱动程序的位置 (高级)”,然后单击 “下一步 >”。
c 选择 “搜索设备的最佳驱动程序。(推荐)”,然后单击相应的框,以便选
中 “指定一个位置:”复选框 (且未选中 “可移动介质”复选框)。
d 将 HP LaserJet 2200 光盘放在光驱中。
e 在 “指定一个位置:”下,键入 D:\9xME_LPT (其中 D 是光驱盘符)。
单击 “下一步 >”。
要在 Windows NT 4.0 中安装该软件,必须具备管理员权限 (启动和重启权限)。
a 将 HP LaserJet 2200 光盘放在光驱中。
b 出现欢迎屏幕后,按照屏幕上的说明操作。如果未出现欢迎屏幕:依次单击
“开始”、“运行”,键入 D:\SETUP (其中 D 是光驱盘符),然后单击
“确定”。
c 单击 “安装打印机”旁边的按钮。
14 ZHCN
Page 46

3 按照屏幕上的说明安装软件。
注注注注 安装完成之前,请确保选中了 “打印测试页”复选框 (在出现提示时)。
在 Windows 2000 中,如果在完成安装之前再次出现 “发现新硬件向导”窗口,则单
击“取消”。
4 单击 “完成”。
5 如果提示您重启计算机,请单击 “是”。重启计算机后应打印出测试页。如果未提
示您重启计算机,测试页应立即打印出来。(对于 Windows NT 4.0 来说,无需重
启计算机。)
6 如果测试页打印正确,则安装完成。继续执行第 20 页的“第 8 步:记录和存储重
要信息”。(如果未打印或测试页打印不正确,请参见第 21 页的 “如果您有问
题 ”。)
如果连接的是
USB
电缆
简体中文
注注注注 Windows 3.1x、 95 和 NT 4.0 不支持 USB 电缆连接。以下说明适用于运行 Windows
Windows 98
98、 2000 或 Millennium 的计算机。如果要将 USB 电缆连接到 Macintosh,请参见第
17 页的 “Macintosh 安装”。
1 如果计算机处于关闭状态,立即将其打开。退出所有打开的程序。
2 执行以下步骤中适合于您所使用的 Windows 版本的步骤:
a 计算机屏幕上应出现 “添加新硬件向导”窗口。单击 “下一步 >”。
b 选择 “搜索设备的最佳驱动程序。(推荐)”,然后单击 “下一步 >”。
c 单击相应的框,以便选中 “指定位置:”复选框 (且未选中 “软驱”和
“光驱”复选框)。
d 将 HP LaserJet 2200 光盘放在光驱中。
e 在 “指定位置:”下,键入 D:\98ME_USB (其中 D 是光驱盘符)。单击
“下一步 >”。
ZHCN 第 7 步:安装打印机软件 15
Page 47

Windows
2000 和
Windows XP
a 计算机屏幕上应出现 “发现新硬件向导”窗口。单击 “下一步 >”。
b 选择 “搜索适于我的设备的驱动程序 (推荐)”,然后单击 “下一步 >”。
c 在 “可选的搜索位置:”下,单击相应的位置,以便选中 “指定一个位
置:”。(且未选中 “软盘驱动器”和 “CD-ROM 驱动器”)。单击 “下一
步 >”。
d 将 HP LaserJet 2200 光盘放在光驱中。
e 在“Copy manufacturer 抯 files from (复制厂商文件自):”,键入
D:\2000_XP (此处 D 是您的 CD-ROM 驱动器的字母),然后单击 “确
定”。
f 该向导应显示一个表明已找到驱动程序的窗口;单击 “下一步 >”。
Windows
Millennium
注注注注 安装完成之前,请确保选中了 “打印测试页”复选框 (在出现提示时)。
a 计算机屏幕上应出现 “添加新硬件向导”窗口。
b 选择 “指定驱动程序的位置 (高级)”,然后单击 “下一步 >”。
c 选择 “搜索设备的最佳驱动程序。(推荐)”,然后单击相应的框以便选中
“指定位置:”复选框。(且未选中 “可移动介质”复选框)。
d 将 HP LaserJet 2200 光盘放在光驱中。
e 在 “指定一个位置:”下,键入 D:\98ME_USB (其中 D 是光驱盘符)。
单击 “下一步 >”。
3 按照屏幕上的说明安装软件。
在 Windows 2000 中,如果在完成安装之前再次出现 “发现新硬件向导”窗口,则单
击“取消”。
4 单击 “完成”。
5 如果提示您重启计算机,请单击 “是”。重启计算机后应打印出测试页。如果未提
示您重启计算机,测试页应立即打印出来。
6 如果测试页打印正确,则安装完成。继续执行第 20 页的“第 8 步:记录和存储重
要信息”。(如果未打印或测试页打印不正确,请参见第 21 页的 “如果您有问
题 ”。)
16 ZHCN
Page 48

Macintosh
注注注注 必须安装 Apple LaserWriter 8 驱动程序才能使用 PPD。使用 Macintosh 附带的
Apple LaserWriter 8 驱动程序。
开始安装之前,请先关闭防病毒程序。
1 将 HP LaserJet 2200 光盘放在光驱中,运行安装程序。桌面上将出现安装窗口。
2 选择正确的语言,然后双击安装程序图标。
3 按照屏幕上的说明操作。
安装
注注注注 HP LaserJet 2200 光盘中包含许多种语言版本的软件。选择安装语言并双击该语言的
“安装”,将出现该语言的安装屏幕。
4 要验证是否成功地完成了安装,任意打开一个软件应用程序,然后打开或新建一个
简单文档。
5 确保出现的打印机名称正确无误,然后打印该文档。
6 如果该文档打印正确,则表明安装已完成。继续执行第 20 页的“第 8 步:记录和
存储重要信息”。(如果未打印或文档打印不正确,请参见 21 页上的 “如果您有
问 题 ”。)
如果连接的是
1 打开 “Apple 桌面打印机实用程序”。
2 选择 “打印机 (USB)”,然后单击 “确定”。
3 在“USB 打印机选择”下,选择 “更改”。
4 选择 HP LaserJet 2200 打印机,然后单击 “确定”。
5 在“PPD”下,单击 “自动设置”。
6 请确保在关闭此窗口之前保存了所有的更改。
USB
电缆
简体中文
ZHCN 第 7 步:安装打印机软件 17
Page 49

网络安装
HP LaserJet 2200 光盘中的软件支持 Novell NetWare 3.2、4.x、5.x 或
Microsoft 网络 (Windows 3.1x 除外)上的网络安装。有关其它操作系
统上的网络安装,请转到 http://www.hp.com/support/net_printing。
注 HP LaserJet 2200dn 或 2200dtn 打印机附带的 HP Jetdirect 打印服务
器有一个 10/100 Base-TX 网络端口。如果需要带有其它类型网络端口
的 HP Jetdirect 打印服务器,请参见电子用户指南(位于 HP LaserJet
2200 光盘上)以查看订购信息,或与当地 HP 经销商联系。
安装打印机软件之前
z 要确保 HP Jetdirect 打印服务器的网络配置正确,请打印自检 /
配置页 (打印机的 “就绪”灯亮时,同时按下后释放 “执行”和
“取消作业”按钮)。在第二页上,查找 “Hardware Address”
(其后有 12 位数字)。要完成网络安装,您可能需要该硬件地
址。
z 如果是在 Windows NT 4.0、 Windows 2000 或 Novell NetWare
上安装该软件,请确保您具有管理员权限。
Windows
安装将指导您逐步完成以下步骤:
z 将打印机连接到 Novell NetWare 服务器上。(“检测到 Novell 服
务器”屏幕出现提示时回答 “是”。)
z 将打印机连接到网络上的 Windows 打印服务器上。(按照 “网络
安装”屏幕上的 “客户安装”步骤操作。)
z 不经打印服务器,将打印机直接连接到网络上。(按照 “网络安
装”屏幕上的 “基本服务器或对等网络设置”步骤操作。)
z 不清楚哪种方法更适合您时,将打印机连接到网络上。(按照
“网络安装”屏幕上的 “帮助我确定哪个设置适合我的情况”
步骤操作。)
18 ZHCN
Page 50

要安装打印机软件
注注注注 以下说明只适用于 Windows 计算机。如果将网络电缆连接到了 Macintosh 上,请参见
第 17 页的 “Macintosh 安装”。
1 将 HP LaserJet 2200 光盘放在光驱中。
2 出现欢迎屏幕后,按照屏幕上的说明操作。如果未出现欢迎屏幕:依次单击 “开
始”、“运行”,键入 D:\SETUP (其中 D 是光驱盘符),然后单击 “确定”。
3 单击 “安装打印机”旁边的按钮,然后按照屏幕上的说明安装打印机软件。
注注注注 安装完成之前,请确保选中了 “打印测试页”复选框 (在出现提示时)。
在 Windows 2000 中,如果在完成安装之前再次出现 “发现新硬件向导”窗口,则单
击“取消”。
4 单击 “完成”。
5 如果测试页打印正确,则安装完成。继续执行第 20 页的“第 8 步:记录和存储重
要信息”。(如果未打印或测试页打印不正确,请参见第 21 页的 “如果您有问
题 ”。)
网络打印机管理软件
z 对于个人网络打印机管理来说,使用 HP Jetdirect EIO 打印服务
器卡中包含的 Embedded Web Server。
z 对于商业和企业环境中的网络打印机管理来说,可能需要安装
HP Web JetAdmin。 HP LaserJet 2200 光盘中没有 HP Web
JetAdmin,但可从下面列出的 Web 站点下载。
有关 HP Jetdirect Embedded Web Server 或 HP Web JetAdmin 的
详细信息,请转到 http://www.hp.com/go/webjetadmin,或查看
HP LaserJet 2200 光盘中的电子用户指南。
简体中文
ZHCN 第 7 步:安装打印机软件 19
Page 51

第8步:记录和存储重要信息
完成软件安装后,将 HP LaserJet 2200 光盘放回包装盒内,并将
1
其放在便于日后使用的位置。
如果需要与 HP 客户支持 (服务和支持)联系,您将需要产品型
2
号和序列号 (位于 HP LaserJet 2200 产品的后部)。现在请花些
时间将产品型号和序列号记在本指南封面的内侧。
因为您还需要购买日期, HP 建议您将带有日期的销售收据或购
3
买证明钉在本指南的封面上。
祝贺您已完成了打印机设置!
我们建议您将本指南放在便于日后参考的位置。
20 ZHCN
Page 52

如果您有问题
如果您有安装问题
使用以下列表解决安装打印机时遇到的问题:
1
2
3
4
5
6
确保打开了打印机且所有的连接都很牢固。确保打印机电缆未连
接任何其它的外设。对于并行连接来说,确保电缆是 IEEE-1284B
兼容电缆。
退出所有软件程序,然后关闭计算机和打印机。打开打印机,
然后再打开计算机。
关闭计算机上正在运行的所有防病毒程序。(在任务栏状态区域中
的防病毒程序图标上单击鼠标右键,然后单击 “禁用”。)
按照 HP LaserJet 2200 光盘中的电子用户指南的说明,卸载打印
机软件。
重试安装过程。
如果看到一条消息,说明双向通信不工作,请单击 “确定”然后
继续安装。
简体中文
如果您有任何其它问题
要解决可能遇到的其它打印机问题,请参考 HP LaserJet 2200 光盘中
的电子用户指南。
有关与 HP 客户支持联系的信息,请参见第 2 页。
注 要对控制面板上的指示灯消息进行识别和故障排除,请使用控制面板
模拟器。有关详细信息,请参见 HP LaserJet 2200 光盘中的电子用户
指南。
ZHCN 如果您有问题 21
Page 53

规格
注注注注 有关介质规格和其它打印机规格,请参见 HP LaserJet 2200 光盘中的电子用户指南。
HP LaserJet 2200 系列打印机对放置位置的要求如下:
z 放置在稳固的水平面上
z 打印机周围留有一定的空隙
z 室内通风良好
z 避免阳光直射或接触化学药品 (包括含有氨水的清洁液)
z 电源充足
z 环境稳定,温度或湿度不骤变
z 相对湿度为 10% 至 80%
z 室温为摄氏 15 至 32.5 度(华氏59 至 89 度)
HP LaserJet 2200
带有可选纸盘
(
打印机规格
高度 255 毫米 (10.0 英寸) 334 毫米 (13.2 英寸) 395 毫米 (15.6 英寸)
宽度 405 毫米 (16.0 英寸) 405 毫米 (16.0 英寸) 405 毫米 (16.0 英寸)
厚度 (机体) 435 毫米 (17.1 英寸) 435 毫米 (17.1 英寸) 435 毫米 (17.1 英寸)
重量
(包括硒鼓)
HP LaserJet 2200
14.0 公斤 (29.0 英镑) 17.1 公斤 (35.9 英镑) 18.7 公斤 (39.4 英镑)
250
页)
3
HP LaserJet 2200
带有可选纸盘
(
页)
500
3
22 ZHCN
Page 54

电气规格
110
伏的型号
220
伏的型号
电源要求 100-127 伏 (+/- 10%)
为典型产品推荐的最低电路负载量 5.0 安培 2.5 安培
平均功耗 (瓦)—
(HP LaserJet 2200 系列打印机)
节电模式的默认激活时间为 15 分钟。
数据可能会有所变动。 有关最新的信息,请参见 http://www.hp.com/support/lj2200。
警告!
警告! 电源要求是根据打印机的销售区域而制定的。不要转换操作电压。否则可能会损坏打印
警告!警告!
机并使产品担保无效。
50/60 赫兹 (+/- 3 赫兹)
打印时 (18 PPM) = 400 瓦
待机时 = 12 瓦
节电时 = 12 瓦
关闭时 = 0 瓦
220-240 伏 (+/- 10%)
50/60 赫兹 (+/- 3 赫兹)
打印时 (18 PPM) = 400 瓦
待机时 = 12 瓦
节电模式下 = 12 瓦
关闭时 = 0 瓦
环境规格 打印时 存放/待机时
温度
(打印机和硒鼓)
相对湿度 10% 至 80% 10% 至 90%
15 度至 32.5 度
(华氏 59 至 89 度)
-20 度至 40 度
(华氏 -4 至 104 度)
简体中文
噪声
(HP LaserJet 2200)
您可能希望将噪声功率大于或等于 6.3 贝尔的打印机放在一个单独的房间内。
数据可能会有所变动。有关最新的信息,请参见 http://www.hp.com/support/lj2200。
ZHCN 规格 23
旁观者的位置 根据
打印 (18 PPM) 时 L
节电 基本无声
噪声功率 根据
打印 (18 PPM) 时 L
节电 基本无声
ISO 9296
= 51 分贝 (校准)
pAm
ISO 9296
= 6.6 贝尔 (校准)
WAd
声明
声明
Page 55

规则信息
注注注注 有关其它规则信息,请参考 HP LaserJet 2200 光盘中的电子用户指南中的附录 A。
FCC
本设备已经测试,并确认其遵守 B 类数字设备的限制 (按照 FCC 规则第 15 部分)。
这些限制用于提供适当的保护,防止住宅安装中的有害干扰。本设备产生、使用并可发
射射频能量。如果不按说明安装和使用该设备,可能会对无线电通信产生有害干扰。然
而,并不能保证在特定安装中不产生干扰;通过开关本设备可确定干扰是否存在。如果
该设备对无线通信或电视通信确实产生干扰,用户最好通过以下一种或多种方法尝试消
除干扰:
z 重定向或重定位接收天线。
z 增加设备和接收器之间的距离。
z 设备和接收器使用不同的电源插座。
z 向经销商或有经验的无线电技术人员 / 电视技术人员咨询。
注注注注 未经 HP 公司明确批准而擅自更改或修改该打印机,可能会导致取消用户操作本设备的
权利。
使用屏蔽接口电缆必须遵循 FCC 规则第 15 部分中的 B 类限制。
规则
激光安全声明
美国食品与药物管理局 (U.S. Food and Drug Administration) 的设备和辐射安全中心
(CDRH) 对 1976 年 8 月 1 日后制造的激光产品实施了一些规定。根据 1968 年“对辐
射危害健康与安全的控制法令”,按照美国卫生和社会事务部 (DHHS) 的辐射性能标
准,该打印机被认定为 “1 类”激光产品。
由于本打印机内部发出的辐射已完全限制在保护性机壳和外部遮盖物内,在正常使用操
作下,激光束不会泄露。
警告!
警告! 如果未按本用户指南中的规定而擅自使用控制器、进行调节或执行操作可能会导致有害
警告!警告!
辐射物的泄露。
24 ZHCN
Page 56

合格声明
按照 ISO/IEC Guide 22 和 EN 45014
厂商名称: Hewlett-Packard Company
厂商地址: 11311 Chinden Boulevard
Boise, Idaho 83714-1021, USA
声明本产品
产品名称: HP LaserJet 2200d, 2200dt, 2200dn, 2200dtn, 2200
型号: C7058A, C7059A, C7063A, C7061A, C4793A*, C7065A**, C7064A
产品选件: 全部
符合以下产品规格:
安全性: IEC 60950:1991+A1+A2+A3+A4 / EN 60950:1992+A1+A2+A3+A4+A11
IEC 60825-1:1993+A1 / EN 60825-1:1994+A11(1 类激光 / 发光二极管产品)
EMC: CISPR 22:1997 / EN 55022:1998 B1类
EN 61000-3-2:1995
EN 61000-3-3:1995
EN 55024:1998
FCC Title 47 CFR,第 15 部分 B2类 / ICES-002,第 2 版
AS / NZS 3548:1995
补充信息:
本指南涉及的产品符合 EMC 指令 89/336/EEC 和低压指令 73/23/EEC 的要求,因此带有 CE 标志。
1) 在典型的配置下,本产品通过 Hewlett-Packard 个人计算机系统的测试。
2) 本设备遵循 FCC 规则的第 15 部分。操作取决于以下两个条件:(1) 此设备不得产生有害干扰,
(2) 此设备必须接受任何接收到的干扰 (包括可能导致不希望的操作的干扰)。
3) 使用打印服务器附件将打印机连接到局域网 (LAN) 电缆时,打印机进行 A 类操作。
* C4793A 是可选的 250 页入纸盘。
** C7065A 是可选的 500 页入纸盘。
简体中文
美国爱达荷州博伊西市
2000年4月6
只限规则主题:
澳大利亚联系
方法:
欧洲联系方法: Your Local Hewlett-Packard Sales and Service Office or Hewlett-Packard
美国联系方法: Product Regulations Manager, Hewlett-Packard Company, PO Box 15,
ZHCN 规则信息 25
Product Regulations Manager, Hewlett-Packard Australia Ltd.,
31-41 Joseph Street, Blackburn, Victoria 3130, Australia
GmbH, Department HQ-TRE / Standards Europe, Herrenberger Straße
110-140, D-71034 Böblingen(传真:+49-7031-14-3143)
Mail Stop 160, Boise, ID 83707-0015 (电话:208-396-6000)
日
Page 57

26 ZHCN
Page 58

hp LaserJet 2200 시리즈 프린터
한국어
입문
입문 설명서
입문입문
설명서
설명서설명서
Page 59

저작권
저작권 정보
정보
저작권저작권
정보정보
Copyright Hewlett-Packard
Company 2001
All Rights Reserved. 저작권법에 의
해 허용되는 경우를 제외하고 사전 서
면 승인 없이 무단 복사, 전재, 또는
번역하는 행위는 금지되어 있습니다.
부품 번호 C7058-90977
1판, 2001년 10월
품질
품질 보증
보증
품질품질
보증보증
본 설명서의 내용은 별도의 통보 없이
변경될 수 있습니다.
HP 는 여기에 나와 있는 내용에 대해
어떠한 보증도 하지 않습니다. HP 는
특정 목적을 위한 상품성 또는 적합성
에 관한 묵시적 보증에 대해 책임을
지지 않습니다.
HP 는 여기에 나와 있는 내용의 제공
과 사용에 따른 직접적, 간접적, 우발
적, 결과적, 또는 기타 모든 손해에 대
해 책임을 지지 않습니다.
등록
등록 정보
정보
등록등록
정보정보
®
Microsoft
Windows NT
, Windows®,
®
는
Microsoft Corporation
의 미국 등록 상표입니다.
본 설명서에 포함된 기타 모든 제품은
각 해당 회사의 등록 상표입니다.
Page 60

목차
목차
목차목차
목차 . . . . . . . . . . . . . . . . . . . . . . . . . . . . . . . . . . . . . . . . . . . . . . . . . . . . . . . . . . . . . . . . . . . . 1
HP 고객 지원 센터(서비스 및 지원) . . . . . . . . . . . . . . . . . . . . . . . . . . . . . . . . . . . . . . . . . . . . . . .2
개요 . . . . . . . . . . . . . . . . . . . . . . . . . . . . . . . . . . . . . . . . . . . . . . . . . . . . . . . . . . . . . . . . . . . . 3
1 단계: 패키지 내용물 확인 . . . . . . . . . . . . . . . . . . . . . . . . . . . . . . . . . . . . . . . . . . . . . . . . . . . 4
2 단계: 프린터 부품 위치. . . . . . . . . . . . . . . . . . . . . . . . . . . . . . . . . . . . . . . . . . . . . . . . . . . . . 5
3 단계: 토너 카트리지 설치 . . . . . . . . . . . . . . . . . . . . . . . . . . . . . . . . . . . . . . . . . . . . . . . . . . . 6
4 단계: 용지함에 용지 넣기 . . . . . . . . . . . . . . . . . . . . . . . . . . . . . . . . . . . . . . . . . . . . . . . . . . . 7
용지함 2 또는 선택 사양
250 장 용지함 3 7
선택 사양 500 장 용지함 3 8
5 단계: 프린터 케이블 연결 . . . . . . . . . . . . . . . . . . . . . . . . . . . . . . . . . . . . . . . . . . . . . . . . . . . 9
6 단계: 전원 코드 연결 . . . . . . . . . . . . . . . . . . . . . . . . . . . . . . . . . . . . . . . . . . . . . . . . . . . . . 11
7 단계: 프린터 소프트웨어 설치 . . . . . . . . . . . . . . . . . . . . . . . . . . . . . . . . . . . . . . . . . . . . . . 12
Windows 설치 . . . . . . . . . . . . . . . . . . . . . . . . . . . . . . . . . . . . . . . . . . . . . . . . . . . . . . . . 13
Macintosh 설치 . . . . . . . . . . . . . . . . . . . . . . . . . . . . . . . . . . . . . . . . . . . . . . . . . . . . . . . 17
네트웍 설치 . . . . . . . . . . . . . . . . . . . . . . . . . . . . . . . . . . . . . . . . . . . . . . . . . . . . . . . . . . 18
8 단계: 중요 정보 기록 및 저장 . . . . . . . . . . . . . . . . . . . . . . . . . . . . . . . . . . . . . . . . . . . . . . . 20
문제가 발생한 경우 . . . . . . . . . . . . . . . . . . . . . . . . . . . . . . . . . . . . . . . . . . . . . . . . . . . . . . . . 21
설치시 문제가 발생한 경우 . . . . . . . . . . . . . . . . . . . . . . . . . . . . . . . . . . . . . . . . . . . . . . 21
기타 문제가 발생한 경우 . . . . . . . . . . . . . . . . . . . . . . . . . . . . . . . . . . . . . . . . . . . . . . . . 21
제품 사양 . . . . . . . . . . . . . . . . . . . . . . . . . . . . . . . . . . . . . . . . . . . . . . . . . . . . . . . . . . . . . . . 22
규격 정보 . . . . . . . . . . . . . . . . . . . . . . . . . . . . . . . . . . . . . . . . . . . . . . . . . . . . . . . . . . . . . . . 24
FCC 규격 . . . . . . . . . . . . . . . . . . . . . . . . . . . . . . . . . . . . . . . . . . . . . . . . . . . . . . . . . . .24
레이저 안전 규격 . . . . . . . . . . . . . . . . . . . . . . . . . . . . . . . . . . . . . . . . . . . . . . . . . . . . . . 24
규격 준수 . . . . . . . . . . . . . . . . . . . . . . . . . . . . . . . . . . . . . . . . . . . . . . . . . . . . . . . . . . . 25
한국어
KOWW 목차 1
Page 61

HP 고객
고객 지원
고객고객
주주주주 품질 보증과 HP 고객 지원 센터에 대한 정보를 추가로 원하시면 HP LaserJet 2200
지원 센터
지원지원
센터(서비스
센터센터
HP 고객 지원 센터는 구입하신 제품에 대해 철저한 애프터 서비스와 온라인 교육
을 제공합니다. 아래에 HP 연락처가 나와 있습니다.
z World Wide Web
CD 에 들어 있는 사용 설명서를 참조하십시오.
서비스 및및및및 지원
서비스서비스
http://www.hp.com/support/lj2200 (영문 사이트)
http://www2.hp.com (유럽)
http://www.hp.co.kr (한국)
지원)
지원지원
2 KOWW
Page 62

개요
개요
개요개요
HP LaserJet 2200 시리즈 프린터를 구입해 주셔서 감사합니다.
HP LaserJet 2200d
HP LaserJet 2200d 프린터는 분당 19페이지 (19ppm) 를 인쇄할 수 있는 레이저 프
린터로서 (Letter 용지의 경우 19ppm/A4 용지의 경우 18ppm) 250장 용지함(용지
함 2) 과 자동 양면 인쇄를 위한 양면 인쇄장치가 내장되어 있습니다. 이 프린터에
는 병렬, 고속 적외선 (FIR), 범용 직렬 버스 (USB) 포트도 내장되어 있습니다. 이
프린터는 표준 8MB 용량의 임의 액세스 기억 장치 (RAM) 를 사용하며 네트웍 연결
을 위한 고급 입출력 (EIO) 슬롯 1개 및 글꼴과 메모리를 추가하기 위한 DIMM
(Dual In-line Memory Module) 2 개를 사용하여 인쇄 기능을 확장할 수 있습니다.
HP LaserJet 2200dt
HP LaserJet 2200dt 프린터는 2200d 모델에 250 장 용지함 (용지함 3) 이 추가된
모델입니다.
HP LaserJet 2200dn
HP LaserJet 2200dn 프린터는 2200d 모델과 동일하지만 네크워크 사용자를 위해
특별히 제작된 프린터라는 점이 다릅니다. 이 프린터에는 10/100 Base-TX 네트웍
에 연결하기 위한 다기능 HP JetDirect EIO 프린트 서버 카드 (J4169A) 가 설치되
어 있습니다.
한국어
HP LaserJet 2200dtn
HP LaserJet 2200dtn 프린터는 2200d 모델에 Letter 용지와 A4 용지를 사용할 수
있는 500 장 용지함(용지함 3)이 추가된 모델입니다. 이 프린터는 네트웍 사용자를
위해 설계된 모델로 10/100 Base-TX 네트웍에 연결하기 위한 다기능 HP JetDirect
EIO 프린트 서버 카드 (J4169A) 가 설치되어 있습니다.
HP LaserJet 2200
HP LaserJet 2200 프린터는 2200d 모델과 동일하지만 자동 양면 인쇄가 아닌 수동
양면 인쇄 기능을 갖고 있습니다. 지역에 따라 이 제품이 공급되지 않을 수도 있습
니다.
별도의 언급이 없는 경우 이 설명서에 나와 있는 그림은 기본 프린터 모델인
HP LaserJet 2200d 프린터 도면입니다.
KOWW 개요 3
Page 63

1 단계
단계: 패키지
단계단계
패키지 내용물
패키지패키지
내용물 확인
내용물내용물
패키지의 내용물은 다음과 같습니다. 누락된 내용물이 있을 경우 HP 대리점이나
HP 고객 지원 센터로 연락하십시오. (2 페이지를 참조하십시오.)
사용 설명서는 HP LaserJet 2200 CD 에 들어 있습니다. 사용 설명서를 CD 를 통해
서 직접 보거나 또는 사용 설명서 전체를 인쇄할 수 있습니다. 아니면 프린터 소프
트웨어 설치시 컴퓨터에 직접 사용 설명서를 설치할 수 있습니다(이 방법 권장).
확인
확인확인
주주주주 이 때 프린터와 함께 구매한 부품들도 설치하십시오. (선택 사양 용지함은 기종에
따라 포함되지 않을 수도 있습니다.)
프린터와 별도로 HP JetDirect EIO 프린트 서버 카드를 구매하였을 경우 지금 설치
하셔야 합니다. 프린트 서버 카드와 함께 제공된 설명서에 따라 설치하십시오.
그림
그림 1 HP LaserJet 2200 시리즈
그림그림
토너
토너 카트리지
카트리지
토너토너
카트리지카트리지
시리즈 패키지
패키지 내용물
시리즈시리즈
패키지패키지
프린터
프린터
프린터프린터
내용물
내용물내용물
HP LaserJet 2200 CD
전원
전원 코드
코드
전원전원
코드코드
선택
선택 사양
사양 용지함
사양사양
용지함
용지함용지함
입문
입문 설명서
설명서
입문입문
설명서설명서
선택선택
주주주주 프린터 케이블은 프린터에 포함되어 있지 않습니다. 적합한 프린터 케이블에 관한
정보를 얻으려면 9페이지의 "5 단계: 프린터 케이블 연결"을 참조하십시오.
HP LaserJet 2200dn 과 2200dtn 프린터에는 HP JetDirect EIO 프린트 서버 카드
(J4169A) 가 내장되어 있습니다.
4 KOWW
Page 64

2 단계
단계: 프린터
단계단계
프린터 부품
프린터프린터
다음 그림에는 프린터 주요 부품의 위치와 해당 이름이 나와 있습니다.
그림
그림 2 프린터
그림그림
그림
그림 3 프린터
그림그림
프린터 부품
프린터프린터
전원
전원 스위치
스위치
전원전원
스위치스위치
프린터 부품
프린터프린터
부품 위치
부품부품
위치
위치위치
부품(앞면
앞면)
부품부품
앞면앞면
용지함
용지함 2
용지함용지함
부품(뒷면
뒷면)
부품부품
뒷면뒷면
윗윗윗윗 덮개
덮개
덮개덮개
고속
고속 적외선
적외선 (FIR) 포트
고속고속
적외선적외선
프린터
프린터 제어판
제어판
프린터프린터
제어판제어판
( 인쇄 단추 ,
작업 취소 단추 ,
상태 표시등 )
용지함
용지함 1
용지함용지함
( 확장대
확장대 포함
확장대확장대
포함 )
포함포함
포트
포트포트
한국어
1 EIO 슬롯
슬롯 및및및및
슬롯슬롯
2 DIMM 슬롯
슬롯
슬롯슬롯
인터페이스
인터페이스
인터페이스인터페이스
케이블
케이블 문문문문
케이블케이블
KOWW 2 단계: 프린터 부품 위치 5
상단
상단 출력함
상단상단
뒷면
뒷면 출력함
뒷면뒷면
( 확장대 포함 )
전원
전원 코드
코드
전원전원
코드코드
출력함
출력함출력함
출력함
출력함출력함
Page 65

3 단계
단계: 토너
단계단계
1
2
토너 카트리지
토너토너
카트리지 설치
카트리지카트리지
설치
설치설치
1 프린터의 윗 덮개를 엽니다.
2 토너 카트리지를 패키지에서 꺼냅니다. 카트
리지를 회전시킨 다음 가볍게 이리저리 흔들
어서 토너가 카트리지 내에서 고르게 분포되
도록 합니다.
주의
주의
주의주의
토너 카트리지의 손상을 막으려면 몇 분 이상 빛
에 노출시키지 마십시오.
3 카트리지의 끝에 부착된 봉함 테이프 탭을
찾으십시오. 탭을 앞뒤로 조심스럽게 구부려
카트리지에서 떼어냅니다. 테이프 전체를 떼
어내려면 카트리지에서 탭을 세게 당겨야 합
니다. 테이프의 검정색 토너를 건드리지 마
십시오.
3
4
주주주주
옷이나 손에 토너가 묻은 경우 마른 천으로 닦아
내고 옷을 찬물로 세탁하십시오. (뜨거운 물을 사
용하면 토너가 옷감에 배어 듭니다.)
4 그림에 나와 있는 바와 같이 화살표가 프린
터 방향을 향하도록 카트리지를 갖다 놓습니
다. 카트리지를 프린터에 제대로 밀어 넣은
다음 윗 덮개를 닫습니다.
주주주주
타사 토너 카트리지나 다쓴 HP 토너 카트리지를
리필하거나 재생산한 제품을 사용하지 말 것을
권장합니다.
6 KOWW
Page 66
4 단계
단계: 용지함에
단계단계
용지함에 용지
용지함에용지함에
용지 넣기
용지용지
넣기
넣기넣기
1
2
3
4
주주주주
용지함 1에서 봉투나 기타 특수 인쇄 매체에 인
쇄하는 방법에 대해 알고 싶으시면 HP LaserJet
2200 CD 에 들어 있는 사용 설명서를 참조하십
시오.
용지함
용지함 2 또는
용지함용지함
250 장장장장 용지함
1 프린터에서 원하는 용지함을 당겨낸 다음 용
지함을 받치고 있는 오렌지색 플라스틱 패키
징 조각을 찾으십시오. 시계 반대방향으로
돌린 후 들어 올려 제거합니다.
2 양 옆의 너비 조정기를 바깥으로 움직여서
원하는 용지 크기에 맞춥니다.
3 뒤쪽 용지 길이 조정기에서 파란색 탭을 누
른 다음 원하는 용지에 맞는 포인터 크기로
탭을 조정합니다.
4 용지를 넣어 용지 크기가 용지함에 잘 맞는지
확인합니다. 용지를 넣어 용지함의 용지의 네
모서리가 평평하게 잘 맞는지 확인합니다.
용지의 분량이 용지함 뒤쪽에 있는 용지 길
이 조정대 탭을 넘지 않도록 하십시오.
5 용지 올림 금속판을 눌러서 제자리에 고정시
킵니다.
또는 선택
또는또는
용지함 3
용지함용지함
선택 사양
사양
선택선택
사양사양
한국어
6 용지함을 다시 프린터에 밀어 넣습니다.
주주주주
프린터에서 250 장 용지함을 떼어낸 다음 다시
부착하는 경우 항상 용지 올림 금속판을 누르십
5
KOWW 4 단계: 용지함에 용지 넣기 7
시오. 용지함을 프린터에 밀어 넣을 때 용지 올림
금속판이 해제되어 용지를 위로 올려줍니다.
Page 67

선택
선택 사양
사양 500 장장장장 용지함
선택선택
사양사양
용지함 3
용지함용지함
1
2
3
1 프린터에서 용지함을 꺼냅니다.
2 용지함을 받치고 있는 오렌지색 패키징 조각
을 찾으십시오. 시계 반대방향으로 돌린 후
들어 올려 제거합니다.
3 Letter 용지에 맞추려면 뒤쪽 용지 멈춤자를
들어 올리고 A4 용지에 맞추려면 뒤쪽 용지
멈춤자를 밀어 내립니다.
4 Letter 용지에 맞추려면 양쪽 너비 조정기를
가능한 한 바깥쪽으로 넓혀주고 A4 용지에
맞추려면 양쪽 너비 조정기를 가능한 한 안
쪽으로 좁혀줍니다.
5 용지를 넣어 용지 크기가 용지함에 잘 맞는
지 확인합니다. 용지의 분량이 용지함 옆과
뒤에 있는 걸쇠의 높이를 넘지 않도록 하십
시오.
6 용지함을 다시 프린터에 밀어 넣습니다.
4
5
8 KOWW
Page 68

5 단계
단계: 프린터
단계단계
프린터 케이블
프린터프린터
케이블 연결
케이블케이블
HP LaserJet 2200 시리즈 프린터에는 컴퓨터에 직접 연결시켜 주는 병렬 및 USB
포트 등 두 개의 포트가 내장되어 있습니다. HP LaserJet 2200dn 과 2200dtn 프린
터에는 네트웍 케이블 포트가 들어 있는 HP JetDirect EIO 프린트 서버 카드가 내
장되어 있습니다. HP JetDirect EIO 프린트 서버 카드를 별도로 구입하여 기타
HP LaserJet 2200 시리즈 프린터에 설치할 수 있습니다. 주문 관련 정보를 원하시
면 HP LaserJet 2200 CD 에 들어 있는 사용 설명서를 참조하거나 또는 해당 지역
의 HP 대리점에 문의하십시오.
프린터 케이블은 프린터에 들어 있지 않습니다. 다음 케이블 중 하나를 구입하셔야
합니다.
z 병렬 포트를 통해 프린터를 컴퓨터에 직접 연결하려면 IEEE-1284B 병렬 케이
블이 있어야 합니다.
z USB 포트를 통해 프린터를 컴퓨터에 직접 연결하려면 USB 케이블이 있어야
합니다. (USB 케이블은 Windows 98/2000/Millennium/XP 또는 Macintosh 시
스템과 호환성을 갖습니다. 그 밖의 컴퓨터 운영 체제를 사용하고 있는 경우
병렬 또는 네트웍 케이블을 사용하십시오.)
z 네트웍에 연결하려면 네트웍 케이블이 있어야 합니다.
프린터를 제대로 설치하려면 사용할 케이블 유형을 파악하고 해당 유형에 맞는 케
이블 설치 지침을 따르는 것이 중요합니다. 보유 중인 케이블의 유형을 파악할 수
없는 경우 아래 그림을 참조하십시오.
연결
연결연결
그림
그림 4 케이블
그림그림
KOWW 5 단계: 프린터 케이블 연결 9
케이블 개요
개요
케이블케이블
개요개요
병렬
병렬 케이블
케이블 USB 케이블
병렬병렬
케이블케이블
케이블
케이블케이블
네트웍
네트웍 케이블
케이블
네트웍네트웍
케이블케이블
한국어
Page 69

프린터
프린터 케이블
프린터프린터
1 프린터 뒷면의 인터페이스 케이블 덮개를 찾으십시오. (아래의 그림을 참조하
2 병렬, USB, 또는 네트웍 케이블을 해당 포트에 연결합니다:
3 인터페이스 케이블 덮개를 닫습니다.
그림
그림 5 병렬
그림그림
병렬, USB, 또는
병렬병렬
케이블 연결
연결:
케이블케이블
연결연결
십시오.) 해제 탭을 누르고 덮개를 옆으로 돌려서 인터페이스 케이블 덮개를
엽니다.
• 병렬
병렬 케이블을
케이블을 병렬
병렬병렬
케이블을케이블을
병렬 포트에
포트에 연결하려면
병렬병렬
포트에포트에
연결하려면 우선 컴퓨터 전원을 끕니다. (권장
연결하려면연결하려면
사항이며 반드시 그럴 필요는 없습니다.) 와이어 클립을 접어서 케이블을
프린터에 고정합니다. 케이블은 자연스럽게 연결되어야 합니다. 연결이 제
대로 안되면 케이블의 방향을 확인하십시오. 케이블의 다른 쪽 끝을 컴퓨
터의 해당 커넥터에 연결합니다.
• USB 케이블을
케이블을 USB 포트에
케이블을케이블을
포트에 연결하려면
포트에포트에
연결하려면 USB 케이블의 사각 끝을 프린터
연결하려면연결하려면
의 USB 포트에 연결하십시오. USB 케이블의 사각 끝을 컴퓨터의 사용 가
능한 USB 포트에 연결하십시오.
• 네트웍
네트웍 케이블을
케이블을 Ethernet 10/100 Base-TX 네트웍
네트웍네트웍
케이블을케이블을
네트웍 포트에
포트에 연결하려면
네트웍네트웍
포트에포트에
연결하려면 네
연결하려면연결하려면
트웍 케이블을 HP JetDirect EIO 프린트 서버의 포트에 연결합니다. 케이
블의 다른 쪽 끝을 네트웍에 연결합니다.
또는 네트웍
네트웍 케이블을
또는또는
케이블을 연결합니다
네트웍네트웍
케이블을케이블을
연결합니다.
연결합니다연결합니다
1
해제 탭을
해제
탭을
해제해제
탭을탭을
누릅니다
누릅니다
누릅니다누릅니다
2
네트웍 케이블
네트웍
케이블
네트웍네트웍
케이블케이블
병렬 케이블
병렬
케이블
병렬병렬
케이블케이블
10 KOWW
USB 케이블
케이블
케이블케이블
Page 70

6 단계
단계: 전원
단계단계
주주주주 본 제품용으로 제공된 전원 코드만 사용하십시오.
그림
그림 6 전원
그림그림
전원 코드
전원전원
코드 연결
코드코드
1 프린터의 측면에 있는 전원 스위치를 찾아서 프린터가 꺼져 있는지 확인합
2 접지선 또는 AC 콘센트에 프린터 전원 코드를 연결합니다.
3 프린터를 켭니다.
전원 코드를
전원전원
연결
연결연결
니다.
코드를 연결합니다
연결합니다.
코드를코드를
연결합니다연결합니다
KOWW 6 단계: 전원 코드 연결 11
한국어
Page 71

7 단계
단계: 프린터
단계단계
주주주주 HP 소프트웨어는 모든 언어를 지원하지는 않습니다.
프린터 소프트웨어
프린터프린터
소프트웨어 설치
소프트웨어소프트웨어
본 프린터에는 프린터 드라이버와 선택 사양 소프트웨어를 포함한 유용한 소프트
웨어들이 들어 있습니다. 프린터를 쉽게 설치하고 프린터의 모든 기능을 사용하려
면 반드시 제공된 소프트웨어를 설치해야 합니다.
소프트웨어를 설치하기 전에 "5 단계: 프린터 케이블 연결" 및 "6 단계: 전원 코드 연
결" 에 나와 있는 지침을 따랐는지 확인하십시오.
프린터 소프트웨어 구성 요소 및 기능에 대해 더 자세히 알아보려면 HP LaserJet
2200 CD 에 들어 있는 사용 설명서를 참조하십시오.
포함된 추가 소프트웨어와 지원되는 언어에 대해 알아보려면 HP LaserJet 2200 CD
에 제공된 ReadMe 파일을 읽으십시오. 최신 드라이버와 기타 드라이버 및 소프트
웨어에 관한 정보는 인터넷과 기타 경로를 통해서 얻으실 수 있습니다. 인터넷에 접
속할 수 없는 경우 최신 소프트웨어에 대한 정보를 얻으려면 HP LaserJet 2200 CD
에 들어 있는 사용 설명서를 참조하십시오.
HP LaserJet 2200 시리즈 프린터에는 다음 컴퓨터 운영 체제에서 사용할 수 있는
프린터 소프트웨어가 제공됩니다:
설치
설치설치
z Microsoft Windows 3.1x (드라이버만), 95, 98, 2000, Millennium, NT 4.0 및
XP. 설치 지침은 13 페이지에 나와 있습니다.
z Macintosh System 7.5.5 이상급 버전설치 방법을 보려면 17 페이지로 이동하
십시오.
네트웍 Windows 컴퓨터에 소프트웨어를 설치하려면 18 페이지에 나와 있는 "네트
웍 설치" 를 참조하십시오.
12 KOWW
Page 72

Windows 설치
설치
설치설치
연결된 케이블의 종류에 따라 Windows 설치 방법이 달라집니다.
z 병렬 케이블을 연결한 경우 아래의 설명을 참조하십시오.
z USB 케이블을 연결한 경우 15 페이지를 보십시오.
z 네트웍 케이블을 연결한 경우 18 페이지를 보십시오.
병렬
병렬 케이블을
케이블을 연결한
병렬병렬
케이블을케이블을
주주주주 다음 소프트웨어 설치 지침은 "5 단계: 프린터 케이블 연결" 및 "6 단계: 전원 코드 연결" 실행 시 컴퓨
터 전원을 끈 상태였음을 가정합니다. 이러한 절차를 컴퓨터를 켠 상태로 수행하였고 재부팅하지 않
았더라도 프린터 소프트웨어를 설치할 수 있지만 그 절차는 아래 설명된 것과 약간 달라집니다. 이러
한 설치 방법에 대해서는 14페이지에 나와 있는 Windows NT 4.0 지침을 참조하십시오.
1 컴퓨터를 켠 다음 열려 있는 프로그램을 종료하십시오.
2 Windows 버전에 맞는 절차를 따르십시오.
연결한 경우
연결한연결한
경우
경우경우
Windows 3.1x
(드라이버
드라이버 전용
드라이버드라이버
전용)
전용전용
Windows 95
a 기본, 제어판, 프린터를 선택합니다.
b 프린터 창에서 추가를 누릅니다. 메뉴에서 목록에 없는 프린터 또는 갱신된 프린터 설
치를 선택한 다음 설치를 누릅니다.
c HP LaserJet 2200 CD 를 CD-ROM 드라이브에 넣으십시오.
d 찾아보기를 누릅니다. "D:\Korean\Drivers\Win3x" 를 탐색합니다 (D 는 CD-ROM 드라
이브). "oemsetup.inf" 를 선택하고 확인을 누릅니다.
e HP LaserJet 2200 시리즈 드라이버를 선택합니다. 확인을 누릅니다.
f 모든 창을 닫고 컴퓨터를 다시 시작합니다.
g 제대로 설치되었는지 확인하려면 애플리케이션을 선택하여 연 후 간단한 문서를 작성
해 보십시오.
h 프린터 이름이 올바른지 확인한 후 문서를 인쇄하십시오.
i 문서가 제대로 인쇄되면 설치가 완료된 것입니다. 20 페이지의 단계 8로 이동하십시오.
(테스트 페이지가 인쇄되지 않거나 제대로 인쇄되지 않으면 21 페이지에 나와 있는
"문제가 발생한 경우" 를 참조하십시오.)
a "프린터 드라이버 갱신 마법사" 창이 컴퓨터 화면에 나타나야 합니다.
b HP LaserJet 2200 CD 를 CD-ROM 드라이브에 넣습니다.
c Windows 95 버전에 따라
• 다음>(메뉴가 있을 경우)을 누르고 아래의 단계 3 으로 건너뜁니다.
또는
또는
또는또는
• 확인을 누르고 아래의 단계 d로 진행합니다.
d 입력난에 D:\9xME_LPT 를 입력한 다음 (D 는 CD-ROM 드라이브) 확인을 누르십시오.
한국어
KOWW 7 단계: 프린터 소프트웨어 설치 13
Page 73

Windows 98
a "새 하드웨어 추가 마법사" 창이 컴퓨터 화면에 나타나야 합니다. 다음>을 누르십시오.
b "내 프린터에 가장 적합한 드라이버 검색" 을 선택한 후(권장 사항) 다음>을 누르십시오.
c 필요한 경우 "위치 지정" 옆에 있는 확인란에 체크 표시합니다. 플로피 디스크 드라이브
와 CD-ROM 드라이브 옆에 있는 확인란에는 체크 표시하지 마십시오.
d HP LaserJet 2200 CD 를 CD-ROM 드라이브에 넣으십시오.
e "위치 지정" 항목에서 D:\9xME_LPT 를 입력하십시오(D 는 CD-ROM 드라이브). 다음>
을 누르십시오.
Windows 2000
및및및및 Windows XP
Windows
Millennium
Windows
NT 4.0
a "검색된 새 하드웨어 마법사" 창이 컴퓨터 화면에 나타나야 합니다. 다음>을 누르십시오.
b "내 프린터에 가장 적합한 드라이버 검색"을 선택한 후(권장 사항) 다음>을 누르십시오.
c "옵션형 검색 위치" 항목에서 필요한 경우 "위치 지정" 옆에 있는 확인란에 체크 표시합
니다. 플로피 디스크 드라이브와 CD-ROM 드라이브 옆에 있는 확인란에는 체크 표시하
지 마십시오. 다음>을 누르십시오.
d HP LaserJet 2200 CD 를 CD-ROM 드라이브에 넣습니다.
e "복사할 제조업체 파일 위치"에 D:\2000_XP 를 입력한 후(여기서 D 는 CD-ROM 드라
이브) 확인을 누릅니다.
f 검색된 드라이버가 표시된 마법사 창이 나타나면 다음>을 누르십시오.
a "새 하드웨어 추가 마법사" 창이 컴퓨터 화면에 나타나야 합니다.
b "(고급) 드라이버 위치 지정"을 선택한 후 다음>을 누르십시오.
c "내 프린터에 가장 적합한 드라이버 검색"을 선택한 후(권장 사항) 필요한 경우 "위치 지
정" 옆에 있는 확인란에 체크 표시합니다. "장착식 용지함" 옆에 있는 확인란에는 체크
표시하지 마십시오.
d HP LaserJet 2200 CD 를 CD-ROM 드라이브에 넣으십시오.
e "위치 지정" 항목에 D:\9xME_LPT 를 입력하십시오(D 는 CD-ROM 드라이브). 다음>을
누르십시오.
Windows NT 4.0 에 소프트웨어를 설치하려면(부팅 및 재부팅 시) 관리자 권한이 있어야 합니다.
a HP LaserJet 2200 CD 를 CD-ROM 드라이브에 넣습니다.
b 시작 화면이 나타나면 화면에 나오는 지시를 따르십시오. 시작 화면이 나타나지 않는
경우 시작과 실행을 차례로 누르고 D:\SETUP 를 입력한 후(D 는 CD-ROM 드라이브)
확인을 누르십시오.
c 프린터 설치 항목 옆에 있는 단추를 누르십시오.
3 화면의 지시에 따라 소프트웨어를 설치합니다.
14 KOWW
Page 74

주주주주 설치가 완료되기 전에 "테스트 페이지 인쇄" 옆에 체크 표시가 되어 있는지 확인하십시오(해당 화면
이 나타날 때).
Windows 2000 에서 설치가 완료되기 전에 "검색된 새 하드웨어 마법사" 창이 다시 나타나면 취소를
누르십시오.
4 완료를 누르십시오.
5 컴퓨터를 다시 시작하라는 메시지가 나타나면 예를 누르십시오. 컴퓨터가 재시작된 후 테스트
페이지가 인쇄됩니다. 컴퓨터를 다시 시작하라는 메시지가 나타나지 않으면 테스트 페이지가
곧 바로 인쇄됩니다. (Windows NT 4.0 을 사용할 경우 컴퓨터를 재부팅할 필요가 없습니다.)
6 테스트 페이지가 제대로 인쇄되면 설치가 완료된 것입니다. 20페이지에서 "8 단계: 중요 정보
기록 및 저장"을 계속 진행하십시오. (테스트 페이지가 인쇄되지 않거나 제대로 인쇄되지 않으
면 21페이지에 나와 있는 "문제가 발생한 경우"를 참조하십시오.)
USB 케이블로
케이블로 연결된
케이블로케이블로
주주주주 Windows 3.1x, 95, NT 4.0 은 USB 케이블 연결을 지원하지 않습니다. 다음 지시 사항은 Windows
98, 2000, Millennium 을 실행하는 컴퓨터에 해당됩니다. USB 케이블을 Macintosh 에 연결하려면 17
페이지에 나와 있는 "Macintosh 설치"를 참조하십시오.
1 컴퓨터가 꺼져 있으면 바로 켜십시오. 열린 프로그램이 있으면 종료하십시오.
2 Windows 버전에 맞는 절차를 따르십시오.
연결된 경우
연결된연결된
경우
경우경우
한국어
Windows 98
KOWW 7 단계: 프린터 소프트웨어 설치 15
a "새 하드웨어 추가 마법사" 창이 컴퓨터 화면에 나타나야 합니다. 다음>을 누르십시오.
b "내 프린터에 가장 적합한 드라이버 검색" 을 선택한 후(권장 사항) 다음>을 누르십시오.
c 필요한 경우 "위치 지정" 항목 옆에 있는 확인란에 체크 표시합니다. 플로피 디스크 드라
이브와 CD-ROM 드라이브 옆에 있는 확인란에는 체크 표시하지 마십시오.
d HP LaserJet 2200 CD 를 CD-ROM 드라이브에 집어 넣으십시오.
e "위치 지정" 항목에 D:\98ME_USB 를 입력하십시오(D 는 CD-ROM 드라이브). 다음>을
누르십시오.
Page 75

Windows 2000
및및및및 Windows XP
a "검색된 새 하드웨어 마법사" 창이 컴퓨터 화면에 나타나야 합니다. 다음>을 누르십시오.
b "내 프린터에 가장 적합한 드라이버 검색" 을 선택한 후(권장 사항) 다음>을 누르십시오.
c 옵션형 검색 위치" 항목에서 필요한 경우 "위치 지정" 옆에 있는 확인란에 체크 표시가
나타나게 하십시오. 플로피 디스크 드라이브와 CD-ROM 드라이브 옆에 있는 확인란에
는 체크 표시하지 마십시오. 다음>을 누르십시오.
d HP LaserJet 2200 CD 를 CD-ROM 드라이브에 넣습니다.
e "복사할 제조업체 파일 위치"에 D:\2000_XP 를 입력한 후(여기서 D 는 CD-ROM 드라
이브) 확인을 누릅니다.
f 검색된 드라이버가 표시된 마법사 창이 나타나면 다음>을 누르십시오.
Windows
Millennium
a "새 하드웨어 추가 마법사" 창이 컴퓨터 화면에 나타나야 합니다.
b "(고급) 드라이버 위치 지정"을 선택한 후 다음>을 누르십시오.
c "내 프린터에 가장 적합한 드라이버 검색"을 선택한 후(권장 사항) 필요한 경우 "위치 지
정" 항목 옆에 있는 확인란에 체크 표시합니다. "장착식 용지함" 옆에 있는 확인란에는
체크 표시하지 마십시오.
d HP LaserJet 2200 CD 를 CD-ROM 드라이브에 집어 넣으십시오.
e "위치 지정" 항목에 D:\98ME_USB 를 입력하십시오(D 는 CD-ROM 드라이브). 다음>을
누르십시오.
3 화면의 지시에 따라 소프트웨어를 설치합니다.
주주주주 설치가 완료되기 전에 "테스트 페이지 인쇄" 항목 옆에 체크 표시가 되어 있는지 확인하십시오(해당
화면이 나타날 때).
Windows 2000 에서 설치가 완료되기 전에 "검색된 새 하드웨어 마법사" 창이 다시 나타나면 취소를
누르십시오.
4 완료를 누르십시오.
5 컴퓨터를 다시 시작하라는 메시지가 나타나면 예를 누르십시오. 컴퓨터가 재시작된 후 테스트
페이지가 인쇄됩니다. 컴퓨터를 다시 시작하라는 메시지가 나타나지 않으면 테스트 페이지가
곧 바로 인쇄됩니다.
6 테스트 페이지가 제대로 인쇄되면 설치가 완료된 것입니다. 20페이지의 "8 단계: 중요 정보 기
록 및 저장"으로 계속 진행하십시오. (테스트 페이지가 인쇄되지 않거나 제대로 인쇄되지 않으
면 21 페이지에 나와 있는 "문제가 발생한 경우"를 참조하십시오.)
16 KOWW
Page 76

Macintosh 설치
설치
설치설치
주주주주 PPD 를 사용하려면 Apple LaserWriter 8 드라이버를 설치해야 합니다. Macintosh 에 내장된
주주주주 HP LaserJet 2200 CD 에는 다양한 언어의 소프트웨어가 들어 있습니다. 일단 설치할 언어를 선택하
Apple LaserWriter 8 드라이버를 사용하십시오.
설치를 시작하기 전에 바이러스 예방 프로그램을 종료합니다.
1 CD-ROM 드라이브에 HP LaserJet 2200 CD 를 넣어서 설치 프로그램을 시작합니다. 설치 창
이 데스크탑에 나타납니다.
2 원하는 언어를 선택하고 설치기 아이콘을 두 번 누릅니다.
3 화면의 지시를 따릅니다.
면 "지정 언어 설치" 를 두 번 누릅니다. 그러면 설치 화면이 지정한 언어로 나타납니다.
4 제대로 설치되었는지 확인하려면 소프트웨어 애플리케이션을 선택하여 연 후 간단한 문서를
작성해 보십시오.
5 프린터 이름이 올바른지 확인한 후 문서를 인쇄하십시오.
6 문서가 제대로 인쇄되면 설치가 완료된 것입니다. 20 페이지의 "8 단계: 중요 정보 기록 및 저장"
으로 계속 진행하십시오. (테스트 페이지가 인쇄되지 않거나 제대로 인쇄되지 않으면 21페이지
에 나와 있는 "문제가 발생한 경우"를 참조하십시오.)
USB 케이블로
케이블로 연결된
케이블로케이블로
연결된 경우
연결된연결된
경우
경우경우
한국어
1 Apple 데스크탑 프린터 유틸리티를 엽니다.
2 "프린터 (USB)"를 선택하고 확인을 누릅니다.
3 USB 프린터 선택에서 변경을 누릅니다.
4 HP LaserJet 2200 프린터를 선택하고 확인을 누릅니다.
5 "PPD" 항목에서 자동 설정을 누릅니다.
6 창을 닫기 전에 변경사항을 저장하십시오.
KOWW 7 단계: 프린터 소프트웨어 설치 17
Page 77

네트웍
네트웍 설치
네트웍네트웍
HP LaserJet 2200 CD 에 들어 있는 소프트웨어는 Novell NetWare 3.2, 4.x, 5.x
또는 Microsoft 네트웍 (Windows 3.1x 제외) 의 네트웍 설치를 지원합니다. 다른
운영 체제에 네트웍을 설치하려면 http://www.hp.com/support/net_printing 으로
이동합니다.
주주주주 HP LaserJet 2200dn 또는 2200dtn 프린터에 포함된 HP JetDirect 프린트 서버에는
10/100 Base-TX 네트웍 포트가 설치되어 있습니다. 다른 종류의 네트웍 포트가 설
치된 HP JetDirect 프린트 서버가 필요한 경우 HP LaserJet 2200 CD 에 들어 있는
사용 설명서의 주문 관련 정보를 참조하거나 현지 HP 대리점에 문의하십시오.
프린터
프린터 소프트웨어를
프린터프린터
z HP JetDirect 프린트 서버가 네트웍에 제대로 연결되었는지 확인하려면 자가
z Windows NT 4.0, Windows 2000, Novell NetWare 에 소프트웨어를 설치하려
Windows 프로그램을
설치
설치설치
소프트웨어를 설치하기
소프트웨어를소프트웨어를
진단 테스트/구성 페이지를 인쇄합니다. (프린터 준비등이 켜져있는 경우 인쇄
및 작업 취소 단추를 동시에 눌렀다가 뗍니다.) 두번째 페이지에서 "하드웨어
주소" 와 그 다음에 나오는 12 자리 숫자를 확인합니다. 네트웍 설치를 완료하
려면 이 하드웨어 주소가 필요할 수 있습니다.
면 관리자 권한이 있어야 합니다.
프로그램을 설치하려면
프로그램을프로그램을
설치하기 전에
설치하기설치하기
설치하려면 다음
설치하려면설치하려면
다음 절차를
다음다음
전에
전에전에
절차를 따르십시오
따르십시오.
절차를절차를
따르십시오따르십시오
z 프린터를 Novell NetWare 서버에 연결합니다. ("Novell 서버 발견" 메시지가
나타나면 예라고 대답합니다.)
z 프린터를 네트웍 Windows 프린트 서버에 연결합니다. ( Network 설정 화면에
서 "클라이언트 설정" 경로를 따라갑니다.)
z 프린트 서버를 거치지 않고 프린터를 네트웍에 직접 연결합니다. (네트웍 설정
화면에서 "서버 또는 피어 투 피어" 경로를 따라갑니다.)
z 어떤 방법이 적합한지 잘 모르는 경우 프린터를 네트웍에 연결합니다. (네트웍
설정 화면에서 "최적 설정 도움말" 경로를 따라갑니다.)
18 KOWW
Page 78

프린터
프린터 소프트웨어를
프린터프린터
소프트웨어를 설치하려면
소프트웨어를소프트웨어를
설치하려면
설치하려면설치하려면
주주주주 다음 지시사항은 Windows 컴퓨터에만 해당됩니다. Macintosh 에 네트웍 케이블을 연결한 경우 17
주주주주 설치가 완료되기 전에 "테스트 페이지 인쇄" 항목 옆에 체크 표시가 되어 있는지 확인하십시오(해당
페이지의 "Macintosh 설치"를 참조하십시오.
1 HP LaserJet 2200 CD 를 CD-ROM 드라이브에 집어 넣으십시오.
2 시작 화면이 나타나면 화면에 나오는 지시를 따르십시오. 시작 화면이 나타나지 않는 경우시작
과 실행을 차례로 누르고 D:\SETUP 를 입력한 후 (D 는 CD-ROM 드라이브) 확인을 누르십시
오.
3 프린터 설치 옆에 있는 단추를 누르고 화면의 지시 사항을 따르면 소프트웨어가 설치됩니다.
화면이 나타날 때).
Windows 2000 에서 설치가 완료되기 전에 "검색된 새 하드웨어 마법사" 창이 다시 나타나면 취소를
누르십시오.
4 완료를 누르십시오.
5 테스트 페이지가 제대로 인쇄되면 설치가 완료된 것입니다. 20 페이지의 "8 단계: 중요 정보 기
록 및 저장"으로 계속 진행하십시오. (테스트 페이지가 인쇄되지 않거나 제대로 인쇄되지 않으
면 21 페이지에 나와 있는 "문제가 발생한 경우"를 참조하십시오.)
네트웍
네트웍 프린터
네트웍네트웍
프린터 관리용
프린터프린터
관리용 소프트웨어
관리용관리용
소프트웨어
소프트웨어소프트웨어
한국어
z 개인 네트웍 프린터 관리를 위해서 HP JetDirect EIO 프린트 서버 카드에 포함
된 내장 웹 서버를 사용하십시오.
z 상업용 및 기업 환경에서 네트웍 프린터를 관리하려면 HP Web JetAdmin
을 사용하십시오. 이 소프트웨어는 HP LaserJet 2200 CD 에 들어 있지 않습
니다. 그러나 아래의 웹 사이트에서 HP Web JetAdmin 을 다운로드 받을 수
있습니다.
HP JetDirect 내장 웹 서버 또는 HP Web JetAdmin 에 대해 자세히 알아보려면
http://www.hp.com/go/webjetadmin 을 방문하거나 HP LaserJet 2200 CD 에 들어
있는 사용 설명서를 참조하십시오.
KOWW 7 단계: 프린터 소프트웨어 설치 19
Page 79

8 단계
단계: 중요
단계단계
중요 정보
중요중요
정보 기록
정보정보
1 소프트웨어 설치를 마친 다음 HP LaserJet 2200 CD 를 보관 케이스에 넣어
2 HP 고객 지원 센터(서비스 및 지원)로 연락하려면 HP LaserJet 2200 제품의
3 제품 구매 일자도 필요하기 때문에 일자가 기록된 판매 영수증 또는 구매 증서
축하합니다. 프린터 설정이 완료되었습니다!
이 입문 설명서를 앞으로의 참조를 위해 보관하실 것을 권합니다.
기록 및및및및 저장
기록기록
앞으로 사용하기 편리한 곳에 보관하십시오.
뒤에 붙어 있는 제품 모델 번호와 일련 번호가 필요합니다. 지금 잠깐 시간을
내서 설명서의 표지 안쪽에 이 정보를 기록하도록 하십시오.
를 이 설명서의 표지에 스테플러로 붙여 놓는 것이 좋습니다.
저장
저장저장
20 KOWW
Page 80

문제가
문제가 발생한
문제가문제가
발생한 경우
발생한발생한
설치시
설치시 문제가
설치시설치시
프린터 설치시 발생한 문제를 해결하려면 다음 목록을 사용합니다.
1 프린터가 켜져 있고 모든 장치가 제대로 연결되었는지 확인합니다. 다른 주변
2 소프트웨어 프로그램을 종료하고 컴퓨터와 프린터를 끕니다. 프린터와 컴퓨
3 컴퓨터에서 실행 중인 모든 바이러스 검사 프로그램을 닫습니다. (작업 표시줄
4 HP LaserJet 2200 CD 에 들어 있는 사용 설명서의 지시 사항에 따라 프린터
5 프린터 소프트웨어를 다시 설치합니다.
6 양방향 통신이 작동되지 않는다는 메시지가 나타나면 확인을 누르고 나머지
경우
경우경우
문제가 발생한
문제가문제가
장치가 프린터 케이블에 연결되어 있지 않도록 하십시오. 병렬 연결의 경우 케
이블이 IEEE-1284B 와 호환성이 있는지 확인합니다.
터를 차례로 켭니다.
상태 영역에서 바이러스 방지 프로그램 아이콘을 마우스 오른쪽 단추로 두 번
누른 다음 해제를 누릅니다.)
소프트웨어를 설치 해제합니다.
설치 절차를 계속 실행합니다.
발생한 경우
발생한발생한
경우
경우경우
한국어
기타
기타 문제가
문제가 발생한
기타기타
문제가문제가
프린터에 발생할 수 있는 기타 문제를 해결하려면 HP LaserJet 2200 CD 에 들어
있는 사용 설명서를 참조하십시오.
HP 고객 지원 센터에 연락하려면 2페이지를 참조하십시오.
주주주주 제어판 표시등의 오류 메시지를 식별하여 원인을 규명하려면 제어판 시뮬레이터
를 사용하십시오. 더 자세히 알아보려면 HP LaserJet 2200 CD 에 들어 있는 사용
설명서를 참조하십시오.
KOWW 문제가 발생한 경우 21
발생한 경우
발생한발생한
경우
경우경우
Page 81

제품
제품 사양
제품제품
주주주주 용지 규격 및 기타 프린터 규격에 대해 알고 싶으시면 HP LaserJet 2200 CD 에 들어 있는 사용 설명
사양
사양사양
서를 참조하십시오.
HP LaserJet 2200 시리즈 프린터의 올바른 설치 위치
z 단단한 수평 바닥
z 프린터 주위에 여유 공간이 있는 곳
z 통풍이 잘되는 곳
z 직사 광선이 없고 암모니아 세척제와 같은 화학약품에 노출되지 않는 곳
z 전원 연결이 가능한 곳
z 갑작스러운 온도나 습도 변화가 없는 안정적 환경
z 상대 습도가 10 ~ 80% 인 장소
z 실내 온도가 15°~ 32.5°C (59° ~ 89°F) 인 장소
프린터
프린터 사양
사양 HP LaserJet 2200
프린터프린터
사양사양
높이:
너비
깊이(본체)
무게
(토너 카트리지 포함)
255 mm (10.0 in.) 334 mm (13.2 in.) 395 mm (15.6 in.)
405 mm (16.0 in.) 405 mm (16.0 in.) 405 mm (16.0 in.)
435 mm (17.1 in.) 435 mm (17.1 in.) 435 mm (17.1 in.)
14.0 kg (29.0 lbs) 17.1 kg (35.9 lbs) 18.7 kg (39.4 lbs)
HP LaserJet 2200
선택
선택 사양
사양 용지함
선택선택
(250 장장장장 )
용지함 3 포함
사양사양
용지함용지함
포함
포함포함
HP LaserJet 2200
선택
선택 사양
사양 용지함
선택선택
(500 장장장장 )
용지함 3 포함
사양사양
용지함용지함
포함
포함포함
22 KOWW
Page 82

전기
전기 사양
사양 110V 모델
전기전기
사양사양
모델 220V 모델
모델모델
모델
모델모델
소요 전력
일반 제품의 경우 권장 최소 회로 용량
평균 전력 소비(W) -
(HP LaserJet 2200
시리즈 프린터)
절전 모드 작동 시간의 기본값은 15 분입니다.
이 값은 변경될 수 있습니다. 최신 정보를 보시려면 http://www.hp.com/support/lj2200 을 방문하십시오.
경고
경고! 소요 전력은 프린터가 판매되는 지역에 따라 다릅니다. 사용 전압을 변경하지 마십시오. 프린터가 손
경고경고
환경
환경 사양
사양 인쇄시
환경환경
사양사양
온도
(프린터 및 토너 카트리지)
상대 습도
상되거나 제품 보증이 무효화됩니다.
100-127V (+/- 10%)
50/60 Hz (+/- 3 Hz)
5.0A 2.5A
인쇄 (18 PPM) = 400 W
대기 = 12 W
절전 모드 = 12 W
끄기 = 0 W
인쇄시 저장
인쇄시인쇄시
15
° ~ 32.5°C
(59
° ~ 89°F)
10% - 80% 10% - 90%
220-240V (+/- 10%)
50/60 Hz (+/- 3 Hz)
인쇄 (18 PPM) = 400 W
대기 = 12 W
절전 모드 = 12 W
끄기 = 0 W
저장 / 대기시
대기시
저장저장
대기시대기시
° ~ 40°C
-20
(-4
° ~ 104°F)
한국어
소음
소음 배출
배출
소음소음
배출배출
(HP LaserJet 2200) 프린터와의
6.3 벨 이상의 소음 배출을 가진 프린터는 별도의 방이나 칸막이에 설치하는 것이 좋습니다.
이 값은 변경될 수 있습니다. 최신 정보를 보시려면 http://www.hp.com/support/lj2200 을 방문하십시오.
프린터와의 거리
프린터와의프린터와의
인쇄(18 PPM)
절전 모드 거의 들리지 않음
소음
소음 출력
소음소음
인쇄 (18 PPM)
절전 모드 거의 들리지 않음
거리 Per ISO 9296 기준
거리거리
L
= 51 dB(A)
pAm
출력 Per ISO 9296 기준
출력출력
= 6.6 bels(A)
L
WAd
기준 준수
준수
기준기준
준수준수
기준 준수
준수
기준기준
준수준수
KOWW 제품 사양 23
Page 83

규격
규격 정보
규격규격
주주주주 규격에 관련된 정보를 추가로 원하시면 HP LaserJet 2200 CD 에 들어 있는 사용 설명서의 부록 A 를
정보
정보정보
참조하십시오.
FCC 규격
규격
규격규격
본 기기는 FCC 규격 15 에 따라 테스트를 마쳤으며, 클래스 B 디지털 기기 제한 규격에 부합하는 것
으로 판명되었습니다. 이러한 제한 규격은 주거 지역에 설치 시 유해한 방해 전파에 대한 보호를 위
해 마련되었습니다. 이 장비는 라디오 주파수 에너지를 생성, 사용 및 방출합니다. 이 장비를 지시 사
항에 따라 설치 및 사용하지 않으면 라디오 통신에 유해한 전파 방해를 일으킬 수 있습니다. 그러나
지시에 따라 설치하더라도 전파 방해가 일어나지 않는다고 보장할 수 없습니다. 전파 방해의 유무 여
부는 장비를 끈 다음 켜보면 알 수 있습니다. 이 장비가 라디오 또는 TV 통신에 유해한 방해 전파를
발생한 경우 사용자는 다음 조치 중 몇 가지를 실행하여 전파 방해를 해소할 수 있습니다.
z 수신 안테나 방향을 바꾸거나 위치를 옮깁니다.
z 프린터와 수신기 간의 거리를 넓힙니다.
z 프린터와 수신기를 각각 별도의 콘센트에 연결합니다.
z 대리점이나 라디오/TV 전문 기술자에게 문의합니다.
주주주주 HP 의 공식 승인 없이 프린터를 변경하거나 변형하는 경우 해당 사용자의 프린터 사용권이 무효화될
경고
경고! 제어 기능 사용, 조정 작업, 기타 사용 설명서에 나와 있지 않은 절차 실행 등으로 인하여 위험한 방사
경고경고
수 있습니다.
차폐 인터페이스 케이블 사용은 FCC 규격 15 의 클래스 B 제한 기준에 따른 의무 사항입니다.
레이저
레이저 안전
레이저레이저
미 식품 의약국 (FDA) 산하 장치 및 방사능 안전 센터 (CDRH) 는 1976 년 8 월 1일부터 생산되는 레
이저 관련 제품에 대한 규제를 시행해 오고 있습니다. 이 규격은 미국내에서 시판되는 제품에 대해
강제적으로 적용됩니다. 본 프린터는 1968 년 건강 및 안전을 위한 방사능 규제법에 의거한 미 보건
후생부 (DHHS) 의 방사능 성능 표준하에서 클래스 1 레이저 제품으로 인증되었습니다.
프린터 내부에서 방출된 방사능은 내부 보호막과 외부 덮개로 완전히 차단되기 때문에 정상적인 작
업시 방사능 광선이 외부로 방출되지 않습니다.
능에 노출될 수 있습니다.
안전 규격
규격
안전안전
규격규격
24 KOWW
Page 84

규격
규격 준수
준수
규격규격
준수준수
ISO/IEC Guide 22 및 EN 45014 에 따름
제조업체
제조업체 상호
상호: Hewlett-Packard Company
제조업체제조업체
상호상호
제조업체
제조업체 주소
주소: 11311 Chinden Boulevard
제조업체제조업체
주소주소
Boise, Idaho 83714-1021, USA
제품
제품 일반
일반 사항
제품제품
제품
제품 명세
제품제품
부가
부가 정보
부가부가
(1) 본 제품은 저전압 지침 73/23/EEC 와 EMC 지침 89/336/EEC 의 규격에 따르며 이에 따라 CE 마크를 부착하고 있
습니다.
1) (2) 본 제품은 일반적인 HP 개인용 컴퓨터 시스템 환경에서 테스트 되었습니다.
2) 본 기기는 FCC 규격 15 에 따릅니다. 작동은 다음 두 가지 조건을 전제로 합니다. (1) 본 기기는 유해한 방해 전파
3) 제품이 프린트 서버 부품을 사용하여 근거리 통신망 (LAN) 에 연결되었을 때 Class A 에 준한 작동을 보여주었습
* C4793A 는 선택 사양 250 장 용지함입니다.
** C7065A 는 선택 사양 500 장 용지함입니다.
사항
일반일반
사항사항
제품명
제품명: HP LaserJet 2200d, 2200dt, 2200dn, 2200dtn, 2200
제품명제품명
모델
모델 번호
번호: C7058A, C7059A, C7063A, C7061A, C4793A*, C7065A**, C7064A
모델모델
번호번호
제품
제품 옵션
옵션: 모두
제품제품
옵션옵션
명세:
명세명세
안전성: IEC 60950:1991+A1+A2+A3+A4/EN 60950:1992+A1+A2+A3+A4+A11
IEC 60825-1:1993+A1/EN 60825-1:1994+A11 (CLASS 1 레이저/LED 제품)
EMC: CISPR 22:1997/EN 55022:1998 Class B
EN 61000-3-2:1995
EN 61000-3-3:1995
EN 55024:1998
FCC Title 47 CFR, Part 15 Class B2/ICES-002, Issue 2
AS/NZS 3548:1995
정보:
정보정보
를 발생하지 않으며, (2) 예상치 못한 작동을 일으키는 방해 전파를 포함한 모든 방해 전파를 수용합니다.
니다.
1
한국어
Boise, Idaho USA
2000년년년년 4월월월월 6일일일일
규제
규제 조항만
조항만 해당
조항만조항만
해당:
해당해당
31-41 Joseph Street, Blackburn, Victoria 3130, Australia
Department HQ-TRE / Standards Europe, Herrenberger Straße 110-140,
D-71034 Böblingen (FAX: +49-7031-14-3143)
Mail Stop 160, Boise, ID 83707-0015 (Phone: 208-396-6000)
규제규제
호주 연락처: Product Regulations Manager, Hewlett-Packard Australia Ltd.,
유럽 연락처: 해당 지역 Hewlett-Packard 판매 및 서비스 사무소 또는 Hewlett-Packard GmbH,
미국 연락처: Product Regulations Manager, Hewlett-Packard Company, PO Box 15,
KOWW 규격 정보 25
Page 85

26 KOWW
Page 86

copyright © 2001
Hewlett-Packard Company
www.hp.com/support/lj2200
*C7058-90977*
*C7058-90977*
C7058-90977
 Loading...