


 Loading...
HP Officejet Pro L7500/L7600/7700
Getting Started Guide
Guide de Mise en Marche
Guía de instalación inicial
Guia de Pimeiros Passos
Copyright Information
© 2007 Copyright Hewlett-Packard Development Company, L.P.
Edition 1, 2/2007
Reproduction, adaptation or translation without prior written permission is prohibited, except as allowed under the copyright laws.
The information contained herein is subject to change without notice.
The only warranties for HP products and services are set forth in the express warranty statements accompanying such products and services. Nothing herein should be construed as constituting an additional warranty. HP shall not be liable for technical or editorial errors or omissions contained herein.
Trademark credits
Microsoft® and Windows® are U.S. registered trademarks of Microsoft Corporation.
Informations sur le copyright
© 2007 Copyright Hewlett-Packard Development Company, L.P.
Édition 1, 2/2007
Toute reproduction, adaptation ou traduction sans autorisation écrite préalable est interdite, à l’exception de ce qui est autorisé en vertu des lois sur le copyright.
Les informations contenues dans ce document sont sujettes à des modifications sans préavis.
Les seules garanties couvrant les produits et les services HP sont celles stipulées de façon explicite dans les déclarations de garantie accompagnant ces produits et services. Rien dans le présent document ne peut être considéré comme constituant une garantie supplémentaire. HP n’est en aucun cas responsable des éventuelles omissions ou erreurs d’ordre technique ou éditorial contenues dans le présent document.
Crédits
Microsoft® et Windows® sont des marques commerciales de Microsoft Corporation aux Etats-Unis.

Safety Information
Always follow basic safety precautions when using this product to reduce risk of injury from fire or electric shock.
1.Read and understand all instructions in the documentation that comes with the device.
2.Use only a grounded electrical outlet when connecting this product to a power source. If you do not know whether the outlet is grounded, check with a qualified electrician.
3.When connecting the device to the electrical outlet, use only the power cord provided with the device.
4.If your device supports fax, use the phone cable included with the device.
5.Observe all warnings and instructions marked on the device.
6.Unplug this device from wall outlets before cleaning.
7.Do not install or use this device near water, or when you are wet.
8.Install the product securely on a stable surface.
9.Install the device in a protected location where no one can step on or trip over the line cord, and the line cord cannot be damaged.
10.If the device does not operate normally, see “Maintaining and troubleshooting” in the onscreen user guide on the Starter CD.
11.There are no user-serviceable parts inside. Refer servicing to qualified service personnel.
Consignes de sécurité
Respectez toujours les mesures de sécurité élémentaires lorsque vous utilisez ce produit afin de réduire les risques de blessures dues au feu ou à un choc électrique.
1.Lisez attentivement toutes les instructions contenues dans la documentation livrée avec l’appareil.
2.Utilisez toujours une prise de courant mise à la terre lors du branchement de ce produit à une source d’alimentation. Si vous ne savez pas si une prise de courant est mise à la terre, consultez un électricien qualifié.
3.Lorsque vous branchez l’appareil sur la prise électrique, utilisez uniquement le cordon d’alimentation fourni.
4.Si votre appareil dispose d’une fonction télécopie, utilisez le cordon téléphonique fourni.
5.Respectez toutes les instructions et tous les avertissements indiqués sur l’appareil.
6.Débranchez cet appareil des prises murales avant de procéder à son nettoyage.
7.N’installez jamais cet appareil près d’une source d’eau, ni si vous êtes mouillé.
8.Installez l’appareil en toute sécurité sur une surface stable.
9.Installez l’appareil en un lieu protégé où personne ne puisse marcher sur le cordon ou trébucher sur celui-ci, et où le cordon ne puisse pas être endommagé.
10.Si l’appareil ne fonctionne pas normalement, reportez-vous à la section « Entretien et dépannage » du guide de l’utlisateur sur le CD de démarrage.
11.L’appareil ne contient aucune pièce dont l’entretien doive être réalisé par l’utilisateur. Confiez l’entretien à du personnel qualifié.
Información de seguridad
Tome las precauciones básicas de seguridad siempre que vaya a usar este producto para reducir el riesgo de daños por fuego o descarga eléctrica.
1.Lea y comprenda todas las instrucciones de la documentación que viene con el dispositivo.
2.Al conectar este producto a una fuente de poder, utilice solamente una toma de corriente con conexión a tierra. Si no sabe si la toma tiene conexión a tierra, verifíquelo con un electricista calificado.
3.Al conectar el dispositivo a la toma de corriente, utilice sólo el cable de alimentación proporcionado con el dispositivo.
4.Si el dispositivo admite el fax, utilice el cable telefónico que incluye el dispositivo.
5.Tenga presente todos los avisos y las instrucciones indicadas en el dispositivo.
6.Antes de proceder a su limpieza, desenchufe este dispositivo de la toma de corriente.
7.No instale ni utilice este dispositivo cerca del agua o cuando esté mojado.
8.Instale el dispositivo de manera segura sobre una superficie estable.
9.Instale el dispositivo en un lugar protegido donde nadie pueda pisar el cable de alimentación eléctrica ni tropezar con él y donde dicho cable no sufra daños.
10.En caso de que el dispositivo no funcione con normalidad, consulte “Mantenimiento y solución de problemas” en la guía del usuario en pantalla del Starter CD.
11.Dentro del producto no hay piezas que el usuario pueda reparar. Confíe las tareas de servicio a personal de servicio calificado.
Informações de segurança
Sempre obedeça às precauções básicas de segurança ao usar este produto para diminuir o risco de queimaduras ou choques elétricos.
1.Leia e certifique-se de que entende todas as instruções na documentação que acompanha a dispositivo.
2.Utilize somente uma tomada elétrica aterrada ao conectar este produto a uma fonte de energia. Se você não souber se a tomada está aterrada, peça ajuda a um eletricista.
3.Ao conectar o dispositivo à tomada elétrica, use apenas o cabo de alimentação fornecido com o dispositivo.
4.Se seu dispositivo suportar fax, use o cabo telefônico incluído com o dispositivo.
5.Obedeça a todos os avisos e instruções do dispositivo.
6.Desconecte este dispositivo da tomada da parede antes de limpá-lo.
7.Não instale ou utilize este dispositivo perto de substâncias líquidas ou quando estiver com as mãos molhadas.
8.Instale o produto com segurança em uma superfície estável.
9.Instale o dispositivo em um local protegido onde ninguém possa pisar ou tropeçar no cabo de alimentação e onde esse cabo não possa ser danificado.
10.Se o dispositivo não funcionar corretamente, consulte "Manutenção e solução de problemas" no guia do usuário exibido na tela do Starter CD.
11.O produto não contém peças que possam ser reaproveitadas pelo usuário. Em caso de problemas com a impressora, entre em contato com o pessoal qualificado para assistência e manutenção da impressora.

Contents
1 Set up the device
Before you begin . . . . . . . . . . . . . . . . . . . . . . 2 Set up the device . . . . . . . . . . . . . . . . . . . . . . 2 Complete the installation . . . . . . . . . . . . . . . . . 4 Finding more information. . . . . . . . . . . . . . . . . 4
2 Identify the device parts
Front view . . . . . . . . . . . . . . . . . . . . . . . . . . . 5 Back view . . . . . . . . . . . . . . . . . . . . . . . . . . . 6 Control panel . . . . . . . . . . . . . . . . . . . . . . . . . 7
3 Set up the fax (optional)
Parallelvs. serial-type phone systems . . . . . . . . 9 Dedicated phone line . . . . . . . . . . . . . . . . . . 10 Shared phone line . . . . . . . . . . . . . . . . . . . . 10
Managing and configuring fax settings . . . . . . 15 Set up speed-dial entries . . . . . . . . . . . . . . . . 15
Test fax setup . . . . . . . . . . . . . . . . . . . . . . . . 15
Hewlett-Packard limited warranty statement
4 Set up Direct Digital Filing for scanning (optional)
Required information. . . . . . . . . . . . . . . . . . . 16 Step 1: Create and share a folder on the
network . . . . . . . . . . . . . . . . . . . . . . . . . . . . 17 Step 2: Set up a shortcut to the folder on the network . . . . . . . . . . . . . . . . . . . . . . . . . . . . 17 Step 3: Test and use Direct Digital Filing . . . . . 18
5 Set up the device for wireless communication (optional)
Required information. . . . . . . . . . . . . . . . . . . 19 Understanding 802.11 wireless network
settings . . . . . . . . . . . . . . . . . . . . . . . . . . . . 19 Set up the device for wireless communication
using the control panel . . . . . . . . . . . . . . . . . 20 Set up the device for wireless communication
using software . . . . . . . . . . . . . . . . . . . . . . . 20
6 Troubleshooting
Solving installation problems . . . . . . . . . . . . . 22 Solving network problems (some models only) . 23 Solving wireless problems (some models only) . 23 Solving Direct Digital Filing problems (optional) 24 Solving fax problems (optional) . . . . . . . . . . . 26 Troubleshooting and configuration tools . . . . . 28
English
1

1 Set up the device
This section summarizes the setup process for the device.
Before you begin
Prepare the location
Make sure the location where you will place the device meets the following requirements.
•The surface must be sturdy and level.
•Make sure that you leave enough room so that you can gain access to the back of the device and open the flatbed scanner lid.
•Do not place the device in direct sunlight or near chemicals. Make sure that the environment does not experience abrupt changes in temperature or humidity.
Temperature |
15° to 35° C (59° to 95° F) |
|
|
Relative humidity |
10% to 80% |
|
|
Set up the device
This section summarizes the steps you follow to set up the device. For more information, see the setup poster that came with the device.
NOTE: Check the package contents and install optional accessories.
1.Remove the tape and packing materials.
NOTE: Be sure to remove the cardboard packing material from the printhead area.
2.Install the control-panel faceplate.
3.Install the document feeder tray.
4.Install the ink cartridges.
NOTE: All four ink cartridges must be correctly installed for the device to work. Ink from the cartridges is used in the printing process in a number of different ways, including in the initialization process, which prepares the device and cartridges for printing, and in printhead servicing, which keeps print nozzles clear and ink flowing smoothly. In addition, some residual ink is left in the cartridge after it is used. For more information see www.hp.com/go/ inkusage.
5.Install the printheads.
CAUTION: Press down firmly on the printheads to ensure proper contact before closing the printhead latch.
6.Connect the power cord and adapter and turn on the device.
NOTE: Set the language and the country/ region (if needed), as well as the date and time, on the display.
2 Set up the device

7.When prompted, load paper, and then press the OK button.
a.Lift the output tray.
b.Insert up to 250 sheets of paper into Tray 1, print-side down, along the right hand side of the tray. Make sure the stack of paper aligns with the right and back edges of the tray and does not exceed the line marking in the tray.
NOTE: Tray 2 can be loaded only with plain paper.
c.Slide the media guides in the tray to the size that you are loading.
d.Lower the output tray and pull out the extension.
To ensure the best possible print quality, the device initializes and aligns the printheads. This process takes approximately 12 minutes.
8.Install software and connect the device.
You can connect the device using one of the following types of connections:
•USB
•Ethernet network (some models only).
•Wireless (802.11) network (some models only).
•Fax (some models only).
For more information about device software and connectivity, see the onscreen user guide on the Starter CD.
USB
a.Insert the Starter CD, click Install (Windows) or Install Software (Mac OS), and then follow the onscreen instructions to complete the software installation.
NOTE: If the CD menu does not start automatically, double-click the setup icon on the Starter CD.
b.Connect the USB cable to the computer, when prompted.
Ethernet network
a.Remove the protective cover from the device’s network connector.
b.Connect the network cable to the connector and to an available port on the network hub, switch, or router. If the connector’s Link light does not turn on, try a different port.
CAUTION: Do not plug the network cable into a port labeled WAN, Uplink, or Internet in the hub, switch, or router.
c.Insert the Starter CD, click Install (Windows) or Install Software (Mac OS), and then follow the onscreen instructions to complete the software installation.
If the installation program displays more than one instance of the device, print a Network configuration page to select the right device.
NOTE: If the CD menu does not start automatically, double-click the setup icon on the Starter CD.
d.Print the Network configuration page. This page contains information needed for setup. On the control panel, press the Setup button, and then complete one of the following:
•If your device has a two-line display, select
Network Setup, select Print Network Settings, and then press OK.
•If your device has a color display, select
Network, select View Network Settings, select Print Network Configuration Page, and then press OK.
Wireless 802.11 network
For information about wireless communication and setup instructions, see “Set up the device for wireless communication (optional)” on page 19.
Fax
If you install software using the installation program on the Starter CD, you can configure fax settings after the device software is installed using the Fax Setup Wizard (Windows) or HP Device Manager (Mac OS). For more information about setting up the fax, see “Set up the fax (optional)” on page 9.
English
Set up the device |
3 |
9.Set up the Direct Digital Filing feature (optional).
For setup instructions, see “Set up Direct Digital Filing for scanning (optional)” on page 16.
Complete the installation
Verify that the device is set up correctly
1.Print a document from an application that you use frequently.
2.Place the document in the document feeder tray with the print-side facing up and the first page on top.
3.Adjust the width adjusters to the size of the document.
4.Press START COPY Black or START COPY Color. The device makes a copy of the document. If you encounter problems, see “Solving installation problems” on page 22.
5.Remove the document from the ADF output tray.
6.Open the flatbed scanner lid.
7.Place the first page of the document print-side down on the scanner glass with the top-left corner of the document located in the lower-right corner of the glass.
8.Close the flatbed scanner.
9.Press START COPY Black or START COPY Color. The device makes a copy of the document. If you encounter problems, see “Solving installation problems” on page 22.
Verify that the device software is installed correctly
To verify that the device software has been installed correctly, start the software and complete basic tasks (such as printing a document or sending a scan to your computer).
To open the HP Photosmart software (Windows)
1.On the Windows desktop, double-click the HP Photosmart software icon.
2.If you have more than one HP device installed, select the appropriate tab for your device.
To open the HP Photosmart Studio software (Mac OS)
1.Click the HP Photosmart Studio icon in the Dock.
2.Click Device, and then choose a device.
For more information about using the device software, see the online help for the software.
Register the device
If you have not already done so, go to www.register.hp.com and register the device.
Finding more information
For information about using the device and troubleshooting, see the following resources:
•Onscreen user guide and readme file on the Starter CD or at www.hp.com/support
•HP Instant Support and embedded Web server (see the onscreen user guide)
•Product support site at www.hp.com/support
4 Set up the device
2 Identify the device parts
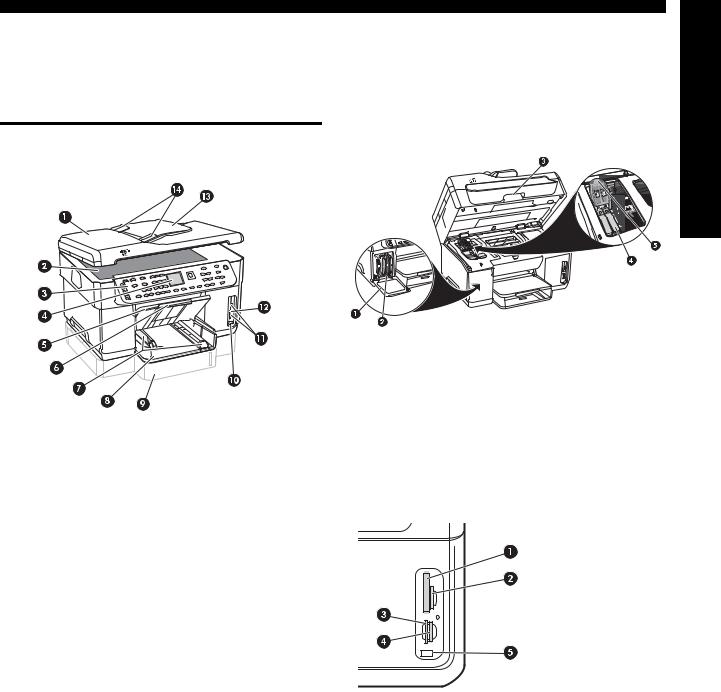
Front view
Printing supplies area
English
1Automatic document feeder (ADF)
2Scanner glass
3Control panel
4Display
5Output tray
6Output tray extension
7Length/width guides
8Tray 1
9Tray 2 (available with some models)
10Front universal serial bus (USB) port
11Memory card slots
12Memory device light
13Document feeder tray
14Width guides
1Ink cartridge door
2Ink cartridges
3Print-carriage access door
4Printheads
5Printhead latch
Memory card slots
1Compact flash (types I and II, solid state only)
2Secure Digital, MultimediaCard (MMC), Secure MMC
3xD
4Memory Stick, Magic Gate Memory Stick, Memory Stick Duo, and Memory Stick Pro
5Front universal serial bus (USB) port (PictBridgeenabled)
Front view |
5 |
Back view
1
2
3
5
6
4
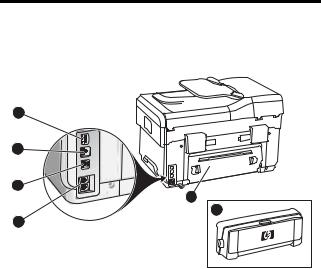
1Power input
2Ethernet network port (some models only)
3Rear USB port
4Fax ports (1-LINE and 2-EXT)
5Rear access panel (some models only)
6Automatic two-sided printing accessory (duplexer), (some models only)
6 Identify the device parts
Control panel
English
NOTE: The control panel layout and features vary depending on the model of the device that you have. Your device might not have all of the buttons and lights described in this section.
1 Speed Dial
Speed-dial buttons: Access the first five speed-dial numbers. An entry might be a fax number or a group of fax numbers, or a folder on the network.
List of speed-dial entries: Identify the speed-dial entries that correspond to the five speed-dial buttons. You can write the entries on the lined paper that is provided, or print lists to insert.
2 SCAN
Scan Menu: Select a scan destination.
Digital Filing: Open the Direct Digital Filing speed-dial address book to select a destination for the scan.
START SCAN: Start a scan job and send it to the destination you selected using the Scan Menu button.
3 FAX
Menu: Open the menu for the fax function.
Junk Fax Blocker: Open the Junk Fax Blocker menu where you can add or delete numbers from a list of blocked fax numbers and view reports. This feature is available only if caller ID is set up through your phone company.
Resolution: Adjust the speed and quality of faxes that are sent from the device.
Redial/Pause: Redial the most recently dialed fax number.
Auto Answer: Set the fax function to answer the phone automatically after a specified number of rings.
START FAX Black or START FAX Color: Start the fax, in black and white or in color.
4 Keypad
Enter fax numbers, values, or text.
5 Display
NOTE: Some device models have a two-line display and some models have a color display.
Shows status and error messages, mode and setup menus and their options, help information, and ink cartridge levels.
Control panel |
7 |
Arrow buttons: Move through menu options or through photos on the color display (if available).
OK: Select a menu, setting, or if the device has a color display, select photos for printing.
Back: Return to the previous menu.
6 Other buttons
Setup: Access the menu system for reports, settings, and maintenance.
2-sided: Select two-sided output (if a duplexer is installed).
 Help: Shows additional information about messages or menus that are shown on the display. For hardware problems, shows a message that explains the problem. If the device does not have a Help button, use the Setup button to access the help.
 Cancel: Stop a job, exit a menu, or exit settings.
7 COPY
Menu: Open the menu for the copy function.
Reduce/Enlarge: Change the size of the copy.
Number Of Copies: Select the number of copies using either the arrow keys or by entering the number directly using the keypad.
Collate: Sequence copied output in the exact order it is scanned from the scanner glass or ADF.
Quality: Control the speed and quality of copies. The Quality light illuminates next to the selected copy quality.
START COPY Black or START COPY Color: Start the copy in black and white or in color.
8 PHOTO
Menu: Open the menu for the photo function.
Proof Sheet: Print a proof sheet when a memory card has been inserted in a memory card slot.
Rotate: If the device has a color display, rotate the currently displayed photo 90 degrees. Subsequent presses continue to rotate the photo 90 degrees.
Zoom (- and +): If the device has a color display, enlarge or reduce the image.
PRINT PHOTOS: Start the photo printing job.
9 Power button and lights
 Power button: Turn the device on or off. When the device is off, a minimal amount of power is still supplied to the device. To completely disconnect the power supply to the device, turn the device off, and then unplug the power cord.
When lit, indicates that the device is on. The light blinks while performing a job.
 Network status light: Indicate the status of the device on a network.

 Wireless (802.11) status light: Indicate the status of the device on a wireless network.
 Attention light: When blinking, the attention light indicates an error has occurred that requires your attention.
8 Identify the device parts

3 Set up the fax (optional)
This chapter provides instructions for setting up the fax in a number of different setup configurations.
•Using a dedicated phone line
•Using a shared phone line
•Managing and configuring the fax
•Configuring the answer mode
•Configuring rings to answer
•Changing the answer ring pattern for distinctive ringing
•Setting the fax header
•Testing the fax setup
For more information about fax features, see the onscreen user guide on the Starter CD.
NOTE: Fax is supported on some models only.
CAUTION: If you do not use the supplied cord to connect from the telephone wall jack to your device, you might not be able to fax successfully.
This special phone cord is different from the phone cords you might already have in your home or office. If the supplied phone cord is too short, see the onscreen user guide on the Starter CD for information.
Parallelvs. serial-type phone systems
Before you begin setting up the device for faxing, determine which kind of phone system your country/ region uses.
NOTE: The instructions for fax setup differ depending on whether you have a serialor parallel-type phone system.
If you do not see your country/region listed in the following sections, you probably have a serial-type phone system. If you are unsure which kind of telephone system you have (serial or parallel), check with your telephone company.
Countries/regions with paralleltype phone systems
In a parallel-type phone system, you are able to connect shared telephone equipment to the phone line by using the “2-EXT” port on the back of the device.
Argentina |
Australia |
Brazil |
Canada |
Chile |
China |
Colombia |
Greece |
India |
Indonesia |
Ireland |
Japan |
Korea |
Latin America |
Malaysia |
Mexico |
Philippines |
Poland |
Portugal |
Russia |
Saudi Arabia |
Singapore |
Spain |
Taiwan |
Thailand |
USA |
Venezuela |
Vietnam |
|
|
NOTE: If you have a parallel-type phone system,
HP recommends you use the 2-wire phone cord supplied with the device to connect it to the telephone wall jack.
Countries/regions with serial-type phone systems
In a serial-type phone system, the connector type on your shared telephone equipment (modems, phones, and answering machines) does not allow a physical connection to the “2-EXT” port on the device. Instead, all equipment must be connected at the telephone wall jack.
NOTE: In some countries/regions that use serial-type phone systems, the phone cord that came with the device might have an additional wall plug attached to it. This enables you to connect other telecom devices to the wall jack where you plug in the device.
English
Parallelvs. serial-type phone systems |
9 |
For information on setting up the device for faxing using a serial-type phone system, see the Fax Configuration Web site for your country/region.
Austria |
www.hp.com/at/faxconfig |
Belgium (Dutch) |
www.hp.be/nl/faxconfig |
Belgium (French) |
www.hp.be/fr/faxconfig |
Denmark |
www.hp.dk/faxconfig |
Finland |
www.hp.fi/faxconfig |
France |
www.hp.com/fr/faxconfig |
Germany |
www.hp.com/de/faxconfig |
Ireland |
www.hp.com/ie/faxconfig |
Italy |
www.hp.com/it/faxconfig |
Norway |
www.hp.no/faxconfig |
Netherlands |
www.hp.nl/faxconfig |
Portugal |
www.hp.pt/faxconfig |
Spain |
www.hp.es/faxconfig |
Sweden |
www.hp.se/faxconfig |
Switzerland (French) |
www.hp.com/ch/fr/faxconfig |
Switzerland (German) |
www.hp.com/ch/de/faxconfig |
United Kingdom |
www.hp.com/uk/faxconfig |
Dedicated phone line
Use this section if you plan on using the following type of phone line for the fax:
•Dedicated phone line (no other devices, such as a phone or answering machine, share the line).
•Dedicated phone line without devices sharing the line but with a subscription to a distinctive ring service.
•Private Branch Exchange (PBX) or an Integrated Services Digital Network (ISDN) line. For more information about PBX and ISDN lines, see the onscreen user guide on the Starter CD.
NOTE: You cannot receive faxes automatically if you have a voice mail service at the same phone number you use for fax calls. You must receive faxes manually; this means you must be available to respond in person to incoming fax calls. If you want to receive faxes automatically instead, contact your telephone company to subscribe to a distinctive ring service, or to obtain
a separate phone line for faxing.
Set up the device to answer incoming calls manually. Press the Auto Answer button until the light is off.
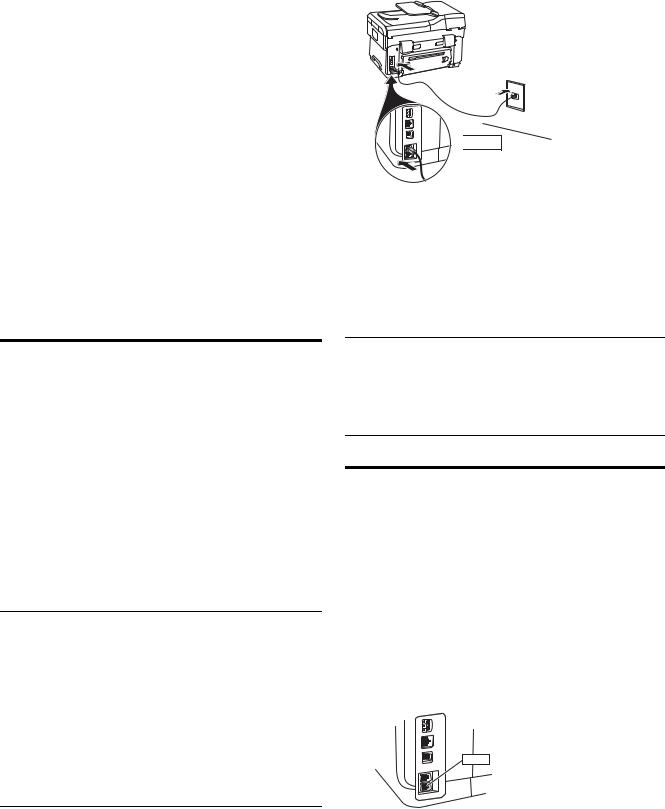
1.Unplug any telephone devices from the phone jack where you are connecting the device.
2.Connect the phone cord that came with the device between the 1-LINE port on the device and the phone jack.
 1-LINE
3.If you subscribe to a distinctive ring service, change the Answer Ring Pattern setting to the pattern that has been assigned to your fax number by the telephone company, for example, double rings or triple rings.
For information on changing this setting, see the onscreen user guide on the Starter CD.
NOTE: Your device is factory-set to answer all ring patterns. If you do not set the correct ring pattern assigned to your fax number by the telephone company, your device might answer both voice calls and fax calls, or it might not answer at all.
Shared phone line
If the fax is going to share the phone line with other devices, such as a phone, answering machine, computer/computer modem, or caller ID box, or if you have voicemail service included with your line, you must follow these instructions to determine how to set up your fax.
1.Follow the steps for the “Dedicated phone line” on page 10.
2.Plug additional devices into the 2-EXT port on the back of the device.
2-EXT
3.Use the following tables to determine the rest of your fax configuration.
10 Set up the fax (optional)
Use the fax setup tables
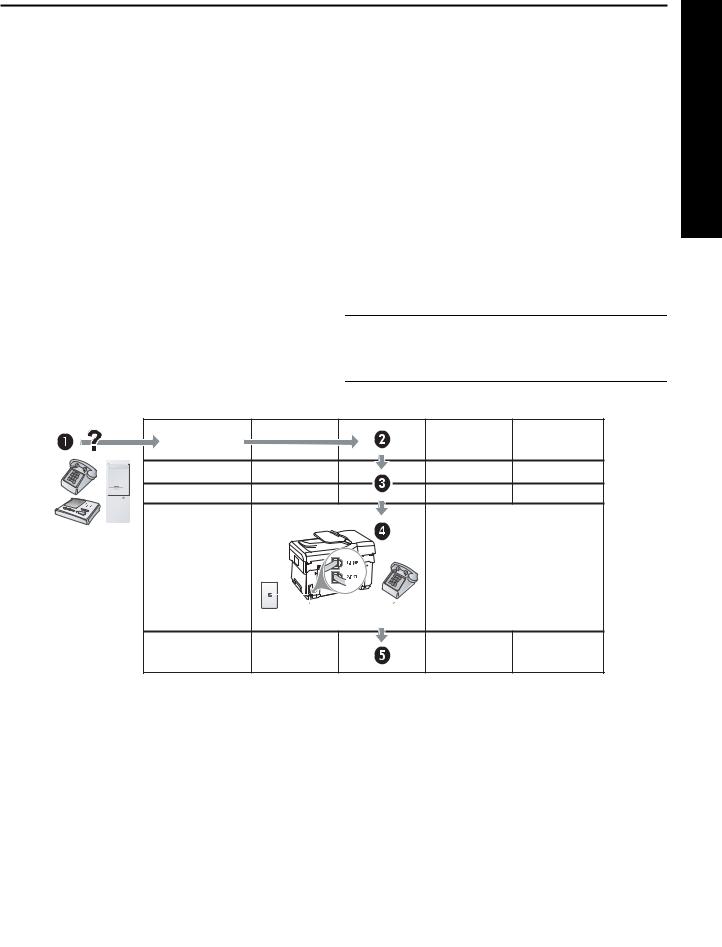
Use the fax setup tables to assist you in setting up the fax function on your device. To use the tables, follow these steps:
Determine how you will use the phone line that your fax machine will be using:
• |
Voice and Fax (see Table 3-1) |
• |
Voice, Fax, and Internet (dial-up) (see Table 3-3) |
• |
Fax and Internet (see Table 3-2) |
• |
Voice, Fax, and Internet (DSL) (see Table 3-4) |
Once you determine how you want to use the phone line, follow these steps:
In the first row, determine what other devices will share the phone line with the all-in-one (phone, computer, answering machine).
In the next rows, determine if the phone line has any special services (voicemail or distinctive ring), and, if the phone line will be used with a computer, determine if you have a dial-up or DSL modem.
The next row provides an example of what your fax setup might look like in terms of how to connect various devices to the all-in-one.
In the last row of the table are numbers that correspond to the Configuration guideline table on page 13. Use the Configuration guideline table to help you set up your all-in-one so that it operates the most effectively based on the way your all-in-one is set up.
NOTE: You must follow the numbers as they appear in the last row of each fax setup table. Performing the steps out of sequence may result in fax setup problems.
English
Table 3-1 Voice and Fax
What devices will you |
Telephone |
• |
Telephone |
connect to the device? |
|
• |
Answering machine |
Does your line have… |
|
Distinctive ring service |
Distinctive ring service |
Your fax setup should look |
|
|
|
like this… |
|
|
|
Then follow configuration # |
3 |
1, 9, 2 |
1, 7 |
1, 9, 7 |
|
Shared phone line 11
 L7500, L7600, L7000 User Manual")
Table 3-2 Fax and Internet
What devices will you |
• |
Computer |
|
connect to the device? |
• |
Modem |
|
|
|
|
|
Is your line… |
Dial-up |
DSL |
|
Your fax setup should look like this…
DSL filter
|
|
Splitter |
Then follow configuration # |
4, 5, 1, 2, 6 |
8, 1, 2, 6 |
|
Table 3-3 Voice, Fax, and Internet (dial-up)
What devices will you |
• |
|
Telephone |
• |
Telephone |
||||||||||||||||||||||||||||||||||||||||
connect to the device? |
• |
|
Computer |
• |
Computer |
||||||||||||||||||||||||||||||||||||||||
|
• |
|
Modem |
• |
Modem |
||||||||||||||||||||||||||||||||||||||||
|
|
|
|
|
|
|
|
|
|
|
|
|
|
|
|
|
|
|
|
|
|
• |
Answering machine |
||||||||||||||||||||||
|
|
|
|
|
|
|
|
|
|
|
|
|
|
|
|
|
|
|
|
|
|
|
|
|
|
|
|
|
|
|
|
|
|
|
|
|
|
|
|
|
|
|
|||
Is your line… |
Dial-up |
Dial-up |
|||||||||||||||||||||||||||||||||||||||||||
|
|
|
|
|
|
|
|
|
|
|
|
|
|
|
|
|
|
|
|
|
|
|
|
|
|
|
|
|
|
|
|
|
|
|
|
|
|
|
|
|
|
|
|
|
|
Does your line have… |
|
|
|
|
|
|
|
|
|
|
|
|
Distinctive ring service |
|
|
|
|
|
|
|
|
|
|
|
|
Distinctive ring service |
|||||||||||||||||||
Your fax setup should |
|
|
|
|
|
|
|
|
|
|
|
|
|
|
|
|
|
|
Splitter |
|
|
|
|
|
|
|
|
|
|
|
|
|
|
|
|
|
|
Splitter |
|||||||
look like this… |
|
|
|
|
|
|
|
|
|
|
|
|
|
|
|
|
|
|
|
|
|
|
|
|
|
|
|
|
|
|
|
|
|
|
|
|
|||||||||
|
|
|
|
|
|
|
|
|
|
|
|
|
|
|
|
|
|
|
|
|
|
|
|
|
|
|
|
|
|
|
|
|
|
|
|
|
|
|
|
|
|
|
|
|
|
|
|
|
|
|
|
|
|
|
|
|
|
|
|
|
|
|
|
|
|
|
|
|
|
|
|
|
|
|
|
|
|
|
|
|
|
|
|
|
|
|
|
|
|
|
|
|
|
|
|
|
|
|
|
|
|
|
|
|
|
|
|
|
|
|
|
|
|
|
|
|
|
|
|
|
|
|
|
|
|
|
|
|
|
|
|
|
|
|
|
|
|
|
|
|
|
|
|
|
|
|
|
|
|
|
|
|
|
|
|
|
|
|
|
|
|
|
|
|
|
|
|
|
|
|
|
|
|
|
|
|
|
|
|
|
|
|
|
|
|
|
|
|
|
|
|
|
|
|
|
|
|
|
|
|
|
|
|
|
|
|
|
|
|
|
|
|
|
|
|
|
|
|
|
|
|
|
|
|
|
|
|
|
|
|
|
|
|
|
|
|
|
|
|
|
|
|
|
|
|
|
|
|
|
|
|
|
|
|
|
|
|
|
|
|
|
|
|
|
|
|
|
|
|
|
|
|
|
|
|
|
|
|
|
|
|
|
|
|
|
|
|
|
|
|
|
|
|
|
|
|
|
|
|
|
|
|
|
|
|
|
|
|
|
|
|
|
|
|
|
|
|
|
|
|
|
|
|
|
|
|
|
|
|
|
|
|
|
|
|
|
|
|
|
|
|
|
|
|
|
|
|
|
|
|
|
|
|
|
|
|
|
|
|
|
|
|
|
|
|
|
|
|
|
|
|
|
|
|
|
|
|
|
|
|
|
|
|
|
|
|
|
|
|
|
|
|
|
|
|
|
|
|
|
|
|
|
|
|
|
|
|
|
|
|
|
|
|
|
|
|
|
|
|
|
|
|
|
|
|
|
|
|
|
|
|
|
|
|
|
|
|
|
|
|
|
|
|
|
|
|
|
|
|
|
|
|
|
|
|
|
|
|
|
|
|
|
|
|
|
|
|
|
|
|
|
|
|
|
|
|
|
|
|
|
|
|
|
|
|
|
|
|
|
|
|
|
|
|
|
|
|
|
|
|
|
|
|
|
|
|
|
|
|
|
|
|
|
|
|
|
|
|
|
|
|
|
|
|
|
|
|
|
|
|
|
|
|
|
|
|
|
|
|
|
|
|
|
|
|
|
|
|
|
|
|
Then follow |
|
|
|
|
configuration # |
4, 10, 5, 3 |
4, 10, 5, 3, 9 |
4, 10, 5, 1, 7 |
4, 10, 5, 1, 9, 7 |
Table 3-4 Voice, Fax, and Internet (DSL)
What devices will you |
• |
Telephone |
• |
Telephone |
connect to the device? |
• |
Computer |
• |
Computer |
|
• |
Modem |
• |
Modem |
|
|
|
• |
Answering machine |
|
|
|
|
|
Is your line… |
DSL |
|
DSL |
|
|
|
|
|
|
Does your line have… |
|
Distinctive ring service |
|
Distinctive ring service |
Your fax setup should look like this…
DSL filter |
DSL filter |
|
|
3 |
3 |
|
|
2 |
|
2 |
|
|
Splitter |
|
Splitter |
|
Then follow |
|
|
|
|
configuration # |
8, 3 |
8, 3, 9 |
8, 1, 7 |
8, 1, 9, 7 |
12 Set up the fax (optional)

Configuration guideline
Configuration # |
Configuration instructions |
|
|
|
|
1 |
Set up the device to answer incoming calls automatically. Press the Auto Answer button until the light is |
|
|
on. |
|
|
|
|
2 |
(Optional) Change the Rings to Answer setting to one ring or two rings. |
|
|
For information on changing this setting, see the onscreen user guide on the Starter CD. |
|
|
|
|
3 |
Determine how you want the device to answer calls: automatically or manually. |
|
|
• If you set up the device to answer calls automatically, it answers all incoming calls and receives |
|
|
faxes. Your device will not be able to distinguish between fax and voice calls in this case; if you |
|
|
suspect the call is a voice call, you will need to answer it before the device answers the call. |
|
|
To answer fax calls automatically, press the Auto Answer button until the light is on. |
English |
|
• If you set up the device to answer faxes manually, you must be available to respond in person to |
|
|
|
|
|
incoming fax calls or your device cannot receive faxes. |
|
|
To answer fax calls manually, press the Auto Answer button until the light is off. |
|
|
|
|
4 |
Since your PC modem shares the phone line with your device, you will not be able to use both your PC |
|
(Dial-up modem) |
modem and your device simultaneously. For example, you cannot use your device for faxing if you are |
|
using your PC modem to send an e-mail or access the Internet. |
|
|
|
|
|
|
|
|
5 |
If your PC modem software is set to receive faxes to your computer automatically, turn off that setting. |
|
(Dial-up modem) |
Caution: If you do not turn off the auto fax receive setting in your PC modem software, your device will |
|
|
not be able to receive faxes. |
|
|
|
|
6 |
When the phone rings, your device will answer automatically after the number of rings you set in the |
|
|
Rings to Answer setting. Then it will begin emitting fax reception tones to the sending fax machine and |
|
|
receive the fax. |
|
|
|
|
7 |
Set your answering machine to answer after four or fewer rings. |
|
(Answering machine) |
Change the Rings to Answer setting on your device to six rings. |
|
|
When the phone rings, your answering machine will answer after the number of rings you have set, and |
|
|
then play your recorded greeting. The device monitors the call during this time, “listening” for fax tones. |
|
|
If incoming fax tones are detected, the device will emit fax reception tones and receive the fax; if there |
|
|
are no fax tones, the device stops monitoring the line and your answering machine can record a voice |
|
|
message. |
|
|
|
|
8 |
DSL lines only: You will need to purchase additional DSL filters for all devices (telephone, computer) that |
|
|
share the DSL phone line. |
|
|
|
|
Shared phone line 13

9 |
Change the Answer Ring Pattern setting to the pattern that has been assigned to your fax number by the |
(Distinctive ring |
telephone company, for example, double rings or triple rings. |
service) |
For information on changing this setting, see the onscreen user guide on the Starter CD. |
|
NOTE: Your device is factory-set to answer all ring patterns. If you do not set the correct ring pattern |
|
assigned to your fax number by the telephone company, your device might answer both voice calls and |
|
fax calls, or it might not answer at all. |
10There are two different ways to set up your device with your computer based on the number of phone ports on your computer. You also need additional phone cords (at least three if your computer has only one phone port and at least two if your computer has two phone ports).
Before you begin, check your computer to see if it has one or two phone ports:
Computer with one phone port
If your computer has only one phone port, you will need to purchase a parallel splitter (also called a coupler). A parallel splitter has one RJ-11 port on the front and two RJ-11 ports on the back. Do not use a two-line phone splitter, a serial splitter, or a parallel splitter which has two RJ-11 ports on the front and a plug on the back. You can purchase a parallel splitter from an electronics store that carries phone accessories.
1.Connect one end of the phone cord that came with the device to the wall jack and the other end to the 1-LINE port on the device.
2.Connect one end of a second phone cord to the 2-EXT port on the device and the other end to the front of the parallel splitter (the end with the single phone port).
3.Connect one end of a third phone cord to the back of the parallel splitter (the end with two phone ports) and the other end to the computer.
4.Connect one end of a fourth phone cord to the last open port on the parallel splitter and the other end to a telephone or answering machine. If you are connecting both a telephone and answering machine, connect the fourth phone cord to the answering machine, and then use a fifth phone cord to connect the answering machine to the telephone.
NOTE: If you do not connect your answering machine in this way, fax tones from a sending fax machine might be recorded on your answering machine, and you might not be able to receive faxes with your device.
Computer with two phone ports
If your computer has two phone ports, complete the following steps to connect the device to the computer:
1.Connect one end of the phone cord that came with the device to the wall jack and the other end to the 1-LINE port on the device.
2.Connect one end of a second phone cord to the 2-EXT port on the device and the other end to the IN port on the computer.
3.Connect one end of a third phone cord to the OUT port on the computer and the other end to a telephone or answering machine. If you are connecting both a telephone and answering machine, connect the third phone cord to the answering machine, and then connect the answering machine to the telephone.
NOTE: If you do not connect your answering machine in this way, fax tones from a sending fax machine might be recorded on your answering machine, and you might not be able to receive faxes with your device.
14 Set up the fax (optional)

Managing and configuring fax settings
If you are connecting the device directly to a computer, install the device software, and then run the Fax Setup Wizard (Windows) or HP Device Manager (Mac OS). You can also launch these tools from Solution Center (Windows) or HP Device Manager (Mac OS) at a later time. Use these tools to set the fax header, country/ region, and date and time.
In addition, you can configure the fax settings from the embedded Web server (EWS). For information on the EWS, see page 28.
You can also configure these settings from the control panel. For information on the control panel, see the onscreen user guide on the Starter CD.
Set up speed-dial entries
You can store fax numbers or groups of fax numbers as speed-dial entries. Speed-dial entries 1 through 5 are associated with the corresponding five speed-dial buttons on the control panel. This lets you dial those numbers quickly by using the control panel.
In addition to using the control panel, you can also set up speed-dial entries using the embedded Web server and the HP Photosmart software. For information,
see the onscreen user guide on the Starter CD.
To set up speed-dial entries
1.From the control panel, press Setup.
2.Select Speed Dial Setup and do one of the following:
•To add or change an entry: Select Individual Speed Dial or Group Speed Dial and press the arrow keys to move to an unused entry number, or type a number on the keypad. Type the fax number, and then press OK. Include any pauses or other required numbers, such as an area code, an access code for numbers outside a PBX system (usually a 9 or 0), or a long-distance prefix. Type the name using the numeric keypad, and then press OK.
•To delete one entry or all entries: Select Delete Speed Dial and press the arrow keys to move to the speed-dial entry that you want to delete, and then press OK.
Test fax setup
You can test your fax setup to check the status of the device and to make sure it is set up properly for faxing. Perform this test after you have completed setting up the device for faxing. The test does the following:
•Tests the fax hardware
•Verifies the correct type of phone cord is connected to the device
•Checks that the phone cord is plugged into the correct port
•Checks for a dial tone
•Checks for an active phone line
•Tests the status of your phone line connection
The device prints a report with the results of the test.
If the test fails, review the report for information on how to fix the problem and rerun the test. For additional troubleshooting information, see “Solving fax problems (optional)” on page 26.
To test fax setup
1.Set up the device for faxing according to your particular home or office setup instructions.
2.Make sure the ink cartridges and printheads are installed, and that full-size paper is loaded in the input tray before starting the test.
3.From the control panel, press Setup.
4.Select Tools, and then select Run Fax Test.
The device displays the status of the test on the display and prints a report.
5.Review the report.
•If the test passes and you are still having problems faxing, check the fax settings listed in the report to verify the settings are correct.
A blank or incorrect fax setting can cause problems faxing.
•If the test fails, review the report for more information on how to fix any problems found.
English
Managing and configuring fax settings 15
4Set up Direct Digital Filing for scanning (optional)
The Direct Digital Filing feature allows you to scan documents directly to multiple shared folders (up to 10) on your network. With Direct Digital Filing, you do not need any scanning software. Also, you do not need to scan files from your computer and then transfer them to the designated network folder.
NOTE: The Direct Digital Filing feature is available with HP Officejet L7600/L7700 all-in-one models that are connected directly to the network either through a wireless connection or with an Ethernet cable.
NOTE: Direct Digital Filing does not support Windows Active Directory.
Required information
To set up Direct Digital Filing, you need the following information:
•The IP address assigned to the all-in-one.
When you press the Digital Filing button on the all-in- one control panel for the first time, the IP address is listed at the end of the instructions that appear on the display.
•Appropriate privileges on the network.
You must be able to create a folder and change the access permissions for the folder.
•The name of the computer where the folder is located.
Direct Digital Filing...
in action!
Recently, a small graphic design firm started to manage their invoices, contracts, and expense reports electronically using Direct Digital Filing. Now, instead of filing invoices and other documents, the office manager uses the all-in-one to create an electronic copy that is automatically stored on a computer on the office network.
Setting it up…
The office manager asked one of the office's IT-savvy employees to set up Direct Digital Filing.
First, the IT-savvy employee created three separate folders (named "Invoices", "Contracts", and "Expense Reports") on the computer that would be used to store the documents.
Then, he changed the access permissions on these folders so that the all- in-one could save the files to the appropriate directories.
16 Set up Direct Digital Filing for scanning (optional)
For information about finding the computer name, see the documentation for your operating system.
•The network address for the folder.
Network addresses are usually written in this format: \\mypc\sharedfolder
•A username and password for the network.
For example, the Windows NT username and password used to log onto the network.
Step 1: Create and share a folder on the network
NOTE: To use Direct Digital Filing, the folder you are using must already exist on a computer connected to the network. You cannot create a folder from the all-in-one control panel.
1.Create a folder on a computer connected to the network.
2.Share the folder.
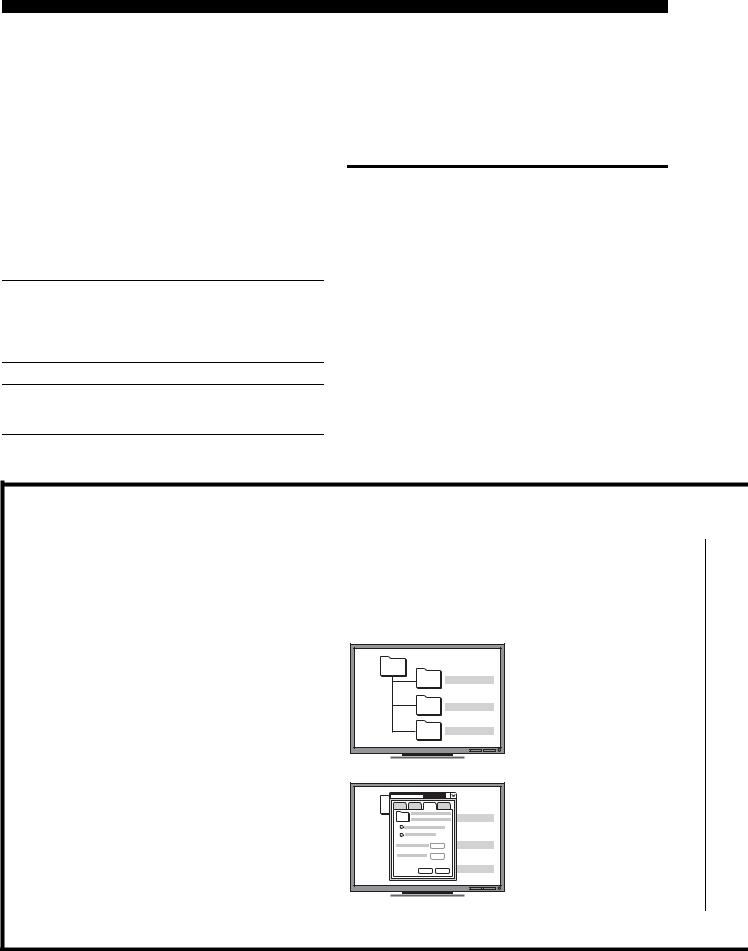
Finally, he used the embedded Web server (EWS) to set up the shortcuts (called "speeddials") for each of these folders
Trying it out…
After the IT-savvy employee finished setting up Direct Digital Filing, the office manager decided to create an electronic copy of an invoice.
First, she loaded the document in the all-in- one, just like she would if she were making a copy.
Make sure the folder preferences provide read and write access.
For more information about creating folders on the network and setting folder preferences, see the documentation for your operating system.
Step 2: Set up a shortcut to the folder on the network
Links between the all-in-one and the network folder are called “Direct Digital Filing Speed-dials”. You create and manage these speed-dials using the embedded Web server (EWS) for the all-in-one.
NOTE: For more information about using the EWS, see “Embedded Web server” on page 28 or the onscreen user guide on the Starter CD.
1.Open a supported Web browser (such as Microsoft Internet Explorer, Netscape, Opera, Mozilla Firefox, or Safari) on your computer.
Then, she pressed the Digital Filing button on the all-in-one control panel, and the speeddials that the IT-savvy employee had set up in the EWS appeared on the display.
Finally, she selected the "Invoices" option and pressed the Scan button.
The all-in-one scanned the document and then transmitted it directly to the invoices folder on the computer.
English
Step 1: Create and share a folder on the network 17

2.Type the IP address that has been assigned to the all- in-one. (For more information, see “Required information”.)
For example, if the IP address is 123.123.123.123, type the following address into the Web browser: http://123.123.123.123
The EWS page appears in the Web browser window.
3.Click the Settings tab.
4.Under Address Book, click Direct Digital Filing Speed-dial..
5.In the Direct Digital Filing Speed-dial Configure the settings for the new speed-dial in the EWS, including the following:
•Friendly Name: Add a friendly name for the folder. After you set up Direct Digital Filing, this name appears on the all-in-one control panel display when you press the Digital Filing button.
•Network Path: The network path for the folder. Network paths are usually written in this format: \\mypc\sharedfolder. In addition, you can enter the IP address assigned to the all-in-one in this format: \\123.123.123.123.
•Username and Password: The username and password you use when you log on to your computer. The username is usually written in one of these formats: Bob, BOBSPC\Bob, BOBDOMAIN\Bob
•Personal Identification Number (PIN): You can assign an optional PIN to help prevent unauthorized people from using the speed-dial. After you set the PIN, the all-in-one control panel prompts for the PIN whenever the speed-dial is used. To disable the PIN, leave the PIN box blank.
•Scan Settings: Set scan settings for the speeddial, such as document type and two-sided scanning options, are used whenever this speeddial is selected.
6.Click Add.
The entry is added to the Direct Digital Filing Speeddial Address Book.
Step 3: Test and use Direct Digital Filing
1.Load the document on the scanner glass or in the ADF.
2.Press Digital Filing.
3.Press the Direct Digital Filing speed-dial button that corresponds to the desired speed-dial.
If prompted, type the PIN for the speed-dial.
4.Press Start Scan.
NOTE: The connection might take some time, depending on network traffic and connection speed.
NOTE: Check troubleshooting for “Active directory”.
18 Set up Direct Digital Filing for scanning (optional)

5Set up the device for wireless communication (optional)
NOTE: Wireless communication is available with some device models.
This chapter provides instruction for setting up the device for wireless communication using:
•The control panel: Use menus on the display to set up wireless communication.
•Software on the Starter CD: Use a network cable to temporarily connect to the network and set up wireless communication using software on the Starter CD.
For information about other ways to set up the device for wireless communication, see the onscreen user guide on the Starter CD.
Required information
Before installing the device software, you might need to find out the settings of your network. Obtain the information from your system administrators,
or complete the following tasks:
•Obtain the network name (SSID) and communication mode (infrastructure or ad hoc) from the configuration utility for the network’s wireless access point (WAP) or the computer’s network card.
•Find out the type of encryption your network uses, such as Wired Equivalent Privacy (WEP) or Wi-Fi® Protected Access (WPA).
•Find out the security password or encryption key of the wireless device.
Understanding 802.11 wireless network settings
Network name (SSID)
By default, the device looks for the wireless network name or Service Set Identifier (SSID) named “hpsetup”. Your network may have a different SSID.
Communication mode
There are two communication mode options:
Ad hoc: On an ad hoc network, the device is set to ad hoc communication mode, and communicates directly with other wireless devices without the use of a wireless access point (WAP):
All devices on the ad hoc network must:
•Be 802.11 compatible
•Have ad hoc as the communication mode
•Have the same network name (SSID)
•Be on the same subnet and same channel
•Have the same 802.11 security settings
Infrastructure (recommended): On an infrastructure network, the device is set to infrastructure communication mode, and communicates with other devices on the network, whether the devices are wired or wireless, through a WAP. WAPs commonly act as routers or gateways on small networks.
Security Settings
For the available settings for the device, see the Network configuration page under “Understanding the configuration page” in the onscreen user guide on the Starter CD.
For more information on wireless security, visit www.weca.net/opensection/pdf/ whitepaper_wifi_security4-29-03.pdf.
English
Required information 19

Network authentication: The device’s factory default setting is Open, which does not require security for authorization or encryption. The other possible values are OpenThenShared, Shared, and WPA-PSK (Wi-Fi® Protected Access Pre-Shared Key).
•WPA increases the level of over-the-air data protection and access control on existing and future Wi-Fi networks. It addresses all known weaknesses of WEP, the original native security mechanism in the 802.11 standard.
•WPA2 is the second generation of WPA security; providing enterprise and consumer Wi-Fi users with a high level of assurance that only authorized users can access their wireless networks.
Data encryption:
•Wired Equivalent Privacy (WEP) provides security by encrypting data sent over radio waves from one wireless device to another wireless device. Devices on a WEP-enabled network use WEP keys to encode data. If your network uses WEP, you must know the WEP key(s) it uses.
•WPA uses the Temporal Key Integrity Protocol (TKIP) for encryption and employs 802.1X authentication with one of the standard Extensible Authentication Protocol (EAP) types available today.
•WPA2 provides a new, encryption scheme,
the Advanced Encryption Standard (AES). AES is defined in counter cipher-block chaining mode (CCM) and supports the Independent Basic Service Set (IBSS) to enable security between client workstations operating in ad hoc mode.
NOTES
•Make sure the device is not connected to the network using a network cable.
•The sending device must have built-in 802.11 capabilities or an 802.11 wireless card installed.
•HP recommends that the device and the computers that use the device be on the same subnet.
Set up the device for wireless communication using the control panel
NOTE: To use this method, you must have a wireless network set up and running.
1.On the control panel, press the Setup button.
2.Press an arrow button to move to Network, and then press OK.
3.Press an arrow button to move to Wireless Setup Wizard, and then press OK.
4.Follow the display instructions to complete the setup.
If you encounter problems, see “Solving wireless problems (some models only)” on page 23.
Set up the device for wireless communication using software
For Windows
1.Remove the protective cover from the device’s network connector.
2.Temporarily connect the device to an available port on the network hub, switch, or router with a network cable (sold separately).
3.Close any applications that are running on your computer system.
20 Set up the device for wireless communication (optional)

4.Insert the Starter CD into the CD drive. You must run the installation program at least once from the Starter CD and create a wireless connection.
If the CD menu does not start automatically, double-click the setup icon on the Starter CD.
5.On the CD menu, click Install and follow the onscreen instructions.
6.On the Connection Type screen, select Wireless, and then click Next.
7.Follow the onscreen instructions to complete the installation, and when prompted, disconnect the cable.
If you encounter problems, see “Solving wireless problems (some models only)” on page 23.
For Mac OS
1.Open the AirPort Setup Assistant, and then follow the onscreen instructions for joining an existing wireless network (hpsetup).
2.Double-click the setup icon on the Starter CD, and then follow the onscreen instructions.
3.When prompted, click Printer Setup Utility to add the device.
If you encounter problems, see “Solving wireless problems (some models only)” on page 23.
English
Set up the device for wireless communication using software 21

6 Troubleshooting
This section provides troubleshooting suggestions for some of the most common issues associated with hardware and software installation.
For late-breaking information, see the readme file and release notes on the Starter CD, or visit the product support Web site at www.hp.com/support.
Solving installation problems
This section provides troubleshooting suggestions for some of the most common issues associated with hardware and software installation.
Hardware installation suggestions
Check the device
•Make sure that all packing tape and material have been removed from outside and inside the device.
•Make sure paper is loaded correctly in the tray, and is not jammed in the device.
•Make sure that no lights are on or blinking except the Power light, which should be on. If the Attention light is blinking, check for messages on the control panel. When the device is first turned on, it takes approximately 45 seconds to warm up.
•Make sure the rear access panel or duplexer is locked into place.
•Make sure that the device can print a Self-test diagnostic page. For more information, see “Self-test diagnostic page” on page 28.
Check the hardware connections
•Make sure that any cords and cables that you are using are in good working order.
•Make sure that the power cord is connected securely to both the device and to a working power outlet.
•Make sure that the phone cord is connected to the 1-LINE port.
Check the printheads and ink cartridges
•Make sure that you have removed the orange caps from the printheads.
•Make sure that all of the printheads and ink cartridges are firmly installed in their correct, colorcoded slot. Press down firmly on each one to ensure proper contact. The device cannot work if they are not all installed.
•Make sure that the printhead latch and all covers are closed.
•If the display shows a printhead error message, clean the contacts on the printheads. For more information, see the onscreen user guide on the Starter CD.
Software installation suggestions
Check the computer system
•Make sure that your computer is running one of the supported operating systems. For more information, see the onscreen user guide on the Starter CD.
•Make sure that the computer meets at least the minimum system requirements. For more information, see the onscreen user guide on the Starter CD.
Verify installation preliminaries
•Make sure to use the Starter CD that contains the correct installation software for your operating system.
•Before installing software, make sure that all other programs are closed.
•If the computer does not recognize the path to the CD-ROM drive that you type, make sure that you are specifying the correct drive letter.
•If the computer cannot recognize the Starter CD in the CD-ROM drive, inspect the Starter CD for damage. You can download the device driver from www.hp.com/support.
•In the Windows device manager, make sure that the USB drivers have not been disabled.
•If you are using a computer running Windows, and the computer cannot detect the device, run the uninstallation utility (util\ccc\uninstall.bat on the Starter CD) to perform a clean uninstallation of the
device driver. Restart your computer, and reinstall the device driver.
22 Troubleshooting

Solving network problems (some models only)
NOTE: After correcting any of the following, run the installation program again.
General network troubleshooting
•If you are unable to install the device software, verify that:
•All cable connections to the computer and the device are secure.
•The network is operational and the network hub is turned on.
•All applications, including virus protection programs, spyware protection programs, and firewalls, are closed or disabled for computers running Windows.
•Make sure the device is installed on the same subnet as the computers that will be using the device.
•If the installation program cannot discover the device, print the Network configuration page (see “To print the Network configuration page” on page 28), and enter the IP address manually in the installation program.
•If you are using a computer running Windows, make sure that the network ports created in the device driver match the device IP address:
1)Print the device’s Network configuration page.
2)From the Windows desktop, click Start,
point to Settings, and then click Printers or
Printers and Faxes.
Or
Click Start, click Control Panel, and then doubleclick Printers.
3) Right-click the device icon, click Properties, and then click the Ports tab.
Or
Right-click the device icon, click Run as administrator, click Properties, click Continue, and then click the Ports tab.
4)Select the TCP/IP port for the device, and then click Configure Port.
5)Compare the IP address listed in the dialog box and make sure it matches the IP address listed on the Network configuration page. If the
IP addresses are different, change the IP address in the dialog box to match the address on the Network configuration page.
6) Click OK twice to save the settings and close the dialog boxes.
Problems connecting to a wired network
• If the Link light on the network connector does not |
|
|
turn on, make sure that all of the “General network |
|
|
troubleshooting” conditions listed above are met. |
English |
|
• Though it is not recommended that you assign the |
||
|
||
device with a static IP address, you might resolve |
|
|
some installation problems (such as a conflict with a |
|
|
personal firewall) by doing so. For more information, |
|
|
see the onscreen user guide on the Starter CD. |
|
Solving wireless problems (some models only)
If the device is unable to communicate with the network after completing the wireless setup and software installation, perform one or more of the following tasks.
Check the wireless communication settings
•Make sure the computer’s wireless card is set to the correct wireless profile. A wireless profile is a set of network settings unique to a given network. A single wireless card might have several wireless profiles (for example, one for a home network and one for an office network). Open the Configuration utility for the network card installed on your computer, and ensure that the profile selected is the profile for the device’s network.
•Make sure the device’s network settings match those of your network. Do one of the following to find the settings for your network:
•Infrastructure communication: Open the wireless access point’s (WAP) Configuration utility.
•Ad hoc communication: Open the Configuration utility for the network card installed in your computer.
•Compare the network’s settings to those on the device’s Network configuration page (see “To print the Network configuration page” on page 28), and note any differences. Possible problems include the following:
Solving network problems (some models only) 23

•The WAP filters hardware addresses
(MAC addresses). See “Add hardware addresses to a wireless access point (WAP)” on page 24.
•One of these settings in the device might be incorrect: communication mode, network name (SSID), channel (ad hoc networks only), authentication type, encryption.
See “Understanding 802.11 wireless network settings” on page 19.
•Print a document. If the document still does not print, then reset the device’s network settings (see “Reset network configuration settings” on page 24) and reinstall the device software.
If the wireless network settings are correct, the computer might be associated with another wireless network. Ensure that the computer is associated with the same wireless network as that of the device.
Users can ensure this by checking the wireless settings on their respective computers. In addition, ensure that the computers have access to the wireless network.
If the wireless network settings are incorrect, follow these steps to correct the device’s settings:
1.Connect the device to your network with a network cable or to the computer using the network cable.
2.Open the device’s embedded Web server.
3.Click the Networking tab, and then click Wireless (802.11) in the left pane.
4.Use the Wireless Setup wizard on the Wireless Setup tab to change the device’s settings to match the settings of the network.
5.Close the device’s embedded Web server, and then disconnect the network cable from the device.
6.Uninstall the device software completely, and then reinstall the software.
Add hardware addresses to a wireless access point (WAP)
MAC filtering is a security feature in which a wireless access point (WAP) is configured with a list of MAC addresses (also called “hardware addresses”) of devices that are allowed to gain access to the network through the WAP. If the WAP does not have the hardware address of a device attempting to access the network, the WAP denies the device access to the network. If the WAP filters MAC addresses, then the device’s MAC address must be added to the WAP’s list of accepted MAC addresses.
1.Print the Network configuration page. See “To print the Network configuration page” on page 28.
2.Open the WAP’s configuration utility, and add the device’s hardware address to the list of accepted MAC addresses.
Reset network configuration settings
If the device is still unable to communicate with the network, reset the device’s network settings.
1.Press Setup. Press an arrow button to move to Network, and then press OK.
2.Press an arrow button to move to Restore Network Defaults, and then press OK.
3.Print the Network configuration page and verify that the network settings have been reset. See “To print the Network configuration page” on page 28.
By default, the network name (SSID) is “hpsetup” and the communication mode is “ad hoc”.
Solving Direct Digital Filing problems (optional)
Unable to scan to network folder
NOTE: The Direct Digital Filing feature does not support Windows Active Directory.
The device is not set up correctly on the network
Make sure that the device is set up properly and connected to the network. PING the device and make sure that it is responding.
The network folder has not been set up correctly
•Make sure the folder is created on the server. For more information, see the documentation available for your operating system.
•Make sure the folder name uses only the letters A through Z (uppercase or lowercase) and the numbers 1 through 9.
•Some common punctuation marks are also supported. However, do not use accented or special characters in the folder name.
•Make sure the folder has been shared and that users can both read and write to the folder. For more
24 Troubleshooting

information, see the documentation available for your operating system.
•Make sure the folder name is entered in the correct format in the embedded Web server (EWS) and that the username and password are entered correctly.
For more information, see the information in the EWS.
The disk is full
Make sure the server containing the folder has enough disk space available.
The device cannot create a unique filename using the assigned prefix and suffix
The device can create up to 9,999 files using the same prefix and suffix. If you have scanned many files to a folder, change the prefix.
The filename prefix has not been set up correctly
Make sure the folder name and filename prefix uses only the letters A through Z, uppercase or lowercase; the numbers 1 through 9. Some common punctuation marks are also supported. However, do not use accented or special characters in the folder name.
If unsupported characters are used in filename prefixes, they will not appear correctly when the file is created.
The server name cannot be resolved
Sending to network folder might fail if the server name provided during setup cannot be resolved to specific IP addresses. When setting up the Direct Digital Filing feature, be sure to do the following:
•Try to use fully qualified DNS names.
•Make sure the DNS server is set up correctly on the device.
TIP: If you have recently changed the DNS settings, turn off and then turn on the all-in-one.
English
Solving Direct Digital Filing problems (optional) 25

Solving fax problems (optional)
If you ran a fax test and the test failed, see the test report for possible solutions. For more detailed information, see the onscreen user guide on the Starter CD.
The device is having problems sending and receiving faxes
Make sure you use the phone cord that came with the device.
Other equipment that uses the same phone line as the device might be in use. Make sure extension phones (phones on the same phone line, but not connected to the device) or other equipment is not in use or off the hook. For example, you cannot use the device for faxing if an extension phone is off the hook or if you are using a computer dial-up modem to send e-mail or access the Internet.
If you are using a phone splitter, the splitter could cause faxing problems. Try connecting the device directly to the telephone wall jack.
Make sure that one end of the phone cord is connected to the telephone wall jack, while the other end to port labeled “1-LINE” on the back of the device.
Try connecting a working phone directly to the telephone wall jack and check for a dial tone –- if you do not hear a dial tone, please contact your telephone company to check the line.
Make sure you connect the device to an analog phone line, or you cannot send or receive faxes. To check if your phone line is digital, connect a regular analog phone to the line and listen for a dial tone. If you do not hear a normal-sounding dial tone, it might be a phone line set up for digital phones. Connect the device to an analog phone line and try sending or receiving a fax.
The phone line connection might be noisy. Phone lines with poor sound quality (noise) can cause faxing problems. Check the sound quality of the phone line by plugging a phone into the telephone wall jack and listening for static or other noise. If you hear noise, turn Error Correction Mode (ECM) off and try faxing again.
If you are using a digital subscriber line (DSL) service, make sure that you have a DSL filter connected. Without the filter, you cannot fax successfully.
If you are using either a private branch exchange (PBX) or an integrated services digital network (ISDN) converter/terminal adapter, make sure the device is connected to the correct port and the terminal adapter is set to the correct switch type for your country/region.
26 Troubleshooting
Loading...