

Page 1

Page 2

Page 3

HP Designjet Z6100 Printer series
Quick reference guide
Page 4

Legal notices
The information contained in this document is
subject to change without notice.
The only warranties for HP products and services
are set forth in the express warranty statements
accompanying such products and services.
Nothing herein should be construed as constituting
an additional warranty. HP shall not be liable for
technical and editorial errors or omissions
contained herein.
Adobe®,Photoshop®, and PostScript® are
trademarks of Adobe Systems Incorporated.
Microsoft® and Windows® are U.S. registered
trademarks of Microsoft Corporation.
PANTONE®* is *Pantone, Inc.'s check-standard
trademark for color.
Page 5

Table of contents
1 Introduction
2 Handle the paper
3 Handle the ink system
Using this guide ..................................................................................... 1
Introduction ........................................................................... 1
Warnings and Cautions ......................................................... 1
The printer's main components ................................................................. 1
Front view 42–in printer ......................................................... 1
Front view 60–in printer ......................................................... 2
Rear view 42–in and 60–in printers ......................................... 3
Take-up reel motor ................................................................. 3
The front panel ...................................................................... 4
Turn the printer on and off ....................................................................... 6
Access the Embedded Web Server ........................................................... 7
Printing paper info ................................................................................. 7
Load a roll onto the spindle ..................................................................... 9
Load a roll into the printer ..................................................................... 11
Unload a roll from the printer ................................................................. 15
The normal procedure (roll attached to spindle) ....................... 15
Roll is detached from spindle ................................................ 16
No paper visible ................................................................. 16
Use the take-up reel .............................................................................. 16
Attach a roll to the take-up reel .............................................. 17
Unload a roll from the take-up reel ......................................... 22
View information about the paper .......................................................... 23
Perform paper advance calibration ........................................................ 24
Overview of the paper advance procedure ............................. 25
Return to default calibration .................................................. 25
Download paper profiles ...................................................................... 25
Remove an ink cartridge ....................................................................... 27
Insert an ink cartridge ........................................................................... 29
Remove a printhead ............................................................................. 29
Insert a printhead ................................................................................. 32
Align the printheads ............................................................................. 34
Use the Printhead status plot .................................................................. 35
Print the Printhead status plot ................................................. 35
Interpret the Printhead status plot ........................................... 36
Corrective action ................................................................. 37
What to do if problems persist .............................................. 37
Remove the maintenance cartridge ......................................................... 38
Insert the maintenance cartridge ............................................................ 39
Check the status of the ink system ........................................................... 40
iii
Page 6

4 Manage print options
Select print quality ................................................................................ 41
Use the Embedded Web Server ............................................. 41
Use a driver ........................................................................ 41
Use the front panel .............................................................. 42
Select page size .................................................................................. 42
Custom page sizes .............................................................. 42
Use the Embedded Web Server ............................................. 42
Use a driver ........................................................................ 43
Use the front panel .............................................................. 43
Adjust margins and layout options .......................................................... 43
Use the Embedded Web Server ............................................. 44
Use a driver ........................................................................ 44
Use the front panel .............................................................. 45
Print crop lines ..................................................................................... 45
Use the Embedded Web Server ............................................. 45
Use a driver ........................................................................ 45
Use the front panel .............................................................. 46
Nest jobs to save paper ........................................................................ 46
Configure the nesting option ................................................. 46
How job compatibility is defined ........................................... 47
Nest with crop lines ............................................................. 48
5 Manage calibration
Color calibration .................................................................................. 49
Color profiling ..................................................................................... 50
Create your own profile ....................................................... 51
Use a third-party profile ........................................................ 52
Color adjustment options ....................................................................... 52
Color emulation modes ......................................................................... 53
CMYK color emulation ......................................................... 54
RGB color emulation ............................................................ 56
6 Troubleshoot print-quality issues
General advice .................................................................................... 57
The Embedded Web Server Print Quality Troubleshooting wizard .............. 57
Lines are too thick, too thin, or missing .................................................... 58
Lines appear stepped or jagged ............................................................. 59
Parts of lines or text are missing ............................................................. 59
Lines are printed double or in wrong colors ............................................. 60
Lines are blurred (ink bleeds from lines) .................................................. 60
Dark or light horizontal lines across the image (banding) .......................... 61
The image is grainy .............................................................................. 62
The image has a metallic hue (bronzing) ................................................. 63
The printed output is not flat .................................................................. 63
The print smudges when touched ........................................................... 63
Ink marks appear on the paper .............................................................. 64
Smears on the front of coated paper ...................................... 64
Smears or scratches on the front of glossy paper ..................... 64
iv
Page 7

Defects near the top of a print ................................................................ 64
Colors are inaccurate ........................................................................... 65
The output is completely blank ............................................................... 66
The output contains only a partial print ................................................... 66
The image is clipped ............................................................................ 66
One image overlays another on the same print ........................................ 67
The image has a wood-grain appearance (aeroworms) ............................ 68
7 Troubleshoot paper issues
The paper cannot be loaded successfully ................................................ 69
The paper has jammed ......................................................................... 69
Check the printhead path ..................................................... 69
Check the paper path .......................................................... 70
Automatic paper-cutter does not function ................................................. 71
Take-up reel paper jammed ................................................................... 71
Take-up reel does not wind .................................................................... 71
8 Troubleshoot ink system issues
Clean the printheads ............................................................................ 74
Align the printheads ............................................................................. 74
Reinsert printheads procedure ............................................... 75
Image Quality Maintenance menu procedure .......................... 76
Scan errors during alignment ................................................ 77
9 Front-panel error messages
10 Get help
Introduction ......................................................................................... 82
HP Instant Support ................................................................................ 82
HP Proactive Support ............................................................................ 82
HP Customer Care ............................................................................... 82
Telephone numbers .............................................................. 84
HP Designjet Online ............................................................................. 86
Other sources of information .................................................................. 86
11 Legal information
Hewlett-Packard Limited Warranty—HP (HP Designjet Z6100 Printer
series) ................................................................................................. 87
A. Extent of HP Limited Warranty .......................................... 87
B. Limitation of warranty ....................................................... 89
C. Limitations of liability ....................................................... 89
D. Local law ........................................................................ 89
Hewlett-Packard Software License Agreement .......................................... 89
HP SOFTWARE LICENSE TERMS .......................................... 90
Open source software ........................................................................... 91
Open source acknowledgments ............................................. 91
Open source written offer ..................................................... 91
Regulatory notices ................................................................................ 91
v
Page 8

Material Safety Data Sheet ................................................... 91
Regulatory Model Number .................................................... 92
Regulatory Statements .......................................................... 92
DECLARATION OF CONFORMITY ......................................................... 96
Index .................................................................................................... 98
vi
Page 9
1
Introduction
Using this guide
The Hp Start-up Kit CD/DVD is the most complete source of information about this
product and is organized into the following chapters.
Introduction
This chapter provides a brief introduction to the printer and its documentation. The
remaining chapters offer information about how to use and maintain the printer, and
how to troubleshoot issues.
Warnings and Cautions
Symbols are used in this manual to ensure the proper use of the printer and to prevent
printer damage. Follow the instructions that are marked with these symbols.
WARNING! Failure to follow the guidelines that are marked with this
symbol could result in serious personal injury or death.
CAUTION: Failure to follow the guidelines that are marked with this
symbol could result in minor personal injury or damage to the product.
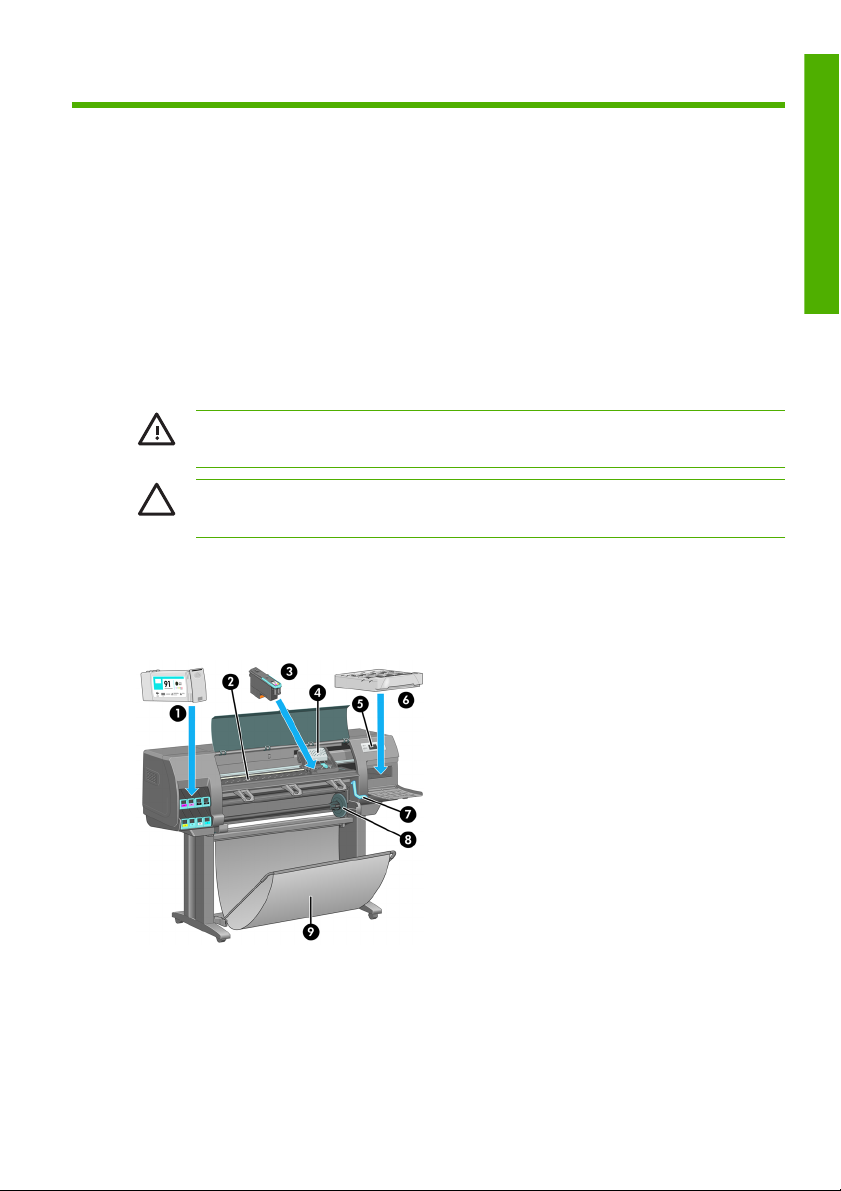
The printer's main components
The following views illustrate the main components of the HP Designjet Z6100 42–
in and 60–in Printers.
Front view 42–in printer
Introduction
Ink cartridge
1.
Platen
2.
Using this guide
1
Page 10
Printhead
Introduction
3.
Printhead carriage
4.
Front panel
5.
Maintenance cartridge
6.
Paper-load lever
7.
Spindle
8.
Bin
9.
Front view 60–in printer
Ink cartridge
1.
Platen
2.
Printhead
3.
Printhead carriage
4.
Front panel
5.
Maintenance cartridge
6.
Paper-load lever
7.
Spindle
8.
Take-up reel deflector
9.
Take-up reel motor
10.
Take-up reel cable and sensor housing unit
11.
2 Chapter 1 Introduction
Page 11
Take-up reel sensor
12.
Take-up reel spindle hub
13.
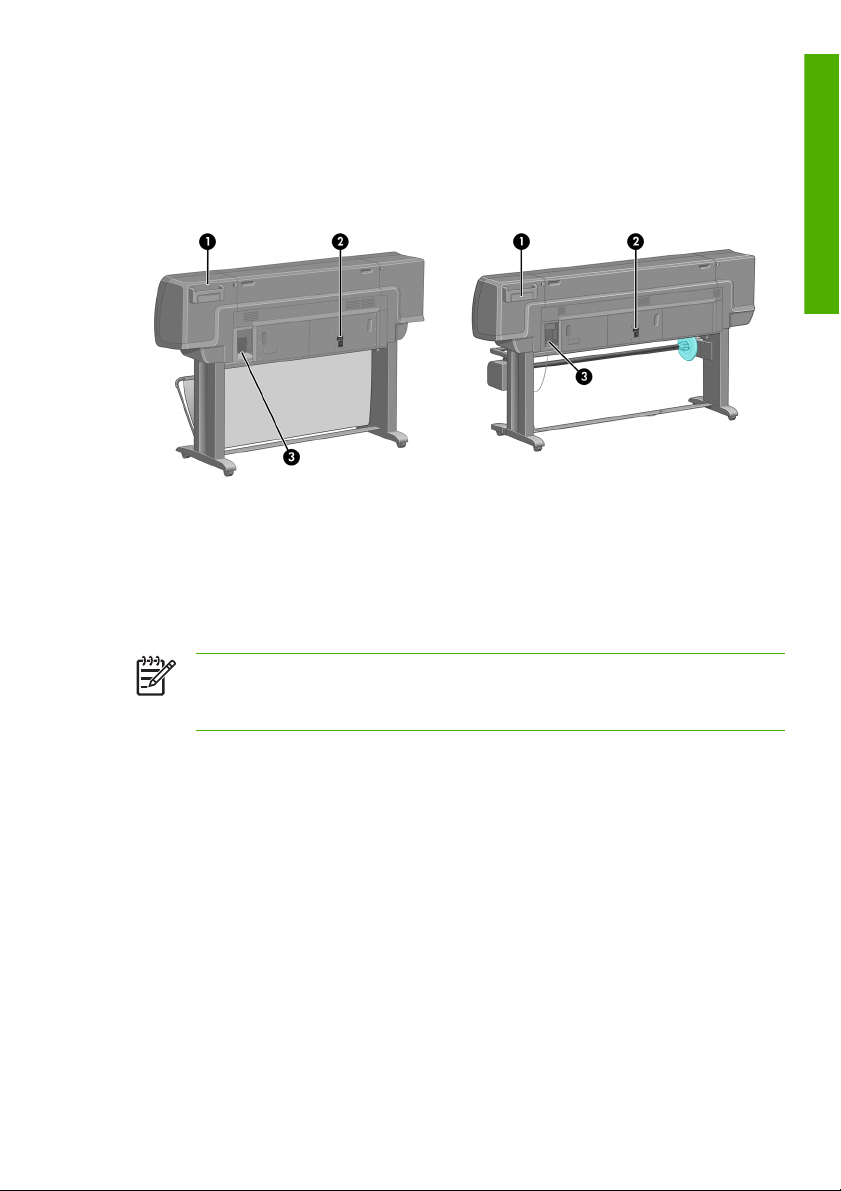
Rear view 42–in and 60–in printers
HP Designjet Z6100 42–in Printer HP Designjet Z6100 60–in Printer
Quick Reference Guide holder
1.
Hard power switch and power-cord plug in
2.
Sockets for communication cables and optional accessories
3.
Take-up reel motor
NOTE: The take-up reel is a standard feature on the HP Designjet Z6100
60–in Printer. It is an optional accessory on the HP Designjet Z6100 42–in
Printer.
Introduction
The printer's main components
3
Page 12
Introduction
1.
2.
3.
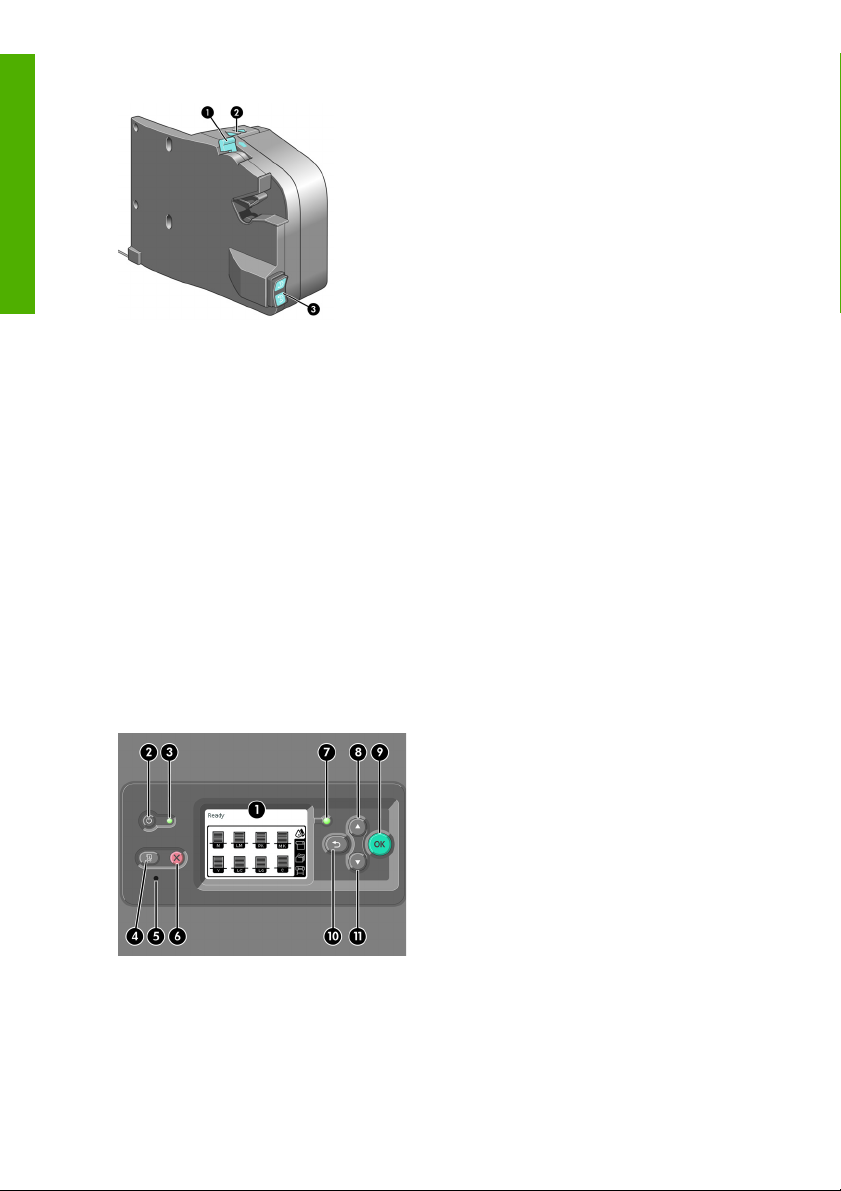
The front panel
Your printer's front panel is located on the front of the printer, on the right-hand side.
Use if for the following functions:
●
●
●
●
●
Take-up reel spindle lever
Manual winding buttons
Wind-direction switch
Use it to perform certain operations, such as loading and unloading paper.
View up-to-date information about the status of the printer, the ink cartridges,
the printheads, the maintenance cartridge, the paper, the print jobs, and other
parts and processes.
Get guidance in using the printer.
See warning and error messages, when appropriate.
Use it to change the values of printer settings and the operation of the printer.
However, settings in the Embedded Web Server or in the driver override
changes made on the front panel.
4 Chapter 1 Introduction
Page 13

The front panel has the following components:
The display area, shows information, icons, and menus.
1.
The Power button turns the printer on and off. If the printer is in sleep mode, this
2.
button will wake it up. (This is different from the hard power switch on the back
of the printer. See
The Power light is off when the printer is off. This light is amber when the printer
3.
Turn the printer on and off on page 6.)
is in sleep mode, green when the printer is on, green and flashing when the
printer is in transition between off and on.
The Form Feed and Cut button normally advances and cuts the roll. Here is a
4.
list of its other functions:
If the printer is waiting for more pages to be nested, this button cancels the
●
waiting time and prints the available pages immediately.
If the printer is drying the ink after printing, this button cancels the waiting
●
time and releases the page immediately.
If the take-up reel is enabled, this button advances the paper 10 cm (3.9
●
inches), but does not cut the paper.
The Reset button restarts the printer (as if it were turned off and turned on again).
5.
You will need a non-conductive implement with a narrow tip to operate the
Reset button.
The Cancel button cancels the current operation. It is often used to stop the
6.
current print job.
The Status light is off when the printer is not ready to print: the printer is either
7.
off, or in sleep mode. The Status light is green when the printer is ready and
idle, green and flashing when the printer is busy, amber when a serious internal
error has occurred, and amber and flashing when the printer is awaiting human
attention.
The Up button moves to the previous item in a list, or increases a numerical
8.
value.
The OK button is used to select the item that is currently highlighted.
9.
The Back button is used to return to the previous menu. If you press it repeatedly,
10.
or hold it down, you return to the main menu.
The Down button moves to the next item in a list, or decreases a numerical value.
11.
To highlight an item on the front panel, press the Up or Down button until the item is
highlighted.
To select an item on the front panel, first highlight it and then press the OK button.
Introduction
The printer's main components
5
Page 14
Introduction
The four front-panel icons are all found on the main menu. If you need to select or
highlight an icon, and you do not see the icons in the front panel, press the Back
button until you can see them.
Sometimes this guide shows a series of front panel items like this: Item1 > Item2
> Item3. A construction like this indicates that you should select Item1, select
Item2, and then select Item3.
You will find information about specific uses of the front panel throughout this guide.
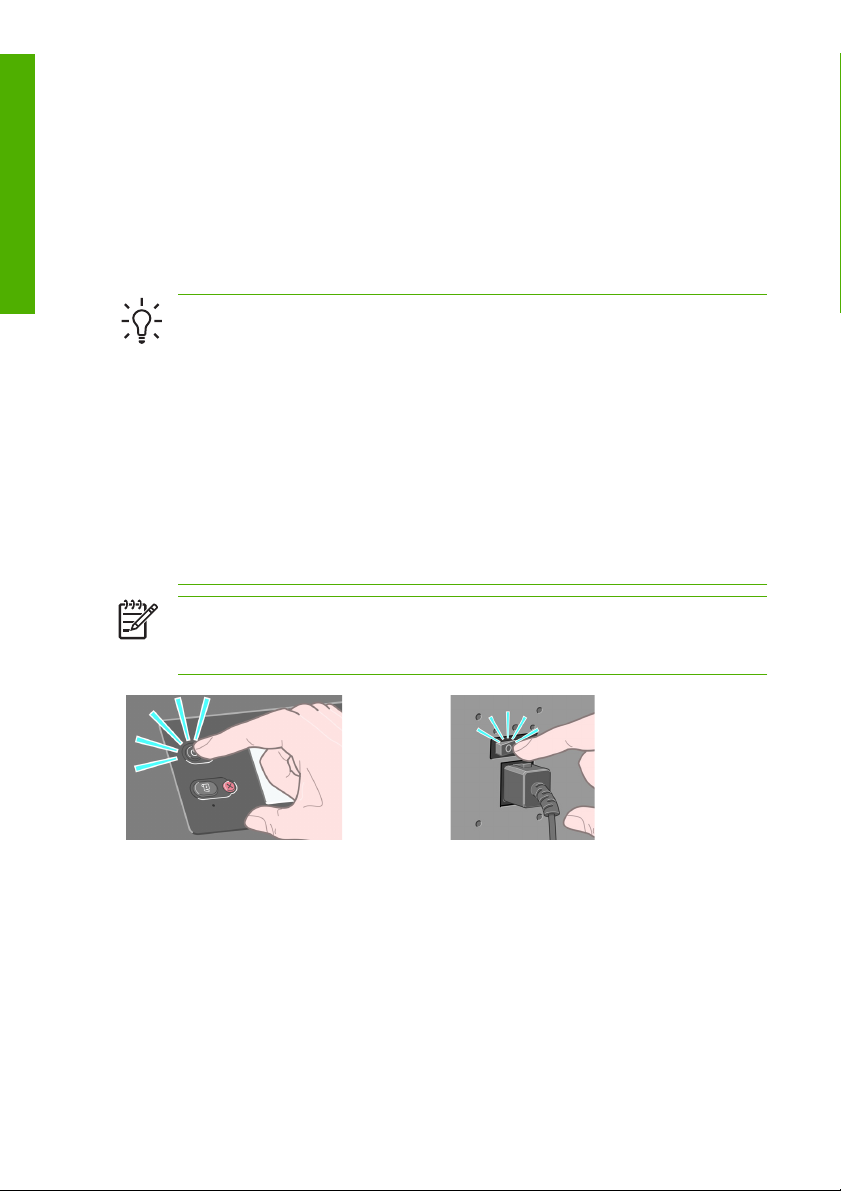
Turn the printer on and off
TIP: Turn the printer on with the hard power switch on the back of the printer
or by pressing the Power button on the front panel. You can leave the printer
on without wasting energy. Leaving it on improves response time and overall
system reliability. When the printer has not been used for a certain period of
time, it saves power by going into sleep mode. Any interaction with the printer
returns it to active mode, and it can resume printing immediately.
If you want to turn the printer on or off, the normal and recommended method
is to use the Power button on the front panel. When you turn off the printer
this way, the printheads are automatically stored with the maintenance
cartridge, which prevents them from drying out.
However, if you plan to leave the printer turned off for a long period of time,
you are recommended to turn it off using the Power button, and then also
switch off the power switch at the rear.
NOTE: In sleep mode, the printer wakes up from time to time to do
maintenance service to the printheads. This avoids the need of doing long
preparation after long idle periods.
To turn it back on later, use the power switch at the rear, and then press the Power
button.
When the printer is turned on, it will take some time to initialize itself. This time is
about 10 minutes for the HP Designjet Z6100 Printer series.
6 Chapter 1 Introduction
Page 15
Access the Embedded Web Server
Use the Embedded Web Server to manage your printer remotely through an ordinary
Web browser running on any computer.
NOTE: To use the Embedded Web Server, you must have a TCP/IP
connection to your printer.
The following browsers are known to be compatible with the Embedded Web Server:
Internet Explorer 5.5 or later for Windows
●
Safari 1, 2, 3 or later for Mac OS X
●
Netscape Navigator 6.01 or later
●
Mozilla 1.5 or later
●
Mozilla Firefox 1.0 or later
●
To use the Embedded Web Server on any computer, open your Web browser and
type the printer address. The printer address appears on the status screen on the
printer's front panel (192.168.1.1 in this example):
If you follow these instructions but fail to open the Embedded Web Server, see Cannot
access the embedded web server in Using your printer.
Printing paper info
Enable the Printing paper info option to see the printer's estimation of the
remaining roll length. The information is a combination of barcode and text that is
printed on the leading edge of the roll when the paper is unloaded from the printer.
Introduction
NOTE: The paper-length estimation is only available if the printer
registered the amount of paper that was on the roll when you loaded it. To
provide this informations to the printer, specify the roll length on the front
panel when loading the paper, or load a roll that has the paper-data barcode
printed on it.
Access the Embedded Web Server
7
Page 16

Introduction
To enable the Printing paper info option, select the icon in the printer's front
panel, and then select Paper handling options > Enable Printing paper
info.
8 Chapter 1 Introduction
Page 17
2
Handle the paper
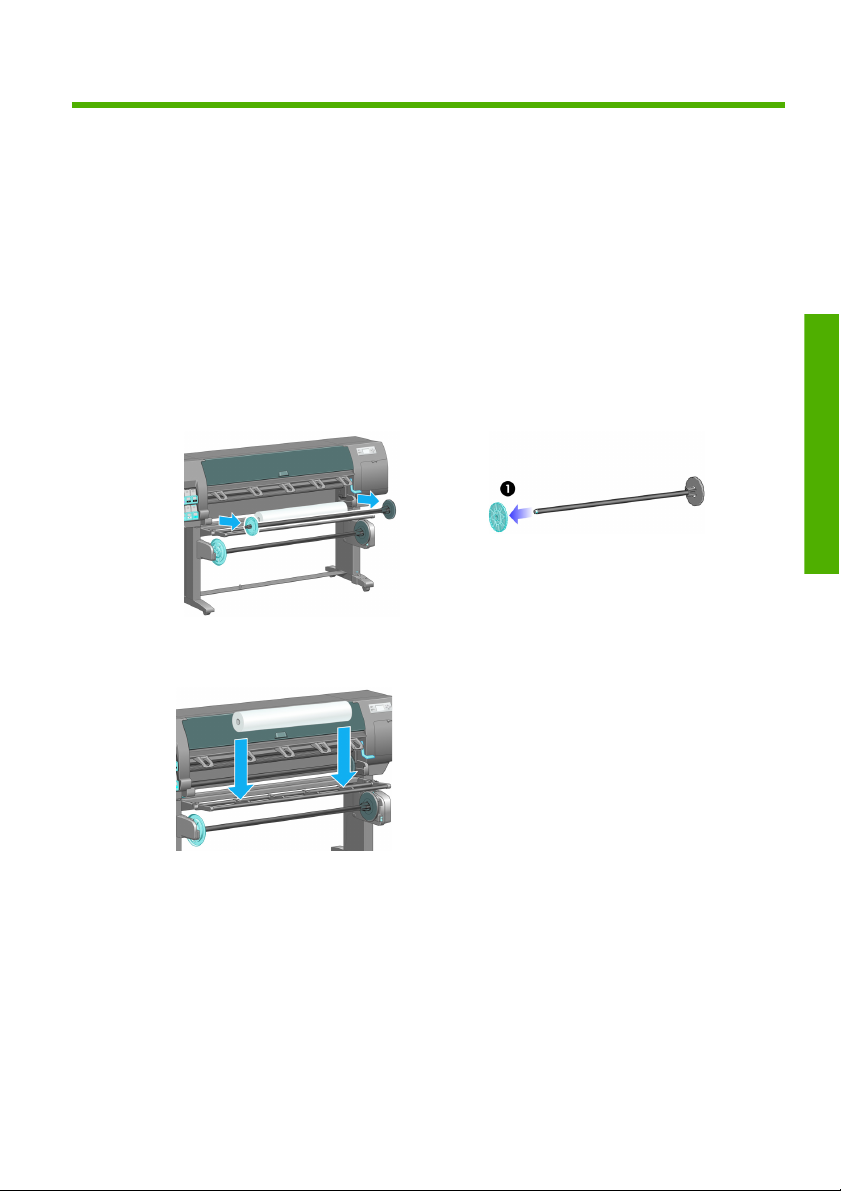
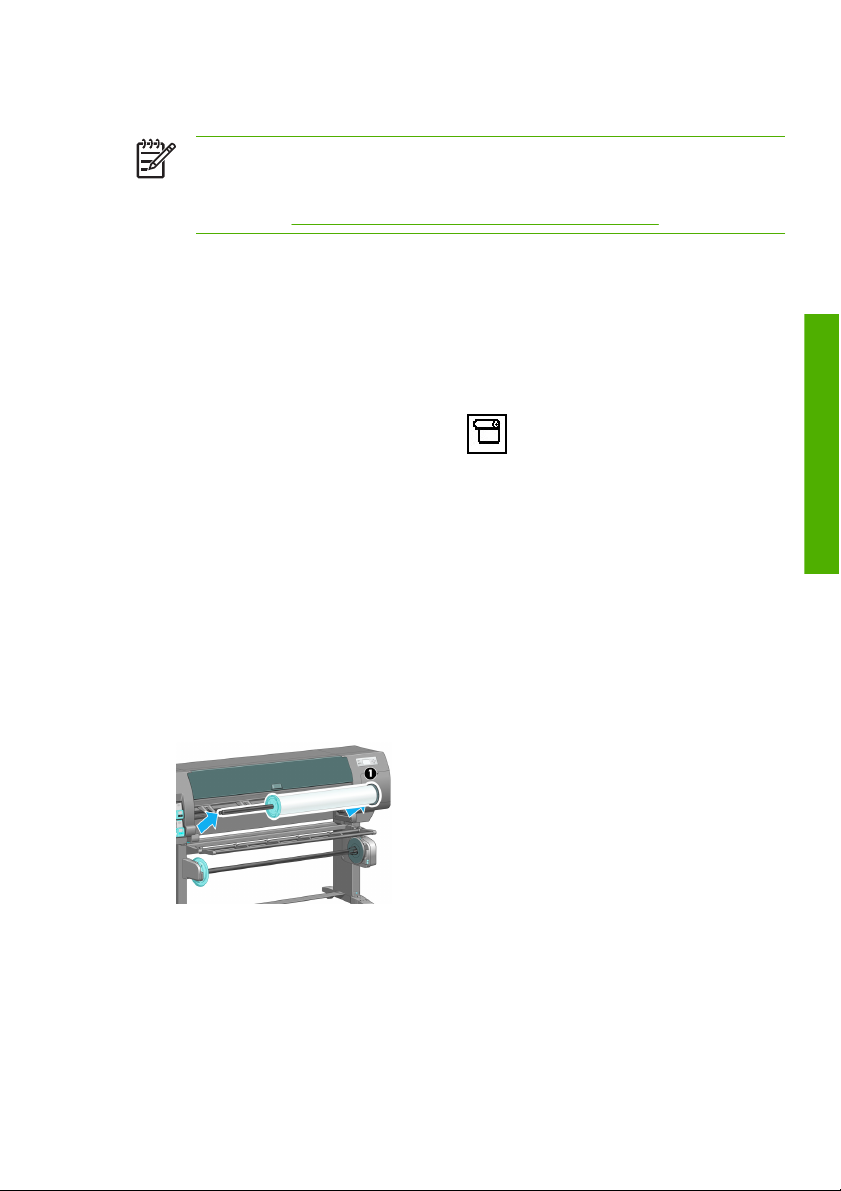
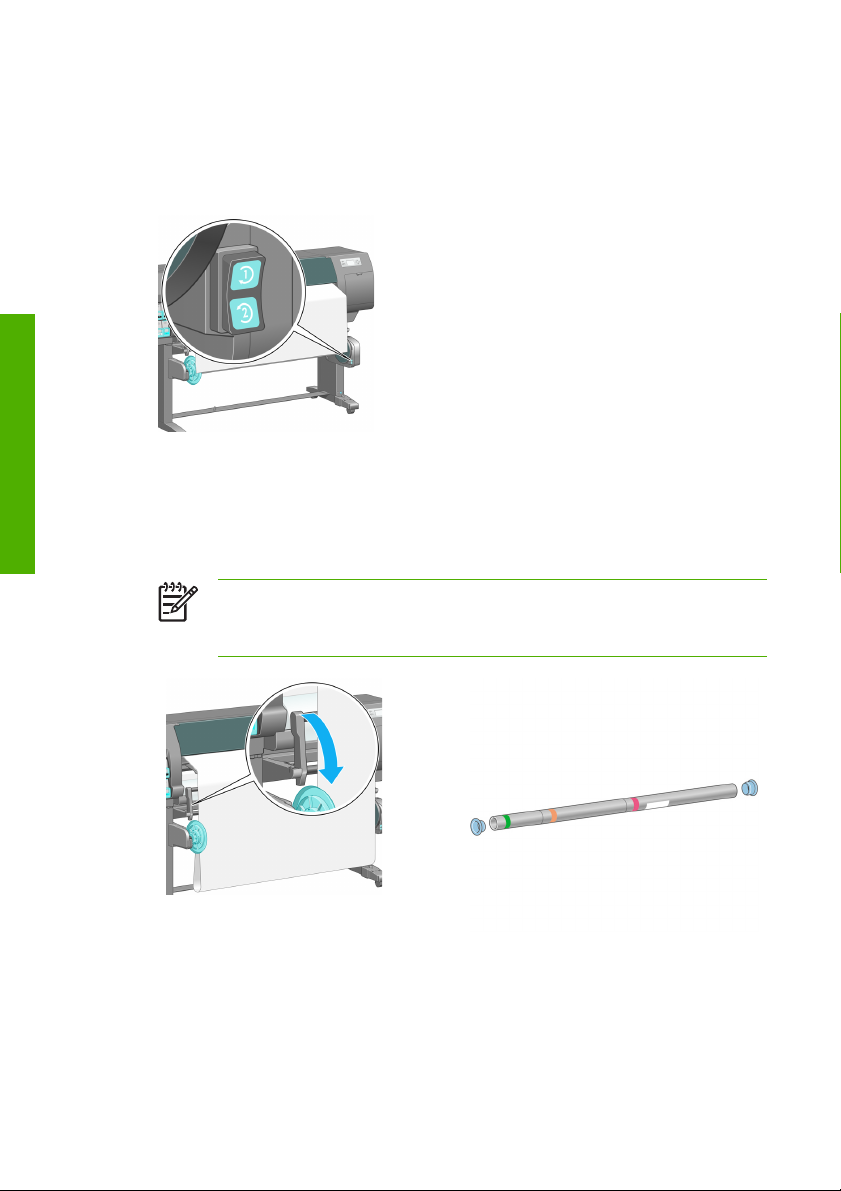
Load a roll onto the spindle
Make sure that the printer wheels are locked (the brake lever is pressed down)
1.
to prevent the printer from moving.
Remove the first end of the spindle from the right side of the printer, and then
2.
move the spindle to the right in order to extract the other end. Do not insert your
fingers into the spindle supports during the removal process.
The spindle has a hub at each end to keep the roll in position. Remove the blue
hub at the left end to mount a new roll. The hub slides along the spindle to hold
rolls of different widths.
Slide the lever-lock on the blue spindle hub to the unlocked position and remove
the hub (1) from the left end of the spindle.
Rest the roll of paper that you want to load on the take-up reel deflector. The
3.
roll might be long and heavy, and you might need two people to handle it.
Handle the paper
Slide the spindle into the roll. Make sure that no space exists between the roll
4.
and the fixed hub at the right end of the spindle.
Make sure that the paper will wind off the roll in the correct direction. If it does
not, remove the spindle from the roll, turn the roll 180° and rest it on the
deflector. Then slide the spindle into the roll.
Load a roll onto the spindle
9
Page 18
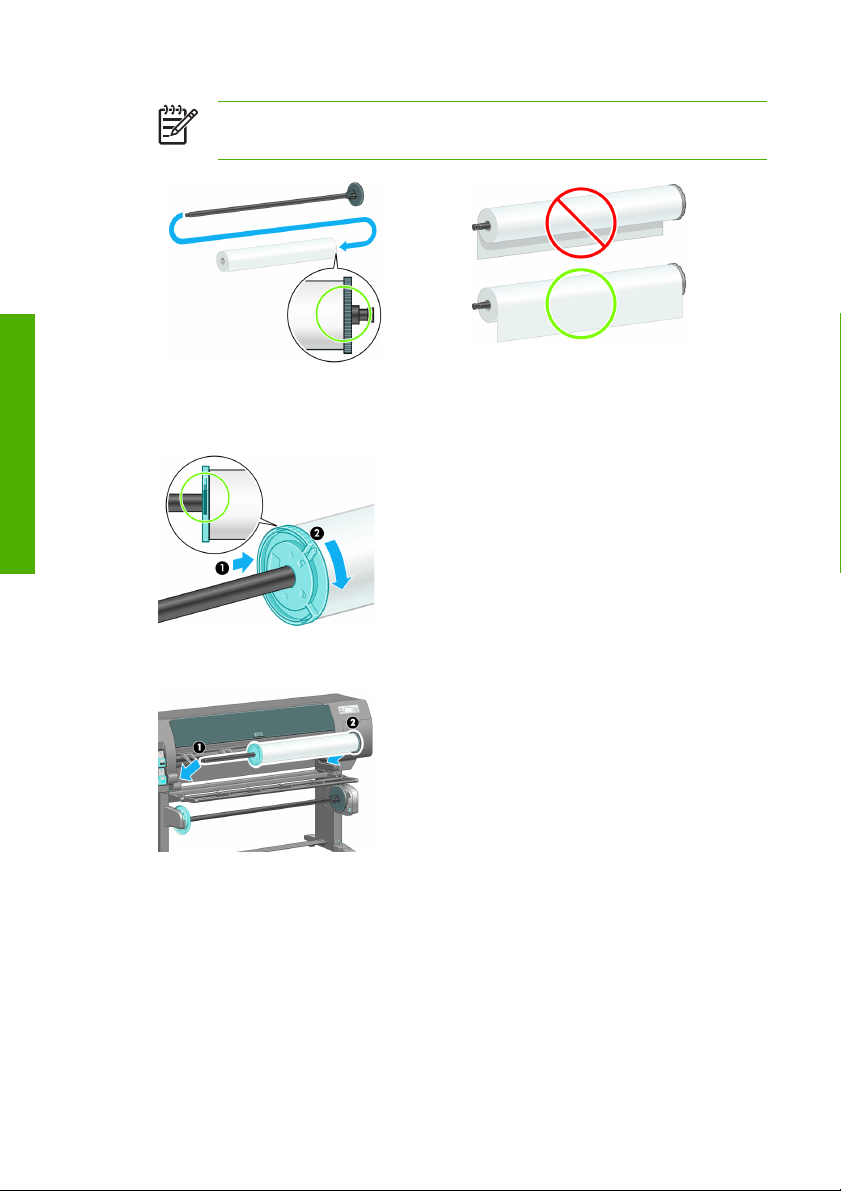
NOTE: A label on the spindle also shows the correct winding
direction.
Handle the paper
Put the blue hub on to the upper end of the spindle, and push it towards the end
5.
of the roll as shown in step 1 in the following image. Then slide the lever-lock
to the locked position as shown in step 2.
With the blue hub on the left, insert the spindle into the left side of the printer
6.
(1), and then into the right side of the printer (2).
If you regularly use different paper types, you can change rolls more quickly if you
pre-load rolls of different paper types on different spindles. Extra spindles are
available for purchase.
10 Chapter 2 Handle the paper
Page 19
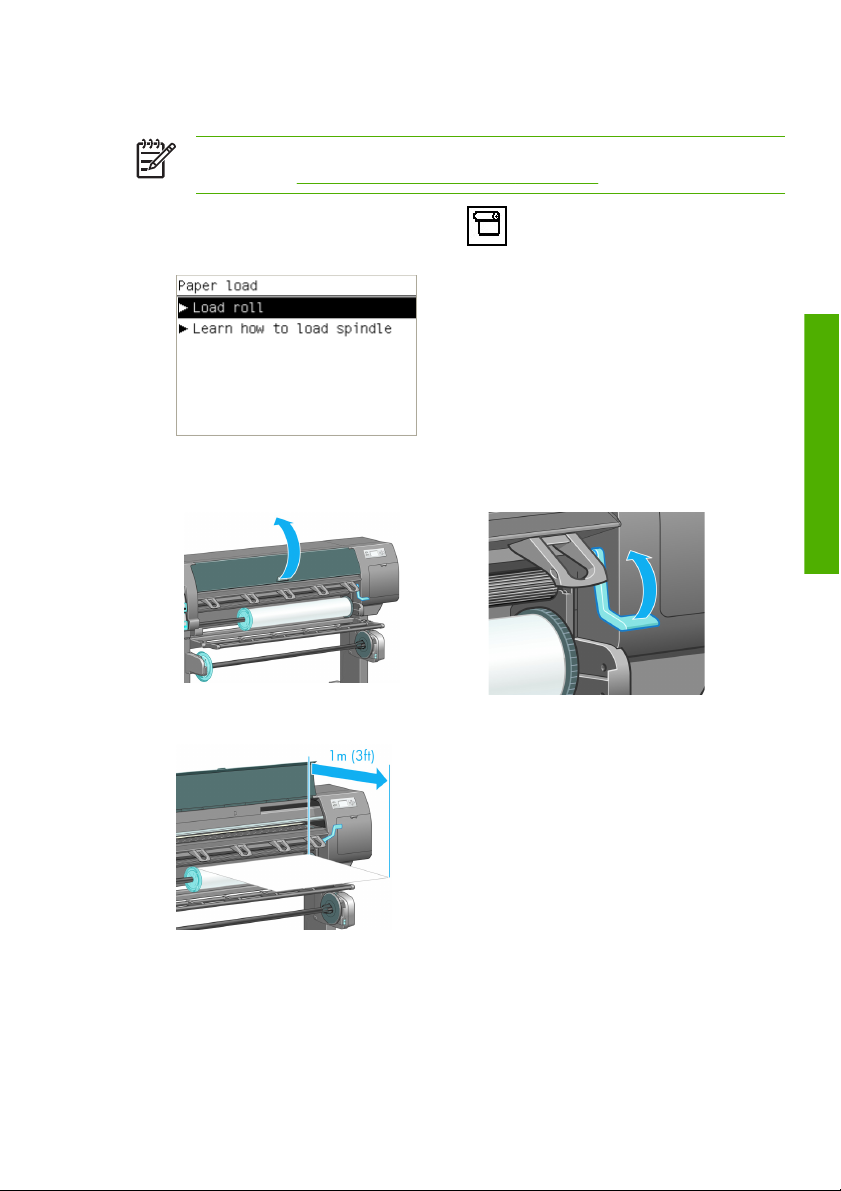
Load a roll into the printer
NOTE: To start this procedure, you need to have a roll loaded on the
spindle. See
1.
At the printer's front panel, select the
> Load roll.
Wait until the front panel prompts you to open the printer window.
2.
After you have opened the printer window, lift the paper-load lever.
Pull out approximately 1 m (3 feet) of paper.
3.
Load a roll onto the spindle on page 9.
icon, and then select Paper load
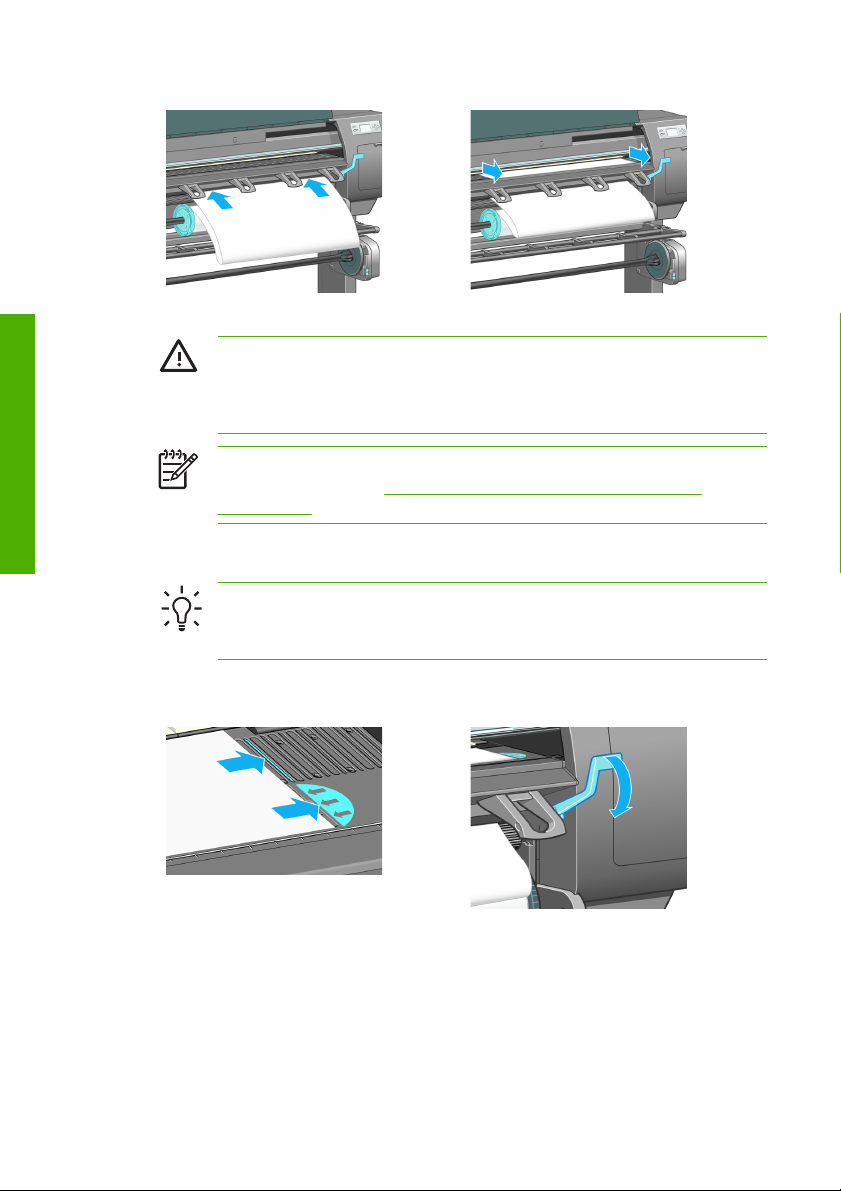
Handle the paper
Carefully insert the leading edge of the roll above the black-ribbed roller.
4.
Wait until the paper emerges from the printer.
Load a roll into the printer
11
Page 20
Handle the paper
WARNING! Take care not to touch the rubber wheels on the platen
while loading paper. These wheels can rotate and trap skin, hair, or
clothing. Take care not to push your fingers inside the printer's paper
path.
NOTE: If you have an unexpected problem at any stage of the paper
loading process, see
The paper cannot be loaded successfully
on page 69.
Align the edge of the paper with the blue line and the left edge of the semi-circle
5.
to the right of the platen.
TIP: It may be helpful to also align the lead edge of the paper with
the front edge of the platen. You can use a blade or scissors to improve
the lead edge of the paper if it is not straight or is not cut well.
When the paper is correctly aligned with the blue line and half-circle, lower the
paper-load lever.
Wait for the front-panel message that prompts you to wind excess paper onto
6.
the roll.
Wind the excess paper onto the roll. Use the hub to turn the roll in the direction
shown.
12 Chapter 2 Handle the paper
Page 21
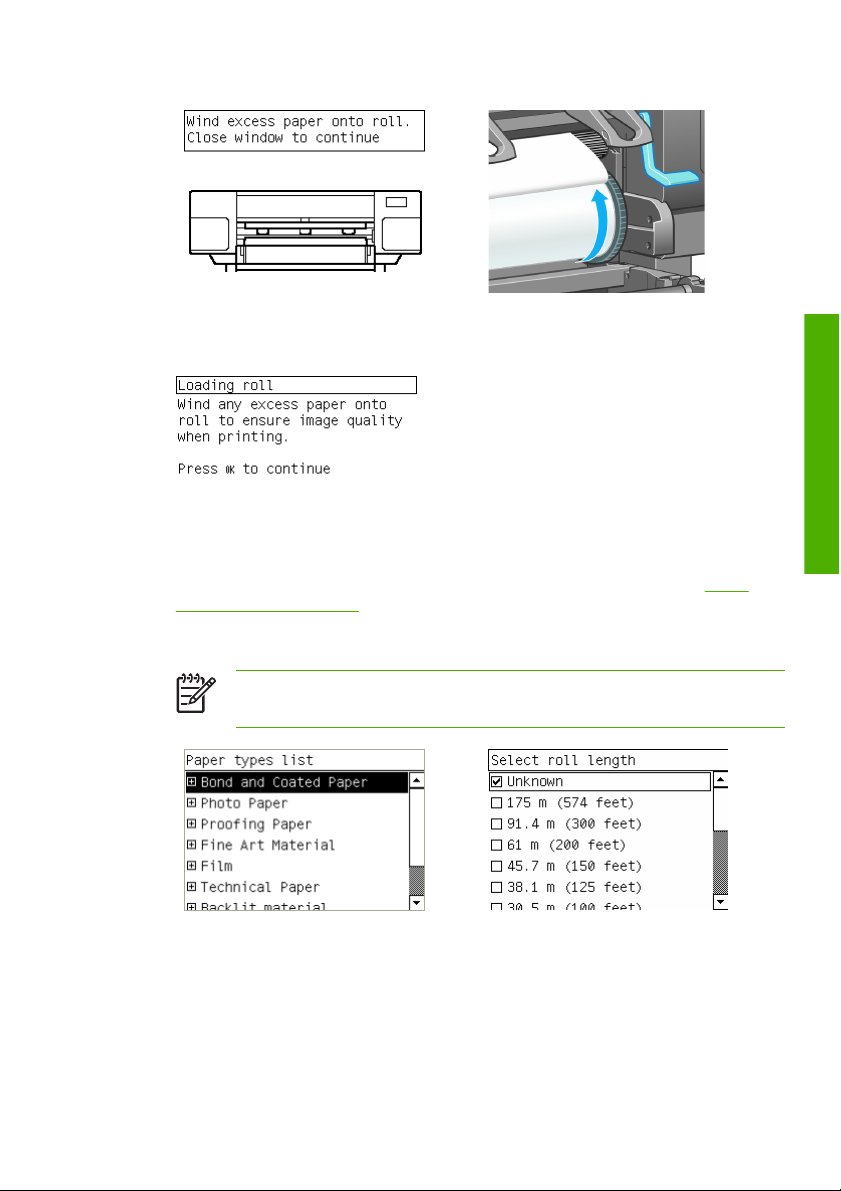
Lower the printer window.
7.
Wait for the front panel to again prompt you to wind excess paper onto the roll.
8.
The printer will perform a color calibration if it has not already calibrated the
9.
paper type you are using, and if color calibration is turned on. See
calibration on page 49.
Select the paper category and paper type of the roll you are loading. Then select
10.
the length of the roll you are loading.
NOTE: If it is not clear which paper category or paper type to select,
see the Supported paper types section in the HP Start-up Kit CD/DVD.
Handle the paper
Color
Load a roll into the printer
13
Page 22
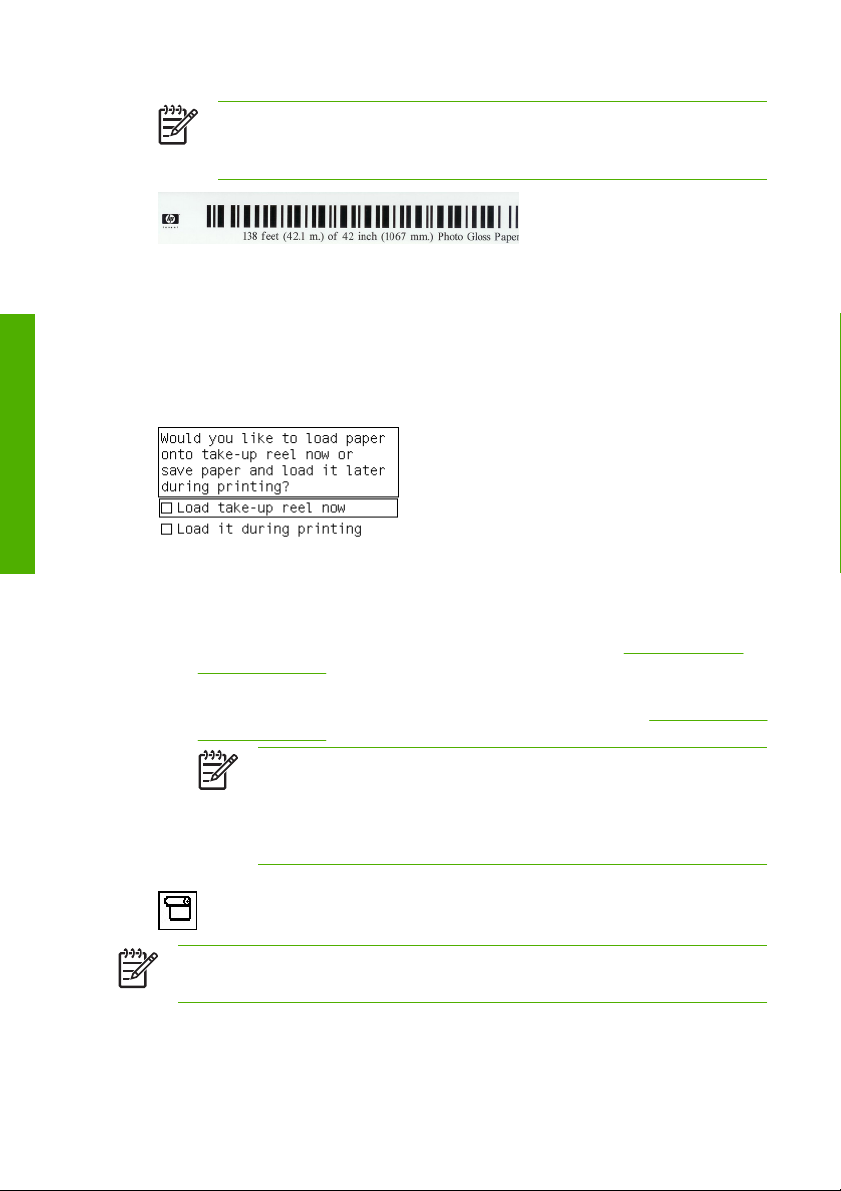
NOTE: If the paper that you are using has a paper-data barcode
printed on the leading edge of the roll, the paper information is
automatically loaded into the printer.
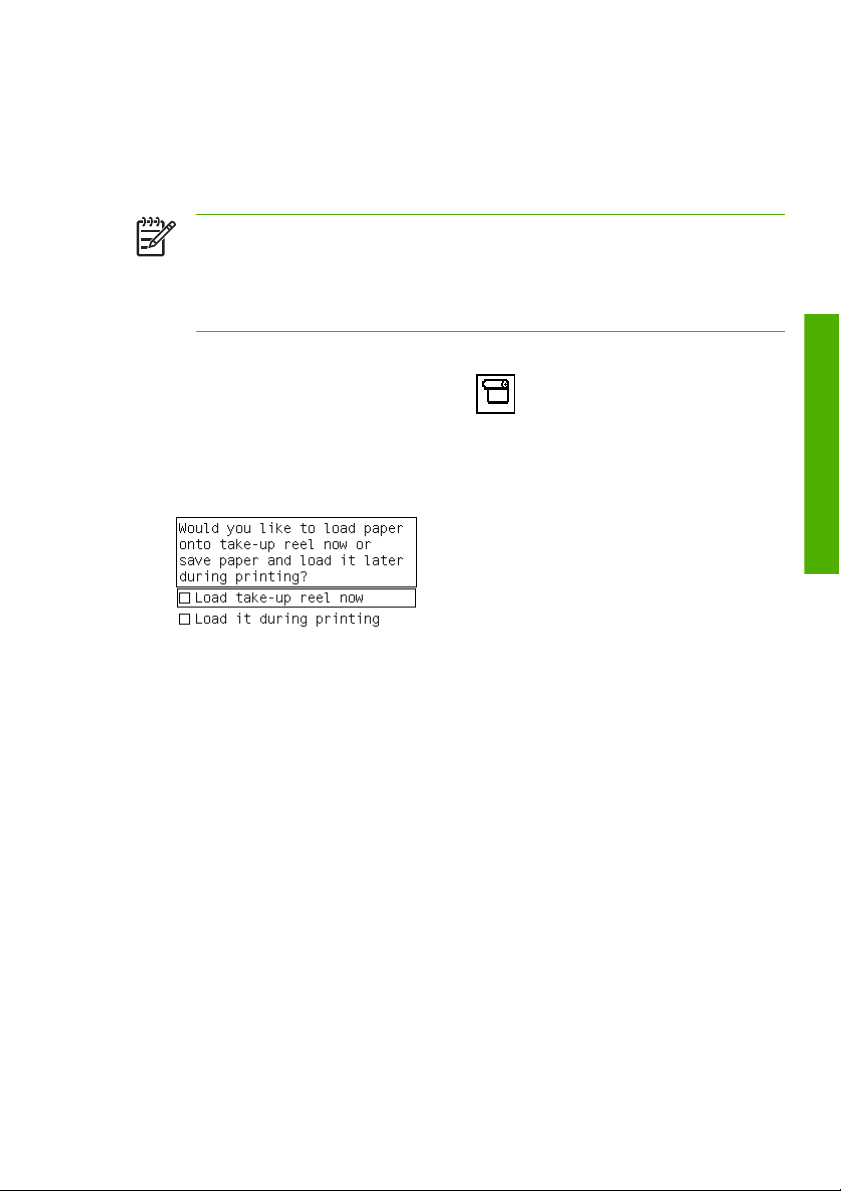
If you have a take-up reel (a standard feature on the 60–in printer and an
11.
optional accessory on the 42–in printer) and it is enabled, you will see the “Takeup reel enabled” message on the front-panel Paper tab. In this case, a message
will appear on the front panel asking if you want to load paper into the reel. If
Handle the paper
you select No (or if you do not have a take-up reel) the front panel displays
the Ready message and the printer is ready to print. If you select Yes, a
message will appear on the front panel asking if you want to load the take-up
reel now or during printing.
● If you want to load the take-up reel now, select Load take-up reel
now, read through the introductory text in the section Use the take-up
reel on page 16, and then continue to step 3 of the procedure.
●
If you want to load the take-up reel during printing, select Load it during
printing, read through the introductory text in the section
Use the take-up
reel on page 16, and then continue to step 3 of the procedure.
NOTE: Familiarize yourself with the procedural steps, because
loading the take-up reel while printing requires you to complete the
procedure while the printer is feeding and printing paper. Loading
the take-up reel during printing saves approximately 1 m (3 feet)
of paper.
If the take-up reel is not enabled and you would like to enable it, select the
icon, and then select Take up reel > Enable.
NOTE: During the initial printer set up, printhead alignment and color
calibration is performed automatically after the roll is loaded into the printer.
14 Chapter 2 Handle the paper
Page 23
Unload a roll from the printer
NOTE: If you used the take-up reel (a standard feature on the 60–in printer
and an optional accessory on the 42–in printer) during printing, unload the
printed roll from the take-up reel before attempting to remove the roll from the
printer. See
Initiate the procedure for unloading a roll from the printer the front panel or by lifting
the paper-load lever. In either case, a front-panel animation guides you through the
remainder of the procedure.
Before unloading a roll, check whether the end of the roll is still attached to the
spindle, and follow the appropriate procedure as described in the following sections.
The normal procedure (roll attached to spindle)
If the end of the roll is still attached to the spindle, use the following procedure.
1.
At the printer's front panel, select the
paper.
The paper is ejected from the printer.
2.
If for some reason the paper is not automatically ejected from the printer, the
front-panel display prompts you to lift the paper-load lever and wind the roll by
hand until the paper leaves the printer. When you have finished, lower the
paper-load lever.
Turn the hub by hand, until the paper is fully wound onto the roll.
3.
Press the OK button.
4.
Remove the roll from the printer, pulling out the right end on the right side of the
5.
printer first. Do not insert your fingers into the spindle supports during the
removal process.
Unload a roll from the take-up reel on page 22.
icon, and then select Unload
Handle the paper
Unload a roll from the printer
15
Page 24

Roll is detached from spindle
Use the following procedure if the end of the roll is visible but no longer attached to
the spindle:
1. If you have already selected Paper unload at the front panel, press the
Cancel button to cancel that procedure.
Lift the paper-load lever. If the front panel shows a warning about the lever,
2.
ignore it.
Pull out the paper from the front of the printer.
3.
Remove the empty spindle from the printer, pulling out the end on the right side
4.
Handle the paper
of the printer first. Do not insert your fingers into the spindle supports during the
removal process.
Lower the paper-load lever.
5.
If the front panel shows a warning message, press the OK button to clear it.
6.
No paper visible
Use this procedure if the end of the roll has entirely disappeared into the printer:
Press the Form Feed and Cut button on the front panel to eject the remaining
1.
paper.
Remove the empty spindle from the printer, pulling out the end on the right side
2.
of the printer first. Do not insert your fingers into the spindle supports during the
removal process.
Use the take-up reel
CAUTION: Make sure the printer is turned off when installing the take-up
reel motor on the printer.
The take-up reel must be enabled and operated from the front panel. When the takeup reel is enabled, the “Take-up reel enabled” message appears on the Paper tab
on the front panel. If the take-up reel is not enabled and you would like to enable it,
select the
Follow these guidelines when taping rolls to the take-up reel spindle core:
Make sure that the paper is straight when it is attached to the spindle core.
●
Otherwise it skews as it winds onto the core.
The spindle core on the take-up reel must be the same width as the paper that
●
you are using.
16 Chapter 2 Handle the paper
icon and then select Take up reel > Enable.
Page 25
Check that neither side of the spindle core has end caps, and make sure the
●
spindle core is pushed firmly into both spindle guides.
If you are using a HP Designjet Z6100 42–in Printer, make sure that the bin
●
loop is placed behind the foot brace so that it does not block the take-up reel
sensors.
NOTE: If you want to load the take-up reel during printing, familiarize
yourself with the procedural steps. Loading the take-up reel during printing
requires you to complete the procedure while the printer is feeding and
printing paper. Loading the take-up reel during printing saves approximately
1 m (3 feet) of paper.
Attach a roll to the take-up reel
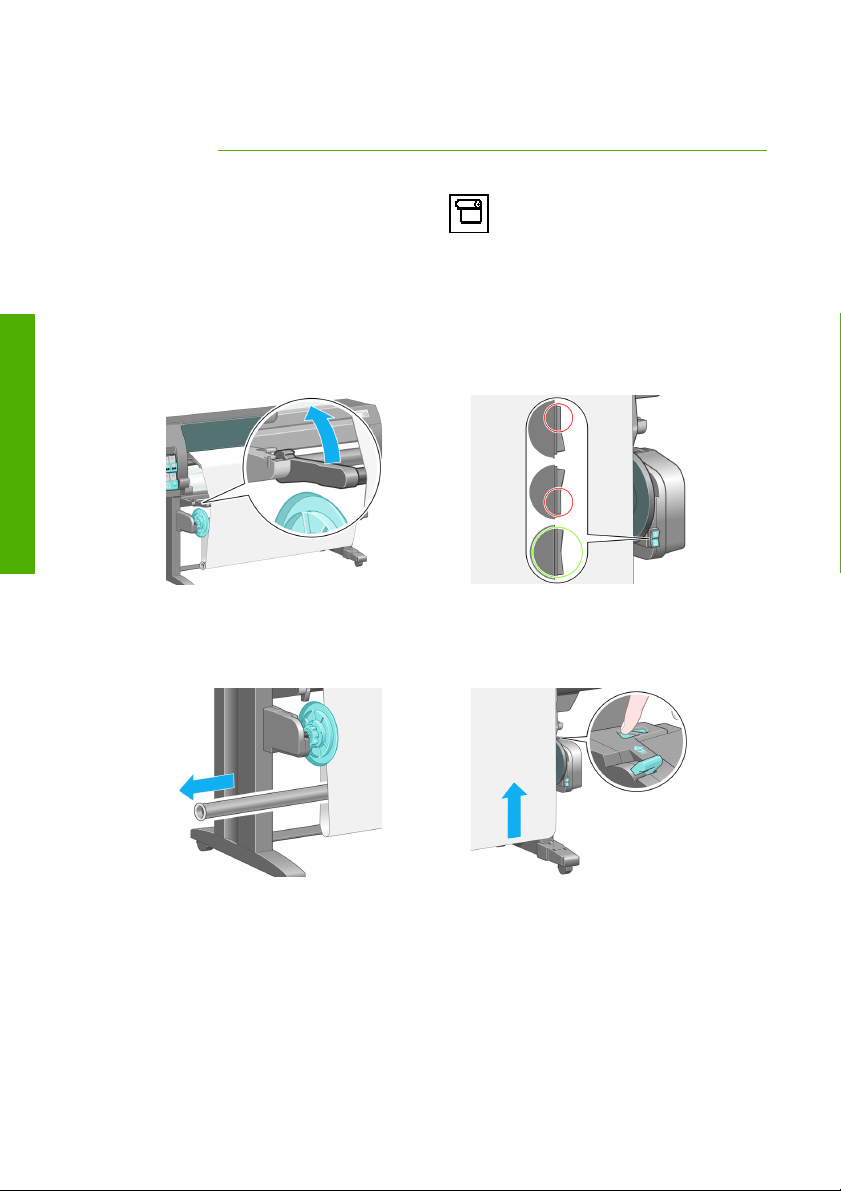
1.
On the printer's front panel, select the
reel > Load take-up reel.
2. If you want to load the take-up reel now, select Load take-up reel now on
the front panel. If you want to load the take-up reel during printing, select Load
it during printing on the front panel.
icon, and then select Take-up
Handle the paper
Make sure that the take-up reel deflector is in its upright position.
3.
Unlock the take-up reel spindle by pushing the spindle lever to its uppermost
position.
Use the take-up reel
17
Page 26
Handle the paper
Remove the take-up reel spindle.
4.
The front-panel display guides you through the process of loading the take-up
reel spindle core onto the take-up reel spindle. When that task is complete, load
the take-up reel spindle into the printer by pushing firmly on both ends of the
spindle.
Press the OK button on the front panel.
5.
The printer advances the paper. Make sure that the paper passes in front of the
take-up reel deflector.
On the front panel, select a winding direction.
18 Chapter 2 Handle the paper
Page 27
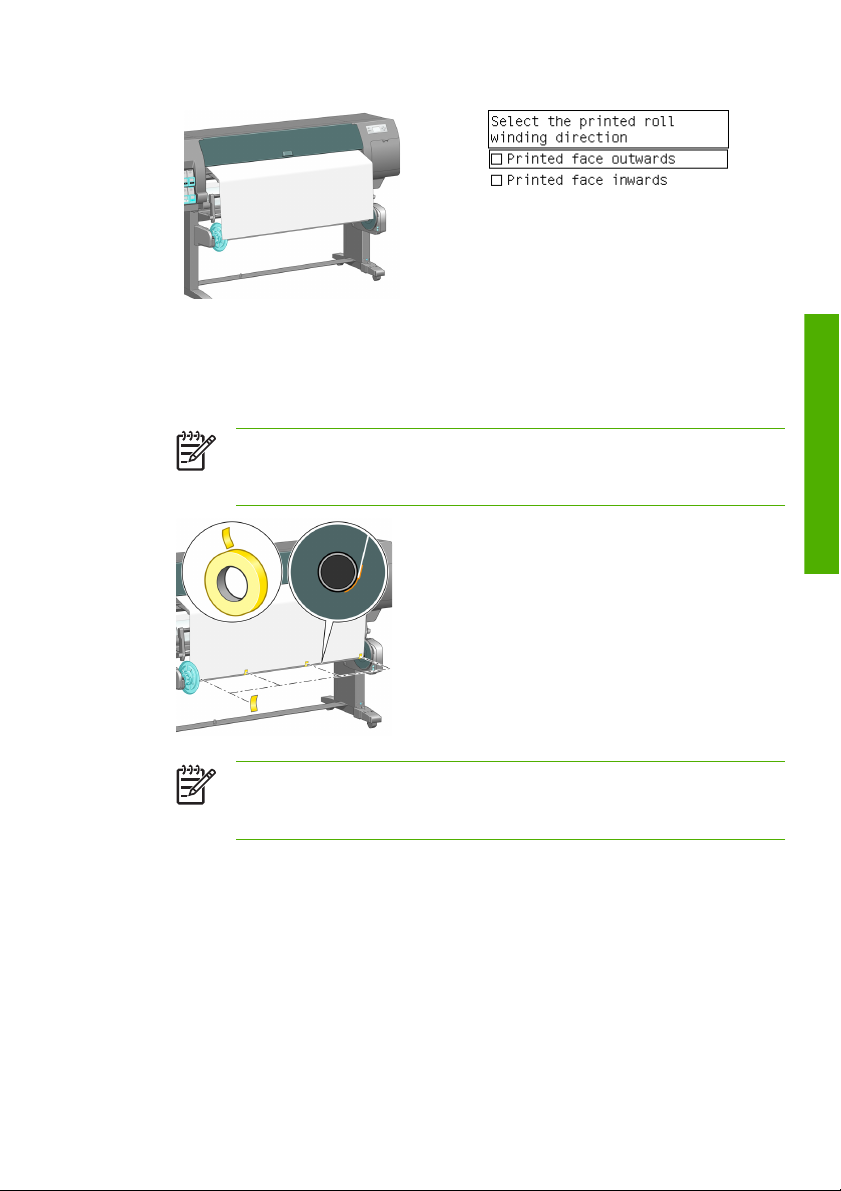
Pull the paper taut to the take-up reel spindle core. Do not attempt to pull more
6.
paper out of the printer. Use tape to secure the paper to the spindle core. You
might need to use more tape than is shown in the following image. The paper
should be secure enough to support the weight of the loop-shaping core, which
you insert in step 10.
NOTE: If you are loading the take-up reel during printing you do not
need to pull the paper taut. Tape the paper to the spindle core when an
adequate length of paper has fed from the printer after printing begins.
NOTE: To avoid having the paper skew as it winds onto the spindle
core, make sure the paper is straight when you attach it. It is sometimes
useful to use the core grooves to align the paper.
Handle the paper
Use the take-up reel
19
Page 28
Use the wind-direction switch on the take-up reel motor to select the winding
7.
direction. Setting 1 winds the paper so that the printed image faces in.
Setting 2 winds the paper so that the printed image faces out.
The front panel shows you to the correct setting based on the winding-direction
decision you made in step 5.
Handle the paper
Gently lower the take-up reel deflector, and then press the OK button on the
8.
front panel. The printer advances the paper.
Assemble a loop-shaping core by matching the shape-coded and color-coded
lengths of plastic tubing. The loop-shaping core must be the same width as the
paper that you are using. Make sure that both end caps are firmly fitted on the
ends of the loop-shaping core.
NOTE: The front-panel display shows the required length of the loop-
shaping core based on the width of the roll that you have loaded into
the printer.
20 Chapter 2 Handle the paper
Page 29
Press the OK button on the front panel. The printer advances the paper.
9.
NOTE: Make sure that you insert the loop-shaping core. The take-up
reel will not function correctly without it. The loop-shaping core must
have end caps. Make sure that the end caps extend over the edges of
the paper.
Carefully insert the loop-shaping core, and the press the OK button on the front
10.
panel. The Ready message appears.
NOTE: You are not required to press the OK button if you are loading
the take-up reel during printing.
NOTE: Make sure the loop-shaping is inserted. The take-up reel will
not function correctly without it. The loop-shaping core must have end
caps. Make sure that the end caps extend over the edges of the paper.
When the printer is printing and the take-up reel is operating, the paper is fed
from the printer, drops down in a loop, and then up into the take-up reel spindle.
Handle the paper
NOTE: While the take-up reel is operating, make sure that the take-
up reel sensors are not blocked.
Use the take-up reel
21
Page 30
NOTE: The automatic paper-cutter is disabled when the take-up reel
is in use.
Unload a roll from the take-up reel
1.
At the printer's front panel, select the
Unload roll.
The printer advances the paper to allow for cutting.
Lift the take-up reel deflector to its upright position.
2.
Switch the wind-direction switch to the Off position. The switch is in the off
Handle the paper
position when it is centered (in other words, when the switch is neither in position
1 nor position 2).
Remove the loop-shaping core.
3.
Use the winding button on the take-up reel motor to wind the excess paper
around the take-up reel spindle.
icon, then Paper unload >
Press the OK button on the front panel.
4.
The printer knows if the type of paper that is loaded is suitable for the automatic
5.
paper-cutter. The paper is cut if it is suitable. If the paper is not suitable, cut the
paper manually.
22 Chapter 2 Handle the paper
Page 31

NOTE: The automatic paper-cutter feature is disabled for some of the
heaviest media types, because they can damage the cutter.
Use the winding button on the take-up reel motor to wind the remainder of the
paper around the take-up reel spindle.
Press the OK button on the front panel.
6.
The amount of printed paper that is on the take-up reel spindle appears on the
front panel.
Unlock the take-up reel spindle by pushing the spindle lever to its uppermost
7.
position.
Remove the roll from the printer, pulling out the end on the right side of the
printer first. Do not insert your fingers into the spindle supports during the
removal process.
Handle the paper
To remove the roll from the printer after you have unloaded the take-up reel,
8.
Unload a roll from the printer on page 15.
see
View information about the paper
On the printer's front panel, select the icon, and then select View loaded
paper > View paper details.
View information about the paper
23
Page 32

The following information appears on the front panel:
The roll status
●
The paper type you have selected
●
The width of the paper in millimeters (estimated by the printer)
●
The length of the paper in millimeters (estimated by the printer)
●
If no paper is loaded, the message Out of paper appears.
The same information appears on the Embedded Web Server's Supplies page.
Perform paper advance calibration
The printer is calibrated to advance correctly when printing all the papers that appear
Handle the paper
on the front panel. When you select the type of loaded paper, the printer adjusts the
rate at which it advances the paper while printing. However, to fine-tune the image
quality of your print, you might need to calibrate the rate at which the paper
advances. See
paper-advance calibration is the solution for your issue.
Accurate paper advance controls proper placement of dots on the paper. If the paper
is not advanced correctly, light or dark bands appear in the printed image and the
grain in the image might increase.
Troubleshoot print-quality issues on page 57 to determine whether
To check the paper advance calibration status of the paper, select the
then select View loaded paper > View paper details. The status appears:
●
DEFAULT: this status appears when an HP paper is loaded. Unless you
experience image-quality problems in your printed image, such as banding or
graininess, HP recommends that you do not calibrate the paper advance.
●
RECOMMENDED: this status appears when you create a new paper. The
paper advance values for this paper are inherited from the family type. HP
recommends that you perform a paper advance calibration to optimize the
values.
●
OK: this status indicates that the loaded paper has been calibrated previously.
However, you might need to repeat the calibration if you experience imagequality problems, such as banding or graininess in your printed image.
NOTE: Whenever you update the printer firmware, the paper-
advance calibration values are reset to the factory default.
NOTE: Colored papers, glossy canvas, and transparent materials
such as translucent bond, clear film, natural tracing paper, and vellum
are not suitable for paper-advance calibration.
24 Chapter 2 Handle the paper
icon, and
Page 33

Overview of the paper advance procedure
1.
On the front panel, select the
maintenance > Paper advance calibration > Calibrate paper
advance. The printer automatically calibrates the paper-advance and prints a
paper advance calibration image.
Wait until the front panel shows the status screen, and then reprint your image.
2.
NOTE: The calibration procedure takes approximately six minutes.
The front-panel display shows any errors in the process.
If you are satisfied with your image, continue using this calibration for your
paper type. If you see improvement in your image, continue with step 3. If you
are dissatisfied with the calibration, return to the default calibration. See
to default calibration on page 25.
3.
To fine-tune the calibration, select the
quality maintenance > Paper advance calibration > Adjust paper
advance.
Select the percentage of change from -100% to 100%. To correct light banding,
4.
decrease the percentage. To correct dark banding, increase the percentage.
Press the OK button on the front panel to save the value.
5.
Wait until the front panel shows the status screen, and then reprint your image.
6.
icon, and then select Image quality
icon, and then select Image
Return to default calibration
Returning to the default calibration sets all the paper-advance calibration to zero. To
return to the default paper advance-calibration value, you must reset the calibration.
1.
On the front panel, select the
maintenance > Paper advance calibration > Reset paper
advance.
Wait until the front panel shows that the operation has been successfully
2.
completed before you press the Back button to return to the Ready screen.
icon, and then select Image quality
Return
Handle the paper
Download paper profiles
Each supported paper type has its own characteristics. The printer changes the way
it prints on each different paper type. For example, some might need more ink and
some might require a longer drying time. The printer requires a description of the
requirements of each paper type. This description is called the “paper profile”.
Download paper profiles
25
Page 34

The paper profile contains the ICC profile, which describes the color characteristics
of the paper. It also contains information about other characteristics and requirements
of the paper that are not directly related to color. Existing paper profiles for your
printer are installed in the printer's software.
Your printer contains paper profiles for only the most commonly used paper types. If
you buy a paper type for which your printer has no profile, you cannot select that
paper type in the front panel.
You can assign a profile for a new paper type in three ways:
Use a HP factory paper profile by selecting the closest category and type on the
●
front panel, in HP Easy Printer Care (Windows), or in HP Printer Utility (Mac
OS)
Handle the paper
NOTE: Because colors might not be accurate, this method is not
recommended for high-quality prints.
●
http://www.hp.com/go/designjet/downloads and click the HP
Go to
Designjet ICC/Media profiles and PANTONE tables link. Select from
the HP Designjet media profiles drop-down menu.
NOTE: HP only provides profiles for HP paper types. If you do not
find the paper profile that you want on the Web, it might have been
added to the latest firmware for your printer. Check the firmware release
notes for information.
Add a custom paper type and create an ICC profile for either HP or non-HP
●
papers.
26 Chapter 2 Handle the paper
Page 35

3
Handle the ink system
Remove an ink cartridge
CAUTION: The procedure to remove an ink cartridge must be initiated
from the front panel. Do not remove an ink cartridge until the front panel
prompts you.
Ink cartridges should be removed for the following two reasons:
The ink cartridge is very low and you want to replace it with a full cartridge for
●
unattended printing. You can use the remaining ink in the first cartridge at a
more convenient time.
The ink cartridge is empty or faulty, and you must replace it to continue printing.
●
CAUTION: Do not try to remove an ink cartridge while printing.
CAUTION: Remove an ink cartridge only if you are ready to insert another
one.
WARNING! Make sure that the printer wheels are locked (the brake lever
is pressed down) to prevent the printer from moving.
1.
At the printer's front panel, select the
cartridges.
Grip the blue tab in front of the cartridge that you want to remove.
icon, and then select Replace ink
Remove an ink cartridge
Handle the ink
27
Page 36

Handle the ink
Pull the blue tab down and then pull it outwards, towards you.
2.
The cartridge comes out, in its drawer.
Lift the cartridge out of its drawer.
3.
The front-panel display identifies the missing ink cartridge.
NOTE: Avoid touching the end of the cartridge that is inserted into the
printer, because the connection might be coated with ink.
NOTE: If necessary, store a partially-used ink cartridge in the same
position as if it were inserted in the printer. Avoid using a partially-used
cartridge that has been stored on its end.
28 Chapter 3 Handle the ink system
Page 37

Insert an ink cartridge
Pick up the new ink cartridge and find the label that identifies the ink color. Hold
1.
the ink cartridge so that you can see the label at the top of the side that is facing
you.
Check that the colored label above the empty slot in the printer matches the
2.
color of the label on the cartridge.
Shake the cartridge vigorously for about 15 seconds.
3.
Insert the ink cartridge into the cartridge drawer.
4.
Slide the drawer and cartridge into the slot until they lock into position. If you
have difficulty, see Cannot insert an ink cartridge in Using your printer.
The front-panel display confirms that all cartridges have been correctly inserted.
5.
Remove a printhead
WARNING! Make sure that the printer wheels are locked (the brake lever
is pressed down) to prevent the printer from moving.
Insert an ink cartridge
Handle the ink
29
Page 38

Handle the ink
Printhead replacement must be performed after the printer has been turned on at the
hard power switch.
1.
At the printer's front panel, select the
icon, and then select Replace
printheads.
The printer moves the carriage into the correct position.
2.
CAUTION: If the carriage remains in the removal position for more
than 3 minutes without inserting or removing any printheads, it will
attempt to return back to its home position to the right.
When the carriage has stopped moving, the front panel prompts you to open
3.
the printer window.
Locate the carriage on the right side of the printer.
4.
Pull up and release the latch on top of the carriage.
30 Chapter 3 Handle the ink system
Page 39

Lift up the cover. This provides access to the printheads.
5.
To remove a printhead, lift up the blue handle.
6.
Using the blue handle, gently disengage the printhead.
Gently pull the blue handle upward until the printhead is released from the
7.
carriage.
CAUTION: Do not pull abruptly. That action can damage the
printhead.
The front-panel display identifies the missing printhead.
Remove a printhead
Handle the ink
31
Page 40

Insert a printhead
If the printhead is new, shake it vigorously before removing the protective caps.
1.
Hold the printhead upright (with the protective caps facing down) and shake
the printhead vigorously in a smooth up and down motion for about 15 seconds.
Remove the orange protective caps by pulling them down.
The printhead is designed to prevent you from accidentally inserting it into the
Handle the ink
2.
wrong slot. Check that the colored label on the printhead matches the colored
label of the carriage slot into which the printhead is to be inserted.
Insert the new printhead into its correct slot in the carriage.
3.
NOTE: Be careful not to strike the printhead against anything while
shaking it, because this could cause damage.
CAUTION: Insert the printhead slowly and vertically, straight down.
It can be damaged if you insert it too quickly, or at an angle, or if you
rotate it as you insert it.
Push down as indicated by the arrow.
CAUTION: You might feel some resistance when installing the new
printhead, so you need to press it down firmly but smoothly. You should
hear a beep and see confirmation on the front-panel display that the
printhead has been inserted. If you have difficulty, see Cannot insert a
printhead in Using your printer.
32 Chapter 3 Handle the ink system
Page 41

Insert all of the other printheads that need to be installed, and close the carriage
4.
cover.
Make sure that the end of the blue handle catches the wire loop on the near
side of the carriage.
Lower the handle to rest on the carriage cover.
5.
When all of the printheads have been inserted correctly and the printer has
accepted them, the printer beeps.
Handle the ink
NOTE: If the printer does not beep when you insert the printhead and
the Replace message appears on the front-panel display, you might
need to reinsert the printhead.
Insert a printhead
33
Page 42

Close the printer window.
6.
The front-panel display confirms that all of the printheads are correctly inserted.
7.
The printer starts checking and preparing the printheads. The default routine
process, when all printheads are changed, takes about 18 minutes. If the printer
identifies a problem when preparing the printheads, the process takes longer,
up to 30 minutes. For a single printhead insertion, the time varies between 10
and 20 minutes. After all printheads are checked and prepared, the printhead
realignment procedure runs automatically if paper is loaded. See
printheads on page 34.
Align the printheads
The printer performs printhead alignment whenever printheads are replaced. If no
paper is loaded when a printhead is replaced, the printer will perform the alignment
the next time you load paper.
Also align the printheads if the Printhead status plot indicates an alignment error.
Use the Printhead status plot on page 35.
See
Make sure that you have a roll of opaque, white paper loaded in the printer.
1.
Colored papers, glossy canvas, and transparent materials such as translucent
bond, clear film, tracing paper, and vellum are not suitable for printhead
alignment.
Handle the ink
Align the
34 Chapter 3 Handle the ink system
Page 43

To request printhead alignment (if the alignment is not being performed
2.
automatically), go to the front panel, select the
Image quality maintenance > Align printheads.
The process takes about 10 minutes and starts immediately, unless an image is
currently being printed. If a print job is in process, the alignment will be done
as soon as the current print job is finished.
NOTE: Occasionally, if the paper in the printer is very close to the
beginning of a roll, the front panel might report that the printer needs to
feed up to 3 m (≈ 10 ft) of paper before starting the printhead
alignment. This is necessary to ensure a successful alignment. You can
continue with the printhead alignment and allow the printer to feed as
much paper as necessary, delay the alignment until later, or cancel the
alignment.
Use the Printhead status plot
The Printhead status plot consists of patterns that are designed to highlight printheadreliability problems. It helps you to check the performance of the printheads that are
currently installed in your printer, and to determine whether any printhead is
experiencing clogging or other problems.
Print the Printhead status plot
To print the Printhead status plot:
Use the same paper type that you were using when you detected a problem.
1.
Verify that the selected paper type is the same as the paper type that is loaded
2.
into the printer.
3.
On the printer's front panel, select the
quality maintenance > Printhead diagnostics image.
It takes about 2 minutes to print the Printhead status plot.
icon, and then select
Handle the ink
icon, and then select Image
Use the Printhead status plot
35
Page 44

Interpret the Printhead status plot
The print is divided into two parts, both of which test printhead performance.
Part 1 (top) consists of rectangles of pure colors, one for each printhead. This
●
part represents the print quality that you will get from each color.
Part 2 (bottom) consists of small dashes, one for each nozzle on each printhead.
●
This part complements the first, and detects how many faulty nozzles are on
each printhead.
First look at the top part of the print. Each colored rectangle should be a uniform
color without any horizontal lines across it.
Then look at the bottom part of the print. For each individual colored pattern, make
sure that most of the dashes are present.
If you see horizontal lines in the top part and also see missing dashes in the bottom
Handle the ink
part for the same color, the printhead for that color needs to be cleaned. However,
if the rectangles look solid, do not worry about a few missing dashes in the bottom
part, because the printer can compensate for a few clogged nozzles.
The graphic shown illustrates printhead 2 in a bad state:
36 Chapter 3 Handle the ink system
Page 45

Corrective action
Clean any faulty printheads. See
1.
reprint the Printhead status plot to see whether the problem has been solved.
If the problem persists, clean the printheads again, and reprint the Printhead
2.
status plot to see whether the problem has been solved.
If the problem persists, consider cleaning your printheads manually. See
3.
the printheads on page 74. Also try reprinting your current print job, in case
it now prints satisfactorily.
If the problem continues to persist, replace any persistently faulty printheads.
4.
What to do if problems persist
If you still experience print-quality problems after applying the advice in this chapter,
here are some additional tips to consider:
Try using a higher print-quality option. See
●
Check the driver you are using to print with. If it is a non-HP driver, consult the
●
driver vendor about the problem. You could also try using the correct HP driver,
if that workaround is acceptable to you. Download the latest HP drivers from
http://www.hp.com/go/designjet/.
If you are using a non-HP raster image processing (RIP), its settings might be
●
incorrect. See the documentation that came with the RIP.
Verify that your printer firmware is up to date.
●
Clean the printheads on page 74. Then
Clean
Handle the ink
Select print quality on page 41.
Use the Printhead status plot
37
Page 46

Verify that you have the correct settings in your software program.
●
Contact HP Support.
●
Remove the maintenance cartridge
A message appears on the front panel when you must change the maintenance
cartridge. Follow these precautions when removing a maintenance cartridge:
Be careful not to get ink on your hands. Ink might be on, around, and inside the
●
replaced maintenance cartridge.
Always handle and store the replaced maintenance cartridge upright to avoid
●
spilling any ink.
CAUTION: A message appears on the front panel when the maintenance
cartridge is almost full and again when it is completely full and must be
changed. You can ignore the alert and continue printing by pressing the OK
button on the front panel. However, HP strongly recommends that you change
the maintenance cartridge when prompted. Ignoring the alert can result in
serious damage to the printer.
WARNING! Make sure that the printer wheels are locked (the brake lever
is pressed down) to prevent the printer from moving.
1.
On the printer's front panel, select the
maintenance ctg.
Handle the ink
The maintenance cartridge is located in a slot underneath the front panel, at the
front of the printer. Open the door.
icon, and then select Replace
The maintenance cartridge has a handle on the front. To remove the cartridge,
2.
press inward and upward as indicated by the arrow, until the cartridge is
released.
Lift up the maintenance cartridge to remove it from the slot, and slide it out.
38 Chapter 3 Handle the ink system
Page 47

Insert the maintenance cartridge
The plastic bag in which the new maintenance cartridge comes can be used to
dispose of the old maintenance cartridge.
Insert the maintenance cartridge into the slot, in the direction indicated by the
1.
arrow.
When the maintenance cartridge has been pushed all the way in, press inwards
and downwards as indicated, until it clicks into place.
If you have difficulty, see Cannot insert the maintenance cartridge in Using your
printer.
NOTE: The front panel will not show the new maintenance cartridge
until the door is closed.
Handle the ink
Insert the maintenance cartridge
39
Page 48

When you have inserted the maintenance cartridge into the printer, close the
2.
door.
NOTE: The printer needs all the ink cartridges, printheads and
maintenance cartridge to be installed before it can continue.
If no paper is loaded, the front panel will instruct you to load some.
3.
NOTE: Make sure that the printer window and the door to the right are
closed after you replace the supplies. The printer will not print while these are
open.
Check the status of the ink system
Access the Embedded Web Server.
1.
Handle the ink
2. Go to the Supplies page on the Main tab.
The Supplies page shows you the status of the ink cartridges (including the ink levels),
the printheads, the maintenance cartridge, and the loaded paper.
40 Chapter 3 Handle the ink system
Page 49

4
Manage print options
Select print quality
The printer has various print-quality options. The best quality printing requires some
loss of speed, while maximum-speed printing can cause some reduction in print
quality. The printer has four different print-quality options.
NOTE: If you have set the print quality in the printer driver or through the
Embedded Web Server, that setting overrides a print-quality setting
established on the front panel.
NOTE: You cannot change the print quality of pages that the printer is
already receiving or has already received (even if they have not started to
print yet).
Use the Embedded Web Server
To specify the print quality through the Embedded Web Server, go to the Submit
Job page on the Main tab. In the Job Settings tree, select Basic settings and
then select one of the settings from the Print quality drop-down menu: Fast,
Normal-Fast, Normal, or Best.
NOTE: Be aware that when you submit more than one job at a time by
clicking the Add files button in the Embedded Web Server, all of the jobs
that you submit will adopt the settings of the final job that you submit.
However, none of the jobs in the print queue are affected.
Use a driver
You can specify the print quality in the following ways:
●
In the Windows HP-GL/2 or Postscript driver, go to the Paper/Quality tab
and look at the Print Quality section. If you select Standard Options, you
can use the slider to select some compromise between speed and quality. If you
select Custom Options, you can choose Fast, Normal-Fast, Normal
or Best.
●
In the Mac OS Print dialog box, go to the Image Quality panel. If you
select Standard quality options, you can use the slider to select some
compromise between speed and quality. If you select Custom quality options,
you will see the specific print-quality options.
NOTE: In the Windows driver dialog box, the rendering resolution for your
job appears in the Custom Print Quality Optionsdialog box. In the Mac
OS Print dialog box, it appears in the Summary panel.
Select print quality
41
Print options
Page 50

Use the front panel
On the front panel, select the icon, and then select Printing preferences
> Select quality level.
Select page size
Select the page size through the Embedded Web Server, in a driver, or on the front
panel. The size that you select should be the page size in which the document was
created. You can resize the document for printing. See Resize a print in Using your
printer.
NOTE: If you set the page size from your computer, that setting overrides
the page size setting on the front panel.
Custom page sizes
Custom page sizes can be defined in a driver or through the Embedded Web Server.
The two types of custom page sizes are differentiated by how they were created, and
therefore, which users have accessibility to them.
●
Custom papers: custom papers are custom page sizes that have been defined
in a driver and that reside on the user's hard drive. Therefore, custom papers
are not available to other users in the network.
Printer forms: printer forms are custom page sizes that have been defined
●
through the Embedded Web Server and are visible to all network users who
share that print queue. Users require at least Print operator network permissions
to create printer forms.
Use the Embedded Web Server
To select the page size through the Embedded Web Server, go to the Submit
Job page on the Main tab. In the Job Settings tree, select Advanced
settings > Paper > Page size and then select Standard or Custom page size.
● Standard: use the drop-down menus to set the Size and Orientation.
●
Custom: use the free-text fields to specify a Width and Length, and use the
Page size drop-down menu to define the units of measurement.
NOTE: Be aware that when you submit more than one job at a time by
clicking the Add files button in the Embedded Web Server, all of the jobs
that you submit will adopt the settings of the final job that you submit.
Print options
42 Chapter 4 Manage print options
However, none of the jobs in the print queue are affected.
Page 51

Use a driver
Select the page size in the following ways:
●
In the Windows HP-GL/2 or PostScript driver, click the Paper/Quality tab,
and then select Document Size.
●
In the Mac OS Print driver dialog, select Page Setup from the File menu,
select your printer in the Format for popup menu, and then select Paper
size.
To define a custom paper size that does not appear in the list of paper sizes:
In the Windows and PostScript drivers, use one of two different methods:
●
●
In the driver dialog, select Custom from the Document size drop-down
menu on the Paper/Quality tab. Type a name for the custom size and
click Save. Then specify the paper dimensions and click OK to save your
custom paper size.
NOTE: The custom paper size you define is not available for
selection in the list of custom sizes until you have exited and
opened the Printing Preferences/Properties again. Then, you can
select More from the Document sizedrop-down menu and find
the custom paper size in the list.
●
On the Start menu, select Printers and Faxes, and then from the
File menu select Server Properties. On the Forms tab, click the
Create a new form check box, specify the name and dimensions of the
new form, and then click Save Form.
●
In Mac OS X V10.4, select Paper Size > Manage Custom Sizes in the
Page Setup dialog box.
●
In Mac OS X V10.2 or V10.3, select Settings > Custom Paper Size in
the Page Setup dialog box.
Use the front panel
On the front panel, select the icon, and then select Printing preferences
> Paper options > Select paper size.
Adjust margins and layout options
The printer margins determine the area between the edges of your image and the
edges of the paper. For information about the exact sizes (in millimeters) of the
available margin settings, see Margins in Using your printer.
Adjust margins and layout options
Print options
43
Page 52

Depending on the method that you use to adjust the margins, at least some of the
following layout options are available.
● Standard. Your image is printed on a page of the size that you have selected,
with a narrow margin between the edges of the image and the edges of the
paper. The image should be small enough to fit between the margins.
●
Oversize. Your image is printed on a page slightly larger than the size that
you have selected. If you cut off the margins, the remaining page is the size you
selected, with no margins between your image and the edges of the paper.
●
Clip Contents By Margins. Use this setting when the contents have white
borders and a size equal to that of the paper that you have selected in the driver.
The printer uses the white border for its margins and you get a page size that
is equal to what was selected in the driver.
See the Usage and Preview sections of the Paper/Quality tab for tips about
deciding which margins and layout option best suit your needs.
NOTE: If margins are set in the printer driver or through the Embedded
Web Server, they override the margins that are set on the front panel.
Use the Embedded Web Server
To set the margins through the Embedded Web Server, go to the Submit Job page
on the Main tab. In the Job Settings tree, select Advanced settings > Paper
> Layout/Margins. Then use the Select margins drop-down menu to set the
margins. Select from: Default, Small, Normal and Extended.
NOTE: Be aware that when you submit more than one job at a time by
clicking the Add files button in the Embedded Web Server, all of the jobs
that you submit will adopt the settings of the final job that you submit.
However, none of the jobs in the print queue are affected.
Use a driver
Specify the margins in the following ways:
● In the Windows HP-GL/2 Normal margins and Standard layout are selected
by default. To change the margins and layout options, click the Paper/
Quality tab and click the Layout button.
●
In the Windows PostScript driver, Normal margins and Standard layout are
selected by default. To change the margins, click the Paper/Quality tab,
Print options
44 Chapter 4 Manage print options
select More from the Document size drop-down menu, and then select the
desired page size and the margins at the same time. Click the Layout button
to change the layout options.
● In the Mac OS driver, select Page Setup from the File menu, select your printer
in the in the Format for popup menu, and then select Paper size. You select
the page size and the margins at the same time.
Page 53

NOTE: In the Windows PostScript driver, you have the option of selecting
a paper size with no margins. The No margins option should only be
selected in conjunction with the Oversized and Clip contents by
margins layout settings.
NOTE: In Mac OS driver, the available margins options depend on the
paper size that you selected in the Page Setup dialog box.
You have the option of selecting a paper size with no margins. To select
the No margins option, click the Printing dialog, select the Finishing
panel, and then click the Layout tab. The No margins option should only
be selected in conjunction with the Oversized and Clip contents by
margins layout settings.
Use the front panel
On the front panel, select the icon, and then select Printing preferences
> Margins > Select margins.
Print crop lines
Crop lines are lines that are printed onto the paper during a print job to indicate
where the paper should be cut to achieve a specific paper size. Crop lines can be
printed for individual jobs or for multiple jobs that are printed with the nesting feature.
For information about how to print crop lines for multiple jobs that are printed with
the nesting feature, see
Use the Embedded Web Server
To enable crop lines through the Embedded Web Server, go to the Submit Job
page on the Main tab. In the Job Settings tree, select Advanced settings >
Roll options and then select a setting from the Enable crop lines drop-down
menu.
Nest with crop lines on page 48.
NOTE: Be aware that when you submit more than one job at a time by
clicking the Add files button in the Embedded Web Server, all of the jobs
that you submit will adopt the settings of the final job that you submit.
However, none of the jobs in the print queue are affected.
Use a driver
●
In the Windows driver, go to the Features tab and in the Roll Options
section, select the Enable Crop lines checkbox
●
In the Mac OS Print dialog box, go to the Finishing panel and select the
Crop lines check box.
Print crop lines
Print options
45
Page 54

Use the front panel
On the front panel, select the icon, and then select Printing preferences
> Paper options > Enable crop lines.
Nest jobs to save paper
Nesting means placing pages side-by-side on the paper, rather than one after the
other. Do this to avoid wasting paper. The graphic below to the left illustrates the
general concept of nested print jobs. The graphic below to the right illustrates three
that have been print jobs printed with the nesting feature disabled.
Configure the nesting option
On the printer's front panel: select the icon, and then select Job
management options > Nest options > Enable nesting and select Off, In
order, or Optimized order.
The following are three nesting options:
●
Off
Select the Off setting to disable the nesting feature.
●
In order
Pages are nested on the roll in the same order in which they are submitted to
the printer. The nest is broken and printed as soon as one of three conditions is
met:
The nest is full, meaning that the remaining paper on the roll is insufficient
●
to accommodate the next page that is submitted.
The nesting timeout elapses.
●
The next page to arrive is incompatible with the pages that are already
●
nested.
Print options
For more information about the compatibility of a page, see
compatibility is defined on page 47.
The advantage of In-order nesting is that the wait time for pages to nest – and
therefore the total printing time – is typically reduced because more conditions
exist to break the nest. The disadvantage is that the nest is broken by the first
incompatible page submitted, even if a sufficient length of paper and additional
How job
46 Chapter 4 Manage print options
Page 55

compatible pages are in the queue. This means that a higher probability exists
that the paper will not be used efficiently.
● Optimized order
Pages are nested on the roll independent of when they are submitted to the
printer. An incompatible page does not break a nest. Instead, the printer waits
for more compatible pages and queues the incompatible pages until one of
three conditions is met:
The nest is full, meaning that the remaining length of paper on the roll is
●
too small to accommodate the next page submitted
The nesting timeout elapses
●
The incompatible-page queue is full. The printer queues up to six
●
incompatible pages while it nests compatible pages. Upon receiving the
seventh incompatible page, the nest is broken and printed. Then the pages
in the incompatible-page queue print.
For more information about the compatibility of a job, see
is defined on page 47.
The advantage of Optimized order nesting is that it typically wastes less paper
because the nest is not broken when an incompatible page is submitted. The
disadvantage is the overall printing time is typically longer because the printer
waits for compatible pages.
NOTE: Pages might not be printed in the order that the were submitted
to the printer when the Optimized order option is selected.
How job compatibility is defined
In order to be in the same nest, the individual pages must be compatible in all of the
following ways:
All pages must have the same print-quality setting.
●
●
The Maximum Detail setting must be the same on all pages.
●
The Mirror setting must be the same for all pages.
●
The Rendering Intent must be the same for all pages.
●
The Cutter setting must be the same for all pages.
The color adjustment settings must be the same for all pages. These are known
●
as Advanced Color Settings in the Windows driver, and CMYK
Settings in the Mac OS driver.
Pages must be all color or all grayscale. The pages cannot be a mix of color
●
and grayscale.
How job compatibility
Nest jobs to save paper
Print options
47
Page 56

All pages must be in one of the following two groups; the two groups cannot
●
be mixed in the same nest:
HP-GL/2, RTL, and CALS G4
●
PostScript, PDF, TIFF, and JPEG
●
JPEG, TIFF, and CALS G4 pages that have a resolution greater than 300 dpi
●
might not nest with other pages.
Nest with crop lines
Crop lines are lines that are printed onto the paper during a print job to indicate
where the paper should be cut to create a specific paper size. Crop lines can be
printed for individual jobs or for multiple jobs printed with the nesting feature.
NOTE: Selecting the crop lines option in the Nest options menu overrides
the setting in the Printing options menu for an individual job.
To print crop lines for multiple jobs printed with the nesting feature through the
Embedded Web Server:
1. Go to the Printer Settings page on the Setup tab.
2. Select Printer settings > Job management and then select Yes from the
Nest drop-down menu.
3. Go to the Submit Job page on the Main tab.
4. In the Job Settings tree, select Advanced settings > Roll options, and
then select Yes from the Enable crop lines drop-down menu.
For information about how to print crop lines for individual jobs, see
lines on page 45.
Print crop
Print options
48 Chapter 4 Manage print options
Page 57

5
Manage calibration
Color calibration
Your printer uses color calibration to produce consistent colors with the specific
printheads, inks, and paper type that you are using, and in your particular
environmental conditions. After color calibration, you can expect to get identical
prints from any two different printers that are situated in different geographical
locations.
Calibration should be done in any of the following circumstances:
Whenever a printhead is replaced
●
Whenever a new paper type is introduced that has not yet been calibrated with
●
the current set of printheads
Whenever a certain amount of printing has been done since the last calibration
●
Whenever the printer has been turned off for a long period of time
●
Whenever the environmental conditions (temperature and humidity) change
●
significantly
The printer usually reminds you with an alert whenever you need to perform color
calibration, unless you have disabled the alerts. However, if the environmental
conditions change, the printer will not be aware of it.
You can check the color calibration status of the currently loaded paper at any time
Manage calibration
by selecting the
paper details. The status can be one of the following conditions:
Pending: the paper has not been calibrated
●
NOTE: Whenever you update the printer's firmware, the color
calibration status of all papers is reset to PENDING.
Recommend: the printer software recommends that you calibrate the printer
●
because it has recognized a condition that might require calibration
Obsolete: the paper has been calibrated, but the calibration is now out of date
●
and should be repeated
OK: the paper has been calibrated, and the calibration is up to date
●
Disabled: this paper cannot be calibrated
●
NOTE: Colored papers; glossy canvas; and transparent materials
such as translucent bond, clear film, tracing paper; and vellum are not
suitable for color calibration.
You can also check the color calibration status by using HP Easy Printer Care
(Windows) or HP Printer Utility (Mac OS).
icon, and then selecting View loaded paper > View
Color calibration
49
Page 58

Manage calibration
Calibrate a paper type before creating its color profile. Later recalibration does not
require a new color profile.
You can start color calibration in the following ways:
From the printer alert that recommends calibration
●
●
From the HP Color Center: select Calibrate Your Printer
●
From the front panel: select the
maintenance > Calibrate color
After launching calibration, the process is fully automatic and can be performed
unattended after you have loaded appropriate paper. The paper must be at least 24
inches wide.
The process takes about 8 minutes and consists of the following steps.
A calibration test chart is printed, which contains patches of each ink that your
1.
printer uses.
To stabilize the colors, the test chart dries for a period of time that depends on
2.
the paper type.
The HP Embedded Spectrophotometer scans and measures the test chart.
3.
The printer uses the measurements to calculate the necessary correction factors
4.
for consistent color printing on that paper type. It also calculates the maximum
amount of each ink that can be applied to the paper.
icon, and then select Image quality
Color profiling
NOTE: Color profiling information applies only to PostScript printers.
Color calibration provides consistent colors, but consistent colors are not necessarily
accurate colors.
In order to print accurate colors, convert the color values in your files to the color
values that will produce the correct colors when using your printer, your inks, and
your paper. An ICC color profile is a description of a printer, ink, and paper
combination that contains all the information for these color conversions.
When you have defined and calibrated a new paper type, the printer is ready to
create a ICC profile for use with your paper, which allows you to print on it with the
best possible color accuracy. Alternatively, if your paper type is already known to
the printer, you already have its appropriate ICC profile.
50 Chapter 5 Manage calibration
Page 59

Create your own profile
Create a color profile easily by using the HP Color Center to select Create and
Install ICC Profile. The printer prompts for information about the paper, and then
creates and installs the new profile automatically.
The process takes about 15 to 20 minutes and consists of the following steps.
A profiling test chart is printed, which contains patches of each ink used in your
1.
printer. Unlike a calibration test chart, most of the patches contain combinations
of ink.
NOTE: To use a longer drying time, instruct the HP Color Center to
create the test chart without creating a profile (Windows: select Print
target only; Mac OS: select Print ICC profiling chart). Later, when
the chart is completely dry, restart the HP Color Center and request a
profile that uses the test chart that you have already created (Windows:
select Create ICC profile from a target that has already been
printed; Mac OS: select Scan ICC profiling chart and create ICC
profile). The scan will begin after the spectrophotometer warms up.
The HP Embedded Spectrophotometer scans and measures the test chart.
2.
The printer uses the measurements to calculate the necessary correction factors
3.
for consistent color printing on that paper type. It also calculates the maximum
amount of each ink that can be applied to the paper.
The new ICC profile is stored in the correct system folder on your computer,
4.
where your software programs can find it.
The profile is also stored in the printer so other computers that are connected to
the same printer can copy it. A profile can be accessed and used as soon as a
job is submitted from the Embedded Web Server. HP Easy Printer Care
(Windows) or HP Printer Utility (Mac OS) will notify you if your printer has
profiles that are not yet stored on your computer.
Manage calibration
NOTE: You might need to quit and restart some programs in order to use
a profile that has just been created.
Color profiling
51
Page 60

Manage calibration
Use a third-party profile
If you have obtained an ICC profile through means other than using the printer’s builtin profiling software (for instance from an Internet download or a third-party profiling
software package), you can install it for use with your printer and paper.
NOTE: You can only import and export CMYK profiles.
The printer needs to know which paper type the profile corresponds to. First select a
paper type from the list of papers that the printer recognizes. When selecting a paper
type, try to pick one that resembles your actual paper type as closely as possible.
The paper type determines the amount of ink that is used and other basic printing
parameters, so making a good choice here is fundamental to achieving good results
later on. If you find that you cannot obtain satisfactory results with the profile and
paper type that you picked, try selecting different types, and use the one that works
best.
If the paper that you are using is not listed, or if you cannot find a paper type that
resembles yours closely enough, you can define a new type. The printer then
calibrates itself for use with that paper, after which you can return to installing the
ICC profile.
After you have selected the paper type, browse to the file that contains the ICC profile
to use with your printer and paper. Normally, ICC profile file names end in the
extension “.icc” (for International Color Consortium) or “.icm” (for Image Color
Matching). The profile is stored in the correct system folder on your computer, and
in the printer.
Color adjustment options
The objective of color management is to print accurate colors. Perform color
management correctly to print accurate colors withuot manual color adjustments.
However, manual adjustments might be useful in the following situations:
Your color management is not providing accurate colors
●
You want colors that are subjectively pleasing rather than accurate
●
You can adjust the colors of your print in similar ways In Windows and Mac OS:
●
In the Windows driver: click the Color tab, and then select Print in
color. Make sure that the Advanced Color Adjustments check box is
selected, and then click the Settings button.
●
In the Mac OS Print dialog box: select the Color options panel, and
then select CMYK Settings.
In either operating system, you can make adjustments by using the black slider and
the three color sliders.
52 Chapter 5 Manage calibration
Page 61

Use the black slider to make the entire print lighter or darker.
●
Use the color sliders to fade or emphasize each of the primary colors in the
●
print. The primary colors are red, green, and blue or cyan, magenta, and
yellow, depending on the color model that is used in the image.
Color emulation modes
If you want to print a particular print job and to see approximately the same colors
that you would get from printing the same job on a different HP Designjet series
printer, use the printer's emulation mode.
NOTE: Color emulations do not apply to TIFF and JPEG jobs.
●
In the Windows driver: click the Color tab, select Printer Managed
Colors, and then select Printer Emulation from the Source profile drop-
down menu. Then select from the Emulated printer drop-down menu.
●
In the Mac OS Print dialog box: select the Color Options panel, and then
select Printer Emulation. Then select from the Emulated printer drop-
down menu.
●
On the front panel: select the
preferences > Color options > Emulate Printer.
●
Through the Embedded Web Server: select the Submit Job page, and then
Job settings > Advanced settings > Color > Color management and
the desired emulation mode.
Manage calibration
icon, and then select Printing
Color emulation modes
53
Page 62

Manage calibration
You can emulate the following printers:
HP Designjet 1050c Plus
●
HP Designjet 1055cm Plus
●
HP Designjet 5500 UV series
●
HP Designjet 5500 Dye series
●
The following table shows approved combinations of print-quality settings and papers
for the best printer-emulation results.
Best Normal Normal-Fast Fast
HP Premium
Instant-Dry
Gloss Photo
Paper
HP Universal
Instant-Dry
Photo Gloss
HP
Heavyweight
Coated Paper
HP Coated
Paper
HP Bright
White Inkjet
Bond Paper
Yes Yes No No
Yes Yes No No
Yes Yes No Yes
Yes Yes Yes Yes
Yes Yes Yes Yes
NOTE: The HP Designjet 5500 UV printer series does not support HP Bright
White Inkjet Bond Paper.
The HP Designjet 1050c Plus and HP Designjet 1055cm Plus printer series
do not support HP Premium Instant-Dry Gloss Photo Paper or HP Universal
Instant-Dry Photo Gloss Paper.
CMYK color emulation
All CMYK emulation options apply to PDF, PostScript, TIFF, and JPEG files only.
A traditional workflow defines color in the CMYK space. For best results, the colors
must be adjusted to the printer, because different printers will produce different colors
from the same CMYK data. If the image file that you are printing was not created
54 Chapter 5 Manage calibration
Page 63

specifically for your HP Designjet Z6100 printer, it will require some readjustment,
which can be done using one of the following options provided with your printer:
● U.S. Web Coated (SWOP) 2 uses specifications that are designed to
produce quality separations that use U.S. inks under the following printing
conditions: 300% total area of ink coverage, negative plate, coated publicationgrade stock.
●
U.S. Web Uncoated 2 uses specifications that are designed to produce
quality separations that use U.S. inks under the following printing conditions:
260% total area of ink coverage, negative plate, uncoated white offset stock.
●
U.S. Sheetfed Coated 2 uses specifications that are designed to produce
quality separations that use U.S. inks under the following printing conditions:
350% total area of ink coverage, negative plate, bright white offset stock.
●
U.S. Sheetfed Uncoated 2 uses specifications that are designed to produce
quality separations that use U.S. inks under the following printing conditions:
260% total area of ink coverage, negative plate, uncoated white offset stock.
●
Euroscale Coated 2 uses specifications that are designed to produce quality
separations that use Euroscale inks under the following printing conditions:
350% total area of ink coverage, positive plate, bright white coated stock
●
Euroscale Uncoated 2 uses specifications that are designed to produce
quality separations that use Euroscale inks under the following printing
conditions: 260% total area of ink coverage, positive plate, uncoated white
offset stock.
●
Europe ISO Coated FOGRA27 uses the FOGRA27 press characterization.
It is designed to produce quality separations for standard ISO printing using:
350% total ink coverage, positive film and coated paper"
●
HP CMYK Plus: a set of HP proprietary re-rendering rules that produce a good
result for most digital commercial printing jobs by expanding the reduced gamut
of your press into the wider gamut of your printer.
●
JMPA: Japanese standard for offset press
●
Photoshop 4 Default CMYK
● Photoshop 5 Default CMYK
●
Japan Color 2001 Coated uses the Japan Color 2001 specification for type
3 (coated) paper. It is designed to produce quality separations by using 350%
total ink coverage, positive film, and coated paper.
●
Japan Color 2001 Uncoated uses the Japan Color 2001 specification for
type 4 (uncoated) paper. It is designed to produce quality separations by using
310% total ink coverage, positive film, and uncoated paper.
●
Japan Web Coated (Ad) uses specifications that are developed by the
Japan Magazine Publisher Association for digital proofing of images in the
Japanese magazine and advertising market.
Manage calibration
Color emulation modes
55
Page 64

Manage calibration
●
Japan Color 2002 Newspaper uses the Japan Color 2002 for
Newspapers specification. It is designed to produce quality separations using:
240% total ink coverage, positive film and standard newsprint paper"
●
Toyo is designed to produce quality separations for Toyo printing presses.
●
DIC is designed to produce quality separations for Dainippon Ink Company
printing presses.
●
Other HP Designjet printers can be emulated.
●
None (Native): no emulation, for use when the when the software or
operating system complete the color conversion. Therefore, the data arrives at
the printer already color–managed
NOTE: These options have no effect if the software defines its own CMYK
space, known as calibrated CMYK or CIEBasedDEFG in PostScript
terminology.
RGB color emulation
These options apply to PDF, PostScript, TIFF, and JPEG files. For HP-GL/2 and RTL
files, only sRGB and AdobeRGB are supported.
If you want to print an RGB image, it must be converted to CMYK data. You might
be able to do the conversion in the software or operating system. To perform this
conversion on the printer, use the following color profiles:
●
None (Native): no emulation. The printer uses its default internal conversion
from RGB to CMYK, without following any color standard. This does not imply
that results will be bad.
● sRGB IEC61966-2.1 emulates the characteristics of the average PC monitor.
This standard space is endorsed by many hardware and software
manufacturers, and is becoming the default color space for many scanners,
printers, and software programs.
●
ColorMatch RGB emulates the native color space of Radius Pressview
monitors. This space provides a smaller gamut alternative to Adobe RGB (1998)
for print-production work.
●
Apple RGB emulates the characteristics of the average Apple monitor, and is
used by a variety of desktop publishing applications. Use this space for files that
you plan to display on Apple monitors, or for working with old desktop
publishing files.
●
Adobe RGB (1998) provides a fairly large gamut of RGB colors. Use this
space if you need to do print-production work that includes a broad range of
colors.
56 Chapter 5 Manage calibration
Page 65

6
Troubleshoot print-quality issues
General advice
Use the following approach when you have any print-quality problem:
To achieve the best performance from your printer, use only genuine HP supplies
●
and accessories, whose reliability and performance have been thoroughly
tested to give trouble-free performance and best-quality prints.
Make sure that the paper type that you select on the front panel is the same as
●
the paper type that is loaded in the printer. Make sure that the paper type has
been calibrated. Also make sure that the paper type that you select in your
software is the same as the paper type that you loaded in the printer.
CAUTION: If you have the wrong paper type selected, you might
experience poor print quality and incorrect colors, and damage to the
printheads might occur.
Make sure that you are using the most appropriate print-quality settings for your
●
purposes. See
quality if you have moved the print-quality slider to the Fast end of the scale,
or set the custom quality level to Fast.
Make sure that your environmental conditions (temperature, humidity) are in the
●
recommended range.
Make sure that your ink cartridges and printheads have not passed their
●
expiration dates.
Avoid touching the paper while printing is in progress.
●
Select print quality on page 41. You are likely to see lower print
The Embedded Web Server Print Quality
Troubleshooting wizard
Troubleshoot images
The Embedded Web Server Print Quality Troubleshooting wizard is designed to help
you resolve some of the most common print-quality issues that users encounter in large-
General advice
57
Page 66

format printing. The wizard guides you through the resolution of the following printquality issues:
Dark or light horizontal lines across the image (banding)
●
Graininess
●
Poor line quality
●
Inaccurate color
●
To access the Embedded Web Server Print Quality Troubleshooting wizard, click
the Print Quality Troubleshooting link on the Support tab. Select the printquality issue that you are experiencing and click the Next button.
Troubleshoot images
A list of suggestions for corrective action appears along with help to guide you
through the corrective action.
Lines are too thick, too thin, or missing
Verify that the paper type that you have loaded corresponds to the paper type
1.
that you selected on the front panel and in your software.
Make sure that you are using the appropriate print-quality settings for your
2.
purposes. See
If you are using a HP-GL/2 driver and the resolution of your image is greater
3.
than the printing resolution, you might notice a loss of line quality. You can find
the Max. Application Resolution option on the Windows driver
Advanced tab, under Document Options > Printer Features. If you
change this option, reprint your job if the problem has been solved.
If lines are too thin or missing, print the Printhead status plot. See
4.
Printhead status plot on page 35.
Try aligning the printheads. See
5.
alignment, reprint your job if the problem has been solved.
6.
Select the
paper to see the paper-advance calibration status. If the status is PENDING,
Select print quality on page 41.
Align the printheads on page 34. After
icon on the printer's front panel, and then View loaded
Use the
58 Chapter 6 Troubleshoot print-quality issues
Page 67

perform a paper-advance calibration. See Perform paper advance
calibration on page 24.
If the problem persists after you complete these actions, contact your customer service
representative for further support.
Lines appear stepped or jagged
Use the following procedure if lines in your image appear stepped or jagged when
printed:
The problem might be inherent in the image. Try to improve the image within
1.
the software program that you are using to edit it.
Make sure that you are using appropriate print-quality settings. See
2.
quality on page 41.
If you are using an HP-GL/2 driver, hange your image-rendering resolution to
3.
300 dpi or 600 dpi, depending on your printing need. The Max. Application
Resolution option in the Windows driver dialog's Advanced tab, under
Document Options > Printer Features.
Parts of lines or text are missing
A high-quality large-format print job often requires a large amount of data, and in
some specific workflows, the output might not look like you expected. Here are some
suggestions to help you to avoid this problem:
Select a smaller page size and scale to the final page size in the driver or on
●
the front panel.
Save the file in another format, such as TIFF or EPS, and open it in another
●
program.
Use a RIP to print the file.
●
Reduce the resolution of the bitmap images in your software.
●
Select a lower print quality in order to reduce the resolution of the printed image.
●
●
On the Advanced tab of the Windows driver dialog, select Document
options, Printer features, and then establish the following settings:
●
Set Send job as bitmap to Enabled (HP-GL/2 driver only).
● Set 16-bit App. Compatibility to Enabled.
●
Set Max. Application resolution to 300.
Select print
Troubleshoot images
Lines appear stepped or jagged
59
Page 68

NOTE: These settings are described for troubleshooting purposes only
and might adversely affect the final output quality or the time necessary
to generate the print job. Therefore, restore these settings to their default
values if they do not help to solve the problem.
Lines are printed double or in wrong colors
This problem can have various visible symptoms:
Colored lines are printed double, in different colors, or the borders of colored blocks
are wrongly colored.
Troubleshoot images
Use these steps to correct this kind of problem:
Align the printheads. See
1.
Make sure that you are using appropriate print-quality settings. See
2.
quality on page 41.
Align the printheads on page 34.
Lines are blurred (ink bleeds from lines)
Select print
60 Chapter 6 Troubleshoot print-quality issues
Page 69

Humidity can cause ink to soak into the paper, making the lines look blurred and
fuzzy. Try the following remedies:
Make sure that your environmental conditions (temperature, humidity) are
1.
suitable for high-quality printing.
Verify that the paper type that you select on the front panel is the same as the
2.
paper type that you are using. To check, select the
front panel, and then select View loaded paper.
Try changing to a heavier paper type, such as HP Heavyweight Coated Paper,
3.
HP Super Heavyweight Coated Paper, or Digital Fine Art paper.
If you are using glossy paper, try changing to a different type of glossy paper.
4.
Align the printheads. See
5.
Align the printheads on page 34.
icon from the printer's
Dark or light horizontal lines across the image
(banding)
Try the following remedies if your printed image suffers from added horizontal lines
as shown (the color may vary):
Make sure that the paper type you have loaded corresponds to the paper type
1.
that you select on the front panel and in your software.
Make sure that you are using appropriate print-quality settings for your
2.
purposes. See
a print-quality problem merely by selecting a higher print-quality level. For
instance, if you have set the print-quality slider to Fast, try setting it to Best. If
you change the print-quality settings, reprint your job if the problem has been
solved.
Print the Printhead status plot. See
3.
Select print quality on page 41. In some cases, you can overcome
Use the Printhead status plot on page 35.
Troubleshoot images
Dark or light horizontal lines across the image (banding)
61
Page 70

Check the paper-advance calibration status on the front panel. If the status is
4.
PENDING, you should perform paper-advance calibration. See
advance calibration on page 24.
Try aligning the printheads. See
5.
alignment, reprint your job if the problem has been solved.
If the problem persists, contact your customer service representative for further
support.
The image is grainy
Troubleshoot images
Verify that the paper type you have loaded corresponds to the paper type that
1.
you select on the front panel and in your software.
Verify that you are printing on the correct side of the paper.
2.
Make sure that you are using appropriate print-quality settings. See
3.
quality on page 41. In some cases, you can overcome a print-quality problem
merely by selecting a higher print-quality level. For instance, if you have set the
print-quality slider to Fast, try setting it to Best. If you change the print-quality
settings, reprint your job if the problem has been solved.
Try aligning the printheads. See
4.
alignment, reprint your job if the problem has been solved.
Check the paper-advance calibration status on the front panel. If the status is
5.
PENDING, you should perform paper-advance calibration. See
advance calibration on page 24.
If the problem persists, contact your customer service representative for further
support.
Perform paper
Align the printheads on page 34. After
Select print
Align the printheads on page 34. After
Perform paper
62 Chapter 6 Troubleshoot print-quality issues
Page 71

The image has a metallic hue (bronzing)
Bronzing describes an image that has a metallic hue when it is viewed from specific
angles. Bronzing occurs most commonly when you print pigmented inks on non-matte
paper, such as photo paper. If you are using standard print-quality options and the
image contains the bronzing effect, move the slider to Quality. See
quality on page 41.
If you are experiencing bronzing when printing grayscale images on glossy paper,
try using the Full Set of Inks printing option. To do so from the Windows driver,
click the Color tab and select Print In Grayscale, and then select the Full Set of
Inks option from the drop-down menu.
The printed output is not flat
If the paper does not lie flat when it comes out of the printer, but instead contains
shallow waves, you are likely to see defects in the printed image, such as vertical
stripes. This can happen when you use thin paper that becomes saturated with ink.
Select print
Troubleshoot images
Make sure that the paper type you have loaded corresponds to the paper type
1.
that you select on the front panel and in your software.
Try changing to a thicker paper type, such as HP Heavyweight Coated Paper,
2.
HP Super Heavyweight Coated Paper, or thicker Digital Fine Art papers.
The print smudges when touched
The black ink pigment can smudge when a finger or pen touches it. This is particularly
noticeable on: vellum, translucent bond, films, productivity photo paper, and natural
tracing paper.
The image has a metallic hue (bronzing)
63
Page 72

Try these remedies to reduce the smudging:
Try to print in an environment that is not too humid for the printer.
●
Change pure black objects in your image to a dark color, such as dark brown,
●
so that they are printed with colored inks instead of black ink.
Use HP Heavyweight Coated Paper.
●
Increase the drying time.
●
Ink marks appear on the paper
This problem can occur for several different reasons.
Smears on the front of coated paper
Troubleshoot images
If a lot of ink is used on coated paper, the paper absorbs the ink quickly and expands.
As the printheads move over the paper, the printheads come into contact with the
paper and smear the printed image.
Whenever you notice this problem, cancel the printing job immediately. Press the
Cancel button on the front panel and also cancel the job from your computer
software. Otherwise the soaked paper might damage the printheads.
Try the following suggestions to avoid this problem:
Use a recommended paper type.
●
If the image you are printing contains intense color, try using HP Heavyweight
●
Coated Paper.
Use extended margins (see
●
try to increase the margins by relocating the image within the page by using
your software program.
If necessary, try changing to a non-paper-based material such as transparent
●
film.
Adjust margins and layout options on page 43), or
Smears or scratches on the front of glossy paper
Glossy paper can be extremely sensitive to the bin or to anything else that it contacts
soon after printing. This depends on the amount of ink that has been deposited on
the paper and the environmental conditions at the time of printing. Avoid any contact
with the paper surface and handle the print with care.
Defects near the top of a print
In a defect that affects only the start of a print, within 5.5 cm of the leading edge of
the paper, a band of inconsistent color appears:
64 Chapter 6 Troubleshoot print-quality issues
Page 73

Use these steps to avoid this problem:
1. The easiest solution might be to select the Extended Margins option in the
driver, through the Embedded Web Server, or on the front panel. Using this
remedy means that the area of the paper affected by the problem (at the start
of the page) might not be printed on. See
on page 43.
Align the printheads. See
2.
Make suer that you are using appropriate print-quality settings. See
3.
quality on page 41.
Colors are inaccurate
If the colors of your print do not match your expectations, try the following remedies:
Verify that the paper type you have loaded corresponds to the paper type that
1.
you selected on the front panel and in your software. At the same time, check
the color-calibration status. If the status is RECOMMENDED or OBSOLETE, you
should perform color calibration. See
made any changes, reprint your job if the problem has been solved.
Verify that you are printing on the correct side of the paper.
2.
Make sure that you are using the appropriate print-quality settings. See
3.
print quality on page 41. If you have selected the Fast options, you might not
get accurate colors. If you change the print-quality settings, reprint your job if
the problem has been solved.
Adjust margins and layout options
Align the printheads on page 34.
Select print
Troubleshoot images
Color calibration on page 49. If you have
Select
Colors are inaccurate
65
Page 74

If you are using Application Color Management, make sure that the color profile
4.
that you are using corresponds to the selected paper type and print-quality
settings. If you have doubts about which color settings to use, see
calibration on page 49. If you need to create a color profile, see Color
profiling on page 50.
If the problem consists of color differences between your print and your monitor,
5.
follow the instructions in the “How to calibrate your monitor” section of the HP
Color Center. Reprint your job if the problem has been solved.
Print the Printhead status plot. See
6.
Consult the HP Knowledge Center at
Troubleshoot images
7.
knowledge_center/djz6100/ for step-by-step color assistance with different
software programs (English language content only).
If the problem persists, contact your customer service representative for further
support.
Use the Printhead status plot on page 35.
http://www.hp.com/go/
The output is completely blank
If the front-panel graphic language setting is Automatic (the default), try the other
settings: PostScript for a PostScript file, HP-GL/2 for an HP-GL/2 file, and so on.
Then send the file again.
When you hav e f ini s h ed th i s par t i cula r p rint, remember to reset the graphic language
to Automatic.
The output contains only a partial print
If you pressed Cancel before the printer received all the data, you ended the
●
data transmission and will have to print the page again.
●
The I/O timeout setting might be too short. This setting determines how long
the printer waits for the computer to send more data, before deciding that the
job is finished. On the front panel, increase the I/O timeout setting to a longer
Manage
period and then send the print again by selecting the
selecting Connectivity > Advanced > Select I/O timeout.
A communications problem between your computer and the printer might exist.
●
Check your USB or network cable.
Verify that your software settings are correct for your current page size (for
●
example, long-axis prints).
If you are using network software, make sure that it has not timed out.
●
The image is clipped
Clipping normally indicates a discrepancy between the actual printable area on the
loaded paper and the printable area as described by your software. You can often
66 Chapter 6 Troubleshoot print-quality issues
icon, and then
Page 75

identify this kind of problem before printing by previewing your print. See Hold for
preview in Using your printer.
Check the actual printable area for the paper size that you have loaded.
●
printable area = paper size – margins
Check what your software understands to be the printable area (which it might
●
cite as "printing area" or "imageable area"). For example, some software
programs assume standard printable areas that are larger than those used in
this printer.
If you have defined a custom page size that has very narrow margins, the printer
●
might impose its own minimal margins and clip your image slightly. You might
want to use a larger paper size. See
on page 43.
If your image contains its own margins, you might be able to print it successfully
●
by using the Clip Contents by margins option. See
layout options on page 43.
If you are trying to print a very long image on a roll, make sure that your software
●
can print an image of that size.
You might have asked to rotate the page to landscape orientation on a paper
●
size that is not sufficiently wide.
If necessary, reduce the size of the image or document in your software, so that
●
it fits between the margins
Other explanations exist for a clipped images. Some programs, such as Adobe
Photoshop, Adobe Illustrator, and CorelDRAW, use an internal 16-bit coordinate
system which means that they cannot handle an image of more than 32,768 pixels.
If you try to print a larger image, the bottom of the image will be clipped. To print
the entire image, try these suggestions:
If you are using an HP-GL/2 driver, you can reduce the resolution so that the
●
whole image requires fewer than 32,768 pixels. The Windows driver includes
an option called 16-bit App. Compatibility, which reduces the resolution
automatically. The option is on the Advanced tab, under Document
Options > Printer Features.
Save the file in another format, such as TIFF or EPS, and open it in another
●
program.
Use a RIP to print the file.
●
Adjust margins and layout options
Adjust margins and
One image overlays another on the same print
The I/O timeout setting might be too long. On the front panel, decrease the setting
Troubleshoot images
and print again. Select the icon, and then select Connectivity >
Advanced > Select I/O timeout.
One image overlays another on the same print
67
Page 76

The image has a wood-grain appearance
(aeroworms)
Troubleshoot images
Aeroworms are wavy, horizontal bands produced by air-induced dot placement error
(DPE). In extreme cases, aeroworms give the image a wood-grain appearance. The
problem occurs most commonly on print jobs that are set for low-quality and highspeed. It does not occur when the custom print-quality setting is set to “best.”
To eliminate aeroworms, select a higher IQ print setting. See
on page 41.
Select print quality
68 Chapter 6 Troubleshoot print-quality issues
Page 77

7
Troubleshoot paper issues
The paper cannot be loaded successfully
Here are a few things to check if you cannot successfully load the paper.
The paper might be loaded at an angle (skewed or mislocated). Make sure that
●
the right edge of the paper is aligned with the half-circle on the right-hand side
of the platen, and that the leading edge of the paper is aligned with the metal
bar in the platen.
The paper might be crumpled or warped, or have irregular edges.
●
If the paper jams in the paper path to the platen, the leading edge of the paper
●
might not be straight or clean. Remove the initial 2 cm (1 in) of paper from the
roll and try again. This might be necessary even with a new roll of paper.
Make sure that the spindle is correctly inserted.
●
Make sure that the paper is correctly loaded on the spindle, and that it loads
●
over the roll towards you.
Verify that the paper is wound tightly on the roll.
●
The paper has jammed
When a jam occurs, the Possible paper jam message usually appears in the front
panel, with one of two error codes:
81:01 indicates that paper cannot advance into the printer.
●
86:01 indicates that the printhead carriage cannot move from side to side.
●
Check the printhead path
Turn off the printer at the front panel, then also switch off the power switch at
1.
the rear.
Open the printer window.
2.
Try to move the printhead carriage out of the way.
3.
Lift the paper-load lever as far up as it will go.
The paper cannot be loaded successfully
Troubleshoot paper
69
Page 78

Carefully remove any of the jammed paper that you can lift up and out from the
4.
top of the printer.
Troubleshoot paper
Carefully pull the rest of the roll down and out of the printer.
5.
Turn on the printer.
6.
Reload the roll. See
7.
If some paper continues to cause an obstruction within the printer, it can often
8.
be cleared by loading a rigid paper type into the printer.
If you find that you have print-quality problems after a jam, try realigning the
9.
printheads. See
Check the paper path
This problem can occur when a roll has finished and the end of the roll is stuck
●
to the cardboard core. If this has happened, cut the end of the roll away from
the core. Then feed the paper through the printer, and load a new roll.
Otherwise, follow the procedure described above, under
●
path on page 69
Load a roll into the printer on page 11.
Align the printheads on page 34.
Check the printhead
70 Chapter 7 Troubleshoot paper issues
Page 79

Automatic paper-cutter does not function
The automatic paper-cutter is disabled when the take-up reel is in use. To use the
cutter on the paper, uninstall (disable) the take-up reel on the front panel by selecting
the
icon, and then selecting Take-up reel > Disable take-up reel.
NOTE: The automatic paper-cutter feature is disabled for some of the
heaviest media types, because they might damage the cutter.
Take-up reel paper jammed
If the paper is severely damaged on the take-up reel spindle core, do not use the
printer's cutter to cut and remove the paper. Instead, cut the paper manually as close
as possible to the printer window, and then remove the roll. See
the printer on page 15.
Take-up reel does not wind
Predictably, if the take-up reel is not winding as anticipated, the printed output is
likely to end up on the floor. If the printer recognizes a problem with the take-up reel,
it will interrupt the print job until the issue is corrected. If the printer does not recognize
a problem, the job will continue to print. The following table highlights possible issues
and solutions.
Take-up reel
LED status
Blinking quickly Take-up reel is not
Blinking slowly Take-up reel is not
Issue Print job
winding
winding
interrupted?
Yes The sensor beam
No The sensor cables
Unload a roll from
Possible cause Possible
was blocked for
more than 3
seconds.
are loose or
unplugged.
solution
Make sure that the
take-up reel
sensors are not
blocked by a strip
of paper, the
collection bin if
you are using the
HP Designjet
Z6100 42–in
Printer, or any
objects. See the
following graphic.
Make sure that the
collection bin is
placed behind the
foot brace.
Also ensure that
the take-up reel
power switch is in
the On position.
Ensure that the
sensor cables are
correctly secured.
Troubleshoot paper
Automatic paper-cutter does not function
71
Page 80

Take-up reel
LED status
Solid red Take-up reel is not
Solid green Take-up reel is not
Solid green Take-up reel is
Troubleshoot paper
Issue Print job
winding
winding
winding in the
wrong direction
interrupted?
No There is too much
No The take-up reel
No The take-up reel
Possible cause Possible
resistance on the
take-up reel motor.
power switch is in
the Off position
wind-direction
switch is in the
wrong winding
position.
After 3 seconds,
the printer
recognizes the
problem and
interrupts the print
job. See the first
error listed in this
table.
solution
Ensure that the
paper is not
winding too
tightly. A loopshaping core
should be inserted
and hanging as
shown in step 10
of
Use the take-up
reel on page 16.
Ensure that the
take-up reel power
switch is in the On
position.
Flip the take-up
reel wind-direction
switch to the
correct position.
The following graphic shows the take-up reel sensors and cable.
72 Chapter 7 Troubleshoot paper issues
Page 81

Take-up reel sensor
1.
Take-up reel sensor and cable housing unit
2.
Troubleshoot paper
Take-up reel does not wind
73
Page 82

8
Troubleshoot ink system issues
Clean the printheads
Periodic printhead cleaning is performed automatically, as long as the printer is kept
turned on. However, you should clean the printheads if you are experiencing poor
image quality and cannot resolve the issues by other methods. This ensures that there
is fresh ink in the nozzles and helps to prevents nozzle clogs.
If you have printed the Printhead status plot, you know which colors are failing. Clean
the pair of printheads that are not performing adequately. If you are not sure which
printheads to clean, clean all of the printheads.
To clean the printheads, go to the printer's front panel and select the
select Image quality maintenance > Clean printheads, and then select
which printheads you want to clean. You can clean all of the printheads or only some
of them. Your choices are:
Clean all
●
Clean M-Y
●
Clean LM-LC
●
Clean PK-LG
●
Clean MK-C
●
Purge ink
●
Cleaning all of the printheads takes about 5 minutes. Cleaning any two printheads
takes about 3 minutes. Purging the ink takes about 6 minutes.
NOTE: Cleaning all printheads uses more ink than cleaning a single pair.
NOTE: HP recommends that you purge the ink from the printheads before
printing a job if the printer has been turned off for more than six weeks or if
you are experiencing inconsistent colors from print to print after long storage
periods. Purging the ink from the printheads helps to ensure maximum color
consistency; it is not a remedy for poor printhead health.
Align the printheads
Troubleshoot ink
Precise alignment between printheads is essential for color accuracy, smooth color
transitions, and sharp edges in graphical elements. Your printer has an automatic
printhead alignment process which runs whenever a printhead has been accessed
or replaced.
In the case of a paper jam, if you have used a custom paper, or if you are
experiencing problems with color accuracy; you might need to align the printheads.
Align the printheads on page 34.
See
icon,
74 Chapter 8 Troubleshoot ink system issues
Page 83

NOTE: If you experience a paper jam, HP recommends that you reinsert
the printheads and align the printheads.
TIP: Use the same paper you intend to print on to align the printheads.
Photo paper is recommended for the best results. Plain; bond; and thin,
coated papers are acceptable, but provide marginal results.
WARNING! Colored papers, glossy canvas, and transparent materials
such as translucent bond, clear film, tracing paper, and vellum are not
suitable for aligning the printheads. However, if you must perform printhead
alignment with a material that is not supported, make sure you use a material
with the same thickness as the material you are going to use for printing.
Reinsert printheads procedure
If the printhead alignment process is running and the wrong paper is loaded,
1.
press the Cancel button on the front panel.
CAUTION: Do not print if the printhead alignment process has been
canceled.
Load the paper you want to use. Photo paper is recommended for the best
2.
results.
WARNING! Colored papers, glossy canvas, and transparent
materials such as translucent bond, clear film, tracing paper, and vellum
are not suitable for aligning the printheads. However, if you must
perform printhead alignment with a material that is not supported, make
sure you use a material with the same thickness as the material you are
going to use for printing.
Align the printheads
Troubleshoot ink
75
Page 84

Remove and reinsert all of the printheads. See
3.
on page 29 and Insert a printhead on page 32. This starts the printhead
alignment process.
NOTE: Make sure the printer window is closed during printhead
alignment.
The process takes about 6 minutes. Wait until the front panel shows that the
4.
process is complete before using the printer.
NOTE: A calibration image is printed during the printhead alignment
process. The front panel shows if there were any errors in the process.
Remove a printhead
Image Quality Maintenance menu procedure
Load the paper you want to use. Photo paper is recommended for the best
1.
results. Plain; bond; and thin, coated papers are acceptable, but provide
marginal results.
WARNING! Colored papers, glossy canvas, and transparent
materials such as translucent bond, clear film, tracing paper, and vellum
are not suitable for aligning the printheads. However, if you must
perform printhead alignment with a material that is not supported, make
sure you use a material with the same thickness as the material you are
going to use for printing.
2.
Troubleshoot ink
76 Chapter 8 Troubleshoot ink system issues
Go to the front panel and select the
maintenance > Align printheads. The printer verifies that a sufficient
amount of paper exists to perform printhead alignment.
icon, and then select Image quality
Page 85

If the paper type that is loaded is acceptable for printhead alignment, the printer
3.
performs the alignment and prints an alignment pattern.
NOTE: Make sure the printer window is closed during printhead
alignment.
The process takes about 5 minutes. Wait until the front panel shows that the
4.
process is complete before using the printer.
Scan errors during alignment
If the alignment process fails, a Scanning problems message appears on the front
panel. This indicates that the alignment was not completed successfully. Therefore,
the printheads are not aligned and the alignment should be repeated before printing.
The problem might be because of one of the following scenarios:
The type of paper used in the printhead alignment process was not acceptable.
●
Repeat the alignment process using one of the recommended paper types.
The printheads are not clean. Clean the printheads. See
●
printheads on page 74.
The printer window was open during the printhead alignment process. Repeat
●
the alignment process with the printer window closed.
If the problem persists after following the recommended remedies, try replacing all
of the printheads. If the problem persists after replacing the printheads, a failure in
the scanning system may exist.
Clean the
Align the printheads
Troubleshoot ink
77
Page 86

Error messages
9
Front-panel error messages
Under certain circumstances, a front-panel error message appears. Follow the advice
in the Recommendation column to resolve the error.
If an error message appears on the front panel that is not included in this list, and
you are in doubt over the correct response, contact HP Support. See
HP Customer
Care on page 82.
Table 9-1 Text messages
Message Recommendation
[Color] cartridge has expired Replace the cartridge. See Remove an ink
[Color] cartridge is missing Insert a cartridge of the correct color. See Insert an
[Color] cartridge is out of ink Replace the cartridge. See Remove an ink
[Color] printhead #[n] error: not present Insert the correct printhead. See Insert a printhead
[Color] printhead #[n] error: please remove Remove the incorrect printhead and insert a new
[Color] printhead #[n] error: replace Remove the non-functional printhead and insert a
[Color] printhead #[n] error: reseat Remove and reinsert the same printhead, or try
[Color] printhead #[n] out of warranty The printhead's warranty has ended, because of the
[Color] printhead #[n] warranty warning The printhead's warranty may be invalidated by the
[Warning] internal failure: Unable to create print The internal print files are not available in the
cartridge on page 27 and Insert an ink cartridge
on page 29.
ink cartridge on page 29.
cartridge on page 27 and Insert an ink cartridge
on page 29.
on page 32.
printhead of the correct type (color and number).
See
Remove a printhead on page 29 and Insert a
printhead on page 32.
new printhead. See
on page 29 and Insert a printhead on page 32.
cleaning the electrical connections. If necessary,
insert a new printhead.
length of time it has been in operation or because
of the volume of ink used. See
on page 87.
use of the wrong kind of ink. See
information on page 87.
printer. Load the internal print files through the
Embedded Web Server.
Remove a printhead
Legal information
Legal
78 Chapter 9 Front-panel error messages
Page 87

Table 9-1 Text messages (continued)
Message Recommendation
IO error Restart the printer. If the problem persists, contact
IO warning Try again; if the problem persists, contact HP
PDL Error: Ink system not ready Clean the printheads. See Clean the printheads
PDL Error: Job clipped The image is too large for the paper or for the
PDL Error: memory full Restart the printer and try resending the job; if
PDL Error: out of paper Load more paper.
PDL Error: parsing error The print job is unintelligible to the printer. Try to
PDL Error: print mode error The paper type or print quality specified for the job
PDL Error: printing error Try sending the job again.
PDL Error: virtual memory full Restart the printer and try resending the job; if
Replace [color] cartridge Replace the cartridge. See Remove an ink
Reseat [color] cartridge Remove and reinsert the same cartridge. See
Update: failed. Invalid file Make sure that you have selected the correct
HP Support. See
Support. See
on page 74.
printer. Load larger paper if possible, or reduce the
image size.
necessary, reduce the complexity of the job.
recreate and resend it. Check your cable
connections.
are incorrect. Change the loaded paper type or the
print settings.
necessary, reduce the complexity of the job.
cartridge on page 27 and Insert an ink cartridge
on page 29.
Remove an ink cartridge on page 27 and Insert an
ink cartridge on page 29.
firmware update file. Then try again to perform the
update.
HP Customer Care on page 82.
HP Customer Care on page 82.
Error messages
Under certain circumstances, a front-panel numeric error message appears. Follow
the advice in the Recommendation column to resolve the error.
If an error message appears on the front panel that is not included in this list, turn off
the printer and then turn it back on. If the problem persists, contact HP Support.
HP Customer Care on page 82.
See
79
Page 88

Error messages
Table 9-2 Numeric error messages
Error code Recommendation
26.n.01 (where n = the subject
ink cartridge number)
29.01 The maintenance cartridge is not inserted correctly. Open the
32.1.01 A take-up reel error has occurred. Make sure that the paper is
32.2.01 The take-up reel can not be detected. Make sure that the take-up reel
61.01 The file format is incorrect and the printer cannot process the job. Try
63.04 An input/output problem has occurred with the network card. Try the
71.03 An “out of memory” failure has occurred. HP recommends that you
Remove the subject ink cartridge and reinstall it in the printer. If the
error persists, replace the subject ink cartridge. If the problem persists,
contact HP Support. See
maintenance cartridge door on the right side of the printer, make sure
that the maintenance cartridge is correctly seated, and then close the
door. If the problem persists, replace the maintenance cartridge. If the
problem persists, contact HP Support. See
on page 82.
adequately taped to the take-up reel spindle core, and then make sure
that the winding direction is correctly set.
sensor cable is correctly connected.
the following remedies:
Turn off the printer by using the Power button on the front panel
●
and the power switch at the back of the printer, and then
disconnect the power cord—then reconnect the power cord and
turn on the printer.
Make sure that the graphic language setting is correct.
●
Resubmit the file to the printer.
●
Verify that your printer firmware is up to date.
●
If the problem persists, contact HP Support. See
on page 82.
following remedies:
Make sure that the network cable is correctly connected to the
●
network card.
Verify that your printer firmware is up to date.
●
If the problem persists, contact HP Support. See
on page 82.
remove any unnecessary files from the printer's hard disk through the
Embedded Web Server.
HP Customer Care on page 82.
HP Customer Care
HP Customer Care
HP Customer Care
80 Chapter 9 Front-panel error messages
Page 89

Table 9-2 Numeric error messages (continued)
Error code Recommendation
74.01 An error occurred when uploading the firmware update file. Try the
76.03 A “disk out of space” has occurred. Try the following remedies:
77.04 An Embedded Web Server internal software error has occurred. Try
81.01, 81.03, 86.01 Open the printer window and make sure that there are no obstacles
following remedies:
Turn off the printer by using the Power button on the front panel
●
and the power switch at the back of the printer, and then
disconnect the power cord—then reconnect the power cord and
turn on the printer.
Try again to upload the firmware update file to the printer.
●
If the problem persists, contact HP Support. See
on page 82.
Turn off the printer by using the Power button on the front panel
●
and the power switch at the back of the printer, and then
disconnect the power cord—then reconnect the power cord and
turn on the printer.
Resubmit the file to the printer.
●
HP recommends that you remove any unnecessary files from the
●
printer's hard disk through the Embedded Web Server.
● Perform an Electrically Erasable Read-Only Memory (EEROM)
reset and then resubmit the file to the printer.
If the problem persists, contact HP Support. See
on page 82.
the following remedies:
Turn off the printer by using the Power button on the front panel
●
and the power switch at the back of the printer, and then
disconnect the power cord—then reconnect the power cord and
turn on the printer.
Verify that your printer firmware is up to date.
●
If the problem persists, contact HP Support. See
on page 82.
restricting the movement of the drive roller. If the paper has jammed
and is restricting the movement of the drive roller, lift the paper load
lever and clear the obstruction. If the problem persists, contact HP
Support. See
HP Customer Care on page 82.
HP Customer Care
HP Customer Care
HP Customer Care
Error messages
81
Page 90

10
Get help
Introduction
HP Customer Care offers award-winning support to ensure that you get the most from
your HP Designjet. HP Customer Care provides comprehensive, proven support
expertise and new technologies to give you unique end-to-end support. Services
include setup and installation, troubleshooting tools, warranty upgrades, repair and
exchange services, phone and Web support, software updates, and selfmaintenance services. For more information about HP Customer Care, go to:
http://www.hp.com/go/designjet/.
HP Instant Support
Get help
HP Instant Support Professional Edition is HP's suite of troubleshooting tools that
collect diagnostic information from your printer and match it with intelligent solutions
from HP's knowledge bases, allowing you to resolve problems as quickly as possible.
To start an HP Instant Support session, click on the link in the Support tab of your
printer's Embedded Web Server. See
on page 7.
To use HP Instant Support, the following conditions must be met:
Because HP Instant Support is accessible only through the Embedded Web
●
Server, you must have a TCP/IP connection to your printer.
Because HP Instant Support is a Web-based service, you must have access to
●
the World Wide Web,
HP Instant Support is currently available in English, Korean, Simplified Chinese, and
Traditional Chinese.
For more information about HP Instant Support, go to:
ispe/.
HP Proactive Support
HP Proactive Support is a troubleshooting support tool that identifies, diagnoses, and
resolves issues you might encounter when using your commercial imaging and
printing products. HP Proactive Support is embedded into multiple HP software
programs including the HP Easy Printer Care (Windows) and HP Printer Utility (Mac
OS), allowing you to easily and conveniently monitor, update and maintain all of
your HP printers.
For more information about HP Proactive Support, go to:
proactivesupport.
HP Customer Care
As your strategic support partner, we make it our business to help keep your business
running smoothly. HP Customer Care offers award-winning support to ensure that you
get the most from your HP Designjet.
Access the Embedded Web Server
http://www.hp.com/go/
http://www.hp.com/go/
82 Chapter 10 Get help
Page 91

HP Customer Care provides comprehensive, proven support expertise and leverages
new technologies to give customers unique end-to-end support. Services include setup
and installation, troubleshooting tools, warranty upgrades, repair and exchange
services, phone and Web support, software updates, and self-maintenance services.
To find out more about HP Customer Care, go to
http://www.hp.com/go/
designjet/. For the most current contact information, click on the Contact HP link
or call the appropriate telephone numbers.
What to do before you call:
Review the troubleshooting suggestions in this guide.
●
Review the relevant driver documentation supplied with this printer (for users
●
sending PostScript files or those using Microsoft Windows).
If you have installed third-party software drivers and RIPs, refer to their
●
documentation.
If the problem appears to be related to your software program, first contact your
●
software vendor.
If you call one of the Hewlett-Packard offices, have the following information
●
available to help us answer your questions more quickly:
The printer you are using (the product number and the serial number, found
●
on the label at the back of the printer)
●
The printer's Service ID: select the
icon, and then View printer
information
If there is an error code on the front panel, make note of it.
●
The brand name and model number of the computer you are using
●
Any special equipment or software you are using (for example, spoolers,
●
networks, switch-boxes, modems, or special software drivers)
The part number of the network cable you are using and the name of the
●
store though which it was purchased
The type of interface used on your printer (USB or network)
●
The software name and version you are using
●
Print out the service information prints. You may be asked to fax them to
●
the support center helping you.
Get help
On the front panel: select the
icon, and then select Internal
prints > Service information prints > Print all pages.
Through the Embedded Web Server: go to the Service support page in
the Support tab, and then select Printer information > All pages.
HP Customer Care
83
Page 92

Telephone numbers
For an up-to-date list of HP Support telephone numbers, go to
http://welcome.hp.com/country/us/en/wwcontact_us.html. If you do not have
access to the Web, try one of the numbers below.
Algeria: 213 17 63 80
●
Argentina: 0 800 777 HP INVENT, local 5411 4778 8380
●
Australia: 13 10 47
●
Austria: 0810 00 10 00
●
Bahrain: 800 171
●
Belgium: (0) 78 600 600
●
Bolivia: 0 800 1110, local 54 11 4708 1600
●
Brazil: 0800 157 751, local 55 11 3747 7799
Get help
●
Canada: 1 800 HP INVENT
●
Caribbean: 1 800 711 2884
●
Central America: 1 800 711 2884
●
Chile: 800 HP INVENT, 123 800 360 999
●
China: 800 810 59 59, 10 6564 59 59
●
Colombia: 01 8000 51 HP INVENT, local 571 606 9191
●
Czech Republic: 420 261 307 310
●
Denmark: 70 11 77 00
●
Ecuador: 999 119, 1 800 225 528
●
Egypt: 202 532 5222
●
Finland: 0203 53232
●
France: 08 26 10 49 49
●
Germany: 0180 52 58 143
●
Greece: 210 6073603, 801 11 22 55 47
●
Guadaloupe: 0800 99 00 11, 877 219 8791
●
Guatemala: 1 800 999 5105, 1 800 711 2884
●
Hong Kong: 852 3002 8555
●
Hungary: 06 1 382 1111
●
India: 1 600 112 267
●
Indonesia: 350 3408
●
Ireland: 1 890 946500
●
Israel: 09 830 4848
●
Italy: 02 3859 1212
●
Jamaica: 0 800 711 2884
●
84 Chapter 10 Get help
Page 93

Japan: software 0120 014121, hardware 0120 742594
●
Korea: 82 1588 3003
●
Luxembourg: 27 303 303
●
Malaysia: 1 800 80 5405
●
Martinique: 0 800 99 00, 877 219 8671
●
Mexico: 01 800 472 6684, local 5258 9922
●
Middle East: 4 366 2020
●
Morocco: 2240 4747
●
Netherlands: 0900 1170 000
●
New Zealand: 09 365 9805
●
Norway: 800 62 800
●
Paraguay: 00 811 800, 800 711 2884
●
Panama: 001 800 711 2884
●
Peru: 0 800 10111
●
Philippines: 632 888 6100
●
Poland: 22 566 6000
●
Portugal: 213 164 164
●
Puerto Rico: 1 800 652 6672
●
RSA: 27 11 258 9301, local 086 000 1030
●
Romania: 40 21 315 4442
●
Russia: 095 797 3520, 812 3467 997
●
Saudi Arabia: 6272 5300
●
Slovakia: 2 50222444
●
South Africa: 0800 001 030
●
Spain: 902 010 333
●
Sweden: 077 130 30 00
●
Switzerland: 0848 80 20 20
●
Taiwan: 886 2 872 28000
●
Thailand: 0 2353 9000
●
Tunisia: 71 89 12 22
●
Turkey: 216 444 71 71
●
UAE: 800 4520, 04 366 2020
●
Ukraine: 44 4903520
●
United Kingdom: 0870 842 2339
●
United States: 1 800 HP INVENT
●
Get help
HP Customer Care
85
Page 94

Uruguay: 54 11 4708 1600
●
Venezuela: 0 800 HP INVENT, local 58 212 278 8000
●
Vietnam: 84 8 823 45 30
●
West Africa (French): 351 213 17 63 80
●
HP Designjet Online
HP offers dedicated services and resources to ensure you always get the best
performance from your HP Designjet products and solutions.
Register at HP Designjet Online, your large-format printing community at
http://www.hp.com/go/designjet/ for unrestricted access to:
Downloads of the latest printer firmware, drivers, software, paper profiles, and
●
so on
Technical support, including online troubleshooting, customer care contacts,
Get help
●
and more
Forums for direct contact with the experts, both HP and your colleagues
●
Warranty tracking online, for your peace of mind
●
Technical documentation and training videos
●
Latest product information about printers, supplies, accessories, software, and
●
so on
Supplies Center for all you need to know about ink and paper
●
You decide the information you need by customizing your registration for the
products you have purchased and your type of business, and by setting your
communication preferences.
Register at HP Designjet Online for the best performance.
HP Designjet Online is available in English, German, French, Italian, Spanish,
Portuguese, Japanese, Korean, Simplified Chinese, and Traditional Chinese.
Other sources of information
More information is available from the following sources:
The Embedded Web Server provides information about your printer status,
●
technical support, online documentation, and so on. Ses Printer software in
Using your printer.
The Printer assembly document that came with your printer
●
86 Chapter 10 Get help
Page 95

11
Legal information
Hewlett-Packard Limited Warranty—HP (HP Designjet
Z6100 Printer series)
HP product Limited Warranty Period
Printer 1 year (from the date of purchase by the customer)
Software 90 days (from the date of purchase by the customer)
Printhead Until the “end of warranty” date printed on the
Ink cartridge Until the genuine HP ink is depleted as indicated by
A. Extent of HP Limited Warranty
HP warrants to you, end-user customer, that the HP hardware products specified
1.
above will be free from defects in materials and workmanship during the Limited
Warranty Period specified above. The Limited Warranty Period starts on the
date of purchase. Your dated sales or delivery receipt, showing the date of
purchase of the product, is your proof of purchase date. You may be required
to provide proof of purchase as a condition of receiving warranty service.
For software products, HP’s Limited Warranty applies only to a failure to execute
2.
programming instructions during the Limited Warranty Period specified above.
HP does not warrant that the operation of any product will be uninterrupted or
3.
error free.
HP’s Limited Warranty covers only those defects that arise as a result of normal
4.
use of the HP products, and does not cover any other problems, including those
that arise as result of:
Improper or inadequate maintenance or modification;
a.
Software, interfacing, paper, parts, or supplies not provided or supported
b.
by HP;
Operation outside the product’s specifications; or
c.
Unauthorized modification or misuse.
d.
Routine printer maintenance operations in the HP Designjet Z6100 Printer
series, such as cleaning and preventive maintenance services (including parts
product is reached, or 1200 ml of HP ink have been
cycled through the printhead, whichever occurs first
the printer, or the “end of warranty” date printed on
the product is reached, whichever occurs first
Legal information
Hewlett-Packard Limited Warranty—HP (HP Designjet Z6100 Printer series)
87
Page 96

Legal information
contained in any preventive maintenance kit and HP service engineer visits), are
not covered by HP’s Limited Warranty.
YOU SHOULD MAKE PERIODIC BACKUP COPIES OF THE DATA STORED ON
5.
THE PRINTER'S HARD DISK OR OTHER STORAGE DEVICES AS A
PRECAUTION AGAINST POSSIBLE FAILURES, ALTERATION, OR LOSS OF THE
DATA. BEFORE RETURNING ANY UNIT FOR SERVICE, BE SURE TO BACK UP
DATA AND REMOVE ANY CONFIDENTIAL, PROPRIETARY, OR PERSONAL
INFORMATION. HP IS NOT RESPONSIBLE FOR DAMAGE TO OR LOSS OF
ANY FILES, STORED BY YOU ON THE PRINTER'S HARD DISK OR OTHER
STORAGE DEVICES. HP IS NOT RESPONSIBLE FOR THE RECOVERY OF LOST
FILES OR DATA.
For HP printer products, the use of a refilled or non-original HP consumable
6.
product (ink, printhead or ink cartridge) does not affect either HP’s Limited
Warranty to you or any HP support contract with you. However, if printer failure
or damage is attributable to the use of a non-HP or refilled ink cartridge, HP will
charge its standard time and materials charges to service the printer for the
particular failure or damage.
If HP receives, during the applicable warranty period, notice of a defect in any
7.
product which is covered by this Limited Warranty:
HP shall replace any defective HP software, media, or consumable product
a.
which is covered by this Limited Warranty, and deliver another product to
you to replace the defective one.
HP, at its sole discretion, shall either repair on site or replace any defective
b.
hardware product or component part. If HP elects to replace any
component part, HP will provide to you (i) a replacement part, in return of
the defective one, and (ii) remote part installation assistance, if needed.
If HP is unable to repair or replace, as applicable, a defective product which is
8.
covered by this Limited Warranty, HP shall, within a reasonable time after being
notified of the defect, refund the purchase price for the product.
HP shall have no obligation to replace or refund until you return the defective
9.
components, parts, consumables, media, or hardware product to HP. All
components, parts, consumables, media or hardware products, removed under
this Limited Warranty become the property of HP. Notwithstanding the above
mentioned, HP may waive the requirement for you to return the defective part.
Unless otherwise stated, and to the extent permitted by local law, HP products
10.
may be manufactured using new materials or new and used materials equivalent
to new in performance and reliability. HP may repair or replace products (i)
with equivalent products to the products being repaired or replaced but which
may have been subject to prior use; or (ii) with an equivalent product to an
original product that has been discontinued.
88 Chapter 11 Legal information
Page 97

This Limited Warranty is valid in any country/region where HP or its authorized
11.
providers offer warranty services and HP has marketed the HP product covered
by this Limited Warranty. However, warranty service availability and response
time may vary from country/region to country/region. HP will not alter form, fit,
or function of the product to make it operate in a country for which it was never
intended to function for legal or regulatory reasons.
Contracts for additional services may be available for any authorized HP service
12.
facility where the listed HP product is distributed by HP or an authorized
importer.
B. Limitation of warranty
TO THE EXTENT ALLOWED BY LOCAL LAW, NEITHER HP NOR ITS THIRD PARTY
SUPPLIERS MAKE ANY OTHER WARRANTY OR CONDITION OF ANY KIND,
WHETHER EXPRESS OR IMPLIED, WITH RESPECT TO THE HP PRODUCTS, AND
SPECIFICALLY DISCLAIM THE IMPLIED WARRANTIES OR CONDITIONS OF
MERCHANTABILITY, SATISFACTORY QUALITY, AND FITNESS FOR A PARTICULAR
PURPOSE.
C. Limitations of liability
TO THE EXTENT ALLOWED BY LOCAL LAW, EXCEPT FOR THE OBLIGATIONS
SPECIFICALLY SET FORTH IN THIS LIMITED WARRANTY, IN NO EVENT SHALL HP
OR ITS THIRD PARTY SUPPLIERS BE LIABLE FOR DIRECT, INDIRECT, SPECIAL,
INCIDENTAL, OR CONSEQUENTIAL DAMAGES (INCLUDING ANY LOSS OF
PROFITS OR SAVINGS), WHETHER BASED ON CONTRACT, TORT, OR ANY
OTHER LEGAL THEORY AND WHETHER ADVISED OF THE POSSIBILITY OF SUCH
DAMAGES.
D. Local law
This Limited Warranty gives you specific legal rights. You may also have other
1.
rights which vary from state to state in the United States, from province to
province in Canada, and from country to country elsewhere in the world. You
are advised to consult applicable state, province, or national laws for full
determination of your rights.
To the extent that this Warranty Statement is inconsistent with local law, this
2.
Warranty Statement shall be deemed modified to be consistent with such local
law. THE WARRANTY TERMS CONTAINED IN THIS LIMITED WARRANTY,
EXCEPT TO THE EXTENT LAWFULLY PERMITTED, DO NOT EXCLUDE,
RESTRICT, OR MODIFY AND ARE IN ADDITION TO THE MANDATORY
STATUTORY RIGHTS APPLICABLE TO THE SALE OF THIS PRODUCT TO YOU.
Revision: December 10th, 2006
Hewlett-Packard Software License Agreement
ATTENTION: USE OF THE SOFTWARE IS SUBJECT TO THE HP SOFTWARE LICENSE
TERMS SET FORTH BELOW. USING THE SOFTWARE INDICATES YOUR
Legal information
Hewlett-Packard Software License Agreement
89
Page 98

ACCEPTANCE OF THESE LICENSE TERMS. IF YOU DO NOT ACCEPT THESE
LICENSE TERMS, YOU MAY RETURN THE SOFTWARE FOR A FULL REFUND. IF THE
SOFTWARE IS SUPPLIED WITH ANOTHER PRODUCT, YOU MAY RETURN THE
ENTIRE UNUSED PRODUCT FOR A FULL REFUND.
HP SOFTWARE LICENSE TERMS
The following terms govern your use of the software integrated into your HP Designjet
Z6100 Printer series, unless you have a separate agreement with HP.
Definitions. HP Designjet Z6100 Printer series software includes HP software
product (“the Software”) and Open Source Software components.
“Open Source Software” means various open source software components including,
but not limited to, Apache, Tomcat, MySQL, and omniORB, licensed under terms of
applicable open source license agreements included in the materials relating to such
software (please see “Open Source Software” section below).
License Grant. HP grants you a license to use one copy of the Software pre-installed
in the HP Designjet Z6100 Printer series. "Use" means storing, loading, executing
or displaying the Software. You may not modify the Software or disable any licensing
or control features of the Software.
Ownership. The Software is owned and copyrighted by HP or its third party
suppliers. Your license confers no title to, or ownership in, the Software and is not a
sale of any rights in the Software. HP's third party suppliers may protect their rights
in the event of any violation of these License Terms.
Copies and Adaptations. You may only make copies or adaptations of the
Software for archival purposes or when copying or adaptation is an essential step
Legal information
in the authorized Use of the Software. You must reproduce all copyright notices in
the original Software on all copies or adaptations. You may not copy the Software
onto any public network.
No Disassembly or Decryption. You may not disassemble or decompile the
Software unless HP's prior written consent is obtained. In some jurisdictions, HP's
consent may not be required for limited disassembly or decompilation. Upon request,
you will provide HP with reasonably detailed information regarding any disassembly
or decompilation. You may not decrypt the Software unless decryption is a necessary
part of the operation of the Software.
Transfer. Your license will automatically terminate upon any transfer of the
Software. Upon transfer, you must deliver the Software, including any copies and
related documentation, to the transferee. The transferee must accept these License
Terms as a condition to the transfer.
Termination. HP may terminate your license upon notice for failure to comply with
any of these License Terms. Upon termination, you must immediately destroy the
Software, together with all copies, adaptations and merged portions in any form or,
if the Software is supplied integrated into the HP Designjet Z6100 Printer series, stop
using the HP Designjet Z6100 Printer series.
90 Chapter 11 Legal information
Page 99

Export Requirements. You may not export or re-export the Software or any copy
or adaptation in violation of any applicable laws or regulations.
U.S. Government Restricted Rights. The Software and accompanying
documentation have been developed entirely at private expense. They are delivered
and licensed, as defined in any applicable DFARS, FARS, or other equivalent federal
agency regulation or contract clause, as either "commercial computer software" or
"restricted computer software", whichever is applicable. You have only those rights
provided for such Software and Documentation by the applicable clause or
regulation or by the HP standard software agreement for the product involved.
Open Source Software. The Open Source Software is composed of individual
software components, each of which has its own copyright and its own applicable
license conditions. You must review the licenses within the individual packages to
understand your rights under them. The licenses can be found in the folder called
licenses on the Drivers and Documentation CD that came with your printer.
Copyrights to the Open Source Software are held by the copyright holders.
Open source software
Open source acknowledgments
This product includes software developed by the Apache Software Foundation
●
(
http://www.apache.org/)
The source code, object code, and documentation in the com.oreilly.servlet
●
package is licensed by Hunter Digital Ventures, LLC
Open source written offer
In accordance with the GNU General Public license, the SMAIL Public License, and
the Sleepy Cat software license, HP is providing you with this written offer to receive
on a CD-R, at the cost of $30, a complete machine-readable copy of the source code
corresponding to all the code distributed to you under a GNU General Public License,
SMAIL Public License, and/or Sleepy Cat software licenses. You can request this CDR from your local HP support representative; telephone numbers and e-mail addresses
can be found at:
http://www.hp.com/go/designjet/support/.
Regulatory notices
This HP product contains a lithium battery located on an internal motherboard that
may require special handling at end-of-life.
Material Safety Data Sheet
You can obtain current Material Safety Data Sheets for the ink systems used in the
printer by mailing a request to this address: Hewlett-Packard Customer Information
Center, 19310 Pruneridge Avenue, Dept. MSDS,Cupertino, CA 95014, U.S.A.
There is also a Web page:
productinfo/psis_inkjet.htm
http://www.hp.com/hpinfo/community/environment/
Legal information
Open source software
91
Page 100

Regulatory Model Number
For regulatory identification purposes, your product is assigned a Regulatory Model
Number. The Regulatory Model Number for your Printer is BCLAA-0701 and the
Take-Up Reel is BCLAA-0702. This regulatory number should not be confused with
the marketing names (HP Designjet printer series or HP Take-Up Reel for Designjet
printer series) or product numbers (Q####X – where X is any single letter and # is
any number).
Regulatory Statements
●
USA
●
Electro-Magnetic Compatibility (EMC)
●
FCC statements (USA)
The U.S. Federal Communications Commission (in 47 cfr15.105) has
specified that the following notices be brought to the attention of users of
this product.
This device complies with part 15 of the FCC Rules. Operation is subject
to the following two conditions: (1) This device may not cause harmful
interference, and (2) this device must accept any interference received,
including interference that may cause undesired operation.
●
Shielded cables
Use of shielded data cables is required to comply with the Class A limits
of Part 15 of the FCC Rules.
Legal information
This equipment has been tested and found to comply with the limits for a
Class A digital device, pursuant to part 15 of the FCC Rules. These limits
are designed to provide reasonable protection against harmful
interference in a commercial environment. This equipment generates, uses,
and can radiate radio frequency energy and, if not installed and used in
accordance with the instructions, may cause harmful interference to radio
communications. Operation of this equipment in a residential area is likely
to cause harmful interference, in which case the user will be required to
correct the interference at their own expense.
92 Chapter 11 Legal information
CAUTION: Pursuant to Part 15.21 of the FCC Rules, any
changes or modifications to this equipment not expressly approved
by the Hewlett-Packard Company may cause harmful interference
and void the FCC authorization to operate this equipment.
 Loading...