

Page 1

HP DesignJet Z2600
PostScript® Printer
EN
Product Assembly
Instructions
JA
セットアップ 手 順
ZHCN
组装说明
ZHTW
印表機組裝說明
KO
프린터 조립 지침
ID
Petunjuk Pemasangan
Dudukan Printer
*T0B52-90006*
T0B52-90006
EN
Hardware Setup:
1- open the printer box
2- Stand assembly
3- Unpack more components
4- Power and network conguration
5- Printhead and cartridge setup
Software setup:
Now, it’s easy to print large-format documents
from virtually anywhere, using your laptop, printer
touchscreen, iPhone®, or iPad®.
JA
ハードウェアのセットアップ:
1- プリンタの箱を開く
2- スタンドを組み立てる
3- その他のコンポーネントを取り出す
4- 電源およびネットワークを設定する
5- プリントヘッドおよびカートリッジをセットア
ップする
ソフトウェアのセットアップ:
ラップトップ コンピュータ、プリンタのタッチス
クリーン、
iPhone®、iPad®を使い、大判ドキュメントをどこか
らでも簡単に印刷できるようになりました。
ZHCN
硬件设置:
1- 打开打印机包装盒
2- 底座组装
3- 打开更多组件的包装
4- 电源和网络配置
5- 打印头和墨盒设置
软件设置:
现在,使用便携式电脑、打印机触摸屏、iPhone® 或
iPad®,
即可随时随地轻松打印大幅面文档。
ZHTW
硬體設定:
1- 打開印表機包裝箱
2- 組裝機架
3- 取出其他組件
4- 配置電源和網路組態
5- 印字頭和墨水匣設定
軟體設定:
現在,您幾乎可從任何位置,輕鬆列印
大型格式文件,只要使用您的 筆記型電腦、印表機
觸控式螢幕、iPhone® 或 iPad® 就可以辦到。
KO
하드웨어 설치:
1- 프린터 박스 열기
2- 스탠드 조립
3- 추가 구성 요소 포장 풀기
4- 전원 및 네트워크 구성
5- 프린트 헤드 및 카트리지 설치
소프트웨어 설치:
이제 노트북, 프린터 터치 스크린, iPhone® 또는
iPad®를 사용하여 어디에서나 대형 파일을 쉽게
인쇄할 수 있습니다.
ID
Kongurasi Perangkat Keras:
1- Membuka kemasan printer
2- Pemasangan dudukan
3- Membuka kemasan komponen lain
4- Kongurasi daya dan jaringan
5- Kongurasi printhead dan kartrid
Kongurasi Perangkat Lunak:
Kini Anda dapat dengan mudah mencetak
dokumen berformat besar secara virtual di manapun,
menggunakan laptop, layar sentuh printer, iPhone®,
atau iPad®.
© Copyright 2016 HP Development Company, L.P.
Large Format Division
Camí de Can Graells 1-21 · 08174
Sant Cugat del Vallès
Barcelona · Spain
All rights reserved
Printed in XXX
1
Page 2

1
2
Read these instructions carefully...What you will need for this procedure
EN
• Because the product is heavy, you may need three people to unpack it. When more than one person isneeded,
this symbol is displayed *.
• To assemble the product you will need at least 3x2 m of empty oor space.
• You will also need a roll of 24 in (minimum) paper, in order to align the printheads
• You will need a LAN connection near in order to connect your printer to the internet.
JA
以下 の指示をよくお 読み くださ い。
セットアップ に 必 要 なも の
•
このプリンタは重いため、開梱する際には3 人必要になります。複数名で行う必要がある作業には、以下のような記
号が 表示 されています * 。
•
プリンタをインターネットに接続 するにはL AN 接続 が必要です。
•
プリンタを組み立てるには、最低でも3 x 2m (120 x 80 i n) の設置面積が必要です。
•
プリントヘッドの軸合わせを行うには 、24インチ (最低 ) のロール紙も必要です。
ZHCN
请仔细阅读以下说明...该组装过程需要注意哪些事项
• 因为打印机很重,打开包装可能需要 三人。需要一人以上时,则显示此符号*。
• 要组装打印机,您需要至少 3 x 2 m (120 x 80 in) 的地板空间。
• 要对齐打印头,您还需要最小尺寸 24 英寸的卷筒纸张。
• 附近必须有 LAN 连接,以便将打印机连接到 Internet。
ZHTW
請仔細閱讀下列說明 ... 本程序中應注意的事項
•
因為印表機很重,可能需要三個人才有辦法拆裝。需要多人幫忙時,這裡會用這個符號來表示。
•
您附近必須有 LAN 連線以便將印表機連線至網際網路 *。
•
如果要組裝印表機,您必須至少騰出 3 x 2 公尺(120 x 80 英吋)的地板空間。
•
您也將會需要 24 英吋(最小尺寸)的捲筒紙,以校正印字頭
KO
이 지시사항을 주의 깊게 읽으십시오...이 절차를 수행하는 데 필요한 사항
•
프린터가 무거우므로 상자에서 꺼낼 때 세 사람이 필요할 수도 있습니다. 한 사람 이상이 필요한 경우 이 기호가 표시되어
있습니다*.
•
프린터를 조립하려면 최소 3 x 2m (120 x 80 인치) 넓이의 빈 공간이 필요합니다.
•
프린트 헤드를 정렬하려면 최소 610 mm의 롤 용지도 필요합니다.
•
프린터를 인터넷에 연결하려면 근처에 LAN 연결이 필요합니다.
Product working area
*
Before you start unpacking, consider where you aregoing to put the assembled
product. You should allow some clear space on all sides of the product box. The
recommended clearances are shown intheillustration above.
3m
プリン タの設 置場 所
開梱する前に、組み立てたプリンタの設置 場所を決めてくだ さい。プリンタの箱の周囲に 、スペースが 必要になります。
推奨するスペースは上記のとおりです。
2m
打印机工作区域
开始打开包装之前,请考虑在何处安放组装好的打印机。应该在打印机包装箱的四周清理出一些空间。上图显示了建议的
空间大小。
印表機工作區
開始拆裝之前,請先想好要將組裝的印表機放置在何處。印表機包裝箱四周應該預留空間。建議清出的空間大小,如
上圖所示。
프린터 작업 장소
포장을 풀기 전에 조립된 프린터를 놓을 장소를 먼저 고려하십시오. 프린터 상자의 주변 사방에 어느 정도의 여유 공간이
있어야 합니다. 권장되는 여유 간격이 위의 그림에 나와 있습니다.
ID
Baca petunjuk ini dengan cermat...
Yang Anda butuhkan untuk prosedur ini
• Karena printer ini berat, Anda mungkin memerlukan tiga orang untuk mengeluarkannya dari kemasan boks. Apabila
diperlukan lebih dari satu orang, simbol ini akan ditampilkan*.
• Untuk memasang printer ini, Anda memerlukan minimal 3 x 2 m (120 x 80 inci) ruang kosong.
• Anda juga akan memerlukan kertas gulung berukuran minimal 24 inci untuk menyelaraskan printhead.
• Anda memerlukan sambungan LAN yang dekat agar dapat menyambungkan printer ke Internet.
Area kerja printer
Sebelum Anda mulai membuka kemasan boks, pertimbangkan tempat untuk meletakkan printer yang sudah dipasang. Anda harus
memberikan ruang kosong pada semua sisi boks printer. Jarak yang dianjurkan dapat dilihat pada gambar di atas.
2
Page 3

1
EN
Open the box
JA
箱を開く
ZHCN
打开包装盒
ZHTW
打開外盒
KO
상자 열기
ID
Membuka kemasan
3 4 5
HP DesignJet Z2600
PostScript® Printer
Start Up
© Copyright 2016 HP Development Company, L.P.
EN
Remove the accessories from the printer box.
プリンタ本体が収められている箱からアクセサリを取り
JA
出し ます。
ZHCN
从打印机包装箱中取出附件箱。
ZHTW
從印表機包裝箱中取出配件。
KO
프린터 상자에서 부속품을 들어냅니다.
ID
Keluarkan aksesori dari kemasan printer.
You will nd the documentation and software for your
printer on top of the printer.
プリンタの上にプリンタの マニュアルとソフトウェ
アが同梱されています。
可以在打印机的最上面找 到打印机的文档和软件。
印表機上會有印表機的文件和軟體。
프린터 맨 위에 프린터 설명서와 소프트웨어가 있습니다.
Di bagian atas printer tersebut terdapat dokumen dan
perangkat lunak untuk printer Anda.
If the printer comes with a stand, remove the box (it is the
largest one). Two people are required, one at each end.
プリンタにスタンドがついている場合、その 箱を取り
除いてください(最大のもの)。両側で 1人ずつ、2 人の
人 員が 必 要で す。
如果打印机自带支架,请去掉包装箱(最大的那个)。
需 要两 个人 ,一 边一 个。
如果印表機內附機架,請取出機架盒(最大的盒子)。
這項工作需要兩人負責,左右各一個。
프린터가 스탠드와 함께 있는 경우, 가장 큰 상자를 제거
하십시오. 양 끝에 한 명씩 두 사람이 필요합니다.
Jika printer dilengkapi dengan sebuah dudukan, singkirkan
boksnya (yakni, boks yang terbesar). Dua orang diperlukan
untuk ini, satu pada setiap sisi.
3
Page 4

6
7 8 9
EN
Remove the pieces of cardboard.
厚 紙を 取り除 きま す。
JA
取出卡纸板。
ZHCN
ZHTW
取出厚紙板。
카드보드 조각을 제거합니다.
KO
Keluarkan bagian karton pen
ID
Lift up the sides and top of the printer box, and remove them
from the printer.
プリンタ本体が収められている 箱の上部と側面を持って
持ち上げ、プリンタから取り外してください。
提起打印机包装箱的侧面和顶部,并从打印机上将其取
下。
抬起印表機包裝箱的上半部,然後將它從印表機
抽離。
프린터 상자의 양쪽 및 상단을 들어 올리고 제거합니다.
Angkat semua sisi dan bagian atas boks printer, kemudian
lepaskan dari printer.
Dismantle the bottom of the printer box by disengaging each
corner and then folding down the sides so that they are out
of the way.
プリンタの 箱の底部 分を、じゃまになら ないように 解体
します。角の合わせ部分を外し、側面を倒します。
拆除打印机包装箱的底部,方法是解开打印机包装箱的
四角,然后向下打开四边,使它们完全铺开。
鬆開四個角落以將箱子的底部拆下來,接著扳開側板,
才不會妨礙動 作。
방해가 되지 않도록 각 모서리를 분리한 다음 양면을 접어
프린터 상자 바닥을 벗겨내십시오.
Pisahkan bagian bawah boks printer dengan melepaskan
setiap sudutnya, kemudian melipat sisinya ke bawah
sehingga dapat dikeluarkan.
Cut and remove the straps around the stand box.
Do not remove the white protective material until
instructed to do so.
IMPORTANT: Make sure ther is nothing on top of the printer
before continuing.
スタンドの 箱を固定しているストラップを切断し 取り除
きます。 指示があるまで白色の保護材は取り外さない
でください。
重要 :作業を続ける前に、 プリンタの上に何も載ってい
な いことを 確 認してくだ さい 。
剪断并取下底座包装盒四周的带子。 在要求您除 去白色
保护 材料前,请 不要这么 做。
重要 : 继续之前,请确保打印机最上面没有任何东西。
割斷並拆除機架盒上的綑紮帶。 請 勿移除白 色包裝材 料,
直到步驟指示移除。
重要 :繼續作業之前請確保印表機上方空無一物。
스탠드 상자를 묶은 띠를 잘라서 버립니다.
없는 한 흰색 보호 포장재를 뜯지 마십시오.
중요:
프린터 위에 아무것도 없는지 확인하고
진행하십시오.
Potong dan lepaskan tali yang mengikat boks dudukan.
Janga n lepaskan m ateri peli ndung puti h hingga
diminta.
PENTING: Pastikan bahwa tida k ada benda ap a pun di
atas printer sebelum melanjutkan.
별도의 지시가
4
Page 5

2
EN
Stand assembly (printer with
stand only)
JA
スタンドの 組み 立て(ス タンド
付き のプ リンタの 場 合)
ZHCN
支架装配件(仅限带支架的打印机)
ZHTW
機架組件(僅限含機架的印表機)
KO
스탠드 조립 (스탠드가 있는 프린
터의 경우에만 )
ID
Perakitan dudukan (khusus
printer dengan dudukan)
10
11
12
22x
EN
Open the stand box.
ス タンド の箱 を開 きま す。
JA
打开底座包装盒。
ZHCN
ZHTW
打開機架盒。
KO
스탠드 상자를 엽니다.
Buka boks dudukan.
ID
Remove the tray contents.
トレイの中身を取り外し.
取出纸盒物品.
取出盤中的內容物.
용지함 내용물을 제거하고.
Keluarkan isi wadah.
A screwdriver and 22 screws are provided in the stand
box: 16 screws to assemble the stand, 4 to attach it to the
product, and 2 are spare. Do not try to remove the washers from the screws. Note: All the screws are for the stand.
The basket does not need screws.
スタンドの箱にはドライバと22 本のネジが同梱されて
います。16 本はスタンドの組み立て用で、4 本はプリン
タへの取り付け用です。
残りの 2本は予備用です。
ネジ からワッシャを取り外さ ないでくだ さい。
注記 :す べ ての ネ ジ は ス タ ン ド 用 で す 。バ ス ケ ット の 取
り付けにはネジは不要です。
底座盒中有一个螺丝刀和 22 枚螺钉: 其中 16 枚螺钉
用于组装底座,4 枚用于将底座连接到打印机,剩下 2
枚螺钉是备用的。
不要尝试从螺钉上取下垫圈。
注:所有螺钉都是用于底座的。纸筐的
安装不需要螺钉。
機架盒內附有螺絲起子和 22 顆螺絲 :16 顆螺絲組裝機
架、4 顆將印表機固定在機架上,剩下的 2 顆備用。
請勿拆除螺絲的墊圈。
注意 :全部的螺絲都是給機架使用的。承紙籃並不需要
螺絲。
스탠드 상자에는 드라이버와 22 개의 나사가 들어
있습니다. 스탠드를 조립하는 데 16 개, 프린터에 스탠드를
연결하는 데 4 개, 그리고
2 개는 예비용입니다.
나사에서 와셔를 제거하지 마십시오.
스탠드용입니다. 바스켓에는 나사가 필요 없습니다.
Dalam kotak dudukan terdapat obeng dan 22 sekrup: 16
sekrup untuk memasang dudukan, 4 sekrup untuk dipasang
di printer, dan 2 sebagai cadangan.
Jangan coba melepas cincin dari sekrup. Catatan: Semua
sekrup tersebut digunakan untuk dudukan. Keranjang printer
tidak memerlukan sekrup.
참고:
모든 나사는
5
Page 6

13 14 15 16
180°
EN
Support one end of the cross-brace on the stand box
and attach a leg to the other end with two screws on the
outside, then two on the inside of the leg. Don’t full tighten
the screws yet. Attach the other leg following the same
process. Now fully tighten the screws on the outside of the
legs, followed by the screws on the inside.
スタンドボックスのクロスブレースの一方の端を支え
JA
て、他方の端に足を留め付けます。最初は足の外側、
次に内側にそれぞれ2個のねじで留め付けます。
まだ、ねじを完全に締めないでください。
同様にして、他の足も据え付けます。次に、足の外
側のねじを完全に締めた後、内側のねじも同様に締
めます。
ZHCN
将十字撑条的一端支撑在支架箱上,先用支脚外侧的
两颗螺丝,再用支脚内侧的两颗螺丝将支脚安装到另
一端。 暂时不要完全拧紧螺丝。按照相同的步骤安装
另一个支脚。 现在完全拧紧支脚外侧的螺丝,随后是
内侧的螺丝。
ZHTW
將橫撐桿的一端置於機架盒上,另一端先與腳柱結合,
腳柱外側鎖入兩顆螺絲,內側再鎖上兩顆螺絲。先不要
將螺絲完全鎖緊。依照相同步驟接上另一支腳柱。現在
鎖緊腳柱外側的螺絲,然後鎖緊內側螺絲。
버팀목의 한 쪽 끝을 스탠드 상자에 지탱시키면서 다른
KO
한 쪽에 다리를 부착하는데, 이때 다리 바깥쪽에 2개의 나
사, 안쪽에 2개의 나사를 사용합니다. 아직 나사를 꽉 조이
지 마십시오. 다른 한 쪽 다리도 동일한 방식으로 부착합
니다. 이제 다리 바깥쪽 나사부터 꽉 조인 다음 안쪽 나사
도 꽉 조입니다.
Tunjang satu ujung batang penahan pada kotak dudukan
ID
dan pasang sebuah kaki ke sisi lain dengan dua sekrup
pada sisi luar, lalu dua pada sisi dalam kaki. Jangan dulu
kencangkan sekrup sepenuhnya. Pasang kaki yang lain
dengan mengikuti proses yang sama. Sekarang kencangkan sekrup sepenuhnya pada sisi luar kaki, diikuti oleh
sekrup pada sisi dalam.
8x
4+4=8
Make sure you have used 4 screws ineachleg.
各脚部の固定には、それぞれ必ず4 本のネジを使用し
てくだ さい 。
确保每个支柱都使用了 4 枚螺钉。
請確定每隻腳架上都有 4 顆螺絲。
각 다리마다 나사를 4 개씩 사용합니다.
Pastikan Anda telah menggunakan 4 sekrup pada setiap
kaki.
4x
Attach a foot to each leg, using four screws in each foot.
First t all four screws loosely, then tighten themup.
4本のネジで各足部を各脚部に固定します。
まず4本すべてのネジを緩めに取り付けてから、固く
締めます。
为每个支柱连接底板,每个底板使用四枚螺钉。先松松
地拧上这四枚螺钉,然后再拧紧。
為每隻腳架裝上腳座,每個腳座各用四顆螺絲鎖定。先
將四顆螺絲大致裝上,然後再一一鎖緊。
각 발에 나사 네 개씩 사용하 여 각 다리에 발을
연결합니다. 먼저 나사 네 개를 모두 느슨하게
맞춘 후 꽉 조이십시오.
Pasang bagian dasar ke setiap kaki menggunakan 4 sekrup
di setiap bagian dasar. Pertama-tama, pasang 4 sekrup,
kemudian kencangkan.
IMPORTANT: Make sure there is nothing on top of the
printer before continuing.
Return to the main body of the product, carefully turn the
product upside down in order to attach the legs. You may
need a third person.
重要 :作業を続ける前に、 プリンタの上に何も載ってい
な いことを 確 認してくだ さい 。
プリンタ本体に戻り、脚部を取り付けるため、プリンタを
慎重に 逆さにします。 必 要に 応 じて 3 人で 行 ってくだ さ
い。
重要: 继续之前,请确保打印机最上面没有任何东西。
回到打印机主体,小心翻转打印机,使其面朝下以便安
可能需要三个人。
装支柱。
重要:繼續作業之前請確保印表機上方空無一物。
回到印表機的主體,然後從兩頭的泡棉端蓋中取出小擋
板。 您稍後可能需要第三位人員協助。
중요:
프린터 위에 아무것도 없는지 확인하고
진행하십시오.
프린터 본체로 돌아가서 다리를 연결하기 위해 프린터를
조심스럽게 뒤집어 놓습니다.
필요할 수 있습니다.
PENTING: Pastikan bahwa tidak ada benda apa pun di atas
printer sebelum melanjutkan.
Kembali ke badan utama printer, balikkan printer dengan
hati-hati untuk memasang kakinya. Anda mungkin
memerlukan orang ketiga.
이때 다른 사람의 도움이
6
Page 7

17
18 19 20
EN
Remove the small aps from each of the foam endpieces.
Do not remove the foam end pieces.
両端の梱包材から小さなカバーを取り外します。
JA
両端 の梱 包材 は取り外さな いでくださ い。
ZHCN
从每个泡沫端填塞 块中取出小法兰。
不要取出泡沫端填塞块。
ZHTW
從兩頭的泡棉蓋中取出小擋板。
請勿拆下泡棉端蓋。
각 폼 끝 조각에서 작은 덮개를 제거합니다.
KO
폼 끝 조각은 제거하지 마십시오.
ID
Lepaskan sirip kecil di setiap bagian ujung gabus.
Jangan lepaskan bagian ujung gabus.
Remove the tape from the transparent covering that
protects the product.
製品を保護している透明カバーのテープをはがしま
す。
从保护产品的透明覆盖物上撕去胶带。
取下印表機透明護套上的橘色膠布。
제품을 보호하는 투명한 덮개에서 테이프를 떼어냅니
다.
Singkirkan pita perekat dari tutup bening yang melindungi
produk.
Open the transparent covering and remove the desiccant
bag from the top of the product.
透明 カバーを 開き、 プリン タの上に ある 乾燥 剤の 袋を
取り出し ます。
打开透明护罩并从打印机顶部取出 干燥剂。
打開透明護套,然後取出印表機上面的乾燥劑。
투명 덮개를 열고 프린터의 위쪽에 있는 건조제 봉지를
제거합니다 .
Buka penutup transparan, kemudian keluarkan kantong
penyerap lembab dari bagian atas printer.
Lift the stand, keeping it upside down.
スタンドを逆さにしたまま持ち上げます。
保持底座的倒置状态并抬起。
提起機架,將它顛倒過來。
스탠드를 뒤집어서 들어올립니다.
Angkat dudukan dengan posisi terbalik.
7
Page 8

21
22 23 24
EN
There is a round yellow button protruding from the top of
one stand leg, and a square green button protruding from
the top of the other leg. Each button ts into a hole in the
product.
一方のスタンド脚部の上部には丸い黄 色のボタン、もう
JA
一方のスタンド脚部の上部には四 角い緑色 のボタンが
出 て い ま す 。プ リ ン タ に は 各 ボ タ ン と 合 わ せ る た め の 穴
が ありま す。
一个底座支柱顶部有一个凸起的黄色圆按钮,另一个支
ZHCN
柱顶部有一个凸起的绿色方形按钮。每个按钮卡入打印
机的一个小孔中。
ZHTW
其中一隻機架腳架頂端會有黃色的圓形凸鈕,而另一隻
腳架則有綠色的方形凸鈕。凸鈕將各自插入印表機中適
合的孔。
KO
스탠드의 한쪽 다리에는 둥글고 노란 버튼이 돌출되어
있고 다른 쪽 다리에는 사각형의 녹색 버튼이 돌출되어
있습니다. 각 버튼은 프린터에 있는 구멍에 들어 맞습니다.
ID
Pada salah satu kaki dudukan, terdapat tombol kuning bulat
yang menonjol keluar, dan tombol hijau kotak yang menonjol
keluar dari bagian atas kaki dudukan lainnya. Masukkan
masing-masing tombol tersebut ke dalam lubang di printer.
Place the stand on the product slowly and carefully, so that
the colored buttons on the legs t into the corresponding
holes in the product. Notice that the product body is
upside down.
脚部の 色の付いた ボタンをプリンタの対応 する穴に合
わせて、スタンドをゆっくりと慎重にプリンタ上に置き
ます。 プリンタ本体は上下が逆さになっています。
小心翼翼地将底座放置在打印机上,支柱上带颜色的按
钮正好卡入打印机上对应的小孔中。注意:打印机主体
处于倒置状态。
小心緩慢的將機架放置在印表機上,讓腳架上有顏色的
凸鈕插入對應的印表機孔。
請注意,現在的印表機機體是上下顛倒的。
다리에 있는 컬러 버튼을 프린터의 해당 구멍에 맞추어
스탠드를 프린터 위에 조심스럽게 놓습니다.
프린터 본체가 뒤집어져 있다는 점에 주의하십시오.
Letakkan dudukan pada printer dengan perlahan dan hatihati, sehingga tombol berwarna pada kaki masuk ke dalam
lubang yang sesuai pada printer.
Perhatikan bahwa badan printer dalam posisi terbalik.
When the legs are correctly located on the product, attach
them to the product using two screws for eachleg. Check
that you have used a total of twenty screws, and that all
have been tightened. You should have two screws left over,
which are spare.
脚部 をプリンタの正しい 位置に 合わせたら、
2本のネジで各脚部をプリンタに固定します。 20本の
ネジ すべてを 使用し、すべ てのネジが 固く締めら れて
いることを確認します。予備のネジが2 本残ります。
将支柱正确放置在打印机上后,每个支柱使用两枚螺钉
连接到打印机。检查是否已用完了 20 枚螺钉,并且所
有螺钉都已拧紧。应该还会剩下两枚备用螺钉。
將腳架正確安放在印表機之後,各使用兩顆螺絲,將每
隻腳架鎖到印表機上。 檢查是否總共使用了二十顆螺
絲,以及是否全部都已鎖緊。您應該還剩兩顆備用螺絲。
다리가 프린터의 올바른 위치에 있으면 각 다리에 나사 두
개씩을 사용하여 프린터에 연결합니다. 나사 를 총 스무
개 사용했는지와 모든 나사가 조여졌는지 확인하십시오.
여분으로 제공된 나사
두 개가 남아 있어야 합니다.
Bila kaki dudukan sudah berada di posisi yang benar pada
printer, pasang kaki tersebut ke printer menggunakan
2 sekrup untuk setiap kaki. Pastikan Anda telah
menggunakan kedua puluh sekrup dan semuanya telah
dikencangkan. Anda harus memiliki 2 sekrup tersisa
sebagai cadangan.
Check that the wheels on the stand are locked.
At this point you will have two spare screws.
スタンドのキャスターがロックされていることを確認し
ま す。
この時点で、予 備のネジが2 本あります。
检查底座的滚轮是否锁紧。现在,您应该有两个备用
螺钉。
檢查機架的腳輪是否鎖定。此時,您手邊將有兩個備用
螺絲。
스탠드의 바퀴가 잠겨 있는지 확인합니다.
이 지점에서 여분의 나사 두 개가 있습니다.
Pastikan roda pada dudukan telah terkunci.
Pada tahap ini, Anda memiliki dua sekrup cadangan.
8
Page 9

25
26 27 28
90°
101.2kg
20x
Make sure there is nothing on top of the printer.
EN
Rotate the product 90 degrees.
IMPORTANT: make sure that the roll feeds are facing
downwards.
プリンタの 上に何 も載ってい ないことを 確認してくださ
JA
い。
製品を 90度回転させます。
重要 :ロール フィードが下向きになっていることを確認
しま す。
ZHCN
请确保打印机最上面没有任何东西。
将产品旋转 90 度。
重要信息:确保卷筒进纸装置朝下。
ZHTW
確保印表機上方空無一物。
將產品旋轉 90 度。
重要事項 :請確認送入捲筒紙的列印面朝下。
KO
프린터 위에 아무것도 없는지 확인하하십시오.
제품을 90도 회전시킵니다.
중요: 롤 공급 장치가 아래쪽을 향 하고 있어야 합니다.
ID
Pastikan bahwa tidak ada benda apa pun di atas printer.
Putar posisi produk 90 derajat.
PENTING: pastikan pengumpan gulungan telah menghadap
ke bawah.
Hold the product by the foam end pieces and by the center
rear, and rotate it until it stands on its feet, with all four
wheels in contact with the oor. The product weighs 101.2
kg (223 lb).
両端の梱包材と中央部の背面を持って製品を支え、4
つのキャスターすべてが床に接し、製品が足部で立つ
まで製品を回転させます。製品の重さは、101.2kg (223
ポンド ) です。
抓住产品包有泡沫填塞块的两端以及中间部分的后侧,
翻转产品直至产品站立,四个轮子均与地面相接触。 产
品重 101.2 千克(223 磅)。
在泡棉端蓋與後方中間位置處抓穩產品,接著翻轉印表
機,直到它的腳座站穩、四個腳輪全部觸及地面。產品
重 101.2 公斤(223 磅)。
폼 끝 조각 및 중앙 뒷면을 이용하여 제품을 받치면서
제품의 네 바퀴가 바닥에 모두 닿은 상태로 프린터가
발 위에서 제자리를 잡을 때까지 회전시킵니다. 제품의
무게는 101. 2kg입니다.
Pegang produk pada ujung gabus dan bagian belakang
tengah, lalu putar posisi produk hingga berdiri pada
kakinya dan keempat roda menyentuh lantai. Berat produk
mencapai 101,2 kg (223 lb).
Remove the foam end pieces.
両端の梱包材を取り除きます。
取下泡沫端填塞块。
拆下泡棉端蓋。
폼 끝 조각을 제거합니다 .
Lepaskan bagian ujung gabus.
Remove the transparent covering from the product.
プリン タか ら透 明 カバ ーを 取り除 きま す。
从打印机上取下透明护罩。
撕下印表機的透明護套。
프린터에서 투명 덮개를 제거합니다.
Lepaskan penutup transparan dari printer.
9
Page 10
29
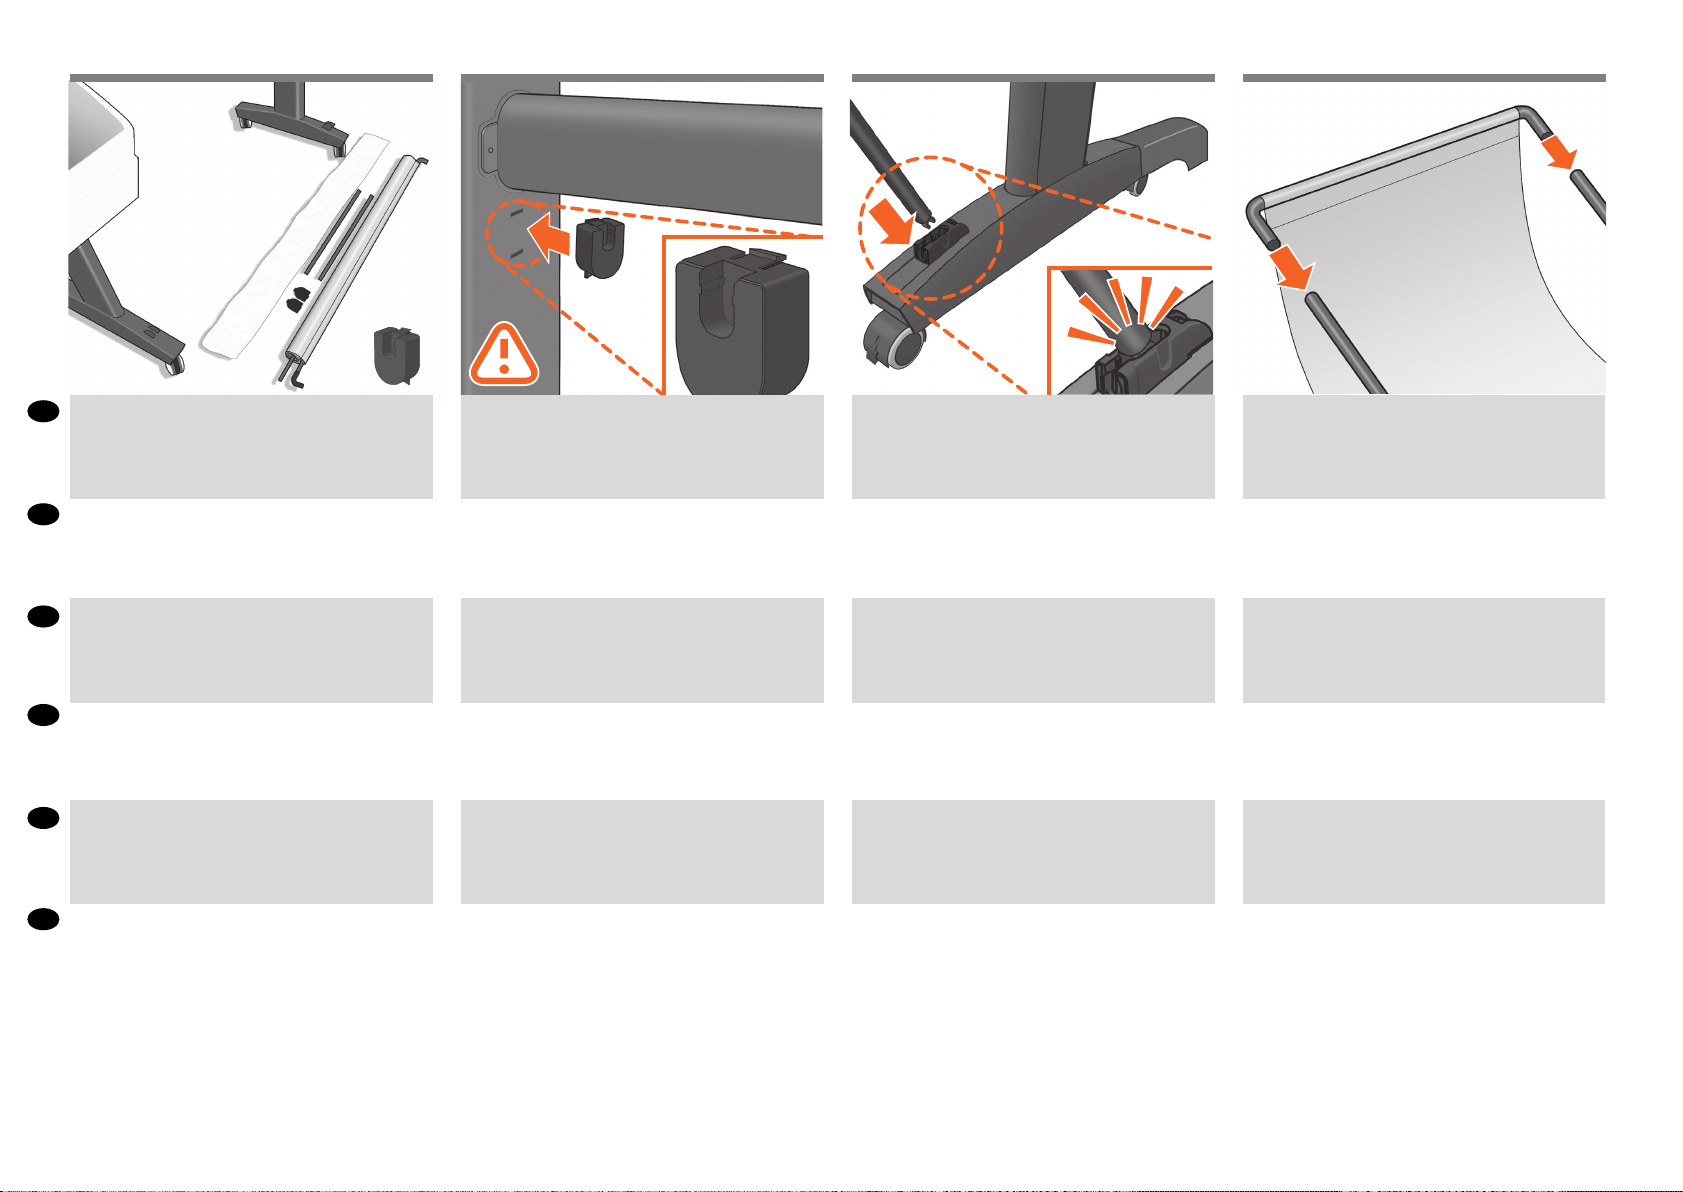
Lay out the components of the basket.
EN
2x
30 31 32
Fit the basket supports to the stand legs, oneto eachleg.
Fit the two short tubes to the product’s feet, one on the
front of each foot. Each tube should click into place.
Attach the basket’s front tube to the two short tubes on
each foot.
JA
バ スケ ットの 部 品を 並 べま す。
ZHCN
取出纸筐的组件。
ZHTW
將承紙籃的組件擺放整齊。
바스켓의 부품들을 바닥에 진열합니다.
KO
ID
Siapkan komponen keranjang.
スタンドの各脚部に、バスケットサポートを 1つずつ
取り 付け ま す。
将纸筐支架安装到底座支柱上,每个支柱安装一个支
架。
將承紙籃支托安插到機架的腳架,每隻腳架各有一個。
바스켓 지지대를 스탠드의 각 다리마다 하나 씩 맞춥니다.
Masukkan penyangga keranjang ke kaki dudukan, satu
untuk setiap kaki.
2 本の短いチューブをプリンタの各足部の前面に合 わせ
ます。各チューブを所定の位置にカチッと音がするまで
押し 込 みま す。
将两个短管安装到打印机底板上,每个底板前面安装一
个短管。两个短管都应该卡入到位。
將兩根短的管條安裝到印表機的腳座上,每根管條都應
該喀嚓一聲卡入定位。
작은 튜브 두 개를 프린터 앞쪽 발에 각각 하나씩
맞추십시오. 각 튜브가 딸깍 소리를 내야 합니다.
Pasang 2 batangan pendek ke bagian dasar kaki printer,
satu di setiap depan dasar kaki. Masing-masing batangan
harus terpasang dengan benar pada tempatnya.
バスケットの前面のチューブを各足部の2本の短い
チュー ブに 取り 付け ます。
将纸筐的前管连接到每个底板的两根短管上。
將承紙籃的前端管條連接到兩根個別裝在各腳座上的短
管條。
바스켓의 앞쪽 튜브를 각 발의 작은 튜브 두 개에
연결합니다.
Pasang batangan depan keranjang pada kedua batangan
pendek di setiap dasar kaki.
10
Page 11
33
34 35
3
EN
Unpack more components
JA
その他のコンポーネントを取り
出す
ZHCN
打开更多组件的包装
ZHTW
取出其他組件
KO
추가 구성 요소 포장 풀기
ID
Membuka kemasan komponen lain
EN
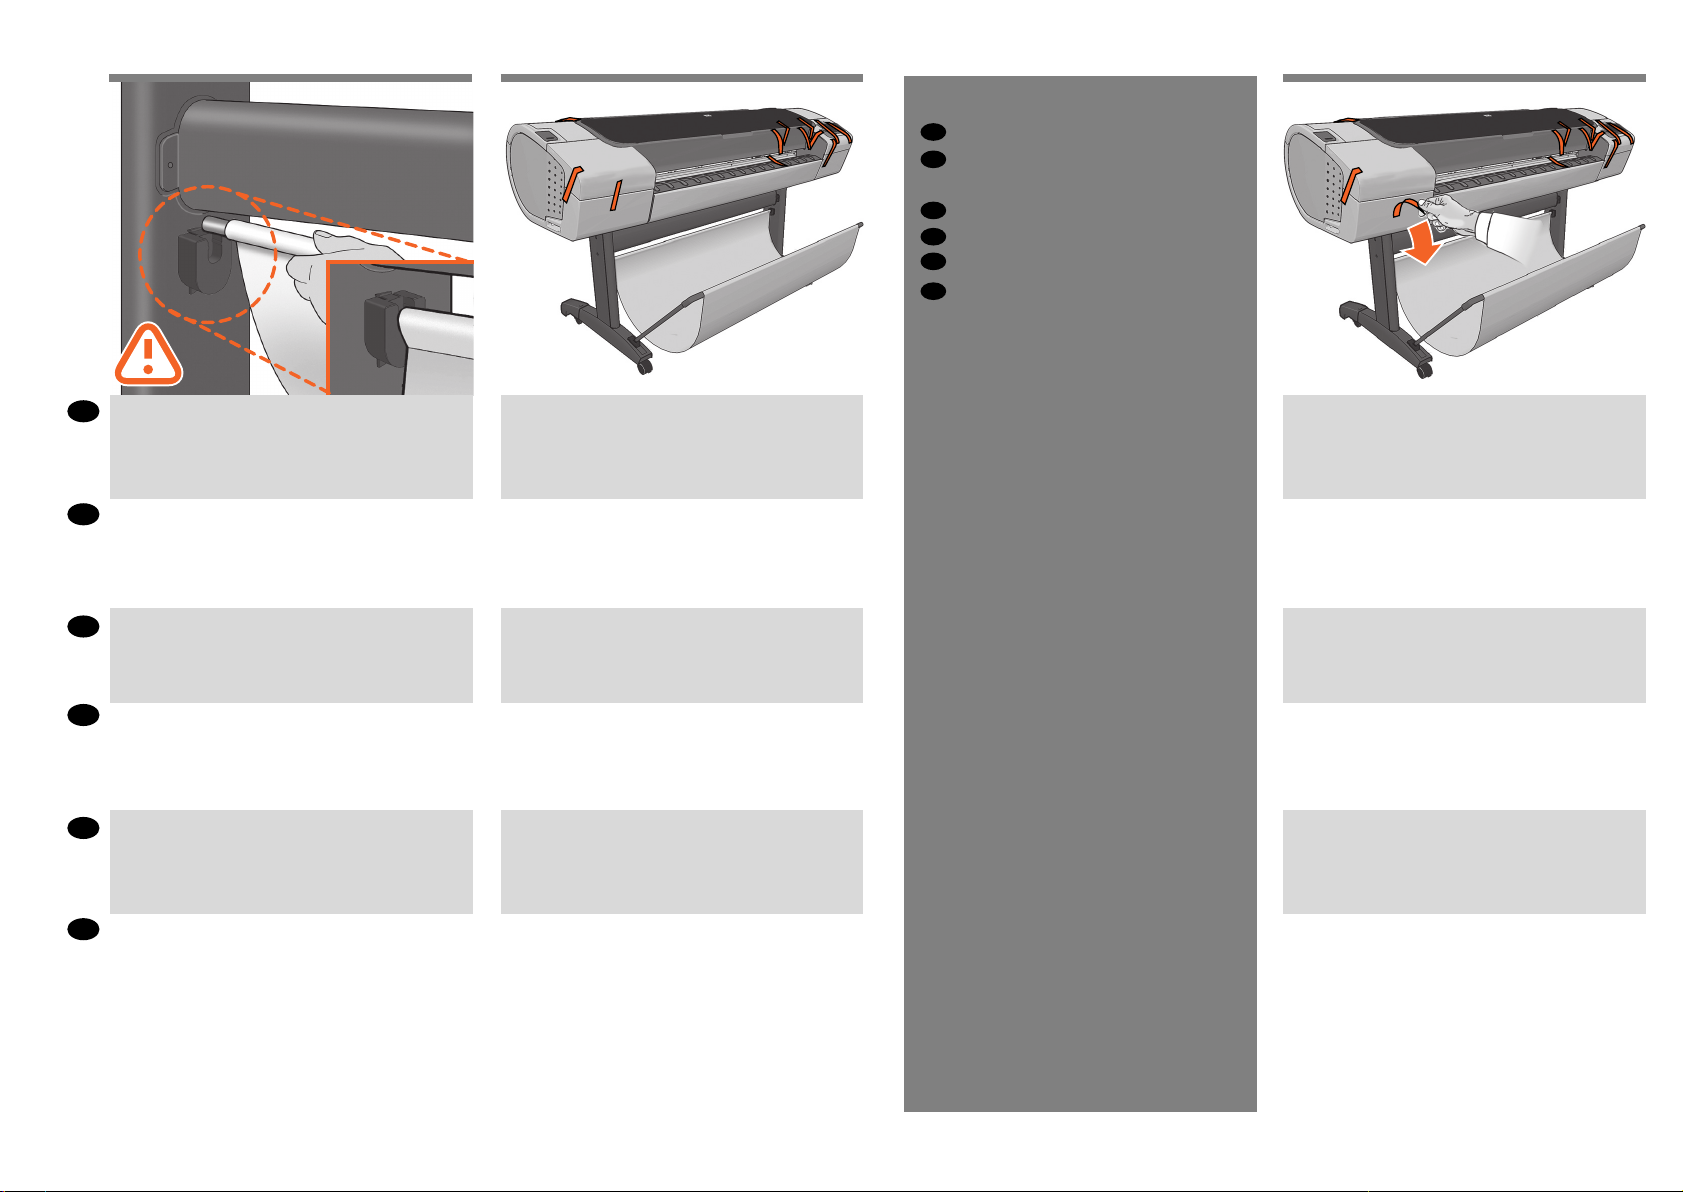
Rest the basket’s rear tube on the supports that you have
just tted to each leg of the stand.
スタンドの 各脚部に 取り付けた バスケットサポートに、
JA
バスケットの背面のチューブを乗せます。
ZHCN
将纸筐的后管放在已经安装到每个底座支柱的支架上。
ZHTW
將承紙籃的後端管條擱放在剛才安插到機架各隻腳架上
的支托。
KO
스탠드의 각 다리에 맞추었던 지지대에 바스켓의 뒤쪽
튜브를 맞춥니다.
ID
Letakkan batangan belakang keranjang pada penyangga
yang baru saja Anda pasang ke setiap kaki dudukan.
The basket is now complete.
これでバスケットの取り付けは完了です。
纸筐现已安装完毕。
承紙籃就完成了。
바스켓이 이제 완성되었습니다.
Pemasangan keranjang sekarang telah selesai.
Remove all the orange tape pieces from the product,
except for the ones coming from inside the product.
製品からオレンジ色のテープを剥がします (製品の内
側から出ているテープを除く)。
除产品内侧胶带之外,请撕去其他所有橙色胶带。
取下所有產品上的橙色膠帶,除了產品內側的以外。
두 번째 롤을 장착 하지 않 아도 제품을 사용할 수
있습니다. 두 번째 롤을 다음에 장 착하려면 81단계로
바로 이동하십시오.
Lepaskan semua pita perekat oranye pada produk, kecuali
pita yang terdapat di bagian dalam produk.
11
Page 12

EN
Open the Window.
37 38 3936
You will see a cardboard support attached to the product
with tape. Remove the tape.
90º90º
Turn the cardboard support 90° to the right.
Carefully lift the cardboard support up and out of the prod-
uct. Itwill not be needed again; you can discard it.
ウィンド ウを 開 けま す。
JA
打开护盖。
ZHCN
ZHTW
打開上蓋。
KO
창을 엽니다.
Buka Jendela.
ID
サポート用の厚紙が、テープで製品に固定されていま
す。テ ープ を取り 外し ます。
您将看到用胶带粘到产品上的纸板支架。 撕下胶带。
您將會看到用膠帶固定在產品上的紙板支撐物。拔掉膠
帶。
제품에 테이프로 연결된 카드보 드 지지대가 있습니다.
테이프를 제거하십시오.
Anda akan melihat karton penahan yang terpasang pada
produk menggunakan pita perekat. Lepaskan pita perekat.
厚紙 のサポートを右に90 度回します。
将纸板架向右旋转 90 度。
將紙板支撐物向右旋轉 90 度。
카드보드 지지대를 오른쪽으로 90° 돌립니다.
Putar karton penahan hingga 90° ke kanan.
サポート用の厚紙を慎 重に持ち上げ、プリンタから取
り外します。この厚紙は今後使うことはないため、捨
ててかまい ません。
小心提起纸板支架,将其从打印机中取出。以后不会再
用到它,您可以将其丢弃。
小心地拿起紙板支撐物,將它從印表機中取出。之後不
會再用到,您可以將它捨棄。
카드보드 지지대를 조심스럽게 위로 들어 올려
프린터에서 제거합니다. 카드보드 지지대는 더 이상
필요하지 않으므로 폐기해도 됩니다.
Angkat karton penahan ke atas dengan hati-hati, kemudian keluarkan dari printer. Karton penahan tersebut tidak
lagi diperlukan, Anda dapat membuangnya.
12
Page 13

40
EN
Inside the right-hand side of the product, you will see a
piece of cardboard.
41 42
4
EN
Power and network conguration
JA
電 源お よび ネットワ ークを 設 定する
ZHCN
电源和网络配置
ZHTW
配置電源和網路組態
KO
전원 및 네트워크 구성
ID
Kongurasi daya dan jaringan
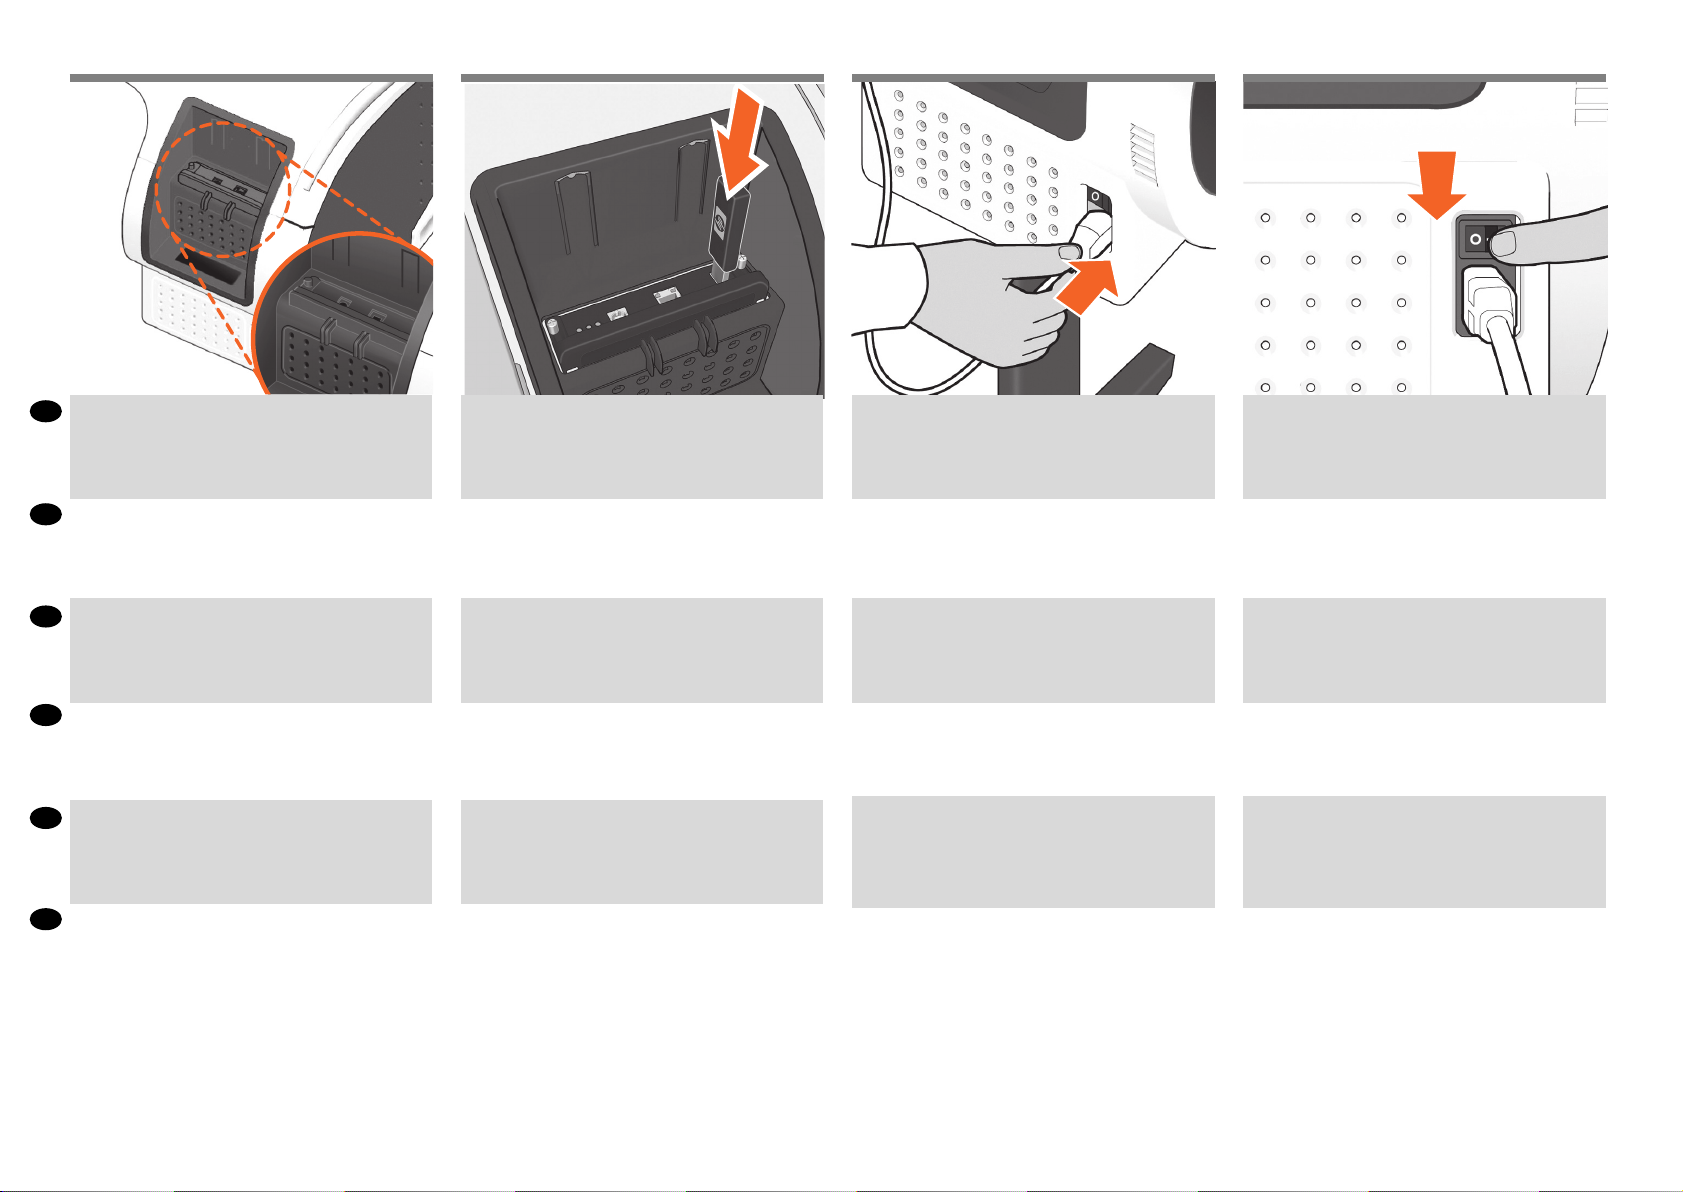
Remove the cardboard carefully.
Note: It can be discarded as it will not be required again.
Unlock the brake lever on each of the four wheels bylifting
the lever.
プリンタの内部右側には、厚紙が 1枚入っています。
JA
ZHCN
在打印机内部右侧,您会看到一块纸板。
ZHTW
在印表機右邊內側,您會看到一張紙板。
프린터 내부 오른쪽에 카드보드 조각이 있습니다.
KO
ID
Di sisi kanan dalam printer, Anda akan melihat karton.
厚 紙を 慎 重に 取り 外してくだ さい 。
注意 :再使用することはないので、廃棄しても構いませ
ん。
小心卸下纸板。
注意:可以将纸板丢弃,因为以后不再需要这些纸板。
小心地移除紙板。
注意 :可以丟掉,以後用不到了。
이 카드보드 조각을 조심스럽게 제거합니다.
참고:
다시 필요하지 않으므로 버려도 됩니다.
Keluarkan karton dengan hati-hati.
Catatan: Pita ini bisa dibuang karena tidak akan diperlukan
lagi.
4 つのキャスターのレバー を上げて、 ブレーキ レバーの
ロッ クを 解 除しま す。
提起四个滚轮的每个制动手柄以将其松开。
將四個腳輪的制動柄逐一上扳以鬆開每個腳輪。
레버를 들어서 네 개의 바퀴에서 고리 레버를 풉니다.
Buka pengunci tuas rem pada setiap roda dengan
mengangkat tuasnya.
13
Page 14
44 45 4643
EN
Connect the network cable and secure it with the clip
provided, to prevent accidental unplugging.
JA
ネットワークケーブルを接続し、付属のクリップで固
定して、プラグが抜ける事故を防止します。
接上网线,用提供的夹子固定住网线,以防意外拔
ZHCN
出。
ZHTW
連接網路線並以內附的勾夾固定,避免意外脫落。
KO
네트워크 케이블을 연결하고, 케이블이 빠지지 않도록
제공된 클립으로 고정합니다.
ID
Sambungkan kabel jaringan dan amankan dengan klip yang
disediakan, untuk mencegah lepas yang tidak sengaja.
If you nd a USB ash drive in a plastic bag inside the box, it
contains the latest Firmware. Please follow the instructions
in the bag. Otherwise, please ignore this step. * The USB
drive is only needed in some products.
最新のファームウェアが含まれているUSBフラッシュ ド
ライバは、箱の中のビニール袋に入っています。袋に表
示されている指示に従ってください。それ以外の場合
は、この手順を無視してください。 * USBドライブは、
いくつか のプリン タでの み必 要で す。
如果纸箱里的塑料袋中装有一个 U 盘(包含最新的固
件),请按照塑料袋中的说明进行操作。否则,请忽略
此步骤。 * 仅有某些打印机型号需要 U 盘。
如果您在包裝箱中找到以塑膠袋包裝的 USB 快閃磁碟
機,則其中會包含最新版的韌體。請依照塑膠袋中的指
示進行 ;否則,請忽略此步驟。 * 只有部分印表機需要
USB 磁碟機。
상자 내부 비닐 포장 안에 든 USB 플래시 드라이브에 최신
펌웨어가 저장되어 있습니다. 비닐 포장 안에 든 지침을
따르십시오. 그렇지 않으면 이 단계를 무시하십시오.
USB 드라이브는 일부 프린터에만 필요합니다.
Jika Anda menemukan drive USB ash dalam kantong
plastik di kotak kemasan, maka drive tersebut berisi
Firmware terbaru. Ikuti petunjuk dalam kantong tersebut.
Jika tidak, abaikan tahap ini. * Drive USB hanya diperlukan
pada printer tertentu.
*
Connect the power cable to the product’s powersocket.
電源 ケーブルをプリンタの電 源ソケットに差し込み
ま す。
将电源线连接到打印机的电源插座中。
將電源線連接到印表機的電源插座。
전원 케이블을 프린터의 전원 소켓에 연결합니다.
Hubungkan kabel daya ke soket daya printer.
Switch on power to the product using the switch just
above the power socket. Remove the plastic lm covering
the window and the plastic lm covering the front panel
(LCDdisplay).
電源ソケットのすぐ上にあるスイッチでプリンタの電
源 を入 れま す。
ウィンドウを覆っているビニールと、フロントパネル ( 液
晶ディスプレイ ) を覆っているビニールを取り除きます。
使用电源插座正上方的开关打开打印机的电源。
取下打印机护盖和前面板(LCD 显示屏)上的塑料薄
膜。
使用電源插座正上方的開關,打開印表機電源。
移除覆蓋印表機窗蓋的塑膠膜,以及覆蓋前方面板的塑
膠膜(LCD 顯示器)。
전원 소켓 위쪽의 스위치를 사용하여 프린터 전원을
켭니다.
창을 덮고 있는 플라스틱 필름 및 전면
패널(LCD 디스플레이)을 덮고 있는 플라스틱 필름을
제거합니다.
Hidupkan daya printer menggunakan tombol yang berada
tepat di bagian atas soket daya.
Lepaskan lembar plastik yang menutupi jendela dan lembar
plastik yang menutupi panel depan (layar LCD).
14
Page 15
47
5
EN
Printhead and cartridge setup
JA
プリント ヘッド およ びカ ートリッ
ジ をセ ットアップ する
ZHCN
打印头和墨盒设置
ZHTW
印字頭和墨水匣設定
KO
프린트 헤드 및 카트리지 설치
ID
Kongurasi printhead dan kartrid
48 49
EN
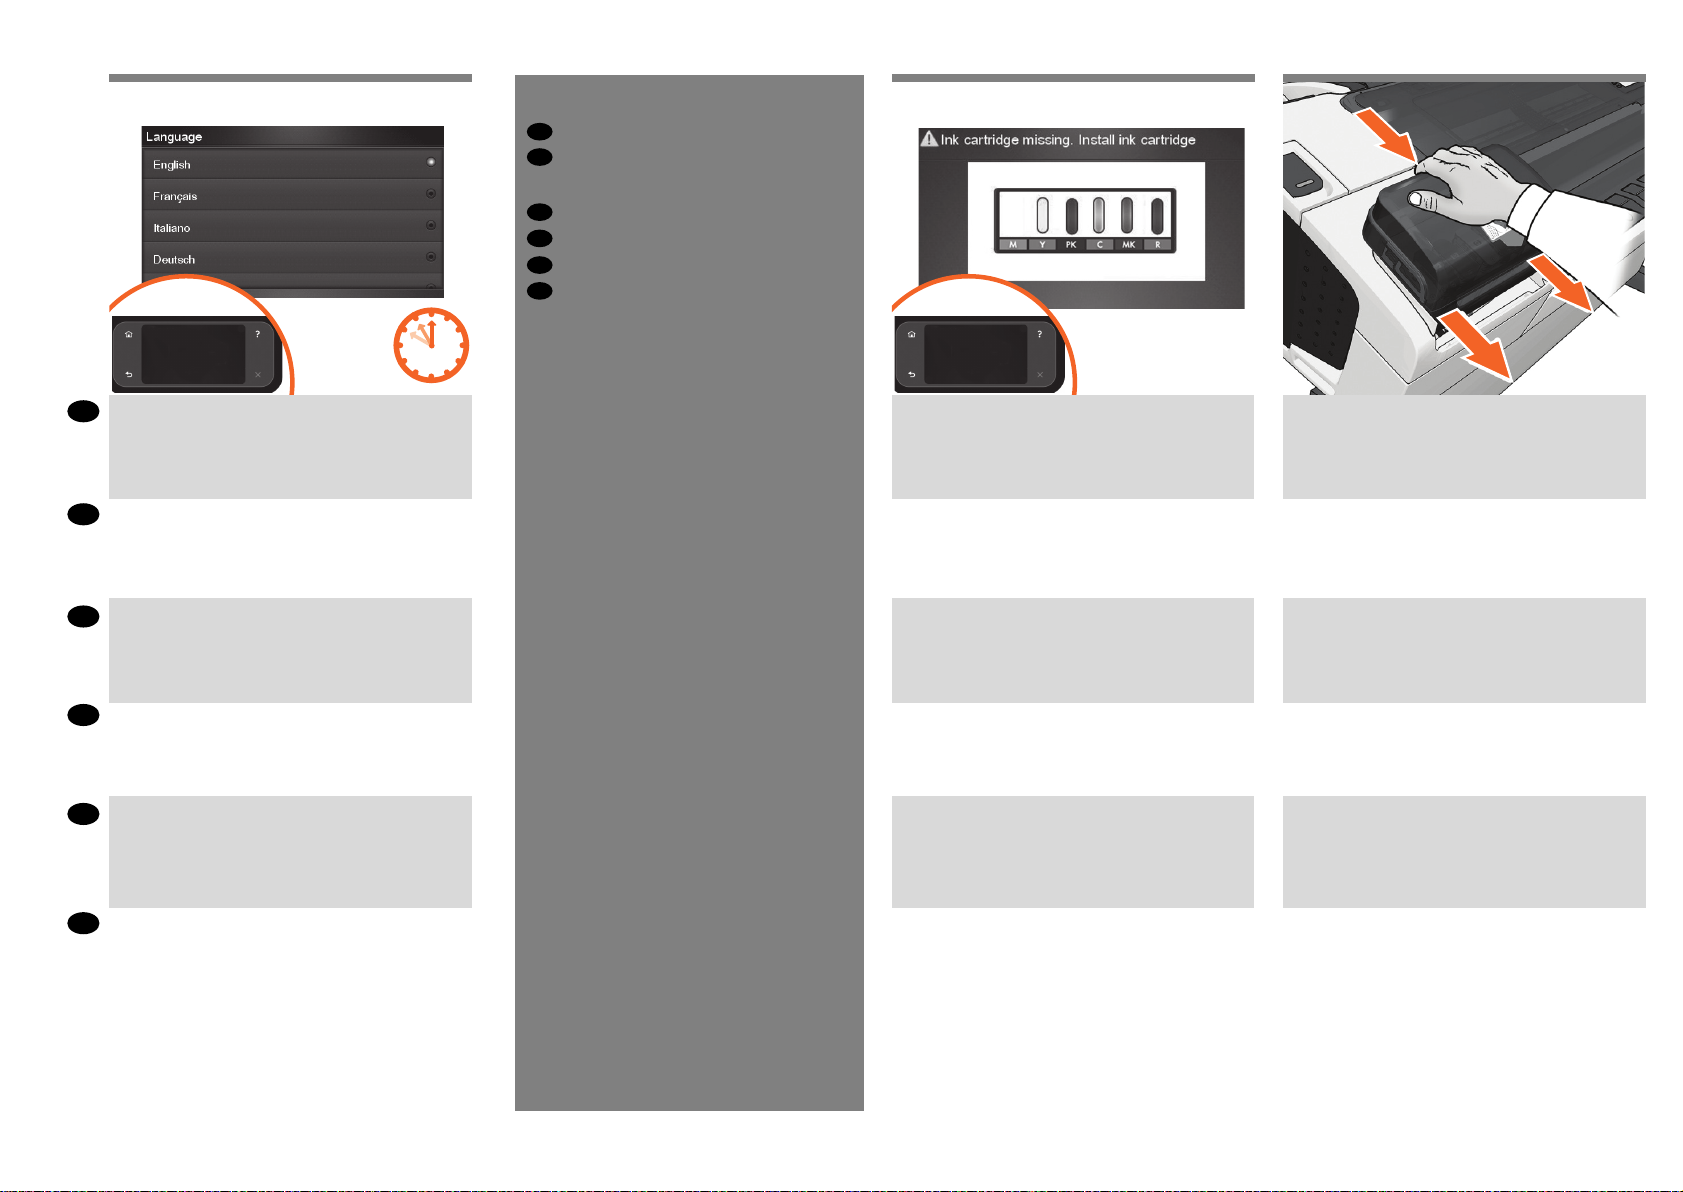
On the front panel, the HP logo appears. Please wait a
while. You will then be prompted to select thelanguage of
the product.
If USB ash drive is found follow the front panel
instructions.
フロントパネルに HP ロゴが表 示されま すので表示さ れ
JA
るまでしばらくお 待ちください 。その後、プリンタの言
語 を 選 択 す る よ う 求 め ら れ ま す。
USBフラッシュドライブが検出された場合、フロントパ
ネルの指示に従ってください。
ZHCN
HP 徽标出现在前面板上。请稍等片刻。 随后系统会提
示您选择打印机的语言。
如果发现 USB 闪存驱动器,请按照前面板的说明操
作。
ZHTW
前方面板上,將會出現 HP 標誌。請稍候一下。
接著會提示您選取印表機的語言。
如果有 USB 快閃碟,請遵循前控制面板上顯示的指示。
KO
전면 패널에 HP 로고가 나타납니다. 잠시 기다립니다. 곧
프린터 언어를 선택하라는 메시지가 나타납니다.
USB 플래시 드라이브 가 표시되면, 전면 패널의 지침을
따르십시오 .
ID
Logo HP akan muncul pada panel depan. Tunggu sebentar.
Selanjutnya Anda akan diminta untuk memilih bahasa
printer.
Jika stik memori (ash drive) USB ditemukan, ikuti
petunjuk panel depan.
The product checks for the presence of ink cartridges. On
nding none, it prompts you to install the ink cartridges.
プリンタは、インクカートリッジが取り付けられ ている
かどうかを確認します。取り付けられてい ないことを
検出すると、インクカートリッジを取 り付けるように指
示し ます。
打印机检查是否有墨盒。如果没有找到,打印机将提示
您安装墨盒。
印表機會接著檢查有沒有墨水匣。找不到時,
就會提示您安裝墨水匣。
잉크 카트리지가 있는지 프린터가 검사합니다. 잉크
카트리지가 없는 경우에는 잉크 카트리지를 설치하라는
메시지가 표시됩니다.
Printer akan memeriksa keberadaan kartrid tinta. Jika tidak
ditemukan, printer akan meminta Anda untuk memasang
kartrid tinta.
Press the ink cover rmly into place until you hear
that it clicks.
インク カバーをカチッと音がするまで押して、所定
の位置に固定します。
按压墨盒盖使其固定到位,直至听到咔嗒声。
將墨水護蓋平穩地壓入定位,直到您聽到護蓋發出
卡嗒聲。
딸깍 소리가 날 때까지 힘을 주어 잉크 덮개를 누릅니다.
Tekan penutup tinta dengan kuat ke tempatnya hingga
terdengar bunyi klik.
15
Page 16

50
51 52 53
Check that the ink cover is properly placed.
EN
JA
インク バーが正しく固定されていることを確認し
ます。
ZHCN
检查墨盒盖是否恰当到位。
ZHTW
檢查墨水護蓋是否在正確的位置。
KO
잉크 덮개가 제대로 고정되었는지 확인합니다.
ID
Pastikan penutup tinta terpasang dengan benar.
Open the cover on the left-hand side of the product.
プリンタの左側にあるカバーを開きます。
打开打印机左侧的护盖。
打開印表機左邊的蓋子。
프린터 왼쪽 덮개를 엽니다.
Buka penutup yang berada di sisi kiri printer.
Insert the ink cartridges one by one. Each cartridge is
marked with its own color, and should be inserted only into
the slot of the same color. Avoid touching pins, leads or
circuits.
インクカートリッジを 1つずつ 取り付け ます。各カート
リッジ にはそ のカ ートリッジの 色が 表 示さ れてい るの
で、同じ色のスロットに挿入する必要があります。ピン、
導線、または回路には触らないでください。
逐个插入墨盒。每个墨盒都标记了颜色,只能插入标有
同样颜色的插槽中。避免接触插针、引线或电路。
逐一插入墨水匣。每個墨水匣都標示有自己的顏色,
只能插入相同顏色的插槽中。請避免碰到針
腳、導線或電路。
잉크 카트리지를 하나씩 삽입합니다 .
각 카트리지에는 색이 표시되어 있으므로 같은 색으로 된
슬롯에 카트리지를 삽입해야 합니다 .
핀 , 리드 또는 회로를 만지지 마십시오 .
Masukkan kartrid tinta satu per satu. Setiap kartrid ditandai
dengan warnanya masing-masing dan harus dimasukkan
hanya ke slot dengan warna sama. Jangan sentuh pin,
kabel, atau sirkuit.
The cartridges must be inserted the right way around:
the ink outlet in the catridge should meet the ink inlet
in the slot. Push the cartridge into the slot until it clicks
into place. The product beeps whenever a cartridge is
successfully inserted.
カートリッジの インク出口 をスロットのインク 注入口に
合 わせ 、 カートリ ッジ を必 ず適 切な 方 向に 挿入してく だ
さい。カートリッジを所定の位置にカチッと音がするま
で 押 し 込 み ま す 。カ ート リ ッジ が 正 し く 挿 入 さ れ る と 、
プリン タの ブザ ー音 が 鳴りま す。
墨盒必须按正确方式插入:即墨盒的出墨口应该紧贴插
槽的进墨口。将墨盒推入插槽,直到它卡入到位。只要
成功插入墨盒,打印机就会发出哔声。
墨水匣必須以正確方式插入 :墨水匣中的出墨口應該對
準插槽中的墨水入口。將墨水匣壓入插槽,直到喀嚓一聲
卡入定位。每當成功插入墨水匣,印表機就會發出嗶聲。
카트리지를 바르 게 삽입해야 합니다 . 즉 , 카트리지의 잉크
출구를 슬롯의 잉크 흡입구에 맞추어야 합니다. 딸각 소리를
내며 제자리에 들어갈 때까지 카트리지를 밀어 넣습니다 .
카트리지가 제대로 장착되면 프린터에서 삐 소리가 납니다 .
Kartrid harus dimasukkan dengan benar, yakni: lubang
keluar tinta pada kartrid harus bertemu dengan lubang
masuk tinta pada slot. Tekan kartrid ke dalam slot hingga
terpasang dengan benar. Printer akan berbunyi ‘bip’ setiap
kali kartrid berhasil dimasukkan.
16
Page 17

54
When you have inserted all of the ink cartridges correctly, the
EN
product must prepare the ink system for its rst use. It will do
this immediately if you press the OK key, or after a 60-second
pause if you do not press the OK key. When the ink system is
ready, the front panel will prompt you to open the window.
すべてのインクカートリッジを正しく取り付け たらプ
JA
リンタで最初にインク システムを使用するための準
備をする必要があります。[OK] ボタン を押 すと、直 ち
に 実行 され ま す。[OK ] ボタンを押さない 場合は 、60 秒
後に 実行さ れま す。イン ク システムの 準備 が整うと、
ウィンドウ を開くように フロントパ ネル にメッセ ージが
表 示さ れ ます。
55 56 57
Open the window and grasp the blue handle of the printhead cover.
ウィンドウを開き、プリントヘッド カバーの
青 いハ ンドル を つか み ます。
Pull the blue handle towards you as far as it willgo.
青いハンドルを、いっぱいまで手前に引き出します。
Lift the handle up to open the printhead cover.
The front panel prompts you for the next step:
removing the printheads. Do not press OK until
you have removed all the orange setup printheads.
ハンドルを持ち上げて、プリントヘッド カバーを 開き
ます。フロントパネルに、プリントヘッドを 取り外すよ
うメッセージが表示されます。オレンジ色の付属のプ
リントヘッドをすべて 取り外すまで、[OK] を押さない
でください 。
ZHCN
正确插入所有墨盒后,打印机必须为首次使用准备墨水
系统。如果您按下 OK 键,打印机将立即执行此操作,
否则将在暂停 60 秒后执行此操作。墨水系统准备就绪
后,前面板将提示您打开护盖。
當您正確地插入所有墨水匣後,印表機將會準備
ZHTW
墨水系統以進行第一次的使用。如果您按下 OK
按鍵,或者不按此鍵並稍候 60 秒鐘,印表機隨
即會執行這個準備工作。墨水系統準備就緒時,
前方面板將提示您打開上蓋。
모든 잉크 카트리지를 올바로 설치했을 경우 프린터에서는
KO
첫 인쇄를 위한 잉크 시스템이 준비되어야 합니다. 이
준비 작업은 사용자가 OK(확인) 키를 누르면 진행됩니다.
OK(확인) 키를 누르지 않더라도 사용자가 아무 동작 없이
60 초가 지나면 준비 작업이 진행됩니다. 잉크 시스템이
준비되면 창을 열라는 메시지가 전면 패널에 표시됩니다.
Bila Anda telah memasukkan semua kartrid tinta dengan benar,
ID
printer harus mempersiapkan sistem tinta untuk penggunaan
pertamanya. Printer akan segera melakukannya jika Anda menekan tombol OK atau setelah jeda selama 60 detik jika Anda
tidak menekan tombol OK. Bila sistem tinta siap, panel depan
akan meminta Anda untuk membuka jendela.
打开护盖并握住打印头遮盖的蓝色手柄。
打開上蓋並抓緊印字頭護蓋的藍色把手。
창을 열고 프린트 헤드 덮개의 파란색 손잡이를 잡습니다.
Buka jendela, kemudian pegang tuas biru pada penutup
printhead.
17
将蓝色手柄朝您的方向拉动,直到拉不动为止。
將藍色把手朝著自己拉到底。
파란 손잡이를 최대한 앞으로 당깁니다.
Tarik tuas biru ke arah Anda sejauh mungkin.
向上提起手柄以打开打印头遮盖。前面板会提示执行
以下步骤:卸下打印头。在卸下所有橙色安装打印头
之前,请勿按“确定”。
提起把手以開啟印字頭護蓋。前面板會提示您
下一個步驟:移除印字頭。在您移除所有橘色
的設定印字頭之前,請勿按下 OK。
핸들을 들어 올려 프린트 헤드 덮개를 엽니다. 프린트
헤드를 제거하라는 다음 단계 메시지가 전면 패널에
나타납니다. 주황색 설정 프린터 헤드를 모두 제거한 후
OK 키를 누르십시오.
Angkat gagang ke atas untuk membuka penutup
printhead. Panel depan akan meminta Anda melanjutkan
ke langkah berikutnya, yakni melepas printhead. Jangan
tekan OK sebelum semua printhead kongurasi oranye
dilepas.
Page 18

58
59 60 61
EN
The setup printheads exist only to prevent the escape of
ink during ink cartridge installation. The front panel now
prompts you to remove the setup printheads and press
the OK key when you have nished.
付 属の プリント ヘッド は、 イン クカ ートリッ ジを 取り付
JA
け る と き の イ ン ク 漏 れ を 防 ぐ た め の も の で す 。付 属 の プ
リントヘッドを 取り外すようにフ ロントパ ネルにメッ
セージが 表示されます。終了したら [OK ] ボタンを 押し
ま す。
ZHCN
设置打印头只是为了防止在墨盒安装过程中墨水溢
出。前面板现在提示您卸下设置打印头,您完成后按
OK 键。
設定印字頭的用途,僅在於防止安裝墨水匣時墨水漏
ZHTW
出。前方面板現在會提示您取出設定印字頭,並在取出
後按「OK」按鍵。
셋업 프린트 헤드는 잉크 카트리지 설치 중에 잉크가
KO
새어 나오는 것을 방지하기 위한 목적이 전부입니다. 이제
셋업 프린트 헤드를 제거하고 OK(확인) 키를 누르라는
메시지가 전면 패널에 표시됩니다.
Printhead kongurasi hanya tersedia untuk mencegah
ID
keluarnya tinta saat pemasangan kartrid tinta
berlangsung. Sekarang panel depan akan meminta Anda
untuk mengeluarkan printhead kongurasi, kemudian
tekan tombol OK bila Anda telah selesai.
Remove and discard all orange setup printheads. Youmay
need to use force to extract each printhead.
The setup printheads contain ink, which could leak out.
Avoid touching pins, leads or circuits.
オレンジ色の付属のプリントヘッドをすべて取り外して
廃棄します。プリントヘッドを取り外すには、適度な力
が 必 要な 場 合が ありま す。
付 属 の プ リ ン ト ヘ ッ ド に は イ ン ク が 入 っ て い る た め 、漏
れる場合があります。ピン、導線、または回路には触ら
ないで ください 。
取下并丢弃所有的橙色设置打印头。拔下每个打印头时
可能要用力。
设置打印头中有墨水,有可能泄漏。
避免接触插针、引线或电路。
拆下並捨棄所有橙色的設定印字頭。您可能需要用點
力氣將每個印字頭抽出。
設定印字頭含有墨水,會漏出來。請避免碰到針腳、
導線或電路。
모든 오렌지색 셋업 프린트 헤드를 꺼내어 폐기합니다. 각
프린트 헤드를 빼낼 때 힘을 주어야 할 수도 있습니다.
셋업 프린트 헤드에는 잉크가 들어 있고 이 잉크가 누 출될
수도 있습니다. 핀, 리드 또는 회로를 만지지 마십시오.
Keluarkan dan buang semua printhead kongurasi
berwarna oranye. Anda mungkin harus menggunakan
tenaga untuk mengambil setiap printhead tersebut.
Printhead kongurasi berisi tinta yang dapat bocor. Jangan
sentuh pin, kabel, atau sirkuit.
Press the OK key on the front panel when you have
removed all of the setup printheads. The front panel then
prompts you to install the new printheads.
付属のプリントヘッド を取り外したら、フロントパネル
の [OK ] ボタンを押します。新しいプリントヘッドを取り
付けるように、フロントパネルにメッセージが表示さ
れ ます。
卸下所有设置打印头后,按前面板上的 OK 键。前面板
将提示您安装新打印头。
將設定印字頭全部拆除後,按下前方面板上的 「OK」
按鍵。前方面板會接著提示安裝新的印
字頭。
셋업 프린트 헤드를 모두 제거했으면 전면 패널에 있는
OK( 확인 ) 키를 누릅니다 . 그러면 새 프린트 헤드를
설치하라는 메시지가 전면 패널에 표시됩니다 .
Tekan tombol OK pada panel depan bila Anda telah
melepas semua printhead kongurasi. Setelah itu panel
depan akan meminta Anda untuk memasang printhead
baru.
Unwrap each printhead and remove all orange parts.
プリントヘッドの包装を開き、オレンジ色の
部分をすべて取り外します。
拆开每个打印头的包装并卸下所有橙色部件。
打開每個印字頭包裝,並將橙色部件全部拆掉。
각 프린트 헤드를 벗기고 오렌지색 부분 을 모두
제거합니다.
Buka kemasan setiap printhead, kemudian lepaskan semua
komponen berwarna oranye.
18
Page 19

62
63 64 65
Insert the printheads one by one. Each printhead ismarked
EN
with its own colors, and should be inserted only into the
correct slot marked with the same colors.Insert the printheads with the blue handle towards you.
プリントヘッドを1 つずつ挿入します。各プリントヘッ
JA
ドにはそのプリントヘッドの色が表示されているの
で、同じ色のスロットに挿入する必要があります。プ
リントヘッドの青いハンドルを手前に引いて、プリン
トヘッドを挿入します。
ZHCN
逐个插入打印头。每个打印头都标有颜色,只能插入标
有同样颜色的正确插槽中。插入打印头时,使蓝色手
柄朝向您。
ZHTW
逐個插入印字頭。每個印字頭都標示有自己的顏色,只
能插入標示相同顏色的正確插槽中。讓藍色把手朝著自
己,再將印字頭插入。
KO
프린트 헤드를 하나씩 삽입합니다. 각 프린트 헤드에는
색이 표시되어 있으므로 같은 색으로
된 슬롯에 삽입해야 합니다. 파란 손잡이가 앞으로
향하도록 하여 프린트 헤드를 삽입하십시오.
ID
Masukkan printhead satu per satu. Setiap printhead
ditandai dengan warna tertentu dan harus dimasukkan ke
slot dengan warna yang sama. Masukkan printhead dengan
tuas biru mengarah kepada Anda.
Push each printhead into the slot until it clicks into place.
The front panel tells you whether the printhead has been
inserted correctly.
プリントヘッドを所定の 位置にカチッと音がするまで 押
し込みます。プリントヘッドが正しく挿入されたかどう
かがフロントパネルに表示されます。
将每个打印头推入插槽,直到它卡入到位。前面板将显
示打印头是否正确插入。
將每個印字頭壓入插槽,直到喀嚓一聲卡入定位。前方
面板會告訴您是否正確插入印字頭。
딸각 소리를 내며 제자리에 들어갈 때까지 프린트 헤드를
밀어 넣습니다. 프린트 헤드가 올바르게 장 착되었는지
여부가 전면 패널에 표시됩니다.
Tekan setiap printhead ke dalam slot hingga terpasang
dengan benar. Panel depan akan memberitahukan Anda
jika printhead telah dipasang dengan benar.
Pull the blue handle towards you as far as it will go, picking
up the latch in the process.
青いハンドルをラッチに 掛け、いっぱいまで手前に引
き 出しま す。
将蓝色手柄朝您的方向拉动,直到拉不动为止,在此过
程中拾起闩锁。
將藍色把手朝著自己拉到底,順勢扳開閂鎖。
파란 손잡이를 최대한 앞으로 당겨서 걸쇠가 드러나게
합니다.
Tarik tuas biru ke arah Anda sejauh mungkin sambil
mengencangkan pengait.
Push the handle down on top of the printhead cover.
The product checks and prepares the new printheads,
which may take 30 to 40 minutes depending on the condition of the printheads and of the environment.
Close the cover.
プリントヘッド カバーの上にハンドルを押し下げます。
プリン タが 新しいプリントヘッド を確 認して準 備し
ます。プリントヘッドの状 態および 環境によって、30
分~ 40 分かかる場合があります。
カバーを閉じます。 。
向下推动打印头遮盖上的手柄。
打印机检查并准备新的打印头,此期间将持续 30 到 40
分钟,这取决于打印头和环境的状况。
关闭盖子。
將把手往下推到印字頭護蓋。
印表機會檢查並準備新的印字頭,需時約 30 至 40 分
鐘,依印字頭及環境的狀況而定。
關閉蓋子。
손잡이를 프린트 헤드 덮개 위로 누릅니다.
프린터는 새 프린트 헤드를 검사하고 준비합니다.
이 과정은 프린트 헤드의 조건이나 환경에 따라
30- 40 분이 걸릴 수 있습니다.
닫기 표지.
Tekan ke bawah tuas yang berada di bagian atas penutup
printhead. Printer akan memeriksa dan mempersiapkan
printerhead baru, mungkin berlangsung selama 30 hingga
40 menit, tergantung pada kondisi printhead tersebut dan
lingkungan.
Tutup penutup.
19
Page 20

66
HP DesignJet Z2600
PostScript® Printer
Start Up
© Copyright 2016 HP Development Company, L.P.
67 68
EN
While the product is preparing the printheads, you could spend the time installing the product software on your computer. Be
sure to follow the software installation instructions. Connecting your product before installing the software can lead to product
errors.
On the DVD you will nd: Software installation (drivers) / HP DesignJet Click / Documentation / Support.
製品が プリントヘッドの準 備をしている間に、コンピュータに 製品ソフトウェアをインストールできます。必ずソフトウェ
JA
アのインストール手順に従ってください 。ソフトウェアをインストールする前に製品を 接続すると、製品エラーが発生す
る可 能性 が ありま す。
DVD の収録内容は次のとおりです。ソフトウェアのインストール
在产品准备打印头期间,您可以在计算机上安装产品软件。请确保按照软件安装说明进行操作。如果在安装软件之前连
ZHCN
接产品,产品可能会出现错误。
在 DVD 上,您将找到 / HP DesignJet Click / 文档 / 支持。
當產品準備印字頭時,您可以趁這個時候在電腦上安裝產品軟體。確定有依照軟體安裝指示進行安裝。在安裝軟體之前
連接產品會發生產品錯誤。
您可以在 DVD 中找到 :軟體安裝 / HP DesignJet Click / 說明文件 / 支援。
ZHTW
제품에서 프린트헤드를 준비하는 동안 컴퓨터에 제품 소프트웨어를 설치하는 것이 좋습니다. 소프트웨어 설치 지침을 반드시
KO
따르십시오. 소프트웨어를 설치하기 전에 제품을 연결하면 제품 오류가 발생할 수 있습니다.
DVD에는 다음과 같은 내용물이 들어 있습니다. 소프트웨어 설치
ID
Saat produk mempersiapkan printhead, Anda dapat menginstal perangkat lunak produk di komputer. Pastikan untuk mengikuti
petunjuk penginstalan perangkat lunak. Menyambung produk sebelum menginstal perangkat lunak dapat mengakibatkan kesalahan
pada produk.
Pada DVD, Anda akan menemukan: Penginstalan perangkat lunak / HP DesignJet Click / Dokumentasi / Dukungan.
/ HP DesignJet Click /
/ HP DesignJet Click /
ドキュメント/ サポート.
설명서 / 지원.
Once the printhead check has nished the product will be
ready to load paper for the printhead alignment.
プリントヘッドの 確認が終了すると、プリントヘッドの
軸合わせのために用紙を取り付けることがで きます。
完成打印头的检查后,打印机将准备装入纸张,以对
齐打印头。
當印字頭檢查完畢,即可開始將紙張裝入印表機以進行
印字頭校正。
프린트 헤드 검사가 끝나면 프린터는 프린트 헤드 정렬을
위한 용지 공급 준비를 마칩니다.
Setelah pemeriksaan printhead selesai, printer siap
menerima kertas untuk menyelaraskan printhead.
When the front panel prompts you to load paper for
printhead alignment: Take the spindle and use it to load the
paper the rst time.
プリントヘッドの軸合わせのために用紙を取り付ける
ようにフロントパネルにメッセージが表示されたら、
スピンドルを使用して最初の用紙を取り付けます。
当前面板提示您装入纸张以对准打印头时:
取出卷轴,并用它来首次装入纸张。
前當方面板提示裝入紙張以校正印字頭時:拿起捲軸,
使用此捲軸進行首次紙張裝入程序。
프린트 헤드 정렬을 위해 용지를 넣으라는 전면 패널에 표
시되면 스핀들을 사용하여 처음으로 용지를 넣습니다 .
Bila panel depan meminta Anda memasukkan kertas
untuk penyelarasan printer: Ambil penggulung yang
lalu gunakan untuk memasukkan kertas untuk pertama
kalinya.
20
Page 21
69
70 71 72
If the blue removable stop is on the spindle, remove it. Put
EN
the roll onto the spindle, making sure to put it on the right
way round: the leading edge of the paper should go into the
product from the top of the roll. Addthe removable stop to
the spindle to keep the rollin place.
青いストッパ (取り外し可能) がスピンドルに付いている
JA
場合は、取り外します。
スピ ンドル にロ ール 紙を 取り付 けま す。
用紙の先端がロール紙の上部からプリンタに入るよう
に、正しい方向に取り付けられていることを確認します。
青い ストッパ ( 取り外し可 能) をス ピンドルに 取り付け
て、ロール紙を所定の位 置に保持します。
ZHCN
如果卷轴上有蓝色可移动挡块,请将其取下。
将纸卷装到卷轴上,确保它处于正确位置:即纸卷的前
缘应该进入到打印机中。
为卷轴加上可移动挡块,使纸卷处于正确位置。
ZHTW
如果捲軸上有可移動的藍色限動環,請將它取下。
將捲筒紙裝到捲軸上,並確定是以正確方式進行 :紙張
前邊沿應該從捲筒紙上方進入印表機。
在捲軸上加裝可移動限動環,使捲筒紙保持定位。
스핀들에 파란색의 탈착식 스톱이 있으면 그것을
KO
제거합니다.
올바른 방법으로 롤을 스핀들에 놓습니다. 즉, 롤의
위쪽으로부터 용지의 앞쪽 끝이 프린터로 들어가도록 해야
합니다.
롤이 제자리를 잡도록 탈착식 스톱을 끼웁니다.
Lepaskan pengaman biru yang dapat dilepas jika terdapat
ID
pada penggulung.
Letakkan gulungan pada penggulung, pastikan untuk
meletakkannya dengan benar: tepi kepala kertas harus
masuk ke printer dari bagian atas gulungan.
Masukkan pengaman yang dapat dilepas ke dalam
penggulung agar gulungan kertas tetap berada di
tempatnya.
Push the removable stop towards the roll as far asitwill
go.
No gap should be left between stop andpaper.
青いストッパをいっぱいまでロール紙の方向に押し込み
ま す。
ストッパと用紙の間に隙間ができないように
してくだ さい 。
将可移动挡块朝纸卷的方向推动,直至不能再推动为
止。
挡块和纸张之间不能有任何间隙。
將可移動限動環朝捲筒紙推到底。
限動環和紙張之間不能留空隙。
탈착식 스톱을 최대한 앞쪽으로 누릅니다.
스톱과 용지 사이에 틈이 없어야 합니다.
Dorong pengaman yang dapat dilepas ke arah gulungan
sejauh mungkin.
Di antara pengaman dan kertas tidak boleh ada celah.
From the front of the product, place the spindle into the
product.
プリン タ前 面から、 スピンドル をプリンタ内 に取り付け
ま す。
从打印机前部,将卷轴放入打印机。
從印表機的前方將捲軸置入印表機。
프린터 앞쪽에서 스핀들을 프린터에 장착합니다.
Tempatkan penggulung ke dalam printer dari arah depan.
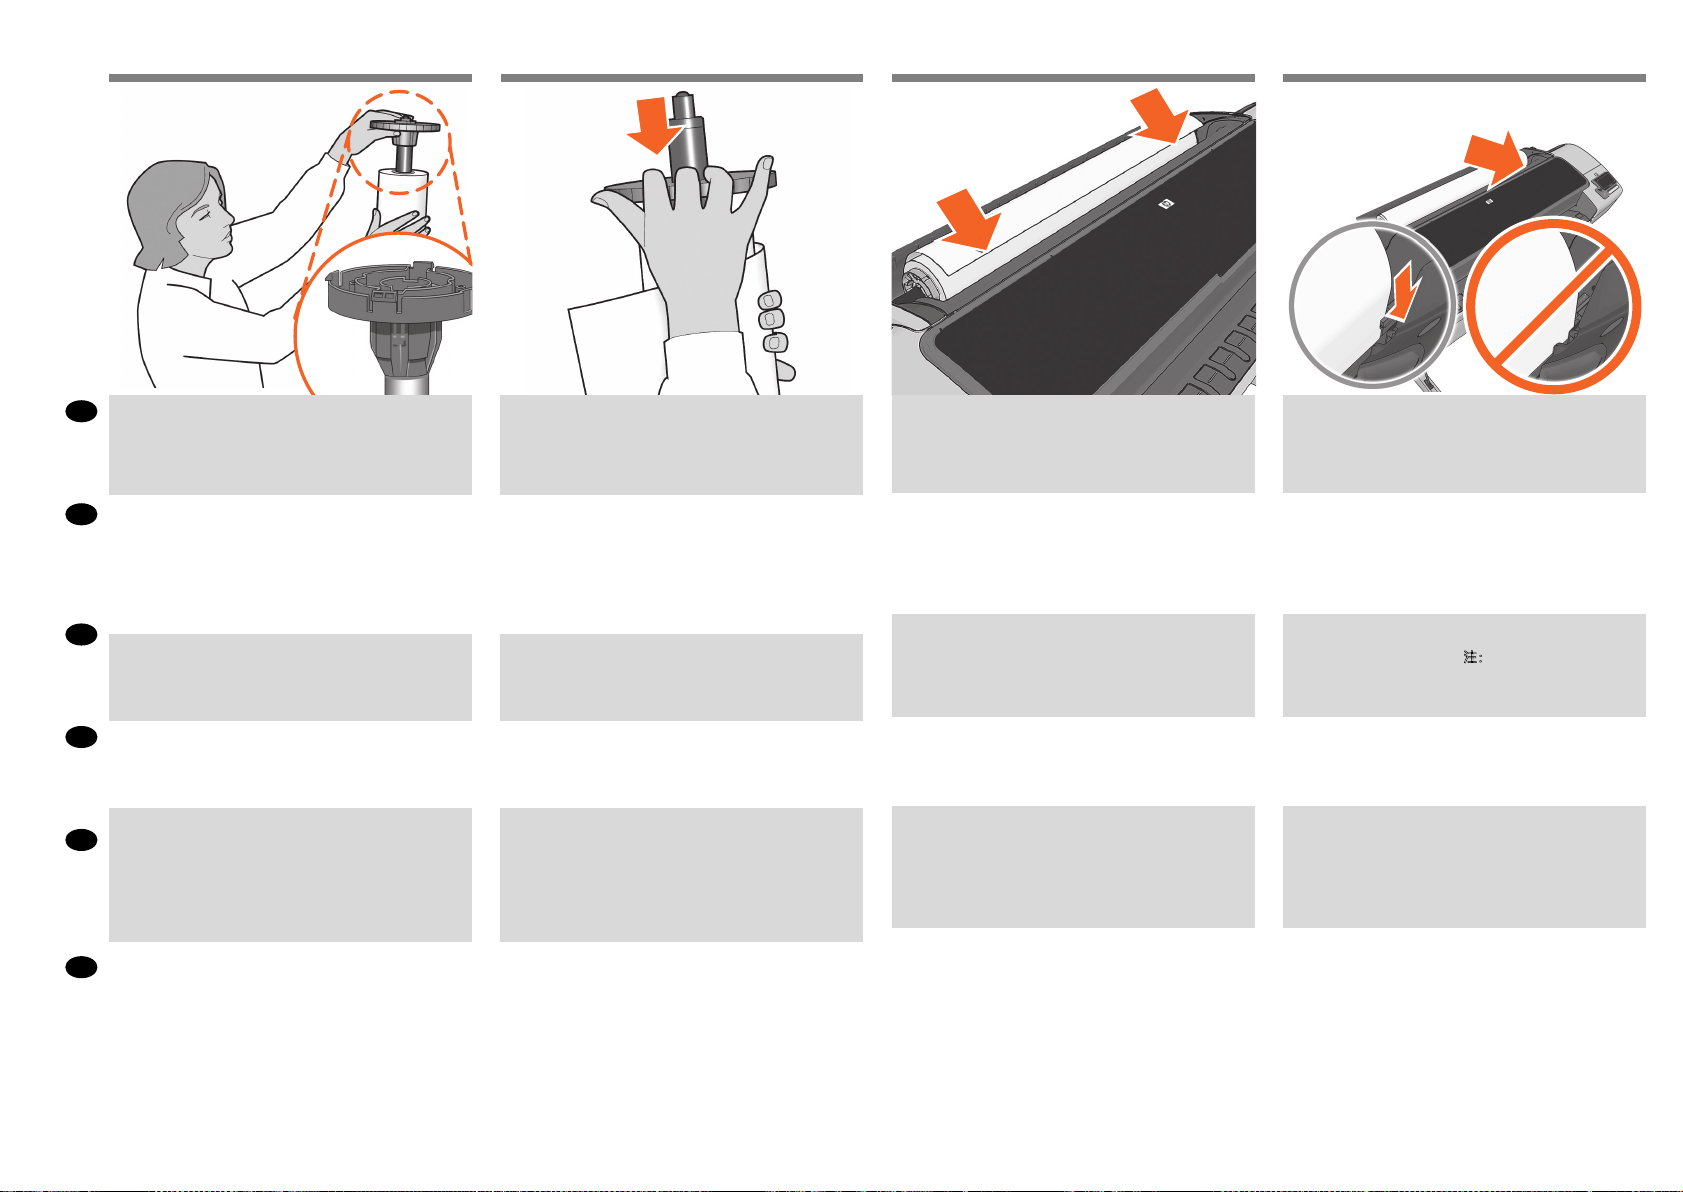
Feed the leading edge of the paper into the product until
the product takes hold of it. Do not insert the roll paper
into the cutsheet slot. Note: do not close the roll cover
until the front panel noties you.
プリン タが 用紙を つか むまで 、用紙の 先端をプリンタ
に 挿入 しま す。 ロール 紙 をカ ット紙 スロ ットに 差し 込 ま
ないで ください。注記 :フロントパ ネルに 表示されるま
で、ロール カバーを閉じないでください。
将纸张前缘装入打印机,直到打印机进纸。不要将卷筒
纸张插入到裁切纸插槽内。
前面板通知您这么做。
將紙張前邊沿送入印表機,讓印表機夾住它。請勿將捲
筒紙插入單張紙槽。注意 :請勿在前控制面板通知之前
合上捲筒紙護蓋。
용지의 앞쪽 끝을 프린터에 공급하여 프린터에 용지가
물리도록 합니다. 낱장 용지 슬롯에 롤 용지를 넣어서는 안
참고:
됩니다.
표시될 때까지 롤 덮개를 닫지 마십시오.
Masukkan tepi atas kertas ke printer hingga tertahan oleh
printer. Jangan masukkan kertas gulung ke slot kertas
lembar. Catatan: jangan tutup penutup gulungan hingga
diminta oleh panel depan.
전면 패널에 롤 덮개를 닫으라는 메시지가
注:不要关闭卷筒盖,直到
21
Page 22

73 74 75
6
EN
HP ePrint: Enable email printing
1 - Make sure that your printer is correctly
connected to the Internet.
2 - Enable Web Services during initial setup of the
printer, or later following the instructions in the
front panel. The printer may need to restart if the
rmware has updated.
JA
電子メール印刷の有効化
1 - プリンタがインターネットに正常に接続し
ていることを確認してください。
2 -プリンタの初期設定の間、Webサービスを有
効にするか、後でフロントパネルの指示に従い
ます。
ファームウェアが更新された場合、プリンタを
EN
The product will proceed to align the printheads. This
process involves printing, and therefore needs to use paper
with a straight leading edge. Note: printhead alignment
requires paper at least 24in (61cm) wide. Roll paper is
recommended.
プリンタが、プリントヘッドの軸合わせを続行します。
JA
この 処 理で は印 刷が 行 われ るの で、先 端 がまっすぐな
用紙を使用する必要があります。 注記 :プ リント ヘッド
の軸合わせには、幅 24インチ (61cm) 以上の用紙が必
要で す。ロ ール 紙を 推 奨し ます。
ZHCN
打印机将继续对准打印头。此过程涉及打印,因此需要
使用一些前缘平直的纸张。
少为 24 英寸(61 厘米)的纸张。建议使用卷筒纸张。
ZHTW
印表機將繼續校正印字頭。此過程需要進行列印,因此
必須使用一些前緣平直的紙張。 注意 :印字頭校正需要
至少寬 24 英呎(61 公分)的紙張。建議使用捲筒紙。
KO
프린터는 프린트 헤드 정렬을 진행합니다. 이 과정에는
인쇄 작업이 포함되므로 앞쪽 끝이 곧게 펴진 용지가
필요합니다.
참고:
프린트 헤드 정렬을 수행하기 위해 최소
61cm(24인치) 너비의 용지가 필요합니다. 롤 용지를
사용하는 것이 좋습니다.
ID
Setelah itu, printer akan menyelaraskan printhead. Proses
ini melibatkan pencetakan, karenanya harus menggunakan
kertas dengan tepi atas yang lurus. Catatan: penyelarasan
printhead memerlukan kertas dengan lebar minimal 24 inci
(61 cm). Sebaiknya gunakan kertas gulung.
注:打印头对齐需要宽度至
The front panel will display a series of messages showing
the progress of the printhead alignment. There is no need
to take any action until the alignment has nished, when
you will see the message shown below. Press the OK key.
フロントパ ネル には 、プリント ヘッドの 軸合 わせ の進
捗 状況 を示 すメッセー ジが 表 示さ れま す。下 記のメッ
セージが表示されて、軸合わせが終了するまでは操作
は必要ありませ ん。
[OK] ボタンを押します。
前面板将显示一系列消息,说明打印头对齐的进度。
对齐过程完成之前不需要进行任何操作,完成时您将
看到下面显示的消息。按 OK 键。
前方面板會顯示一連串訊息,指出印字頭校正的進度。
校正完成以前,並不需要執行任何動作 ;完成時,面
板上會顯示訊息告訴您。請按下 OK 按鍵。
프린트 헤드 정렬 과정을 보여주는 일련의 메시지가
전면 패널에 표시됩니다. 아래에 보이는 것처럼 이러한
메시지가 나타나는 동안은 정렬이 완료될 때까지 별다른
조치가 필요없습니다. OK(확인)
키를 누릅니다.
Panel depan akan menampilkan serangkaian pesan yang
menunjukkan proses penyelarasan printhead. Anda tidak
perlu melakukan apapun hingga penyelarasan selesai,
yakni bila Anda melihat pesan yang ditampilkan di bawah
ini. Tekan tombol OK.
再起動する必要があるかもしれません。
ZHCN
HP ePrint :启用电子邮件打印
1 - 确保打印机正确连接到 Internet 上。
2 - 在初次设置打印机期间启用 Web 服务,或者
以后按照前面板上的说明操作。如果更新了固件,
打印机可能需要重启。
ZHTW
HP ePrint :啟用電子郵件列印
1 - 印表機必須可正常連接網際網路。
2 - 在印表機的初始設定期間啟用網站服務,或
之後遵循前控制面板上顯示的指示。如果韌體更
新,印表機可能必須重新啟動。
KO
HP ePrint:
1 - 프린터가 인터넷에 제대로 연결되었는지 확인
하십시오.
2 - 프린터를 초기 설정하는 중에는 웹 서비스를 사
용하거나, 나중에 전면 패널의 지침을 따르십시오.
펌웨어가 업데이트되면 프린터를 다시 시작해야 합
니다.
ID
HP ePrint: Aktifkan pencetakan surel
이메일을 통한 인쇄 활성화
(email)
1 - Pastikan bahwa printer Anda tersambung secara
benar dengan Internet.
2 - Aktifkan Web Services selama penyiapan awal
printer, atau belakangan dengan mengikuti
petunjuk di panel depan. Printer mungkin perlu
untuk dinyalakan ulang jika program tegar
(rmware) telah diperbarui.”
The connectivity wizard will now start and take you
step by step through connecting your printer to the
internet. Click continue to follow the steps.
接続ウィザードが起動し、プリンタをインターネットに
接続するための一連の手順が示されます。 [ 続行] をク
リックし次の手順に進みま す。
连接向导现在将会启动,并指导您逐步将打印机连接到
Internet。 单击“继续”以按步骤操作。
連線精靈現在即將啟動,並帶領您逐步完成將印表機連
線至網際網路的程序。 按一下「繼續」即可按照步驟執行。
이제 연결 마법사가 실행되며 프린터를인터넷에 연결하는
과정을 단계적으로 안내할것입니다. 단계를 수행하려면
계속을 클릭하십시오.
Wizard konektivitas kini akan dimulai dan akan memandu
Anda menjalankan langkah-langkah untuk menyambung
printer ke Internet. Klik lanjut untuk mengikuti langkahlangkah tersebut.
22
Page 23

76
77 78 79
A screen appears explaining what steps you will
EN
need to complete, click ´Continue´.
JA
完了するために必要な手順を説明する画面が表示され
たら、[続行] をクリックします。
ZHCN
此时将出现一个屏幕,介绍需要完成的步骤,请单击“
继续”。
ZHTW
隨即出現畫面,說明您接下來要完成的步驟,按一下「繼
續 」。
KO
완료해야 하는 단계를 설명하는 화면이 표시됩니다.
´계속´을 누르십시오.
ID
Layar untuk menjelaskan langkah-langkah yang harus
diselesaikan akan ditampilkan, klik ´Continue´ (Lanjut).
Your network conguration connectivity will now be
veried, click ´Check´.
For more information visit: HP Connected.
ネットワークへの接続性に関する設定が認証されま
す。
[確認]をクリックしてください。
詳細はこちらをご覧ください:HP Connected
现在将验证网络配置连接,单击“检查”。
有关更多信息,请访问:HP Connected
現在將驗證您的網路設定連線能力,請點選「檢查」。
如需更多資訊,請瀏覽 HP Connected
네트워크 구성 연결을 지금 확인하려면 ‘확인’을
클릭합니다.
자세한 내용은 HP Connected를 방문하십시오.
Konektivitas kongurasi jaringan Anda kini akan
diverikasikan, click ´Check´.
Untuk informasi lebih lanjut, kunjungi: HP Connected
Your information will be veried, when complete,
click ´OK´.
情報が検証され、完了したら [OK] をクリックします。
此时将验证信息,完成后请单击“OK”。
將會驗證您的資訊,完成時請按一下「OK」。
정보가 확인됩니다 . 완료되면 ´ 확인 ´ 을 누르십시오 .
Informasi Anda akan diverikasi. Setelah selesai, klik ´OK´.
Congratulations! HP ePrint is enabled on your printer.
作業は無事終了しました! HP ePrintがお使いのプリン
タで有効化されます。
恭喜!您的打印机现已启用 HP ePrint。
恭喜!您的印表機已經啟用 HP ePrint。
축하합니다! HP ePrint 기능이 활성화되었습니다.
Selamat! HP ePrint diaktifkan pada printer Anda.
23
Page 24

80
HP DesignJet Z2600
PostScript® Printer
Start Up
81
© Copyright 2016 HP Development Company, L.P.
EN
Install the product software from the DVD that came with your printer onto your computer. Be sure to follow the software
installation instructions. For USB connections: Connecting your product before installing the software can lead to product
errors.
On the DVD you will nd: Software installation (drivers) / HP DesignJet Click / Documentation / Support.
プリンタに同梱 されている DV D からお使い のコンピュータに製 品ソフトウェアをインストールします。必ずソフトウェア
JA
のインストール 手順に従ってください。U SB 接続の場合 :ソフトウェアをインストールする前に製品を 接続すると、製
品エラーが発生する可能性があります。
DV Dの 収録内容は 次のとおりで す。ソフトウェアのインストール
ZHCN
将打印机附带的 DVD 中的产品软件安装到计算机上。请确保按照软件安装说明进行操作。对于 USB 连接 :如果在安装软件
之前连接产品,产品可能会出现错误。
在 DVD 上,您将找到
ZHTW
將印表機隨附 DVD 中的產品軟體安裝到電腦上。確定有依照軟體安裝指示進行安裝。適用於 USB 連線 :在安裝軟體之
前連接產品會發生產品錯誤。
您可以在 DVD 中找到 :軟體安裝
KO
프린터와 함께 제공된 DVD의 제품 소프 트웨어를 컴퓨터에 설치합니다. 소프트웨어 설치 지침을 반드시 따르십시오. USB
연결의 경우: 소프트웨어를 설치하기 전에 제품을 연결하면 제품 오류가 발생할 수 있습니다.
DVD에는 다음과 같은 내용물이 들어 있습니다. 소프트웨어 설치
/ HP DesignJet Click /
/ HP DesignJet Click /
文档 / 支持。
說明文件 / 支援。
/ HP DesignJet Click /
/ HP DesignJet Click /
ドキュメント/ サポート.
설명서 / 지원.
hp.com/go/DesignJetclick
Radically simplify the printing experience:
For Windows and Mac - Install the new large format printing software and simplify print-ready le generation.
Auto-discover printers, quickly prepare PDF, JPEG, Ti and HPGL/2 documents, avoid trial and error with PDF error checks and
real-time print preview.
Download from: www.hp.com/go/designjetclick
印刷作業を大幅に簡素化:
WindowsとMac - 新しい大判プリンタソフトウェアをインストールして、印刷可能なファイルの生成を簡素化しま
す。
自動検出プリンタは、PDF、JPEG、Tiff、およびHPGL/2 ファイルを高速で生成し、PDFエラーチェックとリアルタイ
ムのプリントプレビューで、トライアルやエラーを回避します。
ダウンロード:www.hp.com/go/designjetclick
彻底简化打印体验:
对于 Windows 和 Mac - 安装新版大幅面打印软件,简化打印就绪文件的生成。自动发现打印机;快速准备
PDF、JPEG、Tiff 和 HPGL/2 文档;通过 PDF 错误检查避免试错;以及实时打印预览。
下载网址: www.hp.com/go/designjetclick
大幅簡化列印作業:
Windows 與 Mac - 安裝新的大幅面列印軟體,簡化列印就緒檔案產生作業。自動偵測印表機、迅速準備
PDF、JPEG、Tiff 和 HPGL/2 文件,不需要經過 PDF 錯誤檢查和即時列印預覽的嘗試修正程序。
下載網址:www.hp.com/go/designjetclick
인쇄 환경 간소화:
Windows / Mac - 새 대형 인쇄 소프트웨어를 설치하여 인쇄 준비 파일 생성을 간소화하십시오. 자동 프린터 검색 기능으로
PDF, JPEG, Tiff HPGL/2 문서를 신속히 준비하고 PDF 오류 확인 및 실시간 인쇄 미리보기를 통해 실행 오류를 방지할 수
있습니다.
다운로드: www.hp.com/go/designjetclick
ID
Instal perangkat lunak produk dari DVD yang diberikan bersama printer di komputer. Pastikan untuk mengikuti petunjuk
penginstalan perangkat lunak. Untuk sambungan USB: Menyambung produk sebelum menginstal perangkat lunak dapat
mengakibatkan kesalahan pada produk.
Pada DVD, Anda akan menemukan: Penginstalan perangkat lunak / HP DesignJet Click / Dokumentasi / Dukungan.
Menyederhanakan secara radikal pengalaman mencetak:
Untuk Windows dan Mac - Memasang perangkat lunak pencetakan format besar yang baru dan menyederhanakan pembuatan
berkas (le) siap cetak. Menemukan printer secara otomatis, menyiapkan dengan cepat dokumen-dokumen PDF, JPEG, Ti,
dan HPGL/2, menghindari coba-coba dengan pemeriksaan eror PDF dan pratinjau cetak waktu nyata.
Unduhlah dari: www.hp.com/go/designjetclick
24
Page 25

82
83
EN
You can now, or at some later time, color-calibrate the paper type that you intend to use in the product. Color calibration is
recommended for accurate color printing. It can be started from the Product Utility program installed as part of your product
software, orfrom the front panel’s Image Quality Maintenancemenu (
この時点で、または 後で、プリンタで 使用する用紙の種類に対応したカラー キャリブレーションを実行できます。正確
JA
なカラー印 刷を行うためにカラー キャリブレーションの実 行をお勧めします。カラー キャリブレーションは、プリンタ
ソフトウェアの一部としてインストールされたプリンタ ユーティリティ プログラムから開始できます。または、フロント
パネルの イメージ品 質の保守メニューから開 始できます [
ション ] 。
ZHCN
您可以在现在或以后对打印机中要使用 的纸张类型进行颜色校准。建议进行颜色校准,这样打印的颜色更加准确。可
以从 打印机实用程序(已安装的打印机软件) 启动颜色校准过程,也可以从前面板的“图像质量维护”菜单启动
(“
”>“ ”>“图像质量维护”>“颜色校准”)。
ZHTW
您可以現在或稍後對印表機所要使用的紙張類型進行顏色校準。如果需要精確的彩色列印,您最好進行顏色校
準。您可以從所安裝印表機軟體中的印表機公用程式,或從前方面板的「影像品質維護」功能表,開始進行校準
」>「 」>「影像品質維護」>「色彩校準」。
「
> > image quality maintenance > color calibration).
> >
イメージ 品質の保 守] – [ カラー キャリブレー
1
2
1. Return to home screen
2. Go back to previous screen
3. Help
4. Cancel
1. ホーム画面に戻ります
2. 前の 画面に 戻ります
3. ヘルプ
4 . キャン セル
1. 返回主屏幕
2.返回上一屏幕
3.帮助
4.取消
1. 返回主畫面
2. 返回上一個畫面
3. 說明
4. 取消
3
4
KO
이제 프린터에서 사용할 용지 종류에 대해 색상 보정 작업을 수행할 수 있습니다. 이 작업은 시간이 지난 후 나중에 수행해도 됩니다.
색상 보정을 하면 좀더 정확한 색으로 인쇄할 수 있습니다. 프린터 소프트웨어의 일부로 설치되는 프린터 유틸리티 프로그램이나
전면 패널의 이미지 품질 유지 관리 메뉴를 통해 색상 보정 작업을 시작할 수 있습니다 (
ID
Mulai saat ini, Anda dapat mengkalibrasi warna jenis kertas yang akan digunakan printer. Kalibrasi warna dianjurkan untuk
pencetakan warna yang akurat. Kalibrasi ini dapat dilakukan dari program Printer Utility [Utilitas Printer] yang diinstal sebagai
bagian dari perangkat lunak printer Anda, atau dari menu Image Quality Maintenance [Pemeliharaan Kualitas Gambar] pada panel
depan
> > image quality maintenance [pemeliharaan kualitas gambar] > color calibration [kalibrasi warna]).
(
> > 이미지 품질 유지보수 > 색상 보정).
25
1. 홈 화면으로 돌아가기
2. 이전 화면으로 돌아가기
3. 도움말
4. 취소
1. Kembali ke layar awal
2. Kembali ke layar sebelumnya
3. Bantuan
4. Batal
Page 26

EN
JA
ZHCN ZHTW
Note for MAC & Windows USB
connection:
Do not connect the computer to the product yet.
You must rst install the product driver software
on the computer.
Insert the HP Start Up Kit DVD into your computer.
For Windows:
* If the DVD does not start automatically, run autorun.exe program on the root folder on the DVD.
* To install a Network Product, click on Express
Network Install, otherwise click on Custom Install
and follow the instructions on your screen.
For Mac:
* If the DVD does not start automatically, open the
DVD icon on your desktop.
* Open the Mac OS X HP DesignJet Installer icon
and follow the instructions on your screen.
NOTE: If the installation failed, reinstall the
software from:
http://www.hp.com/go/Z2600/support
Mac および Windows の USB 接続
に関する注記:
この時点ではまだコンピュータをプリンタに
接続しないでください。最初に、プリンタ ド
ライバ ソフトウェアをインストールする必要
があります。
コンピュータに『HP スタートアップ キッ
ト』DVD を挿入します。
Windows の場合:
* DVD が自動的に起動しない場合は、DVD の
ルート フォルダ内の autorun.exe を実行しま
す。
* ネットワーク プリンタをインストールする
には、[エクスプレス ネットワーク インスト
ール] をクリックするか、または [カスタム イ
ンストール] をクリックして画面の指示に従
います。
Mac の場合:
* DVD が自動的に起動しない場合は、デスクト
ップの DVD アイコンを開きます。
* MAC OS X HP DesignJet Installer アイコンを開
き、画面の指示に従ってください。
注記:インストールが失敗した場合は、ソフ
トウェアを以下のサイトから再度インストー
ルしてください。
http://www.hp.com/go/Z2600/support
MAC 和 Windows USB 连接注意事
项:
刚开始时,不要立即将计算机连接到打印机。
必须首先在计算机上安装打印机驱动程序软
件。 将 HP Start Up Kit DVD 插入计算机。
对于 Windows:
* 如果 DVD 未自动启动,请运行 DVD 根文件夹
下的 autorun.exe 程序。
* 要安装网络打印机,请单击“快速网络安装”
,或者单击“自定义安装”并按照屏幕上的说
明进行操作。
对于 Mac:
* 如果 DVD 未自动启动,请打开桌面上的 DVD
图标。
* 打开 Mac OS X HP DesignJet Installer 图标,然
后按照屏幕上的说明进行操作。
注意:如果安装失败,请从以下站点重新安装
软件:
http://www.hp.com/go/Z2600/support
請注意,當 MAC 與 Windows USB
連線時:
請不要急著將電腦連接到印表機。您必須先在
電腦上安裝印表機驅動程式軟體。
HP Start-Up Kit」DVD
將「
在 Windows 中:
* 如果 DVD 沒有自動執行,請執行 DVD 根資料
夾中的 autorun.exe 程式。
* 如果要安裝網路印表機,請按一下「快速網路
安裝」或「自訂安裝」,並且依照螢幕上的指示
進行。
在 Mac 中:
* 如果 DVD 沒有自動執行,請開啟桌面上的
「DVD」圖示。
* 開啟「Mac OS X HP DesignJet Installer」圖示,
並且依照螢幕上指示進行。
註:如果安裝失敗,請在這裡重新安裝軟體 :
http://www.hp.com/go/Z2600/support
放入電腦。
26
Page 27

IDKO
MAC 및 Windows USB 연결을 위한
안내
아직 컴퓨터를 프린터에 연결하지 마십시오.
먼저 프린터 드라이버 소프트웨어를 컴퓨터에
설치합니다.
HP Start-Up Kit(HP 시작 키트) DVD를 컴퓨터에
삽입합니다.
Windows의 경우:
* DVD가 자동으로 실행되지 않는 경우 DVD의
루트 폴더에서 autorun.exe 프로그램을
실행합니다.
* 네트워크 프린터를 설치하려면 Express
네트워크 설치를 클릭하거나 사용자 지정 설치를
클릭한 다음 화면의 지침을 따릅니다.
Mac의 경우:
* DVD가 자동으로 실행되지 않는 경우 바탕
화면에서 DVD 아이콘을 엽니다.
* Mac OS X HP DesignJet Installer 아이콘을 열고
화면의 지침을 따릅니다.
주:
설치하는 데 실패한 경우 다음 위치에서
각각의 소프트웨어를 다시 설치합니다.
http://www.hp.com/go/Z2600/support
Catatan tentang sambungan USB
untuk MAC & Windows:
Jangan sambungkan dulu komputer ke printer.
Anda harus terlebih dulu menginstal perangkat
lunak driver printer di komputer.
Masukkan DVD HP Start Up Kit ke komputer
Untuk Windows:
* Jika DVD tidak memulai secara otomatis, jalankan program autorun.exe pada folder akar DVD.
* Untuk menginstal Network Printer, klik Express
Network Install atau klik Custom Install, kemudian
jalankan petunjuk pada layar.
Untuk Mac:
* Jika DVD tidak memulai secara otomatis, buka
ikon DVD di desktop.
* Buka ikon Mac OS X HP DesignJet Installer,
kemudian jalankan petunjuk pada layar.
CATATA N: Jika penginstalan gagal, instal ulang
perangkat lunak dari:
http://www.hp.com/go/Z2600/support
27
Page 28

EN
© Copyright 2016 HP Development Company, L.P.
The information contained herein is subject to change without
notice. The only warranties for HP products and services are set
forth in the express warranty statements accompanying such
products and services. Nothing herein should be construed as
constituting an additional warranty. HP shall not be liable for
technical or editorial errors or omissions contained herein.
JA
© Copyright 2016 HP Development Company, L.P.
本書の内容は、将来予告なしに変更されることがあります。
HP 製品およびサービスに対する保証については、当該製品
およびサービスの保証規定書に記載されています。 本書中の
いかなる記載も、付加的な保証を構成するものとして解釈さ
れないものとします。 弊社は、本書に含まれる技術上または
編集上の誤りおよび欠落について、一切責任を負うものでは
ありません。
ZHCN
© Copyright 2016 HP Development Company, L.P.
本文档中的内容可能随时变更,恕不另行通知。
HP 产品和服务的所有保修限于这些产品与服务所附带的明确保
修声明。 本文中的任何内容都不应被引伸为补充保证。 HP 对
本文中出现的技术错误、编辑错误或疏漏之处概不负责。
ZHTW
© Copyright 2016 HP Development Company, L.P.
本文件包含的資訊可能有所變更,恕不另行通知。
HP 產品與服務的保固僅限列於隨產品及服務所附的明確保固聲
明中。 本文件的任何部分都不可構成任何額外的保固。 HP 不
負責本文件在技術上或編輯上的錯誤或疏失。
© Copyright 2016 HP Development Company, L.P.
KO
이 설명서의 내용은 예고 없이 변경될 수 있습니다.
HP 제품 및 서비스에 대한 유일한 보증은 해당 제품 및 서비스와 함
께 제공되는 명시적 보증서를 따릅니다. 이 문서의 어떠한 내용도
추가 보증으로 간주되어서는 안 됩니다. HP는 이 문서에 포함된 기
술 또는 편집상의 오류나 누락된 내용에 대해 책임지지 않습니다.
ID
© Copyright 2016 HP Development Company, L.P.
Informasi yang terdapat dalam dokumen ini dapat berubah
tanpa pemberitahuan sebelumnya. Satu-satunya jaminan
untuk produk dan layanan HP tercantum dalam pernyataan
jaminan tertulis yang disertakan bersama produk dan
layanan tersebut. Tidak ada pernyataan apa pun dalam
dokumen ini yang dapat dianggap sebagai jaminan
tambahan. HP tidak bertanggung jawab atas kesalahan
teknis atau editorial maupun.
 Loading...