

Page 1

HP DESIGNJET
T7100 & T7100
monochrome printer
EN
Assembly Instructions
JP
セットアップ手順
ZHCN
组装说明
ZHTW
印表機組裝說明
KO
프린터 조립 지침
Petunjuk pemasangan
1. Printer engine / プリンタ エンジン / /
/ / Mesin printer
1
2. Stand and bin basket / スタンドと
用紙スタッカ バスケット / 底座和
纸盒纸框 / 機架和紙槽承接籃 / 스탠
드 및 용지함 바스켓 / Dudukan dan
keranjang
3. Box / 箱 / 包装箱 / 包裝箱 /
상자 / Kemasan
4. Supplies and cables /
サプライ品とケーブル / 耗材和电缆 /
耗材與纜線 / 소모품 및 케이블 /
Persediaan dan kabel
Please read these instructions carefully. These assembly instructions explain how to assemble the printer. Notice
EN
that the icons used in this document are also located on the printer packaging. The icons help you locate the
2
parts needed at each stage of the assembly. Because spare screws are supplied, some screws will remain unused
after assembly of the printer.
以下の指示をよくお読みください。 - 以下の手順では、プリンタを組み立てる方法について説明します。この
JP
マニュアルで使用されているアイコンは、プリンタのパッケージにも表示されています。アイコンにより、組
み立ての各段階で必要な部品を確認できます。予備のネジが同梱されているため、プリンタの組み立て後、何
本かのネジが使用されないまま残ります。
ZHCN
4
2
EN
1m
3.5ft
ZHCN
3
ZHTW
KO
Ruang yang diperlukan untuk pemasangan adalah 3 m
(10 kaki) di depan dan 1 m (3,5 kaki) di samping dan
belakang.
ZHCN
ZHTW
KO
1m
3.5ft
3m
10ft
EN
4 people are required to perform certain tasks
JP
特定の作業を行うために、4名必要です。
The space required for assembly is
3m (10 feet) in front and 1m (3.5 feet)
at the sides and rear.
JP
組み立てにはプリンタ前面に3m (10
フィート)、側面および背面に1m
(3.5フィート) のスペースが必要で
す。
1
Diperlukan 4 orang untuk menjalankan tugas tertentu.
© 2010 Hewlett-Packard Company
Large Format Division
Camí de Can Graells 1-21 · 08174
Sant Cugat del Vallès
Barcelona · Spain
All rights reserved
Printed in XXX
ZHTW
KO
Bacalah petunjuk ini dengan cermat Petunjuk pemasangan ini menjelaskan cara memasang printer. Perhatikan
bahwa ikon yang digunakan dalam dokumen ini juga terdapat pada kemasan printer. Ikon membantu Anda
menemukan komponen yang diperlukan dalam setiap tahap pemasangan. Karena tersedia sekrup cadangan,
beberapa sekrup tidak digunakan setelah pemasangan printer.
EN
Time required for assembly of the printer is approximately 132 minutes.
2h
JP
プリンタの組み立て所要時間は132分です。
ZHCN
ZHTW
KO
Wakt u yang diperlukan untuk pemasangan printer adalah
sekitar 132 m enit.
Page 2
EN
Remove the packaging
JP
パッケージの開梱
ZHCN
ZHTW
KO
Lepaskan kemasan
1 2 3
5’
x2
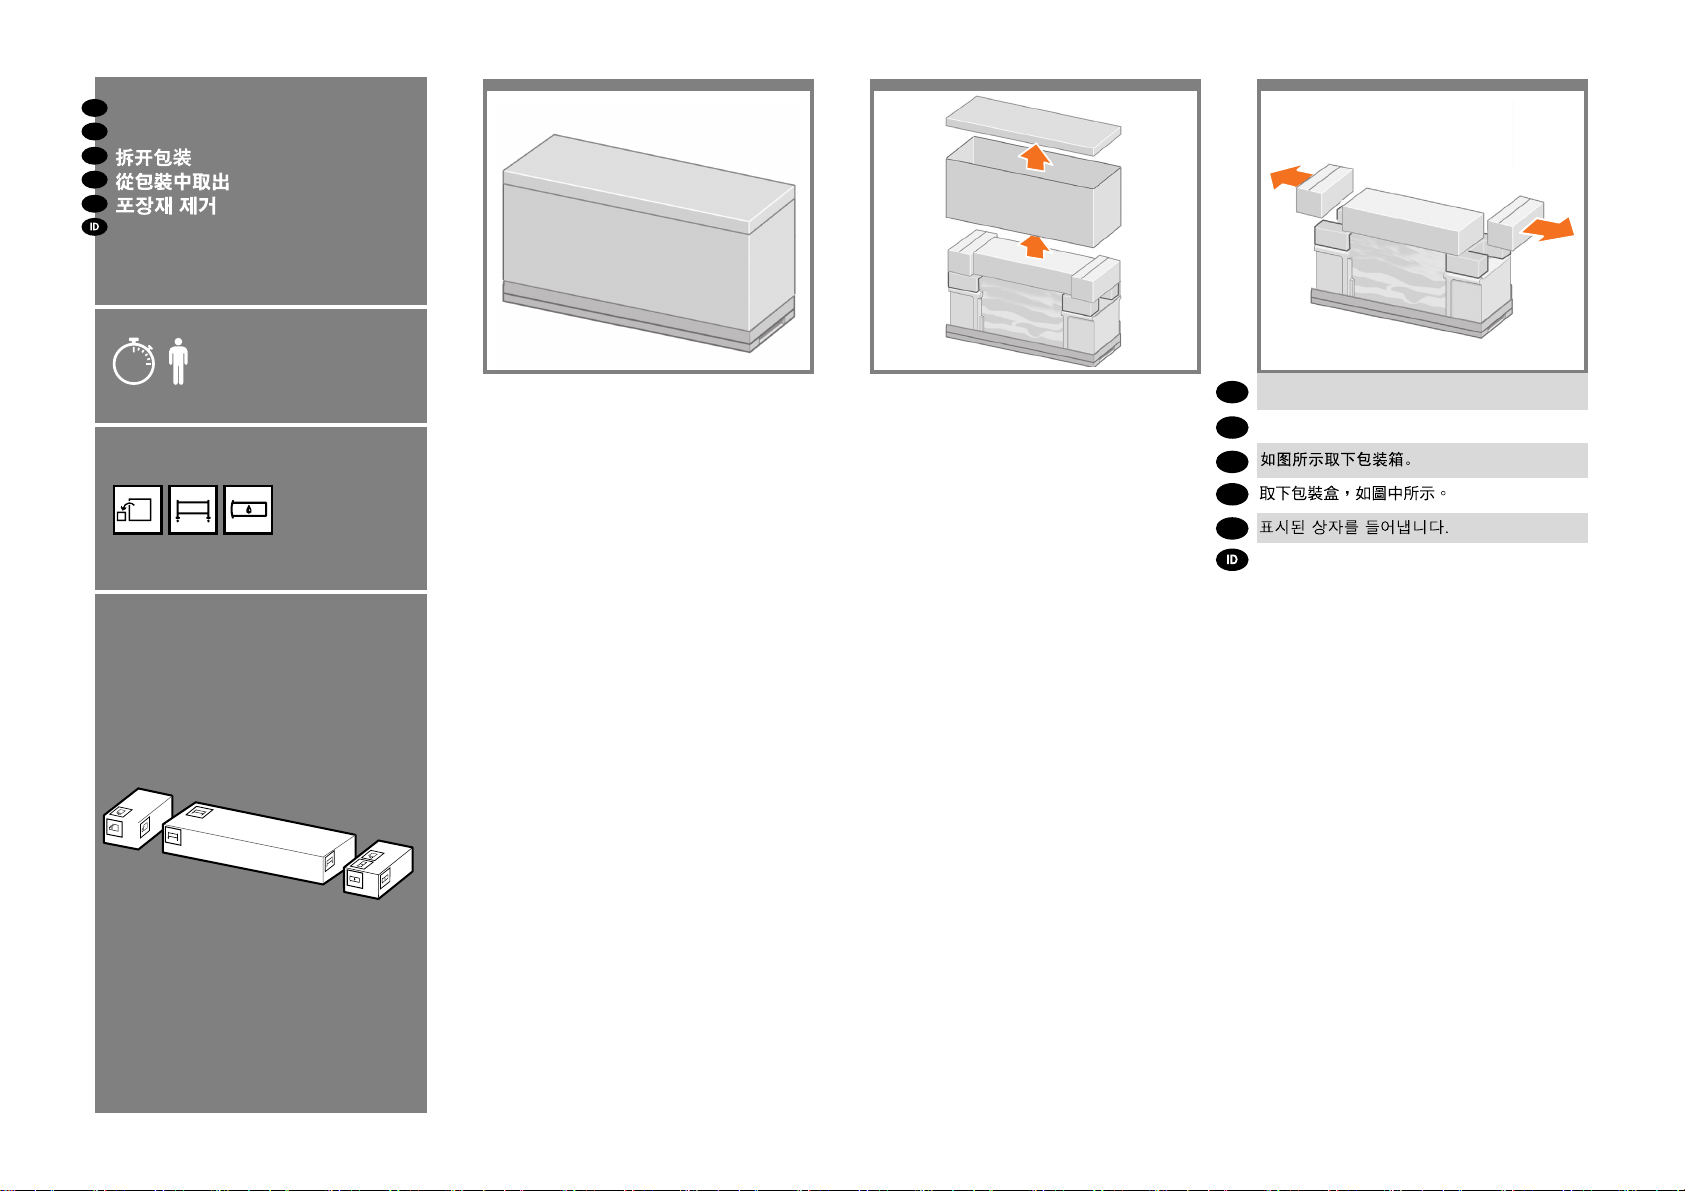
Remove the boxes shown.
EN
図のように箱を取り除きます。
JP
ZHCN
ZHTW
KO
Keluarkan boks yang ditunjukkan.
2
Page 3
EN
4 5 6
Assemble the stand and bin basket
JP
スタンドと用紙スタッカ バスケット
の組み立て
ZHCN
组装底座和纸盒纸框
ZHTW
組裝機架和紙槽承接籃
KO
스탠드 및 용지함 바스켓 조립
Memasang dudukan dan keranjang
x2
EN
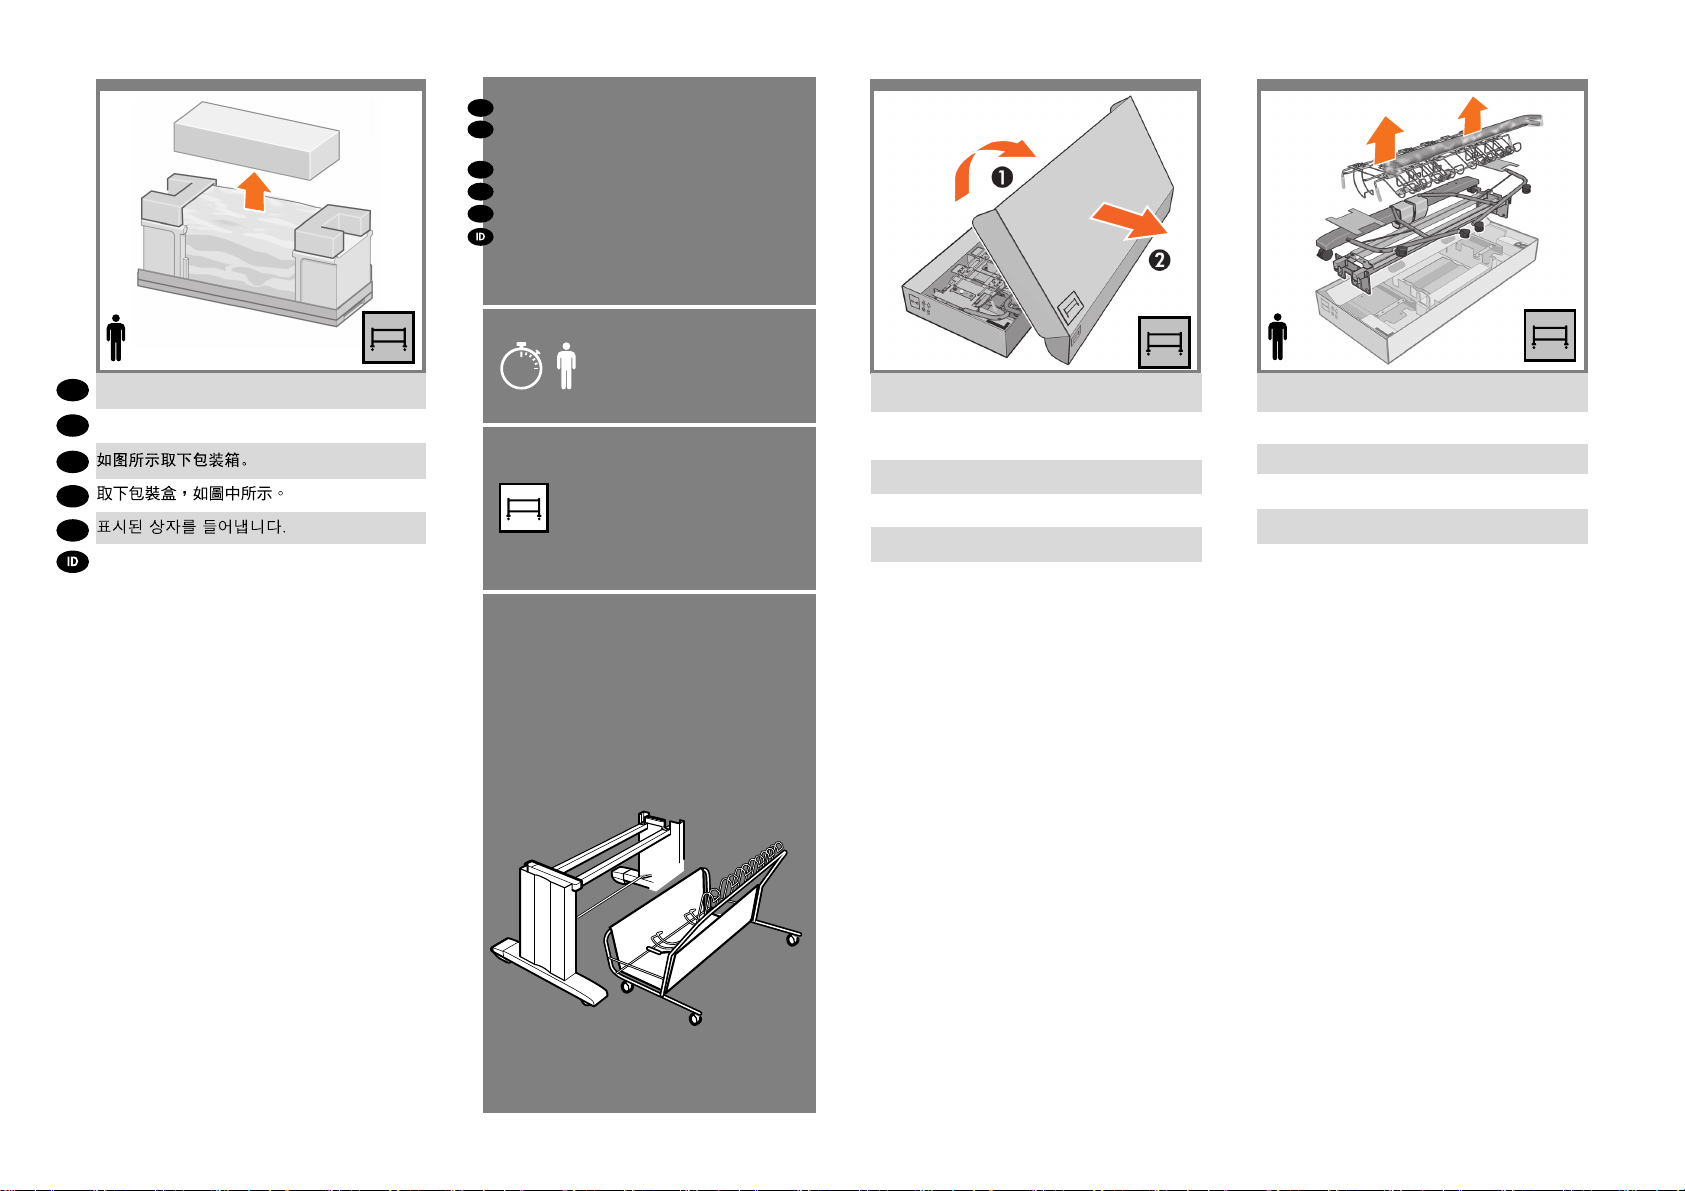
Remove the box shown.
図のように箱を取り除きます。
JP
ZHCN
ZHTW
KO
Keluarkan boks yang ditunjukkan.
x2
20’
x2
Remove the lid from the stand and bin basket box.
スタンドと用紙スタッカ バスケットが入っている箱
の蓋を取ります。
取下底座和纸盒纸框包装箱的箱盖。
取下機架和紙槽承接籃包裝箱的箱蓋。
스탠드와 용지함 바스켓 상자의 덮개를 엽니다.
Lepaskan tutup dari kemasan dudukan dan
keranjang.
Remove only the items shown from the box.
箱から、図に示すアイテムだけを取り出します。
从包装箱中仅取出如图所示的物品。
僅從包裝箱中取出如圖所示的物品。
상자에서 그림에 나타난 부분만 제거합니다.
Keluarkan hanya item yang ditunjukkan dari
kemasan.
3
Page 4
7 9 10
8
x2
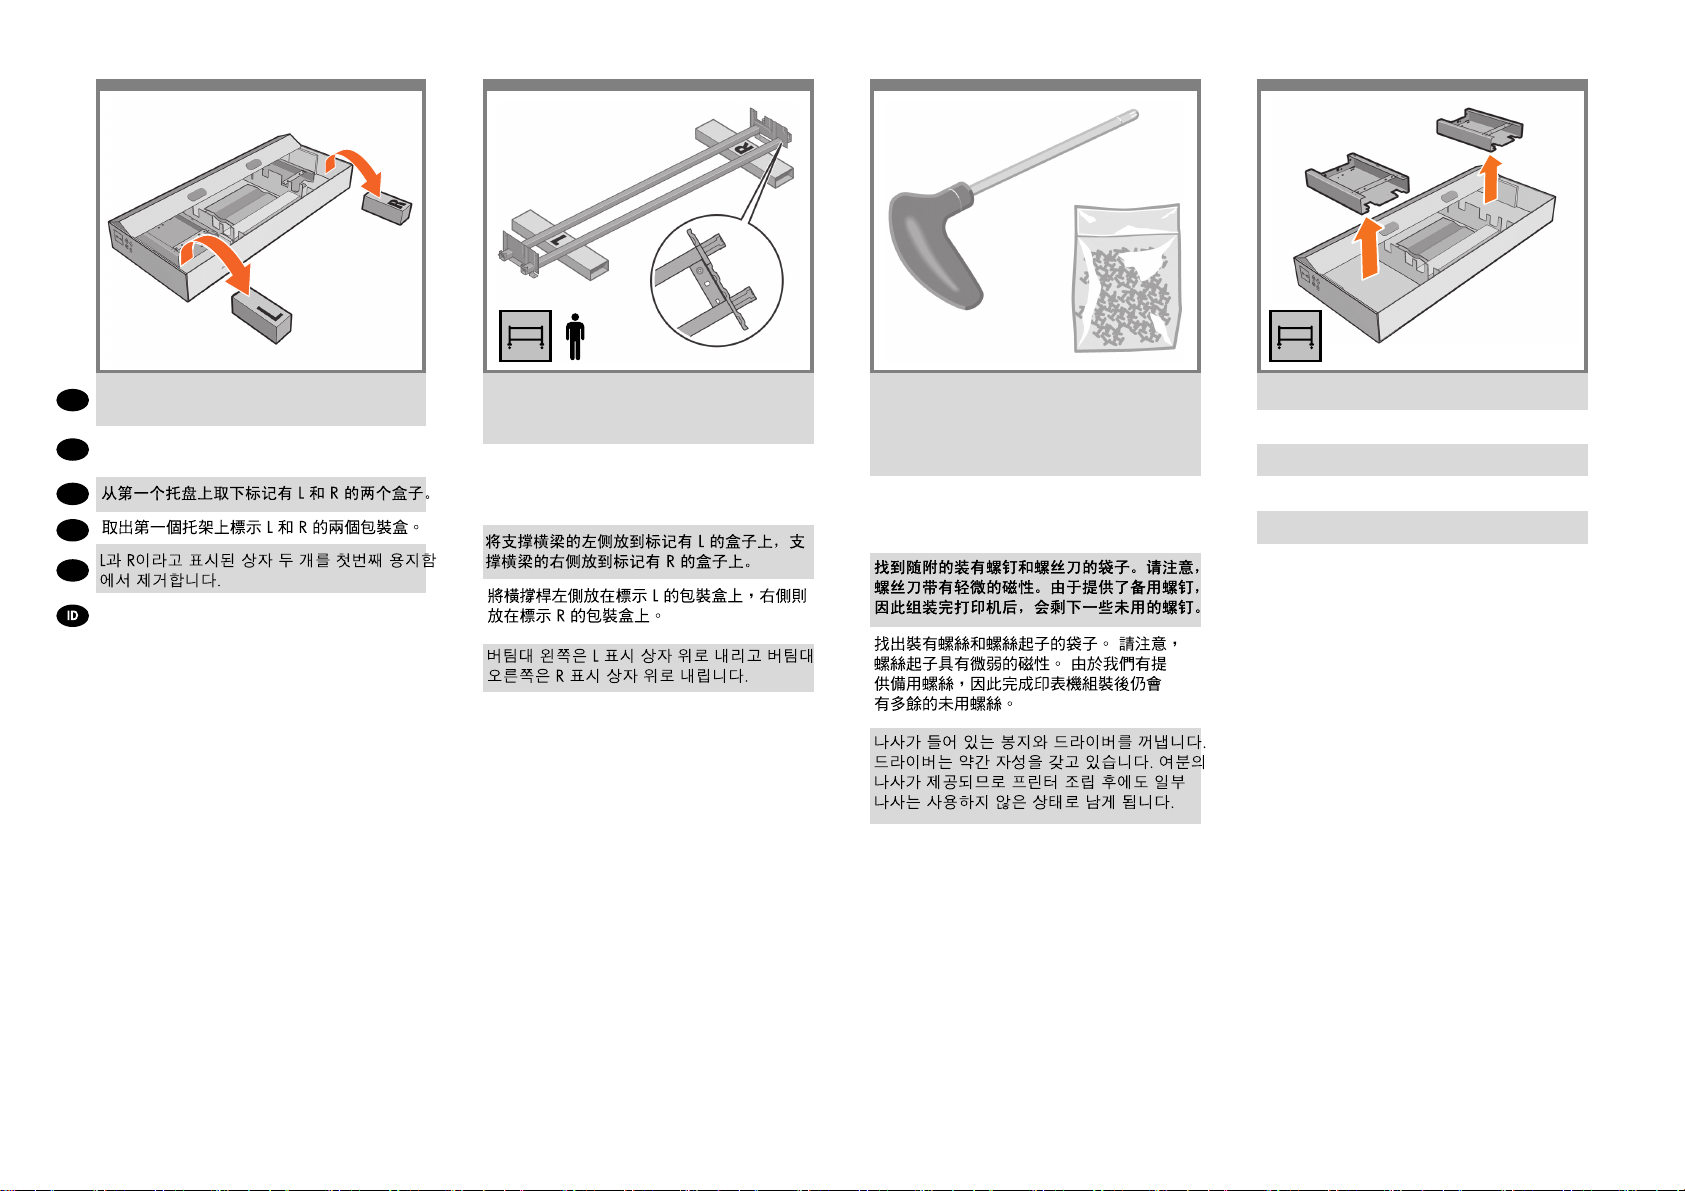
Remove the two boxes marked L and R from the rst
EN
tray.
取り出したトレイから、L (左) およびR (右) という
JP
文字が 書かれている2つの箱を取り出します。
ZHCN
ZHTW
KO
Keluarkan dua kotak yang bertanda L dan R dari baki
pertama.
Lower the left side of the cross-brace onto the box
marked L and the right side of the cross-brace onto
the box marked R.
クロスブレイスの左側をL (左) という文字が書か
れて いる箱の上に下ろし、クロスブレイスの右側
をR (右) という文字が書かれている箱の上に下ろ
します。
Turunkan sisi kiri penahan silang di atas kotak
bertanda L dan sisi kanan penahan silang di atas
kotak bertanda R
Locate the bag of screws and the screwdriver
provided. Notice that the screwdriver is slightly
magnetic. Because spare screws are supplied, some
screws will remain unused after assembly of the
printer.
付属のネジとドライバを用意します。このドライ
バは磁石に なっています。予備のネジが含まれて
いるため、何本かの ネジは使用されないまま残り
ます。
Temukan kantong sekrup dan obeng yang
tersedia. Perhatikan bahwa obeng sedikit bersifat
magnet. Karena tersedia sekrup cadangan,
beberapa sekrup tidak digunakan setelah
pemasangan printer.
Remove the legs from the box.
箱から脚部を取り出します。
从包装箱中取出支柱。
從包裝箱取出腳架。
상자의 다리를 제거합니다.
Lepaskan kaki dari kemasan.
4
Page 5
11 13 14
12
x4
x2
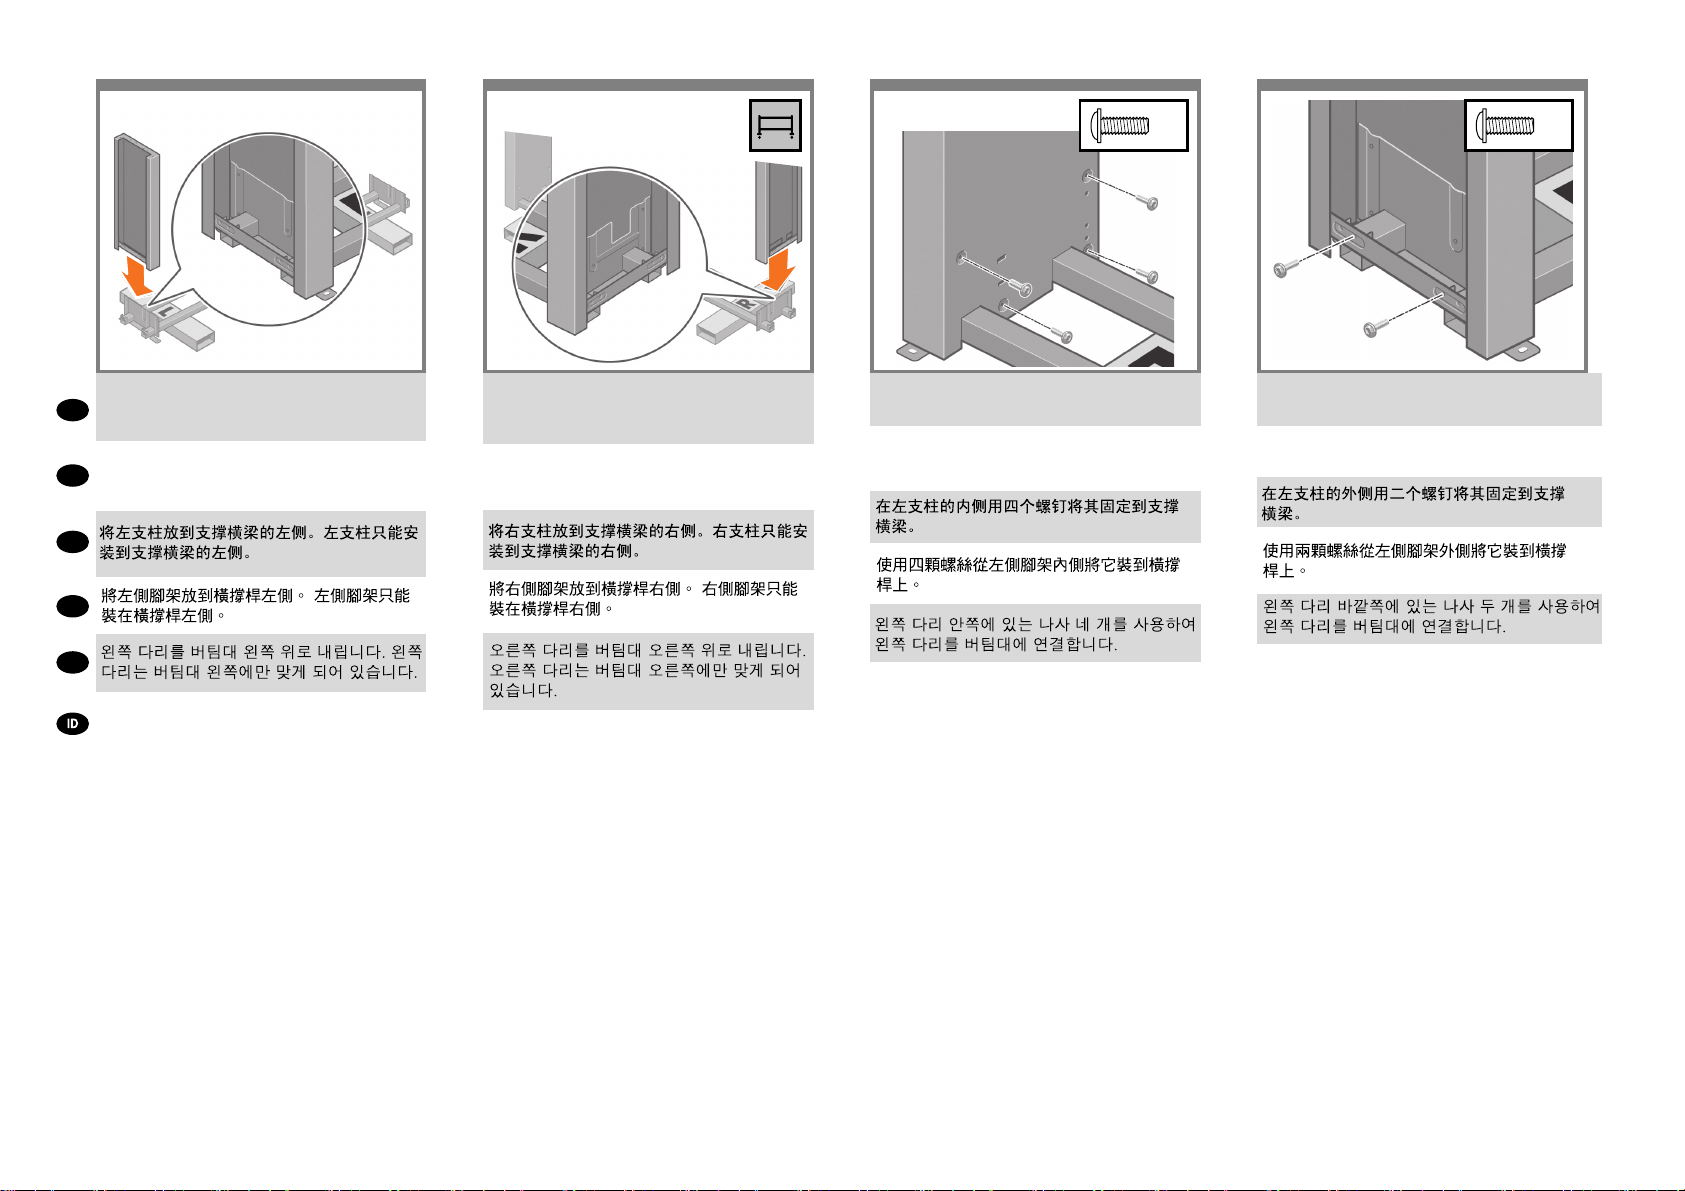
Lower the left leg onto the left side of the cross-brace.
The left leg will t only on the left side of the cross-
EN
brace.
左脚部を、クロスブレイスの左側に差し込みます。
左脚部は、クロスブレイスの左側にのみ取り付ける
JP
ことが できます。
ZHCN
ZHTW
KO
Turunkan kaki kiri ke sebelah kiri penahan
silang. Kaki kiri hanya akan pas di sebelah kiri
penahan silang.
Lower the right leg onto the right side of the cross-
brace. The right leg will t only on the right side of the
cross-brace.
右脚部を、クロスブレイスの右側に差し込みます。
右脚部は、クロスブレイスの右側にのみ取り付ける
ことが できます。
Turunkan kaki kanan ke sebelah kanan penahan
silang. Kaki kanan hanya akan pas di sebelah
kanan penahan silang.
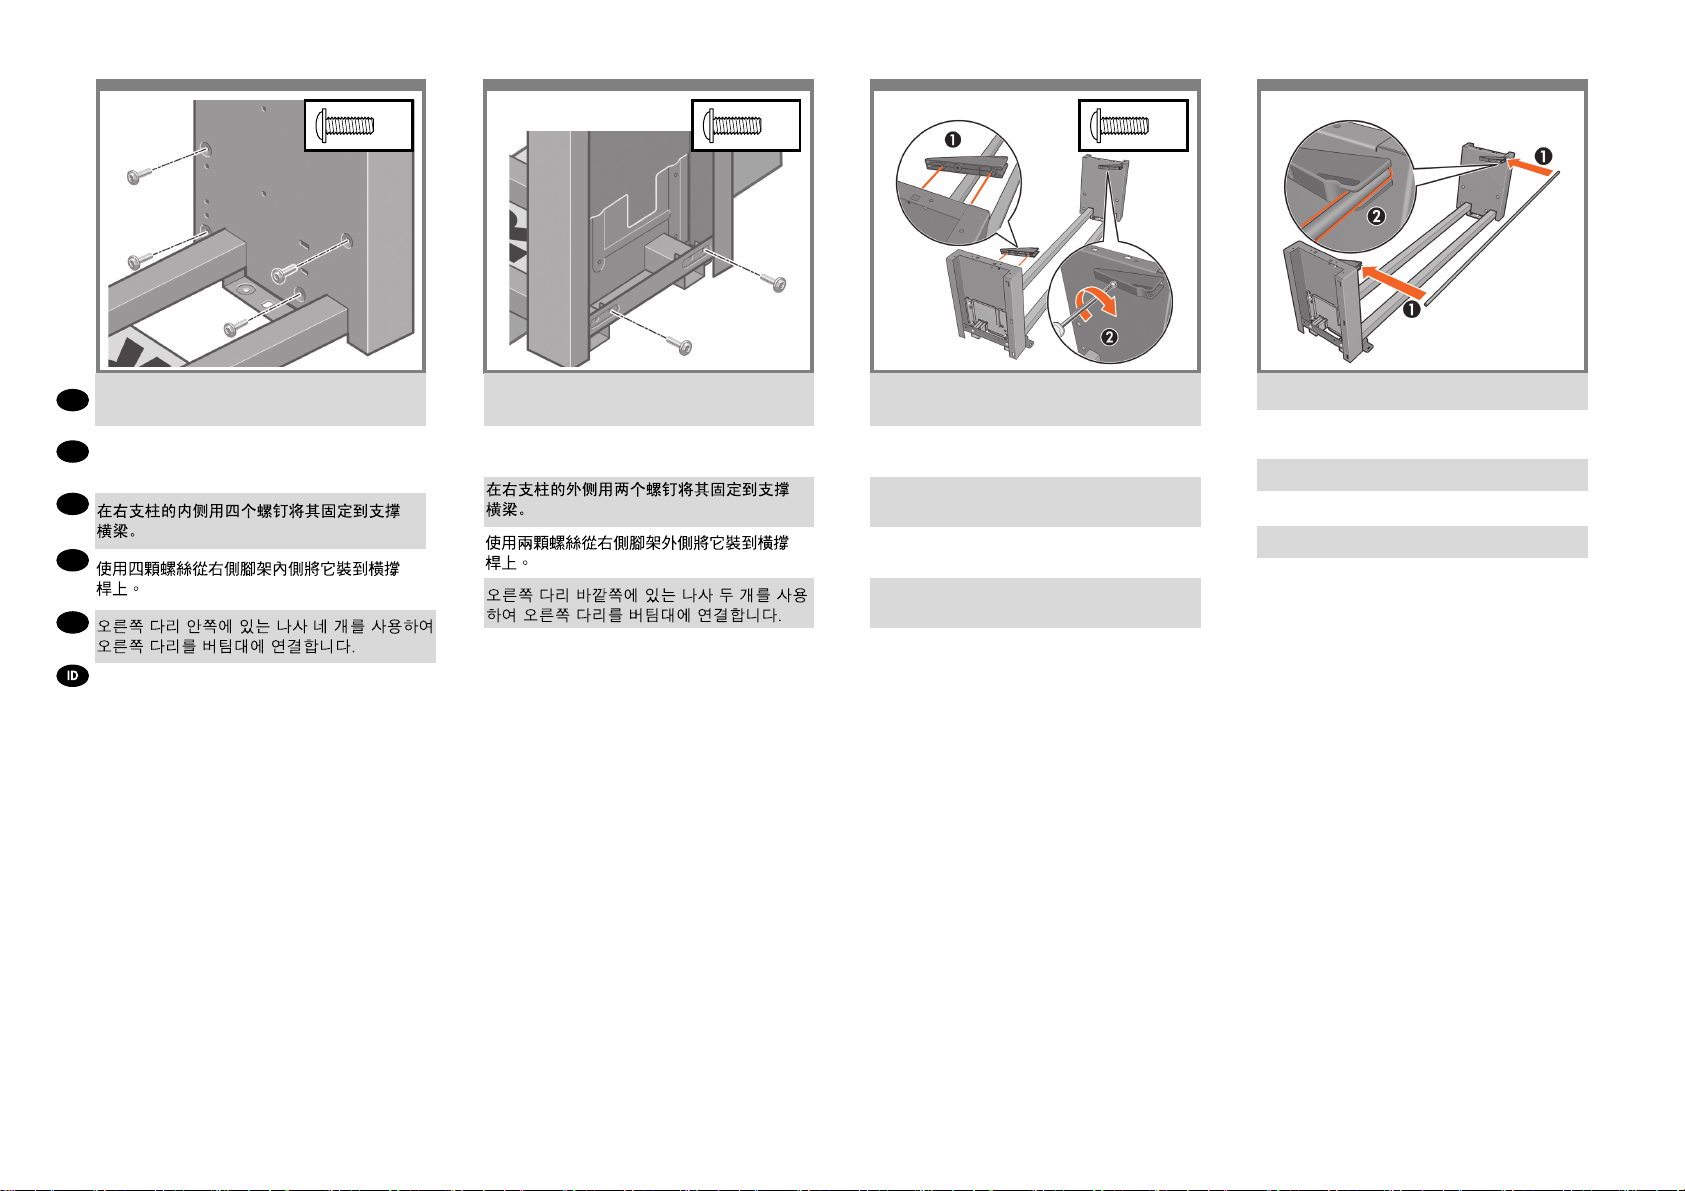
Use four screws on the inside of the left leg to attach
the left leg to the cross-brace.
左脚部の内側にある4本のネジを使用して、左脚
部を
クロスブレイスに取り付けます。
Gunakan empat sekrup di bagian dalam kaki
kiri untuk memasang kaki kiri ke penahan silang.
Use two screws on the outside of the left leg to attach
the left leg to the cross-brace.
左脚部の外側にある2本のネジを使用して
ク ロスブレイスに取り付けます。
5
Gunakan dua sekrup di bagian luar kaki kiri
untuk memasang kaki kiri ke penahan silang.
Page 6
15 17 1816
x4
x2 x2
Use four screws on the inside of the right leg to attach
EN
the right leg to the cross-brace.
右脚部の内側にある4本のネジを使用して、右脚
JP
部を
クロスブレイスに取り付けます。
ZHCN
ZHTW
KO
Gunakan empat sekrup di bagian dalam kaki
kanan untuk memasang kaki kanan ke penahan
silang.
Use two screws on the outside of the right leg to attach
the right leg to the cross-brace.
右脚部の外側にある2本のネジを使用して、右脚部を
クロスブレイスに取り付けます。
Gunakan dua sekrup di bagian luar kaki kanan
untuk memasang kaki kanan ke penahan silang.
Attach the two triangular pieces (one each side) to the
legs with one screw each side.
両側の脚部にそれぞれ三角形の部品を1本のネジで
取り付けます。
将两个三角形部件分别安装到两个支柱上,而且每个
三角形部件的两侧各使用一个螺钉。
使用螺絲,將兩片三角板(兩邊各一片,各使用一個
螺絲)裝上腳架。
각각 하나의 나사를 사용하여 삼각형 조각 두 개(
양쪽에 하나씩)를 다리에 연결합니다.
Pasang kedua bagian segitiga (satu di setiap sisi) ke
kaki dengan satu sekrup di setiap sisi.
Attach the bar to the two triangular pieces.
取り付けた三角形の2つの部品に棒を取り付けま
す。
将条杆安装到两个三角形部件上。
將撐桿裝上兩片三角板。
두 개의 삼각형 조각에 버팀대를 연결합니다.
Pasang batang ke kedua bagian segitiga.
6
Page 7
x2
21 222019
x4
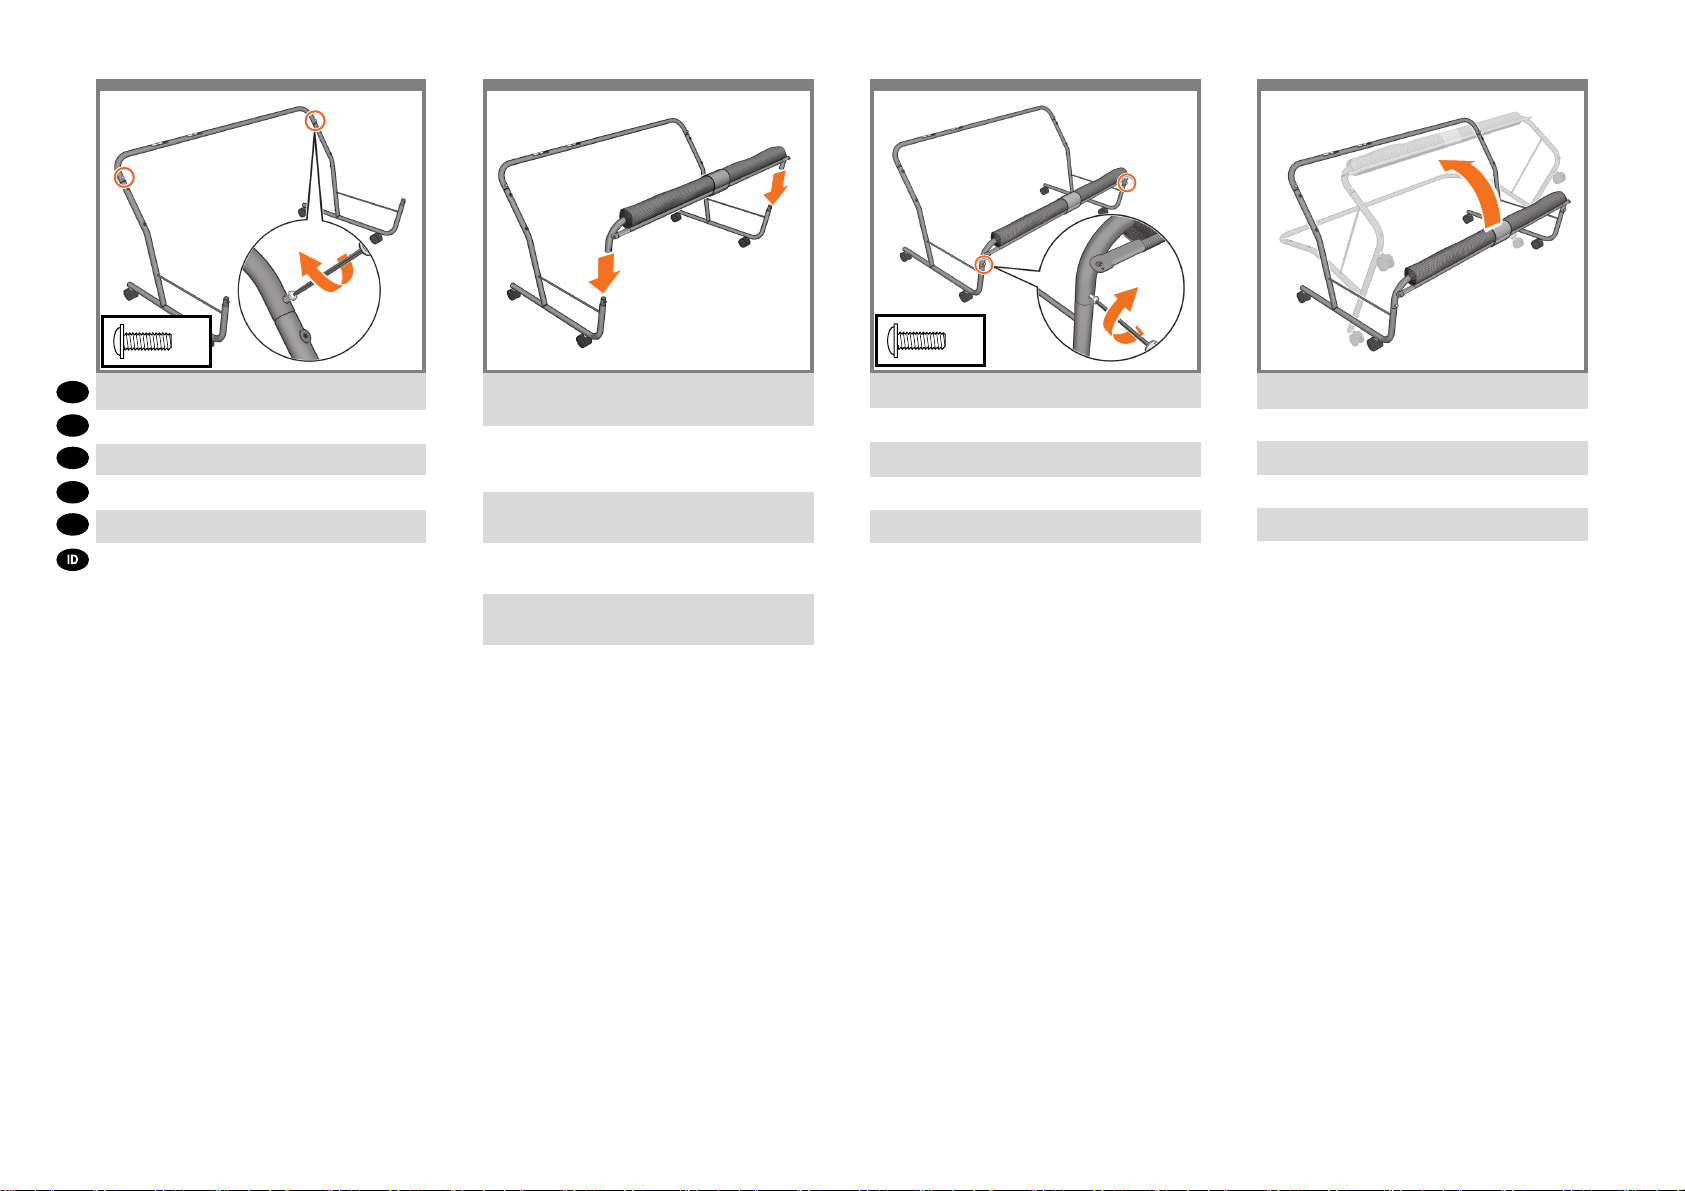
Attach the bar with one screw each side.
EN
棒の両端をそれぞれ1本のネジで固定します。
JP
每侧各使用一个螺钉将条杆安装到位。
ZHCN
在兩邊各使用一個螺絲,裝上撐桿。
ZHTW
양쪽에 나사를 하나씩 사용하여 버팀대를
KO
연결합니다.
Pasang batang tersebut dengan satu sekrup di setiap
sisi.
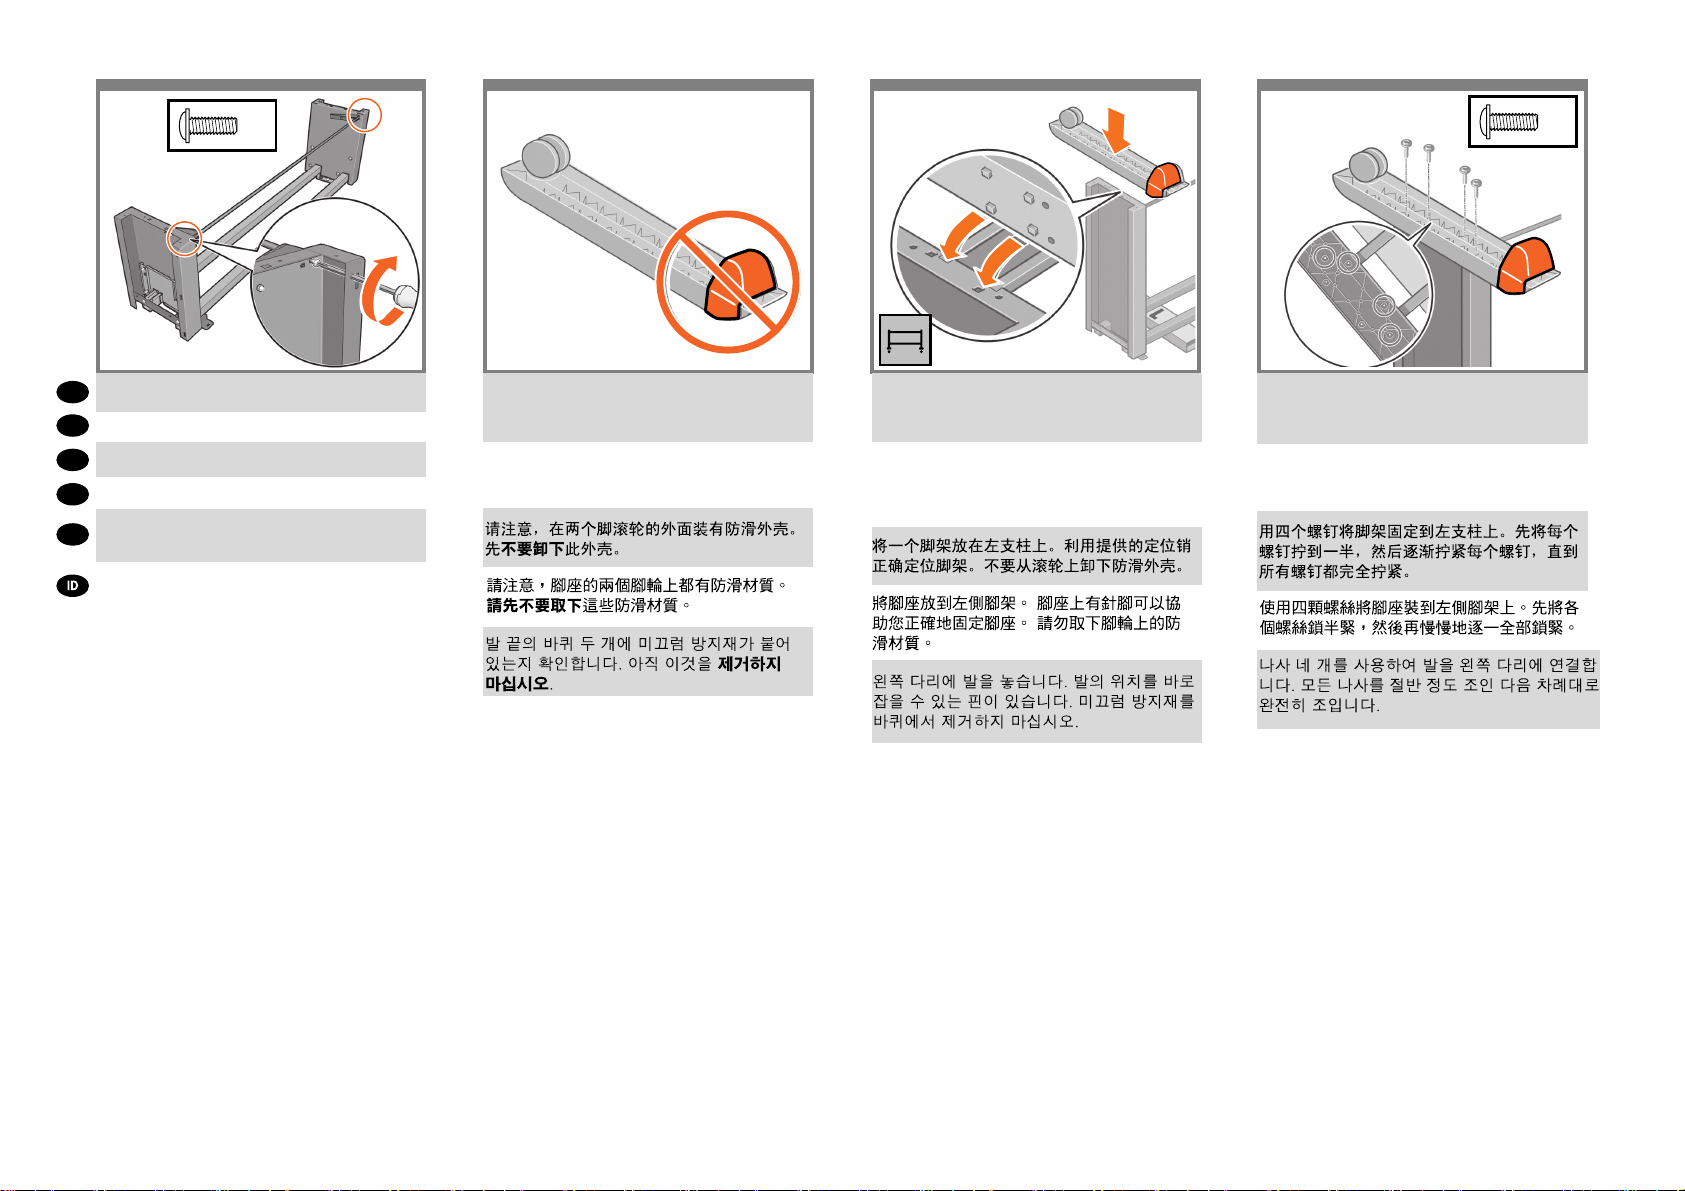
Notice that there is anti-slip material around two
of the wheels on the feet. DO NOT REMOVE this
material yet.
足部の一方のキャスターに滑り止めが付いているこ
とを確認してください。この滑り止めは、この時点
ではまだ取り外さないでください。
Perhatikan bahwa ada bahan anti selip di antara
kedua roda pada kaki. JANGAN LEPASKAN
bahan ini pada tahap ini.
Place a foot on the left leg. There are pins to help you
correctly position the foot. Do not remove the anti-slip
material from the wheel.
足部の一方を、左脚部の所定の位置に合わせます。
足部のピンを利用して、正しい位置に合わせてくだ
さい。 キャスターに付いている滑り止めは取り外さ
ないでください。
Pasang pijakan di kaki kiri. Tersedia pin untuk
membantu Anda memasang kaki dengan benar.
Jangan lepaskan bahan anti selip dari roda.
Use four screws to attach the foot to the left leg.
Tighten each screw half-way, and then gradually
tighten each screw completely.
4本のネジで、足部を左脚部に取り付けます。各ネ
ジを 緩めに締め、次に、完全に締まるまで徐々に
締めます。
7
Gunakan empat sekrup untuk memasang pijakan
ke kaki kiri. Kencangkan setiap sekrup setengah
penuh, kemudian kencangkan perlahan sampai
terkunci sepenuhnya.
Page 8
23 25 2624
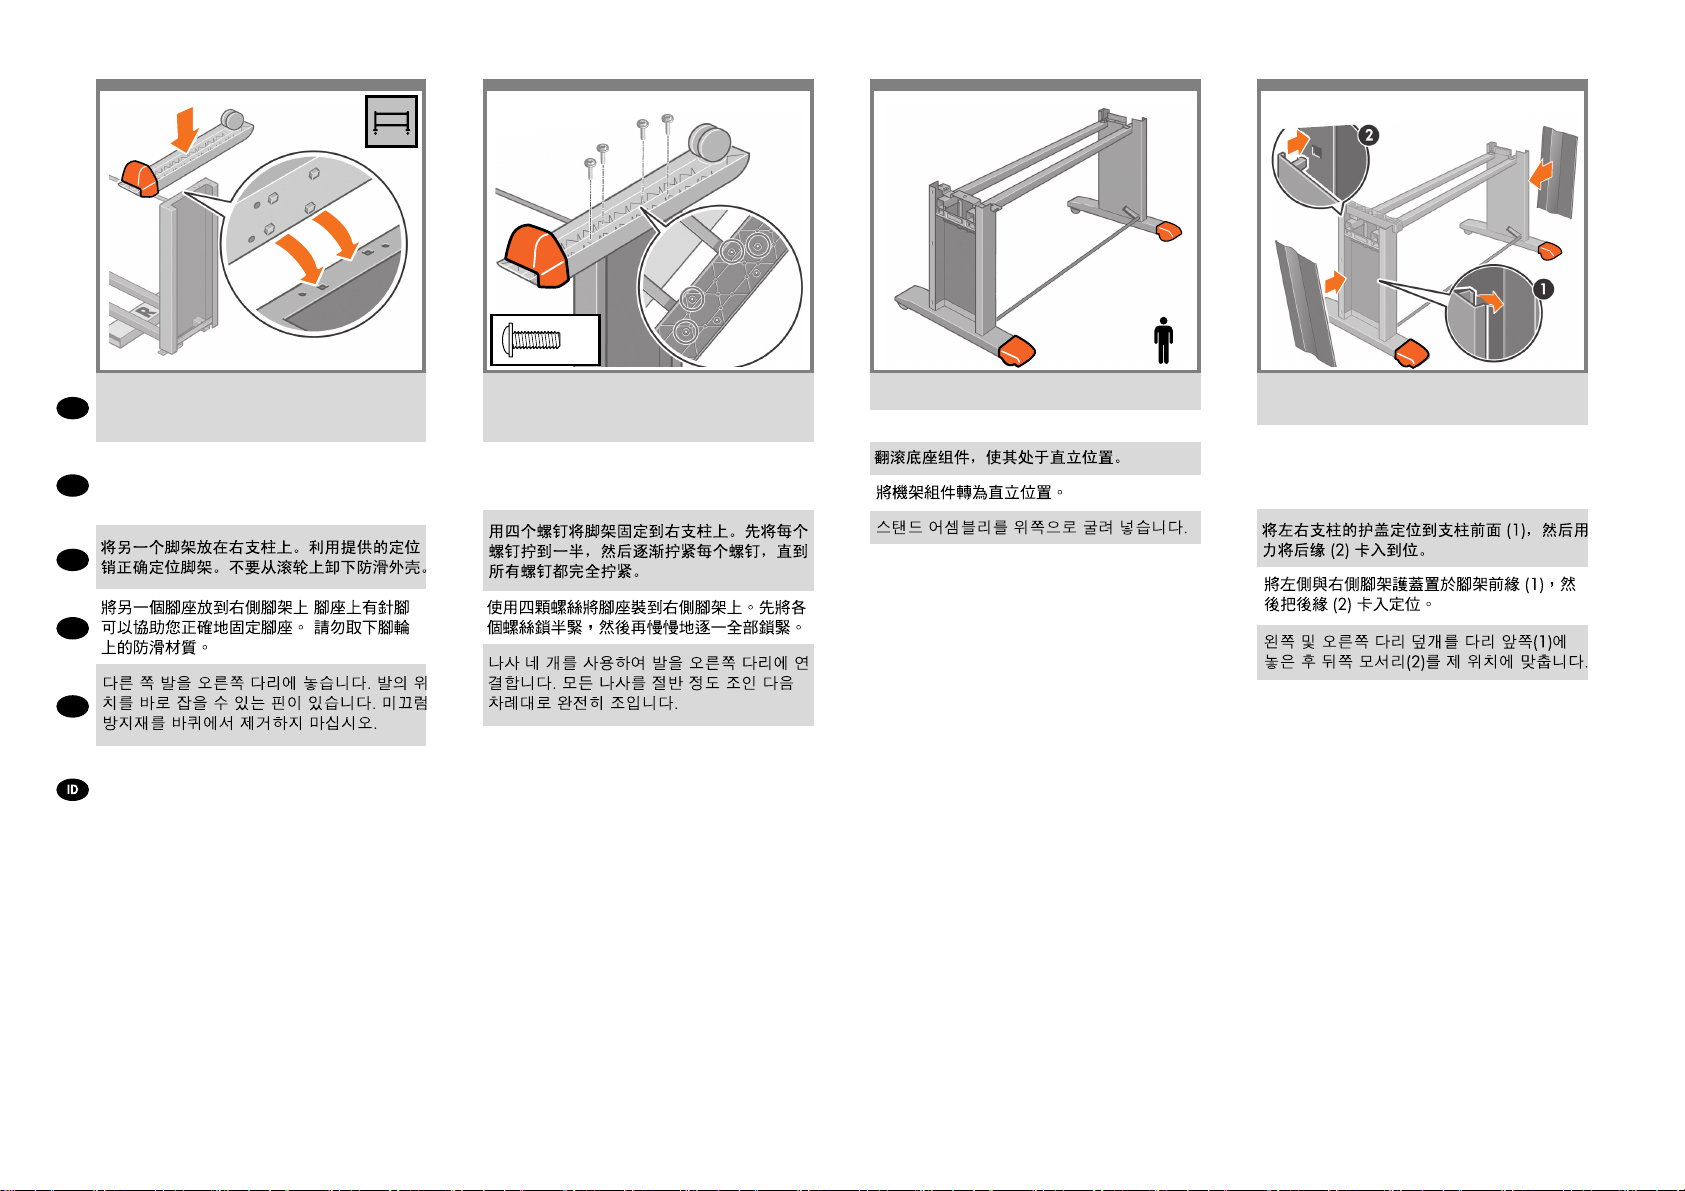
Position the other foot on the right leg. There are pins
to help you correctly position the foot. Do not remove
EN
the anti-slip material from the wheel.
足部のもう一方を、右脚部の所定の位置に合わせま
す。足部のピンを利用して、正しい位置に合わせて
JP
ください。キャスターに付いている滑り止めは取り
外さないでください。
ZHCN
ZHTW
KO
Pasang pijakan yang lain di kaki kanan. Tersedia
pin untuk membantu Anda memasang kaki
dengan benar. Jangan lepaskan bahan anti
selip dari roda.
x4
Use four screws to attach the foot to the right leg.
Tighten each screw half-way, and then gradually
tighten each screw completely.
4本のネジで、足部を右脚部に取り付けます。 各ネ
ジを 緩めに締め、次に、完全に締まるまで徐々に
締めます。
Gunakan empat sekrup untuk memasang pijakan
ke kaki kanan. Kencangkan setiap sekrup
setengah penuh, kemudian kencangkan perlahan
sampai terkunci sepenuhnya.
Roll the stand assembly into its upright position.
組み立てたスタンドを垂直に立てます。
Putar rakitan dudukan ke posisi tegak.
x2
Position the left and right leg covers on the front of the
legs (1), and then clip the rear edge (2) into place.
左脚部および右脚部のカバーを各脚部の前面の側
に合
わせ(1)、後ろ側の端を所定の位置にはめ込みます
(2)。
8
Pasang penutup kaki kiri dan kanan di depan
kaki (1), lalu jepitkan tepi belakang (2) pada
tempatnya.
Page 9
27 28 29
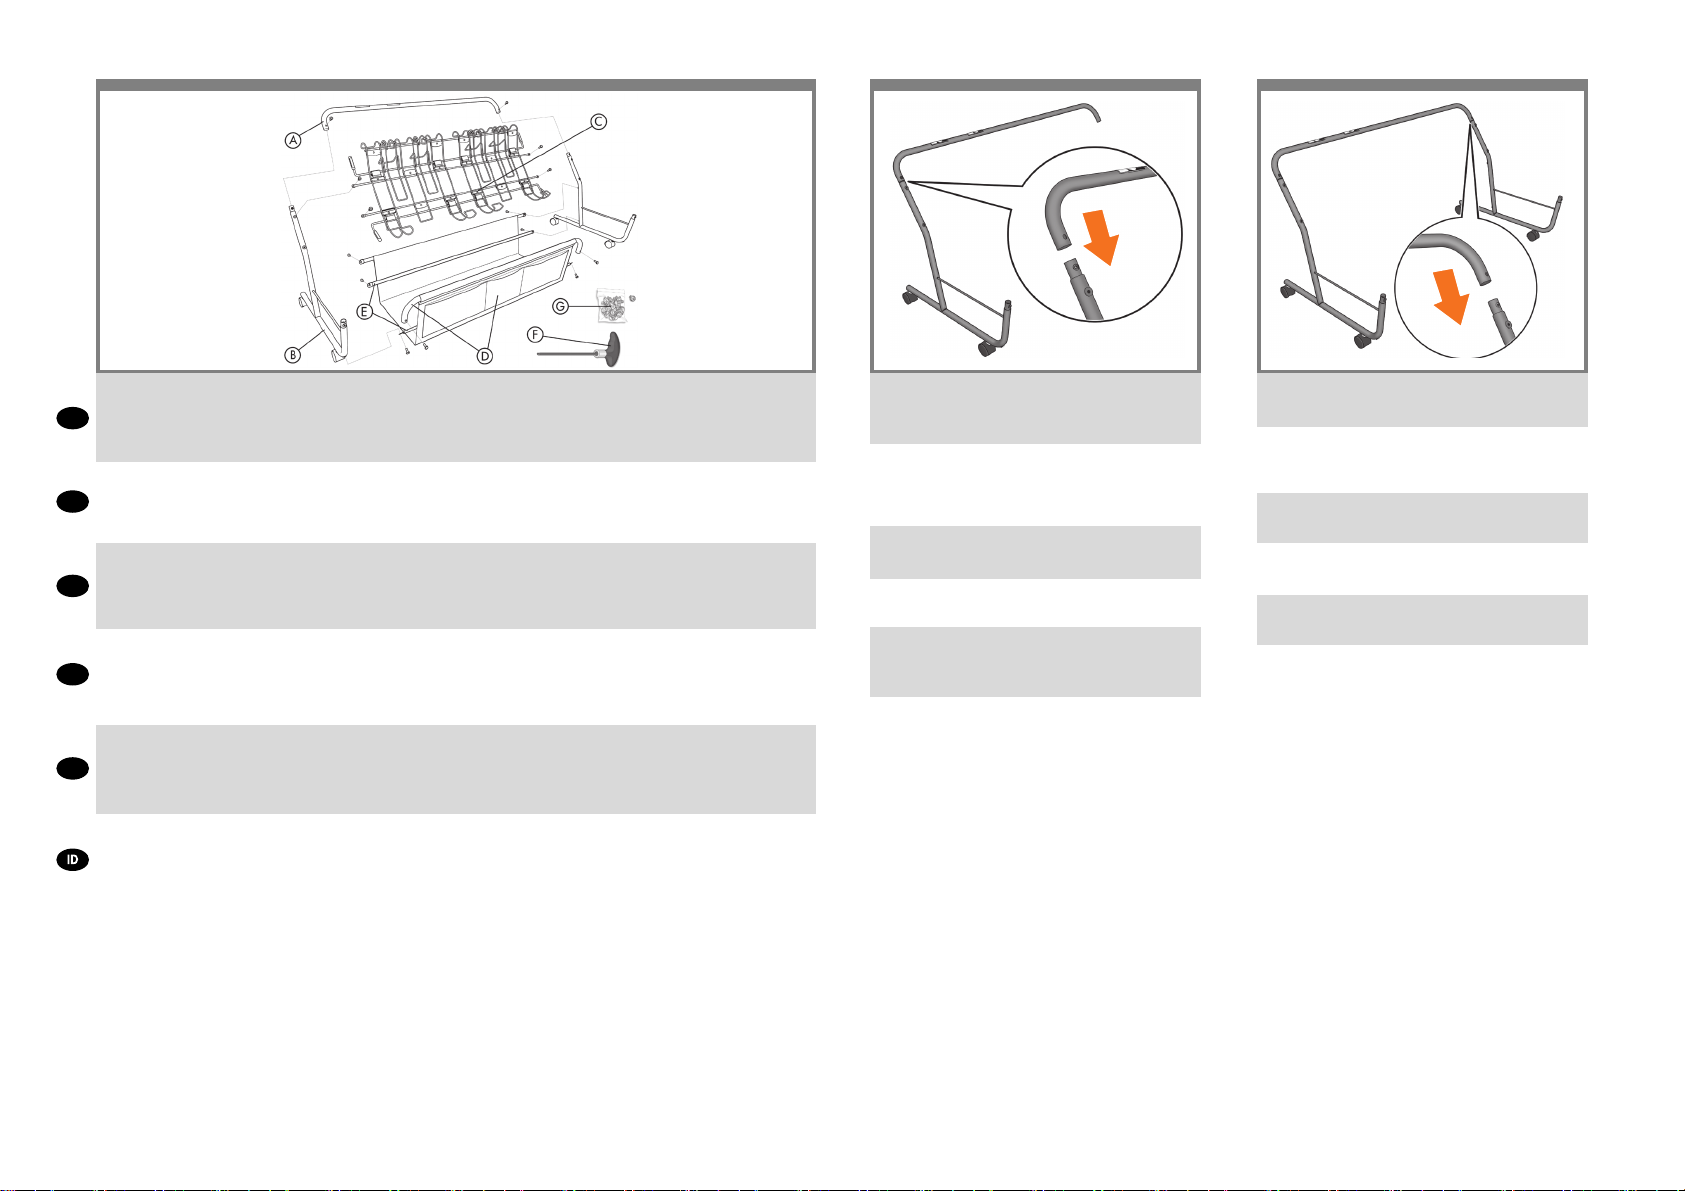
A – Handle (2)
B – Frame (2)
EN
C – Bin Rack (1)
D – Handle with fabric and structure bar (1)
A – ハンドル (2)
B – フレーム (2)
JP
C – 用紙スタッカのラック (1)
D – ファブリックと骨組み棒が付いたハンドル (1)
A – 手柄(2 个)
B – 框架(2 个)
ZHCN
C – 纸盒支架(1 个)
D – 带有织物和结构杆的手柄(1 个)
A – 扶柄 (2)
B – 框架 (2)
ZHTW
C – 紙槽架 (1)
D – 扶柄,搭配織布與結構撐桿 (1)
A – 손잡이(2)
B – 프레임(2)
KO
C – 용지함 랙(1)
D – 패브릭과 구조 버팀대로 구성된 핸들(1)
A – Gagang (2)
B – Bingkai (2)
C – Rak Keranjang (1)
D – Gagang dengan kain dan batang struktur (1)
E – Structure bar (2)
F – Screwdriver
G – Screws (16)
E – 骨組み棒 (2)
F – ドライバ
G – ネジ (16)
E – 结构杆(2 个)
F – 螺丝刀
G – 螺钉(16 个)
E – 結構撐桿 (2)
F – 螺絲起子
G – 螺絲 (16)
E – 구조 버팀대(2)
F – 드라이버
G – 나사(16)
E – Batang struktur (2)
F – Obeng
G – Sekrup (16)
Take the handle without fabric and one half of the
frame. Insert the handle onto the long part of the
frame: ensure that the holes are well aligned.
ファブリックの付いてないハンドルと片方のフレー
ムを取り出します。フレームの長い部分にハンドル
を差し込みます。このとき、ハンドルとフレームの
穴の部分が重なるように差し込みます。
将不带织物的手柄和半个框架拿起。将手柄插入框架
的长端:确保孔和孔对准。
拿起沒有織布的扶柄與半邊的框架。 在框架的長端插
上扶柄:確定小孔有準確對齊。
패브릭이 없는 핸들과 프레임 반쪽을 잡고, 핸들을
프레임의 긴 쪽에 연결합니다. 이때 구멍을 잘 맞춰야
합니다.
Ambil gagang tanpa kain dan satu bagian bingkai.
Masukkan gagang ke bagian panjang pada bingkai:
pastikan lubang telah diselaraskan dengan benar.
Take the other half of the frame and insert it onto the
handle: ensure that the holes are well aligned.
もう片方のフレームを取り出し、同様にハンドルに
差し込みます。このとき、ハンドルとフレームの穴
の部分が重なるように差し込みます。
将另一半框架拿起并将其插入手柄:确保孔和孔对
准。
拿起另外半邊的框架,插上扶柄:確定小孔有準確
對齊。
프레임 다른 한 쪽도 구멍을 잘 맞춰 핸들과
연결합니다.
Ambil bagian bingkai lain dan masukkan ke gagang:
pastikan lubang telah diselaraskan dengan benar.
9
Page 10
30 31 32 33
90º
x2
Fix the handle with two screws.
EN
2本のネジでハンドルを固定します。
JP
ZHCN
用两个螺钉将手柄固定住。
使用兩個螺絲固定扶柄。
ZHTW
KO
나사 두 개로 핸들을 고정합니다.
Kencangkan gagang dengan dua sekrup.
Insert the handle with fabric and structure bar into the
frame: ensure that the holes are well aligned.
ファブリックと骨組み棒が付いたハンドルをフレー
ムに差し込みます。このとき、ハンドルとフレーム
の穴の部分が重なるように差し込みます。
将带有织物和结构杆的手柄插入框架:确保孔和孔
对准。
將配備織布與結構撐桿的扶柄插入框架:確定小孔有
準確對齊。
패브릭과 구조 버팀대가 있는 핸들을 프레임에
연결합니다. 역시 구멍을 잘 맞춰야 합니다.
Masukkan gagang dengan kain dan batang struktur
ke bingkai: pastikan lubang telah diselaraskan
dengan benar.
x2
Fix the handle with two screws.
2本のネジでハンドルを固定します。
用两个螺钉将手柄固定住。
使用兩個螺絲固定扶柄。
나사 두 개로 핸들을 고정합니다.
Kencangkan gagang dengan dua sekrup.
Rotate the bin structure 90 degrees.
用紙スタッカを90度回転します。
将纸盒结构旋转 90 度。
將紙槽結構旋轉 90 度。
용지함 구조물을 90도 눕혀 놓습니다.
Putar struktur keranjang sebesar 90 derajat.
10
Page 11
34 35
36 37
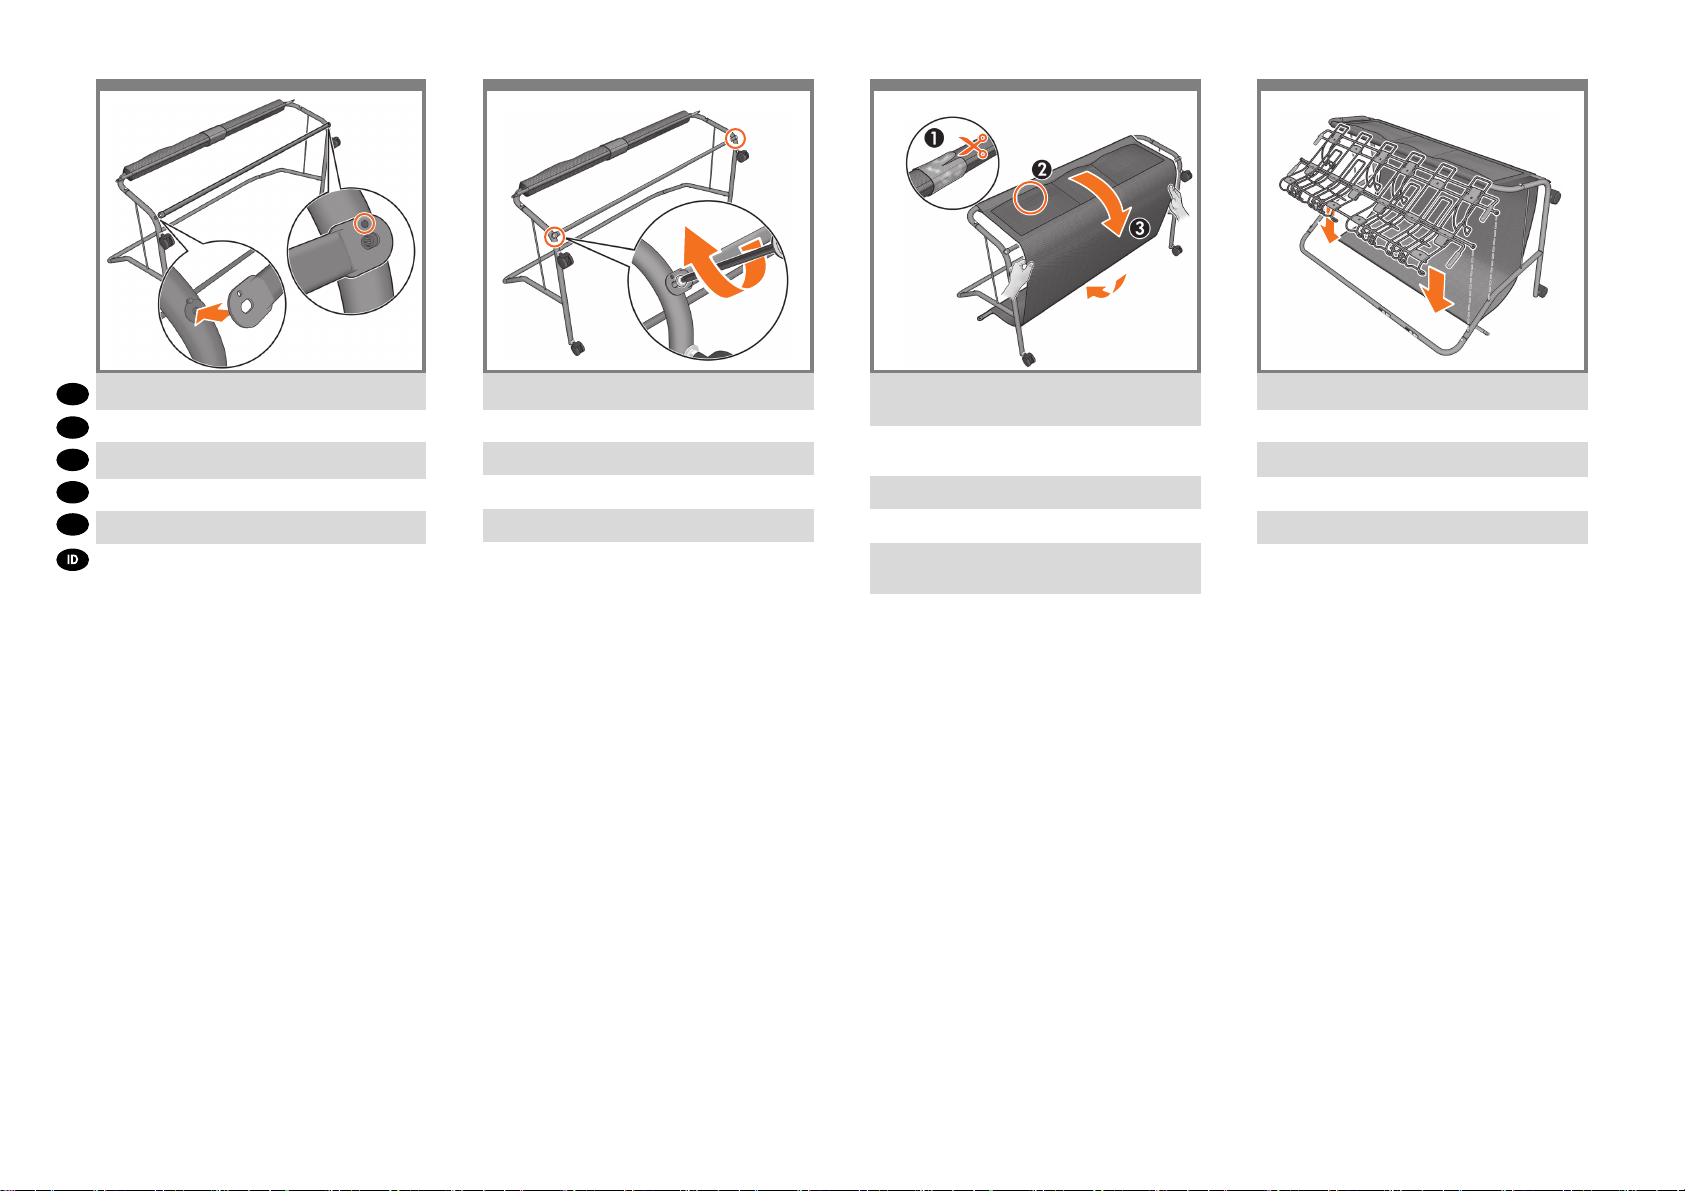
Attach a structure bar to the frame.
EN
フレームに骨組み棒を取り付けます。
JP
将结构杆安装到框架上。
ZHCN
將結構撐桿接上框架。
ZHTW
KO
구조 버팀대 하나를 프레임에 연결합니다.
Pasang batang struktur ke bingkai.
Fix the structure bar with two screws.
2本のネジで骨組み棒を固定します。
用两个螺钉将结构杆固定住。
使用兩個螺絲固定結構撐桿。
나사 두 개로 구조 버팀대를 고정합니다.
Kencangkan batang struktur dengan dua sekrup.
Cut the tape, and unroll the fabric located within the
handle around the structure.
テープをカットし、ハンドルに巻かれたファブリッ
クを骨組み棒の上から広げます。
剪开带子,将手柄内的织物绕结构展开。
剪斷膠帶,攤開位於扶柄內的織布,包覆住結構。
테이프를 자르고 핸들 안에 있는 패브릭을 펼쳐
구조물을 두릅니다.
Potong pita perekat, lalu keluarkan kain yang berada
dalam gagang di sekitar struktur.
Attach the bin rack onto the frame.
フレームに用紙スタッカのラックを取り付けます。
将纸盒支架安装到框架上。
將紙槽架接上框架。
용지함 랙을 프레임에 연결합니다.
Pasang rak keranjang ke bingkai.
11
Page 12

38 39
x4
90º90º
40 41
x2 x2
Fix the bin rack onto the frame with four screws.
EN
4本のネジでフレームに用紙スタッカのラックを固
JP
定します。
用四个螺钉将纸盒支架固定到框架上。
ZHCN
ZHTW
使用四個螺絲,將紙槽架固定在框架上。
KO
나사 네 개로 용지함 랙을 프레임에 고정합니다.
Kencangkan rak keranjang ke bingkai dengan empat
sekrup.
Rotate the bin structure 90 degrees into the upright
position.
用紙スタッカを直立位置まで90度回転させます。
将纸盒结构旋转 90 度以使其直立。
將紙槽結構旋轉 90 度,使其直立。
용지함 구조물을 다시 90도 돌려 세웁니다.
Putar struktur keranjang sebesar 90 derajat ke posisi
tegak.
Attach the handle fabric´s structure bar to the bin
structute with two screws.
ハンドルに付いているファブリックの骨組み棒を2
本のネジで用紙スタッカに取り付けます。
用两个螺钉将手柄织物的结构杆安装到纸盒结构中。
使用兩個螺絲,將扶柄織布的結構撐桿接到紙槽結
構。
나사 네 개로 핸들 패브릭의 구조 버팀대를 용지함
구조물에 연결합니다.
Pasang batang struktur kain gagang ke struktur
keranjang dengan dua sekrup.
Insert a structure bar through the handle fabric and
xto the bin structure with two screws.
ハンドルに付いているファブリックの内側に骨組
み棒を通し、両端を2本のネジで用紙スタッカに固
定します。
将结构杆穿过手柄织物插入,并用两个螺钉将其固定
到纸盒结构中。
將結構撐桿穿繞過扶柄織布,並使用兩個螺絲將撐桿
固定至紙槽結構。
구조 버팀대를 핸들 패브릭을 통과해 넣고 나사 두
개로 용지함 구조물에 고정합니다.
Masukkan batang struktur melalui kain gagang dan
kencangkan ke struktur keranjang dengan dua sekrup.
12
Page 13
EN
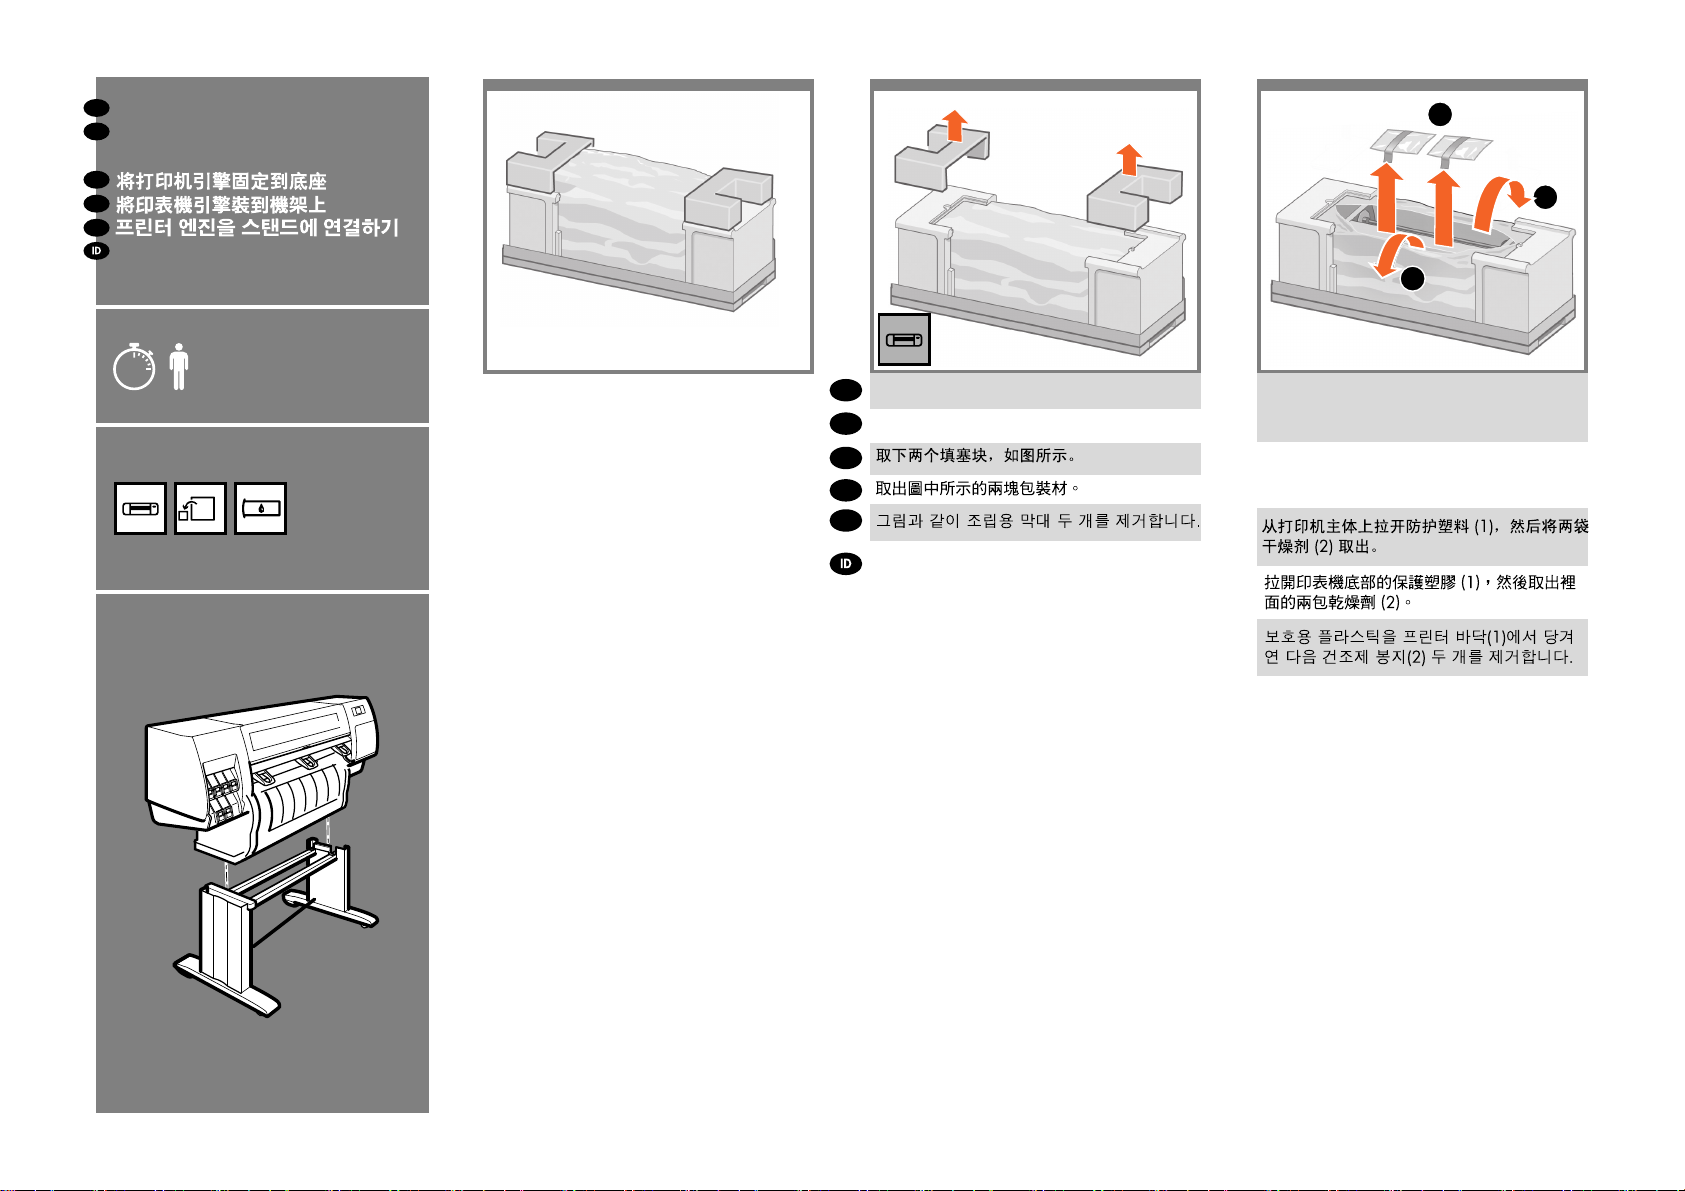
Attach the printer engine to the stand
JP
スタンドへのプリンタ エンジン
の取り付け
ZHCN
ZHTW
KO
Pasang mesin printer ke dudukan
23
42
43
44
2
1
1
15’
x4
EN
Remove the two packing pieces shown.
JP
図のように、2つある梱包材を取り除きます。
ZHCN
ZHTW
KO
Keluarkan kedua materi kemasan yang
ditunjukkan.
Pull open the protective plastic from the base of the
printer (1), and then remove the two desiccant bags
(2).
保護用ビニール シートを引っ張って開き(1)、2つ
ある
乾燥剤の袋を取り除きます(2)。
13
Tarik keluar plastik pelindung dari dasar
printer (1), kemudian keluarkan dua kantong
pengering (2).
Page 14

45 484746
x2
x1
x2
Lift the stand assembly onto the printer engine. The
EN
anti-slip material should face the rear of the printer.
組み立てたスタンドを、プリンタ エンジンの上に
載せます。
JP
滑り止めが、プリンタの背面側を向くようにして
ください。
ZHCN
ZHTW
KO
Angkat rakitan dudukan ke atas mesin printer.
Bahan anti selip harus menghadap ke belakang
printer.
Use one screw to attach the right side of the stand to
the printer engine. Make sure that the screw is fully
tightened.
スタンドの右側を、ネジ1本でプリンタ エンジンに
固定します。ネジはしっかり締めてください。
Gunakan satu sekrup untuk memasang sisi kanan
dudukan ke mesin printer. Pastikan sekrup
dikencangkan sepenuhnya.
Use two screws to attach the left side of the stand
to the printer. Make sure that the screws are fully
tightened.
スタンドの左側を、ネジ2本でプリンタに固定しま
す。ネジはしっかり締めてください。
Gunakan dua sekrup untuk memasang sisi kiri
dudukan ke printer. Pastikan sekrup dikencangkan
sepenuhnya.
Place the spare box and the comsumables box against
the rear of the printer box. The arrows on the boxes
must point towards the printer box. Make sure that the
anti-slip material is attached to the two rear wheels.
予備の箱とサプライ品の箱を、プリンタの箱の背面
側に密着させて置きます。箱に記載されている矢印
が、プリンタの側を向くようにしてください。左右
の後部キャスターに滑り止めが付いていることを確
認します。
14
Letakkan boks suku cadang dan boks persediaan
sekali pakai menempel di bagian belakang boks
printer. Tanda panah pada boks harus mengarah
ke boks printer.
Pastikan bahan anti selip terpasang pada kedua
roda belakang.
Page 15

49 5250 51
x2
x4
Rotate the printer onto the spare box and the
consumables box. HP recommends four people to
EN
complete this task.
予備の箱とサプライ品の箱の上にプリンタを載せて
回転させます。この作業は、4名で行うことをお勧
JP
めします。
ZHCN
ZHTW
KO
Putar printer ke atas boks suku cadang dan boks
persediaan sekali pakai. HP menganjurkan empat
orang untuk menyelesaikan tugas ini.
Rotate the printer until the back of the printer rests
on the spare box and the consumables box, and the
wheels with the anti-slip material touch the oor.
プリンタの背面を2つの箱の上に完全に載せます。
次に、プリンタを滑り止めの付いたキャスターが床
に着くまで起こします。
Putar printer sampai bagian belakang printer
bersandar pada boks suku cadang dan boks
persediaan sekali pakai, dan roda dengan
bahan anti selip menyentuh lantai.
x4x4
Use the hand holds at the rear of the printer engine
to carefully lift the printer to its upright position. HP
recommends four people to complete this task.
手でプリンタ エンジンの背面を押さえながら、プリ
ンタを慎重に持ち上げます。この作業は、4名で行
うことをお勧め
します。
Pegang bagian belakang mesin printer untuk
mengangkat printer dengan hati-hati ke posisi tegak.
HP menganjurkan empat orang untuk menyelesaikan
tugas ini.
Remove the two foam end-packs, and then remove the
plastic covering from the printer engine.
2つの梱包用発泡スチロールと、プリンタ エンジン
を覆っているシートを取り除きます。
15
Lepaskan kedua gabus bantalan ujung, lalu lepaskan
penutup plastik dari mesin printer.
Page 16

EN
53 5554
Unpack more components
JP
その他のコンポーネントの開梱
ZHCN
ZHTW
KO
2
Membuka kemasan komponen lain
4
3
5
6
1
2
7
3
7
6
Push and release the break from the printer. Remove
EN
the anti-slip material from the two rear wheels on the
stand assembly.
レバーを押してプリンタのブレーキを離します。組
JP
み立てたスタンドの左右の後部キャスターに付いて
いる滑り止めを取り外します。
推动断纸装置并将其从打印机上松开,从支架组件的
ZHCN
两个后滚轮上卸下防滑材料。
從印表機推出並移除止動包裝。移除機架組件兩個後
ZHTW
腳輪上的防滑材質。
브레이크를 밀어서 풀고 스탠드 어셈블리의 뒤쪽
KO
바퀴 두 개에서 미끄럼 방지재를 제거합니다.
Dorong dan keluarkan penahan dari printer.
Lepaskan bahan anti selip dari kedua roda belakang
pada rakitan dudukan.
1
4
5
5’
x1
Remove the packing tapes marked 1 to 8 from the
exterior of the printer.
プリンタの外側の梱包テープ1~8を剥がします。
从打印机表面取下用 1 至 8 标记的包装带。
拆掉印表機外部標示 1 到 8 的包裝膠帶。
프린터 바깥쪽에서 1에서 8까지 번호가 붙은 포장
테이프를 뗍니다.
Lepaskan pita kemasan bertanda 1 hingga 8 dari
bagian luar printer.
Open the printer window, and then remove the
packing items (1 to 5) from the interior of the printer,
and the two that are found on the rear of the printer
(6 and 7).
プリンタのウィンドウを開き、次に、梱包材1~5を
プリンタの内側から取り除きます。さらに、プリン
タの後部にある2つの梱包材6、7も取り除きます。
打开打印机护盖,然后从打印机里面取出包装物(1
至 5),以及打印机背面的两个包装物(6 和 7)。
打開印表機上蓋,然後取出印表機內部(標示 1 到
5)的包裝物,以及在印表機後方的包裝物(標示 6
與 7)。
프린터 창을 열고 프린터 안쪽에서 1에서 5까지의
포장 항목을 제거하고, 프린터 뒤쪽에 있는 6번과 7
번 항목도 제거합니다.
Buka jendela printer, lalu keluarkan item kemasan (1
hingga 5) dari bagian dalam printer dan dua yang
terdapat di bagian belakang printer (6 dan 7).
16
Page 17

56 57 58
1
2
Remove the packing item from the interior of the
EN
printer.
プリンタの内側から梱包材を取り除きます。
JP
ZHCN
从打印机里面取出包装物。
ZHTW
拆掉印表機內部的包裝物。
KO
프린터 바깥쪽에서 포장 항목을 제거합니다.
Lepaskan item kemasan dari bagian dalam printer.
Open the supplies and cables box and plug the
Gigabit Ethernet cable into the Gigabit Ethernet
connection.
サプライ品とケーブルの箱を開き、ギガビット イー
サネット ケーブルをギガビット イーサネット接続
部に接続します。
打开耗材和电缆包装箱,将千兆位以太网电缆插入千
兆位以太网接口。
打開耗材與纜線的包裝箱,將 Gigabit 乙太網路纜線
插入 Gigabit 乙太網路孔中。
소모품 및 케이블 상자를 열고 Gigabit Ethernet
케이블을 Gigabit Ethernet 연결 장치에 꽂습니다.
Buka kemasan persediaan dan kabel, lalu pasang
kabel Ethernet Gigabit ke sambungan Ethernet
Gigabit.
Pass the Gigabit Ethernet cable through the hook at
the rear of the printer.
ギガビット イーサネット ケーブルは、プリンタ背
面の フックにかけます。
17
Lewatkan kabel Gigabit Ethernet melalui kait di
bagian belakang printer.
Page 18

EN
Install the ink supplies
JP
インク サプライ品の取り付け
ZHCN
ZHTW
KO
Memasang persediaan tinta
54
6159606362 64
40’
x1
Plug the power cable into the rear of the printer, and
EN
then plug the other end into the AC power outlet.
電源ケーブルをプリンタ背面に差し込み、反対側を
JP
AC電源コンセントに差し込みます。
ZHCN
ZHTW
KO
Tancapkan kabel listrik ke bagian belakang
printer, kemudian tancapkan ujung yang lain ke
stopkontak listrik AC.
Turn the Power switch to the On position at the
rear of the printer.
プリンタ背面の電源スイッチをオンにします。
Hidupkan saklar Daya di bagian belakang
printer ke posisi On [Aktif].
If the power light on the front panel remains off,
press the Power button to switch on the printer. Note:
This printer is Energy Star compliant and can be left
on without wasting energy. Leaving it on improves
response time and overall system reliability.
フロントパネルの電源ランプが点灯しない場合は、
電源ボタンを押してプリンタの電源を入れます。
18
Jika lampu daya di panel depan tetap mati,
tekan tombol Daya untuk menghidupkan printer.
Catatan: Printer ini memenuhi persyaratan
Energy Star dan dapat terus dihidupkan tanpa
membuang energi.
Membiarkan printer ini hidup akan meningkatkan
waktu respon dan keandalan sistem secara
keseluruhan.
Page 19

1’
65
1
2
Wait until this message appears on the front panel
(~1 minute). Use the Up and Down buttons to
EN
highlight the language you want, and then press the
OK button.
しばらくすると、フロントパネルに図のようなメッ
セージが 表示されます (所要時間最長1分)。[上矢印]
JP
ボタンと [下矢印] ボタンを使用して使用する言語を
ハイライトし、[OK] ボタンを押します。
ZHCN
ZHTW
KO
Tunggu sampai pesan ini ditampilkan pada
panel depan (~1 menit). Gunakan tombol Naik
dan Turun untuk menyorot bahasa yang
dikehendaki, lalu tekan tombol OK.
Follow strictly step by step. Wait until this message
appears. The front panel guides you through the
procedures for inserting the ink supplies.
必ず手順どおりに行ってください。
しばらくすると図のようなメッセージが表示されま
す。フロントパネルに、インク サプライ品の取り付
け手順が 表示されます。
严格地一步一步执行操作。
請完全依照指示逐步進行。
각 단계별 지침을 정확히 따라야 합니다.
Lakukan setiap langkah dengan benar.
Tunggu sampai pesan ini ditampilkan. Panel
depan memandu Anda menjalankan prosedur
untuk memasukkan persediaan tinta.
Shake the ink cartridge vigorously for about 15
seconds. Be careful not to strike it against any surface
because this can damage the cartridge.
インクカートリッジを15秒間よく振ります。破損の
原因となるため、カートリッジを振る時は物にぶつ
けないようにしてください。
Kocok kartrid tinta dengan keras selama sekitar
15 detik. Berhati-hatilah jangan sampai
menabrak permukaan apa pun karena dapat
merusak kartrid.
To release the ink cartridge drawer, gently pull
down on the blue handle, and then slide out the ink
cartridge drawer.
青いタブを静かに下げ、インクカートリッジ用の引
き出しを引き出します。
19
Tarik tangkai biru dengan perlahan ke bawah
lalu geser keluar laci kartrid tinta.
Page 20
696766 68
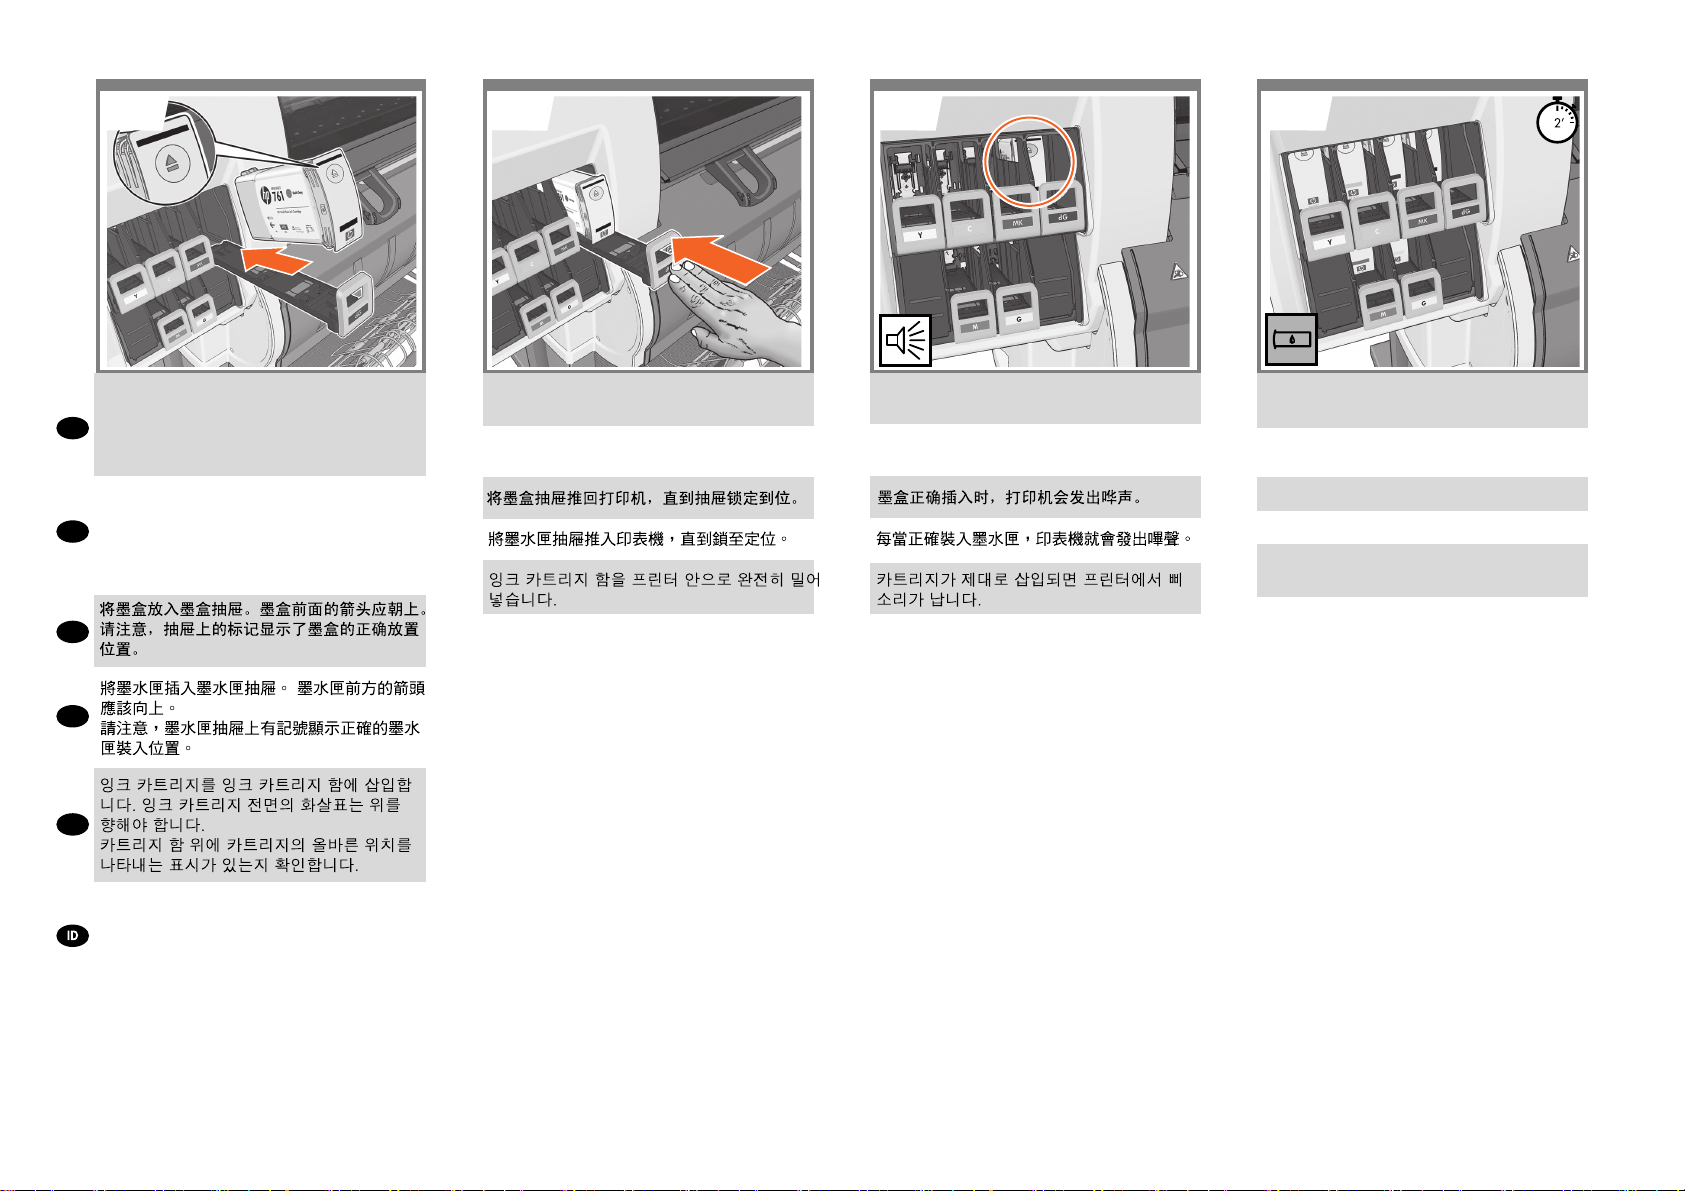
Place the ink cartridge in the ink cartridge drawer.
The arrow on the front of the ink cartridge should
point upwards. Note that there are marks on the
EN
drawer to show the correct location to place the
cartridge.
インクカートリッジをインクカートリッジ用の引き
出しの上に 置きます。 インクカートリッジの正面
の矢印が上を向いているかどうかを確認します。
JP
引き出しには、カートリッジを取り付ける位置が
示されてい
ます。
ZHCN
ZHTW
KO
Masukkan kartrid tinta ke dalam laci kartrid tinta.
Tanda panah di depan kartrid tinta harus
mengarah ke atas.
Perhatikan bahwa laci diberi tanda untuk
menunjukkan lokasi penempatan kartrid yang
benar.
Push the ink cartridge drawer back into the printer
until the drawer locks into position.
インクカートリッジ用の引き出しを、所定の位置に
固定さ れるまでプリンタの中に押し込みます。
Dorong masuk laci kartrid tinta kembali ke dalam
printer sampai laci terkunci pada tempatnya.
The printer “beeps” when the cartridge is correctly
installed.
カートリッジが正しく取り付けられると、プリンタ
のブザー音が鳴ります。
Printer akan berbunyi ‘bip’ bila kartrid dimasukkan
dengan benar.
Follow the same instructions to insert the other ve ink
cartridges.
同様の手順で、残りの5つのインクカートリッジを
挿入します。
按照相同方法插入其他五个墨盒。
依照相同指示裝入其他的五個墨水匣。
나머지 다섯 개 잉크 카트리지를 삽입할 때도 동일한
절차를 따릅니다.
Ikuti petunjuk yang sama untuk memasukkan lima
kartrid tinta lainnya.
20
Page 21

70
71 72 73
73
EN
Open the window.
JP
ウィンドウを開きます。
打开护盖。
ZHCN
ZHTW
開啟窗蓋。
KO
창을 엽니다.
Buka jendela.
When the above question on the front panel of your
printer, you must follow steps 72 to 75 in order to
answer the question.
プリンタのフロントパネルに上の質問が表示され
たら、手順72から手順75に従って質問に答えてく
ださい。
当您看到打印机前面板的上述问题时,必须按照步骤
72 至 75 来回答问题。
當您看到印表機前控制面板出現上述問題時,必須依
照步驟 72 至 75 進行,以回答問題。
전면 패널에 위와 같은 질문이 표시되는 경우 72~75
단계를 수행하여 질문에 답해야 합니다.
Bila Anda melihat pertanyaan di atas pada panel
depan printer, ikuti langkah 72 hingga 75 untuk
menjawab pertanyaan.
Open the printer window, and then remove the
packing foam from the top of the printhead carriage.
プリンタのウィンドウを開き、次に、梱包材をプリ
ントヘッド
キャリッジから取り除きます。
Buka jendela printer, kemudian keluarkan gabus
kemasan dari bagian atas carriage printhead.
Remove the packing tape that is holding down the
printhead carriage latch.
プリントヘッド キャリッジ ラッチを固定している
梱包テープを剥がします。
21
Lepaskan pita kemasan yang menahan kait carriage
printhead ke bawah.
Page 22

76 777574
2
1
1
2
Pull up and release the blue latch on top of the
carriage assembly.
EN
Lift the blue latch to open the printhead cover.
キャリッジ上部の青いラッチを引き上げて、ロック
を解除します。
JP
青いラッチを持ち上げて、プリントヘッド カバー
を開きます。
ZHCN
ZHTW
KO
Tarik ke atas dan lepaskan kait biru di atas rakitan
carriage.
Angkat kait biru untuk membuka penutup printhead.
Remove the big yellow label that covers the set-up
printheads. In each printhead, inspect the cavities
found under the label, to check if they contain ink.
セットアップ プリントヘッドを覆っている黄色の
ラベルを取り外します。各プリントヘッドで、ラベ
ルの下の穴を調べてインクが入っているかどうかを
確認します。
撕下盖在设置打印头上的较大黄色标签覆盖物。检
查每个打印头上标签下面的小槽,查看其是否含有
墨水。
移除遮蓋設定印字頭的大型黃色標籤。 在某個印字頭
中,查看標籤下找到的小動,檢查其中是否有墨水。
셋업 프린트 헤드에 붙어 있는 큰 노란색 레이블을
제거한 다음, 각 셋업 프린트 헤드에서 레이블 아래의
공간을 확인하여 잉크가 들어 있는지 점검합니다.
Lepaskan label besar berwarna kuning yang
menutupi printhead kongurasi. Pada setiap
printhead, periksa rongga yang terdapat di bagian
bawah label untuk mengetahui apakah rongga
tersebut berisi tinta.
Close the latch & window.
ラッチとウィンドウを閉じて.
合上栓锁和护盖.
關閉閂鎖與檢視窗.
닫기 래치와 창문을
Tutup palang pintu dan jendela.
Select:
P All with some ink
選択 :
P すべてにインクが入っています
选择:
P 全都充满墨水
選擇:
P 全部都裝填了一些墨水
선택.
P 전부 잉크 표시되어 있음
Pilih:
P Semua diisi sedikit tinta
22
Page 23

EN
Wait until this message appears on the front panel.
しばらくすると、フロントパネルに図のようなメッ
JP
セージが表示されます。
ZHCN
ZHTW
KO
2’
Pull open the maintenance cartridge door, which is
located on the right side of the printer.
プリンタの右側にある保守カートリッジのドアを開
きます。
807978 81
Remove the transparent shipping tray.
Insert the maintenance cartridge, pushing it in and
down until it clicks into place, and then close the
maintenance cartridge door.
透明の出荷用トレイを取り外します。
保守カートリッジを奥まで挿入し、所定の位置にカ
チッと音がするまで上から押し込みます。次に、保
守カートリッジのドアを閉めます。
Wait until this message appears on the front panel
(about 1 minute).
しばらくすると、フロントパネルに図のようなメッ
セージが表示されます (所要時間1分)。
1’
Tunggu sampai pesan ini ditampilkan pada panel
depan.
Tarik untuk membuka pintu kartrid perawatan, yang
terdapat di sebelah kanan printer.
23
Tunggu sampai pesan ini ditampilkan pada panel
depan (sekitar 1 menit).
Keluarkan baki pengiriman transparan. Masukkan
kartrid perawatan, dorong ke dalam dan ke bawah
sampai ‘terkunci’ pada tempatnya, lalu tutup pintu
kartrid perawatan.
Page 24

8583 8482
Remove all the setup printheads.
EN
付属のプリントヘッドをすべて取り外します。
JP
ZHCN
ZHTW
KO
Keluarkan semua printhead kongurasi.
Shake the printhead vigorously for about 15 second.
Be careful not to strike it against any surface because
this can damage the printhead.
プリントヘッドを15秒間よく振ります。破損の原因
となるため、プリントヘッドを振る時は物にぶつけ
ないようにしてください。
Kocok printhead dengan keras selama sekitar 15
detik. Berhati-hatilah jangan sampai menabrak
permukaan apa pun karena dapat merusak printhead.
Remove the two protective covers on the new
printhead.
プリントヘッドから、2個ある保護カバーを取り外
します。
Lepaskan kedua lapisan pelindung pada printhead
baru.
Lower all of the printheads vertically into their correct
positions. The printer “beeps” when each printhead is
correctly inserted.
すべてのプリントヘッドを、正しい位置に垂直に差
し込みます。 各プリントヘッドが正しく取り付けら
れると、プリンタのブザー音が鳴ります。
24
Turunkan semua printhead secara vertikal ke posisi
yang benar. Printer akan berbunyi ‘bip’ setiap kali
printhead dimasukkan dengan benar.
Page 25

8786 8988
Make sure that the printheads are correctly seated.
When all of the printheads are inserted, the front
EN
panel prompts you to “Close printhead cover and
window”.
プリントヘッドが正しく取り付けられていることを
確認します。すべてのプリントヘッドを挿入する
と、フロントパネルに「プリントヘッド カバーと
JP
ウィンドウを閉じます」というメッセージが表示
されます。
ZHCN
ZHTW
KO
Pastikan printhead dipasang dengan benar. Setelah
semua printhead dimasukkan, panel depan akan
meminta Anda untuk “Close printhead cover and
window” [Tutup penutup dan jendela printhead].
If a “Reseat” message appears on the front panel,
check that all of the protective tape has been
removed, and then rmly reseat the printheads. If the
problem persists, refer to the HP Start-Up Kit CD/DVD.
フロントパネルに「交換します」というメッセージ
が表示される場合は、保護テープがすべて剥がされ
ていることを確認してから、プリントヘッドをもう
一度しっかりと取り付け直してください。 それでも
問題が解決しない場合は、『HP スタートアップ キ
ット』CD/DVDを参照してください。
Jika pesan “Reseat” [Atur ulang dudukan] muncul di
panel depan, periksa apakah semua pita pelindung
telah dilepaskan, kemudian pasang kembali printhead
dengan kuat. Jika masalah ini terus berlanjut, lihat
CD/DVD Start-Up Kit HP.
Close the carriage assembly cover.
キャリッジ カバーを閉じます。
Tutup penutup rakitan carriage.
Make sure that the blue latch is correctly engaged,
and then lower the latch.
青いラッチが正しくはめ込まれていることを確認
し、次にラッチを下げます。
25
Pastikan kait biru terpasang dengan benar, kemudian
turunkan kait tersebut.
Page 26

9190 92
Close the printer window.
EN
ウィンドウを閉じます。
JP
ZHCN
ZHTW
KO
Tutup jendela printer.
Wait until the Ready for paper message appears on
the front panel.
フロントパネルに「用紙をセットできます」という
メッセージが表示されるまでお待ちください。
Tunggu sampai pesan Ready for paper [Siap untuk
kertas] ditampilkan pada panel depan.
Select the altitude where the printer is located.
To select altitude go to: Menu > Setup> Printing
Preferences > Select altitude
プリンタを取り付ける高さを選択してください。高
さを選択するには、[メニュー] > [セットアップ] > [
印刷設定] から高さを選択します。
选择打印机所处的海拔高度。要选择海拔高度,请转
至“菜单”>“设置”>“打印首选项”>“选择海拔高度”
選擇印表機所在的海拔高度。要選擇海拔高度,請移
至:「功能表」>「設定」>「列印喜好設定>「選擇
海拔高度」
프린터가 위치한 곳의 고도를 선택하십시오. 고도를
선택하려면 메뉴 > 설정 > 인쇄 기본 설정 > 고도
선택으로 이동하십시오.
Pilih ketinggian lokasi printer. Untuk memilih
ketinggian, buka: Menu > Kongurasi > Preferensi
Cetak > Pilih ketinggian
26
Page 27

EN
Load the paper
JP
用紙の取り付け
ZHCN
ZHTW
KO
Isikan kertas
9493 95
25’
x1
Load the paper following the instructions.
EN
指示に従って用紙を取り付けます。
JP
按照说明装入纸张。
ZHCN
依照指示裝入紙張。
ZHTW
지침에 따라 용지를 넣습니다.
KO
Masukkan kertas berdasarkan petunjuk.
Select the paper type.
用紙の種類を選択します。
选择纸张类型。
選擇紙張類型。
용지 종류를 선택합니다.
Pilih jenis kertas.
Open the printer cover.
プリンタのカバーを開きます。
打开打印机盖。
打開印表機護蓋。
프린터 덮개를 엽니다.
Buka penutup printer.
27
Page 28

9796 9998
Move left hub until the end of the slot.
EN
JP
左側のハブをスロットの端に移動します。
ZHCN
将左侧轮毂移至插槽末端。
ZHTW
將左側輪軸移動至插槽的尾端。
KO
왼쪽 허브를 슬롯 끝까지 밉니다.
Geser hub kiri hingga bagian akhir slot.
Insert the paper roll with the start of the paper facing
you downwards.
用紙の端を手前にし、端を下に向けた状態でロール
紙を挿入します。
插入纸张卷筒,使纸张开头部分向下冲着您。
插入捲筒紙,紙張起始處朝您且正面朝下。
용지 시작 부분이 아래를 향하게 하여 용지 롤을
넣습니다.
Masukkan gulungan kertas dengan bagian atas
kertas menghadap ke bawah.
Make sure that the roll is sitting on the mobile support.
ロール紙が可動式サポートの上に収まっていること
を確認します。
确保卷筒放在可移动的支座上。
確定捲筒安置在行動支撐架上。
롤을 움직이는 허브에 잘 맞춰서 넣습니다.
Pastikan gulungan tersebut berada di penyangga
yang dapat digerakkan.
Push the roll onto the right hand hub.
ロール紙を右側のハブまで押し込みます。
将卷筒推到右侧轮毂上。
將捲筒推上右側輪軸。
롤을 오른쪽 허브에 밀어 넣습니다.
Dorong gulungan ke hub di sebelah kanan.
28
Page 29

101100 103
102
EN
Adjust the roll using the mobile hub.
可動式ハブでロール紙を調整します。
JP
使用可移动的轮毂调整卷筒。
ZHCN
使用行動輪軸調整捲筒。
ZHTW
움직이는 허브를 사용하여 롤을 조정합니다.
KO
Sesuaikan gulungan menggunakan hub yang dapat
digerakkan.
Ensure that there is no space between the roll and
hubs.
ロールと両側のハブの間に隙間がないことを確認
します。
确保卷筒与轮毂之间没有任何空隙。
確認捲筒與輪軸之間毫無空隙。
롤과 양쪽 허브 사이에 빈 공간이 없는지 확인합니다.
Pastikan tidak terdapat ruang antara gulungan dan
hub.
Open the alignment bar.
位置調整棒を開きます。
打开校准杆。
打開校正撐桿。
정렬 막대를 엽니다.
Buka batang penyelarasan.
Pull the paper until the edge is inside the blue zone.
用紙の端が青いゾーン内に入るまで用紙を引き出
します。
拉动纸张,直到其边缘位于蓝色区域中。
拉出紙張,直到邊緣到達藍色區域內。
가장자리가 파란색 구간 안에 들어갈 때까지 용지를
당깁니다.
Tarik kertas hingga ujungnya berada dalam zona
biru.
29
Page 30

107105 106104
Macintosh*
Windows**
20'
Close the alignment bar.
EN
JP
位置調整棒を閉じます。
合上校准杆。
ZHCN
關上校正撐桿。
ZHTW
정렬 막대를 닫습니다.
KO
Tutup batang penyelarasan.
Close the printer cover.
プリンタのカバーを閉じます。
盖上打印机盖。
合上印表機護蓋。
프린터 덮개를 닫습니다.
Tutup penutup printer.
Slide the bin into place.
用紙スタッカを所定の位置までスライドさせます。
将纸盒滑动到位。
將紙槽滑入定位。
용지함을 프린터에 제 위치에 끼웁니다.
Geser keranjang ke tempatnya.
The printer automatically aligns the printheads and
performs a color calibration for the paper that you
loaded into the printer. During the process, the printer
advances the paper up to 3 m (~10 feet) before printing.
* wait for the printhead alignment.
** proceed with software installation.
自動的に用紙送りおよびプリントヘッドの軸合わせが
実行されます。 この処理中、実際の印刷を開始する前
に、最大で3m (10フィート) の用紙が排出されます。
* をお使いの場合は、プリントヘッドの軸合わせが完
了するまで待ちます。
** をお使いの場合は、ソフトウェアのインストールに
進みます。
30
Printer akan memajukan kertas dan menjalankan
pengaturan printhead secara otomatis. Selama
proses ini printer akan memajukan kertas hingga
3 m (~10 kaki) sebelum mencetak.
* harus menunggu pengaturan printhead.
** dapat melanjutkan dengan instalasi perangkat lunak.
Page 31
108
20'
Please do not try to stop the paper advance; it is
necessary to ensure successful printhead alignment.
EN
The alignment and calibration process will take about
twenty minutes; while it is taking place, you can
proceed to the next step.
プリントヘッドの軸合わせを正常に行うために必要
ですので、この用紙送りは停止しないでください。
JP
軸合わせとキャリブレーションの処理には20分
かかります。この間に次の手順に進むことができ
ます。
ZHCN
31
ZHTW
KO
Jangan hentikan gerak maju kertas; Anda perlu
memastikan keberhasilan pengaturan printhead.
Proses pengaturan dan kalibrasi akan memakan
waktu sekitar dua puluh menit; sementara itu, Anda
dapat melanjutkan ke langkah berikutnya.
Page 32

EN
Note for MAC & Windows USB
connection:
Do not connect the computer to the printer yet.
You must rst install the printer driver software
on the computer.
Insert the HP Start Up Kit DVD into your computer.
For Windows:
* If the DVD does not start automatically, run
autorun.exe program on the root folder on the
DVD.
* To install a Network Printer, click on Express
Network Install, otherwise click on Custom Install and follow the instructions on your screen.
For Mac:
* If the DVD does not start automatically, open
the DVD icon on your desktop.
* Open the Mac OS X HP Designjet Installer
icon and follow the instructions on your screen.
NOTE: If the installation failed, reinstall the
software from:
http://www.hp.com/go/Z7100/drivers
JP
Mac および Windows の USB 接続
に関する注記:
この時点ではまだコンピュータをプリンタに接
続しないでください。最初に、プリンタ ドライ
バ ソフトウェアをインストールする必要があり
ます。
コンピュータに『HP スタートアップ キット』DVD
を挿入します。
Windows の場合:
* DVD が自動的に起動しない場合は、DVD の
ルート フォルダ内の autorun.exe を実行します。
* ネットワーク プリンタをインストールするに
は、[エクスプレス ネットワーク インストール] を
クリックするか、または [カスタム インストール]
をクリックして画面の指示に従います。
Mac の場合:
* DVD が自動的に起動しない場合は、デスクトッ
プの DVD アイコンを開きます。
* MAC OS X HP Designjet Installer アイコンを
開き、画面の指示に従ってください。
注記:インストールが失敗した場合は、ソフトウ
ェアを以下のサイトから再度インストールして
ください。
ZHCN ZHTW
MAC 和 Windows USB 连接注意事
项:
刚开始时,不要立即将计算机连接到打印机。
必须首先在计算机上安装打印机驱动程序软
件。 将 HP Start Up Kit DVD 插入计算机。
对于 Windows:
* 如果 DVD 未自动启动,请运行 DVD 根文件
夹下的 autorun.exe 程序。
* 要安装网络打印机,请单击“快速网络安装”,
或者单击“自定义安装”并按照屏幕上的说明进
行操作。
对于 Mac:
* 如果 DVD 未自动启动,请打开桌面上的
DVD 图标。
* 打开 Mac OS X HP Designjet Installer 图标,
然后按照屏幕上的说明进行操作。
注意:如果安装失败,请从以下站点重新安装
软件:
http://www.hp.com/go/Z7100/drivers
請注意,當 MAC 與 Windows
USB 連線時:
請不要急著將電腦連接到印表機。您必須先在
電腦上安裝印表機驅動程式軟體。
將「
在 Windows 中:
* 如果 DVD 沒有自動執行,請執行 DVD 根資
料夾中的 autorun.exe 程式。
* 如果要安裝網路印表機,請按一下「快速網
路安裝」或「自訂安裝」,並且依照螢幕上的指
示進行。
在 Mac 中:
* 如果 DVD 沒有自動執行,請開啟桌面上的
「DVD」圖示。
* 開啟「Mac OS X HP Designjet Installer」圖
示,並且依照螢幕上指示進行。
註:如果安裝失敗,請在這裡重新安裝軟體:
http://www.hp.com/go/Z7100/drivers
HP Start-Up Kit」DVD
放入電腦。
32
http://www.hp.com/go/Z7100/drivers
Page 33

KO
MAC 및 Windows USB 연결을
위한 안내
Catatan tentang sambungan USB
untuk MAC & Windows:
아직 컴퓨터를 프린터에 연결하지 마십시오.
먼저 프린터 드라이버 소프트웨어를 컴퓨터에
설치합니다.
HP Star t-Up Kit(HP 시작 키트) DVD를
컴퓨터에 삽입합니다.
Windows의 경우:
* DVD가 자동으로 실행되지 않는 경우 DVD의
루트 폴더에서 autorun.exe 프로그램을
실행합니다.
* 네트워크 프린터를 설치하려면 Express
네트워크 설치를 클릭하거나 사용자 지정
설치를 클릭한 다음 화면의 지침을 따릅니다.
Mac의 경우:
* DVD가 자동으로 실행되지 않는 경우 바탕
화면에서 DVD 아이콘을 엽니다.
* Mac OS X HP Designjet Installer 아이콘을
열고 화면의 지침을 따릅니다.
주: 설치하는 데 실패한 경우 다음 위치에서
각각의 소프트웨어를 다시 설치합니다.
Jangan sambungkan dulu komputer ke printer.
Anda harus terlebih dulu menginstal perangkat
lunak driver printer di komputer.
Masukkan DVD HP Start Up Kit ke komputer
Untuk Windows:
* Jika DVD tidak memulai secara otomatis,
jalankan program autorun.exe pada folder akar
DVD.
* Untuk menginstal Network Printer, klik
Express Network Install atau klik Custom Install,
kemudian jalankan petunjuk pada layar.
Untuk Mac:
* Jika DVD tidak memulai secara otomatis,
buka ikon DVD di desktop.
* Buka ikon Mac OS X HP Designjet Installer,
kemudian jalankan petunjuk pada layar.
CATATAN: Jika penginstalan gagal, instal ulang
perangkat lunak dari:
http://www.hp.com/go/Z7100/drivers
33
http://www.hp.com/go/Z7100/drivers
Page 34

Legal notices
© Copyright 2010 Hewlett-Packard Development
Company, L.P.
The information contained herein is subject to change
without notice. The only warranties for HP products
and services are set forth in the express warranty
statements accompanying such products and services.
Nothing herein should be construed as constituting an
additional warranty. HP shall not be liable for
technical or editorial errors or omissions contained
herein.
Trademarks
Microsoft ®; and Windows ®; are U.S. registered
trademarks of Microsoft Corporation.
 Loading...