

HP DESIGNJET T7100, DESIGNJET T7100 3ème rouleau, Designjet T7200, Designjet T7200 3ème rouleau Assembly instructions
Page 1
HP DESIGNJET T7100/
T7200 printer series 3rd roll
HP DESIGNJET T7100/
T7200 3
ème
rouleau
HP DESIGNJET T7100/
T7200. Druckerserie mit
dritter Rolle
Terzo rotolo per stampanti.
HP DESIGNJET serie
T7100/T7200
er
3
rollo de las impresoras
HP DESIGNJET
serie T7100/T7200.
Impressora
HP DESIGNJET T7100/
T7200 série 3º rolo
Третий рулон принтеров
серии HP DESIGNJET
T7100/T7200.
EN
Assembly instructions
FR
Instructions d’assemblage
ES
DE
Anleitung zum Zusammenbau
ES
IT
Istruzioni per l'installazione
ES
Instrucciones de montaje
PT
Instruções de montagem
RU
Инструкции по сборке
EN
2
2
1
1
5
4
4
7
7
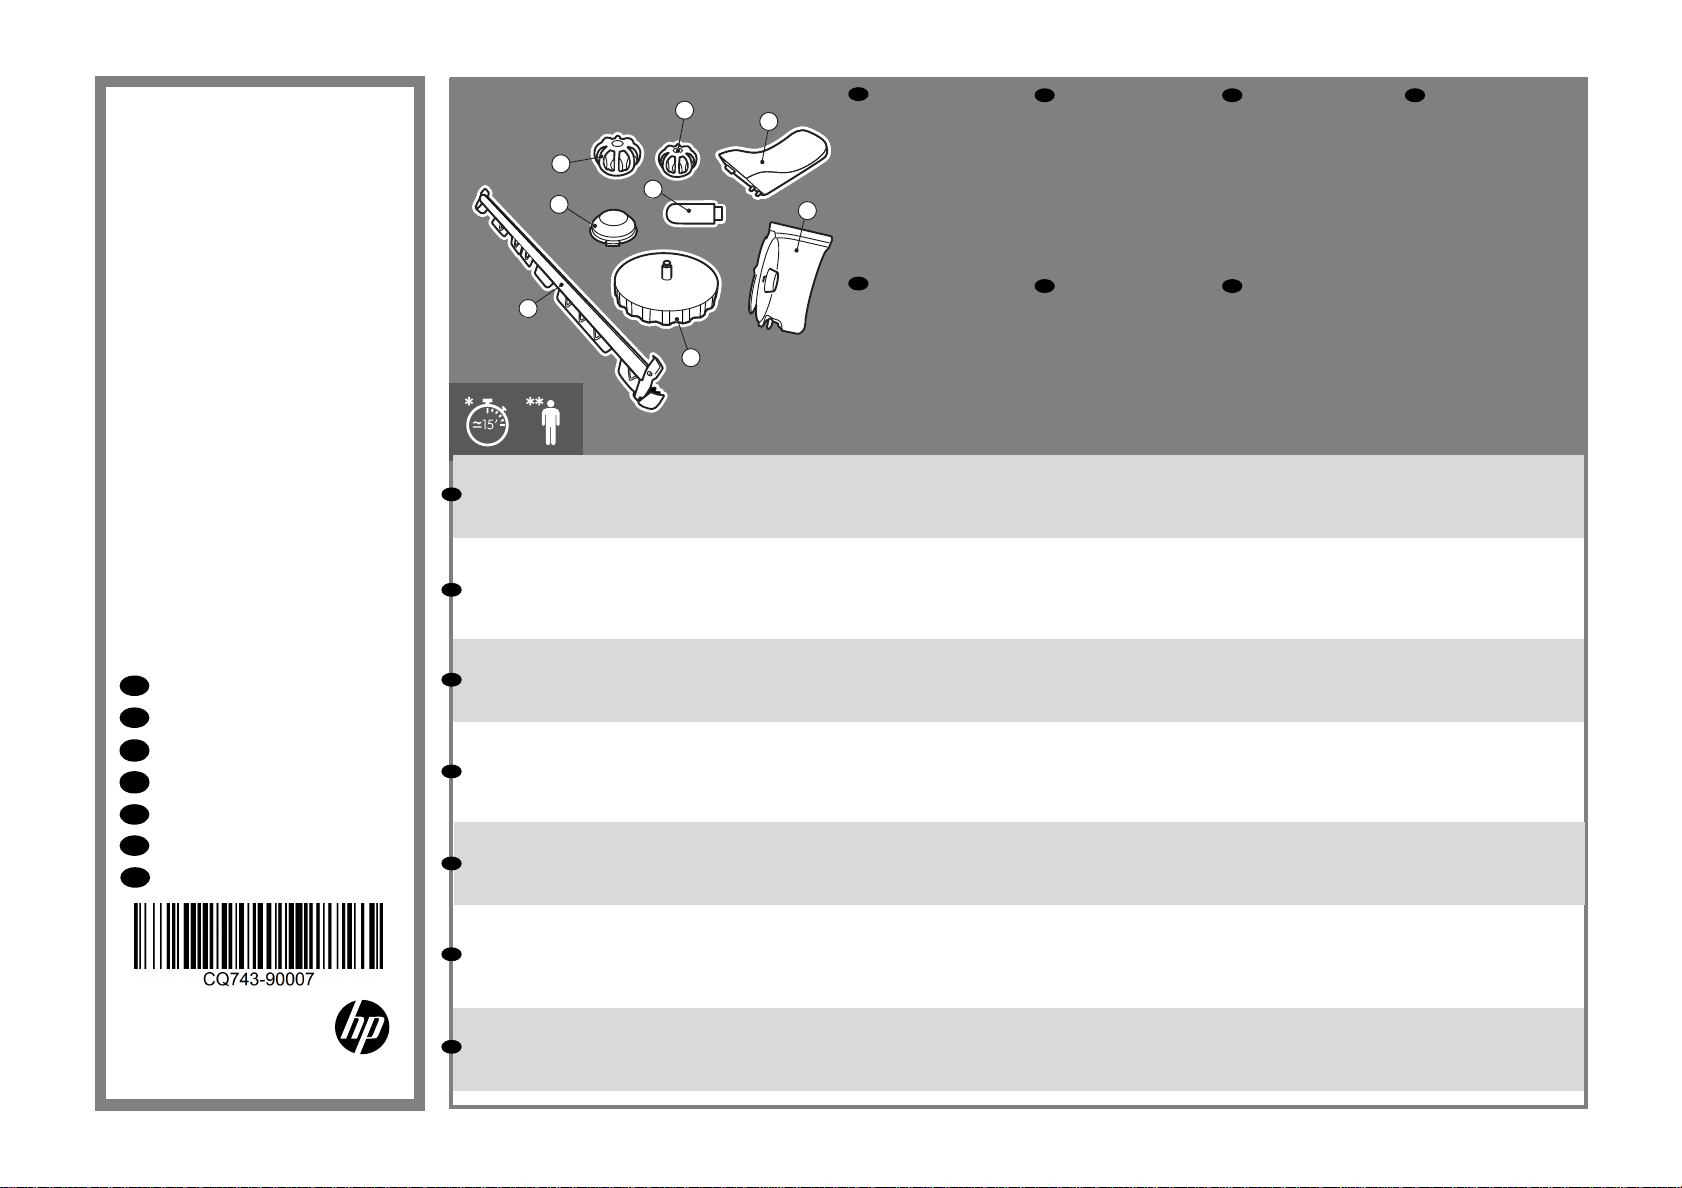
Please read these instructions carefully. These assembly instructions explain how to assemble the 3rd roll. Notice that the icon used in this document is also located on the packaging.
The icon helps you locate the parts needed for the assembly.
EN
Time required for assembly of the 3rd roll is approximately 15 minutes.
*
**1 person is required to perform this task.
Veuillez lire attentivement ces instructions. Ces instructions d’assemblage expliquent la procédure de montage du 3
également sur l’emballage de l’imprimante. Cette icône vous aide à identier les pièces requises pour l’assemblage.
FR
Le temps requis pour l’assemblage du 3
*
** Cette tâche nécessite l’intervention d’1 personne
Lesen Sie diese Anleitung sorgfältig durch. Dieses Dokument enthält Anleitungen für den Zusammenbau der dritten Rolle. Das im Dokument verwendete Symbol bendet sich auch auf
der Verpackung. Das Symbol erleichtert das Aufnden der Komponenten, die für die Montage benötigt werden.
DE
Der Zusammenbau der dritten Rolle dauert ca. 15 Minuten.
*
**Für diese Tätigkeit wird eine Person benötigt.
Leggere attentamente queste istruzioni. Queste istruzioni descrivono le procedure per l'installazione del terzo rotolo. L'icona utilizzata in questo documento è disponibile anche sulla
confezione. L'icona consente di individuare le parti necessarie per l'installazione
IT
L'installazione del terzo rotolo richiede circa 15 minuti
*
**Per eseguire questa operazione è sufciente una persona
Lea atentamente estas instrucciones. Estas instrucciones de montaje explican cómo se monta el tercer rollo. Observe que el icono que se utiliza en este documento también se encuentra
en el embalaje. El icono le ayudará a localizar las piezas necesarias para el montaje
ES
El tiempo de montaje del tercer rollo es de 15 minutos, aproximadamente
*
**Se necesita 1 persona para llevar a cabo esta tarea
5
8
8
3
3
6
6
ème
rouleau est d’environ 15 minutes
1. 3-inch right-hand
adaptor
2-inch right-hand
2.
adaptor
Intermediate support
3.
4. 3-inch left-hand adaptor
5. USB dongle
6. Sliding support
7. Bail
8. Right-hand hub structure
FR
1. Adaptateur côté droit 3"
2. Adaptateur côté droit 2"
3. Support intermédiaire
4. Adaptateur côté
gauche 3"
5. Dongle USB
6. Support coulissant
7. Étrier
8. Structure du moyeu
côté droit
DE
1. Rechter 3-Zoll-Adapter
2. Rechter 2-Zoll-Adapter
3. Zwischenhalterung
4. Linker 3-Zoll-Adapter
5. USB-Dongle
6. Schiebehalterung
7. Bügel
8. Rechter Anschlag
IT
1. Adattatore destro da 3"
2. Adattatore destro da 2"
3. Supporto intermedio
4. Adattatore sinistro
da 3"
5. Chiave di sicurezza USB
6. Supporto scorrevole
7. Traversina
8. Struttura del mozzo
destro
ème
ES
1. Adaptador derecho
de 3"
2. Adaptador derecho
de 2"
3. Soporte intermedio
4. Adaptador izquierdo
de 3"
5. Dispositivo USB
6. Soporte deslizante
7. Barra pisapapeles
8. Estructura del eje
derecho
PT
1.
Adaptador direito de
3 pol.
2. Adaptador direito de
2 pol.
3. Suporte intermediário
4. Adaptador esquerdo
de 3 pol.
5. Plug USB
6. Suporte de deslizamento
7. Esvaziador
8. Estrutura do hub direito
rouleau. Notez que l’icône utilisée dans ce document apparaît
RU
1. Правый адаптер 3”
2. Правый адаптер 2”
3. Промежуточный
держатель
Левый адаптер 3”
4.
5. Ключ USB
6. Подвижная опора
7. Планка
8. Конструкция правой
втулки
1
© 2014Hewlett-Packard Company
Large Format Division
Camí de Can Graells 1-21
08174 Sant Cugat del Vallès
Barcelona · Spain
All rights reserved
Printed in XXX
Leia as instruções com atenção. Essas instruções de montagem explicam como montar o 3º rolo. Observe que o ícone usado neste documento também está localizado na embalagem
da impressora. O ícone o ajuda a localizar as partes necessárias para a montagem
PT
O tempo necessário para a montagem do 3º rolo é de aproximadamente 15 minutos
*
**É necessário uma pessoa para realizar essa tarefa
Внимательно прочтите эти инструкции. В инструкциях по сборке объясняется, как собрать третий рулон. Обратите внимание, что значки, используемые в данном документе,
изображены также и на упаковке. Значки помогают определить расположение частей, необходимых для сборки
RU
Сборка третьего рулона занимает в среднем 15 минут.
*
**Эта операция выполняется одним лицом
Page 2
EN
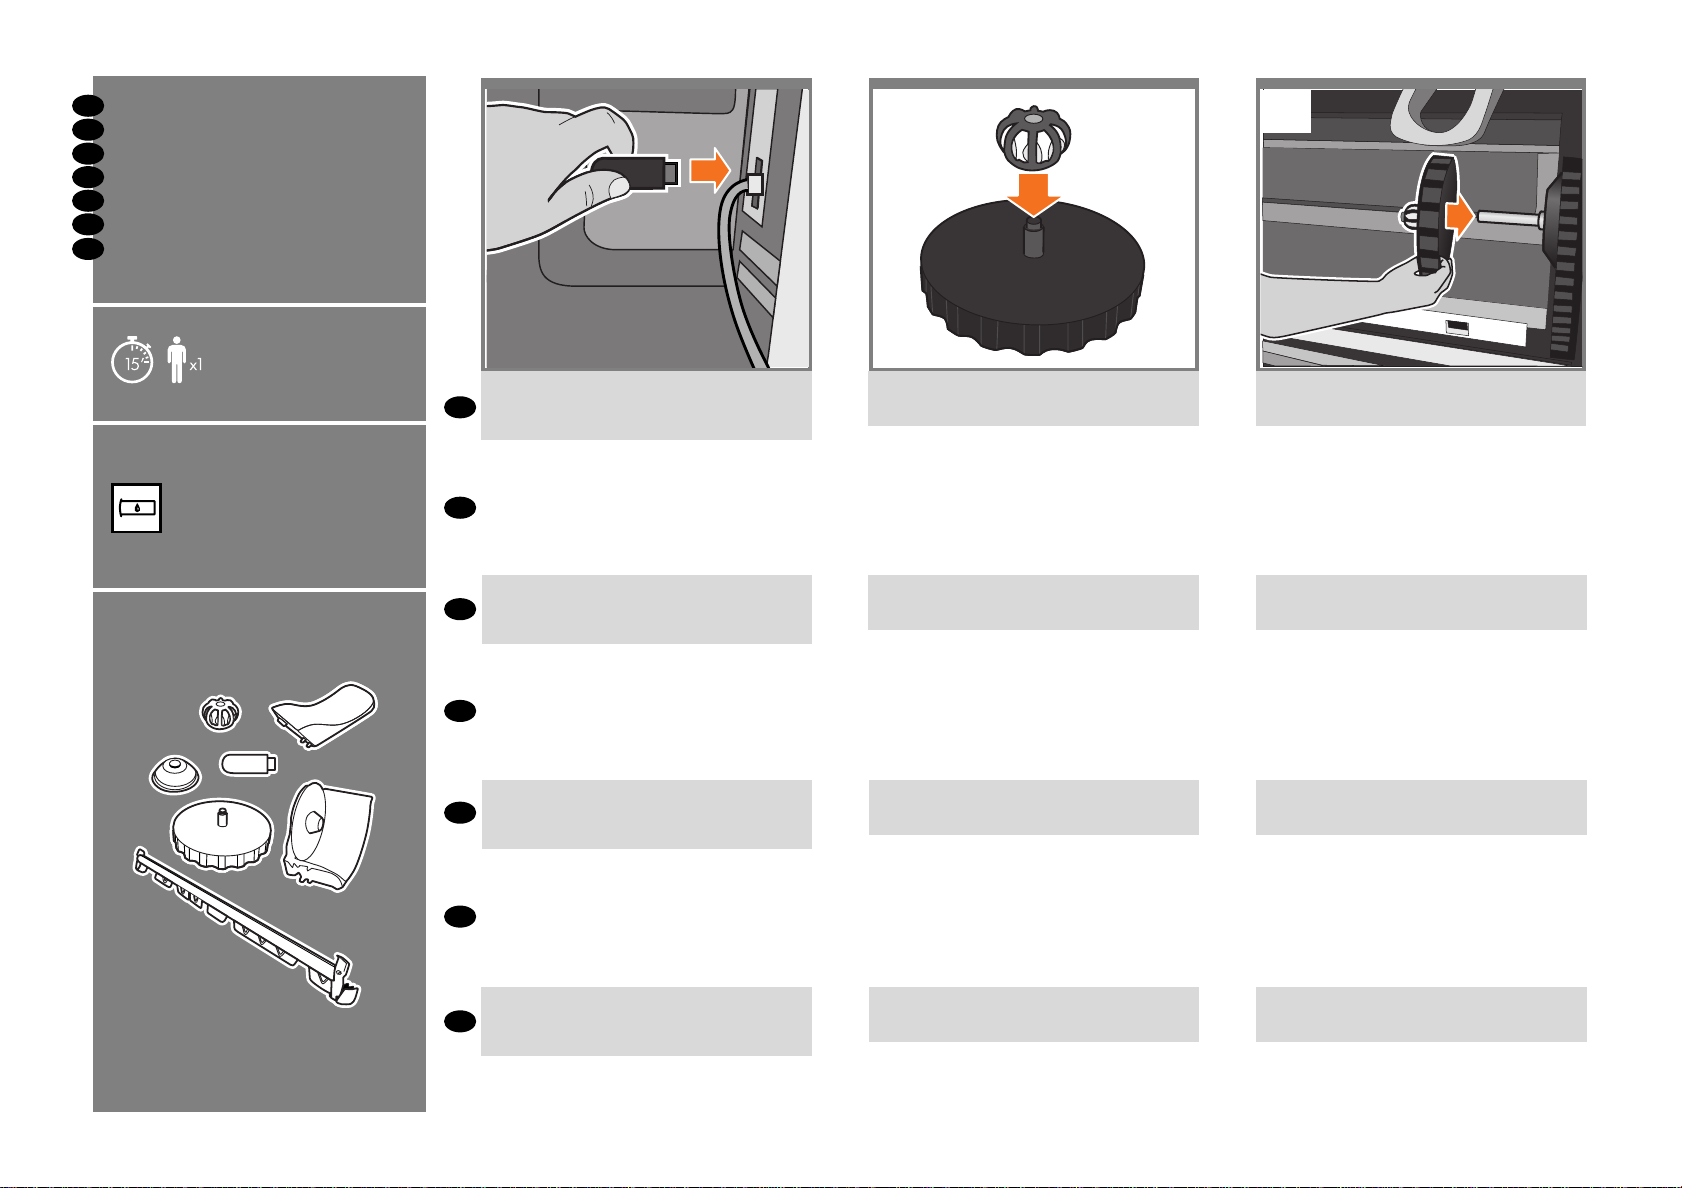
Assemble the 3rd roll
FR
Assemblage du 3
DE
Zusammenbau der dritten Rolle
IT
Installazione del terzo rotolo
ES
Montar el tercer rollo
PT
Monte o 3º rolo
RU
Сборка третьего рулона
ème
rouleau
1 2 3
Insert the USB dongle into the USB slot located
behind the printer. Follow the instructions that
EN
appear on the front panel.
Insérez le dongle USB dans la fente USB située
à l’arrière de l’imprimante. Suivez les instructions
FR
s’afchant sur le panneau avant.
Setzen Sie den USB-Dongle in den USB-Steckplatz
auf der Rückseite des Druckers ein. Folgen Sie den
DE
Anweisungen auf dem Bedienfeld.
Inserire la chiave di sicurezza USB nella porta USB
situata nella parte posteriore della stampante. Seguire
IT
le istruzioni visualizzate sul pannello frontale.
Inserte el dispositivo USB en la ranura de USB
ES
situada en la parte posterior de la impresora. Siga
las instrucciones que aparecen en el panel frontal.
Insira o plug USB no slot USB localizado atrás da
PT
impressora. Siga as instruções que aparecem no
painel frontal.
Put the 2-inch right-hand adaptor onto the right-hand
hub structure.
Insérez l’adaptateur 2" pour le côté droit sur la
structure du moyeu côté droit.
Setzen Sie den rechten 2-Zoll-Adapter auf den
rechten Anschlag auf.
Inserire l'adattatore destro da 2" nella struttura del
mozzo destro.
Conecte el adaptador derecho de 2" en la
estructura del disco derecho.
Coloque o adaptador direito de 2 pol. na estrutura
do hub direito.
Slide the right-hand hub structure onto the extruding
bar on the right-hand part of the printer.
Insérez la structure du moyeu côté droit sur la barre
d’extrusion sur la partie droite de l’imprimante.
Schieben Sie den rechten Anschlag auf die
Prolstange auf der rechten Seite des Druckers.
Fare scorrere la struttura del mozzo destro nella barra
di estrusione sulla parte destra della stampante.
Deslice la estructura del disco derecho en la barra
que sobresale en la parte derecha de la impresora.
Deslize a estrutura do hub direito na barra de
retiração localizada no lado direito da impressora.
2
Установите ключ USB в порт USB в задней панели
принтера. Следуйте инструкциям на передней
RU
панели.
Установите правый адаптер 2" в конструкции
правой втулки.
Установите конструкцию правой втулки на
выступающий валик в правой части принтера.
Page 3
54 6 7
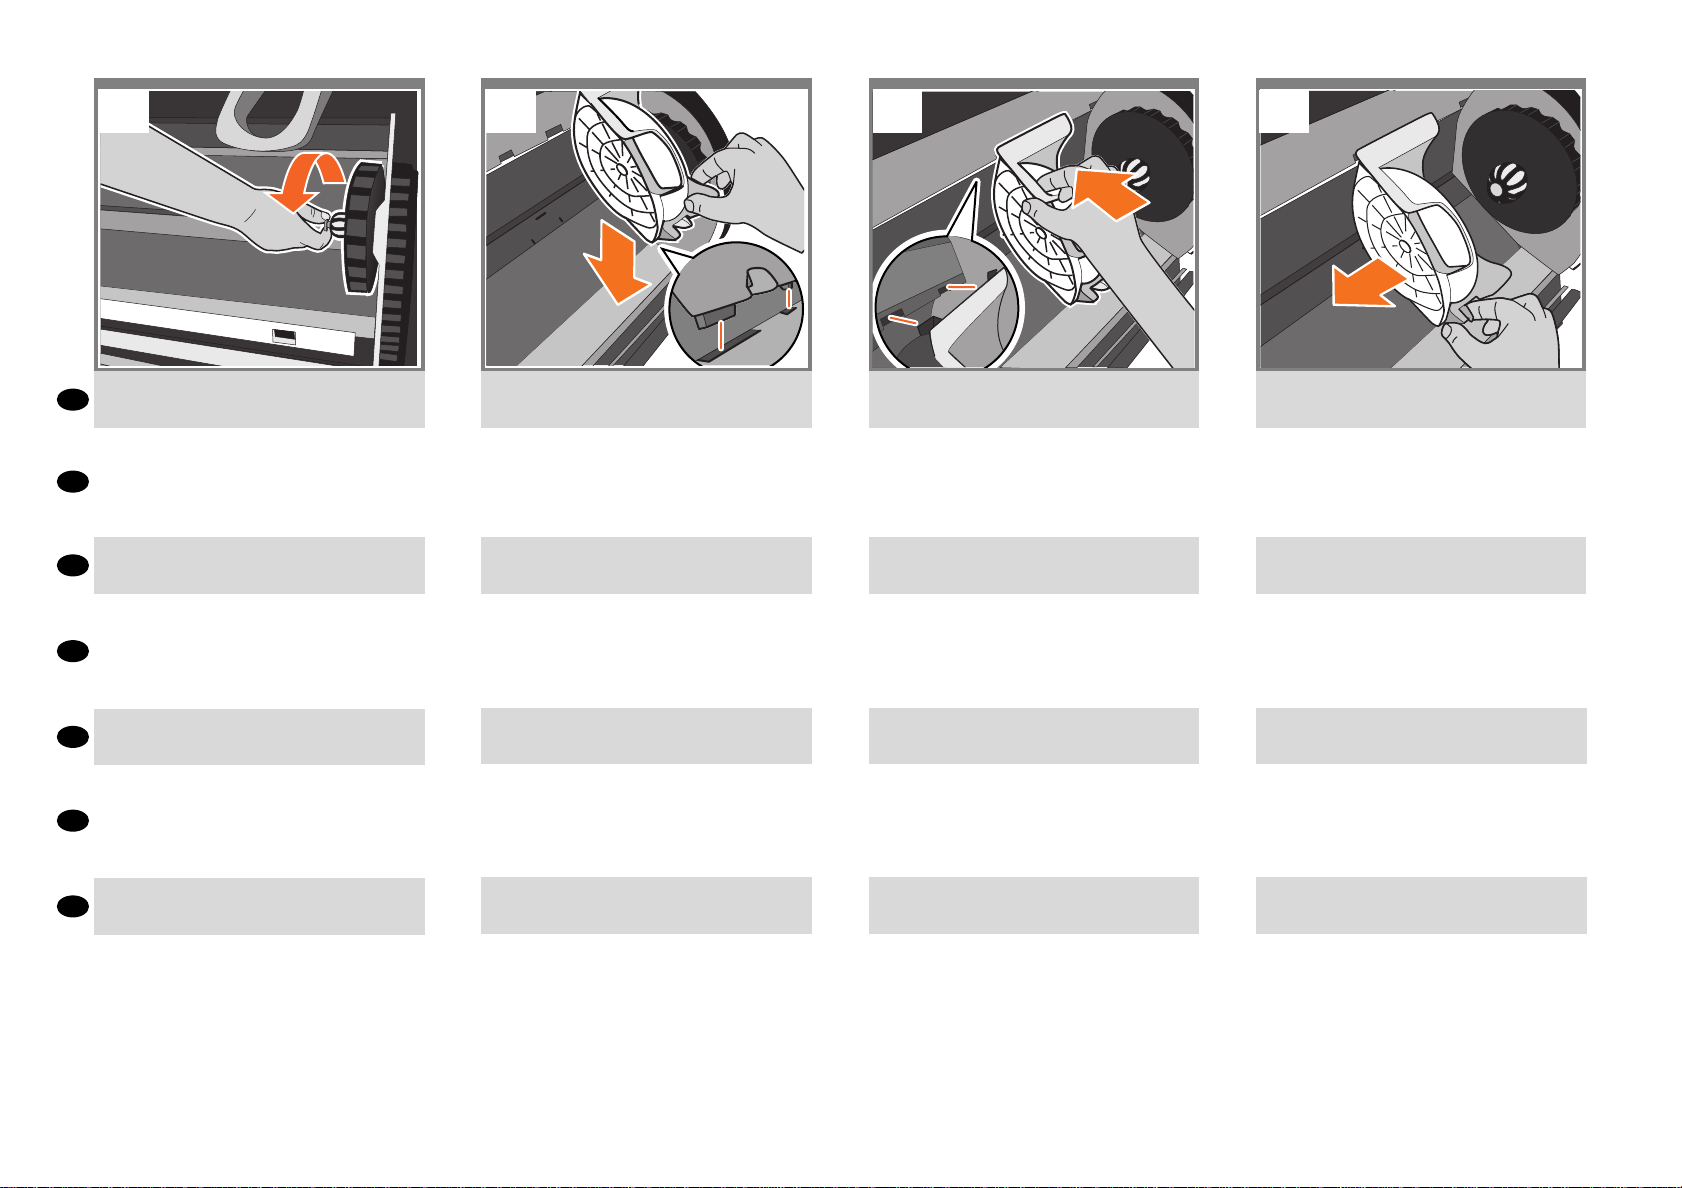
Fix the right-hand hub structure with the screw
EN
provided with the 2-inch right-hand adaptor.
Fixez la structure du moyeu côté droit avec la vis
FR
fournie avec l’adaptateur 2" du côté droit.
Fixieren Sie den rechten Anschlag mit der Schraube,
DE
die mit dem rechten 2-Zoll-Adapter mitgeliefert wurde.
Fissare la struttura del mozzo destro mediante la
IT
vite fornita con l'adattatore destro da 2"
Fije la estructura del disco derecho con el tornillo
ES
que se suministra con el adaptador derecho de 2"
Fixe a estrutura do hub direito com o parafuso
PT
fornecido e com o adaptador direito de 2 pol.
Закрепите конструкцию правой втулки с помощью
RU
винта, прилагаемого к правому адаптеру 2"
Insert the sl
bottom guide by pressing the stopper (blue lever).
Insérez le support coulissant dans les tr
guide inférieur en appuyant sur la butée (manette
bleue).
Setzen Sie die Schiebehilfen in die Löcher der
unteren Führung ein, indem Sie den Anschlag
(blauer Hebel
IInserire il supporto scorrevole nei fori della
guida inferiore premendo il fermo (leva blu).
Inserte el soporte deslizante en los orificios de
la guía inferior pulsando el tope (palanca azul).
Insira o suporte deslizante
inferior pressionando o limitador (alavanca azul).
Вставьте раздв
направляющей,нажав ограничитель (синий рычаг).
iding support into the holes of the
ous du
) drücken.
nos orifícios da guia
ижную опору в отверстия нижней
Insert the top part of the sliding support into
the slot.
Insérez la partie supérieure du support coulissant
dans la fente.
Setzen Sie den oberen Teil der Schiebehalterung in
den Schlitz ein.
Inserire la parte superiore del supporto scorrevole
nello slot
Inserte la parte superior del soporte deslizante en
la ranura.
Insira a parte superior do suporte de deslizamento
no slot.
Вставьте верхнюю часть подвижной опоры
в гнездо.
Press the stopper and slide the support out of the
way, to the left.
Appuyez sur la butée et retirez le support en le
faisant coulisser vers la gauche
Schieben Sie den Anschlag und die Schiebehalterung
nach links.
3
Premere il fermo ed estrarre il supporto facendolo
scorrere verso sinistra
Pulse el tope y el soporte deslizante hasta el fondo,
hacia la izquierda
Pressione a parada e o suporte de deslizamento
para fora do caminho, à esquerda
Нажмите на стопор и полностью выдвиньте
опору влево
Page 4

98 10 11
Insert the intermediate support into the top holes
EN
located in the printer slot.
Insérez le support intermédiaire dans les trous
FR
supérieurs situés dans la fente de l’imprimante
Setzen Sie die Zwischenhalterung in die oberen
DE
Löcher des Druckerschachts ein.
Inserire il supporto intermedio nei fori superiori
IT
situati nello slot della stampante
Inserte el soporte intermedio en los oricios
ES
superiores, situados en la ranura de la impresora
Insira o suporte intermediário nos buracos
PT
superiores, localizados no slot da impressora
Вставьте промежуточный держатель в верхние
RU
отверстия в гнезде принтера
Push down the intermediate support until you hear
it click.
Appuyez sur le support intermédiaire jusqu’à
entendre un clic.
Drücken Sie die Zwischenhalterung nach unten,
bis sie mit einem hörbaren Klicken einrastet.
Premere il supporto intermedio verso il basso no
a udire uno scatto.
Empuje hacia abajo el soporte intermedio hasta
que oiga un clic.
Empurre o suporte intermediário para baixo,
até ouvir um clique.
Нажмите на промежуточный держатель до
щелчка.
Take the bail and position it as circled above.
Prenez l’étrier et positionnez-le comme indiqué sur
le schéma encerclé ci-dessus.
Positionieren Sie den Bügel, wie in der Abbildung
umrandet dargestellt.
Posizionare la traversina come indicato
nell'immagine cerchiata sopra.
Coja la barra pisapapeles y colóquela como se
indica arriba.
Pegue o esvaziador e o posicione conforme
demonstrado acima.
Возьмите планку и разместите ее, как указано
выше.
Insert the bail into the right- and left-hand
cover slots.
Insérez l’étrier dans les fentes du couvercle
à droite et à gauche.
Setzen Sie den Bügel in die rechten und linken
Schlitze der Abdeckung ein.
4
Inserire la traversina negli slot del coperchio
a destra e a sinistra.
Inserte la barra pisapapeles en las ranuras de
la cubierta derecha e izquierda.
Insira o esvaziador nos slots das tampas direita
e esquerda.
Вставьте планку в правое и левое гнезда крышки.
Page 5

1312 14
Press the blue lever until you hear it click at
EN
both sides.
Appuyez sur le levier bleu jusqu’à ce que vous
FR
entendiez un clic des deux côtés
Drücken Sie den blauen Hebel, bis er mit einem
DE
hörbaren Klicken auf beiden Seiten einrastet.
Premere la leva blu no a udire uno scatto su
IT
entrambi i lati
Presione la palanca azul por ambos lados hasta
ES
que oiga un clic
Pressione a alavanca azul até ouvir um clique em
PT
ambos os lados
Go to the front panel and press the OK key.
The printer must restart.
Sur le panneau avant, appuyez sur la touche OK.
L’imprimante doit redémarrer.
Drücken Sie am Bedienfeld die Taste "OK".
Der Drucker muss neu gestartet werden.
Dal pannello frontale premere il tasto "OK".
È necessario riavviare la stampante.
Acceda al panel frontal y pulse la tecla “OK”.
Debe reiniciar la impresora.
Vá ao painel frontal e pressione a tecla “OK”.
A impressora deve reiniciar.
Remove the USB dongle from the printer.
IMPORTANT: Do not throw away the dongle,
it contains a license that you can uninstall on this,
and install on any other supported printer.
Retirez le dongle USB de l’imprimante.
IMPORTANT : Ne jetez pas le dongle. Il contient
une licence que vous pouvez désinstaller sur cette
imprimante pour l’installer ensuite sur n’importe
quel autre modèle d’imprimante pris en charge.
Nehmen Sie den USB-Dongle aus dem Drucker.
WICHTIG: Bewahren Sie den Dongle gut auf.
Er enthält eine Lizenz, die Sie hier deinstallieren
und auf anderen unterstützten Druckermodellen
installieren können.
Rimuovere la chiave di sicurezza USB dalla stampante.
IMPORTANTE: non gettare la chiave di sicurezza,
poiché contiene una licenza che è possibile
disinstallare da questa stampante e installare su
qualsiasi altro modello di stampante supportato.
Extraiga el dispositivo USB de la impresora.
IMPORTANTE: No tire el dispositivo, contiene
una licencia que puede desinstalar de este
equipo e instalarla en otros modelos de impresora
compatibles.
Remova o plug USB da impressora.
IMPORTANTE: Não jogue fora o plug, ele contém
uma licença que você pode desinstalar dessa
impressora, e instalar em qualquer outro modelo
de impressora compatível.
5
Нажмите на обе стороны синего рычажка до
RU
щелчка
На передней панели нажмите "OK". Необходимо
перезапустить принтер.
Извлеките ключ USB из принтера.
ВАЖНО! Не выкидывайте ключ, на нем
содержится лицензия, которую можно удалить
с данного принтера и установить на любой
другой поддерживаемой модели принтера.
Page 6
EN
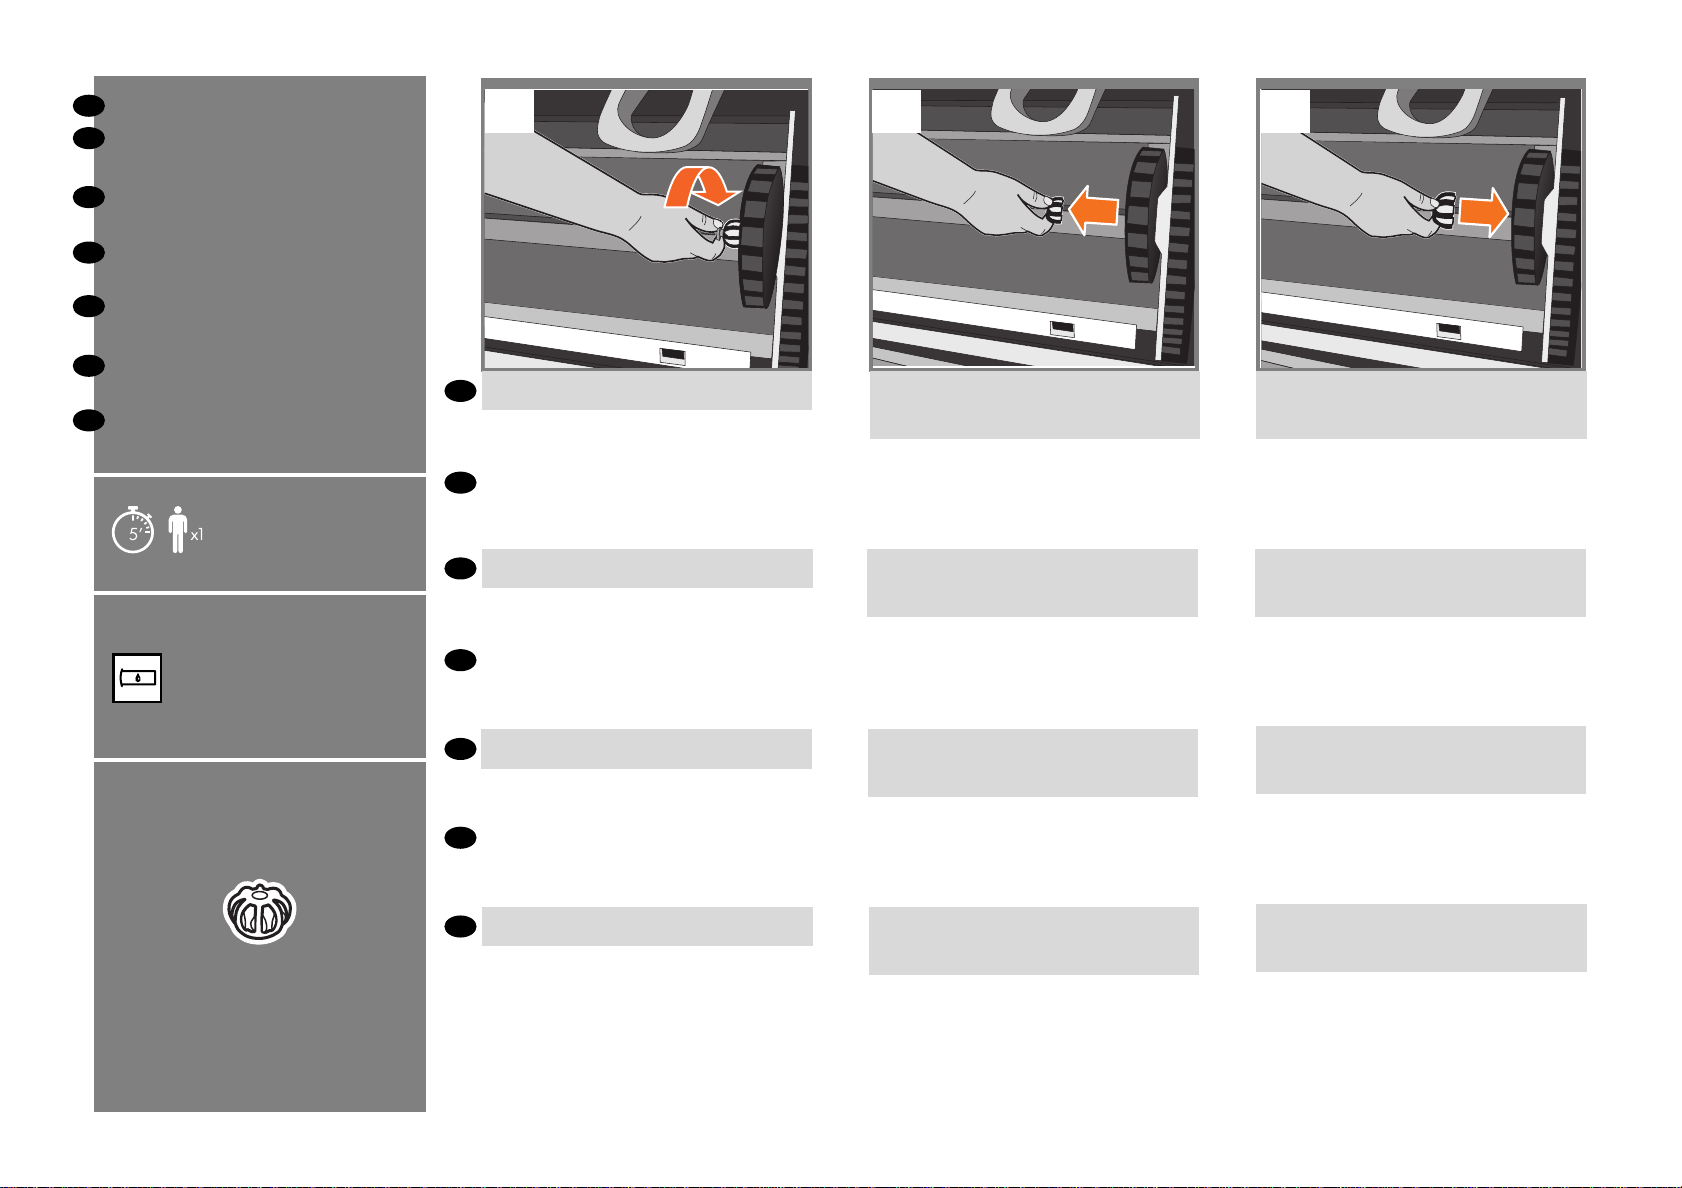
Changing to the 3-inch adaptor
FR
Modier la taille de l’adaptateur
pour passer à 3".
DE
Ändern der Adaptergröße auf
drei Zoll
IT
Modica delle dimensioni
dell'adattatore in 3".
ES
Cambio del tamaño del
adaptador a 3".
PT
Alteração do tamanho do
adaptador para 3 pol.
RU
Изменение размера адаптера
на 3” .
Unscrew the 2-inch right-hand adaptor.
EN
Dévissez l’adaptateur 2" côté droit.
FR
Remove the 2-inch right-hand adaptor. Be sure to
leave the right-hand hub structure in place.
Retirez l’adaptateur 2" côté droit. Veillez à bien
laisser la structure du moyeu côté droit en place.
31 2
Slide the 3-inch right-hand adaptor onto the
right-hand hub structure.
Faites glisser l’adaptateur 3" côté droit sur la
structure du moyeu côté droit.
Lösen Sie den rechten 2-Zoll-Adapter.
DE
Svitare l'adattatore destro da 2".
IT
ES
Desatornille el adaptador derecho de 2".
Desparafuse o adaptador direito de 2 pol
PT
Отверните правый адаптер 2"
RU
Entfernen Sie den rechten 2-Zoll-Adapter. Lassen
Sie den rechten Anschlag, wo er ist.
Rimuovere l'adattatore destro da 2". Accertarsi
di mantenere la struttura del mozzo destro in
posizione.
Extraiga el adaptador derecho de 2". Asegúrese
de que la estructura del disco derecho se queda
en su lugar.
Remova o adaptador direito de 2 pol. Assegure-se
de deixar a estrutura do hub direito no lugar.
Снимите правый адаптер 2". Конструкция правой
втулки должна остаться на месте.
Schieben Sie den rechten 3-Zoll-Adapter auf den
rechten Anschlag.
6
Inserire l'adattatore destro da 3" facendolo scorrere
nella struttura del mozzo destro.
Deslice el adaptador derecho de 3" en la estructura
del disco derecho.
Deslize o adaptador direito de 3 pol. na estrutura
do hub direito.
Задвиньте правый адаптер 3" в конструкцию
правой втулки.
Page 7

54 6
Fix the right-hand adaptor onto the hub structure
EN
with the screw provided.
Fixez l’adaptateur pour le côté droit sur la structure
FR
du moyeu avec la vis fournie.
Fixieren Sie den rechten Adapter mit der
DE
mitgelieferten Schraube am Anschlag.
Fissare l'adattatore destro nella struttura del mozzo
IT
mediante la vite fornita.
Fije el adaptador derecho en la estructura del disco
ES
utilizando el tornillo que se suministra.
Fixe o adaptador direito na estrutura do hub com
PT
o parafuso fornecido.
Insert the 3-inch left-hand adaptor onto the sliding
support.
Insérez l’adaptateur 3" pour le côté gauche dans
le support coulissant.
Setzen Sie den linken 3-Zoll-Adapter auf die
Schiebehalterung auf.
Inserire l'adattatore sinistro da 3" nel supporto
scorrevole.
Inserte el adaptador derecho de 3" en el soporte
deslizante.
Insira o adaptador esquerdo de 3 pol. no suporte
de deslizamento.
Fit the adaptor into the holes located on the sliding
support and rotate it counter-clockwise until you
hear it click.
Emboîtez l’adaptateur dans les trous situés sur le
support coulissant et faites-le pivoter dans le sens
antihoraire jusqu’à ce que vous entendiez un clic.
Stecken Sie den Adapter in die Löcher auf der
Schiebehalterung, und drehen Sie ihn gegen den
Uhrzeigersinn, bis er mit einem hörbaren Klicken
einrastet.
Inserire l'adattatore nei fori situati sul supporto
scorrevole e ruotarlo in senso antiorario no a
udire uno scatto.
Coloque el adaptador en los oricios que se
encuentran en el soporte deslizante y gírelo en
sentido contrario a las agujas del reloj hasta que
oiga un “clic”.
Encaixe o adaptador nos buracos localizados
no suporte de deslizamento e gire-o no sentido
anti-horário até você ouvir um clique.
7
Закрепите правый адаптер на конструкции втулки
RU
с помощью прилагаемого винта.
Вставьте левый адаптер 3” в подвижную опору.
Поместите адаптер в отверстия на подвижной
опоре и поверните его по часовой стрелке до
щелчка.
Page 8

Legal notices
© Copyright 2014 Hewlett-Packard
Development Company, L.P.
The information contained herein is subject to change
without notice. The only warranties for HP products
and services are set forth in the express warranty
statements accompanying such products and services.
Nothing herein should be construed as constituting
an additional warranty. HP shall not be liable for
technical or editorial errors or omissions contained
herein.
 Loading...