


Instructions for Installation and Use
Ultima FDW80 & FDW85
60cm free standing
Dishwasher
Troubleshooting
inside

D ISHWASHER
2

|
|
|
D |
ISHWASHER |
||
|
Contents |
|
|
|
|
|
|
Electrical Connection |
4 |
|
|||
|
For Your Safety |
5 |
|
|||
|
Installation |
6-7 |
|
|||
|
Before Using your Dishwasher |
8-9 |
|
|||
|
Loading your Dishwasher |
10 |
|
|||
|
What Can I Wash |
10 |
|
|||
|
Getting to know your Dishwasher |
11 |
|
|||
|
How to use your Dishwasher |
12 |
|
|||
|
Programme Chart |
13 |
|
|||
|
Care and Cleaning |
14 |
|
|||
|
|
|
|
|
|
|
|
Troubleshooting |
|
|
|
15-20 |
|
|
Information for Test |
Labs |
|
|
21 |
|
|
After Sales Service |
22 |
|
|||
|
Hotpoint Guarantee |
23 |
|
|||
|
Key Contacts |
|
Back Cover |
|||
Retention of this Instruction Book
This Instruction Book must be kept handy for reference as it contains important details on the safe and proper use of the appliance.
If you sell or pass the appliance to someone else, or move house and leave it behind, make sure this Book is also provided so the new owner can become familiar with the appliance and safety warnings.
If the Book is lost or damaged a copy may be obtained from:
MerloniElettrodomesticiUKLtd.MorleyWay,Peterborough,PE29JB
3

Electrical Connection
WARNING: This appliance must be earthed.
Fuses
Your appliance comes fitted with a plug and a 13A fuse. If you need to replace the fuse, only those rated at 13A and ASTA approved to BS1362 should be used. If you lose the fuse cover, a replacement may be obtained from your local authorised Service Centre or Electrical company. Correct replacement is identified by colour coding or the marking on base of plug.
WARNING: DO NOT use the plug unless the fuse cover is fitted.
Changing the Plug
Cut off and dispose of the supplied plug if it does not fit your socket.
WARNING: To avoid a shock hazard DO NOT insert the discarded plug into a socket anywhere else.
IMPORTANT: WIRES IN THE MAINS LEAD ARE COLOURED IN ACCORDANCEWITH THE FOLLOWING CODE:
Green/Yellow |
- |
Earth |
Blue |
- |
Neutral |
Brown |
- |
Live |
If you change the plug, the colour of the wires in the mains lead may not correspond with the terminal markings in the plug, which if not coloured, could be:
EARTH |
‘E’ or |
NEUTRAL |
‘N’ |
LIVE |
‘L’ |
Changing the Mains Lead
A lead can be ordered from Hotpoint Service UK: 08709 066 066 or
Republic of Ireland: 1850 302 220
If you have damaged the existing lead or require a longer one a charge will be made. It is strongly advised that this work is carried out by a qualified electrician.
If the domestic wiring includes a residual current-operated circuit breaker, ensure that it conforms to the latest regulations.
Safety Information
At the time of delivery...
All functions of your dishwasher have been thoroughly tested at the factory.
A small number of water marks may have been left as a result, they will disappear when the appliance is used for the first time.
WARNING: The dishwasher must not be connected to the electricity supply while installation is being carried out.
-This appliance should only be connected to a 230/240V AC source, via a properly installed earthed socket.
-Use the dishwasher solely in a domestic environment.
-DO NOT stand or place heavy objects on the door when it is open, this could damage the door or cause the appliance to tip forward.
If your family includes children...
-DO NOT allow children to play with the appliance or tamper with its controls.
-Keep detergents and rinse aids away from children. Keep children away from the open door of a dishwasher, there could still be some detergent left inside.
CAUTION:
The dishwasher meets the requirements set out by the regulations in force concerning safety and electrical equipment.
Any technical checks should be conducted exclusively by a trained and authorised technician: Repairs carried out by unaithorised persons will invalidate the guarantee, as well as posing a potential hazard to the user.
The manufacturer declines all responsibility for damage to persons or property resulting from failure to observe the above precautions, from tampering with even a single component or from the use of nonoriginal spare parts.
4

For your Safety
This manual forms an integral part of the appliance. It must always be kept handy for reference. Read through all the instructions contained in this manual before using the dishwasher.
Installation must be performed by a qualified technician, in compliance with the regulations in force, including the prevention and elimination of radio frequency interference.
The dishwasher is designed for washing and drying dishes, any other use shall be considered improper. The manufacturer declines all responsibility for uses other than those described above.
1.Seperate the various packaging materials and dispose of safely - DO NOT leave discarded packaging material around the home.
2.Afterremovingthepackaging,checktomakesureyourapplianceis intact. If in doubt, contact a qualified professional.
3.DO NOT use extension leads and multiple plugs. If the electricity supply wire is not long enough, then have it replaced with one of the correct length and remember that it should be free of bends or dangerous kinks.
4.In the event of any damage to the power cord have it replaced by a qualified technician.
5.The mains plug must be easily accessible after installation.
6.Iftheapplianceisnotoperatingproperlyorifmaintenanceoperations are necessary, disconnect the dishwasher from the mains power supply (unplug it!).
7.DO NOT install outdoors, not even if the area is covered by a roof: it isextremelydangeroustoleaveitexposedtorainandthunderstorms.
8.If installed on a carpeted or covered floor, ensure that the openings on the underside are not obstructed.
9.Do not touch the heating element during or straight after a wash cycle.
10.If the appliance malfunctions, turn off the water inlet tap and disconnect the plug from the wall socket. Then read the section entitled "Troubleshooting". If you cannot resolve the problem, then call Hotpoint Service (see KEY CONTACTS, back page).
11.Cutlery and sharp utensils should always be inserted in random order with the blades pointing downwards (take care with knife blades).
12.For your own safety, ensure the door is closed when the dishwasher is not in use.
The rating plate, featuring the technical data, serial number and markings, is visibly positioned on the inner edge of the door. DO NOT remove the rating plate.
The dishwasher is intended for use by adults: DO NOT allow children to come near or play with the controls.
Keep children away from detergents and clear of the dishwasher door when open.
Keep all packaging material away from children.
1.DO NOT use solvents, such as alcohol or turpentine which may cause an explosion.
2.DO NOT load dishes to wash that are soiled with ash, wax or paints.
3.DO NOT lean, sit or stand on any part of the dishwasher - this could cause injury and/or damage the appliance.
4.DO NOT drink any water residues from inside the dishwasher.
5
Installation
Choose where you want to install your dishwasher, you can place it so that its sides or back panel are side by side with furniture or up againstthewall.Thedishwasheris providedwithwatersupplyanddrain hoses, which can be directed towards the left or right to facilitate appropriateinstallation.
Levelling.
Once the appliance is positioned, adjust the feet by screwing them in or out depending on how high you want it and to level it so that it is horizontal. Make sure that it is not inclinedmorethan2degrees.Ifthe applianceislevel,itwill helpensure its correctoperation.
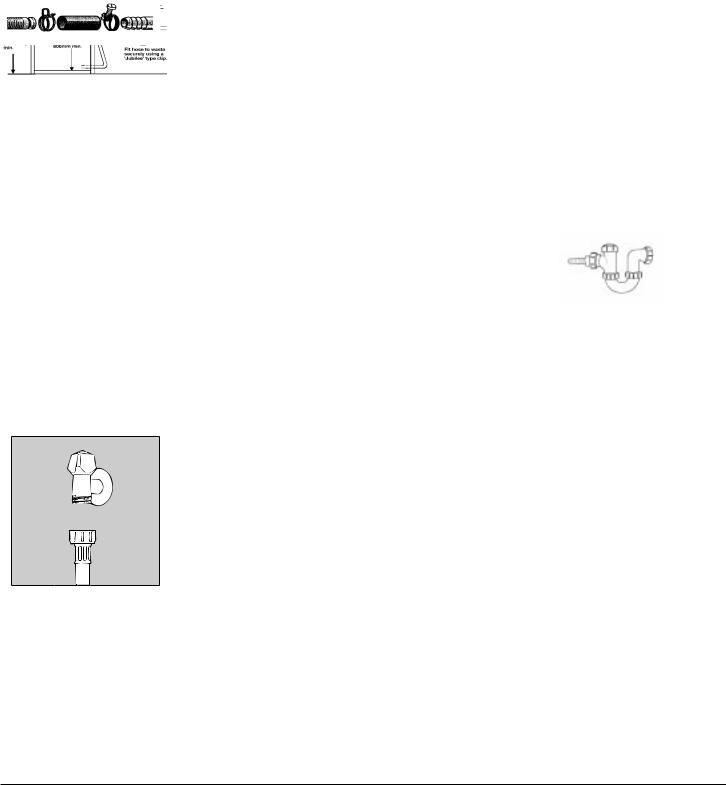
Cold water connection.
Connect the cold water supply hose, inserting the small filter supplied with the dishwasher and making sure that it is fastened tightly in place (see figure 2). If the waterhosesareneworhavebeen outofuseforanextendedperiodof time,letthewaterruntomakesure it is clear and free of impurities beforemakingtheconnection.Ifthis precaution is not taken, the water inlet could get blocked, causing damagetoyourdishwasher.

 A
A
Fig.2
Connect to the Water Supply...
-For your dishwasher to operate correctlyitrequireswaterpressures in the range of 6-150 psi (1001000KPa).Mostcoldwatersupplies willbeinthisrange.NOTE:lowwater pressure will lead to excessively longfilltimesornofill.
-Ensurethatthenewhosesupplied is connected and the old hose is disposedofsafely.
-Ensure the fill hose is only fitted to the cold water supply. DO NOT overtighten the hose connector, handtightissufficient.
-Ensure the fill hose is not kinked.
-Tap connections (if applicable): A range of adaptors are available to suit your tap.
-DONOTconnectthedishwasher toasingleoutletinstantaneouswater heater or an electric heater.
Drain hose connection.
WARNING: Connect your dishwasher drain hose to pipes which connect to the foul drain system and not to surface water drains.
IMPORTANT: For the correct operation of your dishwasher, it is essential to comply with the following information:
Standpipe:
Ensurethatthehoseisnotpushed toofardownthestandpipe.
Iftheendofyourdrainhoseisfitted with‘retainingflaps’,ensuretheyare insertedfullyintothestandpipe. This will prevent the pipe from jumping out during installation and use.
DO NOT position the standpipe near an electrical outlet. ENSUREthatthedrainhoseisnot kinked and it is routed as shown in thediagram.
The standpipe should have a bore of at least 38mm (11/2”). It should be installed as shown, have a trap fitted and must discharge into the same drain system as your household sink.
SinkWasteSystem:
Forundersinkdrainage:
Before connecting the drain hose, remove any internal restrictions - Thiswillpreventabuildupofdebris whichcouldcauseablockage.
Remove any restrictions from the waste spigot and ensure that the sealingbungisremoved.Thehose should be routed, such that it is raised to a minimum height of 800mm(31/2”).
NOTE: Ensure the sink outlet pipe has a minimum diamtere of 32mm.
It MUST NOT be connected to a surface water drain.
1.Untie the end of the GREY drainage hose from the rear of the appliance.
2.Reposition the ‘Hooked End Support’ as required along the GREY drainage hose.
3.If fitting an under sink waste disposal unit, cut out the membrane,bungorblankingplug.
4.Attach the GREY drainage hose to the under sink waste disposal unit securely, using the clip and rubber tube supplied.
Ensure the drain hose is securely attached, to prevent it coming away while the machine is in use and causing a flood.
Remember you will be charges for a service call is a problem with your appliance is caused by incorrect installation or misuse.
6

1
4
820 . min
2 |
3 |
|
600 600
5
 600
600
INSTRUCTIONS FOR INSTALLING THE DISHWASHER IN
FULLY-FITTED KITCHENS.
Your freestandingdishwasher canbeinstalledinmodernkitchensasfollows:
lto stand next to furniture units or other electric household appliances
(Pleasereadthechapteron “Installation”intheinstructionmanual.)
lto insert or built-in under the one worktop.
Shoulditbenecessarytoremovethetopshelfofthedishwasher,proceedasfollows:
–Unscrewthe2rearscrewsandthen,withalightpushforward,letitslideoutandremoveit(seefig.1)
–Discardthepolystyrenerectangle.
–Openthedoorand,afterunscrewingthefixingscrews,removethe3plasticplugsusedtohooktheshelfon(fig.2)
–Glueonthesmallsoundproofingadhesivespongystripontothetopcrosspiece(photo3)and,aftertiltingtheappliance,glue onanotheroneunderneaththebase(photo4).
–Straightenuptheapplianceandadjustthefrontandbackfeetbyunscrewingtheminananti-clockwisedirectiontoraisethe dishwashertotherequiredheight.
–Inserttheapplianceunderneaththeworktop(fig.5),checkingthattheinletandoutletpipesdonotgetbentorsquashed (please readtheinstructionsprovidedinthe“Installation”chapter).
–Openthedishwasherdoorandglueonthetwoequal-sizedadhesivespongystripsonthefrontedgeoftheappliancecabinet. Beginfromthetopwithoutleavingoutanyspacesandmakesurethestripsadhereallalongthelengthoftheedge.Asmallpart ofthespongystripprotrudingontotheoutsidewillblockanylightleftbetweenthedishwasherandadjacentcabinets,thus improvingthesoundproofing.
Warning:
Thedishwasherplugmustbewithinaccessoncetheappliancehasbeenbuiltin,inordertoallowformaintenancetobecarried outsafely.
Thestructureofyourdishwashermakesitimpossibletofititunderahob.
7
Before Using your Dishwasher
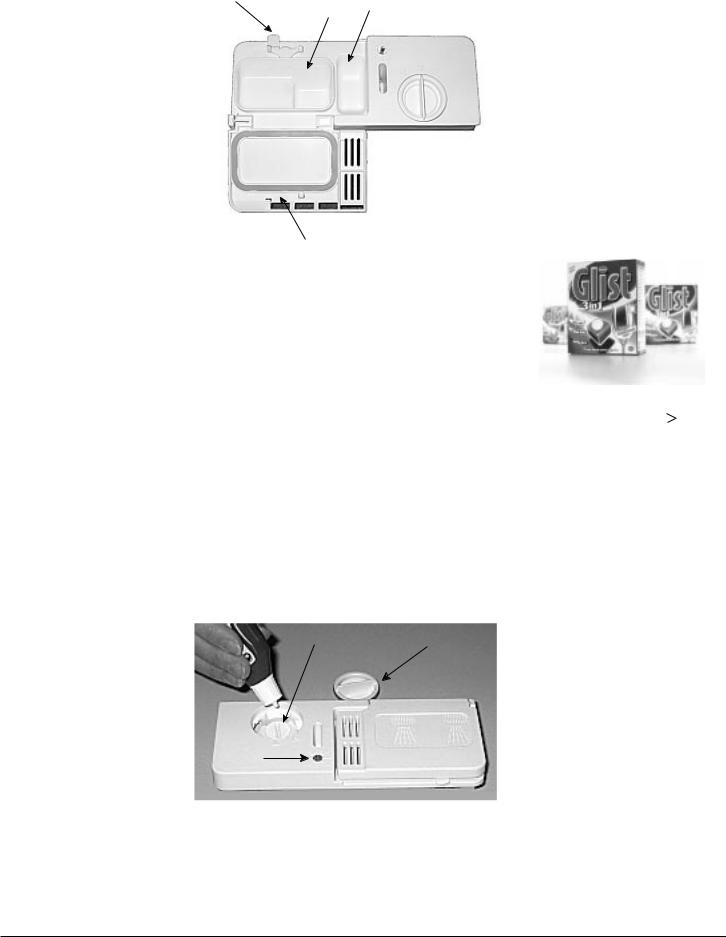
The detergent
Eachtimeyouloadthedishwasher, adddetergergent.Pourdishwasher detergent into thedispenser on the insideofthedoor.
Adding detergent
To open lid A, press button B. Thedetergentshouldbeputintothe twocontainersCandD.
If using a tablet, put it in container "D".
Now you can close the lid: press it down until you hear it click.
If it won't close
Check whether there is any detergent residue on the edges of thedispenser.Removetheexcess.
B C D
25 gr. |
5 gr. |
A
We recommend Glist 3 in 1 for use in all Hotpoint dishwashers...
Brilliant cleaning is guaranteed with Glist 3 in 1.
Hotpoint only recommends Glist 3 in 1 Dishwasher tablets to give outstanding cleaning and care.
It is important to use detergent specially designed for domestic dishwashers. (Always follow the manufacturersinstructions.)
Glist 3 in 1 advanced dishwasher tablets with active enzymes are the ideal way to protect and care for yourdishwasher,whilegettingyourdishesandglassessparkingclean.
Softer Water:
Built in salt action softens water, helping to prevent the build up of limescale in the dishwasher and improvethecleaningresult*.
CleanerDishes:
With unique active enzymes in the cleaning phase Glist 3 in 1 breaks down even the hard to shift foodstuffs and grease, leaving the dishes spotless and the dishwasher clean too.
Sparkling Results:
The built-in Glist rinse agent ensures the dishes and glasses are free from water marks and smears.
If you have any questions regardingGlist 3 in 1, please contact the hotline on 0800 216 730.
•Use the right amount of detergent (seeprogrammechart).
•Store your detergent and rinse aid inacool,dryplace,safelyawayfrom children.
*If you live in an area particularly prone to very hard water ( 35° f) Glist and Hotpoint recommend that you continue to keep your dishwasher salt topped up.
Rinse aid.
Rinse aid makes dishes sparkle moreasitimprovestheirdrying.The rinseaidcontainerissituatedonthe insideofthedoor.
Youshouldfilltherinseaidcontainer when indicator D lights up on the container (see right) and the rinse aid indicator light "U" on the control panelflashes.
Adding rinse aid.
To open the dispenser, turn cap C anticlockwise.Takecarewhenyou pour in the rinse aid to avoid it overflowing.
F C
D
You can regulate the amount of rinse aid used by the dishwasher, move the adjuster F which you will find under lid C.
You can choose from six different positions. It is normally set to 4.
-The amount of rinse aid needs to be increased if the dishes appear dull or you can see circular stains.
-The amount of rinse aid needs to be reduced if the dishes are sticky or you can see white streaks.
8
 Loading...