


Instructions for use
DISHWASHER
EN
English
Contents
Precautions and safety advice, 2-3
General safety
Disposal of old electrical appliances
Saving energy and respecting the environment Recycling & Disposal Information
FDUD 43133 ULTIMA
Installation, 4-5-6
Positioning and levelling
Connecting the electricity and water supplies Technical data
Switching the appliance on for the first time Selecting the language
Child safety lock
Description of the appliance, 7
Overall view Control panel
Loading the racks, 8-9
Lower rack
Cutlery basket
Upper rack
Adjusting the upper rack
Start-up and use, 10
Starting the dishwasher
Measuring out the detergent
Wash cycles, 11
Table of wash cycles
Ecodesign Regulation
Special wash cycles and options, 12
Rinse aid and refined salt, 13
Measuring out the rinse aid Measuring out the refined salt
Care and maintenance, 14
Cutting off the water and electricity supplies Cleaning the dishwasher
Preventing unpleasant odours Cleaning the sprayer arms Cleaning the water inlet filter Cleaning the filters
Leaving the machine unused for extended periods
Troubleshooting, 15
After-Sales Service, 16
Guarantee, 17

Precautions and safety advice
EN |
|
|
The appliance was designed and manufactured in |
|
|
||
|
compliance with current international safety standards. |
||
|
|
||
|
|
The following information has been provided for safety |
|
|
|
reasons and should therefore be read carefully. |
|
Keep this instruction manual in a safe place for future reference. If the appliance is sold, given away or moved, please ensure the manual is kept with the machine, so that the new owner may benefit from the advice contained within it.
Please read this instruction manual carefully: it contains important information regarding the safe installation, use and maintenance of the appliance.
This appliance is intended to be used in household and similar applications such as:
-staff kitchen areas in shops, offices and other working environments;
-farm houses;
-by clients in hotels, motels and other residential type environments;
-bed and breakfast type environments.
General safety
•This appliance is not intended for use by persons
(including children) with reduced physical, sensory or mental capabilities, or lack of experience and knowledge, unless they have been given supervision or instruction concerning use of the appliance by a person responsible for their safety.
•Children should be supervised to ensure that they do not play with the appliance.
•The appliance was designed for domestic use inside the home and is not intended for commercial or industrial use.
•The appliance must be used by adults only, to wash domestic crockery according to the instructions in this manual.
•The appliance must not be installed outdoors, even in covered areas. It is extremely dangerous to leave the machine exposed to rain and storms.
•Do not touch the appliance when barefoot.
•When unplugging the appliance always pull the plug from the mains socket, do not pull on the cable.
•The water supply tap must be shut off and the plug should be removed from the electrical socket before cleaning the appliance or carrying out any maintenance work.
•If the appliance breaks down, do not under any circumstances touch the internal parts in an attempt to carry out the repair work yourself.
•Do not lean or sit on the open door of the appliance: this may cause the appliance to overturn.
•The door should not be left open as it may create a dangerous obstacle.
•The packaging material should not be used as a toy: it can become a choking or suffocation hazard.
If your family includes children:
•DO NOT allow children to play with the appliance or tamper with its controls.
•Keep detergents and rinse aids away from children.
•Keep children away from the open door of a dishwasher, there could still be some detergent left inside.
Disposal of old electrical appliances
The European Directive 2012/19/EU on Waste Electrical and Electronic Equipment (WEEE), requires that old household electrical appliances must not be disposed of in the normal unsorted municipal waste stream. Old appliances must be collected separately in order to optimise the recovery and recycling of the materials they contain and reduce the impact on human health and the environment. The crossed out “wheeled bin” symbol on the product reminds you of your obligation, that when you dispose of the appliance it must be separately collected.
Consumers should contact their local authority or retailer for information concerning the correct disposal of their old appliance.
Saving energy and respecting the environment
Saving water and energy
•Only start a wash cycle when the dishwasher is full. While waiting for the dishwasher to be filled, prevent unpleasant odours with the Soak cycle (see Wash Cycles).
•Select a wash cycle that is suited to the type of crockery and to the soil level of the crockery using the Wash cycle table:
-for dishes with a normal soil level, use the Eco wash cycle, which guarantees low energy and water consumption levels.
-if the load is smaller than usual activate the Half load* option (see Start-up and use).
•If your electricity supply contract gives details of electricity saving time bands, run wash cycles during the periods when a lower tariff is applied.
The Delayed start* button (see Start-up and use) helps you organise the wash cycles accordingly.
Phosphate-free and chlorine-free detergents containing enzymes
•We strongly recommend that you use detergents that do not contain phosphates or chlorine, as these products are harmful to the environment.
2

|
|
|
• Enzymes provide a particularly effective action |
|
|
EN |
||
at temperatures around 50°C, and as a result |
||
|
||
detergents containing enzymes can be used in |
|
|
conjunction with low-temperature wash cycles in |
|
|
order to achieve the same results as a normal 65°C |
|
|
wash cycle. |
|
•To avoid wasting detergent, use the product in appropriate quantities based on the manufacturer’s recommendations, the hardness of the water and the soil level and quantity of the crockery. Even if they are biodegradable, detergents contain substances that may alter the balance of nature.

 Recycling & Disposal Information
 As part of Hotpoint’s continued commitment to helping the environment, Hotpoint reserves the right to use quality recycled components to keep down customer costs and minimise material wastage.
Please dispose of packaging and old appliances carefully.
To minimise risk of injury to children, remove the door, plug and cut mains cable off flush with the appliance.
Dispose of these parts separately to ensure that the appliance can no longer be plugged into a mains socket and the door cannot be locked shut.
* Only available in selected models.
3

Installation
EN |
|
|
If the appliance must be moved at any time, keep it |
|
|
||
|
|
||
|
|
in an upright position; if absolutely necessary, it may be |
|
|
|||
|
|
tilted onto its back. |
|
Positioning and levelling
1.Remove the appliance from all packaging and check that it has not been damaged during transportation.
If it has been damaged, contact the retailer and do not proceed any further with the installation process.
2.Check the dishwasher by placing it so that its sides or back panel are in contact with the adjacent cabinets or even with the wall. This appliance can also be recessed under a single
worktop* (see the Assembly instruction sheet).
3. Position the dishwasher on a level and sturdy floor. If the floor is uneven, the front feet of the appliance may be adjusted until it reaches a horizontal position. If the appliance is levelled correctly, it will be more stable and much less likely to move or cause vibrations and noise while it is operating.
4*. Adjust the height of the rear foot from the front of the appliance on the central lower part of the dishwasher, turning a hexagonal spanner (red color) with an opening of 8 mm in a clockwise direction to increase the height or in an anticlockwise direction to decrease the height.
 The dishwasher meets the requirements set out by the regulations in force concerning safety and electrical equipment.
 Any technical checks should be conducted exclusively by a trained and authorised technician: Repairs carried out by unaithorised persons will invalidate the guarantee, as well as posing a potential hazard to the user.
 The manufacturer declines all responsibility for damage to persons or property resulting from failure to observe the above precautions, from tampering with even a single component or from the use of non-original spare parts.
Electrical Connection
Before inserting the plug into the electrical socket, make sure that:
•the socket is earthed and complies with current regulations;
•the socket can withstand the maximum load of the appliance, which is indicated on the data plate located on the inside of the door (see Description of the appliance);
•the power supply voltage falls within the values indicated on the data plate on the inside of the door;
•the socket is compatible with the plug of the appliance. If this is not the case, ask an authorised technician to replace the plug (see After Sales Service); do not use extension cables or multiple sockets.
 Once the appliance has been installed, the power supply cable and the electrical socket should be easily accessible.
 The cable should not be bent or compressed.
 If the power supply cable is damaged, it must be replaced by the manufacturer or its Technical Assistance Service in order to prevent all potential hazards. (See After Sales Service)
This appliance must be earthed.
Fuses:your appliance comes fitted with a plug and a 13A fuse. If you need to replace the fuse, only those rated at 13A and ASTA approved to BS1362 should be used. If you lose the fuse cover, a replacement may be obtained from your local authorised Service
Centre or Electrical company. Correct replacement is identified by colour coding or the marking on base of plug.
DO NOT use the plug unless the fuse cover is fitted.
Changing the Plug
 Cut off and dispose of the supplied plug if it does not fit your socket.
To avoid a shock hazard DO NOT insert the discarded plug into a socket anywhere else.
 Wires in the mains lead are coloured accordance with the following code:
Green/Yellow - |
Earth |
|
Blue |
- |
Neutral |
Brown |
- |
Live |
If you change the plug, the colour of the wires in the mains lead may not correspond with the terminal markings in the plug, which if not coloured, could be:
EARTH ‘E’ |
or |
|
|
|
|||
NEUTRAL |
‘N’ |
||
LIVE |
‘L’ |
||
Changing the Mains Lead
A lead can be ordered from Hotpoint Service
UK: 08709 066 066 or
Republic of Ireland: 1850 302 220
-If you have damaged the existing lead or require a longer one a charge will be made. It is strongly advised that this work is carried out by a qualified electrician.
-If the domestic wiring includes a residual current-operated circuit breaker, ensure that it conforms to the latest regulations.
The dishwasher must not be connected to the electricity supply while installation is being carried out.
-This appliance should only be connected to a 230/240V AC source, via a properly installed earthed socket.
-Use the dishwasher solely in a domestic environment.
-DO NOT stand or place heavy objects on the door when it is open, this could damage the door or cause the appliance to tip forward.
4

 The Company shall not be held responsible for any incidents that occur if these regulations are not observed.
Anti-condensation strip*
After installing the dishwasher, open the door and stick the adhesive transparent strip under the wooden shelf in order to protect it from any condensation which may form.
Technical data
Dimensions |
width 60 cm |
||
height 85 cm |
|||
|
|
|
depth 60 cm |
Capacity |
14 standard place-settings |
||
Water supply |
0,05 ÷ 1MPa (0.5 ÷ 10 bar) |
||
pressure |
7,25 – 145 psi |
||
Power supply voltage |
See appliance data plate |
||
Total absorbed power |
See appliance data plate |
||
|
|
|
|
Fuse |
See appliance data plate |
||
|
|
|
This dishwasher conforms to the |
|
|
|
following European Community |
|
|
|
Directives: |
|
|
|
-2006/95/EC (Low Voltage) |
|
|
|
-2004/108/EC (Electromagnetic |
|
|
|
Compatibility) |
|
|
|
-2009/125/EC (Comm. Reg. |
|
|
|
1016/2010) (Ecodesign) |
|
|
|
-97/17/EC (Labelling) |
|
|
|
-2012/19/EU Waste Electrical |
|
|
|
|
|
|
|
|
|
|
|
and Electronic Equipment |
|
|
|
(WEEE) |
Connecting the water supplies
 Connection to the water and electricity supplies should only be performed by a qualified technician.
 The dishwasher should not stand on top of the water hoses or the electricity supply cable.
Connecting the water inlet hose
The water inlet and outlet hoses and the electricity supply cable may be positioned towards the right or the left in order to achieve the best possible installation.
•To a suitable cold water connection point: before attaching the hose, run the water until it is perfectly clear so that any impurities that may be present in the water do not clog the appliance; after performing this operation, screw the inlet hose tightly onto a tap with a ¾ gas threaded connection.
•To a suitable hot water connection point: your dishwasher may be provided with hot water from the mains supply (if you have a central heating system with radiators) provided that it does not exceed a temperature of 60°C.
Screw the hose to the tap as described for connection to a cold water supply.
|
If the inlet hose is not long enough, contact a specialist |
EN |
|
||
store or an authorised technician (see Assistance). |
|
|
 The water pressure must be within the values indicated in the Technical data table (see Installation).
 The hose should not be bent or compressed.
 The appliance must be connected to the water supply network using new hoses.
Do not use old hoses.
Ensure that the new hose supplied is connected and the old hose is disposed of safely.
 DO NOT overtighten the hose connector, hand tight is sufficient.
 Ensure the fill hose is not kinked.
 Tap connections*: A range of adaptors are available to suit your tap.
 DO NOT connect the dishwasher to a single outlet instantaneous water heater or an electric heater.
Sink Waste System
Connect the outlet hose (without bending it) to a drain duct with a minimum diameter of 32 mm.
The outlet hose must be at a height ranging from 40 to 80 cm (from 15’’ to 31’’) from the floor/surface where the dishwasher rests (A).
•before connecting the drain hose, remove any internal restrictions; this will prevent a build up of debris which could cause a blockage
•remove any restrictions from the waste spigot and ensure that the sealing bung is removed (B).
 It MUST NOT be connected to a surface water drain.
• Untie the end of the GREY drainage hose from the rear of the appliance.
* Only available in selected models.
5
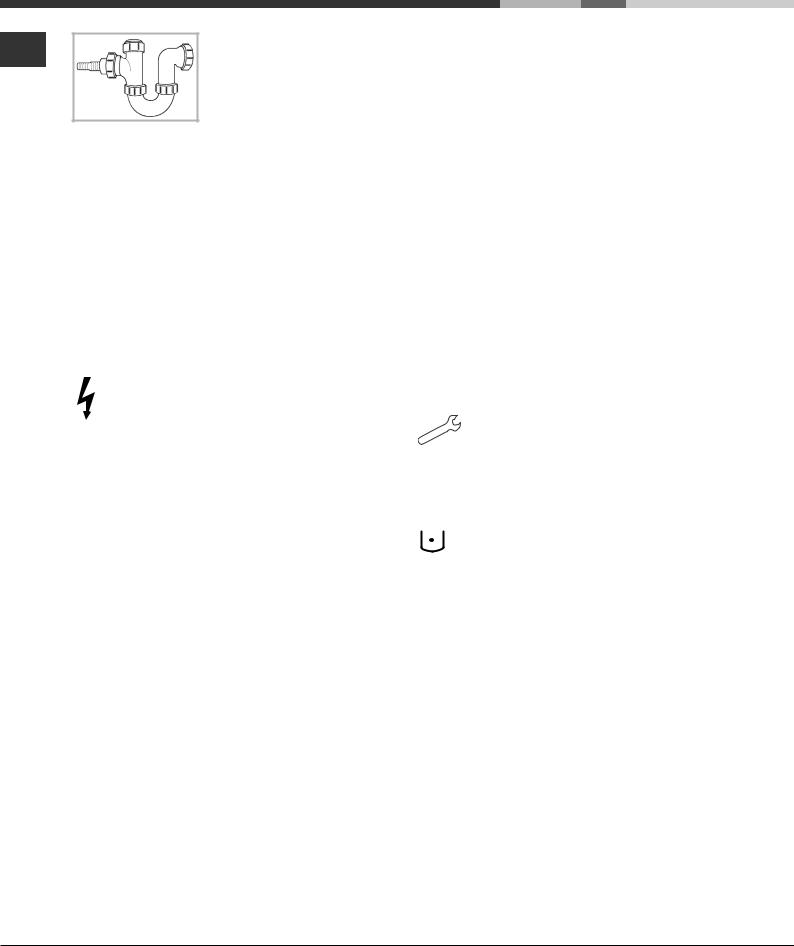
• If fitting an under sink waste
EN disposal unit, cut out the membrane, bung or blanking plug.
 Ensure the drain hose is securely attached, to prevent it coming away while the machine is in use and causing a flood.
 Fit hose to waste securely using a “Jubilee” type clip.
Anti-flooding protection*
To ensure floods do not occur, the dishwasher:
- is provided with a special system which blocks the water supply in the event of anomalies or leaks from inside the appliance.
Some models are also equipped with the supplementary safety device New Acqua Stop*, which guarantees anti-flooding protection even in the event of a supply hose rupture.
WARNING: HAZARDOUS VOLTAGE!
Under no circumstance should the water inlet hose be cut as it contains live electrical parts.
The Company shall not be held responsible for any incidents that occur if these regulations are not observed
Advice regarding the first wash cycle
After the appliance has been installed, immediately before running the first wash cycle, completely fill the salt dispenser with water and add only then approximately 1 kg of salt (see chapter Rinse-aid and refined salt). The water may overflow: this is normal and is not a cause for concern. Select the water hardness value (see chapter Rinse-aid and refined salt). After the salt has been poured into the machine, the LOW SALT indicator light * switches off.
 If the salt dispenser is not filled, the water softener and the heating element may get damaged as a result.
The control panel features a “Touch Control” system; press the symbols lightly with your fingertips to activate the command.
The machine has a buzzer/set of tones (depending on the dishwasher model) to inform the user that a command has been implemented: power on, cycle end etc.
The symbols/indicator lights/LEDs on the control panel/ display may vary in colour and may have a flashing or fixed light (depending on the dishwasher model).
The display provides useful information concerning the type of wash cycle, drying/wash-cycle phase, remaining time, temperature etc etc.
Switching the appliance on for the first time
Selecting the language
Switch on the machine using the ON/OFF button and select the desired language using the buttons next to the grey arrows (the default language is English.)
Press the OK button to confirm the selection. Press the ESC button to exit or wait a few seconds.
SETTINGS button
This button makes it possible to select:
logo display, volume of buzzer/set of tones, language selection, rinse aid adjustment, water hardness adjustment, control panel lock.
 Child safety lock
 The control panel lock can be activated when the dishwasher is switched on or when a cycle is in progress using the “Lock” button. Press again to deactivate the function.
Use the SETTINGS button to access the menu. The control panel lock can be activated automatically after 10/30 seconds from the cycle start.
6
 Loading...