


HDS 108/1-86,HDS 108 X/1-86
1
This manual contains sections of Safety Instructions,Operating Instructions, Installation Instructions and Troubleshooting Tips etc. Carefully reading it before using the dishwasher will help you to use and maintain the dishwasher properly.
To review the section on Troubleshooting Tips will help you to solve some common problems by yourself and not need to ask for the help of professional technicians.
The manufacturer, following a policy of constant development and up-dating of the product, may make modifications without giving prior notice.


 . . . . . . . . . . . . . . . . . . 1
Control Panel . . . . . . . . . . . . . . . . . . . . . . . . 2 Dishwasher Features . . . . . . . . . . . . . . . . . 2 Wash Cycle Table . . . . . . . . . . . . . . . . . . . . 3 Water Softener . . . . . . . . . . . . . . . . . . . . . . 4 Detergent . . . . . . . . . . . . . . . . . . . . . . . . . . . 5 Rinse Aid . . . . . . . . . . . . . . . . . . . . . . . . . 5,6 Loading the Dishwasher Rack . . . . . . . . 6,7 Turning On the Appliance . . . . . . . . . . . . . . 7 Filtering System . . . . . . . . . . . . . . . . . . . . . 8 Caring for the Dishwasher . . . . . . . . . . . . . 9
About Electricity connection . . . . . . . . . . .10 About the Unicouple . . . . . . . . . . . . . . . . . 10 Water Connection . . . . . . . . . . . . . . . . . . . 11
Before calling for service. . . . . . . . . . 12,13
This appliance must be grounded. In the event of a malfunction or breakdown, grounding will
reduce the risk of electric shock by providing a path of least resistance of electric current. This appliance is equipped with a cord having an equipment-grounding conductor and a grounding plug. The plug must be plugged into an appropriate outlet that is installed and grounded in accordance with all local codes and ordinances.
Improper connection of the equipmentgrounding conductor can result in a risk of electric shock. Check with a qualified electrician or service representative if you are in doubt whether the appliance is properly grounded. Do not modify the plug provided witht heappliance ; Ifi t is not fit for the outlet .have a proper outlet installed by a qualified electrician.
This appliances is intended to be used in household and similar applications such as:
-staff kitchen areas in shops, offices and other working environments;
-farm houses;
-by clients in hotels, motels and other residential type environments;
-bed and breakfast type environments.
A different use of this appliance from household environment or from typical housekeeping functions, as commercial use by expert or trained users, is excluded even in the above applications.
If the appliance is used in a manner inconsistent with this it may reduce the life of the appliance and may void the manufacturer’ s warranty.
Any damage to the appliance or other damage or loss arising through use that is not consistent with domestic or household use (even if located in a domestic or household environment) shall not be accepted by the manufacturer to the fullest extent permitted by law.
Do not abuse, sit on, or stand on the door or dish rack of the dishwasher.
Do not touch the heating element during or immediately after use.
Do not wash plastic items unless they are marked dishwasher safe or the equivalent. For plastic
it emsnot so marked, check the manufactures recommendations.
Use only detergent and rinse additives designed for an automatic dishwasher. Never use soap , laundry detergent, or hand washing detergent in your dishwasher. Keep these products out of children.
Keep child away from detergent and rinse aid, keep child away from the open door of the dishwasher, there could still be some detergent left inside.
The door should not be left in the open position since this could present a tripping hazards.
During installation, the power supply must not be excessively or dangerously bent or flattened.
Do not tamper with controls.
The appliance is not intended for use by young children or infirm persons without supervision.
Dishwasher detergents are strongly alkaline,they can be extremely dangerous if swallowed.Avoid contact with skin and eyes and keep children away from the dishwasher when the door is open.
Do not operate your dishwasher unless all enclosure panels are properly inplace. Open the door very carefully if the dishwasher is operating, there is a risk of water squirting out.
Do not place any heavy objects of stand on the door when it is open. The appliance could tip forward.
When loading items to be washed:
1)Locate sharp items so that they are not likely to damage the door seal;
2)Load sharp knives with the handles up to reduce the risk of cut-type injuries.
When using your dishwasher, you should prevent plastic item from contacting with heating element.
If the supply cord is damaged, it must be replaced by the manufacturer or its service agent or a similarly qualified person in order to avoid a hazard.
Please dispose of packing materials properly.
Use the dishwasher only for its intended function.
Remove the door to the washing compartment when removing an old dishwasher from service or discarding it.
Young children should be supervised to ensure that they do not play with the appliance.
Check that the detergent receptable is empty after completion of the wash cycle.
1

To get the best performance from your dishwasher,read all operating instructions before using it for the first time keep this booklet safe for future reference.
1.Power supply indicator light: comes on when the power is turned on.
2.Power Switch: turn on/off the power supply.
3.Display Window: program remaining time, delay time, and faut codes.
4.Delayed Start Button: press this button to set the delayed hours for washing.
5 .Rinse Aid indicator light: comes on when there is not enough rinse agent (Certain model only).
6.No Salt Indicator Light: comes on when there is not enough salt in the softener (Certain model only).
7.Program indicator light
8.Program Button: pressed to choose desired program, whose program indicator light will come on.
9.Start/Reset Button: press this button to start or stop the machine.
1
2
3
Upper Basket
Spray Arms
Lower Basket
4
5
6
Water Softener
Main Filter
Detergent Dispenser
7
8
9
|
|
|
|
|
|
|
|
|
|
|
|
|
|
|
|
|
|
|
|
|
|
|
|
|
|
|
|
|
|
|
|
|
|
|
|
|
|
|
|
|
|
|
|
|
|
|
|
|
|
|
|
|
|
|
|
|
|
|
|
|
|
|
|
|
|
|
|
|
|
|
|
|
|
|
|
|
|
|
|
|
|
|
|
|
|
|
|
|
|
|
|
|
|
|
|
|
|
|
|
|
|
|
|
|
|
|
|
|
|
|
|
|
|
|
|
|
|
|
|
|
|
|
|
|
|
|
|
|
|
|
|
|
|
|
|
|
|
|
|
|
|
|
|
|
|
|
|
|
|
|
|
|
|
|
|
|
|
|
|
|
|
|
|
|
|
|
|
|
|
|
|
|
|
|
|
|
|
|
|
|
|
|
|
|
|
|
|
|
|
|
|
|
|
|
|
|
|
|
|
|
|
|
|
|
|
|
|
|
|
|
|
|
|
|
|
|
|
|
|
|
|
|
|
|
|
|
|
|
|
|
|
|
|
|
|
|
|
|
|
|
|
|
|
|
|
|
|
|
|
|
|
|
|
|
|
|
|
|
|
|
|
|
|
|
|
|
|
|
|
|
|
|
|
|
|
|
|
|
|
|
|
|
|
|
|
|
|
|
|
|
|
|
|
|
|
|
|
|
|
|
|
|
|
|
|
|
|
|
|
|
|
|
|
|
|
|
|
|
|
|
|
|
|
|
Cup Shelf |
10 |
Rinse Aid Dispenser |
||||||||||||||||||||||
Silverware Basket |
11 |
Drain pipe connector |
||||||||||||||||||||||
Coarse Filter |
12 |
Inlet pipe connector |
||||||||||||||||||||||
2
|
|
|
|
|
|
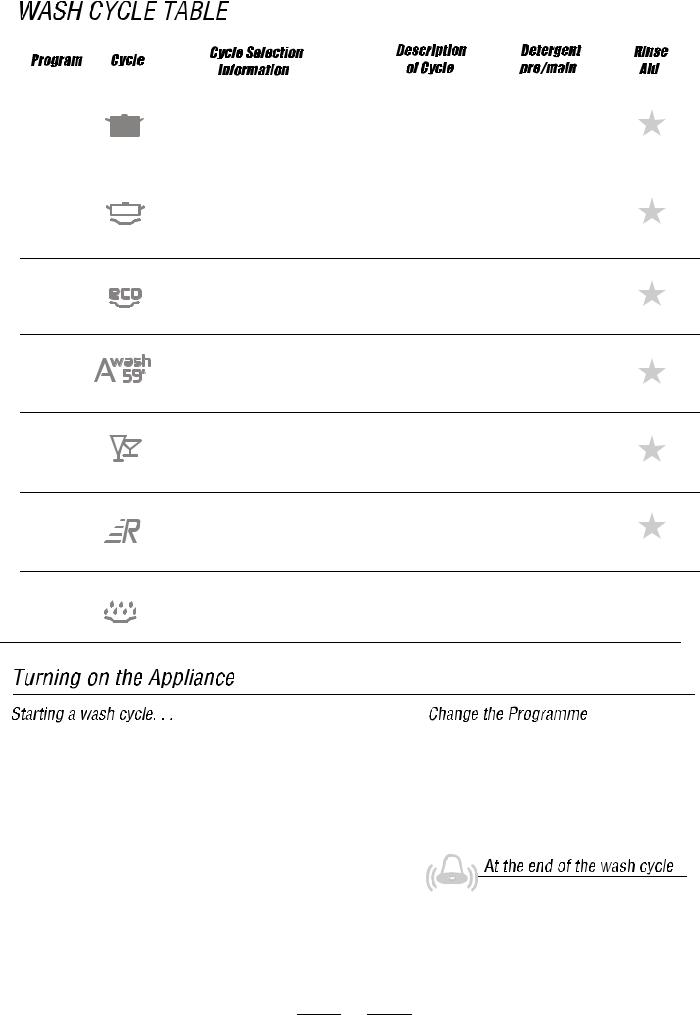
For the heaviest soiled loads, |
Pre-wash 50 |
|
|
Strong |
such as pots,pans,casserole |
Wash 70 |
|
|
dishes and dishes that have |
Rinse |
3/22 gr. |
||
|
been sitting with dried food |
Rinse |
|
|
|
on them for a while. |
Rinse 55 |
|
|
|
|
Drying |
|
|
|
For normally soiled loads, |
Wash 55 |
|
|
Normal |
such as pots, plates,glasses |
Rinse |
3/22gr. |
|
and lightly soiled pans. |
Rinse |
|||
|
|
|||
|
standard daily cycle. |
Rinse 65 |
|
|
|
(EN 50242) |
Drying |
|
Economy |
For lightly soiled loads,such |
as plates,glasses,bowls and |
|
|
lightly soiled pans. |
Pre-wash(50 )
Wash (45 )
Rinse 25 gr. Rinse (65 )
Drying
1 Hour
Glass
Daily wash in only 1 hour. |
Pre-wash (30 ) |
|
|
Suitable for normal soiled dishes |
|
||
Wash (70 ) |
25 gr. |
||
that are to be washed straight |
|||
Rinse (65 ) |
|||
|
|||
after a meal (max 6 plate settings). |
|
||
Drying |
|
||
|
|
||
For lightly soiled loads, |
Pre-wash |
|
|
Wash (45 ) |
25 gr. |
||
such as glasses, crystal and |
|||
Rinse |
fine china. |
Rinse (60 ) |
|
|
|
Drying |
Rapid
Soak
A shorter wash for lightly |
Wash (50 ) |
25 gr. |
Rinse (55 ) |
||
soiled loads (max 4 plate settings). |
Drying |
|
To rinse dishes that you |
Pre-wash |
|
plan to wash later that day. |
||
|
1Draw out the lower and upper basket, load the dishes and push them back. It is commended that loading the lower basket first, then the upper one. The expensive and finer chinaware should not be put in.
2With a little force to ensure the door is properly closed.
Note: a sound of click could be heard when the door is closed perfectly.
3Insert the plug into the socket.
The power supply is 230V 50HZ, the specification of the socket is 250V 10A.
4According to the soil level to choose the desired program by pressing program selection button.
5Press the ON/OFF button
6Press this button to start automatic washing.
7Press the ON/OFF button at the end of washing. Open the door of dishwasher after waiting 30 minutes.
Press the Start/Pause button to stop washing.
Press the programme button to select the programme.
Press the Start/Pause button to start washing.
At end of washing, the time display will flash for 8 seconds while the buzzer sound. But at the end of delayed washing, no sound of the buzzer, only the flash of the time display.
3

If your model have not water softener, you may skip this section.
There are two ways to reduce the water hardness: one way is using water softener, the other is using detergent.
The hardness of the water varies from place to place. If hard water is used in the dishwasher, deposits will form on the dishes and utensils.
The appliances is equipped with a special softener that uses a salt specifically designed to eliminate lime and minerals from the water.
Always use salt intended for use with dishwashers.
The salt container is located beneath the lower rack and should be filled as follows:
1Remove the lower basket and then unscrew and remove the cap from the salt container.
2 If you are filling the container for the first time ,fill 2/3 of its volume with water.
3 Place the end of the funnel(supplied) into the hole and introduce about 2kg of salt .It is normal for a small amount of water to come out of the salt container
4 Carefully screw the cap back on.
1. The salt container must be refilled when the salt warning light comes on. Though the salt container is filled enough, the indicator light may not black out before the salt fully dissolve.
2. If there are spills of the salt, a soak program could be run to wipe them out.
The dishwasher is designed to allow for adjusting the amount of salt consumed based on the hardness of the water used. This is intended to optimize and customize the level of salt consumption so that the salt consumption could be set proceed as follows:
1 Unscrew the cap from the salt container.
|
|
|
|
|
|
|
|
|
|
2 There is a ring on the container with an arrow on it (see Figure to the side), if |
||||||
|
|
|
|
|
|
|
|
|
|
|||||||
|
|
|
|
|
|
|
|
|||||||||
|
|
|
|
|
|
|
|
|
|
necessary, rotate the ring in the anticlockwise direction from the "-" Setting |
|
|||||
|
|
|
|
|
|
|
|
|
|
toward the |
"+" sign, based on the hardness of the water being used.It is |
|
||||
|
|
|
|
|
|
|
|
|
|
|
||||||
|
|
|
|
|
|
|
|
|
||||||||
|
|
|
|
|
|
|
|
|
|
|
||||||
|
|
|
|
|
|
|
|
|
|
recommended that adjustments should be made in accordance with the following |
||||||
|
|
|
|
|
|
|
|
|
|
schema: |
|
|
|
|
|
|
|
|
|
|
|
|
|
|
|
|
|
|
|
|
|
|
|
|
|
|
|
|
|
|
|
|
WATER HARDNESS |
|
Selector |
Salt c onsumption |
|
Aut onomy |
||
|
|
|
|
|
|
|
|
|
|
|
Position |
(gram/cycle) |
|
(cycles/2kgs) |
||
|
|
|
°fH |
|
|
|
dH |
|
mmol/l |
|
||||||
|
|
|
|
|
|
|
|
|
|
|
|
|
|
|||
0~10 |
|
|
|
0-5 |
|
0-1.0 |
- |
0 |
|
/ |
||||||
|
|
|
|
|
|
|
|
|
|
|
|
|
||||
10~25 |
|
|
5-14 |
|
1.0-2.5 |
/ |
20 |
|
60 |
|||||||
|
|
|
|
|
|
|
|
|
|
|
|
|
||||
25~50 |
|
|
14-28 |
|
2.5-5.0 |
MED |
40 |
|
40 |
|||||||
|
|
|
|
|
|
|
|
|
|
|
|
|
|
|||
>50 |
|
|
|
>28 |
|
>5.0 |
+ |
60 |
|
25 |
||||||
|
|
|
|
|
|
|
|
|
|
|
|
|
|
|
|
|
Contact your local water board for information on the hardness of your water supply.
4

YOU MAY NOT ADD TOO MUCH DETERGENT TO PREVENT THE FORMATION OF DEPOSITS BECAUSE YOUR DISHWASHERS HAVE SPECIALLY-DESIGNED WATER SOFTENERS.
The dispenser must be refilled before the start of each wash cycle following the instructions provided in the" Wash Cycle Table".Your dishwashers use less detergent and rinse aid than conventional dishwashers. Generally, only one tablespoon of detergent is needed for a normal wash load. Also, more heavily soiled items need more detergent. Always add the detergent just before starting dishwasher, otherwise it could get damp and will not dissolve properly.
IF THE WATER ISN'T TOO HARD, YOU MAY ALSO PREVENT THE FORMATION OF DEPOSITS BY ADDING DETERGENT.
The amount of detergent needed can vary due to differences in water hardness. To determine the water hardness in your area, contact your local water utility or area water softening company. The harder the water, the more detergent you may need. Remember, you should adjust the amount of detergent you use by small amounts until you find the correct amount.
Dishwasher detergent is corrosive! Take care to keep it out of reach of children.
To remove hard water spots, try the following:
 Run dishes through a normal wash program.
 Remove all metal dishware, such as cutlery, pans, etc., fr om thedishwasher.
 Do not add detergent.
 Pour two cups of vinegar into a bowl and set the bowl face up onthe low err ac kof thedishwasher.
 Run the dishes through a normal wash program.
If this doesn't work, try the same process with 1 / 4 cup of citric acid crystals instead of vinegar.
Use only detergent specifically made for use in dishwashers. Keep your detergent fresh and dry. Don't put powder detergent into the dispenser until You're ready to wash dishes.
To open the dispenser, turn the cap to the "open" (left) arrow and lift it out.
Pour the rinse aid into the dispenser, being careful not to overfill.
Replace the cap by inserting it aligned with "open" arrow and turning it to the closed (right) arrow.
The rinse aid is released during the final rinse to prevent water from forming droplets on your dishes that can leave spots and streaks. It also improves drying by allowing water to "sheet" off the dishes.
Your dishwashers are designed to use liquid rinse aids. The rinse aid dispenser is located inside the door next to the detergent dispenser. To fill the dispenser, open the cap and pour the rinse aid into the dispenser until the level indicator turns completely black. The dispenser holds about 100 ml of liquid rinse aid.
Be careful not to overfill the dispenser, because this could
cause oversudsing. Wipe away any spills with a damp cloth. Don't forget to replace the cap before you close the dishwasher door.
If you have soft water, you may not need rinse aid for it may cause a white film to develop on your dishes.
A measured amount of rinse aid is released during the final rinse. As with detergent, the amount of rinse aid needed for your dishes depends on the hardness of the water in your area. Too much rinse aid can result in lather of foaming and cause cloudiness or steaks on your dishes. If the water in your area is very soft, you may not need rinse aid. If you do,you can dilute the rinse aid with an equal amount of water.
The rinse aid dispenser has six settings. Always start with the dispenser set on " 1 ". If spots and poor drying are problems, increase the amount of rinse aid dispensed by removing the dispenser lid and rotating the dial to "2". If the dishes still are not drying properly or are spotted, adjust the dial to the next higher number until your dishes are spot-free. We suggest you to set on "4" .
If only four settings we suggest you to set on "2".
In accorance with En50242 standard, the dispenser should be set on the maximum lever when doing the performance.
5

If there is no rinse aid warning light in the control panel, you can judge the amount of rinse aid by the following means. The black dot on the rinse aid dispenser indicates the amount of rinse aid in the dispenser. As the rinse aid diminishes, the size of the black dot decreases. You should never let the rinse aid get below 1 / 4 full.
As the rinse aid diminishes, the size of the black dot on the rinse aid level indicator changes, as illustrated below.
Full
3 / 4 full
1 / 2 full
1 / 4 full - Should refill to eliminate spotting Empty
The upper rack is designed to hold more delicate and lighter dishware such as glasses, coffee and tea cup and saucers, as well as plates, small bowls and shallow pans(as long as they are not too dirty).
Position the dishes and cookware so that they do not get moved by the spray of water.
The upper rack can be adjusted for height by putting wheels of different height into the rails.
1 |
6 |
1 |
|
|
|
1 |
Cups |
||
|
|
|
||
3 |
|
|
2 |
Small serving bowl |
|
|
4 |
3 |
Large serving bowl |
4 |
|
4 |
Glasses |
|
|
|
|||
2 |
|
5 1 |
5 |
Saucers |
1 |
|
|||
4 |
|
7 |
6 |
Dish |
|
7 |
Dessert dishes |
||
|
|
|
We recommend that you place large items which are most difficult to clean into the lower rack: pots, pans, lids, serving dishes and bowls, as shown in the figure to the right.
It is preferable to place serving dishes and lids on the side of the racks in order to avoid blocking the rotation of the top spray arm.
Pots, serving bowls, etc, must always be placed top down.
Deeppotsshouldbeslantedtoallowwatertoflowout. Thebottomrackfeaturefolddowntinerowssothatlargeror morepotsandpanscanbeloaded.
36
4 |
2 |
|
4 |
1 |
Oval platter |
|
|
|
|
2 |
Dessert dishes |
||
|
|
|
|
|||
|
|
|
|
3 |
Soup plates |
|
|
|
|
|
4 |
Dinner plates |
|
3 |
5 |
|
3 |
5 |
Silverware basket |
|
2 |
6 |
Saucer |
||||
|
||||||
|
1 |
|
|
|
|
6

Silverware should be placed in the silverware basket with handles at the bottom: If the rack has side baskets, the spoon should be loaded individually into the appropriate slots, Especially long utensils should be placed in the horizontal position at the front of the upper rack.
2 |
1 |
1 |
2 |
1 |
1 |
1 |
1 |
4 55 |
|
5 5 4 |
|
4 |
4 |
4 |
4 |
|
2 |
2 |
|||
3 |
3 |
|||
4 |
4 |
|||
3 |
3 |
|||
2 |
2 |
|||
|
|
|||
4 |
3 |
3 |
4 |
|
2 |
2 |
|||
3 |
3 |
|||
|
|
|||
2 |
3 |
3 |
2 |
|
|
|
|||
5 5 5 |
5 5 5 |
|||
1 |
1 |
1 |
1 |
|
6 |
8 |
6 |
7 |
|
1 |
Forks |
5 |
Knives |
2 |
Soup spoons |
6 |
Serving spoons |
3 |
Dessert spoons |
7 |
Gravy ladles |
4 |
Teaspoons |
8 |
Serving forks |
Do not leave any item extend through bottom. Knives and other utensils with sharp points must be loaded in the basket with their points down or placed in an horizontal position.
1
2
3
4
5
6
7
Make sure that the plug of the appliance is inserted into the wall socket.
Load the dishwasher(see the section entitled, " Loading the Dishwasher " ) . Pour in the detergent(see the section entitled, " Salt, Detergent and Rinse Aid " ).
Close the door,press the ON/OFF button,and the ON/OFF light will turn on.
Press the "prog key-press" to select the "wash cycle".(see the section entitled."wash cycle table".) Press the Start/Pause key, the washing will start after ten seconds.
8Press the key to set the delay start time. This dishwasher can be delayed to start between 1 to 24 hours, and the display window beside the delay key can indicate the remaining time.If you want to cancel the delay start,
just press the key to make the remaining time become 0.
Premise: A cycle that is underway can only be modified if it has been running for a short time. Otherwise, the detergent may have already been released, and the appliance may have already drained the wash water. If this is the case, the detergent dispenser
must be refilled (see the paragraph entitled " Loading the Detergent " ).
Press the Start/Pause key, Then hold the“Prog ”button down for at lease 5 seconds (the running programme will be cancelled). At this point a new programme can be selected.
When the washing cycle has finished, the buzzer of dishwasher will mooing eight second, then stop. Turn off the appliance using the ON/OFF button, open the door of the dishwasher. Wait a few minutes before unloading the dishwasher to avoid handling the dishes and utensils while they are still hot and more susceptible to breakage. They will also dry better.
A forgotten dish can be added any time before the detergent cup opens. 1 Open the door a little to stop the washing.
2After the spray arms stop working,you can open the door completely.
3
4
Add forgotten dishes.
Close the door, the dishwasher will work after ten second.
It is dangerous to open the door when washing, because the hot water may be scalded to you. The door should not be left in the open position since this could present a tripping hazard.
7
 Loading...