


Hoover HDPN 1L390OW, HDPN 1L390PB, HDPN 1L642OB, HDPN 1L642OW, HDPN 1L642OX User Manual
...
EN

Thank you for choosing a Hoover dish washer. We are confident it will assist you loyally in washing your daily dishes in full safety.
Carefully read this manual for correct and safe appliance use and for helpful tips on efficient maintenance.
 Only use the dish washer after carefully reading these instructions. We recommend you always keep this manual to hand and in good condition for any future owner.
Please check that the appliance is delivered with this instruction manual, the warranty certificate, the service centre address and the energy efficiency label. Each product is identified by a unique 16digit code, also called the “serial number”, printed on the warranty certificate or on the serial plate found inside the door, on the upper right hand side. This code is a sort of product-specific ID card that you will need to use to register the product or if you need to contact the Technical Assistance Centre.
Fig. A
5 |
1 |
4 |
|
Contents
1.GENERAL SAFETY RULES
2.WATER SUPPLY
3.LOADING THE SALT
4.ADJUSTMENT THE UPPER BASKET
5.ADJUSTING THE DISHES
6.INFORMATION FOR TEST LABORATORIES
7.LOADING THE DETERGENT
8.TYPES OF DETERGENT
9.LOADING THE RINSE AID
10.CLEANING THE FILTERS
11.PRACTICAL TIPS
12.MAINTENANCE AND CLEANING
13.DESCRIPTION OF THE CONTROL PANEL
14.TECHNICAL DATA
15.PROGRAMME SELECTION AND SPECIAL FEATURES
16.ONE TOUCH
17.PROGRAMME LEGEND
18.WATER SOFTENER UNIT
19.THROUBLESHOOTING AND WARRANTY
20.ENVIRONMENTAL CONDITIONS
3 2
2

1.GENERAL SAFETY RULES
!This appliances is intended to be used in household and similar applications such as:
−Staff kitchen areas in shops, offices and other working environments;
−Farm houses;
−By clients in hotels, motels and other residential type environments;
−Bed and breakfast type environments.
A different use of this appliance from household environment or from typical housekeeping functions, as commercial use by expert or trained users, is excluded even in the above applications. If the appliance is used in a manner inconsistent with this it may reduce the life of the appliance and may void the manufacturer’s warranty.
Any damage to the appliance or other damage or loss arising through use that is not consistent with domestic or household use
(even if located in a domestic or household environment) shall not be accepted by the manufacturer to the fullest extent permitted by law.
!This appliance can be used by children aged from 8 years and above and persons with reduced physical, sensory or mental
capabilities or lack of experience and knowledge if they have been given supervision or instruction concerning use of the appliance in a safe way and understand the hazards involved. Children shall not play with the appliance. Cleaning and user maintenance shall not be made by children without supervision.
!Children should be supervised to ensure that they do not play with the appliance.
!Children of aged 3 and under should be kept away unless continuously supervised.
!If the supply cord is damaged, it must be replaced by the manufacturer, its service agent or similarly qualified persons in order to avoid a hazard. We recommend using an original component, which can be requested from the Technical
Assistance Centre.
!Only use the hose-sets supplied with the appliance for the water supply connection (do not reuse old hose-sets).
!Water pressure must be between 0.05 MPa and 0.8 MPa.
EN
3

!Make sure carpets or rugs do not obstruct the base or any of the ventilation openings.
!After installation, the appliance must be positioned so that the plug is accessible.
 WARNING:
Knives and other utensils with sharp points must be loaded in the basket with their points down or placed in a horizontal position.
!Do not leave the door open in a horizontal position, in order to avoid potential dangers (e.g. tripping).
!For further information on the product or to consult the technical data sheet, please refer to the manufacturer's website.
Electrical connections and safety instructions
!The technical details (supply voltage and power input) are indicated on the product rating plate.
!Make sure that the electrical system is earthed and complies with all applicable laws, and that the socket is compatible with the plug of the appliance.
The manufacturer declines all responsibility for any damage to people or property due to non-earthing of the machine.
!Ensure that the dishwasher does not crush power cables.
!In general it is not advisable to use adaptors, multiple plugs and/or extension cables.
!Before cleaning or maintaining the dishwasher, unplug the appliance and turn off the water supply.
!Do not pull on the power cord or appliance to unplug the machine.
!Do not leave the appliance exposed to the elements (rain, sun, etc.).
!Leaning or sitting on the open door of the dishwasher could cause it to tip over.
!The dishwasher is designed for normal kitchen utensils. Objects that have been contamined by petrol, paint, traces of steel or iron, corrosive chemicals, acids or alkalis must not be washed in the dishwasher.
4

!If there is a water softening device installed in the home there is no need to add salt to the water softener fitted in the dishwasher.
!If the appliance breaks down or stops working properly, switch it off, turn off the water supply and do not tamper with it. Repair work should only be carried out by an approved service agent and only genuine spare parts should be fitted. Any failure to follow the above advice may have serious consequences for the safety of the appliance.
!If it you need to move the machine after removing the packaging, do not try to lift it by the bottom of the door. Open the door slightly and lift the machine by holding on the top.
By |
marking this product, |
|
|
we confirm, under our own |
EN |
||
responsibility, full compliance |
|||
of this product with all |
|
||
relevant |
safety, |
health and |
|
environmental |
requirements |
|
|
under European legislation. |
|
||
Installation
!Remove all elements of the packaging.
 WARNING:
Keep packaging materials away from children.
!Do not install or use the dishwasher if it is damaged.
!Follow the instructions supplied with the product.
5
2. WATER SUPPLY
The appliance must be connected to the water mains using new hose-sets. The old hose-sets should not be reused.
!The inlet and drain hoses can be directed to left or right.
The dishwasher can be connected to either cold or hot water, as long as it is no hotter than 60°C.
!Water pressure must be between 0,08 MPa and 0,8 MPa.
!The inlet hose must be connected to a tap so that the water supply can be cut off when the machine is not in use (fig. 1 B).
!The dishwasher is fitted with 3/4" threaded connector (fig. 2).
!Connect inlet hose “A” to water tap “B” with a 3/4" attachment making sure that it has been properly tightened.
!If the dishwasher is connected to new pipes or to pipes which have not been inuse for a long time run water through for a few minutes before connecting the inlet hose. In this way no deposits of sand or rust will clog up the water inflow filter.
1
B
2
B
!If it is necessary, the inlet pipe can be |
A |
lengthened up to 2,5 m. The extension |
|
pipe is available from the After Sales |
|
Service Centre. |
|
6
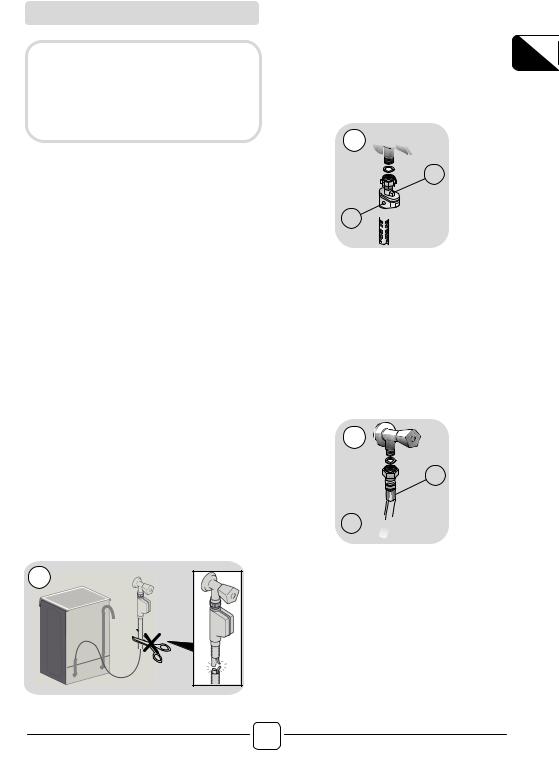
Hydraulic safety devices
These dishwashers are also equipped with an anti-overflow safety device which, if water exceeds normal levels due to malfunctions, automatically blocks water flow and/or drains excess quantities.
Some models may include one or more of the following features:
WATERBLOCK (fig. 3)
The waterblock system has been designed to improve the safety of your appliance. The waterblock system actually prevents flooding which might be caused by a machine malfunction or as a result of a fracture on the pipes.
How does waterblock work
Sump located in the base of the appliance collects any possible water leakage and operates a sensor which subsequently activates a valve placed under the water tap and stops any water from the supply even with the tap fully opened. If the box “A” containing the electrical parts is damaged, remove the plug from the socket immediately. To ensure perfect operation of the safety system, box “A” with the hose, should be connected to the tap as shown in figure. The inlet hose should not be cut, as it contains parts under load. If the hose is not long enough for correct connection, it must be replaced with a longer one. The hose can be obtained from your Service Agent.
!AQUASTOP (fig. 4): |
|
A device located on the supply tube that |
|
stops water flow if the tube deteriorates; |
EN |
in this case, a red mark will appear in the |
|
window “A” and the tube must be |
|
replaced. To unscrew the nut, press the |
|
one-way lock device "B". |
|
4 
B
A 


!AQUAPROTECT - SUPPLY TUBE WITH GUARD (fig. 5):
Should water leak from the primary internal tube "A", the transparent containment sheath "B" will contain water to permit the washing cycle to complete. At the end of the cycle, contact the Customer Service Centre to replace the supply tube.
5
B
A 

3 |
A |
7
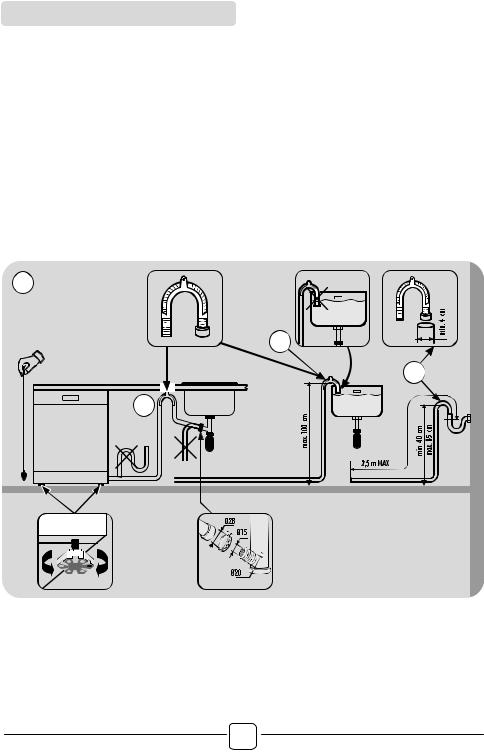
Connecting the outlet hose
!The outlet hose should disharge into a standpipe, making sure that there are no kinks (fig. 6).
!The standpipe must be at least 40 cm above floor level and it must have an internal diameter of at least 4 cm.
!It is advisable to fit an anti-odour air trap (fig. 6X). If necessary the outlet hose can be extended up to 2,5 m, provided that it is kept at a maximum height of 85 cm above floor level. The extension pipe is available from the After Sales Service Centre.
!The hose can be hooked over the side of the sink, but it must not be immersed in water, in order to prevent water from being syphoned back to the machine when this is in operation (fig. 6Y).
!When installing the appliance under a worktop the hose pipe clamp must be
attached to the wall in the highest possible position under the worktop
(fig. 6Z).
!Check that there are no kinks in the inlet and outlet hoses.
6
Y
X
Z
8

3. LOADING THE SALT
(Fig. A "1")
!The appearance of white stains on dishes is generally a warning sign that the salt container needs filling.
!On the bottom of the machine there is a container for the salt for regenerating the softener.
!It is important to use only a salt that is specifically designed for dishwasher. Other types of salt contain small quantities of insoluble particles which over a long period of time may affect and deteriorate the softener performance.
!To add salt, unscrew the cap of the container on the bottom and then refill the container.
!During this operation a little water will overflow; but keep adding salt until the container is full. When the container is full, clean the thread of salt residue and retighten the tap.
!After loading the salt, it is recommended running a complete washing cycle, or COLD RINSE programme.
After loading the salt, YOU MUST run |
|
|
a complete washing cycle, or the |
EN |
|
PRE-WASH/COLD |
RINSE/REFRESH |
|
programme. |
|
|
!The salt dispenser has a capacity of between 1.5 and 1.8 kg and, for efficient use of the appliance, it should be refilled from time to time .
(Only for first start up) When the appliance is used for the first time, after completely filling the salt container, it is necessary to add water until the container overflows.
9

4.ADJUSTMENT THE UPPER BASKET
!If 29 cm to 32.5 cm plates are regularly used, load them onto the lower basket after the upper basket has been placed in its upper position, as detailed below (according to the model):
Type "A":
1.Turn front blocks "A" outwards;
2.Remove the basket and remount it in the upper position;
Type "B": (ONLY MODELS WITH EASY CLICK):
1.Remove the upper basket;
2.Hold the basket on both sides and lift it upwards (fig. 1).
Dishes that are greater than 20 cm* in diameter can no longer be loaded onto the upper basket, and the mobile supports cannot be used when the basket is in the upper position.
* In models fitted with a third basket, dishes measuring more than 14 cm in diameter can no longer be loaded onto the upper basket.
3.Replace blocks "A" in the original ADJUSTING THE BASKET TO THE position. LOWER POSITION:
Dishes that are greater than 20 cm in diameter can no longer be loaded onto the upper basket, and the mobile supports cannot be used when the basket is in the upper position.
Type "A"
1.Hold the basket on both sides and lift it gently upwards (fig. 1);
2.Then slowly release into the correct position (fig. 2).
N.B.: NEVER LIFT OR LOWER THE BASKET FROM ONE SIDE ONLY (fig. 3).
A |
A |
WARNING:
We recommend adjusting the basket before loading the dishes.
Type "B"
1 |
|
2 |
a |
|
|
|
b |
|
a |
|
b |
3 |
|
10
5. ADJUSTING THE DISHES
Using the upper basket
!The upper basket is provided with mobile racks hooked to the sides of the basket, which can be regulated into 4 positions.
!In the lowered position (A-A1) the racks may be used for such items as: tea and coffee cups, kitchen knives and ladles. Also glasses with stems may be safely hung on the ends of the racks.
example of loading see fig. 1, 2 e 3.
Upper basket (fig. 1)
EN
Upper basket (fig. 2)
!In the upright position (B-B1) the racks allow you to load dinner plates and soup plates. Plates should be loaded vertically with the underside of the plate towards the back of the dishwasher with a space between each plate to allow water to pass freely.
Upper basket (fig. 3)
!It is advisable to load large plates (approx. 26 or more cm) slightly tilted towards the rear to facilitate introduction of the basket into the machine.
!Salad bowls and plastic bowls may also be loaded on the upper basket. It is advisable to block these in place so that the jets of water do not make them overturn.
!The upper basket has been designed to offer maximum flexibility in use and can be loaded with up to 24 plates on two rows, up to 30 glasses on five rows or a mixed load.
Using the lower basket
!Saucepans, oven dishes, tureens, salad bowls, lids, serving dishes, dinner plates, soup plates and ladles can be loaded on the lower basket.
11
 Loading...