


 Loading...
|
owners.honda.com (U.S.) |
2017 |
|
myhonda.ca (Canada) |
|
AOG03440 |
|
Accord Sedan |
31T2AG10 |
2017 Honda Accord Sedan Owner’s Guide |
OWNER’S GUIDE |
00X31C2 -T2A| -CoverG100 |
©2016 Honda Motor Co., Ltd. — All Rights Reserved Printed in U.S.A. |
Cover | C3 |
|
|
|
DISCLOSURES
 Devices That Emit Radio Waves
The following products and systems on your vehicle emit radio waves when in operation:
• Audio system |
• Immobilizer system |
• Bluetooth Audio |
• Remote transmitter |
• Bluetooth HandsFreeLink |
• Smart entry system* |
• HomeLink Universal Transceiver |
• Wireless charger* |
• Collision Mitigation Braking System |
|
Each of the above complies with the appropriate requirements or the required standards of the FCC (Federal Communications Commission) and Industry Canada, described below:
As required by the FCC:
This device complies with Part 15 of the FCC rules. Operation is subject to the following two conditions: (1) This device may not cause harmful interference, and
(2) this device must accept any interference received, including interference that may cause undesired operation.
Changes or modifications not expressly approved by the party responsible for compliance could void the user’s authority to operate the equipment.
As required by Industry Canada:
This device complies with Industry Canada licence-exempt RSS standard(s). Operation is subject to the following two conditions: (1) this device may not cause interference, and (2) this device must accept any interference, including interference that may cause undesired operation of the device.
 California Perchlorate Contamination Prevention Act
The airbags, seat belt tensioners, and CR-type batteries in this vehicle may contain perchlorate materials—special handling may apply. See www.dtsc. ca.gov/hazardouswaste/perchlorate/ for more information.
 California Proposition 65 Warning
WARNING: This product contains or emits chemicals known to the state of California to cause cancer and birth defects or other reproductive harm.
 Event Data Recorders
This vehicle is equipped with an event data recorder (EDR). The main purpose of an EDR is to record, in certain crash or near crash-like situations, such as an air bag deployment or hitting a road obstacle, data that will assist in understanding how a vehicle’s systems performed. The EDR is designed to record data related to vehicle dynamics and safety systems for a short period of time, typically
30 seconds or less. The EDR in this vehicle is designed to record such data as:
• How various systems in your vehicle were operating;
• Whether or not the driver and passenger safety belts were buckled/fastened;
• How far (if at all) the driver was depressing the accelerator and/or brake pedal; and,
• How fast the vehicle was traveling.
These data can help provide a better understanding of the circumstances in which crashes and injuries occur. NOTE: EDR data are recorded by your vehicle only if a non-trivial crash situation occurs; no data are recorded by the EDR under normal driving conditions and no personal data (e.g., name, gender, age, and crash location) are recorded. However, other parties, such as law enforcement, could combine the EDR data with the type of personally identifying data routinely acquired during a crash investigation.
To read data recorded by an EDR, special equipment is required, and access to the vehicle or the EDR is needed. In addition to the vehicle manufacturer, other parties such as law enforcement that have the special equipment can read the information if they have access to the vehicle or the EDR.
The data belong to the vehicle owner and may not be accessed by anyone else except as legally required or with the permission of the vehicle owner.
 Service Diagnostic Recorders
This vehicle is equipped with service-related devices that record information about powertrain performance. The data can be used to verify emissions law requirements and/or help technicians diagnose and solve service problems. It may also be combined with data from other sources for research purposes, but
it remains confidential.
*if equipped
INTRODUCTION
This Owner’s Guide is intended to help you quickly get acquainted with your 2017 Honda Accord Sedan. It provides basic information and instructions on
technology and convenience features, as well as emergency procedures and how to get assistance.
This guide is for vehicles sold in the United States and Canada. It covers all Accord Sedan models, so you may find descriptions of features and equipment that are not in your vehicle. Images throughout this guide are from U.S. vehicles and represent features and equipment that are available on some, but not all, models.
This guide is not intended to be a substitute for the Owner’s Manual. The Owner Information CD enclosed in your glove box kit includes the Owner’s Manual, Navigation Manual, and vehicle and tire warranties in electronic format. This information can be viewed on a computer (PC or Mac platform) and saved or printed for your reference. You can also visit owners.honda.com (U.S.) or myhonda.ca (Canada) to view the complete and most current information.
If you are the first registered owner of your vehicle, you may request a complimentary printed copy of the Owner’s Manual, Navigation Manual, or Vehicle Warranty within the first six months of vehicle purchase. To request a copy, visit owners.honda.com (U.S.) and create or log in to your account. In Canada, please request a copy from your Honda dealer.
American Honda Motor Company strives to be proactive in protecting our environment and natural resources. By using electronic delivery for a considerable portion of the information typically found in a vehicle owner’s manual, we are further reducing our impact on the environment.
Honda Automobile Customer Service
Your authorized Honda dealer should be able to answer any questions you have about your vehicle. However, if you are dissatisfied with the information you receive, you can call Honda Automobile Customer Service (see page 152).
Call (800) 999-1009 (U.S.) or (888) 946-6329 (Canada)
Honda Roadside Assistance
24-hour emergency road service is available to you in the United States and Canada throughout your 3-year/36,000-mile warranty term. Services include jump starting, flat tire and lockout assistance, towing, and more (limitations apply).
Call (866) 864-5211 (U.S.) or (800) 465-7587 (Canada)
TABLE OF CONTENTS
VISUAL INDEX............................................................... |
1 |
Steering Wheel and Nearby Controls................ |
1 |
Dashboard and Other Controls........................... |
2 |
SAFETY INFORMATION............................................... |
3 |
Important Safety Information.............................. |
3 |
Seat Belts............................................................... |
5 |
Airbags.................................................................... |
8 |
Child Safety.......................................................... |
14 |
Safety Label Locations....................................... |
21 |
Reporting Safety Defects................................... |
22 |
INSTRUMENT PANEL................................................ |
23 |
Malfunction Indicators....................................... |
23 |
Condition Indicators........................................... |
25 |
On/Off Indicators................................................. |
26 |
Information Display*........................................... |
27 |
Multi-Information Display (MID)*..................... |
28 |
VEHICLE CONTROLS.................................................. |
30 |
Using the Key or Remote Transmitter*............ |
30 |
Smart Entry System*.......................................... |
31 |
Door Operation.................................................... |
32 |
Power Window Operation................................. |
33 |
Power Moonroof Operation* ........................... |
34 |
Interior and Exterior Lights................................ |
35 |
Auto High-Beam System*.................................. |
36 |
Wiper Operation.................................................. |
37 |
One-Touch Turn Signal....................................... |
38 |
Adjusting the Seats............................................. |
39 |
Adjusting the Steering Wheel........................... |
43 |
Driving Position Memory System*................... |
43 |
Adjusting the Mirrors......................................... |
44 |
HomeLink® Universal Transceiver*.................. |
45 |
Climate Control System ..................................... |
46 |
Seat Heaters*...................................................... |
47 |
Customized Features.......................................... |
48 |
Setting the Clock................................................. |
49 |
AUDIO AND CONNECTIVITY.................................... |
50 |
Basic Audio Operation....................................... |
50 |
Models with one display.................................... |
54 |
One Display Audio Operation......................... |
54 |
FM/AM Radio.................................................... |
55 |
Compact Disc (CD)........................................... |
56 |
iPod® .................................................................. |
57 |
USB Flash Drive................................................ |
58 |
Bluetooth® Audio.............................................. |
59 |
Pandora®* .......................................................... |
60 |
Models with touchscreen.................................. |
61 |
Touchscreen Operation................................... |
61 |
HondaLink® ....................................................... |
63 |
Wi-Fi Connection.............................................. |
64 |
Aha™ Radio........................................................ |
64 |
Apple CarPlay™ ............................................... |
65 |
Android Auto™ .................................................. |
66 |
FM/AM Radio ................................................... |
67 |
SiriusXM® Radio*............................................. |
68 |
Compact Disc (CD) .......................................... |
69 |
iPod® .................................................................. |
70 |
USB Flash Drive................................................ |
71 |
Bluetooth® Audio.............................................. |
72 |
Pandora®* .......................................................... |
73 |
BLUETOOTH® HANDSFREELINK® (HFL).................. |
74 |
Models with one display.................................... |
74 |
Basic HFL Operation........................................ |
74 |
Pairing a Phone................................................. |
75 |
Making a Call..................................................... |
76 |
SMS Text Messaging....................................... |
78 |
Models with touchscreen.................................. |
79 |
Basic HFL Operation........................................ |
79 |
Pairing a Phone................................................. |
81 |
Making a Call..................................................... |
82 |
SMS Text Messaging and E-Mail*................ |
84 |
HondaLink® Assist............................................ |
85 |
Siri™ Eyes Free.................................................. |
86 |
NAVIGATION*............................................................. |
87 |
Basic Navigation Operation.............................. |
87 |
Entering a Destination........................................ |
89 |
Routing.................................................................. |
92 |
*if equipped

DRIVING....................................................................... |
94 |
Before Driving...................................................... |
94 |
Maximum Load Limit........................................... |
96 |
Towing a Trailer................................................... |
98 |
Remote Engine Start*......................................... |
99 |
Starting to Drive................................................ |
100 |
Shifting................................................................ |
101 |
Braking................................................................ |
104 |
Eco Assist System............................................. |
105 |
Vehicle Stability Assist (VSA®)....................... |
105 |
Cruise Control*.................................................. |
106 |
Adaptive Cruise Control (ACC)*...................... |
107 |
Road Departure Mitigation (RDM)*............... |
109 |
Lane Keeping Assist System (LKAS)*............ |
110 |
LaneWatch™*..................................................... |
111 |
Collision Mitigation Braking System™*.......... |
112 |
Parking Sensor System*.................................. |
113 |
Multi-View Rear Camera................................. |
114 |
Refueling............................................................. |
115 |
HANDLING THE UNEXPECTED............................... |
116 |
Smart Entry Remote Battery Strength*......... |
116 |
Shift Lever Does Not Move*........................... |
116 |
Jump Starting.................................................... |
117 |
Overheating........................................................ |
119 |
Emergency Engine Stop*................................. |
120 |
Emergency Towing........................................... |
120 |
Tire Pressure Monitoring System (TPMS).... |
121 |
Changing a Flat Tire.......................................... |
123 |
Fuse Locations................................................... |
126 |
MAINTENANCE........................................................ |
129 |
Safety Precautions........................................... |
129 |
Maintenance Minder™..................................... |
130 |
Under the Hood................................................. |
132 |
Engine Oil............................................................ |
134 |
Engine Coolant................................................... |
137 |
Brake Fluid......................................................... |
138 |
Clutch Fluid*....................................................... |
138 |
Checking the Battery........................................ |
139 |
Window Washer Fluid...................................... |
139 |
Changing Wiper Blades................................... |
140 |
Tire Information................................................. |
141 |
Tire Labeling....................................................... |
144 |
DOT Tire Quality Grading................................. |
145 |
Testing of Readiness Codes............................ |
147 |
SPECIFICATIONS...................................................... |
148 |
CUSTOMER INFORMATION.................................... |
151 |
Frequently Asked Questions/ |
|
Troubleshooting................................................. |
151 |
Contact Us.......................................................... |
152 |
Honda Roadside Assistance........................... |
152 |
Warranty Coverages........................................ |
153 |
VOICE COMMAND INDEX....................................... |
154 |
INDEX......................................................................... |
156 |
*if equipped
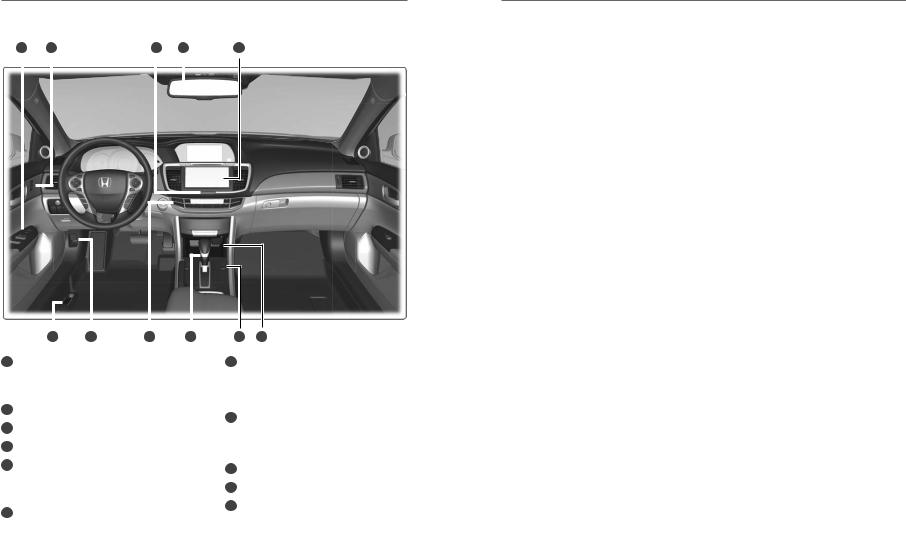
Visual Index
VISUAL INDEX
Quickly locate items in the vehicle’s interior.
Steering Wheel and Nearby Controls
15 |
10 |
1 |
7 |
||||
|
|
|
|
|
|
|
|
|
|
|
|
|
|
|
|
|
|
|
|
|
|
|
|
|
|
|
|
|
|
|
|
|
|
|
|
|
|
|
|
|
|
|
|
|
|
|
|
|
|
|
|
|
|
|
|
|
|
|
|
|
|
|
|
14 11 6
1 Lights/turn signals/LaneWatch button* p. 35, p. 38, p. 111
2 SEL/RESET knob p. 27 Brightness control p. 35
3 Wipers/washers p. 37
4Cruise control buttons* p. 106 Adaptive Cruise Control (ACC) buttons* p. 106
Lane Keeping Assist System (LKAS) button* p. 110
5Horn
6Voice recognition buttons p. 74, p. 79, p. 87
7 Instrument panel p. 23
8Information display* p. 27 Multi-information display* p. 28
8 |
2 |
|
3 |
4 |
||
|
|
|
|
|
|
|
|
|
|
|
|
|
|
|
|
|
|
|
|
|
|
|
|
|
|
|
|
|
|
|
|
|
|
|
|
|
|
|
|
|
|
|
|
|
|
|
|
|
|
|
|
|
|
|
|
|
|
|
|
|
|
|
5 |
9 |
12 |
13 |
9Info (p/q) buttons* p. 28 SEL/RESET button* p. 28
10Audio controls p. 52
11Tire Pressure Monitoring System (TPMS) button p. 121
12Lane Keeping Assist System (LKAS) button p. 110
13ENGINE START/STOP button* p. 101
14Vehicle Stability Assist (VSA) OFF button p. 105
Collision Mitigation Braking System (CMBS) OFF button* p. 112
Road Departure Mitigation (RDM) button* p. 109
Parking sensor system button* p. 113
15ECON button p. 105
*if equipped
| 1
Visual Index
Dashboard and Other Controls
7 |
11 |
|
|
|
2 |
6 |
|
|||
|
|
|
|
|
|
|
|
|
|
|
|
|
|
|
|
|
|
|
|
|
|
|
|
|
|
|
|
|
|
|
|
|
|
|
|
|
|
|
|
|
|
|
|
|
|
|
|
|
|
|
|
|
|
|
|
|
|
|
|
|
|
|
|
|
|
|
|
|
|
|
|
|
|
|
|
|
|
|
|
|
|
|
|
|
|
|
|
|
|
|
|
|
|
|
|
|
|
|
|
|
|
|
|
|
|
|
|
|
|
8 |
10 |
3 |
9 |
|
|
1Audio system/touchscreen*/ navigation* system p. 54, p. 79, p. 87
2Hazard warning button
3 |
Climate control system |
p. 46 |
4 |
Seat heater switches* |
p. 47 |
5 |
USB port p. 50 |
|
|
Wireless charger* p. 51 |
|
|
Accessory power socket p. 50 |
|
6 |
Rearview mirror p. 44 |
|
1
4 5
7 Power window switches p. 33 Door lock switches p. 32 Door mirror controls p. 45
8Fuel fill door release handle p. 115
Trunk release |
p. 32 |
9 Shift lever p. |
101 |
10Hood release handle p. 133
11Driving Position Memory System buttons* p. 43
*if equipped
Safety
SAFETY INFORMATION
Your safety—and the safety of others—is very important, and operating this vehicle safely is an important responsibility. While we strive to help you make informed decisions about safety, it is not practical or possible to warn you about all the hazards associated with operating or maintaining your vehicle. Therefore, you must use your own good judgment.
Important Safety Information
This guide explains many of your vehicle’s safety features and how to use them. Please read this information carefully. Following the instructions below will also help to keep you and your passengers safe.
 Important Safety Precautions
• Always wear your seat belt.
• Secure all children in the proper restraint system. • Be aware of airbag hazards.
• Don’t drink and drive.
• Pay appropriate attention to the task of driving safely. • Control your speed.
• Keep your vehicle in safe condition.
Engaging in cell phone conversation or other activities that keep you from paying close attention to the road, other vehicles, and pedestrians could lead to a crash. Remember, situations can change quickly, and only you can decide when it is safe to divert some attention away from driving.
 Safety Messages
When you see the following messages throughout this guide, pay close attention.
|
You WILL be KILLED or SERIOUSLY HURT if you don’t follow |
DANGER |
|
|
instructions. |
|
You CAN be KILLED or SERIOUSLY HURT if you don’t follow |
WARNING |
|
|
instructions. |
|
You CAN be HURT if you don’t follow instructions. |
CAUTION |
|
|
This information is intended to help you avoid damage to your |
NOTICE |
|
|
vehicle, other property, or the environment. |
2 | |
| 3 |

Safety
 Carbon Monoxide Gas
The engine exhaust from this vehicle contains carbon monoxide, a colorless, odorless, and highly toxic gas. As long as you properly maintain your vehicle and follow the instructions set forth below, you will not accumulate dangerous levels of carbon monoxide gas in the vehicle interior.
Have the exhaust system inspected for leaks whenever:
• The exhaust system is making an unusual noise. • The exhaust system may have been damaged. • The vehicle is raised for an oil change.
When you operate a vehicle with the trunk open, airflow can pull exhaust gas into the interior and create a hazardous condition. If you must drive with the trunk open, open all the windows and set the climate control system as shown below.
1.Select the fresh air mode.
2.Select the 
 mode.
mode.
3.Set the fan speed to high.
4.Set the temperature control to a comfortable setting.
Adjust the climate control system in the same manner if you sit in your parked vehicle with the engine running.
 WARNING
Carbon monoxide gas is toxic. Breathing it can cause unconsciousness and even kill you.
Avoid any enclosed areas or activities that expose you to carbon monoxide.
An enclosed area such as a garage can quickly fill up with carbon monoxide gas. Do not run the engine with the garage door closed. Even when the garage door is open, drive out of the garage immediately after starting the engine.
Safety
Seat Belts
A seat belt is your best protection in all types of collisions. Airbags are designed to supplement seat belts, not replace them. So even though your vehicle is equipped with airbags, make sure you and your passengers always wear your seat belts and wear them properly.
 Lap/Shoulder Seat Belts
All five seating positions are equipped with lap/shoulder seat belts with emergency locking retractors. In normal driving, the retractor lets you move freely while keeping some tension on the belt. During a collision or sudden stop, the retractor locks to restrain your body. The rear seat belts also have a lockable retractor for use with child seats.
The front seats are equipped with automatic seat belt tensioners to enhance safety. The tensioners automatically tighten the front seat belts during a moderate to severe frontal collision, sometimes even if the collision is not severe enough to inflate the front airbags.
 Proper Use of Seat Belts
Follow these guidelines for proper use:
• All occupants should sit upright, well back in the seat, and remain in that position for the duration of the trip. Slouching and leaning reduce the effectiveness of the belt and can increase the chance of serious injury in a crash.
• Never place the shoulder part of a lap/shoulder seat belt under your arm or behind your back. This could cause very serious injuries in a crash.
• Two people should never use the same seat belt. If they do, they could be very seriously injured in a crash.
• Do not put any accessories on the seat belts. Devices intended to improve comfort or reposition the shoulder part of a seat belt can reduce the protective capability and increase the chance of serious injury in a crash.
• No one should sit in a seat with an inoperative seat belt or one that does not appear to be working correctly. Using a seat belt that is not working properly may not protect the occupant in a crash. Have a dealer check the belt as soon as possible.
 WARNING
Not wearing a seat belt properly increases the chance of a serious injury or death in a crash, even though your vehicle has airbags.
Be sure you and your passengers always wear seat belts and wear them properly.
4 | |
| 5 |

Safety
 Seat Belt Inspection
Regularly check the condition of your seat belts as follows:
• Pull each belt out fully, and look for frays, cuts, burns, and wear.
• Check that the latches and buckles work smoothly and the belts retract easily. If a belt does not retract easily, cleaning the belt may correct the problem. Use only mild soap and warm water. Do not use bleach or cleaning solvents. Make sure the belt is completely dry before allowing it to retract.
Any belt that is not in good condition or working properly will not provide proper protection and should be replaced as soon as possible.
A belt that has been worn during a crash may not provide the same level of protection in a subsequent crash. Have your seat belts inspected by a dealer after any collision.
 WARNING
Not checking or maintaining seat belts can result in serious injury or death if the seat belts do not work properly when needed.
Check your seat belts regularly and have any problem corrected as soon as possible.
Safety
 Fastening a Seat Belt
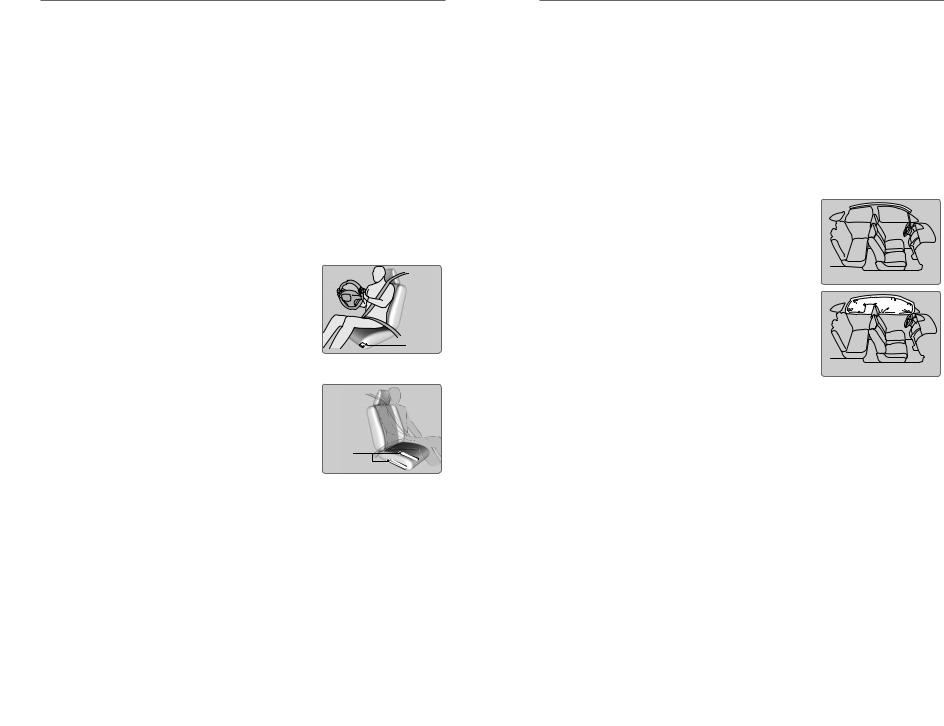
Adjust your seat to the proper position (see page 39), and then follow the below steps.
1.Pull the seat belt out slowly.
2.Insert the latch plate into the buckle, then tug on the belt to make sure the buckle is secure. Make sure that the belt is not twisted or caught on anything.
3.Position the lap part of the belt as low as possible across your hips, then pull up on the shoulder part of the belt so the lap part fits snugly. This lets your strong pelvic bones take the force of a crash and reduces the chance of internal injuries.
4.If necessary, pull up on the belt again to remove any slack, then make sure that the belt rests across the center of your chest and over your shoulder. This spreads the forces of a crash over the strongest bones in your upper body.
To release the belt, push the red PRESS button then guide the belt by hand until it has retracted completely.
Pull out slowly.
Latch plate
Buckle
Lap belt as low as possible.
 WARNING
Improperly positioning the seat belts can cause serious injury or death in a crash.
Make sure all seat belts are properly positioned before driving.
 Adjusting the Shoulder Anchor
The front seats have adjustable shoulder anchors to accommodate taller and shorter occupants.
1. Move the anchor up and down while holding the release button.
2. Position the anchor so that the belt rests across |
|
the center of your chest and over your shoulder. |
Push |
6 | |
| 7 |
Safety
Airbags
Your vehicle is equipped with three types of airbags: front airbags, side airbags, and side curtain airbags.
 Front Airbags (SRS)
The front SRS airbags inflate in a moderate-to-severe frontal collision to help protect the head and chest of the driver and/or front passenger. They are housed in the center of the steering wheel for the driver, and in the dashboard for the front passenger. Both airbags are marked SRS AIRBAG.
SRS (Supplemental Restraint System) indicates that the airbags are designed to supplement seat belts, not replace them. Seat belts are the occupant’s primary restraint system.
 Advanced Airbags
Your front airbags have advanced features to help reduce the likelihood of airbagrelated injuries to smaller occupants.
The driver’s advanced front airbag system includes |
|
a seat position sensor. Based on the seat position |
|
and crash severity, the system determines the |
|
optimal deployment of the driver’s airbag. |
Driver’s |
If there is a problem with the driver’s seat position |
seat |
position |
|
sensor, the SRS indicator will come on and the |
sensor |
airbag will inflate with full (normal) force, regardless |
|
of the driver’s seating position. |
|
The passenger’s advanced front airbag system |
|
has weight sensors. Although Honda recommends |
|
against carrying an infant or small child in front, if |
Passenger’s |
the sensors detect the weight of a child (up to 65 lbs |
seat |
weight |
|
or 29 kg), the system will automatically turn off the |
sensors |
passenger’s front airbag. |
|
For both advanced front airbags to work properly: |
|
• Do not spill any liquid on or under the seats. |
|
• Do not put any object under the passenger’s seat. |
|
• Make sure any objects are positioned properly on the floor. Improperly positioned objects can interfere with the advanced airbag sensors.
• All occupants should sit upright and wear their seat belts properly.
• Do not place any cover over any part of the passenger side dashboard.
Safety
 Side Airbags
The side airbags help protect the upper torso and pelvis of the driver or a front passenger during a moderate-to-severe side impact. They are housed in the outside edge of the driver’s and front passenger’s seat-backs. Both are marked
SIDE AIRBAG.
 Side Curtain Airbags
Side curtain airbags help protect the heads of the driver and passengers in outer seating positions during a moderate-to-severe side impact. The side curtain airbags equipped in this vehicle are also designed to help reduce the likelihood of partial and complete ejection of vehicle occupants through side windows in crashes, particularly rollover crashes.
The side curtain airbags are located in the ceiling above the side windows on both sides of the vehicle.
The side curtain airbags are designed to deploy in a rollover or moderate-to-severe side impact. If the SRS control unit senses that your vehicle is about to roll over, it immediately deploys both side curtain airbags and activates both front seat belt
tensioners. If the impact is on the passenger’s side, the passenger’s side curtain airbag deploys even if there is no passenger in the passenger’s seat.
Side curtain airbag storage
Deployed side curtain airbag
To get the best protection from the side curtain airbags, occupants should wear their seat belts properly and sit upright and well back in their seats.
Do not attach any objects to the side windows or roof pillars, as they can interfere with the proper operation of the side curtain airbags.
When side curtain airbags deploy in a frontal collision
One or both side curtain airbags may inflate in a moderate-to-severe angled frontal collision. In this case, the side curtain airbags will deploy slightly after the front airbags.
8 | |
| 9 |

Safety
 Important Facts About Your Airbags
Always wear your seat belt properly, and sit upright and as far back from the steering wheel as possible while allowing full control of the vehicle. A front passenger should move their seat as far back from the dashboard as possible.
Do not place hard or sharp objects between yourself and a front airbag. Carrying hard or sharp objects on your lap, or driving with a pipe or other sharp object in your mouth, can result in injuries if your front airbag inflates.
Do not attach or place objects on the front airbag covers. Objects on the covers marked SRS AIRBAG could interfere with the proper operation of the airbags or be propelled inside the vehicle and hurt someone if the airbags inflate.
Do not attach accessories on or near the side airbags. They can interfere with the proper operation of the airbags, or hurt someone if an airbag inflates.
Do not attach any objects to the side windows or roof pillars. They can interfere with the proper operation of the side curtain airbags.
Do not cover or replace the front seat-back covers. This can prevent your side airbags from properly deploying during a side impact.
 WARNING
An open glove box can cause serious injury to your passenger in a crash, even if the passenger is wearing the seat belt.
Always keep the glove box closed while driving.
 Airbag System Indicators
If a problem occurs in the airbag system, the SRS indicator comes on and a message appears on the multi-information display*.
SRS (Supplemental Restraint System) indicator |
* |
If the indicator comes on at any other time besides vehicle start-up, or does not come on at all, have the system checked by a dealer as soon as possible. If you don’t, your airbags and seat belt tensioners may not work properly when they are needed.
 WARNING
Ignoring the SRS indicator can result in serious injury or death if the airbag systems or tensioners do not work properly.
Have your vehicle checked by a dealer as soon as possible if the SRS indicator alerts you to a possible problem.
*if equipped
Safety
Passenger airbag off indicator |
|
|
The indicator comes on to alert you that the front |
U.S. |
Canada |
passenger’s front airbag has been turned off. This |
|
|
occurs when the front passenger’s weight sensors |
|
|
detect 65 lbs (29 kg) or less, the weight of an infant |
|
|
or small child, on the seat. |
|
|
Infants and small children should always ride properly restrained in a back seat.
Objects placed on the seat can also cause the indicator to come on.
If the front passenger‘s seat is empty, the passenger’s front airbag will not deploy and the indicator will not come on.
If the indicator comes on with no occupant or objects in the front passenger’s seat, something may be interfering with the weight sensors, such as:
• An object hanging on the seat or in the seat-back pocket.
• A child seat or other object pressing against the rear of the seat-back.
• A rear passenger pushing or pulling on the back of the front passenger’s seat.
• The front seat or seat-back is forced against an object on the seat or floor behind it.
• An object placed under the front passenger’s seat.
If none of these conditions exist, have your vehicle checked by a dealer as soon as possible.
The passenger airbag off indicator may go on and off repeatedly if the total weight on the seat is near the airbag cutoff threshold.
10 | |
| 11 |

Safety
 Airbag System Components
8 |
10 |
9 |
8 |
7 |
12
8
6
8
11
8
8
1Two SRS (Supplemental Restraint System) front airbags. The driver’s airbag is stored in the center of the steering wheel; the front passenger’s airbag is stored in the dashboard. Both are marked SRS AIRBAG.
2Two side airbags, one for the driver and one for the front passenger. The airbags are stored in the outer edges of the seat-backs. Both are marked
SIDE AIRBAG.
3Two side curtain airbags, one for each side of the vehicle. The airbags are stored in the ceiling, above the side windows. The front and rear pillars are marked SIDE CURTAIN AIRBAG.
4An electronic control unit that continually monitors information about the various impact sensors, seat and buckle sensors, rollover sensor, airbag activators, seat belt tensioners, and other information while the vehicle is on. During a crash event the unit records such information.
5Automatic front seat belt tensioners. The driver’s and front passenger’s seat belts incorporate sensors that detect whether or not they are fastened.
6A driver’s seat position sensor. If the seat is too far forward, the airbag will inflate with less force.
7Weight sensors in the front passenger’s seat. The front passenger’s airbag will be turned off if the weight on the seat is 65 lbs (29 kg) or less (the weight of an infant or small child).
8Impact sensors that can detect a moderate-to-severe front or side impact.
9An indicator on the dashboard that alerts you that the front passenger’s front airbag has been turned off.
10An indicator on the instrument panel that alerts you to a possible problem with the airbag system or seat belt tensioners.
Safety
11Safing sensor
12A rollover sensor that detects whether the vehicle is about to roll over and signal the control unit to deploy both side curtain airbags.
 Airbag Care
You do not need to, and should not, perform any maintenance on or replace any airbag system components yourself. However, you should have your vehicle inspected by a dealer in the following situations:
When the airbags have deployed
If an airbag has inflated, the control unit and other related parts must be replaced. Similarly, once an automatic seat belt tensioner has been activated, it must be replaced.
When the vehicle has been in a moderate-to-severe collision
Even if the airbags did not inflate, have your dealer inspect the following: the driver’s seat position sensor, weight sensors in the passenger’s seat, front seat belt tensioners, and each seat belt that was worn during the crash.
Do not remove or modify a front seat without first consulting a dealer
This would likely disable the driver’s seat position sensor or the weight sensors in the passenger’s seat. If it is necessary to remove or modify a front seat to accommodate a person with disabilities, contact a Honda dealer. For U.S. vehicles, call Honda Automobile Customer Service at (800) 999-1009. For Canadian vehicles, call Honda Canada Customer Relations at (888) 946-6329.
12 | |
| 13 |
Safety
Child Safety
Each year, many children are injured or killed in vehicle crashes because they are either unrestrained or not properly restrained. In fact, vehicle collisions are the number one cause of death of children ages 12 and under.
The National Highway Traffic Safety Administration and Transport Canada recommend that all children ages 12 and under be properly restrained in a rear seat. Some states or provinces/territories have laws restricting where children may ride.
To reduce the number of child deaths and injuries, every state, Canadian province and territory requires that infants and children be properly restrained when they ride in a vehicle.
 Protecting Child Passengers
• An inflating front or side airbag can injure or kill a child sitting in the front seat.
• A child in the front seat is more likely to interfere with the driver’s ability to safely control the vehicle.
• Statistics show that children of all sizes and ages are safer when they are properly restrained in a rear seat.
• Any child who is too small to wear a seat belt correctly must be restrained in an approved child seat that is properly secured to the vehicle using either the lap belt portion of the lap/shoulder belt or the lower anchors of the LATCH system.
• Never hold a child on your lap because it is impossible to protect them in the event of a collision.
• Never put a seat belt over yourself and a child. During a crash, the belt would likely press deep into the child and cause serious or fatal injuries.
• Never let two children use the same seat belt. Both children could be very seriously injured in a crash.
• Do not allow children to operate the doors, windows, or seat adjusters.
• Do not leave children in the vehicle unattended, especially in hot weather when the inside of the vehicle can get hot enough to kill them. They could also activate vehicle controls, causing it to move unexpectedly.
 WARNING
Children who are unrestrained or improperly restrained can be seriously injured or killed in a crash.
Any child too small for a seat belt should be properly restrained in a child seat. A larger child should be properly restrained with a seat belt, using a booster seat if necessary.
Safety
 WARNING
Allowing a child to play with a seat belt or wrap one around their neck can result in serious injury or death.
Instruct children not to play with any seat belt and make sure any unused seat belt a child can reach is buckled, fully retracted, and locked.
 Protecting Infants
An infant must be properly restrained in a rear-facing, reclining child seat until the infant reaches the seat maker’s weight or height limit for the seat, and the infant is at least one year old. Many experts recommend use of a rear-facing seat for
a child up to two years old if the child’s height and weight are appropriate for a rear-facing seat.
Child seats must be placed and secured in a rear seating position. Rear-facing child seats should never be installed in a forward-facing position.
When properly installed, a rear-facing child seat may prevent the driver or a front passenger from moving their seat all the way back, or from locking their seat-back in the desired position. If this occurs, we recommend that you install the child seat directly behind the front passenger’s seat, move the seat as far forward as needed, and leave it unoccupied. Or, you may wish to get a smaller rear-facing child seat.
 WARNING
Placing a rear-facing child seat in the front seat can result in serious injury or death during a crash.
Always place a rear-facing child seat in the rear seat, not the front.
14 | |
| 15 |

Safety
 Protecting Smaller Children
If a child is at least one year old and within the weight range indicated by the child seat manufacturer, the child should be properly restrained in a firmly secured forward-facing child seat.
We strongly recommend placing a forward-facing child seat in a rear seating position.
Placing a forward-facing child seat in the front seat can be hazardous, even with advanced front airbags that automatically turn the passenger’s front airbag off. A rear seat is the safest place for a child.
 WARNING
Placing a forward-facing child seat in the front seat can result in serious injury or death if the front airbag inflates.
If you must place a forward-facing child seat in front, move the vehicle seat as far back as possible, and properly restrain the child.
 Selecting a Child Seat
Most child seats are LATCH-compatible (Lower Anchors and Tethers for CHildren). Some have a rigid-type connector, while others have a flexible-type connector. Both are equally easy to use. Some existing and previously owned child seats can only be installed using the seat belt. Whichever type you choose, follow the child seat manufacturer’s use and care instructions as well as the instructions in this manual. Proper installation is key to maximizing your child’s safety.
In seating positions and vehicles not equipped with LATCH, a LATCH-compatible child seat can be installed using the seat belt and a top tether for added security. This is because all child seats are required to be designed so that they can be secured with a lap belt or the lap part of a lap/shoulder belt. In addition, the child seat manufacturer may advise that a seat belt be used to attach a LATCHcompatible seat once a child reaches a specified weight. Please read the child seat owner’s manual for proper installation instructions.
Important considerations when selecting a child seat
Make sure the child seat meets the following three requirements: • The child seat is the correct type and size for the child.
• The child seat is the correct type for the seating position.
• The child seat is compliant with Federal Motor Vehicle Safety Standard 213 or Canadian Motor Vehicle Safety Standard 213.
Safety
 Installing a LATCH-Compatible Child Seat
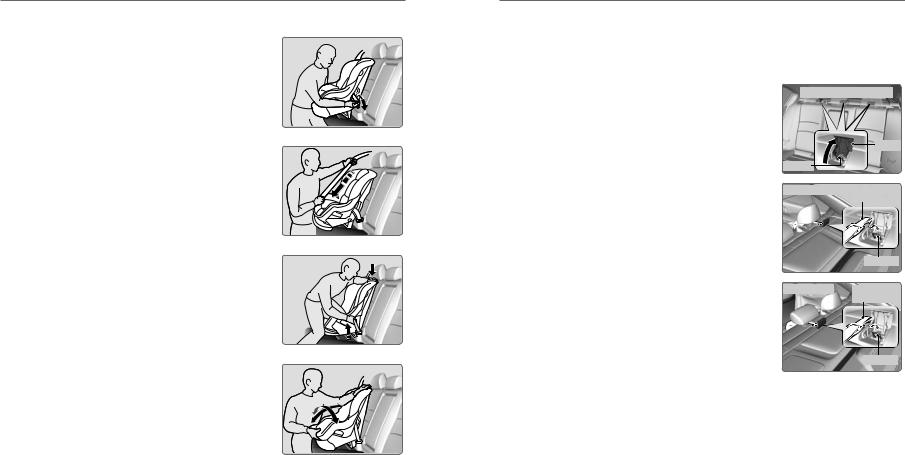
A LATCH-compatible child seat can be installed in either of the two outer rear seats. A child seat is attached to the lower anchors with either the rigid or flexible type of connectors.
1.Locate the lower anchors under the marks.
2.Place the child seat on the vehicle seat, then attach the child seat to the lower anchors according to the instructions that came with the child seat. Make sure that the lower anchors are not obstructed by the seat belt or any other object.
3.Open the tether anchor cover behind the head restraint.
4.Raise the head restraint to its highest position, then route the tether strap between the head restraint legs, and secure the tether strap hook onto the anchor.
5.Tighten the tether strap according to the seat maker’s instructions.
6.Make sure the child seat is firmly secured by rocking it forward and back and side to side; little movement should be felt.
7.Make sure any unused seat belt that a child can reach is buckled, the lockable retractor is activated, and the belt is fully retracted and locked.
Marks
Lower anchors
Rigid type
Flexible type
Tether strap hook
Anchor
16 | |
| 17 |
Safety
 Installing a Child Seat with a Lap/Shoulder Seat Belt
1.Place the child seat on the vehicle seat.
2.Route the seat belt through the child seat
according to the seat manufacturer’s instructions, and insert the latch plate into the buckle. Insert the latch plate fully until it clicks.
3.Slowly pull the shoulder part of the belt all the way out until it stops. This activates the lockable retractor.
4. Let the seat belt retract a few inches, then try to pull it out to make sure the retractor is locked. If you are able to pull the shoulder belt out, the lockable retractor is not activated. Pull the seat belt all the way out, and repeat steps 3 – 4.
5. Grab the shoulder part of the seat belt near the buckle, and pull up to remove any slack from the lap part of the belt. When doing this, place your weight on the child seat and push it into the vehicle seat.
6.Make sure the child seat is firmly secured by rocking it forward and back and side to side; little
movement should be felt.
7.Make sure any unused seat belt that a child can reach is buckled, the lockable retractor
is activated, and the belt is fully retracted and locked.
To deactivate a lockable retractor, release the buckle and allow the seat belt to wind up all the way.
Safety
 Adding Security with a Tether
A tether anchorage point is provided behind each rear seating position. A child seat that is installed with a seat belt and comes with a tether can use the tether for additional security.
1.Locate the appropriate tether anchorage point and lift the cover.
2.Raise the head restraint to its highest position, then route the tether strap through the head restraint legs. Make sure the strap is not twisted.
3.Secure the tether strap hook onto the anchor.
4.Tighten the tether strap according to the seat manufacturer’s instructions.
Tether anchorage points
Cover
Anchor
Outer position
Tether strap hook
|
Anchor |
Center position |
Tether strap |
|
hook |
Anchor
18 | |
| 19 |
Safety
 Protecting Larger Children
When a child is too big for a child seat, secure the child in a rear seat using the lap/shoulder seat belt.
Have the child sit upright and all the way back, then ensure the following:
• The child’s knees bend comfortably over the edge of the seat.
• The shoulder belt crosses between the child’s neck and arm.
• The lap part of the seat belt is as low as possible, touching the child’s thighs.
• The child can stay seated for the whole trip.
If a lap/shoulder belt cannot be used properly, position the child in a booster seat in a rear seating position. For the child’s safety, check that the child meets the booster seat manufacturer’s recommendations.
Some U.S. states and Canadian provinces/territories require children to use a booster seat until they reach a given age or weight (e.g., 6 years or 60 lbs). Be sure to check current laws in the state or province/territory where you intend to drive.
 WARNING
Allowing a child age 12 or under to sit in the front can result in injury or death if the passenger’s front airbag inflates.
If a larger child must ride in front, move the vehicle seat as far to the rear as possible, then have the child sit up properly and wear the seat belt properly, using a booster seat if needed.
Safety
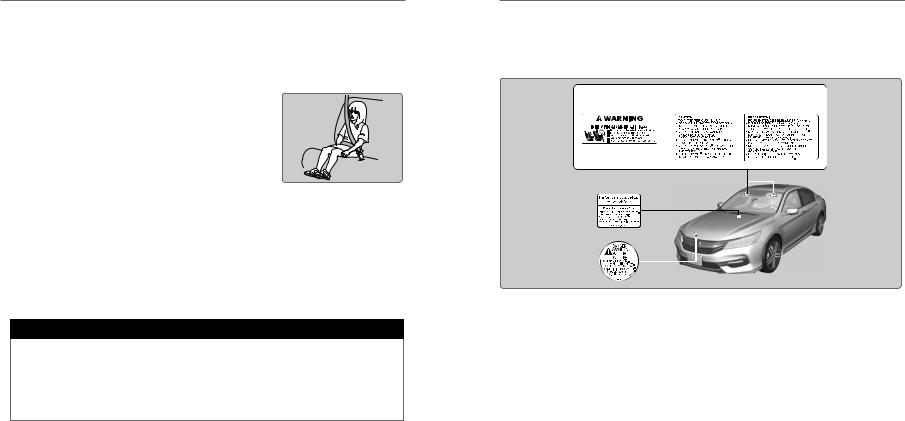
Safety Label Locations
Safety labels are in the locations shown. They warn you of potential hazards that can cause serious injury or death. Read these labels carefully.
Sun visor
U.S. models |
Canadian models |
Dashboard
U.S. models only
Radiator cap
20 | |
| 21 |

Safety
Reporting Safety Defects
In the U.S.
If you believe that your vehicle has a defect which could cause a crash or could cause injury or death, you should immediately inform the National Highway Traffic Safety Administration (NHTSA) in addition to notifying American Honda Motor Co., Inc.
If NHTSA receives similar complaints, it may open an investigation, and if it finds that a safety defect exists in a group of vehicles, it may order a recall and remedy campaign. However, NHTSA cannot become involved in individual problems between you, your dealer, or American Honda Motor Co., Inc.
To contact NHTSA, you may call the Vehicle Safety Hotline toll-free at 1-888-327- 4236 (TTY: 1-800-424-9153); go to http://www.safercar.gov; or write to: Administrator, NHTSA, 1200 New Jersey Avenue, SE., Washington, DC 20590. You can also obtain other information about motor vehicle safety from http://www.safercar.gov.
In Canada
If you believe that your vehicle has a defect which could cause a crash or could cause injury or death, you should immediately inform Honda Canada, Inc., and you may also inform Transport Canada.
If Transport Canada receives similar complaints, it may open an investigation, and if it finds that a safety defect exists in a group of vehicles, it may lead to a recall and remedy campaign. However, Transport Canada cannot become involved in individual problems between you, your dealer, or Honda Canada, Inc.
To contact Transport Canada’s Defect Investigations and Recalls Division, you may call 1-800-333-0510. For more information on reporting safety defects or about motor vehicle safety, go to http://www.tc.gc.ca/roadsafety.
Instrument Panel
INSTRUMENT PANEL
Learn about the indicators, gauges, and displays related to driving the vehicle.
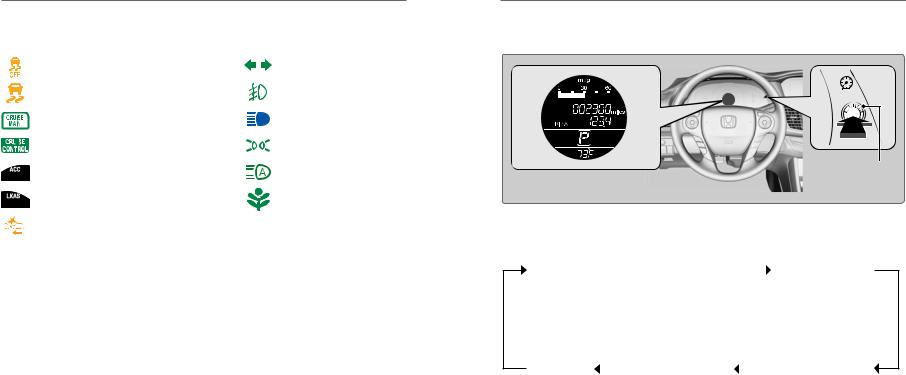
Indicators briefly appear with each engine start and then go out. Red and amber indicators are most critical. Blue and green indicators are used for general information.
Malfunction Indicators
These are the most critical indicators. If they come on and stay lit while driving or at any other time, there may be a problem. See your dealer if necessary.
U.S. |
Brake system |
|
• Brake fluid is low. |
||
|
||
|
• The brake system has a problem. |
|
Canada |
Press the brake pedal lightly to check pedal pressure. If normal, check |
|
|
the brake fluid level when you stop. If abnormal, take immediate action. If |
|
|
necessary, downshift the transmission to slow the vehicle using engine |
|
|
braking. Have your vehicle repaired immediately. |
 Low oil pressure
Engine oil pressure is low. Stop in a safe place. Open the hood. Check the oil level, and add oil if necessary (see page 134). If the indicator does not turn off, have your vehicle repaired immediately.
Charging system
The battery is not charging. Turn off all electrical items, but do not turn off the vehicle to prevent further battery discharge. Have your vehicle repaired immediately.
Supplemental Restraint System (SRS)
There is a problem with one of the airbag systems or seat belt tensioners.
Smart Entry system*
There is a problem with the smart entry system.
*if equipped
22 | |
| 23 |

Instrument Panel
Malfunction indicator lamp (check engine light)
• The emissions control system may have a problem, or the fuel cap is loose or missing.
•(Blinks) A misfire in the engine’s cylinders is detected. Stop in a safe place, and wait for the engine to cool down.
|
|
|
Anti-lock Brake System (ABS) |
|
|
|
There is a problem with the anti-lock brake system. Your vehicle still has |
|
|
|
normal braking ability, but no anti-lock function. |
|
|
|
Tire Pressure Monitoring System (TPMS) |
|
|
|
There is a problem with the tire pressure monitoring system, or the vehicle is |
|
|
|
fitted with the compact spare tire. |
|
|
|
Light control* |
|
|
|
There is a problem with the automatic lighting control system or low beam |
|
|
|
headlights. |
|
|
|
Parking sensor system* |
|
|
|
There is a problem with the system, or the sensor(s) are blocked. |
|
|
|
Collision Mitigation Braking System (CMBS)* |
|
|
|
There is a problem with the system, the temperature is too high, the camera |
|
|
|
is blocked or the radar is blocked. |
|
|
|
Vehicle Stability Assist (VSA) |
|
|
|
There is a problem with the VSA system. |
|
U.S. |
Brake system |
|
|
There is a problem with the brake system. |
||
|
|
|
|
Canada |
|
||
|
|
|
Electric Power Steering (EPS) |
|
|
|
There is a problem with the EPS system. |
|
|
|
Auto High-Beam System* |
|
|
|
There is a problem with the system, or the camera is blocked. |
|
|
|
Starter system* |
|
U.S. |
There is a problem with the starter system. If you cannot start the vehicle, |
|
|
|
|
press the brake pedal, then press and hold the ENGINE START/STOP button |
Canada |
(see page 101) for 15 seconds. |
||
|
|
|
Adaptive Cruise Control (ACC)* |
|
|
|
There is a problem with the system, the temperature is too high, or the radar |
|
|
|
sensor is blocked. |
|
|
|
*if equipped |
Instrument Panel
Lane Keeping Assist System (LKAS)*
There is a problem with the system, the temperature is too high, or the camera is blocked.
Road Departure Mitigation (RDM)*
There is a problem with the system, the temperature is too high, or the camera is blocked.
Condition Indicators
These indicators may require you to perform an action.
U.S. |
Parking brake |
|
Release the parking brake before driving. You will hear a beep if you drive |
||
|
||
Canada with it not fully released. |
||
Seat belt reminder
Make sure seat belts are fastened for you and all passengers. The indicator blinks and beeps sound continuously if you or your front passenger has not fastened your seat belts when you begin driving. If the indicator remains on after seat belts are fastened, see your dealer.
Door open
A door is not closed. A beep sounds while driving if a door is open.
Low fuel
Refuel as soon as possible. If the indicator blinks, there is a problem with the fuel gauge. See your dealer.
Low tire pressure*
Stop in a safe place, check tire pressures, and inflate tire(s) if necessary. The indicator also appears if your vehicle is fitted with the compact spare tire. Have your regular tire repaired or replaced as soon as possible.
Washer fluid level (Canadian models)
The washer fluid is low. Refill the washer fluid (see page 139).
System message*
When a condition or malfunction indicator comes on, a message also appears on the multi-information display. Check the display for more information.
Maintenance Minder*
Scheduled maintenance for your vehicle is due (see page 131).
Immobilizer
Your key or remote transmitter cannot be recognized by the vehicle. If the indicator blinks, you may not be able to start the engine. Turn the vehicle off, and then on again. If it continues to blink, there may be a problem with the system. See your dealer.
24 |
Instrument Panel
On/Off Indicators
These indicators remind you when an item is on or off.
VSA off |
|
Turn signals/hazards on |
||||
VSA engaged (blinking) |
|
Fog lights* on |
||||
CRUISE MAIN on |
|
High beams on |
||||
CRUISE CONTROL on |
|
|
|
|
|
Exterior lights on |
|
|
|
||||
ACC* on |
|
|
|
Auto High-Beam System* on |
||
|
|
|||||
LKAS* on |
|
ECON mode on |
||||
CMBS* off |
|
|
||||
Instrument Panel
Information Display*
Consists of several displays that provide you with useful information.
Select/reset knob
Press the select/reset knob to cycle through the displays shown below.
Instant fuel economy |
|
|
|
|
Instant fuel economy |
||
|
|
|
|
||||
Odometer |
|
|
|
|
Range |
||
Trip meter A |
|
|
|
|
Trip meter A |
||
Outside temperature |
|
|
|
|
Outside temperature |
||
|
|
|
|
Instant fuel economy |
|
|
Instant fuel economy |
Engine oil life |
|
|
Average fuel economy B |
|
Average fuel economy A |
||
|
|
||||||
|
|
|
|
Trip meter B |
|
|
Trip meter A |
|
|
|
|
Outside temperature |
|
|
Outside temperature |
*if equipped |
*if equipped |
26 | |
| 27 |

Instrument Panel
Multi-Information Display (MID)*
Consists of several displays that provide you with useful information.
Multi-information display
 button:
Changes the display.
 SEL/RESET button:
Enters the selected item.
 Main Displays
Press either Info (p/q) button to cycle through the displays shown below.
Average/instant |
Range |
|
|
Elapsed time |
|
Average speed |
|||||||
fuel economy |
|
|
|
||||||||||
|
|
|
|
|
|
|
|
||||||
|
|
|
|
|
|
|
|
|
|
|
|
|
|
|
|
|
|
|
|
|
|
|
|
|
|
|
|
|
|
|
|
|
|
|
|
|
|
|
|
|
|
|
|
|
|
|
|
|
|
|
|
|
|
|
|
Blank screen |
Vehicle Settings |
Engine oil life |
*if equipped
Instrument Panel
 Lower Displays
Press the SEL/RESET button to cycle through the displays shown below.
Odometer |
Trip A |
Trip B |
 Vehicle Settings
Use the MID to customize certain vehicle features when the vehicle is in Park (P) or the parking brake is applied. You can also use the SETTINGS button* (see page 48).
An example of how to change the Trip A reset timing setting is below. Use the Info (p/q) and SEL/RESET buttons to make and enter selections.
1. Scroll to the Vehicle Settings menu and select it.
2. Scroll to Meter Setup and select it.
3. Scroll to “Trip A” Reset Timing and select it.
4.Scroll through the options, and select the one you want.
5. Scroll to Exit, and select it to exit the menus.
*if equipped
28 | |
| 29 |
Vehicle Controls
VEHICLE CONTROLS
Learn about the various controls necessary for operating and driving the vehicle.
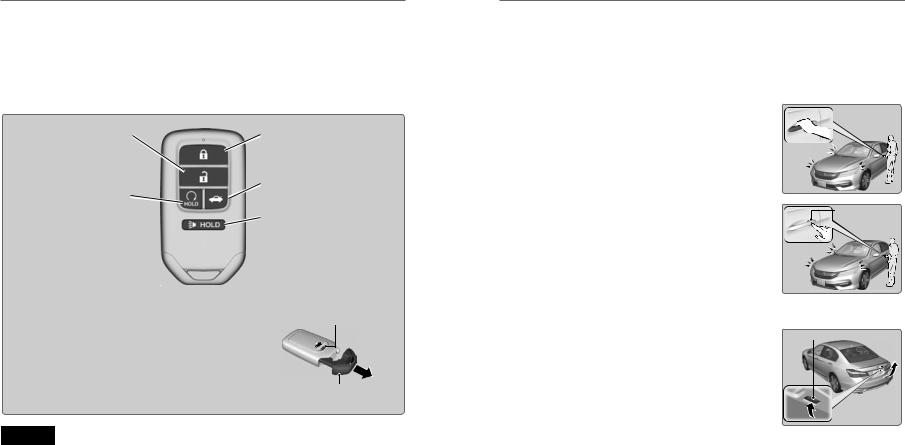
Using the Key or Remote Transmitter*
Lock or unlock the doors and trunk.
Unlock button: Press once to unlock the driver’s door. Press again to unlock all doors.
Engine button*: Press and hold to remotely start the engine (see page 99).
Lock button: Press to lock the doors. Press again for audible verification.
Trunk button: Press and hold to unlock and open the trunk.
Panic button: Press to sound the alarm for 30 seconds. Press again to cancel.
Release knob
Built-in key*: Slide the release knob on the back of the transmitter to pull out the built-in key.
Built-in key
NOTICE
Leaving the key or remote transmitter in the vehicle can result in theft or accidental movement of the vehicle. Always take it with you whenever you leave the vehicle unattended.
*if equipped
Vehicle Controls
Smart Entry System*
When you carry the remote transmitter (for example, in a pocket or purse) and it is outside the vehicle and within range (about 32 inches or 80 cm), you can lock or unlock the doors and trunk without handling the transmitter.
 Unlocking/Locking the Doors
To unlock: Grab the driver’s door handle when the vehicle is off to unlock the driver’s door. Grab the front passenger’s door handle to unlock all doors.
To lock: Press the door lock button on the front door handle when the vehicle is off. If the remote transmitter is inside the vehicle, the doors will not lock.
 Unlocking the Trunk
Press the trunk release button to unlock and open the trunk.
Door lock button
Trunk release button
*if equipped
30 | |
| 31 |

Vehicle Controls
Door Operation
Use several methods to lock or unlock the doors.
 Using the Lock Tab
To unlock: Pull the lock tab rearward. When you unlock the door using the lock tab on the driver’s door, only the driver’s door unlocks.
To lock: Push the lock tab forward. When you lock the door using the lock tab on the driver’s door, all the other doors lock at the same time.
 Using the Front Door Inner Handle
To lock |
Lock tab |
To unlock
When you pull either front door inner handle, the door unlocks and opens. On vehicles with smart entry, pulling the driver’s door inner handle unlocks all other doors.
 Using the Master Door Lock Switch
To unlock: Press the unlock side of the switch to unlock all doors.
To lock: Press the lock side of the switch to lock all doors.
To unlock
Master door lock switch
Inner handle
To lock
 Childproof Door Locks
The childproof door locks prevent the rear doors from being opened from the inside regardless of the position of the lock tab.
Slide the lever in the rear door to the lock position, |
Unlock |
and close the door. |
|
Open the door using the outer door handle. |
Lock |
|
 Using the Trunk Opener
Pull the trunk release near the bottom of the driver’s seat to unlock and open the trunk.
Trunk release
Vehicle Controls
Power Window Operation
The power windows can be opened and closed when the vehicle is on by using the switches on the doors. The switches on the driver’s side can be used to open and close all the windows.
 Automatic Operation
To open: Push the switch down firmly. To close: Pull the switch up firmly.
The window opens or closes completely. To stop the window at any time, push or pull the switch again briefly.
 On
On
 Off
Off
Power window lock button
Driver’s
window
switch
Front passenger’s window switch
 Manual Operation
To open: Push the switch down lightly. To close: Pull the switch up lightly.
Release the switch when the window reaches the desired position.
 Power Window Lock
Push in the power window lock button so only the driver’s window can be operated.
 WARNING
Closing a power window on someone’s hands or fingers can cause serious injury.
Make sure your passengers are away from the windows before closing them.
32 | |
| 33 |
Vehicle Controls
Power Moonroof Operation*
The moonroof can be opened and closed when the vehicle is on by using the switch on the ceiling.
 Automatic Operation
To open: Push the switch back firmly to the second detent, then release.
To close: Push the switch forward firmly to the second detent, then release.
The moonroof opens or closes completely. To stop the moonroof at any time, push the switch briefly.
 Manual Operation
Open
Close Tilt
To open: Push and hold the switch back to the first detent until the desired position is reached.
To close: Push and hold the switch forward to the first detent until the desired position is reached.
 Moonroof Tilt
To tilt: Push the center of the switch.
To close: Push the switch forward firmly, then release.
 WARNING
Closing the moonroof on someone’s hands or fingers can cause serious injury. Make sure your passengers are away from the moonroof before closing it.
NOTICE
Opening the moonroof in below freezing temperatures or when it is covered with snow or ice can damage the moonroof panel or motor.
Vehicle Controls
Interior and Exterior Lights
Operate interior and exterior lights when the vehicle is on or off.
|
Brightness Control |
|
|
|
|
|
|
|
|
|
|
|
|
|
|
|
Adjust instrument panel brightness when the |
|
|
|
|
|
|
|
|
|
|
|
|
|
|
|
vehicle is on. |
|
|
|
|
|
|
|
To brighten: Turn the knob to the right. |
|
|
|
|
|
|
|
To dim: Turn the knob to the left. |
|
Control |
knob |
|
|
|
|
A beep sounds when the brightness reaches its |
|
|
|
|
|
|
|
minimum or maximum. |
|
|
|
|
|
|
|
|
|
|
|
|
|
|
|
Interior Lights |
|
|
|
|
|
|
|
|
|
|
|
|
|
|
|
Change the interior light settings using the switch |
|
|
|
|
|
|
|
on the ceiling. |
|
|
|
|
|
|
|
ON position (rear): Interior lights remain on. |
|
|
|
|
Off |
|
|
|
Map lights |
|||||
|
Door-activated position: Interior lights come on |
|
|||||
|
|
|
|
Door-activated position |
|||
|
when any of the doors are opened, the driver’s door |
|
|
|
|||
|
|
|
|
|
|
|
|
|
is unlocked, or the vehicle is turned off. |
|
|
|
|
|
|
|
OFF position: Interior lights remain off. |
|
|
|
|
|
|
|
Map lights: Press the map lights to turn on or off. |
|
|
|
|
|
|
 Exterior Lights
Rotate the switches on the headlight lever to operate the exterior lights.
OFF: All exterior lights are off.

 : Turn on exterior lights except headlights.
AUTO: Turn on the automatic lighting feature. Headlights turn on or off depending on ambient brightness when the vehicle is on. Headlights automatically come on after the wipers are engaged for a certain time.*
 : Turn on all exterior lights including headlights.
  : Turn fog lights* on or off.
High beams |
Fog |
|
|
|
lights* |
 Flashing the high beams Low beams
*if equipped |
*if equipped |
34 | |
| 35 |

Vehicle Controls
Auto High-Beam System*
Automatically changes the low beam headlights to high beam headlights when necessary.
 How It Works
When you are driving at night above 25 mph (40 km/h) and the headlight lever is in the low beam position with the switch rotated to AUTO, the system changes between low and high beams depending on the surrounding conditions.
Oncoming vehicle
Vehicle ahead of you
Your vehicle
If a vehicle is detected ahead of you, the headlights stay in low beams. If the system does not detect any vehicles ahead of you, the headlights change to high beams.
Certain conditions, such as weather and brightness of other vehicles’ lights, can affect system operation.
 Turning the System On or Off
Make sure the headlight lever is in the low beam position with the switch rotated to the AUTO position. The auto high-beam system indicator comes on.
Headlight switch
The system is canceled temporarily when you drive at speeds below 15 mph (24 km/h), the vehicle speed is below 6 mph (10 km/h), or the windshield wipers run at high speed for more than a few seconds.
To disable the system: When the vehicle is on and parked, pull the headlight lever towards you and hold it for 40 seconds. The auto high-beam indicator blinks twice.
To re-enable the system: Pull the headlight lever towards you and hold it for 30 seconds. The auto high-beam indicator blinks once.
To temporarily cancel operation, do either of the following:
• Flash the high beams by moving the lever toward you. Flash the high beams again to resume auto high beam operation.
• Engage high beams by moving the lever into the high beam position. Return the
lever to the low beam position to resume auto high beam operation.
*if equipped
Vehicle Controls
 Using the Auto High-Beam System
If you find the timing of beam changes inconvenient for driving, change the headlight beams manually.
If the Can Not Operate:  message appears, park your vehicle in a safe place. Wipe away debris blocking the windshield, then start driving again. If the message remains on even after driving for a while with the clean windshield, have your vehicle checked by a dealer.
For the auto high-beam system to work properly:
• Do not place an object that reflects light on the dashboard. • Keep the windshield around the camera clean.
• When cleaning the windshield, be careful not to apply the windshield cleanser to the camera lens.
• Do not attach an object, sticker or film in the area around the camera. • Do not touch the camera lens.
• If the camera receives a strong impact, or repairing of the area near the camera is required, consult a dealer.
Wiper Operation
The windshield wipers and washers can be used when the vehicle is on.
Move the wiper lever up or down to the desired position.
MIST |
|
OFF |
Pull toward |
|
you to use |
INT* / AUTO* |
washer. |
|
|
LO: Low speed wipe |
|
HI: High speed wipe |
|
 Headlight-Wiper Integration*
When the headlights are in the AUTO position, they automatically turn on when the front wipers operate several times within a certain interval. The headlights turn off shortly after the wipers are turned off, or if there is enough ambient light.
 Intermittent (INT) Wipers*
When you move the lever to the INT position, the wipers operate based on the delay adjustment.
Rotate the adjustment ring to adjust the wiper delay.
INT position
Lower speed
Higher speed
Adjustment ring
*if equipped
36 | |
| 37 |

Vehicle Controls
 Automatic Intermittent Wipers*
When you move the lever to the AUTO position while driving in rainy weather, the wipers operate based on the amount of detected rainfall.
Put the lever in the AUTO position only when driving in rainy weather.
Rotate the adjustment ring to adjust the rainfall sensor sensitivity.
Return the lever to the OFF position when rain stops.
AUTO position
Adjustment ring
Low sensitivity: Wipers operate when more rainfall is detected.
High sensitivity: Wipers operate when less rainfall is detected.
NOTICE
To prevent severe damage to the windshield wiper system, ensure the wiper lever is in the OFF position before entering a car wash or cleaning the windshield.
NOTICE
Do not use the wipers when the windshield is dry. The windshield will get scratched, or the rubber blades will get damaged.
In cold weather, the blades may freeze to the windshield, becoming stuck. Operating the wipers in this condition may damage the wipers. Use the defroster to warm the windshield, or manually clear the windshield of ice and snow before turning on the wipers.
One-Touch Turn Signal
Use this quick and convenient method to signal a lane change.
Lightly push the turn signal lever up or down for a |
Right turn |
|
three-blink sequence. |
||
|
For a continuous signal, push the lever up or down
until it locks into place.
Left turn
*if equipped
Vehicle Controls
Adjusting the Seats
Make seat adjustments before driving to ensure the best comfort and safety.
 Adjusting the Front Seats
Adjust the driver’s seat as far back as possible while allowing you to maintain full control of the vehicle. You should be able to sit upright and well back in the seat, adequately press the pedals without leaning forward, and grip the steering wheel comfortably. The passenger’s seat should be adjusted so that it is as far back from the front airbag in the dashboard as possible.
Move back and allow sufficient space.
The National Highway Traffic Safety Administration and Transport Canada recommend that drivers allow at least 10 inches (25 cm) between the center of the steering wheel and the chest.
 Power Seats*
Horizontal position |
Lumbar support |
|
adjustment |
||
adjustment |
||
(driver’s seat only) |
||
|
Height adjustment (driver’s seat only)
Seat-back angle adjustment
 WARNING
Reclining the seat-back too far can result in serious injury or death in a crash. Adjust the seat-back to an upright position, and sit well back in the seat.
 WARNING
Sitting too close to a front airbag can result in serious injury or death if the front airbags inflate.
Always sit as far back from the front airbags as possible while maintaining control of the vehicle.
*if equipped
38 | |
| 39 |
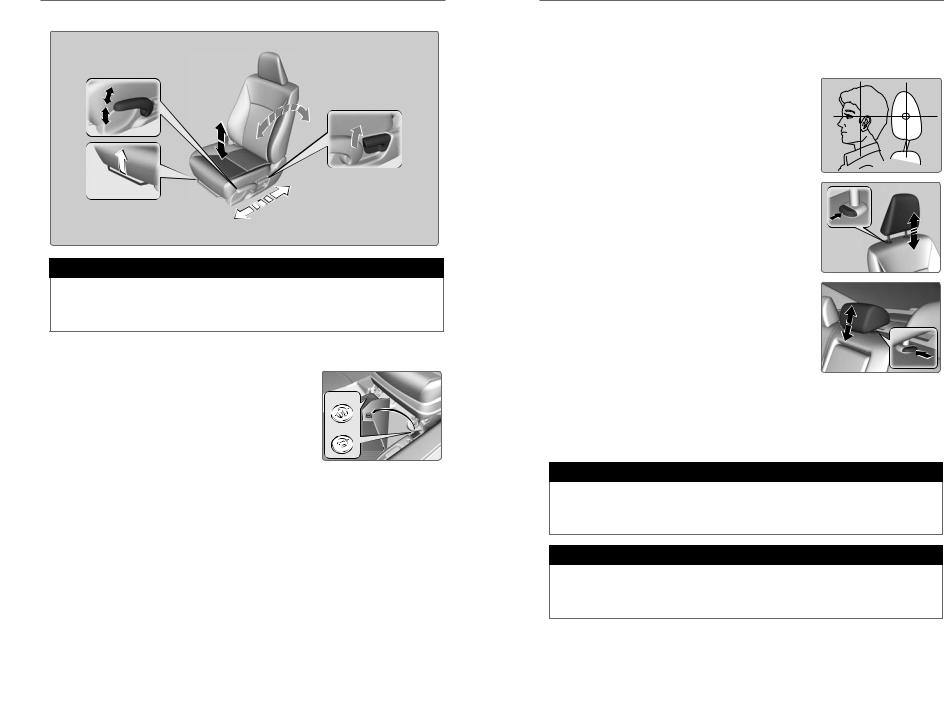
Vehicle Controls
 Manual Seats*
Height adjustment
(driver side only)
Pull up or push down the lever to raise or lower the seat.
Horizontal position adjustment
Pull up on the bar to move the seat, then release the bar.
Seat-back angle adjustment
Pull up the lever to change the angle.
 WARNING
Sitting improperly or out of position can result in serious injury or death in a crash.
Always sit upright, well back in the seat, with your feet on the floor.
|
Floor Mats |
|
|
|
|
|
Position the frontand rear-seat floor mats properly, |
|
|
|
|
|
and anchor them. If they are not properly positioned, |
Unlock |
|
the floor mats can interfere with the front seat |
|
|
|
|
|
functions. |
Lock |
|
Do not put additional floor mats on top of the |
|
|
|
|
|
anchored mats. |
|
*if equipped
Vehicle Controls
 Adjusting the Head Restraints
Your vehicle is equipped with head restraints in all seating positions. Head restraints are most effective for protection against whiplash and other rear-impact crash injuries.
The center of the back of the occupant’s head should rest against the center of the restraint. The tops of the occupant’s ears should be level with the center height of the restraint.
To raise the head restraint: Pull it upward.
To lower the head restraint: Push it down while pressing the release button.
To remove the head restraint: Pull the restraint up as far as it will go. Then push the release button, and pull the restraint up and out.
To reinstall a head restraint: Insert the legs back in place, then adjust the head restraint to an appropriate height while pressing the release button. Pull up on the restraint to make sure it is locked in position.
For a head restraint system to work properly:
• Do not hang any items on the head restraints, or from the restraint legs. • Do not place any object between an occupant and the seat-back.
• Install each restraint in its proper location.
 WARNING
Improperly positioning head restraints reduces their effectiveness and increases the likelihood of serious injury in a crash.
Make sure head restraints are in place and positioned properly before driving.
 WARNING
Failure to reinstall, or correctly reinstall, the head restraints can result in severe injury during a crash.
Always replace the head restraints before driving.
40 | |
| 41 |

Vehicle Controls
 Folding Down the Rear Seats
The rear seat-back(s*) can be folded down to make room for large items in the trunk.
1. Remove the center shoulder belt from the guide.
|
|
|
|
|
|
|
Guide |
|
||
|
|
|
|
|
|
|
|
|
||
|
|
|
|
|
|
|
|
|
||
|
|
Center |
|
|||||||
|
|
shoulder belt |
|
|
|
|
||||
2. Pull the release lever in the trunk to release the |
|
|
|
|
|
|
|
|
|
|
|
|
|
|
|
|
|
|
Release |
||
lock. |
|
|
|
|
|
|
|
|
lever |
|
|
|
|
|
|
|
|
|
|
|
|
|
|
|
|
|
|
|
||||
|
|
|
|
|
|
|
|
|||
|
|
Release |
|
|
|
|||||
|
|
lever * |
|
|
|
|||||
3.Fold down the seat-back. Remove the rear head restraints if necessary (see page 41).
Push the seat-back up firmly until it locks into place to return it to its original position.
Make sure all items in the trunk or items extending through the opening into the rear seats are properly secured. Loose items can fly forward if you have to brake hard.
*if equipped
Vehicle Controls
Adjusting the Steering Wheel
The steering wheel height and distance from your body can be adjusted so that you can comfortably grip the steering wheel in an appropriate driving posture.
1.Pull up the steering wheel adjustment lever.
2.Move the steering wheel up or down, and in or out.
3.Push down the steering wheel adjustment lever to lock the steering wheel in position.
To adjust
Lever |
To lock |
 WARNING
Adjusting the steering wheel position while driving may cause you to lose control of the vehicle and be seriously injured in a crash.
Adjust the steering wheel only when the vehicle is stopped.
Driving Position Memory System*
You can store two driver’s seat positions into memory when the vehicle is on using the buttons on the driver’s door.
1.Adjust the seat to your preferred position.
2.Press SET.
3.Press and hold memory button 1 or 2. You will hear two beeps when the memory is set.
4.Press one of the memory buttons to recall previously stored positions.
Lumbar positions cannot be stored.
Memory button 1
Memory button 2
SET button
When you unlock and open the driver’s door with a remote transmitter, the seat adjusts automatically to one of the two preset positions.
*if equipped
42 | |
| 43 |
Loading...