


|
Instructions for use |
|
Bruksanvisning |
|
|
15LD2400 |
Bruksanvisning |
Instruktionsbog
Käyttöohjeet
2įȘȖȓİȢ ȤȡȒıȘȢ
GB
N
S
DK
FIN
GR

Contents |
|
Remote Control Buttons ....................... |
2 |
Control Panel Buttons ........................... |
3 |
Preparation ............................................. |
4 |
Installation Of The TFT TV To The Wall 4 |
|
Features ............................................... |
6 |
Panel Features ..................................... |
6 |
Safety Precautions ................................. |
6 |
Before Switching On Your TV ............... |
9 |
Power Connection ................................ |
9 |
Connections to the Aerial socket .......... |
9 |
How To Connect Other Devices ........... |
9 |
Inserting Batteries In The Remote Control |
|
Handset ................................................ |
9 |
Switching The TV ON/OFF .................... |
9 |
To switch the TV on: ............................. |
9 |
To switch the TV off: ........................... |
10 |
Operating The TV ................................. |
10 |
Initial A.P.S. (Automatic Programming |
|
System) .............................................. |
10 |
Operating with the buttons on the TV |
|
set ...................................................... |
10 |
Operating With Remote Control ......... |
10 |
Menu System ........................................ |
11 |
picture menu ....................................... |
11 |
audio menu ......................................... |
12 |
window menu ...................................... |
13 |
options menu ...................................... |
14 |
settings menu ..................................... |
15 |
Other Features ..................................... |
17 |
TV Status ............................................ |
17 |
Previous Programme .......................... |
17 |
Sound Indicator .................................. |
17 |
Mute Indicator ..................................... |
18 |
AV Modes ........................................... |
18 |
PC Mode ............................................. |
18 |
Teletext .................................................. |
18 |
To Operate Teletext ............................. |
18 |
To Select A Page Of Teletext .............. |
18 |
To Select Index Page .......................... |
19 |
To Select Teletext With A TV |
|
Programme ......................................... |
19 |
To Select Double Height Text ............. |
19 |
To Reveal “Concealed” Information .... |
19 |
To Stop Automatic Page Change ........ |
19 |
To Select A Subcode Page ................. |
19 |
Fastext ................................................ |
19 |
To Exit Teletext .................................... |
19 |
To Display The Time ........................... |
20 |
Connect Peripheral Equipment .......... |
20 |
PC Sound Connection ........................ |
20 |
Via The SCART .................................. |
20 |
Via Aerial Input ................................... |
20 |
Decoder .............................................. |
20 |
TV And Video Recorder ...................... |
20 |
Playback NTSC .................................. |
23 |
Search For And Store The Test Signal Of |
|
The Video Recorder ........................... |
23 |
Camera And Camcorder ..................... |
23 |
Connect The Decoder To The Video |
|
Recorder ............................................. |
23 |
Connecting Headphones .................... |
23 |
Tips ........................................................ |
23 |
Care Of The Screen ........................... |
23 |
Poor Picture ........................................ |
23 |
No Picture ........................................... |
24 |
Sound ................................................. |
24 |
Remote Control .................................. |
24 |
PC INPUT TYPICAL DISPLAY MODES 25 |
|
Specifications ....................................... |
26 |
UK Guarantee ....................................... |
27 |
Important Instruction ........................... |
28 |
- 1 -
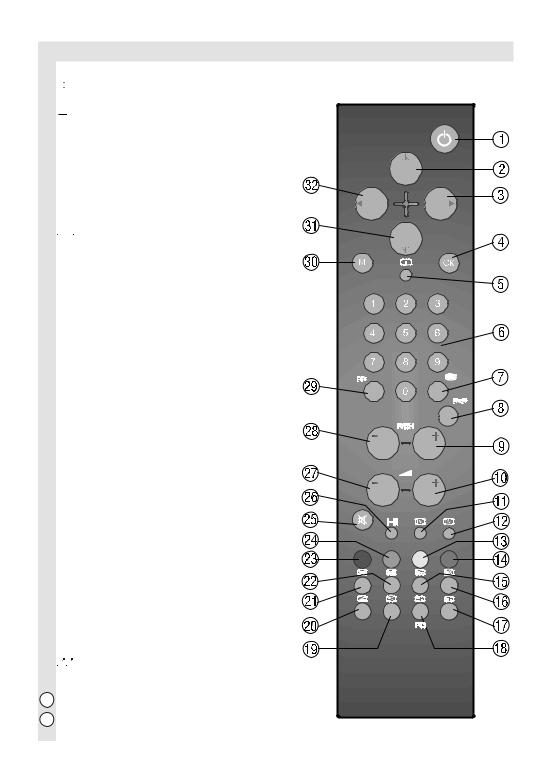
Remote Control Buttons

 = Stand By


 = Cursor Up

 = Cursor Right
 OK = Okay (Store)

 = Info
 0 - 9 = Direct Programme

 = Image size


 =Previous Programme
 P/CH + = Programme Up

 + = Volume Up

 = TV / Quit Menu

 = External Source
(AV-1, RGB1, AV-2, SVHS, PC)  Yellow button
 Blue button

 = Hold

 = Update

 = Index Page

 = Reveal / PC = Switch from TV to PC

 = Expand

 = Mix
= Mix

 = Teletext

 = Time / Subcode page
 Red button
 Green button

 = Mute
 I-II = Mono/Stereo - Dual I-II
 -
-  = Volume Down
 - P/CH = Programme Down


 = Color temperature settings
  M = Menu

 = Cursor Down

 = Cursor Left
- 2 -
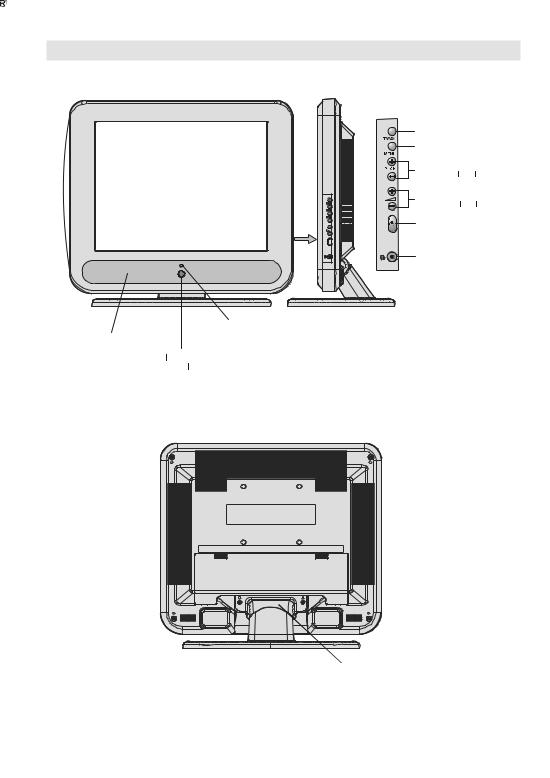
Control Panel Buttons
- 3 -
Preparation
Install Display on solid horizontal surface such as a table or desk.
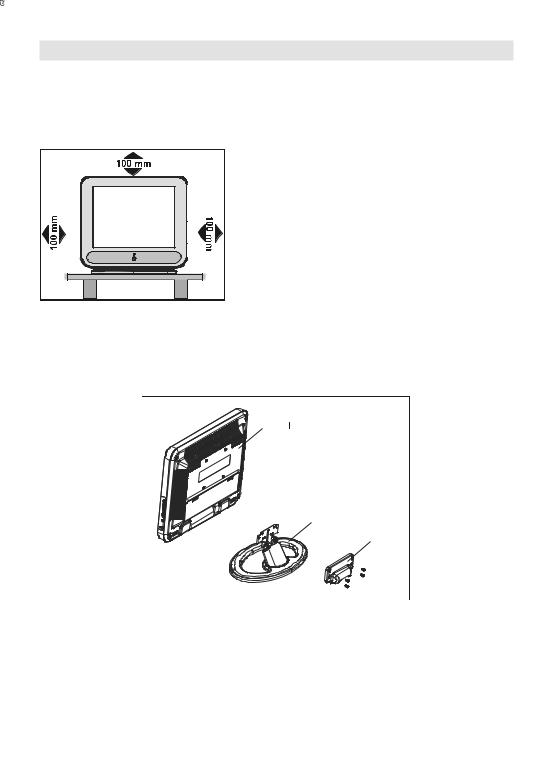
For ventilation, leave a space of at least 10 cm free all around the set. To prevent any fault and unsafe situations, please do not place any objects on top of the set.
Use this apparatus in moderate climates.
Installation Of The TFT TV To The Wall
1- To install the TFT TV on the wall, first of all, foot assembly should be removed. Unscrew the 4 screws that attach the foot top cover and the foot to the TFT panel and remove the foot assembly from the TFT panel.
2- Place the 4 hangers to the circular screw holes at the rear of the TFT and screw them to the TFT panel with 4 (M4 x 10) screws.
3- Decide the place on the wall where the TFT panel would be placed. Level and mark with a pencil the 4 mounting points on the wall hanger. Drill pilot holes for the plastic anchors and then fix the wall hanger with 4 screws (4 x 30).
4- Raise the TFT panel and hang it to the holes on the wall bracket from the 4 hanging screws at the rear of the TFT panel.
- 4 -

- 5 -

Features
•Remote controlled colour television.
•100 programmes from VHF, UHF bands or cable channels can be preset.
•It can tune to cable channels.
•Controlling the TV is very easy by its menu driven system.
•It has a SCART socket for an external device (such as video, video games, audio set, etc.)
•Stereo sound system (German+Nicam).
•Full function Teletext (Fastext)
•Headphone connection.
•Direct channel access.
•A.P.S. (Automatic Programming System).
•All programmes can be named.
•Programme swapping between the last two programmes.
•Forward or backward automatic tuning.
•Sleep timer.
•Child Lock
•Automatic sound mute when no transmission.
•Wide, Auto and Fill all modes.
•NTSC Playback.
•AV in is available.
•SVHS is available.
•VGA connector.
•AVL (Automatic Volume Limiting)
•When no valid signal is detected, after 5 minutes the TV switches itself automatically to stand-by mode.
•PLL (Frequency Search)
•PC input (Support Up to XGA 1024 x 768)
•Plug&Play for Windows 9X, ME, 2000, XP
Panel Features
•High resolution (1024 x 768), 15”-inch TFT LCD display.
•Contrast ratio (500:1 typical)
•Brightness (typical) 400 cd/m2.
•High-speed response time 12 msec.
•Wide viewing angle (typical) 160° (horizontal) and 135° (vertical).
•6-bit+FRC colour depth, display 16.2 M colours.
Safety Precautions
Please read the following recommended safety precautions carefully for your safety.
IMPORTANT SAFETY INFORMATION ON OPERATING YOUR TV
Do’s and Don’ts
DO’s
This Television has been designed and manufactured to meet international safety standards, but like any electrical equipment, care must be taken if you are to obtain the best results and safety is to be assured.
DO read the operating instructions before you attempt to use the equipment.
DO consult your dealer if you are in any doubt about installation, operation or safety of your equipment.
DO be careful with glass panels or doors on equipment.
This TV is supplied with a fitted mains plug. This plug must not be cut off as it may contain a special radio interference filter, the removal of which could lead to impaired performance. If you wish to extend the lead, obtain an appropriate safety approved extension lead or consult your dealer.
Observe the manufacturers instructions when connecting extension leads to the TV. Check the fuse rating on the new plug, this should be fitted with a 5 Amp fuse which conforms to either ASTA or BSI (BS1 362) approvals, these are easily identifiable by either
the |
or |
|
symbols. If you are in any |
doubt about the installation of an extension lead, please consult a competent electrician.
- 6 -

DON’Ts
DON’T continue to operate the equipment if you are in any doubt about it working normally, or if it is damaged in any way switch off, withdraw the mains plug and consult your dealer.
DON’T place water filled vessels on top of T.V. cabinets.
DON’T remove any fixed cover as this may expose dangerous voltages.
DON’T leave equipment switched on when it is unattended unless it is specifically stated that it is designed for unattended operation or has a stand-by mode. Switch off using the switch on the equipment and make sure your family know how to do this. Special arrangements may need to be made for infirm or handicapped people.
DON’T use equipment such as personal stereos or radios so that you are distracted from the requirements of traffic safety. It is illegal to watch television whilst driving.
DON’T obstruct the ventilation of the equipment, for example with curtains or soft furnishings. Overheating will cause damage and shorten the life of the equipment.
DON’T use makeshift stands and NEVER fix legs or stands to the TV with any screws other than those provided - to ensure complete safety always use the manufacturers approved stand with the fixings provided.
DON’T allow electrical equipment to be exposed to rain or moisture.
ABOVE ALL
•NEVER let anyone, especially children push anything into holes, slots or any other opening in the case - this could result in a fatal electric shock.
•NEVER guess or take chances with electrical equipment of any kind - it is better to be safe than sorry!
1. Power
•Always use the provided AC adaptor.
•Operate only from the power source specified on the AC adaptor.
•In using, the AC adaptor gets heat on the surface of the case. It is normal, not defective.
•Do not cover the case of AC adaptor with any material while it is in operation. Leave 15 cm space (minimum) around the AC adaptor.
•The rating information and safety caution of the AC adaptor are on its case.
Warning: When the device is not in use for a long time, disconnect from power.
2.Power Cord
Do not place the set, a piece of turniture, etc. on the power cord (mains lead) or pinch the cord. Handle the power cord by the plug Do not pull out the plug by tugging the cord and never touch the power cord when your hands are wet as this could cause a short circuit or electric shock Never make a knot in the cord or tie it with other cords. The power cords should be placed in such a way that they are not likely to be stepped on A damaged power cord can cause fire or give you an electric shock. When it is damaged and need to be changed, it should be done by qualified personnel.
3. Moisture and Water
Do not use this equipment in a humid and damp place (avoid the bathroom, the sink in the kitchen, and near the washing machine). Do not expose this equipment to rain or water, as this may be dangerous and do not place objects filled with liquids, such as flower vases, on top of the set.Avoid from dripping or splashing. If any solid object or liquid falls into the cabinet, unplug the set and have it checked by qualified personnel before operating it any further.
4. Cleaning
Before cleaning, unplug the adaptor from the wall outlet. Do not use liquid or aerosol cleaners. Use soft and dry cloth.
5. Ventilation
The slots and openings on the back cover are intended for ventilation and to ensure reliable operation. To prevent overheating, these openings must not be blocked or covered in anyway.
- 7 -
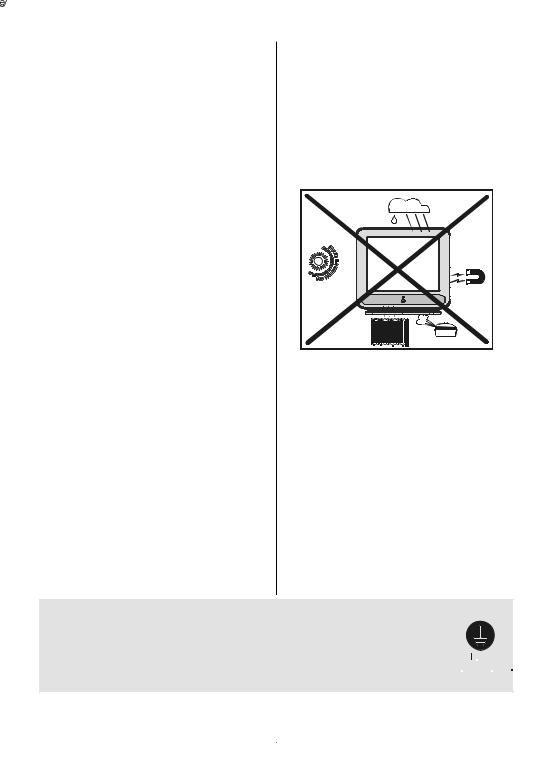
6. Heat and Flames
The set should not be placed near to naked flames and sources of intense heat, such as an electric heater. Ensure that no naked flame sources, such as lighted candles, are placed on top of the set.
7. Lightning
In case of storm and lightning or when going on holiday, disconnect the power cord from the wall outlet.
8. Replacement Parts
When replacement parts are required, be sure the service technician has used replacement parts which are specified by the manufacturer or have the same specifications as the original one. Unauthorised substitutions may result in fire, electrical shock, or other hazards.
9. Servicing
Please refer all servicing to qualified personnel. Do not remove the cover yourself as this may result in an electric shock.
Instructions for waste disposal:
•Packaging and packaging aids are recyclable and should principally be recycled. Packaging materials, such as foil bag, must be kept away from children.
•Battery, including those which is heavy metalfree, should not be disposed of with household waste. Please dispose of used battery in an environmentally sound manner. Find out about the legal regulations which apply in your area.
•Cold cathode fluoresant lamp in LCD PANEL contains a small amount of mercury, please follow local ordinates or regulations for disposal.
“The mains plug of the power supply is used as disconnect device and therefore shall remain readily operable.”
“DO NOT LEAVE YOUR SET AT STANDBY OR OPERATING WHEN YOU LEAVE YOUR HOUSE”
Warning: To prevent injury, this device must be securely attached to the floor/wall in accordance with the installation instructions.
"The LCD panel is very high technology product with about a million thin film transistors, giving you fine picture details. Occasionally, a few non-active pixels may appear on the screen as a fixed point of blue, green or red. Please note that this does not affect the performance of your product."
Be sure to ground the connection properly.
Connect the ground terminal of the AC adaptor with the ground
terminal provided at the power outlet using the enclosed power cord. If the provided plug does not fit your outlet, consult an electrician for replacement of the obsolete outlet.
‘’In order to avoid possible accidents, please do keep children away from the moving gear located at the rear bottom side of your TV.”
- 8 -

Before Switching On Your
TV
Power Connection
IMPORTANT: The TV set is designed to operate on 12 V DC. For this, an adaptor is used which gives 12V DC voltage. Connect this adaptor to a system that supplies 220-240 V AC, 50 Hz.
•After unpacking, allow the TV set to reach the ambient room temperature before you connect the set to the mains.
Connections to the Aerial socket
Please see P21 for further details of connections.
•Connect the aerial or cable TV plug to the aerial socket located at the rear of the TV and connect the cable plug coming out from the TV out socket located on the devices (VCR, DVB etc.) to this socket as well.
How To Connect Other Devices
IMPORTANT: Switch off the TV before connecting any external device.
Sockets for external connections are at the rear side of the TV. For connection of other
devices via SCART refer to the manuals of the related devices.
Inserting Batteries In The Remote Control Handset
•Remove the battery cover located on the back of the handset by gently pulling upwards from the indicated part.
•Insert two AAA (R03) or equivalent type of batteries inside.
•Replace the battery cover.
NOTE: Remove the batteries from remote control handset when it is not to be used for a long period.Otherwise it can be damaged due to any leakage of batteries.
Switching The TV ON/OFF
To switch the TV on:
Your TV will switch on in two steps:
1- Connect the power supply cord to the sys-
tem. Press the “ ” button on the right side of the TV. Then the TV switches itself to standby mode and the led becomes red located on the front of the TV.
2- To switch on the TV from stand-by mode either:
Press a digit button on the remote control so that a programme number is selected,
or,
Press the “-P/CH” or “P/CH+”button on the right side of the TV or press the “-P/CH” or “P/CH+” button on the remote control, so that the last programme switched off is selected.
Either way the TV will switch on and the LED becomes green.
- 9 -
To switch the TV off:
•Press the “ ” button on the remote control, so the TV will switch to stand-by mode and the GREEN LED will become RED,
or,
•Press the “ ” button located on the right side of the TV, so the TV will switch off and the GREEN LED will turn off.
NOTE: To switch the TV off completely remove the mains plug from the socket.
Operating The TV
You can operate your TV using both the remote control handset and onset buttons.
Initial A.P.S. (Automatic
Programming System)
The following menu will be displayed on the screen when you turn on your TV for the first time. A.P.S., searches and sorts all channels and stores them automatically on your TV, according to the transmission of programme systems in your area.
To cancel A.P.S. before starting, press the “ ” button. First of all choose language and country by using “
 ” / “
” / “ ” and “
  ” / “
” / “  ” buttons. This, will effect the sort process in A.P.S. To start aps, select A.P.S. by using
“ ” / “
” / “ ” buttons and press the “
  ” button. The following warning is displayed.
If you want to cancel A.P.S. function, press the “M” button.
If “OK” button is pressed, A.P.S. starts and the following warning is displayed.
$ 3 6 LV UXQQLQJ 3OHDVH :DLW
After A.P.S. is finalized, Program Table will be displayed on the screen. In the Program Table you will see the programme numbers and names assigned to the programmes.
Operating with the buttons on the TV set
Volume setting and programme selection can be made by using the buttons at the control panel on the right side of the TV.
Volume Setting
Press the “-  ” button to decrease volume
or the “ +” button to increase volume, so a volume level scale (slider) will be displayed on the screen.
Programme Selecting
Press the “P/CH +” button to select the next programme or the “- P/CH” button to select the previous programme.
Entering Main Menu
Press “MENU” button to enter Main menu. In the Main menu select submenu using “- P/CH” or “P/CH +” button and enter the
sub-menu using “-  ” or “
 +” button.
AV Mode
Press the “TV / AV” button at the control panel on the right side of the TV to switch your TV to AV modes.
Operating With Remote Control
The remote control handset of your TV is designed to control all the functions of the model you selected. The functions will be de-
- 10 -
 Loading...