


32LD8D20U

Digital LCD olo r TelevisionCu
32LD8D20U
Instructionsforuse
GB

Contents
Remote Control Buttons .............................................................................................................................. 2
LCD TV ....................................................................................................................................................... 3
Rear View and Peripheral Connections ...................................................................................................... 4
Preparation ................................................................................................................................................. 5
Safety Precautions ..................................................................................................................................... 5
Before Switching On Your TV .................................................................................................................... 7
Switching The TV ON/OFF ......................................................................................................................... 8
Navigating the Menu System ...................................................................................................................... 8
Initial Settings.............................................................................................................................................. 8
Basic Operations ........................................................................................................................................ 9
Everyday Operation ................................................................................................................................. 10
IDTV Menu System ................................................................................................................................... 12
Analogue TV Menu System ...................................................................................................................... 18
PC Mode ................................................................................................................................................... 23
Other Features .........................................................................................................................................23
Teletext ..................................................................................................................................................... 25
Connect Peripheral Equipment .................................................................................................................. 26
Tips .......................................................................................................................................................... 27
Specifications ........................................................................................................................................... 28
Appendix A: PC Input Typical Display Modes ............................................................................................ 29
Appendix B: Aerial Connection ................................................................................................................. 29
Appendix C: Connect Peripheral Equipment .............................................................................................. 29
UK Guarantee ........................................................................................................................................... 30
English - 1 -
= Stand By
1
0
FEATURE
INSTALL
A
VWX
A
RC 1072
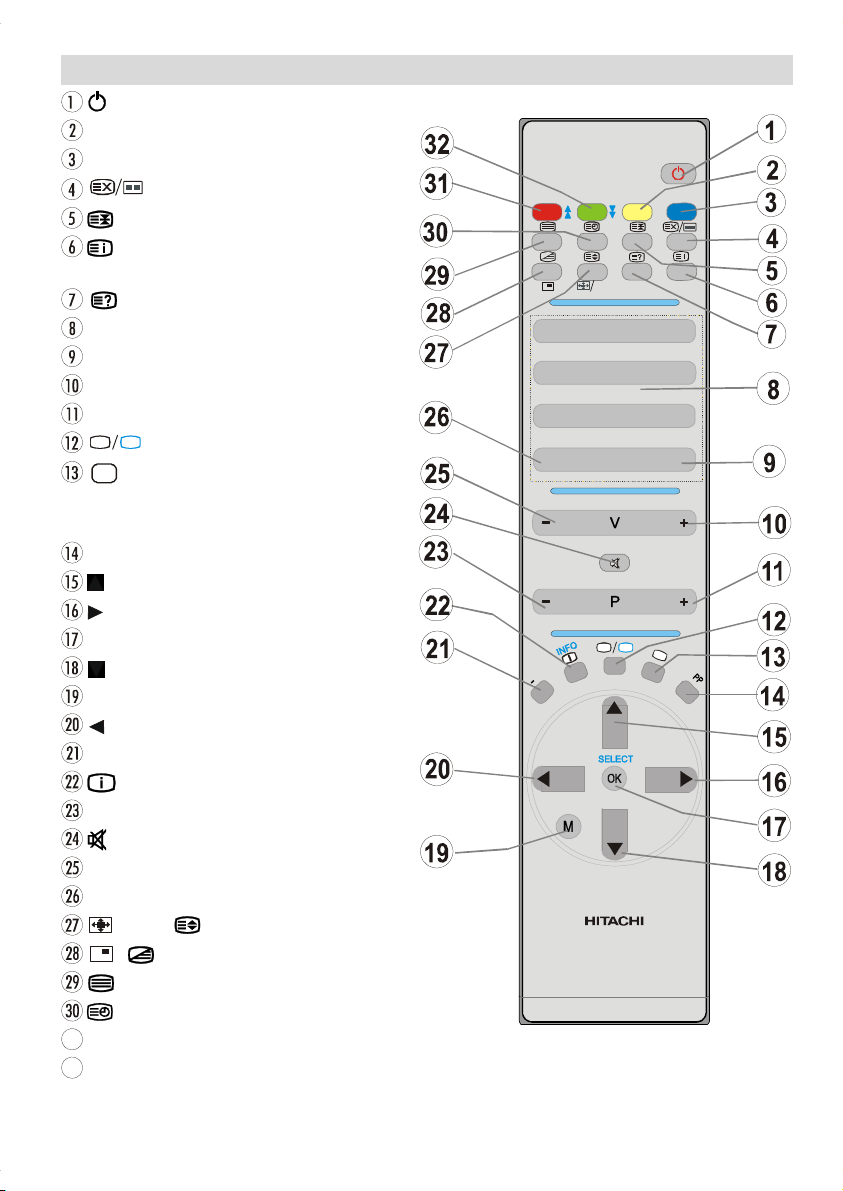
YELLOW / FEATURE = Feature Menu
BLUE / INSTALL = Install Menu
= Update / No function
= Hold
/ GUIDE = Index Page
GUIDE= Electronic Programme Guide (EPG)
/ PC = Reveal / PC
0 - 9 = Direct Programme
- / - - / EXIT = No Function
V+ = Volume Up
P + = Programme Up
TV
DTV
AV = External Source
(TV, EXT1, EXT2, EXT2 S, FAV,
S-VIDEO, HDMI, YPBPR, PC, DTV)
PP = Personal preference
= Cursor Up
= Cursor Right
OK/SELECT = Okay (Store)
= Cursor Down
M = Menu
= Cursor Left
I-II = Mono/Stereo - Dual I-II
/ INFO = Info
- P = Programme Down
= Mute
- V = Volume Down
P<P = Previous Programme
/ WIDE / = Image size / Expand
/ = No function / Mix
= Teletext
= Time
3
RED / SOUND = Sound Menu
32
GREEN / PICTURE = Picture Menu / subtitle on /
= TV / Digital TV Mode
off in the digital mode
Remote Control Buttons
SOUND PICTURE
JKL
STU
I
I
I
WIDE
1
BC DEF
4
7
TV
GUIDE
PC
23
GHI
5
MNO
8
6
PQR
9
YZ
-/--P<P
EXIT
DTV
V
English - 2 -

LCD TV
IR Receiver
Standby LED
TV/AV
MENU
P/CH
VOLUME
STANDBY
English - 3 -
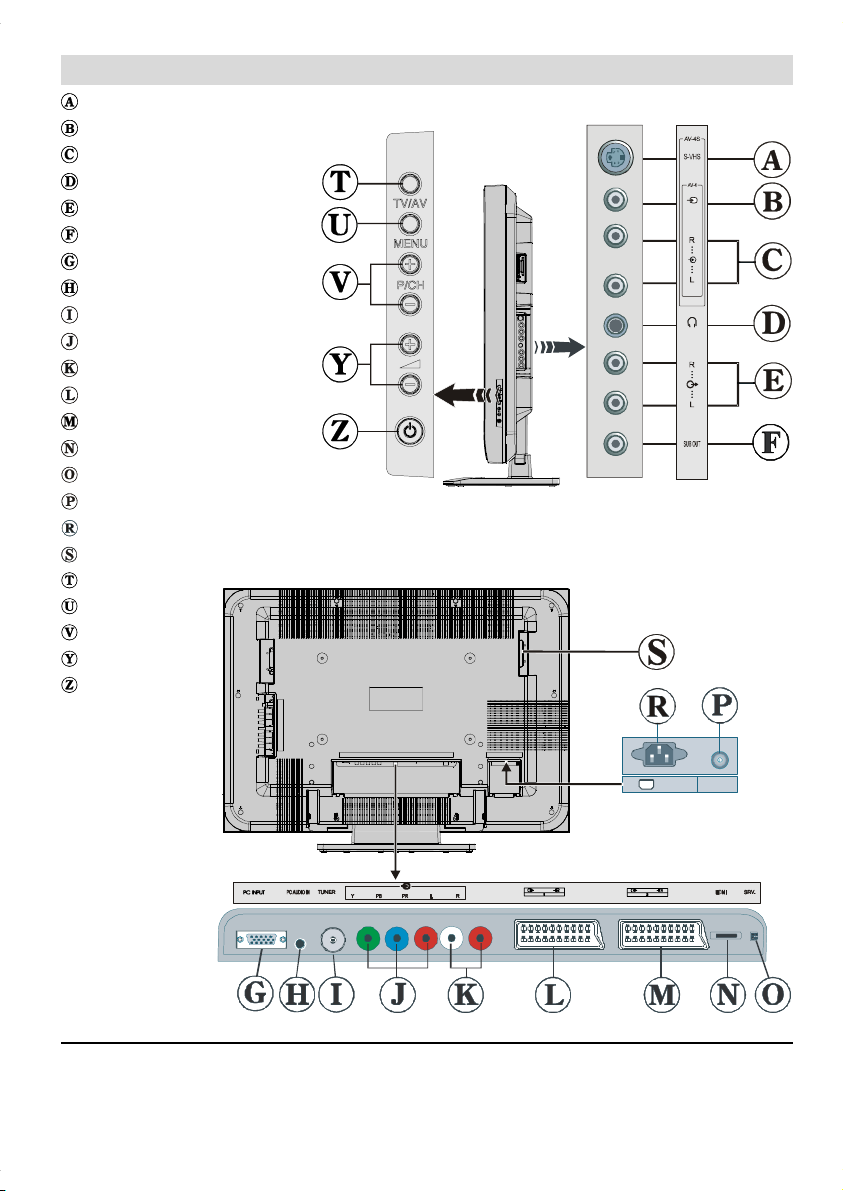
Rear View and Peripheral Connections
S-VHS Input
Video Input
Audio Inputss
Headphone
Audio Line Outss
Subwoofer
PC Input
PC Audio Input
RF (Antenna)
Component Video Inputs (YpBpr)
Component Audio Inputss
SCART 1
SCART 2
HDMI Input
For Service Use Only
Power On/Off Switch
Power Cord Input
CI Slot
TV/AVV
MENU
P/CH
VOLUME
STAND-BY
220V-240V
POWER
AC~50 Hz
Note: Because FAV CVBS and SVHS Y are connected parallelly, the picture may blend if the two peripherals
are used at the same time. Likewise, because SVHS C and SCART II R are connected parallelly, the picture
may blend if the two peripherals are used at the same time. Thus these two are not to be used at the same
time.
English - 4 -

Preparation
For ventilation, leave a space of at least 10 cm free all
around the set. To prevent any fault and unsafe situations, please do not place any objects on top of the set.
Use this apparatus in moderate climates.
Features
• Remote controlled colour LCD TV.
• Fully integrated Digital TV (DVB-T)
• 100 programmes from VHF, UHF bands or cable
channels can be preset.
• It can tune cable channels.
• Controlling the TV is very easy by its menu driven system.
• It has 2 Scart sockets for external devices (such as
video, video games, audio set, etc.)
• Stereo sound system (German+Nicam).
• Full function Teletext (500 pages).
Fastext, TOP text.
• Headphone connection.
• A.P.S. (Automatic Programming System).
• All programmes can be named.
• Forward or backward automatic tuning.
• Sleep timer.
• Child Lock.
• Automatic sound mute when no transmission.
• NTSC Playback.
• AV in and S-VHS in are available.
• It has VGA connector for external devices such as
computer.
• It has an HDMI connector for Digital Video and Audio.
This connection is also designed to accept High
Definition signals.
• AVL (Automatic Volume Limiting)
• When no valid signal is detected, after 5 minutes the
TV switches itself automatically to stand-by mode.
• PLL (Frequency Search)
• PC Input
• Plug&Play for Windows 9X, ME, Vista, 2000, XP
• Audio Line Out
Safety Precautions
Please read the following recommended safety precautions carefully for your safety.
IMPORTANT SAFETY
INFORMATION ON OPERATING
YOUR TV
Do’s and Don’ts
DO’s
This Television has been designed and manufactured to meet international safety standards,
but like any electrical equipment, care must be
taken if you are to obtain the best results and
safety is to be assured.
DO read the operating instructions before you
attempt to use the equipment.
DO consult your dealer if you are in any doubt
about installation, operation or safety of your
equipment.
DO be careful with glass panels or doors on
equipment.
This TV is supplied with a fitted mains plug. This
plug must not be cut off as it may contain a special radio interference filter, the removal
of which could lead to impaired performance. If
you wish to extend the lead, obtain an appropriate safety approved extension lead or consult
your dealer.
Observe the manufacturers instructions when
connecting extension leads to the TV. Check the
fuse rating on the new plug, this should be fitted
with a 5 Amp fuse which conforms to either ASTA
or BSI (BS1 362) approvals, these are easily
identifiable by either the
you are in any doubt about the installation of an
extension lead, please consult a competent
electrician.
DON’Ts
DON’T continue to operate the equipment if you
are in any doubt about it working normally, or if it
is damaged in any way switch off, withdraw the
mains plug and consult your dealer.
DON’T place water filled vessels on top of T.V.
cabinets.
or symbols. If
English - 5 -

DON’T remove any fixed cover as this may ex-
pose dangerous voltages.
DON’T leave equipment switched on when it is
unattended unless it is specifically stated that it
is designed for unattended operation or has a
stand-by mode. Switch off using the switch on
the equipment and make sure your family know
how to do this. Special arrangements may need
to be made for infirm or handicapped people.
DON’T use equipment such as personal stereos
or radios so that you are distracted from the requirements of traffic safety. It is illegal to watch
television whilst driving.
DON’T obstruct the ventilation of the equipment,
for example with curtains or soft furnishings.
Overheating will cause damage and shorten the
life of the equipment.
DON’T use makeshift stands and NEVER fix legs
or stands to the TV with any screws other than
those provided - to ensure complete safety always use the manufacturers approved stand
with the fixings provided.
DON’T allow electrical equipment to be exposed
to rain or moisture.
ABOVE ALL
• NEVER let anyone, especially children push
anything into holes, slots or any other opening in the case - this could result in a fatal
electric shock.
• NEVER guess or take chances with electrical
equipment of any kind - it is better to be safe
than sorry!
1. Power Source
The set should be operated only from a 220-240V AC,
50 Hz. outlet. Ensure you select the correct voltage
setting for your convenience.
2. Power Cord
Do not place the set, a piece of furniture,etc. on the
power cord(mains lead) or pinch the cord.Handle the
power cord by the plug.Do not pull out the plug by
tugging the cord and never touch the power cord
when your hands are wet as this could cause a short
circuit or electric shock.Never make a knot in the cord
or tie it with other cord.The power cord should be
placed in such a way that they are not likely to be
stepped on.
A damaged power cord can cause fire or give you an
electric shock. When it is damaged and need to be
changed, it should be done by qualified personel.
3. Moisture and Water
Do not use this equipment in a humid and damp place
(avoid the bathroom, the sink in the kitchen, and near
the washing machine). Do not expose this equipment
to rain or water, as this may be dangerous and do not
place objects filled with liquids,such as flower vases
on top of the set. Avoid from dripping or splashing.
If any solid object or liquid falls into the cabinet, unplug
the set and have it checked by qualified personnel before operating it any further
4. Cleaning
Before cleaning, unplug the set from the wall outlet.
Do not use liquid or aerosol cleaners. Use soft and
dry cloth.
5. Ventilation
The slots and openings on the back cover are intended for ventilation and to ensure reliable operation. To prevent overheating, these openings must not
be blocked or covered in anyway.
6. Heat and Flames
The set should not be placed near to naked flames
and sources of intense heat,such as an electric
heater. Ensure that no naked flame sources, such as
lighted candles, are placed on top of the set
7. Lightning
In case of storm and lightning or when going on
holiday, disconnect the power cord from the wall outlet.
8. Replacement Part
When replacement parts are required, be sure the service technician has used replacement parts which are
specified by the manufacturer or have the same specifications as the original one. Unauthorised substitutions
may result in fire, electrical shock, or other hazards.
9. Servicing
Please refer all servicing to qualified personnel. Do
not remove the cover yourself as this may result in an
electric shock.
Be sure to ground the connection properly.
Connect the ground terminal of TV with the ground terminal provided at the power
outlet using the enclosed power cord. If theprovided plug does not fit your outlet,
consult an electrician for replacement of the obsolete outlet.
English - 6 -
Surely connect
the ground wire.
WARNING: When the device is not in use for a long
time, disconnect from power.
Instructions for waste disposal:
• Packaging and packaging aids are recyclable and
should principally be recycled. Packaging materials, such as foil bag, must be kept away from children.
• Battery, including those which is heavy metal-free,
should not be disposed of with household waste.
Please dispose of used battery in an environmentally sound manner. Find out about the legal regulations which apply in your area.
• Cold cathode fluoresant lamp in LCD PANEL contains a small amount of mercury, please follow local ordinates or regulations for disposal.
• The mains plug is used to disconnect the TV from
the mains and therefore it shall remain readily operable.
Warning: To prevent injury, this device must be securely attached to the floor/wall in accordance with
the installation instrutions.
Before Switching On Your TV
Power Connection
IMPORTANT: The TV set is designed to operate on
220-240V AC, 50 Hz.
• After unpacking, allow the TV set to reach the ambient room temperature before you connect the set to
the mains.
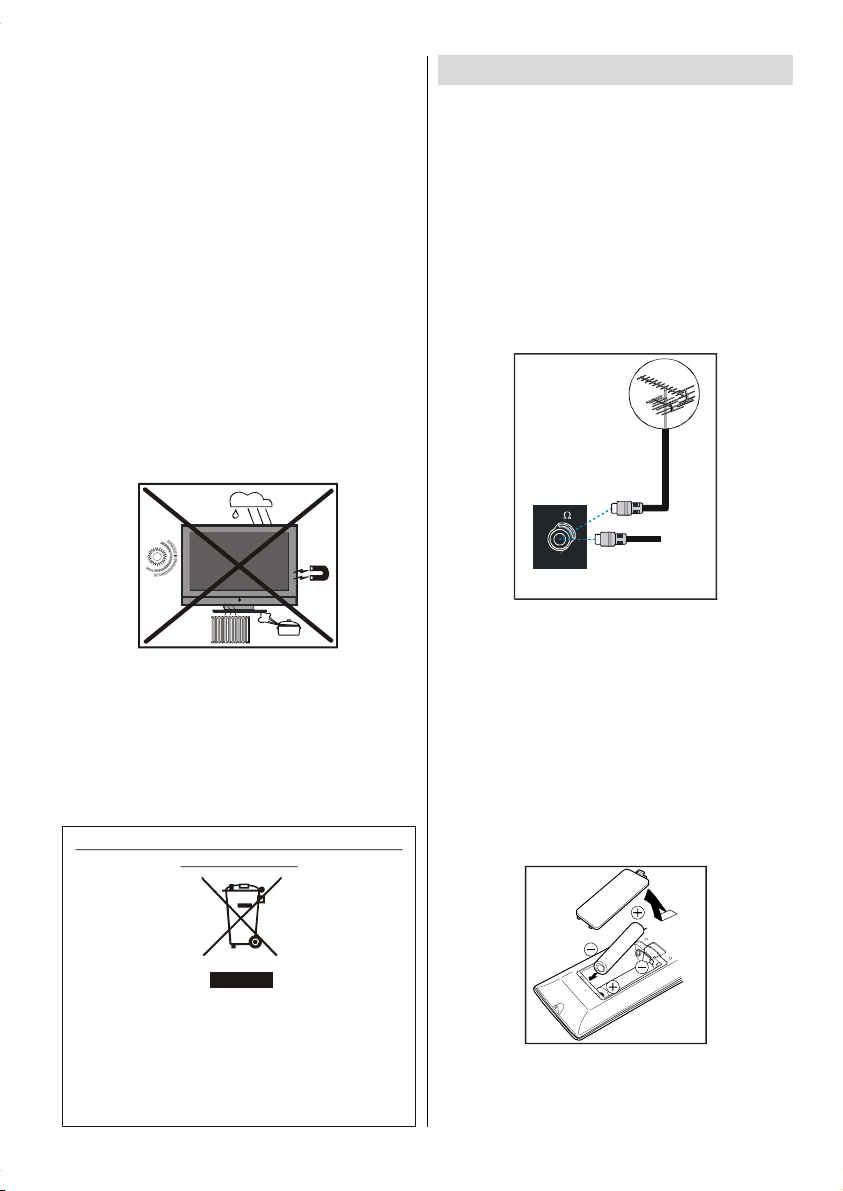
Connections To The Aerial Input Socket
• Connect the aerial or cable TV plug to the Aerial input
socket located at the rear of the TV and connect the
cable plug coming out from the TV out socket located on the devices (VCR, DVB etc.) to this socket
as well.
75
“The LCD panel is very high technology product with
about a million thin film transistors, giving you fine
picture details. Occasionally, a few non-active pixels
may appear on the screen as a fixed point of blue,
green or red. Please note that this does not affect the
performance of your product.”
“DO NOT LEAVE YOUR TV AT STAND-BY OR OPERATING WHEN Y OU LEAVE YOUR HOUSE”
Information for users applicable in European
Union countries
This symbol on the product or on its packaging
means that your electrical and electronic
equipment should be disposed at the end of life
separately from your household wastes. There are
separate collection systems for recycling in EU. For
more information, please contact the local authority
or the dealer where you purchased the product.
English - 7 -
VHF/UHF
REAR OF THE TV
CABLE TV
Inserting Batteries In The Remote
Control Handset
WARNING : Remote control is battery included. A plas-
tic protector is used to disconnect the batteries in
order to prevent the battery life from reducing. Please
remove the plastic protector before the first use.
• Remove the battery cover located on the back of the
handset by gently pulling backwards from the indicated part.
• Insert two AAA/R03 or equivalent type batteries
inside. Place the batteries in the right directions and
replace the battery cover.
Note: Remove the battery from remote control hand-
set when it is not to be used for a long period.
Otherwise it can be damaged due to any leakage of battery.
Switching The TV ON/OFF
s
b
To switch the TV on:
Your TV will switch on in two steps:
1- Connect the power supply cord to the system.
Press Power On/Off button.Then the TV switches
itself to stand-by mode (Optional).
2- To switch on the TV from stand-by mode either:
Press a digit button on the remote control so that a
programme number is selected, or Press the "-P/CH"
or "P/CH+" button on the TV or press the “P-” or
“P+” button on the remote control, so that last mode
switched off is selected.
By either method the TV will switch on.
To switch the TV off:
• Press the “
trol or On/Off switch on the TV, so the TV will switch
to stand-by mode.
To power down the TV completely, press Power On/
Off button or unplug the power cord from the mains
socket.
(stand-by)” button on the remote con-
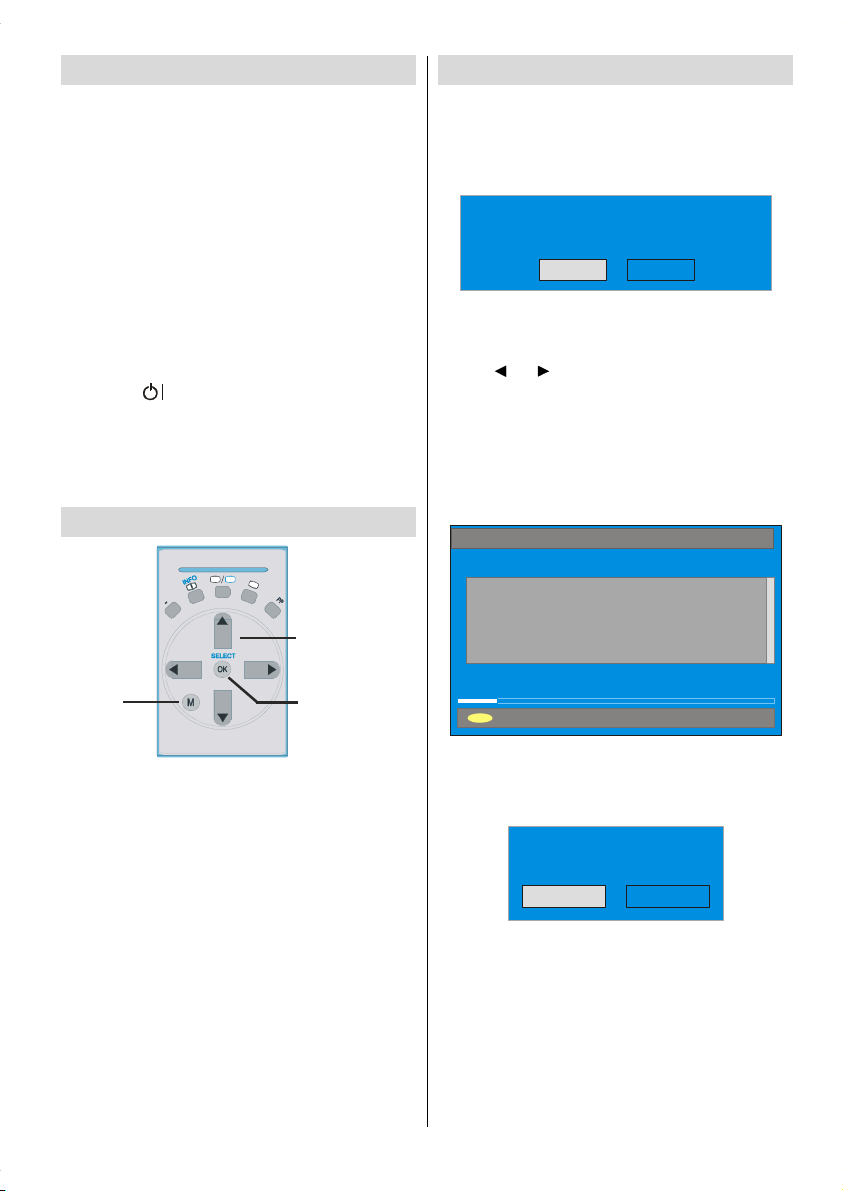
Navigating the Menu System
TV
DTV
A
I
I
I
V
For navigation
Initial Settings
When the TV is turned on for the first time, it is in the
digital mode.
Because this is the first time the TV is used, there are no
channels stored in the memory and the following message
appears on the screen.
Please ensure aerial is plugged in. Do you
want to start first time installation?
Yes No
• To start installation process, select “Yes”, to cancel
select “No”.
• To select an option “Yes or No”, highlight the item by
using
or buttons and press the “SELECT”
button.
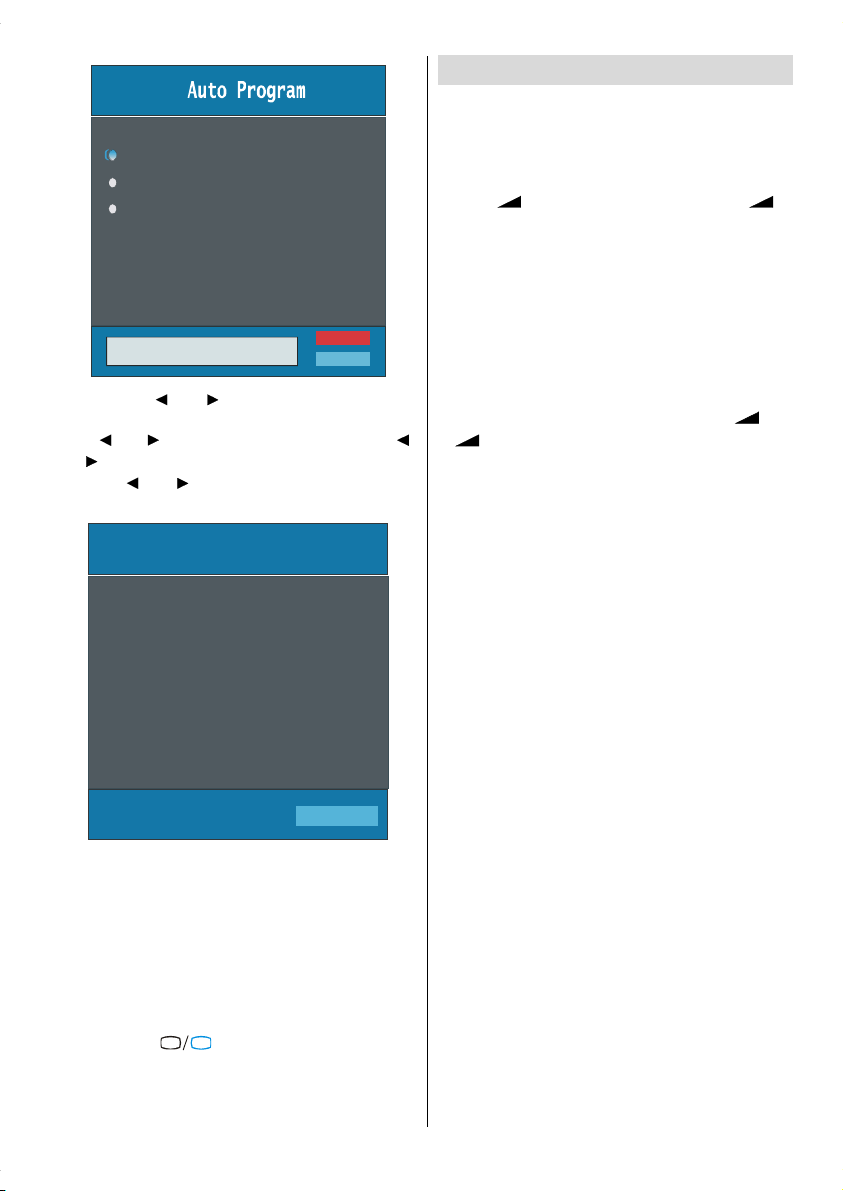
The IDTV will automatically tune to the UHF transmision
channels 21 to 68 looking for digital terrestrial TV broadcasts and displaying the names of channels found.
This process will take about five minutes. To cancel
searching, you can press the "M" button at any time
during the process.
AUTOMATIC SEARCH
Channels:
BBC ONE
BBC TWO
BBC CHOICE
For displaying
menu options
To confirm choice
1- Press M to display the menu.
2- Press “
“
3- Use “
4- Press “
” or “a” button to select an icon. Press
” for more options.
`
b
” or “a” button to highlight.
” or “`” buttons to change the settings.
_
Press OK to set as default.
5- To exit the menu or return from sub-menu screen,
press M.
These explanations are available for the navigation
of the whole Menu System. To select options that are
explained in the following parts, refer to “Navigating
The Menu System”.
English - 8 -
Searching UHF channels 30. Please wait. This will take a few minutes
12 %
MENU
Cancel searching
After Automatic Search process is completed, the
following message asking for analogue channel search
appears on the screen. TV switches to the analogue
TV mode.
Do you want to search for
analogue channels?
Yes
No
To seach for analogue channels, select “Yes”. The
menu below is displayed to search for analogue channels.
Country
y
b
Language
TXT Language
PLEASE CHECK ANTENNA CABLE
AUTO PROGRAMMING SYSTEM
German
Ok
Cancel
By pressing “ ” or “ ” button, adjust the Country
item and press “
” or “ ” button to set “Language”. Use “ ”
Use “
or “
” buttons to select “TXT Language” and set it
by using
” to highlight “Language” item.
” or “ ” buttons. Press “OK” button to
continue:
APS is running...
UK
P 03 - C 04
After APS is finalized, a programme list will appear on
the screen. In the programme list you will see the
programme numbers and names assigned to the
programmes.
If you do not accept the locations and / or the
programme names of programmes, you can change
them in Insall Menu. For details see “Install Menu”
section.
To display channel list in IDTV, switch to the IDTV via
TV
pressing the “
DTV
button to enter main menu, Channel List will be highlighted. Press the “SELECT” button to enter the menu.
63.75 MHz
6%
63.75 MHz
Cancel
” button. Then press the "M"
English - 9 -
Basic Operations
You can operate your TV using both the remote
control and onset buttons.
Operation with the buttons on the TV
Volume Setting
• Press “ -” button to decrease volume or “ +”
button to increase volume, so a volume level scale
(slider) will be displayed at the middle of the bottom
on the screen.
Programme Selection
• Press “P/CH +” button to select the next programme
or “P/CH -” button to select the previous programme.
Entering Main Menu
• Press the “MENU” button to enter Main menu. In the
Main menu select sub-menu using “P/CH -” or “P/CH
+” buttons and enter the sub-menu using “
+” buttons. To learn the usage of the menus,
“
refer to the Menu System sections (pages 10 or
16).
AV Mo de
Press the “TV/AV” button at the control panel on the
the TV to switch your TV to AV modes.
Operation with Remote Control
The remote control of your TV is designed to control
all the functions of the model you selected. The functions will be described in accordance with the menu
system of your TV.
Functions of the menu system are described in the
following sections.
Volume Setting
Press “ V +“ button to increase volume. Press “V -”
button to decrease volume. A volume level scale
(slider) will be displayed in the middle at the bottom of
the screen.
Programme Selection (Previous or next
programme)
• Press “P-” button to select the previous programme.
• Press “P+” button to select the next programme.
Programme Selection (direct access):
Press digit buttons on the remote control to select
programmes between 0 and 9. TV will switch to the
selected programme. To select programmes between
10 - 999 (for IDTV) or 10-99 (for analogue), press the
digit buttons consecutively which programme you
want to select (eg. for programme 27, first press 2
and then 7). When it is too late to press second digit
button only the first digit programme will be displayed.
The limit of the delay time is 3 seconds.
-” or
Press directly the programme number to reselect single
51 BBCi
SELECT
digit programmes.
Everyday Operation
TV
Pressing the “
ing television programmes will switch the TV set between displaying the digital terrestrial television broadcasting and its normal analogue broadcasting.
Information Banner
Whenever you change channel, using the “P-” / “P+”
button or the digit buttons, TV displays the channel
picture along with an information banner at the bottom
of the screen. This will remain on the screen for approximately three seconds. The information banner
can also be displayed at any time while watching TV
by pressing the “INFO” button on the remote control.
Now: 50/50
Next: Ace Lighting
1. BBC ONE
The information banner gives a number of facts on
the channel selected and the programmes on it. The
name of the channel is displayed, along with its channel list number and an indication of the strength of the
signal received on this tuning channel.
Hint
Not all channels broadcast the programme
data. If the name and times of the programmeis
not available then “No Information Available”
are displayed in the information banner.
Icons are also displayed in the information banner
and if this channel is a favourite channel:
Favourite channel icon
If the selected channel is locked, you must enter the
correct four digit code to view the channel.
Enter Lock Key
See page 11 for details.
DTV
” button at any time while watch-
09:25 - 11:00
11:00 - 11:25
Signal Level:
13:15
.
Electronic Programme Guide (EPG)
Some, but not all, channels send information about
the current and next events. Please note that event
information is updated automatically. If there is no event
information data available in channels, only channel
names with “No Information Available” banner is
displayed.
• Pressing the “GUIDE button again exits EPG menu.
• In EPG Menu, you can easily see the extended help
information by pressing “INFO” button and by pressing this button again you can close this window.
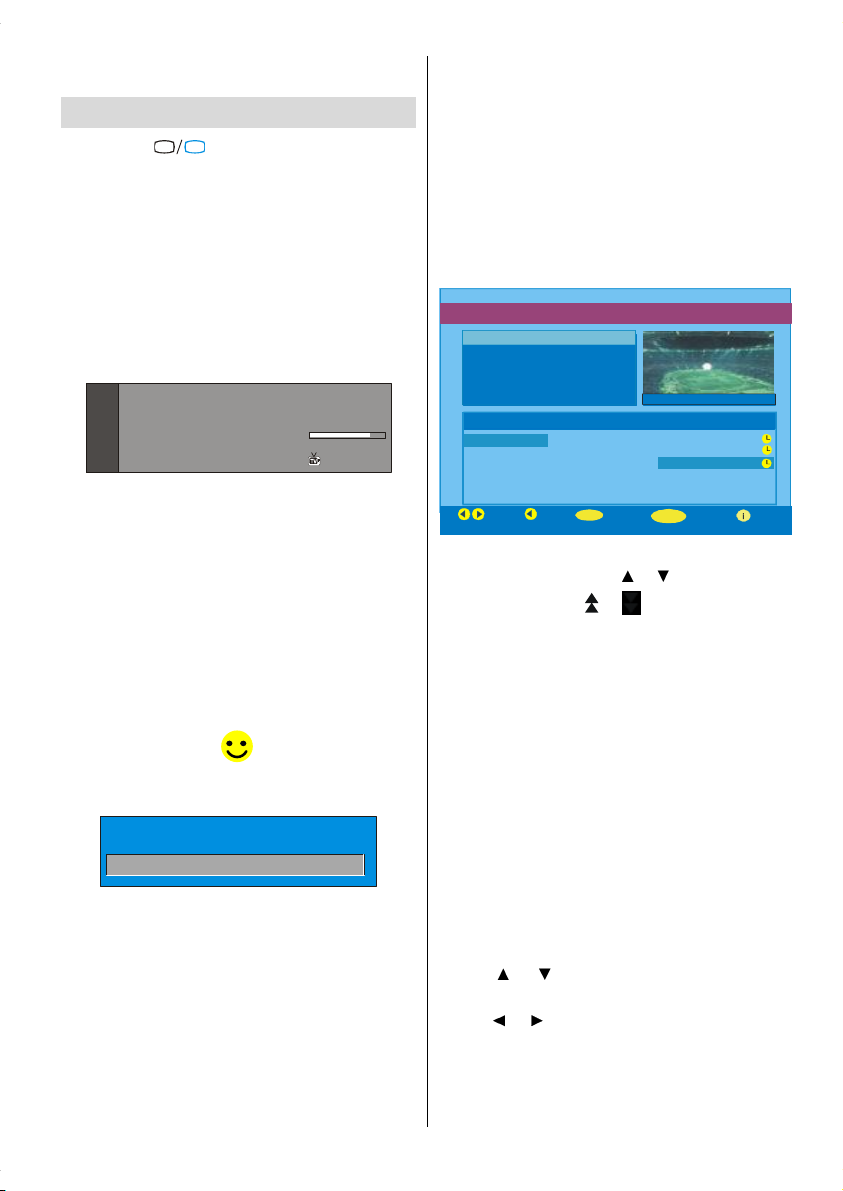
ELECTRONIC PROGRAMME GUIDE(Now&Next) Saturday 21/8 13:48
ITV News 14:00-15.00
Rolling national and international news
including breaking news as it happens,
business updates, sports results and
weather summaries.
Channels Current Programme Next Programme
30. CBBC Channel Chuckle Vision Tracy Beaker
40. BBC NEWS 24 BBC News BBC News
41. ITV News ITV News ITV News
50. Four Text No Information No Information
51. BBCi BBCi BBCi
Current Reminder
Navigate
• In the EPG Menu all channels are displayed. Current
channel is highlighted. Use
channels. Also press
or buttons to make page
up/down scroll for the channels.
• If you highlight an event, short event description,
extended event description, start and finish times of
event are displayed on the screen.
• When the current programme is highlighted, the box
is switched to the highlighted channel by pressing the
“SELECT” button.
• If you press the “SELECT” button when a next event
is highlighted, a reminder is set for the highlighted
programme and a clock appears across the highlighted
channel line.
Programme reminders can be set to signal that a
programme is about to start when you are watching
another channel. If you set reminder to a programme,
then you will be asked for switching to that channel
when the reminder time is reached.
• Press the “M” button to view the 7 day EPG.
• Press
or button to navigate in Channels or
Programmes.
• Press
or button to navigate through the chan-
nel and programme list.
7 Day EPG More
or buttons to change
English - 10 -
 Loading...