

Page 1
Montageanleitung
Mounting Instructions
Instructions de montage
Istruzioni di montaggio
Instrucciones de montaje
取付説明書
安装说明
安裝指導手冊
설치 지침
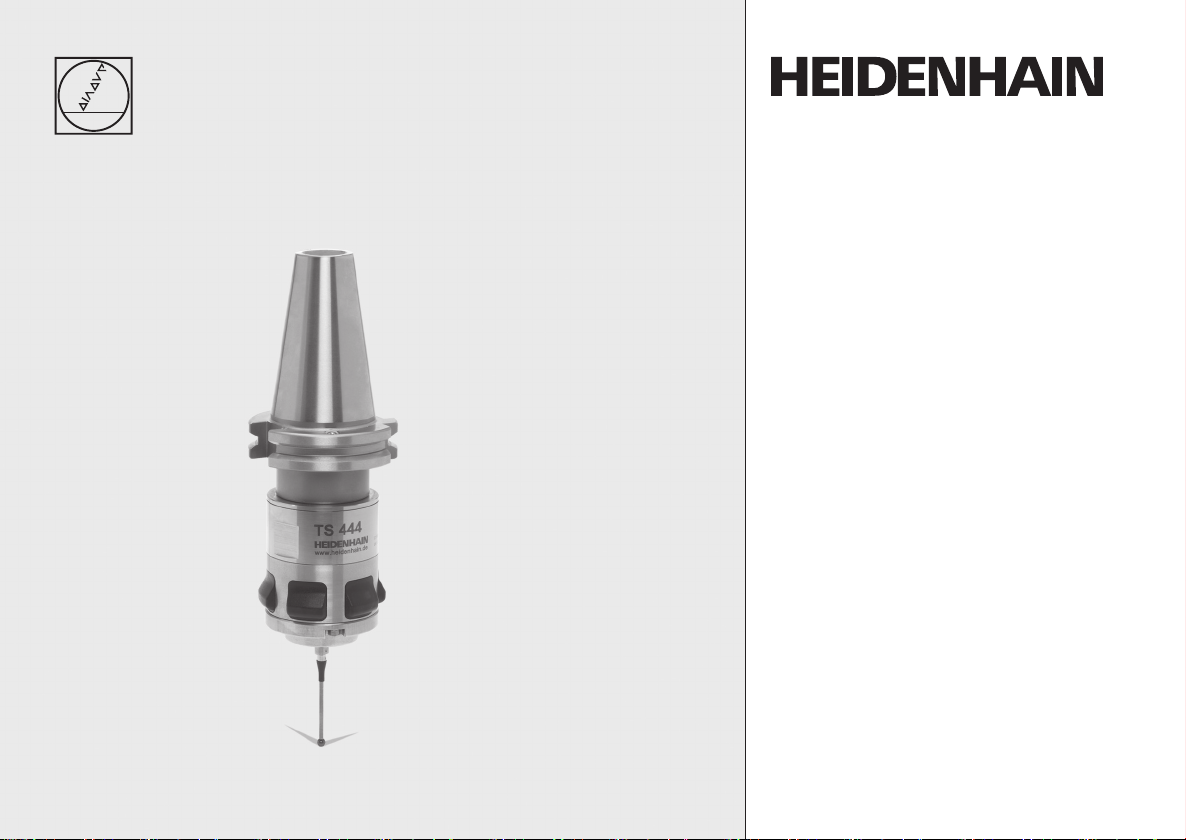
TS 444
4/2011
Page 2

Inhalt Seite
Contents
Sommaire
Indice
Índice
4 Warnhinweise
8 Lieferumfang
10 Abmessungen
12 Hinweise zur Inbetriebnahme
14 Kegeldemontage
16 Kegelmontage
20 Taststiftwechsel
22 Wartungshinweis
24 Zentrieren
28 Technische Kennwerte
30 Signalfolge
Page
4 Warnings
8 Items Supplied
10 Dimensions
12 Notes for initial setup
14 Dismounting the Taper
16 Taper Mounting
20 Stylus Exchange
22 Service note
24 Centering
28 Specifi cations
Signal Sequence
30
Page
4 Avertissement
8 Contenu de la fourniture
10 Dimensions
12 Remarques relatives à la mise en route
14 Démontage du cône
16 Montage du cône
20 Changement de la tige de palpage
22 Remarque sur la maintenance
24 Centrage
28 Caractéristiques techniques
30 Diagramme des signaux
2
Pagina
4 Avvertenze
8 Standard di fornitura
10 Dimensioni
12 Istruzioni per la messa in funzione
14 Smontaggio del cono
16 Montaggio del cono
20 Sostituzione dello stilo
22 Informazioni di manutenzione
24 Centraggio
28 Dati tecnici
30 Treno di segnali
Página
4 Notas de aviso
8 Elementos suministrados
10 Dimensiones
12 Indicaciones para la puesta en marcha
14 Desmontaje del cono
16 Monta je del cono
20 Cambio del vástago
22 Indicación para el mantenimiento
24 Centrado
28 Información técnica
30 Secuencia de la señal
Page 3

Contents Page
目次目次
目录目录
目錄目錄
목차목차
5 Warnings
9 Items Supplied
11 Dimensions
13 Notes for initial setup
15 Dismounting the Taper
18 Taper Mounting
21 Stylus Exchange
23 Service note
26 Centering
29 Specifi cations
31 Signal Sequence
ページページ
5 注意事項
9 梱包品
11 寸法
13 初期セットアップに関する注意事項
15 シャンクからの取外し
18 シャンクへの取付け
21 スタイラスの交換
23 メンテナンスに関する注意事項
26 センタリング(校正)
29 仕様
31 信号シーケンス
页
5 提示
9 零部件
11 尺寸
13 初始设置说明
15 拆下锥柄
18 安装锥柄
21 更换测针
23 保养说明
26 定心
29 技术参数
31 信号顺序
頁碼頁碼
5 警告
9 供應的項目
11 尺寸
13 初始設定注意事項
15 拆解刀把
18 安裝刀把
21 探針更換
23 服務事項
26 中心定位
29 規格
31 信號程序
페이지페이지
5 경고
9 제공 품목
11 규격
13 초기 설정 유의 사항
15 테이퍼 분해
18 테이퍼 설치
21 스타일러스 교체
23 서비스 노트
26 센터링
29 사양
31 신호 순서
3
Page 4
Warnhinweise
Warnings
Avertissement
Avvertenze
Notas de aviso
Achtung: Die Montage und Inbetriebnahme ist von einer Fachkraft für Elektrik und Feinmechanik
unter Beachtung der örtlichen Sicherheitsvorschriften vorzunehmen.
Note: Mounting and commissioning is to be conducted by a specialist in electricity and precision
mechanics under compliance with local safety regulations.
Attention: L'installation et la mise en service doivent être assurées par un spécialiste en électricité
et en mécanique de précision dans le respect des consignes de sécurité locales.
Attenzione: far eseguire montaggio e messa in servizio da un tecnico specializzato in impianti
elettrici e meccanica di precisione in ottemperanza alle disposizioni di sicurezza locali.
Atención: El montaje y puesta en marcha debe realizarse por personal especializado en electrónica
y mecánica de precisión y bajo estricto cumplimiento de las disposiciones de seguridad locales.
4
Page 5
Warnings
注意事項注意事項
提示提示
警告警告
경고경고
Note: Mounting and commissioning is to be conducted by a specialist in electricity and precision
mechanics under compliance with local safety regulations.
注意:取付け及び試運転は設置現場の安全規則のもとで電子機器および精密機械の専門家により
実施するようにしてください。
注意: 安装和调试任务只能由电气和精密机械专业技术人员并在符合当地安全法规要求的条件下
进行。
附註: 請由電子設備及精密機械的專業人員負責安裝及調機以符合當地安全法規。
유의사항: 설치 및 커미셔닝은 현지 안전 규정에 따라 전기 및 정밀 기계 분야의 전문가가 실시해
야 합니다.
5
Page 6
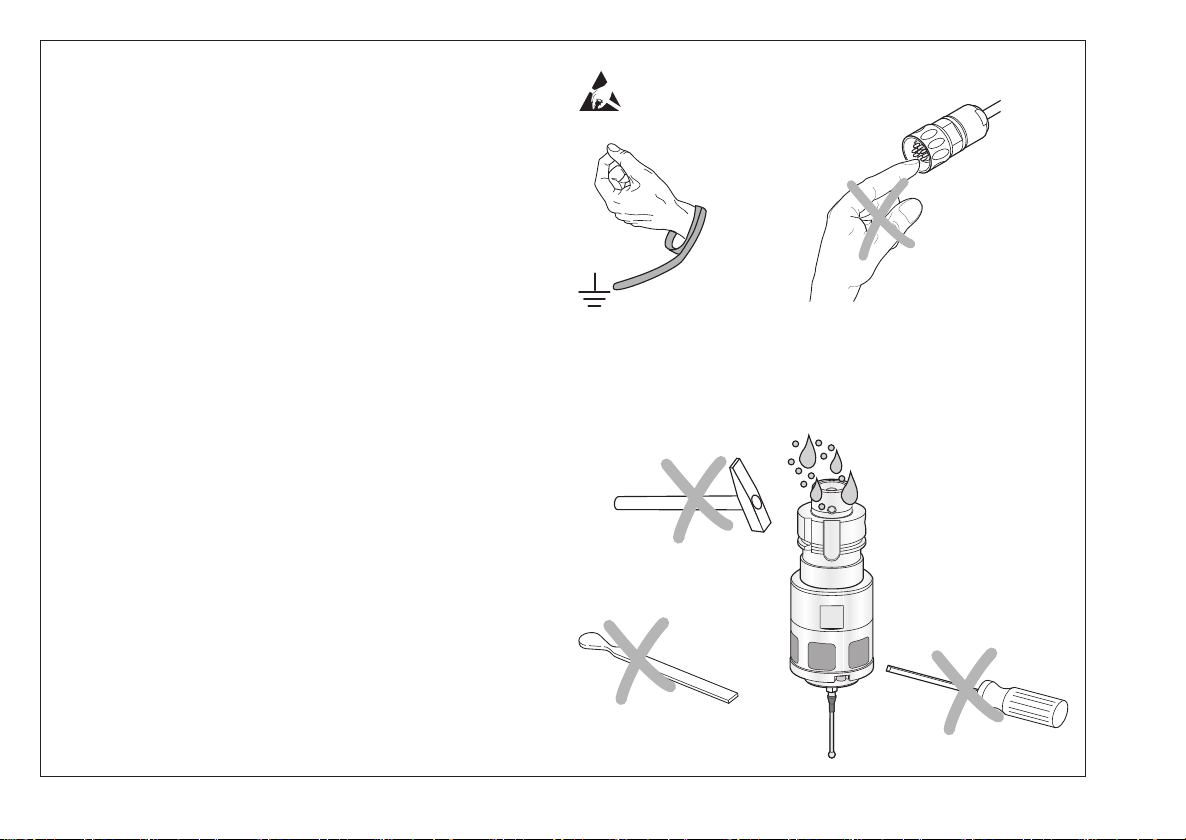
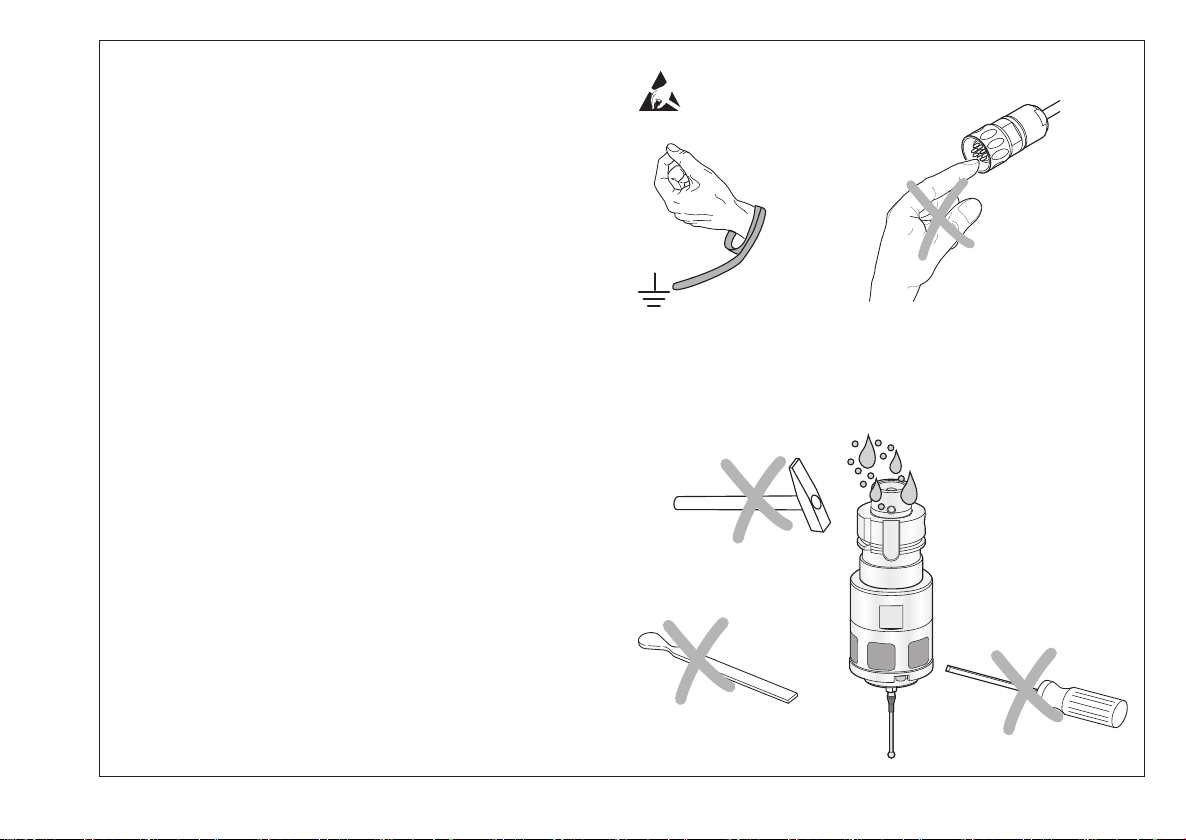
Tastsystem nicht fallen lassen.
Do not drop the touch probe.
Ne pas laisser tomber le palpeur.
Non far cadere il tastatore.
No dejar caer el palpador.
DIN EN 61340 5 1
DIN EN 61340
5
2
IP 67
EN 60 529
6
Page 7
Do not drop the touch probe.
タッチプローブを落とさないでください.
请不要使测头跌落.
探針請勿掉落.
터치 프루브를 떨어뜨리면 않됩니다.
DIN EN 61340 5 1
DIN EN 61340
5
2
IP 67
EN 60 529
7
Page 8
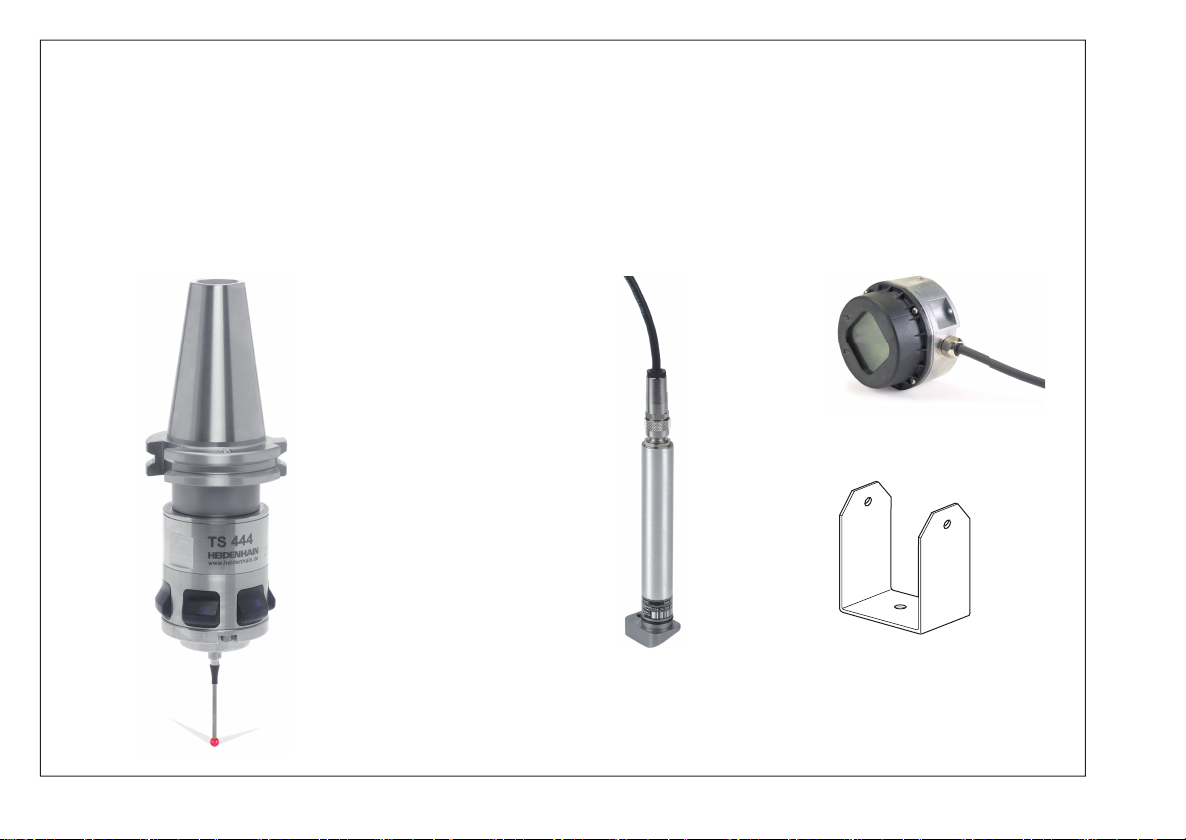
Lieferumfang
Items supplied To be ordered separately:
Objet de la fourniture Commander séparément:
Standard di fornitura Da ordinare separatamente:
Suministro Pedir por separado:
Separat bestellen:
TS 444 SE 540
ID 626 001-xx
8
SE 640
ID 631 225-xx
ID 370 827-01
Halter für SE 640
Holder for SE 640
Support de SE 640
Supporto per SE 640
Soporte para SE 640
Page 9
Items supplied
梱包品梱包品 別売品:
零部件零部件 需单独订购:
供應的項目供應的項目 須另外訂購的項目:
제공 품목제공 품목 별도로 주문하려면:
To be ordered separately:
TS 444 SE 540
ID 626 001-xx
SE 640
ID 631 225-xx
ID 370 827-01
Holder for SE 640
SE 640用ホルダー
SE 640支架
SE 640 安裝支架
SE 640용 홀더
9
Page 10
Abmessungen
Dimensions
Dimensions
Dimensioni
Dimensiones
mm
Tolerancing ISO 8015
ISO 2768 - m H
< 6 mm: ±0.2 mm
63
8.5
6.4
+30° Abstrahlbereich
+30° transmission range
+30° Plage de transmission
+30° Campo di irradiazione
+ 30º Campo de irradiación
M12 x 0.5
41
¬ 32.2
¬ 54.3
¬ 49
10
Page 11

Dimensions
寸法寸法
尺寸尺寸
尺寸尺寸
규격규격
mm
Tolerancing ISO 8015
ISO 2768 - m H
< 6 mm: ±0.2 mm
63
8.5
6.4
+30° transmission range
伝送範囲 +30°
+ 30°传输范围
+30°傳輸範圍
+30° 전송 범위
M12 x 0.5
41
¬ 32.2
¬ 49
¬ 54.3
11
Page 12

Hinweise zur Inbetriebnahme
Notes for initial setup Automatic compressed air supply from the spindle
Remarques relatives à la mise en route Amenée automatique d’air comprimé par la broche
Istruzioni per la messa in funzione Alimentazione aria compressa automatica dal mandrino
Indicaciones para la puesta en marcha
Das TS 444 wird ohne Batterien betrieben.
Die Energieversorgung erfolgt automatisch über die Druckluftzufuhr aus
der Spindel. Es wird keine speziell vorgereinigte Luft benötigt.
Bei Verschmutzung siehe Seite 22.
The TS 444 is operated without batteries.
Energy is supplied automatically via the compressed air supply from the
spindle. Specially pre-cleaned air is not required.
For contamination, see Page 22.
Le TS 444 fonctionne sans piles.
L’alimentation en énergie est automatique avec amenée d’air comprimé
par la broche. L’air comprimé n’a pas besoin d’éatre spécialement purifi é.
En cas de salissures, cf. page 22.
TS 444 funziona senza batterie.
L‘alimentazione di energia avviene automaticamente tramite aria
compressa attraverso il mandrino. Non è richiesta aria particolarmente
depurata.
Nel caso di impurità vedi pagina 22.
El TS 444 funciona sin baterías.
La energía se genera automáticamente mediante la alimentación de aire
comprimido del cabezal. No es preciso que el aire haya sido limpiado
previamente de forma especial.
En caso de contaminación, ver página 22.
Automatische Druckluftzufuhr aus der Spindel
Alimentación automática de aire comprimido del cabezal
12
Page 13

Notes for initial setup
初期セットアップに関する注意事項初期セットアップに関する注意事項 主軸から自動的に圧縮空気を供給
初始设置说明初始设置说明 用主轴自动提供压缩空气
初始設定注意事項初始設定注意事項 壓縮空氣由主軸自動提供
초기 설정 유의 사항초기 설정 유의 사항 스핀들로부터 자동 압축 공기 유입
The TS 444 is operated without batteries.
Energy is supplied automatically via the compressed air supply from the
spindle. Specially pre-cleaned air is not required.
For contamination, see Page 23.
TS 444は電池が必要ありません。
主軸から供給される圧縮空気を利用して稼動します。 特に清浄な空
気を必要としません。
耐環境性に関しては、23ページを参照してください。
TS 444不用电池工作。
用主轴的压缩空气自动提供动力。 空气不需要特别过滤。
有关污染信息,参见第23页。
TS 444 工作不需要電池。
能量由壓縮空氣由主軸自動提供。 不需要特別預先過濾的空氣.
汙染, 請参考23頁.
TS 444는 배터리 없이 작동합니다.
스핀들로부터 압축 공기가 유입되어 에너지가 자동으로 공급됩니다.
미리 정화된 공기는 특별히 필요하지 않습니다.
오염에 대해서는 23페이지를 참조하십시오.
Automatic compressed air supply from the spindle
13
Page 14

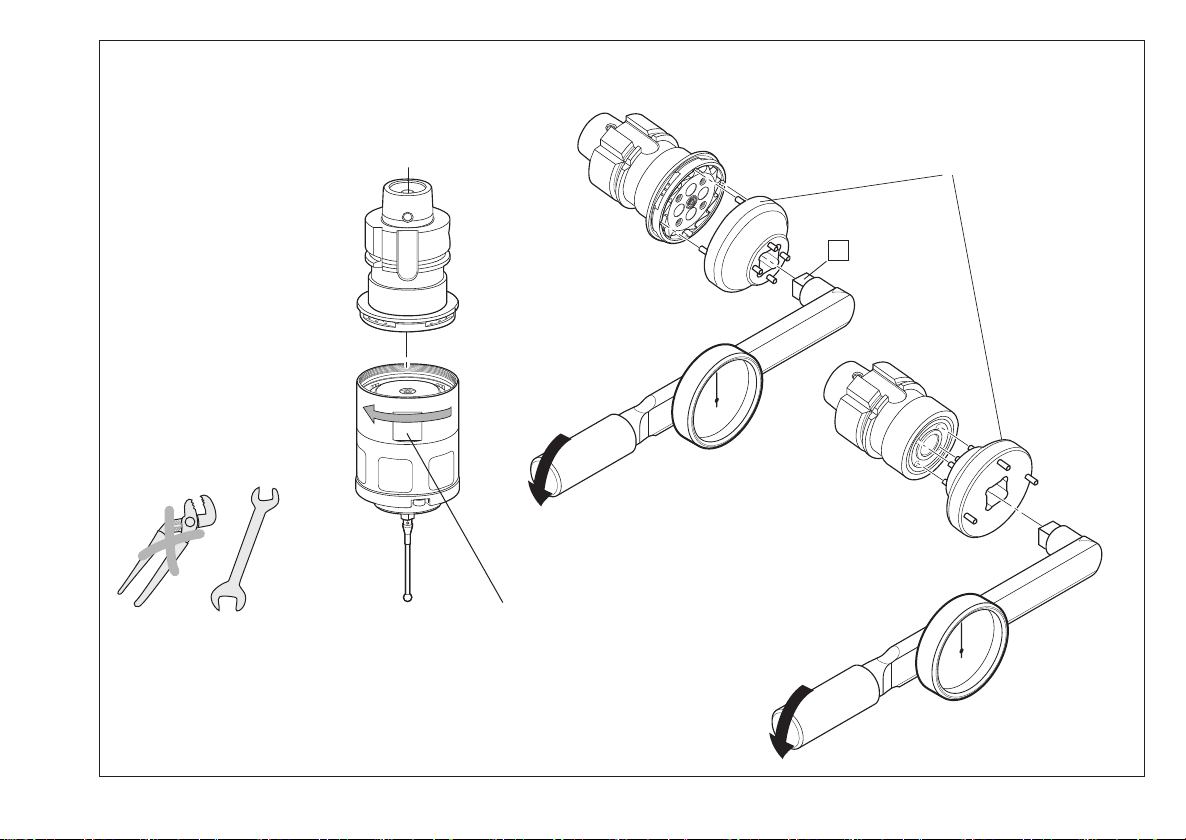
Kegeldemontage
Dismounting the Taper
Démontage du cône
Smontaggio del cono
Desmontaje del cono
ID 634 070-01
SW13
14
1.
SW46
2.
3.
TS 444 mit Maulschlüssel lösen
Loosen TS 444 with open-end wrench
Desserrer le TS 444 avec une clé plate
Allentare il TS 444 con l‘apposita chiave
Soltar el TS 444 con una llave plana
Page 15
Dismounting the Taper
シャンクからの取外しシャンクからの取外し
拆下锥柄拆下锥柄
拆解刀把 拆解刀把
테이퍼 분해테이퍼 분해
ID 634 070-01
SW13
1.
SW46
2.
3.
Loosen TS 444 with open-end wrench
TS 444 を分解する場合はスパナを用いてください。
用开口扳手松开TS 444
使用開口板手鬆開 TS 444
오픈 엔드 렌치로 TS 444 조임을 풉니다.
15
Page 16

Kegelmontage
Taper mounting
Montage du cône
Montaggio del cono
Montaje del cono
Zwischenring mit Kegel bündig verschrauben.
Kleber vollständig aushärten lassen.
(Aushärtezeit nach Herstellerangaben)
Screw the intermediate ring in until it is fl ush with the bottom edge of
the taper.
Let the adhesive cure completely.
(curing time according to the manufacturer‘s specifi cations)
Visser la bague intermédiaire de manière à ce qu’elle soit dans l’alignement du cône.
Laisser durcir complètement la colle.
(Durée de durcissement conforme aux indications du fabricant)
Avvitare il il cono con l‘anello intermedio.
Lasciare asciugare il collante.
(secondo i tempi indicati dal produttore)
Atornillar solidariamente el anillo intermedio con el cono.
Dejar endurecer totalmente el adhesivo.
(tiempo de endurecimiento según indicaciones del fabricante)
Gewinde mit Loctite 222/S8 sichern
Secure the thread with Loctite 222/S8
Freinage des fi letages avec Loctite 222/S8
Bloccare il fi letto con Loctite 222/S8
Asegurar la rosca con Loctite 222/S8
16
1.
0-0.1
Page 17

Gewinde mit Loctite 222/S8 sichern
Secure the thread with Loctite 222/S8
Freinage des fi letages avec Loctite 222/S8
Bloccare il fi letto con Loctite 222/S8
Asegurar la rosca con Loctite 222/S8
2.
Md = 10 Nm
3.
Md = 10 Nm
M12 x 0.5
8.5 mm
17
Page 18

Taper mounting
シャンクへの取付けシャンクへの取付け
安装锥柄安装锥柄
安裝刀把 安裝刀把
테이퍼 설치테이퍼 설치
Screw the intermediate ring in until it is fl ush with the bottom edge of
the taper. Let the adhesive cure completely.
(curing time according to the manufacturer‘s specifi cations)
テーパの下端と同じ高さになるまで中間リングを締付けてください
接着剤を完全に乾かしてください
(接着剤メーカーの仕様による養生時間)
拧入中间环使其与锥柄底沿平齐。 使粘合剂完全固化。
(有关固化时间,参见其制造商技术参数)
鎖住轉接環直到沒入刀把的底部邊緣。使得黏著程序完成。
(黏著時間參考製造商規格)
테이퍼의 아래쪽 가장자리와 같은 높이가 될 때까지 중간 링을 돌립니
다. 접착제를 완전히 건조시킵니다.
(건조 시간은 제작 업체의 사양을 따름)
Secure the thread with Loctite 222/S8
Loctite 222/S8でネジを固定してください
用Loctite 222/S8固定螺纹
使用螺絲固定劑 Loctite 222/S8 固定螺牙
Loctite 222/S8로 나사를 고정합니다.
18
1.
0-0.1
Page 19

Secure the thread with Loctite 222/S8
Loctite 222/S8でネジを固定してください
用Loctite 222/S8固定螺纹
使用螺絲固定劑 Loctite 222/S8 固定螺牙
Loctite 222/S8로 나사를 고정합니다.
2.
Md = 10 Nm
3.
Md = 10 Nm
M12 x 0.5
8.5 mm
19
Page 20
Taststiftwechsel
Stylus exchange
Changement de la tige de palpage
Sostituzione dello stilo
Cambio del vástago
Achtung: Neu zentrieren, siehe Seite 24 und 25
Note: Recenter, see pages 24 and 25
Attention: recentrage, voir pages 24 et 25
Attenzione: ripetere il centraggio, vedere pagina 24 e 25
Atención: centrar de nuevo, ver pág. 24 y 25
5 mm
¬ 1.5 mm
M3
Md = 0.4 ... 0.6 Nm
20
Page 21

Stylus exchange
スタイラスの交換スタイラスの交換
测针更换测针更换
探針交換探針交換
스타일러스 교체스타일러스 교체
Note: Recenter, see pages 26 and 27
注意: 再センタリング。26および27ページを参照ください。
注意: 重新定心时,参见第26和27页
附註: 重校中心, 請参考頁碼 26 及 27
유의사항: 재센터링은 26, 27페이지를 참조하십시오.
5 mm
¬ 1.5 mm
M3
Md = 0.4 ... 0.6 Nm
21
Page 22

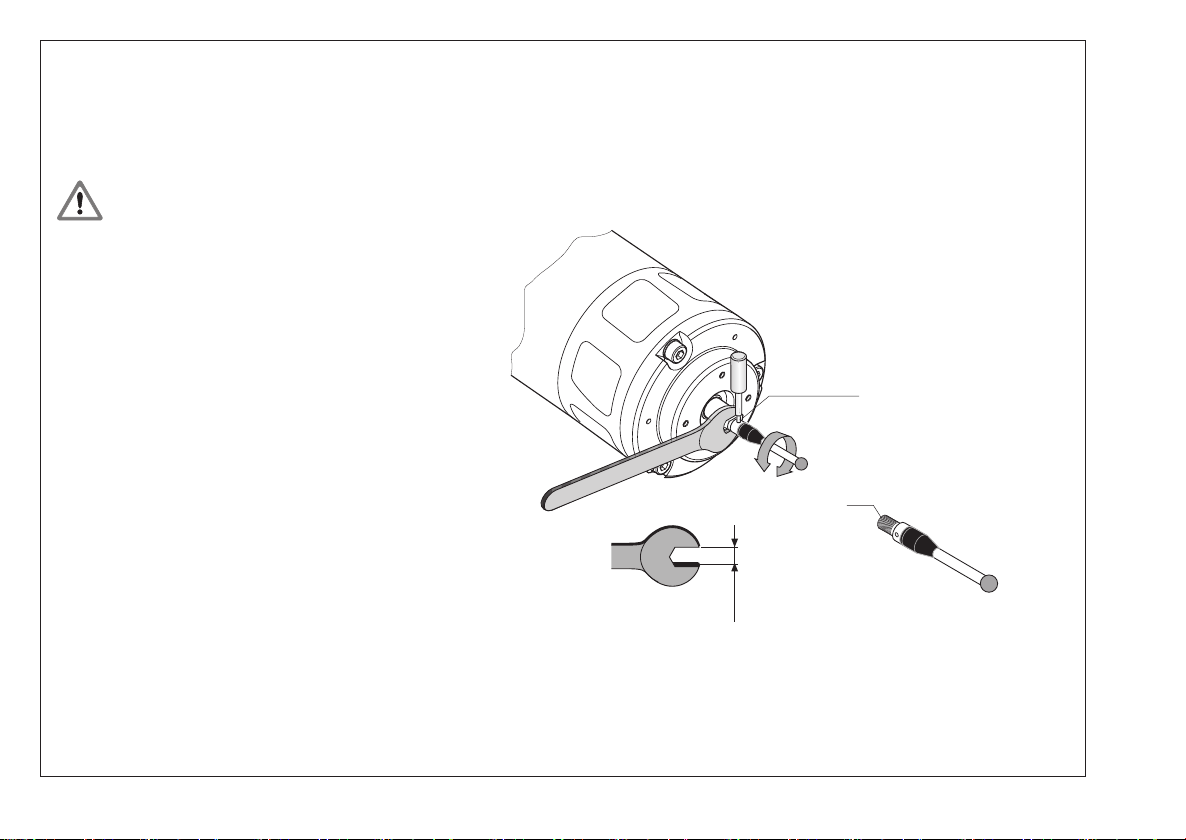
Wartungshinweis
Service note
Remarque sur la maintenance
Informazioni di manutenzione
Indicación para el mantenimiento
Wartungsfrei – Reinigungsmöglichkeit bei unzulässiger
Verschmutzung.
Maintenance-free – Cleanable in the event of impermissible
contamination.
Sans maintenance – Possibilité de nettoyer en cas de salissures
non autorisées.
Senza manutenzione – pulizia solo in caso di contaminazione.
Libre de mantenimiento – Posibilidad de limpieza en caso de
contaminación no admisible.
TS 444 mit Maulschlüssel lösen
Loosen TS 444 with open-end wrench
Desserrer le TS 444 avec une clé plate
Allentare il TS 444 con l‘apposita chiave
Soltar el TS 444 con una llave plana
SW46
22
Page 23

Service note
メンテナンスに関する注意事項メンテナンスに関する注意事項
保养说明保养说明
服務事項 服務事項
서비스 노트서비스 노트
Maintenance-free – Cleanable in the event of impermissible
contamination.
メンテナンスフリー 許容範囲外の汚れが発生してもクリーニング可能メンテナンスフリー 許容範囲外の汚れが発生してもクリーニング可能
免维护 – 严重污染时可清洁。免维护 – 严重污染时可清洁。
不需維護 - 但在不允許的污染事件是可清潔的。不需維護 - 但在不允許的污染事件是可清潔的。
허용되지 않는 오염 발생 시 정비가 필요하지 않으며 세척 가능합니다.허용되지 않는 오염 발생 시 정비가 필요하지 않으며 세척 가능합니다.
Loosen TS 444 with open-end wrench
TS 444 を分解する場合はスパナを用いてください。
用开口扳手松开TS 444
使用開口板手鬆開 TS 444
오픈 엔드 렌치로 TS 444 조임을 풉니다.
SW46
23
Page 24

Zentrieren
Centering
Centrage
Centraggio
Centrado
Elektronisch Zentrieren: in NC durch Umschlagmessung (Kalibrierring)
Electronic centering: In NC through probing from opposite directions
(calibration ring)
Centrage électronique: dans la CN via rotation à 180° (bague d'étalonnage)
Centraggio elettronico: tramite NC eseguire la tastatura su due punti
diametralmente opposti (anello di calibrazione)
Centrado electrónico: en NC a través del palpado en direcciones opuestas
(anillo de calibración)
24
Page 25

Mechanisch Zentrieren, nur nötig wenn keine elektronische Zentrierung möglich ist.
Mechanical centering. Only necessary if electronic centering is not possible.
Centrage mécanique, seulement si le centrage électronique n'est pas possible.
Centraggio meccanico: necessario solo se non è possibile il centraggio elettronico.
Centrado mecánico, sólo requerido si no existe la posibilidad del centrado electrónico.
3.
CU
0
Spindel oder Werkzeugeinstellgerät
Spindle or tool-setting device
Broche ou banc de préréglage d'outils
Mandrino o apparecchio di serraggio dell'utensile
Sistema de ajuste de la herramienta o del cabezal
1.
SW2.5
3 µm
+3 µm
F < 0.25 N
2.
360°
4.
Md = 2 ... 2.5 Nm
25
Page 26

Centering
センタリング(校正)センタリング(校正)
定心定心
中心定位中心定位
센터링센터링
Electronic centering: In NC through probing from opposite directions
(calibration ring)
電気的センタリング:反対方向からプローブしてNCに(校正リング)
电子定心: 用NC程序的探测功能进行相向探测(标准环规)
電子對心: 於 NC 機台上探測對應方向 (校正環規)
자동 센터링: NC의 반대 방향에서 프로빙(교정 링)
26
Page 27
Mechanical centering. Only necessary if electronic centering is not possible.
機械的センタリング 電気的センタリングが不可能のときのみ必要
机械定心。 只适用于不能进行电子定心时。
機械對心。 只有電子對心無效才需要。
기계식 센터링. 자동 센터링이 불가능한 경우에만 필요합니다.
0
CU
Spindle or tool-setting device
スピンドルもしくは工具設定機器
主轴或对刀仪设备
主軸或刀具設定設備
스핀들 또는 공구 설정 장치
3.
1.
SW2.5
3 µm
+3 µm
F < 0.25 N
2.
360°
4.
Md = 2 ... 2.5 Nm
27
Page 28

Technische Kennwerte
Specifi cations
Caractéristiques techniques
Dati tecnici
Características técnicas
v = max. 3 m/min
5 mm
2 s 1.0 µm, v = max. 1m/min.
F ~~ 1N
F ~~ 8 N
5 mm
Zustand des Tastsystems
Status of the touch probe
Etat du palpeur
Stato del sistema di tastatura
Estado del sistema de palpación
28
rot blinkend Tastsystem bereit, Taststift in Ruhelage
Red (blinking) Touch probe ready, stylus at rest
rouge clignotant Palpeur prêt, tige de palpage au repos
rosso lampeggiante sistema pronto, stilo in posizione di riposo
rojo parpadeando Palpador preparado; vástago en posición de reposo
Tastsystem bereit, Taststift ausgelenktrot Dauerleuchten
Touch probe ready, stylus defl ectedRed (permanently lit)
Palpeur prêt, tige de palpage déviéerouge permanent
sistema pronto, stilo defl essorosso permanente
Palpador preparado; vástago defl exionadorojo encendido continuo
Page 29

Specifi cations
仕様仕様
技术参数技术参数
規格規格
사양사양
v = max. 3 m/min
5 mm
2 s 1.0 µm, v = max. 1m/min.
F ~~ 1N
F ~~ 8 N
5 mm
Status of the touch probe
タッチプローブの状態
测头状态
接觸式探針狀態
터치 프로브의 상태
Red (blinking) Touch probe ready, stylus at rest
赤(点滅) タッチプローブ使用可能、スタイラスはフリーの状態
红色(闪亮) 测头就绪,测针在自由位置
紅色(閃爍) 接觸式探針備妥,探針已偏移
적색(깜박임) 터치 프로브 준비, 스타일러스 정지됨
Touch probe ready, stylus defl ectedRed (permanently lit)
タッチプローブ使用可能、スタイラスはワークを検知赤(点灯)
测头就绪,测针偏离自由位置红色(常亮)
接觸式探針備妥,探針已偏移紅色(持續發亮)
터치 프로브 준비, 스타일러스 굴절됨적색(계속 켜져 있음)
29
Page 30

Signalfolge
Signal sequence
Diagramme des signaux
Treno di segnali
Secuencia de la señal
W
typ. 3 s
D
typ. 1.5 s
D =
Druckluft
Compressed air
Air comprimé
Aria compressa
¡Aire comprimido
Störung
Fault
Perturbation
Guasto
Interferencia
30
B
£ 40 ms
S
t
R
£ 40 µs
t
W
³ 25 ms
£ 20 ms
t
£ 40 µs
R
Page 31

Signal sequence
信号シーケンス信号シーケンス
信号顺序信号顺序
信號程序信號程序
신호 순서신호 순서
W
D
typ. 3 s
typ. 1.5 s
D =
Compressed air
圧縮空気
压缩空气
壓縮空氣
압축 공기
Fault
異常発生時異常発生時
故障故障
故障故障
장애장애
B
£ 40 ms
S
t
R
£ 40 µs
t
W
³ 25 ms
£ 20 ms
t
£ 40 µs
R
31
Page 32

DR. JOHANNES HEIDENHAIN GmbH
Dr.-Johannes-Heidenhain-Straße 5
83301 Traunreut, Germany
{ +49 8669 31-0
| +49 8669 5061
E-mail: info@heidenhain.de
Technical support | +49 8669 32-1000
Measuring systems { +49 8669 31-3104
E-mail: service.ms-support@heidenhain.de
TNC support { +49 8669 31-3101
E-mail: service.nc-support@heidenhain.de
NC programming { +49 8669 31-3103
E-mail: service.nc-pgm@heidenhain.de
PLC programming { +49 8669 31-3102
E-mail: service.plc@heidenhain.de
Lathe controls { +49 8669 31-3105
E-mail: service.lathe-support@heidenhain.de
www.heidenhain.de
,B
632 757-92 · Ver01 · 3 · 4/2011 · E · Printed in Germany
 Loading...