


02259
Climber
CL 7.13-7.16-7.21
EDITION 2007

3

4
5
6
7
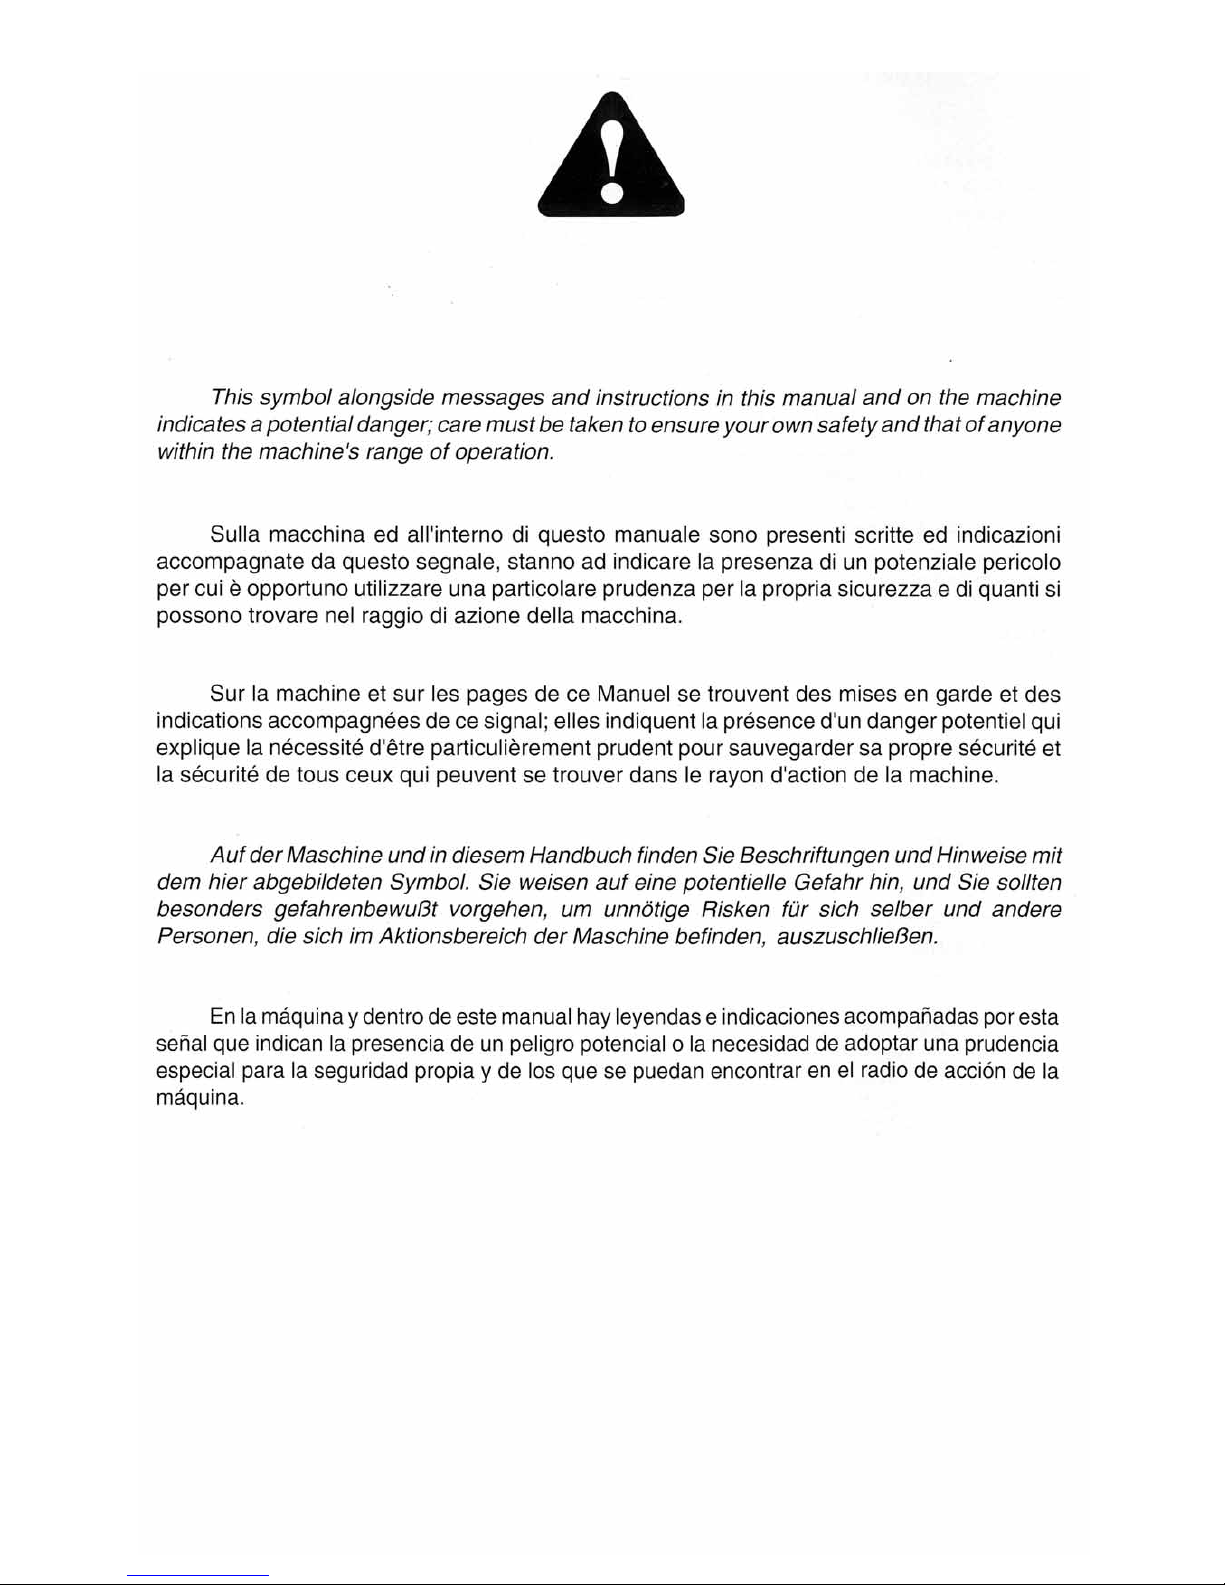
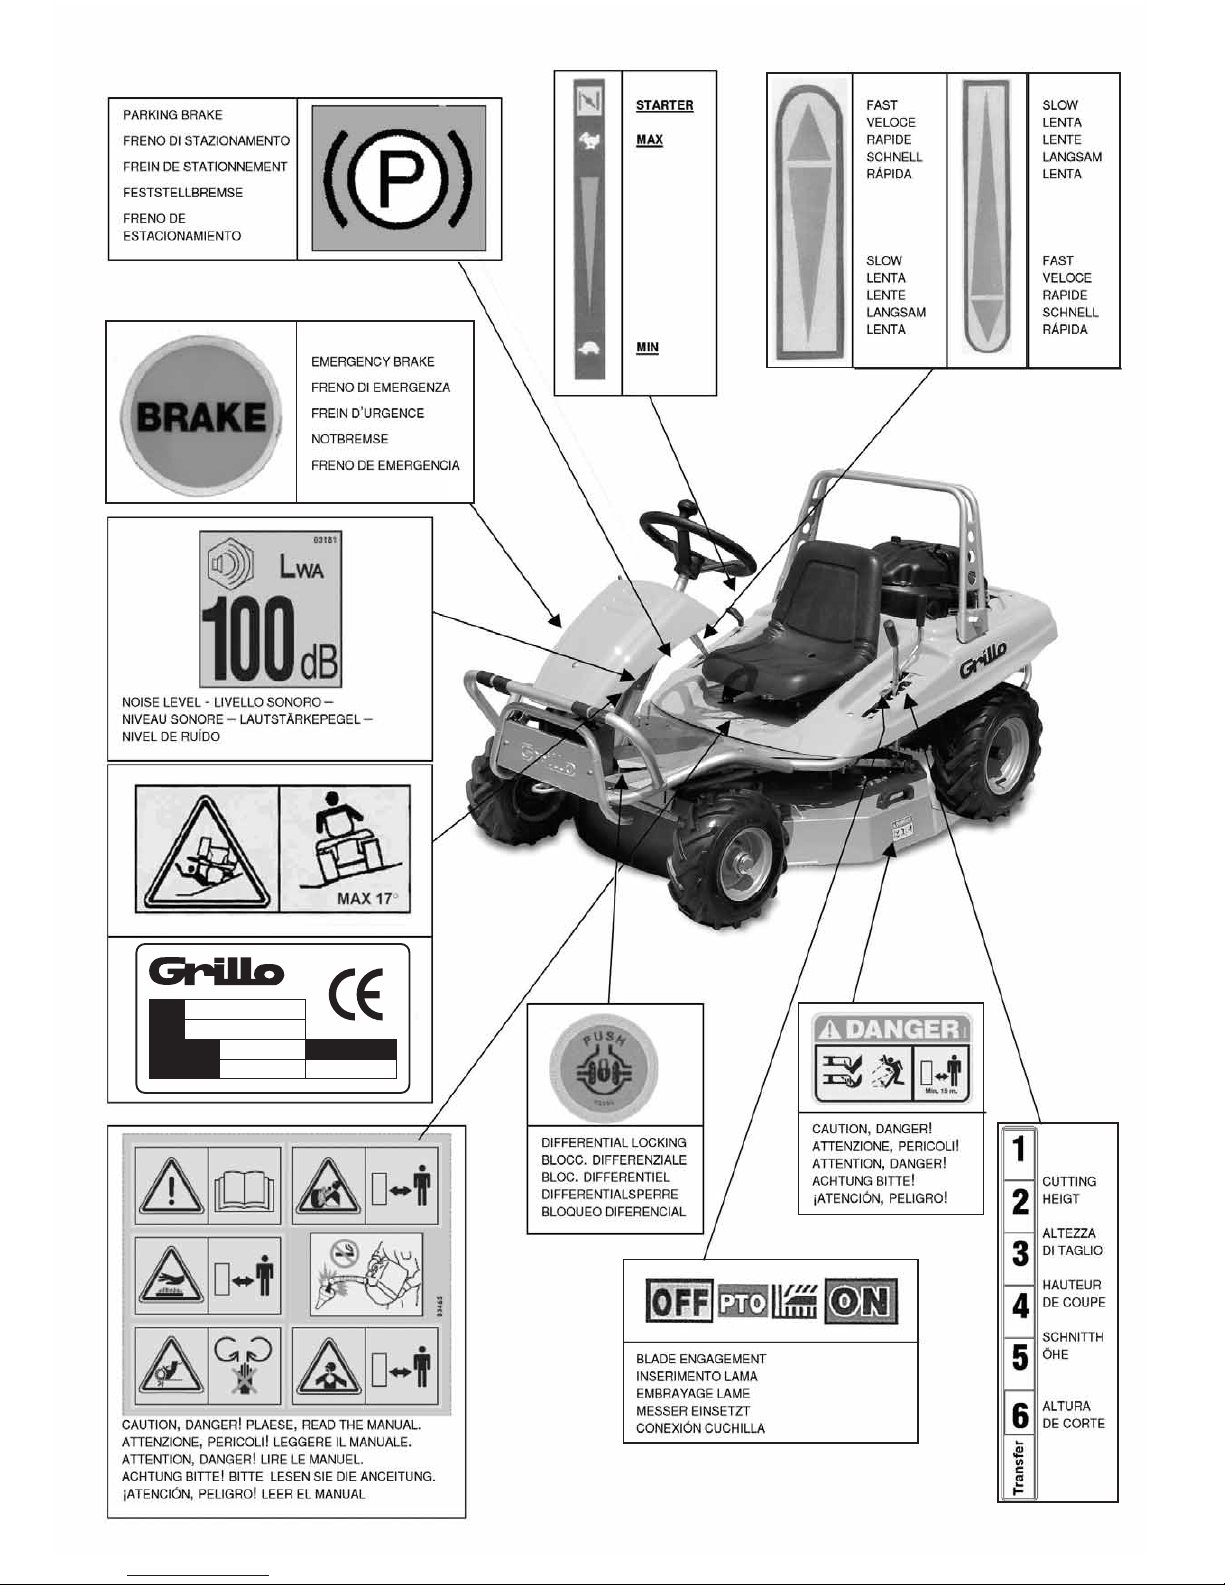
WARNING! SHARP PARTS. Keep hands and feet away. Do not operate the
mower over gravel or foreign bodies which may be sucked up and ejected by
the blades, generating a danger. Keep people away. remove the key and read
the instruction manual before attempting to carry out any maintenance or
repairs to the machine.
ATTENZIONE! ORGANO TAGLIENTE. Tenere lontano mani e piedi. Non lavorare
col rasaerba sopra alla ghiaia o corpi estranei che possono essere aspirati e
centrifugati dalle lame risultando molto pericolosi, tenere lontano le persone.
Togliere la chiave e leggere le istruzioni prima di effettuare qualsiasi operazione
di manutenzione e riparazione.
ATTENTION! ORGANE TRANCHANT. Eloigner les mains et les pieds. Ne pas
utiliser la tondeuse sur le gravier ou sur des corps qui peuvent être aspirés et
centrifugés par les lames et devenir très dangereux. Les personnes doivent se
trouver à une certaine distance. Enlever la clé et lire les instructions avant toute
opération de maintenance et de réparation.
ACHTUNG! SCHARFE KLINGEN. Hände und Füsse fernhalten. Beim Mähen
nicht über Schotter, Steine oder andere Fremdkörper fahren, da diese durch die
Drehbewegung der Messer angesaugt und weggeschleudert werden können
(Verletzungsgefahr). Nicht in der Nähe von anderen Personen mähen. Vor jedem
Wartungs- bzw. Reparatureingriff den Startschlüssel abnehmen und die
Gebrauchsanleitung durchlesen.
¡PELIGRO! ÓRGANO CORTANTE. Mantener lejos los pies y las manos. No
limpiar la herramienta con el motor en marcha, ¡Peligro! Expulsión de objetos:
mantener alejadas las personas. Atención: quitar la llave y leer las instrucciones
antes de efectuar cualquier operación de mantenimiento o reparación.
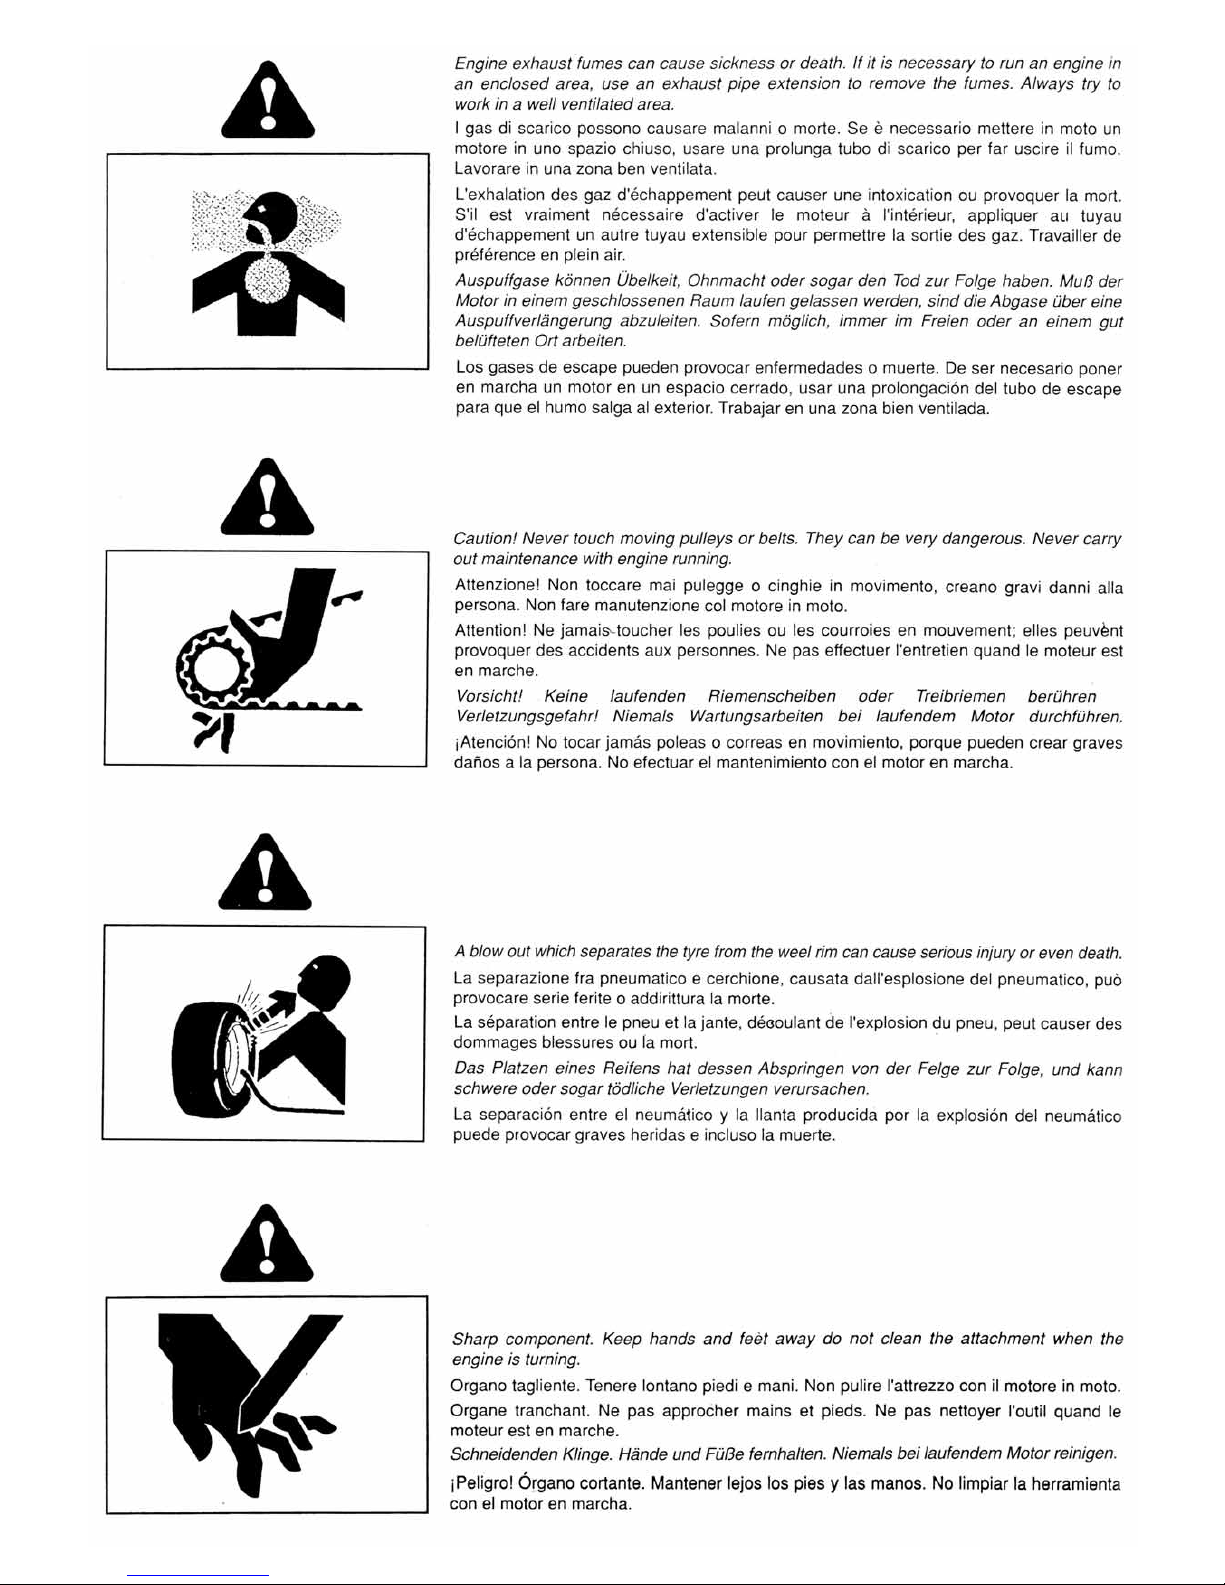
MAX 17°
DANGER! Machine rollover:
Do not use this machine on slopes greater then 17°.
PERICOLO! Ribaltamento della macchina:
Non usare questa macchina su pendii superiori ai 17°.
DANGER! Renversement de la machine:
Ne pas utiliser cette machine sur des pentes supérieures à 17°.
GEFAHR! Umstürzen der Maschine:
Die Maschine nicht an Hängen mit einer Neigung über 17° einsetzen.
¡PELIGRO! Volcado de la máquina:
No utilizar esta máquina en pendientes superiores a 17°.
8
CLIMBER
tipo
serie
massa c.a.
anno
KW/giri minuto
S.p.A.
CESENA - ITALY
000000
03782

9
“GRILLO CLIMBER” HYDROSTATIC TRACTOR MOWER
Dear Customer,
thank you for choosing the Grillo CLIMBER. We hope that this new tractor mower will perfectly meet your
requirements.
For best use and maintenance over time, please carefully read and follow the instructions given in this manual. This
will enable you to get top results from your mower and will prevent avoidable expense.
Please look after this manual which should always be kept with the machine.
WARNING! Read carefully before starting the engine.
These instructions are vital to avoid accidents!
SAFETY RULES
Caution is the best tool for accident prevention.
You are urged to read the following instructions for use of the mower before starting work.
Incorrect use of the mower and its equipment may cause damage. To reduce this risk, follow the precautions
given below:
1) Read the whole of this manual before starting up the mower and setting it into motion.
2) Pay particular attention to the warnings and safety labels on the mower.
3) The rotating blades of the mower are highly dangerous. Never place your hands or feet under the mower.
4) Before allowing others to use the mower, inform them of the safety rules and carefully instruct them on how
to use the machine.
5) Before starting up the mower, make sure that there is nobody nearby, and particularly that there are no
children in the vicinity.
6) Before starting to reverse the mower, make sure that there is nobody and no obstacles behind.
7) Do not allow passengers on the mower.
8) Never use the mower if you are tired, and do not use after drinking alcohol.
9) Check the land before starting mowing. Make sure that there are no stones, sticks or other foreign bodies
that may damage the machine or be thrown a long way, creating a danger to anybody in the vicinity.
10) Before starting work, put on suitable working clothes, gloves, strong shoes and protective glasses.
11) Before getting off the mower, turn off the engine, turn off the PTO, remove the ignition key and set the cutting
deck in the lowest position.
12) This machine cannot be driven on public roads.
13) Travel at low speed along rough tracks.
14) Reduce speed when travelling down steep slopes.
15) Do not allow children to operate the machine: use is prohibited under the age of 16.
16) Do not reverse at high speed.
17) It is dangerous to move the steering wheel abruptly when the engine is running at top speed.
18) While working, never operate the start and reverse pedals abruptly.
19) To avoid the danger of inhaling toxic fumes, do not turn on the engine in closed areas.
20) Before starting the engine, fill up the tank with fuel, do this outdoors.
Always turn off the engine before filling up with fuel. Keep away from sparks and naked flames and
do not smoke!
Do not remove the fuel tank cap when engine is hot.
Replace the fuel and container cap securely.
21) Do not allow the fuel to overflow. After filling the tank, clean off any spills on the mower before starting up the
engine: do not cause any injection sources with the gasoline vapours poured are dispersed.
22) Do not use the mower near ditches or embankments that may give way under the weight of the mower,
particularly when the surface is broken or wet.
23) When driving downhill, always take curves gently.
24) Do not tamper with or disable the safety devices. Never use the machine without guards, with the guards
damaged or without safety devices.
25) Before moving on surfaces different from grass, disengage the blade.
26) Never work on gravel with the mower as the gravel will be taken in and spun by the blades, creating a severe
hazard.
27) If you have children, always hide the ignition key when the mower is not in use.
28) Do not perform any kind of adjustment or cleaning operation with the engine running.
29) Do not allow another person to check the machine while you are sitting in the driving seat with the
engine running.

10
30) Do not rest heavy weights on the driving seat. This could disable the start-up safety device.
31) The user is always responsible for damages caused to third parties.
32) If the machine is used incorrectly, the guarantee will be annulled and the manufacturer will disclaim all
responsibility.
33) Only use the mower with the stone guard.
34) Deformed or damaged blades must always be changed. Never attempt to repair them.
35) Always use original Grillo spare parts.
36) Towing loads over 100 kg is forbidden (max. slope 6%).
37) Cut only in sunlight or with good artificial light.
38) Never stop when working on uphill or downhill slopes.
39) If you have to empty the fuel tank, do this outdoors.
40) CAUTION: to reduce the risk of fire, keep the engine compartment, the exhaust pipe, the exhaust manifolds,
the battery, the tank area and the fuel pipeline free from grass, leaves, dust, etc.
41) Never store the machine inside a building where fuel vapours may reach flames, sparks or bare electrical
wiring.
42) Replace worn or damaged exhaust pipes.
43) Store fuel in containers specially constructed for this purpose.
44) Take care when working close to a road.
45) Never change the engine settings, especially the max. rpm.
46) In case of machine vibration or by collision with a foreign body, disengage the blade, stop the engine,
disconnect the spark plugs, remove the ignition key and inspect the mower.
47) Allow the engine to cool before placing the machine indoors.
IDENTIFICATION AND TECHNICAL ASSISTANCE
IDENTIFICATION
The Grillo CLIMBER CL 7.13, CL 7.16, CL 7.21 has a label on the
steering column indicating the machine’s serial number.
TECHNICAL ASSISTANCE
This manual provides instructions for use and basic maintenance of the mower by the user.
For operations that are not described in this manual, contact your Area Dealer.
SPARE PARTS
Only use original spare parts. These are the only parts that ensure safety and interchangeability.
Always quote the machine’s serial number and the code number of the part to be replaced when ordering spare
parts.
For engine parts, follow the indications given in the specific manual.
GUARANTEE
The guarantee is provided according to the terms indicated on the guarantee card.
For the engine and the battery, the provisions of the relative manufacturers apply.
RECOMMENDED LIST OF SPARE PARTS TO BE KEPT IN STORE
2 x mowing blades
2 x blade screws
2 x blade screw nuts
1 x set of belts
1 x air filter for engine
1 x oil filter for engine
1 x throttle cable
2 x wiring system fuses
CLIMBER
tipo
serie
massa c.a.
anno
KW/giri minuto
S.p.A.
CESENA - ITALY
000000
03782
15.5/3000

11
TECHNICAL DATA
ENGINE:
7.13 - B&S VANGUARD 13,5 hp (10 kW) OHV, single-cylinder, internal combustion, 4-stroke, AVS synchro-
balanced series.
7.16 - B&S VANGUARD OHV 16 hp (13 kW), twin-cylinder, internal combustion, 4-stroke series.
7.21 - B&S VANGUARD OHV 21 hp (15.5 kW), twin-cylinder, internal combustion, 4-stroke series.
HOURLY CONSUMPTION: 3 lt/h – 7.13 / 3.5 lt/h – 7.16 / 3.8 lt/h – 7.21.
STARTING SYSTEM: electric, with battery 12V.
GEARBOX: hydrostatic transmission.
DIFFERENTIAL: with locking device.
CLUTCH: for PTO with V-belt.
GROUND SPEED: from 0 to 9 km/h with continuous variation and reverse from 0 to 4 km/h.
TYRES front: 13x5.00-6; rear: 16x 6.50-8.
BRAKE: front emergency brake; rear parking brake.
OPERATOR SEAT: sprung und adjustable, fitted with roll bar.
CUTTING DECK: side/rear discharge.
CUTTING SYSTEM: single rotating blade.
CUTTING WIDTH: 780 mm – 7.13 / 850 mm – 7-16 &7.21
BLADE SPEED: 70 m/sec.
CUTTING HEIGTH: from 35 mm to 85 mm, 6 cutting positions and 1 for travelling.
WORK CAPACITY: 4800 m
2
/h (indicative) – 7.13 / 6.000 m2/h (indicative) – 7.16 & 7.21
STEERING RADIUS: 485 mm.
FUEL TANK: 7 lt, RESERVE: 1 lt.
TOWING BAR: as a standard.
IMPLEMENTS: garden wheels set.
SIZES: W900xL1895xH975mm.
WEIGHT: • 225 kg – 7.13 / • 235 kg – 7.16 / • 245 kg – 7.21.
PUTTING THE MACHINE INTO SERVICE
1) Check that the machine has not been damaged in transit.
2) Check the oil levels of the engine, hydrostatic transmission and final drive.
3) Check the tyre pressure:
4) 1 BAR front wheels 13 x 5.00-6
5) 1.2 BAR rear wheels 16 x 6.50-8.
6) Check the battery voltage; it must be at least 12 Volts. Charge if necessary.
7) IMPORTANT!!! During assembly take care not to reverse the polarity of the battery.
8) Fix the steering wheel taking care the key is properly inserted and the screw is tight enough (tightening torque
2 KgF.m [20 N.m]).
9) Fit the muffler, the rear bumper and the roll bar.
RUNNING IN - CAUTION!!
Change the engine oil and filter after the first 5 working hours.
Check that there are no oil leaks or slack screws, especially those which fix the blade and the steering.
INSTRUCTIONS FOR USE
Before starting up the engine, always check that:
– the travel lever is in the idle position (fig. 3);
– the engine oil level is correct (fig. 4);
– the engine cooling intake grilles are clean (fig. 4);
– air filter is clean (fig. 8).
– the mowing deck is clean;
– the hydraulic motor fins are clean (fig. 5);
– the blades are sharp and firmly fastened in place;
– the screw in the centre of the blade hub is safety tightened (3, fig. 9)
– the oil in the hydraulic axle is at the correct level (fig. 5); the correct level is 12 mm underneath the bottom of
the tank (fig. 6);
Fill the fuel tank using a funnel with very fine filter (4, fig. 10).
Adjust the seat by using the lever fig. 11.

12
STARTING UP THE ENGINE
– Push the throttle half way in (5, fig. 3)
– If the engine is cold, use the choke (6, fig. 3). Turn the ignition key (1, fig. 1).
– Once the engine has started, turn off the choke and wait for a few minutes to allow the engine to warm up.
N.B. When travelling with the mower from one place to another, you are advised to keep the cutting deck at the
maximum height setting.
STARTING WORK
– Choose the desired cutting height by means of the lever 8 fig. 2. Suitably accelerate the engine and engage the
PTO lever (1, fig. 2). Gently operate the forward travel lever (2, fig. 3) and start work. To stop, return the forward
travel lever to the stop position.
– The lever (2, fig. 3) is also used to reverse. When it is moved back, the machine moves backwards; always
operate it gently.
FRONT BRAKE
The front brake (4, fig. 1) must be used only as emergency brake, sloping down in order to avoid the machine sliding.
If you use it together with the differential lock, the machine is steadier, above all in slope conditions. In normal
conditions, to slow down and brake you need only to use the feed lever.
In order to adjust the cables you have to operate on the adjusters fig. 26.
PARKING BRAKE
To engage the parking brake lift the loop up 10, fig. 3 and hook the lever.
To adjust the parking brake use the register (fig. 5).
DIFFERENTIAL LOCKING
The differential locking pedal is the one indicated in fig. 1 no. 5.
Press the differential locking pedal in case of driving-wheels skidding. It is advisable to use the locking also
sloping down and in steep slant to keep both the driving-wheels in adhesion.
Attention! Do not use the differential locking when bending.
In case of disengagement, keep lubricate with grease the coupling and the drive-chains (fig. 27).
USEFUL RULES FOR EFFICIENT USE
1) Never strain the engine: when fumes are emitted from the exhaust it means that it is being strained. Slow down.
2) Do not leave the machine out in the rain.
3) Frequently sharpen the mower blades: the cut will be better and the engine will not be strained as much.
4) Check the land before mowing to make sure that there are no stones, sticks or foreign bodies.
5) Keep the engine at peak rpm during mowing, adjust the speed according to the height of the grass.
6) Keep the grilles above the engine and the cooling fins of the hydraulic motor (fig. 4 - 5) clean.
CUTTING POSITIONS
The cutting position is adjusted using the lever 8 fig. 2.
The deck can be set in 4 different cutting positions from 35 to 80 mm and one travel position in which the blade
disengages automatically. In case of uneven ground, humps or dips, the deck should be kept in the highest cutting
position to prevent knocks by the blade.
SLOPING GROUND
If possible, steep slopes must be mown in the up/down direction, taking great care when turning that the wheels
upstream do not strike obstacles (stones, branches, roots, etc.) which might cause the machine to overturn, or lead
to loss of control. Assess the conditions and take care if the ground and grass are damp since the machine might
slip. Downhill, set off at low speed and do not pass over dry or cut grass since the wheels lose grip; please remember
that if you engage the differential lock and eventually the front emergency brake (4, fig. 1) the machine is steadier.
INTERVENTION OF SAFETY DEVICES
Remember that the engine will stop whenever:
– The operator gets up from the seat.
The engine will not start up if:
– The blade is engaged.
– Nobody is sitting in the driver’s seat.
– If the forward lever isn’t at STOP setting.

13
MAINTENANCE AND LUBRICATION
CAUTION
Remove the key and disconnect the plug before performing any cleaning, maintenance or repair operation.
Always wear suitable clothing and working gloves.
IMPORTANT!
Protect the environment: carefully dispose of used oils, petrol and any other pollutant product!
Efficient maintenance and correct lubrication help keep the machine in perfect working order.
ENGINE
For the lubrication intervals, follow the instructions provided in the engine handbook; in all cases the oil must be
changed after the first 5 working hours, and then every 50 hours or every season, together with the oil
filter (fig. 12, oil drain plug; please, use a second key in the fixing part).
Replace the engine oil filter (fig. 13).
The first precaution is to ensure that the engine is correctly serviced with the air filter, cooling fins and cylinder
head clean and the oil at the correct level.
Check the air filter every 4 hours, or even more often in very dusty environments.
Check the engine cooling intake grille (fig. 4).
HYDROSTATIC AXLE
With the engine cold, check the expansion tank (fig. 5); it must be empty.
Clean the hydraulic motor cooling fans often, every 4 working hours in summer when conditions are very dusty (fig. 5).
Replace oil after the first 50 working hours, then every 200 hours, use 10W30 engine oil; quantity: 1.85 lt, for
replacing follow the instructions given:
1) remove the two plugs fig. 14;
2) remove the plug using a screwdriver fig. 15;
3) screw the two caps fig. 14 (tightening torque 13-17 N.m);
4) add oil, fix the cap fig. 15;
5) make sure the expansion tank is empty, the correct oil level is 12 mm underneath the bottom of the expansion
tank, fig. 6.
FRONT WHEEL AXLE
Grease the wheel pivot pins (fig. 16) every 20 hours.
Lubricate the steering joints.
Lubricate the bushing in the belt stretcher of cutting deck- engine belt (fig. 16/A).
AIR FILTER
Check the air filter every 4 hours, or more frequently if working in a very dusty environment (fig. 8).
CHECKING THE BLADES AND CUTTING DECK
A blunt blade tears the grass, leaving it unattractive. The cutting edges of both blades must be sharpened. To
remove a blade, take hold of it firmly, wearing work gloves, and unscrew the central screw, remembering that the
screw has a right-hand thread (3 fig. 9). Sharpen both cutting edges using a medium-grain grinding wheel and check
that the blade is balanced by standing it on a round bar inserted in the central hole.
Fit the two cutting blades following the diagram in fig. 9.
CAUTION!
Tighten the fixing screw (3 fig. 9) firmly.
Always replace damaged or crooked blades; never attempt to repair them! When fitting, always follow the diagram fig. 9.
ALWAYS USE ORIGINAL BLADES! If they are worn they can be turned round since they have two cutting edges.
Always check that the blade bolts are not worn or damaged.
ADJUSTING THE CUTTING DECK
Levelness of the cutting deck is essential in order to obtain an evenly mown lawn.
Park the mower on a flat surface and check that the tyre pressure is correct. Adjust the 4 adjustment devices (fig.
17 - 17/A), so that the edge of the cutting plate is at the same distance from the floor, 100 mm, on both sides (with
the operator sitting on board and the cutting deck in the position no. 1, fig. 18/A).
If you are unable to level off the deck, contact an Authorised After-Sales Service Centre.

14
BLADE - ENGINE BELT
To adjust the belt tension operate on the register (fig. 18).
If the belt becomes twisted or comes off, make all the checks and adjustments stated below, keeping the deck at
the lowest position.
Take care when positioning the belt guides; move them towards the belt, checking the deck at the various height
settings (fig. 19 ref. A).
HYDROSTATIC AXLE - ENGINE BELTS
These belts are self-adjusting and do not require any adjustment. Simply check the spring tension. To replace
the belts, release the tension spring (fig. 20).
BLADE ROTATION
Rotation is started and stopped using the lever 1 fig. 2.
When rotation is engaged, the engine must be running at medium rpm and the machine must not be in the grass
for cutting.
The blades are disengaged when the PTO lever is moved to OFF (1, fig. 2). The blade must stop within 5 seconds;
if this is not the case, adjust the brake using the register (fig.19).
N.B. This operation must be carried out by an authorised after-sales service centre.
CHANGING THE BELTS
The movement is transmitted from the motor to the hydraulic transmission and to the blades by means of two vbelts. Replace the belts as soon as they show signs of wear!
Their replacement and subsequent adjustment are fairly complex procedures and must be carried out by an
Authorised After-Sales Service Centre.
For cutting deck drive belt, the three belt guides beside the deck pulley have to be removed (A, fig. 19); release
the belt stretcher spring (A, fig. 21) and remove the belt guide (B, fig. 21).
ALWAYS USE ORIGINAL BELTS!
TRACTION RELEASE LEVER
The traction release device is located at the back of the machine (fig. 22); if the machine breaks down, to allow it
to be towed or moved by hand, move the lever to idle position (B, fig. 22). In the position (A) shown in fig. 22 the
machine is in working condition.
TROUBLE-SHOOTING:
PROBLEM
CAUSE REMEDY
Dashboard OFF with key in “AVV.” (ON) pos.
– Battery not supplying power – Check connecting cables
– Recharge battery
– Change the fuse
Dashboard ON, but starter motor does not turn over with key in “AVV” (ON) pos.
– Battery not supplying enough power – Recharge battery
– Start-up go-ahead not given – Travel lever in stop position
– Disengage blades
– Sit in the driver’s seat
– Check the three saefty sensors
(seat - blades engagement - feed lever)
Difficult starting or irregular running of engine
– Carburetion problems – Clean or change the air filter
– Adjust the carburettor (follow engine manual instructions)
– Deposits or dirt in fuel – Empty the tank and use fresh petrol
– Check and change the petrol filter if necessary

15
Starter motor turns over but engine does not start
– No petrol flow – Check that the choke has been activated (if engine is
cold)
– Check petrol level in tank
– Check wiring of carburettor opening control
– Check petrol filter (and change if necessary)
– Check that the vent on the tank cap is not blocked
– Fault in ignition system – Check that the caps of the sparkplugs are correctly
fastened
– Check that the electrodes are clean and at the correct
distance apart.
Drop in engine performance during cutting
– Speed too high for cutting height – Reduce speed
– Raise cutting deck by a few notches
Uneven cutting
– Cutting deck not parallel to ground – Check tyre pressure
– Level off the deck
– Blades fault – Check that the blades are correctly mounted
– Sharpen or change the blades
– Check the tension of the deck motor belt
Vibrations during operation
– Blades unbalanced – Balance blades or replace if damaged
– Fastenings are loose – Check and fasten the blade fixing screws as well as
the fixing screws of the engine and chassis.
PROBLEM
CAUSE REMEDY
ELECTRICAL SYSTEM
The electrical system is protected by a fuse which cuts out the entire electrical system if blown.
After finding and repairing the fault, replace the fuse with another of the same rating.
Never replace the fuse with one of a different rating.
The electrical system fuses are on the left-hand side of the steering wheel (fig. 23).
If the problems persist after all the procedures described above have been carried out, contact the Authorised AfterSales Service Centre.
Never attempt to make difficult repairs unless you have the necessary equipment and technical expertise.
IMPORTANT!
– Take care not to reverse the battery polarity.
– Never operate the mower without the battery, since it is equipped with a charge regulator.
– Take care not to cause short-circuits.
THE MACHINE DOES NOT REMAIN IN NEUTRAL
Adjust the device (fig. 24) by loosening the counter-nut and acting on the central screws.
FORWARD LEVER
To adjust the forward and reverse travel speeds, use the screws (A, fig. 25) if the forward lever automatically returns
to zero adjust the self-locking nut (B, fig. 25).

16
ENDING WORK
After mowing, disengage the blades and drive back to base with the cutting deck in the highest position.
To stop, move the travel lever to the STOP position (2, fig. 3), set the throttle lever on the minimum rpm, switch off
the engine by turning the key (1, Fig. 1) and lower the deck to the lowest position.
CLEANING
Clean the outside of the mower after each use.
STORAGE AND PROLONGED PERIODS OF DISUSE
Store the mower in a dry place, away from atmospheric agents, and preferably cover with a sheet. If the mower
is not going to be used for a long period (over 1 month), disconnect the red battery cable (fig. 23) and follow the
instructions given in the engine manual. Also lubricate all of the articulated joints.
Regularly check that the battery voltage does not drop below 12 volts. If it does, recharge the battery.
Use the preservative additive for unleaded petrol. If the machine is to be out of use for more than 30 days, drain
the fuel from the engine to prevent sticky deposits from forming in the fuel intake system or in vital parts of
carburettor. To protect the engine we advise you to use the Briggs & Stratton fuel additive, available from all
Briggs & Stratton authorised services centres. Add the additive to the fuel in the tank or in the fuel container. Run
the engine a little to circulate the additive through the carburettor. The engine and carburettor can be stored for up
to 24 months.
NB.: If no additive are used or the engine is running on petrol which contains alcohol, drain the fuel tank and run
the engine until there is no fuel left.

17
RASAERBA IDROSTATICO “GRILLO CLIMBER”
Gentile Cliente,
nel ringraziarla per la fiducia e la preferenza accordata al nostro Grillo CLIMBER, confidiamo che l’uso di questa
sua nuova macchina risponda pienamente alle sue esigenze.
Per l’impiego ottimale e per la sua manutenzione nel tempo, la preghiamo di leggere attentamente e seguire
scrupolosamente le indicazioni di questo libretto; ciò le consentirà di ottenere i massimi risultati e salvaguardare
la sua spesa.
La preghiamo di conservare questo libretto, che dovrà sempre accompagnare la macchina.
ATTENZIONE! Leggere attentamente prima di avviare il motore.
Le seguenti avvertenze sono importanti per l’incolumità dell’operatore!
NORME INFORTUNISTICHE
La prudenza è l’arma principale nella prevenzione degli incidenti!
La preghiamo vivamente di leggere con attenzione le seguenti avvertenze nell’uso del trinciaerba, prima ancora
di iniziare il lavoro.
L’uso improprio del trinciaerba e il suo equipaggiamento possono risultare pericolosi; per ridurre queste possibilità osservare le precauzioni necessarie di seguito riportate:
1) Leggere questo manuale interamente, prima di accendere e mettere in movimento il trinciaerba.
2) Dare particolare attenzione alle ammonizioni e alle etichette di sicurezza attorno al trinciaerba.
3) La rotazione della lama del trinciaerba è altamente pericolosa, non mettere mai le mani o i piedi sotto al
piatto rasaerba.
4) Prima di fare lavorare con la macchina altre persone bisogna metterle al corrente delle norme di sicurezza
e di come si usa.
5) Prima di accendere la macchina verificare che non ci siano persone intorno; specialmente bambini.
6) Prima di partire con la macchina in marcia indietro controllare che non ci siano persone od ostacoli.
7) Non permettere passeggeri sulla macchina.
8) Non usare la macchina quando si è affaticati e non bere alcolici.
9) Controllare il terreno prima di procedere alla rasatura, che non vi siano sassi, bastoni o corpi estranei, che
potrebbero essere scagliati lontano, e quindi molto pericolosi.
10) Prima di iniziare il lavoro, indossare indumenti appropriati da lavoro, guanti, scarponi, occhiali.
11) Prima di scendere dal trinciaerba, spegnere il motore, disinserire la PTO, rimuovere la chiave d’avviamento,
abbassare il piatto tosaerba nella posizione più bassa.
12) Questa macchina, non può viaggiare su strada.
13) Sui viali sconnessi viaggiare a bassa velocità.
14) In discesa moderare la velocità.
15) Non fare lavorare ragazzi troppo giovani; è vietato l’uso ai minori di 16 anni.
16) Non fare retromarcia col motore accelerato.
17) E’ pericoloso azionare il volante bruscamente, col motore a massimo regime.
18) Non azionare la leva avanzamento e retromarcia bruscamente.
19) Per evitare il pericolo di esalazioni velenose non adoperare il motore acceso in un locale chiuso.
20) Prima di avviare il motore riempire il serbatoio di carburante. Fare rifornimento di combustibile solo
all’aperto, spegnere sempre il motore, stare lontano da scintille o fiamme, non fumare!
Non rimuovere il tappo serbatoio carburante quando il motore è caldo.
Riposizionare in modo sicuro il tappo del serbatoio e dei contenitori di carburante.
21) Evitare fuoriuscite di combustibile e dopo aver riempito il serbatoio pulire ogni fuoriuscita sulla macchina
prima di avviare il motore: evitare di creare qualsiasi sorgente di iniezione fino a quando non si siano dissipati i vapori di benzina fuoriuscita.
22) Non operare col trinciaerba vicino a fossati o banchine che si possono rompere sotto il peso della macchina,
specialmente quando la superficie staccata o bagnata.
23) In discesa curvare sempre lentamente.
24) Non manomettere o disattivare i dispositivi di sicurezza, non usare la macchina senza carter di protezione o
con protezioni danneggiate o senza dispositivi di sicurezza.
25) Fermare la lama prima di attraversare superfici diverse dall’erba.
26)
Non lavorare col rasaerba sopra alla ghiaia che viene aspirata e centrifugata dalla lama, risultando molto pericolosa.
27) Se avete dei bambini, quando non usate la macchina, nascondete le chiavi di avviamento.
28) Non fare nessun tipo di regolazione o pulizia col motore in moto.
29) Non fare controllare la macchina da nessuno mentre siete seduti alla guida col motore in moto.

18
30) Non appoggiare pesi sul sedile, si potrebbe disattivare il dispositivo di sicurezza dell’avviamento.
31) L’utilizzatore è sempre responsabile dei danni arrecati a terzi.
32) Ogni utilizzo improprio comporta il decadimento della garanzia ed il declino di ogni responsabilità del
costruttore.
33) Utilizzare la macchina con i deflettori parasassi.
34) I coltelli deformati o danneggiati devono essere sempre sostituiti, mai riparati.
35) Usare sempre ricambi e accessori originali Grillo.
36) E’ vietato trainare carichi superiori a 100 kg (pendenza max. 6%).
37) Tagliare solo con la luce del sole o con buona luce artificiale.
38) Non fermarsi quando si lavora in salita o in discesa.
39) Se dovete svuotare il serbatoio carburante eseguite l’operazione all’aperto.
40) ATTENZIONE: per ridurre il pericolo di incendio mantenere il vano motore, la marmitta, i collettori di scarico,
la batteria, la zona serbatoio e conduttura carburante liberi da erba, foglie, polvere, ecc.
41) Non immagazzinare la macchina dentro un edificio dove i vapori del carburante possono arrivare a fiamme,
scintille o fili elettrici scoperti.
42) Sostituire le marmitte usurate o danneggiate.
43) Immagazzinare il carburante in contenitori specificatamente costruiti con questo obiettivo.
44) Fare attenzione quando si lavora vicino ad una strada.
45) Non cambiare le regolazioni del motore in modo particolare il numero di giri max.
46) Se la macchina vibra o se si urta un corpo estraneo disinnestare la lama fermare il motore scollegare le
candele, togliere la chiave d’avviamento, ispezionare il tosaerba.
47) Far raffreddare il motore prima di mettere la macchina in locali chiusi.
IDENTIFICAZIONE E ASSISTENZA
CLIMBER
tipo
serie
massa c.a.
anno
KW/giri minuto
S.p.A.
CESENA - ITALY
000000
03782
15.5/3000
IDENTIFICAZIONE
Il Grillo CL 7.13, CL 7.16, CL 7.21 è fornito di una targhetta, posta
sul piantone dello sterzo, con il numero della macchina.
SERVIZIO ASSISTENZA
Questo manuale fornisce le indicazioni per l’uso del trinciaerba e per una corretta manutenzione di base, eseguibile dall’utilizzatore.
Per gli interventi non descritti in questo libretto, interpellare il Rivenditore di Zona.
RICAMBI
Si raccomanda di impiegare esclusivamente ricambi originali, gli unici che offrono caratteristiche di sicurezza e
intercambiabilità.
Ogni richiesta deve essere corredata del numero di matricola della macchina e il numero di codice del pezzo da
sostituire.
Per i ricambi del motore, attenersi a quanto indicato nel libretto specifico.
GARANZIA
La garanzia fornita nei modi e nei limiti indicati nell’apposita cartolina.
Per quanto riguarda il motore e la batteria, valgono le condizioni previste dai rispettivi Produttori.
RICAMBI CHE SI CONSIGLIANO DI TENERE DI SCORTA
N. 2 lame
N. 2 viti lame
N. 2 dadi viti lame
N. 1 serie cinghie
N. 1 filtro aria motore
N. 1 filtro olio motore
N. 1 filo acceleratore
N. 2 fusibili impianto

19
CARATTERISTICHE TECNICHE
MOTORE: 7.13 - BRIGGS & STRATTON 13,5 hp (10 kW) OHV, monocilindrico, a scoppio, 4 tempi, sincrobilanciato
(AVS). 7.16 - BRIGGS & STRATTON VANGUARD OHV 16 hp (13 kW) , bicilindrico, a scoppio, 4 tempi. 7.21 BRIGGS & STRATTON VANGUARD OHV 21 hp (15.5 kW), bicilindrico, a scoppio, 4 tempi.
CONSUMO ORARIO: 3 lt/h – 7.13; 3,5 lt/h – 7.16; 3,8 lt/h – 7.21.
AVVIAMENTO: elettrico, con batteria 12V.
CAMBIO: trasmissione idrostatica.
DIFFERENZIALE: con bloccaggio.
FRIZIONE: per P.T.O., a tensione di cinghia.
VELOCITÀ: da 0 a 9 km/h a variazione continua e retromarcia da 0 a 4 km/h.
PNEUMATICI anteriori: 13x5.00 - 6; posteriori: 16 x 6.50-8.
FRENI: anteriori di emergenza; posteriori di stazionamento.
SEDILE: ammortizzato e regolabile, con roll bar.
PIATTO DI TAGLIO: scarico laterale/posteriore.
SISTEMA DI TAGLIO: 1 lama rotante.
LARGHEZZA DI TAGLIO: 780 mm – 7.13; 850 mm – 7-16/7.21
VELOCITÀ PERIFERICA LAMA: 70 m/sec.
ALTEZZA DI TAGLIO: da 35 mm. a 85 mm. 6 diverse posizioni di taglio e 1 di trasferimento.
RESA: 4800 m
2
/h (indicativa) – 7.13 - 6.000 m2/h (indicativa)- 7.16/7.21
RAGGIO INTERNO DI STERZATA: 485 mm.
SERBATOIO: 7 lt, RISERVA: 1 lt.
TIRO TRAINO: di serie
ACCESSORI: set ruote garden.
DIMENSIONI: Lunghezza: 1895 mm, Larghezza: 900 mm, Altezza: 975 mm
PESO: 225 kg – 7.13; 235 kg – 7.16; 245 kg – 7.21.
MESSA IN OPERA DELLA MACCHINA
1) Controllare l’integrità della macchina, che non abbia subito danni durante il trasporto.
2) Verificare i livelli olio, motore, trasmissione idrostatica, riduttore ruote.
3) Verificare la pressione dei pneumatici:
1 BAR ruote anteriori 13 x 50-6
1,2 BAR ruote posteriori 16 x 6.50-8.
4) Controllare il voltaggio della batteria, non deve risultare inferiore al valore di 12 volt, eventualmente provve-
dere alla ricarica.
IMPORTANTE!!! Durante il montaggio evitare di invertire le polarità della batteria.
5) Montare il volante facendo attenzione all’inserimento della chiavetta e al serraggio della vite (coppia di serraggio
2 KgF.m [20 N.m]).
6) Montare la marmitta, il paraurti posteriore e il roll bar.
RODAGGIO - ATTENZIONE!!
Sostituire l’olio motore dopo le prime 5 ore di funzionamento unitamente al filtro.
Controllare che non vi siano perdite d’olio o viti lente, in particolare quelle di fissaggio della lama e dello sterzo.
ISTRUZIONI D’USO
Prima di avviare il motore controllare sempre:
– che la leva avanzamento sia in posizione folle (fig.3);
– che l’olio nel motore sia a livello (fig. 4);
– che le griglie di aspirazione per il raffreddamento del motore siano pulite (fig. 4):
– che il filtro aria sia ben pulito (fig. 8);
– che il piatto tosaerba sia ben pulito;
– che le alette del motore idraulico siano pulite (fig. 5);
– che le lame siano ben affilate e saldamente fissate;
– che la vite centrale mozzo lama sia ben serrata (fig. 9 n. 3).
– che nell’assale idrostatico (fig. 5) il livello si trovi a 12 mm sotto al piano inferiore
della vaschetta (fig. 6)
Riempire il serbatoio di carburante servendosi di un imbuto munito di un filtro molto fine (fig. 10 n. 4).
Regolare la posizione del sedile agendo sulla leva fig. 11.

20
AVVIAMENTO DEL MOTORE
– Spingere fino a metà corsa il manettino acceleratore (fig. 3 n. 5)
– Se il motore è freddo azionare il dispositivo di starter (fig. 3 n. 6). Ruotare la chiave di avviamento (fig. 1 n°1).
– Una volta avviato il motore disinserire lo starter, aspettare qualche minuto per riscaldare il motore.
Nota: durante i trasferimenti è bene che il piatto di taglio sia in posizione di massima altezza.
INIZIO DEL LAVORO
– Scegliere l’altezza di taglio agendo sulla leva fig. 2 n. 8, accelerare opportunamente il motore, innestare la
PTO (fig. 2 n. 1). Azionare dolcemente la leva avanzamento (fig. 3 n. 2) ed iniziare il lavoro. Per fermarsi
riportare la leva avanzamento in posizione centrale.
– La leva (fig. 3 n. 2) serve anche per la retromarcia, spostandola indietro la macchina retrocede - azionarla
dolcemente.
FRENO ANTERIORE
Il freno anteriore (fig. 1 n. 4) va utilizzato unicamente come freno di emergenza in discesa per non fare scivolare
la macchina. Utilizzato in combinazione con il bloccaggio differenziale, esso rende la macchina molto stabile in
discesa. In condizioni normali, per rallentare e frenare, utilizzare solo la leva di avanzamento.
Per registrare i cavi agire sui registri fig. 26.
FRENO DI STAZIONAMENTO
Il freno di stazionamento si inserisce sollevando l’anello fig. 3 n. 10 fino ad agganciare la leva.
Per registrare il freno di stazionamento agire sul registro (fig. 5).
BLOCCAGGIO DIFFERENZIALE
Il pedale del bloccaggio differenziale è quello indicato in fig. 1 al n. 5. Premere il pedale bloccaggio differenziale
in caso di slittamento delle ruote motrici: è consigliabile utilizzare il bloccaggio anche in discesa, in forte pendenza, per mantenere in aderenza entrambe le ruote motrici.
Attenzione! Non utilizzare il bloccaggio differenziale in curva.
Mantenere lubrificati con grasso l’innesto e le catene (fig.27).
REGOLE UTILI PER IL BUON USO
1) Non forzare mai il motore: quando fuma dallo scarico, è sotto sforzo; bisogna rallentare.
2) Non tenere la macchina sotto la pioggia.
3) Affilare frequentemente le lame; il taglio sarà migliore e il motore forzerà di meno.
4) Controllare il terreno prima di procedere alla rasatura che non vi siano sassi, bastoni o corpi estranei.
5) Durante la rasatura tenere il motore a massimo regime, regolare la velocità in base all’altezza dell’erba.
6) Mantenere pulite le griglie sopra al motore e le alette di raffreddamento del motore idraulico (fig. 4 e
fig. 5).
POSIZIONI DI TAGLIO
Per regolare l’altezza di taglio si agisce sulla leva fig. 2 n. 8.
Il piatto può essere posizionato in 6 diverse posizioni di taglio da 35 a 80 mm. ed una posizione di trasferimento
nella quale la lama si disinnesta automaticamente.
In presenza di terreno accidentato, cunette o dossi, è conveniente operare con il piatto nella posizione di taglio
più alta onde evitare urti da parte della lama.
TERRENI IN PENDENZA
I terreni ripidi devono essere percorsi possibilmente nel senso salita/discesa, facendo molta attenzione nei cambi di direzione, che le ruote a monte non incontrino ostacoli (sassi, rami, radici, ecc.) che potrebbero causare il
ribaltamento o la perdita di controllo della macchina.
Valutare pertanto le varie situazioni e prestare attenzione in presenza di terreno umido e erba bagnata in quanto
la macchina potrebbe scivolare. In discesa partire a bassa velocità ed evitare di calpestare erba secca o tagliata
in quanto le ruote perdono aderenza; si tenga presente che, con l’inserimento del bloccaggio differenziale ed
eventualmente del freno di emergenza anteriore (fig.1 n. 4) la macchina è più stabile.

21
INTERVENTI DEI DISPOSITIVI DI SICUREZZA
Ricordare sempre che il motore si ferma ogni volta che:
– L’operatore si alza dal sedile.
Inoltre il motore non si avvia se:
– La lama è innestata.
– Se non si è seduti al posto di guida.
– Se la leva di avanzamento non è in posizione di STOP.
MANUTENZIONE E LUBRIFICAZIONE
ATTENZIONE!
Togliere la chiave e scollegare le candele prima di iniziare qualsiasi intervento di pulizia, manutenzione o
riparazione. Indossare indumenti adeguati e guanti da lavoro.
IMPORTANTE
Non disperdere mai nell’ambiente oli esausti, benzina e ogni altro prodotto inquinante! Un’efficiente manutenzione e una corretta lubrificazione contribuiscono a mantenere la macchina in perfetta efficienza.
MOTORE
Per gli intervalli di lubrificazione seguire le norme contenute nel libretto del motore; comunque è indispensabile
sostituire l’olio dopo le prime 5 ore di lavoro, successivamente ogni 50 ore o ogni stagione unitamente al
filtro olio (fig. 12, tappo scarico olio; utilizzare una controchiave nella parte fissa).
Sostituire il filtro olio (fig. 13).
La prima precauzione è che il motore sia correttamente manutenzionato con filtro aria, alette raffreddamento,
testata pulita e l’olio motore a livello.
Controllare il filtro aria ogni 4 ore o anche più frequentemente se l’ambiente è molto polveroso.
Controllare la griglia a rete di aspirazione del raffreddamento del motore (fig. 4).
ASSALE IDROSTATICO
Controllare con il motore freddo la vaschetta di espansione, deve essere vuota, fig. 5.
Pulire frequentemente le alette di raffreddamento del motore idraulico, in estate, in presenza di molta polvere,
ogni 4 ore di lavoro, fig. 5.
Sostituire l’olio dopo le prime 50 ore di lavoro, successivamente ogni 200 ore, utilizzare olio 10W30 quantità 1,85
lt. per la sostituzione procedere come segue:
1) Togliere i due tappi fig. 14.
2) Rimuovere, utilizzando un cacciavite, il tappo fig. 15.
3) Avvitare i due tappi fig. 14 (coppia di serraggio 13-17 N.m).
4) Inserire l’olio, rimontare il tappo fig. 15.
5) Verificare la vaschetta di espansione sia vuota, il livello è di 12 mm sotto al piano inferiore della vaschetta di
espansione fig. 6.
ASSE RUOTE ANTERIORE
Lubrificare con grasso ogni 20 ore i perni snodo ruota fig. 16.
Lubrificare le articolazioni dello sterzo.
Lubrificare la boccola tenditore cinghia motore piatto di taglio (fig. 16/A).
FILTRO ARIA
Controllare il filtro aria ogni 4 ore od anche più frequentemente se l’ambiente è molto polveroso (fig. 8).
CONTROLLO LAME E PIATTO
Una lama non affilata strappa l’erba, conferendogli un brutto aspetto; é necessario che l’affilatura sia sempre
eseguita sui taglienti delle due lame. Per smontare una lama, afferrarla saldamente, utilizzando guanti da lavoro,
svitare la vite centrale, attenzione la vite è destra (fig. 9 n. 3); affilare entrambi i taglienti per mezzo di una mola
a grana media e verificare l’equilibratura della lama sorreggendola con un tondo infilato nel foro centrale.
Per le due lame di taglio eseguire il montaggio seguendo lo schema fig. 9.
ATTENZIONE!
Serrare bene a fondo la vite di fissaggio (fig. 9 n. 3). Sostituire sempre i coltelli danneggiati o storti; non tentare mai di ripararli! Per
il montaggio seguire lo schema fig. 9. USARE SEMPRE COLTELLI ORIGINALI! Se risultano usurati si possono girare in quanto
sono dotati di doppio tagliente. Verificare sempre visivamente che i bulloni della lama non siano consumati o danneggiati.

22
REGOLAZIONE PIATTO DI TAGLIO
Una buona planarità del piatto è essenziale per ottenere un prato uniformemente rasato.
Posto il rasaerba su una superficie piana e verificata la corretta pressione dei pneumatici, agire sui 4 registri (fig.
17 - 17/A) posizionati sul piatto fino a portare il bordo del piatto alla stessa distanza dal pavimento (100 mm) sia
da un lato che dall’altro (con l’operatore seduto e mettendo il piatto nella posizione 1 fig. 18/A).
Nel caso non si riuscisse ad ottenere un buon parallelismo, consultare un Centro di Assistenza Autorizzato.
CINGHIA MOTORE - LAMA
La tensione si registra agendo sul registro fig. 18.
Se si verifica l’attorcigliamento o la fuoriuscita della cinghia controllare eseguire i controlli e le regolazioni illustrati
in figura 18/A, tenendo il piatto nella posizione più bassa.
Attenzione: quando si posizionano i guidacinghia, occorre avvicinarli alla cinghia controllando il piatto nelle varie
altezze (fig. 19 rif. A).
CINGHIE MOTORE - ASSALE IDROSTATICO
Sono autoregolanti, non hanno bisogno di nessuna regolazione, basta controllare la tensione della molla. Per la
sostituzione occorre sganciare la molla di tensione (fig. 20).
ROTAZIONE LAMA
Per innestare e disinnestare la rotazione della lama si agisce sulla leva fig. 2 n. 1.
Durante l’innesto il motore deve essere a metà regime e la macchina deve essere al di fuori dell’erba da tagliare.
Il disinnesto avviene nella posizione OFF, fig. 2 n.1.
La lama deve arrestarsi entro 5 secondi, se ciò non avvenisse occorre registrare il freno agendo sul registro fig. 19.
N.B. Questa operazione va eseguita da un centro assistenza autorizzato.
SOSTITUZIONE CINGHIE
La trasmissione del movimento del motore alla trasmissione idraulica e dal motore alle lame è ottenuta per
mezzo di due cinghie trapezoidali. Sostituire le cinghie non appena manifestano segni di usura!
La loro sostituzione e successive regolazioni sono abbastanza complesse ed è indispensabile venga affidata ad
un Centro Assistenza Autorizzato.
Per la cinghia motore piatto di taglio, occorre smontare i 3 guidacinghia a lato della puleggia piatto (fig. 19 pos. A)
e sganciare la molla tendicinghia (fig. 21, pos. A) e smontare la protezione (fig. 21, pos. B).
USARE SEMPRE CINGHIE ORIGINALI!
DISPOSITIVO DI SBLOCCO DELLA TRAZIONE
Il dispositivo di sblocco della trazione è posizionato nella parte posteriore della macchina (fig. 22), se si verificasse un’avaria alla macchina, per poterla trainare o spostare a mano posizionare la levetta nella posizione folle (fig.
22, pos. B). Nella posizione (A) la macchina è in lavoro.
GUIDA ALL’IDENTIFICAZIONE DEGLI INCONVENIENTI:
Con la chiave in pos. AVV. il cruscotto rimane spento
– La batteria non eroga corrente alcuna – Controllare i cavi di collegamento
– Ricaricare la batteria
– Sostituire il fusibile
INCONVENIENTE
CAUSA RIMEDIO
Il cruscotto si accende, ma con la chiave in pos. AVV. il motorino di avviamento non gira
– La batteria non eroga sufficiente corrente – Ricaricare la batteria
– Manca il consenso all’avviamento – Leva avanzamento in posizione stop
– Disinserire le lame
– Sedetevi al posto guida
– Controllare i 3 sensori di sicurezza
(sedile - innesto lame - leva avanzamento)

23
INCONVENIENTE
CAUSA RIMEDIO
Avviamento difficoltoso o funzionamento irregolare del motore
– Problemi di carburazione – Pulire o sostituire il filtro dell’aria
– Regolare il carburatore (attenersi al libretto motore)
– Depositi o impurità nel carburante – Svuotare il serbatoio ed impiegare benzina fresca
– Controllare ed eventualmente sostituire il filtro
benzina
Il motorino gira ma il motore non si avvia
– Mancanza del flusso di benzina – Controllare che lo starter sia azionato (se il motore è
freddo)
– Verificare livello nel serbatoio
– Controllare il cablaggio del comando apertura
carburatore
– Controllare (ed eventualmente sostituire) il filtro benzina
– Controllare che il foro di sfiato sul tappo del serbatoio non
sia otturato
– Insufficienza nell’impianto d’accensione – Controllare il fissaggio del cappuccio della candela
– Verificare la pulizia e la corretta distanza fra gli elettrodi
Calo di rendimento del motore durante il taglio
– Velocità di avanzamento elevata in – Diminuire la velocità
rapporto all’altezza di taglio – Alzare di qualche tacca il piatto di taglio
Taglio irregolare
– Piatto di taglio non parallelo al terreno – Controllare la pressione dei pneumatici
– Ripristinare il parallelismo del piatto
– Inefficienza della lama – Controllare il corretto montaggio della lama
– Affilare o sostituire le lame
– Controllare la tensione della cinghia motore piatto
Vibrazioni durante il funzionamento
– Lame squilibrate – Equilibrare o sostituire le lame se danneggiate
– Fissaggi allentati – Verificare e serrare le viti di fissaggio delle lame,
del motore e del telaio
IMPIANTO ELETTRICO
L’impianto elettrico è protetto da fusibile che, se interrotto, provoca la totale inefficacia di tutto l’impianto elettrico.
Ricercato e riparato il guasto, sostituire il fusibile avariato con uno di uguale portata.
Non sostituire mai il fusibile con uno di portata diversa.
I fusibili dell’impianto elettrico si trovano a sinistra dello sterzo (fig. 23).
Se gli inconvenienti perdurano dopo aver eseguito le operazioni sopra descritte, contattare il Centro Assistenza
Autorizzato.
Non tentare mai di effettuare riparazioni impegnative senza avere i mezzi e le cognizioni tecniche necessarie.
IMPORTANTE!
– Evitare di invertire la polarità della batteria.
– Non far funzionare il rasaerba senza la batteria, essendo dotato di un regolatore di carica.
– Fare attenzione a non causare corto circuiti.
LA MACCHINA NON STA IN FOLLE
Registrare il dispositivo (fig. 24) allentare il controdado e agire sulla vite centrale.

24
LEVA AVANZAMENTO
Per registrare la velocità in marcia avanti e in RM agire sulle viti (pos. A, fig. 25). Se la leva avanzamento torna
automaticamente a zero registrare il dado autobloccante (pos. B, fig. 25).
FINE LAVORO
Terminata la rasatura, disinnestare le lame, ed effettuare il percorso di ritorno con il piatto di taglio in posizione di
massima altezza.
Per fermarsi mettere la leva avanzamento in posizione STOP (fig. 3 n. 2), portare il manettino acceleratore al
minimo, spegnere il motore ruotando la chiave (fig. 1 n. 1), abbassare il piatto nella posizione più bassa.
PULIZIA
Dopo ogni utilizzo, ripulire l’esterno del rasaerba.
RIMESSAGGIO E INATTIVITÀ PROLUNGATA
Riporre la macchina in un ambiente asciutto, al riparo dalle intemperie e, possibilmente, ricoprirla con un telo. Se
si prevede un prolungato periodo di inattività (superiore a 1 mese), provvedere a scollegare il cavo rosso della
batteria (fig. 23) e seguire le indicazioni contenute nel libretto di istruzioni del motore; lubrificare inoltre tutte le
articolazioni.
Controllare periodicamente che il voltaggio della batteria non scenda sotto il valore di 12 Volt e in tal caso
provvedere alla ricarica.
Utilizzare l’additivo conservante per benzina verde.
Se la macchina non viene utilizzata per più di trenta giorni, occorre svuotare del carburante il motore onde prevenire
la formazione di depositi gommosi nel sistema di alimentazione o in parti vitali del carburatore.
Per proteggere il motore si raccomanda di utilizzare l’additivo per carburante Briggs&Stratton, acquistabile presso
tutti i centri di assistenza Briggs&Stratton. Miscelare l’additivo al carburante nel serbatoio o nel recipiente del
carburante. Far girare un po’ il motore per far circolare l’additivo nel carburatore. Il motore e il carburatore possono
essere così conservati fino a 24 mesi.
Nota: Se non si utilizzano additivi oppure il motore utilizza benzina contenente alcol, svuotare il serbatoio del
carburante, facendo funzionare il motore finché non finisce il carburante.

25
TONDEUSE HYDROSTATIQUE “GRILLO CLIMBER”
Cher Client,
Nous vous remercions pour la confiance et la préférence que vous avez bien voulu accorder à notre “Grillo
CLIMBER”. Nous sommes certains que l’utilisation de votre nouvelle machine répondra entièrement à vos
exigences. Pour un emploi optimal et pour son entretien au fil du temps, nous vous demandons de lire attentivement
et de respecter scrupuleusement les indications de cette brochure; cela vous permettra d’obtenir d’excellents
résultats et de sauvegarder votre investissement.
Nous vous demandons de conserver ce Manuel qui doit toujours accompagner la machine.
ATTENTION! Avant de mettre le moteur en marche lire attentivement le mode d’emploi.
Les précautions suivantes sont importantes pour votre sécurité!
NORMES POUR LA PREVENTION DES ACCIDENTS
La prudence est l’arme principale pour la prévention des accidents!
Avant de commencer tout travail nous vous demandons de lire attentivement le mode d’emploi suivant concernant
la tondeuse à gazon.
L’utilisation inadéquate de la tondeuse et de son équipement peuvent être dangereux; pour réduire ces possibilités
de danger, veuillez respecter ces précautions nécessaires:
1) Lire entièrement ce Manuel avant l’activation et la mise en mouvement de la tondeuse.
2) Respecter avec une attention particulière les mises en garde et les étiquettes de sécurité placées autour de
la tondeuse.
3) La rotation de la lame de la tondeuse est très dangereuse: ne jamais mettre les mains ou les pieds sous
la tondeuse.
4) Avant de confier votre tondeuse à d’autres personnes il faut leur signaler et les normes de sécurité, et le mode
d’emploi.
5) Avant de placer la tondeuse sous tension, vérifier qu’il n’y ait personne dans les parages, en particulier des
enfants.
6) Avant de faire marche AR. avec la tondeuse, contrôler qu’il n’y ait personne et aucun obstacle.
7) N’accepter aucun passager sur la machine.
8) Ne pas utiliser la machine si vous êtes fatigué et ne pas boire d’alcools.
9) Contrôler le terrain avant de la tonte pour qu’il n’y ait pas de cailloux, de morceaux de bois ou d’autres corps
qui pourraient endommager la machine ou encore être projetés et se révéler très dangereux.
10) Avant de commencer la tonte, revêtir des vêtements de travail appropriés, des gants, des bottes et des
lunettes.
11) Avant de quitter la tondeuse désactiver le moteur, désactiver la prise de force, enlever la clé de démarrage.
12) Cette machine ne peut pas circuler sur les routes.
13) Circuler à une vitesse réduite sur les chemins accidentés.
14) Modérer la vitesse en descente.
15) Ne pas faire travailler les enfants trop jeunes; l’usage est interdit pour les mineurs de moins de 16 ans.
16) Ne pas faire marche AR. si le moteur est accéléré.
17) Il est dangereux d’actionner le volant brusquement, avec le moteur à plein régime.
18) Ne pas actionner brusquement le levier d’avancement ni la marche AR.
19) Pour éviter le danger d’exhalaisons toxiques, ne pas faire tourner le moteur dans un local fermé.
20) Avant de démarrer le moteur, remplir le réservoir de carburant.
Eteindre toujours le moteur avant de faire le plein de combustible; rester loin des étincelles et des
flammes et ne pas fumer!
Ne quitter pas le bouchon du réservoir quand le moteur est chaud.
Replacer, de manière fiable, le bouchon du réservoir et des contenants de carburant.
21) Eviter les fuites de combustible; après avoir rempli le réservoir nettoyer soigneusement les fuites sur la
tondeuse avant d’activer le moteur: ne créer aucune source d’injection jusqu’à totale dispersion des vapeurs
de l’essence sortie.
22) Ne pas utiliser la tondeuse près des fossés ou sur les accotements qui peuvent s’écrouler sous le poids de
la machine, en particulier lorsque la surface est meuble ou mouillée.
23) Dans les descentes tourner très lentement.
24) Ne pas modifier ni désactiver les dispositifs de sécurité, ne pas utiliser la tondeuse sans le carter de
protection ou avec des protections endommagées ou encore sans les dispositifs de sécurité.
25) Ne jamais travailler sans le capot sur le moteur. Avant de traverser surfaces différentes de l’herbe,
déconnecter la lame.

26
26) Ne jamais utiliser la tondeuse sur le gravier car il serait aspiré et centrifugé par la lame, ce qui est très
dangereux.
27) S’il y a des enfants, cacher les clés de démarrage de la tondeuse, en cas de non-utilisation.
28) N’effectuer aucun réglage ou nettoyage avec le moteur en marche.
29) Ne jamais faire contrôler la machine lorsque le conducteur est au volant avec le moteur en marche.
30) Ne poser aucun poids sur le siège; le dispositif de sécurité du démarrage pourrait se désactiver.
31) L’utilisateur est toujours responsable des dégâts occasionnés aux tiers.
32) Toute utilisation impropre comporte la suspension de la garantie et la suppression de la responsabilité du
Constructeur.
33) Utiliser la machine avec les déflecteurs anti-cailloux.
34) Les couteaux déformés ou endommagés doivent être toujours remplacés et jamais réparés.
35) Utiliser toujours des pièces de rechange d’origine Grillo.
36) Il est interdit d’entraîner des poids supérieurs à 100 kg (pendage maximum 6%).
37) Utiliser la tondeuse uniquement en plein jour ou avec un bon éclairage artificiel.
38) Ne jamais s’arrêter quand on travaille en montée ou en descente.
39) Si vous devez vider le réservoir de carburant, effectuer cette opération en plein air.
40) ATTENTION! Pour réduire le danger d’incendie, éliminer les herbes, feuilles, poussière, etc…qui pourraient
obstruer le logement du moteur, la marmite, les collecteurs de décharge, la batterie, la zone du réservoir et
la tuyauterie du carburant.
41) Ne pas stocker la machine dans un édifice où les vapeurs du carburant pourraient arriver jusqu’aux flammes,
aux étincelles ou aux fils électriques dénudés.
42) Remplacer les marmites usées ou endommagées.
43) Stocker le carburant dans des contenants spécifiquement prévus à cet effet.
44) Adopter une vigilance particulière si l’on utilise la machine près d’une route.
45) Ne pas modifier les réglages du moteur, en particulier le nombre de tours maxi.
46) Si la machine vibre ou en cas de collision avec un corps étranger, extraire la lame, bloquer le moteur,
déconnecter les bougies, enlever la clé de démarrage, inspecter la tondeuse.
47) Faire refroidir le moteur avant de stocker la machine dans des locaux fermés.
IDENTIFICATION ET ASSISTANCE
IDENTIFICATION
Le Grillo CL 7.13, CL 7.16, CL 7.21 est muni d’une plaquette
(placée sur la colonne de direction) avec le numéro de série de la
machine.
SERVICE ASSISTANCE
Ce Manuel fournit toutes les indications utiles sur l’emploi de la tondeuse et sur un entretien de base correct, qui
peut être effectué par l’opérateur.
Pour les interventions non décrites dans cette brochure, s’adresser au Revendeur responsable de la Zone.
PIECES DE RECHANGE
Nous recommandons d’utiliser exclusivement des pièces de rechange d’origine, les seules qui offrent des
caractéristiques de sécurité et d’interchangeabilité.
Dans toute demande de pièce il doit être indiqué le numéro de série de la machine et la référence de la pièce à
remplacer.
Pour les pièces de rechange relatives au moteur, respecter les indications contenues dans le manuel spécifique.
GARANTIE
La garantie est assurée selon les modes et les limites indiquées dans le coupon correspondant.
En ce qui concerne le moteur et la batterie, seules les conditions prévues par les Fabricants respectifs sont
valables.
CLIMBER
tipo
serie
massa c.a.
anno
KW/giri minuto
S.p.A.
CESENA - ITALY
000000
03782
15.5/3000

27
PIECES DE RECHANGE QUE NOUS CONSEILLONS D’AVOIR EN RESERVE
* 2 lames
* 2 vis de lames
* 2 écrous pour vis de lames
* 1 série de courroies
* 1 filtre air moteur
* 1 filtre huile moteur
* 1 fil accélérateur
* 2 fusibles installation
CARACTERISTIQUES TECHNIQUES
MOTEUR: 7.13 - BRIGGS & STRATTON 13,5 hp (10 kW) OHV, 1 cylindre, à explosion, 4 temps, synchro-équilibré
(AVS). 7.16 - BRIGGS & STRATTON VANGUARD OHV 16 hp (13 kW) , deux cylindres, à explosion, 4 temps. 7.21
- BRIGGS & STRATTON VANGUARD OHV 21 hp (15.5 kW), deux cylindres, à explosion, 4 temps.
CONSOMMATION HORAIRE: 3 lt/h – 7.13; 3,5 lt/h – 7.16; 3,8 lt/h – 7.21
DEMARRAGE: électrique, avec batterie 12V.
BOITE DE VITESSES: transmission hydrostatique.
DIFFERENTIEL: avec blocage.
EMBRAYAGE: par prise de force, à tension de courroie.
VITESSE: de 0 à 9 Km/h avec variation continue et marche arrière de 0 à 4 Km/h.
PNEUMATIQUES avant: 13x5.00 - 6; arrière: 16 x 6.50-8.
FREINS: avant d’urgence; arrière de stationnement.
SIEGE: amorti et réglable, avec roll bar.
PLATEAU DE COUPE: éjection latérale/arrière.
SISTEME DE COUPE: rotatif à 1 lame.
LARGEUR DE COUPE: 780 mm – 7.13; 850 mm – 7-16/7.21
VITESSE PERIPHERIQUE LAME: 70 m/sec.
HAUTEUR DE COUPE: de 35 mm. à 85 mm. 6 différentes positions de coupe et 1 de transfert.
RENDEMENT: 4800 m
2
/h (indicatif) – 7.13; 6.000 m2/h (indicatif)- 7.16/7.21
RAYON DE BRAQUAGE INTERNE: 485 mm.
RESERVOIR: 7 lt, - RESERVE: 1 lt.
ACCESSOIRES: attelage pour remorque, set roues gazon.
DIMENSIONS: Longueur: 1895 mm; Largeur: 900 mm; Hauteur: 975 mm.
Poids: 225 kg. – 7.13; 235 kg. – 7.16; 245 kg. – 7.21
MISE EN SERVICE DE LA MACHINE
1) Contrôler que la machine soit intacte et qu’elle n’ait pas été endommagée durant le transport.
2) Vérifier les niveaux d’huile du moteur, de la transmission hydrostatique, et du réducteur de roues.
3) Vérifier la pression des pneus:
1 BAR roues AV. 13 x 50-6
1,2 BARS roues AR. 16 x 6.50-8.
4) Contrôler le voltage de la batterie qui ne doit pas être inférieur à la valeur de 12 V; prévoir éventuellement la
recharge.
IMPORTANT!!! Eviter d’inverser les polarités de la batterie durant le montage.
5) Monter le volant, faire attention au montage de la clavette et au serrage de la vis, (couple de serrage 2 KgF.m
[20 N.m]).
6) Monter le pot d’échappement, le pare-chocs arrière et l’arceau de sécurité.
RODAGE - ATTENTION!!
Vidanger l’huile moteur et le filtre après les 5 premières heures d’exploitattion. Contrôler qu’il n’y ait aucune fuite
d’huile ni des vis desserrées, en particulier celles de fixation de la lame et de la direction.
MODE D’EMPLOI
Avant de démarrer le moteur contrôler toujours:
– que le levier d’avancement soit au point mort (fig. 3);
– que l’huile dans le moteur soit au niveau voulu (fig. 4);
– que l’huile du moteur hydraulique soit au niveau voulu (fig. 5); (le niveau correct est 12 mm au-dessous du fond
de la cuvette fig. 6).

28
– que les grilles d’aspiration pour le refroidissement du moteur soient propres (fig. 4);
– que le filtre à air soit bien propre (fig. 8);
– que le disque de la tondeuse soit bien propre;
– que les ailettes du moteur hydraulique soient bien propres (fig. 5);
– que les lames soient bien affûtées et solidement fixées;
– que la vis centrale du moyeu lame soit bien serrée (fig. 9 n. 3).
– que dans le moteur hydrostatique (fig. 5) le niveau se situe à 12 mm. en dessous du fond du réservoir
d’expansion.
Remplir le réservoir de carburant en se servant d’un entonnoir muni d’un tamis très fin (fig. 10 n. 4).
Régler la position du siège en intervenant sur le pommeau (fig. 11).
DEMARRAGE DU MOTEUR
– Pousser jusqu’à la mi-course la manette de l’accélérateur (fig. 3 n. 5).
– Si le moteur est froid, actionner le dispositif de starter (fig. 3 n. 6). Tourner la clé (fig. 1 n. 1).
– Lorsque le moteur a démarré, désactiver le starter, attendre quelques minutes pour réchauffer le moteur.
Note: durant les transferts, nous conseillons de placer le disque de coupe sur la position de hauteur maximale.
DEBUT DU TRAVAIL
– Choisir la hauteur de coupe à l’aide du levier (fig. 2 n. 8), accélérer convenablement le moteur; enclencher la
prise de force (fig. 2 n. 1). Actionner doucement le levier d’avancement (fig. 3 n. 2) et commencer le travail. Pour
s’arrêter reconduire le levier d’avancement sur la position centrale.
– Le levier (fig. 3 n. 2) sert également pour la marche AR.: si on le déplace vers l’arrière, la machine recule,
l’actionner doucement.
FREIN AVANT
Le frein avant (fig.1 n. 4) ne doit être utilisé qu’en tant que frein d’urgence, en descente pour éviter que la machine
ne glisse. Le frein avant, utilisé avec le blocage différentiel, augment la stabilité de la machine en descente. Pour
ralentir et freiner en conditions normales il faut utiliser le levier d’avancement.
Pour régler les câbles, utiliser les dispositifs comme indiqué dans la fig. 26.
FREIN DE STATIONNEMENT
On insère le frein de stationnement en soulevant l’anneau fig. 3 n. 10 jusqu’à enclencher le levier.
Pour régler le frein de stationnement agir sur le dispositif de réglage (fig. 5).
BLOCAGE DIFFERENTIEL
La pédale du blocage différentiel est indiquée dans la fig. 1 au n. 5. Appuyer sur la pédale du blocage différentiel
si les roues motrices ont tendance à glisser. Nous conseillons également d’actionner le blocage en descente
dans les pendages plus forts, afin de maintenir l’adhérence des deux roues motrices.
Attention ! Ne pas utiliser le blocage différentiel dans les tournants.
Maintenir l’attache et les chaînes lubrifiées avec graisse (fig. 27).
REGLES UTILES POUR UN BON USAGE
1) Ne jamais forcer le moteur: lorsque le tuyau d’échappement fume, le moteur est sous effort. Ralentir.
2) Ne pas laisser la machine sous la pluie.
3) Affûter fréquemment les lames; la coupe sera meilleure et le moteur forcera moins.
4) Contrôler le terrain avant d’effectuer la tonte pour qu’il n’y ait pas de cailloux, de morceaux de bois ou d’autres
corps.
5) Durant la tonte le moteur doit tourner à plein régime; régler la vitesse en fonction de la hauteur de l’herbe.
6) Faire en sorte que les grilles au dessus du moteur et les ailettes de refroidissement du moteur
hydraulique (fig. 4 et fig. 5) soient toujours propres.
POSITIONS DE COUPE
Pour régler la hauteur de coupe intervenir sur le levier (fig. 2 n. 8).
Le plateau peut occuper 6 positions de coupe différentes, de 30 à 80 mm, et une position de transfert dans laquelle
la lame se déclenche automatiquement.
En présence d’un terrain accidenté, de cassis ou dos-d’âne, il convient d’agir avec le disque dans la position de
coupe la plus haute pour éviter les chocs de la lame.

29
TERRAINS EN PENTE
Les terrains en pente doivent être parcourus, si possible, dans le sens montée/descente, en faisant grande
attention, lors des changements de direction, à ce que les roues en amont ne rencontrent aucun obstacle (cailloux,
branches, racines, etc…) qui pourraient entraîner le capotage ou la perte de contrôle de la machine.
Evaluer convenablement les différentes situations et faire grande attention si le terrain est humide et l’herbe
mouillée car la machine pourrait glisser. En descente, démarrer avec une faible vitesse et éviter de piétiner
l’herbe sèche ou coupée car les roues perdent leur adhérence, il est important de noter que, avec le blocage
différentiel et éventuellement le frein d’urgence avant (fig. 1 n. 4) actionnés, la machine acquiert stabilité.
INTERVENTIONS DES DISPOSITIFS DE SECURITE
Se rappeler toujours que le moteur s’arrête à chaque fois que:
– l’opérateur quitte son siège.
En plus le moteur ne démarre pas si:
– la lame est connectée,
– l’on n’est pas assis au poste de conduite,
– si le levier avancement ne se trouve pas dans la position de «STOP».
ENTRETIEN ET LUBRIFICATION
ATTENTION!
Enlever la clé et déconnecter les bougies avant de procéder à toute opération de nettoyage, de maintenance
ou de réparation. Porter des vêtements appropriés et des gants de travail.
IMPORTANT
Ne jamais jeter dans la nature les huiles usées, l’essence et tout autre produit polluant!
Une maintenance fiable et un graissage correct contribuent à maintenir la tondeuse en parfait état de marche.
MOTEUR
Respecter les normes contenues dans le manuel du moteur en ce qui concerne les intervalles de lubrification; il
est toutefois indispensable de vidanger l’huile après les 5 premières heures de travail, ensuite toutes les
50 heures ou une fois par saison, en remplaçant également le filtre à huile (fig. 12 bouchon de vidange de
l’huile; utiliser une deuxième clé pour empêcher à la partie fixe de se dévisser).
Remplacer le filtre à huile (fig. 13).
Première précaution à prendre: le moteur doit être correctement entretenu avec un filtre à air, des ailettes de
refroidissement, une tête propre et l’huile moteur au niveau voulu.
Contrôler le filtre à air toutes les 4 heures ou même plus fréquemment si l’environnement est très poussiéreux.
Contrôler la grille d’aspiration du refroidissement du moteur (fig. 4).
ESSIEU HYDROSTATIQUE
Le moteur froid, contrôler le réservoir à expansion, qui doit être vide (fig. 5).
Nettoyer fréquemment les ailettes de refroidissement du moteur hydraulique: toutes les 4 heures de travail
durant l’été, compte tenu de la présence importante de poussière (fig. 5).
Vidanger l’huile après les 50 premières heures de travail, ensuite toutes les 200 heures; utiliser uniquement de
l’huile 10W30, quantité 1,85 litres. Pour exécuter cette opération, il est conseillé de vidanger l’huile en procédant
comme suit :
1) Retirer les deux bouchons fig. 14.
2) Retirer le bouchon fig. 15, en utilisant un tournevis.
3) Visser les deux bouchons fig. 14 (couple de serrage 13-17 N.m).
4) Insérer l’huile et visser le bouchon fig. 15.
5) Vérifier que le réservoir à expansion soit vide, le niveau correct est 12 mm au-dessous du fond du réservoir
fig. 6).
AXES DE ROUE AVANT
Graisser toutes les 20 heures les axes d’articulation de roue avant (fig. 16).
Lubrifier les articulations de la direction.
Lubrifier la bague du tendeur de courroie moteur – plateau de coupe (fig. 16/A).

30
FILTRE A AIR
Contrôler le filtre à air toutes les 4 heures ou plus fréquemment si le milieu est très poussiéreux (fig. 8).
CONTROLE DES LAMES ET DU PLATEAU
Une lame non affûtée arrache le gazon et enlaidit le cadre général. Il faut que l’affûtage des lames soit toujours
effectué sur les tranchants des deux lames. Pour démonter une lame, la saisir avec force en utilisant des gants
de travail et dévisser la vis centrale. Attention! La vis a un filetage à droite (fig. 9 n. 3); affûter les deux tranchants
avec une meule à grain moyen et vérifier l’équilibrage de la lame en la soutenant avec un fer rond enfilé dans le
trou central.
Pour les deux lames de coupe effectuer le montage en respectant le schéma fig. 9.
ATTENTION!
Serrer bien à fond la vis de fixation (fig. 9 n. 3).
Remplacer toujours les couteaux abîmés ou tordus; ne jamais les réparer! Pour le montage respecter le schéma
fig. 9. UTILISER TOUJOURS DES COUTEAUX D’ORIGINE! Les couteaux sont doués de double tranchant: quand
l’un des deux tranchants est usé, on peut utiliser le couteau de l’autre côté. Vérifier toujours que les boulons de
fixation des couteaux ne soient usés ou abîmés.
REGLAGE DU PLATEAU DE COUPE
Un bon parallelisme du plateau est essentiel pour obtenir un gazon uniformément tondu.
Une fois placée la tondeuse sur une surface plate et après avoir contrôlé que la pression des pneus soit appropriée,
intervenir sur les 4 dispositifs de réglage (fig. 17 - 17/A) placés sur le plateau jusqu’à ce que le bord du disque soit
placé à la même distance du sol (100 mm), aussi bien d’un côté que de l’autre (avec l’opérateur assis et le plateau
sur la position 1 fig. 18/A). Si l’on n’arrive pas à obtenir un bon parallélisme il faut consulter un Centre d’Assistance
autorisé.
COURROIE MOTEUR – LAME
Régler la tension en agissant sur le registre fig. 18.
Si l’on constate l’entortillement ou la sortie de la courroie procéder aux vérifications illustrés dans la fig. 18/A, en
maintenant le plateau dans la position la plus basse.
Attention! Lorsqu’on place les guide-courroie, il faut les rapprocher de la courroie en contrôlant le plateau aux
différentes hauteurs (fig. 19 réf. A).
COURROIE DU MOTEUR – ESSIEU HYDROSTATIQUE
Elle est à réglage automatique; elle n’exige aucun réglage: il suffit de contrôler la tension du ressort; pour la
remplacer, décrocher le ressort de tension (fig. 20).
ROTATION DE LA LAME
Pour activer et désactiver la rotation de la lame, intervenir sur le levier fig. 2 n. 1.
Durant l’activation le moteur doit être à mi-régime et la machine doit se trouver hors du gazon à couper. La
désactivation intervient dans la position OFF fig. 2 n.1.
La lame doit s’arrêter en 5 secondes; s’il n’en était pas ainsi, régler le frein en intervenant sur le registre fig. 19.
Important: Cette opération doit être réalisée dans un Centre d’Assistance autorisé.
REMPLACEMENT DES COURROIES
La transmission du mouvement du moteur à la transmission hydraulique et aux lames est assurée par deux
courroies trapézoïdales. Remplacer les courroies dès qu’elles manifestent des signes d’usure!
Leur remplacement et les réglages successifs sont assez complexes. Il faut donc confier ces opérations à un
Centre d’Assistance autorisé.
Pour la courroie du moteur du plateau de coupe, il faut démonter les 3 guide-courroie placés à côté de la poulie
du plateau (pos. A, fig. 19), puis décrocher le ressort de tension de la courroie (pos. A, fig. 21) et démonter la
protection (B, fig. 21).
UTILISER TOUJOURS DES COURROIES D’ORIGINE!
DISPOSITIF DE DEBLOCAGE DE LA TRACTION
Le dispositif de déblocage de la traction est placé dans la partie arrière de la machine fig. 22; si une avarie intervient
sur la machine, placer le levier en point mort (B, fig. 22) pour pouvoir tracter ou déplacer la machine manuellement.
Dans la position (A) la machine est en service.

31
IDENTIFICATION DES INCONVENIENTS
Avec la clé sur la pos. «AVV.» (DEMARRAGE), le tableau de bord reste éteint.
– La batterie ne distribue pas du courant – Contrôler les câbles de liaison.
– Recharger la batterie
– Remplacer le fusible.
Le tableau de bord s’allume, mais avec la clé sur la pos. «AVV.» (DEMARRAGE), le démarreur ne tourne pas.
– La batterie ne distribue pas assez de courant – Recharger la batterie.
– Absence de consensus au démarrage – Levier d’avancement sur la position stop.
– Déconnecter les lames.
– S’asseoir au poste de conduite.
– Contrôler les trois senseurs de sécurité
(siège - embrayage lames - levier avancement)
Démarrage défectueux ou fonctionnement irrégulier du moteur.
– Problèmes de carburation – Nettoyer ou remplacer le filtre à air.
– Régler le carburateur (respecter les indications
du Manuel relatif au moteur).
– Dépôts ou impuretés dans le carburant – Vider le réservoir et utiliser une nouvelle essence.
– Contrôler et remplacer éventuellement le filtre à
essence.
Le démarreur tourne, mais le moteur ne démarre pas.
– L’essence n’arrive pas – Contrôler que le starter soit activé (si le moteur
est froid).
– Vérifier le niveau dans le réservoir.
– Contrôler le câblage de la commande ouverture
carburateur.
– Contrôler (et éventuellement remplacer) le filtre
essence.
– Contrôler que l’orifice de purge sur le bouchon
du réservoir ne soit pas obstrué.
– Le groupe allumage est insuffisant – Contrôler la fixation du capuchon de la bougie.
– Vérifier le nettoyage et la distance correcte entre
les électrodes.
Baisse de rendement du moteur durant la coupe.
– Vitesse d’avancement élevée par rapport – Réduire la vitesse.
à la hauteur de coupe. – Elever de quelques crans le disque de coupe.
Coupe irrégulière.
– Plateau de coupe non parallèle au terrain – Contrôler la pression des pneus.
– Rétablir le parallélisme du plateau.
– Inefficacité des lames – Contrôler que le montage des lames soit correct.
– Affûter ou remplacer les lames.
– Contrôler la tension de la courroie moteur - plateau de
coupe.
Vibrations durant le fonctionnement
– Lames déséquilibrées – Equilibrer ou remplacer les lames si endommagées.
– Fixations desserrées – Vérifier et serrer les vis de fixation des lames, du
moteur et du châssis.
INCONVENIENT
CAUSE REMEDE

32
INSTALLATION ELECTRIQUE
L’installation électrique est protégée par un fusible qui, si interrompu, provoque l’inefficacité totale de toute
l’installation électrique.
Après avoir recherché et réparé la panne, remplacer le fusible grillé par un fusible de même puissance.
Ne jamais remplacer le fusible par un fusible ayant une puissance différente.
Les fusibles de l’installation électrique se trouvent à gauche de la barre de direction (fig. 23).
Si, après les opérations susmentionnées, les inconvénients persistent, contacter le Centre d’Assistance autorisé.
N’essayer jamais d’effectuer des réparations difficiles sans disposer des moyens et des connaissances techniques
nécessaires.
IMPORTANT!
– Eviter d’inverser la polarité de la batterie.
– Ne pas faire fonctionner la tondeuse sans la batterie, car elle est munie d’un régulateur de charge.
– Veiller à ne pas provoquer des courts-circuits.
LA MACHINE NE TIENT PAS LE POINT MORT
Régler le dispositif (fig. 24) desserrer le contre-écrou et intervenir sur la vis centrale.
FIN DE LA TONTE
Après la tonte déconnecter les lames et effectuer le parcours de retour avec le plateau de coupe en position de
hauteur maximale.
Pour s’arrêter: placer le levier d’avancement sur la position “STOP” (fig. 3 n. 2), conduire la manette de l’accélérateur
jusqu’au minimum, désactiver le moteur en tournant la clé (fig. 1 n. 1), abaisser le plateau sur la position la plus
basse.
NETTOYAGE
Au terme de chaque utilisation nettoyer la partie externe de la tondeuse.
MISE EN DEPOT ET INACTIVITE PROLONGEE
Placer la machine dans un milieu sec, à l’abri des intempéries et, si possible, la recouvrir d’une bâche.
Si l’on prévoit une période d’inactivité prolongée (supérieure à 1 mois), déconnecter le câble rouge de la batterie
(fig. 23) et respecter les indications contenues dans le manuel d’instructions du moteur; lubrifier également toutes
les articulations.
Contrôler périodiquement que le voltage de la batterie ne descende pas sous la valeur de 12 V et éventuellement
recharger.
Utiliser l’additif stabilisateur pour l’essence verte.
Si la machine n’est pas utilisée pendant plus de 30 jours, vider le moteur afin de prévenir la formation de dépôts
gommeux dans le système d’alimentation ou dans des parties vitales du carburateur.
Pour protéger le moteur, il est recommandé d’utiliser l’additif pour carburant Briggs and Stratton, disponible dasn
tous les centres d’assistance agrées Briggs and Stratton. Mélanger l’additif au carburant dans le réservoir ou
dans le conteneur du carburant. Faire tourner le moteur pendant quelques instants pour faire circuler l’additif
dans le carburateur. Le moteur et le carburateur peuvent être ainsi conservés pendant une période maximum de
24 mois.
Important: si l’on n’utilise pas d’additifs ou si le moteur utilise de l’essence contenant de l’alchol, vidanger le
réservoir en faisant tourner le moteur jusqu’à l’épuisement du carburant.

33
HYDROSTATISCHER RASENMÄHER “GRILLO CLIMBER”
Sehr geehrter Kunde!
Wir danken Ihnen für Ihr Vertrauen, und beglückwünschen Sie zu Ihrem neuen Grillo CLIMBER.
Damit Sie lange Freude an Ihrem Mäher haben und dieser immer einwandfrei funktioniert, bitten wir Sie, dieses
Handbuch aufmerksam durchzulesen und die darin enthaltenen Hinweise genau zu befolgen. Denn eine
einwandfreie Wartung und eine korrekte Benutzung sind unabdingbare Voraussetzungen für einen problemlosen
Betrieb und ein schönes Schnittbild.
Bewahren Sie das Handbuch sorgfältig auf. Es ist ein wichtiger Bestandteil der Maschinenausstattung.
ACHTUNG! Lesen Sie vor dem Anlassen des Motors die folgenden Hinweise zum
Schutz Ihrer persönlichen Sicherheit genau durch!
UNFALLVERHÜTUNGSNORMEN
Vorsicht ist die wichtigste Maßnahme, um Unfälle zu vermeiden.
Bevor Sie Ihren neuen Mäher in Betrieb nehmen, bitten wir Sie, die folgenden betriebsrelevanten Hinweise
aufmerksam durchzulesen.
Ein unsachgemäßer Gebrauch des Mähers und dessen Ausrüstung kann gefährlich sein. Beachten Sie daher
bitte die folgenden Vorsichtsmaßnahmen:
1) Dieses Handbuch vor der ersten Benutzung des Mähers genau und ganz durchlesen.
2) Die auf dem Mäher angebrachten Plaketten und Hinweise besonders beachten.
3) Hände oder Füße niemals unter den Schneidteller bringen - Verletzungsgefahr!
4) Soll der Mäher von einer anderen Person benutzt werden, ist diese genau im Gebrauch der Maschine und
über die Unfallverhütungsmaßnahmen zu unterweisen.
5) Vergewissern Sie sich vor dem Einschalten der Maschine, dass sich keine anderen Personen und vor
allem keine Kinder in der Nähe aufhalten.
6) Vergewissern Sie sich vor dem Anfahren im Rückwärtsgang immer, dass keine anderen Personen oder
Hindernisse in der Nähe sind.
7) Dieser Mäher ist kein Transportmittel bzw. Spielzeug - keine „Passagiere“ befördern.
8) Das Gerät auf keinen Fall benutzen, wenn Sie unter Alkoholeinfluss stehen und/oder müde sind.
9) Kontrollieren Sie den Boden vor dem Mähen auf Steine, Stöcke und andere Gegenstände, die die Maschine
beschädigen oder von dieser weggeschleudert werden und jemanden verletzen könnten.
10) Beim Arbeiten immer geeignete Arbeitskleidung, Handschuhe, Schuhe und Schutzbrille tragen.
11) Vor dem Absteigen den Motor abstellen, die Zapfwelle ausschalten, den Zündschlüssel abziehen und den
Schneidteller ganz nach unten stellen.
12) Diese Maschine ist nicht für den Verkehr auf öffentlichen Straßen zugelassen.
13) Auf holprigen Straßen langsam fahren.
14) Beim Bergabfahren langsam fahren.
15) Das Mindestalter für die Benutzung des Mähers beträgt 16 Jahre.
16) Im Rückwärtsgang nur langsam fahren.
17) Es ist besonders gefährlich, bei hohen Motordrehzahlen das Lenkrad ruckartig zu betätigen.
18) Die Vor- und Rückwärtsfahrthebel niemals ruckartig betätigen.
19) Den Motor niemals in geschlossenen Räumen laufen lassen (Vergiftungs-/Todesgefahr).
20) Den Treibstofftank vor dem Anlassen des Motors füllen.
Nur im Freien tanken; vor dem Tanken immer den Motor abstellen, nicht rauchen und keine offenen
Flammen benutzen.
Den Tankdeckel nicht abnehmen, wenn der Motor heiß ist.
Den Tank- bzw. Treibstoffbehälter wieder gut schließen.
21) Keinen Treibstoff verschütten, und nach dem Tanken vor dem Anlassen des Motors alle Treibstoffreste
sorgfältig entfernen. Den Motor erst dann wieder anlassen, wenn das ausgetretene Benzin verdampft ist.
22) Nicht neben Gräben arbeiten, deren Rand unter dem Gewicht der Maschine nachgeben könnte, vor allem
bei nassem, lockerem oder brüchigem Boden.
23) Beim Abwärtsfahren Kurven sanft und langsam fahren.
24) Die Sicherheitseinrichtungen nicht beschädigen oder außer Funktion setzen; die Maschine niemals ohne
Schutzverkleidung oder mit beschädigten Schutzeinrichtungen oder ohne Sicherheitseinrichtungen benutzen.
25) Vor dem Verlassen der Grasfläche/Wiese immer das Mähwerk ausschalten.
26) Nicht über Schotter mähen, da dieser angesaugt und von den Messern herumgeschleudert wird, was sehr
gefährlich ist.

34
27) Den Zündschlüssel immer vor Kindern gesichert aufbewahren.
28) Bei laufendem Motor keine Einstellungen oder Reinigungsarbeiten durchführen.
29) Die Maschine niemals von einer zweiten Person kontrollieren lassen, während Sie selbst auf dem
Mäher sitzen und der Motor läuft.
30) Keine schweren Gegenstände auf dem Fahrersitz ablegen, da die Sicherheitseinrichtung ausgeschaltet
werden könnte.
31) Der Fahrer ist immer für Personen- bzw. Sachschäden verantwortlich.
32) Jeder unsachgemäße Gebrauch der Maschine hat den Verfall des Garantieanspruchs und jeglicher
Verantwortung des Herstellers zur Folge.
33) Den Mäher nur mit montiertem Steinschlagschutz benutzen.
34) Verbogene oder beschädigte Messer sofort auswechseln und nicht reparieren.
35) Ausschließlich Original-Grillo-Ersatzteile und Original-Grillo-Zubehör verwenden.
36) Es ist strengstens untersagt, mit der Maschine Lasten über 100 kg zu schleppen (Neigung max. 6%).
37) Nur bei Tageslicht oder guter Beleuchtung arbeiten.
38) Beim Bergauf-/Bergabfahren niemals stehen bleiben.
39) Den Treibstofftank immer nur im Freien entleeren.
40) ACHTUNG: Um die Brandgefahr zu reduzieren, müssen der Motorraum, der Auspufftopf, die Auspuffkrümmer,
die Batterie, der Bereich um den Treibstofftank und die Treibstoffleitungen immer frei von Gras, Blättern,
Staub, usw. gehalten werden.
41) Die Maschine darf nicht in einem Gebäude abgestellt werden, in dem die Treibstoffdämpfe mit Flammen,
Funken oder freiliegenden Stromleitungen in Berührung kommen könnten.
42) Abgenutzte oder beschädigte Auspufftöpfe auswechseln.
43) Den Treibstoff in speziell zu diesem Zweck hergestellten Behältern aufbewahren.
44) Beim Arbeiten in der Nähe einer Straße ist immer größte Vorsicht angebracht.
45) Die Einstellungen des Motors, im Besonderen die maximale Drehzahl, nicht verstellen.
46) Wenn die Maschine vibriert oder man beim Mähen gegen einen Fremdkörper stößt, die Messer auskuppeln,
den Motor anhalten, die Versorgung der Kerzen unterbrechen, den Zündschlüssel abziehen und den Mäher
kontrollieren.
47) Bevor die Maschine in einem geschlossenen Raum abgestellt wird, muss der Motor abgekühlt sein.
IDENTIFIKATION DER MASCHINE UND KUNDENDIENST
IDENTIFIKATION
Auf der Lenksäule befindet sich eine Plakette mit der
Seriennummer der Maschine, Modell GRILLO CL 7.13, CL 7.16,
CL 7.21.
KUNDENDIENST
In diesem Handbuch finden Sie Anleitungen für den korrekten Gebrauch Ihrer Maschine und die vom Benutzer
allein durchführbaren Wartungsarbeiten.
Für alle nicht in diesem Handbuch beschriebenen Eingriffe und Arbeiten wenden Sie sich bitte an Ihren GrilloHändler.
ERSATZTEILE
Verwenden Sie ausschließlich Original-Ersatzteile, da diese unter sicherheitsrelevantem und montagetechnischem
Standpunkt keine Probleme bereiten können.
Bei der Ersatzteilebestellung immer die Seriennummer der Maschine und die Ersatzteilnummer angeben.
Für die Ersatzteile des Motors die Hinweise im Motor-Handbuch beachten.
GARANTIE
Auf dem Garantieschein finden Sie die detaillierten Garantiebedingungen.
Für den Motor und die Batterie gelten die vom jeweiligen Hersteller vorgesehenen Garantiebedingungen.
CLIMBER
tipo
serie
massa c.a.
anno
KW/giri minuto
S.p.A.
CESENA - ITALY
000000
03782
15.5/3000

35
ERSATZTEILE, DIE SIE IMMER ZUR HAND HABEN SOLLTEN
2 Messer
2 Schrauben für die Messer
2 Muttern für die o.a. Schrauben
1 Satz Riemen
1 Luftfilter für den Motor
1 Ölfilter für den Motor
1 Gasseil
2 Sicherungen für elektrische Anlage
TECHNISCHE DATEN - PRODUKTBESCHREIBUNG
MOTOR: 7.13 - B&S VANGUARD 13,5 PS (10 kW) OHV, Einzylinder mit Explosionsmotor, 4 Takt,
synchronausgeglichen (AVS).
7.16 – B&S VANGUARD 16 PS (13 kW) OHV, Zweizylinder mit Explosionsmotor, 4 Takt.
7.21 – B&S VANGUARD 21 PS (15,5 kW) OHV, Zweizylinder mit Explosionsmotor, 4 Takt.
VERBRAUCH PRO STUNDE: 3 lt/h – 7.13; 3,5 lt/h – 7.16; 3,8 lt/h - 7.21.
ANLASSER: elektrisch, mit 12V-Batterie.
GETRIEBE: hydrostatischer Antrieb.
DIFFERENTIAL: mit Sperre.
KUPPLUNG: mit Zapfwelle über Keilriemen.
GESCHWINDIGKEIT: von 0 bis 9 km/h stufenlos regelbar+ Rückwärtsgang von 0 bis 4 km/h.
BEREIFUNG: vorne 13x5.00–6; hinten 16x6.50–8.
BREMSE: vorne Notbremse; hinten Festellbremse.
SITZ: gefedert und längsverstellbar, mit Überrollbügel.
MÄHDECK: Heck – und Seitenauswurf.
TYP: mit 1 rotierenden Messer.
SCHNITTBREITE: 780 mm – 7.13 / 850 mm - 7.16 & 7.21.
MESSERUMLAUFGESCHWINDIGKEIT: 70 m/sec.
SCHNITTHÖHE: von 35 bis 85 mm; 6 Schneidstellungen und 1 Transportstellung.
KAPAZITÄT PRO STUNDE: 4800 m
2
/h (ungefähr) – 7.13; 6000 m2/h (ungefähr) -7.16/7.21.
INNERER WENDEKREIS: 485 mm.
TANK: 7 lt; RESERVE: 1 lt.
ANHÄNGERKUPPLUNG: Standard auf Maschinen.
ZUBEHÖR: Gardenrädersatz.
ABMESSUNGEN: Höhe 975, Breite 900, Länge 1895.
GEWICHT: = 225 kg – 7.13 / = 235 kg – 7.16 / = 245 kg – 7.21.
INBETRIEBNAHME DER MASCHINE
1) Die Maschine auf Transportschäden untersuchen.
2) Ölstand von Motor, hydrostatischem Getriebe, Räderuntersetzung kontrollieren.
3) Reifendruck kontrollieren:
1 Bar Vorderreifen 13x5.00-6
1,2 Bar Hinterreifen 16x6.50-8.
4) Batterie kontrollieren; die Spannung darf nicht weniger als 12V betragen; ggf. Batterie nachladen.
WICHTIG !!! Beim Einbauen auf keinen Fall die Pole der Batterie umkehren.
5) Beim Montieren des Lenkrades darauf achten, dass der Keil eingesetzt und die Schraube angezogen wird
(Anzugsmoment 2 KgF.m [20 N.m]).
6) Bauen Sie den Auspufftopf, die Hinterstoßstange and den Überrollbügel an.
EINFAHREN - ACHTUNG!!
Nach den ersten 5 Betriebsstunden das Motoröl und den Filter auswechseln. Vergewissern Sie sich, dass es
keine undichten Stellen gibt, und alle Schrauben, vor allem die Befestigungsschrauben des Messers und der
Lenkung gut angezogen sind.
BETRIEBSANLEITUNG
Vor dem Anlassen des Motors immer die folgenden Kontrollen vornehmen:
– Der Fahrthebel muss in Leerlaufposition liegen (Abb. 3).
– Motorölstand kontrollieren (Abb. 4).

36
– Die Luftgitter für die Motorkühlung müssen sauber sein (Abb. 4).
– Der Luftfilter muss sauber sein (Abb. 8).
– Das Mähwerk muss sauber sein.
– Die Schlitze des Hydromotors müssen sauber sein (Abb. 5).
– Die Messer müssen scharf und gut befestigt sein.
– Der mittlere Schraube der Messernabe muss gut angezogen sein (3, Abb. 9).
– Ölstand in der Hydrostatischachse kontrollieren (Abb. 5); das Niveau liegt 12 mm unter
dem Wannenboden (Abb. 6).
Zum Einfüllen des Treibstoffs einen Trichter mit einem sehr feinen Filter benutzen (4, Abb. 10).
Die Position des Sitzes einstellen (Hebel C Abb. 11).
ANLASSEN DES MOTORS
– Den Gashebel bis zur Hälfte drücken (5, Abb. 3).
– Bei kaltem Motor die Starthilfe betätigen (6, Abb. 3). Den Zündschlüssel drehen (1, Abb. 1).
– Sobald der Motor angesprungen ist, den Starter wieder abschalten, und den Motor einige Minuten lang warm
laufen lassen.
Hinweis: Während der Transportfahrt sollte das Mähwerk ganz oben positioniert sein.
BEGINN DER ARBEIT
– Die Schnitthöhe mit Hilfe des Hebels 8 Abb. 2 einstellen, den Motor aufdrehen, die Zapfwelle einkuppeln (1,
Abb. 2). Den Fahrthebel sanft betätigen (2, Abb. 3) und mit dem Mähen beginnen. Zum Anhalten den Fahrthebel
in die mittlere Position zurückstellen.
– Der Hebel (2, Abb. 3) dient auch zum Rückwärtsfahren; dazu den Hebel nach hinten geben; nicht ruckartig
betätigen.
VORDERBREMSE
Sie müssen die Vorderbremse (Abb. 1 n. 4) nur als eine Notbremse beim Bergabfahren benutzen, um die Maschine
nicht gleiten zu lassen. Benutzen Sie sie zusammen mit dem Differentialsperre, um eine sehr standsichere
Maschine besonders im Gefälle zu haben. Unter den normalen Konditionen benutzen Sie nur den Fahrthebel, um
die Maschine zu verlangsamen oder zu bremsen.
Um die Kabeln einzustellen, benutzen Sie die Einstelleinrichtungen, Abb. 26.
FESTSTELLBREMSE
Zum Anziehen der Feststellbremse heben Sie den Ring 10 Abb. 3 an, bis der Hebel eingehakt ist.
Zum Einstellen der Feststellbremse die Kronenmutter (Abb. 5) anziehen/lockern.
DIFFERENTIALSPERRE
Das Pedal der Differentialsperre (5, Abb. 1).
Treten Sie das Pedal der Differentialsperre, falls die Antriebsräder durchrutschen. Benutzen Sie die
Differentialsperre auch beim Bergabfahren und starken Gefälle, um beide Antriebsräder in Haftung zu halten.
Benutzen Sie nicht die Differentialsperre in Kurven. Halten Sie die Kupplung und die Treibketten mit Schmierfett
geschmiert, beim Differentialsperre-Auskuppeln während der Benutzung (Abb. 27).
HINWEISE ZUM GEBRAUCH DER MASCHINE
1) Den Motor niemals überanstrengen. Sobald Rauch aus dem Auspuff austritt, wird der Motor zu stark
beansprucht und es muss unbedingt langsamer gefahren werden.
2) Die Maschine nicht im Regen stehen lassen.
3) Die Klingen regelmäßig nachschleifen. Dadurch wird das Schnittbild besser und der Motor geschont.
4) Vor dem Mähen den Boden auf Steine, Äste und andere Gegenstände kontrollieren.
5) Beim Mähen den Motor auf maximaler Drehzahl halten, und die Geschwindigkeit der Grashöhe entsprechend
regeln.
6) Die Gitter über dem Motor und die Kühlschlitze des Hydromotors sauber halten (Abb. 4 und Abb. 5).
EINSTELLEN DER SCHNITTHÖHE
Die Schnitthöhe wird mit Hilfe des Hebels 8 Abb. 2 eingestellt.
Das Mähwerk kann auf vier verschiedenen Schnitthöhen von 35 bis 80 mm positioniert werden; für Transportfahrten
gibt es eine Extrastellung, in der das Messer automatisch ausgekuppelt ist.
Auf unebenem Gelände sollte das Mähwerk in der höchsten Stellung positioniert werden, damit das Messer
keine Bodenerhebungen berühren kann.

37
MÄHEN AUF HÄNGEN
Wiesen in steiler Hanglage sollten vorzugsweise senkrecht (auf-ab), und niemals parallel zum Hang gemäht
werden. Beim Richtungswechsel ist darauf zu achten, dass die bergwärts gelegenen Räder nicht durch Hindernisse
wie Steine, Äste, Wurzeln, o. ä. die Bodenhaftung verlieren, da dies ein Umkippen des Mähers oder den Verlust
der Kontrolle über das Fahrzeug zur Folge haben könnte.
Die Situation muss also von Fall zu Fall gut abgewägt werden. Bei feuchtem Boden und nassem Gras ist besondere
Vorsicht angebracht, da die Maschine rutschen könnte; beim Bergabfahren langsam anfahren, und bedenken,
dass die Räder auf geschnittenem oder trockenem Gras den Halt verlieren können.
Achtung! Wenn die Differentialsperre und die Vordernotbremse (Abb. 1 n. 4) eingekuppelt werden, ist die Maschine
standsicherer.
ANSPRECHEN DER SICHERHEITSEINRICHTUNGEN
Der Motor wird automatisch abgestellt, wenn:
– Der Fahrer vom Sitz aufsteht.
Der Motor kann nicht eingeschaltet werden, wenn:
– Das Messer eingekuppelt ist.
– Niemand auf dem Fahrersitz sitzt.
– Der Fahrthebel sich nicht in der Position STOPP befindet.
WARTUNG UND SCHMIEREN
ACHTUNG!
Vor jedem Reinigungs-, Wartungs- oder Reparatureingriff den Zündschlüssel abziehen und die
Zündkerzenversorgung unterbrechen. Zweckmäßige Arbeitskleidung und Arbeitshandschuhe tragen.
WICHTIG
Altöl, Benzin und andere umweltverschmutzende Produkte ordnungsgemäß entsorgen!
Eine gute Wartung und eine korrekte Schmierung halten den Mäher stets funktionstüchtig und einsatzbereit.
MOTOR
Für die Schmierung des Motors die im Motor-Handbuch angeführten zeitlichen Angaben beachten. Das Öl und
der Ölfilter müssen auf jeden Fall nach den ersten 5 Arbeitsstunden und danach alle 50 Betriebsstunden,
aber mindestens einmal die Saison gewechselt werden (Abb. 12, Ölauslass-Verschluss; bitte, benützen
Sie einen Zweitschlüssel in dem Festen Teil).
Den Ölfilter auswechseln (Abb. 13). Es ist besonders wichtig, dass der Motor korrekt gewartet wird: Luftfilter,
Kühlrippen und Kopf müssen sauber gehalten werden, der Motorölstand muss stimmen.
Den Luftfilter mindestens alle 4 Stunden kontrollieren, bei staubigen Bedingungen auch häufiger.
Das Ansauggitter für die Motorkühlung kontrollieren (Abb. 4).
HYDROSTATISCHE ACHSE
Mit kaltem Motor die Expansionswanne kontrollieren; sie muss leer sein (Abb. 5).
Die Kühlrippen des Hydromotors häufig säubern; im Sommer bei Trockenheit und Staub alle vier Arbeitsstunden,
Abb. 5.
Das Öl nach den ersten 50 Arbeitsstunden und danach alle 200 Stunden wechseln; verwenden Sie dazu 10W30
und zwar 1,85 l für den Ölwechsel wie folgt vorgehen:
1) Die beiden Verschlüsse abnehmen, Abb. 14.
2) Mit einem Schraubenzieher den Verschluss Abb. 15 entfernen.
3) Die beiden Verschlüsse Abb. 14 einschrauben (Anzugsmoment 13-17 N.m).
4) Das Öl einfüllen, den Verschluss Abb. 15 wieder einsetzen.
5) Beim hydrostatischen Getriebe muss das Expansionsgefäß leer sein; der Pegel liegt 12 mm unter dem
unteren Ende der Expansionswanne, Abb. 6.
VORDERE ACHSE
Alle 20 Stunden die hinteren Radgelenkzapfen fetten, Abb. 16.
Die Gelenke der Lenkung ebenfalls schmieren.
Das Achslager des Spanners für den Motor-Mähwerk-Riemen schmieren (Abb. 16/A).
LUFTFILTER
Den Luftfilter alle 4 Stunden kontrollieren, bei staubigen Verhältnissen auch öfter (Abb. 8).

38
KONTROLLE VON MÄHWERK UND MESSERN
Ein stumpfes Messer schneidet das Gras nicht ab, sondern reißt es ab, was ein unschönes Schnittbild zur Folge
hat. Es müssen immer die Schneiden beider Messer geschliffen werden. Zum Ausbauen das Messer mit
Schutzhandschuhen festhalten und die mittlere Schraube - Achtung rechtsgängige Schraube - ausdrehen (Abb.
9 Pos. 3). Beide Schneiden mit einem mittleren Schleifstein nachschleifen und sicherstellen, dass das Messer
ausgewuchtet ist, indem man es mit einem im mittleren Loch eingesteckten Rundeisen hält.
Für die Montage der beiden Schneidklingen siehe Schema Abb. 9.
ACHTUNG!
Die Befestigungsschraube fest anziehen (Abb. 9 Pos. 3). Beschädigte oder verbogene Messer sofort auswechseln.
Nicht zu reparieren versuchen! Für die Montage siehe Schema Abb. 9. AUSSCHLIESSLICH ORIGINAL-MESSER
VERWENDEN! Zeigen die Messer Abnutzungserscheinigungen, können sie umgedreht werden, da sie eine
Doppelschneide haben.
Kontrollieren Sie immer, dass die Messerbolzen nicht verschlissen oder beschädigt sind.
EINSTELLEN DES MÄHWERKS
Ein einwandfreies Schnittbild kann nur dann erhalten werden, wenn das Mähwerk vollkommen plan liegt.
Den Mäher auf einen ebenen Boden stellen, den Luftdruck der Bereifung kontrollieren, und das Mähwerk mit
Hilfe der rechten und linken Stellschrauben (Abb. 17 - 17/A) so ausrichten, dass der Mähwerkrand auf beiden
Seiten 100 mm über dem Boden steht (mit auf der Maschine sitzendem Fahrer und Mähwerk auf Pos. 1 Abb.
18/A).
Kann das Mähwerk nicht plan gestellt werden, ist der Kundendienst zu verständigen.
RIEMEN MOTOR - SCHNEIDMESSER
Die Riemenspannung wird mit Hilfe der Spannvorrichtung eingestellt - Abb. 18.
Springt der Riemen heraus, oder verdreht er sich, stellt man das Mähwerk ganz nach oben und macht die
Kontrollen und die Einstellungen als in Abb. 18/A (halten Sie das Mähwerk in der niedrigsten Position).
Beim Positionieren der Riemenführungen müssen die Führungen dem Riemen genähert und dabei das Mähwerk
auf den diversen Höhen kontrolliert werden (A, Abb. 19).
RIEMEN MOTOR – HYDROSTATISCHE ACHSE
Bei diesen Riemen mit Selbstregulierung ist kein Nachstellen erforderlich. Es muss lediglich die Spannung der
Feder kontrolliert werden. Zum Auswechseln muss die Spannfeder ausgehängt werden (Abb. 20).
ROTATION DES MESSERS
Die Drehbewegung des Messers wird mit dem Hebel Abb. 2 Pos. 1 ein- und ausgeschaltet.
Beim Einschalten muss der Motor mit halber Kraft arbeiten und die Maschine darf nicht auf dem zu schneidenden
Gras stehen.
Das Ausschalten erfolgt in der Position OFF, Abb. 2 Pos.1.
Das Messer muss innerhalb von 5 Sekunden stehen bleiben; andernfalls muss die Bremse mit Hilfe der Vorrichtung
Abb. 19 justiert werden.
NB: Diese Einstellung muss in einem autorisierten Grillo-Kundendienstcenter vorgenommen werden.
AUSWECHSELN DER RIEMEN
Die Übertragung der Bewegung des Motors auf das Druckölgetriebe und auf die Schneidmesser erfolgt über
zwei Keilriemen. Diese Riemen müssen ausgewechselt werden, sobald sie Abnutzungserscheinungen
zeigen.
Das Auswechseln und nachfolgende Einstellen der Riemen ist ziemlich kompliziert, und muss daher von einem
Grillo-Kundendienstcenter vorgenommen werden.
Für den Riemen, der den Motor mit dem Mähwerk verbindet, müssen die drei Riemenführungen neben der
Riemenscheibe des Mähwerks abmontiert (Abb. 19 Pos. A) und die Riemenspannfeder ausgehakt (Abb. 21,
Pos. A) und die Schutzverkleidung (Abb. 21, Pos. B) abmontiert werden.
IMMER ORIGINAL-ERSATZRIEMEN VERWENDEN!
VORRICHTUNG ZUM AUSKUPPELN DES ANTRIEBS
Im hinteren Maschinenteil befindet sich die Vorrichtung zum Auskuppeln des Antriebs (Abb. 22). Sollte die Maschine
eine Panne haben und abgeschleppt oder von Hand verschoben werden müssen, legt man den Hebel in die
Leerlaufstellung (Abb. 22, Pos. B). In der Stellung (A) arbeitet die Maschine.

39
LISTE DER HÄUFIGSTEN STÖRUNGEN UND DEREN BEHEBUNG:
STÖRUNG
URSACHE ABHILFE
Mit dem Zündschlüssel in Pos. AVV (ANLASSEN) schaltet sich das Armaturenbrett nicht ein.
– Die Batterie liefert keinen Strom – Verbindungskabel kontrollieren
– Batterie aufladen
– Sicherung auswechseln
Das Armaturenbrett schaltet sich ein, aber obwohl der Zündschlüssel in der Pos. AVV. (ANLASSEN) ist,
reagiert der Anlassermotor nicht.
– Batterie liefert ungenügenden Strom – Batterie aufladen
– Es fehlt die Zustimmung zum Start – Fahrthebel in Position Stopp
– Messer auskuppeln
– Sie sitzen nicht auf dem Fahrersitz
– Kontrollieren Sie die drei Sicherheits-Messwertgebers
(Sitzt - Messers Einschaltung - Vorschubhebel)
Der Motor hat beim Starten Schwierigkeiten oder läuft unregelmäßig
– Vergaserprobleme – Luftfilter reinigen oder auswechseln
– Vergaser einstellen (siehe Motorhandbuch)
– Schmutziger Treibstoff – Tank entleeren und frisches Benzin nachfüllen
– Benzinfilter kontrollieren und ggf. auswechseln
Anlassermotor funktioniert, Motor springt jedoch nicht an
– Benzinversorgung funktioniert nicht – Kontrollieren, ob der Starter betätigt wurde (bei Kaltstart)
– Benzinstand kontrollieren
– Verkabelung für Vergaseröffnung kontrollieren
– Benzinfilter kontrollieren und ggf. austauschen
– Das Entlüftungsloch im Tankdeckel ist verstopft, und
muss gereinigt werden
– Zündanlage ist defekt – Befestigung des Zündkerzensteckers kontrollieren
– Abstand und Zustand der Elektroden kontrollieren
Motorleistung sinkt beim Mähen
– Für die Schnitthöhe zu hohe Geschwindigkeit – Langsamer fahren
– Mähwerk etwas höher stellen
Schlechtes, unregelmäßiges Schnittbild
– Mähwerk liegt nicht parallel zum Boden – Reifendruck kontrollieren
– Mähwerk justieren
– Messer schneiden schlecht – Sitz des Messers kontrollieren
– Messer nachschleifen oder auswechseln
– Spannung des Riemens vom Motor zum Mähwerk
überprüfen
Vibrationen beim Arbeiten
– Messer nicht ausgewuchtet – Messer auswuchten und ggf. beschädigte Messer
auswechseln
– Befestigungsschrauben locker – Befestigungsschrauben von Messern, Motor und Rahmen
kontrollieren und ggf. nachziehen.

40
ELEKTRISCHE ANLAGE
Die elektrische Anlage ist durch eine Schmelzsicherung geschützt; brennt die Sicherung durch, wird die gesamte
elektrische Anlage außer Betrieb gesetzt.
Den Defekt suchen und beheben und die durchgebrannte Sicherung durch eine neue, identische Sicherung
ersetzen.
Niemals Sicherungen mit anderer Leistung einsetzen.
Die Schmelzsicherungen sind im linken Teil des Steuers untergebracht (Abb. 23).
Funktioniert der Mäher danach noch immer nicht, setzen Sie sich bitte mit Ihrem Grill-Servicecenter in Verbindung.
Versuchen Sie niemals, komplizierte Reparaturen selber durchzuführen, wenn Sie nicht über die dafür
erforderlichen technischen Kenntnisse und Ausrüstungen verfügen.
WICHTIG!
– Die Polarität der Batterie niemals umkehren.
– Den Mäher nicht ohne Batterie arbeiten lassen, da er mit einem Ladungsregler ausgestattet ist.
– Keine Kurzschlüsse verursachen.
DIE MASCHINE BLEIBT NICHT IM LEERLAUF
Die Vorrichtung (Abb. 24) einstellen, die Kontermutter lockern und die mittlere Schraube drehen.
FAHRTHEBEL
Zum Einstellen der Geschwindigkeit beim Vorwärtsfahren und im Rückwärtsgang die Schrauben (A, Abb. 25)
benutzen. Kehrt der Fahrthebel automatisch auf Null zurück, muss die selbstblockierende Mutter (B, Abb. 25)
eingestellt werden.
NACH DER ARBEIT
Die Messer auskuppeln und vor dem Wegfahren das Mähwerk ganz anheben.
Zum Anhalten den Fahrthebel auf STOPP legen (2, Abb. 3) den Gashebel auf Minimum stellen und den Motor
durch Drehen des Schlüssels abstellen (1, Abb. 1), das Mähwerk ganz nach unten stellen.
REINIGUNG
Den Mäher nach jedem Einsatz außen reinigen.
EINSTELLEN DES MÄHERS FÜR DEN WINTER ODER LÄNGERE NICHTBENUTZUNG
Den Mäher an einen trockenen, vor Witterungseinflüssen geschützten Ort bringen und abdecken. Wird die
Maschine voraussichtlich längere Zeit (mehr als 1 Monat) nicht benutzt werden, das rote Kabel der Batterie
abnehmen (Abb. 23) und die Angaben im Motorhandbuch befolgen. Alle Gelenke schmieren.
Regelmäßig die Spannung der Batterie prüfen; sinkt sie unter 12 Volt, muss die Batterie sofort aufgeladen werden.
Konservierungsmittel für bleifreies Benzin beimischen.
Wird der Mäher länger als 30 Tage nicht benutzt, muss der Treibstoff abgelassen werden, damit sich keine
klebrigen Ablagerungen in der Zuleitung oder in wichtigen Vergaserteilen bilden.
Zum Schutze des Motors sollten Sie den Briggs & Stratton -Treibstoffzusatz verwenden, den Sie bei allen offiziellen
Briggs & Stratton - Servicecentern erhalten. Den Zusatz zum Treibstoff in den Tank oder in den Treibstoffbehälter
schütten. Den Motor eine Zeit lang laufen lassen, damit sich des Zusatz im Vergaser verteilt. Der Motor und der
Vergaser können so bis zu 24 Monate stehen.
Hinweis: Benutzt man keinen Zusatz oder alkoholhaltiges Benzin, muss der Treibstofftank entleert werden, indem
man den Motor so lange laufen lässt, bis der Treibstoff aufgebraucht ist.

41
CORTADORA DE CÉSPED HIDROSTÁTICA «GRILLO CLIMBER»
Estimado Cliente:
Le agradecemos por la confianza y la preferencia que ha mostrado por nuestro GRILLO CLIMBER y confiamos
en que el uso de su nueva máquina responda plenamente a sus exigencias.
Para un empleo óptimo y para su mantenimiento a través del tiempo, le rogamos que lea atentamente y siga
escrupulosamente las indicaciones de este manual, ello le permitirá obtener los máximos resultados y salvaguardar
su compra.
Le rogamos también que guarde este manual, el cual deberá acompañar siempre la máquina.
¡ATENCIÓN! Antes de poner en marcha el motor, leer detenidamente este manual.
Las siguientes advertencias son importantes para la incolumidad del operador.
NORMAS DE PREVENCIÓN DE ACCIDENTES
La prudencia es el arma principal para prevenir los accidentes.
Le rogamos lea con atención las siguientes advertencias antes de iniciar el trabajo con la cortadora de césped.
El uso inadecuado de la máquina y de su equipamiento puede resultar dañoso; para limitar estas posibilidades
adopte las precauciones necesarias que se indican a continuación:
1) Leer todo el manual, antes de encender y poner en funcionamiento la cortadora de césped.
2) Prestar especial atención a las prohibiciones y a los adhesivos de seguridad colocados en la máquina.
3) La rotación de la cuchilla de la cortadora de césped es sumamente peligrosa, nunca poner las manos o
los pies debajo del plato de corte.
4) Antes de permitir que otras personas trabajen con el cortacésped, es preciso informarles sobre las normas
de seguridad y cómo se utiliza el cortacésped.
5) Antes de poner en marcha la máquina controle que no haya personas alrededor, sobre todo niños.
6) Antes de partir con la máquina en marcha atrás controlar que no haya personas ni obstáculos.
7) No permitir que suban pasajeros a la máquina.
8) No usar la máquina con síntomas de cansancio y no beba alcohólicos.
9) Controlar el terreno antes de proceder con el corte del césped para que no haya piedras, maderos o
cuerpos extraños, los cuales podrían dañar la máquina o lanzarse lejos y, por lo tanto, ser muy peligrosos.
10) Antes de empezar el trabajo, ponerse las prendas de trabajo adecuadas, guantes, botas y gafas.
11) Antes de encender la cortadora de césped, apagar el motor, desconectar la PTO (toma de fuerza), extraer
la llave de encendido y bajar el plato de corte a la posición más baja.
12) Esta máquina no puede viajar por carretera.
13) En senderos secundarios, viajar a baja velocidad.
14) Moderar la velocidad durante el descenso de pendientes.
15) No permitir el uso de la máquina por parte de personas demasiado jóvenes; está prohibido su uso a los
menores de 16 años.
16) No hacer marcha atrás con el motor acelerado.
17) Es peligroso accionar el volante de manera brusca con el motor en régimen máximo.
18) No accionar la palanca de avance y retroceso de manera brusca.
19) Para evitar el peligro de exhalaciones tóxicas, no arrancar el motor en ambientes cerrados.
20) Antes de poner en marcha el motor, llenar el depósito de combustible.
Reabastecer el combustible sólo al aire libre, apagando siempre el motor y manteniéndose lejos de
chispas o llamas. ¡No fumar!
No quitar la tapa del tanque cuando el motor está caliente.
Volver a colocar de modo seguro la tapa del depósito y de los recipientes de combustible.
21) Evitar las pérdidas de combustible y, tras haber llenado el tanque, limpiar los residuos que queden sobre la
máquina antes de poner en marcha la misma: no crear alguna fuente de inyección hasta la total dispersión
de los vapores de la gasolina vertida.
22) No trabajar con la cortadora de césped cerca de fosos o banquinas que puedan ceder bajo el peso de la
máquina, especialmente cuando la superficie se presente movediza o mojada.
23) En las bajadas, curvar siempre de manera muy lenta.
24) No manipular ni desactivar los dispositivos de seguridad, no usar la máquina sin los cárteres de protección
o con los mismos dañados, así como tampoco sin dispositivos de seguridad.
25) Antes de pasar por superficies que no tengan césped, desconectar la cuchilla.
26) No trabajar con el cortacésped sobre grava, porque la misma sería aspirada y centrifugada por la cuchilla,
resultando muy peligrosa.

42
27) Si se tienen niños, esconder las llaves de encendido cuando no se use la máquina.
28) No hacer algún tipo de regulación o limpieza con el motor en marcha.
29) No hacer controlar la máquina por otras personas mientras el operador esté sentado en el puesto
de conducción con el motor en marcha.
30) Non apoyar pesos en el asiento, puesto que podrían desactivar el dispositivo de seguridad del arranque.
31) El usuario siempre es responsable de los daños originados a terceros.
32) Cualquier uso impropio supone la anulación de la garantía y la exoneración de cualquier responsabilidad
del fabricante.
33) Utilizar la máquina con los deflectores de protección contra las piedras.
34) Las cuchillas deformadas o dañadas siempre deben ser cambiadas, no reparadas.
35) Usar siempre recambios y accesorios originales Grillo.
36) Se prohíbe remolcar cargas de más de 100 kg (pendiente máx. 6%).
37) Cortar sólo a la luz del sol o con buena iluminación artificial.
38) No detenerse cuando se trabaje en subida o en bajada.
39) Si fuera necesario vaciar el tanque de combustible, efectuar la operación al aire libre.
40) ATENCIÓN: Para reducir el peligro de incendio, mantener el alojamiento motor, el silenciador del escape,
los tubos de escape, la batería, la zona del tanque y los conductos de combustible libres de hierba, hojas,
polvo, etc.
41) No almacenar la máquina dentro de un edificio donde los vapores del combustible puedan entrar en contacto
con llamas, chispas o cables de electricidad descubiertos.
42) Sustituir el silenciador de escape cuando el mismo esté gastado o dañado.
43) Almacenar el combustible en recipientes fabricados específicamente con dicha finalidad.
44) Prestar atención cuando se trabaje en proximidad a una carretera.
45) No modificar las regulaciones del motor, especialmente la cantidad máxima de revoluciones.
46) Si la máquina vibra o golpea un cuerpo extraño, desembragar la cuchilla, parar el motor, desconectar las
bujías, quitar la llave de arranque e inspeccionar la cortadora.
47) Dejar enfriar el motor antes de guardar la máquina en ambientes cerrados.
IDENTIFICACIÓN Y ASISTENCIA
CLIMBER
tipo
serie
massa c.a.
anno
KW/giri minuto
S.p.A.
CESENA - ITALY
000000
03782
15.5/3000
IDENTIFICACIÓN
La cortadora de césped Grillo CL 7.13, 7.16, 7.21 está dotada de
una placa de identificación con el número de máquina situada en
la columna de dirección.
SERVICIO DE ASISTENCIA
Este manual ofrece las indicaciones para el uso de la cortadora de césped y para un buen mantenimiento
básico, posible de ser efectuado por el usuario.
Para obtener información acerca de las intervenciones no descritas en este manual, se ruega ponerse en contacto
con el Revendedor local.
RECAMBIOS
Se recomienda emplear exclusivamente recambios originales, los únicos que garantizan características de
seguridad y posibilidad de intercambio.
Cada pedido debe ser acompañado por el número de bastidor de la máquina y el número de código de la pieza
para cambiar.
Para los recambios del motor, atenerse a todo lo indicado en el manual específico.
GARANTÍA
La garantía se ofrece en los modos y en los límites que se indican en la ficha correspondiente.
En lo que se refiere al motor y la batería, valen las condiciones previstas por los respectivos fabricantes.

43
RECAMBIOS QUE SE ACONSEJA TENER DE RESERVA
2 cuchillas
2 tornillos cuchillas
2 tuercas tornillos cuchillas
1 serie correas
1 filtro aire motor
1 filtro aceite motor
1 cable acelerador
2 fusibles instalación eléctrica
CARACTERÍSTICAS TÉCNICAS
MOTOR: 7.13 - BRIGGS & STRATTON 13,5 hp (10 kW) OHV, de un cilindro, de explosión, 4 tiempos,
sincroequilibrado (AVS).
7.16 - BRIGGS & STRATTON VANGUARD OHV 16 hp (13 kW), de dos cilindros, de explosión, 4 tiempos.
7.21 - BRIGGS & STRATTON VANGUARD OHV 21 hp (15.5 kW), de dos cilindros, de explosión, 4 tiempos.
CONSUMO HORARIO: 3 lt/h – 7.13; 3,5 lt/h – 7.16; 3,8 lt/h – 7.21.
ARRANQUE: eléctrico, con batería 12V.
CAMBIO: transmisión idrostática.
DIFERENCIAL: con bloqueo.
EMBRAGUE: por P.T.O., a tensión de correa.
VELOCIDAD: de 0 a 9 km/h con variación continua y marcha atrás de 0 a 4 km/h.
NEUMÁTICOS delanteros: 13x5.00 - 6; traseros: 16 x 6.50-8.
FRENOS: delanteros de emergencia; traseros de estacionamiento.
ASIENTO: amortiguado y regulable, con arco antivuelco.
PLATO DE CORTE: con descarga lateral / trasera.
SISTEMA DE CORTE: 1 cuchilla rotativa.
ANCHO DE CORTE: 780 mm – 7.13; 850 mm – 7-16/7.21
VELOCIDAD PERIFÉRICA CUCHILLA: 70 m/s.
ALTO DE CORTE: desde 35 mm. hasta 85 mm. 6 posiciones de corte diferentes y 1 de traslado.
CAPACIDAD HORARIA: 4800 m
2
/h (aproxim.) – 7.13; 6.000 m2/h (aproxim.)- 7.16/7.21
RAYO DE GIRO: 485 mm.
DEPÓSITO: 7 lt, - RESERVA: 1 lt.
TIRANTE DE TRACCIÓN: de serie
ACCESORIOS: serie ruedas para césped.
DIMENSIONES: Largo: 1895 mm; Ancho: 900 mm; Alto: 975 mm
PESO: 225 kg – 7.13; 235 kg – 7.16; 245 kg – 7.21
PUESTA EN SERVICIO DE LA MÁQUINA
1) Controlar la integridad de la máquina, que no haya sufrido daños durante el transporte.
2) Controlar los niveles de aceite, aceite motor, transmisión hidrostática, reductor ruedas.
3) Controlar la presión de los neumáticos:
1 BAR ruedas delanteras 13 x 50-6
1,2 BAR ruedas traseras 16 x 6.50-8.
4)
Controlar el voltaje de la batería, que no debe ser inferior al valor de 12 Voltios, de ser necesario proceder a su recarga.
¡IMPORTANTE! Durante el montaje, prestar atención en no invertir la polaridad de la batería.
5)
Montar el volante prestando atención en introducir la chaveta y apretar el tornillo (par de torsión = 2 KgF.m [20 N.m]).
6) Montar el silenciador, el para-choque trasero y el arco antivuelco.
RODAJE - ¡ATENCIÓN!
Sustituir el aceite motor y el filtro tras las primeras 5 horas de funcionamiento.
Controlar que no se produzcan pérdidas de aceite y que no se aflojen los tornillos, especialmente los que fijan la
cuchilla de corte y el volante.
INSTRUCCIONES PARA EL USO
Antes de poner en marcha el motor, controlar siempre que:
– la palanca de avance esté en punto muerto (Fig.3);
– el aceite del motor esté a nivel (Fig. 4);
– las rejillas de aspiración para la refrigeración del motor estén limpias (Fig. 4);

44
– el filtro de aire esté bien limpio (Fig. 8);
– el plato de corte esté bien limpio;
– las aletas del motor hidráulico estén limpias (Fig. 5);
– las cuchillas estén bien afiladas y fuertemente aseguradas;
– el tornillo central del cubo de la cuchilla esté bien ajustado (Fig. 9).
– el aceite del motor hidráulico esté a nivel (Fig. 5); el nivel se encuentra 12 mm más abajo que el plano
inferior del recipiente (Fig. 6)
Llenar el depósito de combustible con el auxilio de un embudo provisto de un filtro muy fino (fig. 10 n. 4).
Regular la posición del asiento mediante la perilla (Fig. 11).
PUESTA EN MARCHA DEL MOTOR
– Empujar la manecilla del acelerador hasta la mitad de su recorrido (Fig. 3 n. 5)
– Si el motor está frío, accionar el estárter (Fig. 3 n. 6). Girar la llave de puesta en marcha (Fig. 1 n. 1).
– Una vez en marcha el motor, desconectar el estárter y esperar algunos minutos para calentar el motor.
Nota: Durante los desplazamientos, es oportuno que el plato de corte se encuentre a la máxima altura.
INICIO DEL TRABAJO
– La altura de corte se regula mediante la palanca (Fig. 2 n. 8), acelerar oportunamente el motor, engranar la
PTO (fig. 2 n. 1). Accionar suavemente la palanca de avance (fig. 3 n. 2) e iniciar el trabajo. Para detenerse,
llevar la palanca de avance nuevamente a la posición central.
– La palanca (fig. 3 n. 2) también sirve para la marcha atrás; moviéndola hacia atrás la máquina retrocede
(hacerlo suavemente).
FRENO DELANTERO
El freno delantero (fig. 1 n. 4) sólo se tiene que utilizar en tanto que freno de emergencia, cuesta abajo, para evitar
que la máquina deslice. Si se activa en combinación con el bloqueo del diferencial, el freno delantero aumenta la
estabilidad de la máquina. Para desacelerar y frenar en condiciones normales se utiliza la palanca de avance.
Para regular los cables, utilizar los dispositivos ilustrados en fig. 26.
FRENO DE ESTACIONAMIENTO
El freno de estacionamiento se acciona levantando el anillo fig. 3 n. 10 hasta enganchar la palanca.
Para regular el freno de estacionamiento, servirse del regulador (Fig. 5).
BLOQUEO DEL DIFERENCIAL
La pedal del bloqueo del diferencial es la indicada al n. 5 de la fig. 1. Apretar la pedal del bloqueo en caso de
deslizamiento de las ruedas motrices. Además, se aconseja accionar el bloqueo cuesta abajo, en fuertes
pendientes, para mantener la adherencia de las ruedas motrices.
Atención: El bloqueo del diferencial tiene que estar desembragado en las curvas.
Mantener lubricados con grasa el ataque y la cadena (fig. 27).
REGLAS ÚTILES PARA UN BUEN USO
1) Nunca forzar el motor; cuando sale humo por el escape significa que la máquina se está esforzando,
entonces es necesario desacelerar.
2) No tener la máquina bajo la lluvia.
3) Afilar las cuchillas frecuentemente; el corte será mejor y el motor se esforzará menos.
4) Controlar el terreno antes de proceder al corte del césped; eliminar las piedras, los palos y los cuerpos
extraños.
5) Durante el corte, mantener el motor en régimen máximo, regular la velocidad en base a la altura del césped.
6) Mantener limpias las rejillas situadas sobre el motor y las aletas de enfriamiento del motor hidráulico
(Fig. 4 y 5).
POSICIONES DE CORTE
La altura de corte se regula mediante la palanca fig. 2 n. 8.
El plato puede ubicarse en 6 posiciones de corte diferentes, de 35 a 80 mm, y en una posición de desplazamiento
en la cual la cuchilla se desengrana automáticamente.
En caso de terreno accidentado, cunetas o baches, conviene trabajar con el plato en la posición de corte más
alta para evitar el choque de la cuchilla.

45
TERRENOS EN PENDIENTE
Los terrenos empinados deben recorrerse posiblemente en sentido vertical (subida/bajada), prestando atención
en los cambios de dirección, para que las ruedas delanteras no encuentren obstáculos (piedras, ramas, raíces,
etc.) ya que podrían provocar el vuelco o la pérdida de control de la máquina.
Analizar las diferentes situaciones y prestar atención cuando se esté trabajando en terreno húmedo y césped
mojado, porque la máquina puede resbalar. En bajada, arrancar a velocidad baja y evitar pasar sobre hierba
seca o cortada, porque las ruedas pierden adherencia; es importante notar que, si se acciona el bloqueo del
diferencial y, eventualmente, el freno delantero (fig. 1 n. 4) , la máquina será más estable.
INTERVENCIÓN DE LOS DISPOSITIVOS DE SEGURIDAD
Recordar siempre que el motor se para cada vez que:
– El conductor se levanta del asiento
Además, el motor no arranca si:
– La cuchilla está embragada.
– No se está sentado en el puesto de conducción.
– La palanca de avance no está en posición de STOP.
MANTENIMIENTO Y LUBRICACIÓN
¡ATENCIÓN!
Extraer la llave y desconectar las bujías antes de iniciar cualquier operación de limpieza, mantenimiento
o reparación. Ponerse la ropa adecuada y guantes de trabajo.
IMPORTANTE
¡Nunca arrojar en el medio ambiente aceites usados, gasolina ni cualquier otro producto contaminante!
Un mantenimiento eficiente y una correcta lubricación contribuyen a mantener la máquina en perfecto
funcionamiento.
MOTOR
Para los intervalos de lubricación, seguir las normas detalladas en el manual del motor; de todos modos, es
indispensable cambiar el aceite tras las primeras 5 horas de funcionamiento, posteriormente cada 50
horas o a cada cambio de estación junto con el filtro de aceite (fig. 12, tapón descarga aceite; utilizar una
segunda llave para evitar que la parte fija se destornille).
Cambiar el filtro de aceite (fig. 13). La primera precaución consiste en que el motor esté correctamente mantenido
con filtro de aire, aletas de refrigeración del cilindro, culata limpia y el aceite del motor a nivel.
Controlar el filtro de aire cada 4 horas o aún más frecuentemente si el medio ambiente es muy polvoriento.
Controlar la rejilla de aspiración de la refrigeración del motor (Fig. 4).
EJE HIDROSTÁTICO
Con el motor frío, controlar que la cámara de expansión esté vacía (fig. 5).
Limpiar frecuentemente las aletas de refrigeración del motor hidráulico, sobre todo en verano y ante la presencia
de mucho polvo (cada 4 horas de trabajo) (fig. 5).
Cambiar el aceite tras las primeras 50 horas de funcionamiento y, posteriormente, cada 200 horas, utilizando
1,85 l. de aceite 10W30 y procediendo de la siguiente manera:
1) Quitar los dos tapones (fig. 14).
2) Sirviéndose de un destornillador, remover el tapón (fig. 15).
3) Enroscar los dos tapones (fig. 14) con un par de torsión de 13-17 N.m.
4) Echar el aceite y volver a colocar el tapón (Fig. 15).
5) Controlar que la cámara de expansión esté vacía, el nivel está 12 mm más abajo que el plano inferior de la
misma (Fig. 6).
EJE RUEDAS DELANTERAS
Engrasar cada 20 horas los pernos de articulación de la rueda (fig. 16).
Lubricar las articulaciones de la dirección.
Lubricar el casquillo tensor de la correa motor en el plato de corte (fig. 16/A).
FILTRO AIRE
Controlar el filtro de aire cada 4 horas de trabajo o aún más frecuentemente si el ambiente es muy polvoriento (Fig. 8).

46
CONTROL CUCHILLAS Y PLATO DE CORTE
Una cuchilla desafilada arranca el césped, dándole un aspecto desagradable. Es necesario que se afilen siempre
las dos cuchillas. Para desmontar una cuchilla, aferrarla fuertemente, utilizando guantes de trabajo, y destornillar
el tornillo central considerando que el mismo gira a derechas (Fig. 9 n. 3); afilar ambos filos mediante una muela
de grano mediano y controlar el equilibrado de la cuchilla sosteniéndola con una barra introducida en el orificio
central.
Efectuar el montaje de ambas cuchillas siguiendo el esquema de la Fig. 9.
¡ATENCIÓN!
Ajustar a fondo el tornillo de fijación (Fig. 9 n. 3). Cambiar siempre las cuchillas averiadas o torcidas. ¡Nunca
tratar de repararlas! Para el montaje, seguir el esquema de la Fig. 9. ¡USAR SIEMPRE CUCHILLAS ORIGINALES!
Si las mismas resultan desgastadas, es posible darles la vuelta, dado que constan de doble filo.
Verificar siempre que los bulones de las cuchillas no estén desgastados ni usados.
REGULACIÓN PLATO DE CORTE
Una buena horizontalidad del plato es esencial para obtener un césped cortado de manera uniforme.
Tras colocar el cortacésped sobre una superficie plana y controlar la presión de los neumáticos, servirse de los
4 reguladores (fig. 17 - 17/A) ubicados en el plato hasta que el borde de este último llegue a 100 mm de distancia
del suelo tanto de un lado como del otro (con el operador sentado y teniendo el plato en la posición 1 fig. 18/A).
En caso de que no se logre un buen paralelismo, consultar un Centro de Asistencia Autorizado.
CORREA MOTOR - CUCHILLA
La tensión se registra mediante el regulador (Fig. 18).
En caso de que la correa se enrosque o salga de su sitio procedere a las verificaciones ilustradas en la fig. 18/
A, teniendo el plato de corte en la posición más baja.
Prestar atención cuando se coloquen las guías de la correa al fin de acercarlas a la misma controlando el plato
en las diferentes alturas (Fig. 19 ref. A).
CORREA MOTOR - EJE HIDROSTÁTICO
Se autorregulan, no se requiere regulación alguna, sólo hay que controlar la tensión del muelle. Para cambiarlos
hay que desenganchar el muelle de tensión (Fig. 20).
ROTACIÓN CUCHILLA
Para embragar y desembragar la rotación de la cuchilla, se utiliza la palanca (Fig. 2 n. 1).
Durante el embrague, el motor tiene que estar a la mitad de revoluciones y la máquina tiene que estar fuera del
césped para cortar.
El desembrague se produce en la posición OFF (Fig. 2 n.1).
La cuchilla tiene que detenerse a los 5 segundos, de lo contrario habrá que registrar el freno mediante el regulador
fig. 19.
Nota: Esta operación debe ser realizada por un centro de asistencia autorizado.
CAMBIO CORREAS
La transmisión del movimiento del motor a la transmisión hidráulica y del motor a las dos cuchillas se produce
mediante dos correas trapezoidales. ¡Cambiar las correas en cuanto se noten los primeros signos de
desgaste!
El cambio de las correas y las regulaciones sucesivas son bastante complejas, por lo cual es indispensable
recurrir a un Centro de Asistencia Autorizado.
Para cambiar la correa que une el motor y el plato de corte, es necesario desmontar las 3 guías de correa
colocadas al lado de la polea del plato (fig. 19 ref. A) y desenganchar el muelle tensor (fig. 21 ref. A) y desmontar
la protección (fig. 21 ref. B).
¡USAR SIEMPRE CORREAS ORIGINALES!
DISPOSITIVO DE DESBLOQUEO DE LA TRACCIÓN
El dispositivo de desbloqueo de la tracción se encuentra en la parte trasera de la máquina (fig. 22), si se presentara
una avería en la máquina, para poder remolcarla o desplazarla a mano, colocar la palanca en punto muerto (fig.
22 ref. B). En la posición (A) la máquina está en funcionamiento.

47
GUÍA PARA IDENTIFICAR LOS INCONVENIENTES:
Con la llave en posición AVV. (arranque), el salpicadero sigue apagado
– La batería no suministra corriente – Controlar los cables de conexión
– Recargar la batería
– Cambiar el fusible
El salpicadero se enciende, pero con la llave en posición AVV. (arranque) el motor de arranque no gira
– La batería no suministra corriente suficiente – Recargar la batería
– Falta el asenso para la puesta en marcha – Palanca de avance en posición STOP
– Desembragar las cuchillas
– Sentarse en el puesto de conducción
– Controlar los tres interruptores de seguridad
(asiento - conexión cuchillas - palanca avance)
Puesta en marcha difícil o funcionamiento irregular del motor
– Problemas de carburación – Limpiar o cambiar el filtro de aire
– Regular el carburador (seguir las instrucciones del manual
del motor)
– Depósitos o impurezas en el combustible – Vaciar el depósito y usar gasolina fresca
– Controlar y, de ser necesario, cambiar el filtro
de gasolina
El motor de arranque gira pero el motor no se pone en marcha
– No hay flujo de gasolina – Controlar que el estárter esté accionado (si el motor está
frío)
– Controlar el nivel del depósito
– Controlar el circuito del mando de apertura
del carburador
– Controlar (y de ser necesario cambiar) el filtro de gasolina
– Controlar que el agujero de purga del tapón del depósito
no esté obstruido
– Insuficiencia en el sistema de encendido – Controlar la fijación del capuchón de la bujía
– Controlar la limpieza y la distancia correcta entre los
electrodos
Calo del rendimiento del motor durante el corte
– Velocidad de avance elevada en – Disminuir la velocidad
relación a la altura de corte – Subir unas muescas el plato de corte
Corte irregular
– Plato de corte no paralelo al terreno – Controlar la presión de los neumáticos
– Restablecer el paralelismo del plato
– Ineficacia de la cuchilla – Controlar que la cuchilla esté bien montada
– Afilar o cambiar las cuchillas
– Controlar la tensión de la correa motor del plato
Vibraciones durante el funcionamiento
– Cuchillas desequilibradas – Equilibrar o cambiar las cuchillas averiadas
– Uniones flojas – Controlar y ajustar los tornillos de fijación de las cuchillas,
así como los del motor y del bastidor.
INCONVENIENTE
CAUSA SOLUCIÓN

48
INSTALACIÓN ELÉCTRICA
La instalación eléctrica está protegida por fusibles que, si se interrumpen, provocan el bloqueo total de la
instalación eléctrica.
Tras haber encontrado y reparado la avería, cambiar el fusible averiado por otro de igual capacidad.
Nunca cambiar los fusibles por otros de capacidad diferente.
Los fusibles de la instalación eléctrica se encuentran a la izquierda de la dirección (Fig. 23).
Si los inconvenientes persisten tras haber realizado las operaciones detalladas anteriormente, recurrir al Centro
de Asistencia Autorizado.
Nunca tratar de realizar reparaciones difíciles sin tener los medios y los conocimientos técnicos necesarios.
¡IMPORTANTE!
- No invertir la polaridad de la batería.
- No hacer funcionar el cortacésped sin la batería, dado que está equipado con un regulador de carga.
- Prestar atención en no causar cortocircuitos.
LA MÁQUINA NO SE MANTIENE EN PUNTO MUERTO
Regular el dispositivo (Fig. 24), aflojar la contratuerca y mover el tornillo central.
PALANCA AVANCE
Para regular la velocidad de avance y de retroceso, servirse de los tornillos (ref. A, Fig. 25). Si la palanca de
avance retorna automáticamente a cero, regular la tuerca de autobloqueo (ref. B, Fig. 25).
FIN DEL TRABAJO
Una vez terminado el trabajo con la cortadora, desembragar las cuchillas y efectuar el camino de retorno con el
plato de corte en posición de altura máxima.
Para detenerse, llevar la palanca de avance a la posición de STOP (Fig. 3 n. 2), poner la palanca del acelerador
al mínimo, apagar el motor girando la llave (Fig. 1 n. 1) y bajar el plato a la posición más baja.
LIMPIEZA
Después de cada uso, limpiar la superficie exterior del cortacésped.
ESTACIONAMIENTO E INACTIVIDAD PROLONGADA
Guardar la máquina en un medio ambiente seco, al reparo de la intemperie y, posiblemente, cubrirla con una lona.
Si se prevé un prolongato período de inactividad (superior a 1 mes), desconectar el cable rojo de la batería (fig.
23) y seguir las indicaciones detalladas en el manual del motor; lubricar además todas las articulaciones.
Controlar periódicamente que el voltaje de la batería no descienda por debajo de 12 Voltios y, en tal caso, proceder
con la recarga.
Utilizar el aditivo conservante para gasolina verde.
Si la máquina no se utiliza durante más de 30 días, es necesario vaciar el motor del carburante para prevenir la
formación de depósitos gomosos en el sistema de alimentación o en partes vitales del carburador.
Para proteger el motor, se aconseja utilizar el aditivo conservante para carburante Briggs & Stratton, que es
disponible en todos los centros de asistencia autorizados Briggs & Stratton. Mezclar el aditivo con el carburante
en el tanque o en el recipiente del carburante. Dejar el motor en moto para que el aditivo circule en el carburador.
De esta manera, el motor y el carburador se pueden conservar hasta 24 meses.
Nota: si no se añaden aditivos o el motor utiliza gasolina con alcol, vaciar el tanque del carburante y dejar en moto
el motor hasta cuando se termine el carburante.

49
Fig. 1
5
2
3
1
4
1.Starting-stop key
2.Hours counter
3.Oil warning light
4.Front brake pedal (only emergency)
5.Differential lock pedal
1.Chiave avviamento e arresto
2.Contaore
3.Spia olio
4.Pedale freno anteriore (solo emergenza)
5.Pedale bloccaggio differenziale
1.Clé démarrage et arrêt
2.Compteur horaire
3.Témoin huile
4.Pédale frein avant (uniquement d’urgence)
5.Pédale blocage du différentiel
1.Anlasser-stopschluss
2.Stundenzahler
3.Ölkontrolleeuchte
4.Vornbremsepedal (nur in Notfall-Konditionen)
5.Differentialsperrepedal
1.Llave arranque y parada
2.Cuentahoras
3.Testigo aceite
4.Pedal freno delantero (sólo emergencia)
5.Pedal bloqueo del diferencial

Fig. 5Fig. 4
Fig. 7
Fig. 6
50
Fig. 8
CL 7.13 FILTER
FILTRO
CL 7.16 / 7.21 FILTER
FILTRO
Fig. 3Fig. 2
1
8
6
10
ENGINE 16/21 HP
MOTORE
ENGINE 13.5 HP
MOTORE
2
6
5

51
Fig. 12Fig. 11
Fig. 14
Fig. 10
Fig. 16
Fig. 13
Fig. 9
4
Fig. 15
3

52
Fig. 18Fig. 17/A
Fig. 19
Fig. 20
Fig. 17
Fig. 21
Fig. 18/A
Fig. 16/A
B_ FRONT
ANTERIORE
A_ REAR
POSTERIORE
A
A
B
A
B
CUTTING DECK IN THE LOWEST POSITION
FRONT REAR
Piatto di taglio nella posizione più bassa.
Plateau de coupe dans la position la plus basse.
Mädeck in der niedrigsten position.
Plato de corte en la posición más baja.
A

53
Fig. 25Fig. 24
Fig. 27
Fig. 23
Fig. 26
Fig. 22
NEUTRAL
IN FOLLE
B
IN USE
INSERITA
A
A
A
B

TRANSPORTING
If the machine is transported on a truck or trailer, lower the cutting deck, engage the parking brake and fasten the
machine securely with ropes, cables or chains to the hauling device.
TRASPORTO
Se la macchina viene trasportata con un camion o un rimorchio, abbassare il piatto di taglio, inserire il freno di
stazionamento ed assicurarla adeguatamente al mezzo di trasporto mediante funi, cavi o catene.
TRANSPORT
Si la machine doit être transportée sur un camion ou une remorque, abaisser le plateau de coupe, serrer le frein à
main et la fixer solidement sur l’engin de transport avec des cordes, des câbles ou des chaînes.
TRANSPORT
Wenn die Maschine auf einem Lastwagen oder einem Anhänger transportiert wird, ist das Mähdeck zu senken, die
Festellbremse anzuziehen und die Maschine mit Seilen, Tauen oder Ketten auf dem Transportmittel sicher zu befestigen.
TRANSPORTE
Si la máquina se transporta con un camión o con un remolque, bajar el plato de corte, inserir el freno de estacionamiento
y asegurarla adecuadamente al medio de transporte mediante sogas, cables o cadenas.
54
1.895 mm. 900 mm. 975 mm.

55
VIBRATION LEVELS
Engine speed rpm
Vibrations
m/s
2
3000
awz 0,1 / awx 0,09 / awy 0,05
NOISE LEVEL
Engine speed rpm
3000 LWA 99.5 - LpA 86.5 dBA
RILIEVO DEI LIVELLI DI VIBRAZIONE
Vibrazioni
m/s
2
3000
awz 0,1 / awx 0,09 / awy 0,05
RUMOROSITÀ
3000 LWA 99.5 - LpA 86.5 dBA
Regime di rotazione
del motore giri/min.
Regime di rotazione
del motore giri/min.
RELEVE DES NIVEAUX DE VIBRATION
Vibration
m/s
2
3000
awz 0,1 / awx 0,09 / awy 0,05
NIVEAU DE BRUIT
3000 LWA 99.5 - LpA 86.5 dBA
Régime de rotation du
moteur tours/min.
Régime de rotation du
moteur tours/min.
VIBRATION LEVELS
Motordrehzahl in UpM
Vibrationen
m/s
2
3000
awz 0,1 / awx 0,09 / awy 0,05
GERÄUSCHEMISSION
Motordrehzahl in UpM
3000 LWA 99.5 - LpA 86.5 dBA
DETECCIÓN DE LOS NIVELES DE VIBRACIÓN
Vibraciones
m/s
2
3000
awz 0,1 / awx 0,09 / awy 0,05
NIVELES DEL RUIDO
3000 LWA 99.5 - LpA 86.5 dBA
Régimen de revolución
del motor r.p.m.
Régimen de revolución
del motor r.p.m.

 Loading...