


EN
Dear customer! |
This electric integrated gas cooker is manufactured for household use. |
|
Our appliances are packed in the environmentally friendly materials which may be |
|
recycled, deposited or destroyed without any hazard to the environment. Such packaging |
|
materials are also labeled accordingly. |
|
Once the life cycle your appliance is over, make sure not to pollute the environment, and |
|
deliver it to the authorized collectors of old household appliances. |
Instructions for use |
Instructions for use have been prepared for the user, and describe the appliance and the |
|
way it is handled. These instructions are intended for various types of the appliance, so |
|
you may find some descriptions for the functions that your |
|
particular appliance may not have. |
|
These instructions are only valid of the country symbol is indicated on the appliance. If |
|
there is NO county symbol in the appliance, technical instructions should be observed for |
|
adapting the appliance to comply with the requirements and regulations for use in your |
|
country. |
Instructions for |
The appliance must be connected in compliance with the instructions attached to it, as |
connection |
well as in compliance with relevant regulations and standards. The connection may only |
|
be performed by a qualified person. |
Rating plate |
The rating plate indicating the basic information on the appliance is attached to the lower |
|
side of the hob. |
Important warnings |
3 |
Installation |
4 |
Connecting to the power mains |
5 |
Connecting to the gas supply |
6 |
Technical information |
8 |
Operation |
9 |
Cleaning and maintenance |
10 |
Special warnings and fault reporting |
12 |
2

TECHNICAL INSTRUCTIONS AND INSTALLATION
Important warnings |
• Installation of the appliance (installation class:3) into a kitchen worktop and its |
|
connection to the power mains and the gas supply may only be performed by an |
|
adequately qualified technician. |
|
• When the appliance is in use, additional heat and moisture are emitted into the room. |
|
When the appliance is used for a prolonged period of time at a high performance level, |
|
intensive ventilation or use of kitchen hood may is required in the room where the |
|
appliance is installed. |
|
• Do not use the gas burners, if the flame seems unstable. |
|
• If you smell gas in the room, immediately close the gas supply valve either on the gas |
|
bottle or gas pipeline, extinguish all sources of open fire (including cigarettes), aerate the |
|
room, do not turn on any electric appliances, and call a natural gas expert. |
|
• The main gas supply valve should also be closed if gas burners will be out of use for a |
|
long period of time (e.g. when going on holiday). |
|
• The appliance and its accessible parts become hot during use. Care should be |
|
taken to avoid touching heating elements. Children less than 8 years of age shall |
|
be kept away unless continuously supervised. |
|
Prevent the children to hang around the appliance and warn them properly against the |
|
danger of burns. |
|
• This appliance can be used by children aged from 8 years and above, and persons with |
|
reduced physical, sensory or mental capabilities or lack of experience and knowledge if |
|
they have been given supervision or instruction concerning use of the appliance in a safe |
|
way and understand the hazards involved. Children shall not play with the appliance. |
|
Cleaning and user maintenance shall not be made by children without supervision. |
|
• WARNING: Unattended cooking on a hob with fat or oil can be dangerous and |
|
may result in fire.Be sure have the preparation of such food (fries) under constant control. |
|
Never try to extinguish a fire with water, but switch off the appliance and then cover flame |
|
e.g. with a lid or a fire blanket. |
|
• WARNING: Danger of fire: do not store items on the cooking surfaces. |
|
• WARNING: If the surface is cracked, switch off the appliance to avoid the |
|
possibility of electric shock. |
|
• Do not use high-pressure steam cleaner or hot steam to clean the appliance. |
|
• Never place any metal objects upon the hob surface, such as knives, forks, spoons, pot |
|
lids, and the like, as they may get very hot. |
|
• The hob can not be activated by external timers or remote controls systems. |
|
• Do not use the cooking hob for room heating. |
|
• Do not place empty pans on the hob. |
|
• Make sure that the parts of the burners are correctly positioned / installed. |
|
• Hob surface should not be used as a worktop. Sharp objects may cause scratches. |
|
• Preparing food in thin aluminum of plastic containers on hot cooking zones is not |
|
allowed. Do not place any plastic objects or aluminum foil on the hob surface. |
|
• If there is a wall power outlet located near the hob and another appliance is plugged |
|
into it, make sure the power cord does not come into contact with the hot cooking zones. |
|
• Do not store any temperature-sensitive objects, materials, or substances underneath |
|
the hob, e.g. detergents, sprays, etc. |
|
• In case of a failure of the appliance, immediately disconnect the appliance from the |
|
power mains and contact the service center. |
|
• The appliance is manufactured in compliance with the relevant effective safety |
|
standards. |
|
• After a prolonged use of cast iron plates, the area of the plate and the edge of the |
|
cooking zone may discolour. Repair service is not covered by the warranty. |
|
• Don't connect the hob to the power supply with an extension cable or multiple sockets, |
|
because they don't assure a sufficient safety (e.g. overheating risk of multiple sockets). |
|
• Connect the equipment to a permanent connection. |
|
The symbol on the product or on its packaging indicates that this product may not |
|
be treated as household waste. Instead it shall be handed over to the applicable |
|
collection point for the recycling of electrical and electronic equipment. By |
|
ensuring this product is disposed of correctly, you will help prevent potential |
|
negative consequences for the environment and human health, which could |
|
otherwise be caused by inappropriate waste handling of thisproduct. For more |
|
detailed information about recycling of this product, please contact your local city |
|
offi ce, your household waste disposal service or the shop where you purchased |
|
the product. |
|
3 |

INSTALLATION
Important warnings
•Installation of the appliance into a kitchen worktop and its connection to the power mains may only be performed by an adequately qualified technician.
•Veneer or other fi nish of the piece of kitchen furniture into which the hob is to be built in should be treated with heat resistant glue (100°C); otherwise, the worktop finish may be discolored or deformed.
•Cooking hob is dimensioned to be built into the worktop over a piece of kitchen furniture, with a width of 600 mm or more.
•After installation, the front two fastening elements should be freely accessible from below.
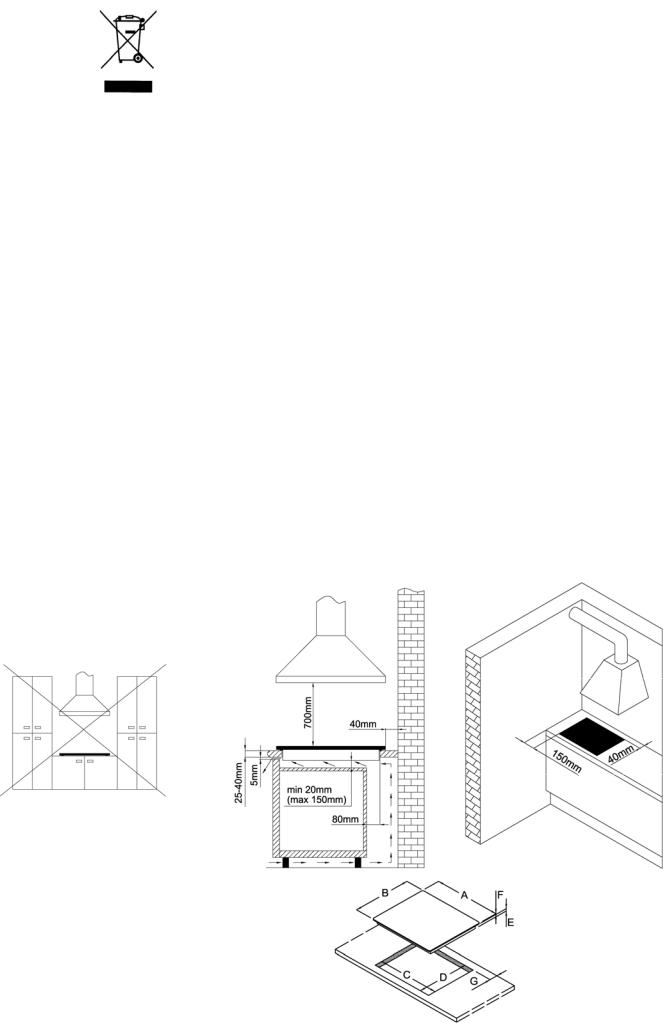
•The kitchen furniture element underneath the hob should not be fitted with a drawer. If the kitchen furniture element as a horizontal partition wall, it should be installed no less than min 20mm from the lower surface of the worktop. The space between the partition wall and the hob must be empty; no objects should be placed into that gap.
•Hanging, or wall-mounted kitchen elements should be installed high enough not to interfere with the work process.
•The distance between the cooking hob and the kitchen hood should be no less than indicated in the instructions for kitchen hood installation. The minimum distance is 700 mm.
•The distance between the appliance edge and the adjacent tall kitchen furniture element should amount to no less than 150 mm.
•Use of massive wood decoration plates or boards on the worktops behind the cooking hob is permitted, if the minimum distance remains the same as indicated in the installation drawings.
•Minimum distance between the built-in cooking hob and the rear wall is indicated on the installation drawing.
•Cooking hobs can be installed into worktops that are 25 to 40 mm thick.
The front part must have an opening of no less than 5 mm.
•Only ovens fitted with a cooling fan must be installed underneath this cooking hob.
•Before installing an oven, the rear wall of the kitchen furniture element should be removed in the area of the cooking hob cutout. Furthermore, a gap of at least 5 mm should be left at the front side.
A (mm) |
585 |
B (mm) |
510 |
C (mm) |
560 |
D (mm) |
480 |
E (mm) |
40 |
F (mm) |
9 |
G (mm) |
50 |
Installing the foam gasket
Before inserting the appliance into the opening in the kitchen worktop, the supplied foam gasket must be attached to the lower side of the glass ceramic (glass) cooking hob (see fi gure above).
Do not install the appliance without the foam gasket!
The gasket should be attached to the appliance in the following way:
-Remove the protective film from the gasket.
-Then, attach the gasket to the lower side of the glass, approximately A=2-3 millimetres from the edge (as shown in the figure). The gasket must be attached along the entire
4
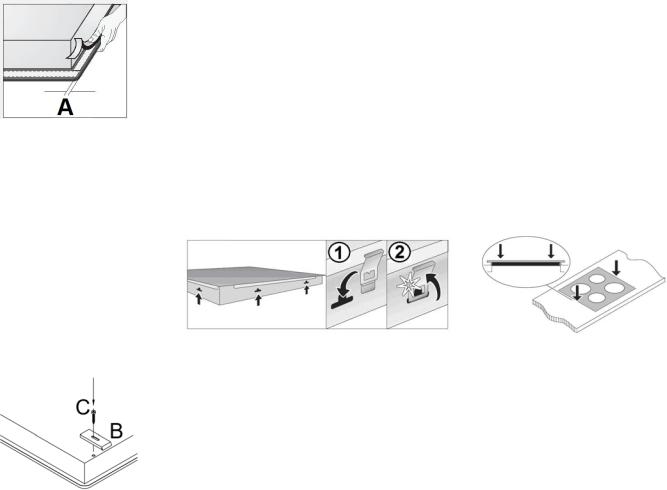
Installation procedure
(with springs)
Installation procedure (with fixing brackets)
length of the glass edge and should not overlap at the corners.
- When installing the gasket, make sure that the glass does not come into contact with any sharp objects.
•Worktop must be placed absolutely horizontal.
•Suitably protect the edges of the cut aperture.
•Connect the cooking hob to the mains power supply (see instructions for the connection of the cooking hob to mains power supply).
•Put the supplied springs in their places.
•Insert the hob into the cut aperture.
•Press the hob firmly towards the worktop from above.
The cook top is fixed to the unit by means of the brackets and accessories provided. Holes are provided in the bottom of the tray where you can attach the screws (C) that hold the fixing brackets (B) in place.
CONNECTING THE APPLIANCE TO THE POWER MAINS
•The appliance may only be connected by an authorized skilled technician.
•Electric system protection should comply with all relevant regulations.
•The connection clips can be accessed when the connection clip covers are opened / removed.
•Before connecting the appliance, make sure the voltage indicated on the rating plate is consistent with the voltage in your home circuit.
•The rating plate with basic information is attached on the lower side of the hob.
•The appliance is manufactured for use with the power supply voltage
220-240 V ~.
•In order to make a fixed connection to the mains, insert an all-pole circuit breaker between the appliance and the mains. This device shall have a contact separation in all poles, providing full disconnection under overvoltage category III conditions.
•Given the protection from the risk of fire, appliances of this type may be installed in a worktop next to a piece of kitchen furniture that is taller than the appliance (when installed); however, in this case, a kitchen furniture element must be installed on the other side, adjacent to the appliance.
•The current conducting and isolated parts must be protected from any possibility of direct contact.
WARNING!
• Before any intervention, disconnect the appliance from the power mains. Connect the appliance in compliance with the electric connections diagram supplied; make sure the
relevant network voltage is observed! The ground wire  should be connected to the clip indicated by the earthing symbol.
•The mains cable should be fed through the fastening clip which protects it from being accidentally pulled out.
•After connecting the appliance, turn on all cooking zones / heaters for approximately three minutes to make sure they are operating correctly.
5

Connecting: |
• Incorrect connection may destroy parts of the appliance, making the warranty void. |
|
• Before connecting the appliance, make sure the voltage indicated on the rating plate is |
|
consistent with the voltage in your home network. Connection voltage should be checked |
|
by a qualified technician using a corresponding measuring device! |
|
• Connection cable on the back of the appliance should be led in such way that it does |
|
not touch the appliance back wall, as this part will get very hot during operation. |
The following can be used for connection:
H05RR-F – 3x0,75mm2
H07RN-F – 3x0,75mm2
H05RN-F – 3x0,75mm2
H05V2V2-F – 3x0,75mm2
H05VV-F – 3x0,75mm2
LIVE = L = BROWN
EARTH =  = GREEN / YELLOW
NEUTRAL = N = BLUE
CONNECTING THE COOKING HOB TO THE GAS SUPPLY
•The appliance must be connected in compliance with all relevant regulations, and it may only be used in well ventilated / aerated rooms. Before connecting or using the appliance, please read the instruction manual.
•Before installing and connecting, make sure the local natural gas supply network and connection (type of gas and pressure), are compatible with your appliance version.
The category with the related types of gas can be used are included in ʺADAPTATION TO A DIFFERENT
TYPE OF GASʺ Table
•The version of this appliance is indicated on the rating plate.
•This appliance is not suitable for connection to a burning fumes exhaust system (i.e. a chimney).
The appliance must be installed and connected in compliance with the relevant effective installation regulations. Special care must be taken to ensure adequate ventilation / aeration (a = min. 100 cm2 ).
Connection |
• When connecting the appliance to the gas supply, follow the regulations of the local gas |
|
distributor. |
|
• On the lower side, the cooking hob is fitted with a gas connection plug with a ISO7-1 |
|
R1/2 thread. |
|
• Also supplied with the appliance is an adapter for liquid gas, a taper male, and a non- |
|
metal gasket. |
|
• When connecting, the knee R1/2 should be held firmly to prevent it from rotating. |
|
• For sealing of the connection joints, use a non-metal approved gaskets and approved |
|
sealants. |
|
• The gaskets should only be used once. The thickness of the flat non-metal gaskets |
|
should not be deformed more than by 25 percent. |
|
6 |

Adaptation to a different type of gas
•To connect the appliance to the gas supply, use a tested and certified flexible hose.
•The flexible connection hose should be able to move freely.
It should not come into contact with the movable parts of the furniture or the bottom of the cooking hob.
• If an electric oven is built into the kitchen element under the cooking hob, it should be fitted with a cooling fan.
After connecting the gas hob, check the joints for any leaks.
Gas supply connection plug A ISO7-1 R1/2 connection plug
B Non-metal gasket with thickness of 2 mm
C Pipe adapter for liquid gas (depending on the model)
Only use pipes and seals in accordance with the Standards. These pipes must be installed so that, when fully extended, their length does not exceed 2000 mm. For easier installation and to prevent gas leaks, attach the swivel coupling to the cook top first, and then to the gas mains pipe. Inverting this sequence may hamper the gas seal between the pipe and the cook top.
Important: when the installation is complete, check that all couplings are completely sealed by using a soapy solution. Never use a flame. Also ensure that the flexible pipe cannot come into contact with any moving part of the cook top (e.g. drawer) and that it is not in a position where it could be damaged.
After the connection, check the burners for correct operation.
The flames must be clearly visible, and should be blue and green at the center. If the flame is unstable, increase the minimum power.
•The procedure or adaptation of the cooker to another type of gas does not require removal of the appliance from the worktop.
•Before adapting, disconnect the appliance from the power mains and close the gas supply valve.
•Replace the existing nozzles for nominal thermal load with corresponding nozzles for the new gas type and supplied provided (see table below).
•After finishing this sequence, replace the old setting label with the new one provided for the new injectors.
Adjustment elements |
To leave the adjustment elements accessible, please observe the following instructions: |
||
|
• Remove the support grid and burner covers with respective crowns. |
||
|
• In double burners, adjustment elements are accessible behind the main nozzle |
||
|
protective plate. |
||
|
• Remove the control knobs, including the gaskets. |
||
|
Gas valve |
||
|
Minimum thermal load regulation valve |
||
Minimum flow |
Instructions for town (G110, G120, G150.1) and methane gas (G20, G25) |
||
adjustment |
1. |
Light the burner and bring it to the minimum position. |
|
|
2. |
Remove the gas tap knob and turn the adjustment screw on the side of the tap rod: |
|
|
|
|
anti-clockwise to increase the gas flow |
|
|
|
clockwise to reduce the gas flow |
|
until a regular minimum flame is obtained. |
||
|
3. |
Re-assemble the knob and verify burner flame stability (when quickly rotating the hand |
|
|
from maximum to minimum position the flame must not shut off). |
||
|
4. |
Repeat the operation on all gas taps. |
|
Instructions for liquid gas (LPG: G30, G31)
Tighten the screw on the side of the tap, rod clockwise completely.
Warning: these tasks may only be carried out by a qualified technician, authorized by the gas distributing company or authorized service center!
7
TECHNICAL INFORMATION
493044
493045
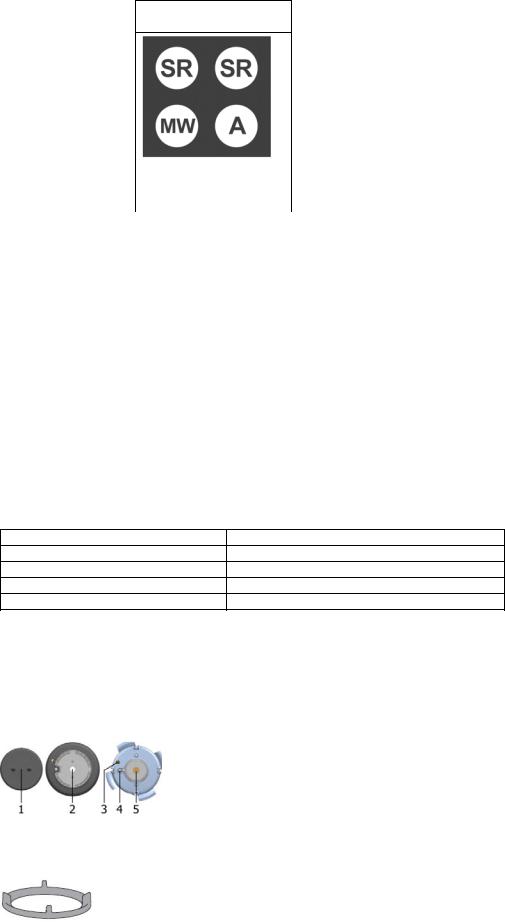
A: Auxiliary |
|
|
|
|
|
|
|
SR: Semirapid |
|
|
|
|
|
|
|
MW: Mini-Wok |
|
|
|
|
|
|
|
|
|
|
|
|
|
|
|
Operating voltage |
220-240 V~ ; 50/60 Hz |
|
|
||||
Regulated for gas |
G20 = 20mbar |
|
|
|
|||
QnGAS HOB |
7,8 kW |
|
|
|
|||
NOZZLE TABLE |
|
|
|
|
|
|
|
|
|
|
|
|
|
|
|
|
Burner |
|
A |
|
SR |
|
MW |
Rated heat output (kW) |
1,00 |
|
1,75 |
|
3,30 |
||
Reduced Rate (kW) |
|
0,45 |
|
0,70 |
|
1,50 |
|
Ø INJECTOR (mm) |
|
|
|
|
|
|
|
G30 |
30mbar |
|
0,50 |
|
0,65 |
|
0,90 |
G20 |
20mbar |
|
0,72 - X |
0,97 - Z |
|
1,28 - T |
|
G20 |
13mbar |
|
0,84 |
|
1,10 |
|
1,48 |
Ø BY- |
PASS (mm) |
|
|
|
|
|
|
G30 |
30mbar |
|
0,27 |
|
0,31 |
|
0,55 |
G20 |
20mbar |
|
REG. |
|
REG. |
|
REG. |
G20 |
13mbar |
|
REG. |
|
REG. |
|
REG. |
ADAPTATION TO A DIFFERENT TYPE OF GAS
COUNTRY OF DESTINATION |
GAS AND SUPPLY PRESSURE |
KZ |
G30=30mbar ; G20=20mbar ; G20=13mbar |
MD |
G30=30mbar ; G20=20mbar ; G20=13mbar |
RU |
G30=30mbar ; G20=20mbar ; G20=13mbar |
UA |
G30=30mbar ; G20=20mbar ; G20=13mbar |
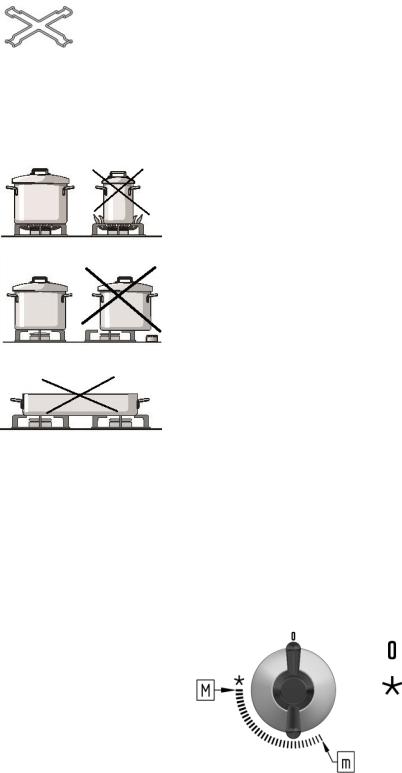
Important warnings |
• The gas burners are fitted a candle as flame failure device. If the burner flame is |
|
extinguished accidentally or unintentionally (e.g. when some liquid boils over or |
|
when there is draught in the room): |
|
gas supply is automatically cut off, thus preventing the gas from being |
|
emitted into the room. |
|
• Gas burner cover should always be placed on the burner crown very carefully. Make |
|
sure the slots on the burner crown are never obstructed. |
|
1 Burner crown cover |
|
2 Burner crown with the support for the burner cover |
|
3 Candle flame failure device |
|
4 Ignition candle |
|
5 Nozzle |
Wok cradle |
The auxiliary support supplied for the wok burner or available as an accessory provides |
|
additional stability in case of a wok with a round base. The auxiliary support for the wok |
|
has special recesses so it can be positioned neatly on top of the standard wok pan |
|
support. |
8
Coffe reductor |
(only available with some models) |
|
Use the extension when using a pan of a smaller diameter. |
|
Place the extension on the grid above the auxiliary burner. |
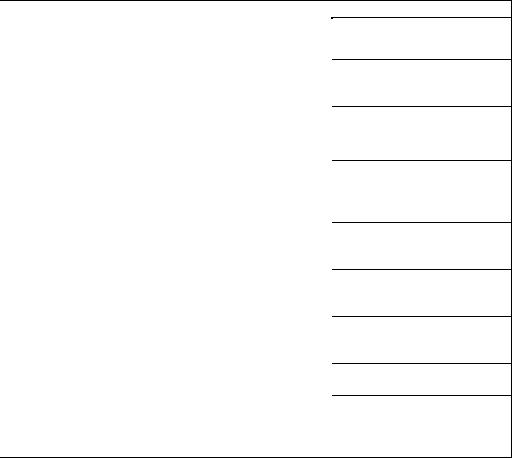
Cookware |
• Correctly selected cookware will enable optimum cooking time and gas consumption. |
|
Pan diameter is the most important parameter. |
|
• Use pans which are the right size for each burner. Do not use small pans on large |
|
burners. The flame should not touch the sides of the pan. |
|
• For combustion, the gas also needs air. If a pan is too large, air supply to the burner is |
|
insufficient; as a result, combustion effect is lesser. |
|
• Always place the pan right over the burner, not to one side. Otherwise it could tip over. |
|
Do not place large pans on the burners near the control knobs. These may be damaged |
|
by the very high temperatures. |
|
• Never use two burners or heat sources to heat one single pan. Do not use grill pans, |
|
earthenware casserole dishes, etc. for a long period of time on maximum power specially |
|
on cristall glass gas hobs. |
|
• Pans should be placed on the hob carefully. Do not strike the hob and do not place |
|
excessive weight on it. |
|
• Place the pans on the pan supports, never directly on the burner. Make sure that the |
|
pan supports and burner caps are correctly positioned before using the appliance. |
|
• Stainless steel working table can burnish when subjected to excessive heat. Therefore |
|
we don’t recommend prolonged cooking with soapstone, earthenware pans or cast iron |
|
plates. Avoid the use of aluminum foil to protect the working table during cooking |
|
operation. |
|
• Do not use cast iron plates or griddles for cooking or heating food on the burners (check |
|
the sizes of pot allowed for each kind of burner) specially on cristall glass gas hobs |
|
• Cooktop should not be used as a worktop. Sharp objects can cause scratches. |
|
• Preparing food in thin aluminum of plastic containers on hot cooking zones is not |
|
allowed. Do not place any plastic objects or aluminum foil on the cooktop. |
|
• If sugar is spilt on a hot cooktop, or a sugar-laden food, immediately wipe the hob. |
|
Burner |
QnBURNER |
Min-Max Pan Ø |
A |
Auxiliary |
1,00 kW |
120 - 180 mm |
SR |
Semirapid |
1,75 kW |
180 - 220 mm |
R |
Rapid |
3,00 kW |
220 - 240 mm |
MW |
Mini-Wok |
3,30 kW |
220 - 260 mm |
TC |
Triple ring |
3,80 kW |
220 - 260 mm |
OPERATION
Hob control elements for gas cooking zones
Ignition and operation of the burners
|
Gas valve closed |
|
Ignition |
M |
Maximum power |
m |
Minimum power |
User’s instructions
This appliance must be used for the purpose it was designed for, i.e. domestic cooking. Any other use is considered to be improper and therefore dangerous.
The manufacturer will accept no liability for any damage caused by improper, incorrect or irrational use.
Using the burners
•If the burners are not used for several days, wait a few seconds before lighting them in order to release any air from the pipes.
•As the cook top burners are fitted with an automatic ignition, to light them simply press and turn the handle to the small star. The appliance uses a spark ignition generator.
•If the flame does not ignite within five seconds, turn the knob back to the 0 position and repeat the procedure; if the electric ignition should not work due to a power failure or damp spark plugs, the gas can also be ignited using a match or a gas lighter.
9
•For models with a safety tap (which interrupt the gas flow should the flame accidentally go out) the burners are ignited as described above, but ensure the knob is pressed in for 5 to 6 seconds after the flame has ignited. After this time, which gives the safety device enough time to cut-in, the flame will be on permanently.
•The flame can then be set between the maximum and minimum level. Any setting between 0 and the large flame is not recommended, as the flame is not stable in this interval and may be extinguished.
WARNING: once the cook top has been cleaned, ensure that the burners are firmly in their seats and do not interfere with the igniter.
To get the best from the burners, use flat-bottomed pots with a diameter suited to the burner being used.
For smaller diameter pots and pans (coffee and tea pots, etc.), the power of the burner being used has to be regulated in order to ensure that the flame laps the bottom of the pot without spilling over. Do not use pots with concave or convex bottoms.
WARNING: if the burner flame is extinguished accidentally, turn off the knob and leave it for at least one minute before trying to re-ignite it.
• To extinguish the flame and close the burner gas supply, rotate the control knob to the ‘OFF’ position ( ).
).
CAUTION: The gas cooking appliance use may cause heat, humidity and products of combustion in the room where is installed. Ensure that the kitchen is well ventilated especially when the appliance is in use: keep open any natural ventilation holes or install a mechanical ventilation device (mechanical extractor hood).
Prolonged intensive use of the appliance may call for additional ventilation, for example opening of a window, or more effective ventilation, for example increasing the level of mechanical ventilation where present.
CAUTION: Accessible parts may be hot when the hob is in use. Young children should be kept away.
CAUTION: This appliance is for cooking purposes only. It must not be used for other purposes, for example room heating.
CLEANING AND MAINTENANCE
Do not use a steam cleaning appliance to clean this appliance. The steam could reach the electrical components and cause a short circuit.
The appliance should be cleaned regularly, preferably after each use, after cooling down.
To avoid water marks and limescale deposits, use a soft cloth to dry surfaces that have been cleaned with water.
Food that has boiled over can cause discolouration of the burner parts and the stainless steel cooktop. Remove any soiling immediately.
To avoid damaging the outer surfaces of your appliance, do not use:
cleaning agents containing soda, alkalines, ammonia, acids or chlorides
cleaning agents containing descaling agents
stain or rust removers
abrasive cleaning agents, e.g. powder cleaners and cream cleaners
solvent-based cleaning agents
dishwasher cleaner
grill and oven cleaners
glass cleaning agents
hard, abrasive brushes or sponges, e.g. pot scourers, brushes or sponges which have been previously used with abrasive cleaning agents
sharp pointed objects (these can damage the seal between the frame and the worktop).
Stainless steel surfaces Clean stainless steel surfaces using a microfibre cloth or with a solution of warm water and a little washing-up liquid applied with a soft sponge. In the case of stubborn dried-on
soiling, soak first.
Finally, dry with a soft cloth.
The stainless steel cooktop cleaner can be used to clean the frame when required. Apply with an even pressure following the direction of the "grain".
The care product for stainless steel can be used after cleaning to help keep your appliance looking good and to hinder resoiling.
Apply sparingly with a soft cloth following the instructions on the packaging.
10
Printed surfaces |
The printing can be damaged if soiling (e.g. food or fluids that contained salt, olive oil) is |
|
not removed immediately. |
|
Remove any soiling immediately. |
|
Do not use any stainless steel cleaner on printed surfaces. This would rub off the print. |
Pan support and control Do not clean the pan support in a dishwasher. |
|
knob |
Remove the pan support. Clean the pan support and the control knob with a solution of |
|
warm water and a little washing-up liquid applied with a soft sponge. Stubborn |
|
soiling should be soaked first. After cleaning, dry all surfaces with a clean cloth. |
Burners |
Do not clean any parts of the burner in a dishwasher. |
The burner should be dismantled and then cleaned by hand using a solution of warm water and a little washing-up liquid applied with a soft sponge.
Parts of the burner that cannot be removed should be wiped clean with a damp cloth only.
The ignition candle and the candle flame failure device should be very carefully wiped clean using a well wrung out cloth.
Do not let the ignitor get wet. If it gets wet, it will not spark. After cleaning, dry all surfaces with a clean cloth.
Make sure that the flame slits are clean and completely dry.
The surface of the burner crown cover will become more matt with time. This is quite normal and will not affect the operation of the cooktop.
Ceramic glass surface
Fig.1
Fig.2
Fig.3
Fig.4
Fig.5
After each use of the glass-ceramic hob, wait for it to cool down and clean it; otherwise, even the smallest food residue will be burnt onto the hot surface next time you use the appliance.
For regular cleaning and maintenance of the glass-ceramic surface, use special conditioning agents which form a protective layer on the surface, shielding it from dirt. Before each use, wipe any dust or other particles from the hob surface and
pan bottom as these could scratch the surface (Figure 1).
Careful: steel wool, abrasive sponges, and abrasive detergents can scratch the hob surface. Glass ceramic surface can also be damaged by aggressive sprays and inappropriate or insufficiently shaken (mixed) liquid cleaning agents (Figure 1 and Figure 2).
Signs and indications on the hob may be worn if aggressive cleaning aids are used on cooking zone edges, or if pans with damaged bottom or used.
Light stains can be removed by a damp soft cloth; then, wipe the surface dry (Figure 3). Water stains can be removed using a mild solution of vinegar however, do not use this solution to clean the frame (only with some models, as it may become dull. Do not use aggressive sprays or decalcification agents (Figure 3).
Heavier stains can be removed using special agents and utensils for cleaning the glassceramic hobs. When using these products, follow the instructions provided by their respective manufacturers.
Make sure any residues of cleaning agents are thoroughly removed, as they could damage the glass-ceramic hob when the cooking zones heat up (Figure 3). Stubborn and burnt residues can be removed using a scraper.
make sure the plastic part of the scraper does not come into contact with a hot cooking zone. Be careful not to cut yourself with the scraper!
Sugar and sugar-laden food may permanently damage the glassceramic surface (Figure 5); therefore, they should be removed from the glass-ceramic surface as soon as possible, although the cooking zone may still be hot (Figure 4). Any change in the color of the glass-ceramic surface does not affect its operation
or the stability of the surface. Such discolorations are mostly a result of burnt food residues or use of cookware made of materials such as aluminum or copper; these stains are difficult to remove.
Warning: All damage described above predominantly relates to the aesthetics, i.e. appearance of the appliance and do not affect its functionality directly. Such errors cannot be the subject of a warranty claim.
11
SPECIAL WARNINGS AND FAULT REPORTING
▪During the warranty period, only a service center authorized by the manufacturer may carry out any repairs.
▪Before making any repairs, make sure the appliance is disconnected from the power mains either by removing the fuse or by disconnecting the power plug from the wall outlet.
▪Unauthorized tampering with and repairs of the kitchen range (cooking hob) can result in electric shock or short circuit; hence, do not attempt to perform any repairs by yourselves. Leave such tasks to an expert or an authorized service unit.
▪In case of minor faults or problems with the appliance operation, check the following instructions to see whether you can eliminate the causes by yourselves.
A visit by a service technician during the warranty period will be charged if the appliance is not functioning because of improper use. Store these instructions in a place where they are always readily accessible; if pas the appliance on to another person, the instructions should also be included.
Following is some advice on rectifying some common problems.
Problem |
Possible cause |
The flame is uneven / |
Wrong gas power setting. |
unstable |
|
|
|
The flame from the |
Wrongly assembled parts |
burners suddenly |
of the kitchen hob |
changes |
|
Burner ignition takes |
Wrongly assembled parts |
more time |
of the kitchen hob |
|
|
The flame is |
Knob pressed too short or |
extinguished shortly |
to weakly. |
after ignition |
|
|
|
The grid has |
This is a commonplace |
discolored in the |
phenomenon resulting from |
burner area |
high temperature |
Electric power supply |
The fuse may be blown |
in general is |
|
interrupted |
|
Electric ignition of the |
There are food or detergent |
burners no longer |
residues between the spark |
works |
plug and the burner |
If the burner cover |
Regular dirt |
looks unappealing |
|
Coffee reducer has |
This is a commonplace |
changed color |
phenomenon resulting from |
|
high temperature and has |
|
no effect on quality. |
Elimination
Have an expert check he gas pipeline!
Assemble the burner correctly.
Assemble the burner correctly.
Keep the knob depressed for a longer period of time. Before releasing it, pres it harder.
Clean the grid with a metal care detergent.
Check the fuse in the fuse box and replace it if it is blown
Open and carefully clean the opening between the spark plug and the burner Clean the burner covers with a metal care detergent.
Use coffee reducer only on auxiliary burner and only when necessary
If the problem persists despite observing the instructions above, call an authorized service technician. Elimination of any errors or warranty claims that resulted from improper connection or use of the appliance is not covered by our warranty. In such cases, the costs of repair are borne by the user.
The Manufacturer strives for continuous improvements. For this reason, the text and illustrations in this book are subject to change without notice.
12
RU
Уважаемый покупатель! Данная газовая варочная панель предназначена для использования в домашнем хозяйстве.
Упаковка изготовлена из экологически чистых материалов, которые можно без ущерба для окружающей среды подвергать переработке, складировать на специальных полигонах для хранения отходов и утилизировать. Упаковочные материалы имеют соответствующую маркировку.
Отслужившее изделие сдайте в соответствующий пункт приема электронного и электрооборудования для последующей утилизации.
Инструкция по эксплуатации
Инструкция по подключению
Заводская табличка
Для пользователя подготовлена инструкция по эксплуатации, где описывается варочная панель и управление ей. Инструкция разработана для нескольких типов приборов, поэтому может включать описание отдельных функций, которых нет в вашей модели.
Данная инструкция действительна, если на приборе стоит символ страны. Если символа страны нет, следуйте техническим указаниям по настройке прибора в соответствии с требованиями вашей страны.
Подключение производится согласно прилагаемой инструкции по подключению и действующим предписаниям и стандартам. Подключение может производить только квалифицированный специалист.
Заводская табличка с основными данными прибора находится на нижней стороне варочной панели.
Важные предостережения |
14 |
Установка |
15 |
Подключение к электросети |
16 |
Подключение к газовой сети |
17 |
Техническая информация |
19 |
Операция |
21 |
Моющие и чистящие средства |
22 |
Специальные предостережения и |
|
оповещение о неисправностях |
24 |
13
ТЕХНИЧЕСКИЕ УКАЗАНИЯ И МОНТАЖ
Важные |
Встраивать прибор (класс прибора: 3) в элемент кухонной мебели, производить |
предостережения |
подключение к электросети и источнику газа может только квалифицированный |
|
специалист. |
|
• Во время работы прибора в помещении увеличивается образование тепла и влаги. |
|
При длительном использовании прибора необходима дополнительная вентиляция или |
|
включение кухонной вытяжки. |
|
• Не пользуйтесь газовыми горелками, если пламя горит нестабильно. |
|
• Если вы почувствовали запах газа в помещении, перекройте поступление газа |
|
вентилем на газовом стояке или баллоне, погасите любой огонь, в том числе табачные |
|
изделия, не включайте электроприборы и освещение, хорошо проветрите помещение |
|
(откройте окна!), немедленно свяжитесь с сервисным центром или газоснабжающим |
|
предприятием. |
|
• Перекрывайте газ вентилем, если вы не будете пользоваться газовыми горелками |
|
длительное время (например, при отъезде в отпуск). |
|
• Перекройте поступление газа вентилем на газовом стояке или баллоне, если |
|
планируете длительное отсутствие (например, при отъезде в отпуск). |
|
• Во время работы прибор и его доступные части сильно нагреваются. Будьте |
|
осторожны, не прикасайтесь к горячим деталям. Дети младше восьми лет не |
|
находились вблизи прибора или постоянно находились под присмотром! |
|
• Перегретый жир может воспламениться, поэтому блюда с использованием большого |
|
количества жира или масла готовьте под постоянным контролем. Опасность ожога и |
|
возгорания! |
|
• Допускается использование прибора детьми старше восьми лет и людьми с |
|
ограниченными физическими, двигательными и психическими способностями, а также |
|
людьми, не имеющими достаточного опыта или знаний для его использования, только |
|
под присмотром или если они были обучены пользованию прибором и осознают |
|
возможную опасность, связанную с неправильной эксплуатацией прибора. Не |
|
позволяйте детям играть с прибором! Дети могут очищать и осуществлять |
|
обслуживание прибора только под присмотром! |
|
• ПРЕДУПРЕЖДЕНИЕ! Постоянно следите за приготовлением блюд с использованием |
|
масла и жира, так как существует опасность возгорания. Если произошло возгорание, |
|
не тушите пламя водой. Выключите прибор, накройте посуду крышкой или влажным |
|
полотенцем. |
|
• ПРЕДУПРЕЖДЕНИЕ! Опасность возгорания! Не используйте варочную поверхность |
|
для хранения предметов! |
|
• Не оставляйте на варочной поверхности металлические предметы, например, |
|
крышки, столовые и кухонные приборы, так как они могут нагреться. |
|
• Не подсоединяйте варочную панель к источнику питания с помощью удлинителя или |
|
удлинителя с многоместными розетками, поскольку они не обеспечивают достаточную |
|
безопасность (например, удлинитель с многоместными розетками может перегреться). |
|
• Обеспечьте постоянное подключение прибора. |
|
• Прибор не предназначен для обогрева помещения. |
|
• Не ставьте пустую посуду на работающие или горячие конфорки. |
|
• Следите, чтобы детали горелок были правильно собраны и установлены. |
|
• Не используйте стеклокерамическую поверхность в качестве рабочего стола. Острые |
|
предметы могут оставить царапины на стеклокерамике. |
|
• Не готовьте на варочной панели в тонкостенной алюминиевой посуде и фольге, а |
|
также в пластиковой посуде. Эти материалы могут расплавиться и повредить |
|
варочную панель. Не кладите на варочную панель пластиковые предметы и |
|
алюминиевую фольгу. |
|
• Присоединительные кабели соседних электроприборов не должны касаться горячих |
|
конфорок. |
|
• Не храните под прибором легковоспламеняющиеся предметы, например, чистящие |
|
средства и аэрозоли. |
|
• Не используйте треснувшую и разбитую варочную панель. Опасность удара |
|
электрическим током! При обнаружении трещин немедленно отключите прибор от |
|
электросети во избежание поражения электрическим током. |
|
• При возникновении неисправностей немедленно отключите прибор от электросети и |
|
позвоните в сервисный центр. |
|
• Для очистки прибора не используйте очистители высокого давления и пароструйные |
|
очистители, так как это может привести к удару электрическим током. |
|
• Прибор изготовлен в соответствии со стандартами по безопасности. |
|
• После длительного использования поверхность чугунных конфорок, металлические |
|
кольца вокруг конфорок и варочная поверхность вокруг конфорок могут изменить цвет. |
|
Замена не является предметом гарантии. |
|
Прибор не предназначен для подключения к внешнему таймеру или блоку |
|
дистанционного управления. |
|
14 |
Символ на изделии или его упаковке указывает, что оно не подлежит утилизации в качестве бытовых отходов. Изделие следует сдать в соответствующий пункт приема электронного и электрооборудования для последующей утилизации. Соблюдая правила утилизации изделия, вы поможете предотвратить причинение ущерба окружающей среде и здоровью людей, который возможен вследствие неподобающего обращения с подобными отходами. За более подробной информацией об утилизации изделия просьба обращаться к местным властям, в службу по вывозу и утилизации отходов или в магазин, в котором вы приобрели изделие.
УСТАНОВКА
Важные предостережения
•Встраивать прибор в элемент кухонной мебели, производить подключение к электросети и источнику газа может только квалифицированный специалист.
•Шпон и другие материалы элемента кухонной мебели, в который встраивается прибор, должны быть термостойкими (100°C), в противном случае более низкая термостойкость материалов может привести к их деформации и изменению цвета.
•Варочная панель предназначена для встраивания в столешницу над кухонным шкафом, ширина которого 600 миллиметров и более.
•Монтаж варочной панели должен обеспечивать постоянный доступ снизу к двум передним крепежным элементам.
•В кухонном шкафу под варочной панелью не должно находиться выдвижных ящиков. Если в кухонном шкафу установлена горизонтальная перегородка, она должна находиться на расстоянии 20 миллиметров от нижней поверхности столешницы. Пространство между перегородкой и варочной панелью должно быть пустым, в нем нельзя хранить предметы.
•Кухонные шкафчики над варочной панелью должны быть повешены на такой высоте, чтобы не создавать помех при приготовлении пищи.
•Расстояние между варочной панелью и вытяжкой должно быть не меньше, чем указано в инструкции по монтажу вытяжки. Минимальное расстояние 700 миллиметров.
•Минимальное расстояние от края варочной панели до стенки соседнего высокого кухонного шкафа составляет 150 миллиметров.
•Использование деревянных плинтусов столешницы с задней стороны варочной панели возможно при соблюдении минимальных допустимых расстояний, приведенных на схеме встраивания.
•Минимальное расстояние между варочной панелью и стеной сзади приведено на схеме встраивания.
•Варочная панель может быть установлена в столешницу толщиной 25-40 мм. В верхней части передней стенки кухонного шкафа необходимо сделать вырез высотой не менее 5 мм по всей ширине шкафа.
•Под варочной панелью можно устанавливать духовки, оснащенные охлаждающим вентилятором.
•При установке духовки под варочной панелью необходимо снять заднюю стенку кухонного шкафа. В верхней части передней стенки кухонного шкафа необходимо сделать вырез высотой не менее 5 миллиметров по всей ширине шкафа.
|
493044 |
|
493045 |
A (mm) |
585 |
B (mm) |
510 |
C (mm) |
560 |
D (mm) |
480 |
E (mm) |
40 |
F (mm) |
9 |
G (mm) |
50 |
15

Наклейка вспененного уплотнителя
Процесс монтажа с помощью зажимов
Процесс монтажа с помощью скоб
Перед встраиванием прибора в столешницу с нижней стороны стеклокерамической или стеклянной варочной панели необходимо приклеить уплотнитель, который прилагается в комплекте (см. рис.).
Встраивание прибора без уплотнителя запрещено!
Чтобы наклеить уплотнитель:
–снимите с уплотнителя защитную пленку;
–приклейте уплотнитель с нижней стороны стеклокерамики или стекла, отступив от края A=2-3 мм (см. рис.). Уплотнитель должен быть наклеен по всему периметру варочной панели и в углах не должен накладываться друг на друга;
–при наклеивании уплотнителя следите, чтобы острые предметы не соприкасались со стеклокерамикой или стеклом (например, не режьте уплотнитель на варочной поверхности).
•Столешница кухонного гарнитура должна быть ровной и горизонтальной.
•Торцы выреза следует соответствующим образом загерметизировать для защиты от влаги и грязи.
•Подключите варочную панель к электросети (см. соответствующий раздел).
•Установите зажимы в предусмотренные отверстия.
•Поместите варочную панель в монтажный проем.
•Прижмите варочную панель к столешнице.
Варочная панель крепится с помощью скоб и крепежных элементов, которые прилагаются в комплекте. В дне варочной панели предусмотрены отверстия для чтобы прикрутить винты (C) для крепления скоб (В).
ПОДКЛЮЧЕНИЕ К ЭЛЕКТРОСЕТИ
•Подключение прибора к электросети и замену присоединительного кабеля может производить только сервисный центр или квалифицированный специалист!
•Защита подключения к электросети должна соответствовать действующим предписаниям.
•Для доступа к клеммам откройте крышку клеммной колодки.
•Перед подключением необходимо проверить, совпадает ли напряжение, указанное в заводской табличке, с фактическим напряжением в сети.
•Заводская табличка с основными данными прибора находится на нижней стороне варочной панели.
•Прибор предназначен для эксплуатации в сети с напряжением 220-240В~.
•При подключении варочной панели к электросети необходимо предусмотреть размыкающее устройство с разомкнутыми контактами на всех полюсах. Уровень защитного устройства будет не ниже, чем уровень перенапряжения категории III.
•Варочная панель может быть встроена между элементами кухонной мебели, причем один из них может быть выше варочной панели, а другой должен быть одинаковой высоты с ней.
•После монтажа необходимо обеспечить полную защиту от прикосновения к токопроводящим и изолированным деталям.
ВНИМАНИЕ!
•Перед любым вмешательством отключите прибор от электросети. В зависимости от сетевого напряжения подключите варочную панель согласно схеме; убедитесь в наличии соответствующего напряжения в сети! Защитный провод заземления
 подключите к клемме, обозначенной символом заземления.
•Присоединительный кабель обязательно проложите через зажим, предотвращающий избыточное натяжение кабеля.
•После подключения включите все конфорки на 3 минуты, чтобы проверить их работу.
16
 Loading...