

Page 1
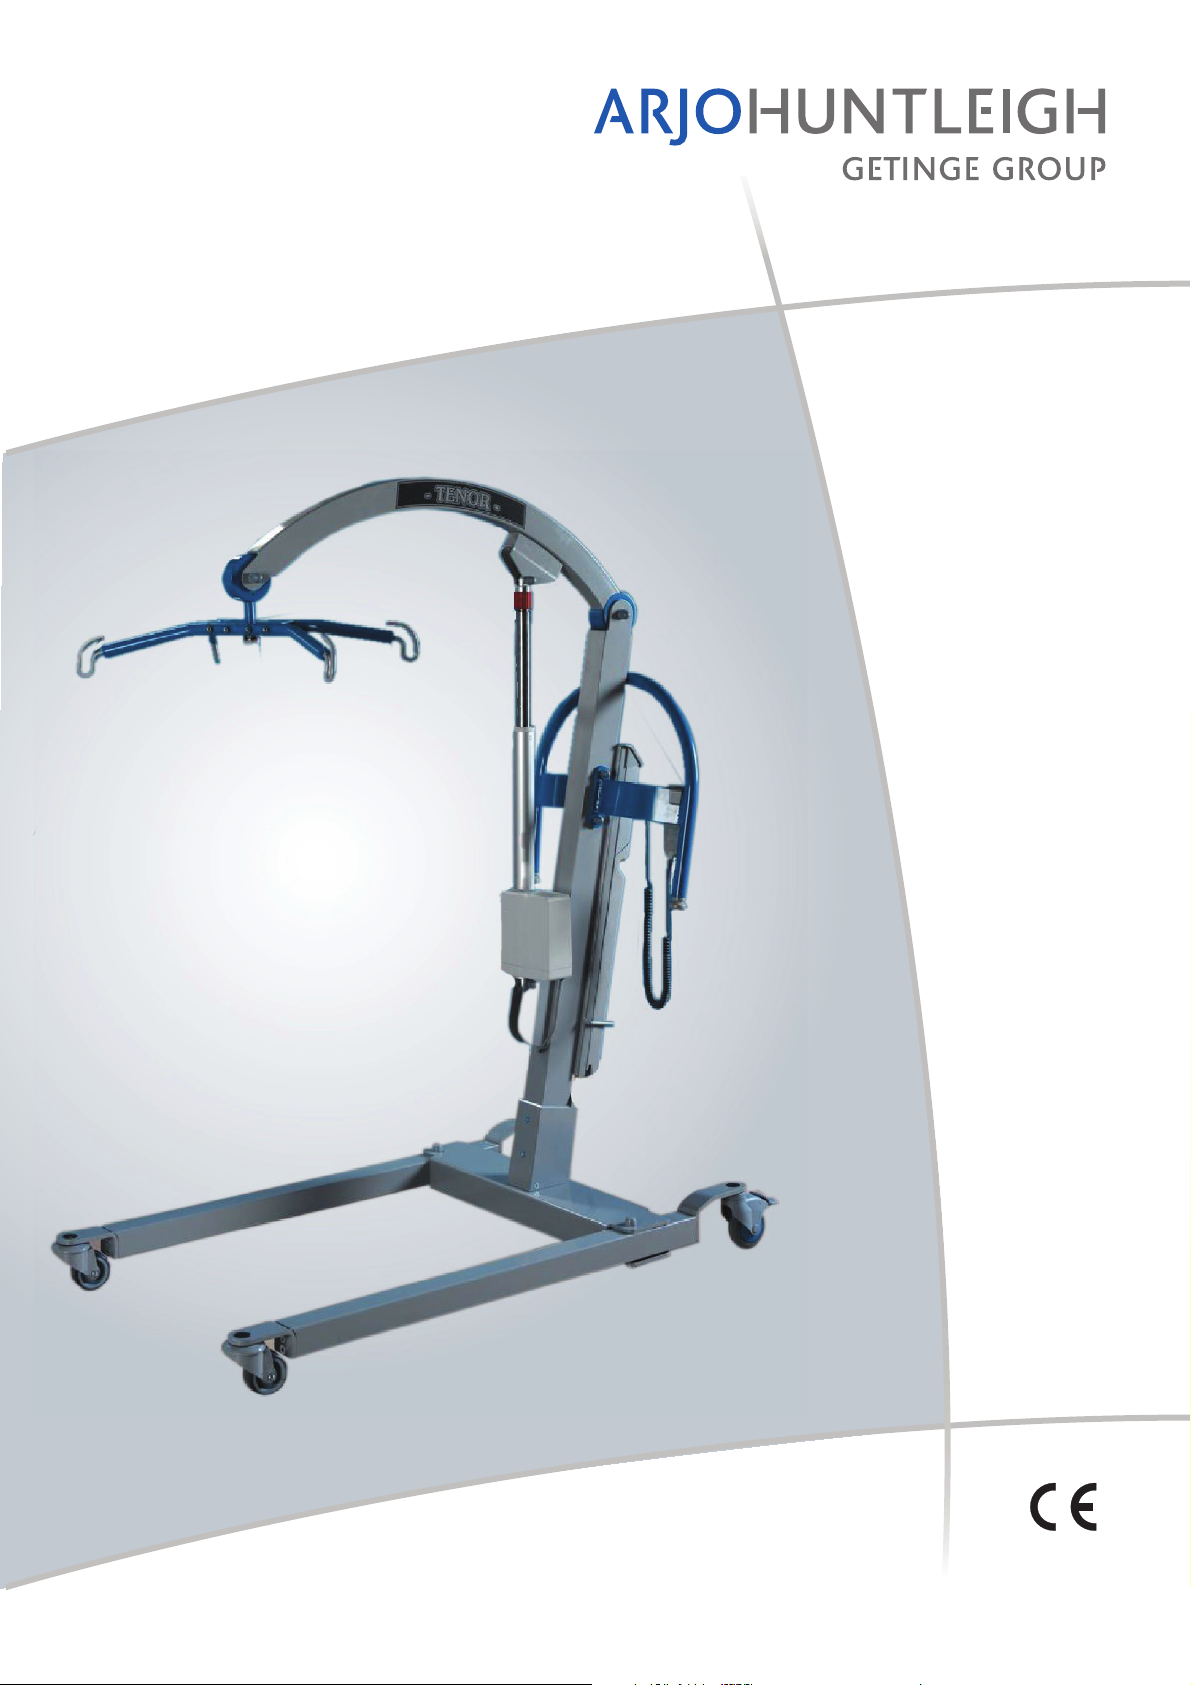
TENOR
INSTRUCTIONS FOR USE
...with people in mind
©4(,-%.?©r©
0086
Page 2

© ArjoHuntleigh
ArjoHuntleigh products are patented or patent pending. Patent information is available by contacting
ArjoHuntleigh.
The policy of ArjoHuntleigh is one of continuous development and we therefore reserve the right to make
technical alterations without notice. The content of this publication may not be copied either whole or in part
without the consent of ArjoHuntleigh.
This product has been manufactured for ArjoHuntleigh by:
ArjoHuntleigh AB
Hans Michelsensgatan 10
211 20 Malmö, Sweden
'TENOR' and 'ArjoHuntleigh' are registered trade marks of Getinge AB.
The TENOR is produced in Poland by ArjoHuntleigh for Getinge AB and sold under the ArjoHuntleigh brand.
Page 3

Contents
Safety instructions. . . . . . . . . . . . . . . . . . . . . . . . . . . . . . . . . . . . . . . . . . . . . . . . . . 3
Read Before Use . . . . . . . . . . . . . . . . . . . . . . . . . . . . . . . . . . . . . . . . . . . . . . . . 3
Intended Use . . . . . . . . . . . . . . . . . . . . . . . . . . . . . . . . . . . . . . . . . . . . . . . . . . . 3
Operational Life . . . . . . . . . . . . . . . . . . . . . . . . . . . . . . . . . . . . . . . . . . . . . . . . . 3
Bariatric Slings Guidance . . . . . . . . . . . . . . . . . . . . . . . . . . . . . . . . . . . . . . . . . 4
Product description . . . . . . . . . . . . . . . . . . . . . . . . . . . . . . . . . . . . . . . . . . . . . . . . . 5
Parts referred to in this manual . . . . . . . . . . . . . . . . . . . . . . . . . . . . . . . . . . . . . 5
Controls and functions. . . . . . . . . . . . . . . . . . . . . . . . . . . . . . . . . . . . . . . . . . . . 6
Control Handset: . . . . . . . . . . . . . . . . . . . . . . . . . . . . . . . . . . . . . . . . . . . . . . . 6
Dual control switch. . . . . . . . . . . . . . . . . . . . . . . . . . . . . . . . . . . . . . . . . . . . . . 6
Emergency Stop Button (red) . . . . . . . . . . . . . . . . . . . . . . . . . . . . . . . . . . . . . 6
Power on / Reset button (green) . . . . . . . . . . . . . . . . . . . . . . . . . . . . . . . . . . . 6
Power off button (red) . . . . . . . . . . . . . . . . . . . . . . . . . . . . . . . . . . . . . . . . . . . 6
Automatic cut out . . . . . . . . . . . . . . . . . . . . . . . . . . . . . . . . . . . . . . . . . . . . . . . 6
System failure lower override. . . . . . . . . . . . . . . . . . . . . . . . . . . . . . . . . . . . . . 6
Automatic stop function . . . . . . . . . . . . . . . . . . . . . . . . . . . . . . . . . . . . . . . . . . 7
Battery discharge indicator . . . . . . . . . . . . . . . . . . . . . . . . . . . . . . . . . . . . . . . 7
Powered adjustable width chassis legs . . . . . . . . . . . . . . . . . . . . . . . . . . . . . . 7
Hour meter . . . . . . . . . . . . . . . . . . . . . . . . . . . . . . . . . . . . . . . . . . . . . . . . . . . . 7
Using your TENOR. . . . . . . . . . . . . . . . . . . . . . . . . . . . . . . . . . . . . . . . . . . . . . . . . . 8
Checklist before use . . . . . . . . . . . . . . . . . . . . . . . . . . . . . . . . . . . . . . . . . . . . . 8
Preparation . . . . . . . . . . . . . . . . . . . . . . . . . . . . . . . . . . . . . . . . . . . . . . . . . . . . 8
Before approaching the resident . . . . . . . . . . . . . . . . . . . . . . . . . . . . . . . . . . . . 8
To lift a resident from a chair . . . . . . . . . . . . . . . . . . . . . . . . . . . . . . . . . . . . . . . 8
To lift a resident from a bed. . . . . . . . . . . . . . . . . . . . . . . . . . . . . . . . . . . . . . . 10
To lift a resident from the floor. . . . . . . . . . . . . . . . . . . . . . . . . . . . . . . . . . . . . 11
ArjoHuntleigh SCALE (if fitted) . . . . . . . . . . . . . . . . . . . . . . . . . . . . . . . . . . . . 12
Battery charging. . . . . . . . . . . . . . . . . . . . . . . . . . . . . . . . . . . . . . . . . . . . . . . . . . . 13
Care of your TENOR . . . . . . . . . . . . . . . . . . . . . . . . . . . . . . . . . . . . . . . . . . . . . . . 16
Servicing Advice . . . . . . . . . . . . . . . . . . . . . . . . . . . . . . . . . . . . . . . . . . . . . . . 16
Slings. . . . . . . . . . . . . . . . . . . . . . . . . . . . . . . . . . . . . . . . . . . . . . . . . . . . . . . . 17
Environmental Advice . . . . . . . . . . . . . . . . . . . . . . . . . . . . . . . . . . . . . . . . . . . 17
Labels . . . . . . . . . . . . . . . . . . . . . . . . . . . . . . . . . . . . . . . . . . . . . . . . . . . . . . . . . . . 18
Key to labels: . . . . . . . . . . . . . . . . . . . . . . . . . . . . . . . . . . . . . . . . . . . . . . . . . . 18
Component Weights . . . . . . . . . . . . . . . . . . . . . . . . . . . . . . . . . . . . . . . . . . . . 19
Maximum Lifting Capacities (Safe Working Load - SWL) . . . . . . . . . . . . . . . . 19
Electrical . . . . . . . . . . . . . . . . . . . . . . . . . . . . . . . . . . . . . . . . . . . . . . . . . . . . . 19
Environment. . . . . . . . . . . . . . . . . . . . . . . . . . . . . . . . . . . . . . . . . . . . . . . . . . . 20
Maximum sound power level . . . . . . . . . . . . . . . . . . . . . . . . . . . . . . . . . . . . . . 20
Scale . . . . . . . . . . . . . . . . . . . . . . . . . . . . . . . . . . . . . . . . . . . . . . . . . . . . . . . . 20
Hoist Dimensions. . . . . . . . . . . . . . . . . . . . . . . . . . . . . . . . . . . . . . . . . . . . . . . 21
Technical specification . . . . . . . . . . . . . . . . . . . . . . . . . . . . . . . . . . . . . . . . . . . . . 22
Troubleshooting / Problem Solving . . . . . . . . . . . . . . . . . . . . . . . . . . . . . . . . . . . 23
Preventive Maintenance Schedule . . . . . . . . . . . . . . . . . . . . . . . . . . . . . . . . . 24
ArjoHuntleigh Slings . . . . . . . . . . . . . . . . . . . . . . . . . . . . . . . . . . . . . . . . . . . . 24
ArjoHuntleigh Battery Charger. . . . . . . . . . . . . . . . . . . . . . . . . . . . . . . . . . . . . 24
ArjoHuntleigh TENOR . . . . . . . . . . . . . . . . . . . . . . . . . . . . . . . . . . . . . . . . . . . 24
Checks to be performed by qualified ArjoHuntleigh personnel . . . . . . . . . . . . 25
1
Page 4

2
Page 5
Safety instructions
READ BEFORE USE
Before using your TENOR, familiarise yourself with the various parts and controls as illustrated in this document. Read this whole
manual thoroughly before operating your
TENOR in order to prevent injury or damage to
the product.
Symbols and definitions used in this manual:
CAUTION
Failure to follow these instructions
may cause damage to the product.
OPERATIONAL LIFE
Unless stated otherwise, the operational life of
the TENOR is ten (10) years, as long as the
required preventive maintenance is carried out
in accordance with the care and maintenance
instructions in this user manual. The TENOR
will not be suitable for use if it is damaged.
The operational life of the sling and of the
consumable parts e.g. batteries, depends on the
actual use conditions. Therefore, before use,
always make sure that the sling, loops, cords
and straps do not show any sign of fraying,
tearing or other damage and that there is no
damage (e.g. cracking, bending, breaking) to
the attachment clips. If any such damage is
observed, do no use the sling.
WARNING
Failure to follow these instructions
may result in injury to yourself or to
others.
INTENDED USE
TENOR is a mobile passive lift, intended to be
used on horizontal surfaces for lifting and
transfer in hospitals, nursing homes or other
health care facilities.
To describe which residents may be lifted using
an ArjoHuntleigh hoist, a resident gallery has
been created by ArjoHuntleigh. The residents
that can be transferred with a TENOR have
been named Doris (D) and Emma (E).
TENOR has been designed to lift Doris, who:
• Sits in wheelchair
• Has no capacity to support herself at all
• Cannot stand unsupported and is not able to
bear weight, not even partially
• Is dependent on carer in most situations
TENOR has been designed to lift Emma, who:
• Is a passive resident
• Might be almost completely bed ridden
• Is often stiff and has contracted joints
• Is totally dependent
WARNING
When using the TENOR, only use the
slings as described in the list on
the next page.
The scale (if fitted) has been designed to weigh
residents.
WARNING
Do not overload the TENOR beyond
the approved maximum lifting capacity
(Safe Working Load) of 320 kg
(705 lbs).
CAUTION
Although manufactured to a high
standard, the TENOR and accessories
should not be left for extended periods
in humid or wet areas.
Do not, under any circumstances,
spray the TENOR or accessories
(excluding sling) with water e.g. under
the shower.
3
Page 6

Safety instructions
WARNING
Before attempting to raise a resident, a
full clinical assessment of the resident’s condition & suitability must be
carried out by a qualified person on
the individual resident to determine if it
WARNING
If FLITES (disposable sling) are to be
used with the TENOR, then always
refer to the separate operating instructions for FLITES as well as these
instructions before using.
is advisable that he/she will be lifted
and/or transferred using a TENOR.
BARIATRIC SLINGS GUIDANCE
Part number Sling Size Edge binding colour Safe Working Load
MAA8000-M M Yellow 454 kg / 1000 lbs
MAA8000-L L Green 454 kg / 1000 lbs
MAA8000-XL XL Blue 454 kg / 1000 lbs
MAA8000-XXL XXL Terracotta 454 kg / 1000 lbs
MAA8010-M M Yellow 454 kg / 1000 lbs
MAA8010-L L Green 454 kg / 1000 lbs
MAA8010-XL XL Blue 454 kg / 1000 lbs
MAA8010-XXL XXL Terracotta 454 kg / 1000 lbs
MAA8020-M M Yellow 454 kg / 1000 lbs
MAA8020-L L Green 454 kg / 1000 lbs
MAA8020-XL XL Blue 454 kg / 1000 lbs
MAA8020-XXL XXL Terracotta 454 kg / 1000 lbs
MAA8030-M M Yellow 454 kg / 1000 lbs
MAA8030-L L Green 454 kg / 1000 lbs
MAA8030-XL XL Blue 454 kg / 1000 lbs
MAA8030-XXL XXL Terracotta 454 kg / 1000 lbs
If the resident’s weight falls into two sizes or if there is any doubt on choosing the right size slings,
always go for the smaller size sling first.
This resident sling guide is only an approximation, other factors which must be considered when
selecting the appropriate sling are: resident’s distribution of body weight (i.e. hips, thighs, upper
body); resident’s height, torso length; resident’s physical condition (i.e. amputee, contractions,
etc.).
WARNING
The TENOR resident must only be lifted using a bariatric sling.
4
Page 7
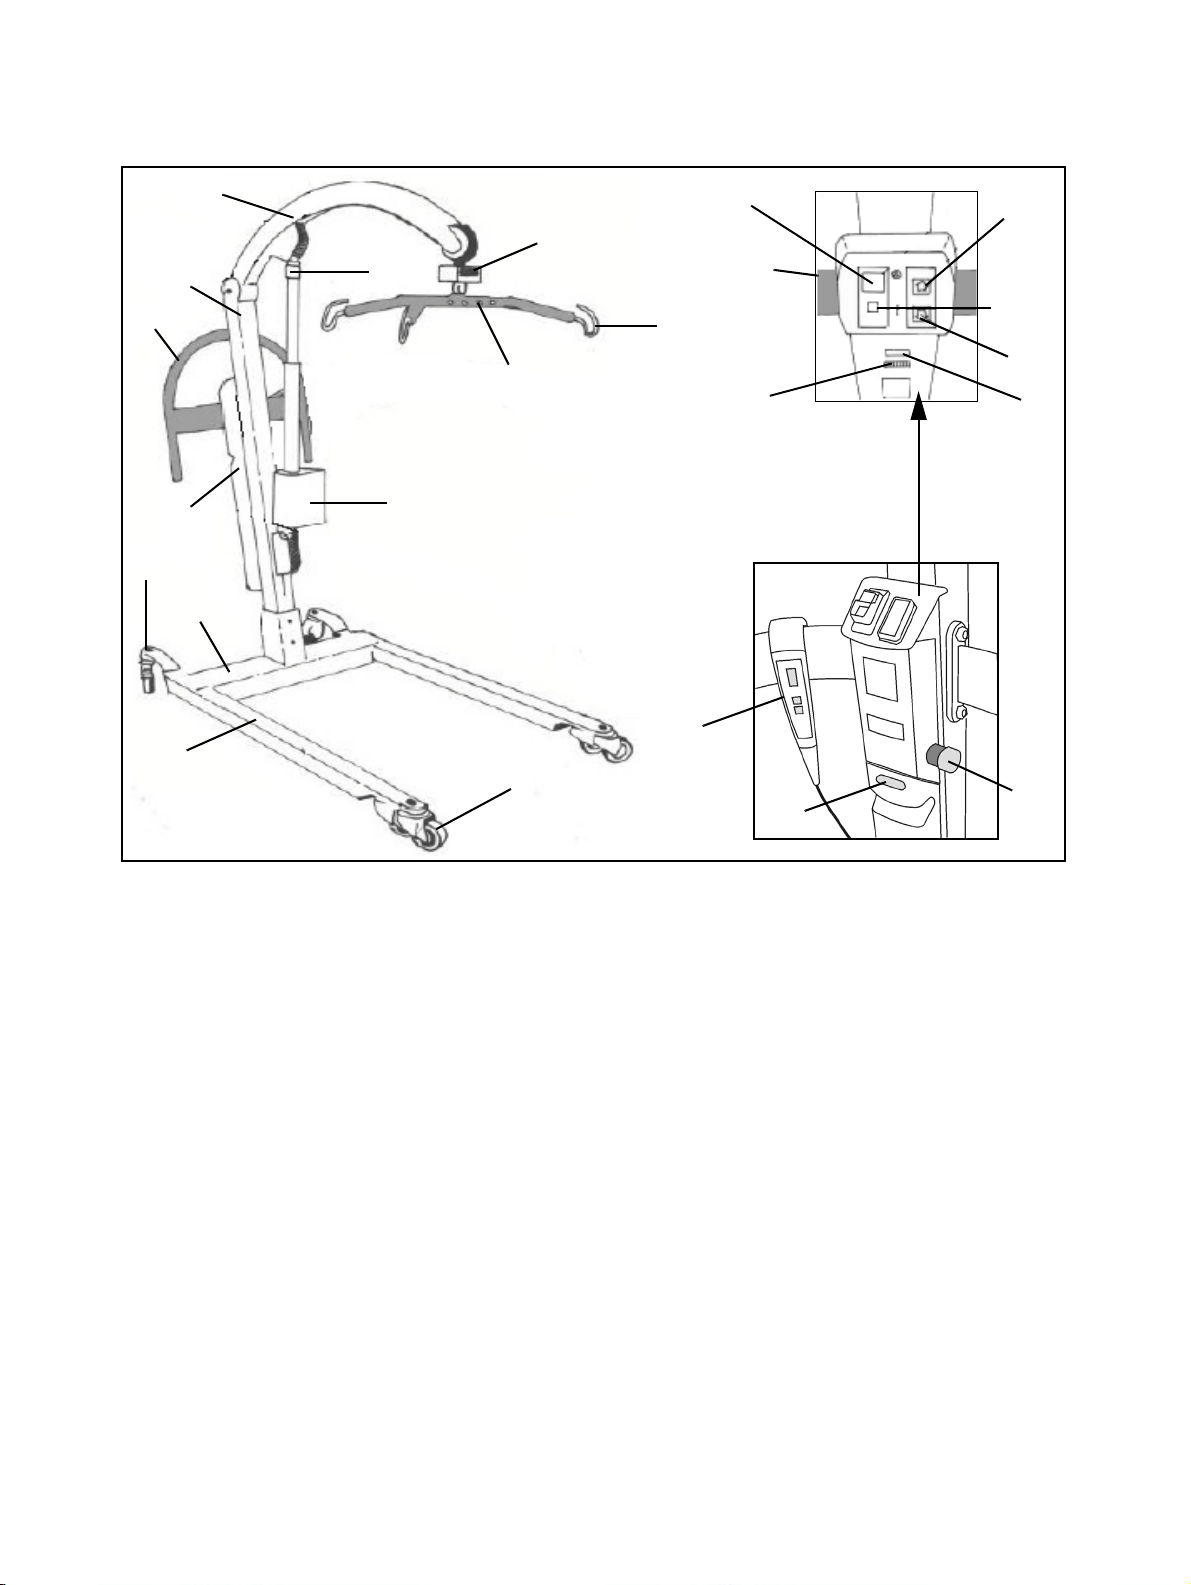
Product description
Parts referred to in this manual
7
4
Fig. 1
6
13
1
8
2
3
14
12
11
5
21
15
10
17
9
22
18
16
19
20
23
1. Mast
2. Chassis
3. Adjustable width chassis legs
4. Rear castors (braked)
5. Lift actuator
6. Jib
7. Manoeuvring handle
8. Battery pack
9. Control handset (for raising and lowering)
10.Electrics / Battery compartment
11.Spreader bar
12.Sling attachment hooks
13.Scale unit (if fitted)
14.System failure lower override
15.Power off button
16.Power on / Reset button
17.Battery discharge indicator LCD
18.Dual control switch for raising UP
19.Dual control switch for lowering DOWN
20.Hour meter
21.Front castor
22.Battery release button
23.Emergency stop button
5
Page 8
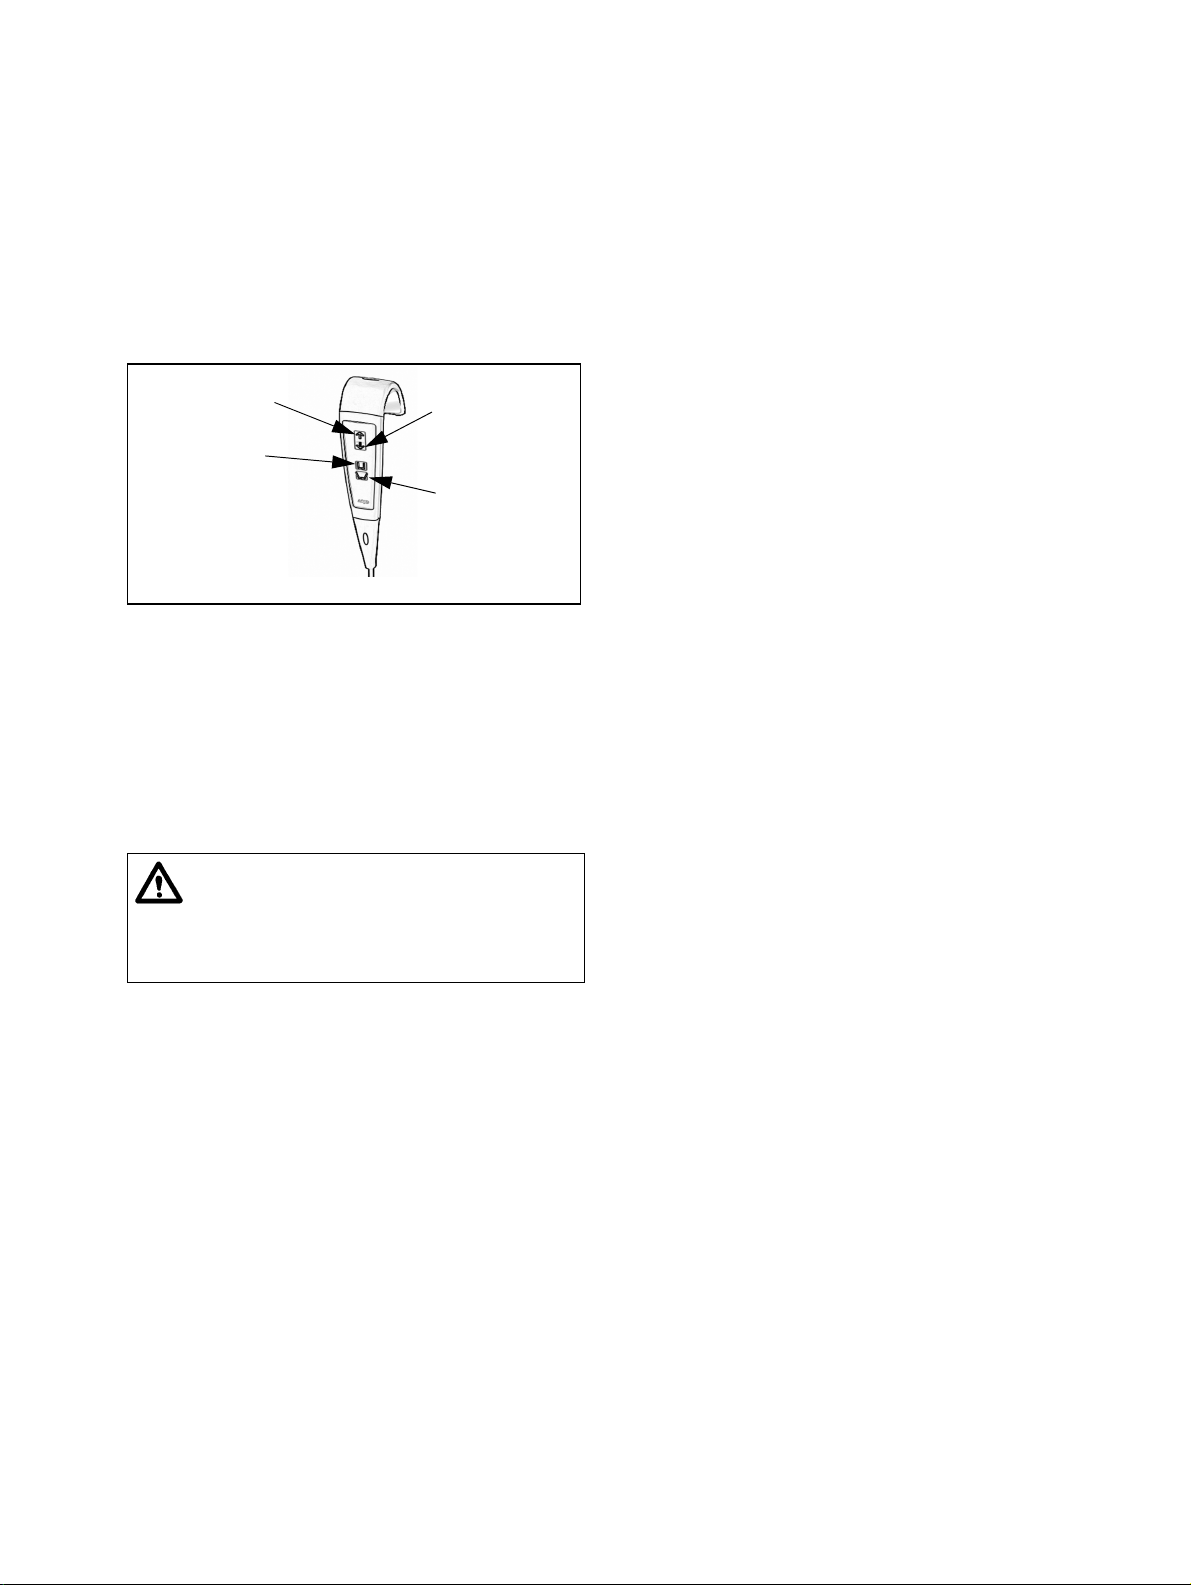
‘Lower’ button
‘Raise’ button
Fig. 2
Product description
CONTROLS AND FUNCTIONS
Control Handset: Press the appropriate button
on the control handset to raise / lower the jib
and to move the spreader bar. A small direction
arrow is printed next to each button for function identification (See Fig. 2).
Chassis legs
‘Open’ button
Chassis legs
‘Close’ button
If pressure is released during any function,
powered motion will stop immediately. Do not
drop the handset into water, e.g. bath.
When not in use, the handset can be kept ready
for use by hooking it over the loop at the rear of
the mast.
WARNING
Do not press two control buttons
simultaneously as this may cause
unintended movement of the hoist.
Stop button has been operated, it must be reset
by turning the red cap until it pops out. Now
the TENOR can be operated again.
Power on / Reset button (green) : Located
on the top control panel (Fig. 1). Press this
button to turn on power to the TENOR. Also
used to reset if the automatic overload fuse has
operated (indicated by the button projecting
outwards slightly). If the fuse has operated and,
once reset, operates again, withdraw the lifter
from use and contact ArjoHuntleigh or their
appointed distributor.
Power off button (red) : Located on the top
control panel (Fig. 1). Press this button to turn
off power to the TENOR.
Automatic cut out: If the lift is accidentally
overloaded, trying to lift a resident heavier than
permitted, an automatic ‘cut out’ operates to
prevent the lift lifting a load in excess of one
and a half a times the maximum allowed load.
The lift motion will stop automatically.
System failure lower override: In case of
control handset / dual switch malfunctioning,
with a resident still supported by the sling, the
lowering process can be continued using the
system failure lower override, situated on the
lift actuator tube (See Figs. 1 & 3).
Dual control switch: The raising / lowering of
the jib can also be controlled from this switch,
situated on the top of the electronics / battery
compartment on the mast. Arrows on the
switch are for function identification (See inset
to Fig. 1). This switch will function, even if the
handset cable has been unplugged.
Emergency Stop Button (red): If, in an
emergency, you have to immediately stop any
powered movement (other than by releasing
pressure on the button on the handset) press the
emergency stop button situated on the right
hand side of the electronics / battery compartment on the mast (Fig. 1). Once the Emergency
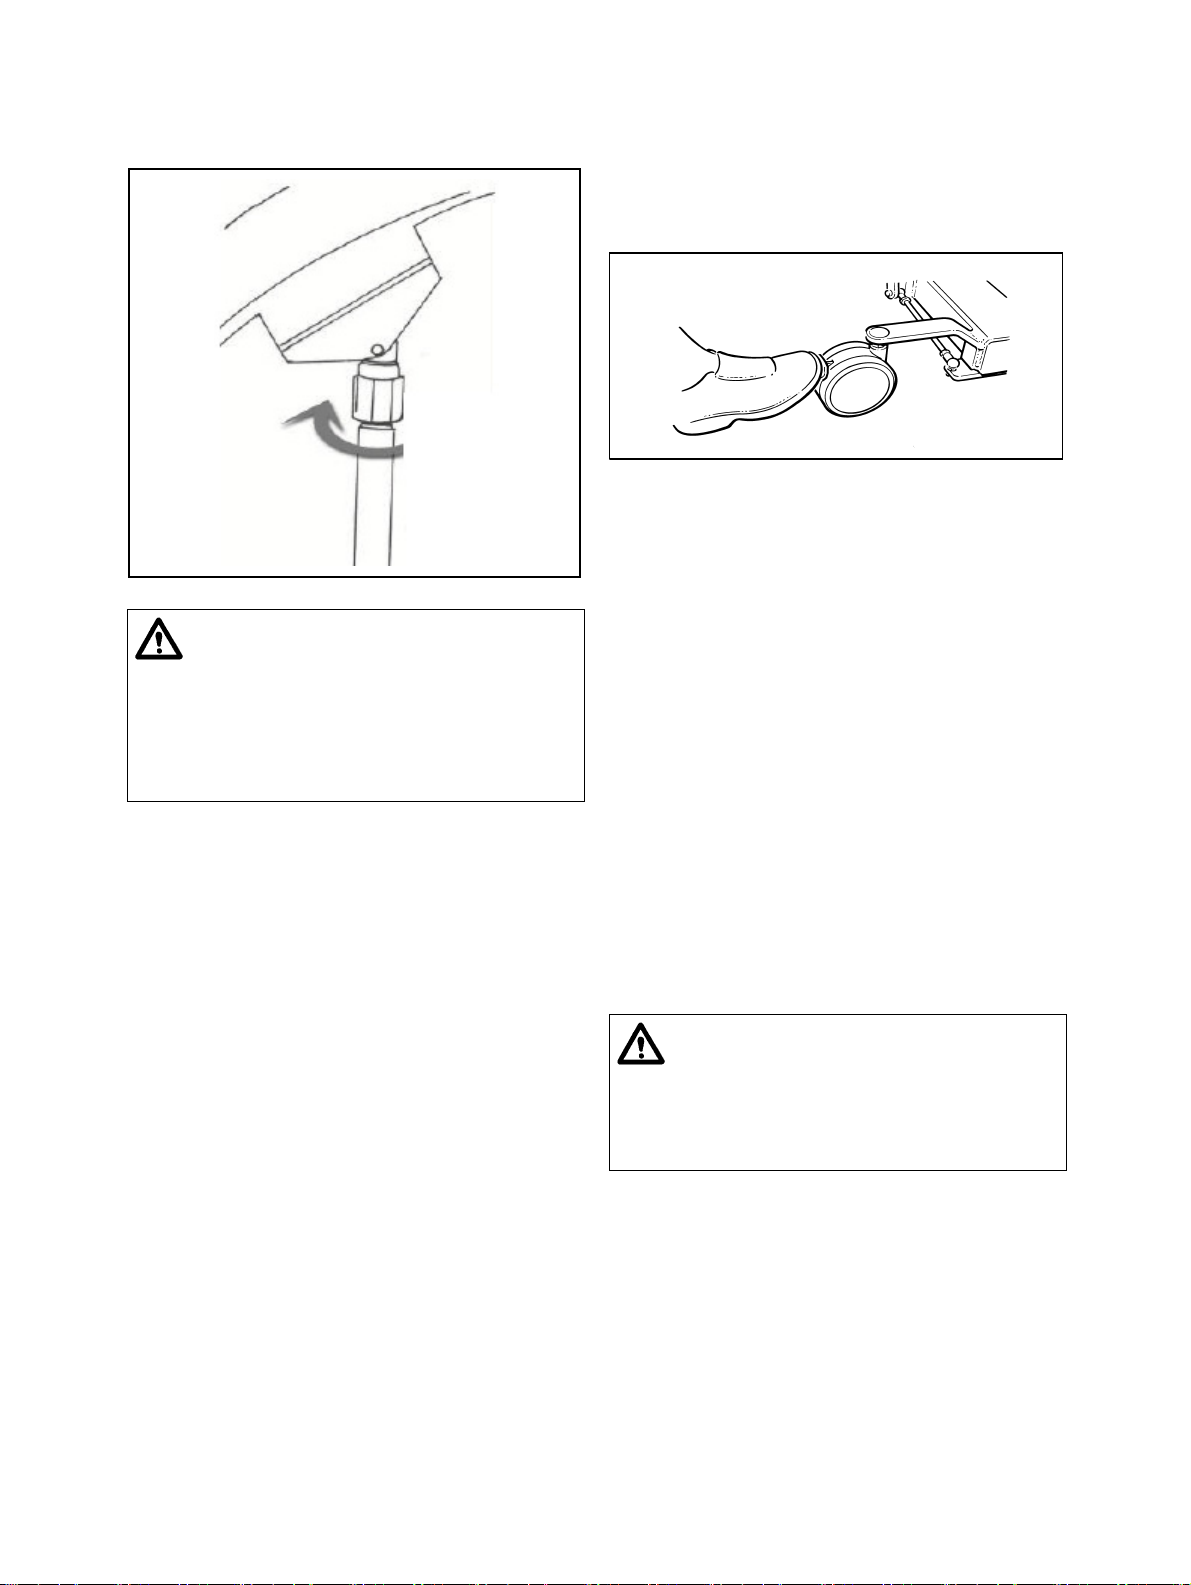
To use this function, turn the red ring on top of
the motor / actuator of the TENOR clockwise,
using the resident’s own weight to enable the
mast to slowly lower. To stop lowering, simply
stop turning the ring. Only use this function in
the event of normal control failure. Do not use
it for normal function lowering.
6
Page 9
Lowering
Fig. 3
Fig. 4
Product description
WARNING
Before operating the “System failure
lower override” to lower a resident,
always ensure that a chair or suitable
support is underneath ready to accept
the resident.
Chassis castor brakes: The chassis rear
castors have brakes which can be foot operated
(See Fig. 4).
Powered adjustable width chassis legs:
The mobile chassis legs can be opened to avoid
obstructions e.g. chair legs. This can be done
by operating the hand control, using only one
hand and having the other free to hold onto the
lift or care for the resident. Use the lower
button to close the chassis legs and the upper
one to open them (See Fig. 2).
Numerous positions can be obtained between
fully opened and fully closed.
Automatic stop function: Great care should
be taken not to lower the jib and / or spreader
bar onto the resident or any obstruction, particularly when the resident is standing up and
weight bearing. If this should happen, the
motor will continue to run but downward
movement will be blocked by the obstruction.
If this occurs, release pressure from the
“lower” button until immediately and operate
the “raise” button until the equipment is clear.
Then remove the obstruction.
Battery discharge indicator: Is a small LED
display situated on the rear of the electronics /
battery compartment, which indicates when the
lifter battery requires recharging.
(See Fig. 1 and also the ‘Battery Charging’
section for complete description).
Transportation should be done with the chassis
legs closed, it will be easier to push the lifter
through doorways, etc.
When opening the chassis legs, the rear castors
will close inwards.
WARNING
When opening or closing the legs on a
powered chassis, care must be taken
not to allow anyone to stand in the way
of the moving chassis legs.
Hour meter: This is a small LCD display
which shows the total duration of powered
operation (in hours - see item 20, Fig. 1). This
is primarily intended to help the caregiver
calculate maintenance intervals.
7
Page 10
Using your TENOR
CHECKLIST BEFORE USE
For a list of what to check before use, please
read the “Preventive Maintenance Schedule”
section of this document.
PREPARATION
Unpack the battery supplied with the lift.
CAUTION
A battery that is charged for the first
time, or after a long storage period,
must be charged for 24 hours or until
the LED indicates the battery is
charged (See “Battery charging
section” and also ArjoHuntleigh
“Battery Care” document.
When the battery pack is fully charged, disconnect the mains power, then remove the pack
from the charger and insert if fully into the
TENOR battery position, located at the rear of
the mast (See Fig. 1). Electrical
connection is made automatically.
Before approaching the resident
To lift a resident from a chair
Hold the sling up with the leg sections pointing
downwards (See Fig. 5), to identify the orientation of the sling.
Before using a sling, first read the ‘Guidelines
on the use of your sling’ and the sling label,
which are delivered with the sling.
Fig. 5
Place the sling around the resident so that the
bottom of the back support area reaches the
bottom of the resident’s spine (it is not necessary to pull the sling under the resident).
Ensure the head support area is behind the head
(See Fig. 6).
Pull each leg section under each thigh so that
they appear on the inside of the thighs
(See Fig. 6).
WARNING
Never leave the resident unattended.
The caregiver should always tell the resident
what he / she is going to do and have the
correct sling size ready. Where possible,
always approach the resident from the front.
To ensure maximum resident comfort, do not
allow the resident to hold onto the spreader bar.
If required, the chassis legs may be opened to
go around a chair, wheelchair or to avoid bed
legs or any other obstruction.
Fig. 6
Ensure the sling is not folded or twisted under
the resident (See Fig. 7).
Move the TENOR towards the resident, ensure
the widest side of the spreader bar is facing
towards the resident and is at, or just below,
shoulder level (See Fig. 7).
8
Page 11

Fig. 8
Fig. 9
Using your TENOR
Fig. 7
Ensure that the TENOR is close enough to be
able to attach the shoulder loops of the sling to
the spreader bar. To accomplish this, you may
have to put the resident’s feet on or over the
chassis.
If the slings supplied have more than one loop
attachment position, attach whichever loop
seems appropriate to the size of the resident.
WARNING
Always check that all sling attachment
loops are completely underneath and
away from the safety latch on the
hanger bar, before and during the
commencement of the lifting cycle, in
tension as the resident’s weight is
gradually taken up (See Figs. 8 & 9)
Once the TENOR is in position, attach the
shoulder strap loops to the hooks on the
spreader bar nearest to the resident
(See Figs. 8 & 9).
The wider hook up points are for the shoulder
sling loops and the narrower hook up points are
for the leg sling loops (See Fig. 9).
If necessary, carefully lower the spreader bar a
little bit using the control handset to enable the
connection of the sling leg section loops, being
careful not to lower it onto the resident.
The leg section loops should not be crossed
over or twisted. Instead, the left leg section
loop should be connected to the exact sidehook
above the leg being lifted (See Figs. 6 & 8).
WARNING
When lifting or lowering the resident,
ensure that no part of the resident’s
body can be caught between the lift’s
moving parts.
Raise the resident with the control handset, just
high enough to move the resident clear of the
seat, ensure their feet are clear of the floor.
Before transportation, turn the resident to face
the caregiver and lower the individual to
approximately normal chair height. This gives
confidence and dignity and also improves the
TENOR mobility.
9
Page 12

Fig. 11
Fig. 12
Using your TENOR
To lift a resident from a bed
WARNING
When lowering the resident back into a
chair or when transferring from bed to
chair, position the resident in such a
way that he / she is fully supported by
the chair when he / she is lowered.
Before lifting a person from a bed, ensure there
is sufficient clearance underneath the bed to
accommodate the TENOR chassis legs. Adjust
width of chassis legs if necessary.
Position the resident onto the sling by rolling
the resident towards you, then folding the sling
in half and placing it behind the resident’s
back, so that the bottom edge of sling is aligned
with bottom of the resident’s spine (See Figs.
10, 11 & 12). Position the sling carefully so
that when rolled back, the resident will lie
centrally on the sling. Check that the head
support area of the sling is in position.
When rolling the resident back onto the sling,
roll them slightly in the opposite direction so
that the folded part of the sling can be brought
out.
Alternatively, the resident can be brought into a
sitting posture. Then position the sling as
detailed in the section “To lift a resident from a
chair”.
Using the adjustable width chassis, it is
possible to make adjustments to chassis leg
widths to assist manoeuvrability around
obstructions, for example, bed legs.
Fig. 10
Approach the bed with the open side of the
TENOR spreader bar towards the resident’s
head.
Position the TENOR so that the spreader bar is
just above and centrally situated over the resident.
Carefully lower the spreader bar until the
shoulder attachment loops can be connected to
the hooks nearest to the resident’s head.
Slide the leg sections of the sling under the
resident’s thighs and connect each loop on the
side hook above each leg.
To make the lift more comfortable for the resident, it is recommended to lift the head end of
the bed to semi-reclined position before
commencing the lifting of the resident.
10
Page 13

Fig. 13
Fig. 14
Using your TENOR
When correctly connected, operate the control
handset to raise the resident from the bed. At
all times when lifting and lowering, it is advisable to stay at the side of the resident to ensure
they are in a comfortable position. This is also
reassuring to the resident.
WARNING
Always check that the sling attachment loops are fully in position before
and during the commencement of the
lifting cycle, and in tension as the resident’s weight is gradually taken up.
After lifting the resident, adjust to a comfortable height for transfer. The specially designed
sling, together with its integral head support,
enables one person to carry out a complete
lifting function without additional help.
If returning the resident to a bed, move into the
desired position above the bed and then lower
using the control handset.
Only when the resident’s body weight is fully
supported by the bed, may the sling connection
loops be detached and while still in sitting position, detach the sling from the hooks before
reclining the resident to the bed.
Move the TENOR away before removing the
sling from under the resident.
If transferring the resident to a chair, refer to
the section “To lift a resident from a chair”.
The resident’s head and shoulders should be
raised on pillows for comfort. This will also
make it easier to attach the shoulder position
attachment loops (See Fig. 13).
Attach the shoulder strap attachment loops. It
will probably be easier to attach the longest
loops.
Some caregivers prefer to use a larger sling
when lifting a resident from the floor.
Bring each leg section of the sling under the
resident’s thighs and attach each leg strap loop
to the side hook above each leg (See Fig. 14).
Once securely connected, raise the resident
carefully, staying in close proximity of the resident’s legs at this stage of the lift to guide his /
her legs safely over the lift until clear. Once
raised from the floor, ensure the resident’s legs
are clear of the chassis before continuing to lift.
To lift a resident from the floor
Put the sling around the resident as before, by
using the rolling or seated position method.
Depending on circumstances, space and / or
position of the resident etc., open the chassis
legs if necessary and carefully approach the
resident with the front of the lift. Now lift the
resident’s legs over the chassis as shown in
Figure 13, should the situation require it.
Always move the TENOR in the direction
shown in Fig. 14.
11
Page 14

Fig. 15
Using your TENOR
Raise the resident to a suitable height for transport in a semi-recumbent position.
WARNING
Before and during the commencement
of the lifting cycle, always check that
all the sling attachment loops are fully
in position and in tension as the resident’s weight is gradually taken up and
that the sling loops are underneath and
away from the safety latch on the
hanger bar.
If the leg sections of the sling tend to be fairly
high in the crotch area, make adjustments for
added comfort. The resident should be positioned in a chair or placed onto a bed in order
to do this.
If the resident is prone to extensor spasm, he /
she may be lifted with the TENOR, but special
attention should be paid to supporting the legs
during lifting.
1. Push the button marked with ‘Zero’, to
calculate the weight unit to zero;
2. Place the resident in the sling;
3. Lift the resident in sling with TENOR;
4. Stabilize the resident’s movements, push the
button marked ‘Operate’;
5. Read the resident’s weight from the display;
6. You can switch between pounds and kilograms using the kg / lbs button, by keeping it
pressed in for 10 seconds.
Staff assessment should be made to determine
if a spastic or combative resident requires an
additional caregiver to assist.
Transportation of a resident is possible with the
chassis legs open or closed, but manoeuvrability will be easier, especially through doorways, with the chassis legs closed. The resident
should be positioned facing the caregiver and
at a dignified height.
Apply the brakes on an incline.
ArjoHuntleigh SCALE (if fitted)
If your TENOR has been supplied, fitted with
the ArjoHuntleigh Scale unit (See Fig. 15), it is
possible to weigh a resident during the lifting
procedure.
The scale can be used as follows:
Alternatively,
1. Weigh the sling by first connecting it to the hanger bar;
2. Read the display;
3. Calibrate the scale to zero;
4. Lift the resident with the sling;
5. Read the display to know the weight;
6. Deduct the sling weight to learn the resident’s net weight.
Technical details:
Capacity: 320 kg / 705 lbs
Display type: LCD
Display units: lbs / Kg
Resolution: 1 / 10
Accuracy: 0.2 kg / 0.44 lbs
12
Page 15

Battery charging
WARNING
The charger is for indoor use only.
Only use the charger in a dry environ-
ment, do not use in the bathroom.
Do not expose the charger unit or
battery pack to rain or spray and do
not immerse in water.
Only use the ArjoHuntleigh battery that
is supplied with the TENOR.
The battery charger is for use only with
ArjoHuntleigh supplied batteries that
are to be used with the TENOR.
The battery charger is for use with
sealed lead acid batteries only.
Under no circumstances should the
charger be used to attempt to
recharge non-rechargeable batteries.
Do not attempt to open or tamper with
the charger unit in any way. For any
repair, the charger must be sent to the
manufacturer.
The mains electricity socket must be
easily accessible. Should a faulty
condition occur, switch off and remove
the connection plug from the socket.
Only use ArjoHuntleigh components
that have been specifically designed
for the purpose when charging
batteries.
WARNING
To avoid overheating, the charger
must not be covered while in use.
No smoking or naked flames in battery
vicinity.
Do not expose the charger unit to dust.
Do not charge batteries in a sealed
container.
Do not place batteries near, or dispose
of, in a fire.
Do not short circuit a battery.
Do not store batteries at temperatures
in excess of 60°C (140°F).
Do not crush, puncture, open,
dismantle, or otherwise mechanically
interfere with batteries
WARNING
Should the battery casing become
cracked and electrolyte come into
contact with skin or clothing, wash
immediately with water.
If the electrolyte contacts the eye,
wash immediately with copious
amounts of water and seek medical
attention.
When disposing of batteries, contact
the appropriate local authorities for
advice.
The abbreviation “Pb” shown next to
the recycling and trash bin symbols on
the battery pack label is the element
symbol for lead and indicates that the
battery contains lead and therefore
should not be disposed of in the
normal manner but must be recycled.
The TENOR incorporates a battery discharge
indicator, situated on the rear of the battery /
electronics compartment (See inset to item 20
on Fig. 1).
13
Page 16

Fig. 16
Fig. 17
Battery charging
It is recommended that the battery is removed
from the lifter and recharged when the battery
discharge indicator LED displays (also see
TENOR Battery instructions).
Best practice is to charge batteries at each shift
to maximize battery life. Avoid totally
discharging the battery, this will prolong
battery life.
To ensure the TENOR is always ready for use,
it is recommended that a freshly charged
battery pack is always available. This is
achieved by having additional battery packs
available and keeping one on charge while the
other is in use.
It may be considered good protocol to have a
freshly charged battery pack ready for the start
of every work shift.
Switch on mains power, a light (LED) will be
displayed on the charger unit.
This light will remain on until the power is
switched off, although once the battery has
been charged, the light will flash intermittently,
indicating the unit has automatically switched
to “trickle charge” (keeping the battery at a full
level of charge).
Place the battery pack on charge as follows:
CAUTION
Ensure the mains power to the charger
unit is switched off before connecting
the battery.
WARNING
Always ensure the cable connection
plug that fits into the battery is fully
inserted before switching on mains
electricity.
When the battery discharge indicator LED
lights up, complete your lift cycle. Then take
the lifter to a convenient location and remove
the battery pack by holding the grip handle on
the top and lift clear (See Fig. 16). Take the battery to the battery charger unit, ensure the battery is positioned securely (See Fig. 17).
Insert the battery connector from the charger
into the corresponding connector socket in the
underside of the battery.
WARNING
Hold the pack firmly to ensure it does
not drop and become damaged or
cause personal injury.
The battery pack may be left connected to the
charger unit when it is fully charged without
being damaged by overcharging. This will also
ensure the battery is kept fully charged.
CAUTION
Always disconnect the mains supply
before disconnecting the battery from
the charger unit.
14
Page 17

Battery charging
When the battery pack is fully charged, disconnect the mains power, remove the battery pack
from the charger and insert it back into the
TENOR battery compartment.
Ensure that the green Power On / Reset button
(Fig. 1) is pressed in.
The TENOR is now ready for use.
CAUTION
After use, turn off the TENOR by
pressing the red Power off button
(Fig. 1) to reduce power consumption.
15
Page 18

Care of your TENOR
How often the following actions are taken, depends on how often the equipment is used.
Unless otherwise stated, before each and every
use follow the cleaning, care and inspection
procedures described in this section.
WARNING
It is recommended that resident lifters,
equipment, accessories and slings
supplied by ArjoHuntleigh are regularly
cleaned and / or disinfected between
each resident use if necessary, or daily
as a minimum. If the slings, lifters and
equipment need cleaning or are
suspected of being contaminated,
follow the cleaning and / or disinfection
procedures below, before re-using the
equipment. This is especially important when using the same equipment
for another resident to minimize the
risk of cross infection.
For cleaning your lifter, equipment and accessories wipe down with a damp cloth using
warm water to which a mild detergent has been
added.
Servicing Advice
CAUTION
Do not use the product in wet areas,
as this could cause problems with
electrical components or internal
corrosion.
If a hot air dryer is used to dry the lifter,
the temperature must not exceed 90°C
(194°F)
Do not use petroleum based solvents
or similar. This may damage plastic
parts.
WARNING
ArjoHuntleigh recommends that the
TENOR is maintained at regular intervals. See ArjoHuntleigh Preventive
Maintenance Schedule.
Spare parts, if required, are available from
ArjoHuntleigh or their approved distributors.
Parts list and circuit diagrams are available
from ArjoHuntleigh or their approved distributors upon request.
For disinfection of contaminated lifters, equipment and accessories, use the preferred method
of wiping the product completely with “hard
surface disinfectant wipes” that are supplied
impregnated with a mild detergent.
A rubbing action will be necessary when using
the wipes to promote effective disinfection of
the surfaces.
WARNING
Cleaning and disinfection products
must be used in accordance with the
manufacturer’s instructions and suitable eye, hand and clothing protection
must be worn at all times when
handling disinfectants.
Special tools are required for certain component replacement.
UK LIFTERS ONLY: Important new legislation
came into force on 5th December 1998, which has
an impact on the schedule of service for your resident lifter(s), variable height baths and other raising
and lowering equipment. The Lifting Operations
and Lifting Equipment Regulations (LOLER) 1998
and the Provision and Use of Work Equipment
Regulations (PUWER 98) must be satisfied by the
duty holder. A scheme of six monthly through
examinations has been devised to comply with the
law and details can be obtained from ArjoHuntleigh
Service UK.
The simplest, safest and most effective way to
maintain your product in good working order, is to
have it methodically and professionally serviced by
an ArjoHuntleigh approved engineer using ArjoHuntleigh approved spare parts.
16
Page 19

Care of your TENOR
For information on service and maintenance
contracts, please contact your local ArjoHuntleigh distributor.
WARNING
Slings
CAUTION
The sling should be checked before
and after using with each resident and
if necessary, washed according to the
instructions on the sling. Also refer to
the sling instruction sheet.
With regard to laundering, the sling should not
be classified as linen, but as an accessory to a
resident transfer lifter and therefore classified
as a medical device. Slings should be cleaned
and disinfected only in strict accordance with
the manufacturer’s instructions.
WARNING
Mechanical pressure should be
avoided during the washing and drying
procedure e.g. rolling and pressing, as
these can damage parts vital to the
safe and comfortable operation of the
sling.
When using your sling, always read
“the Guidelines on the use of your
sling” that are delivered with the sling.
Environmental Advice
When disposing of any items associated with
the equipment, contact the appropriate local
authority for advice.
CAUTION
Washing and drying procedures must
not exceed 90°C (194°F). Wash using
normal detergents, do not iron. Also
refer to the sling instruction sheet.
It is essential that resident lifters, equipment,
accessories and slings supplied by ArjoHuntleigh are regularly cleaned and/or disinfected between each resident use if necessary,
or daily as a minimum. If the slings, lifters and
equipment need cleaning or are suspected of
being contaminated, follow the cleaning and/or
disinfection procedures below, before re-using
the equipment. This is especially important
when using the same equipment for another
resident to minimize the risk of cross infection.
17
Page 20

Labels
4
5
1
6
2
10
9
7
Key to labels:
1. ArjoHuntleigh logo
2. Product name
3. Attention - Read operating instructions before use
4. Sling size guide
5. System failure lower override identification
8
3
6. Safe Working Load and Serial number / chassis ref.
7. Battery instruction / Recycling information
8. Hour meter / Battery discharge indicator
9. On / off label
10.Voltage / current reading
18
Page 21

Technical specification
Component Weights
kg lbs
TENOR complete - Ready for use....................................................69.1 152.3
TENOR Scale unit (option) ...............................................................1.13 2.5
Battery pack......................................................................................3.8 8.4
In normal use, the TENOR can be broken up into two parts:
Battery pack......................................................................................3.8 8.4
TENOR (without Battery pack) .........................................................65.3 144
TENOR with scale (without Battery pack) ......................... ...............66.4 146.4
The TENOR is not intended to be broken up into more than these parts.
Maximum Lifting Capacities (Safe Working Load - SWL)
TENOR .............................................................................. 320 704
All slings - Please verify with the SWL on the sling label
Electrical
Battery type ...................................................................................... Rechargeable - sealed lead acid
Battery part number.......................................................................... NDA0100-20
Battery capacity ................................................................................ 4Ah
Lift - Protection class - Ingress of fluid.............................................. IPX4
Lift - Protection class - Electrical shock protection ........................... Internally powered equipment
Lift nominal voltage........................................................................... 24V
Fuse - Overload................................................................................ 5A (thermal cutout)
Fuse - FCB ....................................................................................... 10A (time delay)
Operating forces - Handset .............................................................. 2.5N
Battery Charger Type ....................................................................... FW7318M / 24
Battery Charger Manufacturer .......................................................... Friwo Mobile Power GmbH
Battery Charger Power input ............................................................ 100 - 240V AC
Battery Charger Nature of supply ..................................................... AC
Battery Charger Supply Frequency .................................................. 50 - 60 Hz
Battery Charger Power output .......................................................... 1A
Battery Charger rated output voltage ............................................... 24V DC
Battery Charger - Protection class - Intrusion of fluid ....................... IP40
Battery Charger - Protection class - Electrical shock protection....... Class II double insulated
Battery Charger Part Number (country code between brackets)...... NDA8200 - EU
.......................................................................................................... NDA8200 - GB
.......................................................................................................... NDA8200 - CH
.......................................................................................................... NDA8200 - US
.......................................................................................................... NDA8200 - AU
Operating force of controls ............................................................... < 5 N
Medical Equipment - type protection against electrical shock in accordance with IEC 60601-1.
ArjoHuntleigh resident handling products meet the requirements of electromagnetic compatibility (EMC) as
stated in the product standard ISO10535, that, besides the requirements of IEC60601-1-2, has additional
EMC requirements.
Although compliant with EMC requirements, there is a remote chance that close proximity usage may affect
the TENOR. The TENOR may also have an affect on other oversensitive electrical equipment.
Conforms to UL standard 2601-1 and certified to CAN / CSA standard C22.2 No 601.1-M90.
19
Page 22

Technical specification
Duty cycle Max volts Max amps
Lift actuator........................................................................10% - 6 min / hr 24 10
“V” Chassis actuator .......................................................... 10% - 6 min / hr 24 2 x 2,5 A
Mode of operation: intermittent
Environment
Air humidity........................................................................80% @ 20°C (68°F)
Usage temperature range (ambient) .................................+ 5°C (41°F) to + 35°C (95°F)
Optimum usage temperature (ambient).............................+ 20°C (68°F) to + 25°C (77°F)
Storage and transportation temp (ambient).......................- 10°C (14°F) to + 45°C (113°F)
Maximum sound power level
In accordance with ISO3746
Unloaded ........................................................................... 67 dBA
Fully loaded .......................................................................71 dBA
Scale
Power supply ..................................................................... 6V DC
Battery life..........................................................................approx. 3000 readings
Accuracy............................................................................0,1% ± digit of reading
Display type ....................................................................... Liquid crystal
Product is a medical device, risk class 1, withing the meaning of the Medical Device Directive 93/42/EEC
Product was designed and manufactured to fulfil the essential requirements from Annex 1 of the Medical
Device Directive 93/42/EEC
Product is in conformity with the international and European product standard ISO / EN 10535: 2007
20
Page 23

Technical specification
Hoist Dimensions
(drawing on page 22)
1. Hoisting reach at max. height of C.S.P.: 840 mm / 33.1”
2. Flexible device: 100 mm / 3.94”
3. C.S.P. 90 mm / 3.6”
4. Spreader bar: 465 mm - 700 mm / 18.32” - 27.6”
5. Lifting machinery: 109,5 mm - 690 mm / 4.31” - 27.2”
6. Hoisting range: 1245 mm / 49.6”
7. Max. height of C.S.P.: 2040 mm / 80.4”
8. Min. height of C.S.P.: 795 mm / 31.32”
9. Height of C.S.P. at max. hoisting reach: 1360 mm / 53.6”
10.Hoisting reach at min. height of C.S.P.: 800 mm / 31.52”
11.Max. hoisting reach: 1035 mm / 40.8”
12.Max. height: 100 mm / 3.94”
13.Min. clearance 40 mm / 1.6”
14.Min. distance wall to C.S.P. at max. height (legs spread) : 540 mm / 21.28”
15.Min. distance wall to C.S.P. at max. reach (legs spread) : 280 mm / 11.03”
16.Min. distance wall to C.S.P. at min. height (legs spread) : 515 mm / 20.29”
17.Maximum reach at 600mm (reference height): 830 mm / 32.7”
18.Max. external length: 1490 mm / 58.71”
19.Max. internal length: 1030 mm / 40.58”
20.Min. internal width: 620 mm / 24.43”
21.Min. external width: 740 mm / 29.2”
22.Max. internal width: 1135 mm / 44.72”
23.Max. external width: 1240 mm / 48.86”
24.Reach from base with legs spread to 700 mm: 470 mm / 18.52”
25.Base
26.Turning radius:1650 mm / 65.01”
Note: ‘C.S.P.’ stands for ‘Central Suspension Point’: a reference point on the lift used
for measurements. On the TENOR, the C.S.P. is the clips attachment point closest to
the resident at the start of the lifting cycle.
Technical specifications may be revised and changed without prior notice.
21
Page 24

1
2
4
6
7
9
8
16
10
11
5
12 13
15
3
18
19
24
25
20
21
22
23
26
14
Technical specification
22
Page 25

Troubleshooting / Problem Solving
Problem description:
The TENOR is (brand new and) not functioning at all.
Probable cause:
Power Off button (red) is still engaged.
Solution:
Please press the Power on / Reset button (green).
Problem description:
The TENOR is raising and lowering slower than normal.
Probable cause:
Low battery power level.
Solution:
Please check LED light, digital display and hour meter on the mast of the TENOR. This should indicate the power level of the battery. In
case of doubt, change the battery on the lift with a fully charged battery and compare performance. In case of low battery power level,
please charge the battery and use a fully charged one to continue using the TENOR.
Problem description:
The TENOR is not raising or lowering, and/or the chassis can not be opened or closed.
Probable cause:
Hand control is damaged.
Solution:
Please try operating the lift with the Dual Up/ Down Control situated on the mast of the TENOR. Should the lift fully function when these
controls are used, and should the lift not fully function when using the hand control, the hand control should be replaced.
Problem description:
As above, the TENOR does not function properly, not with the hand control, neither with the Dual Up-Down Control switches.
Probable cause:
Electronics PCB is malfunctioning or actuator (on lifting arms or in chassis) is malfunctioning
Solution:
Please contact your ArjoHuntleigh dealer or ArjoHuntleigh approved service engineer.
Problem description:
While pressing the ‘raise’ button, the TENOR makes a noise but the lifting arms or the resident are not moving upwards
Probable cause:
An obstruction is blocking the lifting arms.
Solution:
Please remove the obstruction and check thoroughly for damage before continuing the lifting cycle. When in doubt, use the System Failure
Lowering Override, to put the resident back into a safe seated position, before removing the TENOR and placing it out of order. Only recommence using the TENOR after it has been inspected and approved for safe working by an ArjoHuntleigh approved engineer.
Problem description:
While pressing the ‘Chassis legs open’ button, the TENOR makes a noise but the chassis legs are not opening.
Probable cause:
An obstruction is blocking the chassis legs.
Solution:
Please remove the obstruction and check thoroughly for damage before continuing the lifting cycle. When in doubt, use the System Failure
Lowering Override to put the resident back into a safe seated position before removing the TENOR and placing it out of order till it has
been inspected and approved for safe working by an ArjoHuntleigh approved engineer.
Problem description:
The functions on the TENOR are not working properly
Probable cause:
Malfunction of EMC of the hoist making the hoist vulnerable for radiation influences of other machinery
Solution
Operate the TENOR in an environment without influence of radiation.
Problem description:
Unexpected movement of the hoist
Probable cause:
Two control buttons pressed simultaneously; faulty hand control, push buttons or electronics
Solution
Release both control buttons. If this doesn’t work, press the red Emergency Stop button and remove the battery. Use the System Failure
Lowering Override to put the resident back into a safe seated position before removing the TENOR and placing it out of order till it has
been inspected and approved for safe working by an ArjoHuntleigh approved engineer.
23
Page 26

Preventive Maintenance Schedule
The TENOR is subject to wear and tear, and the following actions must be performed when specified to ensure
that the product remains within its original manufacturing specification.
WARNING
The points on this checklist are the minimum the manufacturer recommends. In some cases due to
heavy use of the product and exposure to aggressive environment, more frequent inspections shall
be carried out. Continuing to use this product without conducting regular inspections or when a fault
is found will seriously compromise the user and residents’ safety. Local regulations and standards
may be higher than the manufacturers. Preventive maintenance specified in this manual can prevent
accidents.
The parts which are entitled ‘Checks to be performed by Qualified ArjoHuntleigh personnel’ have to
be carried out by qualified personnel, using the correct tools and knowledge of procedures. Failure
to meet these requirements could result in personal injuries and / or unsafe product.
Preventive Maintenance Schedule
Action/Check Before each
CAREGIVER OBLIGATIONS
use
ARJOHUNTLEIGH SLINGS
Examine the slings, their straps and attachment loops. If
any part of the sling or its straps is frayed or any one of
the loops is damaged, the sling must be withdrawn from
use immediately and replaced with a new sling.
Where necessary, after resident use, carry out
decontamination of the sling in accordance with
ArjoHuntleigh and local decontamination regulations
Read the Guidelines on the use of your sling.
X
X
X
ARJOHUNTLEIGH BATTERY CHARGER
Visually examine the battery charger for loose connectors,
cut wires and damage to the casing. Do not use if found
loose, cut or damaged in any way
X
ARJOHUNTLEIGH TENOR
Make sure the battery is charged before use. If not
adequately charged, replace with a fully charged battery.
When necessary, after each resident use, carry out
decontamination of the ArjoHuntleigh TENOR in
accordance with ArjoHuntleigh Operating Instructions and
local regulations.
Make sure the battery pack is in a good state of charge.
Recharge the battery (minimum 8 hours) at the end of
each working shift.
The lifter is fitted with a warning device. When the battery
discharge indicator reaches the red flashing light, the
battery must be charged as soon as possible
Make sure all castors rotate freely and the two rear brakes
lock.
Make sure the castor-mounting pin is tight on the chassis
and chassis legs and the castor tread is not damaged. Be
sure to remove any fluff, hair or debris from the wheels to
ensure their proper functioning.
Check that all external fittings are secure and that all
screws and nuts are tight.
X
X
Every day Every
Week
X
X
X
X
X
Every
6 months
Every
12 months
24
Page 27

Preventive Maintenance Schedule
Examine all exposed parts, especially where there is
personal contact with the resident’s body. Make sure
no cracks or sharp edges have developed that could
cause resident or user injury or have become
unhygienic. Replace or clean/disinfect them where
necessary.
Make sure all instruction labels are firmly attached and
readable.
Make sure that the sling attachment is visually
inspected. Any component found frayed or damaged,
must be withdrawn from service immediately and
replaced.
For longevity, recharge batteries for a minimum of 15
hours once every seven days.
Operate the lift through its full range. Make sure the lift
can operate in a normal and smooth manner.
Open and close the chassis legs and check for full
travel and smooth movement.
Examine the condition of the handset and its cable.
Withdraw from service immediately and replace with
new cable and handset assembly if damaged.
Examine and ensure all external fittings are secure
and all screws, bolts and nuts are tight.
Examine the integrity of the loop lock assemblies on
the hangar bar.
CHECKS TO BE PERFORMED BY QUALIFIED ARJOHUNTLEIGH PERSONNEL
Perform the weekly PMS checks
Test the Automatic Stop Function as follows. Raise or
lower the lift arm until the spreader bar reaches eye
height. Now hold the lift arm with your hand while using
the remote control handset to lower the lift arm. The
actuator will continue to run, but the lift arm is held up
by your hand. Release the handset button and slowly
lower the lift arm you are holding until you feel it is
supported by the actuator.
Test the Emergency Stop Feature by operating the
cable remote control handset to raise or lower the Lift
arm. While operating, press the emergency stop
button. Powered movement must stop immediately.
Repeat the test, this time operating the opening and
the closing of the chassis legs.
Examine the sling attachment points on the lift arm. If
found damaged, replace the lift arm.
Examine the clip assembly for damage or
deterioration. Replace if necessary.
Perform the 6 monthly PMS checks
Examine the actuator.
Examine the clip assembly for damage or
deterioration. Replace if necessary.
Examine the Foot bracket condition.
Make sure the chassis legs are square to the chassis
member.
Do a torque tightening check of the following:
(a) Castors to the chassis and legs 4 off - 25 Nm
(18lb ft)
(b) Chassis leg pivot bolts 2 off - 47 Nm (35 lb ft)
X
X
X
X
X
X
X
X
X
X
X
X
X
X
X
X
X
X
X
25
Page 28

262728
Page 29

Page 30

Page 31

www.arjohuntleigh.com
AUSTRALIA
ArjoHuntleigh Pty Ltd
78, Forsyth Street
O’Connor
AU-6163 Western Australia
Tel: +61 89337 4111
Free: +1 800 072 040
Fax: + 61 89337 9077
BELGIQUE / BELGIË
ArjoHuntleigh NV/SA
Evenbroekveld 16
BE-9420 ERPE-MERE
Tél/Tel: +32 (0) 53 60 73 80
Fax: +32 (0) 53 60 73 81
E-mail: info@arjohuntleigh.be
BRASIL
Maquet do Brasil
Equipamentos Médicos Ltda
Rua Tenente Alberto Spicciati, 200
Barra Funda, 01140-130
SÃO PAULO, SP - BRASIL
Fone: +55 (11) 2608-7400
Fax: +55 (11) 2608-7410
CANADA
ArjoHuntleigh
90 Matheson Boulevard West
Suite 300
CA-MISSISSAUGA, ON, L5R 3R3
Tel/Tél: +1 905 238 7880
Free: +1 800 665 4831 Institutional
Free: +1 800 868 0441 Home Care
Fax: +1 905 238 7881
E-mail: info.canada@arjohuntleigh.com
ČESKÁ REPUBLIKA
ArjoHuntleigh s.r.o.
Hlinky 118
CZ-603 00 BRNO
Tel: +420 549 254 252
Fax: +420 541 213 550
DANMARK
ArjoHuntleigh A/S
Vassingerødvej 52
DK-3540 LYNGE
Tel: +45 49 13 84 86
Fax: +45 49 13 84 87
E-mail:
dk_kundeservice@arjohuntleigh.com
DEUTSCHLAND
ArjoHuntleigh GmbH
Peter-Sander-Strasse 10
DE-55252 MAINZ-KASTEL
Tel: +49 (0) 6134 186 0
Fax: +49 (0) 6134 186 160
E-mail: info-de@arjohuntleigh.com
ESPAÑA
ArjoHuntleigh Ibérica S.L.
Ctra. de Rubí, 88 1ª planta - A1
08173 Sant Cugat del Vallés
ES- BARCELONA 08173
Tel: +34 93 583 11 20
Fax: +34 93 583 11 22
E-mail: info.es@arjohuntleigh.com
FRANCE
ArjoHuntleigh SAS
2 Avenue Alcide de Gasperi
CS 70133
FR-59436 RONCQ CEDEX
Tél: +33 (0) 3 20 28 13 13
Fax: +33 (0) 3 20 28 13 14
E-mail: info.france@arjohuntleigh.com
HONG KONG
ArjoHuntleigh (Hong Kong) Ltd
1510-17, 15/F, Tower 2
Kowloon Commerce Centre
51 Kwai Cheong Road
Kwai Chung
HONG KONG
Tel: +852 2207 6363
Fax: +852 2207 6368
INTERNATIONAL
ArjoHuntleigh International Ltd
ArjoHuntleigh House
Houghton Hall Park
Houghton Regis
UK-DUNSTABLE LU5 5XF
Tel: +44 (0) 1582 745 800
Fax: +44 (0) 1582 745 866
E-mail:
international@arjohuntleigh.com
ITALIA
ArjoHuntleigh S.p.A.
Via di Tor Vergata 432
IT-00133 ROMA
Tel: +39 (0) 6 87426211
Fax: +39 (0) 6 87426222
E-mail: Italy.promo@arjohuntleigh.com
NEDERLAND
ArjoHuntleigh Nederland BV
Biezenwei 21
4004 MB TIEL
Postbus 6116
4000 HC TIEL
Tel: +31 (0) 344 64 08 00
Fax: +31 (0) 344 64 08 85
E-mail: info.nl@arjohuntleigh.com
NEW ZEALAND
ArjoHuntleigh Ltd
41 Vestey Drive
Mount Wellington
NZ-AUCKLAND 1060
Tel: +64 (0) 9 573 5344
Free Call: 0800 000 151
Fax: +64 (0) 9 573 5384
E-mail: nz.info@ArjoHuntleigh.com
NORGE
ArjoHuntleigh Norway AS
Olaf Helsets vei 5
N-0694 OSLO
Tel: +47 22 08 00 50
Faks: +47 22 08 00 51
E-mail:
no.kundeservice@arjohuntleigh.com
ÖSTERREICH
ArjoHuntleigh GmbH
Dörrstrasse 85
AT-6020 INNSBRUCK
Tel: +43 (0) 512 204 160 0
Fax: +43 (0) 512 204 160 75
POLSKA
ArjoHuntleigh Polska Sp. z o.o.
ul. Ks Piotra Wawrzyniaka 2
PL-62-052 KOMORNIKI (Poznan)
Tel: +48 61 662 15 50
Fax: +48 61 662 15 90
E-mail: arjo@arjohuntleigh.com
PORTUGAL
ArjoHuntleigh em Portugal
MAQUET Portugal, Lda. (Distribudor Exclusivo)
Rua Poeta Bocage n.º 2 - 2G
PT-1600-233 Lisboa
Tel: +351 214 189 815
Fax: +351 214 177 413
E-mail: Portugal@arjohuntleigh.com
SUISSE / SCHWEIZ
ArjoHuntleigh AG
Fabrikstrasse 8
Postfach
CH-4614 HÄGENDORF
Tél/Tel: +41 (0) 61 337 97 77
Fax: +41 (0) 61 311 97 42
SUOMI
Oy Vestek AB
Martinkuja 4
FI-02270 ESPOO
Puh: +358 9 8870 120
E-mail: info@vestek.fi
SVERIGE
ARJO Scandinavia AB
Hans Michelsensgatan 10
SE-211 20 MALMÖ
Tel: +46 (0) 10 494 7760
Fax: +46 (0) 10 494 7761
E-mail: kundservice@arjohuntleigh.com
UNITED KINGDOM
ArjoHuntleigh UK
ArjoHuntleigh House
Houghton Hall Park
Houghton Regis
UK-DUNSTABLE LU5 5XF
Tel: +44 (0) 1582 745 700
Fax: +44 (0) 1582 745 745
E-mail: sales.admin@arjohuntleigh.com
USA
ArjoHuntleigh Inc.
2349 W Lake Street Suite 250
US-Addison, IL 60101
Tel: +1 630 307 2756
Free: +1 800 323 1245 Institutional
Free: +1 800 868 0441 Home Care
Fax: +1 630 307 6195
E-mail: us.info@arjohuntleigh.com
REV 14: 07/2014
Page 32

GETINGE GROUP is a leading global provider of products and
systems that contribute to quality enhancement and cost efficiency
within healthcare and life sciences. We operate under the three
brands of ArjoHuntleigh, GETINGE and MAQUET. ArjoHuntleigh
focuses on patient mobility and wound management solutions.
GETINGE provides solutions for infection control within healthcare
and contamination prevention within life sciences. MAQUET
specializes in solutions, therapies and products for surgical
interventions and intensive care.
www.arjohuntleigh.com
ArjoHuntleigh AB
Hans Michelsensgatan 10
211 20 Malmö, Sweden
 Loading...