


ZISS480NRKSS
GE ZISS480NRKSS, ZISB360DRJ, ZISW360DRJ, ZISW420DRJ, ZISW480DRJ Design And Installation Manual
...
Installation
Instructions
SidebySide Refrigeraters
Design Guide
With Instannation instructions
Monogram:

Safety information
BEFORE YOU BEGBN
Read these instructions completely and carefully.
•IMPORTANT- Sa.e hese
for local h_spector's use. Observe a]] governim_g codes
amid ordi m_am_ces.
• Note to Installer - Be sure to ]cave these
im_structions with the (}om_sm_er.
• Note to Consanler -Keep d]ese im_sm,cdo_s
with ,our Om_er's Mamta] for futm'e referem)ce.
WARNING:
This app]hmce ml*s[ be properly grom]ded. See
"C,rom)dh)g [he P,etHgeramr," page ]H.
AVERT SSEMENT
Cet appare]] doit 0tre correcteme])t m]s {t_]a terre.
Consl*]ter << M]se fi ]a terre (h_ r(_iHg(_ratem" ,>,page ] 0.
lf"_ou received '_ darn'wed refrigerator, "_ou should
immediateh _ontact _om" dealer or builder.
Dl*e to the weight am)dsize of this re{Hgerator, am]
to recline the risk of persom:d iqim T or damage to
the product - THREE PEOPI,E ARE RE@ lINED
FOR PROPER INSTAI,I,ATK)N OF A 36" WlDE
UNIT. FOUR PEOPI,E ARE REQUIRED FOR
INSTAI,I,ATION OF A 42" OR 48" WIDE MODEl.
PRUDENCE
cause du poids et de ]a tai]]e de ce r_frige_rator et
pour r_4duire ]e risque de b]essm'e et de dommages,
li, FAIJT TROIS PERSONNES PO[JR INSTM,I,ER
COI_,RECTEMENT D'IJN &PP&REII, DE 91 cm (36 po)
DE LAk(,E. Ii, FAiJT Q[ J_TRE PERSONNES PO[JR
I ilNSTM,I,ATION D' [JN MODI_I,E DE 1H7 O[ / 122 cm
) ,
(42 OI / 48 po) DE lARGE.
Skill Level - h_sta]]athm of this refrigerator
requires basic mecham_ica], carpem_tr? amid phm_bim_g
skills. Proper i m>ta]h_ti(m is the reslxmsibi]it} of the
im/sta]]er. Product {hi]m'e <]tie to improper im/sta]]atiom/
is Nmt covered m_der the (;E _pp]iam_ce _,_arr;mtv.
See t]_ e ()w]_ e]"s N_a _ I 0a] for WaFFa _1t_ ] _1['OFI)) a t] o11.
WARNING:
* These refrige_:m)rs are top-hea_) am] m_st
be secm'ed to preve_t the possibility of tippi_g
flu'ward. A_ti-Tip protection is req_dred. See
[)age ] 2 for detai]s.
* IJse this app]ia_ce only fin" its ]_temIed purpose.
* Immediately repair or replace electric service cords
that become f}'ayed or damaged.
* I I_q)]ug the reiHgerator before c]ea_h_g or maki_g
* Repairs should be made b} a qualified service
tech _ icia _.
AVERTISSEMENT
*Ces r_}Hg&'a[eurs sm)[ ]om'ds e_) ham e[ il }im[ ]es
_vi [er ]e_r bascu] em e]_L I] fh m avoir
m) svstbme de protection) co_m'e ]e re])vergeme])t.
Voh" ]es d_tai]s page 12.
* II _]e [h_g uti]iser cet apparei] q_e po_r ]'_ti]isati(m
* Re, parer o_* remp]acer ]mm&]iateme_t tol*t cordo]l
_lectriq_*e eiti]och(_ o_* emIommag(_.
* l] %at dSbra_cher ]e r65igSrateur awmt ]e
aettoyage ou rouge h_te]we]]t](m.
* i,es reSparations doivent _tre f_dtes par m_
tec]micie]_ q _*a]ifi(_.
For Monogram local service in your area, call
1.800.444.1845.
For Monogram service in Canada, call
1.888.880.3030
For Monogram Parts and Accessories, car
1.800.626o2002.
www. mmmgram.com
Plam_i_g 6uide
The Installation Space ....................................3
Dimensions and Clearances ..........................3
130° Door Swing ..............................................4
%° Door Swing ................................................5
Customization Basics ......................................6
1/4"Framed Panel Dimensions ......................7
3/4"Overlay Panel Dimensions......................8
Raised Overlay Panel Design ........................9
Side Panels......................................................10
Installation Instmctieas
Tools, Hardware, Materials ........................ 10
Grounding the Refrigerator .......................... 10
Step 1, Remove Packaging .......................... 11
Step 2, Install Water Line ............................ 11
Step 2A, RO Water Line ................................ 12
Step 3, Install Side Panels ..........................12
Step 4, Install Anti-_p Brackets ................ 12
Step 5, Level Refrigerator ............................ 13
Step 6, Alternate Anti-_p Procedure ........ 13
Step 7, Secure Refrigerator to Cabinetry _14
Step 8, Adiust Door Swing .......................... 14
Step 9, Install Grille Panel ............................ 14
Step 10, install Framed Panels .................... 15
Step IOA, install Overlay Panels .......... 16-17
Step 11, install Dispenser Trim .................... 18
Step 12, Connect Water Supply .................. 18
Step 13, Cormect Power .............................. 19
Step 14, Start Icemaker ................................ 19
Step 15, install Toekick ................................ 19

Design Guide
THE INSTALLATION SPACE
36"Models12"
42"Models18"
48"Models20"
75"FromFloor
to Bottom
ff Electrical
Area
*The finished cutout width must be:
35-1/2" fin" 36" models
41-1/2" for 42" models
47-1/2" fin" 48" models
Water And Electrical Locations
The opening must be prepared with the electrical
and water supi)ly located as shown.
The cutout depth must be 24"
The refrigerator will project fin'ward, slightly beyond
ac!jacent cabinetry, depending on yore" installation.
Cutout depth beneath a soffit:
When installed beneath a soffit, the soffit cannot
exceed the 24" installation depth shown. The top case
trim overlaps the bottom of the soffit.
DIMENSIONS AND CLEARANCES
25-3/8"FramedModels
35",41",or47" _ 25-3/4"StainlessSteel Models
]._aCaseWidth_..] * Shippingheight.The
•84"From height.Notethatthe
832
Rea
36",42"or48"
Frameto Frame
DepthincludingHandles:
26-7/8"FramedModels
27-3/4"StainlessSteelModels
28-11/16"ProfessionalModels
Product Clearances
These refrigerators are equii_ped with a 2 position
door stop. The tactorv set 130 ° door swing can be
a(!justed to 90 ° if clearance to a(!jacent cabinets or
walls is restricted.
130° DoorSwing
,J
Floorto top casetrim at the
TopFrame front is 1/2"higher
refrigeratorcanbe
adjustedto fit intoa
cutoutthat is 83-1/2"
min.to 84-1/2"max.
andwill overlap
uppercabinetryor
soffit. Useleveling
legsandwheelsfor a
maximum1"height
adjustment.
90° DoorSwing
23=7/8"
Behind
Frame
l
C
Additional Specifications
• A 115 _olt 60Hz., 15 or 20 amp power suppl_ is
required. An indixidual properl) grotmded branch
circuit or circuit breaker is recommended. Install
a I_r° I_erlv, ,gr°tmded 3-i_ron _, electrical receptacle
recessed into the back wall. Electrical must be
located on rear wall as shown.
NOTE: GF] (grotmd tault interrupter) is not
recoi/llllended.
• Water line can enter the oi_ening, through, the floor
or back wall. The water line should be 1/4" O.D.
copper tubing or (;E _martC_ nnect kit between
the cold water line and water connection location,
long enough to extend to the front of the
refrigerator. Installation of an easily accessible
shut off xalxe in the water line is required.
S _ ) ii
Models A B C *Min. Distance
36" 13" 15" 20-5/8"
42" 13" 19" 26-5/8" '4" Stainlessand
48" 15" 20" 28-5/8" TrimmedModels.
Allow minimmn clearances for fl'eezer door
(Dimension A) and fresh ti)od door (Dimension B)
tot a flfll 130 ° door swing and to allow tot pan
I'eII/ox_ll.
For a 90 ° door swing, allow 4" rain. clearance
to a wall, for framed and stainless steel models.
Allow 5" rain. clearance for professional series models.
If the 90 ° door stop position is used, pan access is
maintained, but pan remoxal is restricted.
See illustrations pages 4 and 5 to determine
door swing interaction with ac!jacent cabinets or
cot/ntertol) S.
toWall
5" ProSeries
Refrigerator
Design Guide
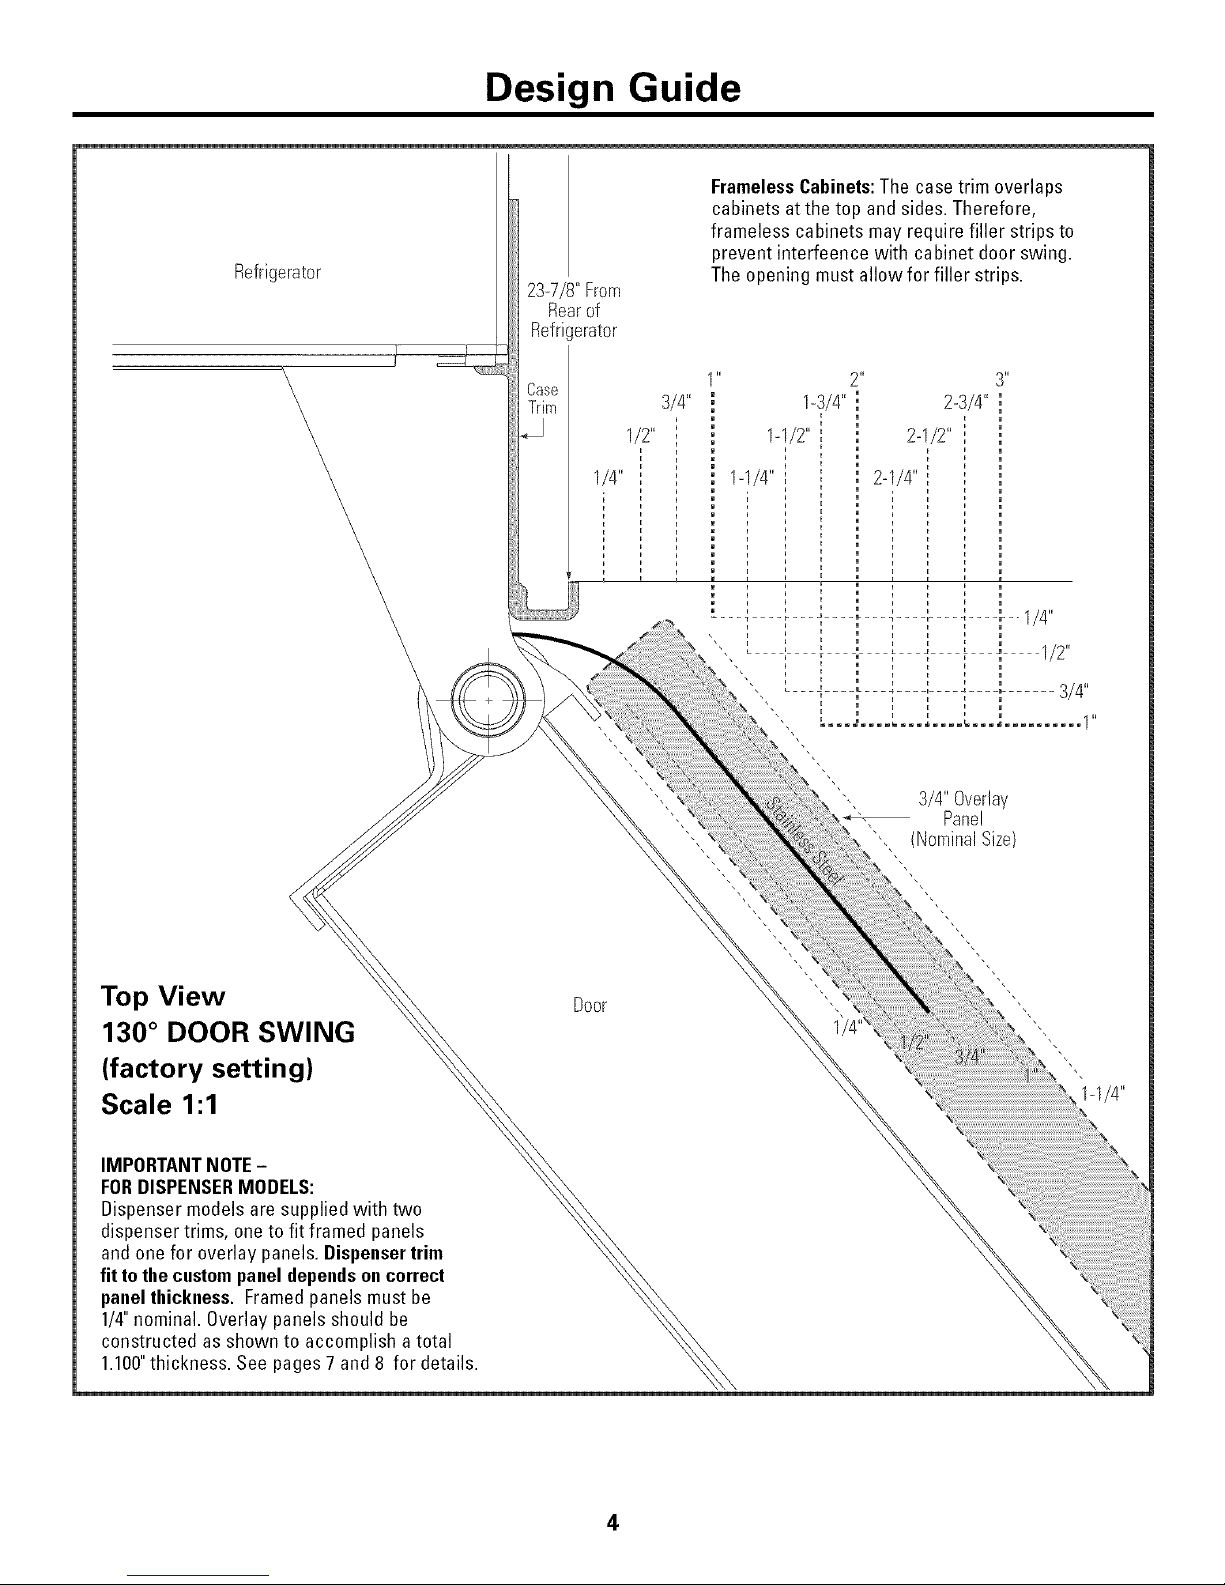
FramelessCabinets:The case trim overlaps
cabinets atthe top and sides. Therefore,
frameless cabinets may require filler strips to
prevent interfeence with cabinet door swing.
Theopening must allow for filler strips.
23-7/8"From
Rearof
Refrigerator
Csse
Trim
3/4"
1/2"
1/4"
3/4"Overlay
Panel
"', (NominalSize)
Top View
130 ° DOOR SWING
(factory setting)
Scale 1:1
IMPORTANTNOTE-
FORDISPENSERMODELS:
Dispenser models are supplied with two
dispenser trims, oneto fit framed panels
and one for overlay panels.Dispenser trim
fitto thecustompanel dependsoncorrect
panelthickness. Framedpanels must be
1/4"nominal. Overlay panelsshould be
constructed as shown to accomplish atotal
1.100"thickness. See pages 7 and 8 for details.
Door
4
Design Guide
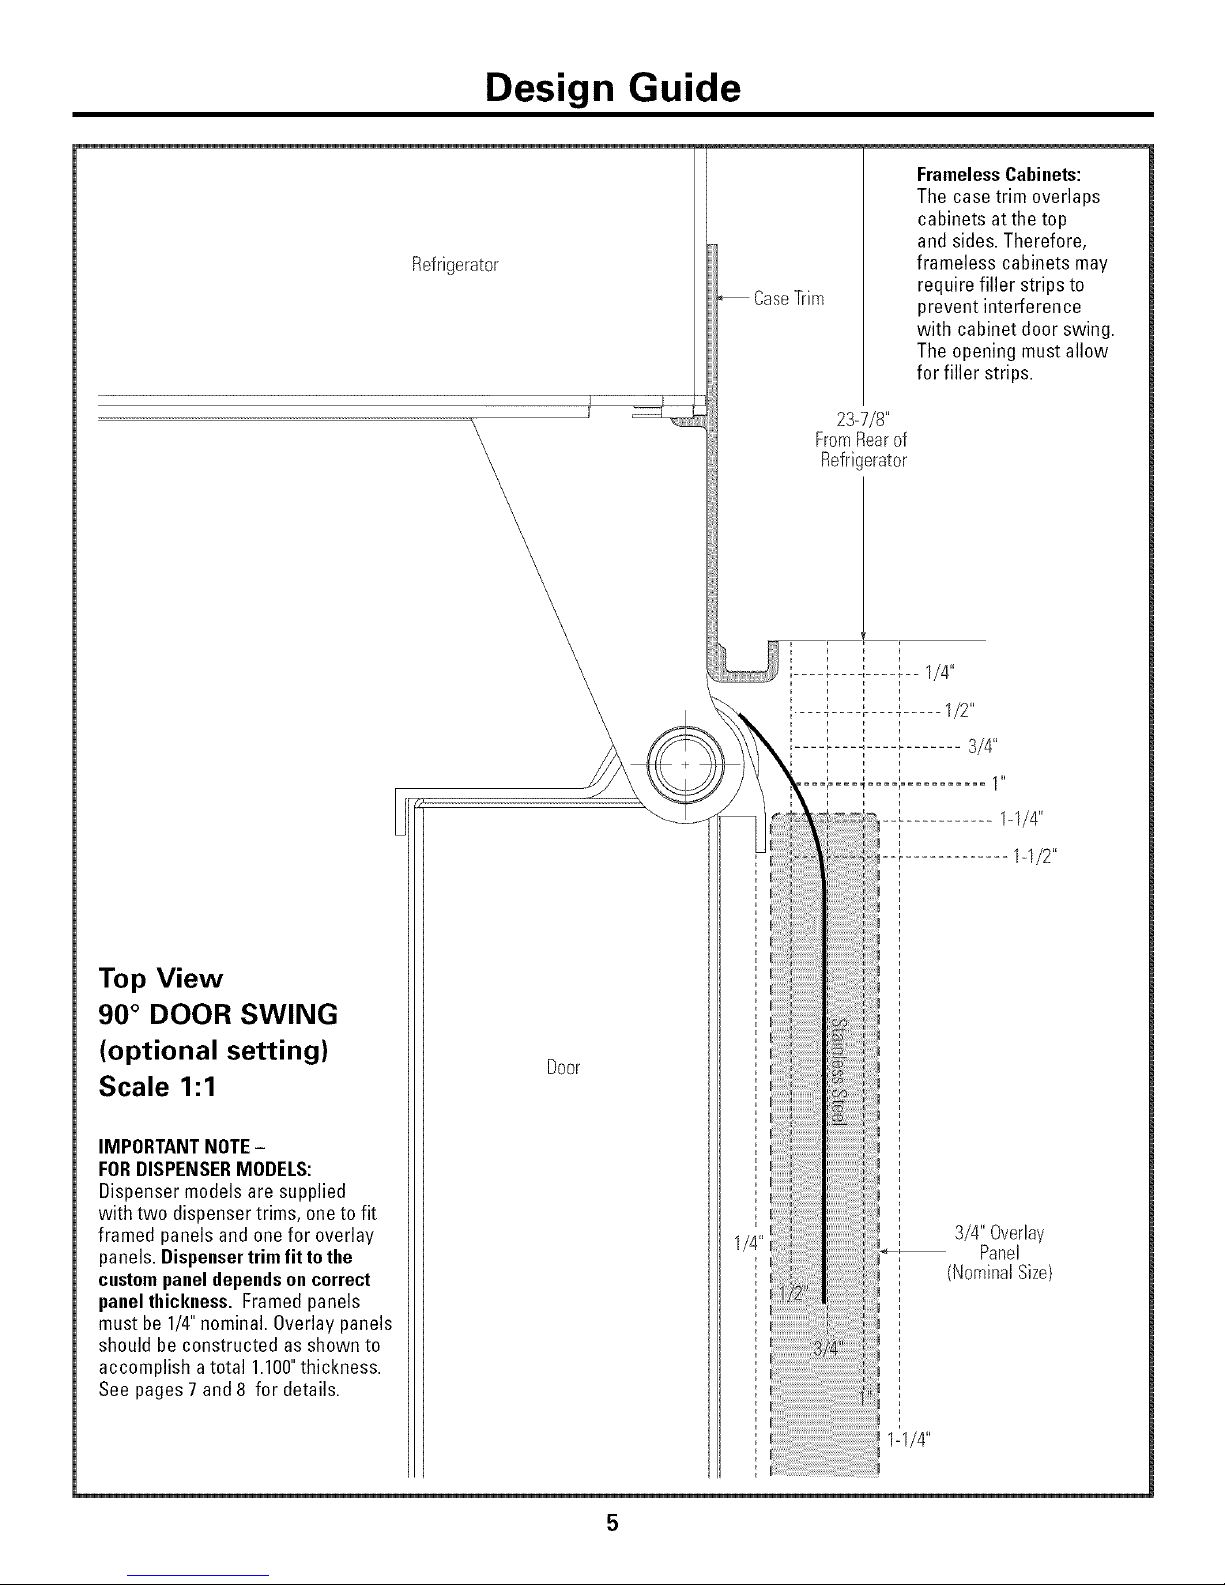
Refrigerator
CaseTrim
FramelessCabinets:
The case trim overlaps
cabinets at the top
and sides.Therefore,
frameless cabinets may
require filler strips to
prevent interference
with cabinet door swing.
The opening must allow
for filler strips.
23-7/8"
FromRearof
Refricerator
k
i i
i i
' ' ' 1/4"
Top View
90 ° DOOR SWING
(optional setting)
Scale 1:1
IMPORTANTNOTE-
FORDISPENSERMODELS:
Dispensermodelsare supplied
with two dispenser trims, oneto fit
framed panels and onefor overlay
panels. Dispensertrimfit tothe
custompaneldependsoncorrect
panelthickness. Framedpanels
must be 1/4"nominal. Overlaypanels
should be constructed as shown to
accomplish atotal 1.100"thickness.
See pages 7 and 8 for details.
1-1/2"
Door
3/4" Overlay
Panel
(NominalSize)

Design Guide
CUSTOMIZATION BASICS:
Framed Or Overlay Panels, Custom Handles and Accessory Kits
Professional Style Stainless Steel Refrigerators
Stainless steel wrapped reti'igerators ha;'e beveled edges
and professional style handles. These models are
shii_ped ready fl)r installation.
Stainless Steel Wrapped Refrigerators
Stainless Steel wrapped refiigerators ha;'e wrapped
doors and grille panel, beveled edges, and tubular
stainless steel handles that coordinate with other
Monogram appliances. These models are shii)ped
ready for installation.
Trimmed Refrigerators
Trimmed refrigerators are designed to be customized
with decorative panels. Field installed custom door
and grille panels are required.
Framed panels
You may install 1/4" thick custom panels ti'om yore"
cabinet manufhctm'er. The decorative panel slides into
the tactorv installed trim. Or, order black, white and
stainless steel accesso_ T panels fl'om yore" Monogram
dealer.
Overlay panels
You may also choose to install custom overlay panels
fl'om wmr cabinet mantflhcturer. This design provides
a seamless appearance which integrates smoothly with
stu'rotmding cabinetry.
StandardDoorHandles
Standard supplied handles shown in 3/4"overlay panel position.
Door Handles
The standard supplied handles can be a(!iusted to
accommodate both fl'amed or overlay panels. Custom
handles of your choice, SUl_plied by your cabinet maker
can also be installed on 3/4" overlay panels. If desired,
you may order ZKHSS2 Monogram stainless steel
tubular handle kit fl)r 3/4" overlay panels.
/
FramedPanel
StandardDoorHandles
Standard supplied handles shown in 1/4" panel position.
Optional Accessory Kits
ZKHSS2: Monogram Tubular Stainless Steel handles
designed to fit. /4 oxerla) panels.
Accessory Panels
Black and stainless steel accessory panels are awfilable
from vom" Monogram dealer. Panels are cut to size and
ready to install.
Side Panels
Side panels must be used whene_er the sides oI the
refrigerator will be exposed.
ZISW480D ZPS480D
ZIS480N ZPB480N ZPS480N
ZISB420D ZPB420D ZPS420D
ZISW360D ZPS360D
ZIS360N ZPB360N ZPS360N
6
 Loading...