


GE GTS21FSKDSS, GTS21FSKCSS, GTS21FMKDES, GTS21FMKCES, GTS21FGKDWW Owner’s Manual
...REFRIGERATORS
Top-Freezer
SAFETY INFORMATION . . . . . . . . .3
USING THE REFRIGERATOR
Temperature Control . . . . . . . . . . . . . . . . . . .5
Refrigerator Shelves . . . . . . . . . . . . . . . . . . .5
Drawers . . . . . . . . . . . . . . . . . . . . . . . . . . . . . .6
Freezer Shelf. . . . . . . . . . . . . . . . . . . . . . . . . .6
CARE AND CLEANING . . . . . . . . . . .7
INSTALLATION INSTRUCTIONS
Preparing to Install the Refrigerator. . . . . .9 Reversing the Door Swing . . . . . . . . . . . . . 10
TROUBLESHOOTING
Normal Operating Sounds . . . . . . . . . . . . . 13
Troubleshooting Tips. . . . . . . . . . . . . . . . . . 14
LIMITED WARRANTY . . . . . . . . . . . . . 16
ACCESSORY. . . . . . . . . . . . . . . . . . . . . . . 17
CONSUMER SUPPORT . . . . . . . . . . 18
Write the model and serial numbers here:
Model #_________________
Serial # _________________
Find these numbers on a label on the left side, near the middle of the refrigerator compartment.
OWNER’S MANUAL &
INSTALLATION
INSTRUCTIONS
GTS18, GTS21 Models
ENGLISH/FRANÇAIS/
ESPAÑOL
GE is a trademark of the General Electric Company. Manufactured under trademark license.
49-60780-2 05-18 GEA

THANK YOU FOR MAKING GE APPLIANCES A PART OF YOUR HOME.
Whether you grew up with GE Appliances, or this is your first, we’re happy to have you in the family.
We take pride in the craftsmanship, innovation and design that goes into every GE Appliances product, and we think you will too. Among other things, registration of your appliance ensures that we can deliver important product information and warranty details when you need them.
Register your GE appliance now online. Helpful websites and phone numbers are available in the Consumer Support section of this Owner’s Manual. You may also mail in the pre-printed registration card included in the packing material.
2 |
|
49-60780-2 |

IMPORTANT SAFETY INFORMATION
READ ALL INSTRUCTIONS BEFORE USING THE APPLIANCE
WARNING To reduce the risk of fire, explosion, electric shock, or injury when using your refrigerator, follow these basic safety precautions:
Ŷ 7KLV UHIULJHUDWRU PXVW EH SURSHUO\ LQVWDOOHG DQG ORFDWHG LQ DFFRUGDQFH ZLWK WKH ,QVWDOODWLRQ ,QVWUXFWLRQV EHIRUH LW LV XVHG
Ŷ 8QSOXJ WKH UHIULJHUDWRU EHIRUH PDNLQJ UHSDLUV replacing a light bulb, or cleaning.
NOTE: Power to the refrigerator cannot be disconnected by any setting on the control panel. NOTE: Repairs must be performed by a qualified Service Professional.
Ŷ 5HSODFH DOO SDUWV DQG SDQHOV EHIRUH RSHUDWLQJ Ŷ 'R QRW XVH DQ H[WHQVLRQ FRUG
Ŷ 'R QRW VWRUH RU XVH JDVROLQH RU RWKHU IODPPDEOH vapors and liquids in the vicinity of this or any other appliance.
Ŷ 'R QRW VWRUH H[SORVLYH VXEVWDQFHV VXFK DV DHURVRO cans with a flammable propellant in this appliance.
Ŷ 7R SUHYHQW VXIIRFDWLRQ DQG HQWUDSPHQW KD]DUGV
WR FKLOGUHQ UHPRYH WKH IUHVK IRRG DQG IUHH]HU doors from any refrigerator before disposing of it or discontinuing its use.
Ŷ 7R DYRLG VHULRXV LQMXU\ RU GHDWK FKLOGUHQ VKRXOG QRW stand on, or play in or with the appliance.
Ŷ &KLOGUHQ DQG SHUVRQV ZLWK UHGXFHG SK\VLFDO VHQVRU\ or mental capabilities or lack of experience and knowledge can use this appliance only if they are supervised or have been given instructions on safe
XVH DQG XQGHUVWDQG WKH KD]DUGV LQYROYHG
Ŷ 7KLV DSSOLDQFH LV LQWHQGHG WR EH XVHG LQ KRXVHKROG and similar applications such as: staff kitchen areas
LQ VKRSV RIILFHV DQG RWKHU ZRUNLQJ HQYLURQPHQWV IDUP KRXVHV E\ FOLHQWV LQ KRWHOV PRWHOV EHG
EUHDNIDVW DQG RWKHU UHVLGHQWLDO HQYLURQPHQWV catering and similar non-retail applications.
|
To reduce the risk of injury when using your refrigerator, follow these basic safety |
|
CAUTION |
||
precautions. |
||
|
Ŷ 'R QRW FOHDQ JODVV VKHOYHV RU FRYHUV ZLWK ZDUP water when they are cold. Glass shelves and covers may break if exposed to sudden temperature changes or impact, such as bumping or dropping. Tempered glass is designed to shatter into many small pieces if it breaks.
Ŷ .HHS ILQJHUV RXW RI WKH ³SLQFK SRLQW´ DUHDV clearances between the doors and between the doors and cabinet are necessarily small. Be careful closing doors when children are in the area.
Ŷ 'R QRW WRXFK WKH FROG VXUIDFHV LQ WKH IUHH]HU compartment when hands are damp or wet, skin may stick to these extremely cold surfaces.
Ŷ 'R QRW UHIUHH]H IUR]HQ IRRGV ZKLFK KDYH WKDZHG completely.
Ŷ ,Q UHIULJHUDWRUV ZLWK DXWRPDWLF LFH PDNHUV DYRLG contact with the moving parts of the ejector mechanism, or with the heating element that
UHOHDVHV WKH FXEHV 'R QRW SODFH ILQJHUV RU KDQGV on the automatic ice making mechanism while the refrigerator is plugged in.
STATE OF CALIFORNIA PROPOSITION 65 WARNINGS
 WARNING This product contains one or more chemicals known to the State of California to cause cancer and birth defects or other reproductive harm.
INSTALLATION

 WARNING
 EXPLOSION HAZARD
.HHS IODPPDEOH PDWHULDOV DQG YDSRUV VXFK DV JDVROLQH DZD\ IURP UHIULJHUDWRU )DLOXUH WR GR VR FDQ UHVXOW LQ ILUH explosion, or death.
INFORMATION SAFETY
READ AND SAVE THESE INSTRUCTIONS
49-60780-2 |
3 |

SAFETY INFORMATION
IMPORTANT SAFETY INFORMATION
READ ALL INSTRUCTIONS BEFORE USING THE APPLIANCE
CONNECTING ELECTRICITY

 WARNING
 ELECTRICAL SHOCK HAZARD
Plug into a grounded 3-prong outlet
'R QRW UHPRYH WKH JURXQG SURQJ 'R QRW XVH DQ DGDSWHU 'R QRW XVH DQ H[WHQVLRQ FRUG
)DLOXUH WR IROORZ WKHVH LQVWUXFWLRQV FDQ UHVXOW LQ GHDWK ILUH RU HOHFWULFDO VKRFN
Do not, under any circumstances, cut or remove the third (ground) prong from the power cord. For personal safety, this appliance must be properly grounded.
The power cord of this appliance is equipped with a 3-prong (grounding) plug which mates with a standard
SURQJ JURXQGLQJ ZDOO RXWOHW WR PLQLPL]H WKH SRVVLELOLW\ RI HOHFWULF VKRFN KD]DUG IURP WKLV DSSOLDQFH
Have the wall outlet and circuit checked by a qualified electrician to make sure the outlet is properly grounded.
Where a standard 2-prong wall outlet is encountered, it is your personal responsibility and obligation to have it replaced with a properly grounded 3-prong wall outlet.
'R QRW XVH DQ DGDSWHU
The refrigerator should always be plugged into its own individual electrical outlet which has a voltage rating that matches the rating plate.
$ 9ROW $& +] RU DPS IXVHG JURXQGHG electrical supply is required. This provides the best performance and also prevents overloading house
ZLULQJ FLUFXLWV ZKLFK FRXOG FDXVH D ILUH KD]DUG IURP overheated wires.
Never unplug your refrigerator by pulling on the power cord. Always grip plug firmly and pull straight out from the outlet.
,PPHGLDWHO\ GLVFRQWLQXH XVH RI D GDPDJHG VXSSO\
FRUG ,I WKH VXSSO\ FRUG LV GDPDJHG LW PXVW EH replaced by a qualified service professional with an
DXWKRUL]HG VHUYLFH SDUW IURP WKH PDQXIDFWXUHU
When moving the refrigerator away from the wall, be careful not to roll over or damage the power cord.
PROPER DISPOSAL OF YOUR OLD REFRIGERATOR

 WARNING SUFFOCATION AND ENTRAPMENT HAZARD
)DLOXUH WR IROORZ WKHVH GLVSRVDO LQVWUXFWLRQV FDQ UHVXOW LQ GHDWK RU VHULRXV LQMXU\
IMPORTANT: Child entrapment and suffocation |
Before You Throw Away Your Old Appliance |
|
are not problems of the past. Junked or abandoned |
Ŷ 7DNH RII WKH IUHVK IRRG DQG IUHH]HU GRRUV |
|
refrigerators are still dangerous even if they will sit |
Ŷ Leave the shelves in place so that children may not |
|
IRU ³MXVW D IHZ GD\V ´ ,I \RX DUH JHWWLQJ ULG RI \RXU ROG |
||
easily climb inside. |
||
refrigerator, please follow the instructions below to help |
||
|
||
prevent accidents. |
|
Refrigerant and Foam Disposal:
'LVSRVH RI DSSOLDQFH LQ DFFRUGDQFH ZLWK )HGHUDO DQG /RFDO 5HJXODWLRQV &RQWDFW \RXU ORFDO DXWKRULWLHV IRU WKH environmentally safe disposal of your appliance.
READ AND SAVE THESE INSTRUCTIONS
4 |
49-60780-2 |
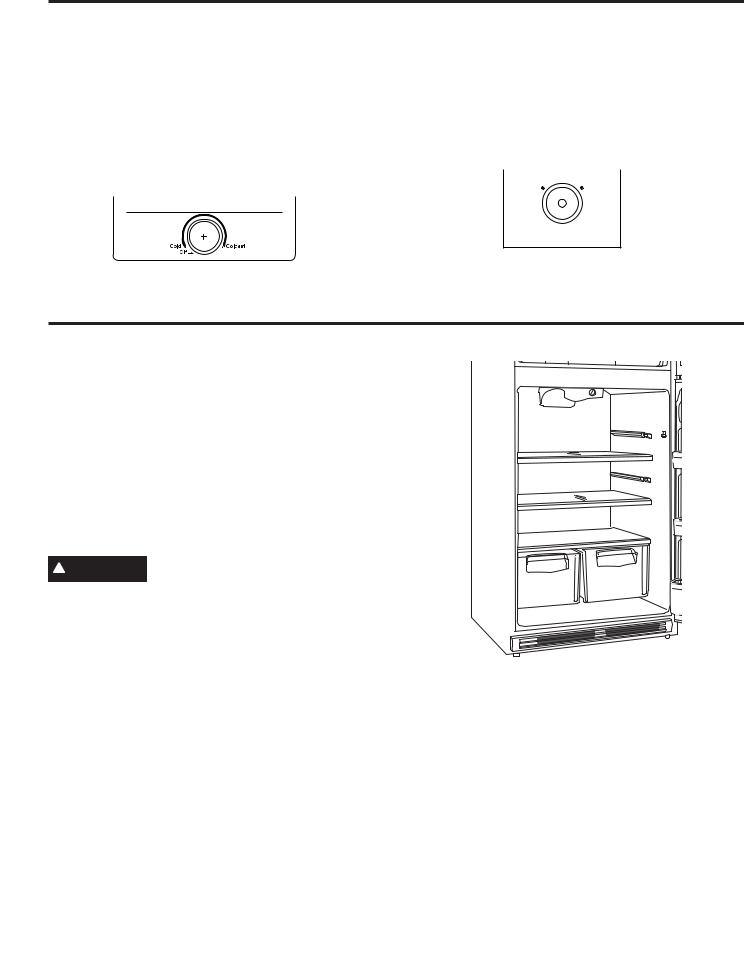
Temperature Control
The temperature control adjusts the refrigerator from its warmest to coldest settings. There are both a refrigerator
FRQWURO DQG D IUHH]HU FRQWURO
Refrigerator Temperature Control
Your refrigerator will come with the recommended factory
VHWWLQJ LQ WKH PLG SRVLWLRQ )RU FROGHU WHPSHUDWXUH turn the knob clockwise toward Coldest )RU ZDUPHU temperature, turn the dial counter-clockwise toward Cold. To turn off the cooling in both compartments, turn the knob counter-clockwise to the vertical off position.
You will hear and feel the control click, and the knob will not turn farther. Note that this does not shut off power to the refrigerator.
Freezer Air Flow Control
7KHUH LV D FRQWURO RQ WKH DLU WRZHU LQ WKH IUHH]HU WKDW
FRQWUROV KRZ PXFK FROG DLU LV LQ WKH IUHH]HU 7KH actual temperature control is only in the refrigerator compartment.
Cold  Coldest
Fresh Food Compartment Shelves
Shelf supports at various levels allow you to custom-space your shelves. Shelves shown below in recommended locations.
Not all features are on all models.
Full-Width Shelves
Some models have a stationary tempered glass shelf, a spillproof shelf or two steel wire stationary shelves. These shelves can be moved to another place in the fresh food compartment.
When placed correctly on the shelf supports, the shelf will stop before coming completely out of the refrigerator and will not tilt when you place food on it or remove food from it.
 CAUTION 'R QRW FOHDQ JODVV VKHOYHV RU FRYHUV with warm water when they are cold. Glass shelves and covers may break if exposed to sudden temperature changes or impact such as bumping or dropping. Tempered glass is designed to shatter into many small pieces if it breaks.
NOTE: 'R QRW EORFN DLU RXWOHW E\ SODFLQJ IRRG LWHPV directly against it. Erratic temperatures may result.
$LU ÀRZ  behind


light bulb
Shelves / Control Temperature REFRIGERATOR: THE USING
49-60780-2 |
5 |
USING THE REFRIGERATOR: 'UDZHUV)UHH]HU6KHOI
Drawers
Climate Zone Drawer
.HHS IUXLWV DQG YHJHWDEOHV RUJDQL]HG LQ VHSDUDWH compartments for easy access.
Excess water that may accumulate in the bottom of the drawers or under the drawers should be wiped dry.
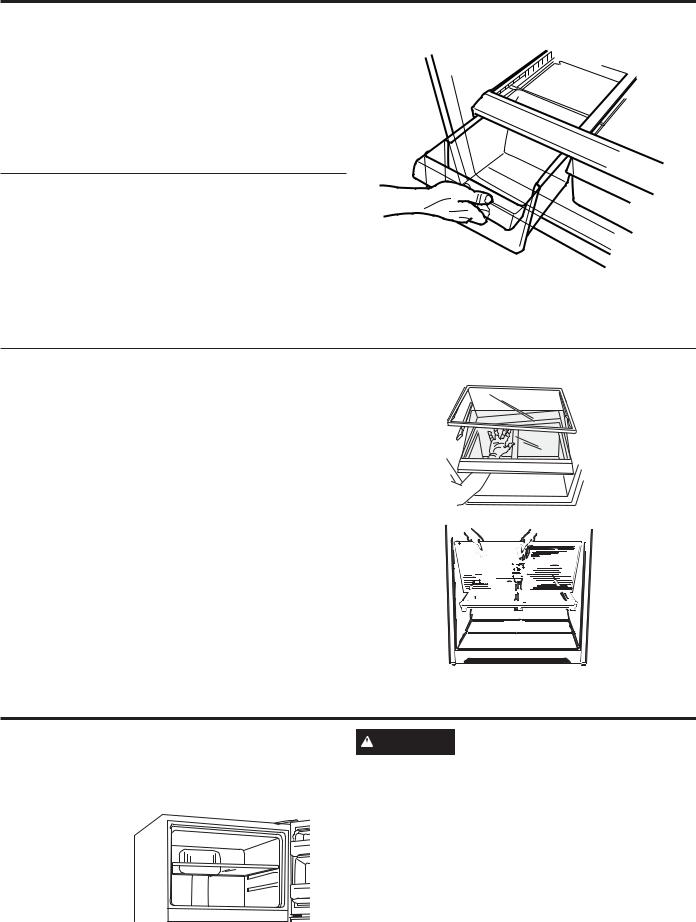
Drawer Removal
'UDZHUV FDQ EH UHPRYHG HDVLO\ E\ JUDVSLQJ WKH VLGHV and lifting up slightly while pulling drawers past the stop location.
Cover Removal
To remove:
1.Remove the drawers.
2.Reach in, push the back of glass cover up. Tilt it and take it out. Avoid cleaning the cold glass cover with hot water because the extreme temperature difference may cause it to break.
3.Remove the drawer frame. (Always remove the glass cover before you take out the drawer frame.)
Lift the frame off the supports at each side and back, pull it forward, tilt it and take it out.
To replace:
1.Lower the frame until it rests on the supports at each side and back.
2.Replace the glass cover
3.Replace the drawers.
Freezer Compartment Shelf
When placed correctly on the shelf supports, the glass shelf will stop before coming completely out of the
IUHH]HU DQG ZLOO QRW WLOW ZKHQ \RX SODFH IRRG RQ LW RU remove food from it.
 CAUTION 'R QRW FOHDQ JODVV VKHOYHV RU FRYHUV with warm water when they are cold. Glass shelves and covers may break if exposed to sudden temperature changes or impact such as bumping or dropping. Tempered glass is designed to shatter into many small pieces if it breaks.
6 |
49-60780-2 |
Care and Cleaning
Cleaning the Outside
The door handles and trim (on some models). Clean
ZLWK D FORWK GDPSHQHG ZLWK VRDS\ ZDWHU 'U\ ZLWK D VRIW cloth.
Keep the outside clean. Wipe with a clean cloth lightly dampened with kitchen appliance wax or mild liquid dish
GHWHUJHQW 'U\ DQG SROLVK ZLWK D FOHDQ VRIW FORWK
'R QRW ZLSH WKH UHIULJHUDWRU ZLWK D VRLOHG GLVK FORWK RU wet towel. These may leave a residue that can erode
The stainless steel doors and door handles (on some models) can be cleaned with a commercially available stainless steel cleaner. Cleaners with oxalic acid such as
%DU .HHSHUV )ULHQG 6RIW &OHDQVHU ZLOO UHPRYH VXUIDFH
UXVW WDUQLVK DQG VPDOO EOHPLVKHV 8VH RQO\ D OLTXLG cleanser free of grit and rub in the direction of the brush
OLQHV ZLWK D GDPS VRIW VSRQJH 'R QRW XVH DSSOLDQFH wax or polish on the stainless steel.
WKH SDLQW 'R QRW XVH VFRXULQJ SDGV SRZGHUHG FOHDQHUV bleach or cleaners containing either bleach or ammonia because these products can scratch and weaken the paint finish.
Cleaning the Condenser
 WARNING To reduce the risk of death or electric shock, you must follow these instructions:
ŶUnplug the refrigerator before removing any panels.
ŶDo not contact or damage any wiring while the panel is removed.
ŶReplace all parts and panels before plugging the refrigerator back in.
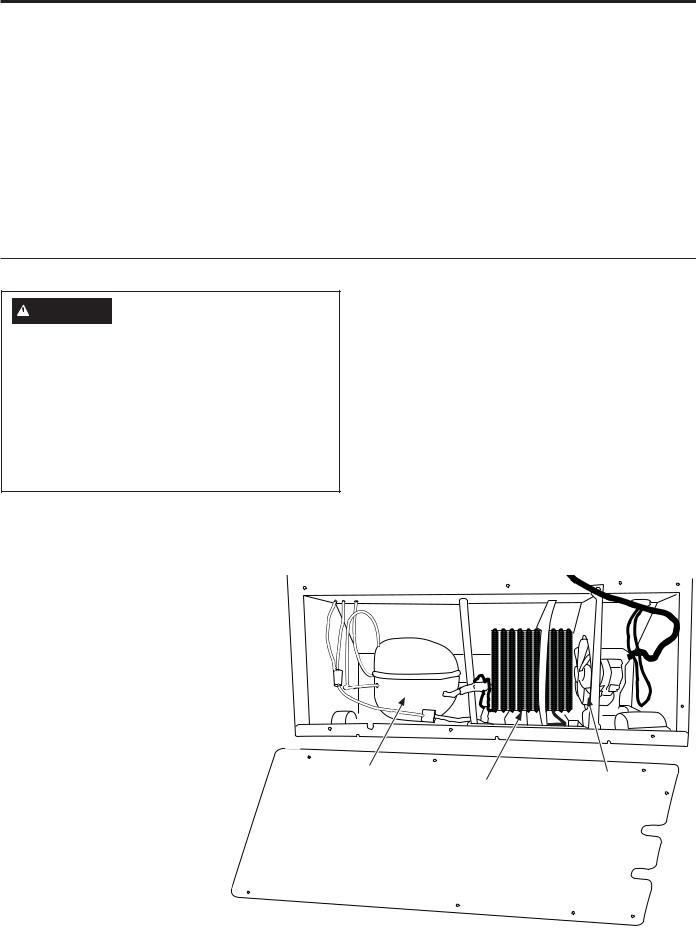
Periodically, the condenser of the refrigerator will become covered with dust and dirt. This can make your refrigerator cool less effectively and use more energy.
You can improve the refrigerators' performance by
FOHDQLQJ WKH FRQGHQVHU ,W LV ORFDWHG
at the back of your refrigerator, at the bottom, behind the access cover.
Cleaning the condenser requires a philliips screwdriver, vacuum cleaner and soft brush with a long handle.
/RFDWH WKH FRQGHQVHU ,W LV EHWZHHQ WKH FRPSUHVVRU
DQG WKH IDQ ,W LV D EODFN VTXDUH VKDSH PDGH RI tubes with fins.
9DFXXP WKH FRQGHQVHU 8VH WKH EUXVK WR JHQWO\ loosen dust and dirt from the gaps and fins of the condenser.
8.Once the condenser is clean, reinstall the access cover, replacing all screws.
9.Plug in the refrigerator.
10.Return it to its normal position. Turn the legs clockwise until the legs again bear the weight of the refrigerator. Also level the refrigerator as required
11.Turn the refrigerator back on and turn the control clockwise until it returns to mid setting (vertical) or the previous position of the control. Check to see if the refrigerator begins operating.
To clean the condenser:
1.Turn off the refrigerator.
2.Turn the leveling legs at each front corner of the refrigerator counterclockwise until the rollers support the refrigerator.
3.Roll the refrigerator out far enough so you can get behind it at the bottom. Be sure not to pull out any water lines connected to your refrigerator.
4.Unplug the refrigerator.
Compressor
)DQ
Condenser - clean with a soft, long handled brush and a vacuum cleaner
Access Cover
8VH WKH 3KLOOLSV KHDG VFUHZGULYHU to remove the screws securing the cover to the refrigerator.
CLEANING AND CARE
49-60780-2 |
7 |

CARE AND CLEANING
Care And Cleaning
Cleaning the Inside
To help prevent odors, leave an open box of baking
VRGD LQ WKH IUHVK IRRG DQG IUHH]HU FRPSDUWPHQWV
Unplug the refrigerator before cleaning.
,I WKLV LV QRW SUDFWLFDO ZULQJ H[FHVV PRLVWXUH RXW RI sponge or cloth when cleaning around switches, lights or controls.
8VH ZDUP ZDWHU DQG EDNLQJ VRGD VROXWLRQ DERXW D tablespoon (15 ml) of baking soda to a quart (1 liter) of
ZDWHU 7KLV ERWK FOHDQV DQG QHXWUDOL]HV RGRUV 5LQVH DQG wipe dry.
After cleaning the door gaskets, apply a thin layer of petroleum jelly to the door gaskets at the hinge side. This helps keep the gaskets from sticking and bending out of shape.

 CAUTION 'R QRW FOHDQ JODVV VKHOYHV RU FRYHUV with warm water when they are cold. Glass shelves and covers may break if exposed to sudden temperature changes or impact such as bumping or dropping. Tempered glass is designed to shatter into many small pieces if it breaks.
'R QRW ZDVK DQ\ SODVWLF UHIULJHUDWRU SDUWV LQ WKH dishwasher.
Moving the Refrigerator
Be careful when moving the refrigerator away from the wall. All types of floor coverings can be damaged, particularly cushioned coverings and those with embossed surfaces.
Turn the leveling legs at each front corner of the refrigerator counterclockwise until the rollers support the refrigerator. Pull the refrigerator straight out and return it to position by pushing it straight in. Moving the refrigerator in a side direction may result in damage to
the floor covering or refrigerator.
When pushing the refrigerator back, make sure you don’t roll over the power cord or ice maker supply line (on some models).
After rolling the refrigerator back into place, turn the legs clockwise until the legs again bear the weight of the refrigerator.
Light Bulb Replacement

 WARNING Before replacing a burned-out light bulb, the refrigerator should be unplugged in order to avoid contact with a live wire filament. (A burned-out light bulb may break when being replaced.) Turning the control to the OFF position does not remove power to the light circuit.
'HSHQGLQJ RQ \RXU PRGHO WKH OLJKWV LQ WKH UHIULJHUDWRU DQG IUHH]HU FRPSDUWPHQWV PD\ XVH HLWKHU ZDWW /(' EXOEV ZLWK D PHGLXP EDVH RU ZDWW DSSOLDQFH
LQFDQGHVFHQW EXOEV ZLWK D PHGLXP EDVH )ROORZ WKH instructions specific to your model.
IMPORTANT:
Ɣ 8VH RQO\ 8/ OLVWHG /(' UHSODFHPHQW EXOEV WKDW DUH recommended for wet/damp environments. The
UHIULJHUDWRU DQG IUHH]HU DUH FRQVLGHUHG WR EH ZHW GDPS HQYLURQPHQWV ,I XVLQJ D EUDQG RI /(' EXOE RWKHU WKDQ WKH UHFRPPHQGHG /(' EXOE EHIRUH LQVWDOODWLRQ UHDG
DQG IROORZ DOO LQVWUXFWLRQV RQ WKH /(' SDFNDJLQJ /(' bulbs should be 5 Watts with a medium base.
Ɣ ,I DQ LQFDQGHVFHQW EXOE LV XVHG WR UHSODFH DQ /(' bulb, use only incandescent bulbs for household appliances with a maximum wattage of 40 with a medium base.
Preparing for Vacation
)RU ORQJ YDFDWLRQV RU DEVHQFHV UHPRYH IRRG DQG unplug the refrigerator. Move the temperature control dial to the OFF position, and clean the interior with a baking soda solution of one tablespoon (15 ml) of baking soda to one quart (1 liter) of water. Leave the doors open.
,I DQ LFHPHDNHU KDV EHHQ LQVWDOOHG LW PXVW EH WXUQHG RII
PRYH WKH VZLWFK WR WKH 2)) SRVLWLRQ RQ WKH SRZHU VZLWFK model. Shut off the water supply to the refrigerator.
,I WKH WHPSHUDWXUH FDQ GURS EHORZ IUHH]LQJ KDYH D qualified servicer drain the water supply system (on some models) to prevent serious property damage due to flooding.
Preparing to Move
Secure all loose items such as grille, shelves and |
To prevent the doors from opening while moving, secure |
drawers by taping them securely in place to prevent |
them to the case with tape. Be sure the refrigerator stays |
damage. |
in an upright position during moving. |
8 |
49-60780-2 |
Installation Instructions GTS21 Models
If you have questions, call 1.800.GE.CARES or visit our Website at: GEAppliances.com.
In Canada, call 1.800.561.3344 or Visit our Website at: www.geappliances.ca
BEFORE YOU BEGIN
Read these instructions completely and carefully.
• IMPORTANT – Save these instructions for local inspector’s use.
• IMPORTANT – Observe all governing codes and ordinances.
• Note to Installer – Be sure to leave these instructions with the Consumer.
• Note to Consumer – .HHS WKHVH instructions for future reference.
•Skill level ± ,QVWDOODWLRQ RI WKLV DSSOLDQFH requires basic mechanical skills.
•Completion time ± 5HIULJHUDWRU ,QVWDOODWLRQ
15 minutes
|
5HYHUVLQJ WKH 'RRU 6ZLQJ |
15minutes
•Proper installation is the responsibility of the installer.
•Product failure due to improper installation is not covered under the Warranty.
REFRIGERATOR LOCATION
•'R QRW LQVWDOO WKH UHIULJHUDWRU ZKHUH WKH
WHPSHUDWXUH ZLOO JR EHORZ ) & EHFDXVH it will not run often enough to maintain proper temperatures.
•'R QRW LQVWDOO WKH UHIULJHUDWRU ZKHUH WKH
WHPSHUDWXUH ZLOO JR DERYH ) & EHFDXVH it will not perform properly.
•'R QRW LQVWDOO WKH UHIULJHUDWRU LQ D ORFDWLRQ H[SRVHG to water (rain, etc.) or direct sunlight.
,QVWDOO LW RQ D IORRU VWURQJ HQRXJK WR VXSSRUW LW IXOO\ loaded.
CLEARANCES
Allow a 2" (50mm) back clearance for ease of installation, proper air circulation and plumbing and electrical connections.
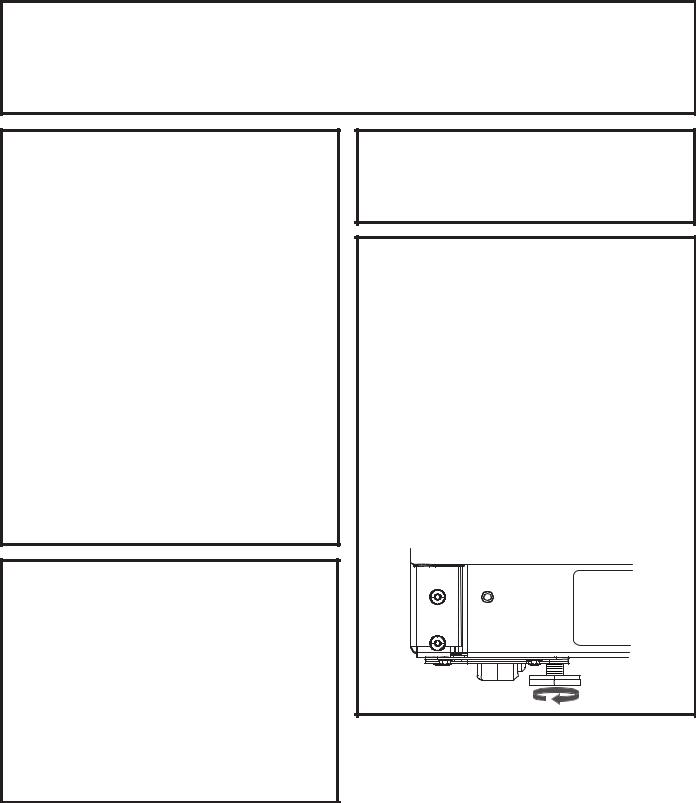
ROLLERS AND LEVELING LEGS
Leveling legs near each front corner of the refrigerator are adjustable. They firmly position the refrigerator and prevent it from moving when the doors are opened. Leveling legs should be set so the front of the refrigerator is raised just enough that the doors close easily when opened about halfway.
Turn the leveling legs clockwise to raise the refrigerator, counterclockwise to lower it.
Rollers next to the leveling legs allow you to move the refrigerator away from the wall for cleaning.
Turn the legs counterclockwise until the weight of the refrigerator is transferred from them to the
rollers. After rolling the refrigerator back into place, turn the legs clockwise until the legs again bear the weight of the refrigerator.
INSTRUCTIONS INSTALLATION
49-60780-2 |
9 |
INSTALLATION INSTRUCTIONS
Installation Instructions
REVERSING THE DOOR SWING
 WARNING )ROORZ DOO VWHSV ZKHQ UHYHUVLQJ
WKH GRRU VZLQJ )DLOXUH WR IROORZ WKHVH LQVWUXFWLRQV leaving off parts, or overtightening screws, can lead to the door falling off and result in injury and property damage.
IMPORTANT NOTES
When reversing the door swing:
•Read the instructions all the way through before starting.
•Tighten all hinge screws but avoid over-tightening to prevent stripping.
•Handle parts carefully to avoid scratching paint.
•Set screws down by their related parts to avoid losing them.
•Provide a non-scratching work surface for the doors.
 CAUTION Lifting Hazard
7KH )UHVK )RRG DQG )UHH]HU GRRUV DUH KHDY\ 8VH both hands to secure the doors before lifting.
IMPORTANT: Once you begin, do not move the cabinet until door-swing reversal is completed.
These instructions are for changing the hinges from
WKH ULJKW VLGH WR WKH OHIW VLGH LI \RX HYHU ZDQW WR change the hinges back to the right side, follow these same instructions and reverse all references to left and right.
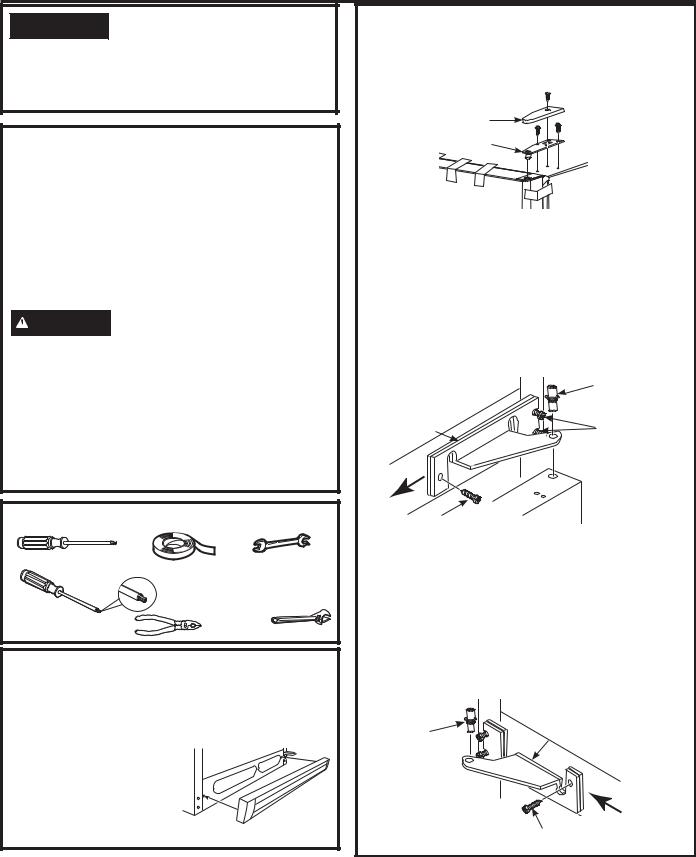
TOOLS REQUIRED
Phillips screwdriver |
Masking tape |
´ |
|
|
|||
|
|
open-end wrenches |
|
Torx T25 |
|
or adjustable |
|
Pliers |
wrench |
||
(some models) |
|||
|
|
BEFORE YOU START
1.Unplug the refrigerator from its electrical outlet.
2.Empty all door shelves, including the dairy compartment.
IMPORTANT: 'R QRW OHW either door drop to the floor. To do so could damage the door stop.
3.Remove the front grille if it is installed.
REMOVING THE DOORS
1.7DSH WKH IUHH]HU GRRU VKXW ZLWK PDVNLQJ WDSH
2.Remove the hinge cover and screws that hold the top hinge to the cabinet.
Top Hinge
Cover
Top Hinge
3.Lift the hinge straight up to free the hinge pin from the socket in the top of the door and set it aside, along with its screws.
4.Remove the tape. Lift the door off the center hinge pin and set the door on a non-scratching surface with the outside up.
5.8QVFUHZ FHQWHU KLQJH SLQ %H VXUH WR UHWDLQ SODVWLF washer(s) for reinstallation. Remove refrigerator door from bottom hinge and set the door on a nonscratching surface with the outside up.
|
Center Hinge |
|
|
Pin and Washer |
|
Hinge and |
Loosen |
|
Spacer |
||
Side Bolts |
||
|
Center Bolt
6. 8VH HLWKHU D ZUHQFK RU 7 7RU[ VFUHZGULYHU WR remove center hinge and plastic spacer(s) by unscrewing center bolt, loosening side bolts and sliding hinge to the center of the cabinet. Tighten bolts back into place and replace the center bolt.
7.Remove the center bolt on the opposite side and
ORRVHQ VLGH EROWV )OLS WKH FHQWHU KLQJH DQG VSDFHU over so the placement of the hinge pin will be toward the outside. Slide center hinge and spacers behind side bolts. Reinstall center bolt and tighten side bolts.
Center |
Hinge and |
|
Spacer |
||
Hinge |
||
|
||
Pin and |
|
|
Washer |
|
Center Bolt
10 |
49-60780-2 |

Installation Instructions
REVERSING THE DOOR SWING (CONT.)
REMOVING THE DOORS (Cont.)
8.Remove the bottom hinge bolts and relocate the bottom hinge to the opposite side of the cabinet.
Tighten bolts.
Hinge Pin


 Bottom Hinge
9.8QVFUHZ WKH KLQJH SLQ DQG PRYH WR WKH RWKHU KROH and tighten.


 Hinge Pin
Bottom Hinge 


REVERSING THE DOOR HANDLES
Stainless Steel Handle
1.Remove handle screws from the top and bottom of fresh food door.
2./RRVHQ VHW VFUHZ RQ KDQGOH ZLWK WKH SURYLGHG ´ wrench.
3.Remove door handle.
4.Change places between the handle fastener and plug button on door front.
5.Move the large and small hole covers on top and front of the door to fill the now vacant holes.
6.2Q ERWK WKH UHIULJHUDWRU DQG IUHH]HU GRRUV UHPRYH the screws from the door stop on one side with a
3KLOOLSV VFUHZGULYHU ,QVWDOO WKH GRRU VWRS RQWR WKH other side of the door.
7.Attach handle to fresh food door with screws at
WRS RI KDQGOH 8VH ´ DOOHQ ZUHQFK WR WLJKWHQ VHW screw at bottom of handle.
8.$WWDFK KDQGOH WR IUHH]HU GRRU ZLWK VFUHZV DW
ERWWRPRIKDQGOH 8VHWKHSURYLGHG ´DOOHQZUHQFK to tighten set screw at top of handle.
9.$WWDFK EDGJH RQ IUHH]HU GRRU RSSRVLWH WKH KDQGOH
REVERSING THE DOOR HANDLES
Plastic Handle Assembly
1.Remove handle screws from the top of fresh food door. Remove handle screws from the bottom of
IUHH]HU GRRU
2.Remove door handle on fresh food door by sliding the handle up off of the fastener. Remove door
KDQGOH RQ IUHH]HU GRRU E\ VOLGLQJ WKH KDQGOH GRZQ off of the fastener.
3.Change places between the handle fastener and plug button on door front.
4.Move the large and small hole covers on top and front of the door to fill the now vacant holes.
5.2Q ERWK WKH UHIULJHUDWRU DQG IUHH]HU GRRUV UHPRYH the screws from the door stop on one side with a
3KLOOLSV VFUHZGULYHU ,QVWDOO WKH GRRU VWRS RQWR WKH other side of the door.
6.Attach handle to fresh food door by sliding handle down onto fastener and with screws at top of handle.
7.$WWDFK KDQGOH WR IUHH]HU GRRU E\ VOLGLQJ KDQGOH XS onto fastener and with screws at bottom of handle.
8.$WWDFK EDGJH RQ IUHH]HU GRRU RSSRVLWH WKH KDQGOH
INSTRUCTIONS INSTALLATION
49-60780-2 |
11 |
INSTALLATION INSTRUCTIONS
Installation Instructions
REVERSING THE DOOR SWING (CONT.)
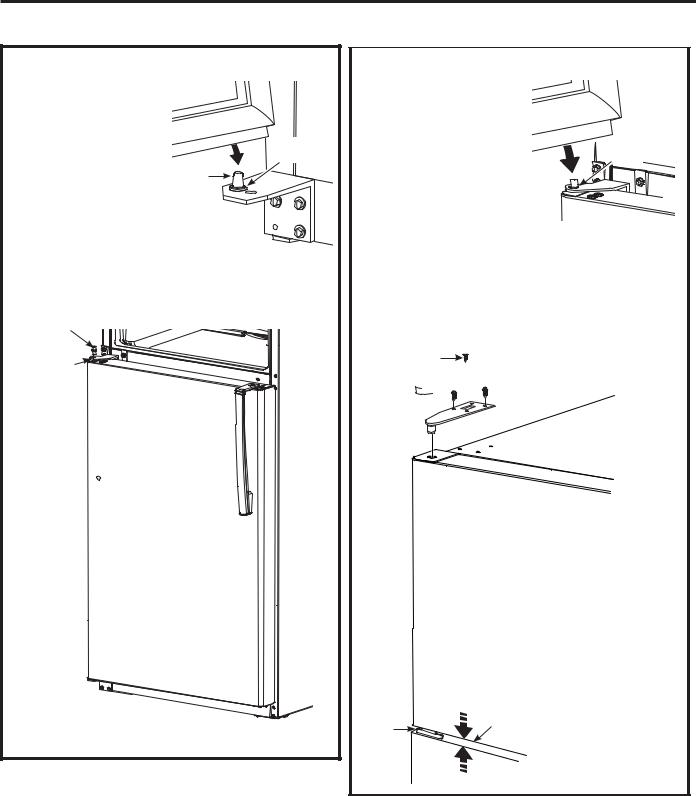
RE-HANGING THE DOORS
1.Lower the fresh food door onto the bottom
hinge pin. Be sure the |
|
|
washer is in place on |
Plastic |
|
the pin. |
||
Washer |
||
2. Tilt the door towards the |
||
Hinge |
||
cabinet. As the door is |
Pin |
|
brought into position, |
|
|
align the socket in the |
|
|
door with the hole in the |
|
|
center hinge. Place the |
|
|
center hinge pin into the hole in the center hinge |
||
and tighten. Make sure the washer is on the top of |
||
the hinge pin. |
|
|
Hinge |
|
|
Pin with |
|
|
Washer |
|
|
Center |
|
|
Hinge |
|
|
RE-HANGING THE DOORS (Cont.)
3./RZHU WKH IUHH]HU GRRU onto the center hinge pin. Be sure the washer is in place on the pin.
4.Tilt the door towards
WKH FDELQHW ,QVWDOO WKH top hinge fitting the pin into the socket on the top of the door.
Plastic
Washer
Hinge 


Pin
5.Make sure the door is slightly above the top of the cabinet and the gap between the doors is even
DFURVV WKH IURQW 7LJKWHQ WKH WRS KLQJH VFUHZV 'R not over-tighten these screws. Tighten them until they are just snug, and then turn them another one-half turn.
6.Replace the top hinge cover.
Top Hinge
Cover 
Top
Hinge 

Center |
Gap |
|
Hinge |
||
|
12 |
49-60780-2 |
 Loading...