


GE GTE21GTHDCC, GTE21GTHCWW, GTE21GTHCCC, GTE21GTHCBB, GTE21GTHBWW Owner’s Manual
...REFRIGERATORS
Top Freezer
SAFETY INFORMATION . . . . . . . . .3
USING THE REFRIGERATOR
Controls . . . . . . . . . . . . . . . . . . . . . . . . . . . . . .5
Shelves and Bins. . . . . . . . . . . . . . . . . . . . . . .6
Crispers and Pans. . . . . . . . . . . . . . . . . . . . . .7
Automatic Icemaker. . . . . . . . . . . . . . . . . . . .8
CARE AND CLEANING . . . . . . . . . . .9
Cleaning the Outside . . . . . . . . . . . . . . . . . . .9 Cleaning the Inside . . . . . . . . . . . . . . . . . . . .9 Condenser . . . . . . . . . . . . . . . . . . . . . . . . . . . .9 Moving the Refrigerator . . . . . . . . . . . . . . . 10 Preparing for Vacation . . . . . . . . . . . . . . . . 10 Preparing to Move . . . . . . . . . . . . . . . . . . . . 10 Replacing the Light Bulb . . . . . . . . . . . . . . 10
INSTALLATION INSTRUCTIONS
Preparing to Install the Refrigerator. . . . . 11 Installing the Water Line. . . . . . . . . . . . . . . 12 Icemaker Installation . . . . . . . . . . . . . . . . . . 16 Reversing the Door Swing . . . . . . . . . . . . . 17
TROUBLESHOOTING
Normal Operating Sounds . . . . . . . . . . . . .22
Troubleshooting Tips. . . . . . . . . . . . . . . . . .23
WARRANTY . . . . . . . . . . . . . . . . . . . . . . .25
CONSUMER SUPPORT . . . . . . . . . 26
Write the model and serial numbers here:
Model #_________________
Serial # _________________
Find these numbers on a label inside the fresh food compartment.
OWNER’S MANUAL &
INSTALLATION
INSTRUCTIONS
GTE21
GIE21
ENGLISH/FRANÇAIS/
ESPAÑOL
GE is a trademark of the General Electric Company. Manufactured under trademark license.
49-60726-2 10-17 GEA

THANK YOU FOR MAKING GE APPLIANCES A PART OF YOUR HOME.
Whether you grew up with GE Appliances, or this is your first, we’re happy to have you in the family.
We take pride in the craftsmanship, innovation and design that goes into every GE Appliances product, and we think you will too. Among other things, registration of your appliance ensures that we can deliver important product information and warranty details when you need them.
Register your GE appliance now online. Helpful websites and phone numbers are available in the Consumer Support section of this Owner’s Manual. You may also mail in the pre-printed registration card included in the packing material.
2 |
|
49-60726-2 |

IMPORTANT SAFETY INFORMATION
READ ALL INSTRUCTIONS BEFORE USING THE APPLIANCE
WARNING To reduce the risk of fire, explosion, electric shock, or injury when using your refrigerator, follow these basic safety precautions:
Ŷ 7KLV UHIULJHUDWRU PXVW EH SURSHUO\ LQVWDOOHG DQG ORFDWHG LQ DFFRUGDQFH ZLWK WKH ,QVWDOODWLRQ ,QVWUXFWLRQV EHIRUH LW LV XVHG
Ŷ 8QSOXJ WKH UHIULJHUDWRU EHIRUH PDNLQJ UHSDLUV replacing a light bulb, or cleaning.
NOTE: Power to the refrigerator cannot be disconnected by any setting on the control panel. NOTE: Repairs must be performed by a qualified Service Professional.
Ŷ 5HSODFH DOO SDUWV DQG SDQHOV EHIRUH RSHUDWLQJ
Ŷ 'R QRW VWRUH RU XVH JDVROLQH RU RWKHU IODPPDEOH vapors and liquids in the vicinity of this or any other appliance.
Ŷ 'R QRW VWRUH H[SORVLYH VXEVWDQFHV VXFK DV DHURVRO cans with a flammable propellant in this appliance.
Ŷ 'R QRW XVH DQ H[WHQVLRQ FRUG
Ŷ 7R SUHYHQW VXIIRFDWLRQ DQG HQWUDSPHQW KD]DUGV
WR FKLOGUHQ UHPRYH WKH IUHVK IRRG DQG IUHH]HU doors from any refrigerator before disposing of it or discontinuing its use.
Ŷ 7R DYRLG VHULRXV LQMXU\ RU GHDWK FKLOGUHQ VKRXOG QRW stand on, or play in or with the appliance.
Ŷ &KLOGUHQ DQG SHUVRQV ZLWK UHGXFHG SK\VLFDO VHQVRU\ or mental capabilities or lack of experience and knowledge can use this appliance only if they are supervised or have been given instructions on safe
XVH DQG XQGHUVWDQG WKH KD]DUGV LQYROYHG
Ŷ 7KLV DSSOLDQFH LV LQWHQGHG WR EH XVHG LQ KRXVHKROG and similar applications such as: staff kitchen areas
LQ VKRSV RIILFHV DQG RWKHU ZRUNLQJ HQYLURQPHQWV IDUP KRXVHV E\ FOLHQWV LQ KRWHOV PRWHOV EHG
EUHDNIDVW DQG RWKHU UHVLGHQWLDO HQYLURQPHQWV catering and similar non-retail applications.
|
To reduce the risk of injury when using your refrigerator, follow these basic safety |
|
CAUTION |
||
precautions. |
||
|
Ŷ 'R QRW FOHDQ JODVV VKHOYHV RU FRYHUV ZLWK ZDUP water when they are cold. Glass shelves and covers may break if exposed to sudden temperature changes or impact, such as bumping or dropping. Tempered glass is designed to shatter into many small pieces if it breaks.
Ŷ .HHS ILQJHUV RXW RI WKH ³SLQFK SRLQW´ DUHDV clearances between the doors and between the doors and cabinet are necessarily small. Be careful closing doors when children are in the area.
Ŷ 'R QRW WRXFK WKH FROG VXUIDFHV LQ WKH IUHH]HU compartment when hands are damp or wet, skin may stick to these extremely cold surfaces.
Ŷ 'R QRW UHIUHH]H IUR]HQ IRRGV ZKLFK KDYH WKDZHG completely.
Ŷ ,Q UHIULJHUDWRUV ZLWK DXWRPDWLF LFH PDNHUV DYRLG contact with the moving parts of the ejector mechanism, or with the heating element that
UHOHDVHV WKH FXEHV 'R QRW SODFH ILQJHUV RU KDQGV on the automatic ice making mechanism while the refrigerator is plugged in.
STATE OF CALIFORNIA PROPOSITION 65 WARNINGS
 WARNING This product contains one or more chemicals known to the State of California to cause cancer and birth defects or other reproductive harm.
INSTALLATION

 WARNING
 EXPLOSION HAZARD
.HHS IODPPDEOH PDWHULDOV DQG YDSRUV VXFK DV JDVROLQH DZD\ IURP UHIULJHUDWRU )DLOXUH WR GR VR FDQ UHVXOW LQ ILUH explosion, or death.
INFORMATION SAFETY
READ AND SAVE THESE INSTRUCTIONS
49-60726-2 |
3 |
SAFETY INFORMATION
IMPORTANT SAFETY INFORMATION
READ ALL INSTRUCTIONS BEFORE USING THE APPLIANCE
CONNECTING ELECTRICITY

 WARNING
 ELECTRICAL SHOCK HAZARD
Plug into a grounded 3-prong outlet
'R QRW UHPRYH WKH JURXQG SURQJ 'R QRW XVH DQ DGDSWHU 'R QRW XVH DQ H[WHQVLRQ FRUG
)DLOXUH WR IROORZ WKHVH LQVWUXFWLRQV FDQ UHVXOW LQ GHDWK ILUH RU HOHFWULFDO VKRFN
Do not, under any circumstances, cut or remove the third (ground) prong from the power cord. For personal safety, this appliance must be properly grounded.
The power cord of this appliance is equipped with a 3-prong (grounding) plug which mates with a standard
SURQJ JURXQGLQJ ZDOO RXWOHW WR PLQLPL]H WKH SRVVLELOLW\ RI HOHFWULF VKRFN KD]DUG IURP WKLV DSSOLDQFH
Have the wall outlet and circuit checked by a qualified electrician to make sure the outlet is properly grounded.
Where a standard 2-prong wall outlet is encountered, it is your personal responsibility and obligation to have it replaced with a properly grounded 3-prong wall outlet.
'R QRW XVH DQ DGDSWHU
The refrigerator should always be plugged into its own individual electrical outlet which has a voltage rating that matches the rating plate.
$ 9ROW $& +] RU DPS IXVHG JURXQGHG electrical supply is required. This provides the best performance and also prevents overloading house
ZLULQJ FLUFXLWV ZKLFK FRXOG FDXVH D ILUH KD]DUG IURP overheated wires.
Never unplug your refrigerator by pulling on the power cord. Always grip plug firmly and pull straight out from the outlet.
,PPHGLDWHO\ GLVFRQWLQXH XVH RI D GDPDJHG VXSSO\
FRUG ,I WKH VXSSO\ FRUG LV GDPDJHG LW PXVW EH replaced by a qualified service professional with an
DXWKRUL]HG VHUYLFH SDUW IURP WKH PDQXIDFWXUHU
When moving the refrigerator away from the wall, be careful not to roll over or damage the power cord.
PROPER DISPOSAL OF YOUR OLD REFRIGERATOR

 WARNING SUFFOCATION AND ENTRAPMENT HAZARD
)DLOXUH WR IROORZ WKHVH GLVSRVDO LQVWUXFWLRQV FDQ UHVXOW LQ GHDWK RU VHULRXV LQMXU\
IMPORTANT: Child entrapment and suffocation |
Before You Throw Away Your Old Appliance |
|
are not problems of the past. Junked or abandoned |
Ŷ 7DNH RII WKH IUHVK IRRG DQG IUHH]HU GRRUV |
|
UHIULJHUDWRUV RU IUHH]HUV DUH VWLOO GDQJHURXV HYHQ LI WKH\ |
Ŷ Leave the shelves in place so that children may not |
|
ZLOO VLW IRU ³MXVW D IHZ GD\V ´ ,I \RX DUH JHWWLQJ ULG RI \RXU |
easily climb inside. |
|
ROG UHIULJHUDWRU RU IUHH]HU SOHDVH IROORZ WKH LQVWUXFWLRQV |
||
|
||
below to help prevent accidents. |
|
Refrigerant and Foam Disposal:
'LVSRVH RI DSSOLDQFH LQ DFFRUGDQFH ZLWK )HGHUDO DQG /RFDO 5HJXODWLRQV )ODPPDEOH LQVXODWLRQ PDWHULDO XVHG requires special disposal procedures. Contact your local authorities for the environmentally safe disposal of your appliance.
READ AND SAVE THESE INSTRUCTIONS
4 |
49-60726-2 |
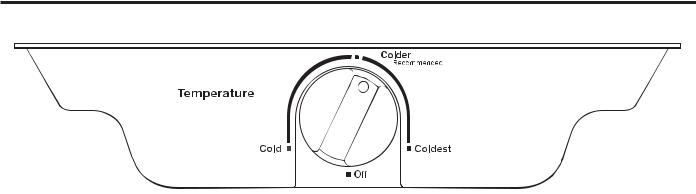
Controls
The controls on your refrigerator will look like the following:
Control Settings
,QLWLDOO\ VHW WKH UHIULJHUDWRU FRQWURO WR WKH UHFRPPHQGHG VHWWLQJ $OORZ KRXUV IRU WKH WHPSHUDWXUH WR VWDELOL]H
Several adjustments may be required. Adjust the refrigerator control one increment at a time and allow 12 hours after each adjustment for the refrigerator to reach the temperature you have set.
Setting the refrigerator control to Off stops cooling in
ERWK WKH IUHH]HU DQG UHIULJHUDWRU FRPSDUWPHQWV EXW GRHV not shut off electrical power to the refrigerator.
Control settings will vary based on personal preferences, usage and operating conditions, and may require more
WKDQ RQH DGMXVWPHQW )DFWRUV WKDW DIIHFW WHPSHUDWXUH
LQFOXGH WKH DPRXQW RI IRRG LQ WKH UHIULJHUDWRU RU IUHH]HU the frequency of door opening and the temperature of food when it is placed in the refrigerator.
Controls REFRIGERATOR: THE USING
49-60726-2 |
5 |
USING THE REFRIGERATOR: Shelves and Bins
Shelves and Bins
Not all features are on all models.
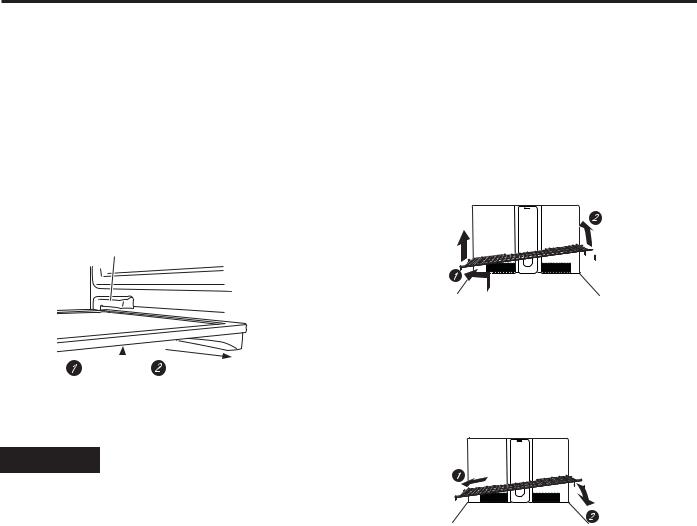
Rearranging the Shelves
6KHOYHV LQ WKH UHIULJHUDWRU DQG IUHH]HU FRPSDUWPHQWV DUH DGMXVWDEOH
REFRIGERATOR COMPARTMENT
Full Width Shelves
The shelf rests on a molded side-wall support and locks into a track on the rear cabinet wall on each side.
To remove:
1.Lift the shelf up through the space in the track.
2.Slide the shelf forward along the track.
3.Pull the shelf out of the unit.
Track
FREEZER COMPARTMENT
To remove:
1.Lift up both sides of the shelf and slide it left into the center of the shelf supports.
2.Rotate the right side of the shelf up and out of the shelf supports.
Lift up |
Slide |
|
forward |
|
To replace:
Reverse removal steps above.
 CAUTION
'R QRW FOHDQ JODVV VKHOYHV RU FRYHUV ZLWK ZDUP ZDWHU when they are cold. Glass shelves and covers may break if exposed to sudden temperature changes or impact such as bumping or dropping. Tempered glass is designed to shatter into many small pieces if it breaks.
'R QRW ZDVK DQ\ SODVWLF UHIULJHUDWRU SDUWV LQ WKH dishwasher.
To replace:
1.Holding the shelf diagonally, insert the left end of the shelf into the top of the shelf supports on the side wall.
,QVHUW WKH ULJKW HQG RI WKH VKHOI LQWR WKH VKHOI VXSSRUWV on the side wall. Rest each end of the shelf on the bottom of the shelf supports.
6 |
49-60726-2 |
Crispers and Pans
Not all features are on all models.
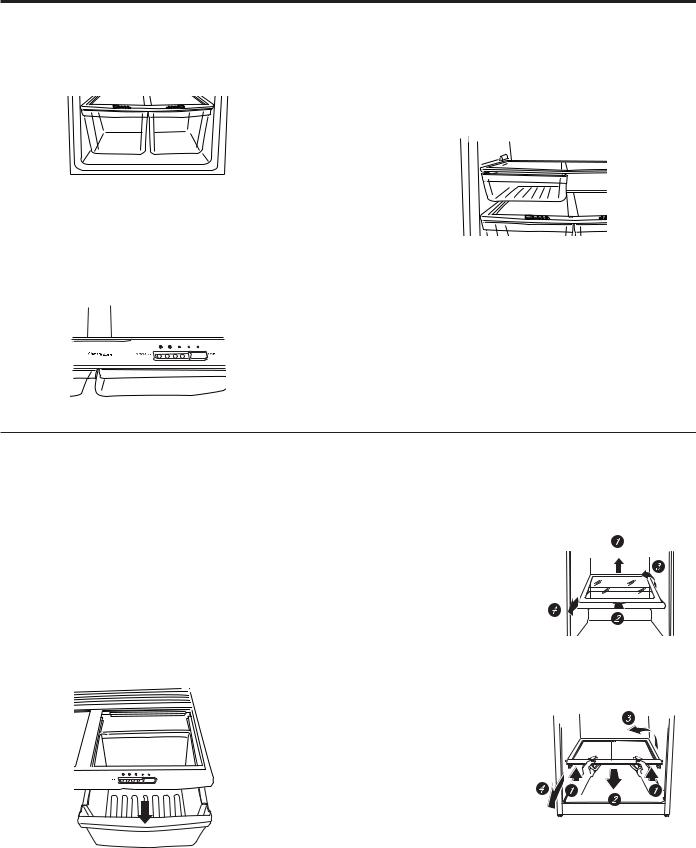
Fruit and Vegetable Crispers
Excess water that may accumulate in the bottom of the drawers or under the drawers should be wiped dry.
Snack Pan
This pan can be moved to the most useful location for your family’s needs.
To remove, slide the pan out to the stop position, lift the pan up and past the stop position, and lift out.
Adjustable Humidity Crisper
Slide the control all the way to the Vegetables setting to provide high humidity recommended for most vegetables.
6OLGH WKH FRQWURO DOO WKH ZD\ WR WKH )UXLWV VHWWLQJ WR provide lower humidity levels recommended for most fruits.
Crisper Removal
8QORDG WKH ERWWRP VKHOI EHIRUH DWWHPSWLQJ WR UHPRYH WKH storage drawers.
To remove:
Lift the drawers up slightly while pulling them past the stop location.
,I WKH GRRU SUHYHQWV \RX IURP WDNLQJ RXW WKH GUDZHUV ILUVW
WU\ WR UHPRYH WKH GRRU ELQV ,I WKLV GRHV QRW RIIHU HQRXJK clearance, the refrigerator will need to be rolled forward
XQWLO WKH GRRU RSHQV HQRXJK WR VOLGH WKH GUDZHUV RXW ,Q some cases, when you roll the refrigerator out, you will need to move the refrigerator to the left or right as you roll it out.
To remove the glass cover:
Remove the glass, then the frame. When replacing the glass, push the front edge firmly into the frame.
1.Push up the glass cover at the rear.
2.Slide the glass cover backwards until the front edge comes out of the frame.
3.Rotate the side of the glass cover up.
4.Remove the glass cover.
To remove the frame:
1.Lift up the front of the frame using both hands.
2.Slide the frame forward.
3. Rotate the side of the frame up.
4. Remove the frame.
Removing the glass cover
Removing the frame
Pans and Crispers REFRIGERATOR: THE USING
49-60726-2 |
7 |
USING THE REFRIGERATOR: $XWRPDWLF,FHPDNHU
Automatic Icemaker
A newly-installed refrigerator may take 12–24 hours to begin making ice.
Automatic Icemaker (on some models)
 CAUTION
Avoid contact with the moving parts of the ejector mechanism, or with the heating element (located on the
ERWWRP RI WKH LFH PDNHU WKDW UHOHDVHV WKH FXEHV 'R not place fingers or hands on the automatic ice making mechanism while the refrigerator is plugged in.
,FHPDNHU
Power Switch |
)HHOHU $UP |
|
7KH LFHPDNHU ZLOO ILOO ZLWK ZDWHU ZKHQ LW FRROV WR )
(-9°C). A newly-installed refrigerator may take 12 to 24 hours to begin making ice cubes.
Once the icemaker starts to make ice, it may take up to 48 hours to fill the bin, depending on the temperature settings and number of door openings.
<RX ZLOO KHDU D EX]]LQJ VRXQG HDFK WLPH WKH LFHPDNHU fills with water.
Throw away the first few batches of ice to allow the water line to clear.
Be sure nothing interferes with the sweep of the feeler arm.
When the bin fills to the level of the feeler arm, the icemaker will stop producing ice.
,W LV QRUPDO IRU VHYHUDO FXEHV WR EH MRLQHG WRJHWKHU
The icemaker will produce approximately 3 to 3-1/2 lbs. (1.36 to 1.59 kg) of ice in a 24-hour period, depending on
WKH IUHH]HU FRPSDUWPHQW WHPSHUDWXUH URRP WHPSHUDWXUH number of door openings and other use conditions.
,I WKH UHIULJHUDWRU LV RSHUDWHG EHIRUH WKH ZDWHU FRQQHFWLRQ LV PDGH WR WKH LFHPDNHU PRYH WKH SRZHU VZLWFK WR 2))
When the refrigerator has been connected to the water supply, set power switch to ON
,I LFH LV QRW XVHG IUHTXHQWO\ ROG LFH FXEHV ZLOO EHFRPH cloudy, taste stale, shrink or fuse together.
NOTE: ,Q KRPHV ZLWK ORZHU WKDQ DYHUDJH ZDWHU pressure, you may hear the icemaker cycle multiple times when making one batch of ice.
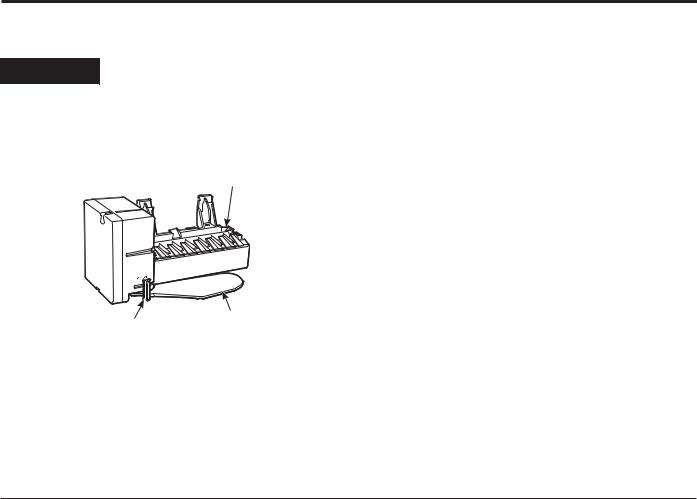
Icemaker Accessory Kit
,I \RXU UHIULJHUDWRU GLG QRW DOUHDG\ FRPH HTXLSSHG ZLWK |
Check the back of the refrigerator for the specific ice |
an automatic icemaker, an icemaker accessory kit is |
maker kit needed for your model. |
available at extra cost. |
|
8 |
49-60726-2 |
Care And Cleaning
Cleaning the Outside
The door handles and trim. Clean with a cloth dampened
ZLWK VRDS\ ZDWHU 'U\ ZLWK D VRIW FORWK
.HHS WKH RXWVLGH FOHDQ :LSH ZLWK D FOHDQ FORWK OLJKWO\ dampened with kitchen appliance wax or mild liquid dish
GHWHUJHQW 'U\ DQG SROLVK ZLWK D FOHDQ VRIW FORWK
The stainless steel panels and door handles (on some models) can be cleaned with a commercially available stainless steel cleaner. Cleaners with oxalic acid such
DV %DU .HHSHUV )ULHQG 6RIW &OHDQVHU ZLOO UHPRYH UXVW
WDUQLVK DQG VPDOO EOHPLVKHV 8VH RQO\ D OLTXLG FOHDQVHU free of grit and rub in the direction of the brush lines with
D GDPS VRIW VSRQJH 'R QRW XVH DSSOLDQFH ZD[ RU SROLVK on the stainless steel.
'R QRW ZLSH WKH UHIULJHUDWRU ZLWK D VRLOHG GLVK FORWK RU wet towel. These may leave a residue that can erode
WKH SDLQW 'R QRW XVH VFRXULQJ SDGV SRZGHUHG FOHDQHUV bleach or cleaners containing bleach because these products can scratch and weaken the paint finish.
Cleaning the Inside
To help prevent odors, leave an open box of baking
VRGD LQ WKH IUHVK IRRG DQG IUHH]HU FRPSDUWPHQWV
Unplug the refrigerator before cleaning.
,I WKLV LV QRW SUDFWLFDO ZULQJ H[FHVV PRLVWXUH RXW RI sponge or cloth when cleaning around switches, lights or controls.
Use warm water and baking soda solution—about a tablespoon (15 ml) of baking soda to a quart (1 liter) of
ZDWHU 7KLV ERWK FOHDQV DQG QHXWUDOL]HV RGRUV 5LQVH DQG wipe dry.
'R QRW FOHDQ ZLWK DQ\ SURGXFWV FRQWDLQLQJ GHWHUJHQW bleach or ammonia. They may damage the refrigerator.
After cleaning the door gaskets, apply a thin layer of petroleum jelly to the door gaskets at the hinge side. This helps keep the gaskets from sticking and bending
RXW RI VKDSH 'R QRW XVH FOHDQVLQJ SRZGHUV RU RWKHU abrasive cleaners.
 CAUTION 'R QRW FOHDQ JODVV VKHOYHV RU FRYHUV with warm water when they are cold. Glass shelves and covers may break if exposed to sudden temperature changes or impact such as bumping or dropping. Tempered glass is designed to shatter into many small pieces if it breaks.
'R QRW ZDVK DQ\ SODVWLF UHIULJHUDWRU SDUWV LQ WKH dishwasher.
CLEANING AND CARE
Condenser
There is no need for routine condenser cleanings in normal home operating environments. However, in environments that may be particularly dusty or greasy, the condenser should be cleaned periodically for efficient refrigerator operation.
Cleaning the condenser:
Sweep away or vacuum up dust.
 WARNING To reduce the risk of death or electric shock, you must follow these instructions:
ŶUnplug the refrigerator before removing any panels.
ŶDo not contact or damage any wiring while the panel is removed.
ŶReplace all parts and panels before plugging the refrigerator back in.
49-60726-2 |
9 |
CARE AND CLEANING
Care and Cleaning
Moving the Refrigerator
Be careful when moving the refrigerator away from the wall. All types of floor coverings can be damaged, particularly cushioned coverings and those with embossed surfaces.
Turn the leveling legs at each front corner of the refrigerator counterclockwise until the rollers support the refrigerator. Pull the refrigerator straight out and return it to position by pushing it straight in.
Moving the refrigerator in a side direction may result in damage to the floor covering or refrigerator.

 WARNING
 ELECTRICAL SHOCK HAZARD
When pushing the refrigerator back, make sure you don’t roll over the power cord or icemaker supply line (on some models).
After rolling the refrigerator back into place, turn the legs clockwise until the legs again bear the weight of the refrigerator.
Preparing for Vacation
)RU ORQJ YDFDWLRQV RU DEVHQFHV UHPRYH IRRG DQG unplug the refrigerator. Move the refrigerator control to
WKH 2)) SRVLWLRQ DQG FOHDQ WKH LQWHULRU ZLWK D EDNLQJ soda solution of one tablespoon (15 ml) of baking soda to one quart (1 liter) of water. Leave the doors open.
6HW WKH LFHPDNHU SRZHU VZLWFK WR WKH 2)) SRVLWLRQ DQG shut off the water supply to the refrigerator.
,I WKH WHPSHUDWXUH FDQ GURS EHORZ IUHH]LQJ KDYH D qualified servicer drain the water supply system (on some models) to prevent serious property damage due to flooding.
Preparing to Move
Secure all loose items such as grille, shelves and |
Be sure the refrigerator stays in an upright position |
drawers by taping them securely in place to prevent |
during moving. |
damage. To prevent the doors from opening while |
|
moving, secure them to the case with tape. |
|
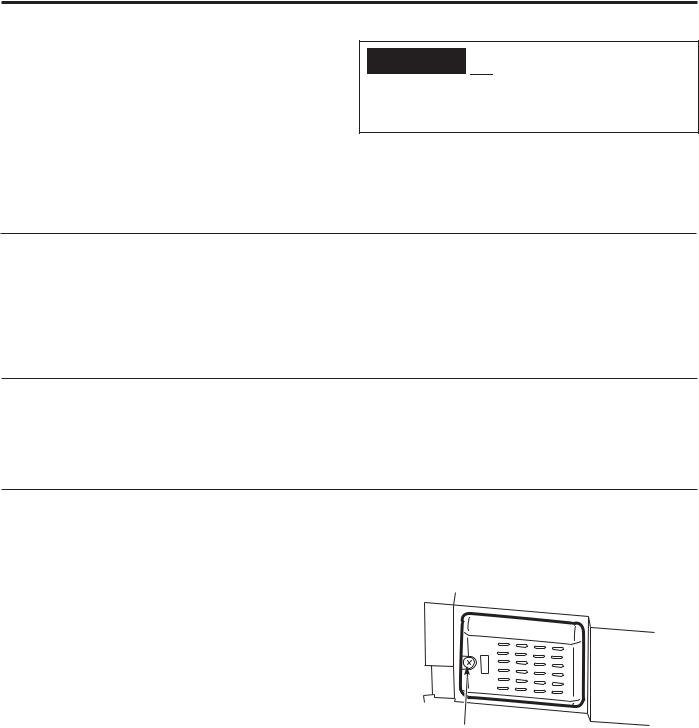
Replacing the Light Bulb
6HWWLQJ WKH UHIULJHUDWRU FRQWURO WR 2)) GRHV QRW UHPRYH power to the light circuit.
8QSOXJ WKH UHIULJHUDWRU
2. |
Remove the top shelf (if necessary). |
|
3. |
The bulb is located behind a light lens in the ceiling |
|
|
of the refrigerator section. Remove the light lens |
|
|
by removing the single screw using a Phillips head |
|
|
screwdriver. |
|
4. |
Replace the bulb with an appliance bulb of the same |
|
|
or lower wattage. |
|
5. |
Replace the light lens. |
Screw |
|
||
6. |
Plug the refrigerator back in. |
|
10 |
49-60726-2 |
Installation |
Refrigerator |
Instructions |
Models GTE21 and GIE21 |
|
Questions? Call 800.GE.CARES (800.432.2737) or visit our Website at: GEAppliances.com In Canada, call 1.800.561.3344 or visit our Website at: www.GEAppliances.ca
BEFORE YOU BEGIN
Read these instructions completely and carefully.
• IMPORTANT – Save these instructions for local inspector’s use.
• IMPORTANT – Observe all governing codes and ordinances.
• Note to Installer – Be sure to leave these instructions with the Consumer.
• Note to Consumer – .HHS WKHVH LQVWUXFWLRQV for future reference.
•Skill level ± ,QVWDOODWLRQ RI WKLV DSSOLDQFH UHTXLUHV basic mechanical skills.
•Completion time±5HIULJHUDWRU ,QVWDOODWLRQ
15minutes
•Proper installation is the responsibility of the installer.
•Product failure due to improper installation is not covered under the Warranty.
WATER SUPPLY TO THE
ICEMAKER (On Some Models)
,I WKH UHIULJHUDWRU KDV DQ LFHPDNHU LW ZLOO KDYH WR EH connected to a cold water line. A GE Appliances water supply kit (containing tubing, shutoff valve, fittings and instructions) is available at extra cost from your dealer or by visiting our Website at GEAppliances.com (in Canada at www.geappliances. ca) or from Parts and Accessories, 1.877.959.8688.
REFRIGERATOR LOCATION
•'R QRW LQVWDOO WKH UHIULJHUDWRU ZKHUH WKH WHPSHUDWXUH
ZLOO JR EHORZ ) & EHFDXVH LW ZLOO QRW UXQ often enough to maintain proper temperatures.
•'R QRW LQVWDOO WKH UHIULJHUDWRU ZKHUH WKH
WHPSHUDWXUH ZLOO JR DERYH ) & EHFDXVH it will not perform properly.
•'R QRW LQVWDOO WKH UHIULJHUDWRU LQ D ORFDWLRQ H[SRVHG to water (rain, etc.) or direct sunlight.
,QVWDOO LW RQ D IORRU VWURQJ HQRXJK WR VXSSRUW LW IXOO\ loaded.
CLEARANCES
Allow the following clearances for ease of installation, proper air circulation and plumbing and electrical connections.
6LGHV ´ PP
7RS ´ PP
%DFN ´ PP ,I WKH UHIULJHUDWRU LV WR EH LQVWDOOHG QH[W WR D ZDOO RQ WKH KLQJH VLGH DOORZ Ǝ PP GRRU FOHDUDQFH
ROLLERS AND LEVELING LEGS
Leveling legs near each front corner of the refriger-
DWRU DUH DGMXVWDEOH 7KH\ ¿UPO\ SRVLWLRQ WKH UHIULJHUator and prevent it from moving when the doors are opened. Leveling legs should be set so the front of the refrigerator is raised just enough that the doors close easily when opened about halfway.
Turn the leveling legs clockwise to raise the refrigerator, counterclockwise to lower it.
Rollers next to the leveling legs allow you to move the refrigerator away from the wall for cleaning.
Turn the legs counterclockwise until the weight of the refrigerator is transferred from them to the rollers. After rolling the refrigerator back into place, turn the legs clockwise until the legs again bear the weight of the refrigerator.
 Clockwise to raise refrigerator
INSTRUCTIONS INSTALLATION
49-60726-2 |
11 |
INSTALLATION INSTRUCTIONS
Installation Instructions
INSTALLING THE WATER LINE
BEFORE YOU BEGIN
Recommended copper water supply kits are WX8X2, WX8X3 or WX8X4, depending on the amount of tubing you need. Approved plastic water supply lines are SmartConnect™ Refrigerator Tubing (WX08X10002, WX08X10006, WX08X10015 and WX08X10025).
When connecting your refrigerator to a GE Appliances Reverse Osmosis Water System, the only
DSSURYHG LQVWDOODWLRQ LV ZLWK D *( $SSOLDQFHV 59.LW
)RU RWKHU UHYHUVH RVPRVLV ZDWHU V\VWHPV IROORZ WKH manufacturer’s recommendations.
,I WKH ZDWHU VXSSO\ WR WKH UHIULJHUDWRU LV IURP D 5HYHUVH 2VPRVLV :DWHU )LOWUDWLRQ 6\VWHP $1' WKH UHIULJHUDWRU DOVR KDV D ZDWHU ILOWHU XVH
WKH UHIULJHUDWRU¶V ILOWHU E\SDVV SOXJ 8VLQJ WKH refrigerator’s water filtration cartridge in conjunction with the RO filter can result in hollow ice cubes and slower water flow from the water dispenser.
This water line installation is not warranted by
WKH UHIULJHUDWRU RU LFHPDNHU PDQXIDFWXUHU )ROORZ
WKHVH LQVWUXFWLRQV FDUHIXOO\ WR PLQLPL]H WKH ULVN RI expensive water damage.
Water hammer (water banging in the pipes) in house plumbing can cause damage to refrigerator parts and lead to water leakage or flooding. Call a qualified plumber to correct water hammer before installing the water supply line to the refrigerator.
To prevent burns and product damage, do not hook up the water line to the hot water line.
,I \RX XVH \RXU UHIULJHUDWRU EHIRUH FRQQHFWLQJ WKH
ZDWHU OLQH PDNH VXUH WKH IHHOHU DUP LV LQ WKH 2)) position.
'R QRW LQVWDOO WKH LFHPDNHU WXELQJ LQ DUHDV ZKHUH WHPSHUDWXUHV IDOO EHORZ IUHH]LQJ
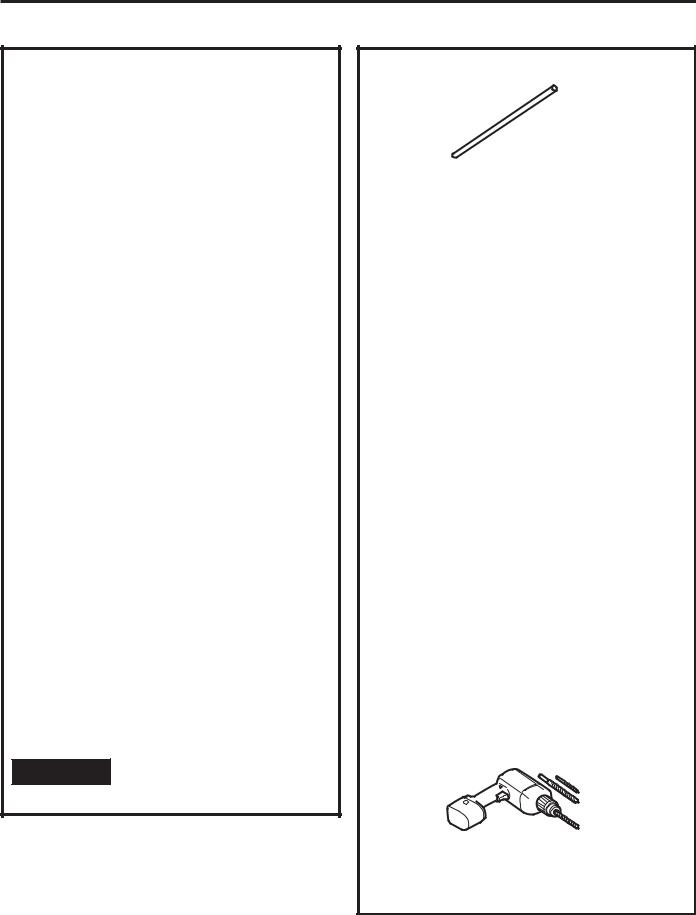
When using any electrical device (such as a power drill) during installation, be sure the device is double insulated or grounded in a manner to prevent the
KD]DUG RI HOHFWULF VKRFN RU LV EDWWHU\ SRZHUHG
All installations must be in accordance with local plumbing code requirements.
 WARNING Connect to potable water supply only.
WHAT YOU WILL NEED
•Copper or SmartConnect™ Refrigerator Tubing kit, 1/4" outer diameter to connect the refrigerator to the
ZDWHU VXSSO\ ,I XVLQJ FRSSHU EH VXUH ERWK HQGV RI the tubing are cut square.
To determine how much tubing you need: measure the distance from the water valve on the back of the refrigerator to the water supply pipe. Then add 8 feet (2.4 m). Be sure there is sufficient extra tubing (about 8 feet [2.4 m] coiled into 3 turns of about 10" [25 cm] diameter) to allow the refrigerator to move out from the wall after installation.
6PDUW&RQQHFW 5HIULJHUDWRU 7XELQJ .LWV DUH available in the following lengths:
2' |
(.6 m) |
– WX08X10002 |
8' |
(2.4 m) |
– WX08X10006 |
15' (4.6 m) |
– WX08X10015 |
|
25' (7.6 m) |
– WX08X10025 |
|
Be sure that the kit you select allows at least 8 feet (2.4 m) as described above.
NOTE: The only GE Appliances approved plastic tubing is that supplied in SmartConnect™
5HIULJHUDWRU 7XELQJ NLWV 'R QRW XVH DQ\ RWKHU SODVWLF water supply line because the line is under pressure at all times. Certain types of plastic will crack or rupture with age and cause water damage to your home.
•A GE Appliances water supply kit (containing tubing, shutoff valve and fittings listed below) is available at extra cost from your dealer or from Parts and Accessories, 877.959.8688.
•A cold water supply. The water pressure must be between 20 and 120 p.s.i. (138-827 kilopascals) on models without a water filter and between 40 and 120 p.s.i. (138-827 kilopascals) on models with a water filter.
•Power drill.
•1/2" or adjustable wrench.
•Straight and Phillips blade screwdriver.
12 |
49-60726-2 |
Installation Instructions
INSTALLING THE WATER LINE (Continued)
WHAT YOU WILL NEED (Cont.)
7ZR ´ RXWHU GLDPHWHU FRPSUHVVLRQ
nuts and 2 ferrules (sleeves)—to 

 connect the copper tubing to the shutoff valve and the refrigerator water
valve. OR
,I \RX DUH XVLQJ D 6PDUW&RQQHFW 5HIULJHUDWRU
Tubing kit, the necessary fittings are preassembled to the tubing. 
,I \RXU H[LVWLQJ FRSSHU ZDWHU OLQH KDV D IODUHG ILWWLQJ at the end, you will need an adapter (available
at plumbing supply stores) to connect the water line to the refrigerator OR you can cut off the flared fitting with a tube cutter and then use a
FRPSUHVVLRQ ILWWLQJ 'R QRW FXW IRUPHG HQG IURP
SmartConnect™ Refrigerator tubing.
•Shutoff valve to connect to the cold water line. The shutoff valve should have a water inlet with a
PLQLPXP LQVLGH GLDPHWHU RI ´ DW WKH SRLQW RI
FRQQHFWLRQ WR WKH &2/' :$7(5 /,1( 6DGGOH W\SH shutoff valves are included in many water supply kits. Before purchasing, make sure a saddle-type valve complies with your local plumbing codes.
,QVWDOO WKH VKXWRII YDOYH RQ WKH QHDUHVW IUHTXHQWO\ XVHG drinking water line.
1SHUT OFF THE MAIN WATER SUPPLY
Turn on the nearest faucet long enough to clear the line of water.
 WARNING To reduce the risk of electric shock or injury during installation, you must first unplug the refrigerator before proceeding.
2CHOOSE THE VALVE LOCATION
Choose a location for the valve that is easily accessible.
,W LV EHVW WR FRQQHFW LQWR the side of a vertical water pipe. When it is necessary
WR FRQQHFW LQWR D KRUL]RQWDO water pipe, make the connection to the top or side, rather than at the bottom,
to avoid drawing off any sediment from the water pipe.
3DRILL THE HOLE FOR THE VALVE
'ULOO D KROH LQ WKH ZDWHU SLSH HYHQ LI XVLQJ a self-piercing valve) using a sharp bit. Remove any burrs resulting from drilling the hole in
the pipe. Take care not to allow water to drain into the drill.
)DLOXUH WR GULOO |
a |
1/4" hole may |
|
result in reduced |
|
ice production |
or |
smaller cubes. |
|
4FASTEN THE SHUTOFF VALVE
)DVWHQ WKH VKXWRII YDOYH WR WKH FROG ZDWHU SLSH with the pipe clamp.
NOTE: Commonwealth of Massachusetts Plumbing Codes 248CMR shall be adhered to. Saddle valves are illegal and use is not permitted in Massachusetts. Consult with your licensed plumber.
Pipe Clamp
Vertical Cold
Saddle-Type 
 Water Pipe
6KXWR 9DOYH
INSTRUCTIONS INSTALLATION
49-60726-2 |
13 |
INSTALLATION INSTRUCTIONS
Installation Instructions
INSTALLING THE WATER LINE (Continued)
5 TIGHTEN THE PIPE CLAMP
Tighten the clamp screws until the sealing washer begins to swell.
NOTE: 'R QRW RYHUWLJKWHQ RU \RX PD\ FUXVK WKH tubing.
|
Washer |
Pipe Clamp |
,QOHW (QG |
Clamp |
|
Screw |
|
6 ROUTE THE TUBING
Route the tubing between the cold water line and the refrigerator.
Route the tubing through a hole drilled in the wall or floor (behind the refrigerator or adjacent base cabinet) as close to the wall as possible.
NOTE: Be sure there is sufficient extra tubing [about 8 feet (244 cm) coiled into 3 turns
of about 10" (25 cm) diameter] to allow the refrigerator to move out from the wall after installation.
7 CONNECT THE TUBING TO
THE VALVE
Place the compression nut and ferrule (sleeve) for copper tubing onto the end of the tubing and connect it to the shutoff valve.
Make sure the tubing is fully inserted into the valve. Tighten the compression nut securely.
)RU SODVWLF WXELQJ IURP D 6PDUW&RQQHFW
Refrigerator Tubing kit, insert the molded end of the tubing into the shutoff valve and tighten compression nut until it is hand tight, then tighten one additional turn with a wrench. Overtightening may cause leaks.
|
Compression |
|
Saddle-Type |
Nut |
|
SmartConnect™ |
||
6KXWR 9DOYH |
||
|
Tubing |
|
Packing Nut |
|
NOTE: Commonwealth of Massachusetts Plumbing Codes 248CMR shall be adhered to. Saddle valves are illegal and use is not permitted in Massachusetts. Consult with your licensed plumber.
8 FLUSH OUT THE TUBING
Turn the main water supply on and flush out the tubing until the water is clear.
Shut the water off at the water valve after about one quart (1 liter) of water has been flushed through the tubing.
9CONNECT THE TUBING TO THE REFRIGERATOR
NOTES:
•Before making the connection to the refrigerator, be sure the refrigerator power cord is not plugged into the wall outlet.
,I \RXU UHIULJHUDWRU GRHV QRW KDYH D ZDWHU ILOWHU
ZH UHFRPPHQG LQVWDOOLQJ RQH ,I \RXU ZDWHU supply has sand or particles that could clog the screen of the refrigerator’s water valve.
,QVWDOO LW LQ WKH ZDWHU OLQH QHDU WKH UHIULJHUDWRU
,I XVLQJ 6PDUW&RQQHFW 5HIULJHUDWRU
Tubing kit, you will need an additional tube
:; ; WR FRQQHFW WKH ILOWHU 'R QRW FXW plastic tube to install filter.
 WARNING To reduce the risk of death or electric shock, you must follow these instructions:
ŶUnplug the refrigerator before removing any panels.
ŶDo not contact or damage any wiring while the panel is removed.
ŶReplace all parts and panels before plugging the refrigerator back in.
Outlet Valve |
)HUUXOH VOHHYH |
14 |
49-60726-2 |

Installation Instructions
INSTALLING THE WATER LINE (Continued)
9CONNECT THE TUBING TO THE REFRIGERATOR (CONT.)
Remove the access cover.
Remove the plastic
flexible cap from the water valve (refrigerator connection).
Place the compression nut and ferrule (sleeve) onto the end
of the tubing as shown. On SmartConnect™ Refrigerator Tubing kit, the nuts are already assembled to the tubing.
,QVHUW WKH HQG RI WKH WXELQJ LQWR WKH ZDWHU YDOYH connection as far as possible. While holding the tubing, tighten the fitting.
)RU SODVWLF WXELQJ IURP D 6PDUW&RQQHFW
Refrigerator Tubing kit, insert the molded end of the tubing into the refrigerator connection and tighten compression nut until it is hand tight, then tighten one additional turn with a wrench. Overtightening may cause leaks.
)DVWHQ WKH WXELQJ LQWR WKH FODPS SURYLGHG WR hold it in a vertical position. You may need to pry open the clamp.

 WARNING
 ELECTRICAL SHOCK HAZARD
$WWDFK WXELQJ FODPS XVLQJ H[LVWLQJ KROH RQO\ '2
NOT drill into the refrigerator.
Tubing |
1/4" Tubing |
Clamp |
|
1/4" |
|
Compression |
|
Nut |
|
)HUUXOH |
|
(sleeve) |
|
Refrigerator |
SmartConnect™ |
Connection |
Tubing |
10TURN THE WATER ON AT THE SHUTOFF VALVE
Tighten any connections that leak.
Reattach the compressor compartment access cover.
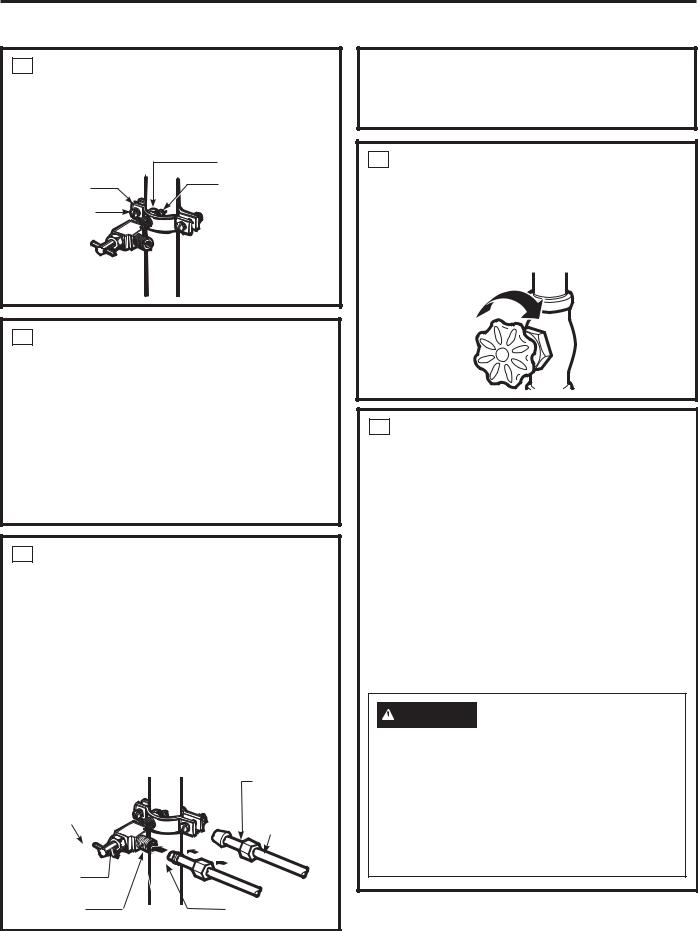
11 INSTALLING THE
REFRIGERATOR
Plug in the refrigerator.
Arrange the coil of tubing so that it does not vibrate against the back of the refrigerator or against the wall. Push the refrigerator back to the wall.
12 START THE ICEMAKER
Set the icemaker power switch to the ON position. The icemaker will not begin to operate until it reaches its operating temperature
RI ) ± & RU EHORZ ,W ZLOO WKHQ EHJLQ operation automatically if the icemaker power switch is in the ON position.
INSTRUCTIONS INSTALLATION
49-60726-2 |
15 |

INSTALLATION INSTRUCTIONS
Installation Instructions
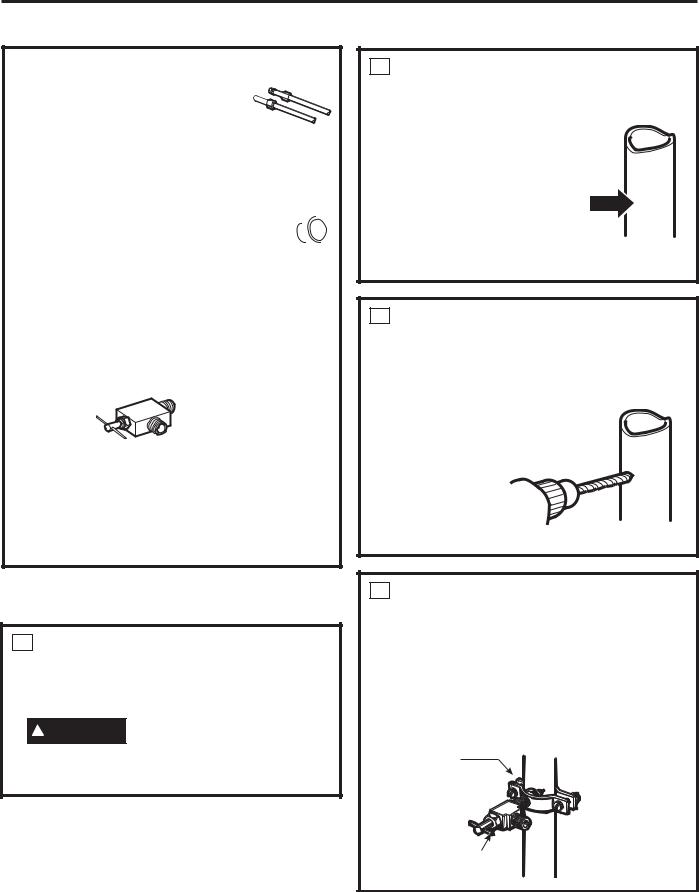
ICEMAKER INSTALLATION INSTRUCTIONS
BEFORE YOU BEGIN
Read each step thoroughly before proceeding.
 WARNING To eliminate the risk of electric shock or injury during installation, you must first unplug the refrigerator
EHIRUH SURFHHGLQJ )DLOXUH WR IROORZ WKHVH instructions can result in electrical shock.
TOOLS YOU WILL NEED
)ODW EODGH DQG 3KLOOLSV |
Pliers |
|
|
|
|
|
|||
|
Sharp knife |
|||
screwdrivers |
|
|
|
|
|
|
|
|
|
2 REPOSITION FREEZER SHELF
0DNH VXUH WKH IUHH]HU VKHOI LV LQ WKH ORZHVW position.
3 PREPARE FOR INSTALLATION
)RU XQLW ZLWKRXW IDFWRU\ LQVWDOOHG LFHPDNHU WKHUH is an installation instruction label on the back of the unit that indicates which installation method
WR XVH )ROORZ WKH LFHPDNHU LQVWDOODWLRQ PDQXDO that comes with your icemaker kit carefully to complete the icemaker installation.
1PREPARE FOR INSTALLATION
•Remove and discard the large white plug
IURP WKH UHDU IUHH]HU ZDOO
•Remove the outlet cover with a flat-blade screwdriver.
Remove plug 
16 |
49-60726-2 |
 Loading...