


GE GSE22, GSE25, GSF25, GSH22, GSH25 Owner’s Manual & Installation Instructions
...<![endif]>REFRIGERATORS
<![if ! IE]><![endif]>Side by Side
SAFETY INFORMATION . . . . . 3
USING THE REFRIGERATOR
Features . . . . . . . . . . . . . . . . . . . . . . . . . . 5
Shelves and Bins. . . . . . . . . . . . . . . . . . . 5
Crispers and Pans. . . . . . . . . . . . . . . . . . 6
Controls . . . . . . . . . . . . . . . . . . . . . . . . . . 7
Ice and Water Dispenser. . . . . . . . . . . . 8
Automatic Icemaker. . . . . . . . . . . . . . . . 9
MWF Water Filter. . . . . . . . . . . . . . . . . 10
XWF Water Filter . . . . . . . . . . . . . . . . . . 11
CARE AND CLEANING . . . . . . 12
The Outside. . . . . . . . . . . . . . . . . . . . . . 12 The Inside . . . . . . . . . . . . . . . . . . . . . . . 12 Behind the Refrigerator . . . . . . . . . . . 12 Preparing for Vacation . . . . . . . . . . . . 13 Preparing to Move . . . . . . . . . . . . . . . . 13 Replacing the Light Bulbs. . . . . . . . . . 13
OWNER’S MANUAL &
INSTALLATION
INSTRUCTIONS
Models GSE22, GSE25, GSF25, GSH22, GSH25, GSL22, GSS20, GSS25
ENGLISH/FRANÇAIS/
ESPAÑOL
INSTALLATION INSTRUCTIONS
Preparing to Install the
Refrigerator. . . . . . . . . . . . . . . . . . . . . 14
Installing the Water Line. . . . . . . . . . . 15
TROUBLESHOOTING TIPS
Normal Operating Conditions . . . . . . 18
Troubleshooting . . . . . . . . . . . . . . . . . . 19
LIMITED WARRANTY . . . . . . . 21
CONSUMER SUPPORT
Water Filter Warranty . . . . . . . . . . . . 22
Performance Data Sheets . . . . . . . . . . 23
Consumer Support . . . . . . . . . . . . . . . . 26
Write the model and serial numbers here:
Model #_________________
Serial # _________________
Find these numbers on a label inside the refrigerator
compartment at the top on the right side behind the controls..
GE is a trademark of the General Electric Company. Manufactured under trademark license.
Pub No. 49-60514-11 06-18 GEA

THANK YOU FOR MAKING GE APPLIANCES A PART OF YOUR HOME.
Whether you grew up with GE Appliances, or this is your first, we’re happy to have you in the family.
We take pride in the craftsmanship, innovation and design that goes into every GE Appliances product, and we think you will too. Among other things, registration of your appliance ensures that we can deliver important product information and warranty details when you need them.
Register your GE appliance now online. Helpful websites and phone numbers are available in the Consumer Support section of this Owner’s Manual. You may also mail in the pre-printed registration card included in the packing material.
2 |
|
49-60514-11 |

IMPORTANT SAFETY INFORMATION
READ ALL INSTRUCTIONS BEFORE USING THE APPLIANCE
|
|
To reduce the risk of fire, explosion, electric shock, or injury when using your refrigerator, follow |
||
|
WARNING |
|||
|
|
these basic safety precautions: |
|
|
|
|
|
||
Ŷ 7KLV UHIULJHUDWRU PXVW EH SURSHUO\ LQVWDOOHG |
Ŷ 7R DYRLG VHULRXV LQMXU\ RU GHDWK FKLOGUHQ VKRXOG QRW |
|||
|
DQG ORFDWHG LQ DFFRUGDQFH ZLWK WKH ,QVWDOODWLRQ |
stand on, or play in or with the appliance. |
||
|
,QVWUXFWLRQV EHIRUH LW LV XVHG |
Ŷ &KLOGUHQ DQG SHUVRQV ZLWK UHGXFHG SK\VLFDO VHQVRU\ |
||
Ŷ 8QSOXJ WKH UHIULJHUDWRU EHIRUH PDNLQJ UHSDLUV RU |
or mental capabilities or lack of experience and |
|||
|
cleaning. |
knowledge can use this appliance only if they are |
||
|
NOTE: Power to the refrigerator cannot be |
supervised or have been given instructions on safe |
||
|
disconnected by any setting on the control panel. |
XVH DQG XQGHUVWDQG WKH KD]DUGV LQYROYHG |
||
|
NOTE: Repairs must be performed by a qualified |
Ŷ 7KLV DSSOLDQFH LV LQWHQGHG WR EH XVHG LQ KRXVHKROG |
||
|
Service Professional. |
and similar applications such as: staff kitchen areas |
||
Ŷ 5HSODFH DOO SDUWV DQG SDQHOV EHIRUH RSHUDWLQJ |
LQ VKRSV RIILFHV DQG RWKHU ZRUNLQJ HQYLURQPHQWV |
|||
Ŷ 'R QRW XVH DQ H[WHQVLRQ FRUG |
IDUP KRXVHV E\ FOLHQWV LQ KRWHOV PRWHOV EHG |
|||
Ŷ 'R QRW VWRUH RU XVH JDVROLQH RU RWKHU IODPPDEOH |
EUHDNIDVW DQG RWKHU UHVLGHQWLDO HQYLURQPHQWV |
|||
catering and similar non-retail applications. |
||||
|
vapors and liquids in the vicinity of this or any other |
|||
|
Ŷ &RQQHFW WR SRWDEOH ZDWHU VXSSO\ RQO\ $ FROG ZDWHU |
|||
|
appliance. |
|||
Ŷ 'R QRW VWRUH H[SORVLYH VXEVWDQFHV VXFK DV DHURVRO |
supply is required for automatic icemaker operation. |
|||
The water pressure must be between 40 and 120 psi |
||||
|
cans with a flammable propellant in this appliance. |
|||
|
(275-827 kilopascals). |
|||
Ŷ 7R SUHYHQW VXIIRFDWLRQ DQG HQWUDSPHQW KD]DUGV |
||||
|
||||
|
WR FKLOGUHQ UHPRYH WKH IUHVK IRRG DQG IUHH]HU |
|
||
|
doors from any refrigerator before disposing of it or |
|
||
|
discontinuing its use. |
|
||
|
|
|
|
|

 CAUTION To reduce the risk of injury when using your refrigerator, follow these basic safety precautions.
Ŷ 'R QRW FOHDQ JODVV VKHOYHV RU FRYHUV ZLWK ZDUP water when they are cold. Glass shelves and covers may break if exposed to sudden temperature changes or impact, such as bumping or dropping. Tempered glass is designed to shatter into many small pieces if it breaks.
Ŷ .HHS ILQJHUV RXW RI WKH ³SLQFK SRLQW´ DUHDV clearances between the doors and between the doors and cabinet are necessarily small. Be careful closing doors when children are in the area.
Ŷ 'R QRW WRXFK WKH FROG VXUIDFHV LQ WKH IUHH]HU compartment when hands are damp or wet, skin may stick to these extremely cold surfaces.
Ŷ 'R QRW UHIUHH]H IUR]HQ IRRGV ZKLFK KDYH WKDZHG completely.
Ŷ ,Q UHIULJHUDWRUV ZLWK DXWRPDWLF LFHPDNHUV DYRLG contact with the moving parts of the ejector mechanism, or with the heating element that
UHOHDVHV WKH FXEHV 'R QRW SODFH ILQJHUV RU KDQGV on the automatic ice making mechanism while the refrigerator is plugged in.
Ŷ Use a sturdy glass when dispensing ice (on models with ice dispenser
STATE OF CALIFORNIA PROPOSITION 65 WARNINGS
WARNING This product contains one or more chemicals known to the State of California to cause cancer and birth defects or other reproductive harm.
INSTALLATION

 WARNING
 EXPLOSION HAZARD
.HHS IODPPDEOH PDWHULDOV DQG YDSRUV VXFK DV JDVROLQH DZD\ IURP UHIULJHUDWRU )DLOXUH WR GR VR FDQ UHVXOW LQ ILUH explosion, or death.
READ AND SAVE THESE INSTRUCTIONS
<![endif]>INFORMATION SAFETY
49-60514-11 |
3 |

<![endif]>SAFETY INFORMATION
IMPORTANT SAFETY INFORMATION
READ ALL INSTRUCTIONS BEFORE USING THE APPLIANCE
CONNECTING ELECTRICITY

 WARNING
 ELECTRICAL SHOCK HAZARD
Plug into a grounded 3-prong outlet
'R QRW UHPRYH WKH JURXQG SURQJ 'R QRW XVH DQ DGDSWHU 'R QRW XVH DQ H[WHQVLRQ FRUG
)DLOXUH WR IROORZ WKHVH LQVWUXFWLRQV FDQ UHVXOW LQ GHDWK ILUH RU HOHFWULFDO VKRFN
Do not, under any circumstances, cut or remove the third (ground) prong from the power cord. For personal safety, this appliance must be properly grounded.
The power cord of this appliance is equipped with a 3-prong (grounding) plug which mates with a standard
SURQJ JURXQGLQJ ZDOO RXWOHW WR PLQLPL]H WKH SRVVLELOLW\ RI HOHFWULF VKRFN KD]DUG IURP WKLV DSSOLDQFH
Have the wall outlet and circuit checked by a qualified electrician to make sure the outlet is properly grounded.
Where a standard 2-prong wall outlet is encountered, it is your personal responsibility and obligation to have it replaced with a properly grounded 3-prong wall outlet.
'R QRW XVH DQ DGDSWHU
The refrigerator should always be plugged into its own individual electrical outlet which has a voltage rating that matches the rating plate.
$ 9ROW $& +] RU DPS IXVHG JURXQGHG electrical supply is required. This provides the best performance and also prevents overloading house
ZLULQJ FLUFXLWV ZKLFK FRXOG FDXVH D ILUH KD]DUG IURP overheated wires.
Never unplug your refrigerator by pulling on the power cord. Always grip plug firmly and pull straight out from the outlet.
,PPHGLDWHO\ GLVFRQWLQXH XVH RI D GDPDJHG VXSSO\
FRUG ,I WKH VXSSO\ FRUG LV GDPDJHG LW PXVW EH replaced by a qualified service professional with an
DXWKRUL]HG VHUYLFH SDUW IURP WKH PDQXIDFWXUHU
When moving the refrigerator away from the wall, be careful not to roll over or damage the power cord.
PROPER DISPOSAL OF YOUR OLD REFRIGERATOR

 WARNING SUFFOCATION AND ENTRAPMENT HAZARD
)DLOXUH WR IROORZ WKHVH GLVSRVDO LQVWUXFWLRQV FDQ UHVXOW LQ GHDWK RU VHULRXV LQMXU\
IMPORTANT: Child entrapment and suffocation |
Before You Throw Away Your Old Appliance |
|
are not problems of the past. Junked or abandoned |
Ŷ 7DNH RII WKH IUHVK IRRG DQG IUHH]HU GRRUV |
|
refrigerators are still dangerous even if they will sit |
Ŷ Leave the shelves in place so that children may not |
|
IRU ³MXVW D IHZ GD\V ´ ,I \RX DUH JHWWLQJ ULG RI \RXU ROG |
||
easily climb inside. |
||
refrigerator, please follow the instructions below to help |
||
|
||
prevent accidents. |
|
Refrigerant and Foam Disposal:
'LVSRVH RI DSSOLDQFH LQ DFFRUGDQFH ZLWK )HGHUDO DQG /RFDO 5HJXODWLRQV )ODPPDEOH LQVXODWLRQ PDWHULDO XVHG requires special disposal of your appliance. Contact your local authorities for the environmentally safe disposal of your appliance.
4 |
49-60514-11 |

Features (Not all features are on all models.)
c TOP FREEZER SHELF |
d FILTER CARTRIDGE |
|
|
Make sure the shelf front locks into |
Remove Bypass Plug |
,QVWDOO )LOWHU &DUWULGJH |
|
position. |
|||
|
|
||
7RS )UHH]HU 6KHOI |
|
|
iFREEZER DOOR SHELF FRONTS
Make sure that the shelf front locks into position.
NOTE: On dispenser models, the longer shelf fronts go in the top two positions.
'RRU 6KHOI |
)URQW |
'RRU |
Shelf |
h LOWER FIXED DOOR BINS |
e DAIRY COVER |
f BOTTLE RETAINER
gADJUSTABLE DOOR BINS DOOR BIN SNUGGERS
Make sure the bin fronts lock into position.
To remove: Lift the shelf extender straight up, then pull
out.
To replace: Engage the shelf extender in the molded supports
RI WKH GRRU DQG SXVK LQ ,W ZLOO lock in place.
/RZHU 'RRU %LQ
To remove: Lift the front of the bin up, then pull out.
To replace or relocate: Engage the bin in the molded supports of the door, and push in. Bin will lock in place.
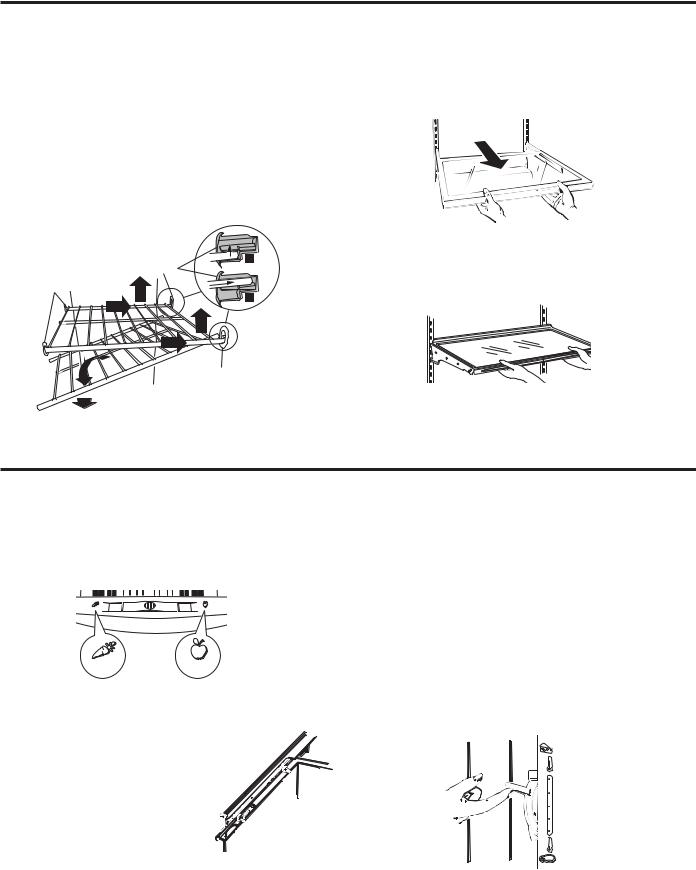
Shelves and Bins (Not all features are on all models.)
Rearranging the Shelves
Refrigerator Shelves: |
|
)UHH]HU 3DQ |
)UHH]HU 6KHOYHV (on some models) |
To Remove |
To Replace |
To Remove |
To Remove |
Lift up and out |
Tilt up |
|
|
|
,QVHUW |
|
top |
|
hook |
|
Lower to |
|
lock in |
|
place |
49-60514-11 |
|
Remove the pan by pulling it forward, lifting up the front and sliding it past the stop location.
<![endif]>%LQVDQG6KHOYHV)HDWXUHV REFRIGERATOR: THE USING
5
<![endif]>USING THE REFRIGERATOR: 6KHOYHVDQG%LQV&ULVSHUVDQG3DQV
Shelves and Bins (Not all features are on all models.)
Freezer Shelves (on some models) |
Slide-Out Spillproof Shelf (on some models) |
1.Lift the right side of the shelf, front and back, until you hear a snap.
2.Push the shelf to the right into the top portion of the bracket. The left ends of the shelf will come free from the left brackets.
3.Tilt the left side down to release the right ends from the right brackets.
4.Pull forward to remove the shelf from the refrigerator.
)ROORZ WKH VWHSV IURP WR WR LQVWDOO WKH VKHOI LQ WKH new location.
1
Bracket
Bracket |
1 |
2 |
|
||
|
2 |
|
|
|
|
|
|
1 |
|
|
2 |
3 |
Bracket |
4
The slide-out spillproof shelf allows you to reach items stored behind others. The special edges are designed to help prevent spills from dripping to lower shelves.
NOTE: Make sure you push the shelves all the way back in before you close the door.
Spillproof Shelves (on some models)
Spillproof shelves have special edges to help prevent spills from dripping to lower shelves.
Crispers and Pans (Not all features are on all models.)
Adjustable Humidity Crispers and Snack
Pan (on some models)
Slide the control all the way to the High setting to provide high humidity recommended for most vegetables. Slide the control all the way to the Low setting to provide lower humidity levels recommended for most fruits.
HIGH |
LOW |
HIGH LOW
Crisper Removal
Crispers can easily be removed by tilting up slightly and pulling past stop location.
,I WKH GRRU SUHYHQWV \RX IURP taking out the crispers, the refrigerator will need to be rolled forward until the door opens enough to slide the crispers
RXW ,Q VRPH FDVHV ZKHQ \RX roll the refrigerator out, you will need to move the refrigerator to the left as you roll it out.
When replacing the crispers, make sure you slide them through the crisper guides.
Convertible Meat Pan (on some models)
The convertible meat pan has its own cold air duct to
DOORZ D VWUHDP RI FROG DLU IURP WKH IUHH]HU FRPSDUWPHQW to flow around the pan.
The variable temperature control regulates the air flow
IURP WKH IUHH]HU FRPSDUWPHQW
Set control lever up to convert the pan to normal refrigerator temperature and provide extra vegetable storage space. Cold air duct is turned off. Variable settings between these extremes can be selected.
Set control lever down to the coldest setting to store
IUHVK PHDWV ,I OHYHU LV OHIW LQ PHDW SRVLWLRQ IRU D ORQJ period of time, some frost may form on the inside of the pan.
Normal
Coldest
6 |
49-60514-11 |
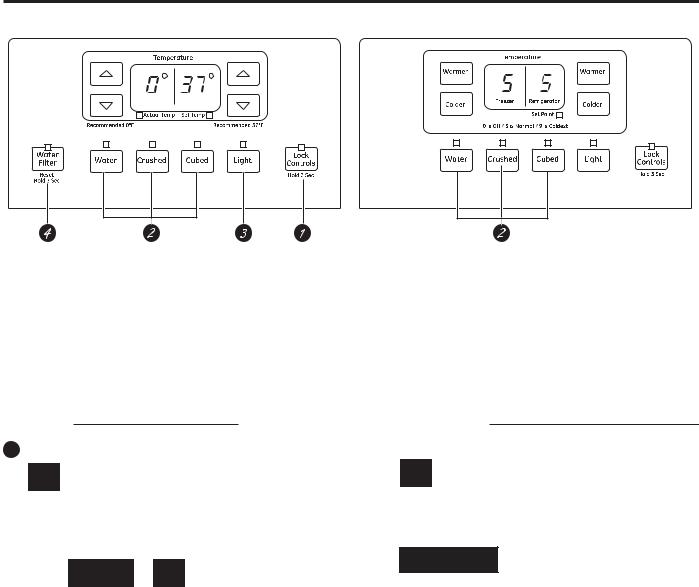
Controls
Not all features are on all models. Your controls may be similar to the following:
Freezer Refrigerator
The temperature controls are preset in the factory
DW ) & IRU WKH UHIULJHUDWRU FRPSDUWPHQW DQG) & IRU WKH IUHH]HU FRPSDUWPHQW $OORZ
KRXUV IRU WKH WHPSHUDWXUH WR VWDELOL]H WR WKH SUHVHW recommended settings.
The temperature controls can display both the SET temperature as well as the actual temperature in the
UHIULJHUDWRU DQG IUHH]HU 7KH DFWXDO WHPSHUDWXUH PD\ vary slightly from the SET temperature based on usage and operating environment.
 Locking the Dispenser
 Press the Lock Controls pad for 3 seconds

 to lock the dispenser and control panel. To unlock, press and hold the key pads again for 3 seconds.
 Using the Dispenser (on some models)
Select 
 or
or 
Press the glass gently against the top of the dispenser cradle.
7KH WHPSHUDWXUH FRQWUROV DUH SUHVHW LQ WKH IDFWRU\ DW ³ ´
IRU WKH UHIULJHUDWRU FRPSDUWPHQW DQG ³ ´ IRU WKH IUHH]HU compartment. Allow 24 hours for the temperature to
VWDELOL]H WR WKH SUHVHW UHFRPPHQGHG VHWWLQJV NOTE: 'LVSOD\ VHWWLQJV DUH ³ ´ ZDUPHVW ³ ´ FROGHVW DQG ³ ´ RII
 Dispenser Light
This pad turns the light in the dispenser on and off. The light also comes on when the
GLVSHQVHU FUDGOH LV SUHVVHG ,I WKLV OLJKW burns out, it should be replaced with a 6
ZDWW PD[LPXP YROW '& EXOE

 WARNING Before replacing a burned-out light bulb, the refrigerator should be unplugged in order to avoid contact with a live wire filament. (A burned-out light bulb may break when being
UHSODFHG 7XUQLQJ WKH FRQWURO WR WKH 2)) SRVLWLRQ does not remove power to the light circuit.
 Water Filter Replacement Indicator
The light on this button will illuminate when the water filter needs to be changed. After the filter has been changed, press and hold for 3 seconds
WR WXUQ WKH OLJKW RII )RU PRUH GHWDLOV VHH ³:DWHU )LOWHU &DWULGJH´ VHFWLRQ
<![endif]>Controls REFRIGERATOR: THE USING
49-60514-11 |
7 |

<![endif]>USING THE REFRIGERATOR: ,FHDQG:DWHU'LVSHQVHU
Ice and Water Dispenser (On some models.)
To Use the Dispenser |
|
CAUTION |
Laceration Hazard |
|
The spill shelf is not self-draining. To reduce water |
||||
Ŷ 1HYHU SXW ILQJHUV RU DQ\ RWKHU REMHFW LQWR LFH FUXVKHU |
||||
spotting, the shelf and its grille should be cleaned |
||||
GLVFKDUJH RSHQLQJ 'RLQJ VR FDQ UHVXOW LQ FRQWDFWLQJ |
||||
regularly. |
|
|||
|
the ice crushing blades and lead to serious injury or |
|||
,I QR ZDWHU LV GLVSHQVHG |
|
|||
|
amputation |
|
||
when the refrigerator is first |
|
|
||
|
Ŷ 8VH D VWXUG\ JODVV ZKHQ GLVSHQVLQJ LFH $ GHOLFDWH |
|||
installed, there may be air in |
|
|||
|
glass may break and result in personal injury. |
|||
the water line system. Press |
|
|||
|
|
|
||
the dispenser arm for at least |
ShelfSpill |
|
|
|
two minutes to remove trapped |
|
|
||
air from the water line and to |
|
|
|
|
fill the water system. To flush |
|
|
|
|
out impurities in the water line, |
|
|
|
|
throw away the first six glassfuls of water.
Ice Storage Drawer on Dispenser Models
 CAUTION The ice bin is heavy when full.
To remove:
6OLGH WKH LFHPDNHU SRZHU VZLWFK WR WKH 2)) SRVLWLRQ
Pull the drawer straight out and then lift past the stop position.
To replace:
When replacing the drawer, make sure to push it firmly
LQWR SODFH ,I LW GRHV QRW JR DOO WKH ZD\ EDFN UHPRYH LW
DQG URWDWH WKH GULYH PHFKDQLVP WXUQ 7KHQ SXVK WKH drawer back again.
Rotate
'ULYH
Mechanism
Important Facts About Your Dispenser
Ŷ 'R QRW DGG LFH IURP WUD\V RU EDJV WR WKH VWRUDJH ELQ ,W may not crush or dispense well.
Ŷ $YRLG RYHUILOOLQJ JODVV ZLWK LFH DQG XVH RI QDUURZ glasses. Backed-up ice can jam the chute or cause
WKH GRRU LQ WKH FKXWH WR IUHH]H VKXW ,I LFH LV EORFNLQJ the chute, poke it through with a wooden spoon.
Ŷ %HYHUDJHV DQG IRRGV VKRXOG QRW EH TXLFN FKLOOHG LQ the ice storage bin. Cans, bottles or food packages in the storage bin may cause the icemaker or auger to jam.
Ŷ 7R NHHS GLVSHQVHG LFH IURP PLVVLQJ WKH JODVV SXW the glass close to, but not touching, the dispenser opening.
Ŷ 6RPH FUXVKHG LFH PD\ EH GLVSHQVHG HYHQ WKRXJK \RX selected Cubed. This happens occasionally when a few cubes have been left in the crusher.
Ŷ $IWHU FUXVKHG LFH LV GLVSHQVHG VRPH ZDWHU PD\ GULS from the chute.
Ŷ 6RPHWLPHV D VPDOO PRXQG RI VQRZ ZLOO IRUP RQ WKH door in the ice chute. This condition is normal and usually occurs when you have dispensed crushed ice repeatedly. The snow will eventually evaporate.
Ŷ 7KH ILUVW JODVV RI ZDWHU GLVSHQVHG PD\ EH ZDUPHU than the following ones. This is normal.
Ŷ 'LVSHQVHG ZDWHU LV QRW LFH FROG )RU FROGHU ZDWHU simply add crushed ice or cubes before dispensing water.
8 |
49-60514-11 |
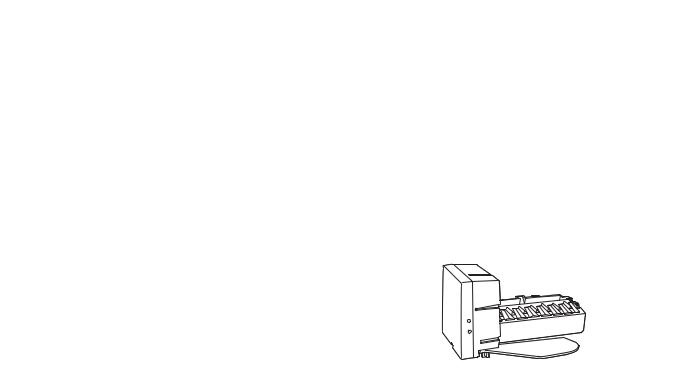
Automatic Icemaker
A newly-installed refrigerator may take 12–24 hours to begin making ice.
When the refrigerator has been connected to the water supply, slide the power switch to the ON position.
7KH LFHPDNHU ZLOO ILOO ZLWK ZDWHU ZKHQ LW FRROV WR )
(-10°C). When the bin fills to the level of the feeler arm, the icemaker will stop producing ice.
Be sure nothing interferes with the sweep of the feeler arm.
Throw away the first few batches of ice to allow the water line to clear.
The icemaker will produce seven cubes per cycle - approximately 100-130 cubes in a 24-hour period,
GHSHQGLQJ RQ IUHH]HU FRPSDUWPHQW WHPSHUDWXUH URRP temperature, number of door openings and other use conditions.
<RX ZLOO KHDU D EX]]LQJ VRXQG HDFK WLPH WKH LFHPDNHU fills with water.
,W LV QRUPDO IRU VHYHUDO FXEHV WR EH MRLQHG WRJHWKHU
,I LFH LV QRW XVHG IUHTXHQWO\ ROG LFH FXEHV ZLOO EHFRPH cloudy, taste stale, and shrink.

 CAUTION Avoid contact with the moving parts of the ejector mechanism, or with the heating element
(located on the bottom of the ice maker) that releases the
FXEHV 'R QRW SODFH ILQJHUV RU KDQGV RQ WKH DXWRPDWLF LFH making mechanism while the refrigerator is plugged in.
Icemaker Accessory Kit
,I \RXU UHIULJHUDWRU GLG QRW FRPH DOUHDG\ HTXLSSHG ZLWK an automatic icemaker, an icemaker accessory kit is available at extra cost. Check the back of the refrigerator for the specific icemaker kit needed for your model.
,FHPDNHU
Power |
)HHOHU $UP |
Switch |
|
<![endif]>,FHPDNHU$XWRPDWLF REFRIGERATOR: THE USING
49-60514-11 |
|
<![endif]>USING THE REFRIGERATOR: 0:) :DWHU)LOWHU
MWF Water Filter (On some models.)
Water filter cartridge |
Installing the filter cartridge |
The water filter cartridge is located in the back upper right corner of the refrigerator compartment.
When to replace the filter on models with a replacement indicator light
There is a replacement indicator light for the water filter cartridge on the dispenser. This light will turn orange to tell you that you need to replace the filter soon.
The filter cartridge should be replaced when the replacement indicator light turns red or if the flow of water to the dispenser
or icemaker decreases.
When to replace the filter on models without a replacement indicator light
The filter cartridge should be replaced every six months or earlier if the flow of water to the dispenser or icemaker decreases.
Removing the filter cartridge
,I \RX DUH UHSODFLQJ WKH FDUWULGJH ILUVW UHPRYH WKH ROG RQH by slowly turning it to the left. Do not pull down on the cartridge. A small amount of water may drip down.

 CAUTION To reduce the risk associated with property damage due to water leakage, read and follow instructions before installation and use of this system.
,QVWDOODWLRQ DQG XVH 0867 FRPSO\ ZLWK DOO VWDWH DQG ORFDO plumbing codes.
1. )LOO WKH UHSODFHPHQW FDUWULGJH ZLWK ZDWHU IURP WKH WDS to allow for better flow from the dispenser immediately after installation.
2. Line up the arrow on the cartridge
and the cartridge holder. Place the Cartridge 
 top of the new cartridge up inside Holder
the holder. Do not push it up into the holder.
3.Slowly turn it to the right until the filter cartridge stops.
'2 127 29(57,*+7(1 $V \RX WXUQ WKH FDUWULGJH LW will automatically raise itself into position. The cartridge will move about a ½ turn.
4. 5XQ ZDWHU IURP WKH GLVSHQVHU IRU JDOORQV liters) about three minutes) to clear the system and prevent sputtering.
5. 3UHVV DQG KROG WKH 5(6(7 :$7(5 ),/7(5 SDG RQ some models) on the dispenser for three seconds.
NOTE: A newly installed water filter cartridge may cause water to spurt from the dispenser.
Filter bypass plug
You must use the filter bypass plug when a replacement filter cartridge is not available. The dispenser and the icemaker will not operate without the filter or filter bypass plug.
)LOWHU %\SDVV |
|
ter |
|
Plug |
)LOWHU %\SDVV |
||
|
Plug |
ss |
|
SmartWater |
ug |
||
|
|||
|
Water by Culligan |
||
To use the filter bypass plug on Water by Culligan™ models, you must first remove the filter adaptor from the cartridge holder by turning it to the left.

 WARNING To reduce the risk associated with choking, do not allow children under 3 years of age to have access to small parts during the installation of this product. The disposable filter cartridge should be replaced every 6 months at the rated capacity, or sooner if a noticeable reduction in flow rate occurs.
)RU WKH PD[LPXP EHQHILW RI \RXU ILOWUDWLRQ V\VWHP *( $SSOLDQFHV UHFRPPHQGV WKH XVH RI *( $SSOLDQFHV EUDQGHG filters only. Using GE Appliances-branded filters in GE Appliances and Hotpoint® refrigerators provides optimal performance and reliability. GE Appliances filters meet rigorous industry standards for safety and quality that are important for products that are filtering your water. GE Appliances has not qualified non-GE Appliances-branded filters for use in GE Appliances and Hotpoint refrigerators and there is no assurance that non-GE Appliancesbranded filters meet GE Appliances standards for quality, performance and reliability.
If you have questions, or to order additional filter cartridges, visit our website at gewaterfilters.com or call GE Appliances Parts and Accessories, 877.959.8688. ,Q &DQDGD FDOO
10 |
49-60514-11 |
Water Filter Cartridge - XWF (On some models.)
Water Filter Cartridge
The water filter cartridge holder is located in the back upper-right corner of the fresh food refrigerator compartment.
When to Replace the Filter
,I WKHUH LV D UHSODFHPHQW LQGLFDWRU OLJKW IRU WKH ZDWHU ILOWHU cartridge on the dispenser, the red filter light will start blinking to tell you that you need to replace the filter soon.
)RU H[WHUQDO FRQWURO PRGHOV WKH ILOWHU OLJKW ZLOO EOLQN while you are dispensing until the filter is replaced.
)RU WRS FRQWURO PRGHOV WKH ILOWHU OLJKW ZLOO EOLQN ZKLOH the door is open until the filter is replaced.
)RU PRGHOV WKDW GRQ¶W KDYH WKH LQGLFDWRU OLJKW WKH ILOWHU cartridge should be replaced every six months, or earlier if the flow of water to the dispenser or icemaker decreases.
Removing the Filter
,I \RX DUH UHSODFLQJ WKH ILOWHU ILUVW UHPRYH WKH SUHYLRXV one:
2SHQ WKH ILOWHU FDUWULGJH KRXVLQJ E\ VTXHH]LQJ WKH front tabs and gently pulling down.
2.Rotate the filter down.
3.Gently grasp the filter and slowly turn it counterclockwise about a ¼ turn. The filter should automatically release itself when you have rotated it far enough to the left. A small amount of water may drip down.

 CAUTION ,I DLU KDV EHHQ WUDSSHG LQ WKH V\VWHP the filter cartridge may be ejected as it is removed. Use caution when removing.
Filter Bypass Plug
To reduce the risk of property damage due to water leakage, you MUST use the filter bypass plug when a replacement filter cartridge is not available. Some models do not come equipped with the filter bypass plug. To
REWDLQ D IUHH E\SDVV SOXJ FDOO *(&$5(6 ,Q
Canada, call 800.561.3344. The dispenser and icemaker will not operate without either the filter or bypass plug installed. The bypass plug is installed in the same way as a filter cartridge.
Installing the Filter Cartridge in a Side by Side Refrigerator
1.Line up the arrow on the filter with the arrow on the filter cartridge holder. Gently push the top of the new filter up inside the holder.
2.Slowly turn the filter to the right until it
VWRSV '2 127 29(57,*+7(1 $V \RX turn the filter, it will automatically raise itself into position. The filter will move
DERXW D ó WXUQ RU GHJUHHV
3.Run water from the dispenser for 2 gallons (7.6 liters) or approximately 5 minutes to clear the system. Water may spurt out and air bubbles may be visible during this process.
3UHVV DQG KROG WKH :$7(5 ),/7(5 SDG RQO\ RQ select models) on the dispenser for three seconds.
Application Guidelines/Water Supply
6HUYLFH )ORZ |
JSP OSP |
Water Supply |
Potable Water |
Water Pressure |
25-120 psi (172-827 kPa) |
Water Temperature |
) ) & & |
Capacity |
170 gallons (643.5 liters) |
Sign-up for TEXT REMINDERS by texting REPLACE to 70543.

 WARNING To reduce the risk associated with choking, do not allow children under 3 years of age to have access to small parts during the installation of this product. The disposable filter cartridge should be replaced every 6 months at the rated capacity, or sooner if a noticeable reduction in flow rate occurs.
)RU WKH PD[LPXP EHQHILW RI \RXU ILOWUDWLRQ V\VWHP *( $SSOLDQFHV UHFRPPHQGV WKH XVH RI *( $SSOLDQFHV EUDQGHG filters only. Using GE Appliances-branded filters in GE Appliances and Hotpoint® refrigerators provides optimal performance and reliability. GE Appliances filters meet rigorous industry standards for safety and quality that are important for products that are filtering your water. GE Appliances has not qualified non-GE Appliances-branded filters for use in GE Appliances and Hotpoint refrigerators and there is no assurance that non-GE Appliancesbranded filters meet GE Appliances standards for quality, performance and reliability.
If you have questions, or to order additional filter cartridges, visit our website at gewaterfilters.com or call GE Appliances Parts and Accessories, 877.959.8688. (Canada 1.800.661.1616 or GEAppliances.ca/en/products/ parts-filters-accessories)
<![endif]>;:)&DUWULGJH)LOWHU:DWHUREFRIGERATOR: THE USING
49-60514-11 |
11 |
<![endif]>CARE AND CLEANING
Care and Cleaning
Cleaning the Outside
The dispenser drip area, (on
some models) beneath the grille, should be wiped dry. Water left in this area may leave deposits. Remove the
deposits by adding undiluted vinegar to the well. Soak until the deposits disappear or become loose enough to rinse away.
The dispenser cradle (on some models). Before cleaning, lock the dispenser by pressing and holding the Lock pad for 3 seconds. Clean with warm water and baking soda solution—about a tablespoon (15 ml) of baking soda to a quart (1 l) of water. Rinse thoroughly and wipe dry.
The door handles and trim. Clean with a cloth dampened
ZLWK VRDS\ ZDWHU 'U\ ZLWK D VRIW FORWK
.HHS WKH RXWVLGH FOHDQ :LSH ZLWK D FOHDQ FORWK OLJKWO\ dampened with kitchen appliance wax or mild liquid dish
GHWHUJHQW 'U\ DQG SROLVK ZLWK D FOHDQ VRIW FORWK
The stainless steel doors and door handles (on some models) can be cleaned with a commercially available stainless steel cleaner. Cleaners with oxalic acid such as
%DU .HHSHUV )ULHQG 6RIW &OHDQVHU ZLOO UHPRYH VXUIDFH rust, tarnish and small blemishes. Use only a liquid cleanser free of grit and rub in the direction of the brush
OLQHV ZLWK D GDPS VRIW VSRQJH 'R QRW XVH DSSOLDQFH ZD[ or polish on the stainless steel.
'R QRW ZLSH WKH UHIULJHUDWRU ZLWK D VRLOHG GLVK FORWK RU wet towel. These may leave a residue that can erode
WKH SDLQW 'R QRW XVH VFRXULQJ SDGV SRZGHUHG FOHDQHUV bleach or cleaners containing bleach because these products can scratch and weaken the paint finish.
Cleaning the Inside
To help prevent odors, leave an open box of baking soda
LQ WKH UHIULJHUDWRU DQG IUHH]HU FRPSDUWPHQWV
8QSOXJ WKH UHIULJHUDWRU EHIRUH FOHDQLQJ ,I WKLV LV QRW practical, wring excess moisture out of sponge or cloth when cleaning around switches, lights or controls.
Use warm water and baking soda solution—about a tablespoon (15 ml) of baking soda to a quart (1 l) of
ZDWHU 7KLV ERWK FOHDQV DQG QHXWUDOL]HV RGRUV 5LQVH DQG wipe dry.
After cleaning the door gaskets, apply a thin layer of petroleum jelly to the door gaskets at the hinge side. This helps keep the gaskets from sticking and bending out of shape.
'UDLQ RSHQLQJ LQ IUHH]HU FRPSDUWPHQW 'XULQJ \HDUO\
FOHDQLQJ UHPRYH ERWWRP IUHH]HU
pan and flush a solution of baking soda—1 teaspoon (5 ml) and 2 cups (500 ml) of hot (not boiling)
water— through the drain line with
the help of a meat baster. This will help eliminate odor
DQG UHGXFH WKH OLNHOLKRRG RI D FORJJHG GUDLQ OLQH ,I GUDLQ becomes clogged, use a meat baster and baking soda solution to force the clog through the drain line.
 CAUTION 'R QRW FOHDQ JODVV VKHOYHV RU FRYHUV with warm water when they are cold. Glass shelves and covers may break if exposed to sudden temperature changes or impact such as bumping or dropping. Tempered glass is designed to shatter into many small pieces if it breaks.
'R QRW ZDVK DQ\ SODVWLF UHIULJHUDWRU SDUWV LQ WKH dishwasher.
Behind the Refrigerator
Be careful when moving the refrigerator away from the wall. All types of floor coverings can be damaged, particularly cushioned coverings and those with embossed surfaces.
Pull the refrigerator straight out and return it to position by pushing it straight in. Moving the refrigerator in a side direction may result in damage to the floor covering or refrigerator.
When pushing the refrigerator back, make sure you don’t roll over the power cord or icemaker supply line (on some models).
12 |
49-60514-11 |

Care and Cleaning
Preparing for Vacation
)RU ORQJ YDFDWLRQV RU DEVHQFHV UHPRYH IRRG DQG unplug the refrigerator. Clean the interior with a baking soda solution of one tablespoon (15 ml) of baking soda to one quart (1 l) of water. Leave the doors open.
6OLGH WKH LFHPDNHU SRZHU VZLWFK WR WKH 2)) SRVLWLRQ DQG shut off the water supply to the refrigerator.
Preparing to Move
Secure all loose items such as grille, shelves and drawers by taping them securely in place to prevent damage.
Be sure the refrigerator stays in an upright position during moving.
Replacing the Light Bulbs
 WARNING Before replacing a burned-out light bulb, the refrigerator should be unplugged in order to avoid contact with a live wire filament. (A burned-out light bulb may break when being replaced.)
7XUQLQJ WKH FRQWURO WR WKH 2)) SRVLWLRQ GRHV QRW UHPRYH power to the light circuit.
1.Unplug the refrigerator.
2.Remove the shelf just below the light shield.
3.Replace with an appliance bulb of the same or lower wattage.
4.Reinstall the shelf and plug the refrigerator back in.
<![endif]>CLEANING AND CARE
49-60514-11 |
13 |
<![endif]>INSTALLATION INSTRUCTIONS
Installation Instructions |
Refrigerator |
Models 20, 22, 25 |
Questions? Call 800.GE.CARES (800.432.2737) or visit our Website at: GEAppliances.com In Canada, call 1.800.561.3344 or visit our Website at: GEAppliances.ca
BEFORE YOU BEGIN
Read these instructions completely and carefully.
• IMPORTANT — Save these instructions
for local inspector’s use
• IMPORTANT — Observe all governing codes and ordinances.
•Note to Installer – Be sure to leave these instructions with the Consumer.
•Note to Consumer – .HHS WKHVH LQVWUXFWLRQV IRU future reference.
•Skill level – ,QVWDOODWLRQ RI WKLV DSSOLDQFH UHTXLUHV basic mechanical skills.
•Completion time – 5HIULJHUDWRU ,QVWDOODWLRQ
15minutes
•Proper installation is the responsibility of the installer.
•Product failure due to improper installation is not covered under the Warranty.
 CAUTION Lifting Hazard.
Single person lift can cause injury. Use assistance when handling, moving or lifting the refrigerator doors. NOTE: When moving door, to prevent damage to door and electronics carefully place the door in a proper location.
 WARNING To reduce the risk of electric shock or injury during installation, you must first unplug the
UHIULJHUDWRU EHIRUH SURFHHGLQJ )DLOXUH WR IROORZ WKHVH instructions can result in electrical shock.
REFRIGERATOR LOCATION
'R QRW LQVWDOO WKH UHIULJHUDWRU ZKHUH WKH WHPSHUDWXUH
ZLOO JR EHORZ ) & EHFDXVH LW ZLOO QRW UXQ often enough to maintain proper temperatures.
'R QRW LQVWDOO WKH UHIULJHUDWRU ZKHUH WKH WHPSHUDWXUH
ZLOO JR DERYH ) & EHFDXVH LW ZLOO QRW perform properly.
'R QRW LQVWDOO WKH UHIULJHUDWRU LQ D ORFDWLRQ H[SRVHG WR water (rain, etc.) or direct sunlight.
,QVWDOO LW RQ D IORRU VWURQJ HQRXJK WR VXSSRUW LW IXOO\ loaded.
CLEARANCES
Allow the following clearances for ease of installation, proper air circulation and plumbing and electrical connections.
6LGHV Ý PP 7RS Ý PP%DFN Ý PP
$ GRRU FOHDUDQFH RI Ý PP LV QHHGHG IRU D door opening which provides better access to food storage area.
WATER SUPPLY TO THE ICEMAKER
(on some models)
,I WKH UHIULJHUDWRU KDV DQ LFHPDNHU LW ZLOO KDYH WR EH connected to a cold water line. A GE Appliances water supply kit is available at extra cost from your dealer, by visiting our Website at GEAppliances.com (in Canada, at geappliances.ca), or from Parts and
$FFHVVRULHV
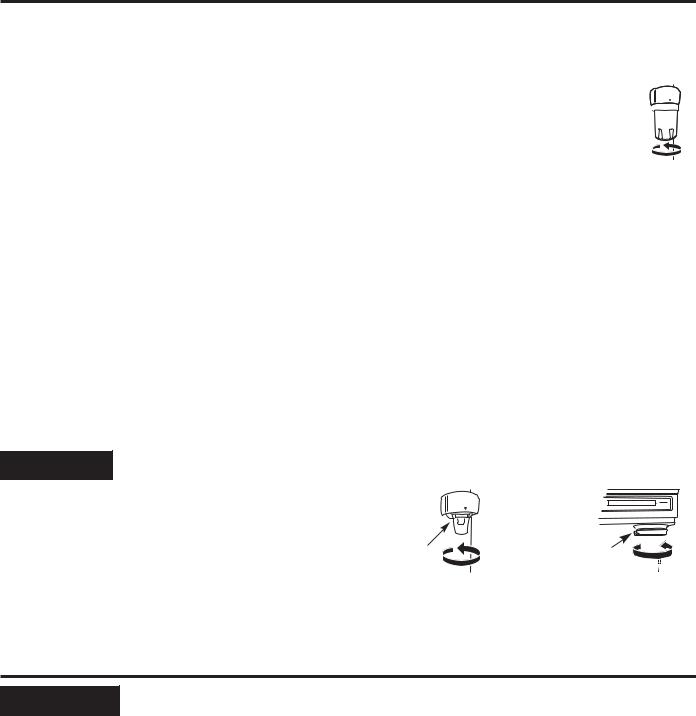
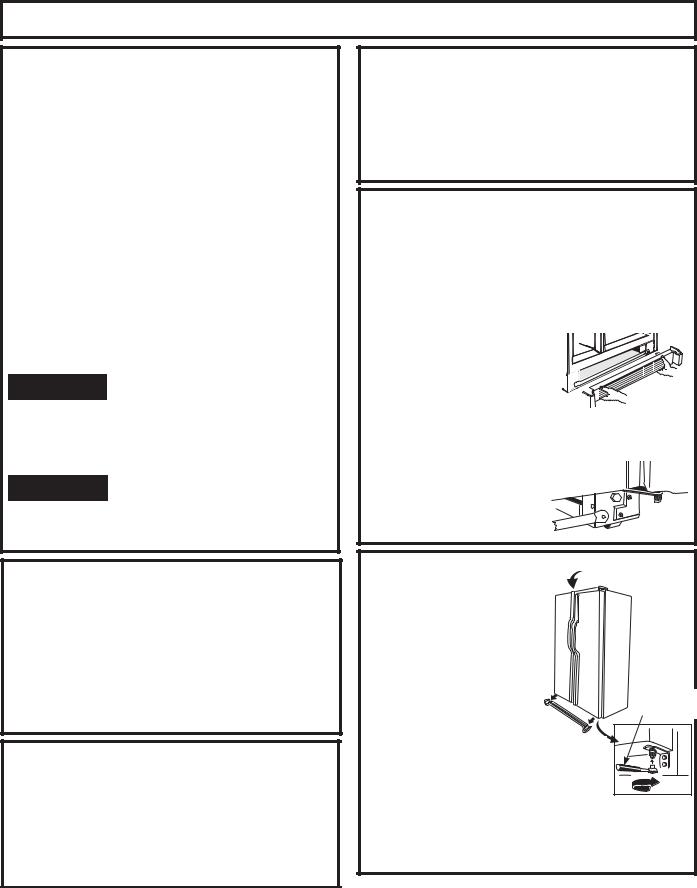
ROLLERS
The rollers have 3 purposes:
Rollers adjust so the door closes easily when opened about halfway.
Rollers adjust so the refrigerator is firmly positioned on the floor and does not wobble.
Rollers allow you to move the refrigerator away from the wall for cleaning.
To adjust the rollers, remove
the base grille by pulling it out at the bottom.
Turn the roller adjusting 


 screws clockwise to


 raise the refrigerator,
  counterclockwise to lower it. Use an adjustable
ZUHQFK ļ hex head bolt) or pliers.
To replace base grille, line up the clips on back of grille between the bar and the bottom of the cabinet. Push forward until grille snaps into place
DOOR ALIGNMENT
After leveling, make sure that doors are even at the top.
To make the doors even, adjust the refrigerator door.
8VLQJ D Ý VRFNHW |
|
|
wrench, turn the door |
|
|
adjusting screw to the |
|
|
right to raise the door, |
|
Ý 6RFNHW |
to the left to lower it. (A |
|
Wrench |
nylon plug, embedded in |
|
|
the threads of the pin, |
To remove |
|
prevents the pin from |
the base |
|
turning unless a wrench |
grille, open |
|
is used.) |
the doors and |
|
then pull the |
|
|
2. After one or two turns of |
grille straight |
Raise |
the wrench, open and |
out. |
|
close the refrigerator |
|
|
compartment door and check the alignment at the |
||
top of the doors. |
|
|
14 |
49-60514-11 |
Installation Instructions
INSTALLING THE WATER LINE
BEFORE YOU BEGIN
5HFRPPHQGHG FRSSHU ZDWHU VXSSO\ NLWV DUH :; ;
:; ; RU :; ; GHSHQGLQJ RQ WKH DPRXQW RI tubing you need. Approved plastic water supply lines are SmartConnect™ Refrigerator Tubing
:; ; :; ; :; ; DQG :; ;
When connecting your refrigerator to a GE Appliances Reverse Osmosis Water System, the only
DSSURYHG LQVWDOODWLRQ LV ZLWK D *( $SSOLDQFHV 59.LW
)RU RWKHU UHYHUVH RVPRVLV ZDWHU V\VWHPV IROORZ WKH manufacturer’s recommendations.
,I WKH ZDWHU VXSSO\ WR WKH UHIULJHUDWRU LV IURP D 5HYHUVH 2VPRVLV :DWHU )LOWUDWLRQ 6\VWHP
$1' WKH UHIULJHUDWRU DOVR KDV D ZDWHU ILOWHU XVH the refrigerator’s filter bypass plug. Using the refrigerator’s water filtration cartridge in conjunction with the RO filter can result in hollow ice cubes and slower water flow from the water dispenser.
This water line installation is not warranted by
WKH UHIULJHUDWRU RU LFHPDNHU PDQXIDFWXUHU )ROORZ
WKHVH LQVWUXFWLRQV FDUHIXOO\ WR PLQLPL]H WKH ULVN RI expensive water damage.
Water hammer (water banging in the pipes) in house plumbing can cause damage to refrigerator parts and lead to water leakage or flooding. Call a qualified plumber to correct water hammer before installing the water supply line to the refrigerator.
To prevent burns and product damage, do not hook up the water line to the hot water line.
,I \RX XVH \RXU UHIULJHUDWRU EHIRUH FRQQHFWLQJ WKH water line, make sure the icemaker power switch is
LQ WKH 2)) SRVLWLRQ
'R QRW LQVWDOO WKH LFHPDNHU WXELQJ LQ DUHDV ZKHUH WHPSHUDWXUHV IDOO EHORZ IUHH]LQJ
All installations must be in accordance with local plumbing code requirements.

 WARNING Connect to potable water supply only.
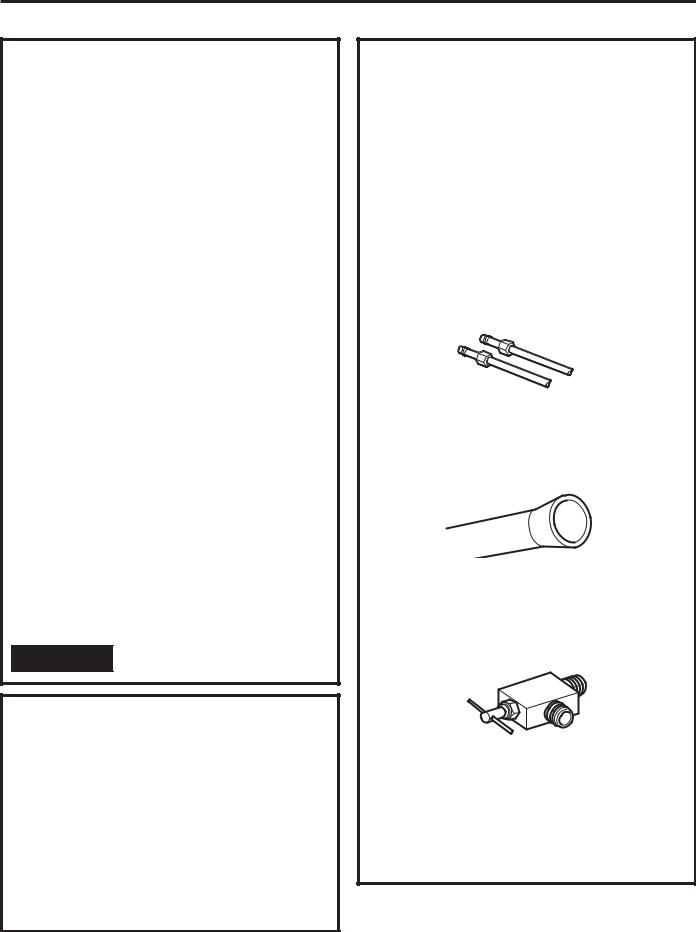
WHAT YOU WILL NEED
•Copper or GE SmartConnect™ Refrigerator Tubing
NLW Ý RXWHU GLDPHWHU WR FRQQHFW WKH UHIULJHUDWRU
WR WKH ZDWHU VXSSO\ ,I XVLQJ FRSSHU EH VXUH ERWK ends of the tubing are cut square.
To determine how much tubing you need: measure the distance from the water valve on the back of the refrigerator to the water supply pipe. Be sure there is sufficient extra tubing to allow the refrigerator to move out from the wall after installation.
6PDUW&RQQHFW 5HIULJHUDWRU 7XELQJ .LWV DUH DYDLODEOH in the following lengths:
¶ P ± :; ; ¶ P ± :; ;¶ P ± :; ; ¶ P ± :; ;
WHAT YOU WILL NEED (Cont.)
NOTE: The only GE Appliances approved plastic tubing is that supplied in SmartConnect™ Refrigerator Tubing kits. Do not use any other plastic water supply line because the line is under pressure at all times. Certain types of plastic will crack or rupture with age and cause water damage to your home.
•A GE Appliances water supply kit (containing tubing, shutoff valve and fittings listed below) is available at extra cost from your dealer or from
3DUWV DQG $FFHVVRULHV
•A cold water supply is required for automatic icemaker operation. The water pressure must be between 40 and 120 psi (275-827 kilopascals).
•Power drill.
Ý RU DGMXVWDEOH ZUHQFK
•Straight and Phillips blade screwdriver.
•7ZR Ý RXWHU GLDPHWHU FRPSUHVVLRQ QXWV DQG
2 ferrules (sleeves) - to connect the copper tubing to the shutoff valve and the refrigerator water valve.
OR
,I \RX DUH XVLQJ D 6PDUW&RQQHFW 5HIULJHUDWRU
Tubing kit, the necessary fittings are preassembled to the tubing.
,I \RXU H[LVWLQJ FRSSHU ZDWHU OLQH KDV D IODUHG ILWWLQJ at the end, you will need an adapter (available at plumbing supply stores) to connect the water line to the refrigerator OR you can cut off the flared fitting with a tube cutter and then use a compression
ILWWLQJ 'R QRW FXW IRUPHG HQG IURP 6PDUW&RQQHFW
Refrigerator tubing.
•Shutoff valve to connect to the cold water line. The shutoff valve should have a water inlet
ZLWK D PLQLPXP LQVLGH GLDPHWHU RI Ý DW WKH point of connection to the COLD WATER LINE. Saddle-type shutoff valves are included in many water supply kits. Before purchasing, make sure a saddle-type valve complies with your local plumbing
FRGHV ,QVWDOO WKH VKXWRII YDOYH RQ WKH QHDUHVW frequently used drinking water line.
<![endif]>INSTRUCTIONS INSTALLATION
49-60514-11 |
15 |

<![endif]>INSTALLATION INSTRUCTIONS
Installation Instructions
INSTALLING THE WATER LINE (Cont.)

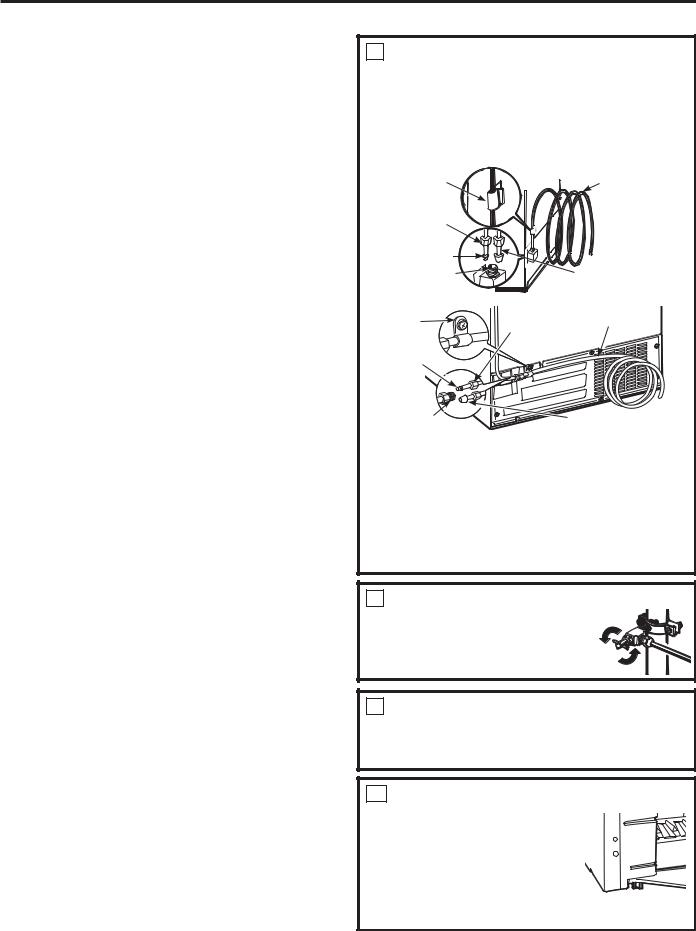
 1 SHUT OFF MAIN WATER SUPPLY
2 DRILL THE HOLE FOR THE VALVE
Choose a location for the valve that is easily
DFFHVVLEOH ,W LV EHVW WR FRQQHFW LQWR WKH VLGH RI a vertical water pipe. When it is necessary to
FRQQHFW LQWR D KRUL]RQWDO ZDWHU SLSH PDNH WKH connection to the top or side, rather than at the bottom, to avoid drawing off any sediment from the water pipe.
'ULOO D Ý KROH LQ WKH
water pipe (even if using a self-piercing valve)
using a sharp bit. Remove
any burrs resulting from drilling the hole in the pipe. Take care not to
allow water to drain into the drill. )DLOXUH WR GULOO
D Ý KROH PD\ UHVXOW LQ UHGXFHG LFH SURGXFWLRQ RU smaller cubes.
3FASTEN THE SHUTOFF VALVE
)DVWHQ WKH VKXWRII YDOYH WR WKH FROG ZDWHU SLSH with the pipe clamp.
Tighten the clamp screws until the sealing washer begins to swell.
|
Washer |
|
Pipe Clamp |
,QOHW (QG |
|
Clamp |
|
|
Screw |
|
|
Saddle-Type |
Vertical Cold |
|
Shutoff Valve |
||
Water Pipe |
||
|
NOTE: 'R QRW RYHUWLJKWHQ RU \RX PD\ FUXVK WKH tubing.
NOTE: Commonwealth of Massachusetts Plumbing Codes 248CMR shall be adhered to. Saddle valves are illegal and use is not permitted in Massachusetts. Consult with your licensed plumber.
4 ROUTE THE TUBING
Route the tubing between the cold water line and the refrigerator.
Route the tubing through a hole drilled in the wall or floor (behind the refrigerator or adjacent base cabinet) as close to the wall as possible.
NOTE: Be sure there is sufficient extra tubing to allow the refrigerator to move out from the wall after installation.
5 CONNECT THE TUBING TO THE VALVE
Place the compression nut and ferrule (sleeve) for copper tubing onto the end of the tubing and connect it to the shutoff valve.
Make sure the tubing is fully inserted into the valve. Tighten the compression nut securely.
)RU SODVWLF WXELQJ IURP D 6PDUW&RQQHFW
Refrigerator Tubing kit, insert the molded end of the tubing into the shutoff valve and tighten
compression nut until it is hand tight, then tighten one additional turn with a wrench. Overtightening may cause leaks.
|
Compression |
|
Saddle-Type |
Nut |
|
SmartConnect™ |
||
Shutoff Valve |
||
|
Tubing |
|
Packing Nut |
|
|
Outlet Valve |
)HUUXOH VOHHYH |
NOTE: Commonwealth of Massachusetts Plumbing Codes 248CMR shall be adhered to. Saddle valves are illegal and use is not permitted in Massachusetts. Consult with your licensed plumber.
6 FLUSH OUT THE TUBING
Turn the main water supply on and flush out the tubing until the water is clear.
16 |
49-60514-11 |
Installation Instructions
INSTALLING THE WATER LINE (Cont.)

 WARNING Connect to potable water supply only. A cold water supply is required for automatic icemaker operation. The water pressure must be between 40 and 120 psi (275-827 kilopascals).

 WARNING
 ELECTRIC SHOCK HAZARD
$WWDFK WXELQJ FODPS XVLQJ H[LVWLQJ KROH RQO\ '2 127 drill into the refrigerator.
7 CONNECT THE TUBING TO THE REFRIGERATOR
NOTES:
•Before making the connection to the refrigerator, be sure the refrigerator power cord is not plugged into the wall outlet.
,I \RXU UHIULJHUDWRU GRHV QRW KDYH D ZDWHU ILOWHU we recommend installing one if your water supply has sand or particles that could clog the
VFUHHQ RI WKH UHIULJHUDWRU¶V ZDWHU YDOYH ,QVWDOO
LW LQ WKH ZDWHU OLQH QHDU WKH UHIULJHUDWRU ,I XVLQJ a SmartConnect™ Refrigerator Tubing kit, you
ZLOO QHHG DQ DGGLWLRQDO WXEH :; ;
WR FRQQHFW WKH ILOWHU 'R QRW FXW SODVWLF WXEH WR install filter.
Some models have the refrigerator connection at the end of tubing located outside the compressor compartment access cover. On other models, the compressor compartment access cover must be removed in order to access the refrigerator connection at the water valve.
On models using the refrigeration connection at the water valve,
remove the plastic flexible cap.
Place the compression nut and ferrule (sleeve) onto the end of the tubing as shown. On a SmartConnect™ Refrigerator
Tubing kit, the nuts
are already assembled to the tubing.
,QVHUW WKH HQG RI WKH WXELQJ LQWR WKH UHIULJHUDWRU connection as far as possible. While holding the tubing, tighten the fitting.
)RU SODVWLF WXELQJ IURP D 6PDUW&RQQHFW
Refrigerator Tubing kit, insert the molded end of the tubing into the refrigerator connection and tighten the compression nut until it is hand tight, then tighten one additional turn with a wrench. Overtightening may cause leaks.
7CONNECT THE TUBING TO THE REFRIGERATOR (Cont.)
)DVWHQ WKH WXELQJ LQWR WKH FODPS SURYLGHG DV shown to keep it in position. You may need to pry open the clamp.
One of the following illustrations will look like the connection on your refrigerator.
Tubing |
|
Ǝ |
Clamp |
|
Tubing |
Ý |
|
|
Compression |
|
|
Nut |
|
|
)HUUXOH |
|
|
(sleeve) |
|
|
Refrigerator |
|
SmartConnect™ Tubing |
Connection |
|
|
|
|
|
Tubing |
Ý |
Ý 7XELQJ |
Clamp |
Compression |
|
)HUUXOH |
Nut |
|
|
|
|
(sleeve) |
|
|
Refrigerator |
|
|
Connection |
|
SmartConnect™ Tubing |
SmartConnect™
Tubing 


Refrigerator
Connection
8 TURN THE WATER ON AT THE SHUTOFF VALVE 


Tighten any connections that leak. Reattach the access cover.
9 PLUG IN THE REFRIGERATOR
Arrange the coil of tubing so that it does not vibrate against the back of the refrigerator or against the wall. Push the refrigerator back to the wall.
10 START THE ICEMAKER
Slide the icemaker power switch to the ON position. The icemaker will not begin
to operate until it reaches its
RSHUDWLQJ WHPSHUDWXUH RI )
& RU EHORZ ,W ZLOO WKHQ begin operation automatically if
the icemaker power switch is in the ON position.
<![endif]>INSTRUCTIONS INSTALLATION
49-60514-11 |
17 |
<![endif]>TROUBLESHOOTING TIPS: Normal Operating Conditions
18
Normal Operating Conditions.
Newer refrigerators sound different from older refrigerators.
Modern refrigerators have more features and use newer technology.
Do you hear what I hear? These conditions are normal.
|
|
|
|
HUMMM... |
|
|
|
|
|
|
|
WHOOSH... |
|
|
|
|
|
|
|
|
|||
|
|
|
|
|
|
||
|
|
|
|
|
|
||
Ŷ The new high efficiency compressor may run faster |
|
|
|||||
and longer than your old refrigerator and you may |
Ŷ |
You may hear the fans spinning at high speeds. |
|||||
hear a high-pitched hum or pulsating sound while it |
|||||||
is operating. |
|
This happens when the refrigerator is first plugged |
|||||
Ŷ Sometimes the refrigerator runs for an extended |
|
in, when the doors are opened frequently or when |
|||||
period, especially when the doors are opened |
|
a large amount of food is added to the refrigerator |
|||||
IUHTXHQWO\ 7KLV PHDQV WKDW WKH )URVW *XDUG |
|
RU IUHH]HU FRPSDUWPHQWV 7KH IDQV DUH KHOSLQJ WR |
|||||
IHDWXUH LV ZRUNLQJ WR SUHYHQW IUHH]HU EXUQ DQG |
|
maintain the correct temperatures. |
|||||
improve food preservation. |
Ŷ ,I HLWKHU GRRU LV RSHQ IRU RYHU PLQXWHV \RX PD\ |
||||||
Ŷ <RX PD\ KHDU D ZKRRVKLQJ VRXQG ZKHQ WKH GRRUV |
|||||||
|
hear the fans come on in order to cool the light |
||||||
FORVH 7KLV LV GXH WR SUHVVXUH HTXDOL]LQJ ZLWKLQ WKH |
|
||||||
|
bulbs. |
||||||
refrigerator. |
|
||||||
Ŷ |
The fans change speeds in order to provide optimal |
||||||
|
|
|
|
|
|||
|
|
|
|
|
|
cooling and energy savings. |
|
|
|
|
|
|
|||
|
|
CLICKS, POPS, |
|
WATER SOUNDS |
|||
CRACKS and SNAPS
ŶYou may hear cracking or popping sounds when the refrigerator is first plugged in. This happens as
|
the refrigerator cools to the correct temperature. |
Ŷ |
The flow of refrigerant through the cooling coils may |
||
Ŷ |
Electronic dampers click open and closed to |
|
make a gurgling noise like boiling water. |
||
|
provide optimal cooling and energy savings. |
Ŷ |
Water dropping on the defrost heater can cause |
||
Ŷ The compressor may cause a clicking or chirping |
|
D VL]]OLQJ SRSSLQJ RU EX]]LQJ VRXQG GXULQJ WKH |
|||
|
sound when attempting to restart (this could take |
|
defrost cycle. |
||
|
up to 5 minutes). |
Ŷ |
A water dripping noise may occur during the defrost |
||
Ŷ The electronic control board may cause a clicking |
|
cycle as ice melts from the evaporator and flows |
|||
|
sound when relays activate to control refrigerator |
|
into the drain pan. |
||
|
components. |
Ŷ |
Closing |
the door may cause a gurgling sound due to |
|
Ŷ Expansion and contraction of cooling coils during |
|||||
|
SUHVVXUH HTXDOL]DWLRQ |
||||
|
and after defrost can cause a cracking or popping |
|
|
|
|
|
sound. |
|
|
|
|
Ŷ |
On models with an icemaker, after an icemaking |
|
|
|
|
|
cycle, you may hear the ice cubes dropping into |
|
|
|
|
|
the ice bucket. |
|
|
|
|
49-60514-11

Troubleshooting Tips... Before you call for service
Save time and money! Review the charts on the following pages first and you may not need to call for service.
Problem |
Possible Causes |
What To Do |
Refrigerator does not operate |
Refrigerator in defrost cycle. |
Wait about 30 minutes for defrost cycle to end. |
|
Freezer control in 0 (off) position. |
0RYH WKH IUHH]HU FRQWURO WR D ORZHU WHPSHUDWXUH VHWWLQJ |
|
Refrigerator is unplugged. |
Push the plug completely into the outlet. |
|
The fuse is blown/circuit breaker is |
Replace fuse or reset the breaker. |
|
tripped. |
|
5HIULJHUDWRU RU IUHH]HU |
Temperature control not set cold |
See Controls. |
compartment too warm |
enough. |
|
|
Warm weather or frequent door |
Set the temperature control one step colder. See Controls. |
|
openings. |
|
|
Door left open. |
Check to see if package is holding door open. |
Vibration or rattling |
Front rollers need adjusting. |
See Rollers. Slight vibration is normal. |
Motor operates for long periods |
Normal when refrigerator is first |
Wait 24 hours for the refrigerator to completely cool down. |
or cycles on and off frequently. |
plugged in. |
|
(Modern refrigerators with more |
Often occurs when large amounts of |
This is normal. |
storage space and a larger |
food are placed in refrigerator. |
|
IUHH]HU UHTXLUH PRUH RSHUDWLQJ |
Door left open. |
Check to see if package is holding door open. |
time. They start and stop often to |
Hot weather or frequent door |
This is normal. |
maintain even temperatures.) |
openings. |
|
|
Temperature controls set at the |
See Controls. |
|
coldest setting. |
|
)URVW RU LFH FU\VWDOV RQ IUR]HQ |
Door left open. |
Check to see if package is holding door open. |
food (frost within package is |
Too frequent or too long door |
|
normal) |
openings. |
|
'LYLGHU EHWZHHQ UHIULJHUDWRU |
Automatic energy saver system |
This helps prevent condensation on the outside. |
DQG IUHH]HU FRPSDUWPHQWV IHHOV |
circulates warm liquid around front |
|
warm |
edge of freezer compartment. |
|
Automatic icemaker does not |
Icemaker power switch is in the 2)) |
Slide the power switch to the ON position. |
work (on some models) |
position. |
|
|
Water supply turned off or not |
6HH ,QVWDOOLQJ WKH ZDWHU OLQH |
|
connected. |
|
|
Freezer compartment too warm. |
Wait 24 hours for the refrigerator to completely cool down. |
|
Piled up cubes in the storage bin |
Level cubes by hand. |
|
cause icemaker to shut off. |
|
|
Ice cubes stuck in icemaker. |
Turn off the icemaker, remove cubes and turn the icemaker |
|
|
back on. |
,FH FXEHV KDYH RGRU WDVWH |
Ice storage bin needs cleaning. |
(PSW\ DQG ZDVK ELQ 'LVFDUG ROG FXEHV |
|
Food transmitting odor/taste to ice |
Wrap foods well. |
|
cubes. |
|
|
Interior of refrigerator needs |
See Care and cleaning. |
|
cleaning. |
|
Small or hollow cubes |
Water filter clogged. |
Replace filter cartridge with new cartridge or with plug. |
6ORZ LFH FXEH IUHH]LQJ |
Door left open. |
Check to see if package is holding door open. |
|
Temperature control not set cold |
See Controls. |
|
enough. |
|
'RRU QRW FORVLQJ SURSHUO\ |
Door gasket on hinge side sticking or |
Apply petroleum jelly on face of gasket |
|
folding over. |
|
2UDQJH JORZ LQ IUHH]HU |
Defrost heater is on. |
This is normal. |
Cube dispenser does not work |
Icemaker or water supply turned off. |
Turn on icemaker or water supply. |
(on some models) |
Ice cubes are frozen to icemaker |
Remove cubes. |
|
feeler arm. |
|
|
Irregular ice clumps in storage |
Break up with fingertip pressure and discard remaining |
|
container. |
clumps. |
|
|
)UHH]HU PD\ EH WRR ZDUP $GMXVW WKH IUHH]HU FRQWURO WR D |
|
|
colder setting, one position at a time, until clumps do not |
|
|
form. |
|
Dispenser is /2&.('. |
Press and hold the Lock pad for 3 seconds. |
<![endif]>TIPS TROUBLESHOOTING
49-60514-11 |
|

<![endif]>TROUBLESHOOTING TIPS
Troubleshooting Tips... Before you call for service
Problem |
Possible Causes |
What To Do |
|
:DWHU KDV SRRU WDVWH RGRU RQ |
Water dispenser has not been used |
'LVSHQVH ZDWHU XQWLO DOO ZDWHU LQ V\VWHP LV UHSOHQLVKHG |
|
some models) |
for a long time. |
|
|
Water in first glass is warm (on |
Normal when refrigerator |
Wait 24 hours for the refrigerator to completely cool down. |
|
some models) |
|
|
|
Water dispenser has not been used |
'LVSHQVH ZDWHU XQWLO DOO ZDWHU LQ V\VWHP LV UHSOHQLVKHG |
||
|
|||
|
for a long time. |
|
|
|
Water system has been drained. |
Allow several hours for replenished supply to chill. |
|
Water dispenser does not work |
Water supply line turned off or not |
6HH ,QVWDOOLQJ WKH ZDWHU OLQH |
|
(on some models) |
connected. |
|
|
|
Water filter clogged. |
Replace filter cartridge or remove filter and install plug. |
|
|
Air may be trapped in the water |
Press the dispenser arm for at least two minutes. |
|
|
system. |
|
|
|
Dispenser is /2&.('. |
Press and hold the Lock pad for 3 seconds. |
|
Water spurting from dispenser |
Newly-installed filter cartridge. |
Run water from the dispenser for 3 minutes (about 11 2 |
|
|
|
gallons). |
|
Water is not dispensed |
Water in reservoir is frozen. |
Call for service. |
|
No water or ice cube production |
Supply line or shutoff valve is |
Call a plumber. |
|
|
clogged. |
|
|
|
Water filter clogged. |
Replace filter cartridge or remove filter and install plug. |
|
|
Dispenser is /2&.('. |
Press and hold the Lock pad for 3 seconds. |
|
Refrigerator has odor |
Foods transmitting odor to |
)RRGV ZLWK VWURQJ RGRUV VKRXOG EH WLJKWO\ ZUDSSHG |
|
|
refrigerator. |
|
|
|
.HHS DQ RSHQ ER[ RI EDNLQJ VRGD LQ WKH UHIULJHUDWRU |
||
|
|
replace every three months. |
|
|
Interior needs cleaning. |
See Care and cleaning. |
|
|
Defrost water drainage system |
See Care and cleaning. |
|
|
needs cleaning. |
|
|
Moisture forms on outside of |
Not unusual during periods of high |
Wipe surface dry. |
|
refrigerator |
humidity. |
|
|
Moisture collects inside |
Too frequent or too long door |
|
|
|
openings. |
|
|
,QWHULRU OLJKW GRHV QRW ZRUN |
No power at outlet. |
Replace fuse or reset the breaker. |
|
|
Light bulb burned out. |
See Replacing the light bulbs. |
|
Water on kitchen floor or on |
Drain in the bottom of the freezer |
See Care and cleaning. |
|
ERWWRP RI IUHH]HU |
clogged. |
|
|
|
Cubes jammed in chute. |
Poke ice through with a wooden spoon. |
|
Hot air from bottom of |
Normal air flow cooling motor. In the |
|
|
refrigerator |
refrigeration process, it is normal |
|
|
|
that heat be expelled in the area |
|
|
|
under the refrigerator. Some floor |
|
|
|
coverings are sensitive and will |
|
|
|
discolor at these normal and safe |
|
|
|
temperatures. |
|
|
&XEHG ,FH ZDV VHOHFWHG EXW |
Last setting was &UXVKHG ,FH. |
A few cubes were left in the crusher from the previous |
|
&UXVKHG ,FH ZDV GLVSHQVHG on |
|
setting. This is normal. |
|
some models) |
|
|
|
)UHTXHQW ³EX]]LQJ´ VRXQG |
Icemaker power switch is in the ON |
6OLGH WKH SRZHU VZLWFK WR WKH 2)) SRVLWLRQ .HHSLQJ LW LQ |
|
|
position but the refrigerator water |
the ON position will damage the water valve. |
|
|
supply is not connected. |
|
20 |
49-60514-11 |
Refrigerator Limited Warranty
GEAppliances.com
For US Customers, DOO ZDUUDQW\ VHUYLFH LV SURYLGHG E\ RXU )DFWRU\ 6HUYLFH &HQWHUV RU DQ DXWKRUL]HG &XVWRPHU &DUH® technician. To schedule service online, visit us at GEAppliances.com, or call GE Appliances at 800.GE.CARES (800.432.2737). Please have your serial number and your model number available when calling for service. In Canada, call 800.561.3344.
Servicing your refrigerator may require the use of the onboard data port for diagnostics. This gives a GE Appliances Factory Service technician the ability to quickly diagnose any issues with your appliance and helps GE Appliances improve its products by providing GE Appliances with information on your appliance. If you do not want your appliance data to be sent to GE Appliances, please advise your technician NOT to submit the data to GE Appliances at the time of service.
For the Period of: |
|
GE Appliances Will Replace |
GE and GE PROFILE MODELS: |
||
One Year |
|
Any part of the refrigerator which fails due to a defect in materials or workmanship. |
)URP WKH GDWH RI WKH RULJLQDO |
|
'XULQJ WKH limited one-year warranty, GE Appliances will also provide, free of charge, all |
purchase |
|
labor and related service to replace the defective part. |
Thirty Days |
|
Any part of the water filter cartridge which fails due to a defect in materials or workmanship. |
(Water filter, if included) |
|
'XULQJ WKLV limited thirty-day warranty, GE Appliances will also provide, free of charge, a |
)URP WKH RULJLQDO SXUFKDVH |
|
replacement water filter cartridge. |
date of the refrigerator |
|
|
GE PROFILE MODELS ONLY |
|
|
Five Years |
|
Any part of the sealed refrigerating system (the compressor, condenser, evaporator an all |
)URP WKH GDWH RI WKH SXUFKDVH |
|
connecting tubing) which fails due to a defect in materials or workmanship. |
|
|
'XULQJ WKLV Oimited five-year sealed refrigerating system warranty, GE Appliances will also |
|
|
provide, free of charge, all labor and related service to replace the defective part in the sealed |
|
|
refrigerating system. |
<![endif]>WARRANTY LIMITED
What GE Appliances Will Not Cover:
ŶService trips to your home to teach you how to use the product.
Ŷ ,PSURSHU LQVWDOODWLRQ GHOLYHU\ RU PDLQWHQDQFH
Ŷ )DLOXUH RI WKH SURGXFW LI LW LV DEXVHG PLVXVHG RU used for other than the intended purpose or used commercially.
Ŷ /RVV RI IRRG GXH WR VSRLODJH
Ŷ 5HSODFHPHQW RI KRXVH IXVHV RU UHVHWWLQJ RI FLUFXLW
breakers.
Ŷ 'DPDJH WR ILQLVK VXFK DV VXUIDFH UXVW WDUQLVK RU VPDOO blemishes not reported within 48 hours of delivery.
Ŷ 5HSODFHPHQW RI WKH ZDWHU ILOWHU FDUWULGJH LI LQFOXGHG GXH to water pressure that is outside the specified operating range or due to excessive sediment in the water supply.
Ŷ 5HSODFHPHQW RI WKH OLJKW EXOEV LI LQFOXGHG RU ZDWHU ILOWHU cartridge, if included, other than as noted above.
Ŷ 'DPDJH WR WKH SURGXFW FDXVHG E\ DFFLGHQW ILUH IORRGV or acts of God.
Ŷ ,QFLGHQWDO RU FRQVHTXHQWLDO GDPDJH FDXVHG E\ SRVVLEOH defects with this appliance.
Ŷ 3URGXFW QRW DFFHVVLEOH WR SURYLGH UHTXLUHG VHUYLFH
Ŷ 'DPDJH FDXVHG E\ D QRQ *($SSOLDQFHV %UDQG ZDWHU filter.
EXCLUSION OF IMPLIED WARRANTIES
Your sole and exclusive remedy is product repair as provided in this Limited Warranty. Any implied warranties, including the implied warranties of merchantability or fitness for a particular purpose, are limited to one year or the shortest period allowed by law.
For US Customers: This limited warranty is extended to the original purchaser and any succeeding owner for products purchased for
KRPH XVH ZLWKLQ WKH 86$ ,I WKH SURGXFW LV ORFDWHG LQ DQ DUHD ZKHUH VHUYLFH E\ D *($SSOLDQFHV$XWKRUL]HG 6HUYLFHU LV QRW DYDLODEOH \RX PD\ EH UHVSRQVLEOH IRU D WULS FKDUJH RU \RX PD\ EH UHTXLUHG WR EULQJ WKH SURGXFW WR DQ$XWKRUL]HG *($SSOLDQFHV 6HUYLFH ORFDWLRQ
IRU VHUYLFH ,Q$ODVND WKH OLPLWHG ZDUUDQW\ H[FOXGHV WKH FRVW RI VKLSSLQJ RU VHUYLFH FDOOV WR \RXU KRPH
Some states do not allow the exclusion or limitation of incidental or consequential damages. This limited warranty gives you specific legal rights, and you may also have other rights which vary from state to state. To know what your legal rights are, consult your local or state consumer affairs office or your state’s Attorney General.
Warrantor: GE Appliances, a Haier company
Louisville, KY 40225
For Customers in Canada: This limited warranty is extended to the original purchaser and any succeeding owner for products
SXUFKDVHG LQ &DQDGD IRU KRPH XVH ZLWKLQ &DQDGD ,Q KRPH ZDUUDQW VHUYLFH ZLOO EH SURYLGHG LQ DUHDV ZKHUH LW LV DYDLODEOH DQG GHHPHG UHDVRQDEOH E\ 0& &RPPHUFLDO ,QF WR SURYLGH ,I WKH SURGXFW LV ORFDWHG LQ DQ DUHD ZKHUH VHUYLFH E\ D *( $SSOLDQFHV $XWKRUL]HG 6HUYLFHU LV QRW DYDLODEOH \RX PD\ EH UHVSRQVLEOH IRU D WULS FKDUJH RU \RX PD\ EH UHTXLUHG WR EULQJ WKH SURGXFW WR DQ $XWKRUL]HG *( $SSOLDQFHV 6HUYLFH ORFDWLRQ IRU VHUYLFH
Warrantor Canada: MC Commercial Inc., Burlington Ontario, L7R 5B6
| <![if ! IE]> <![endif]>is date |
<![if ! IE]> <![endif]>Staple |
| <![if ! IE]> <![endif]>obtain to needed |
<![if ! IE]> <![endif]>.here receipt your |
| <![if ! IE]> <![endif]>.warranty the under service |
<![if ! IE]> <![endif]>purchase original the of Proof |
|
|
49-60514-11 |
21 |

<![endif]>LIMITED WARRANTY
Water Filter Cartridge Limited Warranty
Contact us at geapplianceparts.com, or call 800.GE.CARES.
For the period of |
GE Appliances will replace |
Thirty Days |
Any part of the water filter cartridge which fails due to a defect in materials |
)URP WKH GDWH |
or workmanship during this limited thirty-day warranty.* |
of the original |
|
purchase |
|
What GE Appliances will not cover:
ŶService trips to your home to teach you how to use the product.
Ŷ,PSURSHU LQVWDOODWLRQ
Ŷ)DLOXUH RI WKH SURGXFW LI LW LV DEXVHG PLVXVHG XVHG IRU RWKHU WKDQ WKH LQWHQGHG SXUSRVH RU XVHG FRPPHUFLDOO\
ŶReplacement of house fuses or resetting of circuit breakers.
Ŷ'DPDJH WR WKH SURGXFW FDXVHG E\ DFFLGHQW ILUH IORRGV RU DFWV RI *RG
Ŷ,QFLGHQWDO RU FRQVHTXHQWLDO GDPDJH FDXVHG E\ SRVVLEOH GHIHFWV ZLWK WKLV DSSOLDQFH
EXCLUSION OF IMPLIED WARRANTIES
Your sole and exclusive remedy is part exchange as provided in this Limited Warranty. Any implied warranties, including the implied warranties of merchantability or fitness for a particular purpose, are limited to six months or the shortest period allowed by law.
| <![if ! IE]> <![endif]>Proof of the original purchase |
<![if ! IE]> <![endif]>service under the warranty. |
| <![if ! IE]> <![endif]>your receipt here. |
<![if ! IE]> <![endif]>needed to obtain |
| <![if ! IE]> <![endif]>Staple |
<![if ! IE]> <![endif]>date is |
|
|
This limited warranty is extended to the original purchaser and any succeeding owner for products purchased for
KRPH XVH ZLWKLQ WKH 86$ ,Q $ODVND WKH OLPLWHG ZDUUDQW\ H[FOXGHV WKH FRVW RI VKLSSLQJ RU VHUYLFH FDOOV WR \RXU KRPH
Some states do not allow the exclusion or limitation of incidental or consequential damages. This limited warranty gives you specific legal rights, and you may also have other rights which vary from state to state. To know what your legal rights are, consult your local or state consumer affairs office or your state’s Attorney General.
For Purchases Made In Iowa: This form must be signed and dated by the buyer and seller prior to the consummation of this sale.
This form should be retained on file by the seller for a minimum of two years.
Buyer:
Name
Address
City |
State |
Zip |
Signature |
'DWH |
|
Seller:
Name
Address
City |
State |
Zip |
Signature |
'DWH |
|
,I \RXU *( $SSOLDQFHV SDUW IDLOV EHFDXVH RI D PDQXIDFWXULQJ GHIHFW ZLWKLQ WKLUW\ GD\V IURP WKH GDWH RI RULJLQDO SXUFKDVH IRU XVH ZH ZLOO JLYH \RX a new or, at our option, a rebuilt part without charge. Return the defective part to the parts supplier from whom it was purchased together with a
FRS\ RI WKH ³SURRI RI SXUFKDVH´ IRU WKH SDUW ,I WKH SDUW LV GHIHFWLYH DQG VKRZV QR VLJQV RI DEXVH LW ZLOO EH H[FKDQJHG 7KH ZDUUDQW\ GRHV QRW FRYHU WKH IDLOXUH RI SDUWV ZKLFK DUH GDPDJHG ZKLOH LQ \RXU SRVVHVVLRQ DUH DEXVHG RU KDYH EHHQ LQVWDOOHG LPSURSHUO\ ,W GRHV QRW FRYHU WKH FRVW RI UHWXUQLQJ WKH SDUW WR WKH VXSSOLHU IURP ZKRP LW ZDV SXUFKDVHG QRU GRHV LW FRYHU WKH FRVW RI ODERU WR UHPRYH RU LQVWDOO LW WR GLDJQRVH WKH IDXOW ,W
GRHV QRW FRYHU SDUWV XVHG LQ SURGXFWV LQ FRPPHUFLDO XVH H[FHSW LQ WKH FDVH RI DLU FRQGLWLRQLQJ HTXLSPHQW ,Q QR HYHQW VKDOO *( $SSOLDQFHV EH liable for consequential damages.
Warrantor: GE Appliances, a Haier company
Louisville, KY 40225
22 |
49-60514-11 |

Performance Data Sheet
SmartWater™ Filtration System—GE Appliances MWF Cartridge
The concentration of the indicated substances in water entering the system was reduced to a concentration less than or equal to the
SHUPLVVLEOH OLPLW IRU ZDWHU OHDYLQJ WKH V\VWHP DV VSHFLILHG LQ 16)$16, 6WDQGDUG DQG 6WDQGDUG 6\VWHP WHVWHG DQG FHUWLILHGE\16) ,QWHUQDWLRQDODJDLQVW16)$16,6WDQGDUG DQG6WDQGDUG IRUWKHUHGXFWLRQRIVXEVWDQFHVOLVWHGEHORZ
Capacity 300 Gallons (1,135 Liters). Contaminant Reduction Determined by NSF testing.
Substance Tested |
Average |
NSF specified |
Avg % |
Average |
Max Permissible |
NSF Reduction |
NSF |
Challenge |
Product Water |
Product Water |
|||||
for Reduction |
Influent |
Concentration |
Reduction |
Concentration |
Concentration |
Requirements |
Test Report |
Chlorine Taste and Odor |
2.0 mg/L |
2.0 mg/L ± 10% |
97.4% |
0.05 mg/L |
N/A |
|
J-00137878 |
Nominal Particulate Class |
11,333,333 pts/mL |
At least 10,000 particles/mL |
99.9% |
5,510 pts/mL |
N/A |
|
J-00137881 |
, WR P |
|||||||
Cyst* |
101,000 cysts/L |
Minimum 50,000 cysts/L |
99.99% |
1 cyst/L |
N/A |
|
J-00100036 |
Asbestos |
133 MF/L |
107 to 108 fibers/L; fibers |
>99% |
0) / |
N/A |
|
J-00137886 |
JUHDWHU WKDQ P LQ OHQJWK |
|||||||
Atrazine |
0.008 mg/L |
0.009 mg/L ± 10% |
91.3% |
0.0007 mg/L |
0.003 mg/L |
N/A |
J-00137910 |
Benzene |
0.014 mg/L |
0.015 mg/L ± 10%± |
96.5% |
0.0005 mg/L |
0.005 mg/L |
N/A |
J-00137912 |
Carbofuran |
0.08 mg/L |
0.08 mg/L ± 10% |
74.5% |
0.01 mg/L |
0.04 mg/L |
N/A |
J-00147488 |
Endrin |
0.007 mg/L |
0.006 mg/L ± 10% |
97.1% |
0.0002 mg/L |
0.002 mg/L |
N/A |
J-00100039 |
Lead @ pH 6.5 |
0.148 mg/L |
0.15 mg/L ± 10% |
99.3% |
0.001 mg/L |
0.010 mg/L |
N/A |
J-00137914 |
Lead @ pH 8.5 |
0.155 mg/L |
0.15 mg/L ± 10% |
99.3% |
0.001 mg/L |
0.010 mg/L |
N/A |
J-00137915 |
Lindane |
0.002 mg/L |
0.002 mg/L ± 10% |
96.5% |
0.00002 mg/L |
0.0002 mg/L |
N/A |
J-00137924 |
Mercury @ pH 6.5 |
0.006 mg/L |
0.006 mg/L ± 10% |
87.6% |
0.0004 mg/L |
0.002 mg/L |
N/A |
J-00137925 |
Mercury @ pH 8.5 |
0.006 mg/L |
0.006 mg/L ± 10% |
93.2% |
0.0007 mg/L |
0.07 mg/L |
N/A |
J-00092355 |
P-Dichlorobenzene |
0.223 mg/L |
0.225 mg/L ± 10% |
99.8% |
0.005 mg/L |
0.075 mg/L |
N/A |
J-00137926 |
Tetrachloroethylene |
0.014 mg/L |
0.015 mg/L ± 10% |
96.5% |
0.0005 mg/L |
0.005 mg/L |
N/A |
J-00137929 |
Toxaphene |
0.017 mg/L |
0.015 mg/L ± 10% |
>93.9% |
0.001 mg/L |
0.003 mg/L |
N/A |
J-00137928 |
2, 4-D |
0.192 mg/L |
0.210 mg/L ± 10% |
77.7% |
0.040 mg/L |
0.07 mg/L |
N/A |
J-00147489 |
*Based on the use of Cryptosporidium parvum oocysts.
The following pharmaceutical reduction claims have not been certified by NSF International or the state of California. Claims tested and verified by independent laboratory:
Contaminant |
Average |
NSF specified |
Avg % |
Average |
Max Permissible |
NSF Reduction |
NSF |
Challenge |
Product Water |
Product Water |
|||||
Reduction |
Influent |
Concentration |
Reduction |
Concentration |
Concentration |
Requirements |
Test Report |
Atenolol |
978 ng/L |
N/A |
99.5% |
5.0 ng/L |
N/A |
N/A |
J-00121587 |
Fluoxetine |
907 ng/l |
N/A |
99.4% |
5.4 ng/L |
N/A |
N/A |
J-00121587 |
Ibuprofen |
885 ng/L |
N/A |
94.1% |
52.3 ng/L |
N/A |
N/A |
J-00121588 |
Progesterone |
1097 ng/L |
N/A |
99.5% |
5.0 ng/L |
N/A |
N/A |
J-00121589 |
Trimethoprim |
415 ng/L |
N/A |
99.5% |
2.0 ng/L |
N/A |
N/A |
J-00121587 |
Application Guidelines/Water Supply Parameters
6HUYLFH )ORZ |
JSP OSP |
Water Supply |
Potable Water |
Water Pressure |
40-120 psi (276-827 kPa) |
Water Temperature |
) ) & & |
,W LV HVVHQWLDO WKDW WKH PDQXIDFWXUHU¶V UHFRPPHQGHG LQVWDOODWLRQ PDLQWHQDQFH DQG ILOWHU UHSODFHPHQW UHTXLUHPHQWV EH FDUULHG RXW IRU WKH SURGXFW WR SHUIRUP DV DGYHUWLVHG 6HH ,QVWDOODWLRQ 0DQXDO IRU :DUUDQW\ LQIRUPDWLRQ
NOTE: While the testing was performed under standard laboratory conditions, actual performance may vary. Contaminant reduction testing is conducted every five years by certifying agency to maintain certification.
5HSODFHPHQW &DUWULGJH 0:) )RU HVWLPDWHG FRVWV RI UHSODFHPHQW
HOHPHQWV SOHDVH FDOO RU YLVLW RXU ZHEVLWH DW
GEApplianceparts.com.

 WARNING
To reduce the risk associated with ingestion of contaminants:
•Do not use with water that is microbiologically unsafe or of unknown quality without adequate disinfection before and after the system. Systems certified for cyst reduction may be used on disinfected water that may contain filterable cysts.
Tested and certified by NSF International against
NSF/ANSI Standard 42 and Standard 53 in model
GE Appliances MWF for the reduction of the
REPLACEMENT claims specified on the performance data sheet.
ELEMENT
NOTICE
To reduce the risk associated with property damage due to water leakage:
•Read and follow use instructions before installation and use of this system.
,QVWDOODWLRQ DQG XVH MUST comply with all state and local plumbing codes.
•Do not LQVWDOO LI ZDWHU SUHVVXUH H[FHHGV SVL N3D ,I your water pressure exceeds 80 psi (552 kPa), you must install a pressure-limiting valve. Contact a plumbing professional if you are uncertain how to check your water pressure.
•Do not LQVWDOO ZKHUH ZDWHU KDPPHU FRQGLWLRQV PD\ RFFXU ,I water hammer conditions exist you must install a water hammer arrester. Contact a plumbing professional if you are uncertain how to check for this condition.
•Do not install on hot water supply lines. The maximum operating
ZDWHU WHPSHUDWXUH RI WKLV ILOWHU V\VWHP LV ) &
•Protect filter from freezing. 'UDLQ ILOWHU ZKHQ WHPSHUDWXUHV GURS EHORZ ) &
•The disposable filter cartridge should be replaced every 6 months at the rated capacity, or sooner if a noticeable reduction in flow rate occurs.
49-60514-11 |
23 |

Performance Data Sheet


 Model: GE Appliances XWF
Ŷ 6\VWHP FHUWLILHG E\ ,$302 5 7 DJDLQVW 16)$16, 6WDQGDUGV IRU WKH UHGXFWLRQ RI FODLPV VSHFLILHG RQ WKH SHUIRUPDQFH GDWD sheet and at iapmort.org.
Ŷ $FWXDO SHUIRUPDQFH PD\ YDU\ ZLWK ORFDO ZDWHU FRQGLWLRQV
|
,QIOXHQW FKDOOHQJH |
Maximum permissible |
Avg % |
|
Substance Tested for Reduction |
concentration |
product water |
||
Reduction |
||||
|
PJ / |
FRQFHQWUDWLRQ PJ / |
||
Chlorine Taste and Odor |
PJ / |
1$ |
|
|
|
|
|
|
|
Chloramine Taste and Odor |
PJ / |
0.5 |
|
|
|
|
|
|
|
3DUWLFXODWH &ODVV , |
$W OHDVW P/ |
1$ |
|
|
Cysts |
/ |
1$ |
! |
|
Lead |
0.15 |
0.01 |
|
|
Mercury |
0.006 |
0.002 |
|
|
Asbestos |
WR ILEHUV / |
1$ |
! |
|
Toxaphene |
|
0.003 |
|
|
VOC (Chloroform surrogate chemical) |
0.300 |
0.015 |
|
|
Alachlor |
0.050 |
0.001 |
! |
|
$WUD]LQH |
0.100 |
0.003 |
! |
|
%HQ]HQH |
0.081 |
0.001 |
! |
|
Carbofuran |
|
0.001 |
! |
|
carbon tetrachloride |
0.078 |
0.0018 |
|
|
FKORUREHQ]HQH |
0.077 |
0.001 |
! |
|
chloropicrin |
0.015 |
0.0002 |
|
|
' |
0.110 |
0.0017 |
|
|
GLEURPRFKORURSURSDQH '%&3 |
0.052 |
0.00002 |
! |
|
R 'LFKORUREHQ]HQH |
0.08 |
0.001 |
! |
|
S 'LFKORUREHQ]HQH |
0.040 |
0.001 |
! |
|
1,2-dichloroethane |
0.088 |
0.0048 |
|
|
1,1-dichloroethylene |
0.083 |
0.001 |
! |
|
cis-1,2-dichloroethylene |
0.170 |
0.0005 |
! |
|
trans-1,2-dichloroethylene |
0.086 |
0.001 |
! |
|
1,2-dichloropropane |
0.080 |
0.001 |
! |
|
cis-1,3-dichloropropylene |
|
0.001 |
! |
|
dinoseb |
0.170 |
0.0002 |
|
|
Endrin |
0.053 |
|
|
|
(WK\OEHQ]HQH |
0.088 |
0.001 |
! |
|
HWK\OHQH GLEURPLGH ('% |
0.044 |
0.00002 |
! |
|
bromochloroacetonitrile |
0.022 |
0.0005 |
|
|
dibromoacetonitrile |
0.024 |
0.0006 |
|
|
dichloroacetonitrile |
|
0.0002 |
|
|
trichloroacetonitrile |
0.015 |
0.0003 |
|
|
1,1-dichloro-2-propanone |
0.0072 |
0.0001 |
|
|
1,1,1-trichloro-2-propanone |
0.0082 |
0.0003 |
|
|
heptachlor (H-34, Heptox) |
0.025 |
0.00001 |
! |
|
heptachlor epoxide |
0.0107 |
0.0002 |
|
|
hexachlorobutadiene |
0.044 |
0.001 |
! |
|
hexachlorocyclopentadiene |
0.060 |
0.000002 |
! |
|
Lindane |
0.055 |
0.00001 |
! |
|
methoxychlor |
0.050 |
0.0001 |
! |
|
pentachlorophenol |
|
0.001 |
! |
|
VLPD]LQH |
0.120 |
0.004 |
! |
|
Styrene |
0.150 |
0.0005 |
! |
|
1,1,2,2-tetrachloroethane |
0.081 |
0.001 |
! |
|
Tetrachloroethylene |
0.081 |
0.001 |
! |
|
Toluene |
0.078 |
0.001 |
! |
|
2,4,5-TP (silvex) |
0.270 |
0.0016 |
|
|
tribromoacetic acid |
0.042 |
0.001 |
! |
|
7ULFKORUREHQ]HQH |
0.160 |
0.0005 |
! |
|
1,1,1-trichloroethane |
0.084 |
0.0046 |
|
|
1,1,2-trichloroethane |
0.150 |
0.0005 |
! |
|
trichloroethylene |
0.180 |
0.0010 |
! |
|
bromoform |
0.300 |
0.015 |
|
|
bromodichloromethane |
0.300 |
0.015 |
|
|
chlorodibromomethane |
0.300 |
0.015 |
|
|
xylenes |
0.070 |
0.001 |
! |
|
Meprobamate |
|
60 |
|
|
Atenolol |
|
30 |
|
|
&DUEDPD]HSLQH |
|
200 |
|
|
'((7 |
|
200 |
|
|
Metolachlor |
|
200 |
|
|
Trimethoprim |
|
20 |
|
|
Linuron |
|
20 |
|
|
TCEP |
|
700 |
|
|
TCPP |
|
700 |
|
|
Phenytoin |
|
30 |
|
|
,EXSURIHQ |
|
60 |
|
|
Naproxen |
|
20 |
|
|
Estrone |
|
20 |
|
|
Bisphenol A |
|
300 |
|
|
Nonyl phenol |
|
200 |
|
Application Guidelines/Water Supply Parameters
6HUYLFH )ORZ |
JSP OSP |
Water Supply |
Potable Water |
Water Pressure |
25-120 psi (172-827 kPa) |
Water Temperature |
) ) & & |
Capacity |
170 gallons (643.5 liters) |
,W LV HVVHQWLDO WKDW WKH PDQXIDFWXUHU¶V UHFRPPHQGHG LQVWDOODWLRQ maintenance and filter replacement requirements be carried out for the
SURGXFW WR SHUIRUP DV DGYHUWLVHG 6HH ,QVWDOODWLRQ 0DQXDO IRU :DUUDQW\ information.
NOTE: While the testing was performed under standard laboratory conditions, actual performance may vary.
5HSODFHPHQW &DUWULGJH ;:) )RU HVWLPDWHG FRVWV RI
UHSODFHPHQW HOHPHQWV SOHDVH FDOO RU YLVLW RXU website at gewaterfilters.com.
WARNING To reduce the risk associated with ingestion of contaminants:
•Do not use with water that is microbiologically unsafe or of unknown quality without adequate disinfection before and after the system. Systems certified for cyst reduction may be used on disinfected water that may contain filterable cysts.
NOTICE
To reduce the risk of water leakage or flooding, and to ensure optimal filter performance:
•Read and follow use instructions before installation and use of this system.
,QVWDOODWLRQ DQG XVH MUST comply with all state and local plumbing codes.
•Do not install if water pressure exceeds 120 psi (827
N3D ,I \RXU ZDWHU SUHVVXUH H[FHHGV SVL N3D \RX must install a pressure-limiting valve. Contact a plumbing professional if you are uncertain how to check your water pressure.
•Do not install where water hammer conditions may occur.
,I ZDWHU KDPPHU FRQGLWLRQV H[LVW \RX must install a water hammer arrester. Contact a plumbing professional if you are uncertain how to check for this condition.
•Do not install on hot water supply lines. The maximum
RSHUDWLQJ ZDWHU WHPSHUDWXUH RI WKLV ILOWHU V\VWHP LV )&
•Protect filter from freezing. 'UDLQ ILOWHU ZKHQ WHPSHUDWXUHV GURS EHORZ ) &
•Change the disposable filter cartridge every six months or sooner if you observe a noticeable reduction in water flow rate.
)DLOXUH WR UHSODFH WKH GLVSRVDEOH ILOWHU FDUWULGJH DW recommended intervals may lead to reduced filter performance and cracks in the filter housing, causing water leakage or flooding.
7KLV 6\VWHP KDV EHHQ WHVWHG DFFRUGLQJ WR 16) $16,
53 and 401 for the reduction of the substances listed below. The concentration of the indicated substances in water entering the system was reduced to a concentration less than or equal to the permissible limit for water leaving the
V\VWHP DV VSHFLILHG LQ 16) $16, DQG
XWF System is certified by IAPMO R&T against NSF/ANSI Standards 42,53, and 401 for the reduction of claims specified on the performance data sheet and at iapmort.org.
24 |
49-60514-11 |
 Loading...