

Page 1

07334.book Page i Friday, December 29, 2000 10:23 AM
Contents
1 Computer Basics ................................................1
Controls ...........................................................2
Computerfront ..................................................2
Computerback ..................................................3
Keyboardfeatures ...................................................4
Startingandturningoffyourcomputer ...................................5
Protectingfrompowersourceproblems ..................................6
Usingthemouse ....................................................7
Workingsafely ......................................................9
2GettingStarted..................................................13
3GettingHelp....................................................19
Formoreinformation... .............................................20
HelpSpot ......................................................20
Onlinehelp ....................................................23
GatewayWebsite...............................................24
4 Windows Basics ................................................25
AbouttheWindowsenvironment ......................................26
Desktopcomponents ............................................27
Window components . ............................................29
UsingtheStartmenu ...............................................30
Workingwithfilesandfolders.........................................31
Aboutdrives ...................................................31
Aboutfoldersandfiles ...........................................32
5 Using Your Computer...........................................33
UsingtheCDdrive .................................................34
InsertingaCD ..................................................34
Adjustingthevolume ............................................36
Workingwithdocuments .............................................37
Creatinganewdocument.........................................37
Savingadocument ..............................................38
Openingadocument ............................................38
Printingadocument .............................................39
i
Page 2

07334.book Page ii Friday, December 29, 2000 10:23 AM
6 Using the Internet ...............................................41
LearningabouttheInternet ...........................................42
SettingupanInternetaccount .........................................43
AccessingyourInternetaccount ....................................43
UsingtheWorldWideWeb ...........................................44
ConnectingtoaWebsite..........................................45
Downloadingfiles ................................................46
Usinge-mail .......................................................47
Sendinge-mail ..................................................47
Checkingyoure-mail .............................................48
7 Maintaining Your Computer .....................................49
Protectingyourcomputerfromviruses ..................................50
Optimizingandmaintainingyourdata ...................................51
Windowsutilities.................................................51
Windows maintenance . ...........................................52
RunningtheWindowsutilitiesusingHelpSpot .........................53
8 Customizing Your Computer ....................................55
Adjustingthescreenanddesktopsettings ...............................56
AdjustingyoursettingsusingHelpSpot...............................58
Changingthemousesettings..........................................60
Powermanagement .................................................61
UsingStandbymode .............................................61
Changingpowersettings ..........................................62
Aboutinstallingaprinter,scanner,orotherperipheraldevice ................66
9 Restoring Software ..............................................67
Reinstallingdevicedrivers ............................................68
ReinstallingWindows ................................................69
Reinstallingprograms ................................................69
10 Troubleshooting.................................................71
Safetyguidelines ...................................................72
Firststeps .........................................................72
CDdrive ..........................................................73
CleaningCDs ...................................................74
Computer .........................................................74
Filemanagement ...................................................75
Harddrive .........................................................75
Internet ...........................................................76
ii
Page 3

07334.book Page iii Friday, December 29, 2000 10:23 AM
Keyboard .........................................................77
Modem...........................................................77
Monitor...........................................................83
Mouse ...........................................................84
Power............................................................86
Printer ...........................................................86
ScanDisk .........................................................87
Sound ...........................................................87
Beforecallingfortechnicalsupport.....................................88
Technicalsupportresources ..........................................89
A Safety, Regulatory, and Legal Information ......................91
Index..............................................................103
iii
Page 4

07334.book Page iv Friday, December 29, 2000 10:23 AM
iv
Page 5

07334.book Page 1 Friday, December 29, 2000 10:23 AM
Computer
Basics
This chapter helps you get started with your new computer by:
■ Providing an introduction to your computer features
■ Describing the basic op eration of your computer
1
1
Page 6
07334.book Page 2 Friday, December 29, 2000 10:23 AM
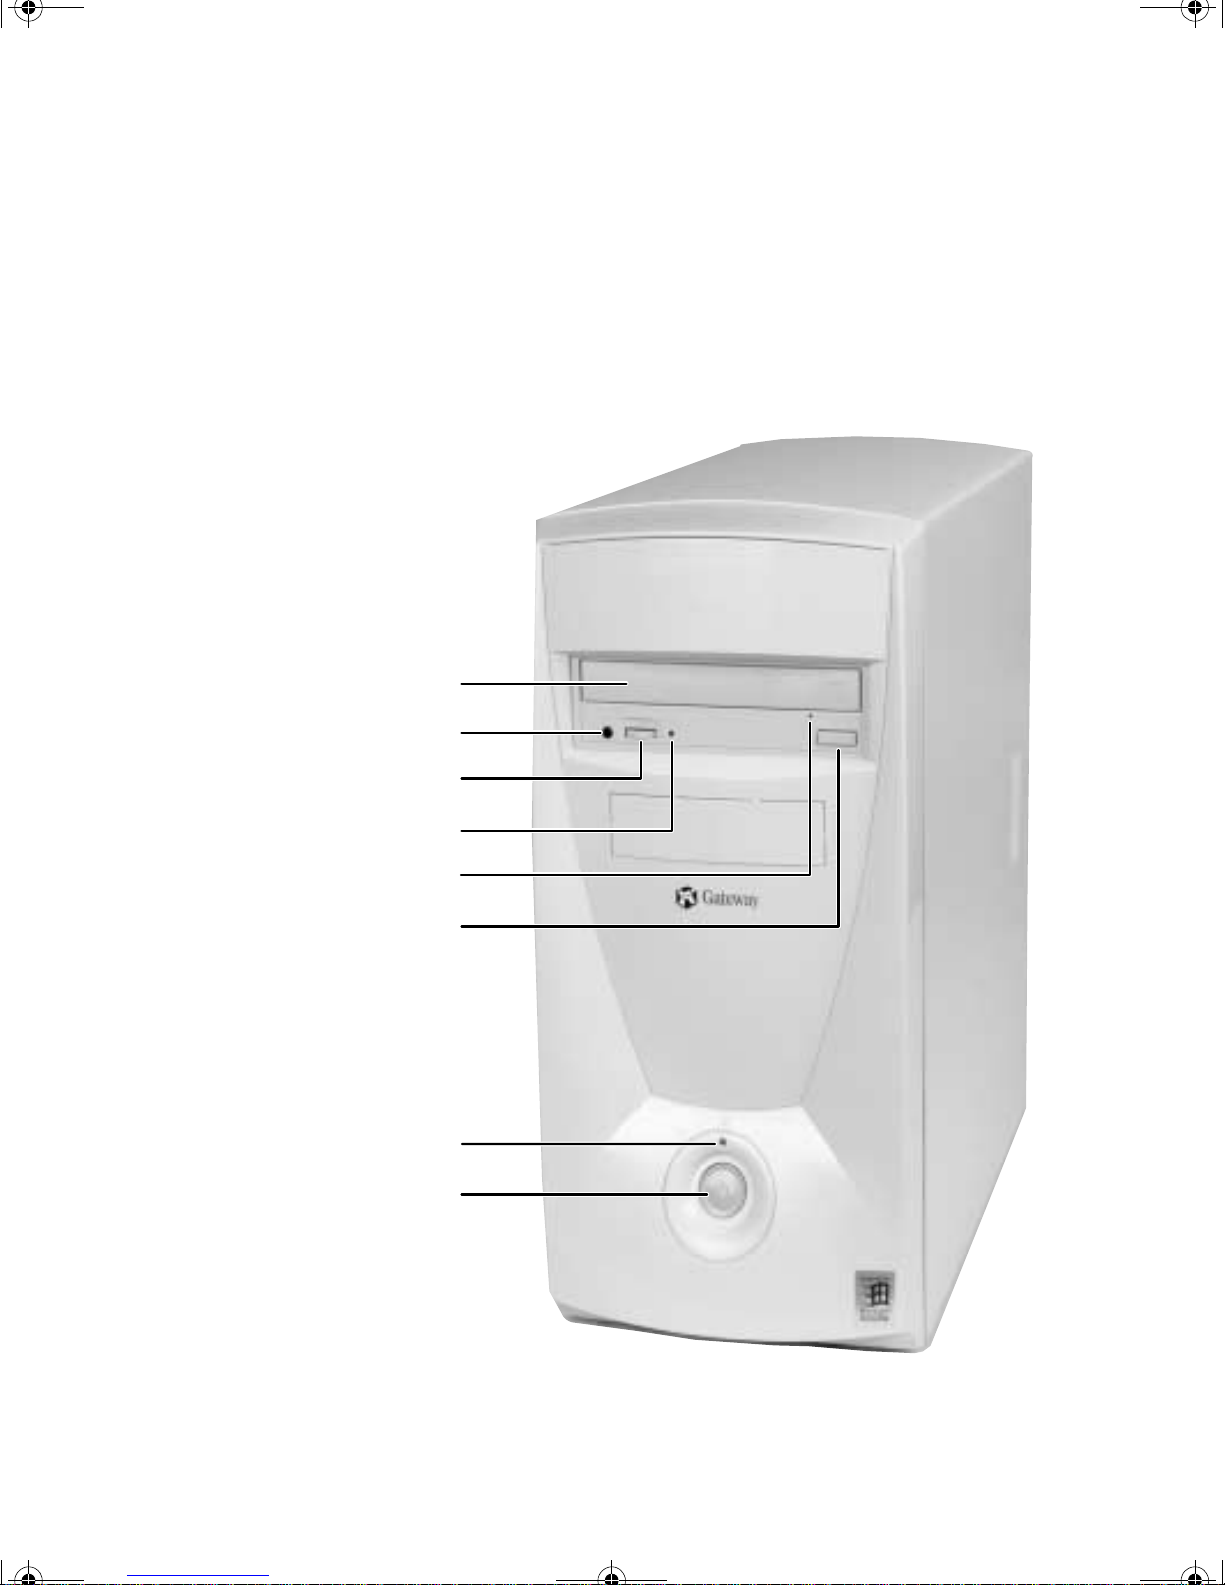
Controls
The following illustrations show the controls and features on the computer
and the keyboard.
Computer front
CD drive tray
CD drive headphone jack
Headphonejackvolumecontrol
CD drive activity light
CD drive manual eject
hole (insert paperclip)
CD eject button
Powerindicatorlight
Power button
2 Computer Basics
Page 7
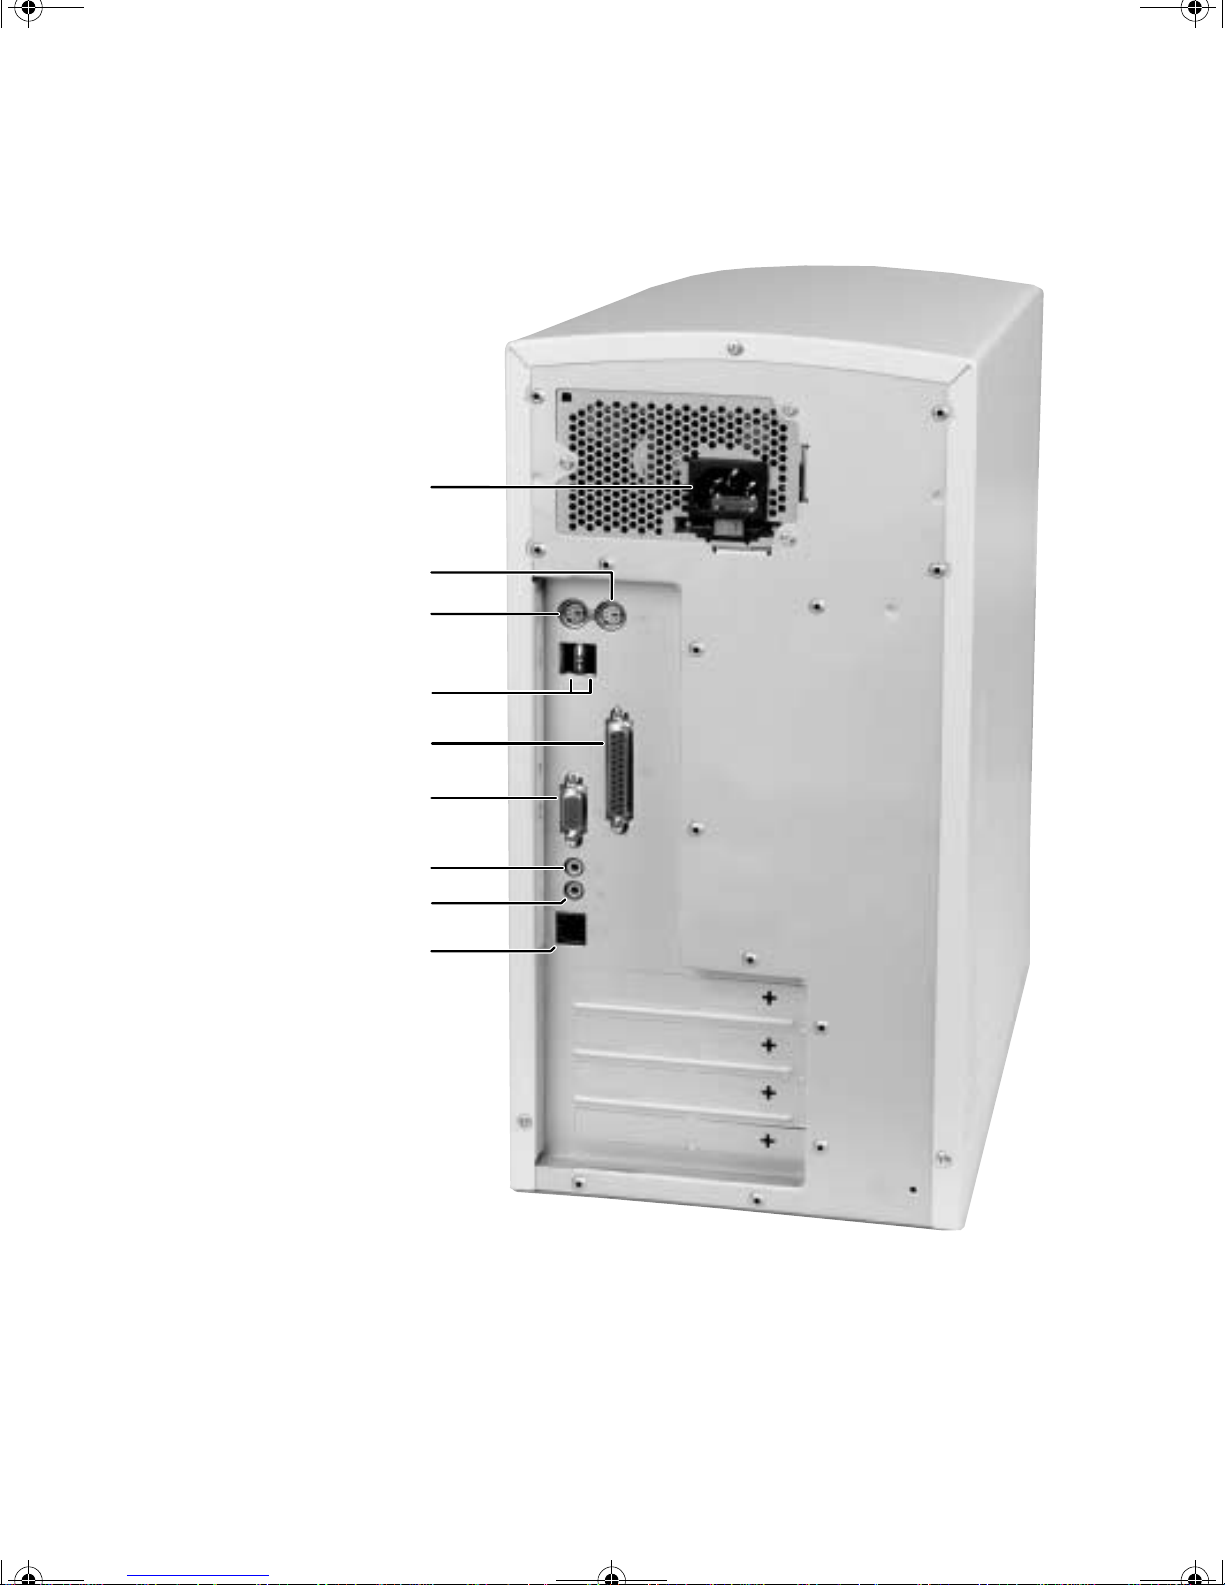
07334.book Page 3 Friday, December 29, 2000 10:23 AM
Computer back
Power cable connector
Mouse port
Keyboard port
USB ports
Printer (LPT) port
Monitor port
Speakers jack
Microphone jack
Modem jack
Controls 3
Page 8
07334.book Page 4 Friday, December 29, 2000 10:23 AM
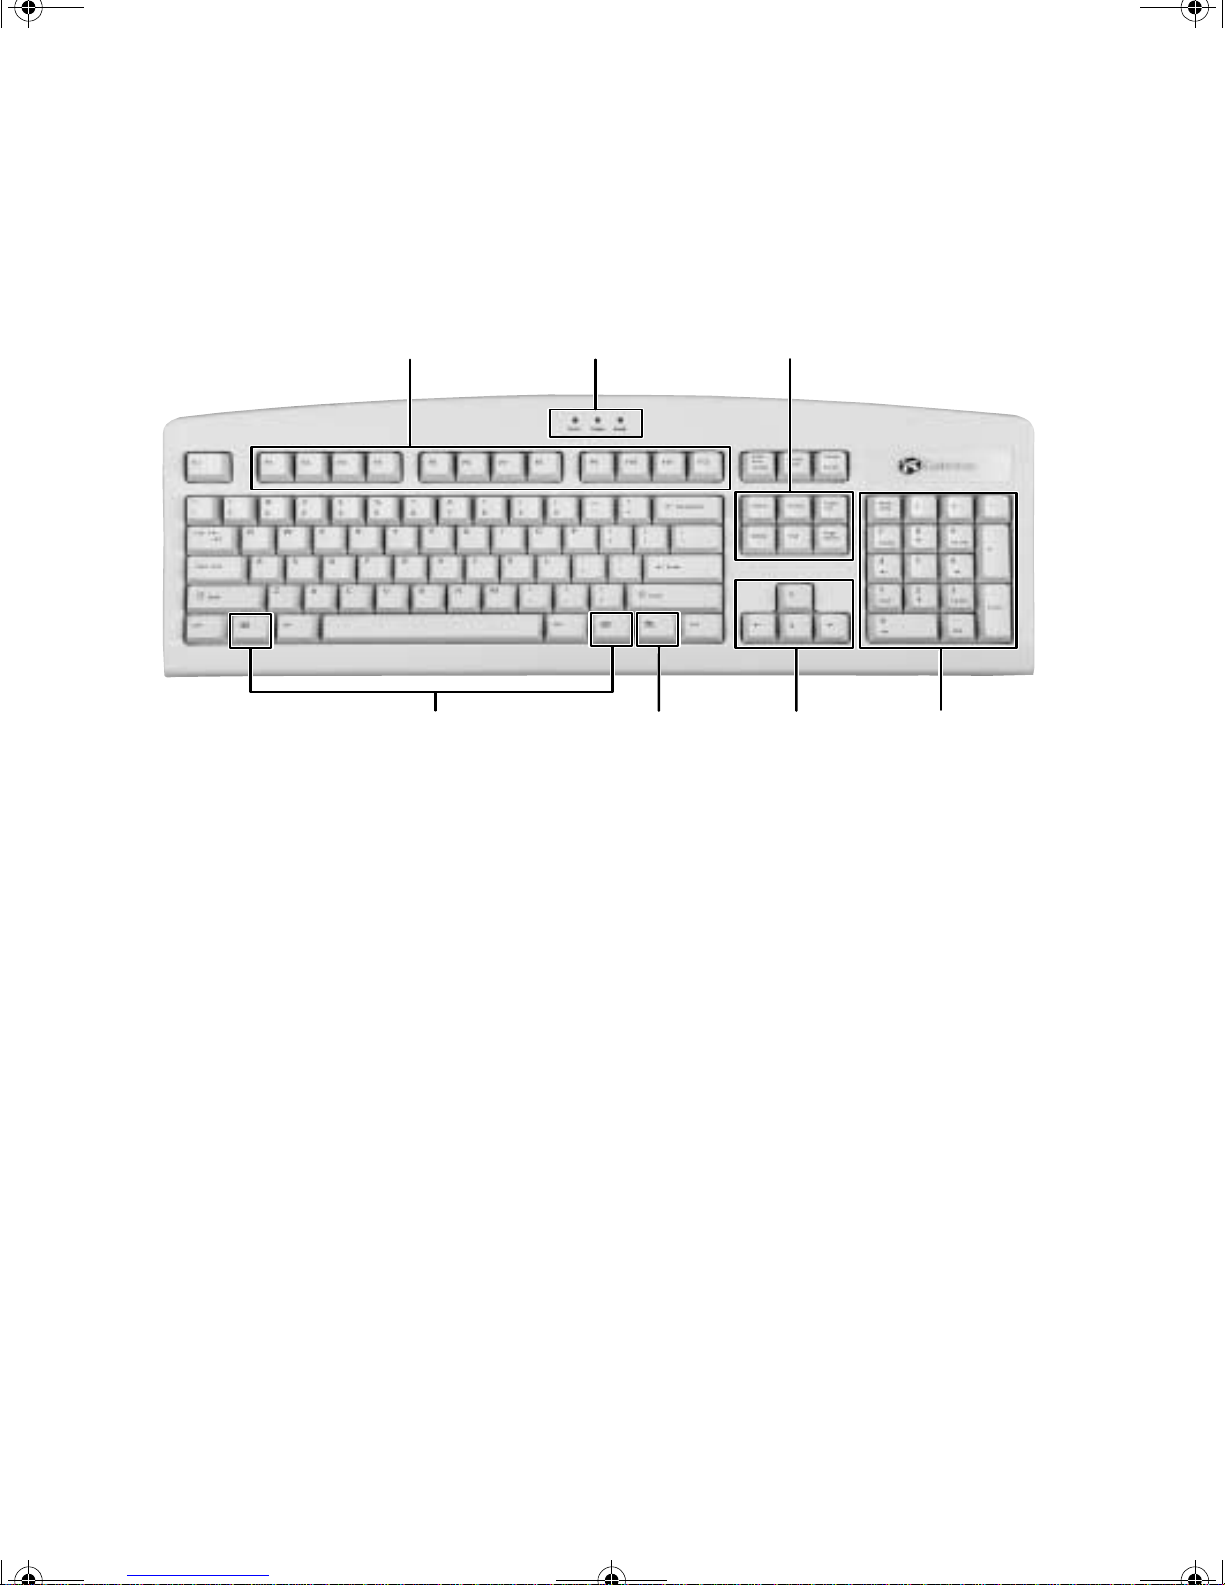
Keyboard features
Your system comes with a standard keyboard.
Function keys
Windows keys
■ Function keys start program actions. Refer to the program
Indicator lights
Application
key
Additional keys
Directional
keys
Numeric
keypad
documentation to find out more about the function key actions. Each
program uses different function keys for different purposes.
■ Indicator lights show if your NUM LOCK, CAPS LOCK, or SCROLL LOC K keys
are activated.
■ Additional keys move the cursor up the page, down the page, to the
beginning (home), or to the end of a document.
■ Win dow s ke ys open the Windows Start menu.
■ Application key opens a menu for the current program.
■ Direction al keys move the cursor up, down, right, or left.
■ Numeric keypad types numbers when NUM LOCK is activated.
4 Computer Basics
Page 9
07334.book Page 5 Friday, December 29, 2000 10:23 AM
Starting and turning off your
computer
To start your computer:
1 Connect the cables to your c omputer using the setup poster.
2 Press the power button on your monitor, then press the power button
on your computer.
3 Turn on any peripherals (speakers, printers, scanners, etc.). When the
computer is finished starting, the Windows desktop screen appears.
4 If you are starting your computer for the first time, follow the on-screen
setup instructions.
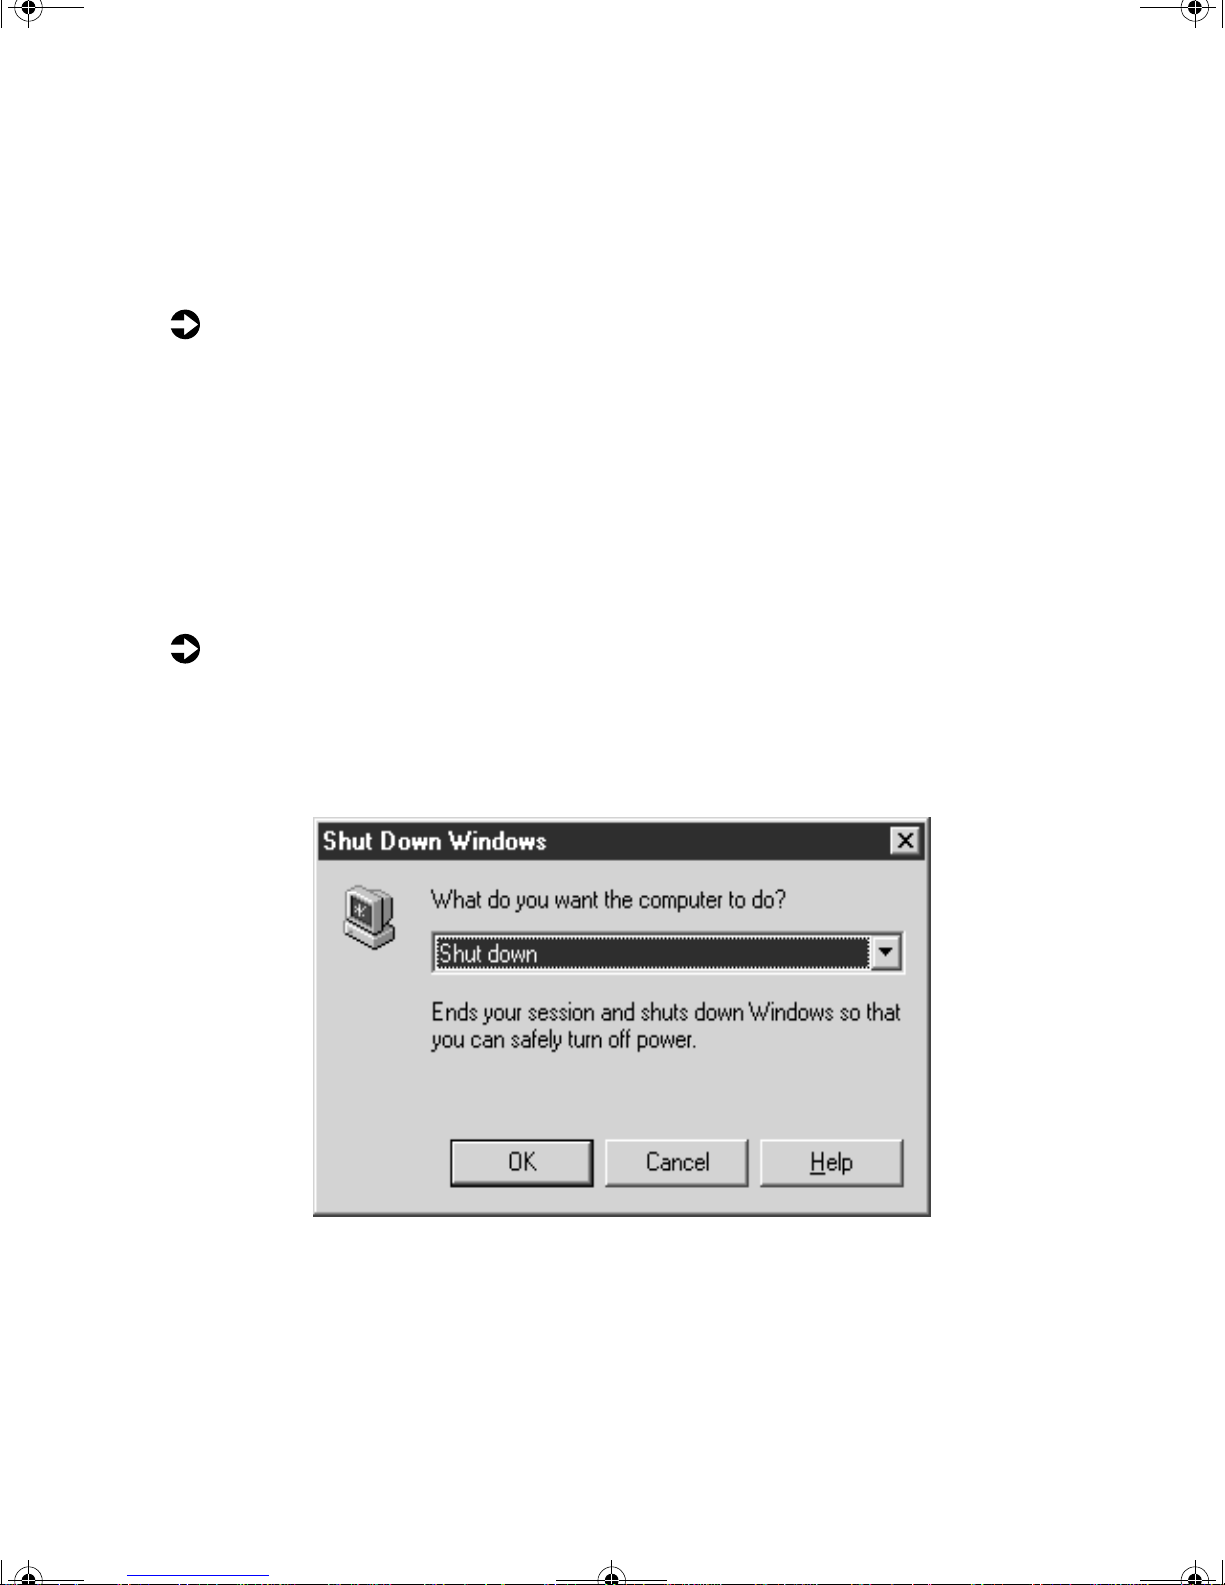
To turn off your computer:
1 Click Start, then select Shut Down. The Shut Down Windows dialog box
opens.
2 Select
Shut down from the drop-down list.
Starting and turning off your computer 5
Page 10

07334.book Page 6 Friday, December 29, 2000 10:23 AM
3 Click OK. Windows shuts down your computer.
If for some reason you cannot use the
shut down your computer , press the power button for abo ut five seconds.
Warning When you shut down your computer the power turns off,
butsome electrical current still flows through the computer.
To avoid possible injury from electrical shock, unplug the
power cable and modem cable from the wall outlets.
Shut down option in Windows to
Protecting from power source
problems
During a power surge, the voltage of electricity coming into your computer
can increase to far above normal levels and cause data loss or system damage.
Protect your computer and peripherals by connecting them to a surge
suppressor, which will absorb voltage surges and prevent them from reaching
your computer.
Warning High voltages can enter your computer through the phone
line connected to the modem. Protect your computer by
plugging the telephone line into a surge suppressor with
a modem connection. To further protect your computer
during an electrical storm, unplug both the surge
suppressor from the power outlet and the telephone line
from the phone jack.
During a power failure, an uninterr uptable p ower supply (UPS) supplies battery
power to your computer. Although you cannot run your computer for an
extended period of time with a UPS, a UPS lets you run your computer long
enough to save your work and shut your computer down normally.
6 Computer Basics
Page 11
07334.book Page 7 Friday, December 29, 2000 10:23 AM
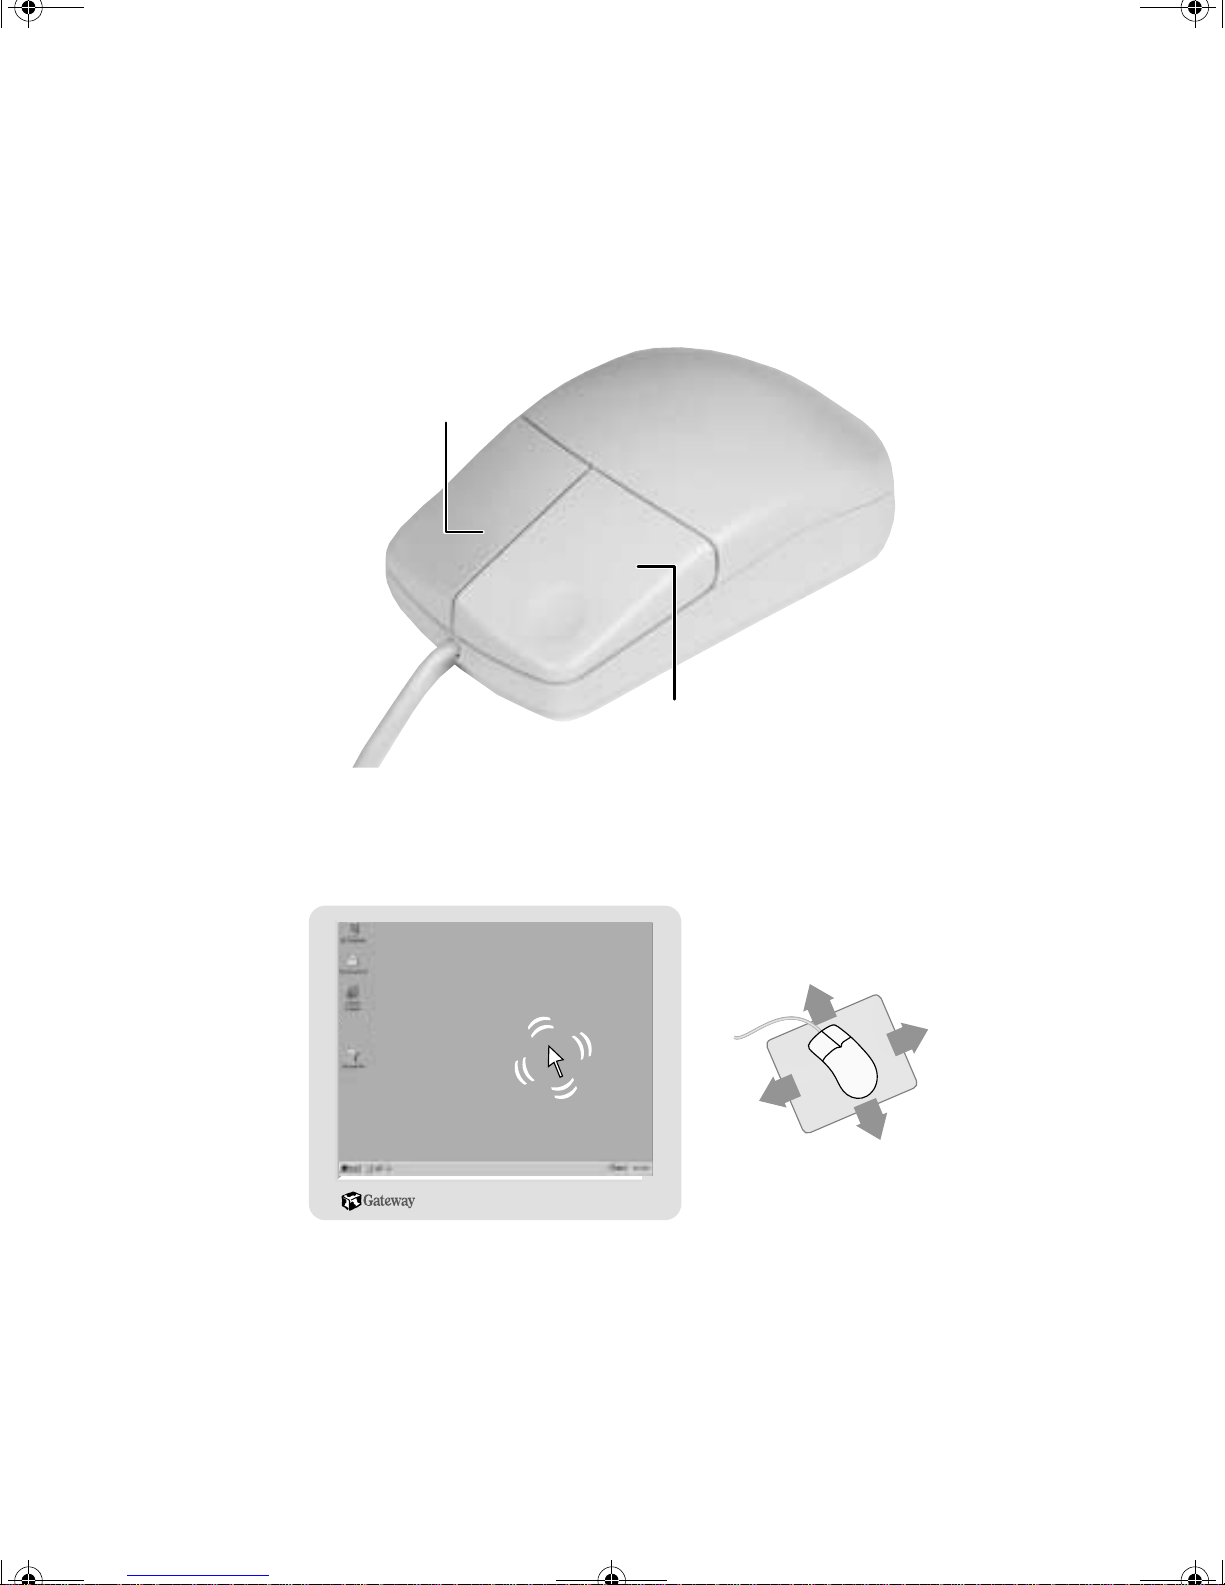
Using the mouse
The mouse is a devi ce that controls the pointer a nd cursor movement on
screen. This illustration shows the standard Gateway mouse.
Right button
Left button
As you move the mouse, the pointer (arrow) on the screen moves in the same
direction.
You can use the left and right buttons on your mouse to select objects on the
screen.
Using the mouse 7
Page 12

07334.book Page 8 Friday, December 29, 2000 10:23 AM
For more information on using special features of your mouse and changing
mouse settings, see HelpSpot.
To... Do this...
Move the pointer
on the screen
Selectanobjecton
the screen
Start a program or
openafilefolder
Access a shortcut
menu or find more
information about
an object on the
screen.
click
click
click,
click,
click
click
click
Move the mouse around on the mouse
pad. If you run out of space on your
mousepadandneedtomovethepointer
farther, pick up the mouse, set it down in
the middle of the mouse pad, then
continue moving the mouse.
Position the pointer over the object.
Quicklypress and release the left mouse
buttononce. This action is called clicking.
Position the pointer over the object.
Quicklypress and release the left mouse
button twice. This action is called
double-clicking.
Position the pointer over the object.
Quickly press and release the r ight
mouse once. This action is called
right-clicking.
Movean object on
the screen.
click
click
8 Computer Basics
and drag
and drag
Positionthepointerovertheobject.Press
the left mouse button and hold it down.
Move(drag) the object to the appropriate
part of the screen, then release the
button.
Page 13
07334.book Page 9 Friday, December 29, 2000 10:23 AM
Working safely
Before using your computer , read the following recommend ations for setting
up a safe and comfortable work area and avo iding discomfort and strain.
Hands and arms are
parallel to the floor
Top of monitor is not
higher than eye level
Feet are flat
on the floor
Improving monitor legibilityand reducingeye strain
Sunlight or bright indoor lighting should not reflect off the screen of the
computer monitor or shine directly into your eyes.
■ Position the computer desk and monitor so that you can avoid glare on
your screen and light shining directly into your eyes.
■ Reduce bright light by installing shades or curtains on windows.
■ Use soft, indirect lighting in your work area. Do not work on your
computer in a dark room.
■ Avoid focusing your eyes on your computer screen for long periods o f
time. Look away from your computer occasionally, perhaps focusing on
a distant object.
Working safely 9
Page 14

07334.book Page 10 Friday, December 29, 2000 10:23 AM
Setting up your computertable and chair
When you are setting up your computer table and chair, make sure that you
use a computer table that is the appropriate height and use a chair that helps
you maintain good posture, distributes your weight evenly, and keeps your
body relaxed.
■ Select a flat surface for your computer table.
■ Adjust the height of the computer table so that y our ha nds a nd ar ms are
positioned parallel to the floor when you use the keyboard and mouse.
■ Position your chair so that the keyboard is at or slightly below the level
of your elbow, letting your shoulders relax while you type comfortably.
■ Adjust the height of your chair so that your knees are slightly higher tha n
your hips. You can use a foot rest to adjust the height of your knees and
remove the pressure on the back of your thighs.
■ Adjust the back of the chair so that it supports the lower curve o f your
spine. You can also use a pillow or cushion to provide extra back support.
Setting up your computer andcomputer accessories
■ Set up the monitor so that the top is no higher than eye level.
■ Place your keyboa rd and mouse at a comf ortable distance. You should
be able to reach them without stretching.
■ Set paper holders at the same height and distance as the computer
monitor.
Sitting at your computer
■ Avoid bending, arching, or angling your wrists. Make sure that they are
in a relaxed position when you type.
■ Do not slouch for ward or lean back too fa r.
■ Sit with your back straight so that your knees, hips, and elbows form
approximately 90 de gree angles when you work.
■ Avoid twisting your torso or neck.
10 Computer Basics
Page 15

07334.book Page 11 Friday, December 29, 2000 10:23 AM
Avoiding discomfort and injury from repetitive strain
■ Vary your activities to avoid excessive repetition.
■ Take bre aks so that you can change your position, stretch your muscles,
and relieve your eyes.
■ Find ways to break up the work day, scheduling a variety of tasks.
Working safely 11
Page 16

07334.book Page 12 Friday, December 29, 2000 10:23 AM
12 Computer Basics
Page 17

07334.book Page 13 Friday, December 29, 2000 10:23 AM
Getting Started
This chapter helps you get started with your new computer by walking you
through the initial Windows Welcome screens. Set up your system by
following the Setup poster, then start your computer.
2
13
Page 18

07334.book Page 14 Friday, December 29, 2000 10:23 AM
To get started:
1 Start your computer. The Windows Welcome window opens.
2 Click
Next on the first Windows Welc ome window. An option al mouse
tutorial opens.
3 You may complete or skip the mouse tutorial.
4 Click to select your time zone from the list, then click
14 Getting Started
Next.
Page 19
07334.book Page 15 Friday, December 29, 2000 10:23 AM
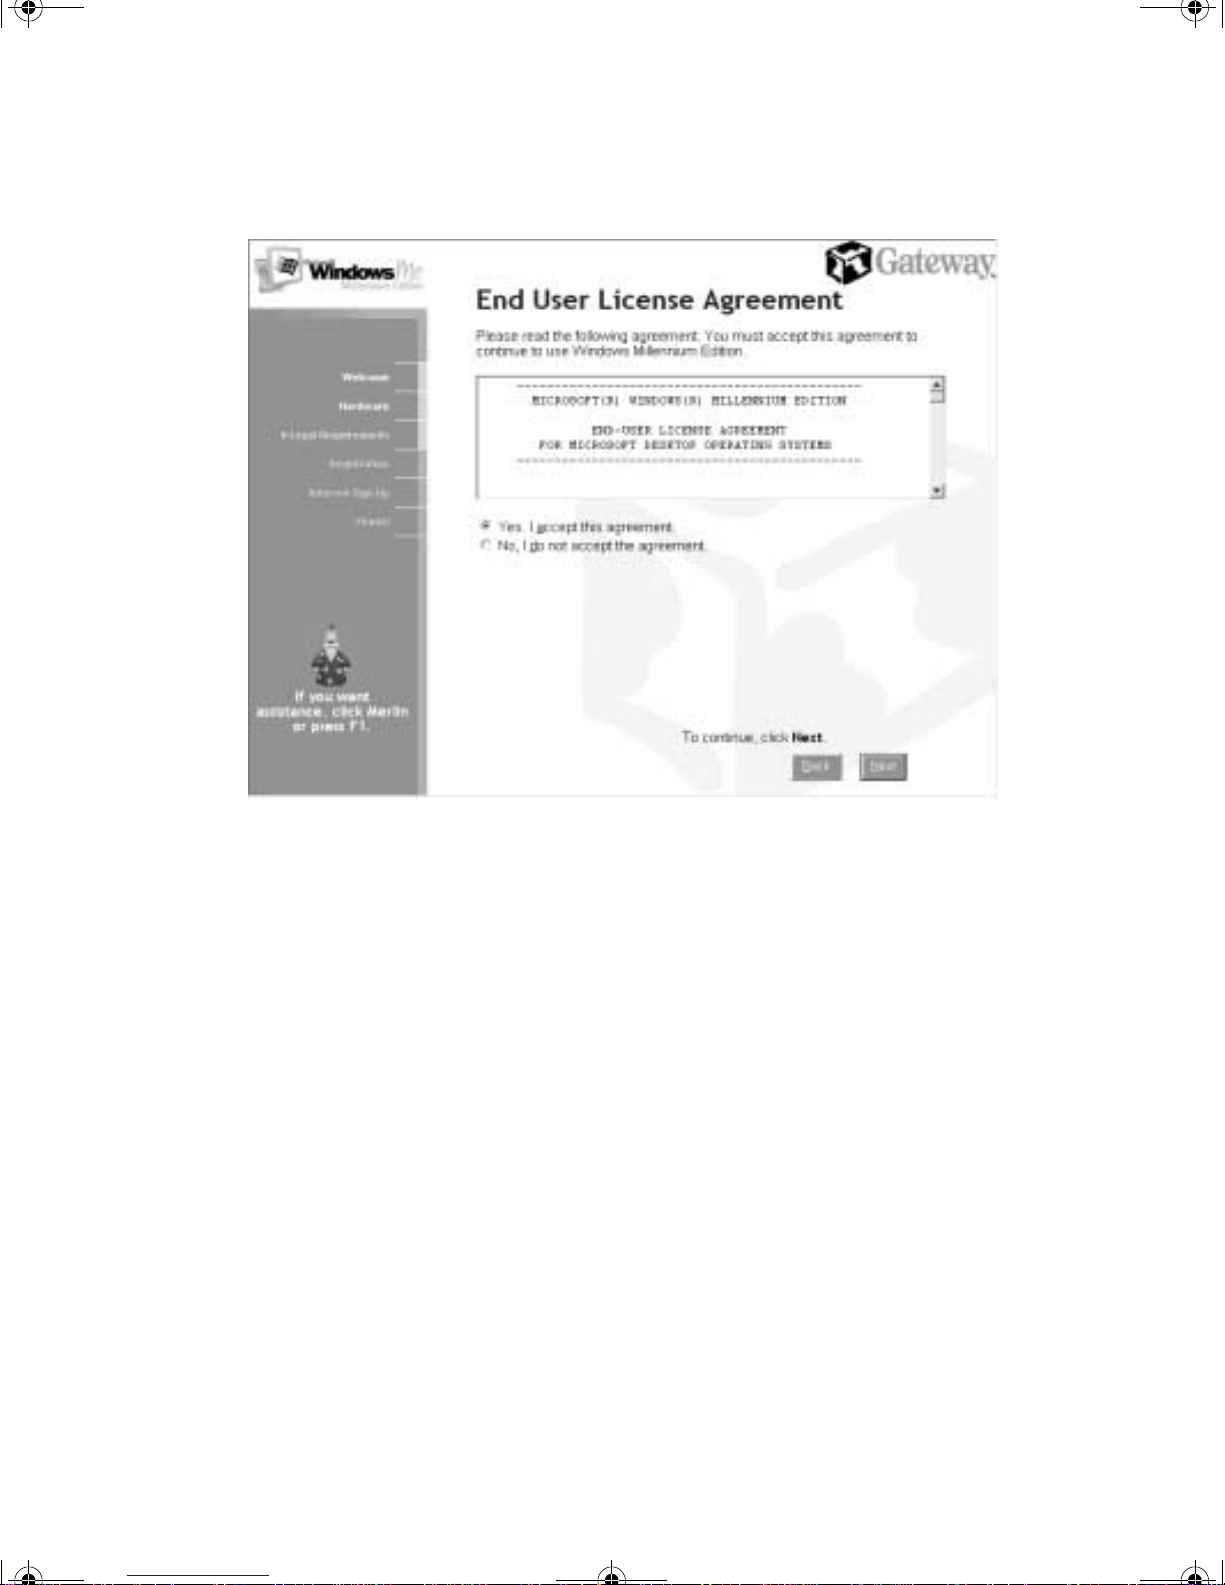
5 Read th e End User License Agreement, then select Yes and click Next.
6 Register your copy of Windows with Microsoft by selecting
register online
, then click Next.
Yes, I want to
After completing the registration process, the Get connected to the
Internet window opens.
- OR Do not register you copy of Windows by selecting
register at this time
, then click Next.
No, I do not want to
The Get connected to the Internet window opens.
15
Page 20
07334.book Page 16 Friday, December 29, 2000 10:23 AM
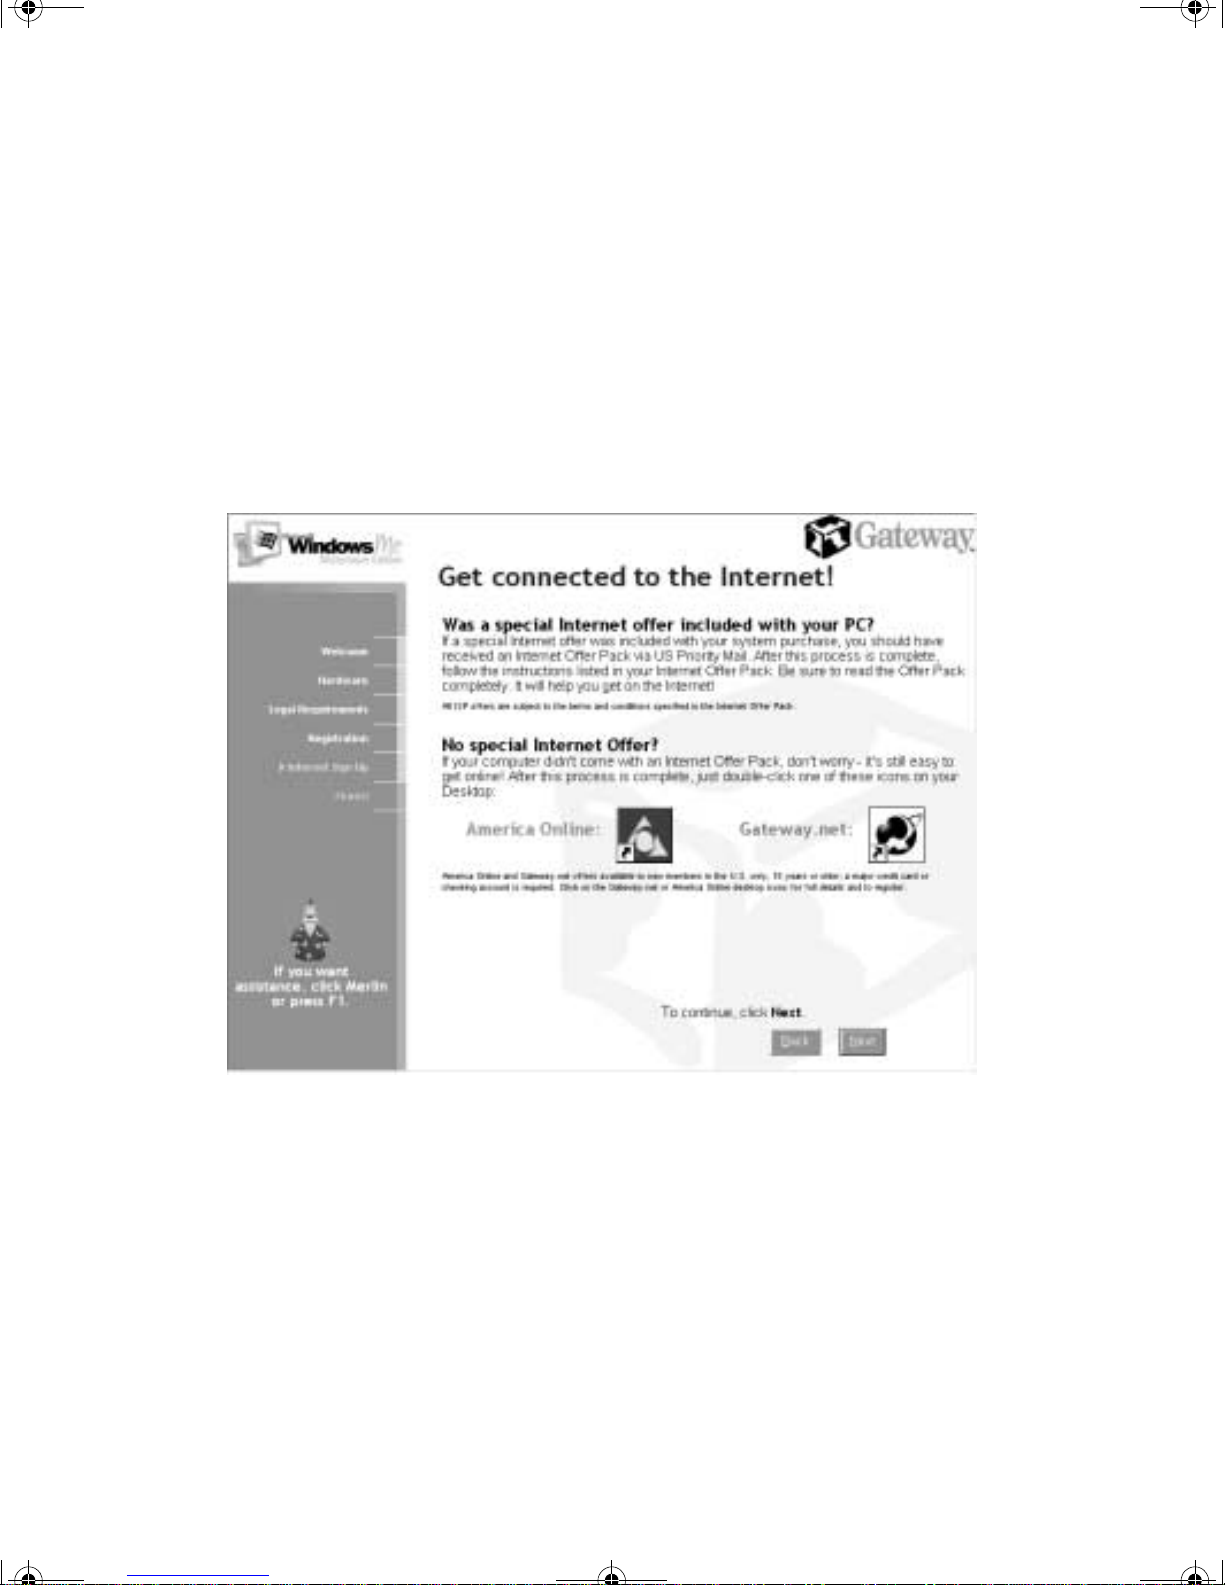
7 Read the information in this window to determine which Internet
connection option you have.
If a special Internet offer was included with your system purchase you
should follow the instructions in your Internet Offer Pack.
- OR If a special Internet offer was not included with your system purchase you
can sign up for the America Online or Gateway.net ISPs by
double-clicking the
Desktop.
America Online or Gateway.net icons on the Windows
8 Click
Next.
16 Getting Started
Page 21

07334.book Page 17 Friday, December 29, 2000 10:23 AM
9 Click Finish to complete the Windows setup and start using your
computer.
17
Page 22

07334.book Page 18 Friday, December 29, 2000 10:23 AM
18 Getting Started
Page 23

07334.book Page 19 Friday, December 29, 2000 10:23 AM
Getting Help
This chapter tells you about additional information resourc es available to help
you use your computer.
If these resources do not provide the information you need, technical support
resources are available .
3
19
Page 24

07334.book Page 20 Friday, December 29, 2000 10:23 AM
For more information . . .
Gateway has provided these additional resour ces to help you get the most out
of your Gateway PC.
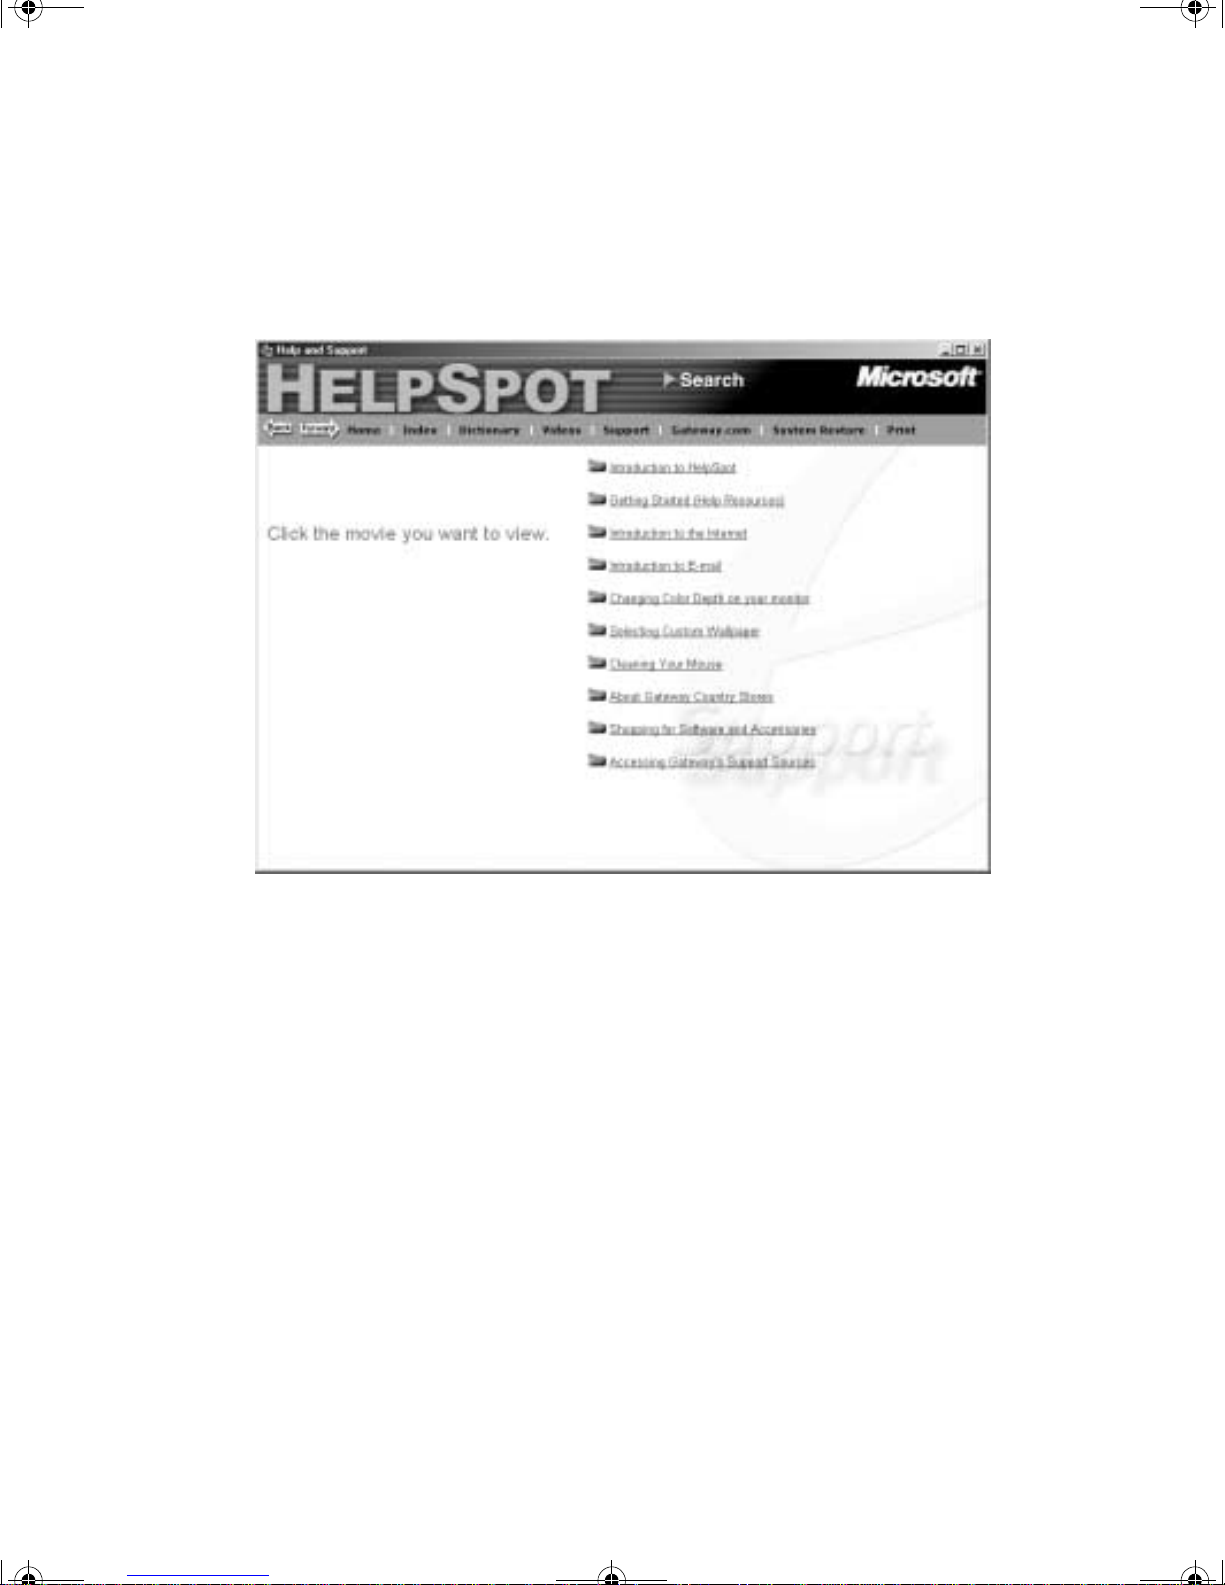
HelpSpot
HelpSpot is an easily accessible set of Help files, troubleshooters, instructional
videos, and automated support . Use HelpSpot to answer questions about
Windows and to help you qu ickly di scover and use the ma ny features of y our
Gateway computer.
To start HelpSpot:
1 Click Start, then select Help, or double-click the Gateway Help & Support
desktop icon.
HelpSpot opens.
20 Getting Help
Page 25
07334.book Page 21 Friday, December 29, 2000 10:23 AM
2 Find help or information by clicking a link, performing a search, or
browsing the index.
3 To watch an introductory video about HelpSpot, click
the main HelpSpot page, then click the
Introductionto HelpSpot video link.
Gateway Videos on
For more information . . . 21
Page 26
07334.book Page 22 Friday, December 29, 2000 10:23 AM
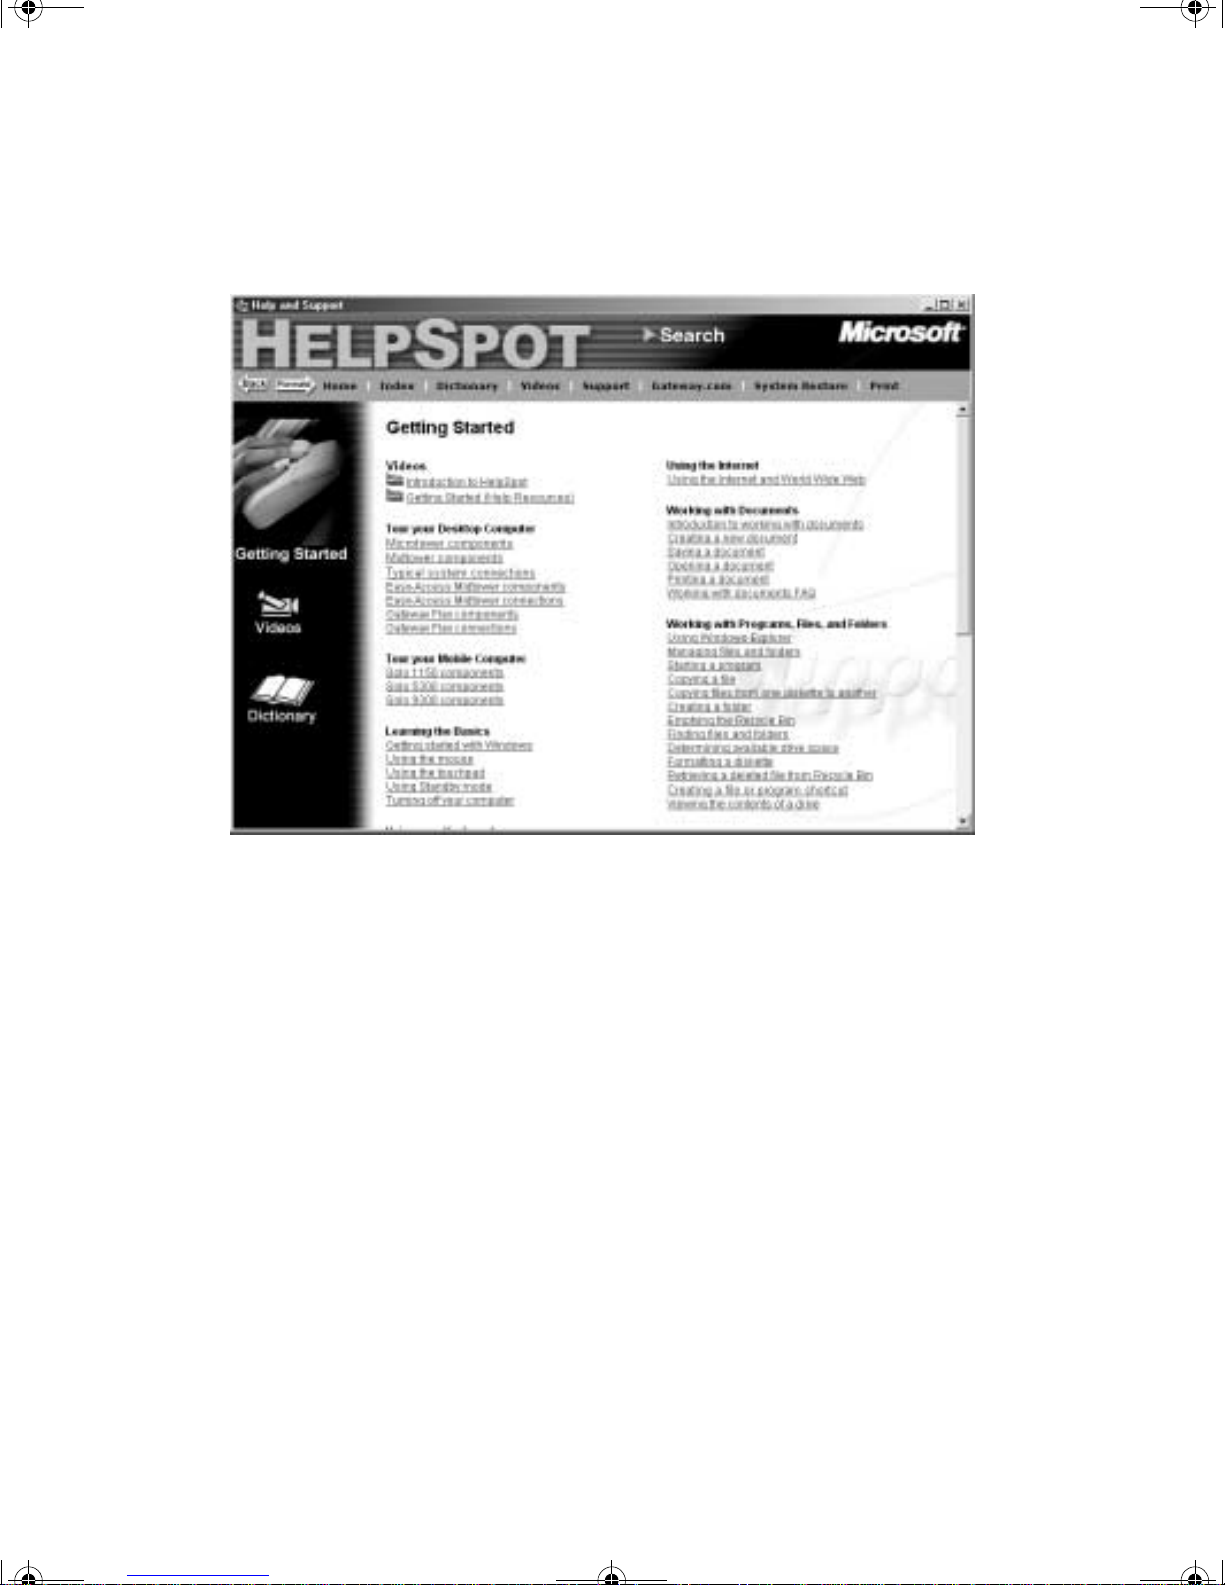
4 To learn about how to work with documents and programs, use your
mouse, and much more, click the
main page.
Getting Started link on the HelpSpot
22 Getting Help
Page 27
07334.book Page 23 Friday, December 29, 2000 10:23 AM
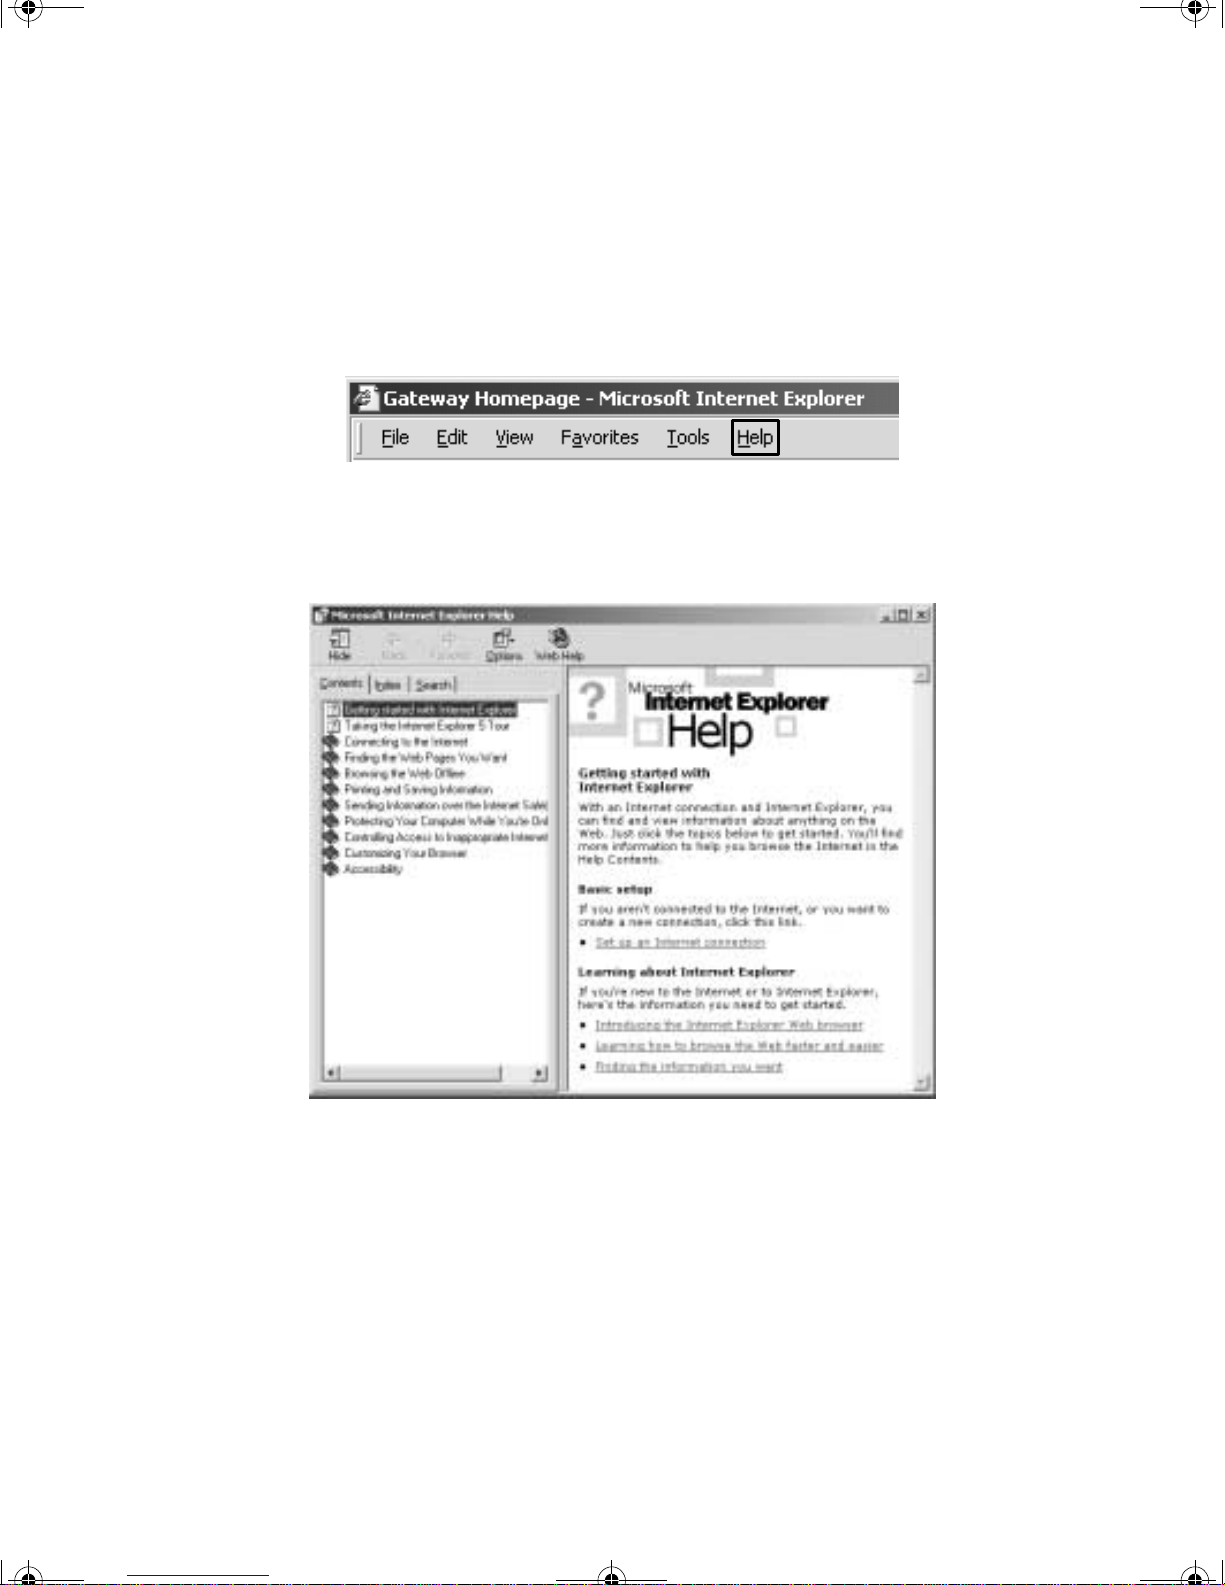
Online help
Many programs provide information online so you can research a topic or
learn how to perform a task while you are using the program. Most online
help information can be accessed by selecting a topic from a
by clicking a
You can search for information by viewing the help contents, checking the
index, searching for a topic or keyword, or browsing through the online help.
Help button.
Help menu or
For more information . . . 23
Page 28
07334.book Page 24 Friday, December 29, 2000 10:23 AM
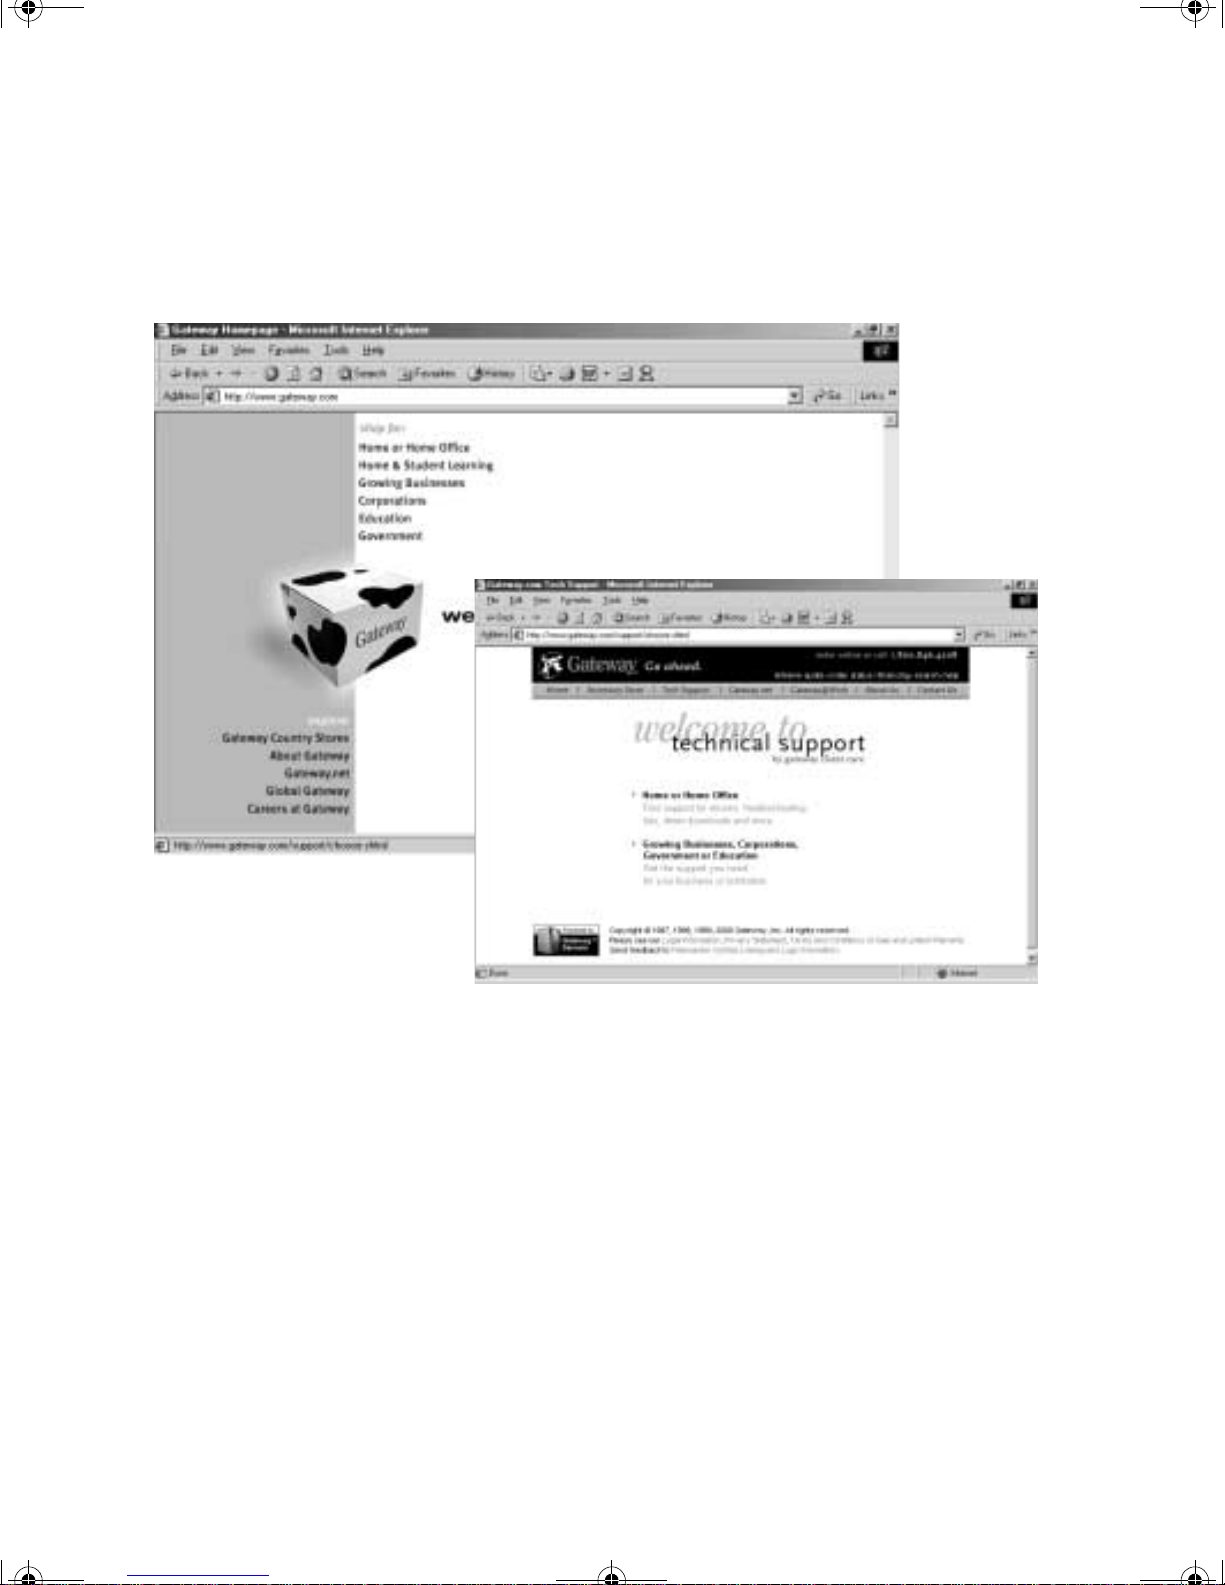
Gateway Web site
Gateway provides a variety of information on its Web site to help you use
your computer.
Visit the Gateway Web site at www.gateway.com for:
■ Technical documentation and product manuals
■ Technical tips and support
■ Hardware drivers
■ A glossary of computer terms
■ Frequently asked questions (FAQs)
For more information about connecting to the Internet, see “Learning about
the Internet” on page 42.
24 Getting Help
Page 29

07334.book Page 25 Friday, December 29, 2000 10:23 AM
Windows
Basics
Read this chapter to get basic information on how to:
■ Wo rk on the Windows desktop
■ Wo rk with document and program windows
■ Manage files and folders
■ Use shortcuts
For more detailed information about Windows, see HelpSpot.
4
25
Page 30
07334.book Page 26 Friday, December 29, 2000 10:23 AM
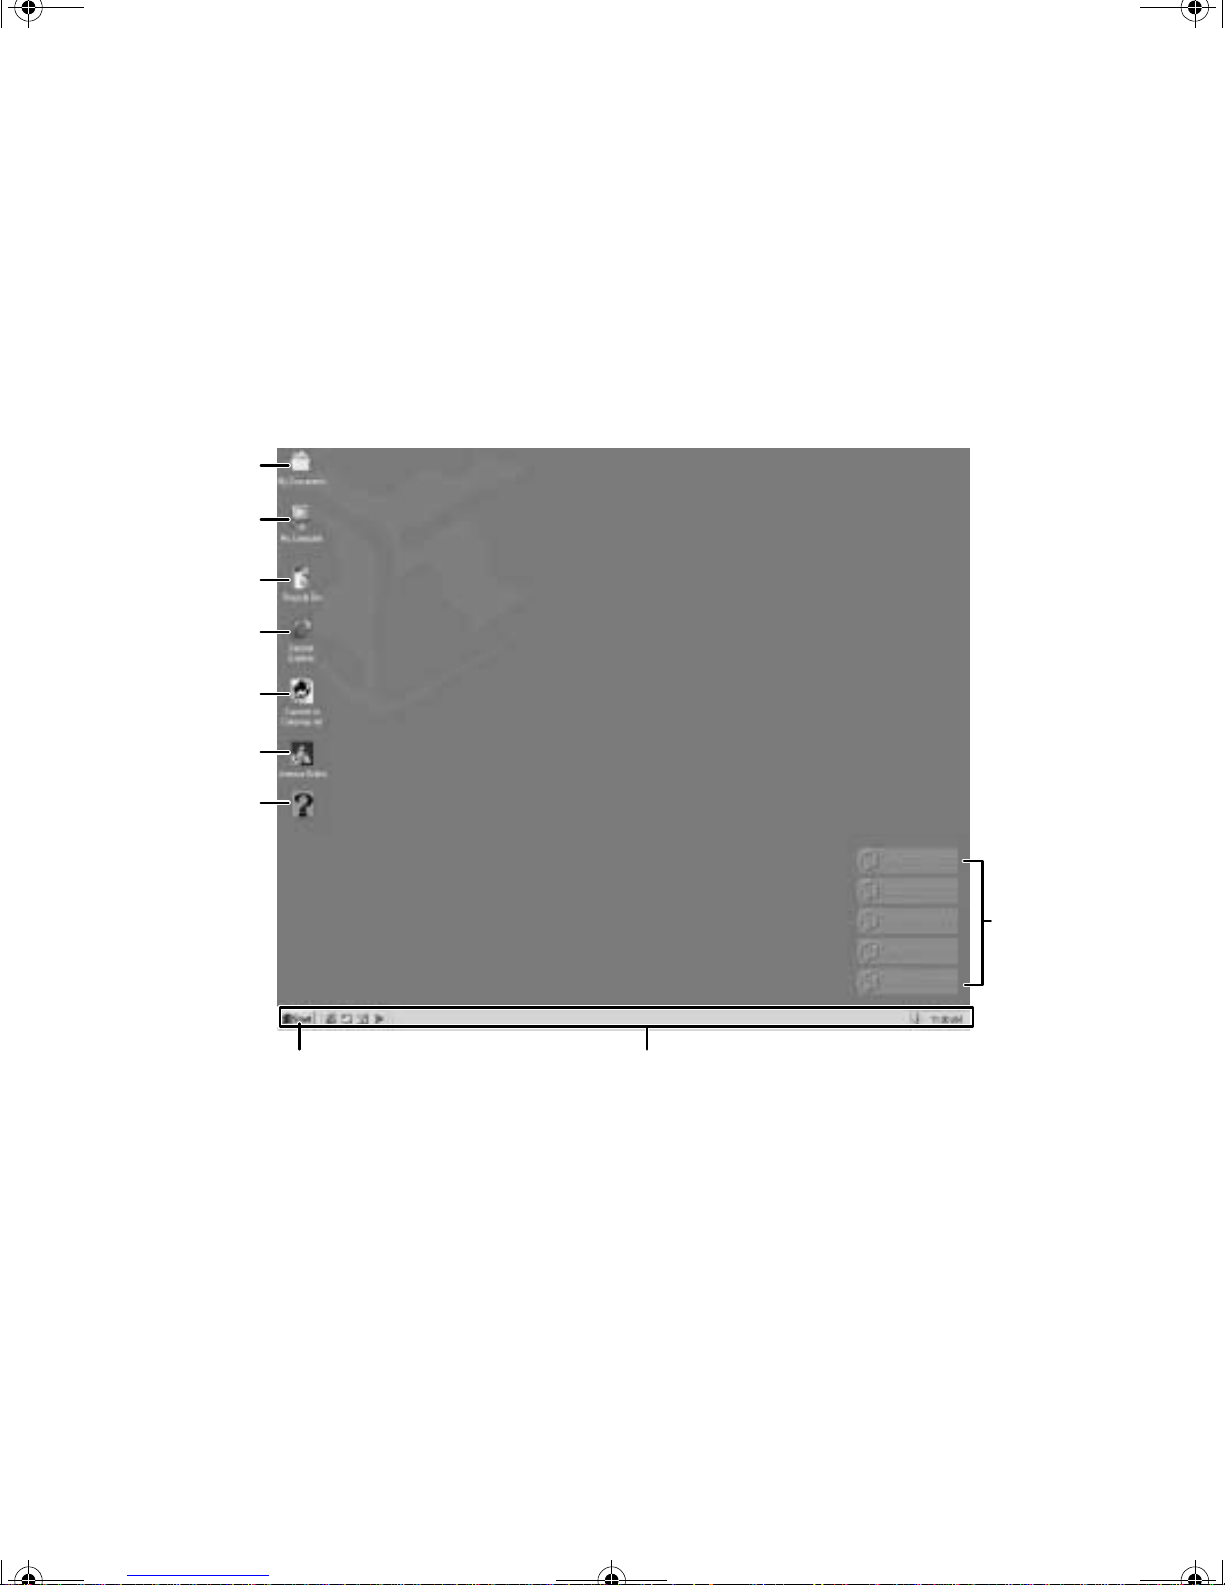
About the Windows environment
After your computer starts, the first screen you see is the Windows desktop.
The desktop is like the top of a real desk. Think of the desktop as your
personalized work space where you open programs and perform other tasks.
Your desktop may be different from the example shown below , depending on
how your computer is set up.
My
Documents
My
Computer
Recycle
Bin
Internet
Explorer
Gateway.net
America
Online
HelpSpot
Quick
Links
Start button Taskbar
26 Windows Basics
Page 31

07334.book Page 27 Friday, December 29, 2000 10:23 AM
Desktop components
Icons are graphic representations of objects on the desktop that you select and
open, such as a drive, folder, document, or program. Buttons are graphic
representations of controls that you use to change the state of desktop
elements such as the window size.
Desktop icons, bu ttons, an d
elements
Description
My Documents is a folder where you store your personal
files. You can create other folders to save files in, but My
Documents is easy to find because it is on the desktop.
Double-click My Documents to view your personal files
and folders.
The My Computer icon provides access to drives and
other computer controls. Double-click the My Computer
icon to view the drives and folders on y our computer.
Driveiconsrepresentthevariousdrivesonyourcomputer,
such as the hard drive and CD drive. Double-click a drive
icon to view files and folders located on the drive.
The Recycle Bin is where files, folders,and programs that
youdiscardedare stored. You must emptytheRecycleBin
to permanently delete them from your computer. For
instructions on how to use the Recycle Bin, see HelpSpot.
About the Windows environment 27
Page 32

07334.book Page 28 Friday, December 29, 2000 10:23 AM
Desktop icons, buttons, and
elements
Description
Microsoft Internet Explorer is a program called a browser
that lets you view Web sites and Web pages on the
Internet. Double-click this icon to open the browser.
Gateway has prov ided an easily accessible interactive
guide called HelpSpot,designedtoprovidehelp
information and let you quickly discover and use the
featuresofyourcomputer.Double-clicktheHelpSpoticon
to begin.
The Gateway.net and AOL icons let you connect to the
Gateway.net
Provider).
Double-click either the Gateway.net or AOL icon to dial
one of the services.
The Start button provides access to programs, files, help
forWIndowsandotherprograms,andcomputertools and
utilities.
Click the Start button, then open a file or program by
clicking (selecting) an item on the menu that opens.
SM
or America Online®ISP (Internet Service
The Quick Links hotlinks provide convenient access to
beneficial Web sites.
Visit the Web site shown on the Quick Link by clicking the
link with your mouse.
The taskbar is the bar at the bottom of the screen containing the Star t button on the left and
a clock on the right. Other buttons on the taskbar represent programs that are running.
Click a program taskbar button to activate its window.
28 Windows Basics
Page 33

07334.book Page 29 Friday, December 29, 2000 10:23 AM
Windowcomponents
When you double-click the icon for a drive, fo lder, document, or program a
window opens on the desktop. This example shows
My Com puter after double-clicking the
Local Disk (C:) in
Local Disk (C:) icon.
Title bar
Menu bar
Every program window looks a little different because each has its own menus,
icons, and controls. To find out more about window controls, see HelpSp ot.
Window element Description
The title bar is the horizontal bar at the top of a
windowthatshowsthenameoftheprogramand
document.
Clicking the minimize button reduces the active
window to a button on the taskbar. Clicking the
programbuttoninthetaskbaropensthe window
again.
Close
button
Maximize
button
Minimize
button
Clickingthe maximizebuttonexpandstheactive
window to fit the entire screen. Clicking the
maximizebuttonagainrestoresthewindowtoits
former size.
Clicking the close button closes the active
window or program.
Clickinganitemonthemenubar startsanaction
such as Print or Sa ve.
About the Windows environment 29
Page 34

07334.book Page 30 Friday, December 29, 2000 10:23 AM
Using the Start menu
You can start programs, open documents, customize your system, get help,
search for files and folders, and more using the
T o open the Start menu, click the Start button on the lower left of the Windows
desktop. The Start menu opens showing you the first level of menu items.
When you move the mouse pointe r over any menu item that has an arrow
next to it, another menu, or submenu, opens and reveals related files,
programs, or commands. Click a file or program to open it.
Start menu.
30 Windows Basics
Page 35

07334.book Page 31 Friday, December 29, 2000 10:23 AM
Working with files and folders
Y ou can organize your documents and programs to s uit your preferences much
like you would store information in a file cabinet. You can store these files
in folders and copy, move, and delete the information just as you would
reorganize and throw away information in a file cabinet.
About drives
Drives are like file cabinets because they hold many files and folders. A
computer almost always has more than one drive. Each drive has a letter, for
example
Local Disk (C:) for the main drive.
Drives
To see the files and folders on a drive, double-click the drive ico n. If you do
not see the contents of a drive after you double-cli ck the drive icon, click
the entire contents of this drive
.
View
Working with files and folders 31
Page 36

07334.book Page 32 Friday, December 29, 2000 10:23 AM
About folders and files
Folders are much like the folders in a file cabinet. They contain files and other
folders.
Files are much like paper documents – letters, spreadsheets, and instructions –
that you keep on your computer. In fact, all information on a computer is
stored in files.
Folders
Files
To create a folder:
1 Double- click the My Computer icon on the desktop. The My Computer
window opens.
2 Double-click the drive or folder, for example
want to put the new folder.
The drive or folder window opens. (If you do not see the contents of the
drive or folder, click
3 Select
File, then New, then Folder. The new folder is created.
View the entire contents...)
4 Type a name for the folder, then press E
appears under the fol der.
Local Disk (C:), where you
NTER. The new folder name
32 Windows Basics
Page 37

07334.book Page 33 Friday, December 29, 2000 10:23 AM
Using Your
Computer
This chapter provides basic information about your Gateway computer. Read
this chapter to find out how to:
■ Use the CD drive
■ Adjust the volume
■ Create, save, and print documents
5
33
Page 38

07334.book Page 34 Friday, December 29, 2000 10:23 AM
Using the CD drive
You can use your computer to enjoy a wide variety of multimedia features,
such as making record ings and listening to au dio CDs.
Inserting a CD
CD drive
To insert a CD:
1 Press the CD drive eject button. The CD dr ive tray opens.
2 In sert the C D in the tr ay with th e label u p.
CD drive eject
button
CD drive
activity light
34 Using Your Computer
Page 39

07334.book Page 35 Friday, December 29, 2000 10:23 AM
.
Important When you place a CD in the tray, make sure that the label
3 Press the eject button again. The CD drive tray closes.
4 Depending on the type of CD you inserted, a program opens, such as an
audio CD music player for music CDs or a program fo r program CDs.
Find out more about how to work with a particular program by reading its
online help, or by using HelpSpot.
side is facing up. If the disc has two playable sides, place
the disc so that the name of the side you want to play is
facing up.
Using the CD drive 35
Page 40

07334.book Page 36 Friday, December 29, 2000 10:23 AM
Adjusting the volume
You can use the volume controls to adjust the overall volume and the volume
of specific sound devices in your computer . Depending on the sound hardware
installed in your computer, you may have additional volume controls
available through the
To adjust overall volume level:
■ Click the speaker icon on the taskbar, then drag the slider to change the
volume or click to select the
- OR If you have external speakers, turn the volume control on the front of
the speakers.
Start menu.
Mute check box.
To adjust specific volume levels:
1 Double-click the speaker icon on the taskbar. The Volume Control dialog
box opens.
If the device does not appear in the Volume Control dialog box, select
Options, Properties, select the audio device you want to appea r , then click
OK.
2 Drag the volume level and balance sliders for the device you want to
adjust, then close the window. For more information about the volume
controls, select
36 Using Your Computer
Help in the Volume Cont rol dialo g box.
Page 41

07334.book Page 37 Friday, December 29, 2000 10:23 AM
Working with documents
Whether you are creating a spreadsheet, writing a letter, or drawing a picture,
you are working with a document (file). The basic methods of creating, savi ng,
opening, and printing a docume nt apply to most programs.
The following examples illustrate the concepts for creating, saving, opening,
and printing a document in Microsoft
Microsoft W ord, similar procedures apply to other programs such as Microsoft
Excel, Microsoft Works, and Microsoft Publisher.
For more information about using a program, select
Creating a new document
To create a new document:
1 Click Start, then select Programs, then Microsoft Word. Microsoft Word
starts and a blank do cument opens.
2 Click
File, then select New. The document templates dialog box opens.
®
Word. Though the examples use
Help on the menu bar.
3 Click a tab for the type of document you want to create, select a
docume nt temp late sty le, the n click
4 Begin composing your document. Use the menus and too lba r buttons at
the top of the window to format the document.
OK. The document template opens.
Working with documents 37
Page 42

07334.book Page 38 Friday, December 29, 2000 10:23 AM
Saving a document
After you create a document, you need to save it if you want to use it later.
To save a document in Microsoft Word:
1 Select File, then Save. The Save As dialog box opens.
2 Select the folder from the
then click
File
folder
File
name
Save.
Opening a document
Save in drop-down box, type the new file name,
To view, revise, or print an existing document, you need to open it. Open
the document from the program it was created in.
To open a document in Microsoft Word:
1 Click Start, then select Programs, then Microsoft Word. Microsoft Word
starts and a blank do cument opens.
2 Select
38 Using Your Computer
File, then Open.
Page 43

07334.book Page 39 Friday, December 29, 2000 10:23 AM
3 Find the file you want to open in the Look in drop-down box.
File
folder
File
name
4 Double-click the document file name. The document opens.
Printing a document
To print a document, you must have a printer connected to your computer
or have access to a network printer. For more information about installing or
using yo ur prin ter, refer to th e printe r docume ntation.
To print a document in Microsoft Word:
1 Make sure that the printer is turned on and loaded with paper.
2 Start Microsoft Word and open a document.
3 Select
4 Select the print options, then click
File, then Print. The Print dialog box opens.
OK. The document prints.
Working with documents 39
Page 44

07334.book Page 40 Friday, December 29, 2000 10:23 AM
40 Using Your Computer
Page 45

07334.book Page 41 Friday, December 29, 2000 10:23 AM
Using the
Internet
This chapter provides information about the Internet and the World Wide
Web, and tells you how to set up Gateway.net
Internet services so that you can send and receive e-mail and access other
Internet resources.
6
SM
or America Online® (AOL)
41
Page 46

07334.book Page 42 Friday, December 29, 2000 10:23 AM
Learning about the Internet
The Internet is a worldwide network of computers linked together to provide
information to people everywhere. The two most popular services on the
Internet are e-mail and the World Wide Web. You can access this network by
connecting your computer to a telephone l ine and signing up with an Internet
Service Provider (ISP).
Internet Servers
store information so other
computers can access it
from the Internet.
Your computer
connects to the
Internet through
an ISP.
ISP Servers
let you connect to
the Internet and
access your e-mail
messages.
If you want to access the Internet you need:
■ A modem – a device that connects your computer , using a telephone line,
to other computers or serv ers. If you have a modem jack on your
computer, you have a modem.
■ An Internet Service Provider – a service that provides access to the Internet
through an ISP server. W hen you c onnect t o an I SP, the I SP server lets you
access the Internet and y our e-mail message s.
■ A Web browser – a program that displays information from the World
Wid e Web .
■ An e-mail program – a program that lets you create, send, and receive
e-mail messages over the Internet.
42 Using the Internet
Page 47

07334.book Page 43 Friday, December 29, 2000 10:23 AM
Setting up an Internet account
Before you can view the information on the Word Wide Web, you need to
set up an Internet account with an Internet Service Provider (ISP). If you have
chosen Gateway.net or America Online (AOL) as an ISP, follow these
instructions to set up and connect to your account.
To set up an Internet account with Gateway.net or AOL:
1 Double- click the Register with Gateway.net or the America Online ic on. If
you do not find the service you want on the W indows desktop, t hen look
for the Gateway.net or America Online icon located in the Online Services
folder on the Windows desktop.
2 Follow the on-screen instructions. After setting up your account, you can
connect to the Internet and access your e-mail services.
Accessing your Internet account
To connect to your Gateway.net or AOL Internet account:
1 Double- click the Connect to Gateway.net or America Online icon. The
Connect dialog box opens.
2 Complete the member name and password information, then click
Connect. The computer dials the Internet account telephone number.
After connecting, the W eb browser opens. For information about the W eb
and the Web browser, see “Using the World Wide Web” on page 44.
To disconnect from your Gateway.net or AOL Internet account:
■ Click X in the top right corner of the Web browser. Your computer
disconnects from the Internet.
Important Make sure that your computer disconnects properly from
your Internet account. If you do not have an “unlimited
hours” ISP account, you may have to pay for the time that
you are connected, even if you are not at the computer.
Setting up an Internet account 43
Page 48

07334.book Page 44 Friday, December 29, 2000 10:23 AM
Using the World Wide Web
The World Wide Web is a multimedia window to the Internet that gives you
access to millions of information sources.
Information on the Web comes to you on We b p ages, w hich are electronic
documents that you view using a Web page display program called a browser.
There are many Web browsers that you can use, one of which is Microsoft
Internet Explorer, which comes installed on your new computer.
Web pages can contain not only text, but animations, music, and other
multimedia features.
A group of related Web page s is called a Web s ite . You can access Web sites to
shop, track investments, read the news, download programs, and much more.
You can explore a Web site or visit other Web sites by clicking areas on the
Web page called links, or hyperlinks. A link may be colored or underlined text,
a picture, or an animated image. You can identify a link by moving the mouse
pointer over it. If the pointer changes to a hand, the item is a link.
To learn more about using the Web browser features, select
bar.
Link
Web
page
Help in the menu
44 Using the Internet
LinkedWeb page
Page 49

07334.book Page 45 Friday, December 29, 2000 10:23 AM
Connecting to a Web site
After you set up an account with an Internet Service Provider (ISP) such as
Gateway.net or AOL, you can access the many information sources on the
Wo rld Wide Web.
To connect to a Web site:
1 Connect to your Internet account. After the computer connects, the
default opening page, your home page, opens.
2 To go to a different Web site, type the address (called a URL for “universal
Resource Locator”) in the browser address bar (for example
www.gateway.com) then click
GO on the browser address bar.
- OR On your home page or another Web page, click a link to a Web site.
The Web browser locates the server computer on the Internet, downloads
(transfers) data to your computer, and displays the opening page of the
site that you requested.
Sometimes Web pages display slowly. The speed that a Web page displays on
your screen depends on the complexity of the Web page and other Internet
conditions.
Using the World Wide Web 45
Page 50

07334.book Page 46 Friday, December 29, 2000 10:23 AM
Downloadingfiles
Downloading is the process of transferring files from a computer on the
Internet to your computer.
To protect your computer against viruses, make sure that you scan the files
you download. For more information about scanning for viruses, see
“Protecting your computer from viruses” on page 50.
To download files or programs from a Web site:
1 Connect to your Internet account.
2 In the address bar, type the address of the Web site that contains the file
or program you want to download, then click
bar.
GO on the browser address
- OR Click on links on a Web page to navigate to the Web site containing the
file that you want to downloa d.
3 Create a folder where you want to store the file on your computer.
4 Click the link on the Web page for the file that you want to download.
5 Follow the on-screen instructions for saving the file in the folder that
you created.
A copy of the file is downloaded to y our computer. The time that it takes
to transfer the file to your computer depends on file size and Internet
conditions.
6 Open the folder that yo u created.
7 Install or view the downloaded file by double-clicking it. If applicable,
follow the instructions provided on the Web site to run or install the
program.
46 Using the Internet
Page 51

07334.book Page 47 Friday, December 29, 2000 10:23 AM
Using e-mail
E-mail (electronic mail) lets you send messages to anyone who has an Internet
connection and e-mail address. E-mail is a free service of your Internet
account.
The Internet never closes, so you can send e-mail messages at any time. Your
e-mail messages arrive at most e-mail addresses in minutes.
An e-mail address consists of a user name, the @ symbol, and the Internet
domain name of the Internet Service Provider (ISP) or company that “hosts”
that user. Your e-mail address is assigned when you sign up for an account
with an ISP. For example, a person with an account with the Gateway .net ISP
might have an e-mail address that is similar to this one:
jdoe@gateway.net
User name Internet domain name
Sending e-mail
To send e-mail using Gateway.net or AOL:
1 Connect to your Gateway.net or AOL account.
2 Click
- OR Click
3 Type the e-mail address of the recipient you want to send e-mail to in
the
4 Type the subject of your e-mail in the Subject box.
5 Type the e-mail message.
Create Mail.
Write.
Send T o box.
6 When finished, click
Your e-mail is sent over the Internet to the e-mail address you specified.
Send Now.
Using e-mail 47
Page 52

07334.book Page 48 Friday, December 29, 2000 10:23 AM
Checkingyoure-mail
To check your e-mail using Gateway.net or AOL:
1 Connect to your Gateway.net or AOL account.
2 Click
- OR Click
For more information about managing and organizing your e-mail
messages, see the online help in your e-mail program.
Read Mail.
Read.
48 Using the Internet
Page 53

07334.book Page 49 Friday, December 29, 2000 10:23 AM
Maintaining
Your Computer
This chapter provides basic information about maintaining your computer
hardware and software.
Use the following table to set up the best maintenance schedule.
Maintenance task Immediately
after purchase
Back up files X X
Scan hard drive X X
Defragment hard drive X X
Check for viruses X X
Optimize and maintain your data X
7
Monthly When needed
49
Page 54

07334.book Page 50 Friday, December 29, 2000 10:23 AM
Protecting your computer from
viruses
A virus is a program that attaches itself to a program or data file on a computer
and then spreads from one computer to another. Viruses can damage data,
cause computers to malfunction, and can display annoying or offensive
messages. Some viruses can go unnoticed for long periods of time because they
are activated on a cert ain date or time.
Protect your computer from a virus by:
■ Obtaining an anti-virus program to check files and programs that are on
diskettes, attached to e-mail messages, or downloaded from the Internet
■ Getting all software from reputable sources and checking the software for
viruses before installing it
■ Disabling macros on suspicious Microsoft Word and Excel files. These
programs will warn you if a document that you are opening contains a
macro that might have a v irus.
50 Maintaining Your Computer
Page 55

07334.book Page 51 Friday, December 29, 2000 10:23 AM
Optimizing and maintaining your data
Windows provides several utilities you can use to manage your hard drive
space and keep your hard drive running efficiently.
Windowsutilities
Scanning the harddrive for errors
ScanDisk is a utility that examines the hard drive for errors and
file problems and corrects them so that your computer performs
correctly.
If you use your computer several hours every day, you probably want to run
ScanDisk once a week. But if you use your computer less frequently, once a
month may be adequa te. You should also run S canDisk if you have hard drive
problems.
Defragmentingthe hard drive
Sometimes Windows divides file data into pieces and stores
them in different places on the hard drive. This is called
fragmentation, and it is normal. But for the hard drive to use a
file, it must search for all the pieces of the file, and this slows
the hard drive performance.
Disk Defragmenter is a utility that organizes file data as one unit instead of in
pieces, improving hard drive performanc e.
If you are connected to a network, log off before running the Disk
Defragmenter utility. While the Disk Defragmenter utility is running, do not
use your keyboard or mouse. Using your computer while defragmenting will
start the process again from the beginning.
Using Disk Cleanup
By deleting unnecessary files from the hard drive you free
space. Use the Windows
Windows files, delete temporary Internet files, empty the
Recycle Bin, and d elete other files.
DiskCleanup utili ty to delete temporary
Optimizing and maintaining your data 51
Page 56

07334.book Page 52 Friday, December 29, 2000 10:23 AM
Using the Maintenance Wizard
The Maintenance Wizard lets you schedule maintenance tasks
such as running Dis k Defragmen ter and ScanDi sk and deleting
unnecessary files.
Windows maintenance
Checkinghard drive space
In Windows, you can see a chart of the available hard drive space.
Backingup files
Backing up files and removing them from the hard drive free s space for new
files on the hard drive. It also protects you f rom losing important information
if the hard drive fails or you accidentally delete files.
You should back up your files regularly to backup media. Use a ba ckup devi ce
such as a CD-R, Zip drive, or other high -capacity backup device. If you do
not have a high-capacity backup device and you want to purchase one, you
can contact Gateway’s Add-on S ales department or visit our Web site at
www.gateway.com.
52 Maintaining Your Computer
Page 57

07334.book Page 53 Friday, December 29, 2000 10:23 AM
Running the Windowsutilities using HelpSpot
HelpSpot contains information about all of these Windows utilities and
maintenance steps, along with instructions on how to use them.
To run Windows utilities:
1 Start HelpSpot. For instructions on how to start HelpSpot, see “HelpSpot”
on page 20.
2 Under the Fixing & Contacts section, click
Maintenance & Fixing.
Optimizing and maintaining your data 53
Page 58

07334.book Page 54 Friday, December 29, 2000 10:23 AM
3 For more information about a Windows Utility, as well as information
on how to start the Windows Utilities, click the Utility topic you are
interested in.
54 Maintaining Your Computer
Page 59

07334.book Page 55 Friday, December 29, 2000 10:23 AM
Customizing
Your Computer
This chapter provides information about customizing your computer by
adding new hardware devices and changing settings in Windows.
Yo u c an :
■ Change screen and display settings
■ Change th e backgrou nd and scree n saver
■ Adjust the mouse settings
■ Install additional devices
8
55
Page 60

07334.book Page 56 Friday, December 29, 2000 10:23 AM
Adjusting the screen and desktop
settings
You can adjust the screen settings for brightness, contrast, and
horizontal and vertical image position using the controls on the
front of your monitor. For more information about these
adjustments, see your monitor guide.
Adjusting the color depth and screen area are two of the basic settings you
may need to change. Y ou also can adjust the display settings su ch as the screen
background and screen saver using the Display Prop erties window.
Some games and video-intensive programs change your screen settings
automatically, but do not return them to their or iginal v alues when y ou close
the game or program. In those cases, you will have to manually return your
settings to normal.
Adjusting the color depth
Color depth is the number of colors your monitor displays. Various image types
require various color depths for optimum appearanc e on your monitor. For
example, simple color drawings may appear adequately in 256 colors while
full-range photographs usually need 24-bit True Color (which renders millions
of colors) to be displayed with optimum quality.
Windows lets you choose from four color depth settings for your monit or.
W e recommend that a 16-bit or higher setting be used at all times. If the color
in your images seems “false” or “jumpy,” especially after you have played a
game or run a video-intensive program, check the color depth setting and
return it to 16-bit or higher, if necessar y.
Adjusting the screen area
The screen area adjustment in Windows lets you c hang e the screen area to a
size you prefer. For example, you may want to increase the screen are a if you
need to have many icons on your desktop. Or you may want to decrease the
screen area to make reading and identifying objects on th e display easier.
The larger the screen area, the smaller individual components of the screen,
such as icons and me nu bars, appear.
56 Customizing Your Computer
Page 61

07334.book Page 57 Friday, December 29, 2000 10:23 AM
Applying a colorscheme
A color scheme is a set of colors that you can apply to your Windows
environment. Y ou can change the appearance of the desktop, windows, dialog
boxes, and other Windows components by selecting a new colo r scheme.
If you do not want to use the color schemes that Windows provides, you can
create and save your ow n schemes.
Changing the desktop background
The Windows desktop back ground can be changed to either a picture or HTML
document. Windows provides several background pictures. You also can use
pictures or HTML documents that you have created or retrieved from other
sources.
Important If Active Desktop is enabled and you have chosen to
displayWeb content, the standarddesktopbackgroundwill
be partially or completely hidden, so you may not be able
to see changes you have made in the background. For
more inform ation about Active Desktop, see Windows
online help.
Selecting a screen saver
An image may get burned in on your monitor screen if you leave your computer
on for long periods of time without using it. You should use a screen saver
to avoid this damage.
You can also use a screen saver to prevent others from viewing your screen
while you are away from your computer.
WIndows supplies a variety of screen savers that you can choo se from, and
many more are available from the Internet and as co mmercial products.
Adjusting the screen and desktop settings 57
Page 62

07334.book Page 58 Friday, December 29, 2000 10:23 AM
Adjusting your settings using HelpSpot
HelpSpot contains instructions for changing display settings.
To adjust Windows settings:
1 Start HelpSpot. For instructions on how to start HelpSpot, see “HelpSpot”
on page 20.
2 Under the Learning & Using section, click
Personalizing FAQ.
58 Customizing Your Computer
Page 63

07334.book Page 59 Friday, December 29, 2000 10:23 AM
3 For more information about a Windows setting, as well as information
on how to customize your settings, click the customizing topic you are
interested in.
Adjusting the screen and desktop settings 59
Page 64

07334.book Page 60 Friday, December 29, 2000 10:23 AM
Changing the mouse settings
You can adjust the double-click speed, pointer speed, left-hand or right-hand
configuration, and other mouse settings.
To change your mouse s ettings:
1 Click Start, then select Settings, then Control Panel. The Control Panel
window opens.
2 If y ou do not s ee the
3 Double- click the
Mouse icon, click view all Control Panel options.
Mouse icon. The Mouse Properties dialog box opens.
4 Click one of the tabs to change your mouse settings:
■ Buttons lets you change the button configuration and the
double-click speed.
■ Pointers lets you customize the look of your cursor and pointer.
■ Motion lets you set your pointer speed and pointer trails.
60 Customizing Your Computer
Page 65

07334.book Page 61 Friday, December 29, 2000 10:23 AM
Power management
Using Standby mode
Computer equipment can account for a significant portion of energy use in
the home and office environment. You may not want to shut down your
computer each time you leave it, especially if you plan to be away for only
a short time. Windows lets you use the Standby mode to conserve ener gy when
the system is not in use.
Always save your work before using the Standby mode. Once in Standby , your
computer reduces or turns the power off to most devices except memory.
However, the information in the memory is not saved to the hard drive. If
power is interrupted, the information is lost.
The table below shows how to change the power modes.
If your
computer is...
Off Start up Press the power button.
On Enter
In
Standby mode
On Shut down Click Start, then select Shut Down,
...and you
want to...
Standby mode
Exit
Standby mode
...then
Click Start, then select Shut Down,
then Standby, then click OK.
Move the mouse or press any key on
the keyboard.
Shut down, then click OK.
Power management 61
Page 66

07334.book Page 62 Friday, December 29, 2000 10:23 AM
Changing power settings
You ca n change power managem ent settings, su ch as the power button
function and power-saving timers, by changing power settings in Windows.
You can also adjust power schem es, adjust advanced p ower settings, and
enable Hibernate mode.
Power schemes (groups of power settings) let you change power saving options
such as when the monitor or hard drive is automatically turned off. You can
also select one of the defined power schemes or create a custom power scheme.
Advanced power settings let you assign different power saving modes to the
power button.
Hibernate mode (al so called save to d isk) writes all current memory (RAM)
information to the hard drive, then turns the computer completely off. The
next time you turn on the computer, it reads the memory information from
the hard drive and opens the programs and documents that were open when
you activated hibernate.
To change the power scheme:
1 Click Start, then select Settings, then Control Panel. The Control Panel
window opens.
2 If you do not see the
PowerOptions icon , click view all Control Panel options.
62 Customizing Your Computer
Page 67

07334.book Page 63 Friday, December 29, 2000 10:23 AM
3 Double-click the Power Options icon. The Power Options Properties dialog
box opens.
4 Select a de fined power scheme from the drop- down list.
- OR Set the timers for
then save your custom power scheme by clicking
System stand by, Turn off monitor, and Turn off hard disks,
Save As and typing in
a name for the scheme.
5 Apply t he changes by clicking
OK.
To change advanced power management settings:
1 Click Start, then select Settings, then Control Panel. The Control Panel
window opens.
2 If you do not see the
3 Double-click the
box opens.
PowerOptions icon , click view all Control Panel options.
PowerOptions i con. The Power Options Properties dialog
Power management 63
Page 68

07334.book Page 64 Friday, December 29, 2000 10:23 AM
4 Click the Advanced tab.
5 Change the settings, then save them by clicking
OK.
To enable Hibernate mode:
1 Click Start, then select Settings, then Control Panel. The Control Panel
window opens.
2 If you do not see the
3 Double-click the Power Options icon. The Power Options Properties dialog
box opens.
PowerOptions icon , click view all Control Panel options.
64 Customizing Your Computer
Page 69

07334.book Page 65 Friday, December 29, 2000 10:23 AM
4 Click the Hibernate tab.
5 Select the
Enable hibernate support check box, then click Apply. Hibernate
mode is now an option you can select in the Advanced tab.
6 Click the
Advanced tab.
7 Select Hibernate as one of the adva nced power settings, then save the
changes by clicki ng
OK.
Power management 65
Page 70

07334.book Page 66 Friday, December 29, 2000 10:23 AM
About installing a printer, scanner, or
other peripheraldevice
Your computer has one or more Universal Serial Bus (USB) connectors, serial
ports, and parallel ports for connecting peripheral devices such as printers,
scanners, and di gital cameras to your computer.
USB ports are plug-and-play, which means that you usually can use a USB
device by just plugging it into the USB connector. Windows establishes
communication between your computer and the device automatically.
Parallel and serial port peripheral devices are not plug-and-play, so they
usually require a setup program and device drivers (small programs that let the
device communicate with your computer and other software).
Refer to the device documen tation for detailed info rmation and installati on
instructions.
66 Customizing Your Computer
Page 71

07334.book Page 67 Friday, December 29, 2000 10:23 AM
Restoring
Software
If your computer is not workin g properly, try the following options to correct
the problem:
■ Troubleshooting. For more information, see “Troubleshooting” on
page 71.
■ Reinstall the device drivers. For more information, see “Reinstalling
device drivers” on page 68.
■ If the options above do not correct the problem, you can use the Gateway
PC Recovery CDs to reinstall Windows and other software. Find out more
about the reinstallation options in “Reinstalling Windows” on page 69
and “Reinstalling programs” on page 69.
9
67
Page 72

07334.book Page 68 Friday, December 29, 2000 10:23 AM
Reinstalling device drivers
Device drivers are programs that control devices such as monitors, CD drives,
and modems. Drivers t ranslate information b etween computer devi ces and
programs.
Drivers for your original computer hardware are installed at Gateway. Also,
if you just reinstalled Windows, the device drivers were automatically
reinstalled. However, if you ins tall a new device, you need to install the drivers
provided by the device manufacturer.
You should reinstall device drivers:
■ If directed to do so while troubleshooting
■ If you see a message indicating that there is a problem with a d evice driver
To reinstall device dr ivers:
1 Place Disc 2 of the Gateway PC Recovery CD into your CD drive. The
Gateway PC Recovery program starts. Go to Step 5.
- OR If the program does not start automatically, go to Step 2.
2 Click
3 In the
of your CD drive).
4 Click
5 Click the
6 Select the device drivers to reinstall.
7 Click
8 Follow any additional on-screen instructions.
Depending on the driver you are reinstalling, you may only need to
restart your computer to complete the installation. However, if a setup
wizard opens when you restart your computer, follow the on-screen
instructions.
Start, then select Run. The Run dialog box opens.
Open text box, type D:\RUNMENU.EXE (where D is the drive letter
OK. The Gateway PC Recovery program starts.
Reinstall tab.
Install.
68 Restoring Software
Page 73

07334.book Page 69 Friday, December 29, 2000 10:23 AM
Reinstalling Windows
The Gateway PC Recovery CD steps you through reinstalling Windo ws. It
automatically reinstalls the hardware device drivers and some software. The
remaining software is installed using the CDs that came with your computer.
Warning All files and partitions you have created or software that
To reinstall Windows:
1 With Disc 1 of the Gateway PC Recovery CD in the CD drive, restart your
computer. The Gateway PC Recovery menu opens.
you have installed since your system left the factory will
be erased. Make sure you backup copies of these files on
external backup media before continuing this process.
2 Follow the on-screen instructions. The on-screen instructions step you
through the operating system and device drivers installation.
Reinstalling programs
If you have problems running a program or if you have reinstalled your
operating system, you can reinstall programs from the Gateway PC Recovery
CD and the program CDs. Follow the installation instructions on each CD.
To reinstall a program from the Gateway PC Recover y CD:
1 Place Disc 2 of the Gateway PC Recover y CD into your CD drive. The
Gateway PC Recovery program starts. Go to Step 5.
- OR If the program does not start automatically, go to Step 2.
2 Click
3 In the
of your CD drive).
Start, then select Run. The Run dialog box opens.
Open text box, type D:\RUNMENU.EXE (where D is the drive letter
4 Click
5 Click the Reinstall tab.
6 Select the program to reinstall.
OK. The Gateway PC Recovery program starts.
Reinstalling Windows 69
Page 74

07334.book Page 70 Friday, December 29, 2000 10:23 AM
7 Click Install.
8 Follow any additional on-screen instructions.
Depending on the program you are reinstalling, you may only need to
restart your computer to complete the installation. However, if a setup
wizard opens when you restart your computer, follow the on-screen
instructions.
To reinstall a program from a CD:
1 Place the program CD in your CD drive.
2 Complete the reinstallation by following the instructions included with
the program CD.
70 Restoring Software
Page 75

07334.book Page 71 Friday, December 29, 2000 10:23 AM
Troubleshooting
This chapter provides some solutions to common computer problems. Use the
information to troubleshoot and correct typical hardware and software issues.
If the suggestions in this chapter do not correct the problem, see “Getting
Help” on page 19, for more information about how to get help.
10
71
Page 76

07334.book Page 72 Friday, December 29, 2000 10:23 AM
Safety guidelines
While troubleshooting your computer, follow these safety guidelines:
■ Never remove your computer cover.
■ Do not attempt to open the monitor. To do so is extremely dangerous.
Even if the power is disconnected, energy stored in the monitor
components can be dangerous. Also, opening the monitor vo ids the
warranty.
First steps
Try these things first before going to the following sections:
■ Make sure the power cable is connected to your computer and an
AC outlet and that the AC outlet is supplying power.
■ If you use a power strip, make sure it is turned on.
■ If a peripheral such as the keyboard or mouse does not work, disconnect
and reconnect the device to make sure all connections are secure.
72 Troubleshooting
Page 77

07334.book Page 73 Friday, December 29, 2000 10:23 AM
CD drive
The computer does not recognize the CD drive
■ Make sure the CD label is facing up, then try again.
■ Try a different CD. Occasionally CDs are flawed and cannot be read by
the CD drive.
■ Shut down and restart your computer.
■ Clean the disc. For instructions, see “Cleaning CDs” on page 74.
■ Reinstall the device driver. For instructions, see “Reinstalling device
drivers” on page 68.
AudioCD does not produce sound
■ If you have two CD drives, try the other drive.
■ Make sure the CD label is facing up, then try again.
■ Check the speaker cables. Make sure they are connected properly and
securely.
■ Click the speaker icon in the lower right corner of the taskbar and make
sure the volume controls are turned up.
■ Make sure mute controls are turned off by double-clicking the speaker
icon in the lower right corner of the taskbar and making sure that the
Master Out, CD Audio, MIDI, Digital, a nd Wave mute check boxes are not
selected. For more information about setting the mute control, see
“Adjusting the volume” on page 36.
■ Shut down and restart your computer.
■ Clean the CD. For instructions, see “Cleaning CDs” on page 74.
■ Reinstall the audio device drivers. For instructions, see “Reinstalling
device drivers” on page 68.
CD drive 73
Page 78

07334.book Page 74 Friday, December 29, 2000 10:23 AM
Cleaning CDs
Clean CDs by wiping from the center to the edge, not around in a circle, using
a product made especially for the purpose.
Computer
The computer will not start
■ Make sure the power cable is connected to an AC power source and the
computer is turned on.
74 Troubleshooting
Page 79

07334.book Page 75 Friday, December 29, 2000 10:23 AM
File management
A file was accidentallydeleted
If the file was deleted at a DOS prompt, it cannot be restored.
To restore files that were deleted in Windows:
1 Double-click the Recycle Bin icon.
2 Right-click the file you want to restore, then select Restore.
Hard drive
You receive an “Insufficient disk space” error message
■ Delete unnecessary files from the disk using Disk Cleanup. For more
information, see “Using Disk Cleanup” on page 51.
■ Empty the Recycle Bin by right-clicking the RecycleBin icon and selecting
EmptyRecycleBin from t he pop-up menu.
■ Save your files to another disk or drive. If the hard drive is full, copy any
files not regularly used to backup media, th en delete t hem from the hard
drive.
The hard drive cannot be accessed, or you receive a “General failure
reading drive C” errormessage
■ Try restarting your computer by pressing CTRL+ALT+DEL.
■ If your computer has been subjected to static electricity o r physical shock,
you may need to reinstall the operating system.
File management 75
Page 80

07334.book Page 76 Friday, December 29, 2000 10:23 AM
Internet
You cannot connect to the Internet
■ Make sure your computer is connected to the telephone line and the
telephone line has a dial tone. Use the Setup poster to make sure that
the connections have been made correctly.
■ If you have the call waiting feature on your telephone line, make sure
it is disabled.
■ Make sure your account with your Internet Service Provider (ISP) is set
up properly. Contact your ISP technical support for help.
■ Make sure you do not have a p roblem with your modem. For info rmation
about solving modem problem s, see “Modem” on page 77.
You receive an “Unable to locate host” message and are unable to
browsethe Internet
This problem can occur when you have typed a URL (Web address) incorrectly ,
lost your Internet connection, or your ISP is having technical difficulties.
Double-check the URL or try a different URL. If the error message still appears,
disconnect from the ISP connec tion and c lose y our brow ser. Then reconnect
and open the browser. If you still get the error, you may have a problem wi th
your Internet connection or ISP.
Connecting to a Website takes too long
Many factors can affect Internet performance:
■ Condition of the telephone lines in your residence
■ Condition of the telephone lines and switches at your local telephone
company
■ Condition of the Internet computers to which you connect and
the number of users accessing those computers
■ Complexity of graphics and multimedia on Web pages
■ Having multiple Web browsers open, performing multiple downloads,
and having multiple programs open on your computer
76 Troubleshooting
Page 81

07334.book Page 77 Friday, December 29, 2000 10:23 AM
Keyboard
The keyboarddoes not work
■ Make sure the keyboard cable is plugged in correctly.
■ Try a keyboard that you know works to make sure the keyboard port
works.
■ Reinstall the keyboard device driver. For instructions, see “Reinstalling
device drivers” on page 68.
■ If you spilled liquid in the keyboard, turn off the computer and unplug
the keyboard. Clean the keyboard and t urn it upside down to drain it.
Let the keyboard dry before using it a gain.
Cleaning the keyboard
You should clean the keyboard occasionally to free it of dust and lint trapped
under the keys. The easiest way to do this is to blow dirt from under the keys
using an aerosol can of air with a narrow, straw-like extension.
If you spill liquid on the keyboard, turn off the computer and turn the unit
upside down. Let the liquid drain, then let the keyboard dry before trying to
use it again. If the keyboard does not work after it dries, you may need to
replace it.
A keyboardcharacter keeps repeating
■ Make sure nothing is resting on the keyboard.
■ Make sure a key is not stuck. Press each key to loosen a key that might
be stuck, then restart the computer.
Modem
Your modem does not dial or does not connect
■ Make sure your computer is connected to the telephone line and the
telephone line has a dial tone. Use the Setup poster to make sure that
the connections have been made correctly.
■ Make sure that the modem cable is less than 6 feet (1.8 meters) long.
■ Remove any line splitters or surge protectors from your telephone line,
then check for a dial tone by plugging a working telephone into the
telephone wall jack.
Keyboard 77
Page 82

07334.book Page 78 Friday, December 29, 2000 10:23 AM
■ If you have additional telephone services such as call waiting, call
messaging, or voice mail, make sure that all messages are cleared and call
waiting is disabled before using the modem. Contact your telephone
service to get the correct code to temporarily disable the service. Also
make sure the modem dialing properties are set appropriately.
To check the dialing properties:
1 Click Start, then select Settings,thenControl Panel. The Control
Panel window opens.
2 If you do not see the Modems icon, click view all control panel
options.
3 Double-click the Modems icon, then click Dialing Properties.The
Dialing Properties window opens.
4 Make sure all settings are correct.
■ Disconnect any ans wering machine, fax m achine, or printer that is on
the same line as the modem. You should not have these devices plugged
into the same telephone line as the modem.
■ Make sure that you are not using a digital, rollover, or PBX line. These
lines do not work with your modem.
■ Check for line noise (scratchy, crackling, or popping sounds). Line noise
is a common p robl em t hat ca n ca use th e mode m to co nne ct at a s lowe r
rate, abort downloads, or even disconnect. The faster the modem, the
less line noise it can tolerate and still work properly.
Listen to the line using your telephone. Dial a single number ( such as 1).
When the dial tone stops, listen for line noise. Wiggle the modem cable
to see if that makes a difference. Make sure the connectors are free from
corrosion and all screws in the wall or telephone jack are secure.
You can also ca ll your telephone service and have th em check the
telephone line for noise or low line levels.
■ Try another telephone line (either a different telephone number in your
house or a telephone line at a different location). If you can connect on
this line, call your telephone company.
■ T ry connecting with the modem at a lower co nnection sp eed. If reduc ing
the connect speed lets you connect, contact your telephone company.
The telephone line may be too noisy.
78 Troubleshooting
Page 83

07334.book Page 79 Friday, December 29, 2000 10:23 AM
You cannot connect to the Internet
■ The ISP may be having technical difficulties. Contact your ISP technical
support for help.
■ See if the modem works with a different communications program. The
problem may be with just one p rogram.
Your 56K modem does not connect at 56K
Current FCC regulations restrict actual data transfer rates over public
telephone lines to 53K. Other factors, such as line noise, telephone service
provider equipment, or ISP limitations, may lower the speed even further.
Upload (sending data out your computer) speeds are limited to 33.6K.
You can check modem connection speeds and dial-up network (DUN)
connections by accessing the gateway.your.way dial-up server. The server also
contains drivers, patches, and updates for current Gateway hardware and
software.
The server provides a secure connection and is a stand-alone server. You
cannot use it to access the Internet. The server cannot be accessed Mondays
from 8:00 a.m. to 12:00 p.m. CST.
To access the gateway.your.way dial-up server:
1 Insert Disc 1 of the System Restoration Kit.
2 Select Help.
3ClickSupport Web Site, then follow the on-screen instructions.
4 To check your modem connection speed, select the Direct Dial option. After your
modem connects, hover your mouse cursor over the Dial-Up Networking icon (located
in the System Tray, next to the clock on your Taskbar).
Modem 79
Page 84

07334.book Page 80 Friday, December 29, 2000 10:23 AM
The modem is not recognized by the computer
■ Make sure the line connected to the modem is working and plugged into
the appr opriat e conne ction on the modem . Use th e Setu p poster to make
sure that the connections have been made correctly.
■ If the modem shares the telephone line with another d evice, make sure
the telephone line is not in use (for example, someone is on the
telephone, or another modem is in use).
■ Use the modem cable that came with your computer. Some telephone
cables do not meet required cable standards and may cause problems with
the modem connection.
■ Shut down and restart your computer.
■ Run Windows modem diagnostics.
To run modem diagnost ics:
1 Close all open programs.
2ClickStart, then select Settings,thenControl Panel. The Control
Panel window opens.
3 If you do not see the Modems icon, click view all control panel
options.
4 Double-click the Modems icon. The Modems Properties dialog box
opens.
5ClicktheDiagnostic tab, click the COM port nextto the name of the
modem, then click More Info. The Modem Info dialog box opens.
If information about the modem appears, the modem passed
diagnostics. If no modem information is available, a white screen
appears with no data, or if you get an error such as “port already
open”or “the modem has failedto respond”, the modem did not pass
diagnostics.
■ Reinstall the device driver. For instructions, see “Reinstalling device
drivers” on page 68.
80 Troubleshooting
Page 85

07334.book Page 81 Friday, December 29, 2000 10:23 AM
The modem is noisy when it dials and connects
When your modem tries to connect to another modem, it begins handshaking.
Handshaking is a digital “getting acquainted” conversation between the two
modems that establishes connection spe eds and communication protocols.
You may hear unusual handshaking sounds when the modems first connect.
If the handshaking sounds are too loud you can turn the modem volume
down.
To turn down the modem volume:
1ClickStart,thenselectSettings,thenControlPanel.TheControlPanelwindow
opens.
2 If you do not see the Modems icon, click view all control panel options.
3 Double-click the Modems icon. The Modems Properties dialog box appears.
4ClickProperties.
5 Adjust the Speaker volume control.
6ClickOK.
Modem 81
Page 86

07334.book Page 82 Friday, December 29, 2000 10:23 AM
You receive an “Unable to establish protocols”error message
■ Reinstall dial-up networking and dial -up networking components.
To reinstall dial-up n etworki ng:
1ClickStart, then select Settings,thenControl Panel.The Control Panelwindow
opens.
2 Click/Double-click Add/Remove Programs,thenclicktheWindows Setup tab.
3 Double-click Communications.
4 Clickto clear the Dial-Up Networkingcheckbox,then clickOK twice. The System
Settings Change dialog box opens.
5ClickOK. The computer restarts.
6ClickStart, then select Settings,thenControl Panel.The Control Panelwindow
opens.
7 Double-click the Add/Remove Programs icon,then click the Windows Setup tab.
8 Double-click Communications.
9 Click to select the Dial-Up Networking check box, then click OK twice. The
System Settings Change dialog box opens.
10 Click Yes. The computer restarts. If youare askedto insert a CD from the System
Restoration Kit, do so.
To reinstall dial-up n etworking componen ts:
1 Click Start, then select Settings,thenControl Panel. The Control Panel window
opens.
2 If you do not see the Network icon, click view all control panel options.
3 Double-click the Network icon.
4IfTCP/IP is not included in the Network Components list, click Add, then select
Protocol,Add,thenMicrosoft as the manufacturer.Click TCP/IP on the right side
ofthedialogbox,thenclickOK.
5 Click Client for Netware Networks, then click Remove .
6 Click IPX/SPX, then click Remove.
7 Click NetBeui,thenclickRemove.
8MakesurethePrimary Network Logon field is set to Windows Logon.
9 Click OK twice, then restart the computer.
82 Troubleshooting
Page 87

07334.book Page 83 Friday, December 29, 2000 10:23 AM
Monitor
The screen area is not correct
■ Change the screen area from the Display Properties dialog box. For
instructions to change the screen area, see “Adjusting the screen area”
on page 56.
The computer is running but there is nodisplay
■ Make sure the monitor is plugged in and turned on. If the monitor is
turned on, the power LED should be lit.
■ Make sure the monitor cable is connected to the video connection on
the back of your computer.
■ Check the connector and cable for bent or damaged pins.
■ Adjust the brightness and contrast controls to the center position.
■ Reinstall the device driver. For instructions, see “Reinstalling device
drivers” on page 68.
■ Connect a working monitor to your computer.
The text on the displayis dim or difficult to read
■ Adjust the brightness and contrast controls.
■ Move the monitor away from sources of electrical interference , such as
televisions, unshielded speakers, microwaves, fluorescent lights, and
metal beams or shelves.
■ Use the monitor degauss feature (see your monitor documentation) or
turn off your computer and monitor, leave them off for at least a half
hour, then restart your computer.
■ Change the display settings.
To change the display settings:
1ClickStart, then select Settings, then Control Panel. The Control Panel window
opens.
2 Click/Double-click the Display icon, then click the Settings tab.
3 Change the settings.
For more information about display settings, see “Adjusting the screen and
desktop settings” on page 56 and HelpSpot.
Monitor 83
Page 88

07334.book Page 84 Friday, December 29, 2000 10:23 AM
Mouse
The mouse does not work
■ Make sure that the mouse cable is plugged in correctly.
■ Try a mouse you know is working to make sure the mouse port works.
■ Shut down and restart your computer.
■ Reinstall the device driver. For instructions, see “Reinstalling device
drivers” on page 68.
The mouse works erratically
■ Clean the mouse. If the mouse pointer begins moving erratically across
the screen or becomes difficult to control precisely, then cleaning the
mouse will likely improve the mouse accuracy.
To clean your mouse:
1 Turn the mouse upside down.
Rotate the retaining ring on the bottom of the mouse
2
counter-clockwise
Remove the retaining ring and mouse ball.
3
.
84 Troubleshooting
Page 89

07334.book Page 85 Friday, December 29, 2000 10:23 AM
4 Remove any dust, lint, or d irt from the mouse ball with a soft cloth.
5 Clean the mouse rollers with a cotton swab dipped in isopropyl
alcohol.
6 Replace the mouse ball and lock the retaining ring into place.
Mouse 85
Page 90

07334.book Page 86 Friday, December 29, 2000 10:23 AM
Power
My system is turned on but nothing is getting power
■ If your system is plugged into a surge protector, make sure the surge
protector is securely connected to an electrical outlet, switched on, and
working properly. Plug a working device, such as a lamp, into the outlet
and turn it on to test the outlet.
■ Make sure all components are connected securely to th e surge protec tor
and properly switched on.
Printer
Printer will not turn on
■ Make sure the power cable is plugged into an AC power source.
Printer is onbut will not print
■ Check the cable between the printer and the computer. Make sure it is
connected to the proper port.
■ Check the connector and cable for bent or broken pins.
■ Reinstall the printer driver. Use the manual that came with your printer
for instructions on installing the printer driver.
■ If the printer you want to print to is not the default printer, make sure
you have selected it in the printer setup.
To set up a default printer:
1 Click Start, then select Settings, then Printers.
2 Right-click on the name of the printer you want to be the default
printer. A menu opens.
3SelectSet as Default.
You receive a “Printer queue is full” error message
■ Make sure the printer is not set to work offline.
■ Wait until files have been printed before sending additional files to the
printer.
86 Troubleshooting
Page 91

07334.book Page 87 Friday, December 29, 2000 10:23 AM
■ If you print large files or many files at one time, you may want to add
additional memory to the printer . Consult the printer documentat ion for
instructions for adding additional memory.
To make sure the printer is not set to wo rk offline:
1ClickStart, then select Settings,thenPrinter.
2 Double-click the icon for the printer you want to use.
3SelectPrinter.IfthereisaUse Printer Offline option on the menu,
click to clear the check mark.
You receive a “Printer is out of paper” error message
■ After adding paper, make sure the printer is online. Most printers have
an online/offline button that you need to press after adding paper.
ScanDisk
When you started your computer, it ran ScanDisk
The computer probably had its power interrupted or was improperly shut
down. Windows automatically runs ScanDisk at startup when the computer
was improperly shut down.
ScanDisk fixes errors on the hard drive to minimize data loss. To prevent
ScanDisk from running when you start your computer , make sure you always
shut down by selecting
Sound
You are not getting sound from the speakers
■ If you are using external speakers, check your speaker con nections.
■ Make sure the Windows volume control is turned up by clicking the
taskbar speaker icon.
■ Make sure that the Mute option is not selected. For more information
about setting the mute control, see “Adjusting the volume” on page 36.
Shut Down from the Start menu.
ScanDisk 87
Page 92

07334.book Page 88 Friday, December 29, 2000 10:23 AM
Beforecalling for technical support
If you have a technical problem with your computer, follow these
recommendations before contacting Gateway technical support:
■ Make sure that your computer is connected properly to a grounded
AC outlet that is supplying power. If you use a power strip, make sure
that it is switched on.
■ If a peripheral device such as a keyboard or mouse does not appear to
work, make sure that all cables are plugged in securely.
■ If you have recently installed hardware or software, make sure that you
have installed it according to the instructions provided with it. If you
did not purchase the hardware or software from Gateway, refer to the
manufacturer docu mentation and techni cal support resources.
■ If you have “how to” questions about using a program, consult:
■ Online Help
■ Printed documentation
■ The software publisher’s Web site
■ Consult the troubleshooting chapter of this guide.
Warning To avoid bodily injury, do not attempt to troubleshoot your
computer problem if:
■
Power cords or plugs are damaged
■
Liquid has been spilled into your computer
■
Your computer was dropped
■
The cabinet was damaged
Instead, unplug your computer and contact a qualified
computer technician.
88 Troubleshooting
Page 93

07334.book Page 89 Friday, December 29, 2000 10:23 AM
Technical support resources
Gateway offers a wide range of customer service, technical support, and
information services. If you have questions or problems, contact the Gateway
service that is most appropriate for your needs:
Resource Service description How to reach
Automated
troubleshooting
system (ATS)
Fax on demand
support
Gateway
fee-based
software tutorial
service
World Wide Web Accessa variety of online informationabout
E-mail support
services
Use an automated menu system and your
telephone keypad to find answers to
common problems.
Order a catalog of documents on common
problems, then order documents by
document numbers. The documents will be
faxed to you.
Get tutorial assistance for software issues
billed by the issue or by the minute.
Gateway, its products, and its software and
hardware manufacturers.
Get help by submitting an e-mail form to one
of the Gateway support services. Complete
an e-mail form, then click Submit at the
bottom of the form. Your e-mail goes to an
onlineservicerepresentativewhowillassist
you as quickly as possible.
800-846-2118 (US)
877-709-2945 (Canada)
800-846-4526 (US)
877-709-2951 (Canada)
800-229-1103 (by issue)
900-555-4695 (by minute)
www.gateway.com/support
http://www.gateway.com/
support/contact/index.shtml
Gateway Client
Care
Talk to a Gateway Client Care
representative about a non-tutorial support
question. Make sure you are at your
computerwhereyoucantrytroubleshooting
ideas with the technician. Be prepared to
explain the problem including error
messages you have received or steps that
youhavetakentosolvetheproblem.Have
your e-mail address, name, customer ID or
order number, serial number, and system
information available.
800-846-2301 (US)
888-888-2032 (Canada)
Technical support resources 89
Page 94

07334.book Page 90 Friday, December 29, 2000 10:23 AM
Resource Service description How to reach
Gateway.net
AOL
CompuServe
Sales,
accounting, and
warranty
Get s upport for your ISP account. 877-247-2051 (US)
800-827-6364 (US)
888-265-4357 (Canada)
800-848-8990 (US)
Get information about available systems,
pricing orders, billing statements, warranty
800-846-2000 (US)
888-888-2037 (Canada)
service, or other non-technical issues.
90 Troubleshooting
Page 95

07334.book Page 91 Friday, December 29, 2000 10:23 AM
Safety,
Regulatory, and
Legal Information
Important safety information
Y our Gateway system is designed and tested to meet the latest standards for safety of information
technology equipment. However , to ensure safe use of this product, it is imp ortant that the
safety instructions marked on the produc t and in the documentation are followed.
Warning Always follow these instructions to help guard against
personal injury and damage to your Gateway system.
Settingupyoursystem
■
Read and follow all instru ctions marked on the product and in the documentation befo re you
operate your system. Retain all safety and operating instructions for future use.
■
Do not use this product near water or a heat source such as a radiator .
■
Set up the system on a stable work surface.
■
The product should be operated only from the type of power source indicated on the rating
label.
■
If your computer has a voltage selector switch, make sure that the switch is in the proper
position for your area. The vo ltage selector switc h is set at t he factory to the cor rect voltage.
■
Openings in the computer case are provided for ventilation. Do not block or cover these
openings. Make sure you provide adequate space, at least 6 inches (15 cm), around the system
for ventilation when you set up your work area. Never insert objects of any kind into the
computer ventilation openi ngs.
■
Some products are equipped with a three-wire power cord to make sure that the product is
properly grounded when in use. The plug on this cord will fit only into a grounding-type
outlet. This is a safety feature. If you are unable to insert the plug into an outlet, contact an
electrician to install the appropriate outlet .
■
If you use an extension cord with this system, make sure that the total ampere rating on the
products plugged into the extension cord does not exceed the extension cord ampere rating.
A
91
Page 96

07334.book Page 92 Friday, December 29, 2000 10:23 AM
■
If your system is fitted with a TV Tuner , cable, or satellite receiver c ard, make sure that the
antenna or cable system is electrically grounded to provide some protection against voltage
surges and buildup of static charges.
Care during use
■
Do not walk on the power cord or allow anything to rest on it.
■
Do not spill anything on the system. The best way to avoid spill s is to avoid eating and
drinking near your system.
■
Some products have a replaceable CMOS battery on the system board. There is a danger of
explosion if the CMOS battery is replaced incorrectly . Replace the battery with the same or
equivalent type recommended by the manufacturer . Dispose of batteries according to the
manufacturer’s instruc tions.
■
When the computer is turned off, a small amount of electrical current still flo ws through the
computer . T o avoid electrical shock, always unplug all power cables and modem cables from
the wall outlets before cleaning the system.
■
Unplug the system from the wall outlet and refer servicing to qualified personn el if:
■
The power cord or plug is damaged.
■
Liquid has been spilled into the system.
■
The system does not operate properly when the operating instructions are followed.
■
The system was dropped or the cabinet is damaged.
■
The system performance changes.
Replacement parts and accessories
Use only replacement parts and accessories recommended by Gateway.
Important Do not use Gateway products in areas classified as
hazardous locations. Such areas include patient care
areas of medical and dental facilities, oxygen-laden
environments, or industrial facilities.
Caution To reduce the risk of fire, use only No. 26 AWG or larger
telecommunications line cord.
92
Page 97

07334.book Page 93 Friday, December 29, 2000 10:23 AM
Regulatory compliance statements
United States users
FCC Part 15
This device has been tested and found to comply with the limits for a Class B digital device,
pursuant to Part 15 of the FCC rules. These limits are designed to provide reasonable protection
against harmful interference in a res idential installatio n. This equipment generates, uses, and
can radiate radio frequency energy and, if not installed and used in accordance with the
instructions, may cause harmful interfer ence to radio or television recept ion. However , there is
no guarantee that interference will not occur in a particular installation. If this equipmen t does
cause interference to radio and television reception , which can be determined by turning the
equipment off and on, the user is encouraged to try to correct the interference by one or more of
the following measures:
■
Reorient or relocate t he receiving antenna
■
Increase the separation between the equipment and receiver
■
Connect the equipment into an outlet on a circuit different from that to which the receiver is
connected
■
Consult the dealer or an experienced radio/TV technician for help.
Compliance Accessories: The accessories associated with this equipment are: shielded video
cable. These accessories are required to be used in order to ensure compliance with FCC rules.
FCC declaration of conformity
Responsible party:
Gateway Companies, Inc.
610 Gateway Drive
North Sioux City, SD 57049
(605) 232-2000 Fax: (605) 232-2023
Product:
■
Gateway LC 2
For unique identificat ion of the product configur ation, please submit the 10-d igit serial number
found on the product to the responsible party .
This device complies with Part 15 of the FCC Rules. Operation of this product is subject to the
following two conditions: (1) this device may not cause harmful inter ference, and (2) this devic e
must accept any interference r eceived, including interference th at may cause undesired
operation.
Caution Changes or modifications not expressly approved by
Gateway could void the FCC compliance and negate your
authority to operate the product.
93
Page 98

07334.book Page 94 Friday, December 29, 2000 10:23 AM
FCC part 68 (applicable to productsfitted with USA modems)
Y our modem compli es with Part 68 of the Federal Communications Commission (FCC) rules. On
the computer or modem card is a label that contains the FCC registration number and Ringer
Equivalence Number (REN) for this device. If requested, this information must be provided to the
telephone company.
An FCC-compliant telephone line cord with a modular plu g is required for use with this devic e.
The modem is designed to be connected to the telephone network or premises wiring using a
compatible modular jack which is Part 68-compliant. See installation ins tructions for deta ils.
The Ringer Equivalence Number (REN) is used to determine the number of devices which may be
connected to the telephone line. Excessive RENs on a telephone line may result in the devices
not ringing in response to an incoming call. In most areas, the sum of RENs should not exceed
five (5.0). T o be certain of the number of devices that may be connected to a line, as determined
by the total RENs, contact the local telephone company.
If this device causes harm to the telephone network , the telephone company will notify you in
advance that temporary discontinuance of service may be required. The telephone company may
request that you disconnect the equipment until the problem is resolved.
The telephone company may make changes in its facilities, equipment, operations, or procedures
that could affect the operation of this equipment. If this happens the telephone company will
provide advance notice in order for you to make necess ary modifications to maintain
uninterrupted service.
This equipment cannot be used on telephone company-provided coin service. Connection to
party line service is subject to state tariffs. C ontact the state public utility commiss ion or public
service commission for informati on.
When programming or making test calls to emergency numbers :
■
Remain on the line and briefly explain to the dispatcher the reason for the call.
■
Perform such activities in the off-peak hours such as early morning or late evenings.
The United States T elephone Consumer Protection Act of 1991 makes it unlawful for any person
to use a computer or other electronic device to send any message via a telephone fax machine
unless such message clearly contains, in a margin at the top or bottom of each transmitted page
or on the first page of the transmission, the date and time it is sent, an identif ication of the
business, other entity, or other individual sending the message, and the telephone number of the
sending machine or such business, other entity, or individual. Refer to your fax communication
software documentation for details on how to comply with the fax-branding requirement.
94
Page 99

07334.book Page 95 Friday, December 29, 2000 10:23 AM
Canadian users
ICES-003
This digital apparatus does not exceed the Class B limits for radio noise emissions from digital
apparatus as set out in the radio interf erence regulations of Industry Canada.
Le présent appareil numérique n’émet pas de bruits radioélectriques dépassant les limites
applicables aux appareils numériques de Classe B prescrites dans le règlement sur le brouillage
radioélectrique édicté par Industrie Canada.
DOC notice (for productsfitted with an IC-compliant modem)
The Industry Canada label identifies certified equipment. This certif ication means that the
equipment meets certain telecommunications network protecti ve, operation, and safety
requirements. The Department does not guarantee the eq uipment will o perate to the users’
satisfaction.
Before installing this equipment, us ers should make sure that it is permiss ible to be connected to
the facilities of the local telecommunications company. The equipment must also be installed
using an acceptable method of connection. In some cases, the inside wiring associated with a
single-line individual service may be extended by means of a certified connector assembly. The
customer should be aware that compliance with the above conditions may not prevent
degradation of service in some situations.
Repairs to certified equipment should be made by an authorized Cana dian maintenance facility
designated by the supplier. Any repairs or alterations made by the user to this equipment, or
equipment malfunctions, may give the telecommunications company cause to request the user
to disconnect the equipment.
Users should make sure for their own protection that the electrical ground connectio ns of the
power utility , telephone lines, and internal metallic water pipe system, if present, are connected
together . This precaution may be partic ularly important in rural areas .
Warning To avoid electrical shock or equipment malfunction do not
attemptto make electrical groundconnectionsbyyourself.
Contact the appropriate inspection authority or an
electrician, as appropriate.
The Ringer Eq uivalence Num ber (REN) assigned to each terminal device provides an indicati on
of the maximum number of terminals allowed to be connected to a telephone interface. The
termination on an interface may consist of any combinatio n of devices subject only to the
requirement that the sum of the Ringer Equivalence Numbers of all the devices does not
exceed 5.
95
Page 100

07334.book Page 96 Friday, December 29, 2000 10:23 AM
European users
European directives
This Information T echnology E quipment has been tested and found to comply with the
following European directives:
■
EMC Directive 89/336/EEC amending directive 92/31/EEC & 93/68/EEC as per
- EN 50081-1:1992 according t o
EN 55022:1994 Class B
EN 61000-3-2:1995 or EN 605 55-2:1987
EN 61000-3-3:1995 or EN 605 55-3:1987
- EN 50082-1:1992 according t o
EN 61000-4-2:1995 or IEC 801-2 :1984
EN 61000-4-3:1996 or IEC 801-3 :1984
EN 61000-4-4:1995 or IEC 801-4 :1988
■
Low Voltage Directive (Safety) 73/23/EEC as per EN 60950:1992(A1/A2/A3/A4/A11)
Europeantelecommunication information (for products fitted with EU-approved
modems)
Marking by the symbol indicates compliance of this equipment to the Radio and T elecom
Ter minal Equipment Directive 1999/S/EC. Such marking is indicative that this equipment meets
or exceeds the following technical standards:
CTR 21 (1998) - Attachment requirements for pan-European approval for connection to the
analogue Public Switched Telephone Networks (PSTNs) of TE (excluding TE supporting voice
telephony services) in which network addressing, if provided, is by means of Dual Tone
Multi-Frequency (DTMF) signalin g.
Warning Although this equipment can use either loop disconnect
(Pulse) or DTMF (Tone) signaling, only the performance
of the DTMF signaling is subject to regulatory
requirements for correct operation. It is therefore strongly
recommended that the equipment is set to use DTMF
signaling for access to public or private emergency
services. DTMF signaling also provides faster call setup.
This equipment has been approved to Council Decision 98/482/EEC—“CTR 21” for
Pan-European single ter minal connec tion to t he Public Swit ched Telephone Network (PSTN).
However, due to differences between the individual PSTNs provided in different countries, the
approval does not, of itself, give an unconditional assurance of successful operation on every
PSTN termination point. In the event of problems, you should contact Gateway customer
support.
96
 Loading...