


 Loading...
P3PC-5242-05ENZ0
N7100
Operator's Guide

Contents
Introduction ................................................................................ |
15 |
||
■ Manuals ......................................................................................... |
16 |
||
■ About This Manual ....................................................................... |
17 |
||
Chapter 1 Overview ................................................................... |
22 |
||
1.1 |
Scanner Features ....................................................................... |
23 |
|
|
■ Basic Uses for Scanned Data ..................................................................... |
23 |
|
|
■ Configure and Manage with Ease ............................................................... |
24 |
|
|
■ Advanced Security Measures ..................................................................... |
26 |
|
1.2 |
Part Names and Functions ........................................................ |
27 |
|
|
■ Front View ................................................................................................... |
27 |
|
|
■ Rear View ................................................................................................... |
28 |
|
|
■ Removable Parts ........................................................................................ |
29 |
|
1.3 |
User Types and Operations ....................................................... |
30 |
|
1.3.1 Operations with Administrator Right............................................................ |
31 |
||
1.3.2 |
Regular User Operations............................................................................. |
35 |
|
1.4 |
Required Scanner Function Settings (Administrator) ............ |
36 |
|
1.5 |
System Requirements ................................................................ |
41 |
|
1.5.1 Requirements for Admin Tool and User Editor............................................ |
41 |
||
1.5.2 Requirements for Related Servers .............................................................. |
43 |
||
1.5.3 |
Port Number List ......................................................................................... |
48 |
|
Chapter 2 Basic Scanner Operations ....................................... |
50 |
||
2.1 |
Turning the Power On/Off .......................................................... |
51 |
|
2.1.1 Turning the Power On ................................................................................. |
51 |
||
2.1.2 Turning the Power Off ................................................................................. |
52 |
||
2.2 |
Using the Scanner Buttons ....................................................... |
53 |
|
|
■ Using the Power Button .............................................................................. |
53 |
|
|
■ Using the Scan Button ................................................................................ |
55 |
|
2.3 |
Using the Touch Panel ............................................................... |
56 |
|
2

|
|
Contents |
2.4 |
Using the On-Screen Keyboard ................................................ |
57 |
|
■ Showing/Hiding the On-Screen Keyboard .................................................. |
57 |
|
■ Using the On-Screen Keyboard .................................................................. |
58 |
|
■ Keyboard Layout ......................................................................................... |
58 |
Chapter 3 Software Installation ................................................ |
59 |
|
3.1 |
Setting Up Internet Explorer ...................................................... |
60 |
|
■ Checking the Internet Explorer Cache Settings .......................................... |
60 |
|
■ Setting Trusted Sites for Internet Explorer .................................................. |
61 |
3.2 |
Showing the Software Download Window ............................... |
62 |
3.3 |
Installing the Admin Tool ........................................................... |
64 |
3.4 |
Uninstalling the Admin Tool ...................................................... |
66 |
3.5Installing the Central Admin Console and
|
Central Admin Server ................................................................. |
67 |
|
Chapter 4 Administrator Operations |
|
||
|
|
(Touch Panel and Admin Tool) ................................... |
68 |
4.1 |
Windows ...................................................................................... |
69 |
|
4.1.1 Administrator Windows via the Touch Panel............................................... |
69 |
||
4.1.2 Administrator Windows via the Admin Tool................................................. |
70 |
||
4.2 |
Administrator Login ................................................................... |
72 |
|
4.2.1 Administrator Login: via the Touch Panel.................................................... |
72 |
||
|
■ When Automatic Login is Not Set ............................................................... |
72 |
|
|
■ When Automatic Login is Set ...................................................................... |
73 |
|
4.2.2 Administrator Login: via the Admin Tool...................................................... |
74 |
||
4.3 Setting the System Settings ...................................................... |
77 |
||
4.3.1 Configuring the Setting Mode...................................................................... |
77 |
||
4.3.2 Setting the System Settings with the Installation Wizard ............................ |
78 |
||
4.4 |
Configuring the System ............................................................. |
80 |
|
4.4.1 Setting the Scanner Name .......................................................................... |
80 |
||
4.4.2 |
Setting the Language .................................................................................. |
82 |
|
4.4.3 |
Setting the Region/Timezone ...................................................................... |
83 |
|
4.4.4 |
Setting the Date/Time.................................................................................. |
84 |
|
4.4.5 |
Setting the Keyboard................................................................................... |
85 |
|
3

|
|
Contents |
4.4.6 |
Managing Certificates.................................................................................. |
86 |
■ Importing a Certificate File .......................................................................... |
86 |
|
■ Deleting a Certificate File ........................................................................... |
87 |
|
4.5 Setting the Scan Options ........................................................... |
88 |
|
4.5.1 |
Setting the Multifeed Detection Method ...................................................... |
88 |
4.5.2 |
Adjusting the Scan Starting Position (Offset/Magnification) ........................ |
90 |
4.5.3 |
Setting General Scanner Settings ............................................................... |
91 |
4.6 Configuring the Login-Related Settings ................................... |
92 |
|
4.6.1 |
Setting the Login Settings ........................................................................... |
92 |
4.6.2 |
Setting the Login Settings (Details) ............................................................. |
95 |
4.6.3 |
Setting the Standby Mode ........................................................................... |
97 |
4.6.4 |
Changing the Admin Password ................................................................... |
99 |
4.6.5 |
Setting the LAN Manager Authentication Level......................................... |
100 |
4.7 Configuring the Network Settings .......................................... |
101 |
|
4.7.1 |
Giving the Scanner an IP Address/DHCP ................................................. |
101 |
4.7.2 |
Setting the DNS Server ............................................................................. |
103 |
4.7.3 |
Setting the WINS Server ........................................................................... |
104 |
4.7.4 |
Setting the NTP Server ............................................................................. |
105 |
4.7.5 |
Setting the Proxy Server ........................................................................... |
106 |
4.7.6 |
Configuring the SNMP Settings................................................................. |
107 |
4.7.7 |
Configuring Network Advanced Settings .................................................. |
108 |
4.8 Checking the Network Status .................................................. |
109 |
|
4.8.1 |
Checking the Network Connection with a Ping Test ................................. |
109 |
4.8.2 |
Checking the Network Operating Status ................................................... |
110 |
4.9 Configuring the Network Admin Settings .............................. |
111 |
|
4.9.1 |
Setting the Admin Connection................................................................... |
111 |
4.9.2 |
Setting a Central Admin Server................................................................. |
112 |
4.9.3 |
Setting a Central Admin Server (Details) .................................................. |
114 |
4.10 Setting the Authentication Server ........................................... |
115 |
|
4.10.1 |
Setting the Login LDAP Server ................................................................. |
115 |
■ LDAP Search Target ................................................................................. |
117 |
|
4.10.2 |
Setting the e-Mail LDAP Server ................................................................ |
122 |
4.10.3 |
Setting the Schema ................................................................................... |
123 |
4.10.4 |
Setting the LDAP Search Parameters....................................................... |
124 |
4.11 Configuring the e-Mail-Related Settings ................................ |
126 |
|
4.11.1 |
Setting the SMTP Server........................................................................... |
126 |
4.11.2 |
Setting the SMTP Server (Extension) ....................................................... |
127 |
4

|
Contents |
4.11.3 Configuring Settings for Sending e-Mail.................................................... |
128 |
4.11.4 Setting a File Name Format for When Attaching Scanned Data |
|
to e-Mail..................................................................................................... |
129 |
4.12 Setting the Fax Server .............................................................. |
130 |
4.13 Setting Folders for Saving Scanned Data .............................. |
131 |
4.13.1 Setting the Network Folders ...................................................................... |
131 |
■ Registering a Network Folder (Network Tree) .......................................... |
132 |
■ Registering a Network Folder (Network Path) .......................................... |
134 |
■ Renaming a Network Folder ..................................................................... |
135 |
■ Removing a Network Folder ..................................................................... |
135 |
■ Viewing the Network Folder Details .......................................................... |
136 |
4.13.2 Setting the FTP Server Folders................................................................. |
137 |
■ Registering an FTP Server Folder ............................................................ |
138 |
■ Changing the FTP Server Folder Settings ................................................ |
139 |
■ Removing an FTP Server Folder .............................................................. |
139 |
■ Viewing the FTP Server Folder Details ..................................................... |
140 |
4.13.3 Setting the SharePoint Folders ................................................................. |
141 |
■ Registering a SharePoint Folder ............................................................... |
141 |
■ Renaming a SharePoint Folder (Display Name) ....................................... |
143 |
■ Removing a SharePoint Folder ................................................................. |
144 |
■ Viewing the SharePoint Folder Details ..................................................... |
144 |
4.13.4 Setting a File Name Format for When Saving Scanned Data ................... |
145 |
4.14 Setting the Network Printers ................................................... |
147 |
■ Checking the Printer Drivers ..................................................................... |
150 |
■ Setting the Printer Properties (via the Print Server) .................................. |
151 |
■ Checking the Printer Name or the IP Address for the Printer (for Direct |
|
Printing) .................................................................................................... |
153 |
■ Checking the Driver Name for the Printer (for Direct Printing) .................. |
153 |
■ Registering a Network Printer (Network Tree) (via the Print Server) ........ |
154 |
■ Registering a Network Printer (Network Path) .......................................... |
156 |
■ Changing the Network Printer Settings ..................................................... |
158 |
■ Removing a Network Printer ..................................................................... |
158 |
■ Viewing the Network Printer Details .......................................................... |
159 |
4.15 Viewing the Scanner Details .................................................... |
160 |
4.15.1 Viewing the System Status........................................................................ |
160 |
4.15.2 Viewing the Usage Status ......................................................................... |
161 |
■ Viewing the Status of Consumable Parts .................................................. |
161 |
■ Resetting the Usage Counter .................................................................... |
161 |
4.15.3 Viewing the Status of Installed Options..................................................... |
162 |
5

Contents |
|
4.15.4 Managing the User Log ............................................................................. |
163 |
■ Viewing the User Log Details .................................................................... |
163 |
■ Downloading the User Logs in CSV Format ............................................. |
164 |
■ Clearing the User Logs ............................................................................. |
164 |
4.15.5 Managing the System Log......................................................................... |
165 |
■ Viewing the System Log Details ............................................................... |
165 |
■ Downloading the System Log in CSV Format ........................................... |
166 |
■ Clearing the System Log ........................................................................... |
166 |
4.16 Managing the User Data Store and System Settings ............ |
167 |
4.16.1 Maintaining the User Data Store ............................................................... |
167 |
■ Backing up the User Data Store ............................................................... |
169 |
■ Restoring the User Data Store .................................................................. |
170 |
■ Clearing the User Data Store .................................................................... |
170 |
4.16.2 Maintaining the System Settings ............................................................... |
171 |
■ Downloading the System Settings in CSV Format .................................... |
171 |
■ Backing up System Settings ..................................................................... |
172 |
■ Restoring the System Settings .................................................................. |
173 |
■ Resetting to Factory Defaults .................................................................... |
174 |
4.17 Maintaining the System ........................................................... |
175 |
4.17.1 Updating the Scanner's System Software................................................. |
175 |
4.17.2 Checking for New Updates........................................................................ |
177 |
■ Checking for New Updates Manually ........................................................ |
177 |
■ Checking for Updates at Scanner Startup ................................................ |
178 |
■ Requesting e-Mail Notification When a New Update is Available ............. |
178 |
4.17.3 Maintaining Add-in Modules ...................................................................... |
179 |
■ Installing an Add-in Module ....................................................................... |
179 |
■ Uninstalling an Add-in Module .................................................................. |
180 |
■ Viewing the Add-in Status ......................................................................... |
180 |
■ Uploading an Add-in Settings File ............................................................. |
181 |
■ Setting Whether to Show the Keyboard Icon When Running an Add-in ... |
181 |
4.17.4 Setting the Information Output Level......................................................... |
182 |
4.17.5 Obtaining Technical Support ..................................................................... |
183 |
4.17.6 Setting the Destination for Alert Notifications ............................................ |
184 |
4.17.7 Getting a Screenshot on the Touch Panel ................................................ |
186 |
4.18 Setting a Job Sequence ........................................................... |
188 |
4.18.1 Job Setting Quick User Guide ................................................................... |
190 |
4.18.2 Setting a Job Sequence ............................................................................ |
192 |
■ Adding a Job Sequence ............................................................................ |
192 |
■ Cloning a Job Sequence ........................................................................... |
198 |
6
|
|
|
Contents |
|
|
|
|
|
■ Editing a Job Sequence ............................................................................ |
198 |
|
|
■ Deleting a Job Sequence .......................................................................... |
199 |
|
|
■ Filtering Job Sequences ........................................................................... |
199 |
|
|
■ Filtering the LDAP List .............................................................................. |
200 |
|
|
■ Splitting an Output File .............................................................................. |
201 |
|
4.18.3 |
Setting a Job Menu ................................................................................... |
202 |
|
|
■ Adding a Job Menu ................................................................................... |
202 |
|
|
■ Cloning a Job Menu .................................................................................. |
205 |
|
|
■ Editing a Job Menu ................................................................................... |
205 |
|
|
■ Deleting a Job Menu ................................................................................. |
206 |
|
|
■ Viewing the Detailed Settings for a Job Menu .......................................... |
206 |
|
4.18.4 |
Setting a Job Group .................................................................................. |
207 |
|
|
■ Adding a Job Group .................................................................................. |
207 |
|
|
■ Cloning a Job Group ................................................................................. |
210 |
|
|
■ Editing a Job Group .................................................................................. |
210 |
|
|
■ Deleting a Job Group ................................................................................ |
211 |
|
|
■ Viewing the Detailed Settings for a Job Group ......................................... |
211 |
|
|
■ Assigning Job Menus to Users Not Included in a Job Group .................... |
212 |
|
|
■ Filtering the LDAP List .............................................................................. |
213 |
|
4.19 |
Messages .................................................................................. |
214 |
|
4.19.1 |
Administrator Window Messages .............................................................. |
215 |
|
Chapter 5 Regular User Operations ....................................... |
216 |
||
5.1 |
Loading Documents ................................................................. |
217 |
|
5.1.1 |
How to Load Documents ........................................................................... |
217 |
|
5.1.2 |
Loading Documents Using a Carrier Sheet............................................... |
221 |
|
5.2 Using Touch Panel Windows: Regular User .......................... |
224 |
||
5.2.1 |
[Main Menu] Window................................................................................. |
224 |
|
5.2.2 |
[Job Menu] Window................................................................................... |
225 |
|
5.2.3 |
Regular User Settings Overview ............................................................... |
226 |
|
5.3 Logging in: Regular User Mode .............................................. |
227 |
||
5.4 Sending the Scanned Data by e-Mail ...................................... |
230 |
||
5.4.1 |
Selecting an e-Mail Target from the e-Mail Address Book ........................ |
233 |
|
5.4.2 |
Adding an e-Mail Target to the e-Mail Address Book................................ |
237 |
|
5.4.3 |
Editing an e-Mail Target in the e-Mail Address Book ................................ |
241 |
|
5.4.4 |
Deleting an e-Mail Target from the e-Mail Address Book.......................... |
243 |
|
5.5 Sending the Scanned Data by Fax .......................................... |
244 |
||
5.5.1 |
Selecting a Fax Number from the Fax Number List .................................. |
246 |
|
7

|
|
Contents |
5.5.2 |
Adding a Contact to the Fax Number List ................................................. |
248 |
5.5.3 |
Editing the Fax Number List ...................................................................... |
250 |
5.5.4 |
Deleting a Contact from the Fax Number List ........................................... |
251 |
5.6 Printing the Scanned Data ....................................................... |
252 |
|
5.6.1 |
Scaling....................................................................................................... |
255 |
5.6.2 |
Positioning................................................................................................. |
259 |
5.6.3 |
Print Side................................................................................................... |
261 |
5.7 Saving the Scanned Data to a Network Folder ...................... |
262 |
|
5.8 Saving the Scanned Data to a SharePoint Folder ................. |
265 |
|
5.9 Setting the Scan Options ......................................................... |
271 |
|
5.9.1 |
Relational Changes among Scan Setting Items........................................ |
272 |
■ Basic ......................................................................................................... |
272 |
|
■ Save .......................................................................................................... |
276 |
|
■ Image Correction ...................................................................................... |
280 |
|
■ Page .......................................................................................................... |
281 |
|
■ Paper Feeding .......................................................................................... |
282 |
|
■ Batch ......................................................................................................... |
282 |
|
5.9.2 |
Setting Image Mode .................................................................................. |
283 |
5.9.3 |
Setting Paper............................................................................................. |
284 |
5.9.4 |
Resolution ................................................................................................. |
285 |
5.9.5 |
Configuring Settings for a Carrier Sheet ................................................... |
286 |
5.9.6 |
File Format ................................................................................................ |
287 |
5.9.7 |
Setting a PDF Password ........................................................................... |
289 |
5.9.8 |
Searchable PDF ........................................................................................ |
290 |
5.9.9 |
Setting a Keyword for the PDF.................................................................. |
291 |
5.9.10 |
Compression ............................................................................................. |
295 |
5.9.11 |
Thresholding.............................................................................................. |
297 |
5.9.12 |
Controlling the image quality of scanned data (Control Image Tone) |
....... 298 |
5.9.13 |
Optimizing Scanned Data (Cleanup)......................................................... |
299 |
■ In [Color] or [Grayscale] mode .................................................................. |
299 |
|
■ In [Black & White] mode ............................................................................ |
300 |
|
5.9.14 |
Reducing Vertical Streaks ......................................................................... |
301 |
5.9.15 |
Removing Colors from Scanned Images (Dropout Color)......................... |
302 |
5.9.16 |
Page Orientation ....................................................................................... |
303 |
5.9.17 |
Filling the Edge of Scanned Image (Edge Correction) .............................. |
305 |
5.9.18 |
Skipping Blank Pages from the Scanned Data ......................................... |
307 |
5.9.19 |
Detecting Multifeeds.................................................................................. |
308 |
5.9.20 |
Outputting Index Information ..................................................................... |
309 |
■ Index Information File Format ................................................................... |
310 |
|
8

|
Contents |
|
5.10 Enabling/Disabling the Scan Viewer ....................................... |
313 |
|
5.11 Editing the Scanned Data in the Scan Viewer ....................... |
316 |
|
5.11.1 Switching the Page Order of the Scanned Data........................................ |
317 |
|
5.11.2 Viewing the Scanned Data ........................................................................ |
318 |
|
|
■ Changing the Display Size of Scanned Data ............................................ |
319 |
5.11.3 Editing Scanned Data on the Scan Viewer Details Window...................... |
319 |
|
|
■ Rotating Scanned Data ............................................................................. |
319 |
|
■ Deleting Scanned Data ............................................................................. |
320 |
5.11.4 Editing Scanned Data on the [Assisted Scan] Window ............................. |
320 |
|
|
■ Changing the Display Size of Scanned Data ............................................ |
322 |
|
■ Resetting a Processed Image ................................................................... |
322 |
|
■ Undoing and Redoing a Process .............................................................. |
322 |
|
■ Rotating Scanned Data ............................................................................. |
322 |
|
■ Changing the Image Mode of Scanned Data ............................................ |
322 |
5.11.5 Editing a Separator.................................................................................... |
323 |
|
5.11.6 Deleting a Separator ................................................................................. |
324 |
|
5.11.7 Scanning an Additional Page .................................................................... |
324 |
|
5.11.8 Editing Marked Characters to Be Set as Keywords .................................. |
325 |
|
5.12 Viewing the Send Status .......................................................... |
326 |
|
5.12.1 Viewing Details on Send Operations That Were Completed (User Log)... |
326 |
|
5.12.2 Viewing Details on Send Operations That Are In Progress....................... |
327 |
|
5.13 |
Maintenance .............................................................................. |
329 |
5.14 |
Processing a Job ...................................................................... |
331 |
5.14.1 Enabling/Disabling the Message Screen................................................... |
333 |
|
5.14.2 Changing a File Name (for Save/e-Mail Attachment)................................ |
335 |
|
5.14.3 Checking the Number of Sheets to Be Scanned....................................... |
336 |
|
5.14.4 Splitting a File Using Patch Codes ............................................................ |
339 |
|
5.15 Changing a User Password ..................................................... |
341 |
|
Chapter 6 Scanner Care .......................................................... |
342 |
|
6.1 Cleaning Supplies and Parts to Clean .................................... |
343 |
|
|
■ Cleaning Supplies ..................................................................................... |
343 |
|
■ Which Parts and When ............................................................................. |
344 |
6.2 Cleaning the Exterior of the Scanner ..................................... |
345 |
|
|
■ Cleaning the Scanner Body ...................................................................... |
345 |
|
■ Cleaning the Touch Panel ......................................................................... |
345 |
6.3 Cleaning Inside the Scanner ................................................... |
346 |
|
9

|
Contents |
|
6.4 |
Cleaning a Carrier Sheet .......................................................... |
352 |
6.5 |
Replacing Parts ........................................................................ |
353 |
6.5.1 Part Numbers and Replacement Cycle ..................................................... |
353 |
|
6.5.2 Checking the Consumable Alert Status..................................................... |
354 |
|
6.5.3 Replacing the Roller Set............................................................................ |
355 |
|
6.5.4 Purchasing a Carrier Sheet ....................................................................... |
362 |
|
6.6 |
Performing a Scan Test ........................................................... |
363 |
|
■ Regular User ............................................................................................. |
363 |
|
■ Administrator ............................................................................................. |
365 |
6.7 |
Calibrating the Touch Panel .................................................... |
366 |
Chapter 7 Troubleshooting ..................................................... |
367 |
|
7.1 |
Removing Jammed Documents .............................................. |
368 |
7.2 |
Network Connection Troubleshooting ................................... |
371 |
7.2.1 Basic Network Operation Tests................................................................. |
371 |
|
|
■ Checking Basic Network Operation with a Ping Test ................................ |
371 |
|
■ Checking the Network Operating Status ................................................... |
374 |
|
■ Checking the NTP Server Settings by Synchronizing the System Time ... |
375 |
|
■ Checking the Mail Server by Sending a Test Mail .................................... |
376 |
7.2.2 Other Network Connection Troubleshooting ............................................. |
377 |
|
|
■ Failure to Connect to a Server Using Its IP Address ................................ |
377 |
|
■ Failure to Connect to a Server Using Its Host Name or FQDN ................. |
379 |
|
■ Failure to Add the Scanner as a Domain Member, or Failure to Login to a |
|
|
Domain ..................................................................................................... |
379 |
|
■ Failure to Add a Network Printer ............................................................... |
380 |
|
■ Failure to Print on a Network Printer ......................................................... |
381 |
|
■ Failure to Add a Network Folder ............................................................... |
381 |
|
■ Failure to Save to a Network Folder ......................................................... |
382 |
7.2.3Failure to Access the Scanner Using Internet Explorer, the Admin Tool,
the Central Admin Server, or the User Editor............................................ |
383 |
7.3 Other Troubleshooting ............................................................. |
386 |
■ Scanner Cannot Be Turned On ................................................................ |
387 |
■ Scanner Does Not Start Up ...................................................................... |
387 |
■ I Want to Reset the Scanner to Factory Defaults ...................................... |
388 |
■ Data Cannot Be Scanned Properly ........................................................... |
388 |
■ Scanned Data Is Inappropriate ................................................................. |
391 |
■ Cannot Login ............................................................................................. |
393 |
■ Operation Does Not Work ......................................................................... |
393 |
10
Contents
7.4Points to Check before Contacting Your FUJITSU Scanner
|
Dealer ......................................................................................... |
395 |
|
7.4.1 |
General Details.......................................................................................... |
395 |
|
7.4.2 |
Error Status ............................................................................................... |
396 |
|
|
■ Problem When Connecting to the Scanner via Computer ........................ |
396 |
|
|
■ Document Feed Trouble ........................................................................... |
396 |
|
|
■ Sending an Original Document and Scanned Data .................................. |
397 |
|
7.5 |
Checking the Scanner Labels ................................................. |
398 |
|
7.6 |
Pre-Maintenance Preparations ................................................ |
399 |
|
Appendix A Paper Specifications ........................................... |
400 |
|
A.1 |
Paper Size ................................................................................. |
401 |
A.2 |
Paper Quality ............................................................................ |
402 |
A.3 |
Maximum Document Loading Capacity ................................. |
404 |
A.4 |
Area not to be Perforated or Affixed with Other Papers ....... |
405 |
A.5 |
Multifeed Detection Conditions ............................................... |
406 |
A.6 |
Conditions for Using a Carrier Sheet ..................................... |
407 |
A.6.1 |
Paper Size................................................................................................. |
407 |
A.6.2 |
Paper Quality............................................................................................. |
407 |
Appendix B Management Settings and Limits ...................... |
408 |
||
B.1 |
e-Mail Address Setting Values ................................................ |
409 |
|
B.2 |
Limits for Setting Items ............................................................ |
410 |
|
Appendix C Compatibility and Connectivity ......................... |
412 |
||
C.1 |
Compatibility ............................................................................. |
413 |
|
C.1.1 |
Add-in Performance .................................................................................. |
413 |
|
C.1.2 Using System Settings in Other Scanners ................................................ |
414 |
||
C.1.3 Using User Data in Other Scanners .......................................................... |
414 |
||
C.1.4 |
Sharing User Data..................................................................................... |
415 |
|
C.1.5 |
Sharing Job Settings ................................................................................. |
415 |
|
C.1.6 Distribution from the Central Admin Console Server................................. |
416 |
||
C.2 |
Connectivity .............................................................................. |
417 |
|
C.2.1 Connectivity with the Admin Tool .............................................................. |
417 |
||
C.2.2 Connectivity with the User Editor (AddressBookEditor) ............................ |
417 |
||
C.2.3 Connectivity with the Central Admin Server .............................................. |
418 |
||
11

|
|
|
Contents |
C.2.4 Root Certification Authority List ................................................................. |
418 |
||
C.2.5 SMTP Server Settings for Using Webmail ................................................ |
419 |
||
Appendix D Scanner Specifications ...................................... |
420 |
||
D.1 |
Installation Specifications ....................................................... |
421 |
|
D.2 |
Basic Scanner Specifications ................................................. |
422 |
|
D.3 |
Software Function List ............................................................. |
423 |
|
D.4 |
Changing the Functions on the On-Screen Keyboard .......... |
425 |
|
D.4.1 Switching the Keyboard Layout................................................................. |
425 |
||
D.5 |
Barcode Types and Detection Conditions ............................. |
427 |
|
|
■ One-dimensional Barcodes ................................................................... |
427 |
|
|
■ Detection Conditions for One-dimensional Barcodes ............................... |
427 |
|
Appendix E SNMP Settings ..................................................... |
429 |
||
E.1 |
Corresponding MIB .................................................................. |
430 |
|
E.2 |
MIB Information ........................................................................ |
431 |
|
|
■ ScannerInfo ............................................................................................... |
431 |
|
|
■ BrakeRoller ............................................................................................... |
431 |
|
|
■ PickRoller .................................................................................................. |
432 |
|
|
■ TrapEvent ................................................................................................. |
432 |
|
E.3 |
SNMP Trap Notification ............................................................ |
433 |
|
Appendix F Editing Using User Editor ................................... |
434 |
||
F.1 |
What is User Editor? ................................................................ |
435 |
|
F.2 |
Pre-settings ............................................................................... |
436 |
|
F.2.1 |
Installing User Editor ................................................................................. |
436 |
|
F.2.2 |
Uninstalling User Editor............................................................................. |
437 |
|
F.3 |
Windows of User Editor ........................................................... |
438 |
|
F.4 |
Starting/Exiting User Editor ..................................................... |
440 |
|
|
■ Starting User Editor ................................................................................... |
440 |
|
|
■ Exiting User Editor .................................................................................... |
440 |
|
F.5 |
Viewing the e-Mail Address Book/Local Accounts ............... |
441 |
|
|
■ Loading from a Scanner ............................................................................ |
441 |
|
|
■ Loading from a File ................................................................................... |
442 |
|
|
■ File Format of e-Mail Address Book Loaded from a File ........................... |
442 |
|
|
■ File Format of Local Accounts Loaded from a File ................................... |
443 |
|
12

|
|
|
Contents |
F.6 Editing an e-Mail Target in the e-Mail Address Book |
............ 444 |
||
F.6.1 |
Setting a Group ......................................................................................... |
444 |
|
|
■ Adding a Group ......................................................................................... |
444 |
|
|
■ Changing the Group Name ....................................................................... |
445 |
|
|
■ Deleting a Group ....................................................................................... |
445 |
|
F.6.2 Setting a Distribution List........................................................................... |
446 |
||
|
■ Adding a Distribution List .......................................................................... |
446 |
|
|
■ Editing a Distribution List .......................................................................... |
447 |
|
|
■ Deleting a Distribution List ........................................................................ |
447 |
|
F.6.3 Setting an e-Mail Address ......................................................................... |
448 |
||
|
■ Adding an e-Mail Address ......................................................................... |
448 |
|
|
■ Editing an e-Mail Address ......................................................................... |
449 |
|
|
■ Deleting an e-Mail Address ....................................................................... |
449 |
|
F.7 |
Editing Local Accounts ............................................................ |
450 |
|
F.7.1 Adding a Local Account............................................................................. |
450 |
||
F.7.2 Editing a Local Account............................................................................. |
451 |
||
F.7.3 Deleting a Local Account........................................................................... |
451 |
||
F.8 Discarding the Edited e-Mail Address Book or |
|
||
|
Local Accounts ......................................................................... |
452 |
|
F.9 Saving the e-Mail Address Book/Local Account ................... |
453 |
||
|
■ Saving the Edited Information to the Scanner .......................................... |
453 |
|
|
■ Saving the Edited Information to a File ..................................................... |
454 |
|
F.10 |
User Editor Information Shown in User Log .......................... |
455 |
|
F.11 |
User Editor Information Shown in System Log ..................... |
456 |
|
Appendix G IPv6 Settings ....................................................... |
457 |
||
G.1 Overview of IPv6 Support for the Scanner ............................. |
458 |
||
|
■ Software that is Updated to Support IPv6 ................................................. |
458 |
|
|
■ Software that is not Updated to Support IPv6 ........................................... |
458 |
|
G.2 Configuring IPv6 Settings for the Scanner ............................ |
459 |
||
G.2.1 Installing the IPv6 Function ....................................................................... |
459 |
||
|
■ Checking the System Version ................................................................... |
459 |
|
|
■ Enabling the IPv6 Function ....................................................................... |
459 |
|
|
■ Configuring an IPv6 Communication Environment ................................... |
459 |
|
|
■ Using the Office Functions via IPv6 .......................................................... |
460 |
|
G.2.2 |
Linked Server ............................................................................................ |
460 |
|
G.2.3 |
Port Number List ....................................................................................... |
462 |
|
13

|
Contents |
G.3 Configuring IPv6 Communication Environment .................... |
463 |
G.3.1 Giving the Scanner an IPv4 Address ........................................................ |
463 |
G.3.2 Giving the Scanner an IPv6 Address ........................................................ |
464 |
G.3.3 Setting the DNS Server (IPv4) .................................................................. |
466 |
G.3.4 Setting the DNS Server (IPv6) .................................................................. |
467 |
G.3.5 Checking the Network Operating Status ................................................... |
468 |
G.4 Using the Settings of the IPv6 Function for the Scanner |
|
in Other Scanners ..................................................................... |
469 |
G.4.1 Distributing System Settings from the Central Admin Server.................... |
469 |
G.4.2 Backing-up and Restoring System Settings .............................................. |
470 |
Glossary .................................................................................... |
472 |
About Maintenance .................................................................. |
475 |
Copyright .................................................................................. |
476 |
Index .......................................................................................... |
482 |
14

Introduction
Thank you for purchasing FUJITSU Image Scanner N7100 (hereinafter referred to as "the scanner").
This scanner is a network image scanner. This easy-to-operate scanner facilitates the optimal flow of office work for workgroups communicating via a network.
Trademarks
Microsoft, Windows, Windows Vista, Windows Server, SharePoint, and Internet Explorer are either registered trademarks or trademarks of Microsoft Corporation in the United States and/ or other countries.
Adobe, Acrobat, and Reader are either registered trademarks or trade names of Adobe Systems Incorporated in the United States and/or other countries.
Intel is a registered trademark or a trademark of Intel Corporation in the United States and other countries.
ABBYY™ FineReader™ Engine © ABBYY. OCR by ABBYY
ABBYY and FineReader are trademarks of ABBYY Software, Ltd. which may be registered in some jurisdictions.
Linux is the registered trademark or trademark of Linus Torvalds in the U.S. and other countries.
Red Hat is the registered trademark or trademark of Red Hat, Inc. in the United States and other countries.
Yahoo! (http://yahoo.com/) is an information portal site on the Internet run by Yahoo! Inc. ScanSnap and the ScanSnap logo are registered trademarks or trademarks of PFU Limited in Japan.
Other company names and product names are the registered trademarks or trademarks of the respective companies.
Manufacturer
PFU Limited
YOKOHAMA i-MARK PLACE, 4-4-5 Minatomirai Nishi-ku, Yokohama, Kanagawa, 220-8567,
Japan
© PFU Limited 2015-2016
15

Introduction
■Manuals
Types of Manuals
The following manuals are prepared for the scanner. Read them as needed.
Manual |
Description |
|
|
N7100 Getting Started |
Contains important information regarding safety. |
(paper) |
Also describes the procedure from installing the scanner to |
|
starting the scanner operation. |
|
Read this manual first. |
|
Referred to as "Getting Started" in this manual. |
|
|
N7100 Operator's Guide |
Contains information about the scanner overview, basic |
(this manual)(PDF) |
operations, daily cleaning, replacement of consumables, |
|
and troubleshooting. |
|
Referred to as "Operator's Guide" in this manual. |
|
|
N7100 Help |
Provides information about items on the screens, and |
(HTML) |
descriptions and actions to take for the messages. Read it |
|
as needed. |
|
|
Scanner Central Admin |
Provides information about overview, introduction |
User's Guide |
procedure, operation procedure, and maintenance |
(PDF) |
procedure for Scanner Central Admin. Read it as needed. |
|
|
Accessing the Manuals
The manuals can be accessed by downloading them from the scanner.
When the [Help] button is available on the window or dialog box that is displayed during the operation, you can open Help by clicking it.
On the touch panel,  is displayed as a Help button.
16
Introduction
■About This Manual
Warning Indications Used in This Manual
The following indications are used in this manual to obviate any chance of accident or damage to you and people near you, and your property. Warning labels indicate the warning level and statements. The symbols indicating warning levels and their meanings are as follows:
This indication alerts operators to an operation that, if not strictly observed,  WARNING may result in severe injury or death.
This indication alerts operators to an operation that, if not strictly observed,  CAUTION may result in safety hazards to personnel or damage to the product.
Symbols Used in This Manual
Besides warning indicators, the following symbols are also used in this manual:
Admin |
This symbol is used to indicate information about administrator operations. |
|
Each operation method is indicated by the following symbols: |
||
|
TouchPanel
Administrator operating via the touch panel.

Administrator operating via the network interface using the Network Scanner Admin Tool.
|
Central Admin |
|
Console |
Administrator operating via the network interface using the Scanner Central
Admin Console.
This symbol is used to indicate information about regular user operations.
User
Arrow Symbols in This Manual
Right-arrow symbols () are used to connect icons or menu options you should select in succession.
Example: Select the [Start] menu [Computer].
17

Introduction
Screen Examples in This Manual
Microsoft product screenshots are reprinted with permission from Microsoft Corporation. The screenshots used in this manual are of Windows 7/Windows Server 2012 R2.
The actual windows and operations may differ depending on the operating system. If the actual screen differs from the screen examples in this manual, operate by following the actual displayed screen.
Screen examples in this manual are based on screens shown on the touch panel. Screens, setting items, and operations are different for the Admin Tool and Central Admin Console. For details about screens, refer to Help.
Screen examples and descriptions in this manual are based on screens and descriptions shown when the SharePoint Option is applied. If the SharePoint Option is not applied, screens, setting items, and operations are different.
Abbreviations Used in This Manual
The following abbreviations are used in this manual:
Abbreviation Used |
|
Option |
|
|
|
Windows |
Windows® operating system |
|
Windows Vista |
Windows Vista® Home Basic operating system (32-bit/64-bit) |
|
|
Windows Vista® Home Premium operating system (32-bit/64-bit) |
|
|
Windows Vista® Business operating system (32-bit/64-bit) |
|
|
Windows Vista® Enterprise operating system (32-bit/64-bit) |
|
|
Windows Vista® Ultimate operating system (32-bit/64-bit) |
|
Windows 7 |
Windows® 7 Starter operating system (32-bit) |
|
|
Windows® 7 Home Premium operating system (32-bit/64-bit) |
|
|
Windows® 7 Professional operating system (32-bit/64-bit) |
|
|
Windows® 7 |
Enterprise operating system (32-bit/64-bit) |
|
Windows® 7 |
Ultimate operating system (32-bit/64-bit) |
Windows 8 |
Windows® 8 operating system (32-bit/64-bit) |
|
|
Windows® 8 |
Pro operating system (32-bit/64-bit) |
|
Windows® 8 |
Enterprise operating system (32-bit/64-bit) |
Windows 8.1 |
Windows® 8.1 operating system (32-bit/64-bit) |
|
|
Windows® 8.1 Pro operating system (32-bit/64-bit) |
|
|
Windows® 8.1 Enterprise operating system (32-bit/64-bit) |
|
18

Introduction
Abbreviation Used |
Option |
|
|
Windows 10 |
Windows® 10 Home operating system (32-bit/64-bit) |
|
Windows® 10 Pro operating system (32-bit/64-bit) |
|
Windows® 10 Enterprise operating system (32-bit/64-bit) |
|
Windows® 10 Education operating system (32-bit/64-bit) |
Windows Server 2003 |
Windows Server® 2003, Standard Edition |
|
Windows Server® 2003, Enterprise Edition |
|
Windows Server® 2003, Datacenter Edition |
|
Windows Server® 2003 R2, Standard Edition |
|
Windows Server® 2003 R2, Standard x64 Edition |
|
Windows Server® 2003 R2, Enterprise Edition |
|
Windows Server® 2003 R2, Enterprise x64 Edition |
|
Windows Server® 2003 R2, Datacenter Edition |
|
Windows Server® 2003 R2, Datacenter x64 Edition |
Windows Server 2008 |
Windows Server® 2008 Standard (32-bit/64-bit) |
|
Windows Server® 2008 Enterprise (32-bit/64-bit) |
|
Windows Server® 2008 Datacenter (32-bit/64-bit) |
Windows Server 2008 |
Windows Server® 2008 R2 Standard (64-bit) |
R2 |
Windows Server® 2008 R2 Enterprise (64-bit) |
Windows Server 2012 |
Windows Server® 2012 Standard (64-bit) |
Windows Server 2012 |
Windows Server® 2012 R2 Standard (64-bit) |
R2 |
|
|
|
Windows Server 2016 |
Windows Server® 2016 Standard (64-bit) |
Exchange |
Microsoft® Exchange Server 2007 (supported by 64-bit operating |
|
systems only) |
|
Microsoft® Exchange Server 2010 (supported by 64-bit operating |
|
systems only) |
|
Microsoft® Exchange Server 2013 (supported by 64-bit operating |
|
systems only) |
|
Microsoft® Exchange Server 2016 (supported by 64-bit operating |
|
systems only) |
|
|
.NET Framework |
Microsoft® .NET Framework |
19

Introduction
Abbreviation Used |
Option |
|
|
SharePoint |
Microsoft® Office SharePoint® Server 2007 |
|
Microsoft® SharePoint® Server 2010 (supported by 64-bit operating |
|
systems only) |
|
|
Solaris 10 |
Solaris 10 operating system |
|
|
Red Hat Enterprise |
Red Hat® Enterprise Linux® 4 |
Linux |
Red Hat® Enterprise Linux® 5 |
|
Red Hat® Enterprise Linux® 6 |
|
Red Hat® Enterprise Linux® 7 |
SUSE Linux Enterprise |
SUSE™ Linux Enterprise Server 10 |
Server |
SUSE™ Linux Enterprise Server 11 |
|
|
Internet Explorer |
Microsoft® Internet Explorer® |
|
Windows® Internet Explorer® |
IIS |
Microsoft® Internet Information Services 6.0 |
|
Microsoft® Internet Information Services 7.0 |
|
Microsoft® Internet Information Services 7.5 |
|
Microsoft® Internet Information Services 8.0 |
|
Microsoft® Internet Information Services 8.5 |
|
Microsoft® Internet Information Services 10.0 |
SQL Server 2005 |
Microsoft® SQL Server® 2005 Express Edition |
Express Edition |
|
|
|
Adobe Acrobat |
Adobe® Acrobat® |
|
Adobe® Acrobat® DC |
Adobe Reader |
Adobe® Reader® |
|
Adobe® Acrobat® Reader® DC |
RightFax |
RightFax Business Server (Version 9.3) |
|
|
Kofax Communication |
Kofax® Communication Server |
Server |
|
|
|
WPF |
Windows Presentation Foundation |
|
|
MIB |
Management Information Base |
|
|
N7100 |
FUJITSU Image Scanner N7100 |
|
|
N1800 |
ScanSnap N1800 |
|
|
fi-6010N |
FUJITSU Image Scanner iScanner fi-6010N |
|
|
20
Introduction
Abbreviation Used |
Option |
|
|
Scanner |
N7100 |
|
|
Admin Tool |
Network Scanner Admin Tool |
|
|
User Editor |
Network Scanner User Editor |
|
|
Central Admin Console |
Scanner Central Admin Console |
|
|
Central Admin Server |
Scanner Central Admin Server |
|
|
SDK |
Network Scanner Control SDK |
|
|
Gmail |
Gmail® Webmail Service |
Yahoo! Mail |
YAHOO!® Mail |
AOL Mail |
AOL® Mail |
Windows Live Hotmail |
Microsoft® Windows Live™ Hotmail® |
Network Folder |
A folder that is set to save scanned data in the file server or FTP |
|
server |
|
|
SharePoint Folder |
A folder that is set to save scanned data in SharePoint |
|
|
21

Chapter 1
Overview Admin User
1.1 |
Scanner Features.................................................................................................. |
23 |
1.2 |
Part Names and Functions................................................................................... |
27 |
1.3 |
User Types and Operations ................................................................................. |
30 |
1.4 |
Required Scanner Function Settings (Administrator) ....................................... |
36 |
1.5 |
System Requirements .......................................................................................... |
41 |
22
1.1 Scanner Features
1.1Scanner Features
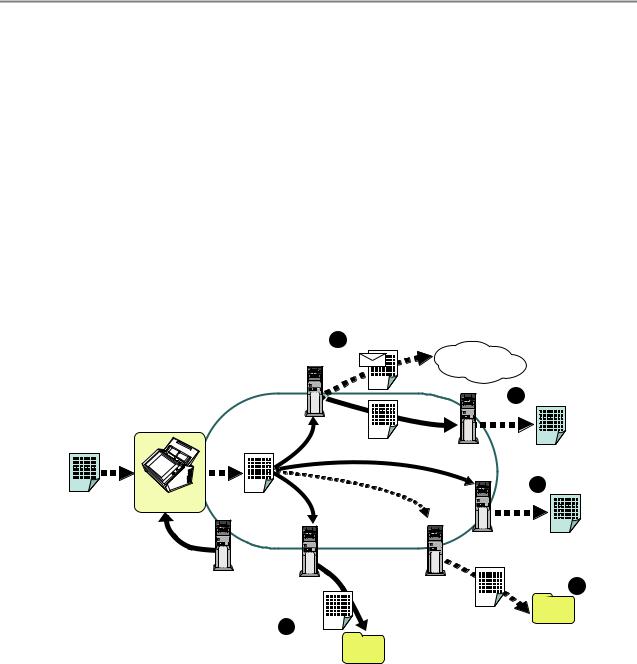
■ Basic Uses for Scanned Data
This easy-to-operate network image scanner is used to scan documents for further use:
1. Scanned data can be sent as an e-mail attachment. 2. Scanned data can be sent by fax.
3. Scanned data can be printed on a network printer. 4. Scanned data can be saved in a network folder.
5. Scanned data can be saved in a SharePoint folder.
|
|
1 |
Send e-Mail |
|
|
|
SMTP Server |
Internet |
|
|
|
|
|
|
|
|
|
2 |
Send Fax |
Original |
|
|
|
|
Document |
|
|
Fax Server |
|
|
|
|
|
|
|
|
|
|
3 Print |
Scanner |
Scanned Data |
|
|
|
User |
|
|
Print Server |
|
Authentification |
|
|
||
|
|
|
|
|
LDAP Server |
SharePoint |
File Server |
4 Network |
|
|
|
|||
|
|
Server |
or |
Folder |
|
|
|
FTP Server |
Save |
|
|
5 |
|
|
|
|
|
|
|
|
|
SharePoint |
Save |
|
|
|
Folder |
|
|
23

1.1 Scanner Features
■ Configure and Manage with Ease
Configuration and management of the scanner can be easily performed via the touch panel on the scanner or via the "Admin Tool" or the "Central Admin Console" installed on a computer.
When you use the scanner, login to the scanner as a user with the administrator right or regular user right.
For more details about the operation rights, refer to "1.3 User Types and Operations" (page 30).
Configuration and management of the scanner must be performed by an administrator.
Computer
Central Admin Console
Set multiple scanners at a time via the network interface
Central Admin Server 
Scanner |
Scanner |
Scanner |
Admin Tool
Computer
Set one scanner at a time via the network interface
Touch Panel
Directly set one scanner at a time
Scanner
Touch panel
Scanner settings management can be implemented directly via the scanner's touch panel.
Setting mode
The administrator can operate the touch panel in the following setting modes.
Basic mode
A setting mode for Administrators with basic knowledge of computers. Basic required scanner settings can be performed.
Advanced mode
A setting mode for Administrators with advanced knowledge of networks and servers.
Settings which are more advanced than those of Basic mode, such as authentication server, server environment, and advanced scanning settings, can be configured.
For details about the configuration of setting modes, refer to "4.3.1 Configuring the Setting Mode" (page 77).
24

1.1 Scanner Features
In addition, using the Installation Wizard on the touch panel allows you to configure the minimum scanner settings required to operate the scanner. You can also use the Installation Wizard to restrict the configurable functions. For details about the configuration with the wizard, refer to "4.3.2 Setting the System Settings with the Installation Wizard" (page 78).
Admin Tool
Application that connects to each scanner and configures the scanner settings. Scanner settings management and updates can be implemented via the network interface by using Admin Tool installed on a computer.
The settings can be configured for one scanner at a time.
Central Admin Console
Application that configures operation settings for multiple scanners, and monitors their operating status.
Scanner settings management and updates can be implemented via the network interface by using Central Admin Console installed on a computer.
The settings can be configured for multiple scanners at a time.
This application is used for connecting with Central Admin Server, which manages multiple scanners at the same times. In this case, settings made with Central Admin Console are applied to scanners via a Central Admin Server.
To use Central Admin Console, the scanner needs to be turned on.
For details about Central Admin Console, refer to the Scanner Central Admin User's Guide.
25

1.1 Scanner Features
■ Advanced Security Measures
The following security functions are provided for the scanner:
Login authentication can restrict user access.
Scanned data can be converted to password protected PDF files.
Scanned data can be protected.
Since the scanner is intended to be shared by multiple users, data privacy is an important factor. The following security measures are used to protect the data against untoward access:
Encryption
The scanned data is temporarily saved in the scanner while being e-mailed, faxed, printed, or saved in a folder.
The data is always saved in the disk in an encrypted form in case the disk contents are analyzed. Encrypted data will prevent the data from exposure.
Scanned data deletion
After the scanned data has been e-mailed, faxed, printed or saved, the temporary data is deleted.
Check whether or not the scanned data has been e-mailed, faxed, printed, or saved properly in the user log. If you find any errors in the user log, try scanning again.
Even if an error interrupts this process, leaving some scanned data in the scanner, this will automatically be deleted at the next start up.
Secure initialize
When initializing the data in the scanner, the free disk space is also overwritten with random data with no meaning. When the user data store is cleared from the scanner, the old cipher key is deleted and a new cipher key is generated.
This totally eliminates the possibility of access to any user data remaining in the free disk space.
Input pathways for files from an external memory media and for files from outside via a network are limited to a minimum by the scanner. Security patches will be provided as needed to protect the scanner against virus attacks. Taking these measures enables the scanner to be protected against virus infection.
26
1.2 Part Names and Functions
1.2Part Names and Functions
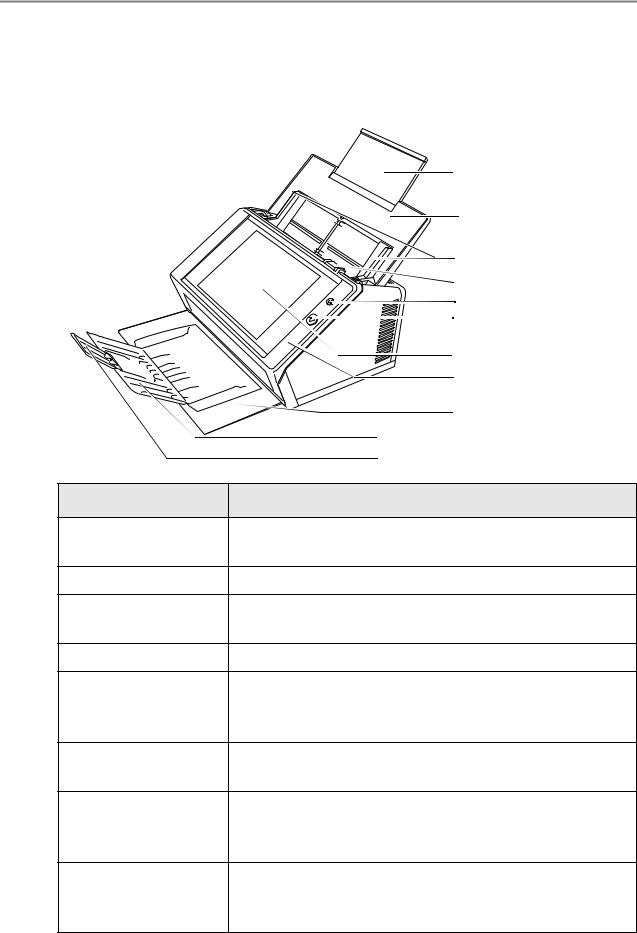
■Front View
|
Extension |
|
ADF paper chute |
|
Side guides |
|
Cover release catch |
|
Power button |
|
Scan button |
|
Touch panel |
|
LCD cover |
|
Stacker |
|
Stacker extension 1 |
|
Stacker extension 2 |
Part Name |
Function |
Extension |
Can be pulled out and adjusted to the size of the document |
|
being scanned. |
ADF paper chute |
Holds the documents waiting to be scanned. |
Side guides |
Adjust to the width of the paper, to prevent skewing of the |
|
scanned pages. |
Cover release catch |
Pull to open the LCD cover. |
Power button |
Turns on scanner or brings up the [Login] window from |
|
standby mode or power off status. For details, refer to |
|
"Using the Power Button" (page 53). |
Scan button |
Starts the scan process. For details, refer to "Using the |
|
Scan Button" (page 55). |
Touch panel |
Shows menus. Operations can be performed by touching |
|
the displayed menu. |
|
For details, refer to "Using the Touch Panel" (page 56). |
LCD cover |
Open by pulling the cover release catch towards you, and |
|
holding the LCD cover by the sides to replace consumable |
|
parts or clean inside the scanner. |
27
|
|
1.2 Part Names and Functions |
|
|
|
|
|
|
|
Part Name |
Function |
|
|
|
|
Stacker |
Pull out before scanning. Scanned documents are ejected |
|
|
on the stacker. |
|
|
|
|
Stacker extension 1 |
Lift up towards you to adjust to the document length. |
|
|
|
|
Stacker extension 2 |
Lift up towards you to adjust to the document length. |
|
|
|
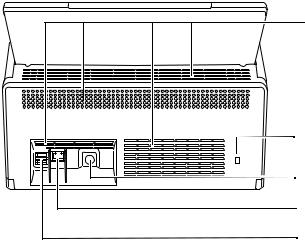
■ Rear View
Ventilation ports
Security cable slot |
Power connector |
LAN connector |
USB connector |
Part Name |
Function |
|
|
Ventilation ports |
Lets out the heated air from the inside of the scanner to the |
|
outside. |
|
|
Security cable slot |
Slot for commercially available security cable to prevent |
|
against theft. |
|
The following security cable is recommended: |
|
Cylindrical part: diameter 25 mm (max), length 50 mm (max) |
|
Type: Right angle |
|
(includes bent part if a straight cable is used) |
|
|
Power connector |
Connects the power cable to the scanner. |
|
|
LAN connector |
Connects the LAN cable to the scanner. |
|
|
USB connector |
Connects a USB device to the scanner. |
|
|
28

1.2 Part Names and Functions
■ Removable Parts
 Brake roller


 Pick roller
Part Name |
Function |
|
|
Pick roller |
Helps to guide documents from the ADF paper chute to the |
|
stacker. |
|
|
Brake roller |
Helps to separate each sheet off documents loaded in the |
|
ADF paper chute. |
|
|
29

1.3 User Types and Operations
1.3User Types and Operations
When you use the scanner, login to the scanner as a user with the following operation right:
Regular user rights
Operation rights given when you login to the scanner with a regular user account. For an account with regular user rights, an LDAP account, a local account, and a default account (guest account) can be used.
When you login to the scanner with these rights, you are a "regular user" of the scanner.
A regular user can scan documents and then send, print, or save the resulting data.
Administrator rights
Operation rights given when you login to the scanner with an administrator account.
For an account with administrator rights, a default account (admin account) and a local account (administrator) can be used.
When you login to the scanner with these rights, you are an "administrator" of the scanner.
An administrator can set up and manage the scanner.
An administrator cannot scan documents (an administrator can perform a scan test only ).
HINT
Local accounts can be edited in User Editor. For details, refer to "Appendix F Editing Using User Editor" (page 434).
Note that the method of login to the scanner varies depending on the user type as follows:
|
|
Login method |
|
|
Operation rights |
|
|
|
|
Touch panel |
Admin Tool |
Central Admin |
||
|
||||
|
Console |
|||
|
|
|
||
|
|
|
|
|
Regular user rights |
Yes |
— |
— |
|
|
|
|
|
|
Administrator rights |
Yes |
Yes |
Yes |
|
|
|
|
|
Yes: Available —: Not available
The following table lists the operations available for the administrator and regular users.
30
Loading...