


D22W-1

Monitor
Getting Started
22" LCD Monitor
Deutsch, English, Français,
Español, Português, Italiano,
Svenska, Nederlands, Dansk,
Suomi, Pycckий, Norsk, Eesti
keel, Ελληνικά, Lietuviškas,
Latviski, Polski, Slovensko,
Slovenský, Česky, Magyar,
Български, Română, Türkçe


Are there ...
... any technical problems or other questions you need clarified?
Please contact
our Help Desk (see Warranty Booklet).
The latest information on our products, tips, updates, etc., can be found on the Internet under:
http://www.fujitsu-siemens.com

22" LCD Monitor
OSD-Description
Icon Functions Detail
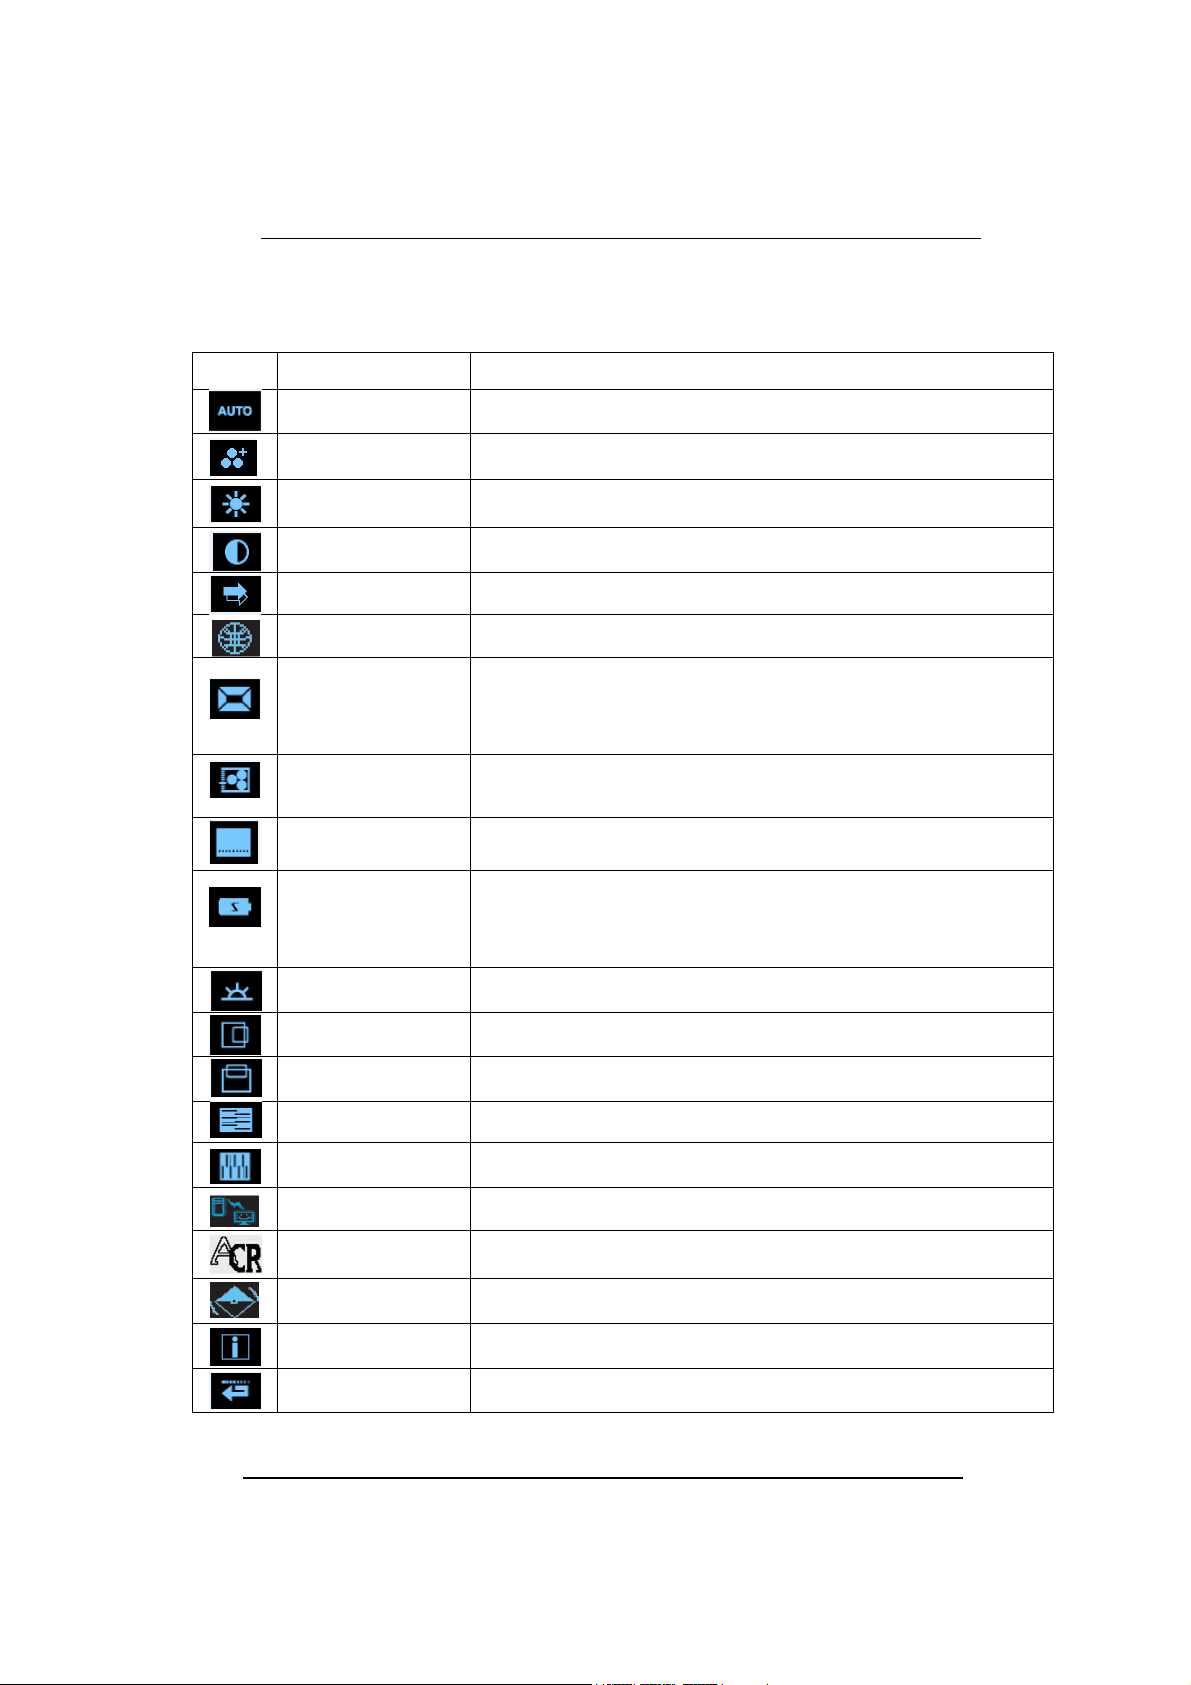
AUTO ADJUSTMENT * Optimize the picture performance automatically.
THEME MODE
BRIGHTNESS * Adjust the luminance level of the screen.
CONTRAST * Adjust the contrast level of the screen.
INPUT SIGNAL SELECT * Select the input signal from Analog, or Digital Inputs (Optional).
OSD MENU LANGUAGE * Select your own preference of language of OSD menu.
DISPLAY RATIO
COLOR TEMPERATURE
SYSTEM
POWER SAVINGMODE
WHITE BALANCE * Adjust the balance of the input signal.
HORIZONTAL POSITION * Shift the screen left or right
* Activate the built-in color engine to enhance the graphic effects according to the different
situations of the display. contents
* Select the display ratio from Native, and Full Screen
* Full Screen: adjust and enlarge the display screen to full screen size (16:10)
* Native: keep the display format as the input signal (4:3, 5:4, etc), and enlarge the display
screen to the maximum w/o losing any content (part of the screen may be blank)
* Select the setting of screen color-Cool, Warm or User.* Cool: Select the setting of
screen color to be bluish white.* Warm: Select the setting of screen color to be reddish
white.
* Adjust the mechanical specifications regarding the display.(Power Saving Mode, White
Balance, Clock, Phase, Horizontal Position, Vertical Position, Information)
* Select between Standard and Advanced power saving modes. See addendum for
details.
* Standard: Fulfill EPA Energy Star power management requirement
* Advanced: Activate monitor Life-Extension function
VERTICAL POSITION * Shift the screen up or down
PHASE * Adjust the monitor internal signal phase
CLOCK * Adjust the monitor internal sampling clock rate
DDC/CI * Select turn on or turn off DDC/CI function
ACR * Select turn on or turn off ACR function
DEMO
INFORMATION
RECALL * Reset monitor parameters back to factory preset values.
* 2 seconds after activation of this function, some of the menus will stimulate feature-
grading effects 2 times over.
* Show the frequency, resolution, input interface and other operating details about this
display.
Edition 2
Technical data
Dimensions and weight (LCD monitor)
Visible diagonals: 558.7 cm ( 22 ''wide)
Screen size : 473.8mm x 296.1mm
Dimensions (W x H x D) incl. monitor base : 510 x 423mm x 225mm
Dimensions box (W x H x D): 569 mm x 481 mm x 130 mm
Weight : 4.94 kg / 6.77kg
Dot pitch : 0.282 mm
Maximal resolution : 1680 x 1050
Electrical data
Video: analogue, positive, 0.7 Vpp, 75 Ohm, (digital),
Synchronisation : Separate H/V-sync
Horizontal frequency: 31.5 kHz ~83 kHz
Refresh rate: 56 Hz ~ 76 Hz
Maximum pixel rate: 146.25 MHz
Power supply: AC 100~240V, 50~60Hz
Total power consumption: < 55 W
< 2 W (standby)
DVI-D)
Environmental conditions
Environment class 3K2, IEC 721
Operating range: 5°C~ 35°C
Humidity: 10 % ~85 %
Condensation must be avoided.
Preset operating modes
The picture position and size have been set set to optimum values at the factory for the
operating modes listed above.
Display resolution Refresh rate Horizontal frequency
640 x 480
640 x 480
720 x 400
800 x 600
800 x 600
1024 x 768
1024 x 768
1280 x 1024
1280 x 1024
1440 x 900
1680 x 1050
60Hz
75 Hz
70 Hz
60Hz
75 Hz
60Hz
75 Hz
60Hz
75 Hz
60Hz
60Hz
pixels
31.5kHz
37.5kHz
31.5kHz
37.9kHz
46.9 kHz
48.4 kHz
60 kHz
64 kHz
80 kHz
59.9kHz
65.3kHz

Deutsch
Magyar
Русский
22" LCD Monitor
Getting Started
English
Български
Norsk
Français
Română
Eesti keeles
Español
Türkçe
Ελληνικά
Português
WEEE
Lietuviškas
Italiano
Latviski
Svenska
Polski
August 2007 edition
Nederlands
Slovensko
Dansk
Slovenský
Suomi
Česky

Copyright © Fujitsu Siemens Computers GmbH 2007
VESA, DDC and DPMS are registered trademarks of Video Electronics Standards
Association.
All rights, including rights of translation, reproduction by printing, copying or similar methods,
even of parts are reserved.
Offenders will be liable for damages.
All rights, including rights created by patent grant or registration of a utility model or design,
are reserved.
Delivery subject to availability. Right of technical modification reserved.
Inhalt
Einleitung.............................................................................................................................................. 1
Weitere Informationen .................................................................................................................. 1
Wichtige Hinweise ................................................................................................................................ 2
Sicherheitshinweise...................................................................................................................... 2
Netzleitung ................................................................................................................................... 3
Transport ...................................................................................................................................... 3
Reinigung ..................................................................................................................................... 4
CE-Kennzeichnung ...................................................................................................................... 4
Überprüfen der Lieferung ..................................................................................................................... 4
Anschließen des Bildschirms ............................................................................................................... 5
Bedienen des Bildschirms .................................................................................................................... 6
Fehlerbehandlung................................................................................................................................. 7
Montage des Bildschirmfußes .............................................................................................................. 9
Ausgabe 2 Deutsch


Einleitung
In diesem Handbuch finden Sie wichtige Informationen, die Sie für die Inbetriebnahme Ihres LCDBildschirms benötigen.
Für die Ansteuerung des LCD-Bildschirms ist eine Grafikkarte (Bildschirm-Controller) mit VGASchnittstelle erforderlich. Der Bildschirm verarbeitet die Daten, die ihm von der Grafikkarte geliefert
werden. Für die Einstellung der Modi (Auflösung und Bildwiederholfrequenz) ist die Grafikkarte bzw.
die zugehörige Treiber-Software zuständig.
Wenn Sie den Bildschirm das erste Mal in Betrieb nehmen, sollten Sie die Bildschirmanzeige optimal
an die verwendete Grafikkarte anpassen und Ihren Bedürfnissen entsprechend einstellen.
Zielgruppe
Um die beschriebenen Arbeiten auszuführen, müssen Sie kein "Fachmann" sein. Beachten Sie aber
unbedingt die Sicherheitshinweise in der Betriebsanleitung des Computers und in diesem Handbuch!
Bei Problemen wenden Sie sich bitte an Ihre Verkaufsstelle oder unseren Help Desk.
Darstellungsmittel
In diesem Handbuch werden folgende Darstellungsmittel verwendet.
► kennzeichnet einen Arbeitsschritt, den Sie ausführen müssen.
"Anführungszeichen" kennzeichnen Kapitelnamen und Begriffe, die hervorgehoben werden sollen.
Diese Schrift kennzeichnet Dateinamen und Menüpunkte.
Diese Schrift stellt Bildschirmausgaben dar.
kennzeichnet Hinweise, bei deren Nichtbeachtung Ihre Gesundheit, die Funktionsfähigkeit
Ihres Geräts oder die Sicherheit Ihrer Daten gefährdet ist.
!
kennzeichnet zusätzliche Informationen und Tipps.
i
Weitere Informationen
Wie Sie Auflösungen und Bildwiederholfrequenzen einstellen, entnehmen Sie bitte den
Dokumentationen Ihrer Grafikkarte bzw. der dazugehörigen Treiber-Software.
Ausgabe 2 Deutsch - 1
LCD-Bildschirm
Wichtige Hinweise
In diesem Kapitel finden Sie Sicherheitshinweise, die Sie beim Umgang mit Ihrem
Bildschirm unbedingt beachten müssen.
!
Sicherheitshinweise
Dieses Gerät entspricht den einschlägigen Sicherheitsbestimmungen für Einrichtungen der
Informationstechnik, einschließlich elektrischer Büromaschinen für den Einsatz in Büroumgebung.
Falls Sie Fragen haben, ob Sie das Gerät in der vorgesehenen Umgebung aufstellen können,
wenden Sie sich bitte an Ihre Verkaufsstelle oder an unseren Help Desk.
● Die Display-Oberfläche des LCD-Bildschirms ist druck- und kratzempfindlich. Behandeln Sie
deshalb die Display-Oberfläche vorsichtig, um bleibende Schäden (Newton-Ringe, Kratzer) zu
vermeiden.
● Wenn das Gerät aus kalter Umgebung in den Betriebsraum gebracht wird, kann Betauung
auftreten. Warten Sie, bis das Gerät temperaturangeglichen und absolut trocken ist, bevor Sie
es in Betrieb nehmen.
● Um eine ausreichende Belüftung zu gewährleisten, müssen die Zuluft- und Abluftöffnungen des
Bildschirms unbedingt freigehalten werden.
● Der Bildschirm stellt sich automatisch auf eine Netzspannung im Bereich von 100 V bis 240 V
ein. Stellen Sie sicher, dass die örtliche Netzspannung diesen Bereich weder unter- noch
überschreitet.
● Stellen Sie sicher, dass die Steckdose am Bildschirm oder die Schutzkontakt-Steckdose der
Hausinstallation frei zugänglich ist.
● Der Ein-/Ausschalter trennt das Gerät nicht von der Netzspannung. Zur vollständigen Trennung
von der Netzspannung müssen Sie den Netzstecker ziehen.
● Der Bildschirm ist mit einer sicherheitsgeprüften Netzleitung ausgestattet.
● Verlegen Sie die Leitungen so, dass sie keine Gefahrenquelle (Stolpergefahr) bilden und nicht
beschädigt werden. Beachten Sie beim Anschließen des Geräts die entsprechenden Hinweise
im Kapitel "Anschließen des Bildschirms".
● Wenn Sie eine andere als die mitgelieferte Datenleitung verwenden, achten Sie darauf, dass
die Leitung ausreichend abgeschirmt ist. CE-Konformität sowie eine optimale Bildqualität
werden nur mit der mitgelieferten Datenleitung gewährleistet.
● Während eines Gewitters dürfen Sie Datenübertragungsleitungen weder anschließen noch
lösen.
● Achten Sie darauf, dass keine Gegenstände (z. B. Schmuckkettchen, Büroklammern etc.) oder
Flüssigkeiten in das Innere des Geräts gelangen (Gefahr von elektrischem Schlag,
Kurzschluss).
● Das Gerät ist nicht wasserfest! Tauchen Sie das Gerät nie ins Wasser und schützen Sie es vor
Spritzwasser (Regen, Meerwasser).
● In Notfällen (z. B. bei Beschädigung von Gehäuse, Bedienelementen oder Netzleitung, bei
Eindringen von Flüssigkeiten oder Fremdkörpern) schalten Sie das Gerät sofort aus, ziehen
Sie den Netzstecker und verständigen Sie Ihre Verkaufsstelle oder unseren Help Desk.
2 - Deutsch Ausgabe 2

LCD-Bildschirm
● Der Bildschirm muss nach den örtlichen Vorschriften über Beseitigung von Sondermüll entsorgt
werden. Die Hintergrundbeleuchtung des Bildschirms ist quecksilberhaltig. Bei Handhabung
und Entsorgung sind die für Leuchtstoffröhren geltenden Sicherheitsbestimmungen zu
beachten.
● Reparaturen am Gerät dürfen nur von autorisiertem Fachpersonal durchgeführt werden. Durch
unbefugtes Öffnen und unsachgemäße Reparaturen können erhebliche Gefahren für den
Benutzer entstehen (elektrischer Schlag, Brandgefahr).
● Setzen Sie einen Bildschirmschoner mit bewegten Bildern ein und aktivieren Sie das Power-
Management für Ihren Bildschirm, um ein "Einbrennen" von Standbildern zu vermeiden.
● Der Bildschirm darf nur im Breitformat (0° Landscape-Modus) betrieben werden. Eine Drehung
bei Montage von Schwenkarm oder Wandhalterung ist nicht zulässig.
● Heben Sie dieses Handbuch zusammen mit dem Gerät auf. Wenn Sie das Gerät an Dritte
weitergeben, geben Sie bitte auch dieses Handbuch weiter.
● Wir empfehlen Ihnen, das Gerät auf eine rutschfeste und unempfindliche Unterlage zu stellen.
Bei der Vielfalt der bei Möbeln verwendeten Beschichtungen und Lacke ist es nicht auszuschließen, dass die Gerätefüße Schäden auf der Stellfläche verursachen.
Netzleitung
Verwenden Sie die mitgelieferte Leitung, um sicheren Betrieb zu gewährleisten. Wenn es notwendig
ist, die ursprünglich mitgelieferte Leitung zu ersetzen, sind die folgenden Richtlinien unbedingt zu
beachten.
● Stecker und Buchse der Netzleitung müssen den Vorschriften von IEC60320/CEE-22
entsprechen.
● Die Leitung muss den VDE- bzw. HAR-Bestimmungen entsprechen. Das VDE- bzw. HAR-
Zeichen ist auf der Kabelaußenhülle zu finden.
● Für Geräte, die auf Schreibtischen, Tischen etc. aufgestellt werden, ist die Verwendung von
Netzleitungsausführungen SVT bzw. SJT zulässig.
● Bei der Auswahl der Leitung ist der für das Gerät erforderliche Nennstrom zu beachten.
● Falls notwendig, ersetzen Sie die ursprünglich mitgelieferte Netzleitung durch eine
landesübliche 3-polige Netzleitung mit Schutzkontakt.
Transport
● Transportieren Sie den Bildschirm vorsichtig und nur in der Originalverpackung oder einer
anderen geeigneten Verpackung, die Schutz gegen Stoß und Schlag gewährt.
● Der LCD-Bildschirm darf keinesfalls herunterfallen (Glasbruchgefahr).
Ausgabe 2 Deutsch - 3
LCD-Bildschirm
Reinigung
● Ziehen Sie den Netzstecker, bevor Sie den Bildschirm reinigen.
● Der Gehäuseinnenraum darf nur von einem Servicetechniker gereinigt werden.
● Verwenden Sie für die Reinigung kein Scheuerpulver und keine Kunststoff lösenden
Reinigungsmittel.
● Lassen Sie keine Flüssigkeit in das Innere des Geräts dringen.
● Achten Sie darauf, dass die Lüftungsschlitze am Bildschirm frei bleiben.
● Reinigen Sie die druck- und kratzempfindliche Display-Oberfläche des LCD-Bildschirms nur mit
einem weichen, leicht angefeuchteten Tuch.
Zur Reinigung der Gehäuseoberfläche des Bildschirms ist ein trockenes Tuch ausreichend. Bei
starker Verschmutzung kann ein feuchtes Tuch verwendet werden, das in Wasser mit mildem
Spülmittel getaucht und gut ausgewrungen wurde.
CE-Kennzeichnung
Dieses Gerät erfüllt in der ausgelieferten Ausführung die Anforderungen der EGRichtlinien 2004/108/EG "Elektromagnetische Verträglichkeit" und 2006/95/EG
"Niederspannungsrichtlinie".
Überprüfen der Lieferung
Die Display-Oberfläche des LCD-Bildschirms ist druck- und kratzempfindlich. Bitte fassen
Sie das Gerät deshalb grundsätzlich nur am Gehäuse an.
!
► Packen Sie alle Teile aus.
► Prüfen Sie den Verpackungsinhalt auf sichtbare Transportschäden.
► Prüfen Sie, ob die Lieferung mit den Angaben auf dem Lieferschein übereinstimmt.
Zur vollständigen Lieferung des LCD-Bildschirms gehören:
– ein Bildschirm
– Datenleitung
– eine Netzleitung
– ein Garantieheft
– dieses Handbuch "Erste Schritte"
Wenn Sie Transportschäden oder Unstimmigkeiten zwischen Verpackungsinhalt und Lieferschein
feststellen, informieren Sie unverzüglich Ihre Verkaufsstelle!
Wir empfehlen Ihnen, die Originalverpackung des Geräts nicht wegzuwerfen. Bewahren
Sie die Originalverpackung für einen eventuellen Transport auf.
i
4 - Deutsch Ausgabe 2
Anschließen des Bildschirms
Beachten Sie die Sicherheitshinweise im Kapitel "Wichtige Hinweise".
!
CE-Konformität sowie eine optimale Bildqualität werden nur mit der mitgelieferten
Datenleitung gewährleistet.
Die Öffnungen für die Zu- und Abluft dürfen nicht verdeckt werden!
Der Netzstecker des Computers muss gezogen sein!
► Stellen Sie sicher, dass der Bildschirm und der Computer ausgeschaltet sind.
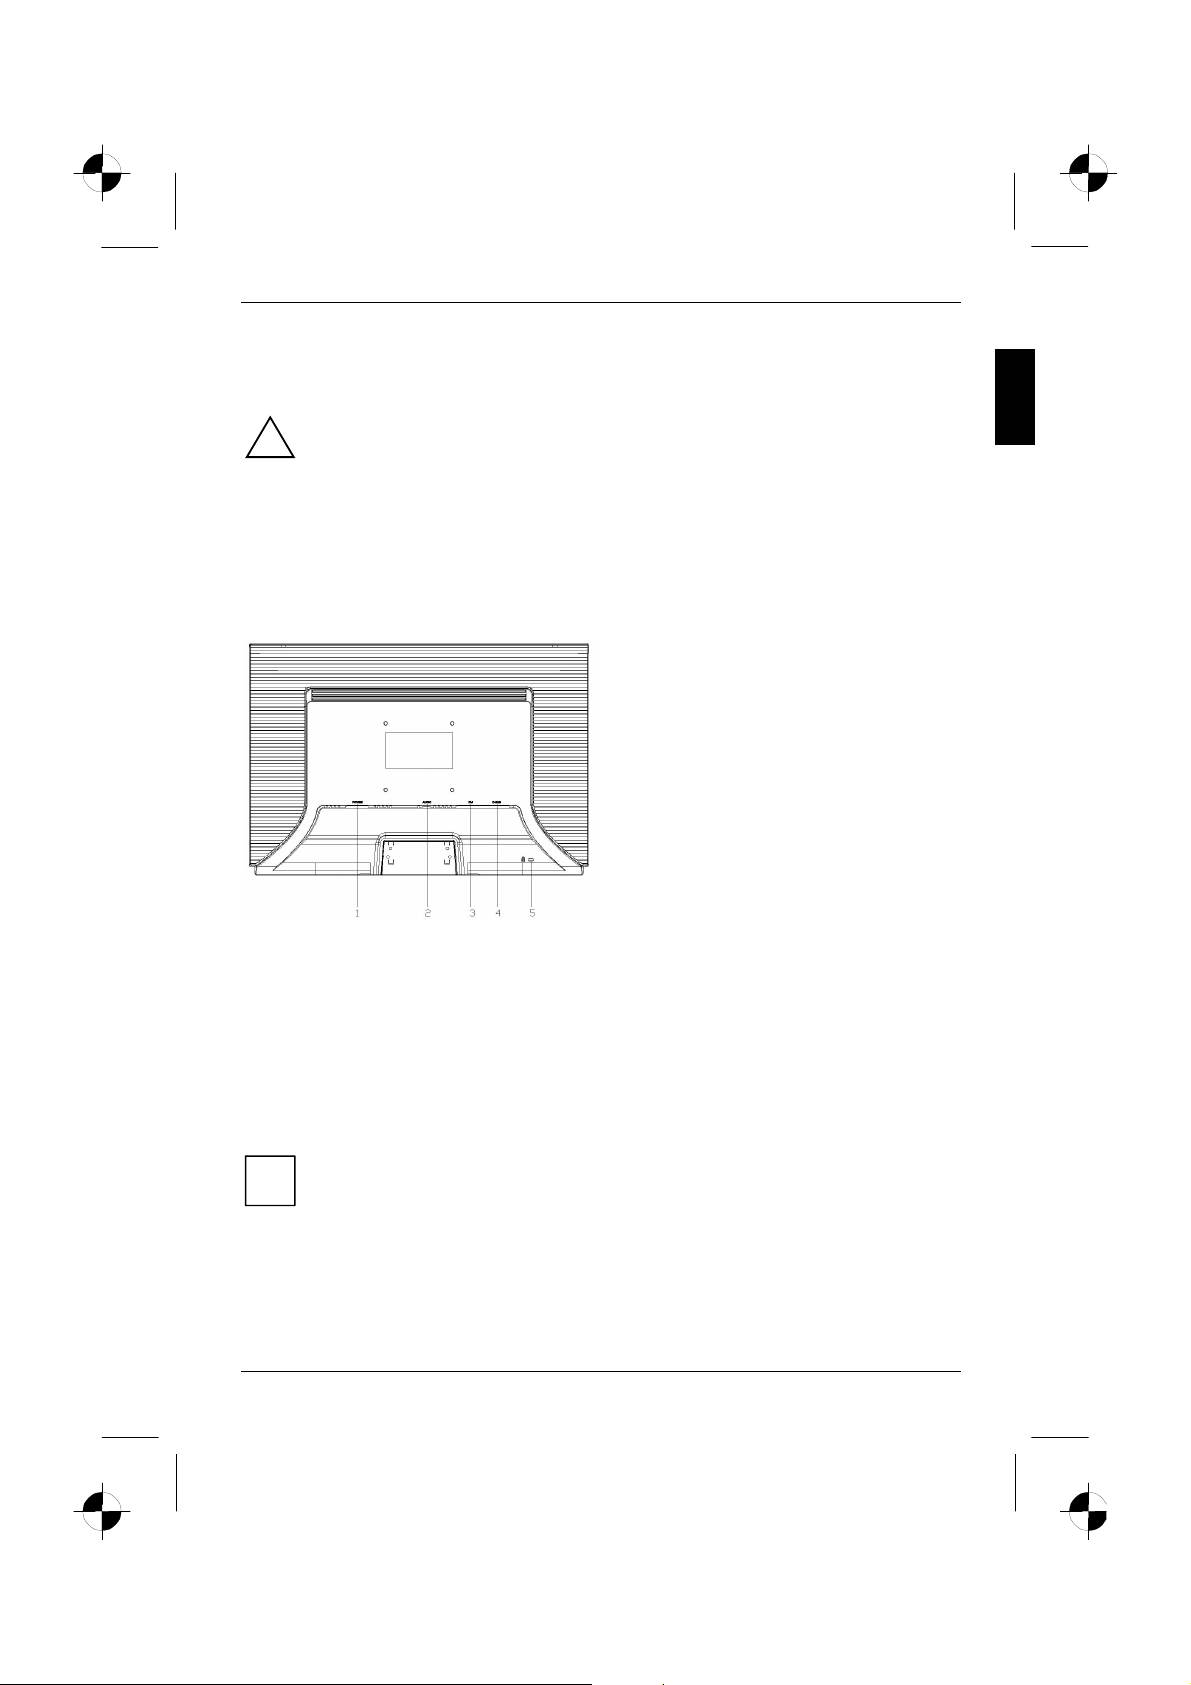
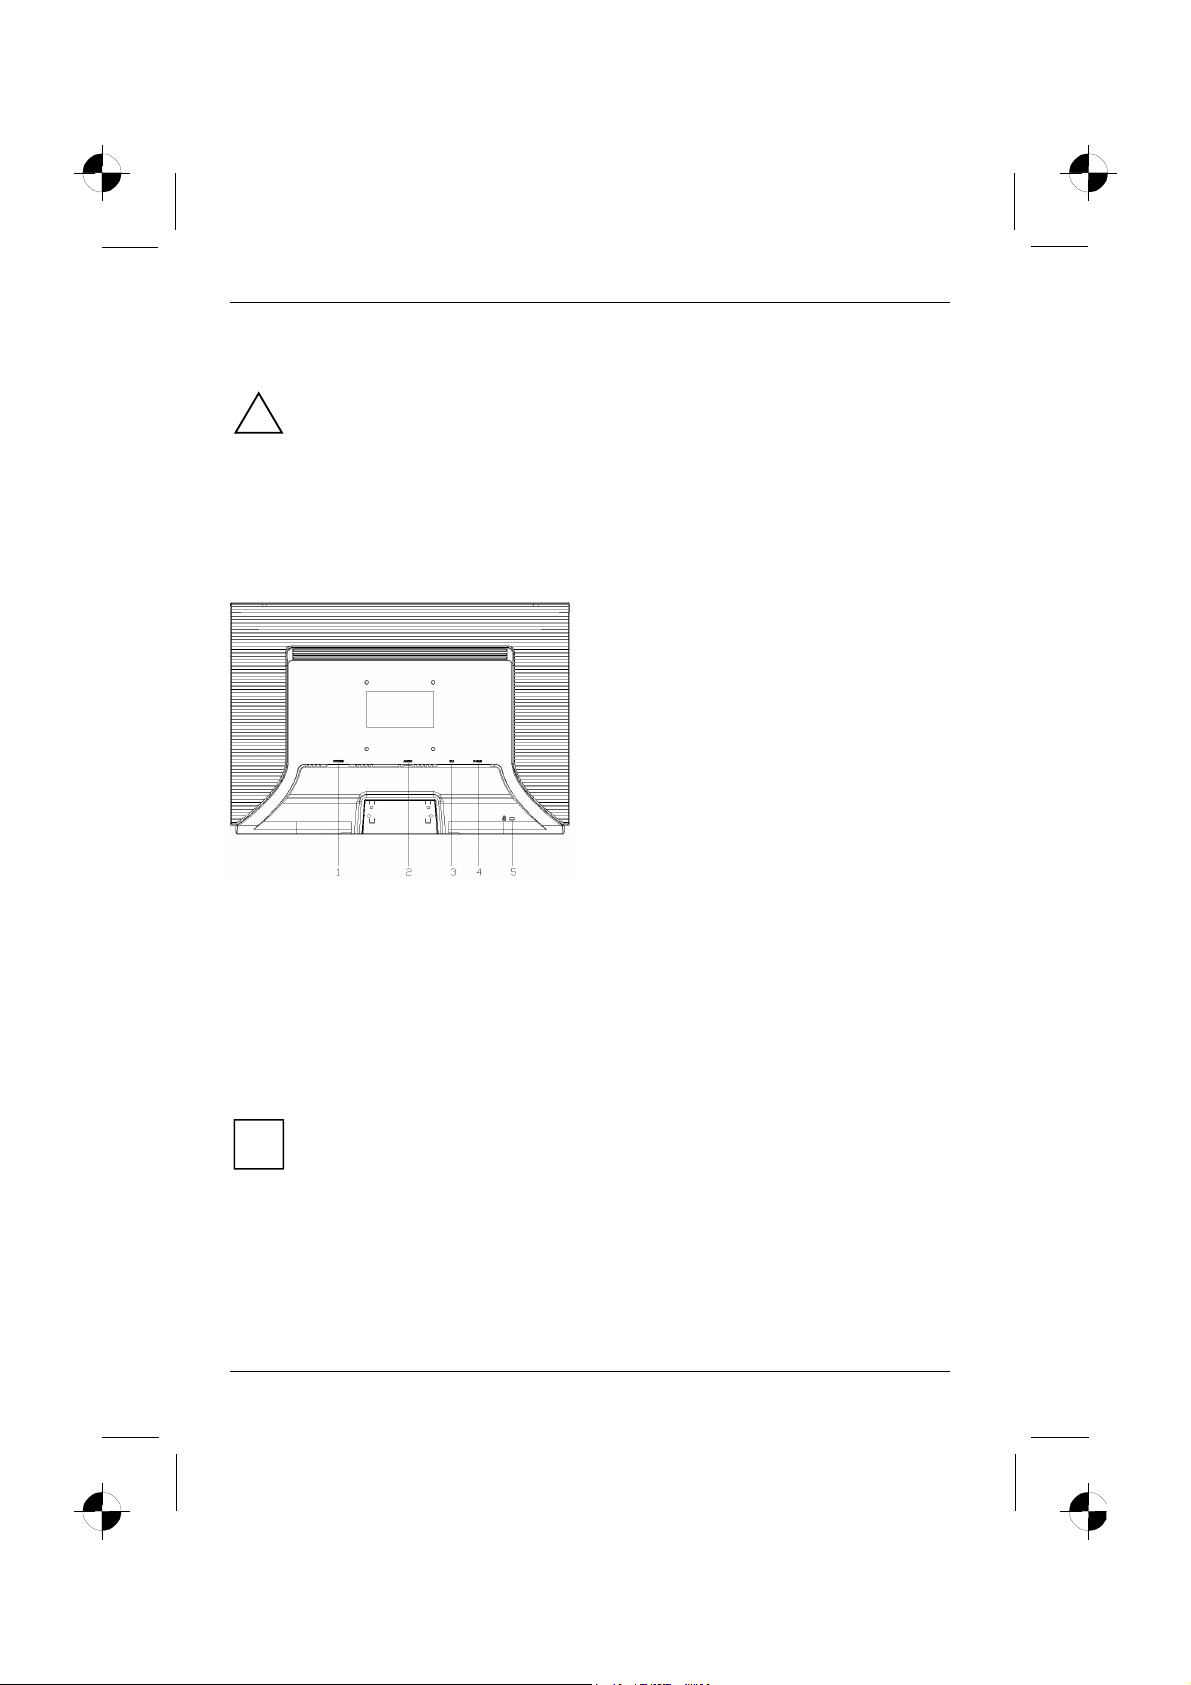
Leitungen an den Bildschirm anschließen
1 = Netzanschlussbuchse
2 = AUDIO-IN-Anschlussbuchse
3 = DVI-D-Anschlussbuchse (DIGITAL)
4 = D-SUB-Anschlussbuchse (ANALOG)
5 = Sicherheitsschlitz für "Kensington Lock"
► Wenn die Datenleitung nicht fest mit dem Bildschirm verbunden ist:
Stecken Sie einen Stecker der Datenleitung an die D-SUB-Anschlussbuchse des Bildschirms
und sichern Sie die Steckverbindung durch Anziehen der Sicherungsschrauben.
► Stecken Sie die mitgelieferte Netzleitung an die Netzanschlussbuchse des Bildschirms.
Leitungen an den Computer anschließen
Informationen über die Anschlüsse und Schnittstellen des Computers finden Sie in der
Betriebsanleitung Ihres Computers.
► Stecken Sie die Datenleitung an den (aktiven) Bildschirmanschluss des Computers und sichern
► Stecken Sie den Stecker der mitgelieferten Netzleitung in eine ordnungsgemäß geerdete
Ausgabe 2 Deutsch - 5
Wenn Ihr Computer zwei Bildschirmanschlüsse hat (Bildschirm-Controller "onboard" und
separate Grafikkarte), so ist im Allgemeinen der Bildschirmanschluss der separaten
i
Grafikkarte aktiv.
Sie die Steckverbindung durch Anziehen der Sicherungsschrauben.
Schutzkontakt-Steckdose und achten Sie auf sichere Steckverbindung.
LCD-Bildschirm
► Stecken Sie den Netzstecker des Computers in eine ordnungsgemäß geerdete Schutzkontakt-
Steckdose.
Wenn Sie den Bildschirm das erste Mal in Betrieb nehmen, sollten Sie die passenden
Grafiktreiber für Ihre Anwendungsprogramme installieren. Informationen dazu finden Sie in
i
der Dokumentation Ihrer Grafikkarte bzw. der dazugehörigen Treiber-Software.
Bedienen des Bildschirms
Neigung einstellen
Der Bildschirm kann in seiner Neigung nach vorn und nach hinten aus seiner senkrechten Stellung
verstellt werden.
► Fassen Sie den Bildschirm mit beiden Händen am rechten und linken Gehäuserand und
bewegen Sie ihn in die gewünschte Neigung.
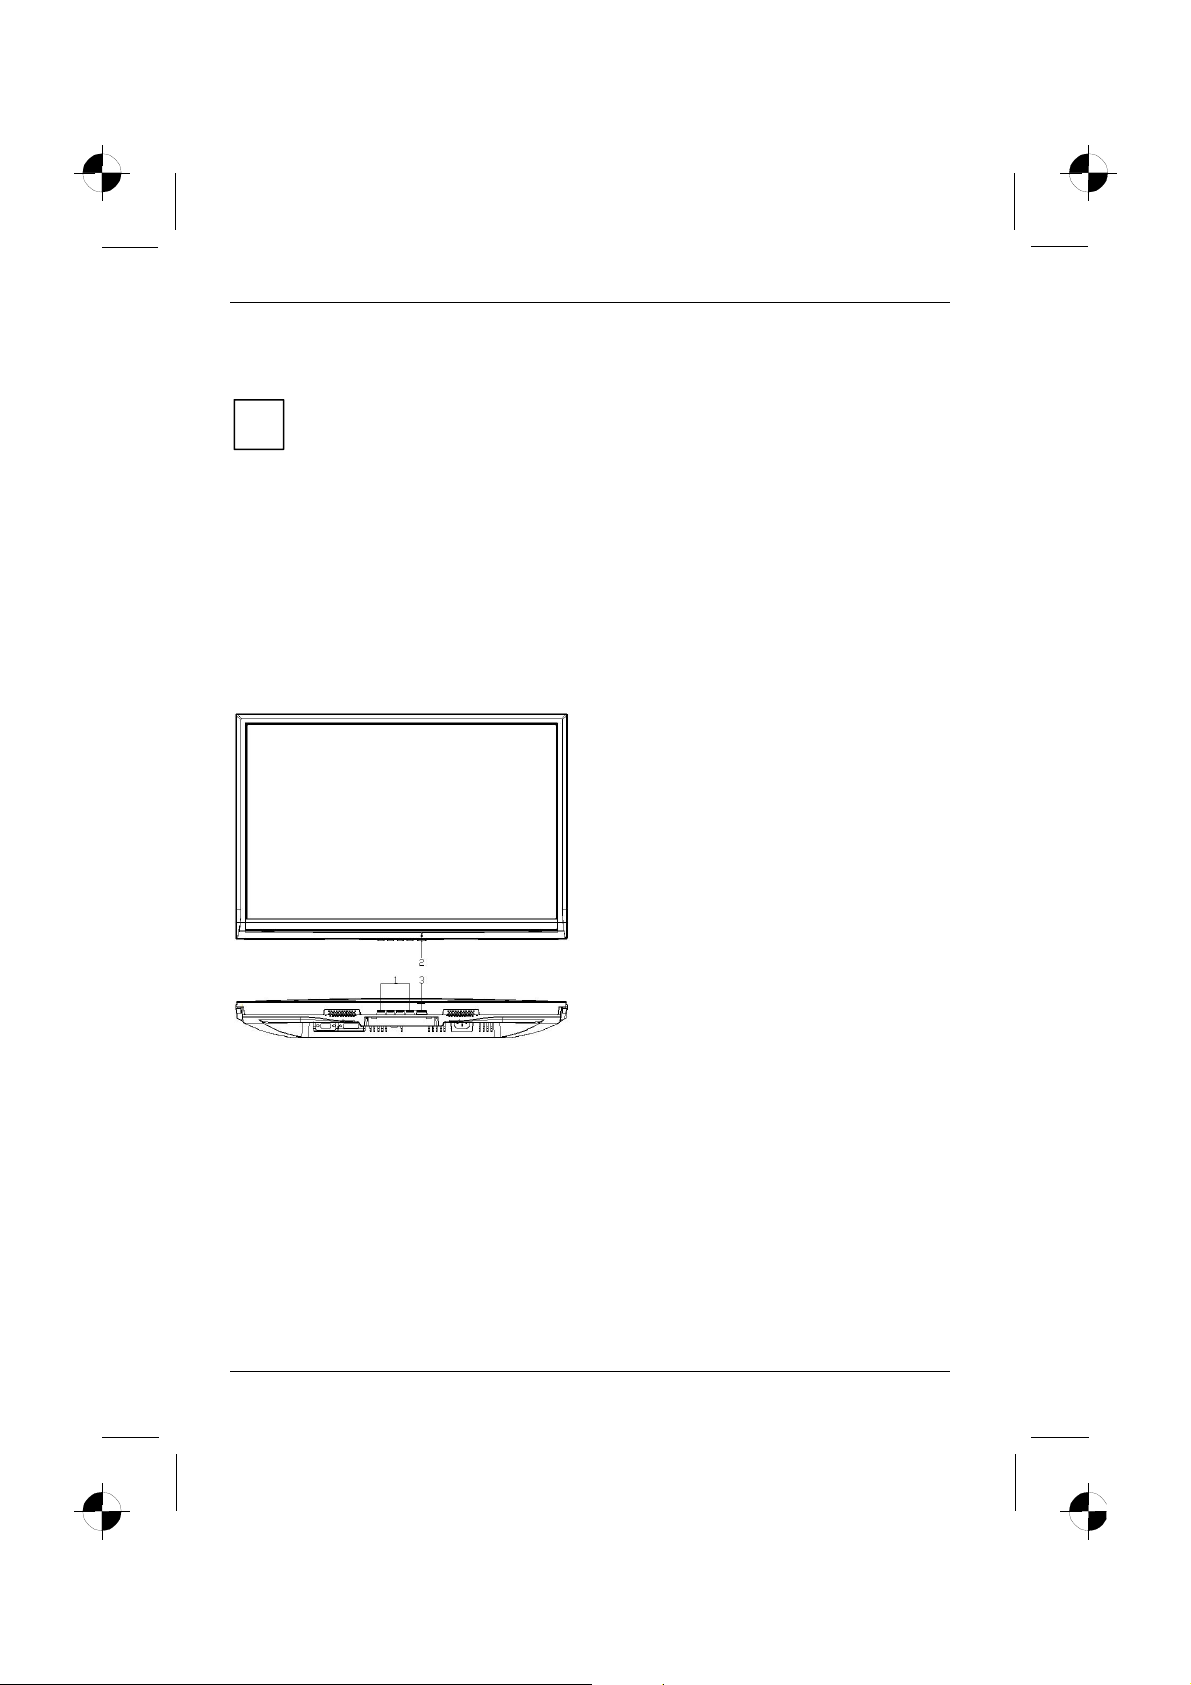
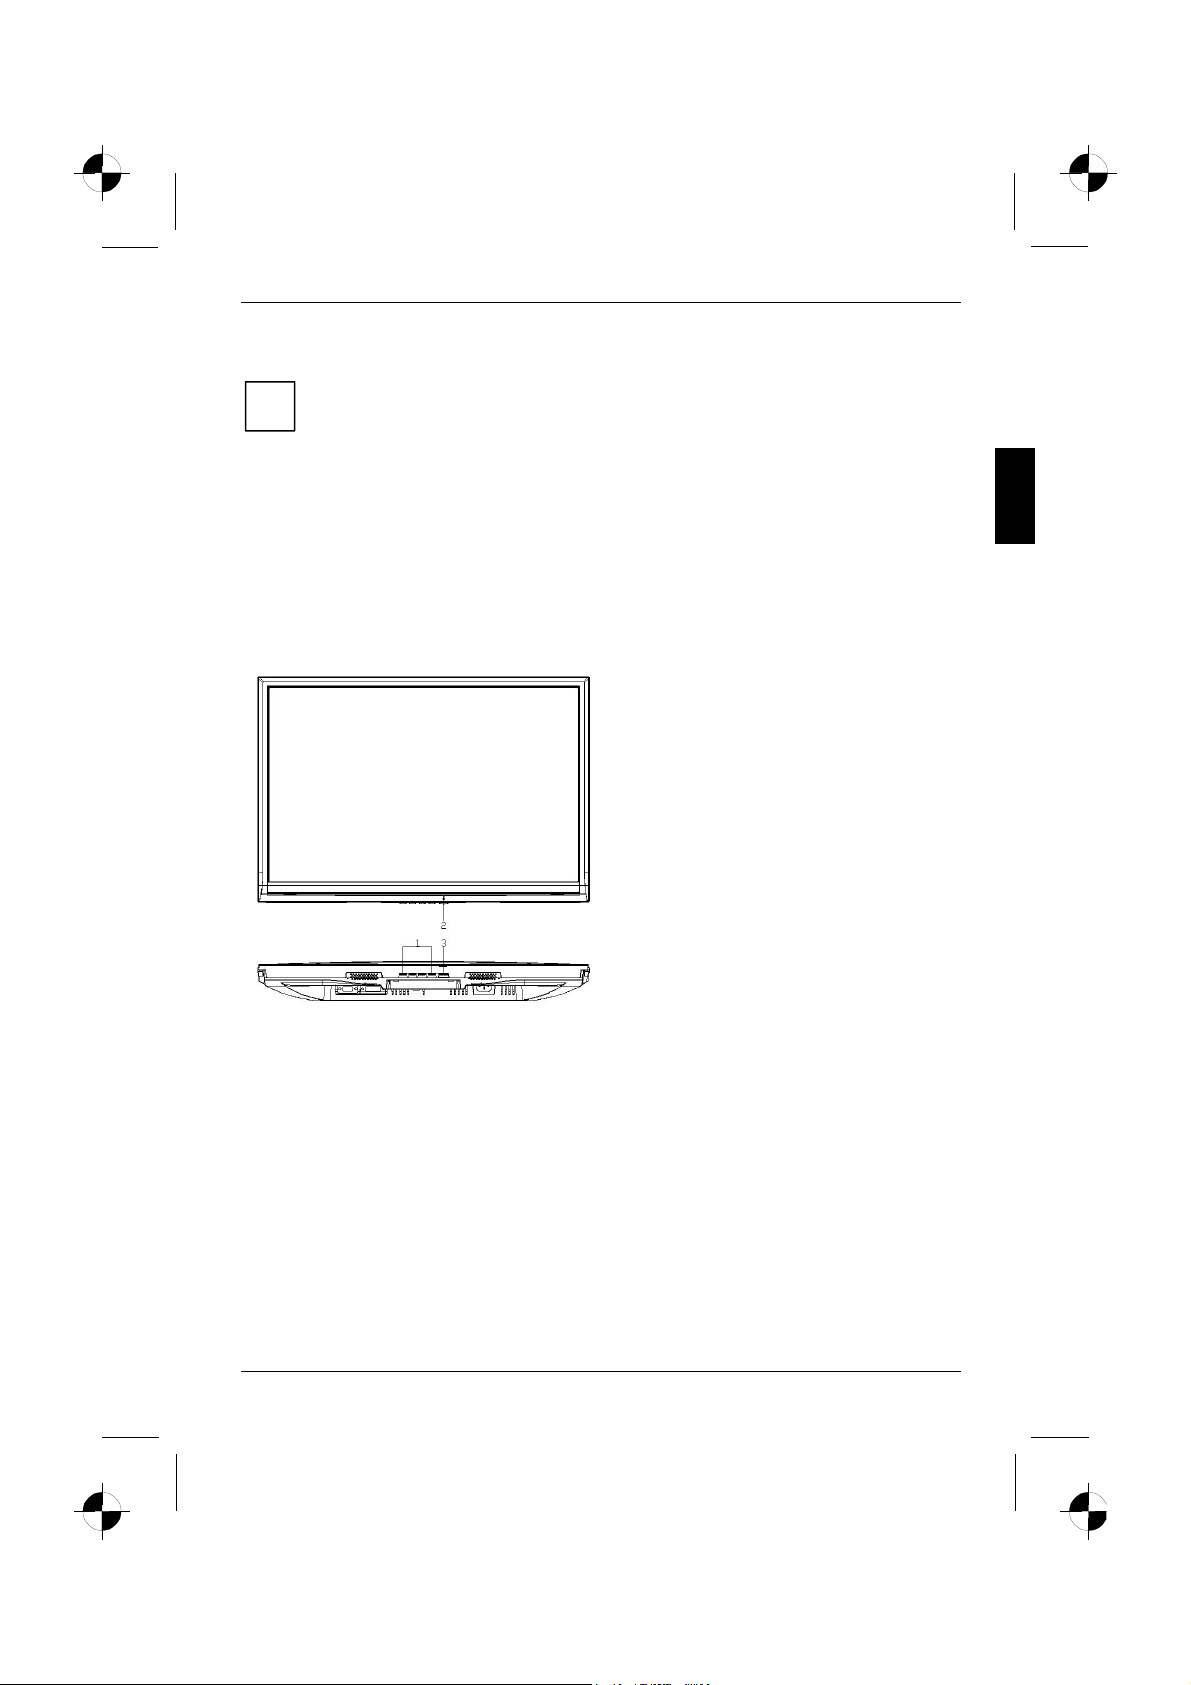
Bildschirm ein-/ausschalten
1 = Tasten für das OSD-Menü
(On-Screen-Display)
2 = Netzanzeige
3 = Ein-/Ausschalter
Zum Ein- und Ausschalten des Bildschirms dient der Ein-/Ausschalter.
Die Netzanzeige leuchtet grün oder blau, wenn der Bildschirm und der Computer eingeschaltet sind.
Die Netzanzeige leuchtet gelb, wenn der Bildschirm kein Videosignal erhält bzw. sich im
Energiesparmodus befindet. Die Netzanzeige erlischt, wenn der Bildschirm ausgeschaltet ist.
Bitte beachten Sie beim Einschalten des Computer-Systems die folgende Einschaltreihenfolge:
► Schalten Sie zuerst mit dem Ein-/Ausschalter den LCD-Bildschirm ein.
► Schalten Sie dann den Computer ein.
6 - Deutsch Ausgabe 2
LCD-Bildschirm
Fehlerbehandlung
Bei Auftreten eines Fehlers überprüfen Sie zunächst die im Folgenden genannten Punkte. Falls das
Fehlerbild dadurch noch nicht beseitigt wurde, sollte der Bildschirm nach Möglichkeit an einem
anderen Computer geprüft werden.
Wenn Sie das Problem nicht lösen können, verständigen Sie bitte unseren Help Desk.
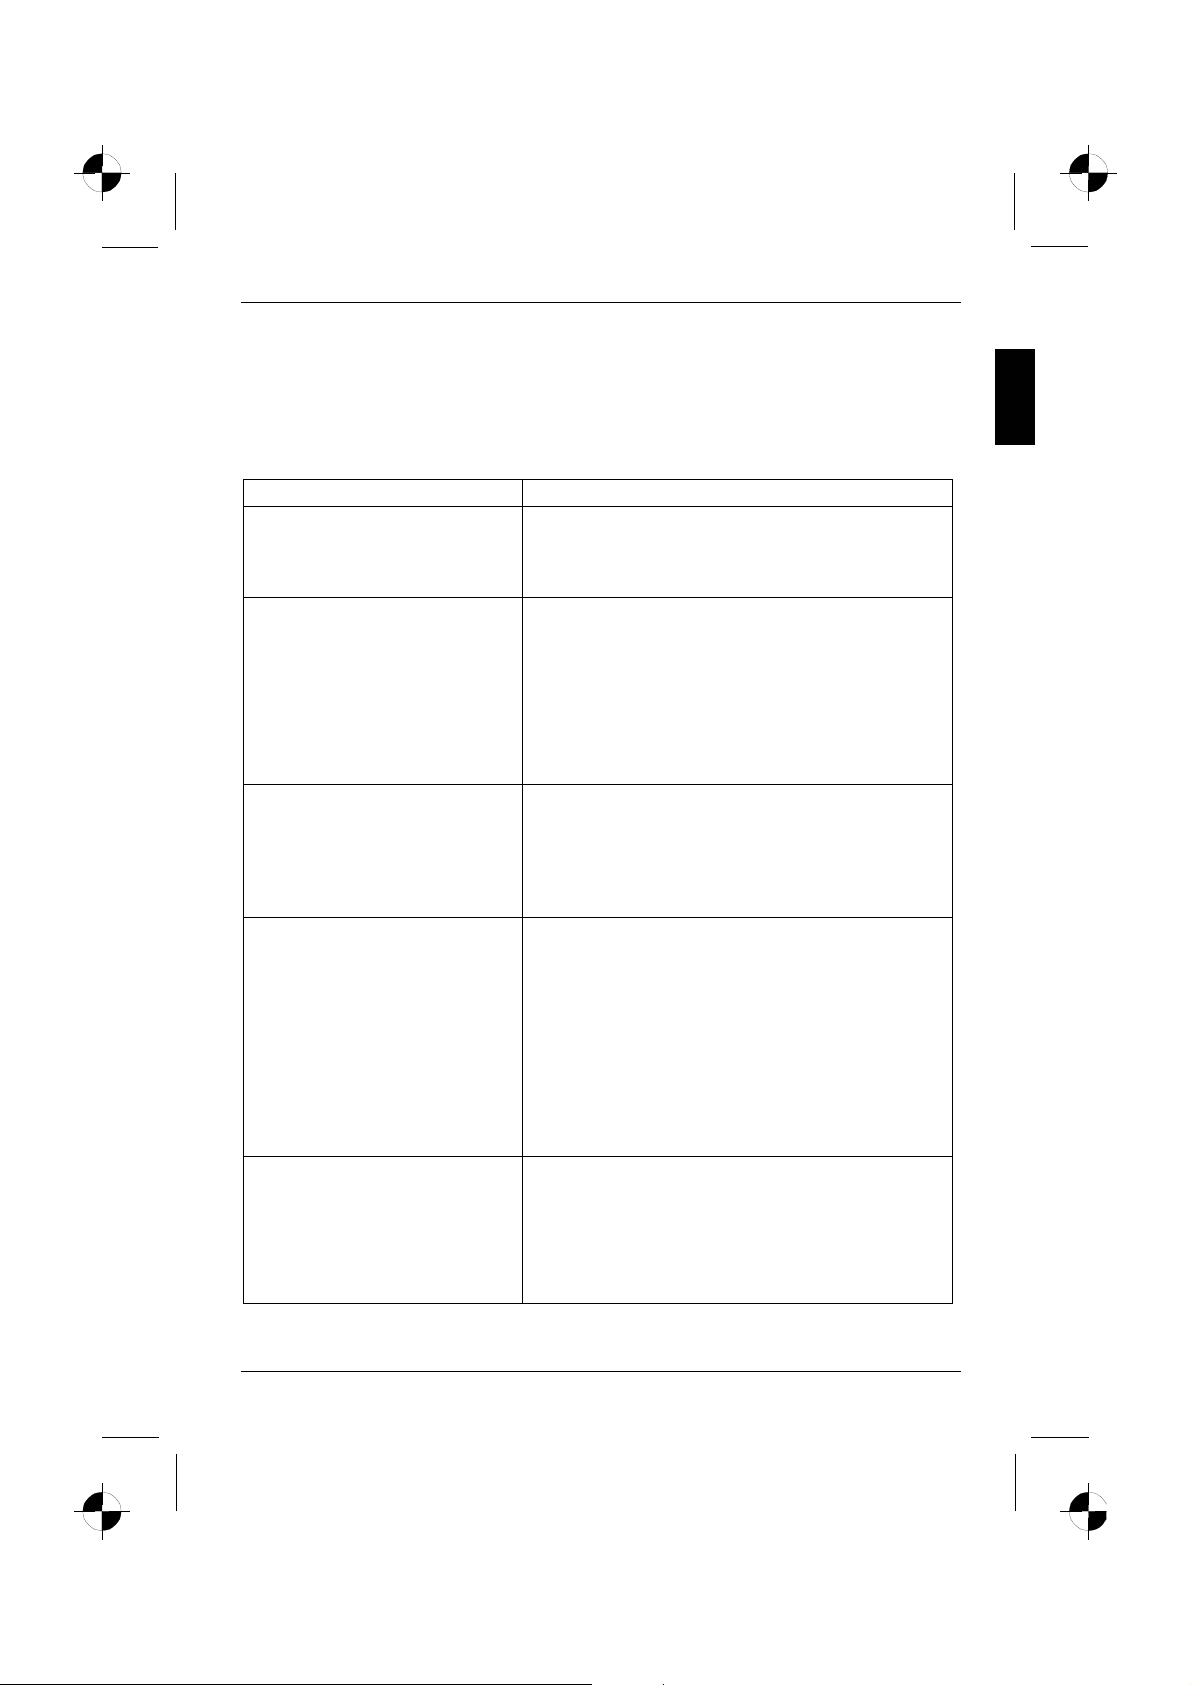
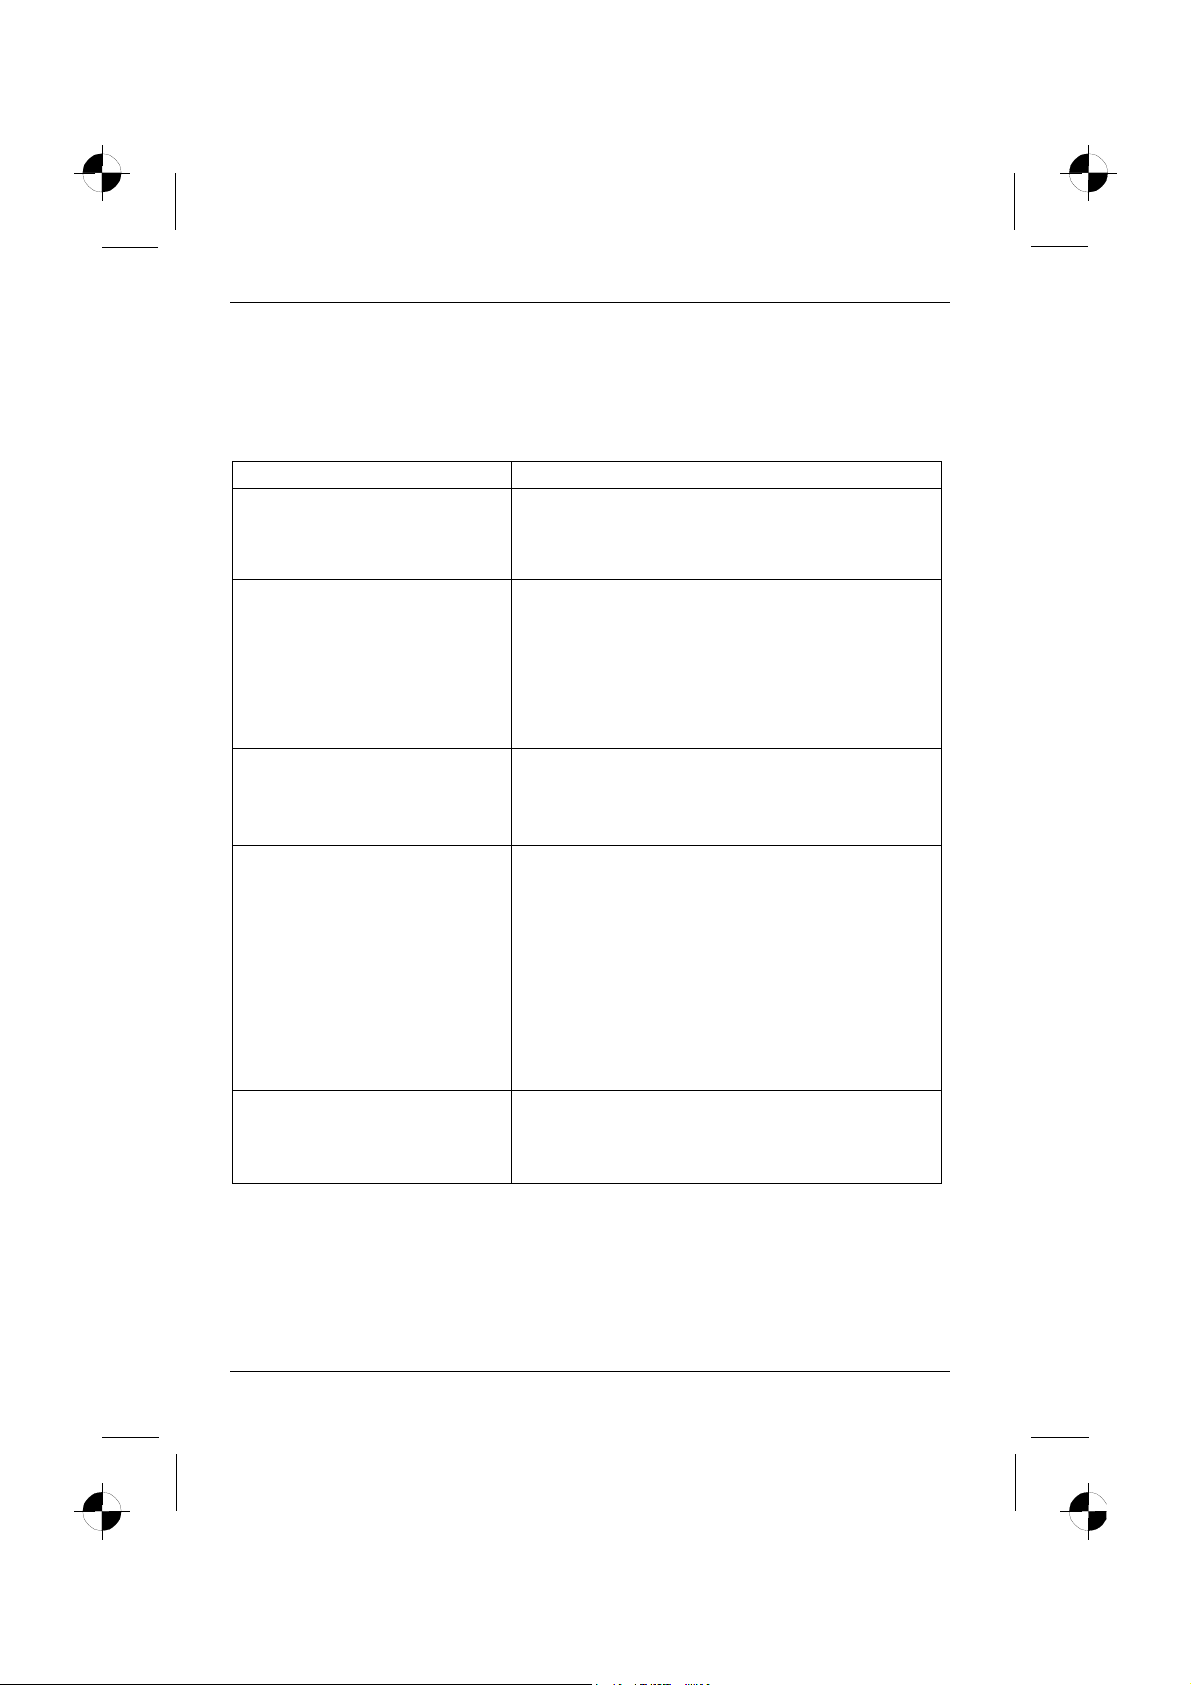
Haben Sie dieses Problem? Überprüfen Sie die genannten Punkte:
Keine Bildschirmanzeige
(Netzanzeige leuchtet nicht)
Keine Bildschirmanzeige
(Netzanzeige leuchtet)
Meldung:
e.g.
No Video Input
Or
No Signal
Meldung:
e.g.
This is 85 Hz overdrive.
Change computer display
input to ….. x ….. at
60 Hz.
or
Frequency out of range
Please change the display
mode to …….
Bildposition nicht korrekt Der Bildschirm erkennt eine noch nicht eingestellte
► Prüfen Sie, ob der Bildschirm eingeschaltet ist.
► Prüfen Sie, ob die Netzleitung des Bildschirms richtig
gesteckt ist.
► Prüfen Sie, ob der Computer eingeschaltet ist.
► Prüfen Sie, ob der Computer eingeschaltet ist.
► Prüfen Sie, ob die Datenleitung des Bildschirms fest
mit dem Bildschirmanschluss des Computers
verschraubt ist.
► Drücken Sie eine beliebige Taste der Computer-
Tastatur - eventuell ist der Computer im
Energiesparmodus.
► Verändern Sie die Helligkeit und/oder den Kontrast,
bis Sie ein Bild erhalten.
► Prüfen Sie, ob die Datenleitung des Bildschirms fest
mit dem Bildschirmanschluss des Computers
verschraubt ist.
► Prüfen Sie, ob der Computer eingeschaltet ist.
Das Eingangssignal (Horizontalfrequenz und
Bildwiederholfrequenz) entspricht nicht den technischen
Daten des Bildschirms.
► Stellen Sie mit Hilfe der Computer-Software gültige
Frequenzen ein (siehe Dokumentation Ihres
Computers oder Ihrer Grafikkarte).
► Stellen Sie mit Hilfe der Computer-Software eine
gültige Auflösung ein (siehe Dokumentation Ihres
Computers oder Ihrer Grafikkarte).
Betriebsart.
► Führen Sie die Selbstjustage des Bildschirms durch
(mit der Taste AUTO - falls vorhanden - oder über
das OSD-Menü).
► Stellen Sie die Bildlage über das OSD-Menü richtig
ein.
Ausgabe 2 Deutsch - 7

LCD-Bildschirm
Haben Sie dieses Problem? Überprüfen Sie die genannten Punkte:
Bild zittert ► Prüfen Sie, ob die Datenleitung des Bildschirms fest
Bildstörungen (vertikale Streifen)
Bildstörungen
(horizontale Streifen, Grießeln)
Bild zu hell oder zu dunkel
mit dem Bildschirmanschluss des Computers
verschraubt ist.
► Führen Sie die Selbstjustage des Bildschirms durch
(mit der Taste AUTO - falls vorhanden - oder über
das OSD-Menü).
► Führen Sie die Selbstjustage des Bildschirms durch
(mit der Taste AUTO - falls vorhanden - oder über
das OSD-Menü).
► Führen Sie die Selbstjustage des Bildschirms durch
(mit der Taste AUTO - falls vorhanden - oder über
das OSD-Menü).
► Führen Sie die Selbstjustage des Bildschirms durch
(mit der Taste AUTO - falls vorhanden - oder über
das OSD-Menü).
► Stellen Sie Kontrast und Helligkeit über das OSD-
Menü richtig ein, falls die Selbstjustage kein
befriedigendes Ergebnis liefert.
Helle oder dunkle Bildpunkte
Nach dem heutigen Stand der Produktionstechnik kann eine absolut fehlerfreie Bildschirmanzeige
nicht garantiert werden. Es können einige wenige konstant helle oder dunkle Bildpunkte vorhanden
sein. Die maximal zulässige Anzahl solcher fehlerhaften Bildpunkte wird durch die strenge
internationale Norm ISO 13406-2 (Klasse II) festgelegt.
Beispiel: Ein 17"/19" -Flachbildschirm mit der Auflösung 1280 x 1024 hat 1280 x 1024 = 1310720
Bildelemente (Pixel). Jedes Bildelement besteht aus drei Bildpunkten (Rot, Grün und Blau), sodass
sich fast 4 Millionen Bildpunkte (Subpixel / Dots) ergeben. Laut ISO 13406-2 (Klasse II) dürfen
maximal 6 Bildelemente und zusätzlich 7 Bildpunkte defekt sein, d. h. in Summe 25 fehlerhafte
Bildpunkte.
Ein 22" wide-Flachbildschirm mit der Auflösung 1680 x 1050 hat 1680 x 1050 = 1764000
Bildelemente (Pixel). Jedes Bildelement besteht aus drei Bildpunkten (Rot, Grün und Blau), sodass
sich fast 5 Millionen Bildpunkte (Subpixel/Dots) ergeben. Laut ISO 13406-2 (Klasse II) dürfen
maximal 8 Bildelemente und zusätzlich 10 Bildpunkte defekt sein.
8 - Deutsch Ausgabe 2
LCD-Bildschirm
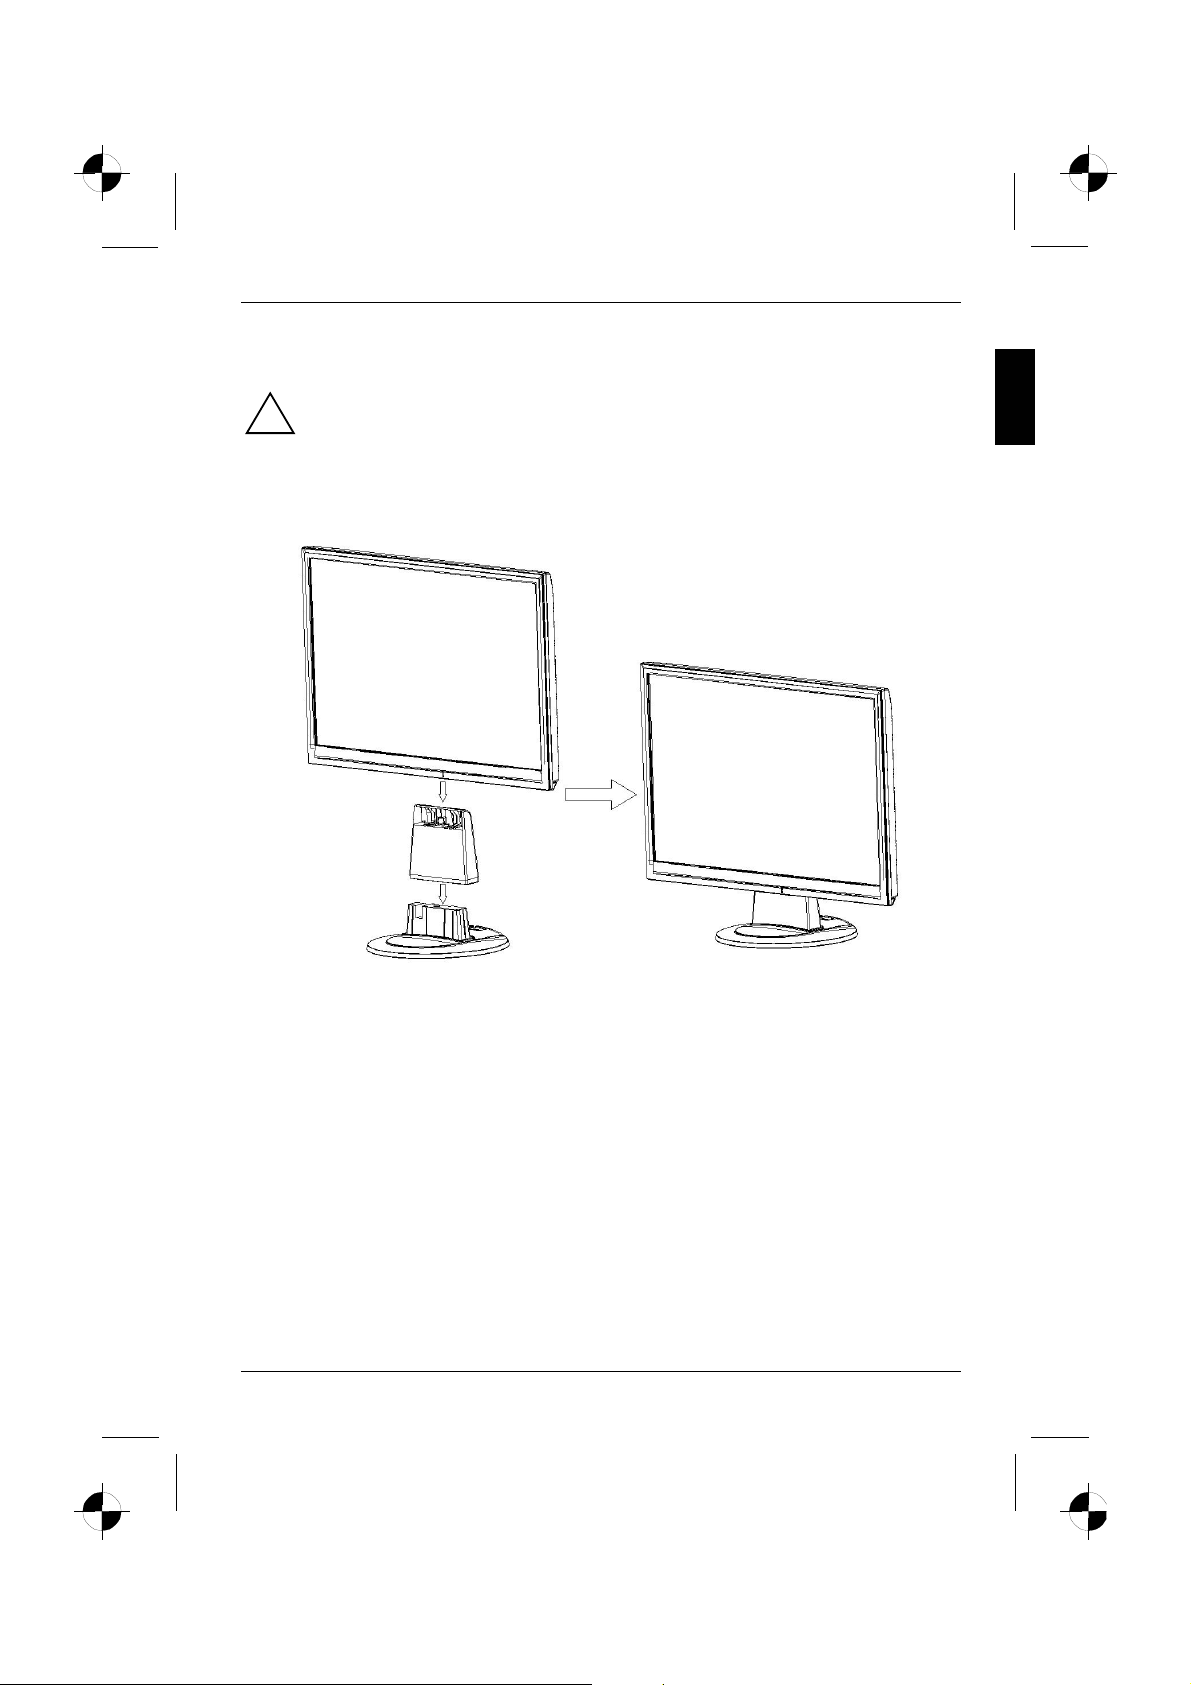
Montage des Bildschirmfußes
Die Display-Oberfläche des LCD-Bildschirms ist druck- und kratzempfindlich. Legen Sie
den Bildschirm bei der Montage oder Demontage des Bildschirmfußes deshalb auf eine
!
weiche Unterlage.
Ausgabe 2 Deutsch - 9


Contents
Introduction........................................................................................................................................... 1
Additional information................................................................................................................... 1
Important notes..................................................................................................................................... 2
Safety notes.................................................................................................................................. 2
Power cable.................................................................................................................................. 3
Transport ...................................................................................................................................... 3
Cleaning ....................................................................................................................................... 4
CE marking................................................................................................................................... 4
FCC Class B Compliance Statement ........................................................................................... 4
Checking the contents of the consignment........................................................................................... 5
Connecting the monitor ........................................................................................................................ 6
Operation of the monitor....................................................................................................................... 7
Troubleshooting.................................................................................................................................... 8
Assembling the monitor base ............................................................................................................. 10
Edition 2 English


Introduction
This manual contains important information for correct set-up of your LCD monitor.
A screen controller with VGA interface is required to control the LCD monitor. The monitor processes
the data supplied to it by the screen controller. The screen controller/the associated driver software is
responsible for setting the modes (resolution and refresh rate).
When putting the monitor into operation for the first time, the screen display should be optimally
adapted to the screen controller used and adjusted in accordance with your needs.
Target group
You don't need to be an "expert" to perform the operations described here. However, please observe
the safety information given in the operating instructions of the computer and in this manual!
In the event of any problems occurring, please contact your sales outlet or our help desk.
Notational conventions
The meanings of the symbols and fonts used in this manual are as follows:
► Text which follows this symbol describes activities that must be performed in the order shown.
"Quotation marks" indicate names of chapters or terms.
This font indicates filenames and menu items.
This font indicates screen outputs.
Pay particular attention to text marked with this symbol. Failure to observe this warning
endangers your life, destroys the device, or may lead to loss of data.
!
Supplementary information, remarks, and tips follow this symbol.
i
Additional information
Details of how you set the resolution and refresh rate are provided in the documentation on your
screen controller/the associated driver software.
Edition 2 English - 1
LCD monitor
Important notes
In this chapter you will find information regarding safety which is essential to take note of
with your monitor.
!
Safety notes
This device complies with the relevant safety regulations for data processing equipment, including
electronic office machines for use in an office environment. If you have any questions, contact your
sales outlet or our help desk.
● The display surface of the LCD monitor is sensitive to pressure and scratches. You should
therefore be careful with the display surface so as to avoid lasting damage (Newton rings,
scratches).
● If the device is brought into the installation site from a cold environment, condensation can form.
Before operating the device, wait until it is absolutely dry and has reached approximately the
same temperature as the installation site.
● To ensure sufficient ventilation, the intake and exhaust air openings of the monitor must never
be blocked.
● The monitor automatically sets itself to a mains voltage in the range of 100 V to 240 V. Ensure
that the local mains voltage lies within these limits.
● Ensure that the power socket on the device or the grounded mains outlet is freely accessible.
● The ON/OFF switch does not disconnect the device from the mains voltage. To completely
disconnect the mains voltage, remove the power plug from the socket.
● The monitor is equipped with a power cable that complies with safety standards.
● Lay all cables so that nobody can stand on them or trip over them. When attaching the device,
observe the relevant notes in the "Connecting the monitor" chapter.
● If you use a different data cable from the one supplied, ensure that it is adequately shielded.
CE conformance and optimum picture quality are guaranteed only if you use the data cable
supplied.
● No data transfer cables should be connected or disconnected during a thunderstorm.
● Make sure that no objects (e.g. jewellery chains, paper clips, etc.) or liquids get inside the
device (danger of electric shock, short circuit).
● The device is not waterproof! Never immerse the device in water and protect it from spray
water (rain, sea water).
● In emergencies (e.g. damaged casing, elements or cables, penetration of liquids or foreign
matter), switch off the unit, disconnect the power plug and contact your sales outlet or our help
desk.
2 - English Edition 2
LCD monitor
● The monitor must be disposed of in accordance with the local regulations for disposal of
special waste. The screen background lighting contains mercury. You must observe the
applicable handling and disposal safety regulations for fluorescent tubes.
● Only qualified technicians should repair the device. Unauthorised opening and incorrect repair
may greatly endanger the user (electric shock, fire risk).
● Use a screen saver with moving images and activate the power management for your monitor
to prevent still images from "burning in".
● The screen may only be operated in the wide format (0° landscape mode). Turning with a
swivel arm or wall bracket mounted is not permitted.
● Store this manual close to the device. If you pass the device on to third parties, you should
pass this manual on with it.
● We recommend that you place your device on a durable, non-slip surface. In view of the many
different surface coatings and finishes used on furniture, it is possible that the feet of the device
could mark the surface they stand on.
Power cable
To guarantee safe operation, use the cable supplied. Use the following guidelines if it is necessary to
replace the original cable set.
● The female/male receptacles of the cord set must meet IEC60320/CEE-22 requirements.
● The cable has to be HAR-certified or VDE-certified. The mark HAR or VDE will appear on the
outer sheath.
● For devices which are mounted on a desk or table, type SVT or SJT cable sets may be used.
● The cable set must be selected according to the rated current for your device.
● If necessary, replace the original power cable with a regular grounded 3-core mains lead.
Transport
● Transport the monitor with care and only in its original packaging or another corresponding
packaging fit to protect it against knocks and jolts.
● Never drop the LCD monitor (danger of glass breakage).
Edition 2 English - 3
LCD monitor
Cleaning
● Always pull out the power plug before you clean the monitor.
● Do not clean any interior parts yourself, leave this job to a service technician.
● Do not use any cleaning agents that contain abrasives or may corrode plastic.
● Ensure that no liquid will run into the system.
● Ensure that the ventilation areas of the monitor are free.
● The display surface of the LCD monitor is sensitive to pressure and scratches. Clean it only
using a soft, slightly moistened cloth.
Wipe the monitor casing with a dry cloth. If the monitor is particularly dirty, use a cloth which has
been moistened in mild domestic detergent and then carefully wrung out.
CE marking
The shipped version of this device complies with the requirements of the EC directives
2004/108/EC "Electromagnetic compatibility" and 73/23/EEC "Low voltage directive".
FCC Class B Compliance Statement
The following statement applies to the products covered in this manual, unless otherwise specified
herein. The statement for other products will appear in the accompanying documentation.
NOTE:
This equipment has been tested and found to comply with the limits for a "Class B" digital device,
pursuant to Part 15 of the FCC rules and meets all requirements of the Canadian InterferenceCausing Equipment Standard ICES-003 for digital apparatus. These limits are designed to provide
reasonable protection against harmful interference in a residential installation. This equipment
generates, uses and can radiate radio frequency energy and, if not installed and used in strict
accordance with the instructions, may cause harmful interference to radio communications. However,
there is no guarantee that interference will not occur in a particular installation. If this equipment does
cause harmful interference to radio or television reception, which can be determined by turning the
equipment off and on, the user is encouraged to try to correct the interference by one or more of the
following measures:
● Reorient or relocate the receiving antenna.
● Increase the separation between equipment and the receiver.
● Connect the equipment into an outlet on a circuit different from that to which the receiver is
connected.
● Consult the dealer or an experienced radio/TV technician for help.
Fujitsu Siemens Computers GmbH is not responsible for any radio or television interference caused
by unauthorised modifications of this equipment or the substitution or attachment of connecting
cables and equipment other than those specified by Fujitsu Siemens Computers GmbH. The
correction of interferences caused by such unauthorised modification, substitution or attachment will
be the responsibility of the user.
4 - English Edition 2

LCD monitor
Checking the contents of the consignment
The display surface of the LCD monitor is sensitive to pressure and scratches. Always hold
the device by the casing!
!
► Unpack all the individual parts.
► Check the delivery for damage incurred during transportation.
► Check whether the delivery agrees with the details in the delivery note.
The complete LCD monitor package includes:
– one monitor
– data cable
– one power cable
– one Warranty Booklet
– this "Getting Started" manual
Should you discover that the delivery does not correspond to the delivery note, notify your local sales
outlet immediately.
We recommend that you keep the original packaging material. You may need the
packaging in the future if you need to transport your device.
i
Edition 2 English - 5
LCD monitor
1 = POWER CONNECTOR
2 = AUDIO CONNECTOR
4 = D-SUB CONNECTOR
3 = DVI CONNECTOR
5 = Kensington Lock
Connecting the monitor
Please take note of the safety information in the "Important notes" chapter.
!
CE conformance and optimum picture quality are guaranteed only if you use the data cable
supplied.
Do not cover the ventilation openings of the monitor.
The computer power plug must be pulled out!
► Be sure that the monitor and the computer are switched off.
Connecting cables to the monitor
► If the data cable is not firmly connected to the monitor:
Connect one of the connectors of the data cable to the D-SUB connector on the monitor and
secure the plug-in connection by tightening the locking screws.
► Plug the power cable supplied into the power connector of the monitor.
Connecting cables to the computer
Information on the computer connections and interfaces is contained in the operating manual for your
computer.
► Connect the data cable to the (active) monitor port on the computer and secure the plug-in
► Connect the connector of the power cable supplied into a properly earthed mains outlet and
If your computer has two monitor ports ("onboard" screen controller and separate
graphics card), the monitor port for the separate graphics card is usually active.
i
connection by tightening the safety screws.
ensure a secure connection.
6 - English Edition 2
LCD monitor
► Plug the power connector of the computer into a properly grounded mains outlet.
When you start working with your monitor for the first time you should install the
appropriate graphics drivers for your application software. Details of how to do this are
i
provided in the documentation on your screen controller/the associated driver software.
Operation of the monitor
Adjusting rake
The rake of the monitor can be adjusted forward and back from its vertical position.
► Grasp the monitor with both hands on the right and left edge of the casing and adjust it to the
desired rake.
Switching the monitor on/off
1 = Buttons for the OSD menu
(On-Screen-display)
2 = Power indicator
3 = ON/OFF switch
The ON/OFF switch is used for switching the monitor on and off.
The power indicator glows green or blue when the monitor and computer are switched on. The power
indicator lights up yellow when the monitor does not receive a video signal or is in the energy saving
mode. The power indicator goes off when the monitor is switched off.
When you switch the computer system on, you must proceed in the following order:
► First switch the LCD monitor on with the ON/OFF switch.
► Then switch on the computer.
Edition 2 English - 7
LCD monitor
Troubleshooting
Should an error occur, first check the following points. If the distortion is still not eliminated, the
monitor should, if possible, be checked on another computer.
If you are unable to solve the problem, please inform our help desk.
Having this problem? Check the following points:
No screen display
(power indicator does not light)
No screen display
(power indicator lights)
Message:
No Video Input
Or
No Signal
Message:
e.g.
This is 85 Hz overdrive.
Change computer display input
to ….. x ….. at 60 Hz.
or
Frequency out of range
Please change the display
mode to …….
Picture position not correct The monitor recognises an undefined mode.
► Check whether the monitor is switched on.
► Check whether the power cable on the monitor is
connected correctly.
► Check whether the computer is switched on.
► Check whether the computer is switched on.
► Check whether the data cable for the monitor is
correctly attached to the monitor port on the
computer.
► Press any key on the computer keyboard - the
computer may be in energy saving mode.
► Alter the brightness and/or contrast until you get a
picture.
► Check whether the data cable for the monitor is
correctly attached to the monitor port on the
computer.
► Check whether the computer is switched on.
The input signal (horizontal frequency and refresh rate)
does not correspond to the technical monitor data.
► Adjust the video frequency range using the computer
software (see documentation for your computer or
your graphics card).
► Adjust a different screen resolution using the
computer software (see documentation for your
computer or your screen controller).
► Carry out the auto-adjustment of the monitor (with
the AUTO button - if present - or via the OSD menu).
► Set the picture position with the OSD menu.
8 - English Edition 2
 Loading...