

Page 1

DE AT
CH
Benzin-Rasenmäher
Bedienungs- und Sicherheitshinweise
FR
CH
Tondeuse thermique
Instructions d´utilisation et consignes de s écurité
IAN 79270
IT
CH
Tosaerba a benzina
Indicazioni per l’uso e per la sicurezza
GB
IE
Petrol Lawnmower
Instruction and safety manual
DE FR
IT GB
Page 2

Page 3

INDEX
BESTIMMUNGSZWECK 3
SICHERHEITSHINWEISE 3
A BESCHREIBUNG/INHALT DER LIEFERUNG 4
B AUFBAU DES GRASFANGKORBES 4
C AUFBAU UNTERER GRIFF 4
D AUFBAU OBERER GRIFF 4
E MULCHEINSATZ EINSETZEN 4
F EINSTELLEN DER SCHNITTHÖHE 5
G SICHERHEITSVORKEHRUNGEN 5
H FUNKTIONSWEISE 5
I EINSTELLEN DES ANTRIEBKABELS 6
J WARTUNG UND PFLEGE 6
K SCHNEIDWERK 7
GARANTIEBEDINGUNGEN 7
SERVICE ALLGEMEIN 8
ENTSORGUNG/UMWELTSCHUTZ 8
TECHNISCHE DATEN 8
EG-KONFORMITÄTSERKLÄRUNG 9
DEUTSCH -
1
Page 4
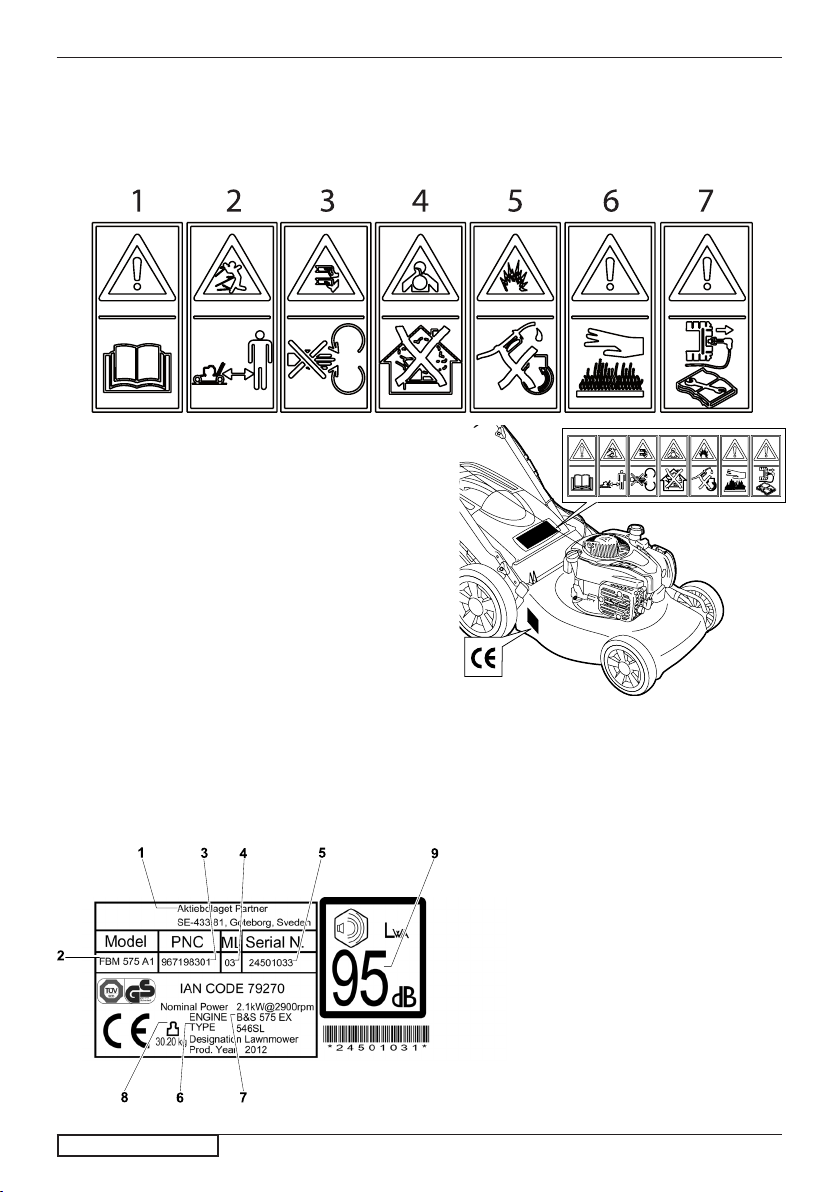
Wir danken Ihnen für Ihr Vertrauen, das Sie uns durch den Kauf unseres Rasenmähers entgegengebracht haben und sind sicher, dass Sie mit der Qualität unseres Produktes zufrieden sein werden. Wir
bitten Sie, dieses Bedienungsanleitung aufmerksam durchzulesen, es informiert Sie über die richtige
Verwendung in Übereinstimmung mit den Sicherheitsvorschriften. Die folgenden Warnhinweise benden sich am Rasenmäher an der Kunststoffabdeckung des Fangkorbes.
Vorsicht! Vor der Verwendung ist die Bedienungs-
1
anleitung zu lesen.
Vorsicht! Verletzungsrisiko durch herausge-
2
schleuderte Gegenstände! Halten Sie andere
Personen von dem Gefahrenbereich fern.
Vorsicht! Verletzungsrisiko durch scharfe Messer!
3
Halten Sie sich von den rotierenden Messern fern.
Vorsicht! Gefahr des Einatmens giftiger Gase!
4
Der Rasenmäher darf nicht in geschlossenen oder
schlecht belüfteten Räumen verwendet werden.
Vorsicht! Explosionsgefahr! Treibstoff darf nicht
5
bei laufendem Motor nachgefüllt werden.
6
Vorsicht! Oberäche ist heiß.
Vorsicht! Vor der Ausführung jeglicher War-
7
tungsarbeiten ist der Motor abzuschalten und der
Zündkerzenstecker zu ziehen.
DEUTSCH - 2
1 Hersteller
2 Modell
3 Produkt Nummer
4 Wartungsstufe
5 Seriennummer
6 Typ
7 Motoren Info
8 Gewicht
9 Geräuschpegel
Page 5

BESTIMMUNGSZWECK
Der Rasenmäher wurde ausschließlich für das Rasenmähen konzipiert. Er ist für den Privatgebrauch
bestimmt und darf nur von erwachsenen Personen
benutzt werden. Er ist für das Mähen von Wiesen
von normalem Umfang bestimmt.
SICHERHEITSHINWEISE
Sicherheitsvorkehrungen für handgeführte
Rasenmäher mit Messer
WICHTIG: Der Rasenmäher kann Hände und Füße
amputieren und Gegenstände schleudern. Eine
Nichtbeachtung folgender Sicherheitshinweise kann
schwere Verletzungen oder auch tödliche Unfälle
zur Folge haben.
I. Schulung
Die Bedienungsanleitung sorgfältig durchlesen.
Mit den Bedienungselementen und der vorschriftsmäßigen Bedienung des Rasenmähers
vertraut machen.
Auf keinen Fall Kindern oder Erwachsenen, die
mit der Bedienungsanleitung des Rasenmähers
nicht vertraut sind, das Bedienen des Rasenmähers gestatten.Das Mindestalter von Anwendern
ist womöglich gesetzlich geregelt.
Auf keinen Fall mähen, solange sich Personen
oder Tiere, besonders Kinder oder Haustiere, im
Arbeitsbereich benden.
Bitte denken Sie daran, dass der Benutzer für
jegliche Unfälle oder Gefahren, denen andere
oder deren Eigentum ausgesetzt werden, verantwortlich ist.
II. Vorbereitung
Während dem Mähen immer festes Schuhwerk
und lange Hosen tragen. Den Rasenmäher nicht
barfuss oder mit offenen Sandalen in Betrieb
nehmen.
Das Arbeitsgelände sorgfältig untersuchen und
alle Gegenstände, die von dem Rasenmäher
aufgeschleudert werden könnten, entfernen.
WARNUNG - Benzin ist äußerst leicht ent-
zündlich.
- Kraftstoff in speziell dafür ausgelegten Behältern lagern.
- Nur im Freien tanken und währenddessen nicht
rauchen.
- Kraftstoff nachfüllen, bevor der Motor angelassen wird. Auf keinen Fall den Tankdeckel
entfernen oder Benzin nachfüllen, solange der
Motor läuft oder heiß ist.
- Falls Kraftstoff verschüttet wurde, nicht
versuchen, den Motor anzulassen, sondern
den Rasenmäher vom verschütteten Benzin
wegschieben und das Verursachen jeglicher
Zündquellen vermeiden, bis die Benzindämpfe
sich verüchtigt haben
- Alle Deckel wieder fest auf Kraftstofftanks und
Kraftstoffbehältern anbringen.
Schadhafte Schalldämpfer ersetzen.
Vor dem Gebrauch immer mit einer Sichtprü-
fung sicherstellen, dass Mähmesser, Messerschrauben und Mäheinheit nicht abgenutzt oder
beschädigt sind. Abgenutzte oder beschädigte
Messer und Schrauben ersetzen, um Unwucht
und damit Gefährdungen zu vermeiden.
III. Betrieb
Den Rasenmäher nicht in einem geschlosse-
nen Bereich betreiben, in dem die gefährlichen
Kohlenmonoxydgase sich sammeln können.
Nur bei Tageslicht oder guter künstlicher Be-
leuchtung mähen.
Vermeiden Sie den Gebrauch des Geräts auf
nassem Gras, soweit möglich.
Achten Sie bei geneigten Böden stets auf Ihr
Gleichgewicht.
Gehen Sie (nicht rennen).
Bewegen Sie sich mit fahrbaren Motor-Ra-
senmähern stets quer zur Neigung der Fläche,
gehen Sie nie auf und ab.
Gehen Sie beim Richtungswechsel auf geneig-
ten Flächen besonders vorsichtig vor.
Mähen Sie nicht auf besonders steilen Ab-
hängen.
Gehen Sie besonders vorsichtig vor, wenn Sie
den Rasenmäher zu sich ziehen oder zu sich
hin drehen.
Stoppen Sie das Messer, wenn der Rasenmäher
für den Transport über Flächen ohne Gras angekippt werden muss, bzw. auf dem Hin-/Rückweg
zur/von der zu mähenden Fläche.
Den Rasenmäher nie mit defekten Schutzab-
deckungen oder nicht in Position bendlichen
Schutzvorrichtungen, wie beispielsweise Leitbleche und/oder Grasfangkorb, benutzen.
Die Einstellung des Drehzahlreglers nicht ändern,
und die Drehzahl des Motors nicht über die Werk-
spezikationen heraufsetzen. Der Betrieb des
Motors bei zu hohen Drehzahlen kann die Gefahr
von Körperverletzungen vergrößern.
Vor Anlassen des Motors die Kupplungen
abkuppeln.
Beim Starten des Motors vorsichtig vorgehen.
Halten Sie sich an die Bedienungsanleitung und
achten Sie darauf, dass Ihre Füße weit genug
von dem Messer entfernt sind.
Kippen Sie den Rasenmäher nicht während des
Starts oder Einschalten des Motors, es sei denn,
dass dies für den Start erforderlich ist. Kippen
Sie ihn in diesem Fall nicht mehr als unbedingt
nötig und heben Sie nur den vom Benutzer
entfernteren Bereich an.
Den Rasenmäher nicht starten, wenn Sie nahe
am Auswurfkanal stehen.
Bringen Sie Ihre Hände und Füße nicht in die
Nähe des rotierenden Messers. Halten Sie den
Auswurfkanal stets sauber.
Den Rasenmäher bei laufendem Motor nie
anheben oder tragen.
Den Motor stoppen und den Zündkerzenstecker
ziehen:
DEUTSCH - 3
Page 6

- vor dem Entfernen von Verstopfungen aus dem
Mähwerk oder dem Auswurf;
- vor dem Prüfen, Reinigen oder Reparieren des
Rasenmähers;
- nachdem auf ein Fremdkörper gestoßen wurde.
Den Rasenmäher auf Schäden untersuchen
und die Reparaturen durchführen, bevor der
Rasenmäher wieder angelassen und in Betrieb
genommen wird;
- falls der Rasenmäher anfangen sollte, ungewöhnlich zu vibrieren (sofort prüfen).
Den Motor stoppen:
- immer wenn Sie den Rasenmäher zurücklassen;
- vor dem Auftanken.
IV. Wartung und Lagerung
Darauf achten, dass alle Muttern, Bolzen
und Schrauben fest angezogen sind, um zu
gewährleisten, dass der Rasenmäher für den
Betrieb sicher ist.
Den Rasenmäher auf keinen Fall mit Benzin
im Tank in einem Gebäude lagern, in dem die
Benzindämpfe ein offenes Feuer oder einen
Funken erreichen könnten.
Den Motor abkühlen lassen, bevor er in
einem geschlossenen Raum gelagert wird.
Um die Feuergefahr herabzusetzen, den Motor,
den Schalldämpfer, den Batteriekasten und den
Kraftstofftank von Gras, Laub und übermäßigem
Schmierfett freihalten.
Den Grasfänger häug auf Abnutzung oder
Verschleiß prüfen.
Es wird empfohlen immer den gleichen
Zündkerzentyp zu benutzen. Der Einsatz einer
falschen Zündkerze kann den Kolben/Zylinder
beschädigen.
Aus Sicherheitsgründen müssen verschlissene
oder beschädigte Teile ausgewechselt werden.
Man soll immer originale Ersatzteile benutzen.
Falls der Kraftstofftank entleert werden muss,
sollte dies im Freien getan werden.
BESCHREIBUNG/INHALT DER LIEFERUNG (Entsprechende Abbildungen in Anlage A)
1 Kupplungshebel
2 Schalthebel
3 Kabelbinder
4 Befestigungsknopf oberer Holm
5 Unterer Holm
6 Öltankdeckel
7 Tankdeckel
8 Zündkerze
9 Mähgehäuse
10 Einstellhebel für Schnitthöhe
11 Feder für den Mulcheinsatz
12 Mulcheinsatz
13 Schutzklappe
14 Grasfangkorb
15 Startergriff
16 Oberer Holm
17 Stopfen
18 Zündkerzenschlüssel
19 Bedienungsanleisung
20 5 Liter-Kanister
AUFBAU DES GRASFANGKORBES
Zuerst den Metallbügel an der Kunststoffabdeckung des Grasfangkorbes anbringen. Danach
den unteren Teil montieren, indem die Haken der Kunststoffabdeckung in die Kunststofeiste
des unteren Teils gedrückt werden bis diese einrasten und den Metallbügel in die vorgesehene
Halterung am unteren Teil einfügen, wie in Abbildung B dargestellt.
AUFBAU UNTERER GRIFF
Den unteren Griff an der Holmaufnahme mit der Schraube, Unterlegscheibe und Befestigungsknopf
montieren, wie in Abbildung C dargestellt. Zum Montieren die Mutter in den Befestigungsknopf
einsetzen.
AUFBAU OBERER GRIFF
Montage den Kunststoffstopfen (17) wie in Abbildung D dargestellt. Danach oberen Griff mit der
Schraube, Unterlegscheibe, Starterseilführung und Befestigungsknopf montieren.Verwenden Sie
die zwei beiliegenden Kabelbinder, um die Bowdenzüge am linken Holm zu sichern, wie in Abb.
A und Abb. D gezeigt. Platzieren Sie einen Kabelbinder direkt über dem oberen Gelenk und den
anderen 10 cm über dem unteren Gelenk. Ziehen Sie die Kabelbinder gerade so stark an, dass
diese die Bowdenzüge festhalten ohne sie zu deformieren.
MULCHEINSATZ EINSETZEN
Wenn man beim Mähen den Mulcheinsatz verwenden möchte (ohne Grasaufnahme), muss man
die Schutzklappe anheben, den Mulcheinsatz einschieben und - wie in der Abbildung angege-
ben – xieren.
DEUTSCH -
4
Page 7
EINSTELLEN DER SCHNITTHÖHE
Die Schnitthöhe wird durch einen Hebel, der sich am rechten Hinterrad bendet, eingestellt, wie in
der Abb. F dargestellt. Den Hebel nach hinten verschieben, um die Schnitthöhe zu erhöhen, und
nach vorne um sie zu verringern. Es sind 6 Einstellungen verfügbar (30, 39, 51, 64, 79, 95 mm).
SICHERHEITSVORKEHRUNGEN
Immer mit eingehängtem Grasfangkorb oder Schutzklappe arbeiten.
Motor abstellen, bevor der Grasfangkorb ausgehängt oder die Schneidhöhe verstellt wird.
Bei laufendem Motor, niemals mit den Händen oder Füßen innerhalb des Rasenmäher-
gehäuses kommen oder in die Schutzklappe greifen. (Abb.GII)
Vor dem Mähen sollen Fremdkörper vom Rasen
entfernt werden, beim Mähen ist auf Fremdkörper zu achten (Abb.GIII).
Der Benutzer ist im Arbeitsbereich des Ra-
senmähers gegenüber Dritten verantwortlich.
Beim Anlassen oder Einschalten des Motors
darf der Benutzer den Rasenmäher nicht hochkanten, sondern, falls erforderlich, nur so schräg
stellen, dass das Messer in die vom Benutzer
abgewandte Richtung zeigt.
FUNKTIONSWEISE
VORBEREITUNG DES MOTORS (Abb.H)
Das Öl und den Treibstoffstand überprüfen, falls
erforderlich, diesen auffüllen, wie in der Abb. Hl
angegeben. Es muss sichergestellt werden, dass
das richtige Öl und ausschließlich bleifreies Benzin
von 95 Oktan als Treibstoff benutzt wird.
Für weitere Informationen nehmen Sie bitte Bezug
auf das Wartungshandbuch des Motorherstellers.
VORSICHT: Bei der erstmaligen Benutzung
des Motors müss Öl hinzugefügt
werden.
START DES MOTORS (Abb.HII)
Nachdem die Einstellungen vorgenommen wurden, kann der Motor wie folgt gestartet werden:
a)Schalthebel (2) betätigen, Motor zum Anlaufen
vorbereiten, Hebel beim Starten und im Betrieb
des Gerätes gegen den Griff gedrückt halten
(damit die Motorbremse funktionieren kann).
b) Indem der Motorabstellungshebel (2) gehalten
wird, den Motorstartgriff (15) erreichen und das
Anlasserseil sanft ziehen, bis man einen durch
die Kompression verursachten Widerstand spürt.
Das Anlasserseil langsam freigeben und den
Griff vollständig zu sich ziehen, um den Motor
zu starten.
Sicherstellen, dass die Klappe des Grasfangkor-
bes heruntergeklappt ist (Abb. Gl), wenn ohne
Grasfangkorb gearbeitet wird.
Bei der Benutzung des Rasenmähers sollte
ein geeigneter Gehörschutz getragen werden.
Eine hohe Vibrationsaussetzung kann für Perso-
nen mit Kreislaufsstörungen Gefäßverletzungen
oder Schäden am Nervensystem verursachen.
VORSICHT: Bei Inbetriebnahme des
Motors beginnt das Messer sich zu drehen.
Den Schalthebel (2) während des Betriebs gedrückt halten. Beim Loslassen des Griffs stellt
sich der Motor ab.
VORSICHT: Überprüfen, dass der
Motorabstellungshebel (2) korrekt
funktioniert, indem er bei laufendem Motor
freigegeben wird. Der Motor muss
innerhalb von 3 Sekunden vollständig
stillstehen.
MÄHEN
Zum Mähen des Grases das Gerät von Hand
anschieben oder den automatischen Vorschub
einschalten.
Einschalten des automatischen Vorschubs:
den Kupplungshebel (1) anheben und gedrückt
halten.
VORSICHT: nur bei laufendem Motor
einschalten.
Ausschalten des automatischen Vorschubs:
den Kupplungshebel (1) loslassen.
DEUTSCH -
5
Page 8
BASIS-FUNKTIONSTECHNIK
Für die Erzielung von optimalen Ergebnissen
muss immer mit gut geschliffenen Messern geschnitten werden. Ein abgestumpftes Messer
schneidet mit einem unregelmäßigen Schnitt und
das gemähte Gras wird an der Schnittäche gelb.
Nie mehr als ein Drittel der Graslänge schneiden.
Das gilt insbesondere für die trockene Jahreszeit.
Immer die eingestellte Schnitthöhe beachten.
Dann das Ergebnis überprüfen und auf die geeignete Höhe absenken. Ist das Gras wirklich noch
zu hoch, langsam vorgehen und, falls erforderlich,
ein zweites Mal mähen.
Jedes Mal in verschiedenen Richtungen mähen,
um Streifen auf dem Rasen zu vermeiden.
Will man, dass der Rasenmäher das Gras
zerkleinert, kann das Zubehör Mulch -Einsatz
eingesetzt werden, das zerkleinerte Gras kann
als Wiesendünger verwendet werden.
Für die entsprechenden Anweisungen verweisen
wir auf den Abschnitt E die Bedienungsanleitung.
Für das Sammeln des Schnittgutes soll der Grasfangkorb verwendet werden, um eine saubere
Rasenäche zu erhalten.
EINSTELLEN DES ANTRIEBKABELS
Wenn beim Andrücken des Kupplungshebels der automatische Vorwärtsgang nicht anspringt,
müssen die Bowdenzüge reguliert werden. Für eine feine Regulierung das Regulierungshandrad
(Abb. I) gegen den Uhrzeigersinn, für den Vorwärtsgang, drehen. Für eine gröbere Regulierung
muss die Feder (Abb. I) in einer der Bohrungen nach dem Hebel eingesetzt werden.
WARTUNG UND PFLEGE
Vorsicht! Vor der Ausführung jeglicher Wartungsarbeiten ist der Motor abzuschalten und
der Zündkerzenstecker zu ziehen.
VORSICHT: Der Benutzer darf nur die
Wartungseingriffe durchführen, die in
dieser Bedienungsanleitung beschrieben
sind. Kompliziertere Eingriffe dürfen nur
durch den zugelassenen technischen
Kundendienst ausgeführt werden.
Allgemeine Überprüfungen
Überprüfen, dass alle Muttern und Schrauben
gut angezogen sind.
Den Rasenmäher vor Gebrauch kontrollieren
und sicherstellen, dass alle Grasrückstände
unter der Maschine beseitigt wurden.
Vor jedem Starten des Rasenmähers Ölstand,
Gehäuse, Schneidausrüstung und Funktion
des Motorabstellungshebels überprüfen.
Ölwechsel, Austauschen der Zündkerze und
Säubern / Austauschen des Luftlters anhand
des Wartungshandbuchs des Motorherstellers
durchführen.
Schneidvorrichtung
Überprüfen, dass die Schneidvorrichtung
nicht beschädigt oder gesprungen ist. Eine
beschädigte Schneidvorrichtung soll immer
ausgewechselt werden. Siehe Abschnitt K.
DEUTSCH - 6
Immer überprüfen, dass das Messer gut ange-
zogen und korrekt ausgewuchtet ist.
Schärfen des Messers sollte immer von einem
Fachmann durchgeführt werden. Kontaktieren Sie
ihre Servicestelle, um eine autorisierte Werkstatt
in Ihrer Nähe zu erfahren, mit welcher die weitere
Abwicklung vereinbart werden kann.
Ölstand
Wenn der Ölstand überprüft werden soll, muss
der Mäher auf einem achen Boden stehen. Der
Ölstand muss mit dem dafür bestimmten Öl-
messstab, der sich auf dem Auffülldeckel bendet,
kontrolliert werden.
- Den Öldeckel entfernen und den Stab reinigen.
- Den Stab wieder einsetzen. Der Behälterdeckel
muss für eine korrekte Ölstandmessung fest
angeschraubt werden.
- Ist der Ölstand zu tief, muss der Ölbehälter bis
zum obersten Stand auf dem Stab aufgefüllt
werden.Siehe Minimal-Maximal-Markierung auf
dem Ölstab.
Für weitere Informationen über den Ölwechsel
und über die Motorwartung nehmen Sie Bezug
auf das Wartungshandbuch des Motorherstellers.
Page 9

Reinigung
Für die Reinigung des Rasenmähers darf nie
Wasser über das Gerät geschüttet werden, da
dieses die Elektronik des Rasenmähers schwer
beschädigen kann. Verwenden Sie eine Bürste,
um Blätter, Staub oder Gras von der oberen Seite
des Rasenmähers zu beseitigen.
Wenn der Rasenmäher geneigt werden muss,
sollte der Auspuff nach unten zeigen und der
Treibstoffbehälter sollte so wenig Treibstoff wie
möglich enthalten.
Vorsicht! Sicherstellen, dass der Motor
kalt ist, da andernfalls bei geneigtem
Rasenmäher der Treibstoff durch den
Deckel und auf den Auspuff ießen kann.
Ein heißer Auspuff könnte den Treibstoff
entzünden.
SCHNEIDWERK
Reinigung unter dem Rasenmäherrahmen nur
bei stillstehendem und ausgeschaltetem Rasenmäher: Siehe Abbildung J
- Den Wasseranschluss auf dem Flachboden
an die Wasserleitung anschließen. Den Wasserhahn öffnen.
- Den Motor (Messer) starten und für einige Minuten warm werden lassen.
- Nach der Reinigung den Motor ausschalten,
den Wasserhahn schließen und den Wasseranschluss vom Flachboden abtrennen.
Wenn die Unterseite des Rasenmähers sehr
verschmutzt ist, verwenden Sie einen Holz- oder
Kunststoffstock, um Gras, vor dem Reinigen mit
Wasser, zu entfernen.
Auswechseln des Messers (23): Schraube
(26) lösen.
Kontrollieren des Messerhalters (22), Kupp-
lungsscheibe (24) Hohlkeil (21) und Scheiben
(25) und wenn nötig ersetzen.
Bei der Montage achten Sie darauf dass der
Hohlkeil (21) im Sitz des Wellenmotors liegt
GARANTIEBEDINGUNGEN
Für das von Ihnen erworbene Gerät erhalten Sie
3 Jahre Garantie.
Die Garantiefrist beginnt mit dem Erstverkauf
- der Kauf muss durch einen aussagefähigen
Kassenbeleg nachgewiesen werden.
Unsere Garantieleistung bezieht sich auf alle
wesentlichen Mängel des Gerätes, welche nachweislich auf Material– oder Fabrikationsfehler
zurückzuführen sind.
Im Falle einer berechtigten Mängelrüge sind wir
berechtigt nach unserer Wahl nachzubessern oder
kostenlosen Ersatz zu liefern.
Neben der Garantiefrist müssen für den Garantiefall folgende Voraussetzungen gewährleistet sein:
Der Rasenmäher wurde sachgemäß und laut
den Empfehlungen der Bedienungsanleitung im
privaten Bereich eingesetzt.
Es wurde weder vom Käufer noch durch einen
nicht von uns autorisierten Dritten versucht das
Gerät zu reparieren.
und dass das Messer mit der Schneidkante
in Drehrichtung des Motors gesetzt wird. Das
erforderliche Anzugdrehmoment der Messerbefestigungschraube (26) muss 5,34 Kpm (52,4
Nm) betragen. Sollten Sie Fragen haben, so
wenden Sie sich an eine Fachwerkstatt.
Normaler Verschleiß sowie Wartungs- und
Einstellarbeiten sind von der Garantie ausgenommen.
Folgende Verschleißteile sind von der Garantie
ausgenommen:
� Messer
� Keilriemen
� Bowdenzüge
� Starterseil
� Luftlter
� Zündkerzen
� Sonstige Wartungsteile
Diese Hersteller-Garantie berührt nicht die
zwischen Verkäufer und Käufer bestehenden
gesetzlichen Gewährleistungsansprüche.
DEUTSCH -
7
Page 10

SERVICE ALLGEMEIN
Wir freuen uns, dass Sie ein Produkt aus unserem
Hause erworben haben.
Sollte trotz aller Qualitätssicherungsmaßnahmen
ein Defekt auftreten, so wenden Sie sich bitte
an die unten aufgeführten Servicestellen des
jeweiligen Landes.
Bitte halten Sie dazu alle erforderlichen Geräteda-
ten bereit, diese nden Sie auf dem Typschild des
jeweiligen Produktes. Die Servicestelle wird den
weiteren Ablauf mit Ihnen festlegen. Falls eine
Reparatur notwendig wird, muss der Rasenmäher
nach vorheriger Absprache mit der Servicestelle
an die genannte Adresse geschickt werden.
ENTSORGUNG/UMWELTSCHUTZ
Es sollen alle die in dieser Bedienungsanleitung
angegebene Kundendiensteingriffe und Wartungsarbeiten durchgeführt werden. Auf diese
Weise hat der Motor eine lange Lebensdauer und
die giftigen Emissionen werden aufs Minimum
reduziert.
Wenn der Rasenmäher abgenutzt ist, sollte er für
die Wiederverwertung entsorgt werden. Lassen
Sie Öl- und Benzinreste ab, wie in das Wartungshandbuch des Motorherstellers beschrieben,
und geben Sie ihn bei einer Entsorgungsstelle zur
ordnungsgemäßen Entsorgung ab. Schütten Sie
Altöl oder Benzin nicht in den Abuss oder in die
Kanalisation. Dies muss auch bei einer entsprechenden Entsorgungsstelle abgegeben werden.
Kunststoff und Metall kann für die Wiederverwertung getrennt werden.
Werfen Sie geschnittenes Gras nicht in die Mülltonne, sondern verwenden Sie dies als Kompostmaterial. Für weitere Informationen kontaktieren
Sie bitte Ihre Servicestelle.
TECHNISCHE DATEN
Modell FBM 575 A1
Motor B&S575EX
Hubraum 140 cm
Nominale Motorleistung (Note 1) 2,1 kW
Motorgeschwindigkeit 2900 U/Min.
Zündkerze Champion QC12YC
Kapazität Treibstoffbehälter 0,75 Liter
Kapazität Ölbehälter 0,44 Liter
Motoröl SAE 30/SAE 10W-30
Gewicht bei leeren Behältern 31 kg
3
Akustische Leistung, gemessen (siehe Note 2) 94 dB(A)
Akustische Leistung, garantiert LWA (siehe Note 2) 95 dB(A)
Schalldruckpegel am Ohr des Benutzers: (siehe Note 3) 86 dB(A)
Vibrationen (siehe Note 4) ) < 2,5 m/s
2
Schnittbreite 460 mm
Schnitthöhe 6 Stufen (30, 39, 51, 64, 79, 95mm)
Schneidevorrichtung Rundmesser
Geschwindigkeit 4,7 km/h
Note 1: Die Nominalleistung des Motors entspricht der Netto-Durchschnittsleistung (bei angegebener
Drehzahl) eines typischen Motors in Produktion für das Motormodell, die entsprechend der Norm
SAE J1349/ISO1585 gemessen wurde.
Die Motoren für die Serienproduktion können von diesem Wert abweichen. Die effektive Leistung
des auf der Endmaschine montierten Motors hängt von der Betriebsgeschwindigkeit, von den
Umweltzuständen und von sonstigen Werten ab.
Note 2: Die Schallemissionen, die als akustische Leistung (LWA) gemessen werden, entsprechen den
Richtlinien EG 2000/14/EG.
Note 3: Der Schalldruckpegel entspricht der Norm EN 836. Der für den Schalldruckpegel ermittelte Wert
weist eine typische statistische Dispersion (Standard-Abweichung) von 1,2 dB(A) auf.
Note 4: Der Vibrationspegel entspricht der Norm EN 836, Annex G. Der für den Vibrationspegel ermit-
telte Wert weist eine typische statistische Dispersion (Standard-Abweichung) von 0,2 m/s2 auf.
DEUTSCH - 8
Page 11

EG-KONFORMITÄTSERKLÄRUNG
(Wird nur für Europa verwendet) Übersetze Version
Hiermit erklärt Aktiebolaget Partner, SE-433 81, Göteborg, Schweden, dass der Rasenmäher Florabest
FBM575A1
den Anforderungen folgender EG-Richtlinie entspricht:
• 2006/42/EG vom 17. Mai 2006 ”Richtlinie über Maschinen”.
• 2004/108/EG vom 1. Dezember 2004 ”Richtlinie über die elektromagnetische Verträglichkeit”.
• 2000/14/EG vom 8. Mai 2000 ”Richtlinie über umweltbelastende Geräuschemissionen von zur Verwendung im Freien vorgesehenen Geräten und Maschinen ”.
Für alle sonstigen Informationen über die akustischen Emissionen, siehe Kapitel der Technischen Daten.
Es wurden folgende Vorschriften angewendet: EN 836, ISO 11094, EN 55012.
Die zuständige Stelle: Nr. 0036, TÜV SÜD Product Service GmbH Ridlerstr. 65, 80339 München
- Deutschland, hat die Berichte über die Bewertung der Konformität auf Grund der Anlage VI der EGRichtlinie 2007147EG vom 8, Mai 2000 „über umweltbelastende Geräuschemissionen von zur Verwendung
im Freien vorgesehenen Geräten und Maschinen“ ausgestellt.
Emissionstyp Nr.: e11*97/68SA*2010/26*1581*01
04.12.2012, Göteborg
Bengt Ahlund, Entwicklungsleiter
(Berechtigter Vertreter von Aktiebolaget Partner und Verantwortlicher für die technischen Unterlagen).
DEUTSCH - 9
Page 12

INDEX
DESTINATION D'EMPLOI 3
NORMES DE SÉCURITE 3
A DESCRIPTION/CONTENU DE LA LIVRAISON 4
B MONTAGE DU BAC 4
C MONTAGE DU GUIDON INFERIEUR 4
D MONTAGE DU GUIDON SUPERIEUR 4
E INSERTION DU BOUCHON MULCHING 4
F REGLAGE DE COUPE 5
G PRE-EQUIPEMENT PROTECTIONS 5
H FONCTIONNEMENT 5
I REGULATION DU CABLE D’EMBRAYAG 6
J MAINTENANCE 6
K LAME 7
GARANTIE 7
ASSISTANCE GÉNÉRALE 8
ÉLIMINATION/ENVIRONNEMENT 8
DONNÉES TECHNIQUES 8
DÉCLARATION CE DE CONFORMITÉ 9
FRANÇAIS -
1
Page 13
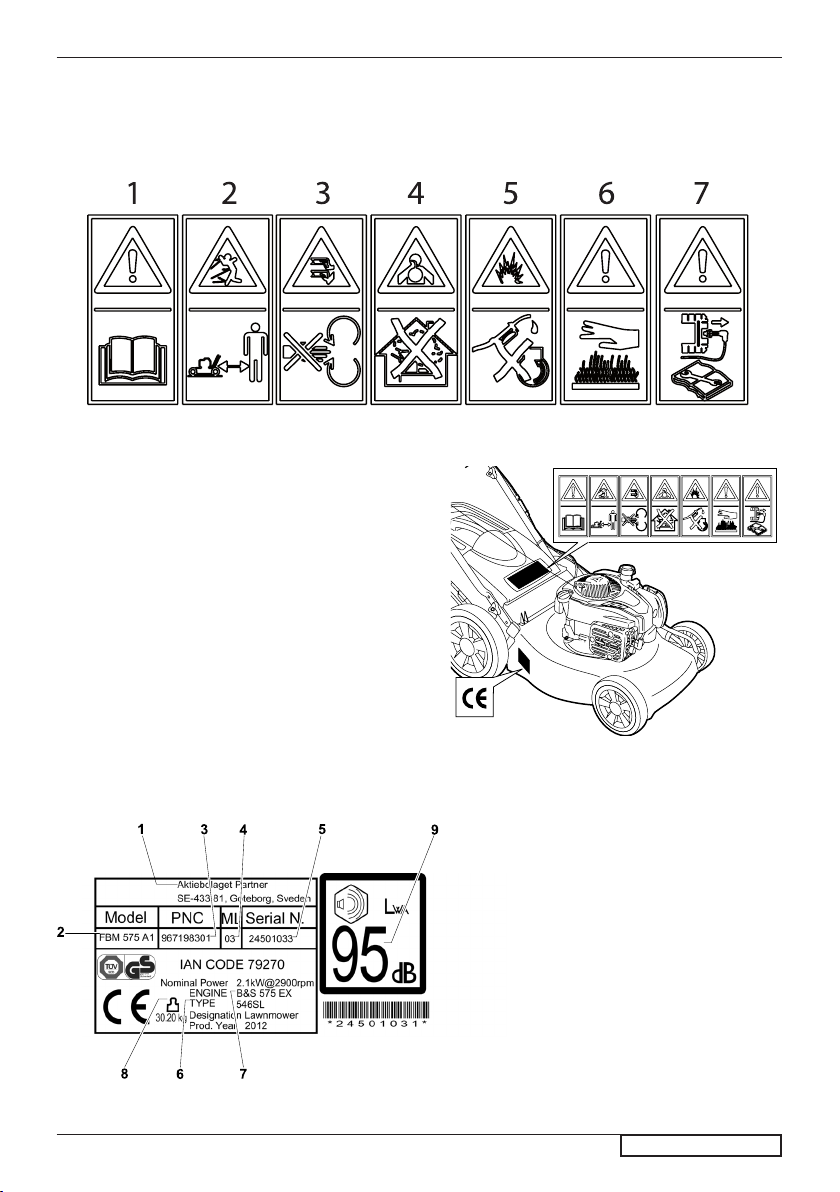
Nous vous remercions de la préférence que vous nous avez accordée en choisissant notre tondeuse. Nous
sommes persuadés que vous pourrez apprécier dans le temps la qualité de notre produit et que vous en
serez entièrement satisfaits.Nous vous prions de lire attentivement ce manuel, spécialement conçu pour
illustrer l’utilisation correcte de cette machine, dans le respect des normes de sécurité fondamentales.
Les symboles de sécurité reproduits ci-dessous se trouvent sur le déecteur comme le montre la gure.
Attention! Lire la notice d'instructions avant
1
l'emploi.
Danger de blessures provoquées par la projec-
2
tion d'objets. Tenir toute autre personne à l'écart
de la zone de danger.
Danger de blessures causées par la lame tran-
3
chante ! Se tenir à l'écart des organes rotatifs.
Risque d'inhalation de gaz toxiques ! Ne pas
4
utiliser l'appareil dans des endroits fermés ou
peu aérés.
Danger d’explosion! Ne pas ravitailler la machine
5
en carburant alors que le moteur est en marche.
Attention! Surfaces brûlante.
6
Attention! Éteindre le moteur et débrancher la
7
bougie avant de réaliser une opération d'entretien
quelle qu'elle soit.
1 Constructeur
2 Modèle
3 Code produit
4 Maintenance levier
5 Numéro de série
6 Type
7 Informations sur le moteur
8 Poids
9 Niveau de puissance sonore
FRANÇAIS -
2
Page 14

DESTINATION D'EMPLOI
Cette machine a été conçue et destinée pour
tondre la pelouse seulement. Elle est destinée
à une utilisation privée et ne peut être actionnée
que par un adulte. Elle est indiquer pour tondre
des pelouses d'extension normale.
NORMES DE SÉCURITE
Mesures de sécurité d’utilisation d’une tondeuse à hélice horizontale à conducteur marchant
IMPORTANT : Cette machine peut amputer les
mains et les pieds et peut projeter des objets. Le
non-respect des instructions de sécurité suivantes peut entraîner des blessures graves, voire
mortelles.
I. Précautions d’utilisation
Lisez toutes les instructions soigneusement.
Familiarisez vous avec les commandes pour
apprendre à utiliser efcacement cette machine.
Ne jamais autoriser les enfants ou les personnes
qui n’auraient pas lu ce manuel d’utilisation à
utiliser cete tondeuse. La règlementation locale
peut de plus interdire l’utilisation de telle machine
au-dessous d’un certain âge.
Ne jamais tondre à proximité de personnes,
d’enfants ou d’animaux.
Ne pas oublier que tout utilisateur ou propriétaire
d’un tondeuse à gazon est responsable des accidents ou dommages causés à une personne
ou a ses biens.
II. Préparation
Pendant la tonte, ne portez que des chaussures
solides et des pantalons longs. Ne jamais tondre
pieds nus ou chaussés de sandales.
Contrôlez systématiquement et soigneusement
l’état de la surface à tondre et retirer tous les
objets susceptibles de devenir des projectiles
lors du passage de la machine.
ATTENTION – Le carburant est très inam-
mable.
-Pour transporter ou stocker le carburant, utilisez exclusivement des récipients conçus et
approuvés pour ces usages.
-Toujours remplir le réservoir de carburant à l’air
libre et ne pas fumer pendant le remplissage.
-Remplir le réservoir de carburant avant de
démarrer le moteur. Ne jamais retirer le bouchon
du réservoir et ne jamais rajouter de carburant
tant que le moteur est en foctionnement ou qu’il
est encore chaud.
-Si du carburant a été renversé, ne pas tenter de
démarrer la tondeuse, mais la pousser hors de la
zone où le carburant a été renversé et éviter de
créer une quelconque source de chaleur avant que
les vapeurs de carburant ne se soient dissipées.
-Refermez avec précautions les bouchons des
réservoirs ou des récipients contenant du carburant pour garantir la sécurité.
Avant d’utiliser un tondeuse à gazon, toujours
véri er que les lames, les boulons de lame et
le carter de coupe ne sont pas usés ou endom-
magés. Toujours remplacer les lames et les
boulons simultanément de façon à éviter tout
problème d’équilibrage.
III. Utilisation
Ne jamais démarrer un moteur à l’intérieur dans
un espace conné où des émanations dangereuses de monoxyde de carbone pourraient
s’accumulées.
Tondez uniquement à la lumière du jour ou avec
une bonne lumière articielle.
Évitez de faire fonctionner l’équipement sur le
gazon mouillé, si possible.
Soyez toujours sûrs de bien prendre pied sur
les pentes.
Marchez, ne courrez jamais.
Pour les machines rotatives à roues, tondre à tra-
vers les surfaces des pentes, jamais de haut en bas.
Soyez très prudents lorsque vous changez de
direction sur les pentes.
Ne tondez pas excessivement les pentes
escarpées.
Soyez extrêmement prudents lorsque vous
faites marche arrière ou tirez la tondeuse à
gazon vers vous.
.Utilisez une butée d’arrêt an de maintenir la
lame immobile si la tondeuse à gazon doit être
inclinée pour le transport lorsqu’elle traverse
des surfaces autres que le gazon, et lorsque
vous transportez la tondeuse à gazon d’un
endroit à l’autre.
N’utilisez jamais la tondeuse à gazon avec des
pro-tec tions défectueuses ou sans dispositif de
sécurité, comme par exemple des déecteurs ou
bacs à herbe, en place.
Conserver le régime de rotation du moteur et
ne jamais le faire fonctionner au dessus de son
régime nominal car cela peut être dangereux.
Décrocher les embrayages avant de mettre le
moteur en marche.
Mettez le moteur en marche ou mettez le con-
tact avec soin selon les instructions, les pieds
éloignés des lames.
N’inclinez pas la tondeuse à gazon lors de la
mise en marche ou de contact du moteur, sauf
si la tondeuse à gazon doit être inclinée pour
ce faire. Dans ce cas, n’inclinez pas plus que
nécessaire et soulevez seulement la partie
éloignée de l’opérateur.
.Ne mettez pas le moteur en marche lorsque
vous vous trouvez devant la goulotte d’éjection.
.Ne mettez pas les mains ou les pieds près ou
sous les parties rotatives. Tenez-vous toujours
à l’écart de l’orice de sortie.
Ne ramassez ou ne transporter jamais la ton-
deuse à gazon pendant son fonctionnement.
Arrêtez la machine et débrancher le câble de
bougie. -avant de retirer l’insert broyeur ou avant
de retirer la goulotte d’éjection pour la nettoyer.
-avant de contrôler, nettoyer ou travailler sur le
carter de coupe.
-avant de retirer un objet coincé dans le tondeuse.
-si la machine commence à vibrer anormalement.
FRANÇAIS -
3
Page 15

Arrêtez la machine.
-en tous temps lorsque vous vous éloignez de
la tondeuse à gazon
-avant le ravitaillement en combustible.
Lorsque la tonte est terminée, réduisez les gaz
avant de couper le moteur.
IV. Entretien et Entreposage
Assurez-vous que tous les écrous, boulons et
vis sont bien serrés pour être certain que l’équipement est prêt à fonctionner de nouveau, dans
de bonnes conditions.
Ne jamais entreposer le tondeuse à gazon avec
du carburant dans le réservoir, dans un bâtiment
où les vapeurs pourraient s’enammer au contact
d’une amme ou d’une étincelle de l’allumage.
Attendre le refroidissement du moteur avant
d’entreposer la tondeuse dans un espace fermé.
Pour supprimer les risques d’incendie s’assurer
que le moteur, le pot d’échappement, le logement de la batterie et du réservoir de carburant
ne sont pas encrassés par de l’herbe, des feuilles ou des surplus de graisse.
Vérier souvent le bac ou le collecteur pour
vous assurer qu’il est propre et qu’il n’est pas
endommagé.
Nous recommandons vivement d'utiliser
toujours le même type de bougie d'allumage.
L'emploi d'une bougie d'allumage inadaptée peut
endommager le piston/vérin.
Pour des motifs de sécurité, remplacer les par-
ties usées ou endommagées. Utiliser toujours
des pièces de rechange d'origine.
Si le réservoir de carburant doit être vidangé,
procéder à cette opération à l’extérieur. plus
de sécurité.
DESCRIPTION/CONTENU DE LA LIVRAISON (Illustrations correspondantes à
l'annexe A)
1 Manette d'embrayage
2 Dispositif de securité
3 Courroie de xation
4 Vis, ecrou de serrage manche
supérieur
5 Guidon inférieur
6 Bouchon de remplissage d'huile
7 Bouchon du réservoir d'essence
8 Bougie
9 Châssis
10 Levier de réglage de hauteur de
coupe
11 Ressort du bouchon mulch
12 Bouchon mulch
13 Dèecteur arrière
14 Bac
15 Lanceur
16 Guidon supérieur
17 Bouchon
18 Outil bougie d'allumage
19 Notice d'utilisation
21 Bidon de 5 l
MONTAGE DU BAC
Commencer par monter la structure en acier dans la partie supérieure rigide du sac. Monter
ensuite la partie inférieure, enfoncer la baguette en plastique dans le logement prévu à cet effet
dans la partie supérieure comme le montre l'annexe B.
MONTAGE DU GUIDON INFERIEUR
Fixer la poignée inférieure au pont d'accrochage avec vis, rondelle et pommeau comme le montre
l'annexe C. Introduire l'écrou dans le pommeau pendant le montage.
MONTAGE DU GUIDON SUPERIEUR
Monter les bouchons en plastique (17) comme le montre l'annexe D. Monter ensuite la poignée
supérieure avec vis, rondelle, guide de la celle de démarrage et pommeau. Se servir des deux
courroies fournies pour xer les câbles de commande à la barre de préhension gauche, comme
le montrent la Fig. A et la Fig. D. Placer une courroie juste au-dessus de la poignée pliable
centrale et l'autre à 10 cm de la poignée pliable inférieure. Veiller à ce que le câble ne touche
pas la roue. Serrer les courroies de façon à tendre les câbles sans les déformer.
INSERTION DU BOUCHON MULCHING
Pour effectuer la coupe de l’herbe avec système mulching (sans recueillir l’herbe), soulever la
paroi de division et insérer le bouchon en le xant avec le ressort comme indiqué dans la gure.
FRANÇAIS -
4
Page 16

REGLAGE DE COUPE
La hauteur de coupe se règle à l'aide du levier qui est placé près de la roue arrière droite comme
le montre la Fig. F.
Déplacer le levier en arrière pour augmenter la hauteur de coupe et en avant pour la diminuer.
Les niveaux de coupe possibles sont au nombre de six : 30, 39, 51, 64, 79, 95 mm.
PRE-EQUIPEMENT PROTECTIONS
Effectuer toujours la tonte avec bac à herbe ou déecteur installé.
Arrêter le moteur avant de retirer le bac ou régler la hauteur de coupe
Lorsque le moteur tourne, ne mettez jamais vos mains ou vos pieds sous le carter ou
dans le tunnel d'éjection
Avant de commencer la coupe de l'herbe, il faut
enlever du gazon les éventuels corps étrangers.
Lors de la mise en marche du moteur l'utilisateur
ne doit pas soulever la tondeuse, toutfois si necessaire, il peut seulement l'incliner de sorte que
la lame se trouve du coté opposé a l'utilisateur.
Quand vous travaillez sans sac à herbe, veillez
à ce que le volet du sac de collecte de l'herbe
soit en position baissée (Fig. GI).
FONCTIONNEMENT
PRÉPARATION DU MOTEUR (Fig.H)
Vérier le niveau d'huile et de carburant ; en cas
de besoin, faire l'appoint à travers le goulot prévu
à cet effet comme le montre la Fig. HI. Veiller à
utiliser l'huile appropriée et, comme carburant, de
l'essence à 95 octanes sans plomb.
Pour plus de renseignements, consulter le manuel
d'entretien du fabricant des moteurs.
ATTENTION : Avant l’utilisation, ajouter de
l’huile au moteur.
DÉMARRAGE DU MOTEUR (Fig.HII)
Après avoir effectué les opérations de mise au
point, procéder au démarrage du moteur de la
manière suivante:
a) Agir sur la poignée de frein (2) pour permettre
le démarrage du moteur, tenir le levier serré
contre la poignée en phase de démarrage et
lors de l’utilisation de la machine (actionne le
frein moteur).
b) Tout en tenant le levier d'arrêt du moteur (2),
rejoindre la prise de démarrage du moteur (15)
et tirer délicatement sur le cordon de démarrage
jusqu'à ce que vous sentiez la résistance causée
par la compression. Relâchez lentement le cordon de démarrage et tirez la manette vers vous
complètement pour mettre le moteur en marche.
Quand vous utilisez la machine, dotez-vous
d'un protecteur acoustique adapté.
L'exposition excessive aux vibrations peut
provoquer des lésions vasculaires ou des dommages au système nerveux chez les individus
souffrant de troubles circulatoires.
ATTENTION: La lame est entraînée en
rotation dès le démarrage du moteur.)
Pendant le fonctionnement, maintenir appuyée la
poignée (2). Dès qu'on la relâche, le moteur s'arrête.
ATTENTION: Vériez que le levier
d'arrêt du moteur (2) fonctionne
correctement en la relâchant alors que le
moteur est en marche. Le moteur devrait
s'arrêter complètement dans les
3 secondes suivantes.
TONTE
Pour tondre le gazon, pousser manuellement la
machine ou enclencher l'avancement automatique.
Enclenchement avancement automatique:
soulever la poignée d'embrayage (1) et la maintenir appuyée.
ATTENTION: ne procéder à l'enclenchement
que lorsque le moteur est en marche.
Exclusion avancement automatique: relâcher
la poignée d'embrayage (1).
FRANÇAIS -
5
Page 17

TECHNIQUES FONCTIONNELLES DE BASE
Pour obtenir les meilleurs résultats, coupez
toujours avec une lame affûtée. Une lame
épointée donne une coupe irrégulière ; l'herbe
devient alors jaune sur la surface de coupe.
Ne coupez jamais plus d'un tiers de la longueur de
l'herbe. Cela est valable surtout dans les périodes
sèches. Coupez à la hauteur de coupe établie.
Vériez ensuite le résultat et, le cas échéant,
baissez à la hauteur souhaitée. Si l'herbe est
encore haute, procédez lentement et repassez
une deuxième fois si nécessaire.
Coupez toujours dans plusieurs directions pour
éviter de dessiner des raies dans le gazon.
Si vous voulez que l'appareil broie l'herbe pour
l'utiliser comme fertilisant de votre pelouse, utilisez l'accessoire Mulch Plug. Voir la section E
pour les instructions.
Utilisez le sac pour ramasser l'herbe et obtenir
un résultat propre.
REGULATION DU CABLE D’EMBRAYAG
Si quand vous poussez le levier d'embrayage, la marche d'anticipation automatique ne s'enclenche pas, il est nécessaire de régler le câble de l'embrayage. Pour effectuer des réglages précis,
tournez la poignée de réglage (Fig. I) dans le sens antihoraire pour enclencher la première. Pour
effectuer des réglages grossiers, enclencher le ressort (Fig. I) dans un des trous successifs du levier.
MAINTENANCE
ATTENTION! Eteindre le moteur et enlever la
bougie avant d’effectuer quelque opération
d’entretien que ce soit
ATTENTION: L'utilisateur ne doit réaliser
que les interventions d'entretien et
d'assistance qui sont décrites dans ce
manuel opérateur. Des interventions plus
complexes doivent être réalisées auprès
d'un centre d'assistance agréé.
Inspection générale
Vérier que les vis et les boulons sont tous
bien serrés.
Inspecter toujours la tondeuse à gazon et veiller
à enlever tous les résidus d'herbe de dessous
la plateforme.
Avant chaque mise en marche, vérier le niveau
d'huile, le pont d'accrochage, les éléments de
coupe et le fonctionnement du levier d'arrêt du
moteur.
Changer l'huile, remplacer la bougie et netto-
yer/remplacer le ltre à air conformément aux
indications du tableau d'entretien du manuel
d'opérateur du moteur.
Outils de coupe
Vérier que le dispositif de coupe n'est pas
endommagé ou fêlé. Un dispositif de coupe
endommagé doit toujours être remplacé. Voir
section K.
Vérier que la coupeuse est toujours bien rec-
tiée et équilibrée correctement.
Faites remplacer ou affûter les lames auprès d'un
centre d'assistance agréé. Faites apprécier au
technicien du centre d'assistance si la lame doit
être affûtée ou remplacée. Après l'affûtage, faites
toujours bien équilibrer les lames.
Niveau d'huile
Placez la tondeuse sur un terrain plat an de
pouvoir contrôler le niveau d'huile. Vériez le
niveau d'huile avec la tige située sur le bouchon
de remplissage.
- Enlevez le bouchon d'huile et nettoyez la tige.
- Remettez en place la tige. Le bouchon du réservoir d'huile doit être vissé à fond pour offrir une
situation exacte du niveau d'huile.
- Si le niveau d'huile est bas, faites l'appoint
jusqu'à atteindre le niveau supérieur de la tige.
Faire toujours aiguiser la lame par un professionnel compétent. Contactez votre centre d'assistance pour trouver un atelier agréé dans votre région.
FRANÇAIS -
6
Page 18

Nettoyage
Ne versez jamais de l'eau sur la tondeuse à gazon
pour la nettoyage, vous pourriez endommager
gravement l'installation électrique. Utiliser une
brosse pour retirer les feuilles, la poussière et
l'herbe déposées dans la partie supérieure.
S'il est nécessaire de retourner la machine, veillez
à ce que le silencieux d'échappement soit tourné
vers le bas et à ce qu'il y ait dans le réservoir le
moins de carburant possible.
ATTENTION: Vériez que le moteur est
froid : le carburant pourrait en effet
déborder par l'orice de ventilation du
bouchon et sur le pot d'échappement
quand vous inclinez l'appareil. Si le pot
d'échappement est chaud, le carburant
pourrait prendre feu.
LAME
Nettoyer sous le châssis ; voir l'illustration à l'annexe J.. Machine à l'arrêt et éteinte :
- Brancher le raccord sur la plateforme au robinet
d'alimentation d'eau. Ouvrir le robinet.
- Mettre en marche le moteur (lame en rotation) et
le laisser chauffer quelques minutes.
- Une fois le nettoyage terminé, fermer le robinet
et détacher le tuyau du raccord de la plateforme.
Si la partie inférieure de la machine est très sale,
se servir d'une baguette en bois ou en plastique
pour enlever l'herbe avant de nettoyer à l'eau.
Pour démonter la lame (23) dévisser le boulon
(26).
Contrôler le support porte-lame (22), la rondelle
friction (24), la clavette (21) et les rondelles (25)
si elles sont usées ou endommagées doiven
être remplacé.
GARANTIE
L'appareil est garanti 3 ans.
La période de garantie prend effet au moment de
la première vente - dûment attestée par un ticket
de caisse valable.
Notre garantie couvre tous les défauts graves
du dispositif attribuables au matériau ou à la
fabrication.
En cas de réclamation justiée nous pourrons,
selon notre jugement sans appel, réparer ou
remplacer le composant concerné.
L'appareil sous garantie doit également remplir
les conditions suivantes :
Le dispositif doit avoir été utilisé correctement,
dans un contexte privé et conformément aux
recommandations fournies dans le manuel.
Aucune tentative de réparation ne doit avoir été
effectuée par l'acheteur ou par un tiers autorisé.
Pendant le montage s'assurer que le clavette
(21) est bien à sa place sur l'arbre-moteur et que
le côte tranchant de la lame soit dans le sens de
rotation du moteur. La vis de lame (26) doit être
bloquée avec une couple de serrage de 5,34
Kgm (52,4 Nm).
La garantie ne couvre pas les éléments soumis
à l'usure normale ni les interventions d'entretien
et de réglage.
Sont exclues de la garantie les pièces de consommation suivantes:
� couteau
� bande
� câbles
� cordon de démarrage
� ltre à air
� bougie
� autres éléments requérant un entretien
La présente garantie n'affecte pas les termes de
garantie obligatoires entre le vendeur et l'acheteur.
FRANÇAIS - 7
Page 19

ASSISTANCE GÉNÉRALE
Nous vous félicitons pour avoir choisi un de nos
produits. Si malgré l'attention que nous accordons
à la qualité, vous constatez un défaut, nous vous
invitons à contacter notre centre d'assistance
agréé dans votre pays indiqué au verso de ce
manuel.
Assurez-vous que vous disposez de toutes les
données de l'appareil. Vous les trouverez sur l'étiquette signalétique qui est appliquée sur chaque
produit. Le service chargé de l'assistance xera
avec vous les modalités d'intervention. Si une
réparation est nécessaire, vous devrez remettre
l'appareil au centre agréé.
ÉLIMINATION / ENVIRONNEMENT
Réaliser les activités d'assistance et d'entretien
conformément aux instructions contenues dans
ce manuel. Cela assurera une durée de vie plus
longue à votre moteur et permettra de réduire au
minimum les émissions nocives.
Quand la machine est usée, l'éliminer de façon
à l'acheminer vers la lière de recyclage. Vidanger l'huile et vider le réservoir à essence conformément aux instructions du manuel d'opérateur
du moteur ; porter la machine à un centre de
traitement pour son élimination correcte. Ne pas
jeter d'huile ou d'essence dans le lavabo.
Les matériaux en plastique et en métal doivent
être triés pour leur récupération sélective. Ne
pas jeter les résidus d'herbe dans les ordures
ménagères, mais les utiliser comme matériau de
compostage.
Pour tout renseignement complémentaire, nous
vous invitons à vous mettre en contact avec votre
centre d'assistance.
DONNÉES TECHNIQUES
Modèle FBM 575 A1
Moteur B&S575EX
Cylindrée 140 cm
Capacité nominale du moteur (Note 1) 2,1 kW
Vitesse moteur 2900 rpm
Bougie Champion QC12YC
Capacité du réservoir de carburant 0,75 l
Capacité du réservoir d'huile 0,44 l
Huile moteur SAE 30/SAE 10W-30
Poids des réservoirs vides 31 kg
Puissance sonore, mesurée (voir note 2) 94 dB(A
Puissance sonore, garantie LWA (voir note 2) 95 dB(A
Niveau de pression sonore à l’oreille de l’opérateur (voir note 3) 86 dB(A
Vibrations (voir note 4) < 2,5 m/s²
Largeur de coupe 460 mm
Hauteur de coupe 6 niveaux (30, 39, 51, 64, 79, 95 mm)
Élément de coupe lame rotative
3
Vitesse 4,7 km/h
Note 1: La puissance nominale du moteur correspond à la puissance nette moyenne (au régime indiqué)
d'un moteur type en production pour le modèle de moteur mesurée selon la norme SAE J1349/
ISO1585.
Les moteurs de fabrication en série pourraient s'écarter de cette valeur. La puissance réelle
du moteur installé sur la machine dépendra de la vitesse de fonctionnement, des conditions
ambiantes et d'autres valeurs.
Note 2: Les émissions sonores dans l’environnement mesurées comme niveau de puissance sonore
(LWA) sont conformes à la directive 2000/14/CE.
Note 3: Le niveau de pression sonore est conforme à la norme EN 836. La valeur enregistrée pour le
niveau de pression sonore présente une dispersion statistique typique (écart type) de 1,2 dB(A).
Nota 4: Le niveau de vibration est conforme à la norme EN 836, Annexe G. La valeur enregistrée pour
le niveau de vibrations présente une dispersion statistique typique (écart type) de 0,2 m/s².
FRANÇAIS -
8
Page 20

DÉCLARATION CE DE CONFORMITÉ
(applicable pour l'Europe seulement) Version traduite
Par la présente, Aktiebolaget Partner, SE-433 81, Göteborg, Suède, déclare que la tondeuse à gazon
Florabest FBM575A1
est conforme aux exigences des DIRECTIVES CE
• 2006/42/CE du 17 mai 2006 : « Directive Machines ».
• 2004/108/CE du 15 décembre 2004: « concernant la compatibilité électromagnétique ».
• 2000/14/CE du 8 mai 2000 : « concernant les émissions sonores dans l'environnement ».
Pour tous renseignements concernant les émissions sonores, consulter le chapitre « Données techniques ».
Les normes suivantes ont été appliquées : EN 836, ISO 11094, EN 55012.
L’organisme notié N° 0036, TÜV SÜD Product Service GmbH Ridlerstr. 65, 80339 München / Munich
- Allemagne a délivré les rapports d'évaluation de la conformité selon l'Annexe VI de la DIRECTIVE CE
2000/14/CE du 8 mai 2000 « concernant les émissions sonores dans l'environnement ».
Type d'émission n° e11*97/68SA*2010/26*1581*01
2012-12-24, Göteborg
Bengt Ahlund, Directeur Développement
(Représentant autorisé d'Aktiebolaget Partner et responsable de la documentation
FRANÇAIS -
9
Page 21

INDICE
DESTINAZIONE D'USO 3
NORME DI SICUREZZA 3
A DESCRIZIONE/CONTENUTO DELLA CONSEGNA 4
B MONTAGGIO SACCO/CESTELLO RACCOGLIERBA 4
C MONTAGGIO MANICO INFERIORE 4
D MONTAGGIO MANICO SUPERIORE 4
E INSERIMENTO TAPPO MULCHING 4
F REGOLAZIONE ALTEZZA TAGLIO 5
G PREDISPOSIZIONE PROTEZIONI 5
H FUNZIONAMENTO 5
I REGOLAZIONE CAVO FRIZIONE 6
J MANUTENZIONE 6
K LAMA 7
GARANZIA 7
ASSISTENZA GENERALE 8
SMALTIMENTO/AMBIENTE 8
DATI TECNICI 8
DICHIARAZIONE DI CONFORMITÀ CE 9
ITALIANO -
1
Page 22

La ringraziamo per la ducia accordataci con l'acquisto della nostra rasaerba. Siamo certi che avrà modo
di apprezzare nel tempo e con soddisfazione la qualità del nostro prodotto. La preghiamo di leggere
attentamente questo manuale predisposto appositamente per informarla circa il suo uso corretto in con-
formità ai requisiti essenziali di sicurezza. I simboli di sicurezza sotto riportati si trovano sul deettore,
come illustrato nella gura.
Attenzione! Leggere il manuale d’istruzioni prima
1
dell’uso.
Pericolo di lesioni dovute ad oggetti proiet-
2
tati! Tenere le altre persone lontane dalla zona
di pericolo.
Pericolo di lesioni dovute alla lama tagliente!
3
Allontanarsi dagli organi rotanti.
Rischio di inalazione di gas tossici! Non usare
4
l’apparecchiatura in ambienti chiusi o scarsamente
ventilati.
Pericolo di esplosione! Non fare rifornimento di
5
carburante con il motore in funzione.
6
Attenzione! Supercie rovente.
Attenzione! Spegnere il motore e scollegare la
7
candela prima di effettuare qualsiasi intervento
di manutenzione.
ITALIANO -
1 Costruttore
2 Modello
3 Codice prodotto
4 Indice di modica
5 Numero di serie
6 Tipo
7 Caratteristiche motore
8 Peso
9 Livello sonoro
2
Page 23

DESTINAZIONE D’USO
Questa macchina è stata studiata per essere usata
solo per falciare il prato. È destinata ad uso privato
e deve essere azionata solo da adulti. È indicata
per falciare prati di normale estensione.
NORME DI SICUREZZA
Misure operative di sicurezza per tosaerba
controllate da pedoni.
IMPORTANTE: La macchina è in grado di amputare mani e piedi e proiettare oggetti. La mancata
osservanza delle seguenti istruzioni di sicurezza
può comportare lesioni gravi o incidenti mortali.
I. Addestramento all’uso
Studiare attentamente le istruzioni. Acquisire
dimestichezza con i comandi e conoscere a
fondo l’uso corretto dell’equipaggiamento.
Non consentire mai l’uso dei trattorini tosaerba
ai bambini né agli adulti che non abbiano dimestichezza con le istruzioni sull’uso. Le nor mative
locali possono stabilire l’età minima per operare
i trattorini tosaerba.
Non operare mai con i tosaerba in caso vi siano
persone, specialmente bambini, o animaletti
domestici nella zona di lavoro.
Tenere presente che in caso di incidenti, rischi
o pericoli provocati a persone o a beni, la responsabilità dell’operato ricade sull’operatore,
od utilizzatore.
II. Preparazione
Indossare sempre scarpe robuste da lavoro e
pantaloni lunghi. Non usare i tosaerba a piedi
nudi o indossando soltanto sandali.
Controllare scrupolosamente l’area in cui ver-
rà utilizzato l’equipaggiamento e togliere tutti
gli oggetti che potrebbero venire scagliati dal
macchinario.
ATTENZIONE - La benzina è inammabi-
lissima.
- Conservare il carburante in contenitori appositi.
- Fare rifornimento soltanto all’aperto. E’ vietato
fumare durante il rifornimento.
- Fare rifornimento prima di avviare il motore.
Non svitare mai il tappo del serbatoio, né fare
rifornimento con il motore acceso o caldo.
- In caso di fuoriuscita di benzina, non mettere
in moto il motore. Spostare l’equipaggiamento
dall’area in cui si è vericata la fuoriuscita del
carburante ed evitare di provocare qualsiasi tipo
di accensione no a quando i vapori non si siano
dissipati.
- Reinserire e serrare bene il tappo del serbatoio
e del contenitore.
Prima di iniziare il lavoro ispezionare visualmente
le lame, i bulloni delle lame e il gruppo falciante
per vericare che non vi siano tracce di usura o
danneggiamenti. In caso di lame e bulloni danneggiati od usurati, installate un nuovo set completo
in modo che il macchinario rimanga bilanciato.
III. Funzionamento
Non accendere il motore in spazi ristretti dove
vi si possa accumulare ossido di carbonio, un
gas inodore ma letale.
Usare i tosaerba soltanto con la luce del giorno
oppure in presenza di buona luce articiale.
Se possibile, evitare di utilizzare l’apparecchio
sull’erba bagnata.
Stare sempre bene in equilibrio nei tratti sco-
scesi.
Camminare sempre, non correre mai.
Per macchine rotanti a ruote, nei tratti scoscesi,
falciare l’erba seguendo la costa del pendio, non
salendo e scendendo.
Prestare estrema attenzione al cambio di dire-
zione su un tratto scosceso.
Non falciare tratti eccessivamente ripidi.
Prestare estrema attenzione girando o tirando
la macchina verso di sé.
Fermare le lame nel caso in cui la macchina
debba essere trasportata su superci non erbose, oppure verso la zona da falciare.
Non utilizzare mai la macchina con protezioni
difettose, oppure in assenza di dispositivi di
sicurezza, ad esempio, deettori e/o separatori
di erba.
Non modicare le impostazioni del regolatore
del motore né far operare il motore a velocità
eccessive. Le velocità eccessive possono aumentare il pericolo di infortuni.
Disinnestare le frizioni prima di avviare il motore.
Avviare il motore ponendo molta attenzione,
attenendosi alle istruzioni e con i piedi ben
lontani della lame.
Non inclinare mai la macchina avviando o
accendendo il motore, con la sola eccezione dei
casi in cui questo sia assolutamente necessario.
In questo caso, comunque non inclinarla mai oltre
quanto sia strettamente necessario e sollevare
solamente la parte distante dall’operatore.
Non avviare il motore stando davanti al tubo
di scarico.
Non avvicinare mani o piedi alle parti rotanti.
Mantenersi a distanza dal tubo di scarico,
sempre aperto.
Non rimorchiare o trasportare mai la macchina
con il motore in funzione.
Arrestare il motore e staccare il cavo della
candela:
- prima di pulire eventuali intasamenti e prima di
stasare lo scivolo;
- prima di interventi o controlli sul tosaerba e
prima delle operazioni di pulizia;
- dopo aver colpito un oggetto estraneo. Controllare che il tosaerba non sia stato danneggiato
ed effettuare le riparazioni del caso prima di riavviare e mettere in funzione l’equipaggiamento;
- se il tosaerba, o trattorino, vibra in modo anomalo (in qual caso eseguire immediatamente dei
controlli).
ITALIANO -
3
Page 24

Arrestare il motore:
- ovunque sia stata lasciata la macchina;
- prima di fare carburante.
Ridurre la velocità, con la leva dell’acceleratore,
per rallentare il motore prima dello spegnimento.
IV. Manutenzione e Periodi di Inattivita’
Vericare che tutti i dadi, i bulloni e le viti siano
sempre ben stretti per assicurare che l’equipaggiamento sia in buone condizioni operative.
Non lasciare mai l’equipaggiamento, con ben-
zina nel serbatoio, in locali chiusi dove i vapori
possano raggiungere amme libere o scintille.
Lasciare raffreddare il motore prima di riporre i
tosaerba, o trattorini, in qualsiasi spazio stretto
e chiuso.
Per ridurre i pericoli d’incendio assicurarsi che
il motore, la marmitta, il vano batteria e la zona
di stoccaggio benzina siano liberi da erba, foglie
o quantità eccessive di grasso.
Controllare spesso il raccoglitore dell’erba
tagliata per individuare eventuali segni di usura
o di danneggiamento.
Si raccomanda di usare sempre lo stesso tipo
di candela di accensione. L’uso di una candela
di accensione sbagliata può danneggiare il
pistone/cilindro.
Sostituire per motivi di sicurezza le parti usurate
o danneggiate. Usare sempre ricambi originali.
Il serbatoio del carburante va vuotato all’aperto,
qualora necessario.
NOMENCLATURA (Relative illustrazioni nell’Allegato A)
1 Maniglia frizione
2 Leva di sicurezza
3 Cinghia di ssaggio
4 Vite, dado ssaggio manico
superiore
5 Manico inferiore
6 Tappo carico olio
7 Tappo serbatoio benzina
8 Candela
9 Scocca
10 Leve regolazione altezza taglio
11 Molla tappo mulching
12 Tappo mulching
13 Paratoia posteriore
14 Raccoglierba
15 Maniglia avviamento motore
16 Manico superiore
17 Tappot
18 Attrezzo candela di accensione
19 Manuale utente
20 Tanica da 5 lt
MONTAGGIO SACCO/CESTELLO RACCOGLIERBA
Iniziare montando la struttura in acciaio nella parte superiore rigida del sacco. Montare quindi
la parte inferiore premendo il listello in plastica nella sede della parte superiore, come illustrato
nell’Allegato B.
MONTAGGIO MANICO INFERIORE
Fissare la maniglia inferiore al ponte di aggancio con vite, rondella e pomolo come da illustrazione
nell’Allegato C. Inserire il dado nel pomolo durante il montaggio.
MONTAGGIO MANICO SUPERIORE
Montare i tappi in plastica (17) come illustrato nell’Allegato D. Montare poi la maniglia superiore
con vite, rondella, guida della cordicella di avviamento e pomolo. Usare le due cinghie in dotazione
per ssare i cavi di comando alla barra di impugnatura sinistra, come mostrato nella Fig. A e Fig.
D. Collocare una cinghia appena sopra la manopola pieghevole centrale e l’altra a 10 cm dalla
manopola pieghevole inferiore. Assicurarsi che il cavo non tocchi la ruota. Stringere le cinghie in
modo da mantenere i cavi tesi senza deformarli.
INSERIMENTO TAPPO MULCHING
Per effettuare il taglio dell'erba con sistema mulching (senza la raccolta dell'erba) alzare la paratoia
ed inserire il tappo ssandolo con la molla come indicato in gura.
ITALIANO -
4
Page 25

REGOLAZIONE ALTEZZA TAGLIO
L’altezza di taglio viene regolata con la leva posta vicino alla ruota posteriore destra, come indicato nella Fig. F.
Spostare la leva indietro per aumentare l’altezza di taglio e in avanti per diminuirla. Sono possibili
6 regolazioni (30, 39, 51, 64, 79, 95 mm).
PREDISPOSIZIONE PROTEZIONI
Operare sempre con il raccoglierba o il deettore montati.
Spegnere il motore per la rimozione del raccoglierba e per la regolazione altezza taglio
A motore funzionante evitare assolutamente di mettere le mani o piedi sotto il bordo
della carcassa o nell'apertura di espulsione
Prima di iniziare il taglio del prato, bisogna
togliere eventuali corpi estranei dallo stesso.
Durante il lavoro bisogna fare attenzio-
ne ad eventuali corpi estranei, rimasti sul
prato.L'utilizzatore è responsabile verso terzi
nella zona di lavoro.
Durante la messa in moto o l'avviamento del
motore, l'operatore non deve alzare la rasaerba,
però, se necessario, solo inclinarla, in modo che la
lama sia rivolta verso il lato opposto all'operatore.
Assicurarsi che lo sportello del sacco di raccolta
erba è in posizione abbassata (Fig.GI) quando
si lavora senza sacco erba.
Indossare una protezione acustica idonea
quando si utilizza la macchina.
L’eccessiva esposizione alle vibrazioni può cau-
sare lesioni vascolari o anni al sistema nervoso
a soggetti affetti da disturbi circolatori.
FUNZIONAMENTO
PREPARAZIONE DEL MOTORE (Fig.H)
Controllare l’olio e il livello di carburante e, se del
caso, rabboccare attraverso l’entrata corretta,
come da Fig. HI. Assicurarsi di usare l’olio giusto
e solo benzina a 95 ottani senza piombo per il
carburante.
Per ulteriori informazioni, si prega di fare riferimento al manuale manutenzione del produttore
di motori
ATTENZIONE: Prima dell’uso aggiungere
olio al motore.
AVVIAMENTO MOTORE (Fig.HI)
Effettuate le operazioni di messa a punto, si procede all’avviamento del motore nel seguente modo:
a)Azionare la maniglia freno (2) per permettere
l’avviamento del motore, tenere la leva premuta
contro la maniglia in fase di avvio e durante
l’utilizzo della macchina (funzionamento del
freno del motore).
b) Tenendo la leva di fermo motore (2), raggiun-
gere la presa di avvio del motore (15) e tirare la
fune di avviamento delicatamente no ad avvertire la resistenza causata dalla compressione.
Rilasciare lentamente la fune di avviamento e
tirare la maniglia verso di sé completamente per
avviare il motore.
ATTENZIONE! La lama entra in rotazione
quando si mette in funzione il motore.
Mantenere premuta la maniglia (2) durante il
funzionamento, al rilascio della stessa il motore
si ferma.
ATTENZIONE: Vericare che la leva di
arresto del motore (2) funzioni corrett mente rilasciandola mentre il motore è
in funzione. Il motore dovrebbe fermarsi
completamente entro 3 secondi.
TAGLIO
Per effettuare il taglio dell’erba spingere manualmente la macchina o innestare l’avanzamento
automatico.
Innesto avanzamento automatico: alzare la
maniglia frizione (1) e tenerla premuta.
ATTENZIONE: innestare solo a motore
funzionante.
Disinnesto automatico avanzamento: rilasciare
la maniglia frizione (1).
ITALIANO -
5
Page 26

TECNICHE FUNZIONALI DI BASE
Per ottenere risultati ottimali, tagliare sempre con
una lama aflata. Una lama spuntata dà un taglio
irregolare e l’erba diventa gialla sulla supercie
del taglio.
Non tagliare mai oltre un terzo della lunghezza
dell’erba. Questo vale soprattutto nei periodi
asciutti. Tagliare all’altezza di taglio stabilita.
Controllare poi il risultato ed abbassare all’altezza adeguata. Se l’erba è effettivamente alta,
procedere lentamente e ripassare la seconda
volta, se necessario.
Tagliare ogni volta in più direzioni per evitare
strisce sul prato.
Usare l’accessorio Mulch Plug se volete che la
macchina sminuzzi l’erba che potrà essere usata
come fertilizzante del prato.Vedi sezione E per
le istruzioni.
Usare il sacco per raccogliere l’erba e ottenere
un risultato pulito.
REGOLAZIONE CAVO FRIZIONE
Se, quando premete la leva della frizione, la marcia di anticipo automatico non si inserisce, occorre
regolare il cavo della frizione. Per eseguire regolazioni accurate, ruotare la manopola di regolazione
(Fig. I) in senso antiorario per inserire la prima. Per eseguire regolazioni grossolane, inserire la
molla (Fig. I) in uno dei fori successivi della leva.
MANUTENZIONE
Attenzione! Spegnere il motore e staccare la candela
prima di effettuare qualunque manutenzione
ATTENZIONE: L’utilizzatore deve eseguire
solo gli interventi di manutenzione e
assistenza descritti in questo Manuale
Operatore. Interventi più complessi
vanno eseguiti da un centro di assistenza
autorizzato.
Ispezione generale
Controllare che tutte le viti e bulloni sono ben
serrati.
Controllare spesso il tosaerba e assicurarsi
che tutti i residui di erba vengono rimossi da
sotto il pianale.
Prima di ogni avvio, controllare il livello dell’olio,
il ponte di aggancio, gli elementi di taglio e il
funzionamento della leva di arresto del motore.
Cambiare l’olio, sostituire la candela e pulire/
sostituire il ltro dell’aria, secondo la tabella di
manutenzione del Manuale Operatore Motore.
Attrezzature per il taglio
Controllare che il dispositivo di taglio non sia
danneggiato o incrinato. Un dispositivo di taglio
danneggiato andrebbe sempre sostituito. Vedi
sezione K.
ITALIANO -
6
Controllare sempre che la taglierina sia ben
retticata e bilanciata correttamente.
La lama va sempre aflata da un professionista.
Contattate il vostro centro assistenza per trovare
un laboratorio autorizzato nella vostra zona.
Livello dell’olio
Il tosaerba deve stare su un terreno piano quando
controllate il livello dell’olio. Controllare il livello
dell’olio con l’astina posta sul tappo di rabbocco.
- Togliere il tappo dell’olio e pulire l’astina.
- Riporre l’astina. Il tappo del serbatoio dell’olio
deve essere avvitato a fondo per offrire un quadro
esatto del livello dell’olio.
- Se il livello dell’olio è basso, rabboccare no a
quando raggiunge il livello superiore dell’astina.
Per ulteriori informazioni sul cambio olio e la manutenzione del motore, fare riferimento al Manuale
Manutenzione Motore.
Page 27

Pulizia
Non pulire mai il tosaerba versandovi sopra
dell’acqua in quanto potrebbe danneggiare gravemente l’impianto elettrico. Usare una spazzola
per rimuovere foglie, polvere o erba dalla parte
superiore.
Qualora si renda necessario ribaltare la macchina,
controllare che il silenziatore di scarico sia rivolto
verso il basso e che nel serbatoio sia presente la
minor quantità di carburante possibile.
ATTENZIONE: Accertarsi che il motore
sia freddo in quanto il carburante potrebbe
fuoriuscire attraverso la ventilazione nel
tappo e sulla marmitta di scarico quando
inclinate la macchina. Una marmitta calda
potrebbe innescare l’incendio del carburante.
LAMA
Pulire sotto il telaio, vedi illustrazione nell’Allegato
J. Con la macchina ferma e spenta:
- Collegare il raccordo sul pianale al rubinetto di
alimentazione acqua. Aprire il rubinetto.
- Avviare il motore (lama in rotazione), facendolo
riscaldare per qualche minuto.
- Al termine della pulizia spegnere il motore, chiudere il rubinetto, staccare il tuo dal raccordo del
pianale.
Se la macchina è molto sporca sotto, usare un
bastoncino in legno o in plastica per togliere l’erba
prima di pulire con acqua.
Per togliere la lama (23) svitare la vite (26)
Controllare : il supporto lama (22), la rondella
frizione (24), la chiavetta (21) e le rondelle (25),
se risultassero danneggiati o incrinati sostituirli.
Durante il montaggio accertarsi che la chiavetta
GARANZIA
Il dispositivo viene garantito per 3 anni.
Il periodo di garanzia inizia con la prima vendita – l’acquisto va dimostrato con uno scontrino
scale valido.
La nostra garanzia copre tutti i difetti gravi del
gruppo che siano riconducibili al materiale o alla
lavorazione.
In caso di reclamo giusticato, possiamo optare
a nostra discrezione se riparare o sostituire il
componente interessato.
Oltre al periodo della garanzia, vanno soddisfatti
i seguenti requisiti:
Il dispositivo è stato usato correttamente
nel settore privato e in conformità alle
raccomandazioni contenute nel manuale.
Non dovrebbe esserci stato alcun tentativo
da parte del compratore o terzi autorizzati a
riparare il gruppo.
(21) sia nella sede dell’albero motore e che la
lama sia montata con il lato tagliente rivolto verso
il senso di rotazione del motore. La vite lama
(26) va bloccata con coppia di serraggio di 5,34
Kpm (52,4 Nm).
La garanzia non copre i componenti soggetti a
normale usura, gli interventi di manutenzione e
regolazione.
Sono escluse dalla garanzia le seguenti parti di
consumo:
� coltello
� nastro
� cavi
� fune di avviamento
� ltro aria
� candela
� altri componenti soggetti a manutenzione
La presente garanzia non pregiudica i diritti di
garanzia legali spettanti al compratore e venditore.
ITALIANO -
7
Page 28

ASSISTENZA GENERALE
Ci congratuliamo con voi per aver acquistato
un prodotto della nostra società. Se, malgrado
tutte le assicurazioni di qualità, riscontrate la
presenza di un qualche difetto, siete pregati di
contattare il Centro di Assistenza autorizzato nel
vostro paese, come risulta dall’elenco sul retro di
questo manuale.
Assicuratevi di avere a disposizione tutti i dati
relativi all’apparecchiatura. Questi sono reperibili sull’etichetta apposta su ciascun prodotto.
L’incaricato dell’assistenza concorderà con voi
le modalità di intervento. Se si rende necessario
un intervento di riparazione, l’apparecchiatura va
consegnata al Centro Servizio Assistenza.
.
SMALTIMENTO/AMBIENTE
Eseguire l’intervento di assistenza e manutenzione come da istruzioni fornite in questo manuale.
In questo modo il motore durerà più a lungo e le
emissioni nocive saranno ridotte al minimo.
Quando la macchina è usurata, è necessario
smaltirla per il riciclaggio. Scaricare l’olio e il
serbatoio della benzina come da istruzioni nel
Manuale Operatore Motore, e portare la macchina
in un centro di recupero per il corretto smaltimento.
Non scaricare olio o benzina nel lavandino.
I materiali di plastica e di metallo vanno separati
per il recupero. Non gettare i residui di erba nel
bidone della spazzatura, ma usarli come materiale
da compostaggio.
Siete pregati di contattare il vostro centro di assistenza per ulteriori informazioni.
DATI TECNICI
Modello FBM 575 A1
Motore B&S575EX
Cilindrata 140 cm
Capacità nominale motore (Nota 1) 2,1 kW
Velocità motore 2900 rpm
Candela Champion QC12YC
Capacità serbatoio carburante 0,75 lt
Capacità serbatoio olio 0,44 lt
Olio motore SAE 30/SAE 10W-30
Peso serbatoi vuoti 31 kg
3
Potenza acustica, misurata (vedi nota 2) 94 dB(A)
Potenza acustica, garantita LWA(vedi nota 2) 95 dB(A)
Livello pressione acustica all’orecchio dell’operatore: (vedi nota 3) 86 dB(A)
Vibrazioni (vedi nota 4) < 2,5 m/s
2
Larghezza di taglio 460 mm
Altezza di taglio 6 livelli (30, 39, 51, 64, 79, 95 mm)
Elemento di taglio lama rotante
Velocità 4,7 km/h
Nota 1: La potenza nominale del motore corrisponde alla potenza netta media (a regime indicato) di un
motore tipo in produzione per il modello di motore, misurata secondo la normativa SAE J1349/
ISO1585.
I motori per la produzione in serie potrebbero discostarsi da questo valore. La potenza effettiva
del motore installato sulla macchina nale dipenderà dalla velocità operativa, dalle condizioni
ambientali e da altri valori.
Nota 2: Le emissioni sonore nell’ambiente misurate come potenza acustica (LWA) sono conformi alla
Direttiva CE 2000/14/CE.
Nota 3: Il livello di pressione acustica è conforme alla normativa EN 836. Il valore registrato per il livello di
pressione acustica presenta una dispersione statistica tipica (scostamento standard) di 1,2 dB(A).
Nota 4: Il livello di vibrazioni è conforme alla normativa EN 836, Allegato G. Il valore registrato per il
livello di vibrazioni presenta una dispersione statistica tipica (scostamento standard) di 0,2 m/s
ITALIANO -
8
2.
Page 29

DICHIARAZIONE DI CONFORMITÀ CE
(Si applica solo per l’Europa) Versione tradotta
Con la presente Aktiebolaget Partner, SE-433 81, Göteborg, Svezia, dichiara che il tosaerba Florabest
FBM575A1
è conforme ai requisiti della DIRETTIVA CE:
• 2006/42/CE del 17 maggio 2006 ”Direttiva Macchine”.
• 2004/108/CE del 15 dicembre 2004 ”relativa alla compatibilità elettromagnetica”.
• 2000/14/CE del 8 maggio 2000 ”relativa alle emissioni acustiche nell’ambiente”.
Per tutte le informazioni relative alle emissioni acustiche, vedi il capitolo Dati Tecnici.
Sono state applicate le seguenti normative: EN 836, ISO 11094, EN 55012.
L’Ente noticato: Nr. 0036, TÜV SÜD Product Service GmbH Ridlerstr. 65, 80339 München - Germania,
ha rilasciato i rapporti relativi alla valutazione della conformità in base all’Allegato VI della DIRETTIVA
CE 2000/14/CE del 8 maggio 2000” relativa alle emissioni acustiche nell’ambiente”
Tipo di emissione N°: e11*97/68SA*2010/26*1581*01
.
04-12-2012, Göteborg
Bengt Ahlund, Responsabile Sviluppo
(Rappresentante Autorizzato di Aktiebolaget Partner e responsabile per la documentazione tecnica.)
ITALIANO -
9
Page 30

INDEX
INTENDED PURPOSE OF USE 3
SAFETY RULES 3
A DESCRIPTION/CONTENT OF DELIVERY 4
B ASSEMBLY OF GRASS CATCHER 4
C ASSEMBLY LOWER HANDLES 4
D ASSEMBLY UPPER HANDLES 4
E MULCHING CAP INSERTION 4
F ADJUSTMENT OF CUTTING HEIGHT 5
G SAFETY PRECAUTIONS 5
H OPERATION 5
I ADJUSTMENT OF CLUTCH CABLE 6
J MAINTENANCE 6
K BLADE 7
WARRANTY 7
GENERAL SERVICE 8
RECYCLING 8
TECHNICAL DATA 8
EC-DECLARATION OF CONFORMITY 9
ENGLISH -
1
Page 31

We wish to thank you for choosing our lawn mower. We are condent that the high quality of our machine will meet with your satisfaction and appreciation and that your lawn mower will give you long-lasting
service.Before starting to use your machine, make sure to read with care this manual, which has been
purposely drawn up to provide you with all the necessary information for proper use, in compliance with
basic safety requirements. Safety symbols below are located on the deector, as shown in picture.
Caution!
1
Read the instruction manual before use.
Risk of injury from ying objects!
2
Keep other people well away from the danger area
Risk of injury from sharp blade!
3
Keep away from rotating parts.
Risk of inhalation of toxic gases!
4
Do not use the appliance in closed or poorly ventilated
environments.
Risk of explosion!
5
Do not refuel with engine running.
Caution!
6
Hot surface
Caution!
7
Switch off the engine and disconnect the spark plug
before undertaking any maintenance work.
1 Manufacturer
2 Model
3 Product number
4 Maintenance level
5 Serial number
6 Type
7 Engine information
8 Weight
9 Sound power level
ENGLISH -
2
Page 32

INTENDED PURPOSE OF USE
This lawn mower is intended to be used for lawn
mowing only. The lawn mower is for private use
and should be operated by adults only. It is suitable
for normal sized lawn.
SAFETY RULES
Safe Operation Practices for PedestrianControlled Rotary Lawnmowers
IMPORTANT: The machine is capable of amputating hands and feet and throwing objects. Failure
to observe the following safety instructions could
result in serious injury or death.
I. Training
Read the instructions carefully. Be familiar with
the controls and the proper use of the equipment.
Never allow children or people unfamiliar with
the instructions to use the lawnmower. Local
regulations may restrict the age of the operator.
Never mow while people, especially children,
or pets are nearby.
Keep in mind that the operator or user is re-
sponsible for accidents or hazards occurring to
other people or their property.
II. Preparation
While mowing, always wear substantial footwear
and long trousers. Do not operate the equipment
when barefoot or wearing open sandals.
Thoroughly inspect the area where the
equipment is to be used and remove all objects
which may be thrown by the machine.
WARNING - Petrol is highly ammable.
- Store fuel in containers specically designed
for this purpose.
- Refuel outdoors only and do not smoke while
refueling.
- Add fuel before starting the engine. Never remove the cap of the fuel tank or add petrol while
the engine is running or when the engine is hot.
- If petrol is spilled, do not attempt to start the
engine but move the machine away from the
area of spillage and avoid creating any source
of ignition until petrol vapors have dissipated.
- Replace all fuel tanks and container caps
securely.
Before using, always visually inspect to see that
the blades, blade bolts and cutter assembly are
not worn or damaged. Replace worn or damaged
blades and bolts in sets to preserve balance.
III. Operation
Do not operate the engine in a conned space
where dangerous carbon monoxide fumes can
collect.
Mow only in daylight or in good articial light.
Avoid operating the equipment in wet grass,
where feasible.
Always be sure of your footing on slopes.
Walk, never run.
For wheeled rotary machines, mow across the
face of slopes, never up and down.
Exercise extreme caution when changing di-
rection on slopes.
Do not mow excessively steep slopes.
Use extreme caution when reversing or pulling
the lawnmower towards you.
Stop the blade if the lawnmower has to be tilted
for transportation when crossing surfaces other
than grass, and when transporting the lawnmower to and from the area to be mowed.
Never operate the lawnmower with defective
guards, or without safety devices, for example
deectors and/or grass catchers, in place.
Do not change the engine governor settings or
overspeed the engine. Operating the engine at
excessive speed may increase the hazard of
personal injury.
Disengage drive clutch before starting the
engine.
Start the engine carefully according to instruc-
tions and with feet well away from the blade.
Do not tilt the lawnmower when starting the
engine or switching on the motor, except if the
lawnmower has to be tilted for starting. In this
case, do not tilt more than absolutely necessary
and lift only the part which is away from the
operator.
Do not start the engine when standing in front
of the discharge chute.
Do not put hands or feet near or under rotating
parts. Keep clear of the discharge opening at
all times.
Never pick up or carry lawnmower while the
engine is running.
Stop the engine and disconnect the spark
plug wire:
- before cleaning blockages or unclogging chute;
- before checking, cleaning or working on the
lawnmower;
- after striking a foreign object. Inspect the
lawnmower for damage and make repairs before
restarting and operating the lawnmower;
- if the lawnmower starts to vibrate abnormally
(check immediately).
Stop the engine:
- whenever you leave the lawnmower;
- before refuelling.
ENGLISH - 3
Page 33

IV. Maintenance and Storage
Keep all nuts, bolts and screws tight to be sure
the equipment is in safe working condition.
Never store the equipment with petrol in the
tank inside a building where fumes may reach
an open ame or spark.
Allow the engine to cool before storing in any
enclosure.
To reduce the re hazard, keep the engine,
silencer, battery compartment and petrol storage
area free of grass, leaves, or excessive grease.
Check the grass catcher frequently for wear or
deterioration.
Always use the recommended spark plug type.
Use of the wrong spark plug can damage the
piston/cylinder.
Replace worn or damaged parts for safety.
Always use genuine spare parts.
If the fuel tank has to be drained, this should
be done outdoors.
DESCRIPTION/CONTENT OF DELIVERY (Related illustrations in Appendix A)
1 Clutch lever
2 Engine stop lever
3 Tie strap
4 Fastening knobs for upper handles
5 Lower handles
6 Oil ller cap
7 Fuel cap
8 Spark plug
9 Deck
10 Adjusting lever for cutting height
11 Mulch plug spring
12 Mulch plug
13 Rear deector
14 Grass catcher
15 Engine start-grip
16 Upper handles
17 Cap
18 Spark plug tool
19 Owners manual
20 Canister 5l
ASSEMBLY OF GRASS CATCHER
Start by mounting the steel frame in the hard top part of the bag. Then assemble the lower part
by pressing the plastic list into the upper part slot as illustrated in Appendix B
ASSEMBLY LOWER HANDLES
Mount the lower handle to the clip deck with screw, washer and knob according to illustration in
Appendix C. Insert nut in knob when mounting.
ASSEMBLY UPPER HANDLES
Mount the plastic caps (17) as illustrated in Appendix D. Then mount upper handle with screw,
washer, starter cord guide and knob. Use the two straps enclosed to secure the control cables
to the left handle bar as shown in g A and g D. Place one strap just above the middle folding
knob and the other one 10cm from the lower folding knob. Make sure no cable gets in contact
with the wheel. Tighten straps just enough to hold the cables tight without deforming them.
MULCHING CAP INSERTION
To cut the grass with the mulching system (no grass collection), lift the rear deector panel and
insert the cap by xing it with the spring as shown in the gure.
ENGLISH -
4
Page 34

ADJUSTMENT OF CUTTING HEIGHT
Cutting height is adjusted with the lever located by the right rear wheel as shown in g F.
Increase cutting height by moving the lever backwards and decrease cutting height by moving it
forward. There are 6 steps availible (30, 39, 51, 64, 79, 95mm).
SAFETY PRECAUTIONS
Always operate with the deector or grasscatcher in the correct position.
Always stop the engine before removing the grasscatcher or adjusting the height of cut.
Never place your hands or feet underneath the deck or into the grass discharge
chute while the engine is running.
Before mowing, remove all foreign objects from
the lawn which may be thrown by the machine.
While mowing, stay alert for any foreign objects
which may have been missed.
Never lift the rear of the mower while starting
the engine or during normal operation.
Make sure the grass bag hatch is in down
position (Fig.GI) while operating the machine
without grass bag.
Use appropriate ear protection while operating
the machine.
Overexposure to vibration can lead to circulatory
damage or nerve damage for people who have
impaired circulation.
OPERATION
ENGINE PREPARATIONS (Fig.H)
Check oil and fuel level and, if needed, rell in
correct inlet according to Fig. HI. Make sure to
use correct oil and only 95 octane unleaded
petrol for fuel.
For further information, please advise the engine
operator's manual.
CAUTION: Oil must be added to the
engine before rst use.
STARTING THE ENGINE (Fig.HII)
Once the machine has been set up properly, start
the engine as follows:
a) Activate the engine stop lever (2) to prepare
the engine for start, keep lever pressed against
handle while starting and using the machine (it
operates the engine brake).
b) While holding the engine stop lever (2), reach
for the engine start-grip (15) and pull the starter
rope gently until you feel the resistance caused
by compression. Return the starter rope slowly
then pull the handle rmly towards you to its full
extent to start engine.
ENGLISH -
5
CAUTION: The blade starts turning as
soon as the engine is started.
Keep the engine stop lever (2) depressed during
machine operation.
CAUTION: Make sure the engine stop
lever (2) works properly by releasing it
while engine is running.
Engine should stop completely within
3 seconds.
MOWING
To cut the grass, push the lawn mower manually
or insert the automatic advance gear.
How to insert automatic advance: Lift up the
clutch handle (1) and keep it pressed in position.
CAUTION: Engage the gear only when
the engine is running.
How to disengage advance: Release the clutch
handle. (1)
Page 35

BASIC WORKING TECHNIQUES
Always cut with a sharp blade for optimal results.
A dull blade gives an uneven cut and the grass
becomes yellow on the surface of the cut.
Never mow more than 1/3 of the length of the grass.
This especially applies during dry periods. Mow st
with the cutting height set high. Then check the
result and lower to an appropriate height. If the
grass is really long, drive slowly and mow twice
if necessary.
Cut in different directions each time in order to
avoid stripes in the lawn.
Use the mulchplug if you want the machine to cut
the grass in small pieces that will work as lawn
fertilizer. See section E for instructions.
Use the bag to collect the grass in order to have
a clean lawn.
ADJUSTMENT OF CLUTCH CABLE
If, when you press the clutch lever, the automatic advance gear does not engage, the clutch cable
should be adjusted. To make ne adjustments, turn the adjuster wheel(Fig.I) counter clockwise to
engage advance gear earlier. To make rough adjustments, insert the spring (Fig.I) in one of the
subsequent holes in the lever.
MAINTENANCE
Caution! Switch off the engine and disconnect
the spark plug before undertaking any maintenance work.
CAUTION: The user must only carry out the
maintenance and service work described
in this Operator's Manual. More extensive
work must be carried out by an
authorized service workshop.
General Inspection
Check that all screws and nut are tightened.
Frequently check the mower and ensure that
all grass deposits are removed from beneath
the deck.
Before use check oil level, clipping deck, cutting
equipment and function of engine stop lever.
Change oil, replace spark plug and clean/replace
air lter, according to the maintenance chart in
Engine Operator's Manual.
Cutting Equipment
Check the cutting attachment for damage or
cracks. A damaged cutting attachment should
always be replaced. See section K.
Always ensure the blade is well tightened and
balanced correctly.
Sharpening of the blade should always be performed by a professional. Contact your service centre
to discuss and arrange the handling.
Oil level
The lawn mower should stand on at ground when
you check the oil level. Check the oil level with the
dipstick on the oil ller cap.
- Remove the oil cap and wipe the dipstick clean.
- Put the dipstick back in. The oil ller cap must
be completely screwed down to give a correct
picture of the oil level.
- If the oil level is low, ll engine oil up to the upper
level on the dipstick. See min and max marking.
For further explanation of oil change and engine
maintenance, see Engine Operator's Manual.
Cleaning
Never clean the mower by pouring water over it:
this may seriously damage the electric system.
Use a brush to clean the top from leaves, dust
and grass.
ENGLISH -
6
Page 36

If the machine needs to be tilted, it should only be
with exhaust mufer facing downwards and with
as little fuel in the tank as possible.
CAUTION: Make sure engine is cold as fuel
could leak through the ventilation in the
cap and onto the exhaust mufer while
tilting machine. A hot mufer could cause
fuel to start burning.
Cleaning under the body work, see illustration
in Appendix J. With machine at a standstill and
turned off:
- Attach tting on the deck to the water supply tap.
Turn on the tap.
BLADE
- start up the motor (blade in rotation), allowing it
to warm up for a few minutes.
- at the end of cleaning switch off the engine,
turn off the tap, detach the tube from the deck
connection.
If machine is very dirty underneath, use a wooden
or plastic stick to remove grass before cleaning
with water.
To remove the blade (23) unscrew the screw
(26).
Check the conditions of the blade-support (22),
the washer (24), the key (21) and the washer
(25) and replace any parts which are damaged.
WARRANTY
For the purchased device you will get 3 years
guarantee.
The warranty period begins on the rst sale - the
purchase must be demonstrated by a valid cash
voucher.
Our guarantee covers all serious defects of the
unit, which are proved related to material or
workmanship.
In case of a justied complaint, we are entitled
to choose to either rectify or replace the product.
In addition to the warranty period of the warranty,
the following requirements must be fullled:
The device has been properly, and according
to the recommendations of the manual, used in
the private sector.
There should have been no attempt by
purchaser or an authorized third party to repair
the unit.
When reassembling, make sure that the key
(21) is correctly seated in the shaft and that the
cutting edges face in the direction of the engine
rotation. The blade screw (26) must be torqued
to 5,34 Kgm (52,4 Nm).
Normal wear, maintenance and adjustments are
excluded from the guarantee.
Following consumable parts are excluded from
warranty:
� blade
� belt
� cables
� starter rope
� air lter
� spark plug
� other maintenance items
This warranty does not affect the existing buyer
and seller statutory warranty claims.
ENGLISH - 7
Page 37

GENERAL SERVICE
We are pleased that you have purchased a product from our company. If, despite of all quality
assurance, a defect occurs, you should contact the
Authorized Servicecentre in your country stated
at the back of this manual.
Make sure you have all the necessary equipment
data at hand; it can be found on the label of each
product. The Service Agent will determine the
next steps with you. If repairs are necessary, the
device must be handed in to the Service Centre.
DISPOSAL/ENVIRONMENT
Perform service and maintenance according to the
instructions in this manual. In this way the engine
will last longer and the hazardous emissions are
minimized.
When the machine is worn out it should be disposed of for recycling. Drain oil and gasoline
tank according to Engine Operator's Manual, and
take the machine to a recycle centre for proper
disposal. Do not poor oil or gasoline into the sink.
Plastics and metals can be separated for
recycling. Do not throw the grass clip in the
garbage can, but use this as compost material.
Please contact your service centre for further
information.
TECHNICAL DATA
Model FBM 575 A1
Engine B&S575EX
Displacement 140 cm
Nominal engine output (note 1) 2,1 kW
Engine speed 2900 rpm
Spark plug Champion QC12YC
Fuel capacity 0,75 l
Oil capacity 0,44 l
Engine oil SAE 30/SAE 10W-30
Weight empty tanks 31 kg
3
Sound power, measured (see note 2) 94 dB(A)
Sound power, guaranteed LWA (see note 2) 95 dB(A)
Sound pressure level at operators ear, (see note 3) 86 dB(A)
Vibrations (see note 4) < 2,5 m/s
2
Cutting width 460 mm
Cutting height 6 step (30, 39, 51, 64, 79, 95mm)
Cutter Rotary blade
Speed 4,7 km/h
Note 1: The power rating of the engine indicated is the average net output (at specied rpm) of a typical
production engine for the engine model measured to SAE standard J1349/ISO1585. Mass production engines may differ from this value. Actual power output for the engine installed on the
nal machine will depend on the operating speed, environmental conditions and other values.
Note 2: Noise emissions in the environment measured as sound power (LWA) in conformity with EC
directive 2000/14/EC.
Note 3: Noise pressure level according to EN 836. Reported data for noise pressure level has a typical
statistical dispersion (standard deviation) of 1.2 dB(A).
Note 4: Vibration level according to EN 836, Annex G. Reported data for vibration level has a typical
statistical dispersion (standard deviation) of 0.2 m/s2.
ENGLISH - 8
Page 38

EC-DECLARATION OF CONFORMITY
(Applies to Europe only) Original version
Aktiebolaget Partner, SE-433 81, Göteborg, Sweden, hereby declares that the lawn mower Florabest
FBM575A1
complies with the requirements of the EC DIRECTIVE:
• of May 17, 2006 ”relating to machinery” 2006/42/EC.
• of December 15, 2004 ”relating to electromagnetic compatibility” 2004/108/EC.
• of May 8, 2000 ”relating to the noise emissions in the environment” 2000/14/EC.
For information relating to noise emissions, see the Technical data chapter.
The following standards have been applied: EN 836, ISO 11094, EN 55012.
Notied body: Nr. 0036, TÜV SÜD Product Service GmbH Ridlerstr. 65, 80339 München / Munich -
Germany, has issued reports regarding the assessment of conformity according to annex VI of the EC
DIRECTIVE of May 8, 2000 ”relating to the noise emissions in the environment” 2000/14/EC.
Emission type No.: e11*97/68SA*2010/26*1581*01
2012-12-04, Göteborg
Bengt Ahlund, Development manager
(Authorized representative for Aktiebolaget Partner and responsible for technical documentation.)
ENGLISH -
9
Page 39

Page 40

Page 41

Page 42

Page 43

Page 44

Page 45

Page 46

Authorized Service Partners
Service Deutschland:
Tel.: +49 731-490 6519
Fax: +49 731-490 8622
Email: service@happy-garden.com
Service Great Britain:
Tel.: +44 844-844 4558
Service Ireland:
Tel.: +353 1 800 882 350
Service Österrei ch:
Tel.: +43 732-770 101 482
Fax: +43 732-770 101 442
Service Schweiz / Suisse / Svizzera:
Tel.: +41 62 887 37 70
Fax.: +41 62 887 37 77
Email: HOPSwitzerland@gmx.ch
Authorized Service Partners:
Service Česko:
Tel.: +420 800 100 425
Fax.: +420 272 083 464
Email: servis-infolinka@centrum.cz
Service Deutschland:
Tel.: +49 731-490 6519
Fax: +49 731-490 8622
Email: service@happy-garden.com
Service Great Britain:
Tel.: +44 844-844 4558
Service Ireland:
Tel.: +353 1 800 882 350
Service Österreich:
Tel.: +43 732-770 101 482
Fax: +43 732-770 101 442
Service Schweiz / Suisse / Svizzera:
Tel.: +41 62 887 37 70
Fax.: +41 62 887 37 77
Email: HOPSwitzerland@gmx.ch
Service Slovensko:
Tel.: +42 1 800 154 044
Fax.: +42 1 445 522 515
Email: servis.infolinka@gmail.com
IAN 79270
P/N: 1155536-20
Aktiebolaget Partner
Headquarters: SE-433 81 - Göteborg, Sweden
ED.09/2012 Q.TY 10000 PRINTED IN ITALY
1
 Loading...