


 Loading...
-
UserManual
Version 1.0

Table of Contents
Get started |
6 |
What's in the box |
6 |
Set up Charge 4 |
7 |
Charge your tracker |
7 |
Set up with your phone or tablet |
8 |
See your data in the Fitbit app |
9 |
Unlock Fitbit Premium |
10 |
Wear Charge 4 |
11 |
Placement for all-day wear vs. exercise |
11 |
Handedness |
12 |
Change the band |
13 |
Remove a band |
13 |
Attach a new band |
14 |
Basics |
15 |
Navigate Charge 4 |
15 |
Basic navigation |
15 |
Quick settings |
17 |
Adjust settings |
18 |
Check battery level |
19 |
Set up device lock |
19 |
Turn off the screen |
20 |
Care for Charge 4 |
20 |
Apps and Clock Faces |
21 |
Change the clock face |
21 |
Open apps |
21 |
Download additional apps |
21 |
Remove apps |
21 |
Lifestyle |
23 |
2

Agenda |
23 |
Weather |
23 |
Check the weather |
23 |
Add or remove a city |
24 |
Notifications |
25 |
Set up notifications |
25 |
See incoming notifications |
25 |
Manage notifications |
26 |
Turn off notifications |
26 |
Answer or reject phone calls |
27 |
Respond to messages |
28 |
Timekeeping |
29 |
Use the Alarms app |
29 |
Dismiss or snooze an alarm |
29 |
Use the Timers app |
30 |
Activity and Sleep |
31 |
See your stats |
31 |
Track a daily activity goal |
31 |
Choose a goal |
32 |
Track your hourly activity |
32 |
Track your sleep |
32 |
Set a sleep goal |
33 |
Learn about your sleep habits |
33 |
See your heart rate |
33 |
Practice guided breathing |
34 |
Fitness and Exercise |
35 |
Track your exercise automatically |
35 |
Track and analyze exercise with the Exercise app |
35 |
Track an exercise |
35 |
Customize your exercise settings and shortcuts |
37 |
Check your workout summary |
38 |
Check your heart rate |
38 |
3

Custom heart-rate zones |
39 |
Earn Active Zone Minutes |
40 |
Share your activity |
41 |
View your cardio fitness score |
41 |
Control music with the Spotify app |
42 |
Fitbit Pay |
43 |
Use credit and debit cards |
43 |
Set up Fitbit Pay |
43 |
Make purchases |
44 |
Change your default card |
45 |
Pay for transit |
45 |
Update, Restart, and Erase |
46 |
Update Charge 4 |
46 |
Restart Charge 4 |
46 |
Erase Charge 4 |
47 |
Troubleshooting |
48 |
Heart-rate signal missing |
48 |
GPS signal missing |
48 |
Other issues |
49 |
General Info and Specifications |
50 |
Sensors |
50 |
Materials |
50 |
Wireless technology |
50 |
Haptic feedback |
50 |
Battery |
50 |
Memory |
51 |
Display |
51 |
Band size |
51 |
Environmental conditions |
51 |
Learn more |
52 |
Return policy and warranty |
52 |
Regulatory & Safety Notices |
53 |
4

USA: Federal Communications Commission (FCC) statement |
53 |
Canada: Industry Canada (IC) statement |
54 |
European Union (EU) |
55 |
IP Rating |
56 |
Argentina |
56 |
Australia and New Zealand |
57 |
Belarus |
57 |
Customs Union |
57 |
China |
57 |
India |
59 |
Indonesia |
59 |
Israel |
59 |
Japan |
59 |
Mexico |
60 |
Morocco |
60 |
Nigeria |
60 |
Oman |
60 |
Philippines |
61 |
Taiwan |
61 |
United Arab Emirates |
64 |
Vietnam |
65 |
Zambia |
65 |
Safety Statement |
65 |
5

Get started
Push your goals further with built-in GPS, personalized heart-rate features, up to 7 days of battery life, and more on Fitbit Charge 4. Take a moment to review our complete safety information at fitbit.com/safety. Charge 4 is not intended to provide medical or scientific data.
What's in the box
Your Charge 4 box includes:
Tracker with small band |
Charging cable |
Additional large band |
|
(color and material vary) |
(color and material vary) |
||
|
The detachable bands on Charge 4 come in a variety of colors and materials, sold separately.
6

Set up Charge 4
For the best experience, use the Fitbit app for iPhones and iPads or Android phones.
To create a Fitbit account, you're prompted to enter your birthdate, height, weight, and sex to calculate your stride length and to estimate distance, basal metabolic rate, and calorie burn. After you set up your account, your first name, last initial, and profile picture are visible to all other Fitbit users. You have the option to share other information, but most of the information you provide to create an account is private by default.
Charge your tracker
A fully-charged Charge 4 has a battery life of up to 7 days. Battery life and charge cycles vary with use and other factors; actual results will vary.
Note: The Charge 4 charging cable has a gray connector on the base of the clip. The Charge 3 charger doesn’t work with Charge 4.
To charge Charge 4:
1.Plug the charging cable into the USB port on your computer, or a UL-certified USB wall charger, or another low-energy charging device.
2.Clip the other end of the charging cable to the port on the back of Charge 4. The pins on the charging clip must lock securely with the gold contacts on the
7

back of the tracker. Charge 4 vibrates, and a battery icon appears on the screen.
Charging fully takes about 1-2 hours. While the tracker charges, you can press the button to check the battery level. A fully-charged tracker shows a solid battery icon with a smile.
Set up with your phone or tablet
Set up Charge 4 with the Fitbit app. The Fitbit app is compatible with most popular phones and tablets. For more information, see fitbit.com/devices.
8
To get started:
1. Download the Fitbit app:
•Apple App Store for iPhones and iPads
•Google Play Store for Android phones
2.Install the app, and open it.
•If you already have a Fitbit account, log in to your account > tap the Today tab  > your profile picture > Set Up a Device.
•If you don't have a Fitbit account, tap Join Fitbit to be guided through a series of questions to create a Fitbit account.
3.Continue to follow the on-screen instructions to connect Charge 4 to your account.
When you're done with setup, read through the guide to learn more about your new tracker and then explore the Fitbit app.
For more information, see help.fitbit.com.
See your data in the Fitbit app
Sync Charge 4 to transfer your data to the Fitbit app, where you can view your activity and sleep data, log food and water, participate in challenges, and more.
Each time you open the Fitbit app, Charge 4 syncs automatically when it's nearby. You can also use the Sync Now option in the app at any time.
9

Unlock Fitbit Premium
Fitbit Premium helps you build healthy habits by offering tailored workouts, insights into how your behavior impacts your health, and personalized plans to help you reach your goals. A Fitbit Premium subscription includes health insights and guidance, advanced sleep tools, customized programs, and 150+ workouts from fitness brands.
For more information, see help.fitbit.com.
10
Wear Charge 4
Place Charge 4 around your wrist. If you need to attach a different size band, or if you purchased another band, see the instructions in "Change the band" on page 13.
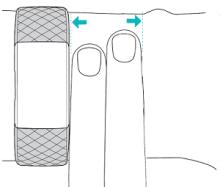
Placement for all-day wear vs. exercise
When you're not exercising, wear Charge 4 a finger's width above your wrist bone.
For optimized heart-rate tracking while exercising:
•During a workout, experiment with wearing your tracker higher on your wrist (2 finger widths) for an improved fit. Many exercises, such as bike riding or weight lifting, cause you to bend your wrist frequently, which could interfere with the heart-rate signal if the tracker is lower on your wrist.
11
•Wear your tracker on top of your wrist, and make sure the back of the device is in contact with your skin.
•Consider tightening your band before a workout and loosening it when you’re done. The band should be snug but not constricting (a tight band restricts blood flow, potentially affecting the heart-rate signal).
Handedness
For greater accuracy, you must specify whether you wear Charge 4 on your dominant or non-dominant hand. Your dominant hand is the one you use for writing and eating. To start, the Wrist setting is set to non-dominant. If you wear Charge 4 on your dominant hand, change the Wrist setting in the Fitbit app:
From the Today tab  in the Fitbit app, tap your profile picture > Charge 4 tile > Wrist > Dominant.
12

Change the band
Charge 4 comes with a small band attached and an additional large, bottom band in the box. Both the top and bottom bands can be swapped with accessory bands, sold separately on fitbit.com. For band measurements, see "Band size" on page 51. Charge 3 bands are compatible with Charge 4.
Remove a band
1.Turn over Charge 4 and find the band latches.
2.To release the latch, press down on the flat button on the band.
3. Gently pull the band away from the tracker to release it.
4. Repeat on the other side.
13

Attach a new band
To attach a new band, press it into the end of the tracker until you feel it snap into place.
If you have trouble attaching the band or if it feels loose, gently move the band back and forth to make sure it's attached to the tracker.
14

Basics
Learn how to manage Charge 4's settings, set a personal PIN code, navigate the screen, and more.
Navigate Charge 4
Charge 4 has a PMOLED touchscreen display and 1 button.
Navigate Charge 4 by tapping the screen, swiping side to side and up and down, or pressing the button. To preserve battery, the tracker’s screen turns off when not in use.
Basic navigation
The home screen is the clock.
•Swipe down to see notifications.
•Swipe up to see your daily stats.
•Swipe left to see the apps on your tracker.
•Press the button to go back to a previous screen or return to the clock face.
15

16

Quick settings
Press and hold the button and swipe left on Charge 4 for a faster way to access certain settings. Tap a setting to turn it on or off. When you turn off the setting, the icon appears dim with a line through it.
On the quick settings screen:
17

DND (Do not disturb) |
When the do not disturb setting is on, notifications, goal |
||
|
celebrations, and reminders to move don't cause the tracker |
||
|
to vibrate or the screen to turn on. |
|
|
|
You can't turn on do not disturb and sleep mode at the same |
||
|
time. |
|
|
|
|
|
|
Sleep Mode |
When the sleep mode setting is on: |
|
|
|
• Notifications don't cause the tracker to vibrate or |
||
|
|
the screen to turn on. |
|
|
• The screen's brightness is set to dim. |
||
|
• |
Turning your wrist won't cause the tracker's |
|
|
|
screen to turn on. |
|
|
Sleep mode doesn't automatically turn off unless you set a |
||
|
sleep mode schedule. To schedule sleep mode to |
||
|
automatically turn on during certain hours: |
||
|
1. |
Open the Settings app |
and tap Sleep Mode. |
|
2. |
Tap Schedule to turn it on. |
|
|
3. |
Tap Sleep Interval and set your sleep mode |
|
|
|
schedule. Sleep mode automatically turns off at |
|
|
|
the time you schedule, even if you manually |
|
|
|
turned it on. |
|
|
You can't turn on do not disturb and sleep mode at the same |
||
|
time. |
|
|
|
|
||
Screen Wake |
When the screen wake setting is on, turn your wrist toward |
||
|
you to turn on the screen. |
|
|
|
|
|
|
Adjust settings
Manage basic settings in the Settings app  :
:
18
Brightness |
Change the screen's brightness. |
|
|
Vibrations |
Adjust your tracker's vibration strength. |
|
|
Heart Rate |
Turn heart-rate tracking on or off. |
|
|
Do Not |
Adjust do not disturb settings, including whether the mode should turn on |
Disturb |
automatically when you use the Exercise app. |
|
|
Sleep |
Adjust sleep mode settings, including setting a schedule for the mode to |
Mode |
automatically turn on and off. |
|
|
Heart |
Turn heart-rate zone alerts on or off. |
Zone |
|
Alerts |
|
|
|
Tap a setting to adjust it. Swipe up to see the full list of settings.
Check battery level
On the clock face, swipe up. The battery level icon is at the top of the screen.
Set up device lock
To help keep your tracker secure, turn on device lock in the Fitbit app, which prompts you to enter a personal 4-digit PIN code to unlock your tracker. If you set up Fitbit Pay to make contactless payments from your tracker, device lock is turned on automatically and you're required to set a code. If you don't use Fitbit Pay, device lock is optional.
Turn on device lock or reset your PIN code in the Fitbit app:
From the Today tab  in the Fitbit app, tap your profile picture > Charge 4 tile > Device Lock.
For more information, see help.fitbit.com.
19
Turn off the screen
To turn off Charge 4's screen when not in use, briefly cover the tracker face with your opposite hand, press the button, or turn your wrist away from your body.
Care for Charge 4
It's important to clean and dry Charge 4 regularly. For more information, see fitbit.com/productcare.
20
Loading...