


Fisher & Paykel DW60CH User Manual

INSTALLATION INSTRUCTIONS
USER GUIDE
Dishwasher
DW60CH, DW60CHP and DW60CK
models
NZ AU


CONTENTS
Safety and warnings 2
Installation instructions 6
Introduction 14
Using your dishwasher - quick reference 15
CH & CHP models
Controls and starting a wash 16
Setting a Delayed start 19
User preference settings 20
CK models
Controls and starting a wash 22
Setting Delay start 25
Changing Wash options 26
User preference settings 28
Caring for your dinnerware 30
Loading 31
Water hardness and dishwashing 35
Wash programmes and detergent quantities 36
Adding detergent 37
Using rinse aid 38
After the wash 39
Care and cleaning 40
Fault codes 42
Trouble shooting 43
Warranty and service 46
Wash prograrmme data 48
Standards test 49
IMPORTANT!
SAVE THESE INSTRUCTIONS
The models shown in this user guide may not be available in all markets and are subject
to change at any time. For current details about model and specification availability in
your country, please go to our website www.fisherpaykel.com or contact your local
Fisher & Paykel dealer.
1

SAFETY AND WARNINGS
Your dishwasher has been carefully designed to operate safely during normal
dishwashing procedures. Please keep the following instructions in mind when you are
using your dishwasher.
IMPORTANT SAFETY INSTRUCTIONS
WARNING! When using your dishwasher, follow basic precautions, including the
following:
●
Read all instructions before using the dishwasher.
●
The information in this manual must be followed to minimise the risk of fire or
explosion or to prevent property damage, personal injury or loss of life.
●
Use the dishwasher only for its intended function as described in this user guide.
●
This appliance is intended to be used in household and similar applications such as:
– staff kitchen areas in shops, offices and other working environments;
– farm houses;
– by clients in hotels, motels and other residential type environments;
– bed and breakfast type environments.
●
Use only detergents or rinse aid recommended for use in a domestic dishwasher and
keep them out of reach of children.
●
Check that the detergent dispenser is empty after the completion of each wash
program.
●
When loading items to be washed, locate sharp items so that they are not likely to
damage the dishwasher and load sharp knives with the handle up to reduce the risk of
cut-type injuries.
●
Do not touch the filter plate (the metal disc in the dishwasher base) during or
immediately after use, as it may be hot from the heater plate underneath.
●
Do not tamper with the controls.
●
Do not abuse, sit in, stand on the door or dish rack of the dishwasher.
●
Do not lean on the adjustable racks or use them to support your body weight.
●
To reduce the risk of injury, do not allow children to play in or on the dishwasher.
●
Under certain conditions, hydrogen gas may be produced in a hot water heater system
that has not been used for two weeks or more. HYDROGEN GAS IS EXPLOSIVE. If the
hot water system has not been used for such a period, before using the dishwasher,
turn on all hot water taps and let the water flow from each for several minutes. This
will release any accumulated hydrogen gas. As the gas is flammable, do not smoke or
use an open flame during this time.
●
Remove the door to the washing compartment when removing an old dishwasher
from service or discarding it.
●
Some dishwasher detergents are strongly alkaline. They can be extremely dangerous
if swallowed.
●
Avoid contact with the skin and eyes and keep children away from the dishwasher
when the door is open. Check that the detergent receptacle is empty after completion
of the wash cycle.
2

SAFETY AND WARNINGS
IMPORTANT SAFETY INSTRUCTIONS
Installation
●
This dishwasher must be installed and located in accordance with the Installation
instructions before it is used.
●
If you did not receive Installation instructions with your dishwasher, you can order
them by calling your Authorised Repairer or download them from our local Fisher &
Paykel website, listed on the back cover.
●
Installation and service must be performed by a qualified technician.
●
If the power supply cord is damaged, it must be replaced by a dealer or Authorised
Repairer or a similar qualified trades person in order to avoid a hazard.
●
Ensure the dishwasher is placed between cabinetry. Failure to do so may result in an
unstable product, which may cause damage or injury.
●
Do not operate this appliance if it is damaged, malfunctioning, partially disassembled
or has missing or broken parts, including a damaged power supply cord or plug.
●
Do not store or use petrol, or other flammable vapours and liquids in the vicinity of
the dishwasher.
●
Connect to a properly rated, protected and sized power supply circuit to avoid
electrical overload.
●
Make sure that the power supply cord is located so that it will not be stepped on,
tripped over or otherwise subject to damage or stress.
●
Do not install or store the dishwasher where it will be exposed to temperatures below
freezing or exposed to weather.
●
Do not use an extension cord or a portable electrical outlet device (e.g. multi-socket
outlet box) to connect the dishwasher to the power supply.
●
This appliance must be earthed. In the event of a malfunction or breakdown, earthing
will reduce the risk of electric shock by providing a path of least resistance for
electric current.
●
This appliance is equipped with a cord having an equipment-earthing conductor and
a earthing plug. The plug must be plugged into an appropriate outlet that is installed
and earthed in accordance with all local codes and ordinances.
●
WARNING - Improper connection of the equipment-earthing conductor can result in
a risk of electric shock. Check with a qualified electrician or service representative
if you are in doubt as to whether the appliance is properly earthed. Do not modify
the plug provided with the appliance; if it will not fit the outlet, have a proper outlet
installed by a qualified technician. If the dishwasher is installed as a permanently
connected appliance, please follow the earthing instructions:
●
EARTHING INSTRUCTIONS - This appliance must be connected to a earthed metal,
permanent wiring system, or an equipment-earthing conductor must be run with the
circuit conductors and connected to the equipment-earthing terminal or lead on the
appliance.
3

SAFETY AND WARNINGS
IMPORTANT SAFETY INSTRUCTIONS
Maintenance
●
Disconnect the appliance from the power supply before any cleaning or maintenance.
●
When disconnecting the appliance pull the plug rather than the power supply cord or
junction of cord to avoid damage.
●
Do not repair or replace any part of the appliance or attempt any servicing unless
specifically recommended in this user guide.
●
We recommend that you contact Customer Care to arrange service. See your ‘Service
and warranty’ booklet for contact details.
●
Keep the floor around your appliance clean and dry to reduce the possibility of
slipping.
●
Keep the area around/underneath your appliance free from the accumulation of
combustible materials, such as lint, paper, rags and chemicals.
Operational
●
Open the door very carefully if the dishwasher is in operation. There is a risk of being
sprayed with hot water. Do not open the door fully until the spray arms have stopped
rotating.
●
The door should not be left in the open position as this could present a tripping
hazard.
●
The water inside the dishwasher is not suitable for drinking.
●
Always press the button to pause and wait a few seconds before opening the
drawer.
●
The dishwasher must be used with the filter plate, drain filter and spray arm(s) in
place. To identify what these parts are, see drawings in section ‘‘Care and Cleaning’
of this user guide.
●
Do not operate this dishwasher if it is damaged, malfunctioning, partially
disassembled or has missing or broken parts, including a damaged power supply cord
or plug.
●
Children of less than 8 years old must be kept away from the appliance unless
continuously supervised. This appliance can be used by children aged from 8 years
and above, and persons with reduced physical, sensory or mental capabilities or
lack of experience and knowledge, if they have been given supervision or instruction
concerning the use of the appliance in a safe way and they understand the hazards
involved.
●
Cleaning and user maintenance shall not be done by children without supervision.
●
Do not allow children to play inside, on or with this appliance or any discarded
appliance.
●
If a dishwasher cleaner is used, we would strongly recommend a wash program
with detergent should be run immediately afterward, to prevent any damage to the
dishwasher.
●
The dishwasher is designed for washing normal household utensils. Items that are
contaminated by petrol, paint, steel or iron debris, corrosive, acidic or alkaline
chemicals are not to be washed in the dishwasher.
●
If the dishwasher is not being used for long periods of time, turn the electricity and
water supply to the dishwasher off.
4


INSTALLATION INSTRUCTIONS
Before you start
Safety and compliance
●
These instructions are intended as a guide only. It is the responsibility of the installer
to ensure that installation complies with applicable regulations and local government
by-laws.
●
Installation must be performed by a suitably qualified person. Incorrect installation or
malfunctioning resulting from incorrect installation are not covered by warranty.
●
Carefully read through the ‘Safety and warnings’ section of this document.
●
The dishwasher must not be connected to the electrical supply while it is being installed.
Ensure all domestic wiring is properly earthed.
●
If an old appliance is being replaced, make sure it is disposed of properly. To avoid
children getting trapped or injured while playing with an old appliance, ensure you
remove any doors, door locks and cables from it.
●
In order to ensure that the dishwasher is stable, it must be installed under a continuous
surface which is attached to adjacent cupboards.
Unpacking and handling
●
Check packaging and dishwasher for signs of transport damage. If the dishwasher is in
any way damaged, do not install it. Contact the dealer the dishwasher was purchased
from.
●
Disposal of packaging: some of the packaging is recyclable. Check the symbols and
labels and recycle if possible.
●
Never lift the dishwasher from the door handle or the top panel. Doing so may cause
damage.
●
Always be careful with the hoses and power cord at the back of the dishwasher. Careful
handling will prevent damage and malfunction from squashing, kinking or cuts.
●
While installing the dishwasher, check the drain hose is not restricted or kinked.
Connections and services
●
Check that the power cord is long enough to reach the outlet. If it isn’t, it must be
replaced by a Fisher & Paykel authorised technician. Extension cords or multi-outlet
power boards should not be used to connect the dishwasher to the power supply.
●
Check that the hoses are long enough to reach the services. If a hose needs extending,
ensure that the extension hose is new and of equal quality and diameter to the one
already fitted. Note: the drain hose should not be longer than 4 m, as a longer drain
hose will cause reduced performance.
●
The dishwasher should not be connected to a water system where the temperature
exceeds 60oC, or where there is no temperature control, e.g. wetback system, unless the
system is fitted with a suitable tempering valve.
●
The dishwasher must not be connected to an undersink high-pressure “push-through”
type hot water system, as damage to the system will result.
6

INSTALLATION INSTRUCTIONS
Technical data
Check the electrical data on the rating label (located on the left-hand side of the
dishwasher’s stainless steel inner door). Should the data on the rating label be different
to those specified below, consider those on the rating label as correct.
DW60CH/CHP DW60CK
Capacity 14 standard place settings 14 standard place settings
Mains water
pressure
Power voltage 230-240 V (50 Hz) 220-240 V (50 Hz)
Maximum current
intensity
Total absorbed
power
Colour
White
Stainless Steel
Anti-flood protection
This dishwasher has anti-flood protection, which will stop the water flowing in the event
of a leak within the machine.
0.03-1 MPa (= 0.3-10 bar) 0.03-1 MPa (= 0.3-10 bar)
10 A 10 A
1900-2050 W 1720-2050 W
DW60CHW/DW60CHPW
DW60CHX/DW60CHPX
DW60CKW
DW60CKX
7
INSTALLATION INSTRUCTIONS
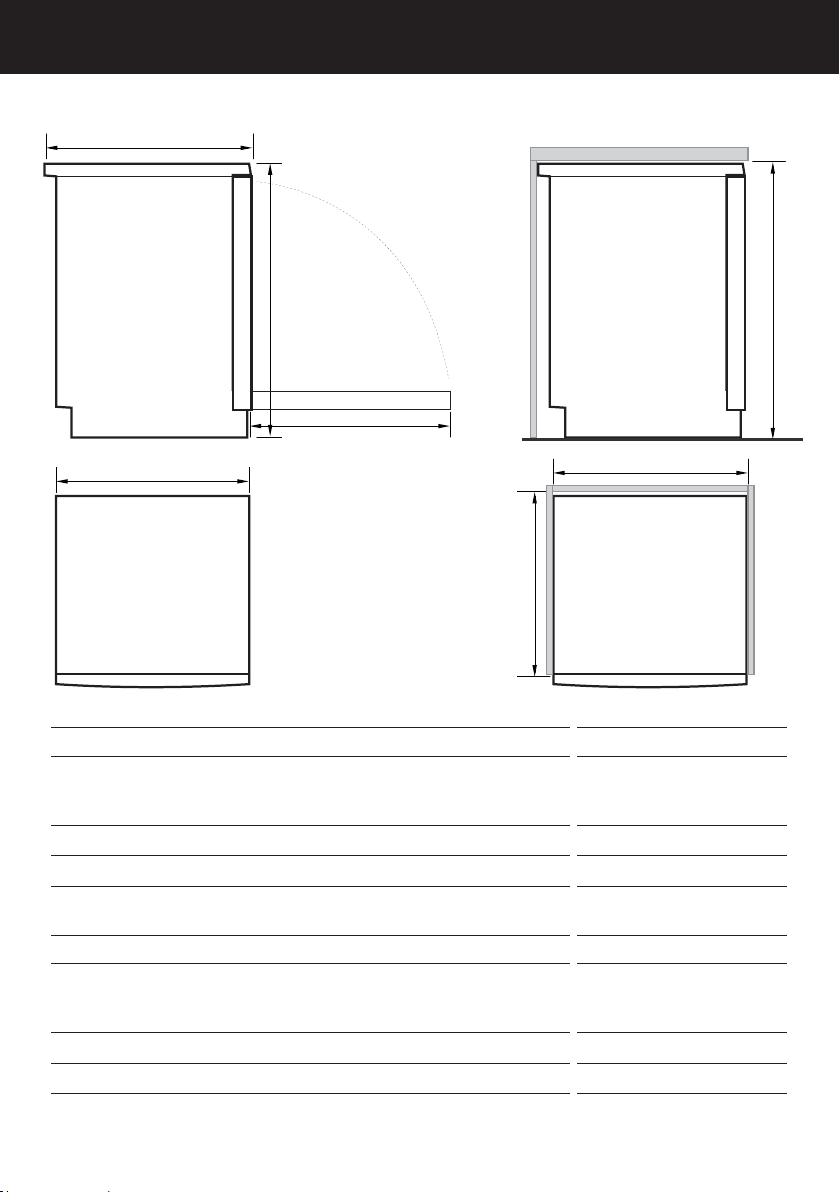
Product and cabinetry dimensions
C
A
D
B
G
Product Dimensions mm
Overall height of product
A
with top panel in place
with top panel removed*
Overall width of product 598
B
Overall depth of product 612
C
Depth of open door
D
(measured from front of kickstrip)
Cabinetry Dimensions
Inside height of cavity
E
with top panel in place
with top panel removed*
min. inside width of cavity 600
F
min. inside depth of cavity 605
G
* The top panel may be removed to suit underbench cavity height. See instructions further below.
**Depending on feet height adjustment.
8
F
850 (min) -870 (max)**
820 (min) -840 (max)**
855 (min) -875 (max)**
825 (min) -845 (max)**
E
595
INSTALLATION INSTRUCTIONS
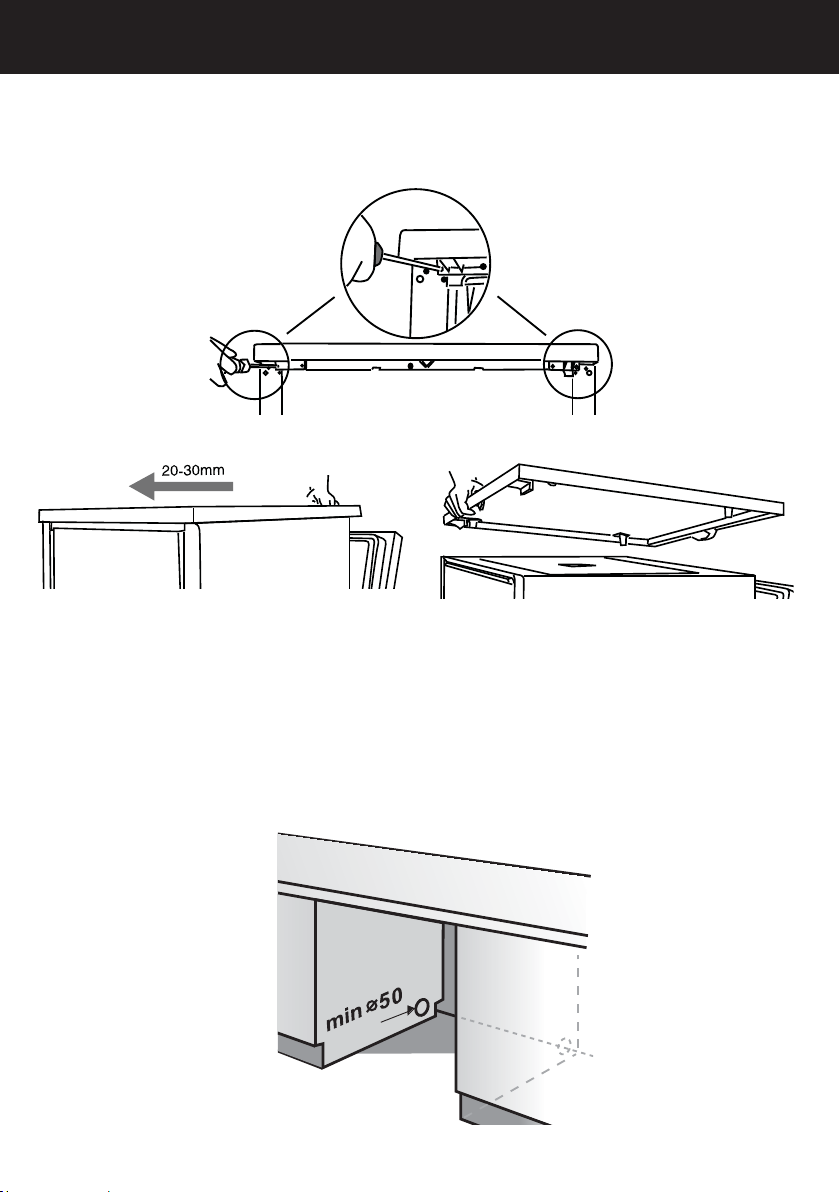
Preparing the product and cabinetry
●
The top panel may be removed to suit underbench cavity height. See the illustrations
below.
1
23
IMPORTANT!
To prevent possible steam damage to the cabinetry, ensure that any bare wood
surrounding the dishwasher is sealed with an oil-based paint or moisture-proof
polyurethane.
●
Services can be located either side of the dishwasher.
●
Ensure that the services hole has a minimum diameter of 50 mm.
mm
9
INSTALLATION INSTRUCTIONS
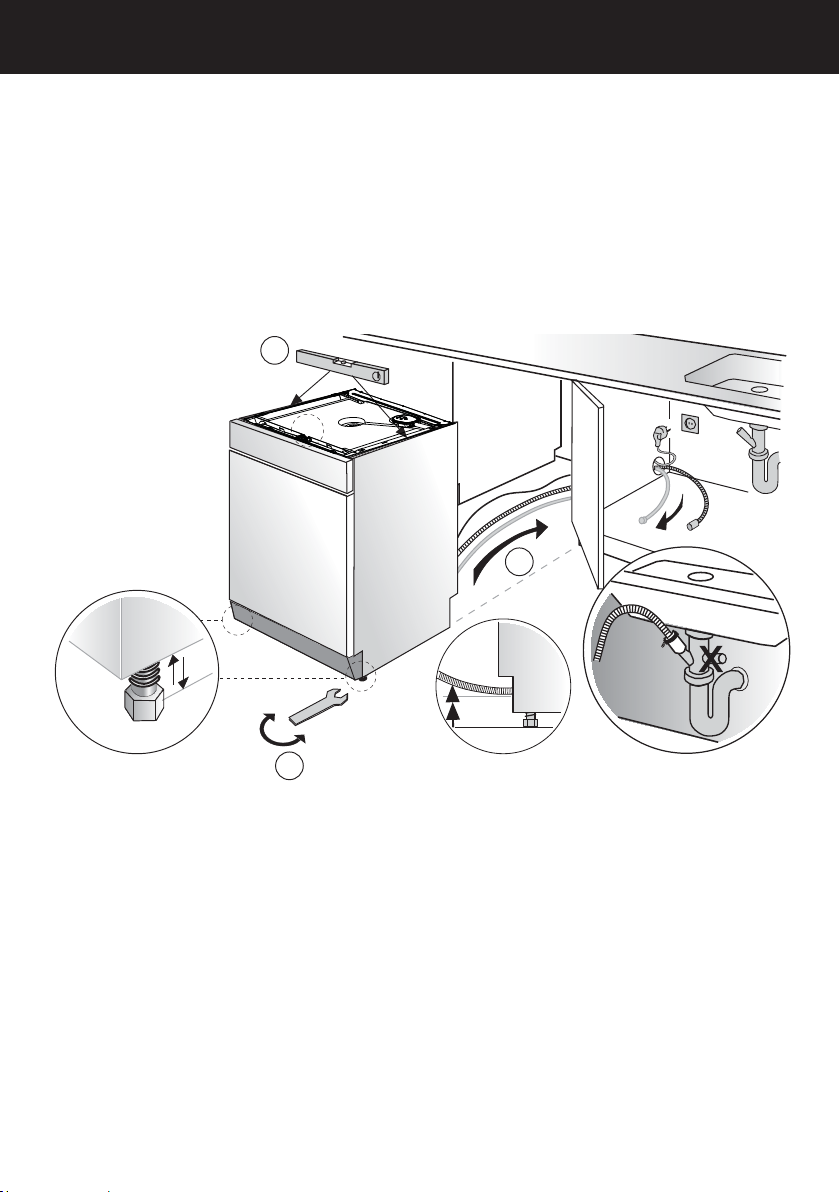
Levelling and positioning the dishwasher
●
Before sliding the dishwasher into position, adjust the feet with a spanner (1) to ensure
that the dishwasher is level (2) and the required height.
●
Do not lift the dishwasher from the door handle or top panel.
●
Position the dishwasher in the cavity, ensuring that the hoses and power cord don’t get
bent, crimped, or trapped under the dishwasher in the process (3).
●
We recommend that you adjust the feet so that the dishwasher sits securely under the
bench top so that it doesn’t tip.
2
3
10
1
INSTALLATION INSTRUCTIONS
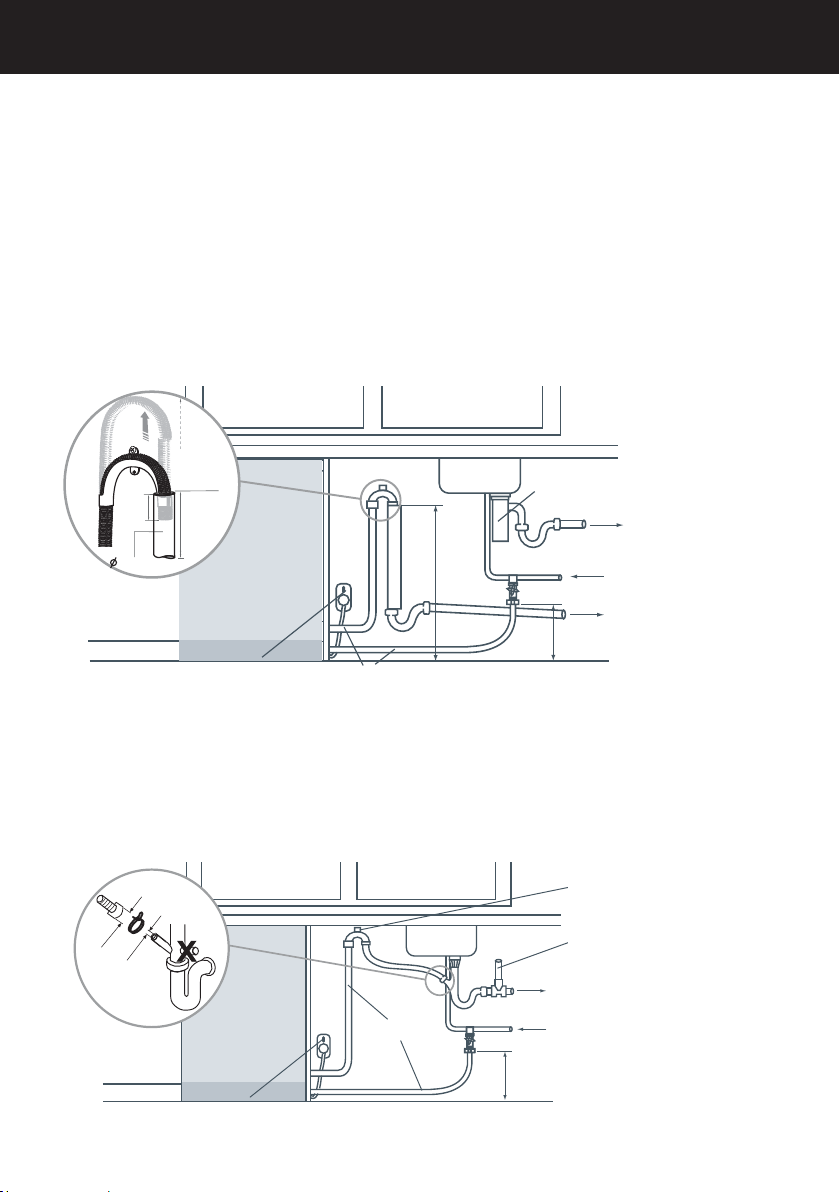
Plumbing -- Waste connection
These drainage options are designed to eliminate problems that occur with combined
sink-dishwasher waste systems.
Drainage option A: Separate sink and dishwasher waste systems
●
The standpipe must have a minimum diameter of 38 mm and stand 750 mm above the
floor.
●
Use the supplied drain hose support to hold the drain hose in place in the standpipe.
IMPORTANT!
We do not recommend connecting the drain hose or drain pipe directly to a built-in
waste disposal unit.
Waste disposal
min.
120
mm
min.
750 mm
unit (optional)
Was te
min.38 mm
Power outlet with
disconnection switch
Hose supplied
min.
750 mm
Water
Was te
min. 200 mm
Drainage option B: Combined sink and dishwasher waste systems
●
When connecting the drain hose to a sink trap with a drain hose spigot, make sure
that the drain hose is supported to the height of the bench.
●
Ensure the drain spigot has a minimum hole diameter of 15 mm and it has been drilled
out.
Ensure drain hose is supported to
height of bench
Vent
min. Ø21mm
min. Ø15mm
Hose supplied
Power outlet with
disconnection switch
Was te
Water
min. 200 mm
11
INSTALLATION INSTRUCTIONS
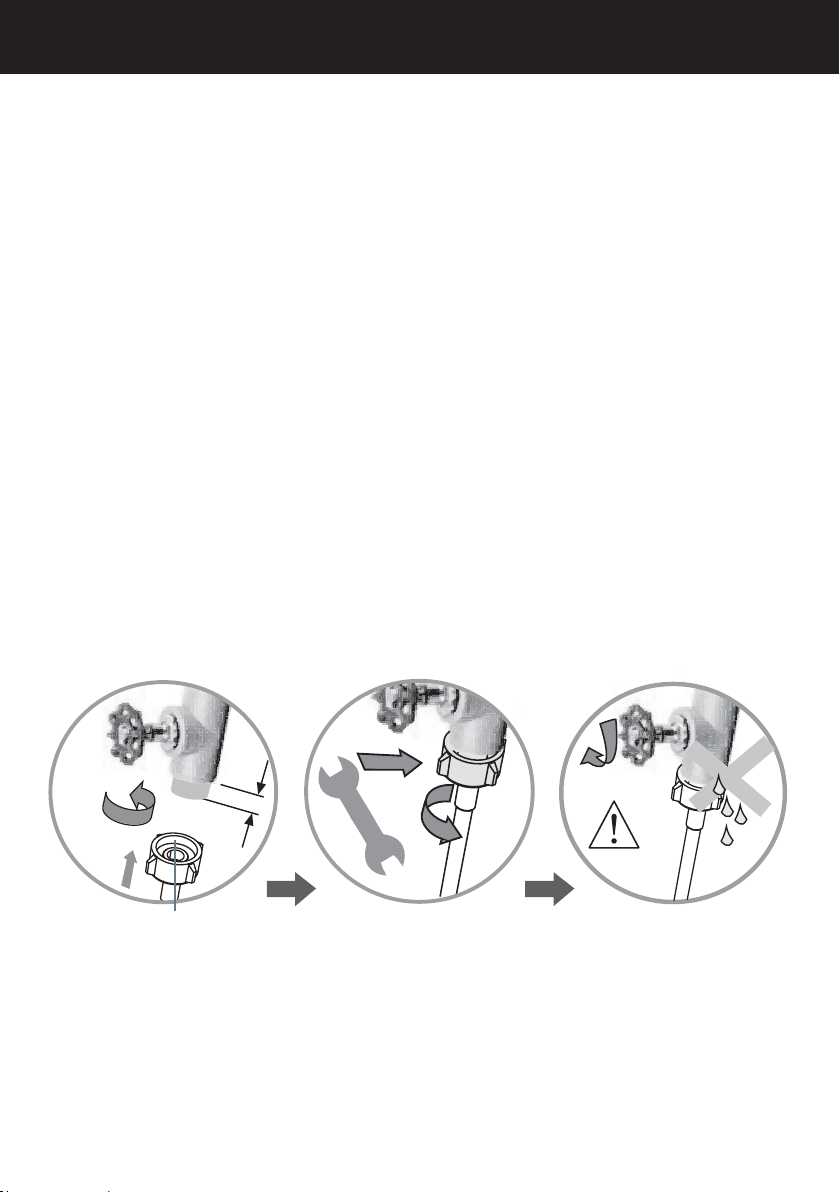
Plumbing -- Water inlet connection
IMPORTANT!
●
The appliance should be connected to the water main using the new water inlet hose
supplied. Old hoses should not be used.
●
Do not shorten the inlet hose.
1 Take note of water connection requirements.
●
The dishwasher has a single valve water connection.
●
We recommend a cold water connection for best performance and energy efficiency.
●
The incoming water temperature should not exceed 25oC.
2 Take note of the permitted water pressure extremes.
●
Lowest: 0.3 bar = 3 N/cm2 = 30kPa
●
Where pressure is below 1 bar, contact a qualified plumber.
●
Highest: 10 bar = 100 N/cm2 = 1MPa
●
Where pressure is above 10 bar, a pressure reduction valve must be installed. Contact
a qualified plumber.
3 Connect the water inlet hose to an accessible water tap with a 3/4” BSP connector.
Ensure that there is no kink in the inlet hose that could restrict the flow of water. A 90o
bend requires a minimum height of 200 mm for a kink-free curve.
●
Ensure incoming water is clear. If the water pipes have not been used for a long
period of time, let the water run to make sure it is clear with no impurities. Not doing
so may result in the water inlet hose getting blocked and damaging the appliance.
●
If required, use a filter insert to filter out deposits from the piping. The filter insert is
available from your Authorised Service Centre or Customer Care.
4 Tighten the hose coupling a further half turn after seal contact.
5 Check that the connection does not leak.
12
10 mm
3/4” BSP connector
min.

INSTALLATION INSTRUCTIONS
Electrical connection
●
The dishwasher must not be connected to the electrical supply while installation is
being carried out. Ensure all domestic wiring is properly earthed.
●
Check the rating label (located on the left-hand side of the dishwasher’s stainless steel
inner door) and ensure that the voltage and frequency values for the current in the
house correspond to those on the rating label.
●
Insert the plug into a properly earthed power outlet that has a disconnection switch.
IMPORTANT!
●
The earthing of the appliance is a safety requirement mandated by law.
●
If the power cord is not long enough to reach the outlet or the outlet to which the
appliance must be connected is not appropriate for the plug, the entire dishwasher
power cord must be replaced. This should only be done by a Fisher & Paykel
authorised technician. Do not modify or cut the plug. Do not use an adaptor,
extension cord, or multi-outlet power board to connect the dishwasher to the power
supply, as these could cause overheating and create a fire hazard.
●
The outlet into which the dishwasher is plugged must remain easily accessible (e.g.
in an adjacent cabinet) even when the appliance is installed. This is to ensure that
the dishwasher can be disconnected from the power supply for safe cleaning and
maintenance.
Installer final checklist
●
Check that the door opens and closes freely without resistance to adjacent cabinetry.
●
Check that the plug is accessible.
●
Check that the dishwasher is level. If necessary, adjust the levelling feet slightly. To
ensure optimum performance, the diswasher should not be inclined more than 2o.
Check with a spirit level.
●
Check the operation of the dishwasher:
1 Press to turn the dishwasher on.
2 Select the Rinse programme.
CH & CHP models: Press until Rinse is selected.
CK models: Press ‘Program’ button to scroll to ‘Rinse’
3 Press to start the Rinse programme.
Can you hear the dishwasher filling?
4 When the Rinse programme is over (approx. 20 minutes), check that the water has
drained.
If a fault code appears, see the ‘Fault codes’ section of the User guide for advice.
13
INTRODUCTION
Before you start
●
Make sure the installer has completed the ‘Final checklist’ in the Installation instructions.
●
Read this guide, taking special note of the ‘Safety and warnings’ section.
●
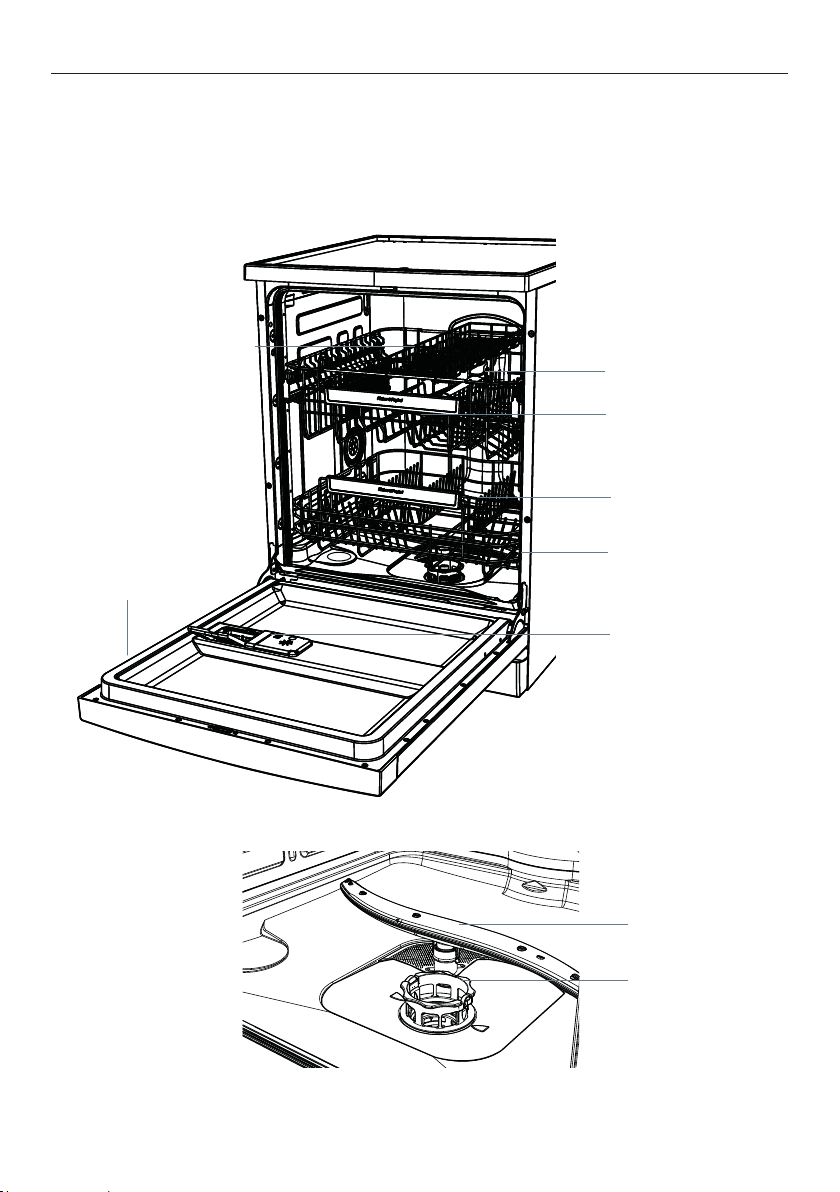
Remove all packaging and check you have the accessories listed below.
Utensil tray
Upper basket
Upper spray arm
Lower basket
Door seal
Rating label
Detergent and rinse aid
dispensers
Cutlery basket
(not shown)
Lower spray arm
Filters
14
USING YOUR DISHWASHER – QUICK REFERENCE
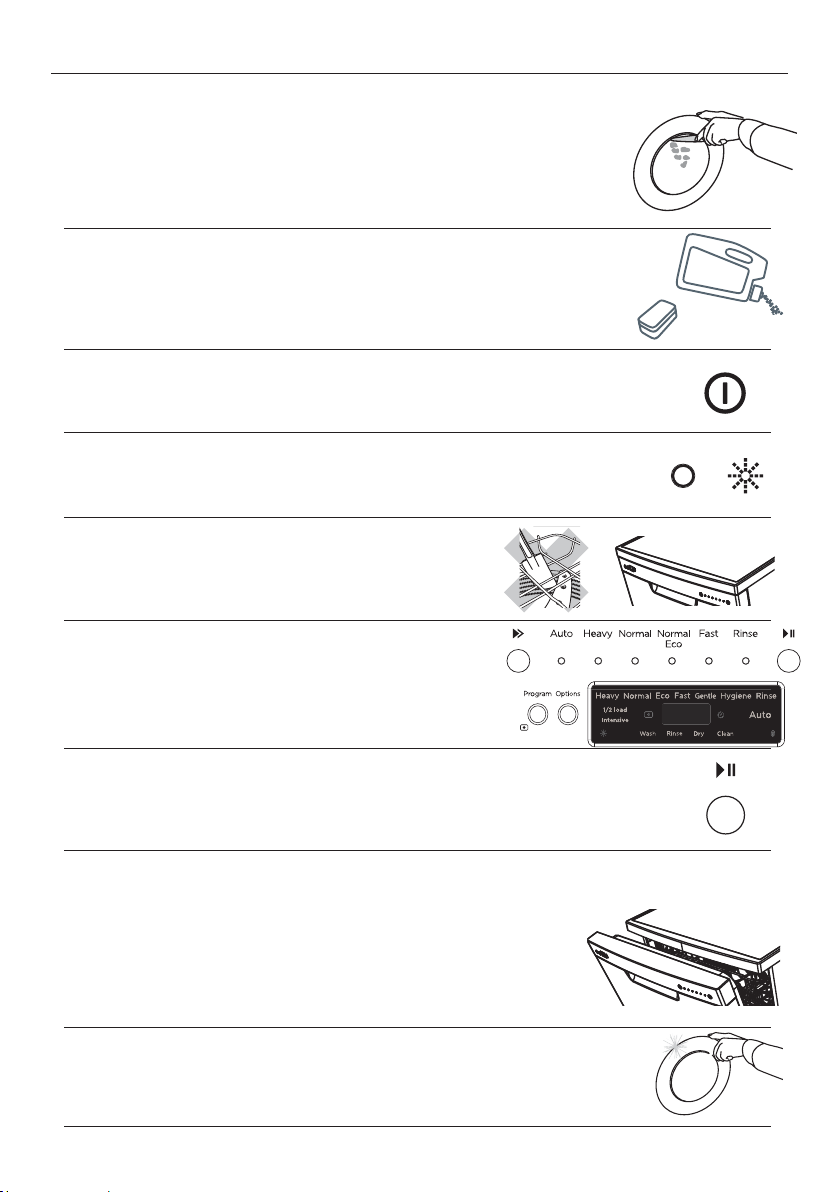
Starting a wash
1 Remove food scraps and load dishes carefully
For more detail, see sections
‘Caring for your dinnerware’
‘Loading’
2 Add detergent
For more detail, see sections
‘Water hardness and dishwashing’
‘Wash programmes and detergent quantities’
‘Adding detergent’
3 Turn power on (also check water is turned on)
For more detail, see section
‘Controls and starting a wash’
4 Check rinse aid level, refill if necessary
For more detail, see section
‘Using rinse aid’
5 Check that nothing obstructs the spray arms, then
close the door firmly
6 Select wash programme
For more detail, see section
‘Controls and starting a wash’
‘Wash programmes and detergent quantities’
7 Start wash OR set Delay start
For more detail, see section
‘Controls and starting a wash’
‘Setting Delay start’
After the wash
8 Open the door slightly and leave ajar to help drying
For more detail, see section
‘After the wash’
CH & CHP models
CK models
9 Once cooled, unload dishes carefully
For more detail, see section
‘After the wash’
!0 Check condition of dishwasher, clean if necessary
15
 Loading...