


Installation instructions
and user guide US CA (EN)
Active Smart™ Refrigeration
Instructions d’installation et
guide de l’utilisateur US CA (FR)
Réfrigération Active Smart™
US CA

Important: This User Guide is to be used for all refrigerator/freezers. It contains all the
general information required for the operation of your refrigerator/freezer.
A User Guide is provided with the Ice & Water refrigerator. This booklet contains additional
specific information about the ice and water functions on the refrigerator
The models shown in this user guide may not be available in all markets and are subject
to change at any time. For current details about model and specification availability in
your country, please go to our website www.fisherpaykel.com / www.fisherpaykel.ca or
contact your local Fisher & Paykel dealer.
Important : Ce Guide de l’utilisateur est destiné à tous les réfrigérateurs/congélateurs.
Il contient toute l’information générale nécessaire au bon fonctionnement de votre
réfrigérateur/congélateur.
Un Guide de l’utilisateur est fourni avec chaque réfrigérateur Ice & Water. Ce livret contient
des renseignements supplémentaires sur les fonctions du système Ice & Water de votre
réfrigérateur.
Les modèles illustrés dans ce guide de l’utilisateur peuvent ne pas être offerts dans
tous les marchés et sont sujets à modification en tout temps. Pour connaître le modèle
et les spécifications applicables à votre pays, veuillez visiter notre site Web à
www.fisherpaykel.com / www.fisherpaykel.ca ou communiquer avec le représentant
Fisher & Paykel de votre région.

Contents
Important Safety Information 4
Installation – Four Essential Requirements 6
Moving or Storing Your Refrigerator 9
Ice & Water Refrigerators – please refer to supplement Ice & Water User Guide 10
Active Smart™ Operating Instructions 10
Active Smart™ Special Features 12
Active Smart™ Maintenance 13
Cleaning Care 14
Storing Food in Your Refrigerator 17
Storing Food in Your Freezer 19
Problem Solving Checklist 21
Limited Warranty 23
EN
Table des matières
Consignes de sécurité importantes 26
Installation – quatre exigences essentielles 28
Déplacement ou entreposage du réfrigérateur 31
Réfrigérateurs Ice & Water
– veuillez consulter le supplément au Guide de l’utilisateur du système Ice & Water 32
Procédures de mise en marche de l’Active Smart™ 32
Caractéristiques spéciales de l’Active Smart™ 34
Entretien de l’Active Smart™ 35
Nettoyage 36
Conservation des aliments au réfrigérateur 39
Conservation des aliments au congélateur 41
Un problème! Que faire? 43
Garantie limitée 45
FR
3

Important Safety Information
To reduce the risk of fire, electric shock, or injury to persons read the IMPORTANT SAFETY
INSTRUCTIONS before operating this appliance.
Use this appliance only for its intended purpose as described in this User Guide.
Warning
When using this appliance always exercise basic safety precautions including the following:
Danger
This appliance is not intended for use by young children or infirm persons without supervision.
Young children should be supervised to ensure they do not play with the appliance.
Risk of child entrapment. Before you throw away your old refrigerator or freezer:
–Take off the doors
–Leave the shelves in place so that children may not easily climb inside.
Disposal
Extreme care must be taken when disposing of your old appliance to avoid hazards. The
refrigerant gas must be safely removed and for the safety of young children, remove doors.
Your Fisher & Paykel Appliances Authorised Service Center will be able to give advice on
environmentally friendly methods of disposing of your old refrigerator or freezer.
Electrical
This appliance must be properly installed in accordance with the installation instruction before it
is used.
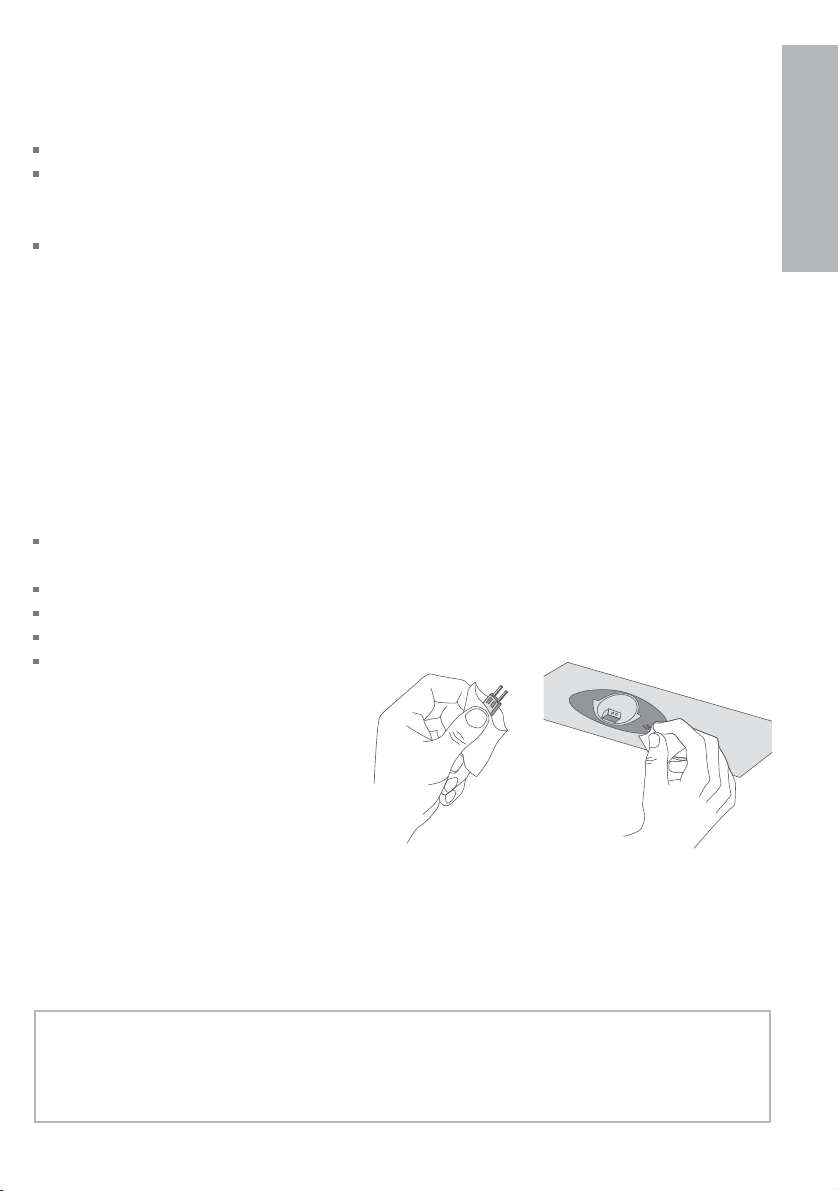
Never unplug your refrigerator by pulling on the power cord.
Always grip the plug firmly and pull straight out from the outlet.
Do not plug in any other appliance at its power point or use extension cords or double adapters.
Repair or replace immediately all electric service cords that have become frayed or otherwise
damaged. Do not use a cord that shows cracks or abrasion along its length or at either the plug
or appliance end.
If the power supply cord is damaged, it must only be replaced by your Fisher & Paykel Appliances
Authorised Service Center because special purpose tools are required.
When moving your appliance away from the wall, be careful not to roll over or damage the
power cord.
Unplug your refrigerator before cleaning or replacing the lightbulb.
I
4

Important Safety Information
Storing Food and Drinks
Never store volatile or flammable materials in your refrigerator or freezer as they may explode.
Never freeze liquids in glass containers. Liquid expands during freezing, which may cause the
container to explode.
Never freeze carbonated drinks. They may explode.
Do not consume food if it is too cold. Food removed from the freezer compartment may be cold
enough to cause damage when brought into contact with bare skin e.g. frozen ice cubes.
Power Failure – Food Safety
Do not refreeze frozen foods that have thawed completely. Follow the recommendations below
if you discover food in your freezer has thawed:
1) Ice crystals still visible – food may be refrozen but should be stored for a shorter period than
recommended.
2) Thawed but refrigerator cold – refreezing generally not recommended. Fruits and some
cooked food can be refrozen but use as soon as possible. Meat, fish, poultry – use immediately
or cook then refreeze. Vegetables – discard as they usually go limp and soggy.
3) Thawed but warmer than 4˚C /40˚F. Red meat can be cooked immediately and refrozen but
use as soon as possible. Discard all other frozen foods.
Do not refreeze frozen foods that have thawed completely. The food may be dangerous to eat.
EN
Cleaning
Many commercially available cleaning products contain solvents which may attack plastic
components of your refrigerator or freezer and cause them to crack. Please refer to the cleaning
care section of this booklet for further advice.
SAVE THESE INSTRUCTIONS
5
Installation - Four Essential Requirements
Please follow the steps for installation to ensure your appliance operates correctly.
1. Power
The appliance must be installed so the plug is accessible.
To ensure that the appliance is not accidentally switched off, connect your refrigerator or freezer
to its own power point. Do not plug in any other appliance at this power point or use extension
cords and double adaptors, as the combined weight of both power cords can pull the double
adaptor from a wall outlet socket.
For power requirements, refer to the information on the serial plate located at the front bottom
right-hand side of the refrigerator when the door is open.
It is essential that the appliance be properly grounded (earthed).
2. Location
Your refrigerator or freezer should not be located in direct sunlight or next to any heat
generating appliance such as a range or dishwasher.
3. Stability
It is important that all four corners of the refrigerator or freezer base are supported firmly on the
floor to eliminate any cabinet movement.
Installing the appliance on a soft or uneven or unlevel floor may result in twisting of the cabinet
and poor sealing of the doors. If the doors do not seal properly, warm air will enter the food
storage areas causing the temperature to increase, resulting in food spoilage and food loss.
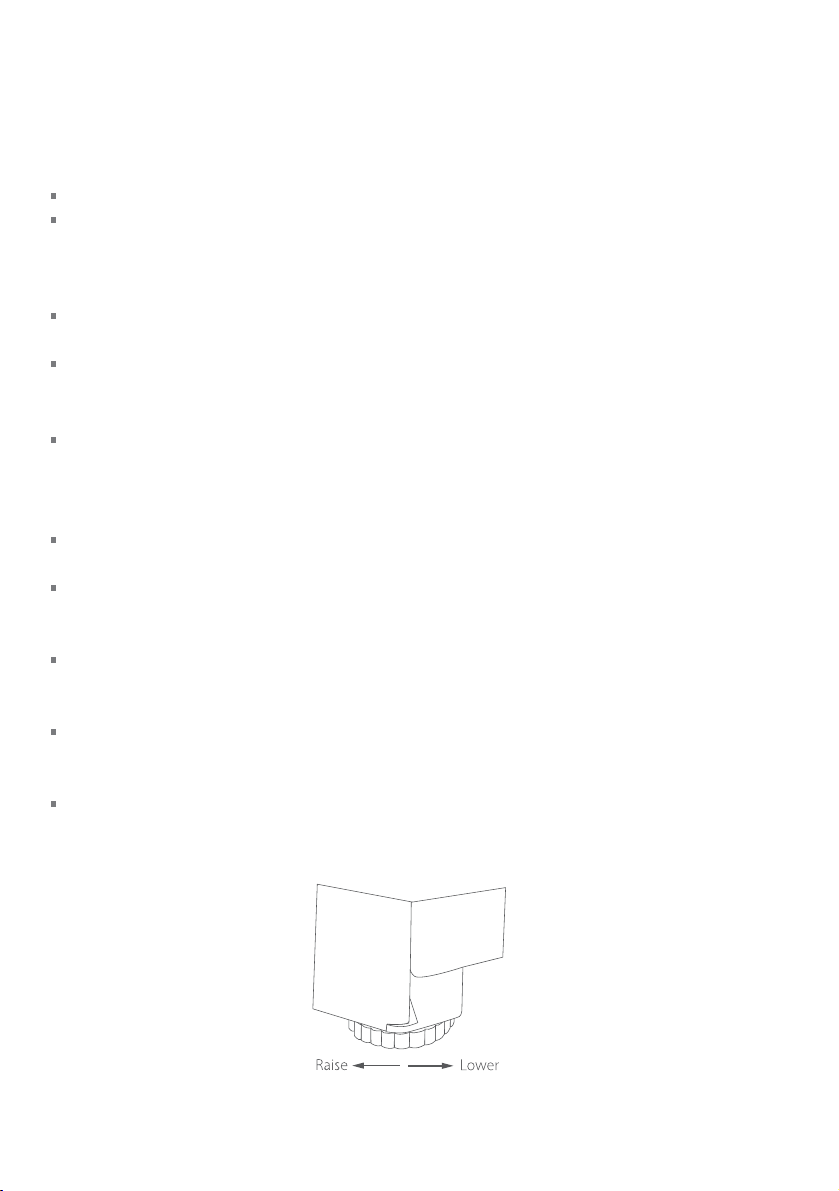
Before moving your refrigerator or freezer into its position, ensure that the adjustable front feet
are fully retracted by turning them anticlockwise (counter-clockwise), ie. towards the right of
the cabinet.
Position your refrigerator or freezer. Turn the adjustable feet clockwise, ie. to the left, to lower
the adjustable front feet. Raise the front of the appliance until it is stable and the doors move
towards the closed position, on their own, when open.
The front levelling foot on the hinge side should take the majority of the weight of the cabinet
and the cabinet should be stable, i.e. cabinet should not rock or wobble.
6
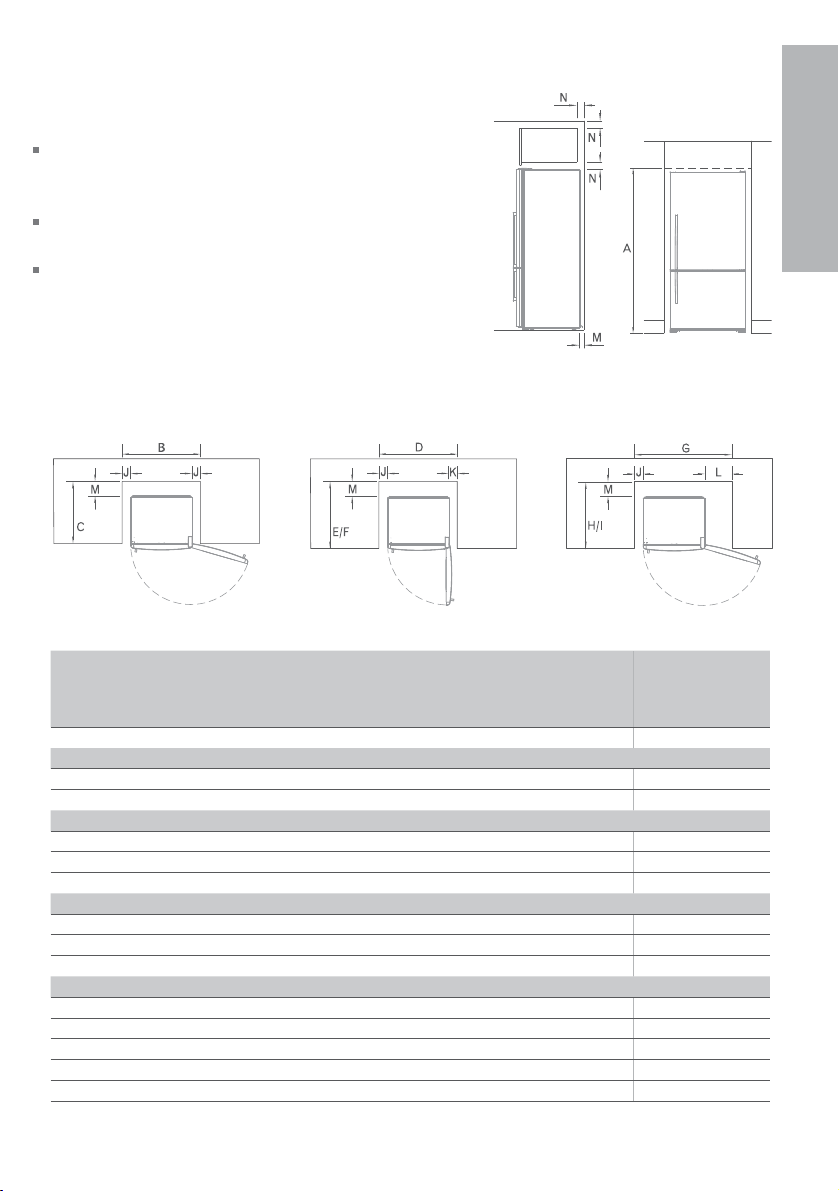
Installation - Four Essential Requirements
4. Ventilation and Installation
To ensure adequate ventilation for your
refrigerator or freezer see recommended
cabinetry dimensions below.
The appliance is intended to be placed against a
wall with a free distance not exceeding 3” (75mm).
If building the appliance into a cupboard, follow
installation instructions provided with the
integration kits.
Flush with refrigerator chassis
– full door rotation
Flush with refrigerator door
– 90˚ door rotation
Flush with refrigerator door
– full door rotation
EN
Cabinetry dimensions (inches / mm) (including minimum clearances)
A inside height
Flush with refrigerator chassis – full door rotation
B inside width
C inside depth
Flush with refrigerator door – 90º door rotation
D inside width
E inside depth flush to curved door
F inside depth flush to flat door
Flush with refrigerator door – full door rotation
G inside width
H inside depth flush to curved door
I inside depth flush to flat door
Minimum clearances
J side clearance
K side clearance – hinge side flush with door – 90° rotation
L side clearance – hinge side flush with door – full rotation
M rear clearance (incl. evaporator tray)
N vent
E522B
68 ¾ / 1745
32 ¾ / 830
24 ⁄ / 620
32 ⁄ / 835
26 ⁄ / 675
27 ⁄ / 690
37 ⁄ / 950
26 ⁄ / 675
27 ⁄ / 690
¾ / 20
1 / 25
5 ½ / 140
1 ⁄ / 30
2 / 50
7

Installation - Four Essential Requirements
Before Placing Food in the Fresh Food or Freezer Compartments
Remove all packaging. Ensure that all transit clips are removed from the refrigerator. These are
small rubber stops located at the back of the shelves.
Allow the refrigerator and freezer to run empty for 2 – 3 hours to allow each compartment to
cool to the appropriate temperature.
Clean the inside of the appliance with warm water and a little liquid detergent to remove
manufacturing and transportation dust.
The appliance may have an odor on its initial operation, but this will go when the refrigerator
and freezer have cooled sufficiently.
Energy Efficiency
Do not cover your appliances with any material that will prevent air from flowing around the
cabinet sides.
Do not leave the door open for any longer than is necessary.
Allow good clearances in front of the air ducts within the cabinet for maximum cold
air distribution.
8

Moving or Storing Your Refrigerator
If your refrigerator or freezer is turned off for any reason, wait 10 minutes before turning it back
on. This will allow the refrigeration system pressures to equalise before restarting.
Moving Your Refrigerator
Turn off the appliance and unplug from the power point. Remove all food.
Turn the adjustable feet to the right as far as they will turn (see page 6).
Ease the refrigerator out of its position. Tuck the power cord away and tape the doors closed.
Tape the shelves in place. If the cabinet needs to be placed at an angle or laid down, carefully lay
it on its side (the right hand side when viewed from the front).
Relocate and install. If the appliance has been left on its side for any length of time, leave it
standing upright for at least 10 minutes before turning on.
Storing Your Refrigerator or Freezer
When storing your cleaned appliance, leave the door(s) open. This allows air to circulate and
prevents the build up of bacteria and moulds.
Before using again, clean well using a mixture of warm water and baking soda (add 1 teaspoon
of baking soda to each 1 pint (500 ml) of water). Rinse with clean water.
Vacation Time
We recommend you leave your refrigerator or freezer operating while you are on vacation.
EN
9
Active Smart™ Operating Instructions
For information on the operation of the Ice & Water control panel please refer to
the Ice & Water User Guide.
Temperature Control
When the refrigerator is first turned on, the powerful cooling system will automatically cool both
refrigerator and freezer compartments to their set temperatures. This will take between 2 – 3
hours depending on the temperature and humidity of the environment.
The two compartment temperatures are accurately and independently controlled and do not
change with the temperature or humidity of the surroundings; whether summer or winter.
If you wish to alter the temperature of either the fresh food compartment or freezer
compartment, this can be easily done by using the Control panel located at the back of the fresh
food compartment.
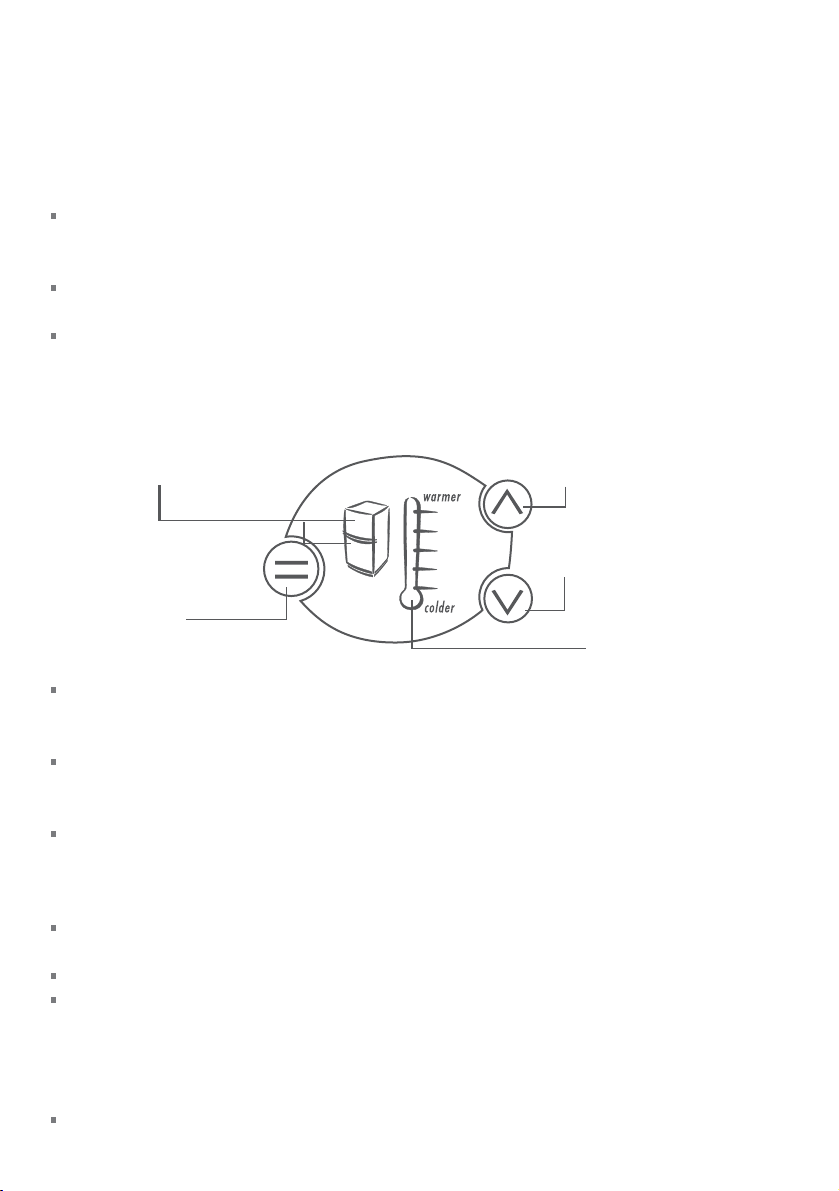
Control Panel To adjust temperatures
Fresh food and freezer
compartment indicator
Compartment
select button
Fresh Food Compartment
The fresh food compartment light on the refrigerator diagram will be showing. The temperature
indicator illustrated by a thermometer will show the temperature setting for this compartment as
a series of lights.
The temperature may be altered by pressing the increase temperature or decrease temperature
buttons. One press on either of these buttons will produce a dimmer light which indicates a
small change in temperature.
Pressing either button twice gives a brighter light and indicates a greater change in temperature.
Fewer lights on the thermometer means a cooler temperature for the compartment selected.
Increase temperature button
Decrease temperature button
Temperature
indicator (thermometer)
Freezer Foods Compartment
To adjust the freezer temperature press the compartment select button until the light flashes on
the freezer compartment indicator.
The freezer temperature can be altered by pressing the increase or decrease temperature buttons.
One press on either of these buttons will produce a dimmer light which indicates a small change
in temperature. Pressing either button twice gives a brighter light and indicates a greater change
in temperature.
Note: Successively pressing the compartment select button will automatically select between the
compartments, a return to the fresh food compartment will be accompanied by a longer beep.
When the door is reopened the control panel will return automatically to the fresh food
compartment setting.
10

Active Smart™ Operating Instructions
Sabbath Mode
To activate the Sabbath mode press the compartment select button on the temperature control
panel for 10 seconds.
When the Product is in Sabbath Mode:
The light will not operate when the door is opened.
The door alarm will not operate.
The display will not be illuminated.
Opening the door will not affect the compressor or fans.
If the power to the refrigerator is turned off whilst in this mode, the product will continue in
Sabbath mode when the power is restored.
Sabbath mode will automatically de-activate 80 hours after activation.
To de-activate earlier than 80 hours press the compartment select button on the temperature
control panel for 10 seconds.
Normal Refrigerator Sounds
Active Smart™ refrigerators, with their excellent energy ratings and cooling performance, can
produce sounds somewhat different to your old refrigerator.
Normal Operational Sounds Include:
Fan air flow sound. Active Smart™ refrigerators have fans which change speed depending on
demand. During cooling periods, such as after frequent door openings, fans circulate the
cold air in the refrigerator and freezer compartments producing some air flow sound. This is
quite normal.
Cracking or popping which may sound like ice coming off the evaporator. This occurs when the
defrost function is operating.
Running water sound. This is the liquid refrigerant in the system and can be heard as a boiling or
gurgling noise.
An audible hissing sound after closing the freezer door. This is due to the pressure difference
between the warm air that has entered the cabinet and suddenly cooled, and the outside
air pressure.
Other strange sounds may be heard for the following reasons:
– Cabinet not level
– Floor uneven or weak
– Bottles or jars rattling on shelves
EN
11
Active Smart™ Special Features
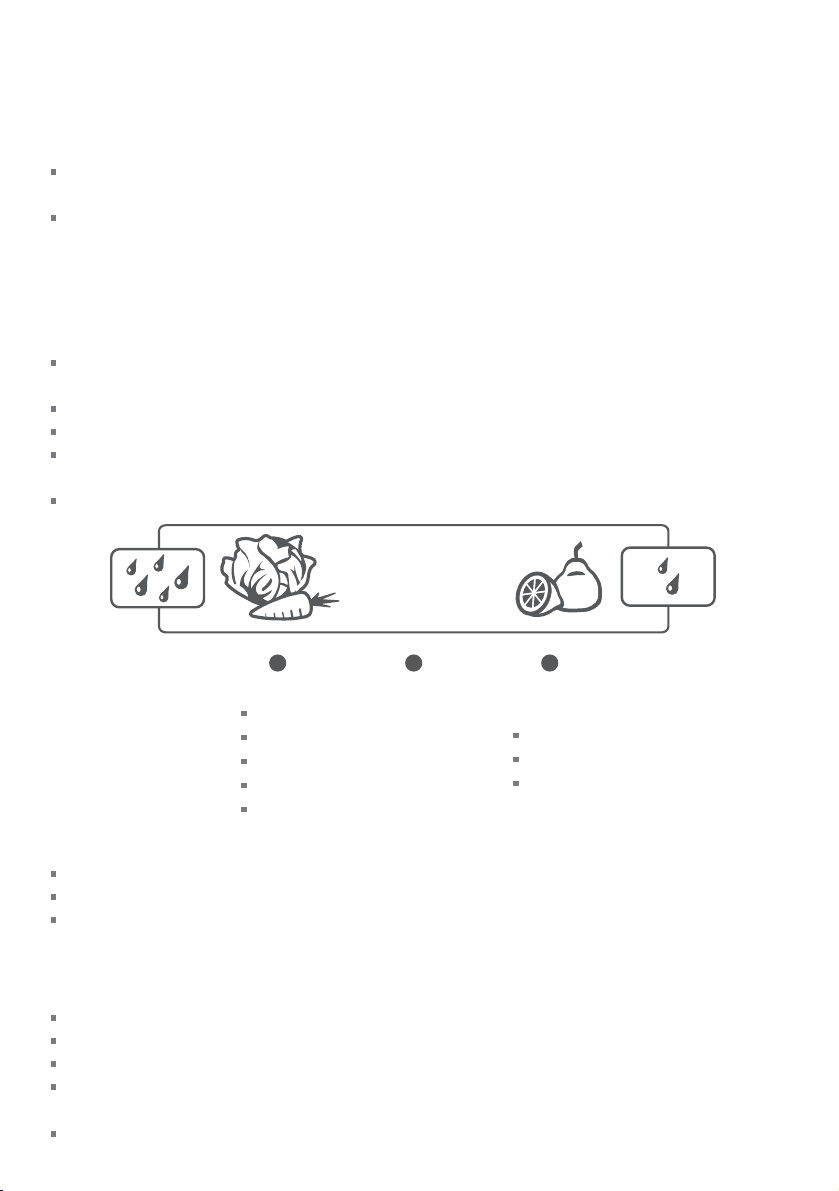
Fruit and Vegetable Bins and Humidity Control Cover
The vegetable bins feature a unique cover which provides two functions:
The humidity cover seals the bins and provides a humid microclimate to extend storage times of
fruits and vegetables.
The humidity cover prevents condensation, which forms at high humidities from dripping down
onto the fruit and vegetables. The ability to retain high humidity in the fruit and vegetable bin
may produce small amounts of water in the bottom of the fruit and vegetable bins. This can be
wiped out as required.
Fruit and Vegetable Bins and Humidity Slide
Each fruit and vegetable bin has a humidity adaptor control that can be adjusted to fruit or
vegetables depending on what is stored in the bins.
If possible try to store fruit and vegetables separately. This will help extend their storage life.
If there is a mixture of fruit and vegetables in the bin adjust the position of the control to the centre.
If there is too much water in the bins the control can be adjusted towards the setting with
fewer drips.
Remember a small amount of water in the bins is beneficial for fruit and vegetable storage.
SUITABLE FOR:
Salad Greens
Lettuce
Spinach
Broccoli
Cabbage
Carrots
Mixed fruit
& vegetables
Fruit with
skin/peel
Oranges
Lemons
Limes
Ice Trays and Lid
To empty the ice cubes into the lid, hold the tray and lid together and twist to dislodge the cubes.
Refill the ice tray with water, place lid containing ice cubes on top and store in the freezer.
Ice cubes are best stored in a closed container or plastic bag as they readily absorb odors and
tastes from other foods.
Door Alarms
If the fresh food compartment door is left open the refrigerator will beep after 90 seconds.
If the freezer door is left open the refrigerator will beep after 60 seconds.
While either door remains open, subsequent beeps will sound every 30 seconds for 5 minutes.
A continuous alarm will sound if the door has been left open for 5 minutes or longer and the
interior light will turn off.
The alarm will stop when the door is closed.
12
Active Smart™ Special Features
Fault Alarms
If the electronic controller detects a fault from which it is unable to recover an alarm will sound.
When the fresh food compartment door is opened a fault code (specific pattern of lights) will
flash red and green on the Control panel to alert you to the fault. The audible alarm will stop
when any button is pressed but the lights will remain flashing.
If such a fault occurs, call your Fisher & Paykel Appliances Authorised Service Center immediately;
the fault code will help the service person find and remedy the cause of failure.
Active Smart™ Maintenance
Replacement of the Interior Light (Halogen Light Bulb)
Turn the power off at the wall socket before replacing the bulb. The light bulb is located on the
top roof of the cabinet at the front.
Remove the lens cover using a small screwdriver. Insert the screwdriver in the front center of the
lens cover and gently lever down. Pull out old bulb.
Do not touch the new bulb with your hand. Leave it in the plastic bag whilst slotting into position.
Remove plastic bag when bulb is in position.
Replace lens cover.
Turn power on. Light bulb should now glow.
EN
Note:
The replacement halogen bulb
must not exceed 12 Volt/10 Watt.
Bulbs are available from your
Fisher & Paykel Appliances Customer
Care Center.
Your refrigerator is designed to operate for many years without the need for service checks.
However, if your refrigerator is malfunctioning, have it attended to by your
Fisher & Paykel Appliances Authorised Service Center as soon as possible. All electrical repairs
must be carried out by an adequately trained service technician or qualified electrician.
13

Cleaning Care – Interior/Exterior
Interior
It is important to keep the interior of the refrigerator and freezer clean to help prevent food from
becoming contaminated during storage.
The amount and types of food stored determines how often cleaning should be carried out
(ideally once every 1 to 2 weeks) in the refrigerator.
Remove the shelves from cabinet and door. Wash shelves and storage bins in warm water and
detergent; rinse in clean water and dry before replacing.
Wipe over the interior surfaces with warm water and detergent or baking soda dissolved in warm
water (add 1 teaspoon of baking soda to each 1 pint (500mls) of water). Rinse with clean water.
To help remove “old stale refrigerator” smells add a few drops of vanilla essence or vinegar to the
water before cleaning.
Clean exterior surfaces with warm water and detergent. Use a toothbrush for the magnetic
door gasket.
Do not use harsh, abrasive cloths or cleaners or highly perfumed, strong smelling cleaners or
solvents on any part of the refrigerator or freezer.
Exterior
Stainless Exterior Door
It is important when cleaning the exterior door surface of your refrigerator, to only use liquid
dishwashing detergent dissolved in warm water.
Dry the door with a clean, lint free cloth.
The use of any abrasive or stainless steel cleaners and solvents will damage the door surface.
Other Exterior Surfaces
Clean all other exterior surfaces with warm water and detergent.
If necessary, clean the magnetic door gasket with an old toothbrush, warm water and detergent.
14

Cleaning Care – Special Features
To Remove Trays
For ease of removal, empty food from tray/bin first.
Hold the centre front of the tray/bin handle.
Lift vertically to unclip from the runners and pull tray/bin towards you to remove.
Push runners back into refrigerator.
To Replace Trays
With the runners pushed back into the refrigerator, place the tray/bin on top of the runners.
Push the tray/bin back slowly until you feel it clip back onto the runners.
EN
Important Note: Ensure that trays and bins are securely clipped onto the runners before use.
Important Note: Bin and tray runners are pre-lubricated, and will not need to be
re-lubricated during their life. Do not attempt to clean grease from the runners, as this will
affect their ability to function. Do not immerse runners in water.
Interior
Glass Shelves
Clean with warm water and detergent or a glass cleaner. If cleaning the shelves without
removing from the cabinet use only warm water and detergent as a glass cleaner can damage
the plastic components of your refrigerator.
Important Note: Many commercially available cleaning products contain solvents that
may attack the plastic components of your freezer and cause them to crack. It is important
to use only warm water and a small amount of liquid dishwashing detergent on any
plastic components inside and outside your freezer. Avoid using anti-bacterial cleaning
products on either the interior or exterior of the cabinet as they may cause rusting of metal
components and cracking of plastic components.
15

Cleaning Care – Special Features
Humidity Control System
Important Note: When cleaning the shelf above
the vegetable bins, we recommend that you do
not disassemble the Humidity Control System
from the shelf.
In the event that the plastic lid and humidity slides
become separated from the glass shelf, follow these
instructions to reassemble.
1
Turn shelf upside down
2
To attach humidity slides onto shelf
front corners, fit bottom clips into shelf
front trim. Next, slide sideways towards
shelf until arm clips onto glass.
Retainer
Humidity Slides
3
To attach humidity control lid – with
text facing you, align lid with front of
shelf. Hold lid vertically and fit front
end into retainer on shelf. Ensure lid
fits into retainer as well as underneath
humidity slides.
4
At the sides of the shelf, adjust
humidity slide tabs so that the plastic
lid is between the shelf and the tabs.
5
If clips on back of shelf are present,
fasten lid with rear clips. Ensure that
the cover is fully secure at front and
back of shelf.
16

Storing Food in Your Refrigerator
Storing fresh, perishable foods in your refrigerator helps to extend storage times. The cold
temperatures slow down the major causes of food spoilage – namely, the growth of bacteria,
moulds and yeasts, and chemical and physical reactions.
Fresh Food Care
The quality of food before it is placed in the refrigerator is critical to successful storage. For
best results:
Select foods that are very fresh and of good quality.
Buy only the amount that you will use within the recommended storage time. If you buy extra,
plan to freeze it.
Ensure that food is well wrapped or covered before it is stored. This will prevent food from
dehydrating, deteriorating in color or losing taste and will help maintain freshness. It will also
prevent cross-flavoring. Vegetables and fruit need not be wrapped provided they are stored in
the vegetable bins of the refrigerator.
Make sure that strong smelling foods are wrapped or covered and stored away from foods such
as butter, milk and cream which can be tainted by strong odors.
Refrigerate fresh, perishable foods as soon as possible after purchase. If left at room temperature
for any length of time the rate of deterioration will be accelerated.
Avoid placing food directly in front of air outlets, as it may freeze. Cold air needs to circulate to
maintain safe food storage. Do not open the refrigerator door unnecessarily.
Cool hot foods down before placing them in the refrigerator. This should be done quickly.
It can be aided by placing the container of food in a bowl of ice and water; renew the ice as
necessary. (Note also that hot containers may damage shelves and wall of the refrigerator).
Store raw and cooked food in separate containers or packaging to prevent cross contamination.
In addition:
Keep the refrigerator clean. Wipe the inside walls and shelves frequently (refer to Cleaning Care)
and place only clean containers in the refrigerator.
Keep a close check on the quality of food in your refrigerator. Discard any food that shows
signs of spoilage. Pay particular attention to meat, fish and poultry, as these foods are highly
perishable. Use food within the recommended storage times.
EN
Dairy Foods and Eggs
Most pre-packed dairy foods have a recommended use by/best
before/best by’ date stamped on them. Store them in the refrigerator
and use within the recommended time.
Butter can become tainted by strongly flavored foods so it is best
stored in a sealed container.
Eggs should be stored in the refrigerator. For best results, especially
when baking, remove the eggs from the refrigerator two hours
before they are to be used.
17

Storing Food in Your Refrigerator
Red Meat
Place fresh red meat on a plate and loosely cover with waxed paper or
plastic wrap or foil.
Store cooked and raw meat on separate plates. This will prevent any
juices lost from the raw meat from contaminating the cooked product.
Delicatessan meats should be used within the recommended storage time.
Poultry
Fresh whole birds should be rinsed inside and out with cold running
water. Dry and place on a plate. Cover loosely with plastic wrap or foil.
Poultry pieces should also be stored this way. Whole poultry should
never be stuffed until just before cooking, otherwise food poisoning
may result.
Cool and refrigerate cooked poultry quickly. Remove stuffing from
poultry and store separately.
Fish and Seafood
Whole fish and fillets should be used on the day of purchase. Until
required, refrigerate on a plate loosely covered with plastic wrap,
waxed paper or foil.
If storing overnight or longer, take particular care to select very fresh
fish. Whole fish should be rinsed in cold water to remove loose scales
and dirt and then patted dry with paper towels. Place whole fish or
fillets in a sealed plastic bag.
Keep shellfish chilled at all times. Use within 1 – 2 days.
Precooked Foods and Leftovers
These should be stored in suitable covered containers so that the food
will not dry out.
Keep for only 1 to 2 days.
Reheat leftovers only once and until steaming hot.
Fruit and Vegetable Bins
Although most fruit and vegetable varieties store best at low
temperatures, take care not to store the following at temperatures of
less than 47˚F (7˚C) for long periods.
Citrus fruit Melons Eggplant
Courgettes Passionfruit Cucumber Peppers Tomatoes
Undesirable changes will occur at low temperatures such as
softening of the flesh, browning and/or accelerated decaying.
Do not refrigerate avocados (until they are ripe), bananas, mangoes
or pepinos. If possible store fruit and vegetables separately. ie. fruit in
one bin and vegetables in the other.
18
Pineapple Paw Paw

Storing Food in Your Freezer
The use of temperatures of 0˚F (-18˚C) or colder to store food means that the food can be kept
for longer periods than when refrigeration temperatures are used. This is because the growth
of bacteria, moulds and yeasts are stopped, and chemical and physical reactions are severely
restricted at very low temperatures.
Frozen Food Care
For best results:
Choose only high quality foods that freeze well.
Store at 0˚F (-18˚C) or colder. Take care to maintain this low storage
temperature e.g. try to avoid opening the freezer door unnecessarily.
If your ice cream is soft you are running your freezer too warm.
Leave space at the top of containers, glass jars or plastic bags
containing liquids or semi-solid foods. These expand as they freeze. Usually 1” (2 – 5cm) head
space is recommended. Seal. Ideally, remove all the air from the package after food is frozen.
Packages or containers of solid foods should have the air removed from them and be sealed
tightly before freezing.
Freeze immediately and as quickly as possible. Freeze only small quantities of food at any one time.
For best results we recommend that only 2.2lb (1kg) of food be frozen per 0.9 cu. ft (25 L) freezer
capacity. (About 7 lb (3 kg) in small freezers and 9 lb (4kg) in larger freezers). For faster freezing, we
recommend that fresh food is placed at the top of the freezer compartment close to the air vent.
Do not pile frozen food around the fan cover. It can prevent adequate air circulation.
Thaw foods preferably in a refrigerator, or using a microwave oven or multifunction oven.
Keep a constant turnover of food. Use older items of food first. Do not exceed recommended
storage times.
Use good quality freezer proof packaging to maintain food quality.
If food is only covered in plastic film place inside a freezer-proof plastic bag.
EN
Recommended Freezer Storage Times
These times should not be exceeded.
1 Bacon, casseroles, milk
2 Bread, ice-cream, sausages, pies – (meat and fruit),
prepared shellfish, oily fish
3 Non oily fish, shellfish, pizza, scones and muffins
4 Ham, cakes, biscuits, beef, chops and lamb
6 Poultry pieces, butter, vegetables (blanched), eggs
Months
12 Fruit (dry or in syrup), egg whites, beef (raw), whole
whole and yolks, cooked crayfish, minced meat (raw),
pork (raw)
chicken, lamb (raw), fruit cakes
19

Storing Food in Your Freezer
Meat, Poultry and Game
Do not try to freeze more than 22lb (1kg) meat per 0.9 cu.ft (25 L) freezer
capacity. Meat must be frozen quickly in order to maintain its texture.
Do not stuff poultry before freezing.
Red meat can be cooked from frozen, or from the partly or completely
thawed states. Remember to allow extra cooking time if cooking from frozen.
Always thaw poultry completely before cooking.
Fish
Fish is best frozen commercially. If however you do want to freeze fish
at home, make sure the fish is very fresh and of high quality.
Clean, scale and preferably leave whole. All fish should be wrapped in
two layers of packaging as depending on the type of fish, odors and
flavors can be readily transferred either to or from it. Seal well.
For best results, cook from either the frozen or partly thawed state.
Vegetables
Most vegetables freeze well, although ‘salad’ vegetables lose their
crispness. Other vegetables e.g. celery, onion and tomatoes should
only be used in cooked dished as they soften on freezing.
Freeze only high quality, mature, ready-to-eat vegetables.
Sort and discard any that are damaged.
It is necessary to blanch most raw vegetables prior to freezing.
Blanching involves a short cooking period during which vegetable
enzymes are destroyed. If these enzymes are not destroyed they cause
undesirable physical and chemical changes during freezer storage.
Vegetables can be blanched in boiling water, steam or microwave
oven. If using boiling water, boil vegetables for 2 – 4 minutes and cool quickly.
In general frozen vegetables are best cooked from their frozen state, i.e. Do not thaw.
Prepared and Cooked Foods
Most cooked foods can be frozen but it is not recommended to freeze
the following:
Cooked egg white, custards, cream fillings and milk puddings, gelatine
or jelly-like dishes, mayonnaise and similar salad dressings, meringue
toppings. These tend to separate on thawing.
Fruit
Choose high quality, mature, and ready to eat fruit. Preferably select
varieties recommended for freezing.
Avoid unripe and over-ripe fruit.
The way fruit is packed depends on how it is to be used. Fruits packed in
syrup are ideal for deserts, whereas fruits packed without sugar are better
used for cooking. Most fruits can be stored for 8 – 12 months.
20

Problem Solving Checklist
If there is a problem with your appliance, please check the following points before contacting
your local Fisher & Paykel Appliances Authorised Service Center Dealer or Customer Care Center.
Problem Possible Causes What to do
Appliance does
not operate
Light not
working
Light and display
not working
Motor operates
for long periods
Storage
compartments
too warm
Food freezing in
the refrigerator
Unfamiliar noises
Water in the
vegetable bins
No electricity at power Check that the plug is correctly
Blown light bulb Change light bulb
Refrigerator not working See Maintenance section
Product in Sabbath Mode Hold compartment select button down
Hot weather
Frequent door openings
Large amount of food recently
added
Temperature control set too low See Temperature control section
Doors not sealing properly Check that cabinet is level and gasket
Temperature setting not correct See Temperature control section
Frequent door openings
Large amount of food recently
added
Temperature setting not correct See Temperature control section
Food placed directly in front of
air outlets
Cabinet not stable or level
Freezer is defrosting
Condensation is formed by the
water produced by vegetables.
connected and power switched on
Check another appliance at the same
outlet
Check house fuse
for 10 seconds
Minimise door opening to allow
temperature to stabilise
seals are clean
Minimise door openings to allow
temperature to stabilise
Move chill sensitive foods away from the
center back of the shelf
See Installation section
A small amount of condensation is
beneficial for vegetable storage
If there is too much water, store vegetables
loosely wrapped in plastic bags
Wipe out water with a cloth
Set humidity slide to
low humidity setting
EN
21

Problem Solving Checklist
Problem Possible Causes What to do
Sides of cabinet
are warm
Condensation
on outside of
refrigerator
Condensation
inside fresh food
compartment
Ice buildup
inside freezer
compartment
Taste or odor in
ice cubes
Door handles out
of alignment
Tray/bin does not
slide in and out
evenly
This is normal
Not unusual during periods of
high humidity
Frequent or long door openings Minimise door openings
Door gasket leaking Check that gasket is sitting flat and
Not unusual during
periods of high humidity
Freezer door not closing tightly Move items in freezer so door can close
Transfer of odor/taste from strong
smelling foods
With time and usage, movement
may occur
Packaging trapped Check to ensure no food or packaging is
Runners not extending fully Holding onto sides of tray/bin, extend the
Wipe dry
sealing tightly
Wipe dry
tightly
Check and clean door gasket seal
Wrap or cover strong smelling foods
See Installation: four alignment essential
requirements – Stability instructions
trapped behind the tray/bin
runners fully by using a firm pull – this
will reset the runner.
22

Limited Warranty
When you purchase any new Fisher & Paykel whiteware product for personal or consumer use
you automatically receive a one year limited warranty covering parts and labor for servicing
within the 48 mainland United States, Hawaii, Washington DC and Canada. In Alaska the limited
warranty is the same except that you must pay to ship the product to the service shop or the
service technician’s travel to your home. Products for use in Canada must be purchased through
the Canadian distribution channel to ensure regulatory compliance.
If the product is installed in a motor vehicle, boat or similar mobile facility, you receive the same
one year limited warranty, but you must bring the vehicle, boat or mobile facility containing the
product to the service shop at your expense or pay the service technician’s travel to the location
of the product.
You receive an additional four year Limited Warranty (for a total of five years) covering parts
and labor for sealed refrigeration system (compressor, evaporator, condenser, filter dryer, and
connecting tubing) within the 48 mainland United States, Hawaii, Washington D.C. and Canada.
In Alaska the Limited Warranty for the sealed refrigeration system is the same except that you
must pay to ship the product to the service shop or the service technician’s travel to your home.
Fisher & Paykel Undertakes to:
Repair without cost to the owner either for material or labor any part of the product, the serial
number of which appears on the product, which is found to be defective. In Alaska, you must
pay to ship the product to the service shop or for the service technician’s travel to your home.
If the product is installed in a motor vehicle, boat or similar mobile facility, you must bring it to
the service shop at your expense or pay for the service technician’s travel to the location of the
product. If we are unable to repair a defective part of the product after a reasonable number of
attempts, at our option we may replace the part or the product, or we may provide you a full
refund of the purchase price of the product (not including installation or other charges).
EN
This warranty extends to the original purchaser and any succeeding owner of the product for
products purchased for ordinary single-family home use.
All service under this limited warranty shall be provided by Fisher & Paykel or its Authorized
Service Agent during normal business hours.
How Long Does this Limited Warranty Last?
Our liability under this limited warranty expires ONE YEAR from the date of purchase of
the product by the first consumer.
Our liability under any implied warranties, including the implied warranty of merchantability
(an unwritten warranty that the product is fit for ordinary use) also expires ONE YEAR (or such
longer period as required by applicable law) from the date of purchase of the product by the first
consumer. Some States do not allow limitations on how long an implied warranty lasts, so this
limit on implied warranties may not apply to you.
23

Limited Warranty
This Warranty Does Not Cover:
A
Service calls that are not related to any defect in the product. The cost of a service call will be
charged if the problem is not found to be a defect of the product. For example:
1. Correcting faulty installation of the product.
2. Instructing you how to use the product.
3. Replacing house fuses, resetting circuit breakers, correcting house wiring or plumbing, or
replacing light bulbs.
4. Correcting fault(s) caused by the user.
5. Changing the set-up of the product.
6. Unauthorized modifications of the product.
7. Noise or vibration that is considered normal, for example, drain/fan sounds, refrigeration
noises or user warning beeps.
8. Correcting damage caused by pests, for example, rats, cockroaches etc.
B
Defects caused by factors other than:
1. Normal domestic use or
2. Use in accordance with the product’s User Guide.
C
Defects to the product caused by accident, neglect, misuse, fire, flood or Act of God.
D
The cost of repairs carried out by non-authorized repairers or the cost of correcting such
unauthorized repairs.
E
Travel fees and associated charges incurred when the product is installed in a location with
limited or restricted access. (eg airplane flights, ferry charges, isolated geographic areas).
F
Normal recommended maintenance as set forth in the product’s User Guide.
G
Filter replacement except in the case of faulty parts or materials within the filter cartridge.
This product has been designed for use in a normal domestic environment. It is not intended for
commercial use. Doing so may affect product warranty.
If you have an installation problem contact your dealer or installer. You are responsible for
providing adequate electrical, exhausting and other connection facilities.
We are not responsible for consequential or incidental damages (the cost of repairing or
replacing other property damaged if the product is defective or any of your expenses caused if
the product is defective). Some States do not allow the exclusion or limitation of incidental or
consequential damages, so the above limitation or exclusion may not apply to you.
24

Limited Warranty
How to get Service
Please read your User Guide. If you then have any questions about operating the product,
need the name of your local Fisher & Paykel Authorized Service Agent, or believe the product is
defective and wish service under this limited warranty, please contact your dealer or call us at:
USA
TOLL FREE 1.888.9.FNP.USA (1.888.936.7872)
or use the link at: www.fisherpaykel.com/locator/servicer/
Canada
TOLL FREE 1.888.9.FNP.USA (1.888.936.7872)
or use the link at: www.fisherpaykel.com/locator/servicer/
You may be required to provide reasonable proof of the date of purchase of the product before
the product will be serviced under this limited warranty.
No Other Warranties
This limited warranty is the complete and exclusive agreement between you and Fisher & Paykel
regarding any defect in the product. None of our employees (or our Authorized Service Agents)
are authorized to make any addition or modification to this limited warranty.
Warrantor: Fisher & Paykel Appliances, Inc.
EN
If you need further help concerning this limited warranty, please call us at above number, or
write to:
Fisher & Paykel Appliances, Inc.
5900 Skylab Road
Huntington Beach
CA 92647
This limited warranty gives you specific legal rights, and you may also have other rights which
vary from state to state.
25

Consignes de sécurité importantes
Afin de réduire les risques d’incendie, d’électrocution ou de blessures, veuillez lire les consignes
de sécurité importantes qui suivent avant d’utiliser cet appareil.
N’utiliser cet appareil qu’aux fins décrites dans ce guide de l’utilisateur.
Avertissement
Cet appareil ne doit être utilisé qu’en respectant les mesures de sécurité élémentaires suivantes :
Danger
Cet appareil n’est pas conçu pour être utilisé par des enfants ou des personnes infirmes sans
surveillance. Veillez à ce que les enfants ne jouent pas avec l’appareil.
Avant de se défaire d’un vieux réfrigérateur ou congélateur, observez les consignes suivantes afin
d’éviter que les enfants s’enferment involontairement dans l’appareil :
–Enlevez les portes
–Laissez les étagères en place afin que les enfants ne tentent pas de s’y loger
Mise au rebut
Lors de la mise au rebut des vieux appareils ménagers, vous devez prendre d’extrêmes
précautions afin d’éviter les risques d’accidents. Il faut soigneusement vider le gaz frigorigène et,
pour la sécurité des enfants, il faut démonter les portes.
Le centre de service à la clientèle des appareils Fisher & Paykel est en mesure de vous donner des
renseignements utiles quant à la mise au rebut des vieux réfrigérateurs et congélateurs.
Électricité
Avant d’utiliser cet appareil, celui-ci doit être correctement monté en respectant les instructions
d’installation.
Ne débranchez jamais le réfrigérateur en tirant sur le cordon d’alimentation.
Tenez toujours la fiche fermement pour la sortir de la prise.
Ne branchez pas d’autre appareil dans la prise de courant qui alimente le réfrigérateur, ne le
branchez pas non plus sur une rallonge électrique ou sur une prise double.
Réparez ou remplacez immédiatement tout cordon électrique effiloché ou endommagé. Ne
branchez pas l’appareil si le cordon, la fiche ou la connexion à l’appareil est fissuré ou usé.
Lorsqu’un cordon d’alimentation est endommagé, il ne peut être remplacé que par un
technicien de centre du service à la clientèle de Fisher & Paykel car la réparation requiert des
outils spéciaux.
Lorsque vous éloignez votre appareil du mur, faites attention de ne pas rouler sur le cordon
d’alimentation ou l’endommager.
Débranchez le réfrigérateur avant de le nettoyer ou d’en remplacer l’ampoule.
26

Consignes de sécurité importantes
Stockage des aliments et des boissons
Ne conservez jamais de matières volatiles ou inflammables dans un réfrigérateur car elles
peuvent exploser.
Ne congelez jamais de liquides dans des récipients en verre. Les liquides se dilatent pendant la
congélation, ce qui peut entraîner l’explosion du récipient.
Ne jamais congeler de boissons gazéifiées. Elles risquent d’exploser.
Ne pas ingérer de nourriture trop froide. Les aliments sortant d’un congélateur,p. ex. : des cubes
de glace, peuvent être assez froids pour causer des lésions cutanées au contact direct avec la
peau.
Panne de courant — Hygiène alimentaire
Ne pas recongeler les aliments déjà décongelés. Si vous trouvez des aliments décongelés dans
votre congélateur, suivez les consignes ci-dessous :
1) Si des cristaux de glace sont encore visibles, les aliments peuvent être recongelés, mais
devraient être conservés moins longtemps que la période recommandée.
2) Si les aliments sont décongelés, mais qu’ils sont à la température du réfrigérateur, il n’est pas
recommandé de les recongeler. Certains fruits et aliments cuits peuvent être recongelés, mais
ils doivent être consommés dès que possible. La viande, le poisson et la volaille doivent être, soit
immédiatement consommés, soit cuits et recongelés. Jetez les légumes puisque, généralement,
ils ramollissent et ne sont plus très frais.
3) Pour les aliments qui sont décongelés mais dont la température est supérieure à 4˚C : la
viande rouge peut être cuite immédiatement puis recongelée, mais elle doit être consommée le
plus tôt possible. Jeter tous les autres aliments.
Ne recongelez pas les aliments déjà entièrement décongelés. Ils pourraient être dangereux à
consommer.
FR
Nettoyage
Beaucoup de produits de nettoyage sur le marché contiennent des solvants qui peuvent
endommager les composants en plastique du réfrigérateur ou du congélateur et entraîner des
craquelures. Pour plus de renseignements, référez-vous à la section des consignes de nettoyage.
CONSERVEZ CES CONSIGNES
27

Installation – Quatre exigences essentielles
Afin que votre appareil fonctionne correctement, veuillez suivre chaque étape de l’installation.
1. Alimentation
L’appareil doit être installé à proximité d’une prise électrique.
Afin de s’assurer que l’appareil n’est pas débranché par erreur, branchez le réfrigérateur ou le
congélateur à sa propre prise de courant. Il ne faut pas brancher un autre appareil ménager sur
la même prise d’alimentation, ni utiliser de rallonge ou d’adaptateur double sur cette prise car le
poids des deux cordons électriques peut tirer l’adaptateur hors de la prise de courant murale.
Pour l’alimentation, ouvrez la porte de votre réfrigérateur et référez-vous à l’information qui
apparaît sur la plaque du numéro de série se trouvant en bas, à droite de l’appareil.
Il est primordial que l’appareil soit correctement mis à terre.
2. Emplacement
Le réfrigérateur ou congélateur ne doit pas être placé au soleil ou proche d’un appareil générant
de la chaleur tels que les cuisinières ou les lave-vaisselle.
3. Stabilité
Il est important que les quatre coins de la base du réfrigérateur ou du congélateur soient
fermement appuyés afin d’éviter tout mouvement de l’appareil.
L’installation de l’appareil sur un plancher non solide ou inégal peut entraîner la déformation
du caisson de l’appareil et la dégradation de l’étanchéité des portes. Si les portes ne sont pas
étanches, l’air chaud pénètrera dans les divisions de conservation des aliments, provoquant une
hausse de la température qui entraînera la détérioration et la perte de ces aliments.
Avant de mettre en place le réfrigérateur ou le congélateur, assurez-vous que les pieds réglables
avant soient entièrement rentrés en les tournant dans le sens inverse des aiguilles d’une montre,
c.-à-d. vers la droite de la caisse.
Mettre en place le réfrigérateur ou congélateur. Tourner le pied ajustable dans le sens inverse des
aiguilles d’une montre, c.-à-d. vers la gauche, afin d’abaisser le pied antérieur ajustable. Lever
le devant de l’appareil jusqu’à ce qu’il soit stable et que les portes tendent à se refermer d’ellesmêmes une fois ouvertes.
Le pied réglable avant situé sur le côté de la charnière de porte devrait supporter la plus grande
partie du poids et l’appareil devrait être stable, c.-à-d. qu’il ne devrait pas balancer ou osciller.
28

Installation – Quatre exigences essentielles
4. Aération et installation
Pour assurer une ventilation adéquate de votre
réfrigérateur ou de votre congélateur vertical,
voyez les dimensions recommandées ci-dessous.
L’appareil est conçu pour être placé contre un
mur, à une distance égale ou inférieure à 75 mm.
Si l’appareil doit être monté dans un espace
entouré d’armoires, suivez les consignes
d’installation qui sont fournies avec les trousses
d’encastrement.
Nivellement par rapport à la
Nivellement par rapport au châssis
– Ouverture complète de la porte
Dimensions de l’encastrement (mm) (incluant le dégagement minimal)
A Hauteur intérieure
Nivellement par rapport au châssis - Ouverture complète de la porte
B Largeur intérieure
C Profondeur intérieure
Nivellement par rapport à la porte du réfrigérateur – Ouverture de la porte à 90°
D Largeur intérieure
E Profondeur intérieure nivelée à la porte incurvée
F Profondeur intérieure nivelée à la porte plate
Nivellement par rapport à la porte du réfrigérateur – Ouverture complète de la porte
G Largeur intérieure
H Profondeur intérieure nivelée à la porte incurvée
I Profondeur intérieure nivelée à la porte plate
Dégagements minimaux
J Dégagement latéral
K Dégagement latéral – Côté charnière nivelé à la porte – Ouverture à 90°
L Dégagement latéral – Côté charnière nivelé à la porte – Ouverture complète
M Dégagement arrière (incluant l’évaporateur)
N Ventilation
porte du réfrigérateur
– Ouverture de la porte à 90°
Nivellement par rapport à la porte
du réfrigérateur
– Ouverture complète de la porte
FR
E522B
1745
830
620
835
675
690
950
675
690
20
25
140
30
50
29

Installation – Quatre exigences essentielles
Avant de placer des aliments dans la partie réfrigérateur ou congélateur
Retirez l’emballage. Enlevez toutes les attaches de transport du réfrigérateur. Les attaches sont
des butées en caoutchouc situées derrière les étagères.
Laissez le réfrigérateur et le congélateur fonctionner à vide pendant 2 à 3 heures pour permettre
à chaque compartiment d’atteindre la température appropriée.
Nettoyez l’intérieur de l’appareil avec de l’eau chaude et un peu de détergent liquide pour
enlever les poussières de la fabrication et du transport.
L’appareil peut avoir une certaine odeur lors de la misse en marche, mais celle-ci disparaîtra dès
que le réfrigérateur et le congélateur auront atteint la température appropriée.
Efficacité énergétique
Ne couvrez pas le réfrigérateur ou le congélateur de matériaux qui pourraient empêcher l’air de
circuler autour du caisson de l’appareil.
Ne laissez pas la porte de l’appareil ouverte plus longtemps que nécessaire.
Laissez suffisamment d’espace libre devant les sorties d’air à l’intérieur de l’appareil afin de
permettre la meilleure distribution d’air possible.
30

Déplacement ou entreposage du réfrigérateur
Si, pour une raison quelconque, le réfrigérateur ou le congélateur s’est éteint, attendez
dix minutes avant de le remettre sous tension. Cela permettra aux pressions du système de
réfrigération de s’équilibrer avant la remise en marche de l’appareil.
Déplacement du réfrigérateur
Éteignez l’appareil et débranchez la fiche de sa prise de courant. Retirez tous les aliments.
Tournez les pieds réglables vers la droite autant que possible (voir page 28).
Sortez le réfrigérateur de son emplacement. Rangez le cordon d’alimentation et fermez bien les
portes à l’aide de ruban adhésif. Toujours à l’aide de ruban adhésif, fixez les étagères à leur place.
Si l’appareil doit être placé dans un certain angle ou doit être couché, placez-le soigneusement
sur le côté (le côté droit lorsqu’il est vu de devant).
Déplacez et réinstallez l’appareil. S’il est resté couché sur le côté pendant un certain temps,
laissez-le debout au moins dix minutes avant de le remettre sous tension.
Entreposage du réfrigérateur ou du congélateur
Lors de l’entreposage de l’appareil nettoyé, laissez les portes ouvertes. Ceci permet à l’air de
circuler et empêche l’apparition de bactéries et de moisissures.
Avant de réutiliser l’appareil, nettoyez-le avec un mélange d’eau chaude et de bicarbonate de
soude (ajoutez une cuillère à thé de bicarbonate pour chaque demi-litre d’eau). Rincez à l’eau
propre.
Vacances
Même lorsque vous partez en vacances, il est recommandé de laisser votre réfrigérateur ou
congélateur en marche.
FR
31

Procédures de mise en marche de l’Active Smart™
Pour obtenir davantage de renseignements sur le fonctionnement du panneau de
commande Ice & Water, veuillez consulter le Guide de l’utilisateur du système
Ice & Water.
Le contrôle de la température
Lorsque le réfrigérateur est mis en marche, le puissant système de réfrigération refroidit
automatiquement le réfrigérateur et le congélateur à leurs températures respectives. Le
refroidissement peut prendre entre 2 et 3 heures, selon la température et le niveau d’humidité
ambiants.
Les températures des deux compartiments sont contrôlées avec exactitude de façon
indépendante. Elles ne varient donc pas avec la température ni le niveau d’humidité ambiants,
que ce soit l’été ou l’hiver.
Si vous désirez changer la température dans le réfrigérateur ou le congélateur, il suffit d’utiliser le
panneau de contrôle qui se trouve au fond du réfrigérateur.
Panneau de contrôle pour ajuster la température
Voyants du réfrigérateur
et / ou du congélateur
Bouton de sélection
réfrigérateur/
congélateur
Réfrigérateur
Sur le schéma du panneau de contrôle, une lumière s’allume sur le réfrigérateur pour indiquer que vous
effectuez le changement de la température du réfrigérateur. L’indicateur de la température, représenté
par le thermomètre, indique le réglage de la température au moyen d’une série de lumières.
Vous pouvez modifier la température en appuyant sur les boutons pour augmenter ou diminuer la
température. En appuyant une fois sur l’un de ces boutons, une lumière plus faible s’allume indiquant
un léger changement de température.
plus intense s’allume indiquant un changement de température plus important.
Un nombre réduit de lumières sur le thermomètre signale une plus faible température dans le
compartiment sélectionné (réfrigérateur ou congélateur).
En appuyant deux fois sur l’un des boutons, une lumière
Congélateur
Pour régler la température du congélateur, appuyez sur le bouton de sélection du compartiment
jusqu’à ce que la lumière clignote sur l’indicateur du congélateur.
Vous pouvez modifier la température du congélateur en appuyant sur les boutons pour augmenter
ou diminuer la température.
En appuyant une fois sur l’un de ces boutons, une lumière plus faible s’allume indiquant un léger
changement de la température. En appuyant deux fois sur l’un des boutons, une lumière plus
intense s’allume indiquant un changement de température plus important.
Remarque: En appuyant successivement sur le bouton de sélection du compartiment, il
sélectionne automatiquement le réfrigérateur ou le congélateur; un signal sonore prolongé se
fera entendre pour indiquer le retour au réglage de la température du réfrigérateur.
Lorsque la porte de l’appareil est rouverte à la suite du réglage de la température, le panneau de
contrôle indique automatiquement le réglage du réfrigérateur.
32
Bouton d’augmentation de la
température
Bouton de diminution de la
température
Indicateur de la température
(thermomètre)

Procédures de mise en marche de l’Active Smart™
Mode Sabbat
Afin d’activer le mode Sabbat, appuyez pendant 10 secondes sur le bouton de sélection du
compartiment situé sur le panneau de contrôle de la température.
Lorsque le produit fonctionne en mode Sabbat:
La lumière ne s’allumera pas si la porte est ouverte.
L’alerte de la porte ne fonctionnera pas.
L’affichage ne s’illuminera pas.
Le fait d’ouvrir la porte ne produira aucun effet sur le compresseur ou les évents de ventilation.
Si l’alimentation électrique du réfrigérateur est interrompue pendant qu’il fonctionne en mode
Sabbat, le produit reprendra ce mode une fois l’alimentation rétablie.
Le mode Sabbat se désactivera automatiquement après 80 heures.
Pour le désactiver avant que ces 80 heures soient écoulées, appuyez pendant 10 secondes sur le
bouton de sélection du compartiment situé au panneau de contrôle de la température.
Sons normaux du réfrigérateur
Grâce à son excellente économie d’énergie et à sa grande performance de refroidissement, le
réfrigérateur Active Smart™ peut produire des sons quelque peu différents de ceux émis par les
réfrigérateurs plus anciens.
Les sons de fonctionnement normaux comprennent :
Des sons produits par la soufflerie du ventilateur : les réfrigérateurs Active Smart™ sont munis
de ventilateurs qui changent de vitesse selon l’air froid nécessaire. Pendant les périodes de
refroidissement, comme après l’ouverture fréquente de la porte, les ventilateurs font circuler l’air
froid dans le réfrigérateur et le congélateur, produisant un certain son de soufflerie d’air. Ce son
est tout à fait normal.
Des crépitements ou des craquements semblables à de la glace sortant de l’évaporateur. Ces
sons se font entendre lorsque la fonction de décongélation est en marche.
Des sons d’eau qui coule : il s’agit du frigorigène liquide qui circule dans le système et qui peut
émettre des sons de bouillonnement ou de gargouillement.
Un sifflement peut se fait entendre après la fermeture de la porte du congélateur. Ce son est
causé par la différence de pression entre l’air chaud qui est rentré dans l’appareil et qui est
soudainement réfrigéré, et la pression externe.
D’autres sons étranges peuvent se faire entendre pour les raisons suivantes :
– L’appareil n’est pas à niveau
– Le sol est inégal ou n’est pas assez solide
– Des bouteilles ou des bocaux en verre s’entrechoquent sur les étagères
FR
33

Caractéristiques spéciales de l’Active Smart™
Bacs à fruits et légumes et leur couvercle de contrôle de l’humidité
Les bacs à légumes sont munis d’un couvercle unique qui remplit deux fonctions :
Le couvercle de contrôle de l’humidité scelle les bacs et maintient un degré d’humidité idéal
pour prolonger la conservation de vos fruits et légumes.
Le couvercle de contrôle de l’humidité empêche la condensation se formant lorsque le niveau
d’humidité est élevé et produisant de l’eau qui dégoûte sur les fruits et légumes. Puisque les bacs
à fruits et légumes peuvent contenir un haut degré d’humidité, cela peut entraîner la présence
d’un peu d’eau au fond de ces derniers. Essuyez cette eau selon les besoins.
Bacs à fruits et légumes et couvercle de contrôle d’humidité
Chaque bac à fruits et légumes est doté d’une commande d’adaptation de l’humidité ajustable à
la nature des fruits ou des légumes y étant conservés.
Dans la mesure du possible, conservez les fruits et les légumes séparément. Vous prolongerez
ainsi leur durée de conservation.
Si le bac comporte à la fois des fruits et des légumes, ajustez le réglage de la commande vers le centre.
Si les bacs contiennent un surplus d’eau, il est possible d’ajuster la commande vers le réglage
produisant le moins de gouttes.
N’oubliez pas que le fait de laisser un peu d’eau dans les bacs favorise la conservation des fruits
et des légumes.
CONVIENT
AUX ALIMENTS
SUIVANTS :
Légumes à
salade
Laitue
Épinards
Brocoli
Chou
Carottes
Fruits et
légumes
mélangés
Fruits avec
peau/pelure
Oranges
Citrons
Limes
Moule à glaçons et couvercles
Pour vider les glaçons, tenez le moule et le couvercle ensemble et exercez une légère torsion sur
le moule pour déloger les glaçons.
Remplissez le moule à glaçons d’eau, placez le couvercle et rangez le moule dans le congélateur
en prenant soin de ne pas le renverser.
Parce qu’ils absorbent facilement les goûts et odeurs des autres aliments, il vaut mieux conserver
les glaçons dans un contenant ou un sac en plastique scellés.
Alarmes des portes
Si la porte du réfrigérateur reste ouverte, l’appareil émettra un signal sonore au bout de 90 secondes.
Si la porte du congélateur reste ouverte, l’appareil émettra un signal sonore au bout de 60 secondes.
Si l’une des deux portes reste ouverte, l’appareil émettra des signaux sonores toutes les
30 secondes pendant 5 minutes.
Si une porte est restée ouverte pendant 5 minutes ou plus, une alarme continue retentira et la
lumière intérieure s’éteindra.
L’alarme cessera lorsque la porte sera refermée.
34

Caractéristiques spéciales de l’Active Smart™
Alarmes de notification d’anomalies
Si le régulateur électronique détecte une défectuosité qu’il est incapable de réparer, une alarme
sonore se déclenchera.
Lorsque vous ouvrirez la porte du réfrigérateur, un code de défectuosité (une série de lumières
particulière) clignotera au panneau de contrôle pour vous alerter qu’il y a une anomalie. Vous
pouvez arrêter l’alarme en appuyant sur n’importe quel bouton du panneau, mais les lumières
continueront de clignoter.
Si une alarme semblable retentit, appelez le centre de service à la clientèle Fisher & Paykel. Le
code de notification d’anomalie aidera le technicien à trouver et à remédier à la cause de cette
défectuosité.
Entretien de l’Active Smart™
Remplacement de la lumière intérieure (ampoule halogène)
Débranchez l’appareil avant de changer l’ampoule. L’ampoule se trouve dans le haut et à l’avant
de l’appareil.
Retirez le couvercle à l’aide d’un petit tournevis. Introduisez le tournevis dans le centre avant du
couvercle et faites-le ouvrir doucement vers le bas. Retirez l’ampoule.
Ne prenez pas la nouvelle ampoule avec les doigts. Laissez-la dans son sac en plastique pendant
que vous l’introduisez dans son emplacement.
Lorsque l’ampoule est en place, retirez le plastique.
Replacez le couvercle.
Branchez l’appareil. L’ampoule devrait s’allumer.
FR
Remarque:
L’ampoule halogène de
remplacement ne doit pas être
supérieure à 12 Volts/ 10 Watts.
On peut se procurer ces ampoules
dans les centres de service
Fisher & Paykel.
Le réfrigérateur est conçu pour fonctionner pendant plusieurs années sans entretien
technique. Cependant, si le réfrigérateur ne fonctionne pas, contacter le centre de service
Fisher & Paykel aussitôt que possible. Toute réparation électrique doit être faite par un
technicien formé à cet effet ou par un électricien professionnel.
35

Nettoyage
Intérieur
Il est important de garder l’intérieur du réfrigérateur et du congélateur propre afin de prévenir la
contamination des aliments pendant l’entreposage.
La quantité et les sortes d’aliments entreposés déterminent la fréquence de nettoyage du
réfrigérateur (idéalement une fois par semaine ou toutes les deux semaines).
Retirez les étagères du réfrigérateur et les balconnets des portes. Lavez les clayettes et les bacs à
rangement avec du détergent dilué dans de l’eau chaude, rincez à l’eau propre et laissez sécher
avant de les remettre en place.
Essuyez les surfaces intérieures avec du détergent ou du bicarbonate de soude dilué dans de l’eau
chaude (une cuillère à thé de bicarbonate pour chaque demi-litre d’eau). Rincez à l’eau propre.
Pour faciliter la disparition des « vieilles odeurs », ajoutez à l’eau quelques gouttes d’essence de
vanille ou de vinaigre avant de nettoyer.
Nettoyez les surfaces externes avec du détergent dilué dans de l’eau chaude. Pour nettoyez le
joint de la porte magnétique, utilisez une brosse à dents.
N’utilisez pas de tissus ou de produits nettoyants abrasifs, ni de solvants très parfumés sur
aucune partie du réfrigérateur ou du congélateur.
Extérieur
Porte extérieure en inox
Il est important de n’utiliser que du détergent à vaisselle liquide dilué dans de l’eau chaude pour
nettoyer la surface extérieure de la porte du réfrigérateur.
Essuyez la porte à l’aide d’un chiffon propre et non pelucheux.
L’utilisation de produits nettoyants, de solvants abrasifs ou de produits nettoyants pour l’acier
inoxydable endommagera la surface de la porte.
Autres surfaces extérieures
Nettoyez toutes les autres surfaces externes avec du détergent dilué dans de l’eau chaude.
Si nécessaire, nettoyez le joint de la porte magnétique avec une brosse à dents et de l’eau
chaude contenant du détergent.
36

Nettoyage — Caractéristiques spéciales
Enlèvement des bacs
Afin de faciliter l’enlèvement du bac ou du plateau, retirez-en d’abord toute trace de nourriture.
Tenez le bac ou le plateau au centre de sa partie antérieure.
Levez le bac ou le plateau verticalement afin de l’extraire des coulisseaux et tirez-le vers vous afin
de l’enlever.
Repoussez les coulisseaux dans le réfrigérateur.
Remplacement des bacs
Après avoir repoussé les coulisseaux dans le réfrigérateur, placez le bac ou le plateau sur ceux-ci.
Poussez lentement le bac ou le plateau jusqu’à ce que vous sentiez qu’il se remboîte dans les coulisseaux.
Remarque importante : Assurez-vous que les bacs et les plateaux sont sécuritairement
montés sur les coulisseaux avant toute utilisation
FR
Remarque importante : Les coulisseaux des bacs et des paniers sont préalablement lubrifiés;
il n’est donc pas nécessaire de les lubrifier pendant toute leur durée d’utilisation. Ne tentez
pas de nettoyer la graisse des coulisseaux, car vous nuiriez ainsi à leur fonctionnement.
N’immergez pas les coulisseaux dans l’eau
Intérieur
Clayettes en verre
Nettoyez avec du détergent dilué dans de l’eau chaude ou avec un nettoyant pour verre. Si
vous nettoyez les clayettes sans les retirer de l’appareil, n’utilisez que du détergent dilué dans de
l’eau chaude car un nettoyant pour verre risque d’endommager les composants en plastique du
réfrigérateur.
Remarque importante: Beaucoup de produits de nettoyage sur le marché contiennent des
solvants qui peuvent endommager les composants en plastique du congélateur et entraîner
des craquelures. Sur tous les composants en plastique intérieurs et extérieurs du congélateur,
il est important de n’utiliser qu’une faible quantité de détergent liquide à vaisselle diluée
dans de l’eau chaude. Évitez d’utiliser des produits nettoyants antibactériens, tant sur les
surfaces intérieures que sur les surfaces extérieures de l’appareil, car ces nettoyants risquent
de rouiller les composants métalliques et de fissurer les composants en plastique.
37

Nettoyage — Caractéristiques spéciales
Système de contrôle de l’humidité
Remarque importante : Lorsque vous nettoyez
la clayette au-dessus du bac à légumes, il est
recommandé de laisser le système de contrôle
d’humidité en place.
Si le couvercle de plastique et les glissières
d’humidité se séparent de la clayette en verre, suivez
les instructions suivantes pour les remettre en place.
1
Tournez la clayette à l’envers.
2
Pour fixer les glissières d’humidité
aux coins antérieurs de la clayette,
emboîtez les attaches du bas dans
la bordure antérieure de la clayette.
Ensuite, faites glisser de côté jusqu’à
ce que le bras soit fixé à la clayette en verre.
3
Pour fixer le couvercle de contrôle
d’humidité, aligner le couvercle avec
le devant de la clayette en faisant
face au texte. Tenez le couvercle
verticalement et insérez son
extrémité avant dans le dispositif de
retenue, sur la clayette. Assurez-vous
que le couvercle s’insère dans le
dispositif de retenue, ainsi que sous
les glissières d’humidité.
Dispositif de retenue
Glissières d’humidité
4
Ajustez les languettes de la glissière
d’humidité situées sur les côtés de la
clayette de façon à ce que le couvercle
de plastique se trouve entre la clayette
et les languettes.
5
Si les attaches du derrière de la
clayette y sont encore, fermez le
couvercle au moyen de celles-ci.
Assurez-vous que le couvercle est bien
fermé à l’avant et à l’arrière de la clayette.
38

Conservation des aliments au réfrigérateur
L’entreposage d’aliments frais et périssables dans le réfrigérateur permet de prolonger leur
conservation. Les températures froides ralentissent les principales causes de dégradation des
aliments, entre autres, la prolifération de bactéries, de moisissures, de levures ainsi que des
réactions chimiques et physiques.
Conservation des aliments frais
La qualité des aliments avant qu’ils soient mis dans le réfrigérateur est essentielle pour un bon
entreposage. Pour de meilleurs résultats :
Choisissez des aliments très frais et de bonne qualité.
N’achetez que la quantité d’aliments devant être utilisée dans les temps de conservation
recommandés. Si vous achetez un surplus d’aliments, prévoyez en congeler une partie.
Assurez-vous que les aliments soient bien enveloppés ou couverts avant de les entreposer dans le
congélateur. L’emballage empêchera les aliments de se déshydrater, de perdre leur couleur ou leur
goût et aidera à les garder frais. Il empêchera également les échanges de goûts. Les légumes et les
fruits n’ont pas besoin d’être emballés s’ils sont entreposés dans les bacs à légumes du réfrigérateur.
Assurez-vous que les aliments qui ont une forte odeur soient enveloppés ou couverts et entreposés
loin d’aliments tels le beurre, le lait et la crème puisqu’ils prennent facilement le goût des odeurs
fortes.
Après l’achat, réfrigérez dès que possible les aliments frais et périssables. Si les aliments sont laissés
à la température de la pièce pendant un certain temps, leur détérioration sera accélérée.
Évitez de placer les aliments directement devant les sorties d’air froid car ils risquent de geler.
L’air froid doit bien circuler pour que les conditions d’entreposage soient optimales. N’ouvrez pas
inutilement la porte du réfrigérateur.
Laissez refroidir les plats cuisinés avant de les mettre au réfrigérateur. Le refroidissement doit être
fait rapidement. Pour ce faire, placez le récipient de la nourriture à entreposer dans un bol d’eau avec
de la glace, renouvelez l’eau et la glace au besoin. (Il faut noter que les récipients chauds risquent
d’endommager les clayettes et les parois du réfrigérateur.)
Entreposer les aliments crus et cuits dans des récipients ou des emballages différents afin
d’empêcher la contamination entre les aliments.
De plus :
Gardez le réfrigérateur propre. Essuyez fréquemment les parois intérieures et les clayettes (référez-
vous aux consignes pour le nettoyage) et ne mettez que des récipients propres dans le réfrigérateur.
Surveillez la qualité des aliments entreposés dans le réfrigérateur. Jetez les aliments présentant des
signes de dégradation. Portez une attention particulière à la conservation des viandes, des poissons
et des volailles puisque ces aliments ont tendance à se détériorer
rapidement. Utilisez les aliments pendant leur durée de conservation
recommandée.
FR
Produits laitiers et oeufs
La plupart des produits laitiers préemballés ont une date de péremption
étampée sur leur emballage. Gardez-les dans le réfrigérateur et
consommez-les avant la date de péremption.
Le beurre peut facilement prendre l’odeur d’aliments à forte odeur, il est
donc préférable de le garder dans un récipient hermétique.
Les oeufs doivent être gardés au réfrigérateur. Lorsque vous cuisinez avec
des œufs, dans des recettes de cuisson au four particulièrement, retirez les œufs du réfrigérateur
deux heures avant de les utiliser pour obtenir de meilleurs résultats de cuisson.
39

Conservation des aliments au réfrigérateur
La viande rouge
Placez la viande rouge sur une assiette et couvrez-la d’un papier ciré,
cellophane ou aluminium.
Entreposez les viandes cuites et crues sur des assiettes différentes. Cette
division empêchera les jus provenant des viandes crues de contaminer les
produits cuits.
La charcuterie doit être consommée avant la date de péremption.
Volaille
Il faut rincer à l’eau froide l’intérieur et l’extérieur des volailles fraîches.
Séchez et placez sur une assiette. Couvrez de cellophane ou d’un papier
d’aluminium.
Les morceaux de volaille doivent également être conservés de la même
façon. Les volailles entières ne devraient jamais être farcies longtemps
avant leur cuisson pour éviter les risques d’intoxication alimentaire.
Refroidissez puis réfrigérez les volailles cuites le plus rapidement possible.
Retirez la farce de la volaille et conservez-la à part.
Poisson et fruits de mer
Les poissons entiers et les filets de poisson devraient être consommés le
jour même de l’achat. En attendant leur consommation, réfrigérez-les sur
une assiette et couvrez d’une pellicule de cellophane, de papier ciré ou
d’aluminium.
Si vous devez conserver le poisson jusqu’au lendemain, assurez-vous qu’il
soit très frais. Les poissons entiers doivent être rincés à l’eau froide afin
d’enlever les écailles et les saletés. Ensuite, séchez avec des serviettes en
papier. Placez le poisson entier ou les filets dans un sac en plastique.
Les fruits de mer doivent être réfrigérés en tout temps. Consommez-les
dans les deux jours suivant l’achat.
Aliments précuits et restes
Ceux-ci doivent être conservés dans des récipients adéquats couverts afin
que les aliments ne s’assèchent pas.
Conservez-les un à deux jours seulement.
Ne réchauffez les restes qu’une seule fois jusqu’à ce qu’ils soient très chaud.
Bacs à fruits et légumes
Bien que la plupart des fruits et légumes se conservent mieux à des
températures basses, prenez soin de ne pas conserver pendant longtemps
les aliments suivants à moins de 7 °C :
Les agrumes les melons les aubergines
les courgettes les grenadilles les concombres les poivrons les tomates
En conservant les fruits et légumes à de basses températures, vous
observerez des changements peu désirables comme le ramollissement,
la couleur virant au brun et la détérioration accélérée.
Ne réfrigérez pas les avocats (jusqu’à ce qu’ils soient mûrs), les bananes,
les mangues ou les pépinos. Si possible, conservez les fruits séparément des
légumes, c.-à-d. les fruits dans un bac et les légumes dans un autre.
40
les ananas les asimines
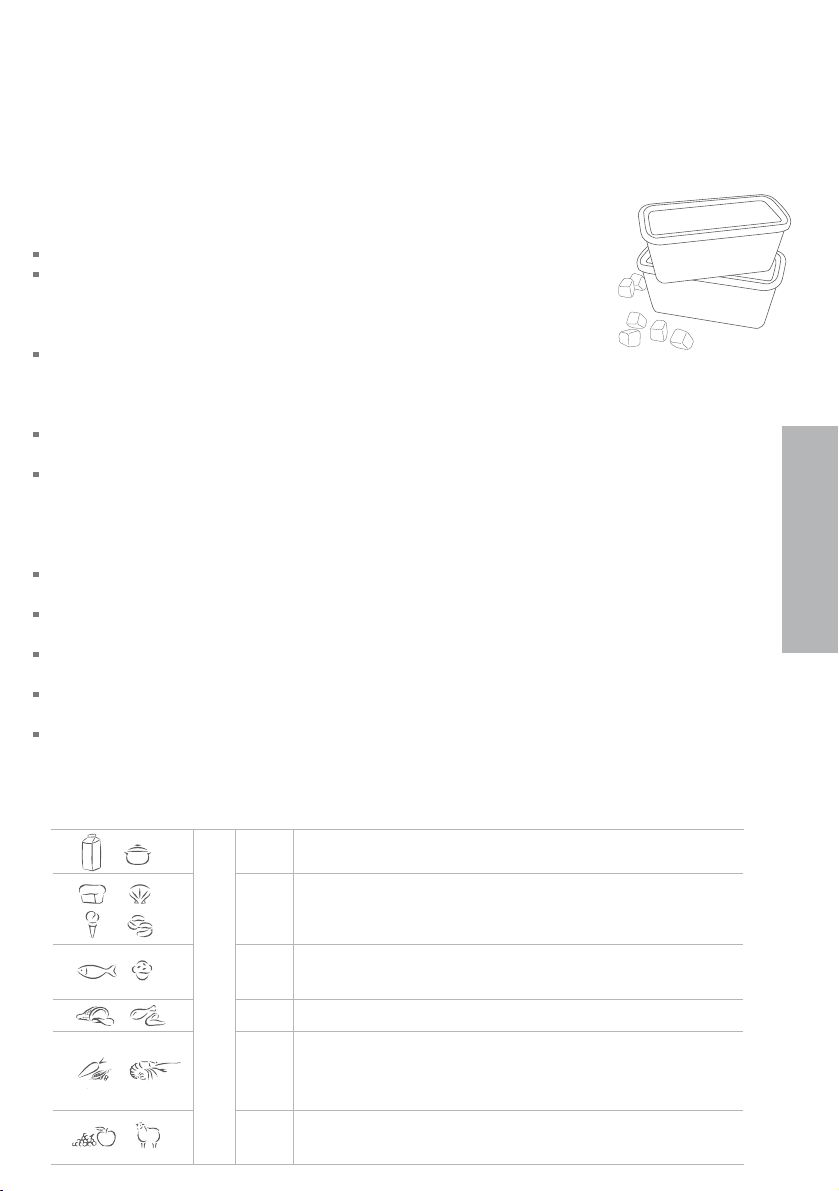
Conservation des aliments au congélateur
Les aliments entreposés à des températures égale ou inférieures à 0 °C peuvent être conservés
plus longtemps qu’à des températures de réfrigération. Ce phénomène est possible puisque la
prolifération de bactéries, de moisissures et de levures est interrompue et les températures très
basses réduisent de manière importante les réactions chimiques et physiques.
Conservation des aliments congelés
Pour de meilleurs résultats :
Ne choisissez que des aliments de haute qualité qui se congèlent bien.
Conservez à une température égale ou inférieure à 0 °C. Prenez soin de
maintenir cette température basse, c.-à-d. évitez d’ouvrir inutilement la
porte du congélateur. Si votre crème glacée est molle, cela signifie que la
température de votre congélateur est trop élevée.
Laissez un espace libre dans les récipients, les bocaux en verre ou les sacs
en plastique contenant des liquides ou de la nourriture en sauce. Ces derniers augmentent de
volume en gelant. Généralement, il est conseillé de laisser un espace d’environ 2,5 cm. Scellez. Il est
préférable de vider l’air de l’emballage après que les aliments soient congelés.
Les paquets ou les récipients d’aliments solides devraient être vidés d’air et fermés
hermétiquement avant la congélation.
Congelez immédiatement et aussitôt que possible. Ne congelez que de petites quantités à la fois.
Pour de meilleurs résultats, nous recommandons de ne congeler qu’un kilo par 25 litres cubes de la
capacité du congélateur (environ 3 kg dans les petits congélateurs et 4 kg dans les gros congélateurs).
Afin d’accélérer la congélation, il est recommandé de placer les aliments frais dans le haut du
compartiment de congélation, près de l’évent d’aération.
N’empilez pas d’aliments congelés autour du couvercle du ventilateur. Cela peut empêcher l’air de
circuler.
Il est préférable de faire décongeler les aliments dans le réfrigérateur, ou à l’aide d’un micro-ondes
ou d’un four multifonctions.
Faites une rotation d’aliments constante. Consommez d’abord les aliments qui ont été entreposé
depuis plus longtemps. Ne dépassez pas la durée de conservation recommandée.
Pour une meilleure qualité de congélation des aliments, n’utilisez que des emballages résistants aux
dommages causés par le froid.
Si les aliments ne sont recouverts que par une pellicule de plastique, placez-les dans un sac en
plastique à l‘épreuve des brûlures par le froid.
FR
Durée de conservation recommandée des aliments congelés
Ces durées ne devraient pas être dépassées.
1 Bacon, plats cuisinés, lait
2 Pain, crème glacée, saucisses, tartes — (viande et fruits),
fruits de mer préparés, poissons huileux
3 Poisons non-huileux, fruits de mer, pizza, scones, et
muffins
4 Jambon, gâteux, biscuits, boeuf, côtelettes et agneau
Mois
6 morceaux de volaille, beurre, légumes (blanchis), oeufs
entiers et jaunes d’oeufs, crevettes cuites, viande hachée
(crue), porc (cru)
12 Fruits secs ou confits, blanc d’oeufs, boeuf (cru), poulet
entier, agneau (cru), gâteaux aux fruits
41

Conservation des aliments au congélateur
Viande, volaille et gibier
Ne congelez pas plus d’un kilo de viande par 25 litres cubes de la capacité du
congélateur. La viande doit être congelée très rapidement pour qu’elle garde
sa texture.
Ne farcissez pas les volailles avant de les congeler.
La viande rouge peut être cuite lorsqu’elle est encore congelée, ou
partiellement ou entièrement décongelée. Si vous faites cuire un morceau de
viande congelé, laissez-le cuire plus longtemps.
La volaille doit toujours être décongelée avant la cuisson.
Poisson
La congélation commerciale du poisson est préférable. Si toutefois vous
voulez congeler du poisson à la maison, assurez-vous qu’il soit bien frais et
de bonne qualité.
Nettoyez, écaillez et de préférence laissez le poisson entier. Le poisson
doit être enveloppé dans un emballage double, car selon le type de
poisson, les odeurs et les goûts peuvent facilement se transmettre. Fermez
hermétiquement.
Pour de meilleurs résultats, faites cuire le poisson lorsqu’il congelé ou
partiellement décongelé.
Légumes
La plupart des légumes se congèlent bien, bien que les légumes à feuilles
perdent leur fraîcheur. D’autres légumes, p. ex. le céleri, les oignons et les
tomates, ne devraient être congelés que dans des plats cuisinés, car ils
ramollissent lorsqu’ils sont congelés seuls.
Ne congelez que des légumes de bonne qualité, mûrs et prêts à manger.
Triez et jetez tous légumes dépéris.
Avant la congélation, il est nécessaire de blanchir tous les légumes crus.
Le blanchiment consiste en une courte période de cuisson au cours de
laquelle les enzymes des légumes sont détruites. Si ces enzymes ne sont
pas détruites, elles provoquent des changements physiques et chimiques
indésirables pendant la congélation.
Les légumes peuvent être blanchis dans l’eau bouillante, à la vapeur ou au micro-ondes. Si vous
les blanchissez à l’eau bouillante, laissez-les bouillir 2 à 4 minutes et refroidissez-les rapidement.
Généralement il vaut mieux faire cuire les légumes congelés, c.-à-d. ne décongelez-les pas.
Aliments préparés et cuits
La plupart des aliments cuits peuvent être congelés, mais il n’est toutefois
pas recommandé de congeler les aliments suivants :
Les blancs d’oeuf cuits, les poudings au lait, les crèmes pâtissières, les plats
avec de la gélatine ou de la gelée, la mayonnaise et autres sauces à salade,
ainsi que les garnitures de meringue. Ces aliments tendent à se défaire au
moment de la décongélation.
Fruits
Choisissez des fruits de bonne qualité, mûrs et prêts à manger. Choisissez, de
préférence, les variétés se prêtant à la congélation.
Évitez les fruits verts ou trop mûrs.
L’emballage du fruit dépend de son utilisation. Les fruits en confitures sont
idéaux pour les desserts, tandis que les fruits conservés sans sucre sont
mieux pour la cuisson. La plupart des fruits peuvent être conservés de 8 à
12 mois.
42
Un problème! Que faire?
Si votre appareil est défectueux, vérifiez les points suivants avant de communiquer avec votre
centre de service à la clientèle ou avec le centre de services des appareils Fisher & Paykel
autorisé de votre détaillant.
Problème Causes possibles Quoi faire
L’appareil ne
fonctionne pas
La lumière ne
fonctionne pas
La lumière et
l’affichage ne
fonctionnent pas
Le moteur
fonctionne
pendant de
longues périodes
Les espaces de
rangement sont
trop chauds
Les aliments
gèlent dans le
réfrigérateur
Des sons
étranges se font
entendre
Présence d’eau
dans les bacs à
légumes
Pas de tension à l’alimentation Vérifiez que la fiche est bien branchée et
L’ampoule est brûlée Changez l’ampoule
Le réfrigérateur ne fonctionne pas Référez-vous à la section « Entretien »
Le produit est en mode Sabbat. Appuyez sur le bouton de sélection du
Le temps chaud
L’ouverture fréquente des portes
Une grande quantité d’aliments
vient d’être ajoutée
La température est réglée trop
basse au panneau de contrôle
Les portes ne ferment pas
correctement
La température est mal réglée Référez-vous à la section sur le contrôle
L’ouverture fréquente de la porte
Une grande quantité d’aliments
vient d’être ajoutée
La température est mal réglée Référez-vous à la section sur le contrôle
Des aliments sont placés juste
devant les sorties d’air
L’appareil n’est pas stable
Le congélateur se dégivre
Il se forme de la condensation à
cause de l’eau que produisent les
légumes
que l’appareil est en marche.
Vérifiez qu’un autre appareil fonctionne
sur la même prise de courant.
Vérifiez les fusibles
compartiment pendant 10 secondes
Réduisez au minimum la fréquence
d’ouverture de la porte pour stabiliser la
température
Référez-vous à la section sur le contrôle
de la température
Vérifiez que l’appareil est à niveau et que
les joints sont propres.
de la température
Réduisez au minimum la fréquence
d’ouverture de la porte pour stabiliser la
température
de la température
Écartez les aliments sensibles à la
réfrigération du centre arrière de la
clayette
Référez-vous à la section sur l’installatiion
Une petite quantité de condensation
favorise la conservation des légumes.
S’il y a trop d’eau, emballez les légumes
dans des sacs en plastique ampless
Essuyez l’eau excédentaire avec un chiffon
Fixer la languette réglant
l’humidité à réglage
d’humidité bas
FR
43

Un problème! Que faire?
Problème Causes possibles Quoi faire
Les parois de
l’appareil sont
chaudes
Condensation
à l’extérieur du
réfrigérateur
Condensation
à l’intérieur du
réfrigérateur
Formation de
glace dans le
congélateur
Les glaçons ont
un goût ou une
odeur
Les poignées de
porte ne sont pas
alignées
Le bac ou le
plateau ne
glisse pas
uniformément
Ce réchauffement est normal
Cette condensation n’est pas
inhabituelle par temps très
humide
Des ouvertures trop fréquentes
ou trop longues de la porte
Le joint de la porte fuit Vérifiez que le joint soit bien en place et
Cette condensation n’est pas
inhabituelle par temps très
humide
La porte du congélateur ne ferme
hermétiquement
Transfert d’odeur et de goût des
aliments à odeur forte
Avec le temps et l’usage, il peut y
avoir eu un déplacement
L’emballage est coincé Vérifier qu’aucun aliment ou emballage
Les coulisseaux ne sont pas
entièrement déployés
Essuyez l’extérieur de l’appareil
Réduisez au minimum la fréquence
d’ouverture de la porte
qu’il ferme hermétiquement
Essuyez l’intérieur de l’appareil
Déplacez les aliments dans le congélateur
afin que la porte puisse se fermer
correctement
Vérifiez et nettoyez le joint de la porte
Emballez ou couvrez les aliments à odeur
forte
Référez-vous à la section : « Quatre
exigences essentielles — Stabilité »
n’est bloqué derrière le bac ou le plateau
Tout en tenant les côtés du bac ou du
plateau, déployez complètement les
coulisseaux en tirant fermement, ce qui
les remettra en position initiale
44

Garantie limitée
Lorsque vous achetez un nouvel appareil électroménager Fisher & Paykel pour une utilisation
ménagère, vous recevez automatiquement une garantie limitée d’un an couvrant les pièces de
rechange et la main d’œuvre pour le service dans les 48 états du continent américain, Hawaï,
Washington D.C. et au Canada. Eu égard à l’Alaska, la garantie limitée est identique sauf que vous
devez prendre en charge les frais d’expédition du produit jusqu’au service clientèle ou prendre
en charge les frais de déplacement du technicien de maintenance jusqu’à votre domicile. Les
produits destinés à être utilisés au Canada doivent être achetés par l’intermédiaire de la chaîne
de distribution canadienne pour garantir la conformité avec la réglementation en vigueur.
Si le produit est installé dans un véhicule automobile, sur un bateau ou sur une unité
mobile similaire, vous bénéficiez de la même garantie limitée d’un an, mais il relève de votre
responsabilité d’amener le véhicule, bateau ou l’unité mobile dans laquelle est installé le
produit au service après-vente à vos frais ou de prendre en charge les frais de déplacement du
technicien de maintenance jusqu’au lieu où se trouve le produit.
Vous bénéficiez d’une garantie limitée supplémentaire de quatre ans (pour un total de cinq ans)
couvrant les pièces et la main-d’œuvre du système de réfrigération scellé (compresseur,
évaporateur, condenseur, déshydrateur de filtre et tube de raccordement) dans les 48 états
continentaux des États-Unis, à Hawaï, à Washington DC et au Canada. Les clients de l’Alaska
bénéficient de la même garantie limitée pour le système de réfrigération scellé, mais ils doivent
payer les frais nécessaires pour la livraison du produit à l’atelier de réparation, ou le déplacement
d’un technicien à leur domicile.
Fisher & Paykel s’engage à :
Réparer sans frais encourus sur le propriétaire en termes de main d’œuvre ou de matériau
une quelconque partie du produit, dont le numéro de série se trouve sur le produit, s’avérant
défectueuse. Eu égard à l’Alaska, vous devez prendre en charge les frais d’expédition du produit
jusqu’au service clientèle ou prendre en charge les frais de déplacement du technicien de
maintenance jusqu’à votre domicile. Si le produit est installé dans un véhicule automobile, sur un
bateau ou sur une unité mobile similaire, il relève de votre responsabilité d’amener le véhicule,
bateau ou l’unité mobile dans laquelle est installé le produit au service après-vente à vos frais ou
de prendre en charge les frais de déplacement du technicien de maintenance jusqu’au lieu où
se trouve le produit. Si nous ne pouvons pas réparer une pièce défectueuse du produit après un
nombre raisonnable de tentatives, nous procéderons au remplacement de la pièce ou du produit
ou nous vous proposerons de vous rembourser intégralement le prix d’achat du produit (frais
d’installation et autres frais étant exclus), selon notre choix.
FR
Cette garantie s’étend à l’acheteur original et à tout propriétaire successeur du produit pour les
produits achetés pour toute utilisation ménagère par une seule famille.
Le service en vertu de cette garantie limitée devra être assuré par Fisher & Paykel ou par son
agent agréé pendant les heures normales de bureau.
Durée de cette garantie limitée
Notre responsabilité en vertu de cette garantie limitée expire UN AN après la date d’achat
du produit par le premier consommateur.
Notre responsabilité en vertu de toutes garanties implicites, y compris la garantie implicite de
qualité marchande (une garantie implicite selon laquelle le produit est adapté à toute utilisation
ordinaire) expire également UN AN (ou durée supérieure comme requis par la loi en vigueur) à
compter de la date d’achat du produit par le premier consommateur. Certains États n’autorisent
pas les limitations sur la durée de la garantie implicite, il est donc possible que les limitations sur
les garanties implicites ne vous concernent pas.
45

Garantie limitée
Cette garantie ne couvre pas les points suivants :
A
Les déplacements d’un technicien de maintenance jusqu’à votre domicile pour tout problème
non lié à un défaut dans le produit. Les frais du déplacement vous seront facturés si le problème
s’avère ne pas être un défaut du produit. Par exemple :
1. Rectifier une mauvaise installation du produit.
2. Vous expliquer comment utiliser le produit.
3. Remplacer les fusibles de la maison ou procéder au réglage des disjoncteurs, refaire le
câblage ou la plomberie de la maison ou remplacer les ampoules.
4. Rectifier les défaillances provoquées par l’utilisateur.
5. Rectifier le réglage du produit.
6. Modifications non autorisées du produit.
7. Bruits ou vibrations considérés normaux, comme par exemple, les sons de drain/ventilateur,
les bruits de réfrigération ou les bips sonores.
8. Réparations des dommages provoqués par des animaux nuisibles comme les rats ou les
cafards, etc.
B
Défauts causés par des facteurs autres que :
1. L’utilisation ménagère normale ou
2. L’utilisation en conformité avec le manuel d’utilisation du produit.
C
Les défaillances du produit causées par accident, la négligence, une mauvaise utilisation,
l’incendie, l’inondation ou une catastrophe naturelle.
D
Les frais des réparations effectuées par des réparateurs non agréés ou les frais associés à la
correction de telles réparations non autorisées.
E
Les frais de déplacement et frais associés encourus lorsque le produit est installé dans un
endroit disposant d’un accès limité ou restreint (p. ex. : frais d’avions, frais de ferry et zones
géographiques isolées).
F
La maintenance recommandée normale comme énoncée dans le manuel d’utilisation du
produit.
G
Le remplacement du filtre, sauf en présence de pièces ou matériaux défectueux à l’intérieur de la
cartouche du filtre.
Ce produit a été conçu pour une utilisation dans un environnement domestique normal. Il n’est
pas conçu pour une utilisation commerciale. Le fait de ne pas respecter cette consigne peut
entraîner l’annulation de la garantie.
En cas de problème avec l’installation, prenez contact avec votre revendeur ou installateur.
Les raccordements électriques et d’évacuation et autres raccordements relèvent de votre
responsabilité.
Nous ne sommes pas responsable des dommages indirects (les frais des réparations ou les
frais de remplacement d’autres propriétés endommagées si le produit est défectueux ou vos
dépenses encourues si le produit est défectueux). Certains États n’autorisent pas l’exclusion
ou la limitation des dommages indirects, il est donc possible que la limitation ou l’exclusion
ci-dessus ne s’applique pas à votre situation.
46

Garantie limitée
Comment solliciter le service clientèle
Veuillez lire le manuel d’utilisation. Si après la lecture du manuel, vous avez toujours des
questions sur le fonctionnement du produit, ou si vous avez besoin de connaître le nom de
votre représentant Fisher & Paykel agréé local ou si vous pensez que le produit est défectueux et
que vous souhaitez contacter le service clientèle dans le cadre de cette garantie limitée, veuillez
prendre contact avec votre revendeur ou nous appeler au numéro suivant :
États-Unis
SANS FRAIS 1.888.9.FNP.USA (1.888.936.7872)
Ou utilisez le lien sur le site : www.fisherpaykel.com/locator/servicer/
Canada
SANS FRAIS 1.888.9.FNP.USA (1.888.936.7872)
Ou utilisez le lien sur le site : www.fisherpaykel.com/locator/servicer/
Il est possible qu’il vous soit demandé de fournir une preuve valable de la date d’achat du
produit avant que le produit puisse être accepté par le service clientèle en vertu de cette
garantie limitée.
Aucune autre garantie
Cette garantie limitée constitue l’intégralité de l’accord exclusif passé entre l’acheteur et
Fisher & Paykel eu égard à toute défaillance du produit. Aucun de nos employés (ou de
nos agents agréés) n’est autorisé à procéder à un quelconque ajout ou à une quelconque
modification de cette garantie limitée.
Garant : Fisher & Paykel Appliances, Inc.
FR
Si vous avez besoin d’assistance eu égard à cette garantie limitée, veuillez nous contacter au
numéro ci-dessus ou nous écrire à l’adresse ci-dessous :
Fisher & Paykel Appliances, Inc
5900 Skylab Road
Huntington Beach
CA 92647
Cette garantie limitée vous donne des droits juridiques spécifiques et il est également possible
que vous bénéficiez d’autres droits pouvant varier d’un état à un autre.
47

Copyright © Fisher & Paykel 2009. All rights reserved.
The product specifications in this booklet apply to
the specific products and models described at the
date of issue. Under our policy of continuous product
improvement, these specifications may change at any
time. You should therefore check with your Customer
Care Center to ensure this booklet correctly describes
the product currently available.
Copyright © Fisher & Paykel 2009. Tous droits réservés.
Les spécifications du produit présenté dans ce livret
s’appliquent aux produits et modèles spécifiquement
décrits à la date de publication. En accord avec notre
politique d’amélioration continue de nos produits,
ces spécifications sont susceptibles de changer à
tout moment. Veuillez donc vérifier auprès de votre
centre de service à la clientèle que ce livret décrit
correctement le produit disponible actuellement.
www.fisherpaykel.com
www.fisherpaykel.ca
US CA
Active Smart™ Refrigeration
Installation Instructions and User Guide
Published: 02/2009
Part No. 814942 B
 Loading...