

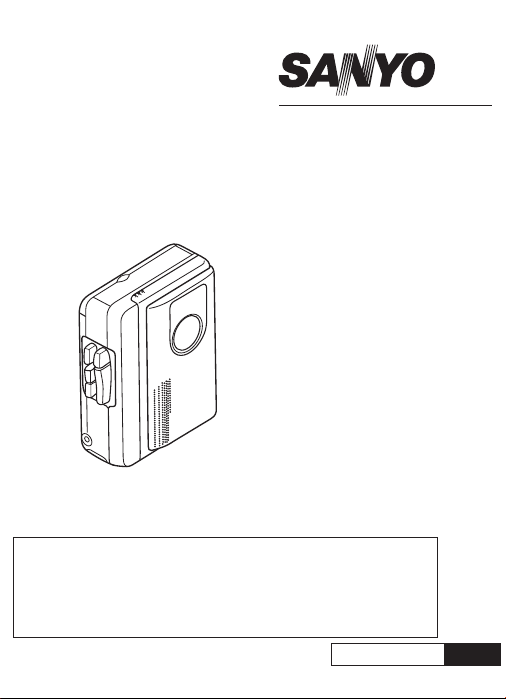
INSTRUCTION MANUAL
Compact Cassette Recorder
M-1060C
M-1060C
M-1110C
M-1110C
1AD6P1P0718-R
M-1060C/M-1110C, Issue Number 1
ENGLISH
Printed in China
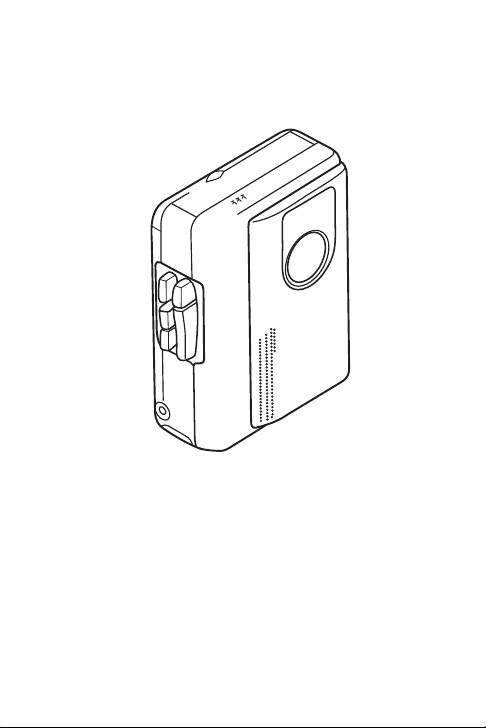
CONTROLS (Fig. 1)
Fig. 1
1. Battery/Operation indicator (BATT/OPR) (M-1110C only)
2. Voice activated system switch (VAS) (M-1110C only)
3. Volume control (VOLUME)
4. Microphone jack (MIC) (M-1110C only)
5. Earphone jack (EAR)
6. Built-in microphone
-E1-
7. Cassette compartment
8. Battery compartment (back panel)
9. Tape counter and reset button (M-1110C only)
10. Record button (REC)
11. Play button (PLAY)
12. External DC 3V jack (EXT DC 3V)
13. Fast forward/Cue button (FFWD/CUE)
14. Rewind/Review button (REW/REV)
15. Stop button (STOP)
16. Pause switch (PAUSE)
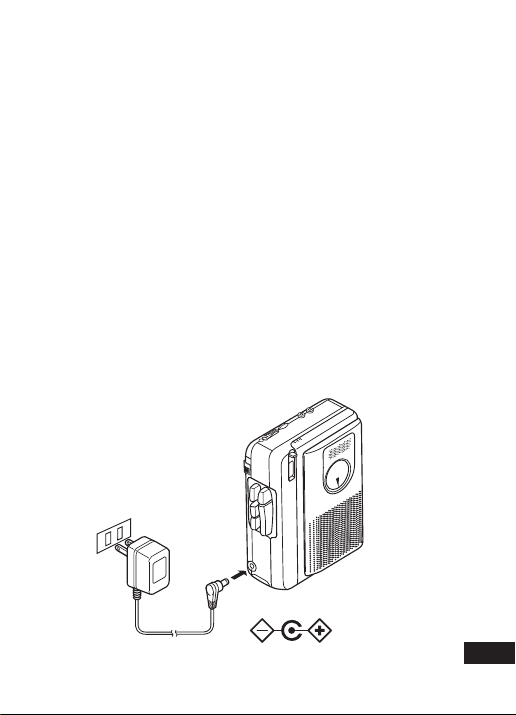
POWER
AC adaptor
Connect the included AC adaptor (Part No. 645 016 1018)
to the EXT DC 3V jack (Fig. 2). (The batteries are automatically disconnected.)
• The centre pin of the EXT DC 3V jack is positive (+).
AC 120V
EXT DC3V
-E2-
Fig. 2

Battery
Install two “AA” batteries (not supplied)
as shown in Fig. 3. Observe proper
polarity.
• If you are not going to use the unit
with batteries for one month or
more, remove the batteries.
Fig. 3
Battery replacement
When the BATT/OPR indicator (M-1110C only) does not light
during operation or is lit dimly, replace the batteries.
• When replacing the batteries, use two new batteries of
the same type. Do not mix a used battery with a new
one or mix different types of batteries.
IMPORTANT NOTE:
SPENT OR DISCHARGED BATTERIES MUST BE RECYCLED OR DISPOSED OF PROPERLY IN COMPLIANCE WITH ALL APPLICABLE LAWS.
FOR DETAILED INFORMATION, CONTACT YOUR LOCAL COUNTY SOLID WASTE AUTHORITY.
Rechargeable battery
Install the rechargeable battery (SANYO
NBP-30B, not supplied) as shown in Fig.
4. Connect the AC adaptor. The battery
fully charged approximately 8 hours after the AC adaptor is connected.
• Do not charged continuously for 24
hours or more.
-E3-
IMPORTANT NOTE:
SPENT NICKEL-CADMIUM RECHARGEABLE BATTERY MUST BE RECYCLED OR
DISPOSED OF PROPERLY IN COMPLIANCE
WITH ALL APPLICABLE LAWS.
FOR DETAILED BATTERY RECYCLING
INFORMATION, CONTACT THE RECHARGEABLE BATTERY RECYCLING CORPORATION AT 1-800-822-8837.
CONNECTIONS
External microphone (M-1110C only)
Connect an external microphone (not supplied) to the MIC
jack. (The built-in microphone is automatically disconnected.)
Earphone
Connect an earphone (not supplied) to the EAR jack for private listening. (The speaker is automatically disconnected.)
RECORDING (Fig. 5)
NOTE: Do not use C-120
or endless cassettes.
Built-in
microphone
-E4-
Fig. 5
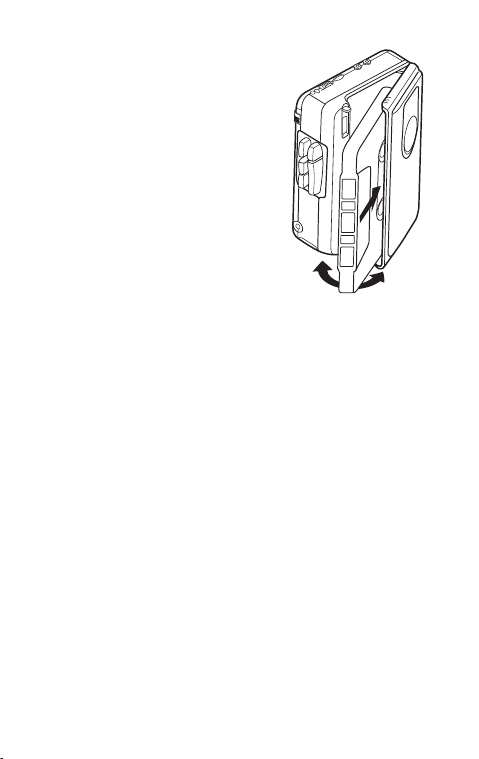
1. Load a cassette as shown in
Fig. 6.
2. Press the reset button to set
the counter to “000”. The
counter shows relative tape
position. (M-1110C only)
3. Set the VAS switch to ON or
OFF. (M-1110C only)
4. Press the REC button. (The
PLAY button is engaged
simultaneously.)
VAS ON: Voice activated recording (M-1110C only)
When you talk, the unit will start
recording. When you stop talking for as long as 4 to 8
seconds, the unit will stop recording (variations in voice
level do not stop recording).
Use the VOLUME control to adjust the microphone sensitivity to your voice. If voices are not activating recording,
increase the volume. If recording does not stop when
talking stops, decrease volume.
NOTE: If the first few words you speak activate recording but are not recorded, say an extra word to start recording before you dictate. (For important recordings,
set the VAS switch to OFF.)
VAS OFF: Standard recording (M-1110C only)
Recording will continue until the STOP button is pressed.
5. Press the STOP button to stop recording.
Fig. 6
-E5-
Fast forwarding or rewinding
In the stop mode, press the FFWD/CUE or REW/REV button.
Press the STOP button when the desired point or end of the
tape is reached.
Temporarily stopping operation (all modes)
Slide the PAUSE switch right. Slide it left to resume operation.
Quick reviewing and recording
While recording, press and hold the REW/REV button (the
REC button is released) until the tape has rewound to the
desired point. Release the REW/REV button to play back
your recording. Press the REC button to resume recording.
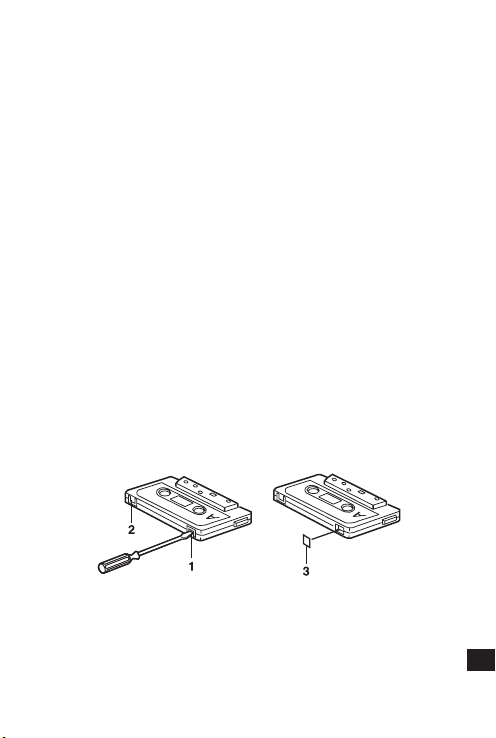
Safeguards against accidental erasure (Fig. 7)
To protect side A, break out tab (1). To protect side B, break
out tab (2).
• To erase or record a protected cassette, cover the tab
openings with adhesive tape (3).
NOTE: The REC button cannot be depressed when using a
protected cassette.
Fig. 7
-E6-

PLAYBACK (Fig. 8)
1
2
3
2
3
4
5
2
1
1. Load the cassette as shown
in Fig. 6.
2. Press the PLAY button and
adjust the VOLUME control.
3. Press the STOP button to
stop playback.
2
1
3
2
Cue and reviewing
While playback, press and hold
the FFWD/CUE or REW/REV button. Release the button when
the desired point is reached. Playback continues.
MAINTENANCE
To ensure continued high
performance, use cotton swab (1)
moistened with head cleaner to
clean the heads (4, 5), pinch roller
(3) and capstan (2) after about
every 10 hours of use (Fig. 9).
-E7-
3
4
2
1
Fig. 8
5
Fig. 9
SANYO SERVICE PLUS LIMITED
WARRANTY
DICTATION PRODUCTS ONLY
In order to obtain factory warranty service for Sanyo Dictation Products, call the toll-free number below. The unit must be packed in the
original carton or a well-padded sturdy carton in order to avoid shipping damage.
Note: Do not return this unit to the retail store for service.
To obtain Service Plus Warranty service, product operation information or for problem resolution, call
THIS WARRANTY IS VALID ONLY ON SANYO DICTATION PRODUCTS PURCHASED AND USED IN THE UNITED
STATES OF AMERICA, EXCLUDING ALL U.S. TERRITORIES AND PROTECTORATES. THIS WARRANTY APPLIES
ONLY TO THE ORIGINAL RETAIL USER, AND DOES NOT APPLY TO PRODUCTS USED FOR ANY INDUSTRIAL,
PROFESSIONAL, OR COMMERCIAL PURPOSE. THE ORIGINAL DATED BILL OF SALE OR SALES SLIP MUST BE
SUBMITTED AT THE TIME WARRANTY SERVICE IS REQUESTED.
Subject to the OBLIGATIONS above and EXCLUSIONS below, SANYO FISHER COMPANY (SFC) warrants this SANYO Dictation
product against defects in materials and workmanship for the periods of LABOR and PARTS specified below. SFC will, at its option,
within two business days after its receipt of any dictation product that fails to conform to this warranty at SFC’s designated facility, either
(a) repair such product or any of its parts which fail to conform to this warranty or (b) ship a replacement product. The warranty period
commences on the date the product was first purchased at retail.
OBLIGATIONS
Toll Free 1-877-999-1840
Weekdays 8:00 AM - 5:00 PM Pacific Time
LABOR PARTS
1 YEAR 1 YEAR
This warranty does not cover (A) the adjustment of customer-operated controls as explained in the appropriate model’s instruction
manual, or (B) the repair of any product, whose serial number has been altered, defaced or removed. This warranty shall not apply to
the cabinet or cosmetic parts, antenna, knobs, batteries or routine maintenance.
This warranty does not apply to repairs or replacements necessitated by any cause beyond the control of SFC including, but not limited
to, any malfunction, defect, or failure caused by or resulting from unauthorized service or parts, improper maintenance, operation
contrary to furnished instructions, shipping or transit accidents, modification or repair by the user, abuse, misuse, neglect, accident,
incorrect line voltage, fire, flood, or other Acts of God, or normal wear and tear.
The foregoing is in lieu of all other expressed warranties and SFC does not assume or authorize any party to assume for it any other
obligation or liability.
THE DURATION OF ANY WARRANTIES WHICH MAY BE IMPLIED BY LAW (INCLUDING THE WARRANTIES OF MERCHANTABILITY
AND FITNESS) IS LIMITED TO THE TERM OF THIS WARRANTY. IN NO EVENT SHALL SFC BE LIABLE FOR SPECIAL, INCIDENTAL OR CONSEQUENTIAL DAMAGES ARISING FROM OWNERSHIP OR USE OF THIS PRODUCT, OR FOR ANY DELAY IN THE
PERFORMANCE OF ITS OBLIGATIONS UNDER THIS WARRANTY DUE TO CAUSES BEYOND ITS CONTROL. SOME STATES
DO NOT ALLOW LIMITATIONS ON HOW LONG AN IMPLIED WARRANTY LASTS AND/OR DO NOT ALLOW THE EXCLUSION OR
LIMITATION OF CONSEQUENTIAL DAMAGES, SO THE ABOVE LIMITATIONS AND EXCLUSIONS MAY NOT APPLY TO YOU.
THIS WARRANTY GIVES YOU SPECIFIC LEGAL RIGHTS. YOU MAY HAVE OTHER RIGHTS, WHICH VARY FROM STATE TO
STATE.
For your protection in the event of theft or loss of this product, please fill in the information below for your own personal records.
Model No. Serial No.
Date of Purchase Purchase Price
Where Purchased
EXCLUSIONS
(Located on back or bottom side of unit)
-E8-

-E9-
21605 Plummer Street
Chatsworth, CA 91311
 Loading...