


XP-635
Table of contents
 Loading...
Network Guide
NPD 5283-00 EN

Network Guide
Copyright
Copyright
No part of this publication may be reproduced, stored in a retrieval system, or transmitted in any form or by any
means, electronic, mechanical, photocopying, recording, or otherwise, without the prior written permission of
Seiko Epson Corporation. No patent liability is assumed with respect to the use of the information contained
herein. Neither is any liability assumed for damages resulting from the use of the information herein.
information contained herein is designed only for use with this Epson product. Epson is not responsible for any
use of this information as applied to other products.
Neither Seiko Epson Corporation nor its aliates shall be liable to the purchaser of this product or third parties for
damages, losses, costs, or expenses incurred by the purchaser or third parties as a result of accident, misuse, or
abuse of this product or unauthorized modications, repairs, or alterations to this product, or (excluding the U.S.)
failure to strictly comply with Seiko Epson Corporation's operating and maintenance instructions.
Seiko Epson Corporation and its aliates shall not be liable for any damages or problems arising from the use of
any options or any consumable products other than those designated as Original Epson Products or Epson
Approved Products by Seiko Epson Corporation.
e
Seiko Epson Corporation shall not be held liable for any damage resulting from electromagnetic interference that
occurs from the use of any interface cables other than those designated as Epson Approved Products by Seiko
Epson Corporation.
© 2015 Seiko Epson Corporation. All rights reserved.
contents of this manual and the
e
specications
of this product are subject to change without notice.
2

Network Guide
Trademarks
Trademarks
❏ EPSON® is a registered trademark, and EPSON EXCEED YOUR VISION or EXCEED YOUR VISION is a
trademark of Seiko Epson Corporation.
❏ EPSON Scan
❏ Microso
❏ Apple, Macintosh, Mac OS, OS X, AirPort, AirMac, Bonjour, and Safari are trademarks of Apple Inc., registered
in the U.S. and other countries. AirPrint is a trademark of Apple Inc.
❏ Android™ is a trademark of Google Inc.
❏ PictBridge is a trademark.
❏ General Notice: Other product names used herein are for
of their respective owners. Epson disclaims any and all rights in those marks.
soware
, Windows®, and Windows Vista® are registered trademarks of Microso Corporation.
®
is based in part on the work of the Independent JPEG Group.
identication
purposes only and may be trademarks
3

Network Guide
Contents
Contents
Copyright
Trademarks
About this Manual
Marks and Symbols.........................6
Denitions of Terms Used in this Manual.........6
Artworks.................................7
Operating System References..................7
Introduction
Introduction of
Using the Printer from a Smart Device...........8
Using the printer from a Computer..............8
Connecting the Printer to an Access Point.........8
Manual...................8
is
Connecting the Printer to a Smart
Device
Connection Types Between the Printer and a
Smart Device..............................9
Wi-Fi................................. 9
Wi-Fi Direct (Direct Connection).............9
Connection Settings Between the Printer and a
Smart Device.............................10
Connecting through an Access Point..........10
Preparing an Application and Wi-Fi
Connection from a Smart Device............11
Connecting by Wi-Fi Direct................12
Checking the Connection Between the Printer
and the Smart Device.......................18
Changing the Connection Method Between the
Printer and the Smart Device.................20
Additional Connections for a Smart Device. . . . .20
Connecting the Printer and a
Connection Settings Between the Printer and a
Computer...............................24
Connecting to Wi-Fi......................24
Connecting the Printer and a Computer
Directly...............................28
Setting up a USB Connection...............30
Changing a Connection Method Between the
Printer and a Computer.....................32
Replacing or Adding New Access Points.......33
Changing the Printer Connection to Wi-Fi..... 33
Adding a USB Connection to the Printer.......36
Adding Computers.........................38
Adding Computers Using the Soware Disc
(for Windows Only)......................38
Adding Computers from the Website -
Windows..............................40
Adding Computers from the Website - Mac
OS X.................................42
Adding Computers Manually - Windows.......42
Adding Computers Manually - Mac OS X. . . . . . 43
Making Wi-Fi Network Settings from
the Printer's Control Panel
Setting Up Manually........................44
Setting Up Automatically by Pressing a Button
(WPS)..................................47
PIN Code Setup (WPS).....................49
Simple AP Mode..........................51
Checking the Printer's Network
Connection Status
Network Icon.............................55
Checking the Network Status from the Printer's
Control Panel............................ 55
Printing a Network Connection Report..........56
Printing a Network Status Sheet...............56
Computer
Connection Types Between the Printer and a
Computer...............................22
Wi-Fi.................................22
Wi-Fi Direct Simple AP Mode...............22
Ad Hoc Mode.......................... 23
USB Connection........................23
Advanced Network Settings
Setting Up from the Printer's Control Panel.......57
Setting Up from Web Cong..................58
Disconnecting or Initializing the
Network
Disabling Wi-Fi from the Printer's Control Panel. . . 59
4

Network Guide
Contents
Disconnecting Wi-Fi Direct from the Printer's
Control Panel............................ 59
Initializing the Network Settings from the
Printer's Control Panel......................59
Disabling Wi-Fi from Web
..............59
Cong
Solving Problems
Cannot Connect by Wi-Fi....................61
A: Cannot Connect to the Internet from a
Smart Device...........................61
B: Cannot Print with Wi-Fi from a Smart
Device................................62
C: Cannot Print with Direct Connect from a
Smart Device...........................62
D: Cannot Connect to the Internet from a
Computer.............................63
E: Cannot Print or Scan by Wi-Fi from a
Computer.............................67
F: Cannot Print with Direct Connect from a
Computer.............................68
G: Cannot Register the Printer to Cloud
Services or Cannot Update the Firmware. . . . . . .68
H: e Internet Disconnects when no
Changes were made to the Network
Environment...........................68
Messages and Solutions on the Network
Connection Report........................ 69
Checking the Connection Using a Ping Command. .73
Checking the Connection Using a Ping
Command - Windows.................... 73
Checking the Connection Using a Ping
Command - Mac OS X....................74
Cannot Connect Aer Trying all Solutions.......76
Setting Up a WSD Port – Windows...........87
Checking the Print Port...................89
Connecting a Scanner to the Network...........90
Appendix
Basic Network Information Used by the Printer. . . . 77
Type of Network Used by the Printer..........77
Summary of Networks with a Relay Point. . . . . . 77
Networks Without a Relay Point (Wi-Fi
Direct/Ad Hoc).........................81
Public Line Networks.....................82
Network Functions and IPv4/IPv6 Tables........ 82
Client Operating Systems that Support the
TCP/IP Protocol........................ 82
Network Functions and IPv4/IPv6 Tables...... 83
Combinations that can be Connected at the
Same Time...............................83
Ports and Protocols........................84
Setting Up Standard TCP/IP Ports – Windows. . . 85
5

Network Guide
About this Manual
About this Manual
Marks and Symbols
Caution:
!
Instructions that must be followed carefully to avoid bodily injury.
Important:
c
Instructions that must be observed to avoid damage to your equipment.
Note:
Instructions containing useful tips and restrictions on printer operation.
&
Related Information
Clicking this icon takes you to related information.
Denitions of Terms Used in this Manual
e following terms are used in this manual.
❏ Wi-Fi (Wireless LAN)
Wi-Fi (Wireless LAN) is a network that wirelessly communicates data.
"Infrastructure mode" that communicates data through a relay point (for example, an access point) when
connecting printers and computers.
❏ Ethernet (Wired LAN)
An Ethernet is a network that communicates data using an Ethernet cable. is is also known as a "Wired LAN",
but in this manual we will use "Ethernet".
❏ Access Point
is relays communication between Wi-Fi devices. We also use the term “access point” for a wireless router that
has a relay function. Many wireless routers have a LAN port to allow wired LAN connections. ese can also be
used as a hub for wired LAN connections.
❏ Smart Device
is term is a generic term for Android devices and iOS devices that are capable of communicating with a
printer.
term includes smart phones and tablets.
is
term is the same as the term
is
❏ Password
is is an encryption key used in the security for the access point. A password may also be called a “WEP key”, a
“WPA passphrase”, a “Pre-Shared Key”, and so on according to the access point or security system being used.
We use “Password” in this manual.
6

Network Guide
About this Manual
Artworks
❏ Details of screen shots and illustrations may vary by model, but the instructions are the same.
❏ Screen shots are from Windows 7 and Mac OS X v 10.10.x. Details may vary between OS versions.
❏ Some of the menu items in the screen shots may vary by model.
Operating System References
Windows
In this manual, terms such as "Windows 8.1", "Windows 8", "Windows 7", "Windows Vista", and "Windows XP" refer
to the following operating systems. Additionally, "Windows" is used to refer to all versions.
❏ Microso
❏ Microso
❏ Microso
❏ Microso
❏ Microso
❏
Microso
Mac OS X
In this manual, "Mac OS X v10.10.x" refers to OS X Yosemite, "Mac OS X v10.9.x" refers to OS X Mavericks, and
"Mac OS X v10.8.x" refers to OS X Mountain Lion. Additionally, "Mac OS X" is used to refer to "Mac OS X
v10.10.x", "Mac OS X v10.9.x", "Mac OS X v10.8.x", "Mac OS X v10.7.x", and "Mac OS X v10.6.8".
Wi n dow s® 8.1 operating system
®
Wi n dow s® 8 operating system
®
Wi n dow s® 7 operating system
®
Wi n dow s Vi s ta® operating system
®
Wi n dow s® XP operating system
®
Wi n dow s® XP Professional x64 Edition operating system
®
7

Network Guide
Introduction
Introduction
Introduction of This Manual
is manual introduces the procedures for connecting smart devices and computers to the printer, building a
network connection, and making network settings for the printer. To use the printer with Wi-Fi, you need a relay
point such as an access point or a router. If you have a relay point, we recommend that you use it to connect the
printer by Wi-Fi. If you do not have a relay point, you can also connect the printer directly to your smart device by
Wi - F i .
is manual explains the procedures for making network settings on computers and smart devices. Follow the
procedure that best suits your network setup.
Before you start reading this manual, you have to nish the initial setup for the printer. See the manual supplied
with the printer for details. Also, if you want to make the printer's network settings from a computer, connect a
computer and relay point (access point), and connect the computer to the network beforehand.
Using the Printer from a Smart Device
e [Connecting the Printer to a Smart Devices] section explains how to connect the printer to a smart device. If
you want to connect a computer and a smart device to the printer at the same time, we recommend connecting the
printer to the computer rst. is allows you to connect the smart device to the printer simply by selecting the
same network (SSID) as the printer.
Related Information
& “Connecting the Printer to a Smart Device” on page 9
Using the printer from a Computer
[Connecting the Printer and a Computer] section explains how to make printer connection settings from a
e
computer. You can set up by using the
Related Information
& “Connecting the Printer and a Computer” on page 22
soware
disc, set up from the website, or set up manually.
Connecting the Printer to an Access Point
Explains how to connect the printer to an access point. Make settings from the printer's control panel.
Related Information
& “Making Wi-Fi Network Settings from the Printer's Control Panel” on page 44
8
Network Guide
Connecting the Printer to a Smart Device
Connecting the Printer to a Smart Device
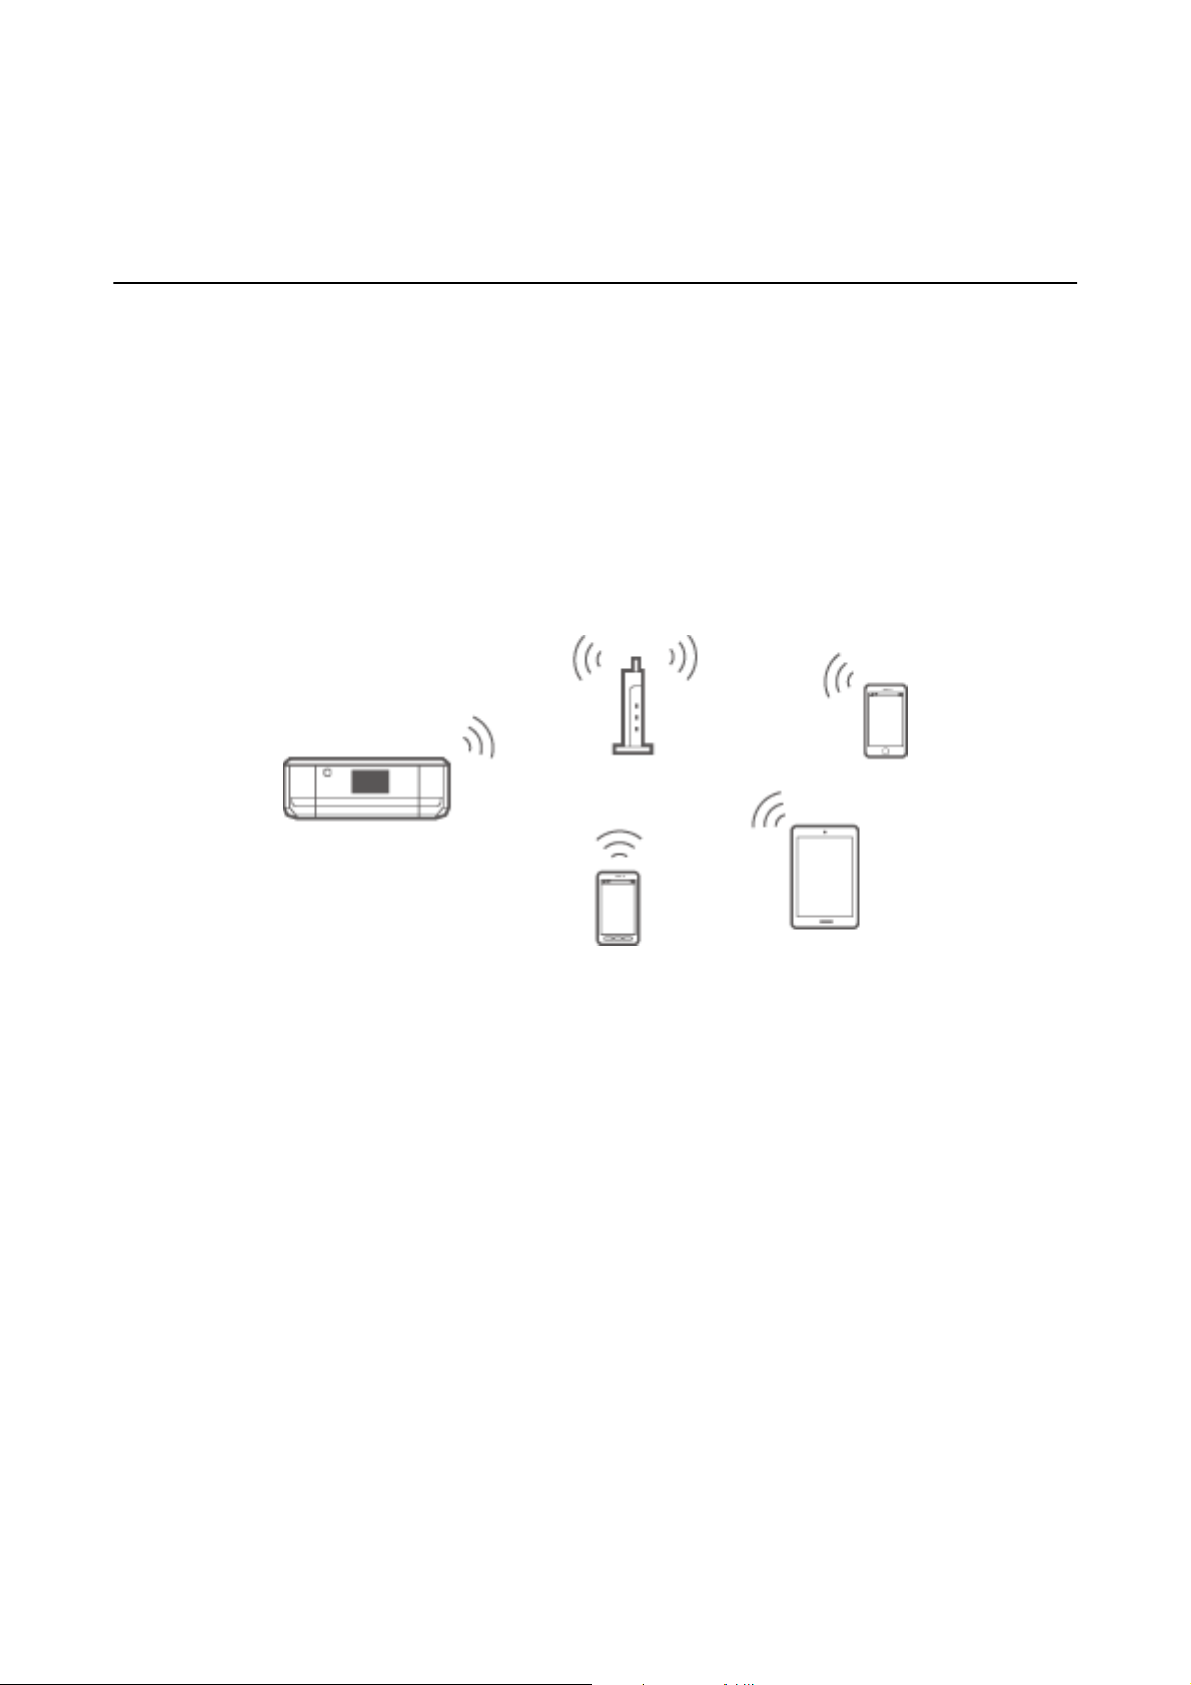
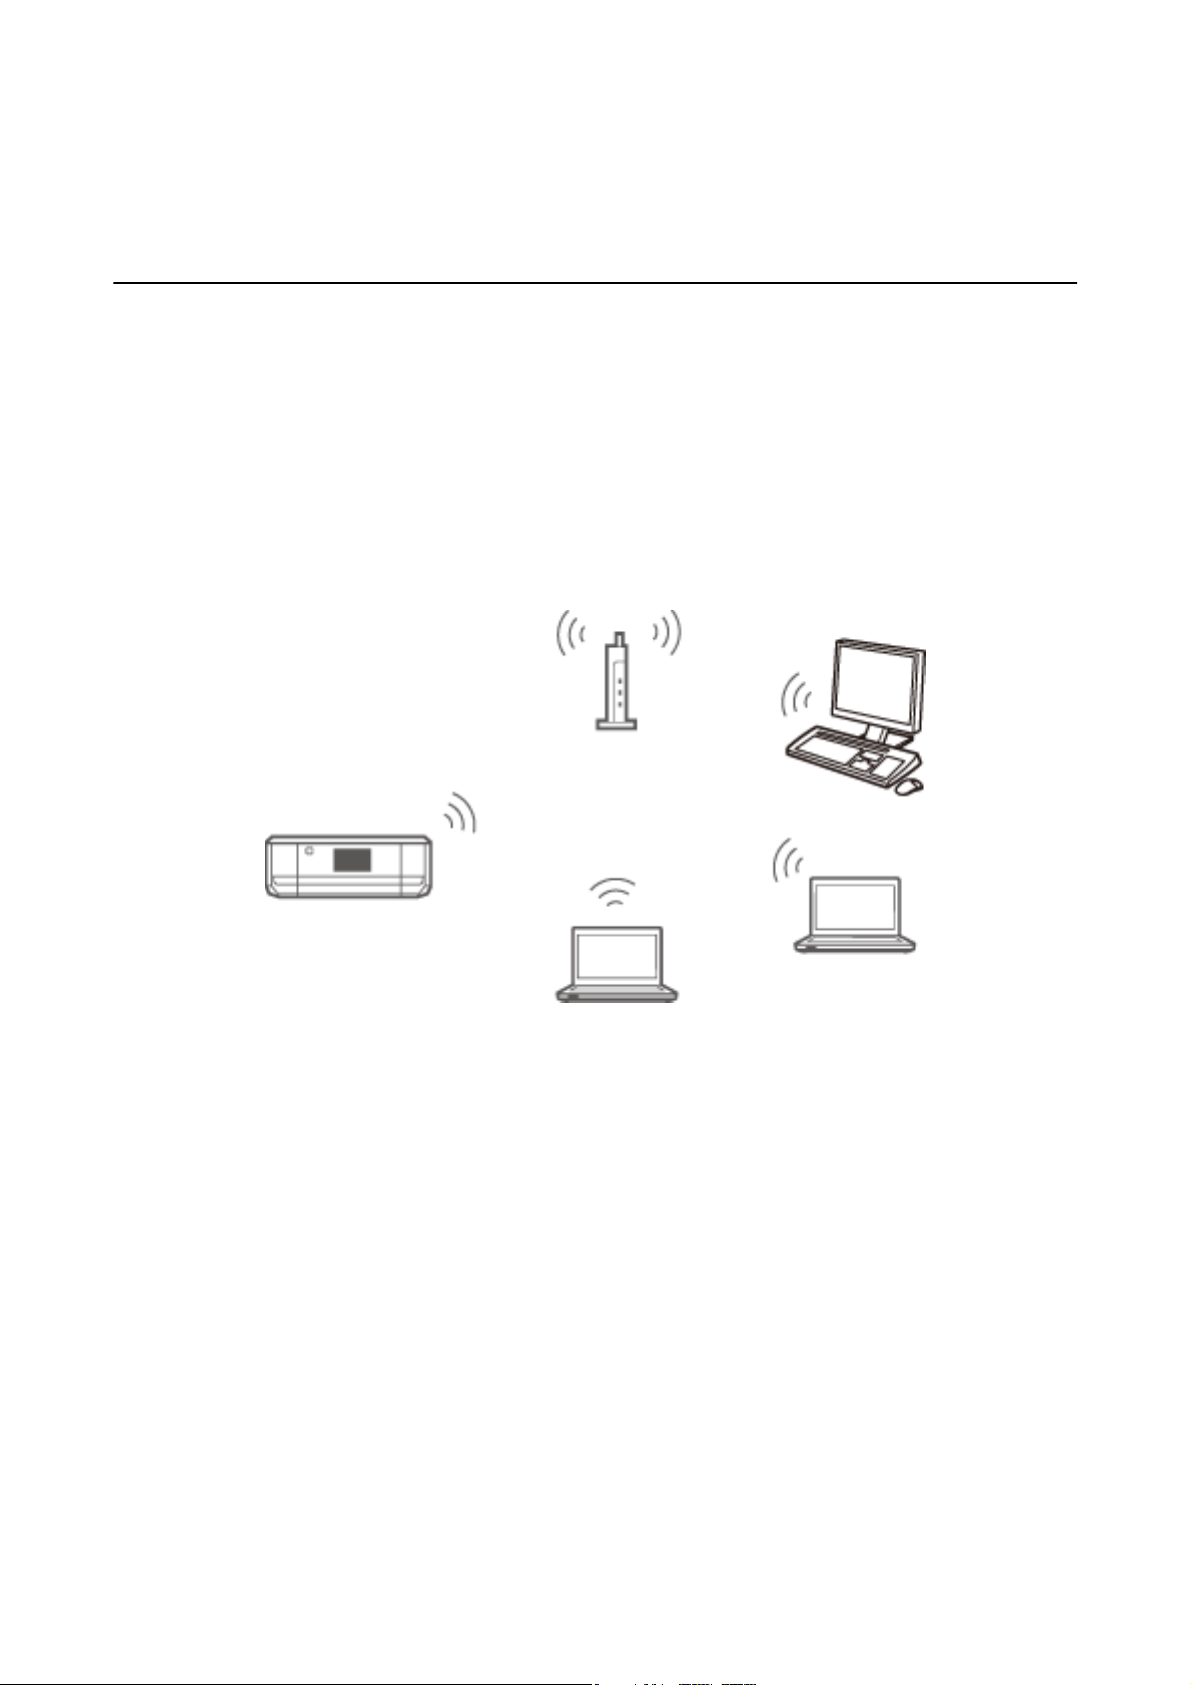
Connection Types Between the Printer and a Smart Device
Use one of the following connection methods to connect the printer to a smart device. e illustrations may vary
by model.
Wi-Fi
Connect the printer and the smart device to the access point. is is the typical connection method for home or
oce networks where computers are connected by Wi-Fi through the access point.
Related Information
& “Connecting by Wi-Fi” on page 10
& “Basic Network Information Used by the Printer” on page 77
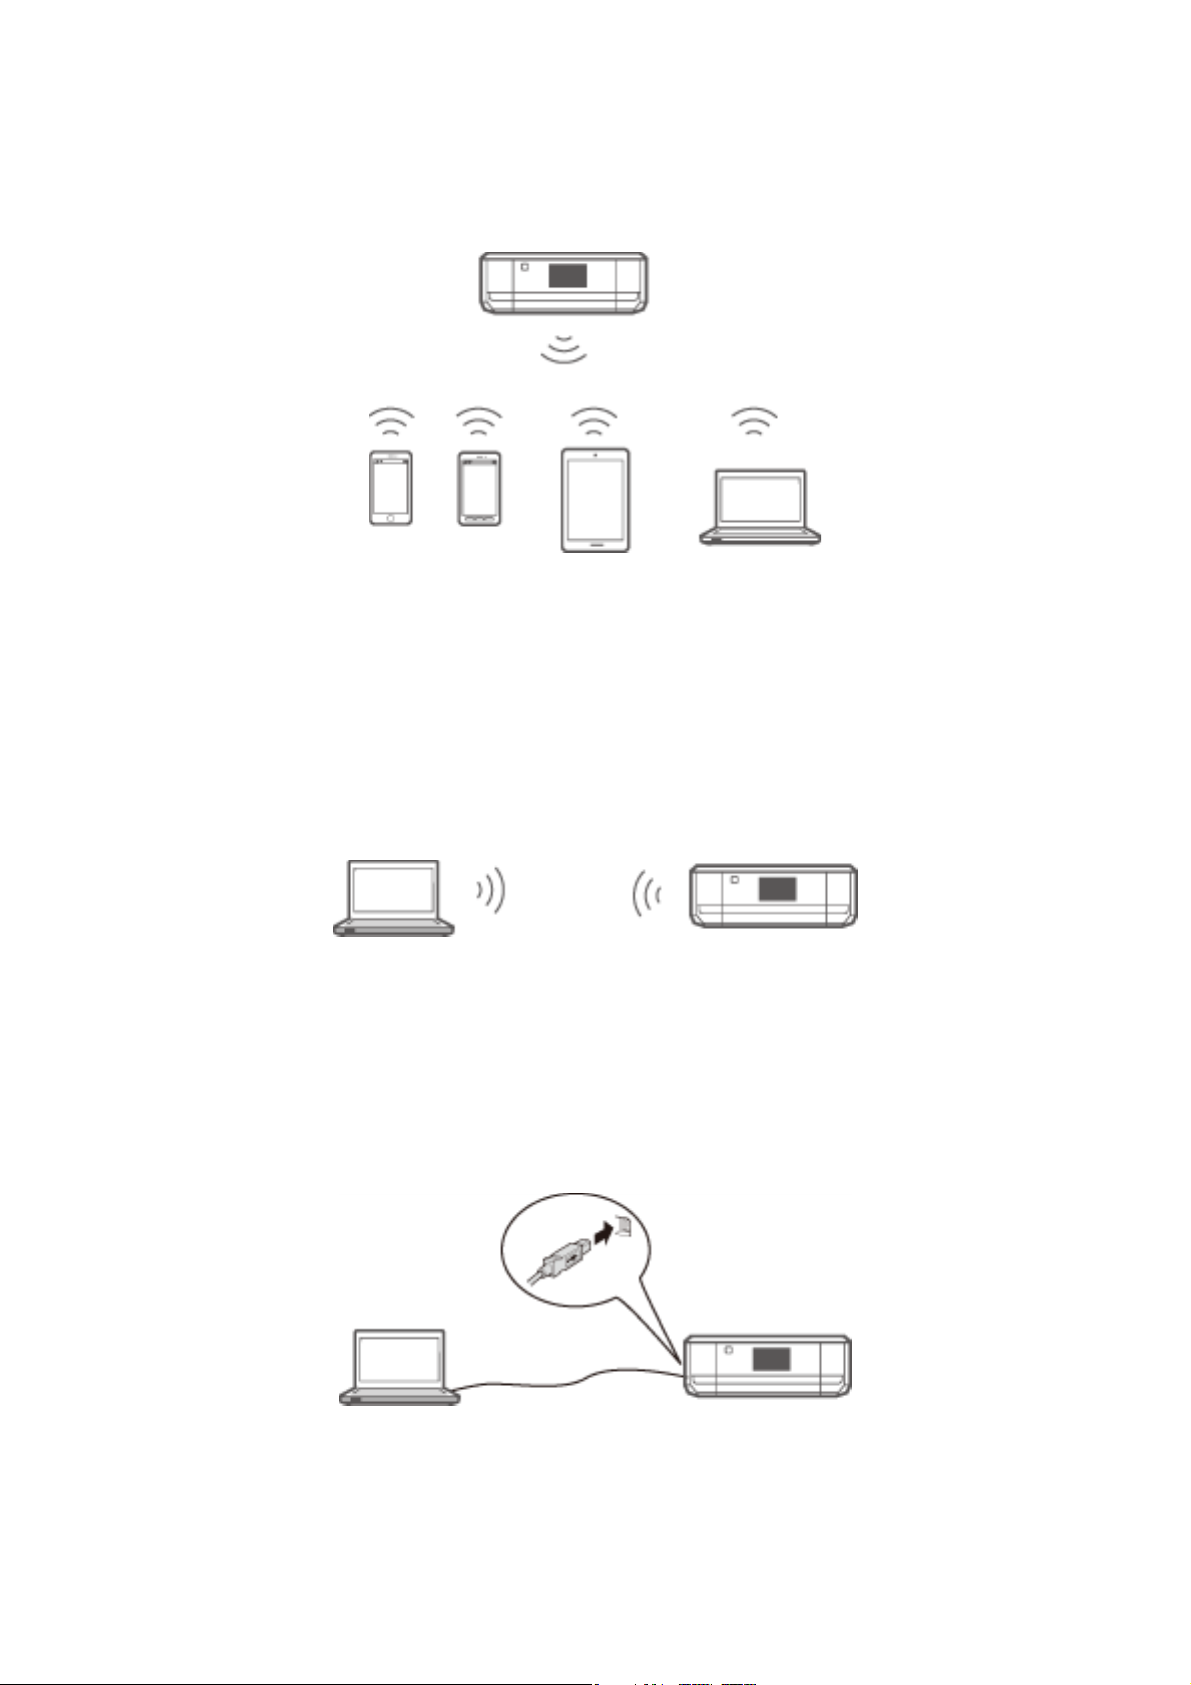
Wi-Fi Direct (Direct Connection)
Use this connection method when you are not using Wi-Fi at home or at the oce, or when you want to connect
the printer and the smart device directly.
ere are two Wi-Fi Direct modes.
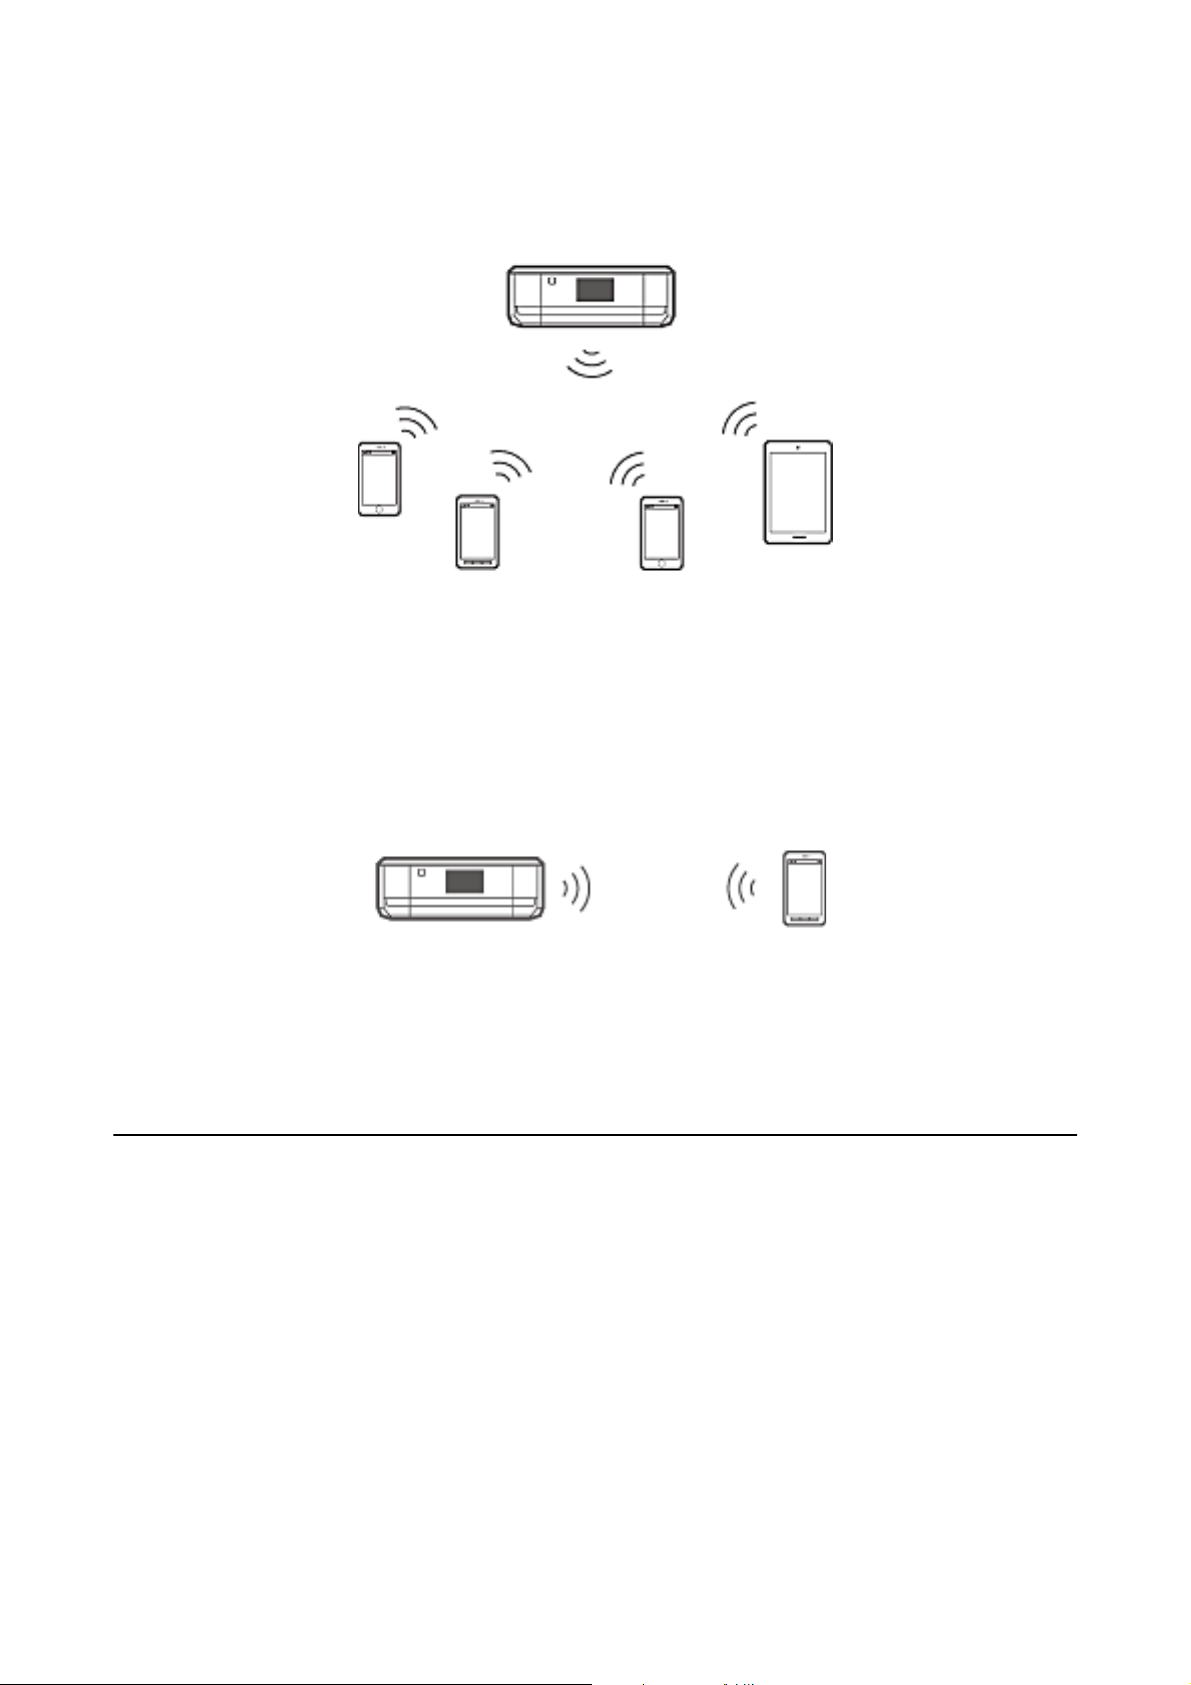
❏ Simple AP Mode
In this mode, the printer acts as an access point and you can connect up to four devices to the printer without
having to use a standard access point. However, devices directly connected to the printer cannot communicate
9
Network Guide
Connecting the Printer to a Smart Device
with each other through the printer. ere are two ways to connect to the printer from a smart device; Wi-Fi
connection and Wi-Fi Direct connection.
e printer can be connected by Wi-Fi and Simple AP mode simultaneously. However, if you start a network
connection in Simple AP mode when the printer is connected by Wi-Fi, the Wi-Fi is temporarily disconnected.
❏ Wi - Fi D ir e c t Mo de
You can establish a one-to-one connection between the printer and a smart device. Since the network
connection is disconnected in Wi-Fi Direct mode, this type of connection should only be used as a temporary
measure. Your smart device must be Wi-Fi Direct capable. See the documentation provided with your smart
device for details.
Related Information
&
“Connecting by Wi-Fi Direct” on page 12
& “Basic Network Information Used by the Printer” on page 77
Connection Settings Between the Printer and a Smart Device
Connecting through an Access Point
Connecting by Wi-Fi
Connect the printer to the access point by Wi-Fi, and select the same network (SSID) as the smart device. Make the
following settings.
Making Wi-Fi Settings on the Printer
Use one of the following methods to set up the Wi-Fi and connect to the access point.
10

Network Guide
Connecting the Printer to a Smart Device
❏ From the printer's control panel
Make Wi-Fi settings from the printer's control panel.
❏ From the computer
Make Wi-Fi settings for the printer automatically from the computer if your computer is connected to the
network by Wi-Fi.
Note:
Connect a smart device to the same network as the printer when you want to connect the smart device to a printer that has
already been connected to the network.
Related Information
& “Making Wi-Fi Network Settings from the Printer's Control Panel” on page 44
Preparing an Application and Wi-Fi Connection from a Smart Device
Install Epson iPrint on your smart device, and then connect it to the same network (SSID) as the printer. Epson
iPrint is a free application for smart devices. is allows you to print photos and other content from the smart
device.
Related Information
& “Preparing an Application and Wi-Fi Connection from a Smart Device” on page 11
Checking the Connection Using Epson iPrint
Check the connection between the printer and the smart device using Epson iPrint.
Related Information
& “Checking the Connection Between the Printer and the Smart Device” on page 18
Preparing an Application and Wi-Fi Connection from a Smart Device
Connect a smart device to a printer that is already connected to the network by Wi-Fi.
1.
Install Epson iPrint on your smart device.
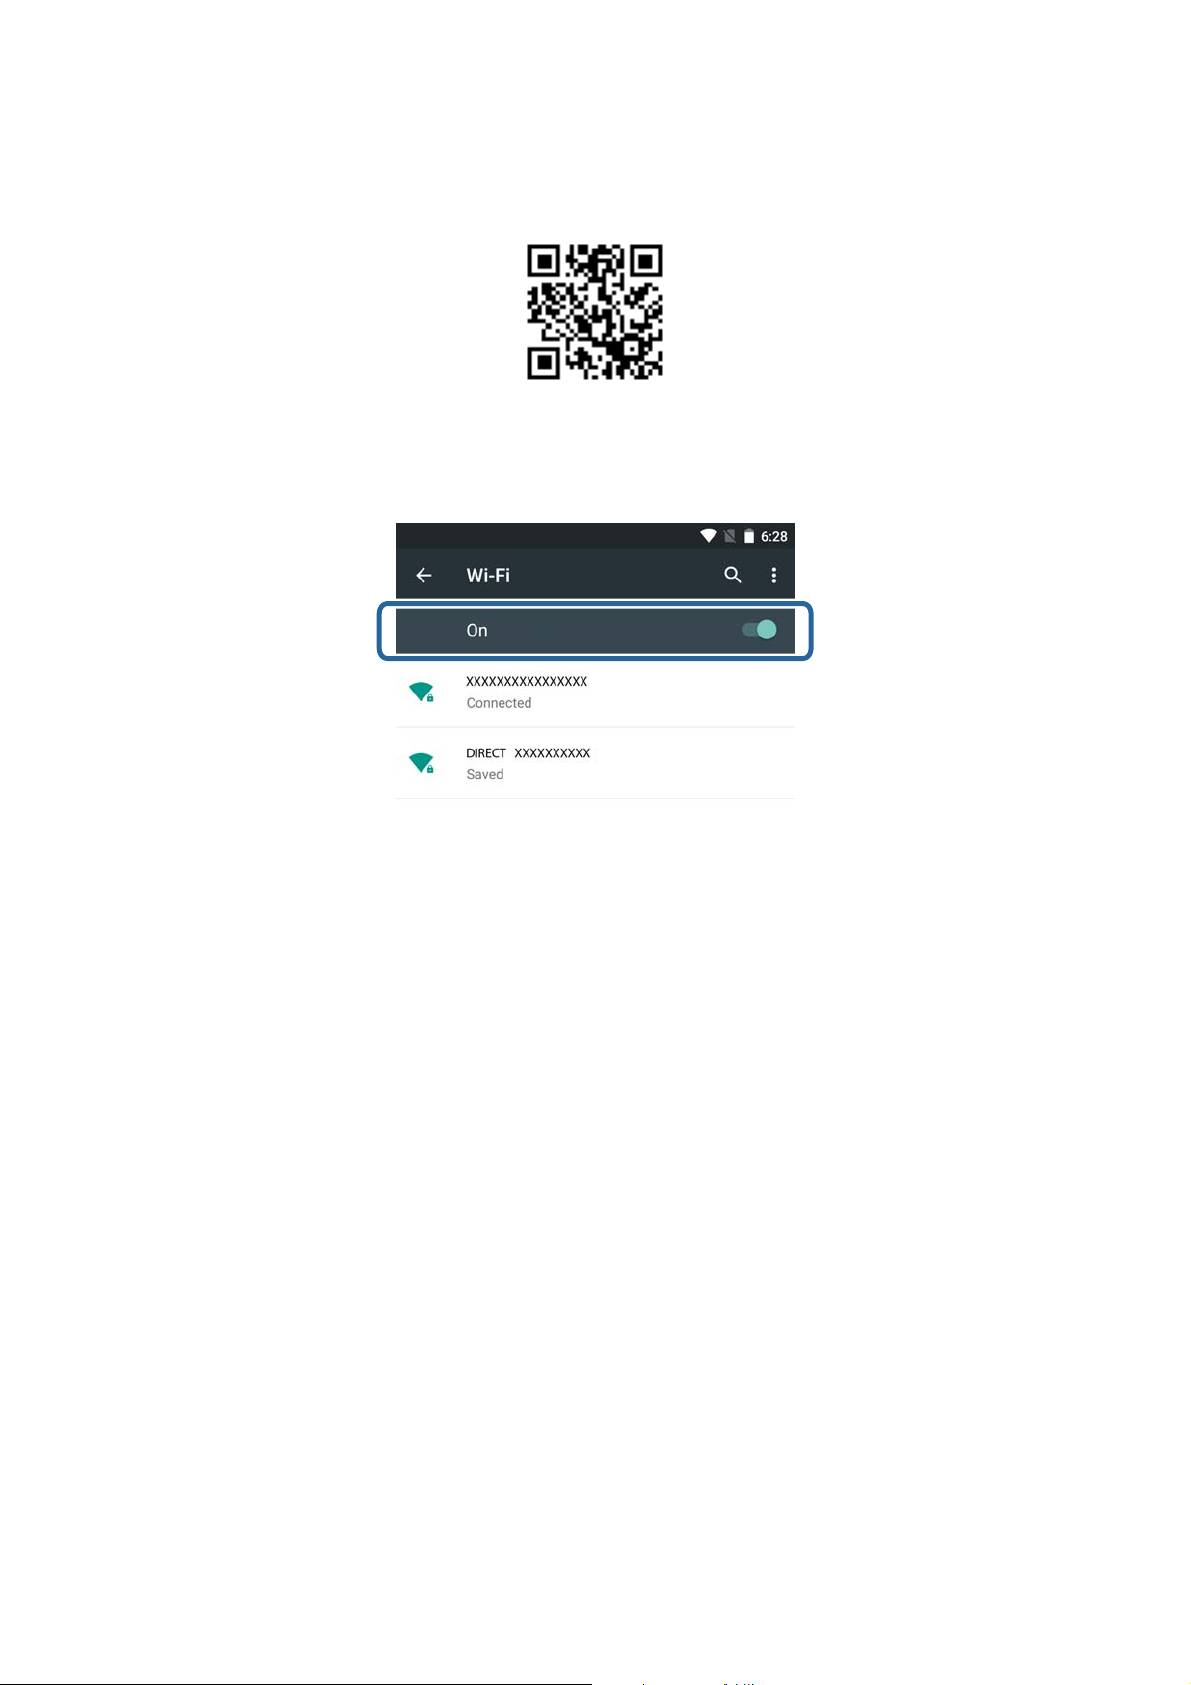
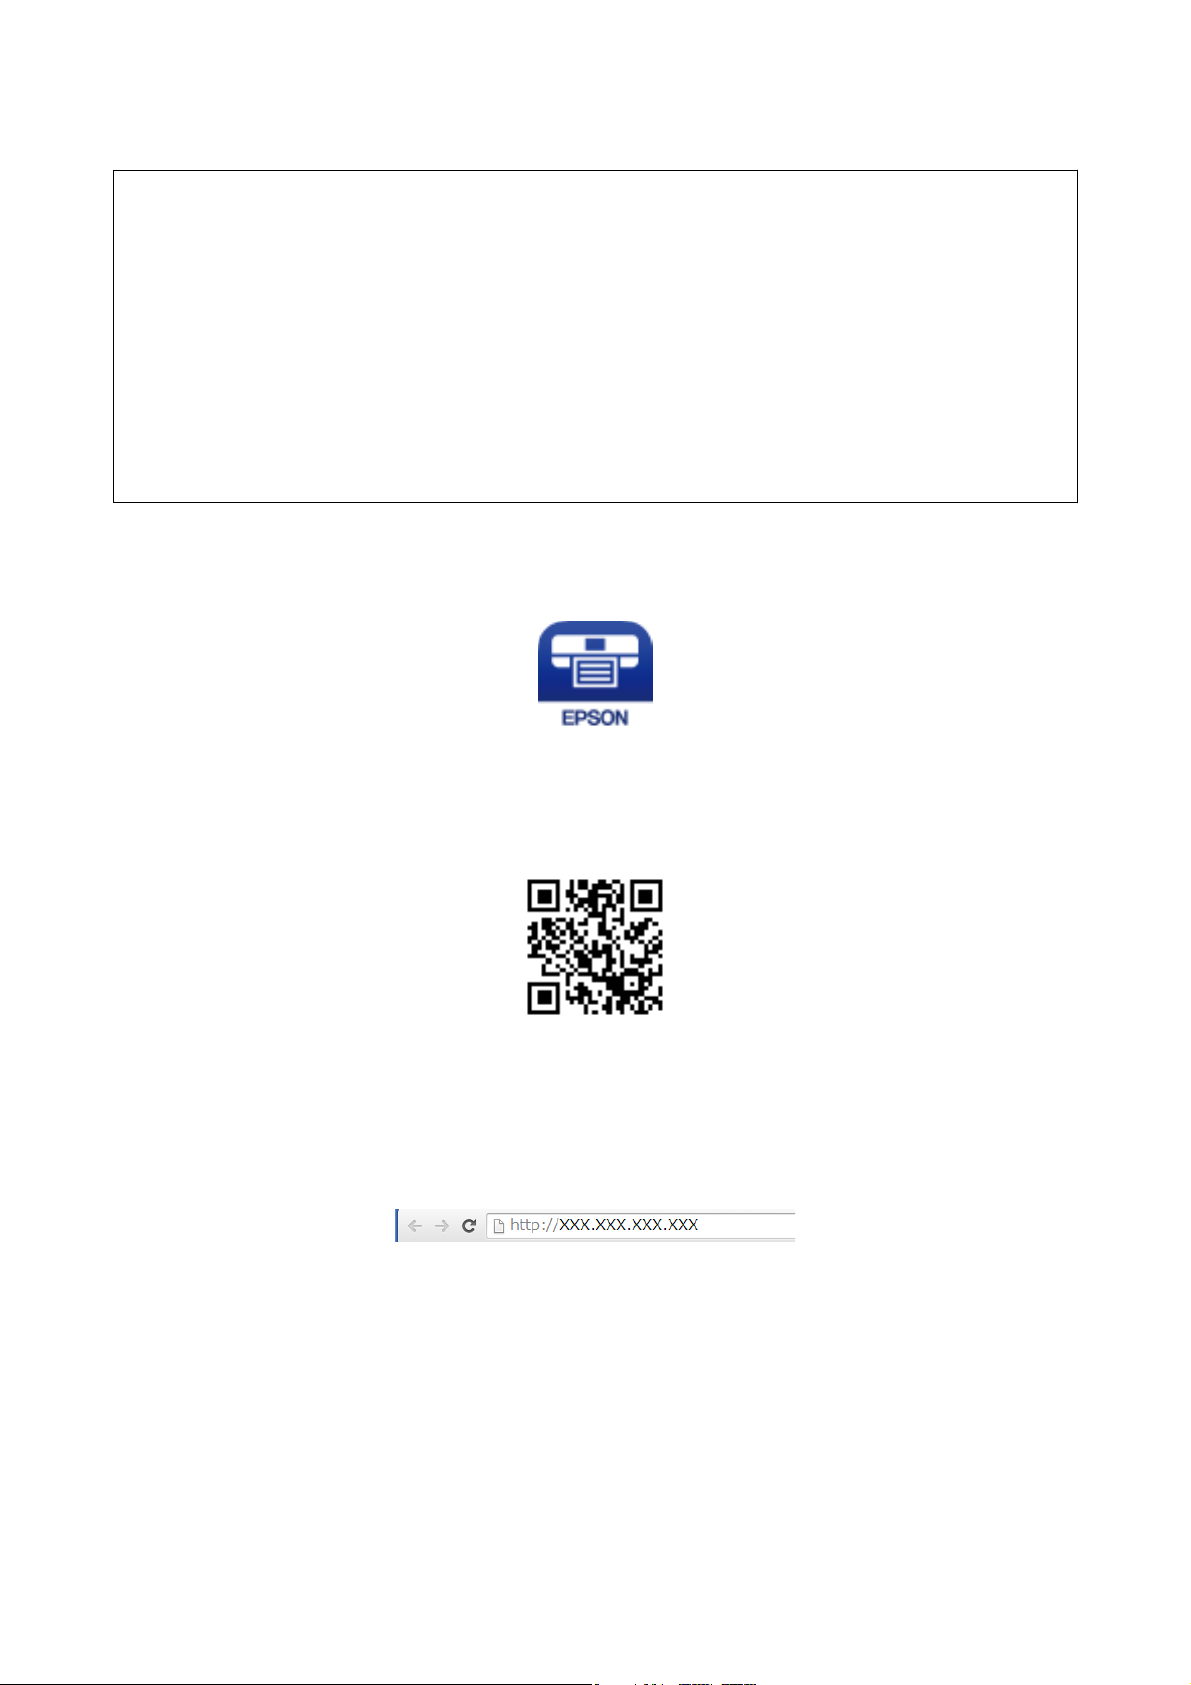
Install Epson iPrint on your smart device from the following URL or QR code.
11
Network Guide
Connecting the Printer to a Smart Device
http://ipr.to
2.
Select Wi-Fi from the settings screen on your smart device, and then enable Wi-Fi.
See the documentation provided with your smart device for the operating instructions.
3. Select the same SSID as the printer, and then enter the password.
You can check the SSID that the printer has already connected to from the network status screen on the
printer's control panel or by printing a network status sheet. For the SSID and password, contact the person
who set up the access point, or see the documentation provided with the access point.
4.
You can check the connection between the printer and the smart device using Epson iPrint.
Related Information
& “Checking the Connection Between the Printer and the Smart Device” on page 18
establishing a connection, return to the home screen on the smart device.
Aer
Connecting by Wi-Fi Direct
Connects the printer and the smart device directly without using an access point.
Related Information
& “Connecting by Wi-Fi to the Printer in Simple AP Mode” on page 12
& “Making a Wi-Fi Direct Connection to the Printer in Simple AP Mode (for Android Only)” on page 15
& “Connecting the Printer and Smart Device by Wi-Fi Direct Mode (for Android Only)” on page 16
Connecting by Wi-Fi to the Printer in Simple AP Mode
is connection method allows you to use the printer in Simple AP mode and connect devices by Wi-Fi.
12

Network Guide
Connecting the Printer to a Smart Device
Important:
c
❏ Devices directly connected to the printer cannot communicate with each other through the printer.
❏ Smart devices directly connected to the printer cannot access the Internet through the printer.
❏ e printer can be connected by Wi-Fi and Simple AP mode simultaneously. However, if you start a network
connection in Simple AP mode when the printer is connected by Wi-Fi, the Wi-Fi is temporarily disconnected.
❏ You cannot connect directly by Wi-Fi when the printer is connected to a computer in Ad Hoc mode.
Make the following settings.
Making Simple AP Mode Settings on the Printer
Make Simple AP mode settings from the printer's control panel.
Related Information
& “Simple AP Mode” on page 51
Preparing an Application and Wi-Fi Connection from a Smart Device (Simple AP Mode)
Install Epson iPrint on your smart device, and then connect it to the printer. Epson iPrint is a free application for
smart devices. is allows you to print photos and other content from the smart device.
Related Information
& “Preparing an Application and Wi-Fi Connection from a Smart Device (Simple AP Mode)” on page 13
Checking the Connection Using Epson iPrint
Check the connection between the printer and the smart device using Epson iPrint.
Related Information
& “Checking the Connection Between the Printer and the Smart Device” on page 18
Preparing an Application and Wi-Fi Connection from a Smart Device (Simple
AP Mode)
Connect the smart device to the printer in Simple AP mode.
1.
Install Epson iPrint on your smart device.
Install Epson iPrint on your smart device from the following URL or QR code.
13
Network Guide
Connecting the Printer to a Smart Device
http://ipr.to
2.
Select Wi-Fi from the settings screen on your smart device, and then enable Wi-Fi.
See the documentation provided with your smart device for the operating instructions.
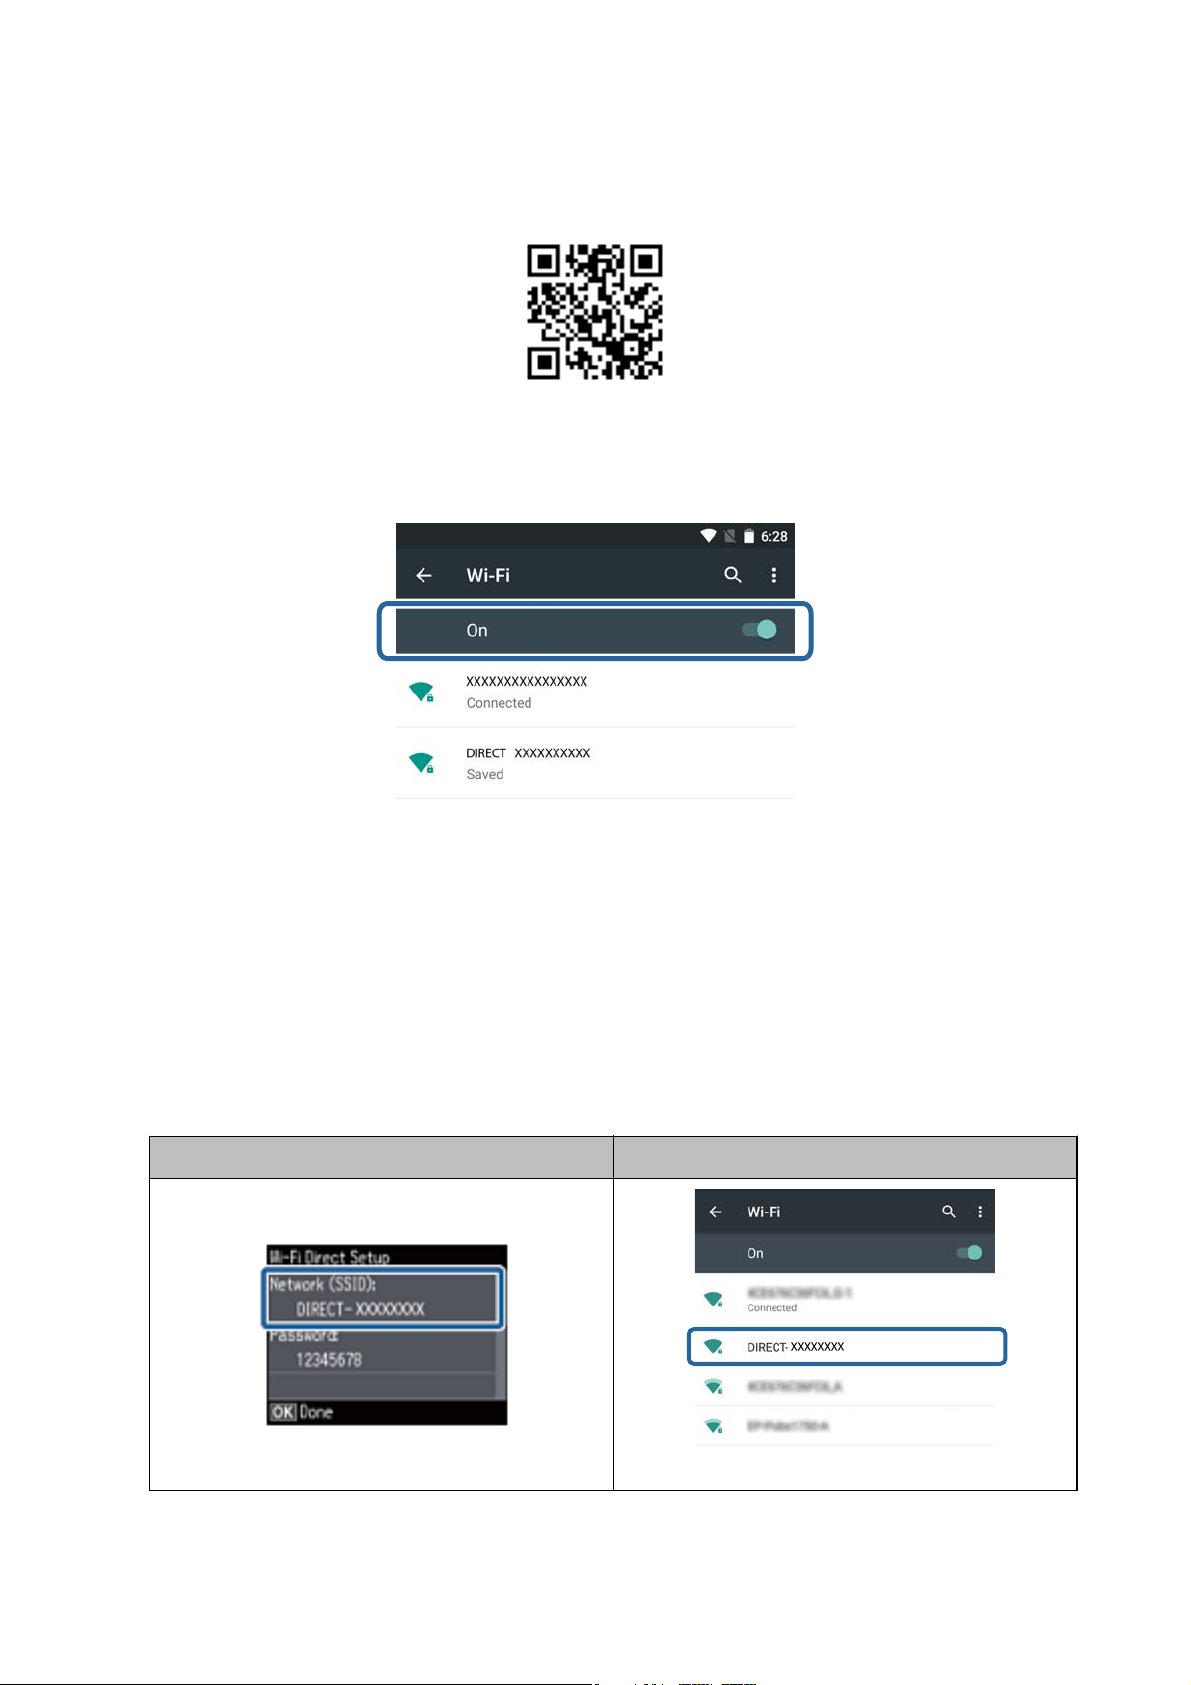
3. Select Wi - Fi S et up on the printer's home screen, and then press the OK button.
4.
Select Wi- Fi Di r e ct Se tu p, and then press the OK button.
5. Select Connection Setup, and then press the OK button.
6. Press the OK button.
7.
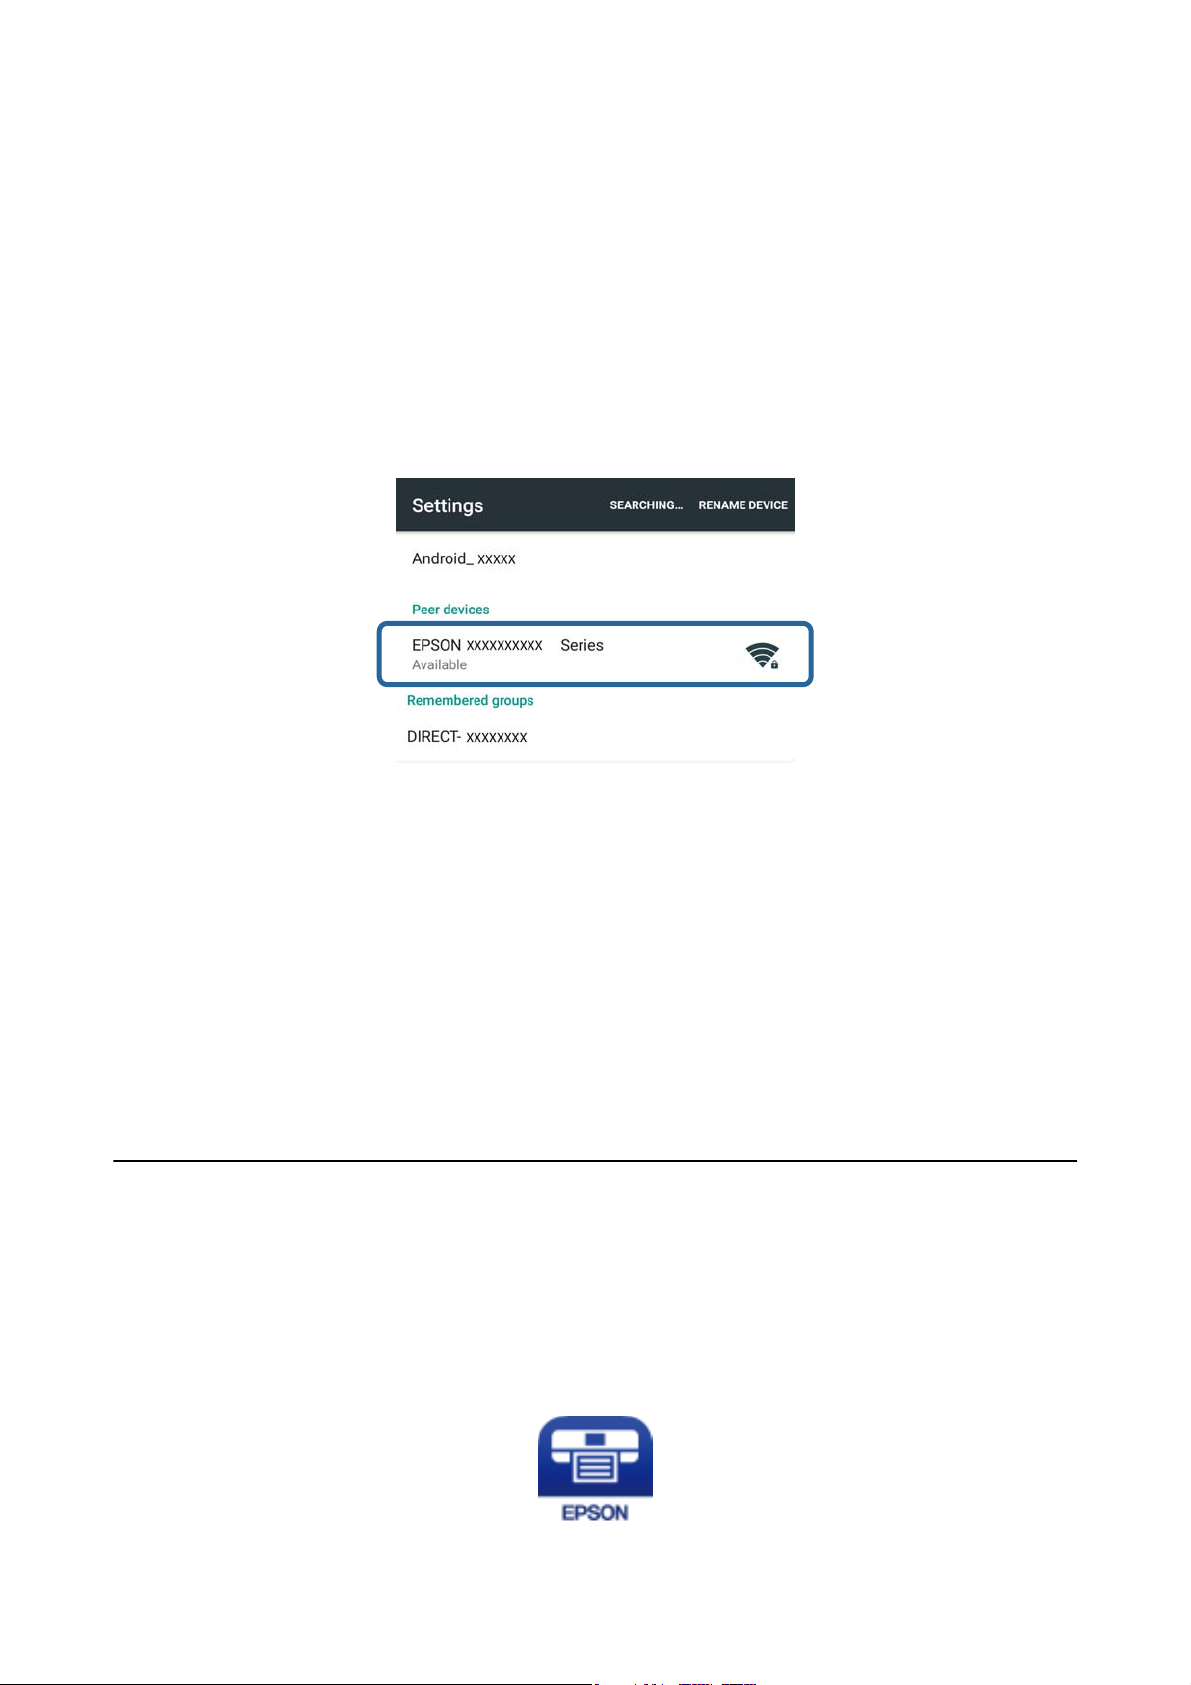
Press the OK button to display the SSID.
8. Select the same SSID that is displayed on the printer's control panel on the smart device.
Printer Smart Devices
9. Enter the password displayed on the printer's control panel in the smart device and connect.
14

Network Guide
Connecting the Printer to a Smart Device
10. Aer the connection is established, press the OK button on the printer's control panel.
You can check the connection between the printer and the smart device using Epson iPrint.
Related Information
& “Checking the Connection Between the Printer and the Smart Device” on page 18
& “Checking the Printer's Network Connection Status” on page 55
Making a Wi-Fi Direct Connection to the Printer in Simple AP Mode (for
Android Only)
If you have an Android device that supports Wi-Fi Direct, you can connect the smart device to the printer in
Simple AP mode by using Wi-Fi Direct mode on the Android device.
Note:
❏ Depending on the Android OS version or the model, you may not be able to connect the smart device to the printer by
Wi-Fi Direct. e operating procedure is also dierent.
❏ If you cannot connect using the following procedure, set the printer to Wi-Fi Direct mode, and then try again.
1. Install Epson iPrint on your smart device.
Install Epson iPrint on your smart device from the following URL or QR code.
http://ipr.to
2. Open the Wi-Fi Direct settings screen on your smart device. Select the printer's device name, and then connect
using Wi-Fi Direct.
15

Network Guide
Connecting the Printer to a Smart Device
Note:
See the documentation provided with your smart device for the operating instructions.
3. Check the message on the printer's control panel, and then select whether or not to connect to the smart
device.
❏ To connect
Select Approve.
❏ If you do not want to connect
Select Reject. If you received a connection request from an unknown device, select Reject.
4. Select whether or not to register the device information to the printer.
❏ To reg is te r
Select Yes .
When you register the device aer selecting Approve, the device connects automatically without asking you
the next time it connects.
When you register the device aer selecting Reject, the device is rejected without asking you the next time
you try to connect.
❏ To rej e c t
Select No.
When a connection request is sent from a device to the printer, the connection permission screen is
displayed on the printer. Follow step 3 and 4 every time the screen is displayed.
Note:
❏ If you frequently receive a connection request from an unknown device, we recommend registering this device as a
rejected device.
❏ You can delete the registered device information from Delete Registered Device in Wi - Fi Se t up > Wi -F i D ir e ct
Setup if you accidentally approve an unwanted device, or reject the device you want to connect. All information for
rejected devices and approved devices is deleted.
You can check the connection between the printer and the smart device using Epson iPrint.
Related Information
& “Connecting the Printer and Smart Device by Wi-Fi Direct Mode (for Android Only)” on page 16
& “Checking the Connection Between the Printer and the Smart Device” on page 18
& “Checking the Printer's Network Connection Status” on page 55
Connecting the Printer and Smart Device by Wi-Fi Direct Mode (for Android
Only)
Connect the smart device to the printer in Wi-Fi Direct mode. e smart device needs to support Wi-Fi Direct to
connect. See the documentation provided with your smart device for the operating instructions.
16
Network Guide
Connecting the Printer to a Smart Device
Important:
c
❏ Smart devices directly connected to the printer cannot access the Internet through the printer.
❏ If you start a network connection in Wi-Fi Direct mode when the printer is connected either by Wi-Fi or Simple
AP mode, the original connection is disconnected. If you disconnect Wi-Fi Direct mode, the original connection
is re-established.
❏ Some of the functions (for example, printer rmware updates and Epson Connect setup) are disabled during Wi-
Fi Direct connection.
❏ You cannot connect directly by Wi-Fi when the printer is connected to a computer in Ad Hoc mode.
❏ Use Web Cong to make Wi-Fi Direct settings for the printer. To use Web Cong, the IP address must be
assigned to the printer, and the printer and the smart device must be connected to the same network.
1. Install a printing application on your smart device.
Epson iPrint is used here as an example.
Install Epson iPrint on your smart device from the following URL or QR code.
http://ipr.to
2. Check the printer's IP address.
Check the IP address from the network status screen on the printer's control panel or the network status sheet.
3. Run Web Cong by entering the printer's IP address in the browser on your smart device.
Note:
See the documentation provided with your smart device for the operating instructions.
4. Select Advanced Settings > Services > Wi - Fi D ir e ct .
5. Select Connect to the Wi-Fi Direct devices only from Connection Mode.
6. Press Next, check the settings, and then press OK on the next screen.
Note:
e printer is set to connect in Wi-Fi Direct mode. is setting is available until the next time you change the mode
setting. You do not need to make settings every time.
17
Network Guide
Connecting the Printer to a Smart Device
7. Select Wi - Fi S et up on the home screen, and then press the OK button.
8. Select Wi - Fi D ir e ct S e t u p, and then press the OK button.
9.
Select Connection Setup, and then press the OK button.
10. Press the OK button aer checking the message.
11. Press the OK button aer checking the message.
12.
Connect to the printer by Wi-Fi Direct from the smart device.
Note:
❏ Wi-Fi Direct mode is disconnected if you turn the printer o or the smart device moves too far from the printer.
Repeat steps 7 to 11 each time you want to use the printer.
❏ See the documentation provided with your smart device for instructions on connecting from the device using Wi-Fi
Direct.
You can check the connection between the printer and the smart device using Epson iPrint.
Related Information
& “Checking the Connection Between the Printer and the Smart Device” on page 18
& “Checking the Printer's Network Connection Status” on page 55
Checking the Connection Between the Printer and the Smart Device
Make printer settings from a printing application and check the connection. Epson iPrint is used here as an
example.
1.
Run Epson iPrint.
18
Network Guide
Connecting the Printer to a Smart Device
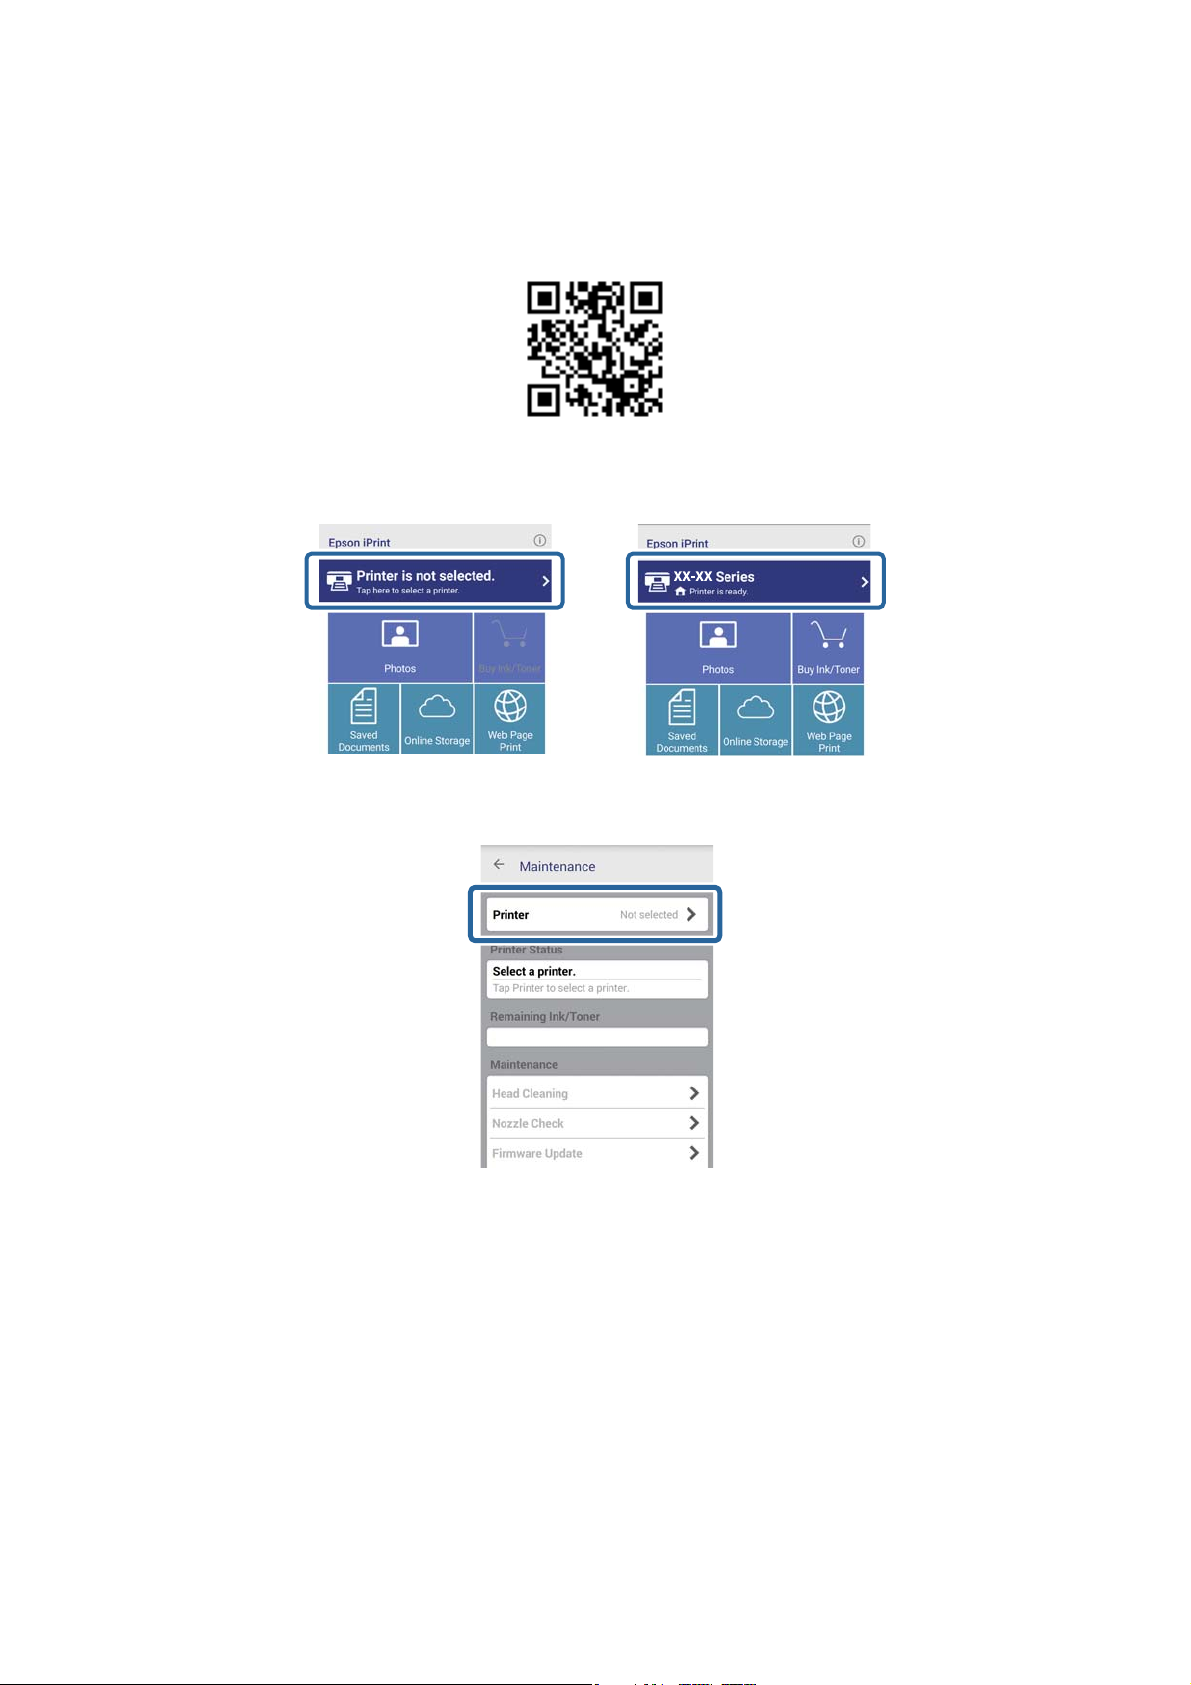
If Epson iPrint is not installed, install it on your smart device from the following URL or QR code.
http://ipr.to
2. Tap Printer is not selected. at the top of the screen, or tap the printer name.
3. Tap Printer.
19
Network Guide
Connecting the Printer to a Smart Device
4. Select the printer name you want to connect to.
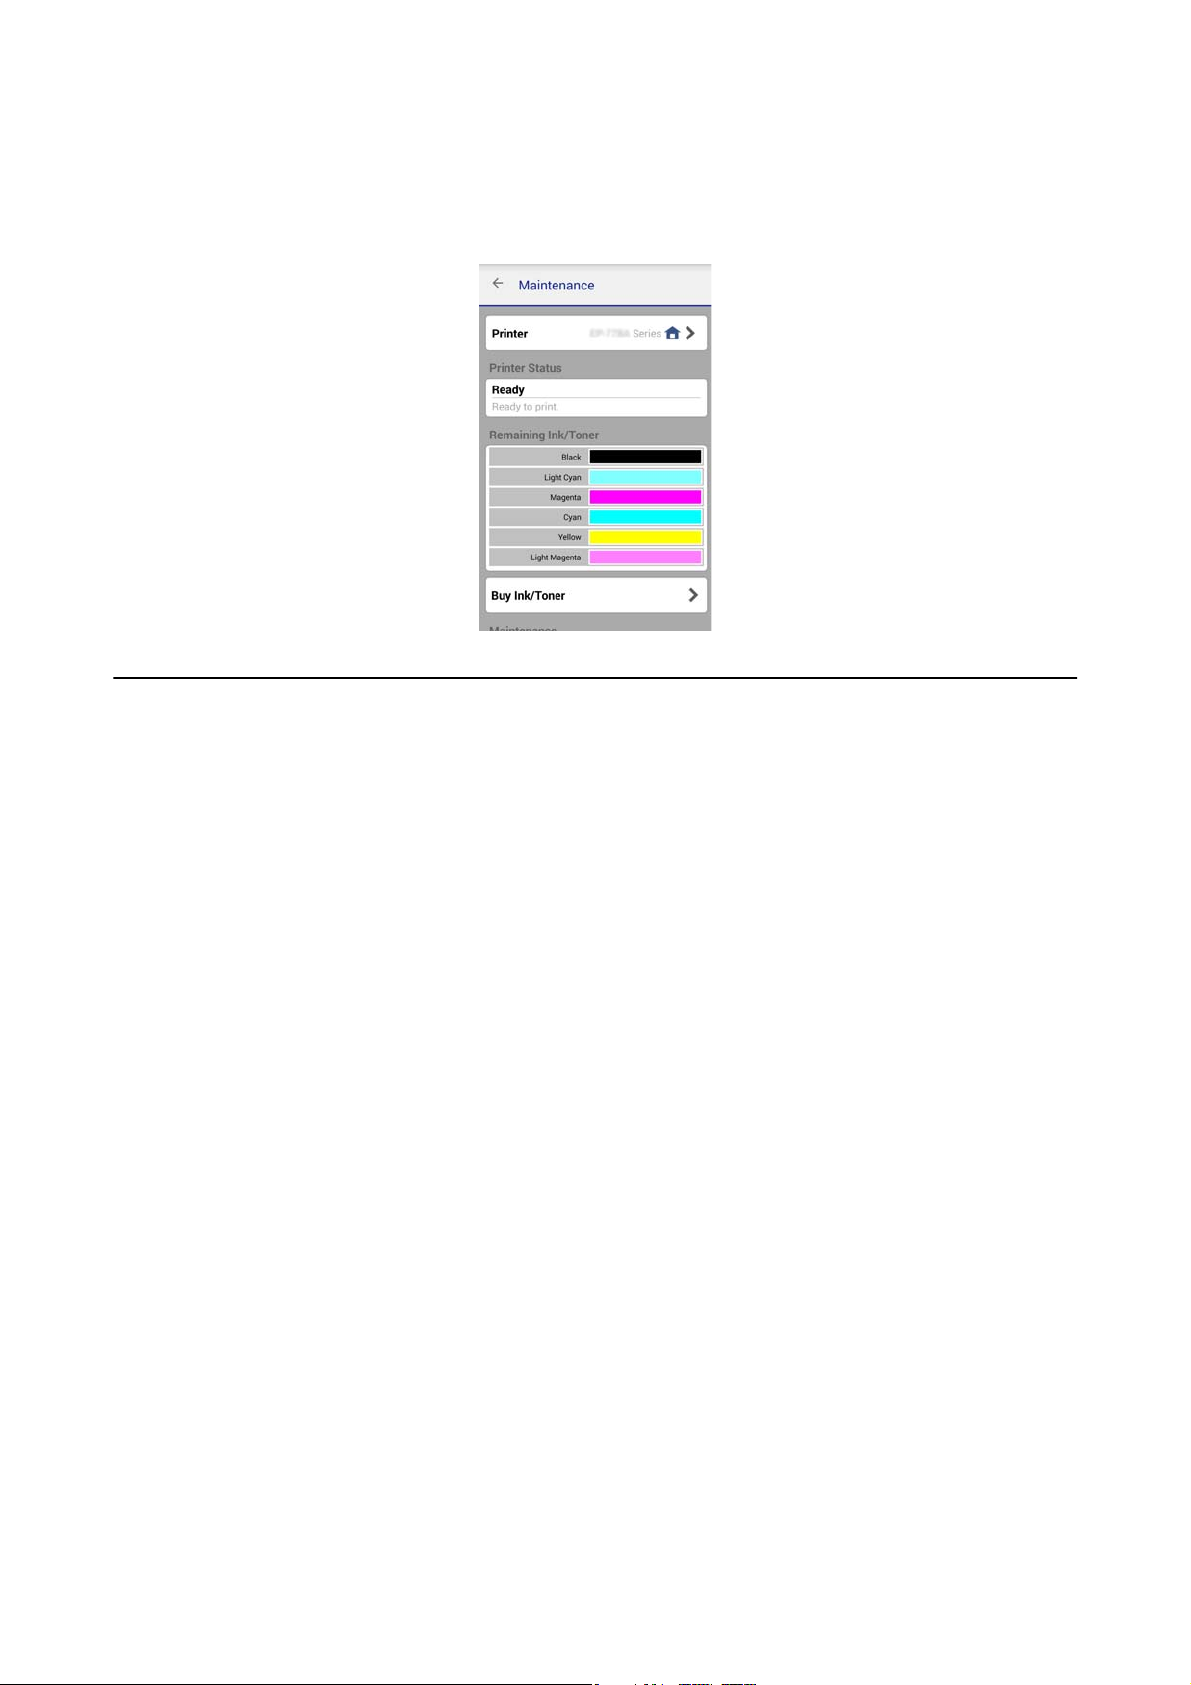
If the connection is successful, the remaining ink/toner levels are displayed.
Changing the Connection Method Between the Printer and the Smart Device
Follow the steps below to change to the connection method you want to use.
When changing to Wi-Fi, make sure that the smart device is connected to the same Wi-Fi network as the printer.
See the documentation provided with your smart device for instructions on making network settings.
When changing the connection method from Wi-Fi Direct mode to Simple AP mode, connect the printer and
smart device in Wi-Fi Direct mode and run Web
from Advanced Settings > Services > Wi- Fi Di r e c t .
Related Information
& “Connecting by Wi-Fi” on page 10
& “Connecting by Wi-Fi to the Printer in Simple AP Mode” on page 12
&
“Making a Wi-Fi Direct Connection to the Printer in Simple AP Mode (for Android Only)” on page 15
&
“Connecting the Printer and Smart Device by Wi-Fi Direct Mode (for Android Only)” on page 16
&
“Checking the Connection Between the Printer and the Smart Device” on page 18
Additional Connections for a Smart Device
. Change the Connection Mode to OFF or Simple AP
Cong
❏ Adding a smart device to the printer that is connected by Wi-Fi.
Connect the smart device and the printer to the same network (SSID). See the documentation provided with
your smart device for instructions on making network settings.
❏ Adding a smart device to the printer in Simple AP mode.
Follow the Simple AP mode connection procedure. You can simultaneously connect up to four Wi-Fi devices in
Simple AP mode.
You can check the connection between the printer and the smart device using Epson iPrint.
20

Network Guide
Connecting the Printer to a Smart Device
Related Information
& “Preparing an Application and Wi-Fi Connection from a Smart Device” on page 11
& “Preparing an Application and Wi-Fi Connection from a Smart Device” on page 11
& “Making a Wi-Fi Direct Connection to the Printer in Simple AP Mode (for Android Only)” on page 15
& “Checking the Connection Between the Printer and the Smart Device” on page 18
21
Network Guide
Connecting the Printer and a Computer
Connecting the Printer and a Computer
Connection Types Between the Printer and a Computer
Use one of the following connection methods to connect the printer to a computer.
Wi-Fi
is connection method is recommended for home or oce networks where computers and smart devices are
connected by Wi-Fi through an access point.
Related Information
& “Connecting to Wi-Fi” on page 24
Wi-Fi Direct Simple AP Mode
is connection method is recommended when you are not using Wi-Fi for your home or oce networks. Some
Internet services are unavailable when connecting in Simple AP mode.
22
Network Guide
Connecting the Printer and a Computer
In this mode, the printer acts as an access point and you can connect up to four devices to the printer. However,
devices directly connected to the printer cannot communicate with each other through the printer.
Related Information
& “Connecting in Simple AP Mode (for Windows Only)” on page 28
Ad Hoc Mode
You can connect the printer directly to a computer without using an access point. To use this mode, your
computer's wireless adapter needs to support Ad Hoc mode. See the documentation provided with the computer
for details.
Related Information
& “Connecting in Ad Hoc Mode (for Windows Only)” on page 29
USB Connection
Connect the printer to a computer with a USB cable.
Related Information
“Setting up a USB Connection” on page 30
&
23
Network Guide
Connecting the Printer and a Computer
Connection Settings Between the Printer and a Computer
Make sure you nish setting up the printer before connecting to a computer. (Connecting the power cable,
installing ink cartridges, and loading paper.)
Connecting to Wi-Fi
You can set up Wi-Fi on your printer from a computer using one of the following methods.
Related Information
& “Setting Up a Wi-Fi Connection from the Soware Disc (for Windows Only)” on page 24
& “Setting Up Wi-Fi from the Website” on page 25
& “Connecting to Wi-Fi Manually” on page 27
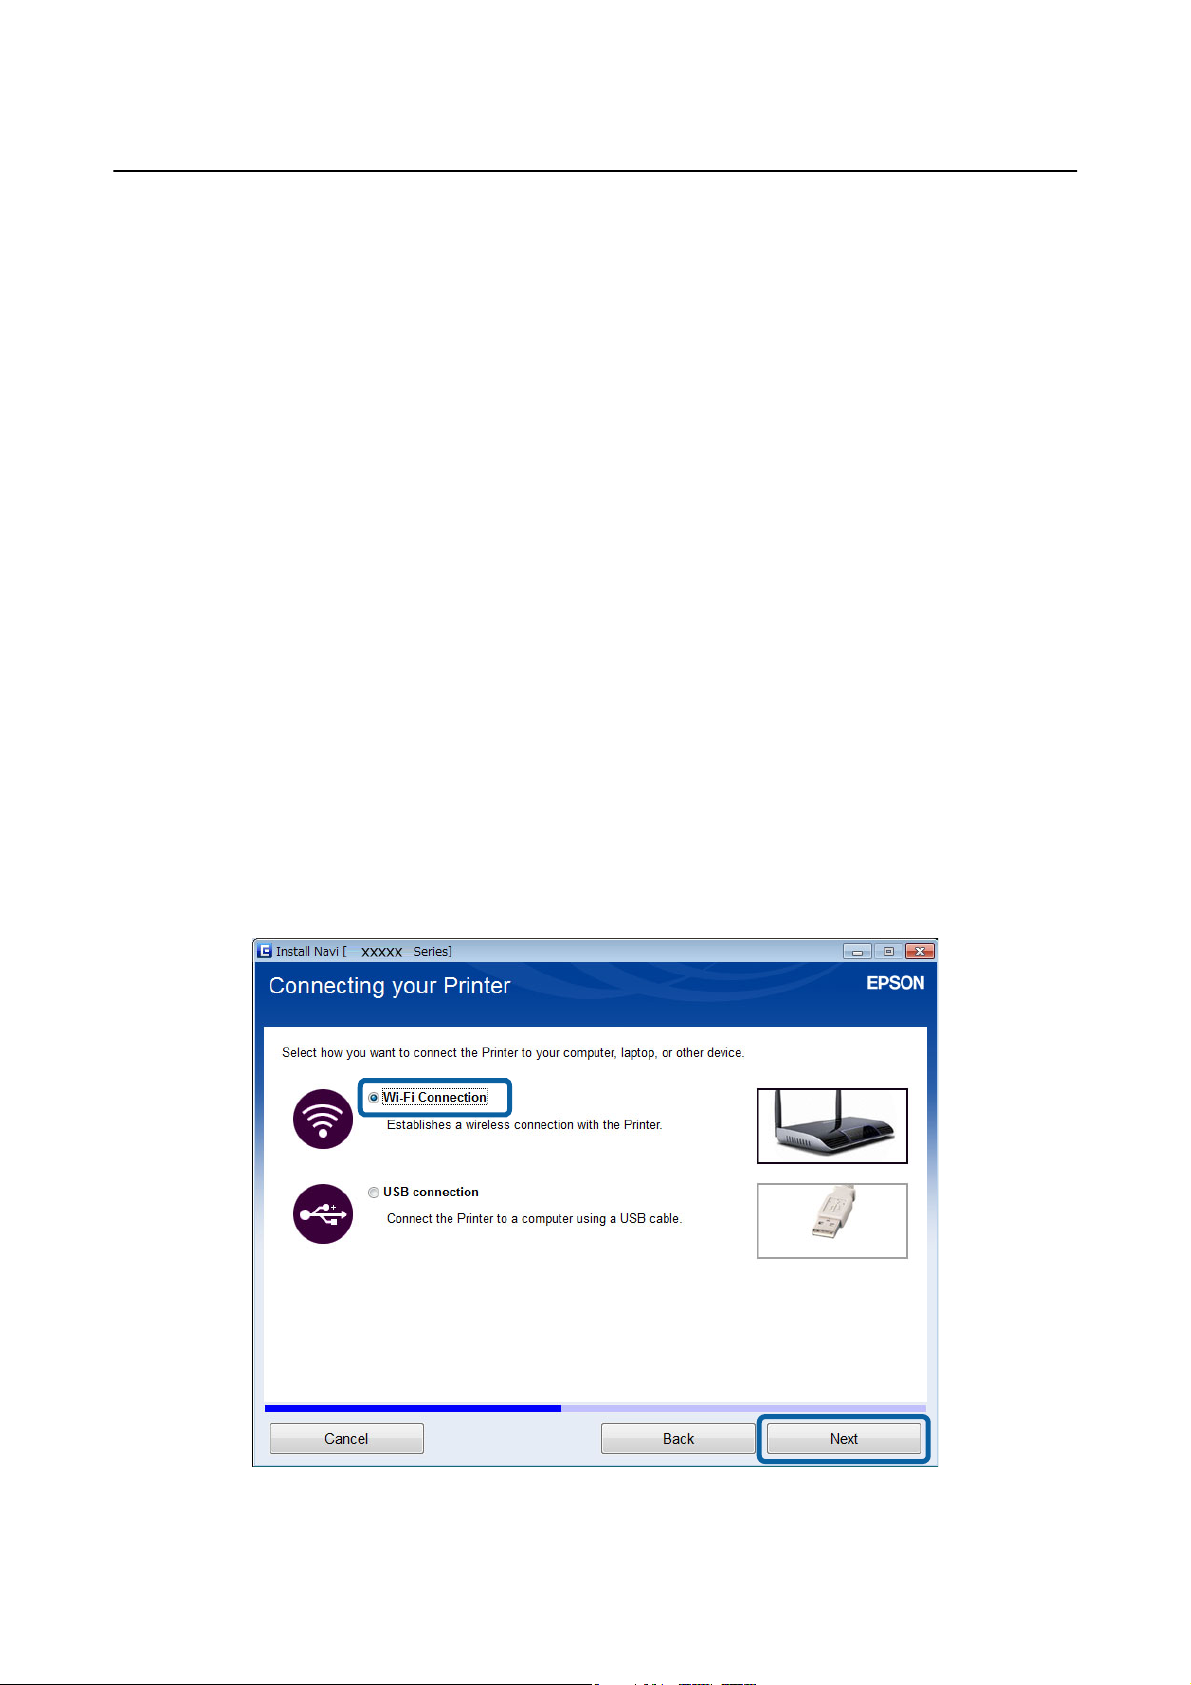
Setting Up a Wi-Fi Connection from the Software Disc (for Windows Only)
is method is recommended for Windows users to automatically set up a connection.
1. Insert the soware disc supplied with the printer into the computer.
2.
Follow the on-screen instructions.
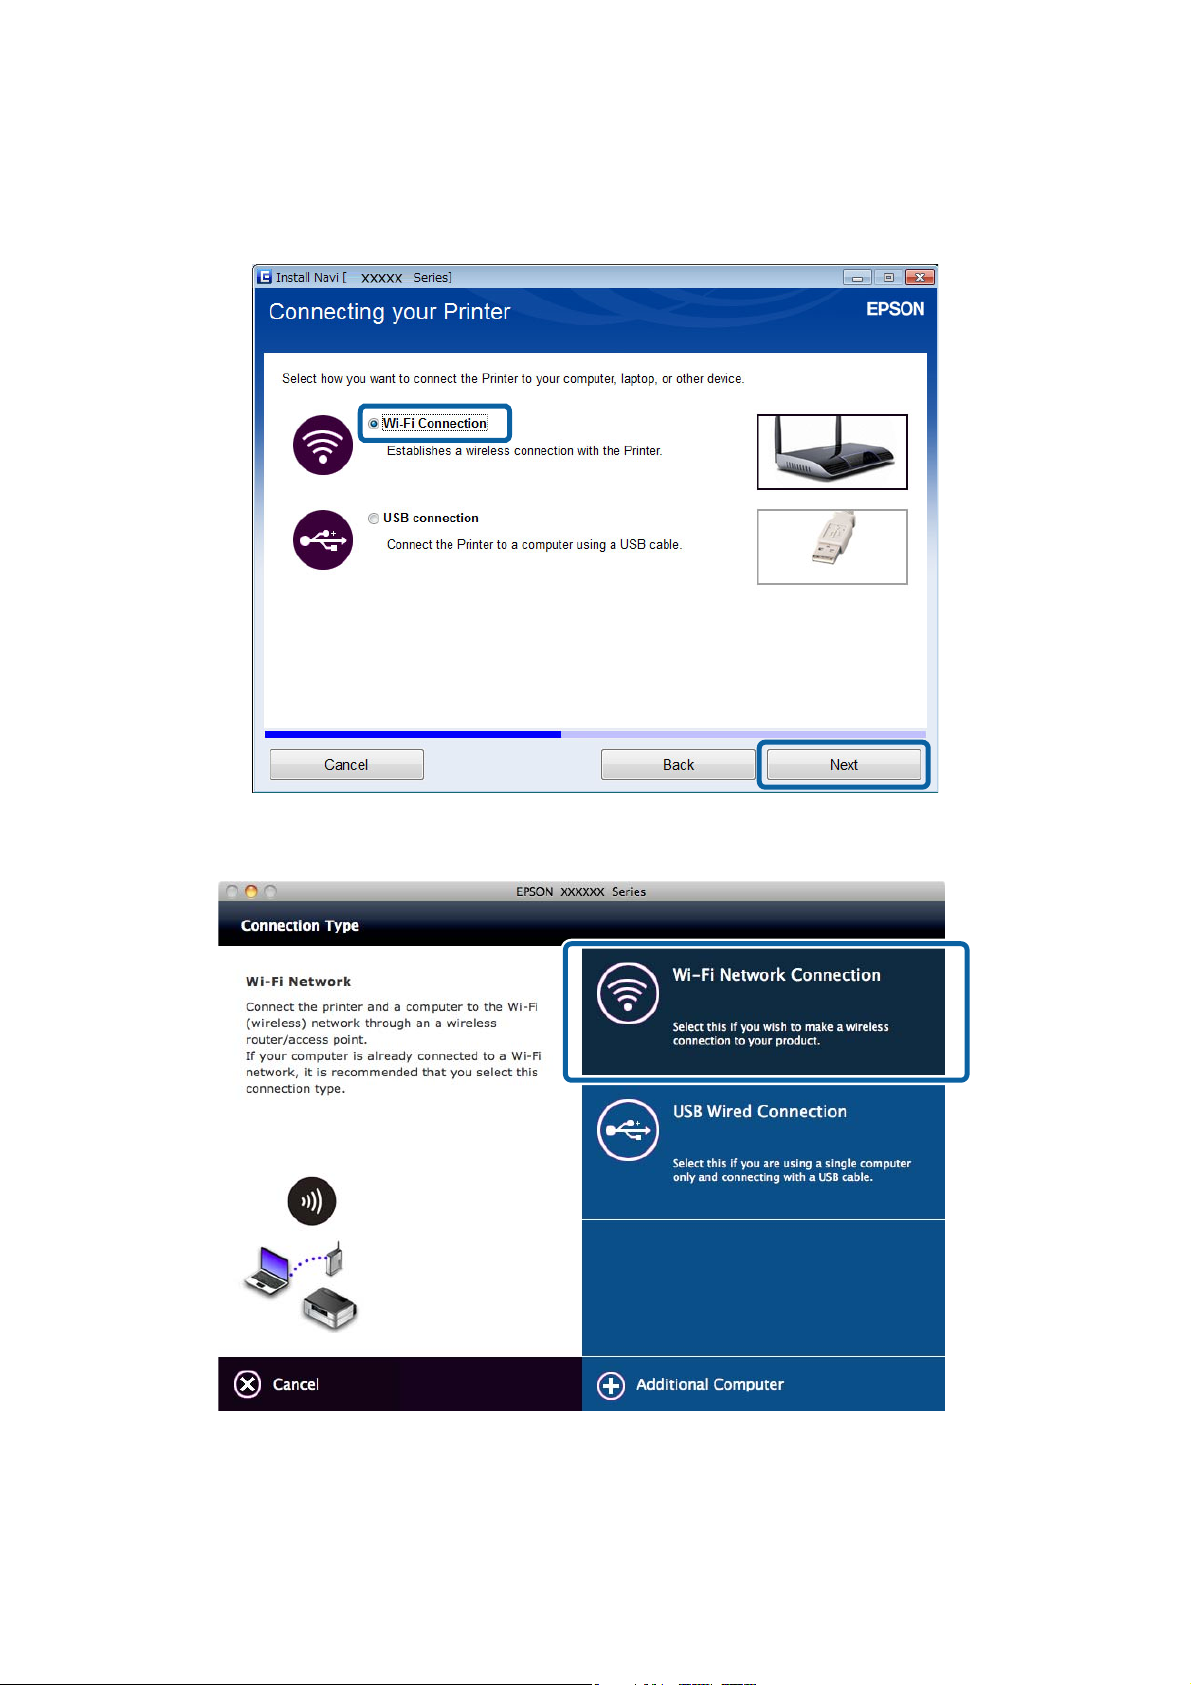
3. Select Wi - Fi C on ne ct i o n on the Connecting your Printer screen.
24
Network Guide
Connecting the Printer and a Computer
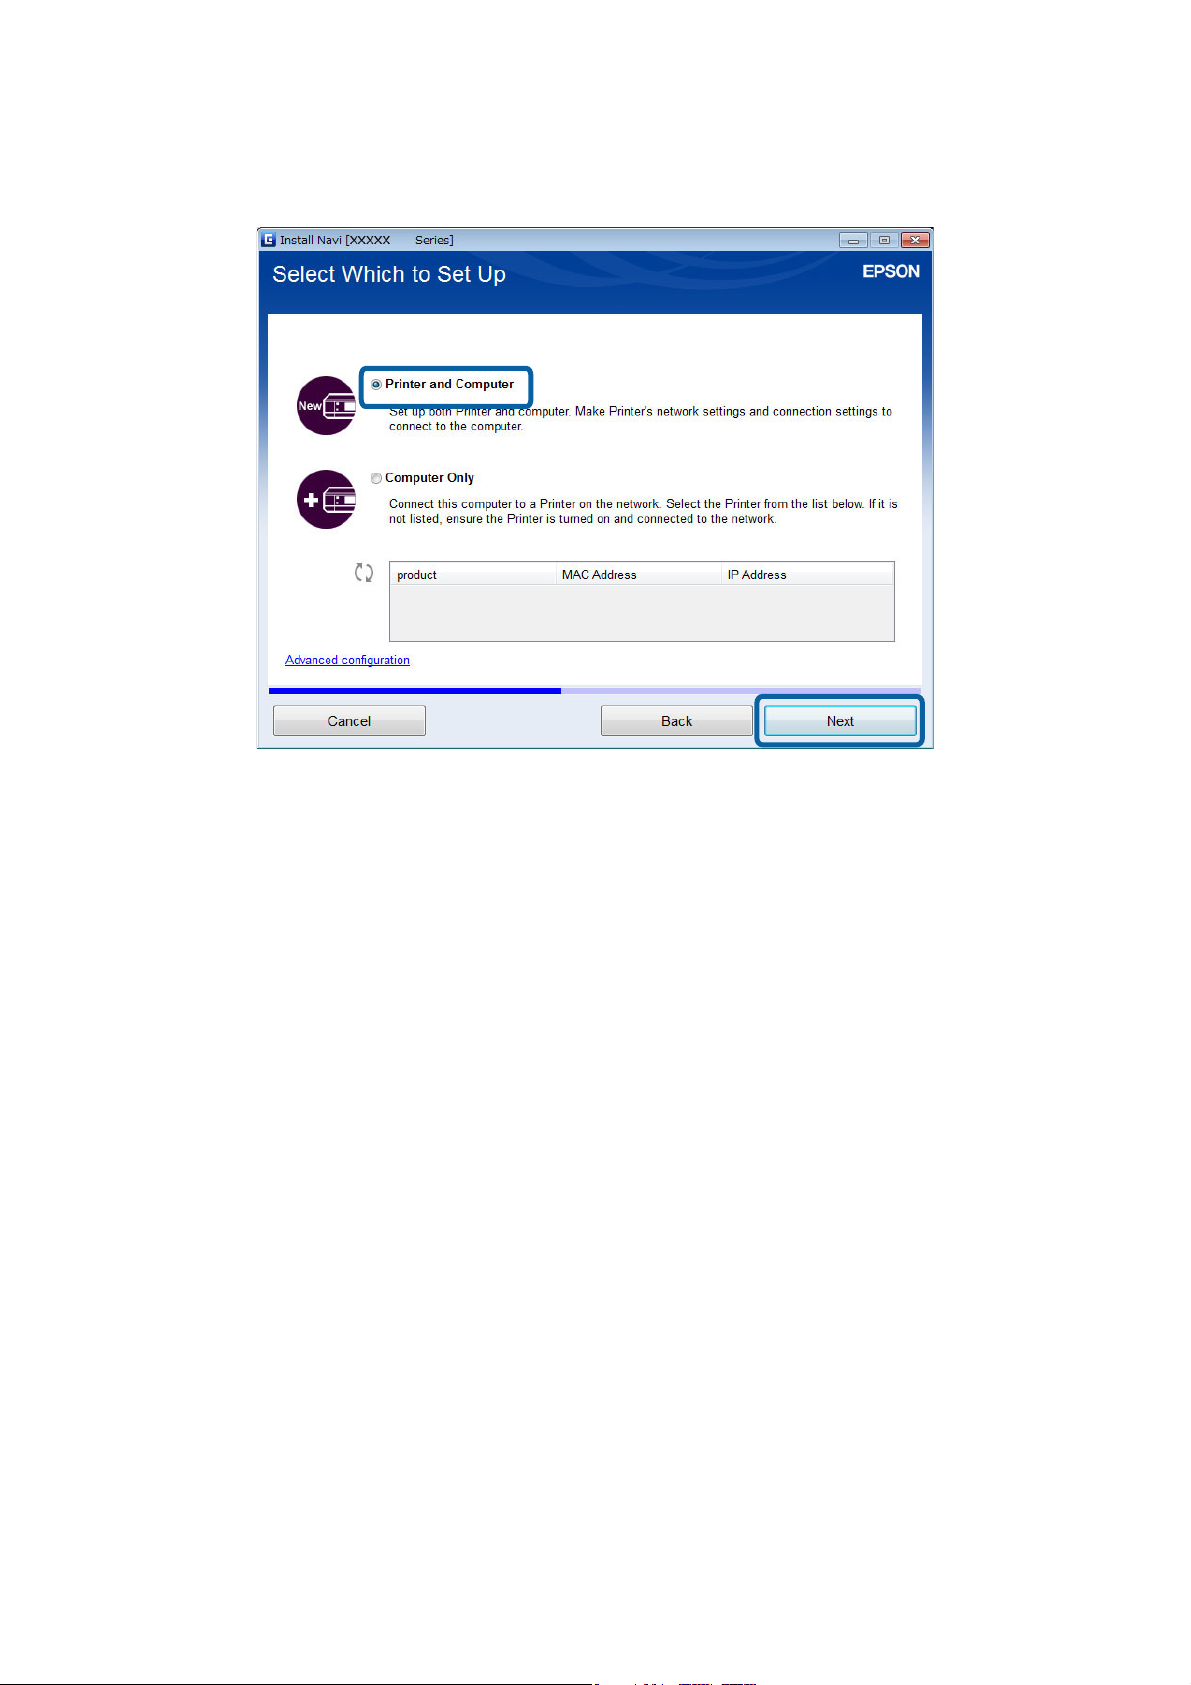
4. Select Printer and Computer on the Select Which to Set Up screen.
5. Follow the on-screen instructions.
Setting Up Wi-Fi from the Website
is method is for Mac OS X users or if you cannot use the soware disc.
1. Access the following website, and then enter the product's model number.
http://epson.sn
2. Go to Setup, and then download the soware.
3. Run the
soware,
and then follow the on-screen instructions.
25
Network Guide
Connecting the Printer and a Computer
4. Select Wi-Fi on the following screen.
❏ Wi n d o w s
❏ Mac OS X
Follow the on-screen instructions.
26

Network Guide
Connecting the Printer and a Computer
5. Select Printer and Computer on the Select Which to Set Up screen. (for Windows only)
Follow the on-screen instructions.
Connecting to Wi-Fi Manually
is method allows you to install essential soware by making network settings on the printer's control panel. Set
up the following.
Connecting the Printer to Wi-Fi
You can set up Wi-Fi from the printer's control panel using one of the following methods.
❏ Wi - Fi S et u p Wi z a rd
❏ Push Button Setup (WPS)
❏ PIN Code Setup (WPS)
Set up Printer Driver
Install the printer driver from the following website.
http://epson.sn > Additional Soware
Install EPSON Scan from the following website
❏ Install EPSON Scan from the following website.
http://epson.sn > Additional Soware
❏ Make connection settings from EPSON Scan Settings.
Related Information
& “Setting Up Manually” on page 44
27

Network Guide
Connecting the Printer and a Computer
& “Setting Up Automatically by Pressing a Button (WPS)” on page 47
& “PIN Code Setup (WPS)” on page 49
& “Ports and Protocols” on page 84
& “Connecting a Scanner to the Network” on page 90
Connecting the Printer and a Computer Directly
Connecting in Simple AP Mode (for Windows Only)
You can connect the printer directly to a computer using Simple AP mode. If you have an access point, we
recommend you connect using Wi-Fi.
1. Set the printer to Simple AP mode.
2. Connect the computer to the SSID for Simple AP mode.
Note:
See the documentation provided with your computer for the operating instructions.
3. Insert the soware disc supplied with the printer into the computer.
4. Select Wi - Fi C on ne ct i o n on the Connecting your Printer screen.
28
Loading...