


OWNER’S MANUAL
“EMERSON AND THE G-CLEF LOGO ARE REGISTERED TRADEMARKS OF EMERSON RADIO CORP., PARSIPPANY, NEW JERSEY, U.S.A.”
9-INCH COLOR TV/DVD
EWC09D5
EWC09D5 B
INSTRUCCIONES EN ESPAÑOL INCLUIDAS.
If you need additional assistance for set-up or operating after reading owner’s manual, please call TOLL FREE : 1-800-256-2487.
Or visit our WEB SITE at http://www.EmersonAudioVideo.com
Please read before using this equipment
WARNING:
TO REDUCE THE RISK OF FIRE OR ELECTRIC SHOCK, DO NOT EXPOSE THIS APPLIANCE TO RAIN OR MOISTURE.
CAUTION
RISK OF ELECTRIC SHOCK
DO NOT OPEN
CAUTION: TO REDUCE THE RISK OF ELECTRIC SHOCK, DO NOT REMOVE COVER (OR BACK). NO USER SERVICEABLE PARTS INSIDE. REFER SERVICING TO QUALIFIED SERVICE PERSONNEL.
The caution marking is located on the rear of the cabinet.
THIS SYMBOL INDICATES THAT DANGEROUS VOLTAGE CONSTITUTING A RISK OF ELECTRIC SHOCK IS PRESENT WITHIN THIS UNIT.
THIS SYMBOL INDICATES THAT THERE ARE IMPORTANT OPERATING AND MAINTENANCE INSTRUCTIONS IN THE LITERATURE ACCOMPANYING THE APPLIANCE.
IMPORTANT SAFEGUARDS
1.Read instructions-All the safety and operating instructions should be read before the appliance is operated.
2.Retain Instructions-The safety and operating instructions should be retained for future reference.
3.Heed Warnings-All warnings on the appliance and in the operating instructions should be adhered to.
4.Follow Instructions-All operating and use instructions should be followed.
5.Cleaning-Unplug the unit from the wall outlet before cleaning. Do not use liquid cleaners or aerosol cleaners. Use a damp cloth for cleaning.
EXCEPTION: A product that is meant for uninterrupted service and, that for some specific reason, such as the possibility of the loss of an authorization code for a CATV converter, is not intended to be unplugged by the user for cleaning or any other purpose, may exclude the reference to unplugging the appliance in the cleaning description otherwise required in item 5.
6.Attachments-Do not use attachments not recommended by the unit manufacturer as they may cause hazards.
7.Water and Moisture-Do not use this unit near water-for example, near a bath tub, wash bowl, kitchen sink, or laundry tub, in a wet basement, or near a swimming pool, and the like.
8.Accessories-Do not place this unit on an unstable cart, stand, tripod, bracket, or table. The unit may fall, causing serious injury to someone, and serious damage to the appliance. Use only with a cart, stand, tripod, bracket, or table recommended by the manufacturer, or sold with the unit. Any mounting of the appliance
should follow the manufacturer’s instructions and should use a mounting accessory recommended by the manufacturer. An appliance and cart
combination should be moved with care.
Quick stops, excessive force, and
uneven surfaces may cause the appliance and cart combination to over-
turn.
Accessoires- Ne placez pas cet appareil sur une table roulante, un support, un trépied, une console ou une table instable. Cet appareil risquerait de tomber, pouvant gravement blesser quelqu'un et l'appareil même pourrait être sérieusement endommagé. N'utilisez qu'une table roulante, un support, un trépied, une console ou une table recommandé par le fabriquant, ou vendu avec l'appareil. Pour n'importe quelle installation de l'appareil, on devra suivre les instructions du fabriquant et l'on devra utiliser les accessoires d'installation recommandés par le fabriquant. L'ensemble combiné de l'appareil avec une table roulante devra être déplacé avec précaution. Des arrêts brusques, une force excessive et des surfaces inégales peuvent provoquer le renversement de l'ensemble combiné de l'appareil/table roulante.
9.Ventilation-Slots and openings in the cabinet and the back or bottom are provided for ventilation and to ensure reliable operation of the unit and to protect it from overheating, and these openings must not be blocked or covered. The openings should never be blocked by placing the unit on a bed, sofa, rug, or other similar surface. This unit should never be placed near or over a radiator or heat register. This unit should not be placed in a built-in installation such as a bookcase or rack unless proper ventilation is provided or the manufacturer’s instructions have been adhered to.
10.Power Sources-This unit should be operated only from the type of power source indicated on the marking label. If you are not sure of the type of power supply to your home, consult your appliance dealer or local power company. For units intended to operate from battery power, or other sources, refer to the operating instructions.
11.Grounding or Polarization-This unit is equipped with a polarized alternating-current line plug(a plug having one blade wider than the other). This plug will fit into the power outlet only one way. This is a safety feature. If you are unable to insert the plug fully into the outlet, try reversing the plug. If the plug should still fail to fit, contact your electrician to replace your obsolete outlet. Do not defeat the safety purpose of the polarized plug.
– 2 – |
EN |
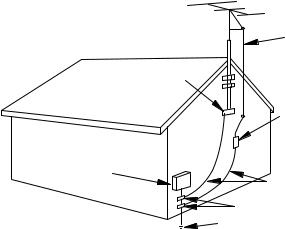
FIGURE A
EXAMPLE OF ANTENNA GROUNDING AS PER
NATIONAL ELECT RICAL CODE
|
|
|
|
|
|
ANTENNA |
|
|
|
|
|
|
L EAD I N |
|
|
|
|
|
|
W I R E |
|
GROUND |
|||||
|
C L A M P |
|||||
|
|
|
|
|
|
ANTENNA |
|
|
|
|
|
|
|
|
|
|
|
|
|
|
|
|
|
|
|
|
DI SCHARG E UN I T |
|
|
|
|
|
|
(NEC SECTION 8 10 -2 0) |
EL ECTRI C |
|
|
|
|
|
|
SE RV I CE |
|
|
|
|
|
|
EQ U I PMEN T |
|
|
|
|
|
|
|
|
|
|
|
|
G RO UNDI NG CO NDUCTORS |
|
|
|
|
|
|
(NEC SECTION 8 10 -2 1) |
|
|
|
|
|
G RO UND CL AMPS |
|
NEC - NATI O NAL EL ECTRI CAL CO DE |
|
|
POWER SERVI C E G RO UNDI NG |
|||
|
|
|
EL EC TR O DE SYSTEM |
|||
S2 8 9 8 A |
|
|
(NEC ART 2 50 , PART H) |
|||
12.Power-Cord Protection-Power-supply cords should be routed so that they are not likely to be walked on or pinched by items placed upon or against them, paying particular attention to cords at plugs, convenience receptacles, and the point where they exit from the appliance.
13.Outdoor Antenna grounding-If an outside antenna or cable system is connected to the unit, be sure the antenna or cable system is grounded so as to provide some protection against voltage surges and built-up static charges. Article 810 of the National Electrical Code, ANSI/NFPA No. 70, provides information with respect to proper grounding of the mast and supporting structure, grounding of the lead-in wire to an antenna discharge unit, size of grounding conductors, location of antenna-discharge unit, connection to grounding electrodes, and requirements for the grounding electrode. (Fig. A)
14.Lightning-For added protection for this unit receiver during a lightning storm, or when it is left unattended and unused for long periods of time, unplug it from the wall outlet and disconnect the antenna or cable system. This will prevent damage to the unit due to lightning and power-line surges.
15.Power Lines-An outside antenna system should not be located in the vicinity of overhead power lines or other electric light or power circuits, or where it can fall into such power lines or circuits. When installing an outside antenna system, extreme care should be taken to keep from touching such power lines or circuits as contact with them might be fatal.
16.Overloading-Do not overload wall outlets and extension cords as this can result in a risk of fire or electric shock.
17.Object and Liquid Entry-Never push objects of any kind into this unit through openings as they may touch dangerous voltage points or short out parts that could result in a fire or electric shock. Never spill liquid of any kind on the unit.
18.Servicing-Do not attempt to service this unit yourself as opening or removing covers may expose you to dangerous voltage or other hazards. Refer all servicing to qualified service personnel.
19.Damage Requiring Service-Unplug this unit from the wall outlet and refer servicing to qualified service personnel under the following conditions:
a.When the power-supply cord or plug is damaged or frayed.
b.If liquid has been spilled, or objects have fallen into the unit.
c.If the unit has been exposed to rain or water.
d.If the unit does not operate normally by following the operating instructions. Adjust only those controls that are covered by the operating instructions, as improper adjustment of other controls may result in damage and will often require extensive work by a qualified technician to restore the unit to its normal operation.
e.If the unit has been dropped or damaged in any way.
f.When the unit exhibits a distinct change in performancethis indicates a need for service.
20.Replacement Parts-When replacement parts are required, be sure the service technician has used replacement parts specified by the manufacturer that have the same characteristics as the original part. Unauthorized substitutions may result in fire, electric shock, injury to persons or other hazards.
21.Safety Check-Upon completion of any service or repairs to this unit, ask the service technician to perform routine safety checks to determine that the unit is in proper operating condition.
22.Heat-This unit product should be situated away from heat sources such as radiators, heat registers, stoves, or other products (including amplifiers) that produce heat.
– 3 – |
EN |

PRECAUTIONS
IMPORTANT COPYRIGHT INFORMATION
Unauthorized copying, broadcasting, public performance and lending of discs are prohibited.
This product incorporates copyright protection technology that is protected by U.S. patents and other intellectual property rights. Use of this copyright protection technology must be authorized by Macrovision, and is intended for home and other limited viewing uses only unless otherwise authorized by Macrovision. Reverse engineering or disassembly is prohibited.
FCC WARNINGThis equipment may generate or use radio frequency energy. Changes or modifications to this equipment may cause harmful interference unless the modifications are expressly approved in the instruction manual. The user could lose the authority to operate this equipment if an unauthorized change or modification is made.
RADIO-TV INTERFERENCE
This equipment has been tested and found to comply with the limits for a Class B digital device, pursuant to Part 15 of the FCC Rules. These limits are designed to provide reasonable protection against harmful interference in a residential installation. This equipment generates, uses, and can radiate radio frequency energy and, if not installed and used in accordance with the instructions, may cause harmful interference to radio communications. However, there is no guarantee that interference will not occur in a particular installation. If this equipment does cause harmful interference to radio or television reception, which can be determined by turning the equipment off and on, the user is encouraged to try to correct the interference by one or more of the following measures:
1)Reorient or relocate the receiving antenna.
2)Increase the separation between the equipment and receiver.
3)Connect the equipment into an outlet on a circuit different from that to which the receiver is connected.
4)Consult the dealer or an experienced radio/TV technician for help.
LASER SAFETY
This unit employs a laser. Only a qualified service person should remove the cover or attempt to service this device, due to possible eye injury.
CAUTION: USE OF CONTROLS OR ADJUSTMENTS OR PERFORMANCE OF PROCEDURES OTHER THAN THOSE SPECIFIED HEREIN MAY RESULT IN HAZARDOUS RADIATION EXPOSURE.
CAUTION: VISIBLE AND INVISIBLE LASER RADIATION WHEN OPEN AND INTERLOCK DEFEATED. DO NOT STARE INTO BEAM.
LOCATION: INSIDE, NEAR THE DECK MECHANISM.
This Class B digital apparatus complies with Canadian ICES-003.
Cet appareil numérique de la classe B est conforme à la norme NMB-003 du Canada.
CAUTION: TO PREVENT ELECTRIC SHOCK, MATCH WIDE BLADE OF PLUG TO WIDE SLOT, FULLY INSERT.
ATTENTION: POUR ÉVITER LES CHOC ÉLECTRIQUES, INTRODUIRE LA LAME LA PLUS LARGE DE LA FICHE DANS LA BORNE CORRESPONDANTE DE LA PRISE ET POUSSER JUSQU’AU FOND.
A NOTE ABOUT RECYCLING
Batteries should never be thrown away or incinerated but disposed of in accordance with your local regulations concerning chemical wastes.
The serial number of this product may be found on the back of the unit. No other unit has the same serial number as yours. You should record the number and other vital information here and retain this book as a permanent record of your purchase to aid identification in case of theft. Serial numbers are not kept on file.
Date of Purchase
Dealer Purchase from
Dealer Address
Dealer Phone No.
Model No.
Serial No.
– 4 – |
EN |
LOCATION |
|
WARNING |
|
|
|
For safe operation and satisfactory performance of your unit, keep the following in mind when selecting a place for its installation:
•Shield it from direct sunlight and keep it away from sources of intense heat.
•Avoid dusty or humid places.
•Avoid places with insufficient ventilation for proper heat dissipation. Do not block the ventilation holes at the top and bottom of the unit. Do not place the unit on a carpet because this will block the ventilation holes.
•Install the unit in a horizontal position.
•Avoid locations subject to strong vibration.
•Do not place the unit near strong magnetic fields.
•Avoid moving the unit to locations where temperature differences are extreme.
AVOID THE HAZARDS OF ELECTRICAL SHOCK AND FIRE
•Do not handle the power cord with wet hands.
•Do not pull on the power cord when disconnecting it from an AC wall outlet. Grasp it by the plug.
•If by accident, water is spilled on your unit, unplug the power cord immediately and take the unit to our Authorized Service Center for servicing.
•Do not put your fingers or objects into the unit disc loading tray.
•Do not place anything directly on top of the unit.
Moisture condensation may occur inside the unit when it is moved from a cold place to a warm place or after heating a cold room or under conditions of high humidity. If a DVD is played in a unit which has moisture, it may damage the DVD and the unit. Therefore when the condensation occurs inside the unit, turn the unit on and allow at least 2 hours for the unit to dry out.
SYMBOLS USED IN THIS MANUAL
The following symbols below appear in some headings and notes in this manual, with the following meanings
TV
:Description refers to TV operation (in the TV mode).
DVD-V
:Description refers to playback of DVD video discs (in the DVD mode).
CD
:Description refers to playback of audio CDs (in the DVD mode).
QUICK
:Description refers to the items to be set by the QUICK mode (in the DVD mode).
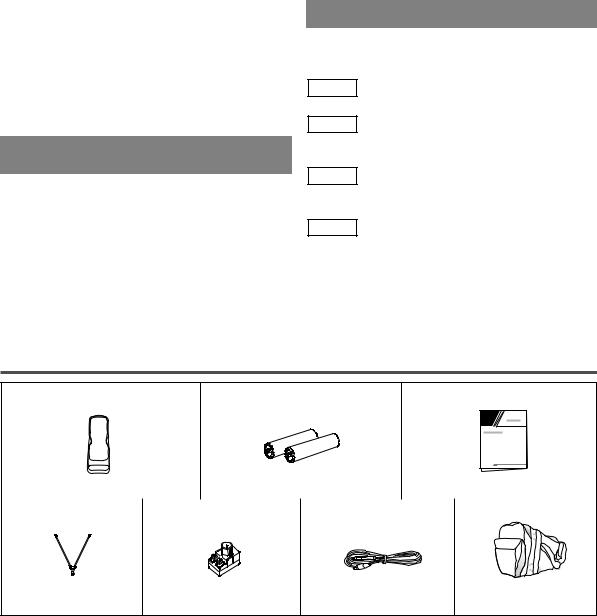
SUPPLIED ACCESSORIES
Remote Control Unit |
Batteries |
Owner’s Manual |
|
|
Owner’s |
|
|
Manual |
|
|
|
|
|
|
(NE221UD) |
|
2 AA Batteries |
(1EMN20217) |
||
Indoor Antenna |
Matching Adapter |
Car Battery Cord |
|
Carrying Bag |
|
(0EMN00723 or |
(1813641 or 1780258 |
(WPC0202GA001 |
(1EMN20243) |
0EMN01183) |
or UCPGANTPK004) |
or WPC0202HHH01) |
*Only EWC09D5 B |
•If you need to replace these accessories, please refer to the PART NO. under the illustrations and call 1-800- 256-2487.
•Depending on your antenna system, you may need different types of Combiners (Mixer) or Separators (Splitter). Contact your local electronics store for these items.
– 5 – |
EN |

TABLE OF CONTENTS
C IMPORTANT SAFEGUARDS . . . . . . . . . . . . .2
C PRECAUTIONS . . . . . . . . . . . . . . . . . . . . . . . .4
LOCATION . . . . . . . . . . . . . . . . . . . . . . . . . . . .5
AVOID THE HAZARDS OF ELECTRICAL SHOCK AND FIRE . . . . . . . . . . . . . . . . . . . . . .5
WARNING . . . . . . . . . . . . . . . . . . . . . . . . . . . .5 SYMBOLS USED IN THIS MANUAL . . . . . . .5
C SUPPLIED ACCESSORIES . . . . . . . . . . . . . . .5
C TABLE OF CONTENTS . . . . . . . . . . . . . . . . . .6
C FEATURES . . . . . . . . . . . . . . . . . . . . . . . . . . . .7
C OPERATING CONTROLS AND FUNCTIONS . . .8
INSTALLING THE BATTERIES . . . . . . . . . . .9
C PREPARATION FOR USE . . . . . . . . . . . . . . .10
ANTENNA/CABLE CONNECTION . . . . . . . .10
INDOOR ANTENNA . . . . . . . . . . . . . . . . . . .10
CONNECTING TO EXTERNAL INPUT JACKS .11
MOBILE CONNECTION . . . . . . . . . . . . . . . .11
CONNECTING TO A STEREO AMPLIFIER EQUIPPED WITH DIGITAL INPUT JACKS
(for DVD) . . . . . . . . . . . . . . . . . . . . . . . . . . . . .12
CONNECTING TO A DOLBY DIGITAL
DECODER (for DVD) . . . . . . . . . . . . . . . . . . .13
TV SECTION
C TV OPERATION AND SETTINGS . . . . . . . . .14
SET UP FOR THE FIRST TIME . . . . . . . . . . . |
14 |
WATCHING A TV PROGRAM . . . . . . . . . . . . |
14 |
PICTURE CONTROL . . . . . . . . . . . . . . . . . . . |
15 |
DEGAUSSING . . . . . . . . . . . . . . . . . . . . . . . . |
15 |
SLEEP TIMER . . . . . . . . . . . . . . . . . . . . . . . . . |
15 |
CHANNEL RESETTING . . . . . . . . . . . . . . . . . |
16 |
MENU LANGUAGE . . . . . . . . . . . . . . . . . . . . |
17 |
DVD SECTION |
|
C ABOUT THE DISCS . . . . . . . . . . . . . . . . . . . . |
18 |
PLAYABLE DISCS . . . . . . . . . . . . . . . . . . . . .18 UNPLAYABLE DISCS . . . . . . . . . . . . . . . . . .18
C PLAYING A DISC . . . . . . . . . . . . . . . . . . . . . .19
BASIC PLAYBACK . . . . . . . . . . . . . . . . . . . .19 GENERAL FEATURES . . . . . . . . . . . . . . . . . .19 DISC MENU . . . . . . . . . . . . . . . . . . . . . . . . . .19 TITLE MENU . . . . . . . . . . . . . . . . . . . . . . . . .19 RESUME . . . . . . . . . . . . . . . . . . . . . . . . . . . . .20 PAUSE . . . . . . . . . . . . . . . . . . . . . . . . . . . . . . .20
STEP BY STEP PLAYBACK . . . . . . . . . . . . .20 FAST FORWARD / FAST REVERSE . . . . . . .20 SLOW FORWARD / SLOW REVERSE . . . . .20
C SEARCH FUNCTION . . . . . . . . . . . . . . . . . .21
TRACK SEARCH . . . . . . . . . . . . . . . . . . . . . .21 TITLE / CHAPTER SEARCH . . . . . . . . . . . . .21 TIME SEARCH . . . . . . . . . . . . . . . . . . . . . . . .21 MARKER SETUP SCREEN . . . . . . . . . . . . . .21
C SPECIAL PLAYBACK FUNCTION . . . . . . . .22
REPEAT . . . . . . . . . . . . . . . . . . . . . . . . . . . . .22 PROGRAM . . . . . . . . . . . . . . . . . . . . . . . . . . .22 RANDOM PLAYBACK . . . . . . . . . . . . . . . . .22
C CHANGING THE SETTINGS . . . . . . . . . . . .23
SUBTITLE LANGUAGE . . . . . . . . . . . . . . . .23 AUDIO LANGUAGE . . . . . . . . . . . . . . . . . . .23 STEREO SOUND MODE . . . . . . . . . . . . . . . .23 CAMERA ANGLE . . . . . . . . . . . . . . . . . . . . . .24 BLACK LEVEL SETTING . . . . . . . . . . . . . . .24 VIRTUAL SURROUND . . . . . . . . . . . . . . . . .24
C THE ON-SCREEN INFORMATION . . . . . . .25
C CHANGING THE DVD SETUP ITEMS . . . .26
CUSTOM MENU . . . . . . . . . . . . . . . . . . . . . .26 LANGUAGE SETTING . . . . . . . . . . . . . . . .26 DISPLAY SETTING . . . . . . . . . . . . . . . . . . .27 AUDIO SETTINGS . . . . . . . . . . . . . . . . . . .27 PARENTAL CONTROL . . . . . . . . . . . . . . . .28
INITIALIZE . . . . . . . . . . . . . . . . . . . . . . . . . . .28
C TROUBLESHOOTING GUIDE . . . . . . . . . . .29
C MAINTENANCE . . . . . . . . . . . . . . . . . . . . . . .31
DISC HANDLING . . . . . . . . . . . . . . . . . . . . . .31
C SPECIFICATIONS . . . . . . . . . . . . . . . . . . . . .32
C ESPAÑOL . . . . . . . . . . . . . . . . . . . . . . . . . . . .33
C WARRANTY . . . . . . . . . . . . . . . . . . .Back Cover
– 6 – |
EN |

FEATURES
TV Mode
•181 channel capability PLL frequency synthesizer tuner with direct station call
(A converter may be necessary to view scrambled cable channels.)
•Infrared remote control
•Trilingual on screen menu display selectable in English, Spanish, or French
¡Sleep Timer
Allows you to have the unit automatically turn off at a desired time.
¡Auto Shut Off Function
If there is no air signal input from the antenna terminal and no operation for 15 minutes, the TV will turn itself off automatically.
DVD Mode
¡Dolby Digital sound
This unit can handle Dolby Digital surround sound having 5.1 channels when connected to a Dolby Digital decoder.
¡Still/fast/slow/step playback
Various playback modes are available including still pictures, fast forward/reverse, slow motion and step frames.
¡Random playback for Audio CD
This unit can shuffle the order of tracks to play them in random order.
¡Program playback for Audio CD
You can program the order of tracks to play them in any desired order.
¡DVD menus in a desired language
You can display DVD menus in a desired language, if available on a DVD.
¡Screen saver/Auto power-off functions
The screen saver program starts when there is no input from the unit for 5 minutes in the stop mode. After the screen saver program is activated for 15 minutes, the power automatically turns off.
¡Subtitles in a desired language
You can select a desired language for the display subtitles, if that language is available on a disc.
¡Selecting a camera angle
You can select the desired camera angle, if a disc contains sequences recorded from different angles.
¡Choices for audio language and sound mode
You can select the desired audio language and sound mode, if different languages and modes are available on a disc.
¡Parental lock
You can set the control level to limit playback of discs which may not be suitable for children.
¡Automatic detection of discs
This unit automatically detects if the loaded disc is DVD or Audio CD.
¡On-screen display
Information about the current operation can be displayed on a TV screen, allowing you to confirm the currently active functions (such as program playback), on the TV screen using the remote control.
¡Search
Chapter search / Title search / Track search / Time search
¡Repeat
Chapter / Title / Track / All / A-B
¡Marker
The part designated by user can be called back.
¡Resume Play
User can resume to playback from the part at which the play was stopped.
¡Virtual Surround
¡Bit rate indication
¡DRC (Dynamic range control)
You can control the range of sound volume.
NOTE:
•We do not recommend the use of universal remote controls. Not all of the functions may be controlled with a universal remote control.
If you decide to use a universal remote control with this unit, please be aware that the code number given may not operate this unit. In this case, please call the manufacturer of the universal remote control.
– 7 – |
EN |

OPERATING CONTROLS AND FUNCTIONS
|
|
FRONT PANEL |
|
|
|
[Fig. 1] |
|
REAR VIEW |
|
[Fig. 3] |
|
|||
|
|
|
|
|
|
|
|
|
|
|
|
DC 13.2V |
|
|
|
|
|
|
|
|
|
|
|
|
|
|
|
ANT. |
|
|
VIDEO |
L AUDIO R |
POWER |
VOLUME |
CHANNEL |
|
STOP |
SKIP |
PLAY SKIP PAUSE |
OPEN/CLOSE HEADPHONE |
|
|
|
|
|
|
|
|
|
|
|
|
|
|
|
|
COAXIAL |
|
|
|
|
|
|
|
|
|
|
|
SEARCH |
|
|
|
|
|
1 |
2 |
3 |
4 |
5 |
6 |
7 |
8 |
9 |
10 11 12 13 |
14 |
|
|
|
|
|
|
|
|
|
|
|
|
|
|
|
37 |
38 |
39 |
40 |
|
7. Remote Sensor Window |
REMOTE CONTROL [Fig. 2] |
8. C STOP Button [page 19] |
Stops operation of the disc. |
|
|
9. H SKIP Button [page 21] |
|
Plays back from the beginning of the current |
|
chapter or track. |
OPEN/
POWER PICTURE SELECT CLOSE
4 |
|
|
|
36 |
1 |
2 |
3 |
|
|||
|
|
|
CH. |
16 |
4 |
5 |
6 |
|
7 |
8 |
9 |
17 |
SLEEP |
|
+100 VOL. |
|
0 |
+10 |
13
34
6
5
E SEARCH Button (Front Panel)
[page 20]
During playback or in the pause mode, press and hold button down for a few seconds to change reverse playback speed.
10.B PLAY Button [page 19] Starts playback of the disc contents.
Hit to change to DVD mode when TV mode.
9
11
10
SKIP |
V.SURR MUTE |
|
PLAY |
REV |
FWD |
35 |
11. SKIP G Button [page 21] |
|
Plays back from the beginning of the next chapter |
||
19 |
18or track.
SEARCH D Button (Front Panel)
|
|
STOP |
|
8 |
|
[page 20] |
|
|
|
|
DISC |
|
|||
|
PAUSE |
SLOW |
|
During playback or in the pause mode, press and |
|||
12 |
MENU |
33 |
|
||||
DISPLAY |
|
|
|
hold button down for a few seconds to change for- |
|||
23 |
|
|
32 |
|
ward playback speed. |
||
|
ENTER |
|
|
||||
20 |
SETUP |
TITLE |
RETURN |
31 |
12. F PAUSE Button [page 20] |
||
|
|
|
30 |
|
Pauses the current disc operation. |
||
21 |
CLEAR |
SEARCH MODE REPEAT |
A-B |
|
|||
29 |
13. A OPEN/CLOSE Button [page 19] |
||||||
22 |
|
|
|
||||
15 |
MODE |
AUDIO SUBTITLE |
ANGLE |
28 |
|
Hit to insert a disc into or remove it from the tray. |
|
|
|
|
14. HEADPHONE Jack |
||||
24 |
|
|
|
27 |
|||
|
|
|
|
To connect headphone (not supplied) for personal |
|||
25 |
|
|
|
26 |
|
||
|
|
|
|
listening. |
|||
1. Disc loading tray |
|
|
15. MODE Button [pages 22-24] |
||||
|
|
|
Activates program playback or random playback |
||||
2. VIDEO input Jack [page 11] |
|
|
|||||
|
|
mode when playing CDs. |
|||||
Connect to the video output jack of a video |
16. Number Button |
||||||
camera or VCR. |
|
|
|
||||
|
|
|
|
TV Mode: [page 14] |
|||
3. AUDIO L/R input Jacks [page 11] |
|
|
|||||
|
|
Hit two digits to directly access the desired channel. |
|||||
Connect to the audio output jacks of a video |
|
Remember to hit [0] before a single digit channel. |
|||||
camera or VCR. |
|
|
|
|
+100 Button– |
||
4. POWER Button [page 14] |
|
|
|
||||
|
|
|
Hit to select cable channels which are higher than |
||||
Hit to turn the power on and off. |
|
|
99. |
||||
5. VOLUME (VOL.) K / L Buttons |
|
|
DVD Mode: [page 21] |
||||
Press to control the volume level for the DVD and TV. |
|
Hit to enter the desired number. |
|||||
6. CHANNEL (CH.) K / L Buttons [page 14] |
|
+10 Button– |
|||||
Press to select memorized channel. |
|
|
Hit to enter the desired numbers which are higher |
||||
|
|
than 9. |
|||||
Press to change to TV mode when in DVD mode. |
|
||||||
|
EN |
||||||
|
|
|
|
– 8 – |
|||
17.SLEEP Button [page 15] Sets the sleep timer.
18.REV h Button [page 20]
Hit to fast reverse the Disc. Hit [PAUSE F], then hit this button to begin slow motion playback. Hit this button repeatedly to change the reverse speed of slow motion.
FWD g Button [page 20]
Hit to fast forward the Disc. Hit [PAUSE F], then hit this button to begin slow motion playback. Hit this button repeatedly to change the forward speed of slow motion.
19.V.SURR (VIRTUAL SURROUND) Button
[page 24]
Hit to set virtual surround on/off.
20.SETUP Button [pages 16, 26-28]
Hit to enter or exit the setup menu of TV or DVD.
21.TITLE Button [page 19] Displays the title menu.
22.CLEAR Button [pages 21-22]
Hit to clear or cancel a setting currently entered.
23.DISPLAY Button TV Mode:
Hit to display the channel number on the screen. If you hit it again, the channel number will disappear.
DVD Mode: [page 25]
Displays the current status on the TV screen.
24.SEARCH MODE Button [page 21] Hit to locate a desired point.
25.AUDIO Button [page 23]
Hit to select a desired audio language or sound mode.
26.SUBTITLE Button [page 23]
Hit to select a desired subtitle language.
27.REPEAT Button [page 22]
Repeats playback of the current disc, title, chapter or track.
28.ANGLE Button [page 24]
Hit to change the camera angle to see the sequence being played back from a different angle
(if available).
29.A-B Button [page 22]
Repeats playback of a selected section.
30.RETURN Button [page 21, 24]
Returns to the previous screen in the setup menu.
31.ENTER Button [pages 14, 19] Hit to accept a setting.
32.K / L / s / B Buttons TV Mode: [page 14]
Press to select a setting mode from the menu on the TV screen.
Press to select or adjust from a particular menu.
DVD Mode: [page 19] Press to select a menu item.
33.DISC MENU Button [page 19] Calls up the DVD menu.
34.SELECT Button [pages 11, 19]
Hit to change to TV mode, external input mode or DVD mode.
NOTE: When you select the DVD mode by this button, press [PLAY O] or [OPEN/CLOSE A] first. Otherwise, the DVD features are not operated.
35.MUTE Button
Mutes the sound.
(Volume level display turns LIGHT RED from
LIGHT BLUE.)
Hit it again or press [VOL. X / Y] to restore sound.
36.PICTURE Button [page 15]
Hit to enter picture adjustment mode.
37.Power cord
Connect to a standard AC outlet (120V/60Hz).
NOTE: Remove the power cord from the hook to avoid breaking a wire before you connect to a standard AC outlet.
38.COAXIAL Jack (DVD Audio Only)
Connect to the digital input of an external amplifier or decoder.
39.ANT(ENNA). Jack
Connect to an antenna, cable system, or satellite system.
40.DC 13.2V Jack
Connect to the Car Battery Cord.
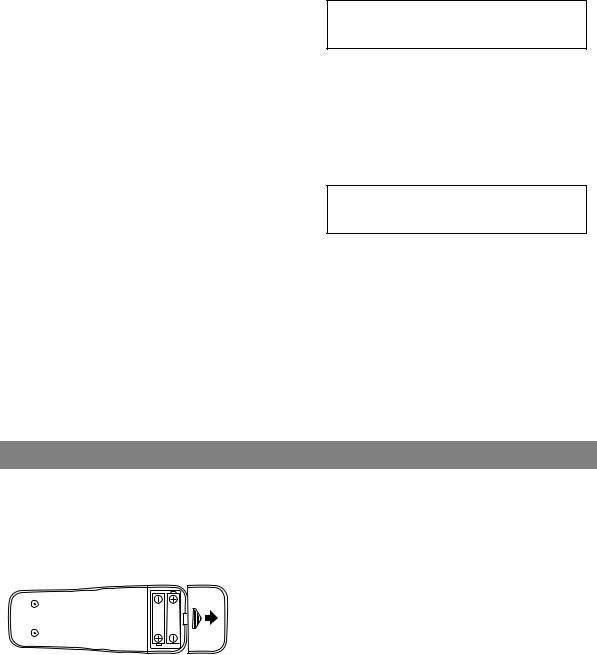
INSTALLING THE BATTERIES
1)Open the battery compartment cover by pressing the cover on the remote unit in the direction of the arrow.
2)Insert 2 “AA” penlight batteries into the battery compartment in the direction indicated by the polarity (+/-) markings.
3)Replace the cover.
[BATTERY PRECAUTIONS]
•Be sure to follow the correct polarity as indicated in the battery compartment. Reversed batteries may cause damage to the device.
•Do not mix different types of batteries together (e.g. Alkaline and Carbon-Zinc) or old batteries with fresh ones.
•If the device is not to be used for a long period of time, remove the batteries to prevent damage or injury from possible battery leakage.
•Do not try to recharge batteries not intended to be recharged; they can overheat and rupture.
– 9 – |
EN |

PREPARATION FOR USE
ANTENNA/CABLE CONNECTION
Cables used here are commercially available.
[ANTENNA CONNECTION] |
[CATV/SATELLITE CONNECTION] |
VHF/UHF
VHF
UHF
VHF or UHF
75-ohm Coaxial Cable
OR
VHF/UHF
Combiner
Adaptor
Flat twinlead cable
CATV Box or
Satellite Box *
OUT |
IN |
|
From Cable System or |
|
Satellite Antenna |
ANT. |
75-ohm |
OR |
Coaxial Cable |
|
From Cable System |
[Fig. 4]
*Some cable TV systems use scrambled signals and require a special converter to receive these channels. Consult your local cable company.
Note to CATV system installer:
This reminder is provided to call the CATV system installer’s attention to Article 820-40 of the NEC that provides guidelines for proper grounding and in particular, specifies that the cable ground shall be connected to the grounding system of the building as close to the point of cable entry as practical.
NOTE: |
Bent pin |
• Before plugging the an antenna into the ANT. jack of the unit, check that the |
Cable |
pin is not bent. If it is bent, straighten the pin as illustrated, then plug the pin |
|
into the ANT. jack of the unit. |
Plug |
(Needs to be straightened)(Straight pin) |
VHF/UHF COMBINED ANTENNA
A VHF UHF 75 ohm combination antenna can be connected to ANT. jack of the unit.
CABLE WITHOUT CONVERTER/ DESCRAMBLER BOX
Use this connection if your cable system connects directly to the unit without a converter box.
VHF/UHF SEPARATE ANTENNAS |
CABLE WITH CONVERTER/DESCRAM- |
|
In some areas it will be necessary to use an outdoor |
BLER BOX OR SATELLITE BOX |
|
If your cable service supplies you with a converter |
||
antenna. |
||
box or if you use a satellite system, you can use the |
||
|
||
|
basic connection shown above. |
|
|
Channel selection must be made with the converter |
|
|
box or satellite box. This means that channels cannot |
|
|
be changed using the remote control of this unit. |
NOTE:
•For your safety and to avoid damages to the unit, unplug the antenna cable from the ANT. jack before moving the unit.
INDOOR ANTENNA
The Indoor Antenna (supplied) is detachable. Insert the stem of the antenna into the hole on the upper-back portion of the unit. Connect the Indoor Antenna to the unit as shown in the diagram. For the best reception, fully extend the Indoor Antenna and make the necessary adjustments. (Avoid touching the top section when adjusting.)
NOTE:
•The connection of an Indoor antenna may not always give acceptable TV reception.
–10 –
Indoor Antenna (Supplied)
Flat twin-lead cable
Matching Adapter (Supplied)
ANT. |
[Fig. 5] |
EN
CONNECTING TO EXTERNAL INPUT JACKS
When you watch a program recorded on another source (VCR or video camera), use the |
AUX |
AUDIO/VIDEO input jacks on the front of the unit. |
Connect the AUDIO/VIDEO output jacks of another source to the AUDIO L/R and VIDEO jacks of this unit.
Then hit [SELECT] until “AUX” appears on the screen.
ex.
VCR or video camera, etc.
NOTE:
To the Audio output jacks
(OUT) |
Audio Cable |
(IN) |
|
(commercially available) |
|
|
|
VIDEO L AUDIO R |
To the Video output jack |
[Fig. 6] |
|
(OUT) |
Video Cable |
(IN) |
|
(commercially available) |
|
•When you connect a monaural VCR (another source) to this unit, connect the Audio output jack of the monaural VCR (another source) to the AUDIO L jack of this unit. The audio will output in both L and R channel equally.
MOBILE CONNECTION
WARNING: The driver should never watch the unit while operating a motor vehicle.
CAUTION:
•When used in moving vehicle, be sure that the unit is secure at all the times to prevent injury. Consult a professional installer.
•If you use the unit with the vehicle’s engine off, recharge the vehicle’s battery after about every 4 hours of use to prevent it from running down. After you finish using the unit be sure you unplug the car-battery cord from the cigarette-lighter socket.
•Do not use this unit while driving.
•Do not leave this unit in a car.
•This unit is not designed for use in a car.
To the vehicle's cigarette-lighter socket
VHF/UHF Combination Mobile Antenna
(Not supplied)
Car battery cord (Supplied)
ANT.
DC13.2V
1)The supplied indoor antenna is adequate when your vehicle is stationary. For best reception on the road, use a high-quality VHF/UHF mobile TV antenna.
2)Attach the car battery cord to the DC13.2V(12V) connector on the back of the unit. Then, connect the other end to your vehicle’s cigarette-lighter socket.
NOTES:
•Be sure your vehicle has a 13.2-volt (12-volt), nega- tive-ground electrical system.
•Be sure you use only the supplied car battery cord. Using another cord could damage the unit.
•Be sure the socket is free of ashes and other debris.
•Be sure to push the car battery cord’s plug completely into the cigarette-lighter socket.
•Always unplug the car battery from the cigarettelighter socket before you unplug it from the unit.
•You must disconnect the car battery cord from the unit before you can use the AC power.
•Be sure to replace the fuse with only the same type, 6A, 250V.
– 11 – |
EN |
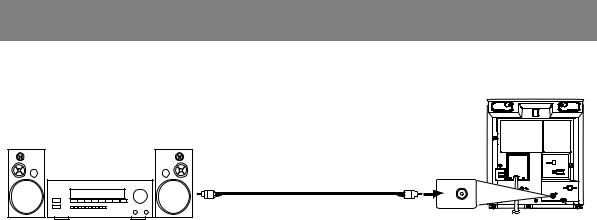
CONNECTING TO A STEREO AMPLIFIER EQUIPPED WITH
DIGITAL INPUT JACKS (for DVD)
Use an audio coaxial digital cable (commercially available) for the audio connections. Connect to an amplifier equipped with digital input jacks such as MD Deck or DAT Deck.
ex.
MD deck, DAT deck, etc.
To Coaxial digital Audio input jack
COAXIAL
(IN) |
Audio coaxial digital cable |
(OUT) |
|
(commercially available) |
To COAXIAL jack |
|
|
(Only DVD AUDIO OUT) |
[Fig. 7]
NOTES:
•The audio source on a disc in a 5.1 channel Dolby Digital surround format cannot be recorded as digital sound by an MD or DAT deck.
•Be sure to turn off the power to all components in the system before connecting another component.
•Refer to the Owner’s Manuals for the components to be connected to the unit.
•Set DOLBY DIGITAL to “OFF” for audio output in the setup mode. Playing a unit using incorrect settings may generate noise distortion, and may also damage the speakers. (Refer to page 27 to set DOLBY DIGITAL to “OFF”.)
– 12 – |
EN |
 Loading...