


 Loading...
Important
Please read PRECAUTIONS, this User’s Manual, and Setup Manual (separate volume) carefully to familiarize yourself with safe and effective usage.
•Please refer to the Setup Manual for basic information ranging from connection of the monitor to a PC to using the monitor.
•The latest User’s Manual is available for download from our web site: http://www.eizo.com
This product has been adjusted specifically for use in the region to which it was originally shipped. If operated outside this region, the product may not perform as stated in the specifications.
No part of this manual may be reproduced, stored in a retrieval system, or transmitted, in any form or by any means, electronic, mechanical, or otherwise, without the prior written permission of EIZO NANAO CORPORATION. EIZO NANAO CORPORATION is under no obligation to hold any submitted material or information confidential unless prior arrangements are made pursuant to EIZO NANAO CORPORATION’s receipt of said information. Although every effort has been made to ensure that this manual provides up-to-date information, please note that EIZO monitor specifications are subject to change without notice.

Notice for this monitor
This product is suited to displaying medical images of such modalities as MRI and CT. It does not support the display of mammography images for diagnosis.
Caution: Federal law (USA) restricts this device to sale by or on the order of a physician.
This product has been adjusted specifically for use in the region to which it was originally shipped. If the product is used outside the region, it may not operate as specified in the specifications.
This product may not be covered by warranty for uses other than those described in this manual.
The specifications noted in this manual are only applicable when the following are used:
·Power cords provided with the product
·Signal cables specified by us
Only use optional products manufactured or specified by us with this product.
As it takes about 30 minutes for the performance of electrical parts to stabilize, adjust the monitor 30 minutes or more after the monitor power has been turned on or the monitor has recovered from the power saving mode.
Monitors should be set to a lower brightness to reduce changes in luminosity caused by long-term use and maintain a stable display.
When the screen image is changed after displaying the same image for extended periods of time, an afterimage may appear. Use the screen saver or power save function to avoid displaying the same image for extended periods of time.
Periodic cleaning is recommended to keep the monitor looking new and to prolong its operation lifetime (refer to “Cleaning” (page 4)).
The screen may have defective pixels or a small number of light dots on the screen. This is due to the characteristics of the panel itself, and is not a malfunction of the product.
The backlight of the LCD panel has a fixed lifetime. When the screen becomes dark or begins to flicker, please contact your dealer.
Do not press on the panel or edge of the frame strongly, as this may result in display malfunctions, such as interference patterns, etc. If pressure is continually applied to the panel, it may deteriorate or damage your panel. (If the pressure marks remain on the panel, leave the monitor with a black or white screen. The symptom may disappear.)
Do not scratch or press on the panel with any sharp objects, as this may result in damage to the panel. Do not attempt to brush with tissues as this may scratch the panel.
When the monitor is cold and brought into a room or the room temperature goes up quickly, dew condensation may occur on the interior and exterior surfaces of the monitor. In that case, do not turn the monitor on. Instead wait until the dew condensation disappears, otherwise it may cause some damage to the monitor.
Notice for this monitor |
3 |

Cleaning
Attention
•Chemicals such as alcohol and antiseptic solution may cause gloss variation, tarnishing, and fading of the cabinet or panel, and also quality deterioration of the image.
•Never use any thinner, benzene, wax, and abrasive cleaner, which may damage the cabinet or panel.
Note
• The optional ScreenCleaner is recommended for cleaning the cabinet and panel surface.
If necessary, the stains on the cabinet and panel surface can be removed by moistening part of a soft cloth with water.
To use the monitor comfortably
•An excessively dark or bright screen may affect your eyes. Adjust the brightness of the monitor according to the environmental conditions.
•Staring at the monitor for a long time tires your eyes. Take a 10-minute rest every hour.
4Notice for this monitor
CONTENTS
Cover....................................................................... |
|
|
1 |
..........................................Notice for this monitor |
3 |
||
.....................................................................Cleaning |
|
4 |
|
To use the monitor comfortably.............................. |
4 |
||
CONTENTS............................................................. |
|
5 |
|
Chapter 1 |
.......................................Introduction |
6 |
|
1-1. |
..........................................................Features |
6 |
|
1-2. |
EIZO LCD Utility Disk.................................... |
7 |
|
●● |
|
7 |
|
|
Disk contents and software overview.............. |
||
●● |
|
|
|
|
To use RadiCS LE/ScreenManager Pro |
|
|
|
for Medical....................................................... |
7 |
|
1-3. |
Basic Operations and Functions................. |
8 |
|
●● |
|
8 |
|
|
Basic Adjustment menu operations................. |
||
●● |
|
9 |
|
|
Functions......................................................... |
||
Chapter 2 |
Adjusting Screens........................... |
10 |
|
2-1. |
..............................Compatible Resolutions |
10 |
|
2-2. |
Setting the Resolution................................. |
10 |
|
●● |
|
10 |
|
|
Windows 7...................................................... |
||
●● |
|
10 |
|
|
Windows Vista................................................ |
||
●● |
|
10 |
|
|
Windows XP.................................................... |
||
●● |
|
10 |
|
|
Mac OS X........................................................ |
||
2-3. |
Adjusting Mode............................................. |
11 |
|
●● |
|
|
|
|
To select the display mode (CAL Switch |
|
|
|
mode).............................................................. |
11 |
|
●● |
|
11 |
|
|
Adjustable settings in each mode................... |
||
●● |
|
12 |
|
|
To adjust brightness........................................ |
||
●● |
|
|
|
|
To set the mode in the monochrome |
|
|
|
display area..................................................... |
12 |
|
●● |
|
13 |
|
|
To set the mode in the base display area....... |
||
●● |
|
|
|
|
To set the detection type in the image |
|
|
|
display area..................................................... |
13 |
|
●● |
|
|
|
|
To set the highlight area in the image |
|
|
|
display area..................................................... |
13 |
|
Chapter 3 |
Setting Monitor................................ |
14 |
|
3-1. |
.......................................Setting Orientation |
14 |
|
3-2. |
Enabling/Disabling Mode Selection........... |
14 |
|
3-3. |
Setting Language......................................... |
15 |
|
3-4. |
Setting Adjustment Menu Display.............. |
15 |
|
●● |
|
|
|
|
Changing Adjustment Menu Display Position.15 |
||
3-5. |
Setting the EIZO Logo Display.................... |
15 |
|
3-6. |
Locking Buttons........................................... |
16 |
|
3-7. |
Enabling/Disabling DDC Communication.16 |
||
3-8. |
Enabling/Disabling DC5V Output............... |
16 |
|
3-9. |
Return To Default Setting............................ |
17 |
|
●● |
|
17 |
|
|
To reset the mode adjustments...................... |
||
●● |
|
17 |
|
|
To reset all settings......................................... |
||
Chapter 4 Controlling Monitor Quality........... |
18 |
||
4-1. |
..................................Executing Calibration |
18 |
|
●● |
|
18 |
|
|
Executing SelfCalibration............................... |
||
●● |
|
18 |
|
|
Viewing SelfCalibration result......................... |
||
4-2. |
Checking Grayscale..................................... |
19 |
|
●● |
|
19 |
|
|
Executing Grayscale Check........................... |
||
●● |
|
19 |
|
|
Viewing Grayscale Check result..................... |
||
4-3. |
Acquiring Life Prediction Data.................... |
19 |
|
4-4. |
Setting On/Off for Warning and QC |
|
|
|
History.......................................................... |
20 |
|
Chapter 5 Power Saving Functions................. |
21 |
||
5-1. |
......................................Setting Power Save |
21 |
|
5-2. |
Setting Power Indicator............................... |
21 |
|
5-3. |
Setting the power saving mode when a |
|
|
|
person leaves the monitor.......................... |
22 |
|
Chapter 6 |
Troubleshooting.............................. |
23 |
|
6-1. |
.....................................................No picture |
23 |
|
6-2. |
Imaging problems........................................ |
24 |
|
6-3. |
Other problems............................................ |
25 |
|
●● |
|
26 |
|
|
Error Code Table........................................... |
||
Chapter 7 |
Reference......................................... |
27 |
|
7-1. |
................................How to Attach the Arm |
27 |
|
7-2. |
Connecting Multiple PCs............................ |
28 |
|
●● |
|
28 |
|
|
To switch among input signals....................... |
||
●● |
|
29 |
|
|
To set input signal selection........................... |
||
7-3. |
Making Use of USB (Universal Serial |
|
|
|
Bus)............................................................... |
30 |
|
●● |
|
30 |
|
|
Required system environment....................... |
||
●● |
|
|
|
|
Connection procedure (Setup of USB |
|
|
|
function)......................................................... |
30 |
|
7-4. |
Displaying Monitor Information.................. |
31 |
|
●● |
|
31 |
|
|
Displaying signal information.......................... |
||
●● |
|
31 |
|
|
Displaying Monitor Information....................... |
||
7-5. |
Specifications.............................................. |
32 |
|
7-6. |
Glossary....................................................... |
36 |
|
Appendix............................................................... |
|
37 |
|
.................................................................Trademark |
37 |
||
License...................................................................... |
|
37 |
|
Medical Standard.................................................... |
38 |
||
FCC Declaration of Conformity............................. |
39 |
||
EMC Information..................................................... |
40 |
||
LIMITED WARRANTY............................................. |
43 |
||
Recycling Information............................................ |
50 |
||
China Measures for RoHS Compliance in |
|
||
ChinaRoHS.............................................................. |
54 |
||
CONTENTS 5

Chapter 1 Introduction
Thank you very much for choosing an EIZO monochrome LCD monitor.
1-1. Features
•21.3 inches
•Applicable to the resolution of 2M pixels (Portrait : 1200 × 1600 dots (H × V))(GX240-CL)
•Applicable to the resolution of 3M pixels (Portrait : 1536 × 2048 dots (H × V))(GX340-CL)
•Uses high-contrast panel
Enables the display of sharp images.
-- 1400 : 1
•Applicable to DisplayPort (applicable to 8 bit or 10 bit, not applicable to audio signals)
•The Hybrid Gamma function automatically identifies the display area for the medical and other images on the same screen, and displays each set status.
*1 The identification may fail depending on the displayed image. The software to be used needs to be verified. For
validation, see “To set the highlight area in the image display area” (page 13).
•The RadiCS SelfQC function and the built-in Integrated Front Sensor allow the user to perform the calibration and Grayscale Check for the monitor independently.
See “Chapter 4 Controlling Monitor Quality” (page 18)
*2 When a panel protector is attached, the Integrated Front Sensor cannot be used.
•The quality control software “RadiCS LE (for Windows)” used to calibrate the monitor and to manage the history is included
See “1-2. EIZO LCD Utility Disk” (page 7)
•The software “ScreenManager Pro for Medical” to adjust the screen using the mouse and keyboard is included
See “1-2. EIZO LCD Utility Disk” (page 7)
•CAL Switch function for selecting an optimal calibration mode
See “To select the display mode (CAL Switch mode)” (page 11)
•Selectable DICOM (page 36) Part 14 complied screen.
•Frame Synchronous mode supported (29.5 to 30.5 Hz (GX340-CL), 59 to 61 Hz)
•Power saving function
This product is equipped with power saving function.
-- Power Consumption when main power switch is Off: 0 W
Equipped with main power switch.
Turning off the main power switch completely shuts off power supply to the monitor while the monitor is not used.
-- Presence Sensor
The sensor on the front side of the monitor detects the movement of a person. When a person moves away from the monitor, it shifts to the power saving mode automatically and does not display the images on the screen. Therefore, the function reduces the power consumption.
See “5-3. Setting the power saving mode when a person leaves the monitor” (page 22)
6Chapter 1 Introduction

•Long service life LED backlight LCD panel
•Built-in ambient light sensor
Built-in ambient light sensor measures the environmental illuminance in lux. Depending on the environment, the sensor sometimes indicates different values from those measured by a stand-alone illuminance meter.
The usage of this sensor requires the quality control software “RadiCS/RadiCS LE” and the measurement is always triggered by the user’s operation in the corresponding menu.
For further details about the measured value and how to execute the measurement, refer to the RadiCS/RadiCS LE User’s Manual (on the CD-ROM).
•HDCP (High-bandwidth Digital Content Protection) (DisplayPort only)
Attention
•Storing or using the monitor at a temperature of under 30˚C and a humidity of under 70% is recommended, or it may affect the measurement accuracy of the built-in sensor. Avoid storing or using the sensor where it may be exposed to direct sunlight.
1-2. EIZO LCD Utility Disk
An “EIZO LCD Utility Disk” (CD-ROM) is supplied with this product. The following table shows the disk contents and the overview of the software programs.
●●Disk contents and software overview
The disk includes application software programs for adjustment, and User’s Manual. Refer to Readme.txt file on the disk for software startup procedures or file access procedures.
Contents |
Overview |
Readme.txt file |
|
RadiCS LE (for Windows) |
Quality control software for calibrating the monitor and managing the |
|
calibration history. |
ScreenManager Pro for Medical (for |
Software for adjusting the screen using the mouse and keyboard. |
Windows) |
|
User’s Manual of this monitor (PDF file)
●●To use RadiCS LE/ScreenManager Pro for Medical
For the installation and use of “RadiCS LE/ScreenManager Pro for Medical”, refer to the respective User’s Manual on the disk.
When using this software, you will need to connect a PC to the monitor with the supplied USB cable. For more information, see “7-3. Making Use of USB (Universal Serial Bus)” (page 30).
Chapter 1 Introduction |
7 |
1-3. Basic Operations and Functions
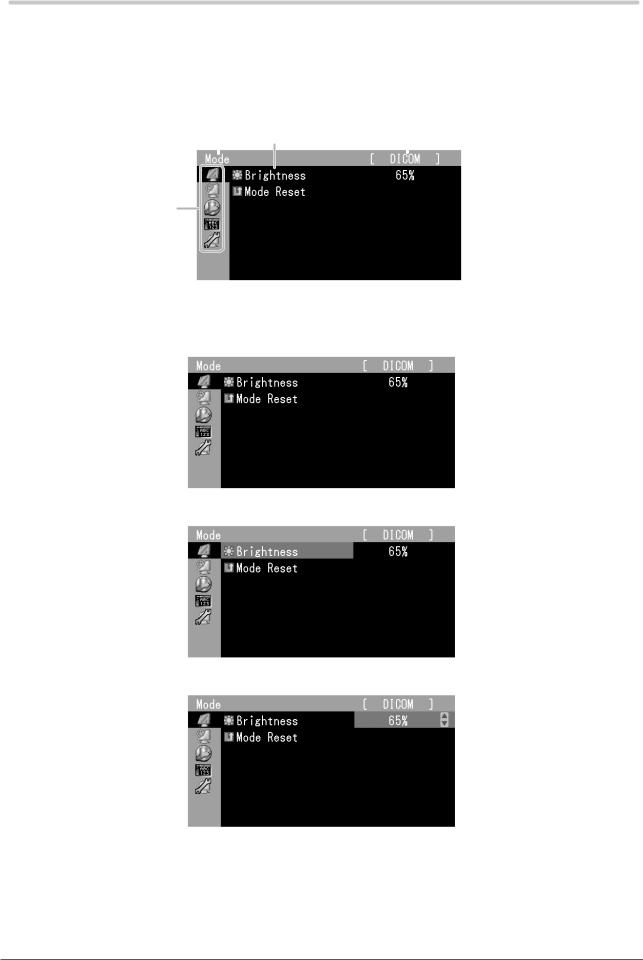
●●Basic Adjustment menu operations
1.Displaying Adjustment Menu
1. Press

 . The Adjustment menu appears.
Menu title |
Current mode |
|||
|
|
Item |
|
|
|
|
|
||
|
|
|||
|
|
|
|
|
|
|
|
|
|
 Setting
Menu
2.Adjusting/Setting
1. Choose a menu to adjust/set with ,
, , and then press

 .
.
2. Choose an item to adjust/set with ,
, , and then press

 .
.
3.Adjust/set the selected item with ,
, , and then press

 .
.
3.Quit
1.Press 

 a few times. The Adjustment menu finishes.
8Chapter 1 Introduction
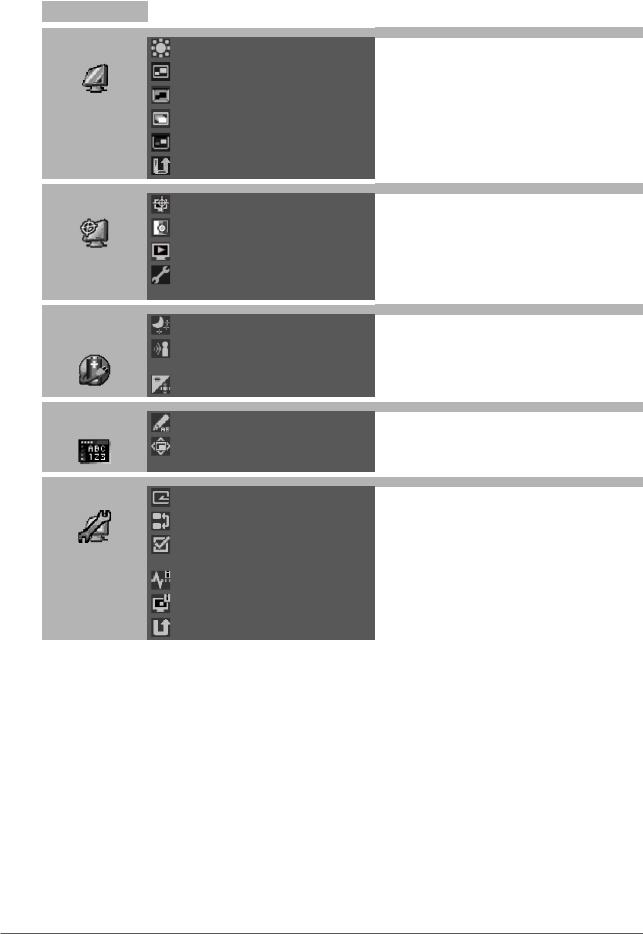
●● |
|
|
|
Functions |
|
|
|
The following table shows all the Adjustment menu’s adjustment and setting menus. |
|||
|
|
|
|
|
Main Menu |
Item |
Reference |
|
|
|
|
|
|
|
|
|
Mode |
Brightness |
“2-3. Adjusting Mode” (page 11) |
|
|
|
|
|
|
Gray Area |
|
|
|
|
|
|
|
Base Area |
|
|
|
|
|
|
|
Hybrid Assignment |
|
|
|
|
|
|
|
Highlight Area |
|
|
|
|
|
|
|
Mode Reset |
“3-9. Return To Default Setting” (page 17) |
|
|
|
|
|
|
|
|
|
RadiCS SelfQC |
|
|
|
SelfCalibration |
“4-1. Executing Calibration” (page 18) |
|
|
|
|
|
|
|
Grayscale Check |
“4-2. Checking Grayscale” (page 19) |
|
|
|
|
|
|
LEA |
“4-3. Acquiring Life Prediction Data” (page 19) |
|
|
|
|
|
|
Settings |
“4-4. Setting On/Off for Warning and QC |
|
|
|
History” (page 20) |
|
|
|
|
|
|
|
|
|
Power |
Power Save |
“5-1. Setting Power Save” (page 21) |
|
Manager |
|
|
|
Presence Sensor |
“5-3. Setting the power saving mode when a |
|
|
|
||
|
|
|
person leaves the monitor” (page 22) |
|
|
Power Indicator |
“5-2. Setting Power Indicator” (page 21) |
|
|
|
|
|
|
|
|
|
Menu Settings |
|
|
|
Language |
“3-3. Setting Language” (page 15) |
|
|
|
|
|
|
|
Menu Position |
“3-4. Setting Adjustment Menu Display” (page 15) |
|
|
|
|
|
|
|
|
|
Tools |
|
|
|
Input |
“To switch among input signals” (page 28) |
|
|
|
|
|
|
|
Input Selection |
“To set input signal selection” (page 29) |
|
|
|
|
|
|
Mode Preset |
“3-2. Enabling/Disabling Mode Selection” (page |
|
|
|
14) |
|
|
Signal Info |
“7-4. Displaying Monitor Information” (page 31) |
|
|
|
|
|
|
Monitor Info |
|
|
|
|
|
|
|
All Reset |
“3-9. Return To Default Setting” (page 17) |
|
|
|
|
Chapter 1 Introduction |
9 |

Chapter 2 Adjusting Screens
2-1. Compatible Resolutions
For details on compatible resolutions, refer to “Compatible Resolutions” in the Setup Manual.
2-2. Setting the Resolution
●●Windows 7
1.Right-click the mouse anywhere on the desktop except for icons.
2.From the displayed menu, click “Screen resolution”.
3.On the “Screen Resolution” dialog box, select the monitor.
4.Click “Resolution” to select the desired resolution.
5.Click the “OK” button.
6.When a confirmation dialog box is displayed, click “Keep changes”.
●●Windows Vista
1.Right-click the mouse anywhere on the desktop except for icons.
2.From the displayed menu, click “Personalize”.
3.On the “Personalization” window, click “Display Settings”.
4.On the “Display Settings” dialog box, select the “Monitor” tab and select desired resolution in the “Resolution” field.
5.Click the “OK” button.
6.When a confirmation dialog box is displayed, click “Yes”.
●●Windows XP
1.Right-click the mouse anywhere on the desktop except for icons.
2.From the displayed menu, click “Properties”.
3.When the “Display Properties” dialog box is displayed, click the “Settings” tab and select desired resolution for “Screen resolution” under “Display”.
4.Click the “OK” button to close the dialog box.
●●Mac OS X
1.Select “System Preferences” from the Apple menu.
2.When the “System Preferences” dialog box is displayed, click “Displays” for “Hardware”.
3.On the displayed dialog box, select the “Display” tab and select desired resolution in the “Resolutions” field.
4.Your selection will be reflected immediately. When you are satisfied with the selected resolution, close the window.
10 Chapter 2 Adjusting Screens
2-3. Adjusting Mode
●●To select the display mode (CAL Switch mode)
This function allows easy selection of a desired mode according to monitor application.
Display Modes
Mode |
Purpose |
1-DICOM |
Available to display in DICOM mode. |
2-CAL1 |
Displays the screen adjusted by calibration software. |
3-CAL2 |
|
4-Hybrid-γ |
Automatically identifies the display area for the medical and other images on the same |
|
screen, and displays each set status. |
The mode menu appears.
Procedure
1.Press 
 .
.
The mode menu appears at the bottom left of the screen.
2.The mode among the list is highlighted in turn each time 
 is pressed.
You can switch the mode with or
or while the mode menu is displayed.
→1-DICOM←→2-CAL1←→3-CAL2←→4-Hybrid-γ←
Note
• The Adjustment menu and the Mode menu cannot be displayed at the same time.
●●Adjustable settings in each mode
The adjustable settings depend on the mode. (You cannot select any non-adjustable or non-settable function.) √: Adjustable -: Not adjustable
Icon |
Function |
|
CAL Switch mode |
|
1-DICOM |
2-CAL1 |
4-Hybrid-γ |
||
|
|
3-CAL2 |
||
|
|
|
|
|
|
Brightness |
√ |
√ |
- |
|
|
|
|
|
|
Gray Area |
- |
- |
√ |
|
|
|
|
|
|
Base Area |
- |
- |
√ |
|
|
|
|
|
|
Hybrid Assignment |
- |
- |
√ |
|
|
|
|
|
|
Highlight Area |
- |
- |
√ |
|
|
|
|
|
|
Mode Reset |
√ |
√ |
√ |
|
|
|
|
|
Chapter 2 Adjusting Screens 11

●●To adjust brightness
The screen brightness is adjusted by changing the brightness of the backlight (light source from the LCD back panel).
Setting Range
0 to 100%
Procedure
1.Choose “Mode” from the Adjustment menu, and press

 .
.
2.Choose “Brightness” from “Mode”, and press

 .
.
3.Use or
or for adjustment.
4.Press

 to exit.
●●To set the mode in the monochrome display area
The mode suitable for the monochrome image display area can be set (see “To select the display mode (CAL Switch mode)” (page 11)).
Setting Range
DICOM, CAL1, CAL2
Procedure
1.Choose “Mode” from the Adjustment menu, and press

 .
.
2.Choose “Gray Area” from “Mode”, and press

 .
.
3.Use or
or for adjustment.
4.Press

 to exit.
Attention
•After the configuration in the display area, you cannot select any mode for which Mode Preset is “Off” (see “3-2. Enabling/Disabling Mode Selection” (page 14)).
Note
•The Brightness is the same as the value for the mode selected. To change the brightness, use the mode selected for adjustment.
12 Chapter 2 Adjusting Screens
●●To set the mode in the base display area
The mode suitable for the base display area can be set.
Setting Range
Base-L, Base-H
Procedure
1.Choose “Mode” from the Adjustment menu, and press

 .
.
2.Choose “Base Area” from “Mode”, and press

 .
.
3.Select “Base-L” or “Base-H” with or
or .
.
Mode |
Purpose |
Base-L |
Specifies the target brightness at 100 cd/m2. |
Base-H |
Specifies the target brightness to 170 cd/m2. |
4. Press

 to exit.
Attention
•After the configuration in the display area, you cannot select any mode for which Mode Preset is “Off” (see “3-2. Enabling/Disabling Mode Selection” (page 14)).
Note
•If the brightness value in the base display area is higher than the target brightness, the target brightness is applied for Base-L and Base-H.
●●To set the detection type in the image display area
You can set the detection type in the display area.
Procedure
1.Choose “Mode” from the Adjustment menu, and press

 .
.
2.Choose “Hybrid Assignment” from “Mode”, and press

 .
.
3.Select “Full Scan”, “Partial Scan”, or “Custom” with or
or .
.
Detection |
Purpose |
Type |
|
Full Scan |
Identifies the display area automatically. |
Partial Scan |
Identifies the selection area using software (Hybrid Gamma Manager) automatically. |
Custom |
Allows you to set the display area manually using software (Hybrid Gamma Manager). |
4. Press

 to exit.
Note
• For Hybrid Gamma Manager, contact your local dealer.
●●To set the highlight area in the image display area
You can set On/Off for the highlight area in the image display area.
Procedure
1.Choose “Mode” from the Adjustment menu, and press

 .
.
2.Choose “Highlight Area” from “Mode”, and press

 .
.
3.Select “On” or “Off” with or
or .
.
4.Press

 to exit.
Note
• You can set On/Off for the highlight area with .
.
Chapter 2 Adjusting Screens 13
Chapter 3 Setting Monitor
3-1. Setting Orientation
This function changes the display orientation of the image based on the operating environment.
Attention
•Refer to the User’s Manual of the graphics board.
•Setting is available even when the PC is not started up.
Procedure
1.Press  to turn off the monitor.
2.Holding 
 down, press
  for at least two seconds to turn on the monitor.
The “Optional Settings” menu appears.
3.Choose “Orientation” from “Optional Settings”, and press

 .
.
4.Choose “Landscape”, “Portrait (SW)”, or “Portrait (HW)” with or
or , and press

 .
.
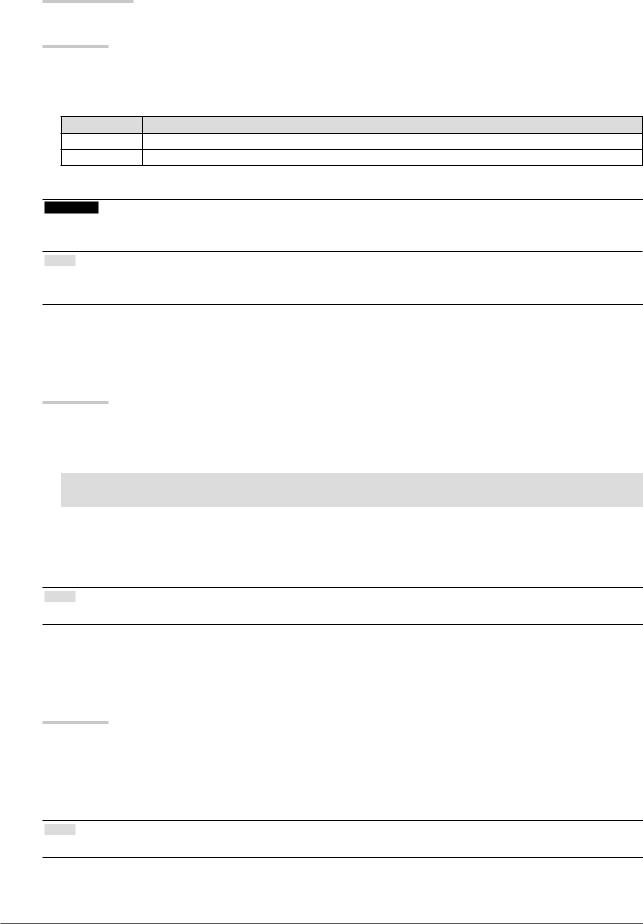
Monitor Orientation
Landscape
Select this option when using the Landscape orientation.
Portrait (SW)
Select this option when using the Portrait orientation. Graphics board utility software is used to rotate the display image 90 degrees.
Portrait (HW)
Select this option when using the Portrait orientation. Graphics board utility software is used to rotate the display image 90 degrees.
5.Select “Finish” with or
or .
.
6.Press

 .
.
The “Optional Settings” menu is closed.
Display Example
A |
A |
A |
A |
A |
A |
3-2. Enabling/Disabling Mode Selection
Allows you to select the specified modes only.
Use this function when all the display modes are not available or when keeping the display mode unchanged.
Procedure
1.Choose “Tools” from the Adjustment menu, and press

 .
.
2.Choose “Mode Preset” from “Tools”, and press

 .
.
3.Use or
or to select the mode to change, and press

 .
.
4.Select “On” or “Off” with or
or .
.
5.Press

 to exit.
Attention
• You cannot set all the modes disable. Set at least one mode to “On”.
14 Chapter 3 Setting Monitor

3-3. Setting Language
This function allows you to select a language for the Adjustment menu and messages.
Selectable languages
English/German/French/Spanish/Italian/Swedish/Japanese/Simplified Chinese/Traditional Chinese
Procedure
1.Choose “Menu Settings” from the Adjustment menu, and press

 .
.
2.Choose “Language” from “Menu Settings”, and press

 .
.
3.Select a language with or
or .
.
4.Press

 to exit.
3-4. Setting Adjustment Menu Display
●●Changing Adjustment Menu Display Position
You can change the display position of the Adjustment menu.
Procedure
1.Choose “Menu Settings” from the Adjustment menu, and press

 .
.
2.Choose “Menu Position” from “Menu Settings”, and press

 .
.
3.Choose the position with or
or .
.
4.Press

 to exit.
3-5. Setting the EIZO Logo Display
This function allows you to display, or not, the EIZO logo.
Procedure
1.Press  to turn off the monitor.
2.Holding 
 down, press
  for at least two seconds to turn on the monitor.
The “Optional Settings” menu appears.
3.Choose “Logo” from “Optional Settings”, and press

 .
.
4.Select “On” or “Off” with or
or , and press

 .
.
5.Select “Finish” with or
or .
.
6.Press

 .
.
The “Optional Settings” menu is closed.
Chapter 3 Setting Monitor 15

3-6. Locking Buttons
This function allows you to lock the adjusted/set status to prevent changing them.
Procedure
1.Press  to turn off the monitor.
2.Holding 
 down, press
  for at least two seconds to turn on the monitor.
The “Optional Settings” menu appears.
3.Choose “Key Lock” from “Optional Settings”, and press

 .
.
4.Choose “Off”, “Menu”, or “All” with or
or , and press

 .
.
Settings |
Buttons that can be locked |
Off |
None (All buttons are enabled) |
(Default setting) |
|
Menu |
button |
All |
All buttons excluding |
5.Select “Finish” with or
or .
.
6.Press

 .
.
The “Optional Settings” menu is closed.
3-7. Enabling/Disabling DDC Communication
This function allows you to enable/disable the DDC communication. Normally, turn it on during use. (This is different from the DDC/CI communication.)
Procedure
1.Press  to turn off the monitor.
2.Holding 
 down, press
  for at least two seconds to turn on the monitor.
The “Optional Settings” menu appears.
3.Choose “DDC” from “Optional Settings”, and press

 .
.
4.Select “On” or “Off” with or
or , and press

 .
.
5.Select “Finish” with or
or .
.
6.Press

 .
.
The “Optional Settings” menu is closed.
3-8. Enabling/Disabling DC5V Output
This function allows you to enable/disable the DC5V output. Normally, turn it off during use.
Procedure
1.Press  to turn off the monitor.
2.Holding 
 down, press
  for at least two seconds to turn on the monitor.
The “Optional Settings” menu appears.
3.Choose “DC5V Output” from “Optional Settings”, and press

 .
.
4.Select “On” or “Off” with or
or , and press

 .
.
5.Select “Finish” with or
or .
.
6.Press

 .
.
The “Optional Settings” menu is closed.
16 Chapter 3 Setting Monitor

3-9. Return To Default Setting
There are two different Resets: Mode Reset for only resetting the mode adjustments to the default settings and All Reset for resetting all settings to the defaults.
Attention
• After resetting, you cannot undo the operation.
Note
• Regarding the default setting, see “Main Default Settings” (page 34).
●●To reset the mode adjustments
This function only resets the mode adjustment value for the currently selected mode to the default settings.
Procedure
1.Choose “Mode” from the Adjustment menu, and press

 .
.
2.Choose “Mode Reset” from “Mode”, and press

 .
.
3.Select “Execute” with or
or .
.
4.Press

 .
.
The mode adjustments revert to the default settings.
●●To reset all settings
This function resets all adjustments to the default settings (except the “Input” and “Optional Settings” menus).
Procedure
1.Choose “Tools” from the Adjustment menu, and press

 .
.
2.Choose “All Reset” from “Tools”, and press

 .
.
3.Select “Execute” with or
or .
.
4.Press

 .
.
All settings excluding the “Input” and “Optional Settings” menus are reset to the default settings.
Chapter 3 Setting Monitor 17
Loading...