


 Loading...
User’s Manual
Color LCD Monitor
Important
Please read PRECAUTIONS, this User’s Manual, and the Setup Guide (separate volume) carefully to familiarize yourself with safe and effective usage.
•Please refer to the Setup Guide for basic information ranging from connection of the monitor to a PC to using the monitor.
•The latest User’s Manual is available for download from our web site:
http://www.eizoglobal.com

Location of Caution Statement
This product has been adjusted specifically for use in the region to which it was originally shipped. If operated outside this region, the product may not perform as stated in the specifications.
No part of this manual may be reproduced, stored in a retrieval system, or transmitted, in any form or by any means, electronic, mechanical, or otherwise, without the prior written permission of EIZO Corporation.
EIZO Corporation is under no obligation to hold any submitted material or information confidential unless prior arrangements are made pursuant to EIZO Corporation’s receipt of said information. Although every effort has been made to ensure that this manual provides up-to-date information, please note that EIZO monitor specifications are subject to change without notice.
- 2 -

Notice for this monitor
Notice for this monitor
This product is suited to general purposes like creating documents, viewing multimedia content.
This product has been adjusted specifically for use in the region to which it was originally shipped. If the product is used outside the region, it may not operate as specified in the specifications.
This product may not be covered by warranty for uses other than those described in this manual.
The specifications noted in this manual are only applicable when the following are used:
·Power cords provided with the product
·Signal cables specified by us
Only use optional products manufactured or specified by us with this product.
It takes about 30 minutes for the performance of electrical parts to stabilize. Please wait 30 minutes or more after the monitor power has been turned on, and then adjust the monitor.
Monitors should be set to a lower brightness to reduce changes in luminosity caused by long-term use and maintain a stable display.
When the screen image is changed after displaying the same image for extended periods of time, an afterimage may appear. Use the screen saver or power save function to avoid displaying the same image for extended periods of time.
If the monitor displays continuously over a long period of time, dark smudges or burn-in may appear. To maximize the life of the monitor, we recommend the monitor be turned off periodically.
Periodic cleaning is recommended to keep the monitor looking new and to prolong its operation lifetime (refer to “Cleaning” (page 4)).
The LCD panel is manufactured using high-precision technology. Although, missing pixels or lit pixels may appear on the LCD panel, this is not a malfunction. Percentage of effective dots: 99.9994% or higher.
The backlight of the LCD panel has a fixed lifetime. When the screen becomes dark or begins to flicker, please contact your local EIZO representative.
- 3 -
Notice for this monitor
Do not press on the panel or edge of the frame strongly, as this may result in display malfunctions, such as interference patterns, etc. If pressure is continually applied to the panel, it may deteriorate or damage your panel. (If the pressure marks remain on the panel, leave the monitor with a black or white screen. The symptom may disappear.)
Do not scratch or press on the panel with any sharp objects, as this may result in damage to the panel. Do not attempt to brush with tissues as this may scratch the panel.
When the monitor is cold and brought into a room or the room temperature goes up quickly, dew condensation may occur on the interior and exterior surfaces of the monitor. In that case, do not turn the monitor on. Instead wait until the dew condensation disappears, otherwise it may cause some damage to the monitor.
Cleaning
Attention
•Chemicals such as alcohol and antiseptic solution may cause gloss variation, tarnishing, and fading of the cabinet or panel, and also quality deterioration of the image.
•Never use any thinner, benzene, wax, and abrasive cleaner, which may damage the cabinet or panel.
Note
• The optional ScreenCleaner is recommended for cleaning the cabinet and panel surface.
The stains on the cabinet and panel surface can be removed by moistening part of a soft cloth with water.
To use the monitor comfortably
•An excessively dark or bright screen may affect your eyes. Adjust the brightness of the monitor according to the environmental conditions.
•Staring at the monitor for a long time tires your eyes. Take a 10-minute rest every hour.
-4 -
CONTENTS
CONTENTS
Notice for this monitor................................................................................. |
3 |
||
.................................................................................................................Cleaning |
|
4 |
|
To use the monitor comfortably.......................................................................... |
4 |
||
CONTENTS.................................................................................................... |
|
5 |
|
Chapter 1 |
..............................................................................Introduction |
7 |
|
1-1. |
......................................................................................................Features |
7 |
|
1-2. |
Controls and Functions............................................................................ |
9 |
|
●● |
|
9 |
|
|
Front............................................................................................................. |
||
●● |
|
10 |
|
|
Rear........................................................................................................... |
||
1-3. |
Supported Resolutions........................................................................... |
11 |
|
●● |
|
11 |
|
|
EV2450...................................................................................................... |
||
●● |
|
12 |
|
|
EV2455...................................................................................................... |
||
1-4. |
Setting the Resolution............................................................................ |
13 |
|
●● |
|
13 |
|
|
Windows 8.1 / Windows 8 / Windows 7..................................................... |
||
●● |
|
13 |
|
|
Windows Vista........................................................................................... |
||
●● |
|
13 |
|
|
Mac OS X................................................................................................... |
||
Chapter 2 |
Basic Adjustment/Setting..................................................... |
14 |
|
2-1. |
.......................................................................Switch Operation Method |
14 |
|
2-2. |
Switching Input Signals.......................................................................... |
15 |
|
2-3. |
Switching Display Modes (Color Modes).............................................. |
16 |
|
●● |
|
16 |
|
|
Display Modes........................................................................................... |
||
2-4. |
Conserving Energy................................................................................. |
17 |
|
2-5. |
Adjusting Brightness.............................................................................. |
20 |
|
2-6. |
Adjusting Volume.................................................................................... |
21 |
|
Chapter 3 |
Advanced Adjustment/Setting.............................................. |
22 |
|
3-1. |
....................................................Basic Operation of the Setting menu |
22 |
|
3-2. |
Setting Menu Functions.......................................................................... |
23 |
|
●● |
|
23 |
|
|
Color Adjustment....................................................................................... |
||
●● |
|
26 |
|
|
Signal Settings........................................................................................... |
||
●● |
|
31 |
|
|
Preference Settings................................................................................... |
||
●● |
|
33 |
|
|
Language................................................................................................... |
||
●● |
|
33 |
|
|
Information................................................................................................. |
||
Chapter 4 |
Administrator Settings .......................................................... |
34 |
|
4-1. |
....................Basic Operation of the “Administrator Settings” Menu |
34 |
|
4-2. |
Functions of the “Administrator Settings” Menu................................ |
35 |
|
Chapter 5 |
Troubleshooting ..................................................................... |
37 |
|
5-1. |
.................................................................................................No picture |
37 |
|
5-2. |
Imaging problems (for both digital and analog).................................. |
39 |
|
5-3. |
Imaging problems (for analog only)..................................................... |
40 |
|
5-4. |
Other problems........................................................................................ |
41 |
|
Chapter 6 |
Reference ................................................................................ |
42 |
|
6-1. |
...................................................................Attaching the Optional Arm |
42 |
|
6-2. |
Detaching/Attaching Stand Base......................................................... |
43 |
|
6-3. |
Attaching/Detaching the Cable Holder................................................. |
47 |
|
6-4. |
Connecting Multiple PCs....................................................................... |
49 |
|
6-5. |
Making Use of USB (Universal Serial Bus).......................................... |
50 |
|
●● |
|
50 |
|
|
Required System Environment.................................................................. |
||
●● |
|
50 |
|
|
Connection Procedure (Setup of USB Function)....................................... |
||
6-6. |
Specifications.......................................................................................... |
51 |
|
●● |
|
55 |
|
|
Outside Dimensions................................................................................... |
||
●● |
|
57 |
|
|
Main Default Settings................................................................................. |
||
●● |
|
57 |
|
|
Accessories............................................................................................... |
||
6-7. |
Preset Timings........................................................................................ |
58 |
|
Chapter 7 |
Glossary .................................................................................. |
60 |
|
Appendix |
..................................................................................................... |
63 |
|
|
|||
............................................................................................................Trademark |
63 |
||
License / Copyright............................................................................................ |
64 |
||
- 5 -

CONTENTS
ENERGY STAR.................................................................................................... |
64 |
TCO...................................................................................................................... |
64 |
FCC Declaration of Conformity......................................................................... |
67 |
Hinweise zur Auswahl des richtigen Schwenkarms für Ihren Monitor....... |
69 |
Hinweis zur Ergonomie :................................................................................... |
69 |
LIMITED WARRANTY......................................................................................... |
70 |
Recycling Information........................................................................................ |
79 |
China Measures for RoHS Compliance in ChinaRoHS.................................. |
84 |
- 6 -
Chapter 1 Introduction
Chapter 1 Introduction
Thank you very much for choosing an EIZO color LCD monitor.
1-1. Features
•23.8″ wide format LCD (EV2450)
•24.1″ wide format LCD (EV2455)
•Supports a resolution of 1920 × 1080 (EV2450)
•Supports a resolution of 1920 × 1200 (EV2455)
•IPS panel with 89˚ horizontal and vertical viewing angles
•Supports four digital signal input interfaces (DisplayPort (HDCP) × 1, HDMI TypeA (HDCP) × 1, DVI-D (HDCP) × 1, and D-Sub mini 15-pin × 1)
-- DisplayPort (8-bit support) *1
The DisplayPort input receives both image signals and audio signals via a single DisplayPort cable.
*1 When transmitting an audio signal using the DisplayPort cable, the graphics board must support audio output. See “6-6. Specifications” (page 51).
-- HDMI
Supports PC signals via HDMI input.
The HDMI input receives both image signals and audio signals via a single HDMI cable.
•The Color Mode function allows the user to select the display mode optimum to the displayed image.
The Paper mode reproduces a printed paper effect on the monitor. In Paper mode, the amount of blue light emitted from the screen is reduced by changing the color tone and controlling the brightness.
See “2-3. Switching Display Modes (Color Modes)” (page 16).
•Power saving functions
Suppressing power consumption*2 reduces carbon dioxide emissions. This product is equipped with power saving functions.
-- 0 W power consumption when the main power is off
Equipped with a main power switch.
When not using the monitor, you can turn off the main power supply so that the power is cut completely.
-- Auto EcoView
The ambient light sensor on the front of the monitor detects the ambient brightness to automatically adjust the screen brightness to a comfortable level. Excessively high brightness may increase power consumption and cause unwanted environmental effects. It may also lead to eye fatigue. The range of automatic adjustment can be configured to personal preference.
See “Auto EcoView” (page 18).
-- EcoView Optimizer 2
The monitor automatically adjusts the screen brightness according to the white level of the input signal. This function can reduce power consumption while maintaining the brightness specified by the input signal.
See “EcoView Optimizer 2” (page 18).
- 7 -
Chapter 1 Introduction
-- EcoView Sense
The sensor on the front of the monitor detects user movement. When the user moves away from the monitor, the monitor shifts to power saving mode automatically and does not display images on the screen in order to reduce power consumption. The sensitivity of the sensor and time until power saving mode is activated can be set according to the monitor usage environment and movement of the user.
See “EcoView Sense” (page 19). *2 Reference values:
EV2450
Maximum power consumption: 47 W (when a USB device is connected, speaker working), standard power consumption: 12 W (brightness 120 cd/m2, when no USB device is connected, speaker not working, at default settings)
EV2455
Maximum power consumption: 49 W (when a USB device is connected, speaker working), standard power consumption: 13 W (brightness 120 cd/m2, when no USB device is connected, speaker not working, at default settings)
•Equipped with a USB Hub function that supports USB 3.0
Achieves high-speed data transfers of up to 5 Gbps, which enables transfers of large amounts of data to and from USB-connected devices in a short amount time. See “6-5. Making Use of USB (Universal Serial Bus)” (page 50).
•High degree of flexibility for installation
-- Stand with wide range of movement. The monitor can be adjusted to a position that provides a comfortable and less tiring work environment.
Tilt: 35˚ up/5˚ down, swivel: 344˚, vertical rotation: 90˚ left/90˚ right, adjustable height: 114.7 mm (tilt: 35˚) / 140 mm (EV2450), 131 mm (EV2455) (tilt: 0˚)
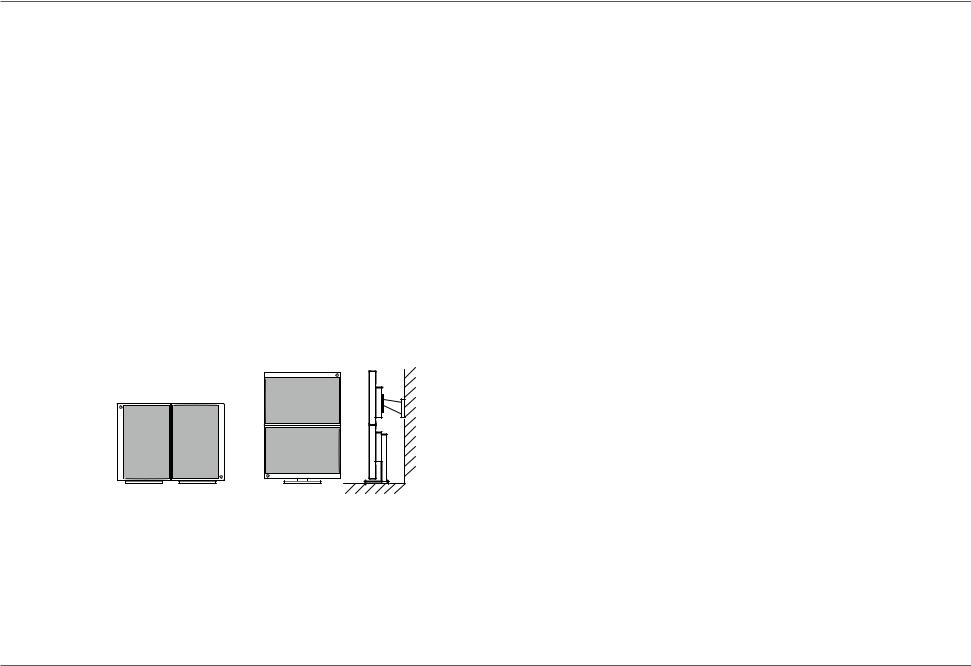
-- A thin bezel provides a virtually seamless viewing experience in multiple monitor environments. Mounting the monitor on an arm allows the screen to be
installed rotated by 180˚ (flipped vertically).
Installation example
• The orientation of the Setting menu can be changed when using the monitor screen in the portrait display position (see “Menu Rotation” (page 31)).
•Displays HDCP (High-bandwidth Digital Protection) *3 protected contents.
*3 Supports HDCP Version 1.x
•Supports the “ScreenManager Pro” software for adjusting the screen using the mouse and keyboard
This software can be downloaded from our web site (http://www.eizoglobal.com).
•Supports the “EIZO Monitor Configurator” software for creating monitor configuration files
When installing multiple units of this monitor, this software allows users to apply a single configuration file to all monitors at the same time. This increases the efficiency of monitor installation work by eliminating the need for configuring each monitor individually.
For more information, refer to our web site (http://www.eizoglobal.com).
-8 -
Chapter 1 Introduction
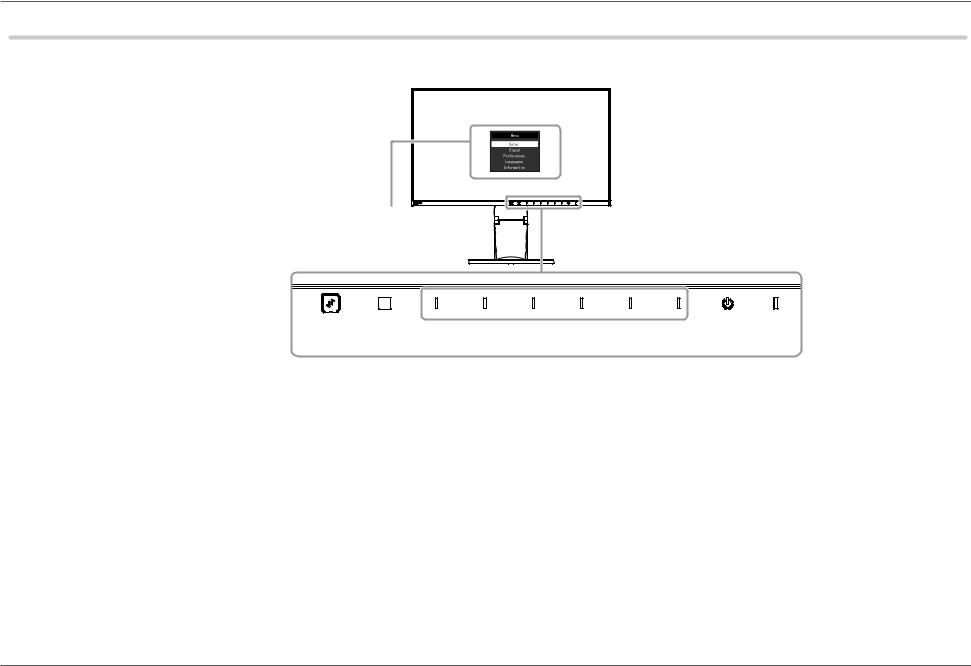
1-2. Controls and Functions
●●Front
Setting menu*1
|
|
|
|
|
|
|
|
|
|
|
|
|
|
|
|
|
|
|
|
|
|
|
|
|
|
|
|
|
|
|
|
|
|
1 |
|
2 |
3 |
4 |
5 |
|
|||||||
|
|
|
|
|
|
|
|
|
|
|
|||||
1. |
EcoView Sense sensor |
Detects user movement in front of the monitor (EcoView Sense function (page 19)). |
|
|
|
|
|
||||||||
2. |
Ambient light sensor |
Detects ambient brightness (Auto EcoView function (page 18)). |
|
|
|
|
|
||||||||
3. |
Operation switches |
Displays menus. Operate the switches according to the operation guide. |
|
|
|
|
|
||||||||
4. |
Power switch |
Turns the power on or off. |
|
|
|
|
|
|
|
||||||
5. |
Power indicator |
Indicates the monitor’s operation status. |
|
|
|
|
|
|
|
||||||
|
|
White: Screen display |
|
|
|
|
|
|
|
|
|
||||
|
|
Orange: Power saving mode |
|
|
|
|
|
|
|
||||||
|
|
OFF: Main power / power off |
|
|
|
|
|
|
|
||||||
*1 |
For details on usage, see “3-1. |
Basic Operation of the Setting menu” (page 22). |
|
|
|
|
|
|
|
||||||
- 9 -

Chapter 1 Introduction
●●Rear
|
9 |
14 |
16 |
|
15 |

 10
10
11


 12
12

 13
13
17 |
6 |
7 |
8 |
Turns the main power on or off.
Connects the power cord.
The following connectors are available on the monitor rear in order of left to right.
D-Sub mini 15-pin connector
DisplayPort connector
HDMI connector
DVI connector
This handle is used for transportation
Connects to a peripheral USB device.
Connects to the USB cable when using software that needs a USB connection, or when using the USB Hub function.
Connects to headphones.
Connects to a stereo mini jack cable.
Complies with Kensington’s MicroSaver security system.
Outputs audio.
Adjusts the height and angle (tilt, swivel, and rotation) of the monitor.
Holds the monitor cables.
*2 An optional arm (or optional stand) can be attached by removing the stand section (see “6-1. Attaching the Optional Arm” (page 42)). *3 For the cable holder attachment procedure, see “6-3. Attaching/Detaching the Cable Holder” (page 47).
- 10 -
Chapter 1 Introduction
1-3. Supported Resolutions
The monitor supports the following resolutions.
●●EV2450
Resolution |
Applicable |
Vertical Scan |
Scan Type |
DisplayPort |
HDMI |
DVI |
D-Sub |
|||
Signals |
Frequency |
|||||||||
|
|
|
|
|
|
|
||||
640 |
× 480 |
VGA/CEA-861 |
59.94 |
Hz |
Progressive |
√ |
√ |
√ |
√ |
|
640 |
× 480 |
CEA-861 |
60 Hz |
Progressive |
√ |
√ |
- |
√ |
||
640 |
× 480 |
VESA |
72.81 Hz / 75 Hz |
Progressive |
- |
- |
- |
√ |
||
720 |
× 400 |
VGA TEXT |
70.09 |
Hz |
Progressive |
√ |
√ |
√ |
√ |
|
720 × 480 (4:3) |
CEA-861 |
59.94 Hz / 60 Hz |
Progressive |
√ |
√ |
- |
- |
|||
720 × 480 (16:9) |
CEA-861 |
59.94 Hz / 60 Hz |
Progressive |
√ |
√ |
- |
- |
|||
720 (1440) × 480 (4:3) |
CEA-861 |
59.94 Hz / 60 Hz |
Interlaced |
- |
√ |
- |
- |
|||
720 (1440) × 480 (16:9) |
CEA-861 |
59.94 Hz / 60 Hz |
Interlaced |
- |
√ |
- |
- |
|||
720 × 576 (4:3) |
CEA-861 |
50 Hz |
Progressive |
- |
√ |
- |
- |
|||
720 × 576 (16:9) |
CEA-861 |
50 Hz |
Progressive |
- |
√ |
- |
- |
|||
720 (1440) × 576 (4:3) |
CEA-861 |
50 Hz |
Interlaced |
- |
√ |
- |
- |
|||
720 (1440) × 576 (16:9) |
CEA-861 |
50 Hz |
Interlaced |
- |
√ |
- |
- |
|||
800 |
× 600 |
VESA |
56.25 Hz / 72.19 Hz / 75 Hz |
Progressive |
- |
- |
- |
√ |
||
800 |
× 600 |
VESA |
60.32 |
Hz |
Progressive |
√ |
√ |
√ |
√ |
|
1024 × 768 |
VESA |
60 Hz |
Progressive |
√ |
√ |
√ |
√ |
|||
1024 × 768 |
VESA |
70.07 Hz / 75.03 Hz |
Progressive |
- |
- |
- |
√ |
|||
1280 × 720 |
CEA-861 |
50 Hz |
Progressive |
- |
√ |
- |
- |
|||
1280 × 720 |
CEA-861 |
59.94 |
Hz |
Progressive |
√ |
√ |
- |
- |
||
1280 × 720 |
CEA-861 |
60 Hz |
Progressive |
√ |
√ |
√ |
√ |
|||
1280 × 800 |
VESA CVT |
59.81 |
Hz |
Progressive |
√ |
√ |
√ |
√ |
||
1280 |
× 1024 |
VESA |
60.02 |
Hz |
Progressive |
√ |
√ |
√ |
√ |
|
1280 |
× 1024 |
VESA |
75.03 |
Hz |
Progressive |
- |
- |
- |
√ |
|
1600 × 900 |
VESA RB |
60 Hz |
Progressive |
√ |
√ |
√ |
√ |
|||
1680 |
× 1050 |
VESA CVT |
59.95 |
Hz |
Progressive |
√ |
√ |
√ |
√ |
|
1680 |
× 1050 |
VESA CVT RB |
59.88 Hz |
Progressive |
√ |
√ |
√ |
√ |
||
1920 × 1080*1 |
CEA-861 |
50 Hz / 59.94 |
Hz / 60 Hz |
Interlaced |
- |
√ |
- |
- |
||
1920 × 1080*1 |
CEA-861 |
50 Hz |
Progressive |
- |
√ |
- |
- |
|||
1920 × 1080*1 |
CEA-861 |
59.94 |
Hz |
Progressive |
√ |
√ |
- |
- |
||
1920 × 1080*1 |
CEA-861 |
60 Hz |
Progressive |
√ |
√ |
√ |
√ |
|||
*1 Recommended resolution
- 11 -

|
|
|
|
|
|
|
|
|
|
Chapter 1 Introduction |
|
|
|
|
|
|
|
|
|
|
|
|
|
EV2455 |
|
|
|
|
|
|
|
|
|
|
|
●● |
|
|
|
|
|
|
|
|
|
|
|
|
Resolution |
Applicable |
Vertical Scan |
Scan Type |
DisplayPort |
HDMI |
DVI |
|
D-Sub |
||
|
Signals |
Frequency |
|
||||||||
|
|
|
|
|
|
|
|
|
|||
|
640 |
× 480 |
VGA/CEA-861 |
59.94 |
Hz |
Progressive |
√ |
√ |
√ |
|
√ |
|
640 |
× 480 |
CEA-861 |
60 Hz |
Progressive |
√ |
√ |
- |
|
√ |
|
|
640 |
× 480 |
VESA |
72.81 Hz / 75 Hz |
Progressive |
- |
- |
- |
|
√ |
|
|
720 |
× 400 |
VGA TEXT |
70.09 |
Hz |
Progressive |
√ |
√ |
√ |
|
√ |
|
720 × 480 (4:3) |
CEA-861 |
59.94 Hz / 60 Hz |
Progressive |
√ |
√ |
- |
|
- |
||
|
720 × 480 (16:9) |
CEA-861 |
59.94 Hz / 60 Hz |
Progressive |
√ |
√ |
- |
|
- |
||
|
720 (1440) × 480 (4:3) |
CEA-861 |
59.94 Hz / 60 Hz |
Interlaced |
- |
√ |
- |
|
- |
||
|
720 (1440) × 480 (16:9) |
CEA-861 |
59.94 Hz / 60 Hz |
Interlaced |
- |
√ |
- |
|
- |
||
|
720 × 576 (4:3) |
CEA-861 |
50 Hz |
Progressive |
- |
√ |
- |
|
- |
||
|
720 × 576 (16:9) |
CEA-861 |
50 Hz |
Progressive |
- |
√ |
- |
|
- |
||
|
720 (1440) × 576 (4:3) |
CEA-861 |
50 Hz |
Interlaced |
- |
√ |
- |
|
- |
||
|
720 (1440) × 576 (16:9) |
CEA-861 |
50 Hz |
Interlaced |
- |
√ |
- |
|
- |
||
|
800 |
× 600 |
VESA |
56.25 Hz / 72.19 Hz / 75 Hz |
Progressive |
- |
- |
- |
|
√ |
|
|
800 |
× 600 |
VESA |
60.32 |
Hz |
Progressive |
√ |
√ |
√ |
|
√ |
|
1024 × 768 |
VESA |
60 Hz |
Progressive |
√ |
√ |
√ |
|
√ |
||
|
1024 × 768 |
VESA |
70.07 Hz / 75.03 Hz |
Progressive |
- |
- |
- |
|
√ |
||
|
1280 × 720 |
CEA-861 |
50 Hz |
Progressive |
- |
√ |
- |
|
- |
||
|
1280 × 720 |
CEA-861 |
59.94 |
Hz |
Progressive |
√ |
√ |
- |
|
- |
|
|
1280 × 720 |
CEA-861 |
60 Hz |
Progressive |
√ |
√ |
√ |
|
√ |
||
|
1280 × 800 |
VESA CVT |
59.81 |
Hz |
Progressive |
√ |
√ |
√ |
|
√ |
|
|
1280 |
× 1024 |
VESA |
60.02 |
Hz |
Progressive |
√ |
√ |
√ |
|
√ |
|
1280 |
× 1024 |
VESA |
75.03 |
Hz |
Progressive |
- |
- |
- |
|
√ |
|
1600 × 900 |
VESA RB |
60 Hz |
Progressive |
√ |
√ |
√ |
|
√ |
||
|
1600 |
× 1200 |
VESA |
60 Hz |
Progressive |
√ |
√ |
√ |
|
√ |
|
|
1680 |
× 1050 |
VESA CVT |
59.95 |
Hz |
Progressive |
√ |
√ |
√ |
|
√ |
|
1680 |
× 1050 |
VESA CVT RB |
59.88 Hz |
Progressive |
√ |
√ |
√ |
|
√ |
|
|
1920 |
× 1080 |
CEA-861 |
50 Hz / 59.94 |
Hz / 60 Hz |
Interlaced |
- |
√ |
- |
|
- |
|
1920 |
× 1080 |
CEA-861 |
50 Hz |
Progressive |
- |
√ |
- |
|
- |
|
|
1920 |
× 1080 |
CEA-861 |
59.94 |
Hz |
Progressive |
√ |
√ |
- |
|
- |
|
1920 |
× 1080 |
CEA-861 |
60 Hz |
Progressive |
√ |
√ |
√ |
|
√ |
|
|
1920 × 1200*1 |
VESA CVT |
59.89 |
Hz |
Progressive |
- |
- |
- |
|
√ |
|
|
1920 × 1200*1 |
VESA CVT RB |
59.95 Hz |
Progressive |
√ |
√ |
√ |
|
√ |
||
|
*1 Recommended resolution |
|
|
|
|
|
|
|
|
|
|
- 12 -

Chapter 1 Introduction
1-4. Setting the Resolution
If the resolution is incorrect after connecting the monitor to a PC or if you want to change the resolution, follow the procedure below.
●●Windows 8.1 / Windows 8 / Windows 7
1.For Windows 8.1 / Windows 8, click the “Desktop” tile on the Start Screen to display the desktop.
2.Right-click the mouse anywhere on the desktop except for icons.
3.From the displayed menu, click “Screen resolution”.
4.On the “Screen Resolution” dialog box, select the monitor.
5.Click “Resolution” to select the desired resolution.
6.Click the “OK” button.
7.When a confirmation dialog box is displayed, click “Keep changes”.
●●Windows Vista
1.Right-click the mouse anywhere on the desktop except for icons.
2.From the displayed menu, click “Personalize”.
3.On the “Personalization” window, click “Display Settings”.
4.On the “Display Settings” dialog box, select the “Monitor” tab and select the desired resolution in the “Resolution” field.
5.Click the “OK” button.
6.When a confirmation dialog box is displayed, click “Yes”.
●●Mac OS X
1.Select “System Preferences” from the Apple menu.
2.When the “System Preferences” dialog box is displayed, click “Displays” for “Hardware”.
3.On the displayed dialog box, select the “Display” tab and select the desired resolution in the “Resolutions” field.
4.Your selection will be reflected immediately. If you are satisfied with the selected resolution, close the window.
- 13 -
Chapter 2 Basic Adjustment/Setting
Chapter 2 Basic Adjustment/Setting
This monitor enables users to change the brightness according to personal preference or to suit the usage environment and reduce power consumption to conserve energy.
This chapter describes the basic functions that can be adjusted and set using the switches on the front of the monitor.
For advanced adjustment and setting procedures using the Setting menu, see “Chapter 3 Advanced Adjustment/Setting” (page 22).
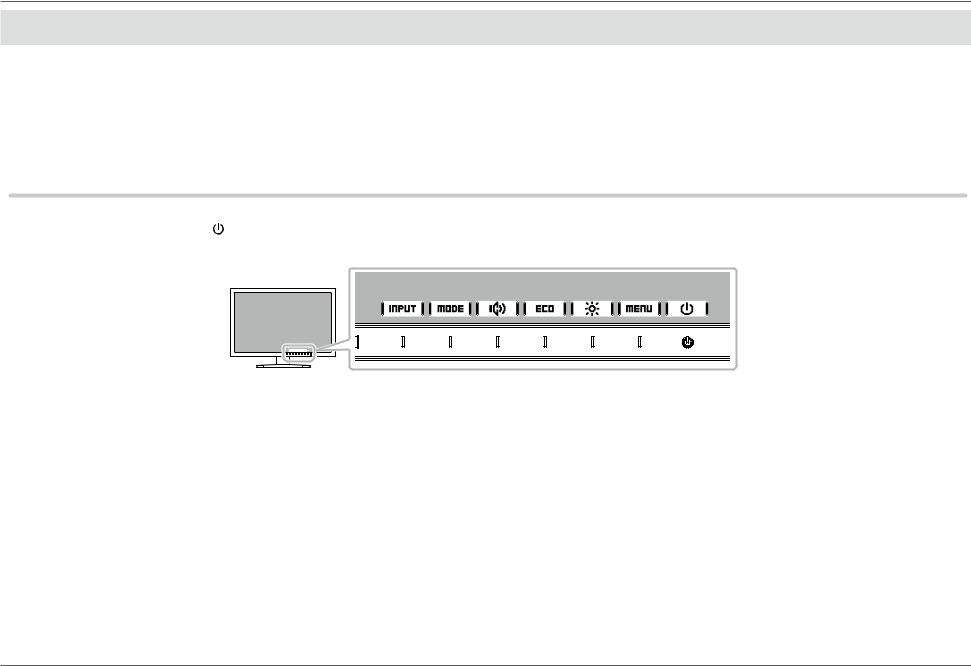
2-1. Switch Operation Method
1. Displaying the operation guide
1. Touch any switch (except ).
The operation guide appears on the screen.
2.Adjusting/setting
1.Touch a switch for adjustment/setting.
The Adjustment/Setting menu appears.
(A submenu may also be displayed. In this case, select the item for adjustment/setting using 
 and select
  .)
.)
2.Perform adjustment/setting with the switches and select  to accept the changes.
3.Exiting
1.Select  or
or  to exit the menu.
2.When no menu is displayed, the operation guide will automatically disappear after a few seconds if no switches are operated.
-14 -
Chapter 2 Basic Adjustment/Setting
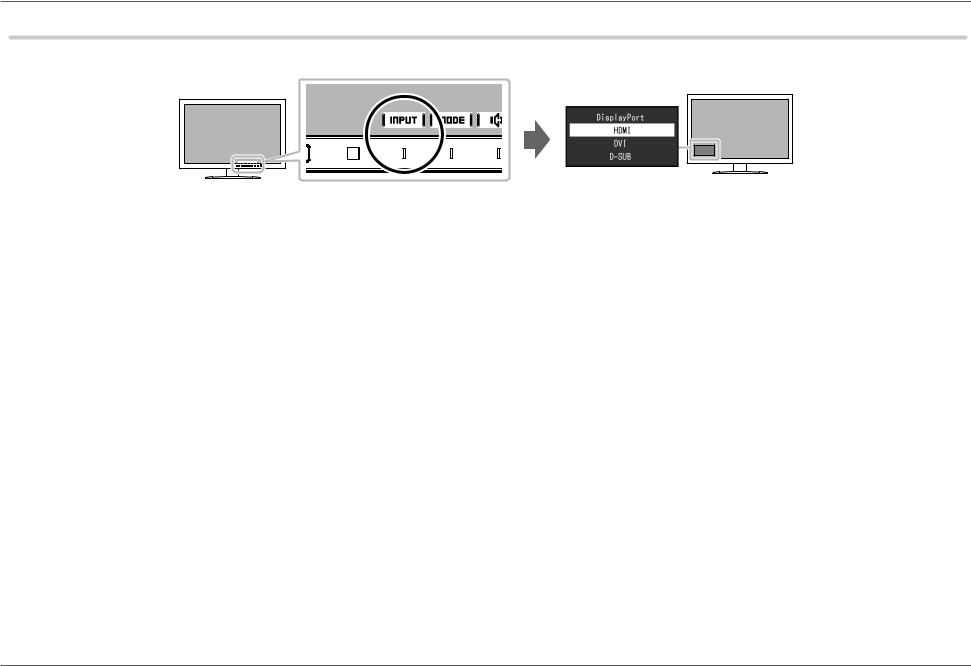
2-2. Switching Input Signals
When a monitor has multiple signal inputs, the signal to display on-screen can be changed.
- 15 -

Chapter 2 Basic Adjustment/Setting
2-3. Switching Display Modes (Color Modes)
This product is preinstalled with color modes for various display purposes.
Switch the mode according to the purpose and content for display. This allows the monitor to display images in a manner appropriate to the display content.
●● |
|
|
|
|
|
|
|
|
|
|
|
|
|
|
|
|
|
|
|
|
|
|
|
|
|
|
|
||
|
|
|
|
|
|
|
|
|
|
|
|
|
||
|
|
|
|
|
|
|
|
|
|
|
|
|
||
Display Modes |
|
|
|
|
|
|
|
|
|
|
|
|
|
|
|
|
|
|
|
|
|
|
|
|
|
|
|
||
|
Color Mode |
|
|
|
|
|
|
|
|
Purpose |
||||
|
User1 |
Select either of these modes to set a user-defined display mode. |
||||||||||||
|
User2 |
|
|
|
|
|
|
|
|
|
|
|
|
|
|
sRGB |
This mode is suitable for matching color reproduction with peripheral devices that support sRGB, such as when printing photos taken using a |
||||||||||||
|
|
digital camera. |
||||||||||||
|
Paper |
This mode uses color tones and contrast similar to that of paper to produce a printed paper effect. It is suitable for displaying images from |
||||||||||||
|
|
media such as books and documents. |
||||||||||||
|
Movie |
This mode displays moving images brightly and with a clear-cut three-dimensional appearance. It is suitable for playing back video content. |
||||||||||||
|
DICOM |
Selected for the display in the DICOM mode. |
||||||||||||
Note
•“ScreenManager Pro” allows you to select the color mode automatically according to the application in use. (“ScreenManager Pro” is software for adjusting the screen using the mouse and keyboard. This software can be downloaded from our web site (http://www.eizoglobal.com).)
-16 -
Chapter 2 Basic Adjustment/Setting
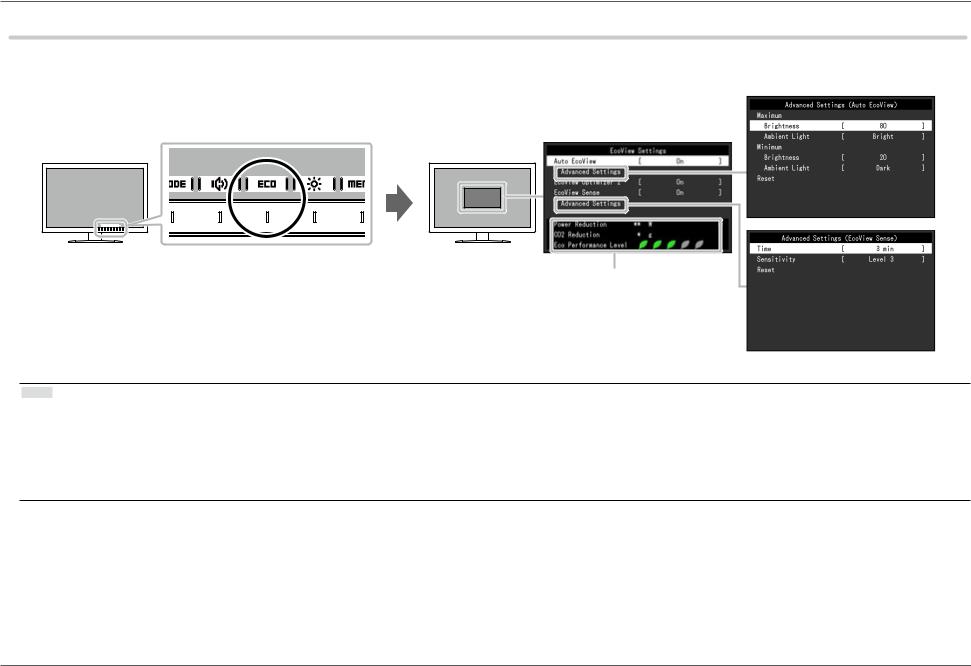
2-4. Conserving Energy
This monitor is equipped with EcoView functions to enable users to conserve energy.
Use this function to curtail unnecessary power consumption and save on electricity expenses. Saving power also reduces carbon dioxide emissions.
Level of power saving
Note
•The power saving level (Power Reduction, CO2 Reduction, and Eco Performance Level) can be checked on the “EcoView Settings” menu. The more indicators that light up representing the Eco Performance Level, the higher the power saving level attained.
-- Power Reduction: the reduction in the backlight’s power consumption as a result of the adjusted brightness value.
-- CO2 Reduction: converted from the “Power Reduction” value, this is an estimate of the quantity of CO2 emissions reduced when using the monitor for 1 hour.
* The numeric value is a result of calculation based on a default setting (0.000555 t -CO2/kWh) determined by a Japanese ministerial ordinance (2006, Ministry of Economy, Trade and Industry, Ministry of Environment, civil code article 3) and may differ depending on country and year.
-17 -

|
|
|
|
|
|
|
|
|
|
Chapter 2 Basic Adjustment/Setting |
|
|
|
|
|
|
|
|
|
|
|
|
|
|
|
|
|
|
|
|
|
|
|
|
|
Function |
Setting Range |
Description |
|
|
|
Note |
|
|
Auto EcoView |
|
|
On |
The ambient light sensor on the front of the monitor |
|
• |
Be careful not to block the ambient light sensor |
||
|
|
|
|
|
Off |
detects the ambient brightness to automatically |
|
|
on the lower side of the monitor when using the |
|
|
|
|
|
|
|
adjust the screen brightness to a comfortable |
|
|
Auto EcoView function. |
|
|
|
|
|
|
|
level using the Auto EcoView function. The power |
|
• |
Even when the Auto EcoView setting is “On”, |
|
|
|
|
|
|
|
consumption of the backlight can be curtailed by |
|
|
the |
operation switch on the front of |
|
|
|
|
|
|
adjusting the brightness to an appropriate level. |
|
|
the monitor or color adjustment can be used to |
|
|
|
|
|
|
|
This function can also mitigate eye strain and |
|
|
change the “Brightness” to suit your personal |
|
|
|
|
|
|
|
tiredness caused by a screen that is too bright or |
|
|
preference. Moreover, the manner in which |
|
|
|
|
|
|
|
too dark. |
|
|
the Auto EcoView function changes brightness |
|
|
|
|
|
|
|
|
|
|
also differs according to the changed value. |
|
|
|
|
|
|
|
Use the “Advanced Settings” to set the automatic |
|
• |
When “DICOM” is selected for the color mode, |
|
|
|
|
|
|
|
adjustment range to suit the monitor’s usage |
|
|
the Auto EcoView setting is turned “Off”. |
|
|
|
|
|
|
|
environment or personal preference. |
|
|
|
|
|
|
Advanced |
Maximum |
Brightness |
0 to 100 |
Set the range for automatic brightness adjustment. |
|
• |
The maximum and minimum brightness values |
|
|
|
Settings |
Minimum |
|
|
By setting the maximum value and minimum value |
|
|
cannot be set to the same value. |
|
|
|
|
|
|
|
of the adjustment range in advance, the brightness |
|
|
|
|
|
|
|
|
|
|
will be adjusted automatically within the set range. |
|
|
|
|
|
|
|
|
Ambient Light |
Bright |
Using the default setting is recommended. |
|
• |
For details on the “Ambient Light” setting, refer |
|
|
|
|
|
|
Standard |
(Default setting: “Bright” for maximum value, “Dark” |
|
|
to our web site (http://www.eizoglobal.com). |
|
|
|
|
|
|
Dark |
for minimum value) |
|
|
|
|
|
|
|
Reset |
- |
Return the advanced settings to their default values. |
- |
|
|
|
|
|
EcoView Optimizer 2 |
On |
The monitor automatically adjusts the screen |
|
• |
The setting is turned “Off” in the following |
||||
|
|
|
|
|
Off |
brightness according to the white level of the input |
|
|
cases: |
|
|
|
|
|
|
|
signal. |
|
|
--When “Movie” or “DICOM” is selected for the |
|
|
|
|
|
|
|
This function can reduce power consumption while |
|
|
color mode |
|
|
|
|
|
|
|
maintaining the brightness specified by the input |
|
• |
When set to “On”, the appearance of pale |
|
|
|
|
|
|
|
signal. |
|
|
colors may change. If this bothers you, set this |
|
|
|
|
|
|
|
|
|
|
function to “Off”. |
|
- 18 -

|
|
|
|
|
|
|
Chapter 2 Basic Adjustment/Setting |
|
|
|
|
|
|
|
|
|
|
|
|
|
|
|
|
|
|
|
Function |
Setting Range |
Description |
|
Note |
|
EcoView Sense |
On |
When set to “On”, the sensor on the front of the |
• |
At the time of shifting to power saving mode, |
||
|
|
|
|
Off |
monitor detects user movement. When the user |
|
a message that indicates the transition is |
|
|
|
|
|
moves away from the monitor, it automatically |
|
displayed. |
|
|
|
|
|
shifts to power saving mode and does not display |
• |
When “Power Save” on the Preferences menu |
|
|
|
|
|
images on the screen in order to reduce power |
|
is set to “Off”, the EcoView Sense setting is |
|
|
|
|
|
consumption. When the user comes near the |
|
disabled. |
|
|
|
|
|
monitor again, it recovers from power saving mode |
|
|
|
|
|
|
|
and displays images. |
|
|
|
|
|
|
|
The sensitivity of the sensor and time until |
|
|
|
|
|
|
|
power saving mode is activated can be set in the |
|
|
|
|
|
|
|
“Advanced Settings” according to the monitor usage |
|
|
|
|
|
|
|
environment and movement of the user. |
|
|
|
|
Advanced |
Time |
5, 30 sec |
Specifies the time from when the user leaves the |
- |
|
|
|
Settings |
|
1, 3, 5, 10, 15, 30, 45, |
monitor until the “No Presence detected” message |
|
|
|
|
|
|
60 min |
appears. The monitor shifts to power saving mode |
|
|
|
|
|
|
|
about 20 seconds after the message is displayed. |
|
|
|
|
|
Sensitivity |
Level 5 |
When the setting level is high (“Level 5” at |
• |
The EcoView Sense function is activated when |
|
|
|
|
Level 4 |
maximum), even minor movements of the user are |
|
the sensor on the front of the monitor detects |
|
|
|
|
Level 3 |
detected, which prevents the monitor from readily |
|
the movement of heat. Therefore, the sensitivity |
|
|
|
|
Level 2 |
shifting to power saving mode. On the other hand, |
|
should be changed depending on the typical |
|
|
|
|
Level 1 |
when the setting level is low (“Level 1” at minimum), |
|
user’s clothes or typical room temperature. If |
|
|
|
|
|
only major movements of the user are detected, |
|
the monitor shifts to or recovers from power |
|
|
|
|
|
which allows the monitor to readily shift to power |
|
saving mode contrary to your expectations, try |
|
|
|
|
|
saving mode. |
|
changing the setting level. |
|
|
|
|
|
|
• |
To use the monitor comfortably, increase the |
|
|
|
|
|
|
|
sensitivity for high temperatures, because the |
|
|
|
|
|
|
|
detection sensitivity decreases. Reduce the |
|
|
|
|
|
|
|
sensitivity for low temperatures because the |
|
|
|
|
|
|
|
detection sensitivity increases. |
|
|
|
Reset |
- |
Return the advanced settings to their default values. |
- |
|
- 19 -

Chapter 2 Basic Adjustment/Setting
2-5. Adjusting Brightness
The brightness of the screen can be adjusted to suit the installation environment or personal preference.
The screen brightness is adjusted by changing the brightness of the backlight (light source from the LCD back panel).
Setting Range
0 to 100
Note
•When Auto EcoView is set to “On”, the adjustment range is restricted as follows. (For details on Auto EcoView, see “Auto EcoView” (page 18).)
-- The brightness setting cannot be increased or decreased past the maximum and minimum brightness values specified in the advanced settings of Auto EcoView. -- Brightness may not be adjusted when the installation environment of the monitor is excessively bright or dark.
- 20 -
Chapter 2 Basic Adjustment/Setting
2-6. Adjusting Volume
The volume of the speakers and headphones can be set individually.
Setting Range
0 to 30
- 21 -
Chapter 3 Advanced Adjustment/Setting
Chapter 3 Advanced Adjustment/Setting
This chapter describes the advanced monitor adjustment and setting procedures using the Setting menu.
For basic functions, see “Chapter 2 Basic Adjustment/Setting” (page 14).
3-1. Basic Operation of the Setting menu
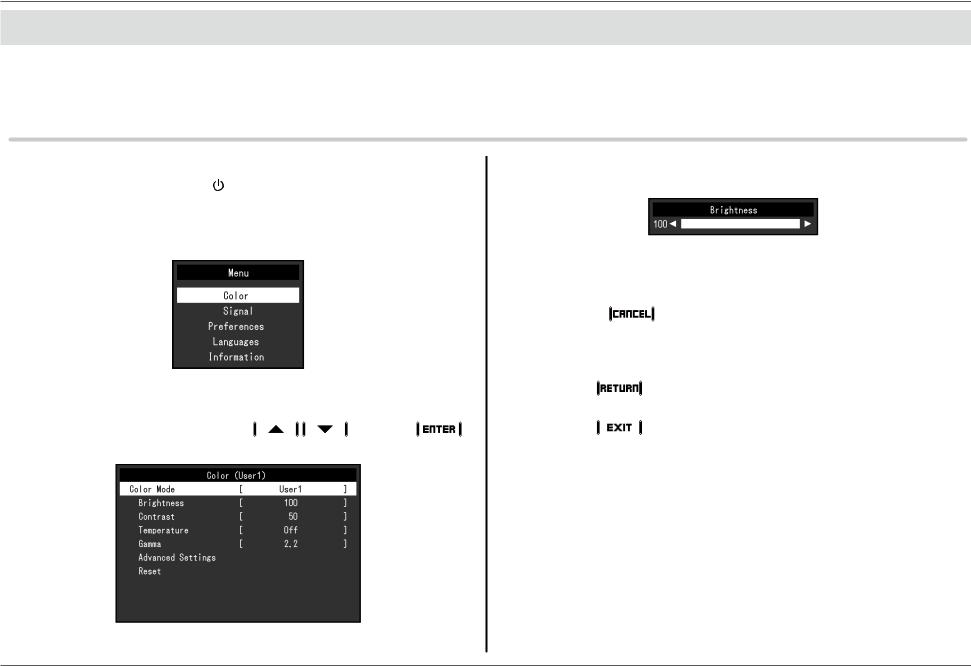
1. Menu display
1. Touch any switch (except ).
The operation guide appears.
2.Select  .
.
The Setting menu appears.
2.Select an item to adjust/set with 
 and select
  .
.
The Adjustment/Setting menu appears.
3.Perform adjustment/setting with 
 or
or 
 and select
  to accept the changes.
The Sub menu appears.
Selecting during adjustment/setting will cancel the adjustment/ setting and restore the state prior to making changes.
3.Exiting
2.Adjusting/setting |
|
|
1. |
Select |
. |
|
|
|
The Setting menu appears. |
||
|
|
|
|
||
1. Select a menu to adjust/set with |
and select |
. |
2. |
Select |
. |
The Sub menu appears. |
|
|
|
The Setting menu quits. |
|
- 22 -

Chapter 3 Advanced Adjustment/Setting
3-2. Setting Menu Functions
●●Color Adjustment
The color mode setting status can be adjusted according to personal preference.
Attention
•It takes about 30 minutes for the performance of electrical parts to stabilize. Please wait 30 minutes or more after power to the monitor has been turned on before adjusting the monitor.
•The same image may be observed in different colors on multiple monitors due to monitor-specific characteristics. Make fine color adjustments visually when matching colors across multiple monitors.
Note
•Using “ScreenManager Pro” allows you to perform color adjustment with the mouse and keyboard on your PC. The adjusted state can also be saved and loaded as color data. “ScreenManager Pro” can be downloaded from our web site (http://www.eizoglobal.com).
|
|
|
Color Mode |
|
|
|
|
|
|||
|
|
(Functions that can be adjusted differ |
|
|
|
|
|
||||
|
Function |
depending on the color mode.) |
|
Setting |
Description |
|
Note |
||||
|
√: Adjustable -: Not adjustable |
Range |
|
||||||||
|
|
|
|
|
|||||||
|
|
User1 |
sRGB |
Paper |
Movie |
|
DICOM |
|
|
|
|
|
|
User2 |
|
|
|
|
|
|
|
|
|
Color Mode |
√ |
√ |
√ |
√ |
|
√ |
User1 |
Select the desired mode according to the |
• |
For details on the adjustment |
|
|
|
|
|
|
|
|
|
User2 |
monitor application. |
|
status of each mode, see “2- |
|
|
|
|
|
|
|
|
sRGB |
|
|
3. Switching Display Modes |
|
|
|
|
|
|
|
|
Paper |
The color setting status can also be adjusted |
|
(Color Modes)” (page 16). |
|
|
|
|
|
|
|
|
Movie |
according to personal preference. Select the |
|
|
|
|
|
|
|
|
|
|
DICOM |
mode for adjustment and perform adjustment |
|
|
|
|
|
|
|
|
|
|
|
using the relevant functions. |
|
|
|
Brightness |
√ |
√ |
√ |
√ |
|
- |
0 to 100 |
The screen brightness is adjusted by changing |
• |
If the image is too dark even |
|
|
|
|
|
|
|
|
|
the brightness of the backlight (light source |
|
when the brightness is set to |
|
|
|
|
|
|
|
|
|
from the LCD back panel). |
|
100, adjust the contrast. |
- 23 -

|
|
|
|
|
|
|
|
|
|
Chapter 3 Advanced Adjustment/Setting |
||
|
|
|
|
|
|
|
|
|
|
|
|
|
|
|
|
|
|
|
|
|
|
|
|
|
|
|
|
|
|
Color Mode |
|
|
|
|
|
|||
|
|
|
(Functions that can be adjusted differ |
|
|
|
|
|
||||
|
|
Function |
depending on the color mode.) |
|
Setting |
Description |
|
Note |
||||
|
|
√: Adjustable -: Not adjustable |
Range |
|
||||||||
|
|
|
|
|
|
|||||||
|
|
|
User1 |
sRGB |
Paper |
Movie |
|
DICOM |
|
|
|
|
|
|
|
User2 |
|
|
|
|
|
|
|
|
|
|
|
Contrast |
√ |
- |
- |
√ |
|
- |
0 to 100 |
The brightness of the screen is adjusted by |
• |
A contrast of 50 displays every |
|
|
|
|
|
|
|
|
|
|
varying the video signal level. |
|
color gradation. |
|
|
|
|
|
|
|
|
|
|
|
• |
When adjusting the monitor, |
|
|
|
|
|
|
|
|
|
|
|
|
it is recommended to perform |
|
|
|
|
|
|
|
|
|
|
|
|
brightness adjustment, which |
|
|
|
|
|
|
|
|
|
|
|
|
does not lose gradation |
|
|
|
|
|
|
|
|
|
|
|
|
characteristics, prior to |
|
|
|
|
|
|
|
|
|
|
|
|
contrast adjustment. |
|
|
|
|
|
|
|
|
|
|
|
• |
Perform contrast adjustment |
|
|
|
|
|
|
|
|
|
|
|
|
in the following cases. |
|
|
|
|
|
|
|
|
|
|
|
|
--If the image is too dark even |
|
|
|
|
|
|
|
|
|
|
|
|
when the brightness is set |
|
|
|
|
|
|
|
|
|
|
|
|
to 100 (Set the contrast to |
|
|
|
|
|
|
|
|
|
|
|
|
higher than 50.) |
|
|
Temperature |
√ |
- |
√ |
√ |
|
- |
Off |
Adjust the color temperature. |
• |
The value shown in “K” is |
|
|
|
|
|
|
|
|
|
4000 K to |
The color temperature is normally used to |
|
available only as a reference. |
|
|
|
|
|
|
|
|
|
10000 K |
express the hue of “White” and/or “Black” with |
• |
“Gain” allows you to perform |
|
|
|
|
|
|
|
|
|
(specified in |
a numerical value. The value is expressed in |
|
more advanced adjustment. |
|
|
|
|
|
|
|
|
|
500 K units, |
degrees “K” (Kelvin). |
• |
If set to “Off”, the image is |
|
|
|
|
|
|
|
|
|
includes 9300 |
The screen becomes reddish at low color |
|
displayed in the preset color |
|
|
|
|
|
|
|
|
|
K) |
temperatures and bluish at high color |
|
of the monitor (Gain: 100 for |
|
|
|
|
|
|
|
|
|
|
temperatures, similar to the temperatures of a |
|
each RGB channel). |
|
|
|
|
|
|
|
|
|
|
flame. A gain preset value is set for each color |
• |
When the gain is changed, |
|
|
|
|
|
|
|
|
|
|
temperature setting value. |
|
the color temperature setting |
|
|
|
|
|
|
|
|
|
|
|
|
changes to “Off”. |
|
|
Gamma |
√ |
- |
- |
- |
|
- |
1.8 |
Adjust the gamma. |
• |
If “Paper” is selected for |
|
|
|
|
|
|
|
|
|
2.0 |
While the brightness of the monitor varies |
|
the color mode, “Paper” is |
|
|
|
|
|
|
|
|
|
2.2 |
depending on the input signal, the variation |
|
displayed for the gamma |
|
|
|
|
|
|
|
|
|
2.4 |
rate is not proportional to the input signal. |
|
value. |
|
|
|
|
|
|
|
|
|
|
Maintaining the balance between the input |
• |
If “DICOM” is selected for |
|
|
|
|
|
|
|
|
|
|
signal and brightness of the monitor is referred |
|
the color mode, “DICOM” |
|
|
|
|
|
|
|
|
|
|
to as “Gamma correction”. |
|
is displayed for the gamma |
|
|
|
|
|
|
|
|
|
|
|
|
value. |
- 24 -

|
|
|
|
|
|
|
|
|
|
|
Chapter 3 Advanced Adjustment/Setting |
||
|
|
|
|
|
|
|
|
|
|
|
|
|
|
|
|
|
|
|
|
|
|
|
|
|
|
|
|
|
|
|
|
|
Color Mode |
|
|
|
|
|
|||
|
|
|
|
(Functions that can be adjusted differ |
|
|
|
|
|
||||
|
|
Function |
depending on the color mode.) |
|
Setting |
Description |
|
Note |
|||||
|
|
√: Adjustable -: Not adjustable |
Range |
|
|||||||||
|
|
|
|
|
|
|
|||||||
|
|
|
|
User1 |
sRGB |
Paper |
Movie |
|
DICOM |
|
|
|
|
|
|
|
|
User2 |
|
|
|
|
|
|
|
|
|
|
|
Advanced |
Overdrive |
√ |
- |
- |
- |
|
- |
Enhanced |
This function allows you to set the overdrive |
- |
|
|
|
Settings |
|
|
|
|
|
|
|
Standard |
intensity based on the use of the monitor. |
|
|
|
|
|
|
|
|
|
|
|
|
Off |
Image lag can be reduced by using the |
|
|
|
|
|
|
|
|
|
|
|
|
|
“Enhanced” setting when displaying moving |
|
|
|
|
|
|
|
|
|
|
|
|
|
images. |
|
|
|
|
|
Hue |
√ |
- |
- |
√ |
|
- |
-50 to 50 |
Adjust the hue. |
• |
Using this function may |
|
|
|
|
|
|
|
|
|
|
|
|
|
make some color gradations |
|
|
|
|
|
|
|
|
|
|
|
|
|
unavailable for display. |
|
|
|
Saturation |
√ |
- |
- |
√ |
|
- |
-50 to 50 |
Adjust the color saturation. |
• |
Using this function may |
|
|
|
|
|
|
|
|
|
|
|
|
|
make some color gradations |
|
|
|
|
|
|
|
|
|
|
|
|
|
unavailable for display. |
|
|
|
|
|
|
|
|
|
|
|
|
• |
The minimum value (-50) |
|
|
|
|
|
|
|
|
|
|
|
|
|
changes the screen to |
|
|
|
|
|
|
|
|
|
|
|
|
|
monochrome. |
|
|
|
Gain |
√ |
- |
- |
- |
|
- |
0 to 100 |
The brightness of each red, green, and blue |
• |
Using this function may |
|
|
|
|
|
|
|
|
|
|
|
color component is referred to as “Gain”. The |
|
make some color gradations |
|
|
|
|
|
|
|
|
|
|
|
hue of “white” can be changed by adjusting the |
|
unavailable for display. |
|
|
|
|
|
|
|
|
|
|
|
gain. |
• |
The gain value changes |
|
|
|
|
|
|
|
|
|
|
|
|
|
according to the color |
|
|
|
|
|
|
|
|
|
|
|
|
|
temperature. |
|
|
|
|
|
|
|
|
|
|
|
|
• |
When the gain is changed, |
|
|
|
|
|
|
|
|
|
|
|
|
|
the color temperature setting |
|
|
|
|
|
|
|
|
|
|
|
|
|
changes to “Off”. |
|
|
Reset |
√ |
√ |
√ |
√ |
|
- |
- |
Reset any color adjustments for the currently |
- |
|
|
|
|
|
|
|
|
|
|
|
|
|
selected color mode back to the default |
|
|
|
|
|
|
|
|
|
|
|
|
|
settings. |
|
|
- 25 -
Chapter 3 Advanced Adjustment/Setting
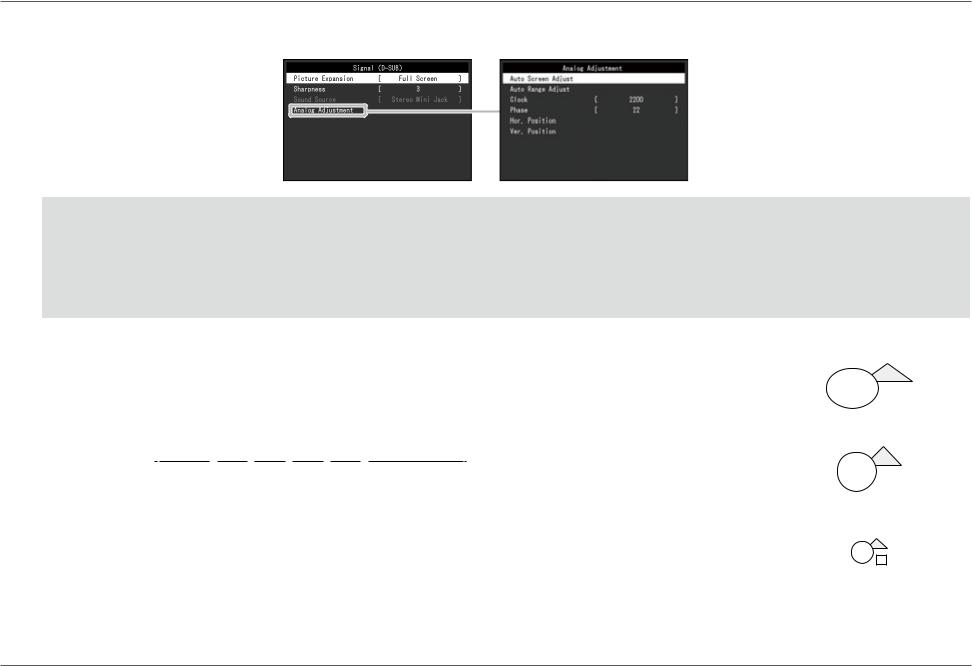
●●Signal Settings
Set the method for outputting the signal input from the PC to the monitor.
|
|
|
|
|
Input Signal |
|
|
|
|
|
|
|
|
|
|
|
|
|
|
|
|
|
|||||
|
(The setting range of each function differs |
|
|
|
|
|
|
|
|
|
|
|
|
|
|||||||||||||
|
depending on the input signal.) |
|
|
|
|
|
|
|
|
|
|
|
|
|
|
|
|||||||||||
Function |
|
√: Settable -: Not settable |
|
|
Setting Range |
|
Description |
|
|
|
|
Note |
|||||||||||||||
|
|
|
|
|
HDMI |
|
|
|
|
|
|
|
|
|
|
|
|
|
|
|
|
|
|
||||
|
DisplayPort |
|
PC |
|
Video |
|
DVI |
D-Sub |
|
|
|
|
|
|
|
|
|
|
|
|
|
||||||
|
|
|
|
|
signal |
|
signal |
|
|
|
|
|
|
|
|
|
|
|
|
|
|
|
|
|
|
||
Picture Expansion |
√ |
|
|
|
√ |
- |
|
|
√ |
√ |
Full Screen |
The screen size of the monitor display can be changed. |
• |
Example settings |
|||||||||||||
|
|
|
|
|
|
|
|
|
|
|
|
|
|
|
Aspect Ratio |
• |
“Auto” |
|
--Full Screen |
||||||||
|
|
|
|
|
|
|
|
|
|
|
|
|
|
|
Dot by Dot |
|
The monitor automatically changes the screen |
|
|
|
|
|
|
|
|
|
|
|
|
|
|
|
|
|
|
|
|
|
|
|
|
|
|
|
|
|
|
|
|
|
|
|
|
||
|
|
|
|
|
|
|
|
|
|
|
|
|
|
|
|
|
size according to the aspect ratio and resolution |
|
|
|
|
|
|
|
|
|
|
|
|
|
|
|
|
|
|
|
|
|
|
|
|
|
|
|
information from the PC. |
|
|
|
|
|
|
|
|
|
|
|
|
|
|
|
|
|
|
|
|
|
|
|
|
|
|
|
|
|
|
|
|
|
|
|
|
|
|
|
|
|
|
|
|
|
|
|
|
|
|
|
|
|
|
• |
“Full Screen” |
|
|
|
|
|
|
|
|
|
|
|
|
|
|
|
|
|
|
|
|
|
|
|
|
|
|
|
|
|
|
|
|
|
|
|
|
||
|
|
|
|
|
|
|
|
|
|
|
|
|
|
|
|
|
Images are stretched to full screen. Since aspect |
|
--Aspect Ratio |
||||||||
|
|
|
|
|
|
|
|
|
|
|
|
|
|
|
|
|
ratios are not maintained, images may be distorted |
|
|||||||||
|
|
|
|
|
|
|
|
|
|
|
|
|
|
|
|
|
|
|
|
|
|
|
|
|
|
|
|
|
|
|
|
|
|
|
|
|
|
|
|
|
|
|
|
|
|
|
|
|
|
|
|
|
|
|
|
|
|
|
|
|
|
|
|
|
|
|
|
|
|
|
|
|
in some cases. |
|
|
|
|
|
|
|
|
|
|
|
- |
|
|
- |
|
|
√ |
|
- |
|
- |
|
Auto |
• |
“Aspect Ratio” |
|
|
|
|
|
|
|
|
|
|
||
|
|
|
|
|
|
|
|
|
|
|
|
|
|
|
Full Screen |
|
Images are enlarged to full screen without |
|
|
|
|
|
|
|
|
|
|
|
|
|
|
|
|
|
|
|
|
|
|
|
|
|
Aspect Ratio |
|
changing the aspect ratio. Since aspect ratios are |
|
|
|
|
|
|
|
|
|
|
|
|
|
|
|
|
|
|
|
|
|
|
|
|
|
|
|
--Dot by Dot (input signal) |
||||||||||
|
|
|
|
|
|
|
|
|
|
|
|
|
|
|
Dot by Dot |
|
maintained, blank horizontal or vertical borders |
|
|||||||||
|
|
|
|
|
|
|
|
|
|
|
|
|
|
|
|
|
|
|
|
|
|
|
|
|
|
||
|
|
|
|
|
|
|
|
|
|
|
|
|
|
|
|
|
|
|
|
|
|
|
|
|
|
||
|
|
|
|
|
|
|
|
|
|
|
|
|
|
|
|
|
may appear. |
|
|
|
|
|
|
|
|
|
|
|
|
|
|
|
|
|
|
|
|
|
|
|
|
|
|
|
|
|
|
|
|
|
|
|
|
|
|
|
|
|
|
|
|
|
|
|
|
|
|
|
|
|
|
• |
“Dot by Dot” |
|
|
|
|
|
|
|
|
|
|
|
|
|
|
|
|
|
|
|
|
|
|
|
|
|
|
|
|
|
|
|
|
|
|
|
|
||
|
|
|
|
|
|
|
|
|
|
|
|
|
|
|
|
|
Displays the image at the set resolution or size |
|
|
|
|
|
|
|
|
|
|
|
|
|
|
|
|
|
|
|
|
|
|
|
|
|
|
|
|
|
|
|
|
|
|
|
|
|
|
|
|
|
|
|
|
|
|
|
|
|
|
|
|
|
|
|
specified by the input signal. |
|
|
|
|
|
|
|
|
|
|
|
|
|
|
|
|
|
|
|
|
|
|
|
|
|
|
|
• |
If the monitor is EV2455 and |
|||||||||
|
|
|
|
|
|
|
|
|
|
|
|
|
|
|
|
|
|
||||||||||
|
|
|
|
|
|
|
|
|
|
|
|
|
|
|
|
|
|
|
the resolution is set to 1920 |
||||||||
|
|
|
|
|
|
|
|
|
|
|
|
|
|
|
|
|
|
|
× 1080, only “Full Screen” is |
||||||||
|
|
|
|
|
|
|
|
|
|
|
|
|
|
|
|
|
|
|
available. |
||||||||
- 26 -
Loading...