


 Loading...
Important
Please read PRECAUTIONS, this User’s Manual and Setup Manual (separate volume) carefully to familiarize yourself with safe and effective usage.
•Please read the Setup Manual (separate volume)
•The latest User’s Manual is available for download from our site: http://www.radiforce.com

Product specification may vary with sales areas.
Confirm the specification in the manual written in language of the region of purchase.
•It shall be assured that the final system is in compliance to IEC60601-1-1 requirement.
•Power supplied equipment can emit electromagnetic waves, that could influence, limit or result in malfunction of the monitor.
Install the equipment in a controlled environment, where such effects are avoided.
•This is a monitor intended for use in a medical image system. It does not support the display of mammography images for diagnosis.
Copyright© 2009 EIZO NANAO CORPORATION All rights reserved.
No part of this manual may be reproduced, stored in a retrieval system, or transmitted, in any form or by any means, electronic, mechanical, or otherwise, without the prior written permission of EIZO NANAO CORPORATION.
EIZO NANAO CORPORATION is under no obligation to hold any submitted material or information confidential unless prior arrangements are made pursuant to EIZO NANAO CORPORATION’s receipt of said information. Although every effort has been made to ensure that this manual provides up-to-date information, please note that EIZO monitor specifications are subject to change without notice.
VGA is a registered trademark of International Business Machines Corporation.
Windows is a registered trademark of Microsoft Corporation in the United States and other countries.
VESA is a registered trademark or a trademark of Video Electronics Standards Association in the United States and other countries. PC-9801 and PC-9821 are trademarks of NEC Corporation.
EIZO, RadiCS, RadiForce and ScreenManager are registered trademarks of EIZO NANAO CORPORATION in Japan and other countries.
All other trademarks are the properties of their respective owners.

Notice for this monitor
This product is suited to clinical review. It does not support the display of mammography images for diagnosis.
This product has been adjusted specifically for use in the region to which it was originally shipped. If the product is used outside the region, it may not operate as specified in the specifications.
This product may not be covered by warranty for uses other than those described in this manual.
The specifications noted in this manual are only applicable for power cords and signal cables specified by us.
Use optional products manufactured or specified by us with this product.
As it takes about 30 minutes for the performance of electrical parts to stabilize, adjust the monitor 30 minutes or more after the monitor power has been turned on.
In order to suppress the luminosity change by long-term use and to maintain the stable luminosity, use of a monitor in lower brightness is recommended.
When the screen image is changed after displaying the same image for extended periods of time, an afterimage may appear. Use the screen saver or timer to avoid displaying the same image for extended periods of time.
Periodic cleaning is recommended to keep the monitor looking new and to prolong its operation lifetime. (Refer to “Cleaning” on the next page.)
The screen may have defective pixels. These pixels may appear as slightly light or dark area on the screen. This is due to the characteristics of the panel itself, and not the product.
The backlight of the LCD panel has a fixed life span. When the screen becomes dark or begins to flicker, please contact your dealer.
Do not press on the panel or edge of the frame strongly, as this may result in the display malfunction, such as the interference patterns, etc. If pressure is continually applied to the LCD panel, it may deteriorate or damage your LCD panel. (If the pressure marks remain on the LCD panel, leave the monitor with a white or black screen. The symptom may disappear.)
Do not scratch or press on the panel with any sharp objects, such as a pencil or pen as this may result in damage to the panel. Do not attempt to brush with tissues as this may scratch the LCD panel.
When the monitor is cold and brought into a room or the room temperature goes up quickly, dew condensation may occur inside and outside the monitor. In that case, do not turn the monitor on and wait until dew condensation disappears, otherwise it may cause some damages to the monitor.

Cleaning
Attention
•Never use any solvents or chemicals, such as thinner, benzene, wax, alcohol, disinfectant, and abrasive cleaner, which may damage the cabinet or LCD panel.
NOTE
• Optional ScreenCleaner is recommended for cleaning the panel surface.
LCD Panel
•Clean the LCD panel with a soft cloth such as cotton cloth or lens cleaning paper.
•Remove persistent stains gently with a cloth dampened with a little water, and then clean the LCD panel again with a dry cloth for better finishing.
Cabinet
• Clean the cabinet with a soft cloth dampened with a little mild detergent.
To use the monitor comfortably
•An excessively dark or bright screen may affect your eyes. Adjust the brightness of the monitor according to the environmental conditions.
•Staring at the monitor for a long time tires your eyes. Take a 10-minute rest every hour.

CONTENTS
COVER ............................................................. |
1 |
|
...........................................Notice for this monitor |
3 |
|
..................................................................Cleaning |
4 |
|
To use the monitor comfortably........................... |
4 |
|
CONTENTS............................................................. |
5 |
|
Chapter 1 Features and Overview...................... |
6 |
|
1-1 |
............................................................Features |
6 |
1-2 |
Buttons and Indicators.................................... |
7 |
1-3 Basic operation of Adjustment menu and the |
||
|
icon list.............................................................. |
8 |
Chapter 2 Settings and Adjustments............... |
11 |
|
2-1 |
........................................................Utility Disk |
11 |
|
● Disk contents and software overview................. |
11 |
|
● To use RadiCS LE or ScreenManager Pro for |
|
|
Medical............................................................... |
11 |
2-2 |
Screen Adjustment......................................... |
12 |
Digital Input.......................................................... |
12 |
|
Analog Input......................................................... |
12 |
|
2-3 |
Color Adjustment........................................... |
15 |
|
● To select the display mode (CAL Switch mode) 15 |
|
|
● To perform advanced adjustments.................... |
16 |
|
● Adjustment items in each mode........................ |
16 |
|
● To adjust the brightness [Brightness]................ |
16 |
|
● To adjust the contrast [Contrast]....................... |
17 |
|
● To adjust the gamma value [Gamma]............... |
17 |
|
● To adjust the color temperature [Temperature]. 18 |
|
|
● To adjust the gain value [Gain].......................... |
18 |
|
● To adjust the color saturation [Saturation]......... |
18 |
|
● To adjust the hue [Hue]..................................... |
19 |
2-4 |
Adjusting Sharpness [Sharpness]................ |
20 |
2-5 Setting Enable/Disable for the automatic |
|
|
|
brightness adjustment function |
|
|
[Auto EcoView]............................................... |
20 |
2-6 Turning off the monitor automatically |
|
|
|
[Off Timer]....................................................... |
20 |
2-7 |
Locking Buttons |
|
|
[Key Lock] [Menu Lock]................................ |
21 |
2-8 |
Displaying Monitor Infomation |
|
|
[Info1] [Info2].................................................. |
21 |
2-9 |
Setting Power Indicator ON/OFF |
|
|
[Power LED].................................................... |
22 |
2-10 |
Setting Language [Language]....................... |
22 |
2-11 |
Displaying EIZO logo..................................... |
22 |
2-12 |
Resuming the Default Setting [Reset].......... |
23 |
● To reset color adjustment values...................... |
23 |
|
● To reset all adjustments to |
|
|
|
the factory default settings............................... |
23 |
Chapter 3 |
Connecting Cables........................... |
24 |
|
.............3-1 Connecting Two PCs to the Monitor |
24 |
||
|
● To switch the input signal.................................. |
24 |
|
|
● Setting auto-selection of the input signal |
|
|
|
[Input Signal]..................................................... |
25 |
|
Chapter 4 |
Troubleshooting............................... |
26 |
|
Chapter 5 |
..........................................Reference |
28 |
|
5-1 |
............................................Attaching an Arm |
28 |
|
5-2 |
Power Saving Mode....................................... |
29 |
|
5-3 |
Specifications................................................. |
30 |
|
5-4 |
Glossary.......................................................... |
34 |
|
5-5 |
Preset Timing.................................................. |
36 |
|
FCC Declaration of Conformity........................... |
37 |
||
..................................................EMC Information |
38 |
||
CONTENTS

Chapter 1 Features and Overview
Thank you very much for choosing an EIZO color LCD monitor.
1-1 Features
•Over drive circuit for clear motion pictures
•Dual-input system (DVI-D, D-sub)
3-1 “Connecting Two PCs to the Monitor” (page 24)
• Auto EcoView
2-5 “Setting Enable/Disable for the automatic brightness adjustment function” (page 20)
• Sharpness
2-4 “Adjusting Sharpness” (page 20)
• Auto adjust
2-2 “Screen Adjustment” (page 12)
• 11 bit gamma correction
“To adjust the gamma value” (page 17)
• DICOM mode (CAL Switch function)
To select the display mode (CAL Switch mode) (page 15)
•CAL Switch function for selecting an optimal calibration mode
•The quality control software "RadiCS LE" (for Windows) used to calibrate the monitor is included
Refer to the EIZO LCD Utility Disk
•Adjustment menu to execute the target function by simple operation.
1-3 “Basic operation of Adjustment menu and the icon list” (page 8)
•The utility software "ScreenManager Pro for Medical" (for Windows) to control the monitor from a PC with mouse/keyboard is included
Refer to the EIZO LCD Utility Disk
•HDCP (High-bandwidth Digital Content Protection)
NOTE
•The stand of the unit can be replaced with an arm (or another stand). (Refer to “5-1 Attaching an Arm” on page 28.)
Chapter 1 Overview and Features
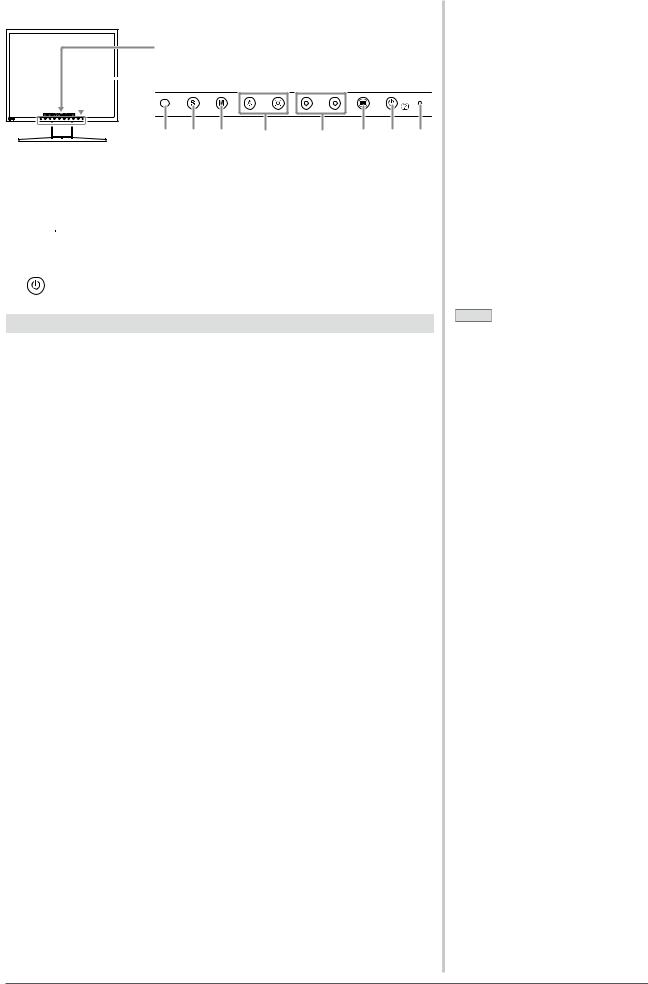
1-2 Buttons and Indicators
Adjustment menu
 Button
1 |
2 |
3 |
4 |
5 |
6 |
7 |
8 |
1.Sensor (Auto EcoView)
2. button
3. button
4.
 buttons
5. button
6. button
7.button
8.Power indicator
Indicator status |
Operation status |
Blue |
The screen is displayed (Power on) |
Orange |
Power saving (Power on) |
Off |
Power off |
NOTE
•While the screen is displayed, the power indicator that is lighting blue can be turned off (see “Setting Power Indicator ON/OFF” on page 22).
Chapter 1 Overview and Features

1-3 Basic operation of Adjustment menu and the icon list Basic operation of Adjustment menu
Displaying the adjustment menu
Pressing the function button to change the setting or pressing  allows you to display the adjustment menu.
When pressing the input signal selection, mode or brightness control
When pressing the menu button
Modifying the setting
The operation methods differ depending on the icons.
Example |
Operation method |
|
As for the icons displayed with the +/- marks, selecting + allows you to increase the setting value |
|
or selecting - to decrease it. |
Selecting the icon displayed with  mark allows you to show the next menu.
/The Enable/Disable setting is toggled by selecting the icon. X is displayed when the function is invalid.
Displaying the function name
(1)Press  while the adjustment menu appears.
(2)The function name appears.
Storing the setting/Exiting the adjustment menu
After completing the setting, selecting  allows you to store the setting. Selecting
  repeatedly allows you to close the adjustment menu.
NOTE
• The adjustment menu automatically finishes when no input operation occurs in 45 seconds.
Chapter 1 Overview and Features
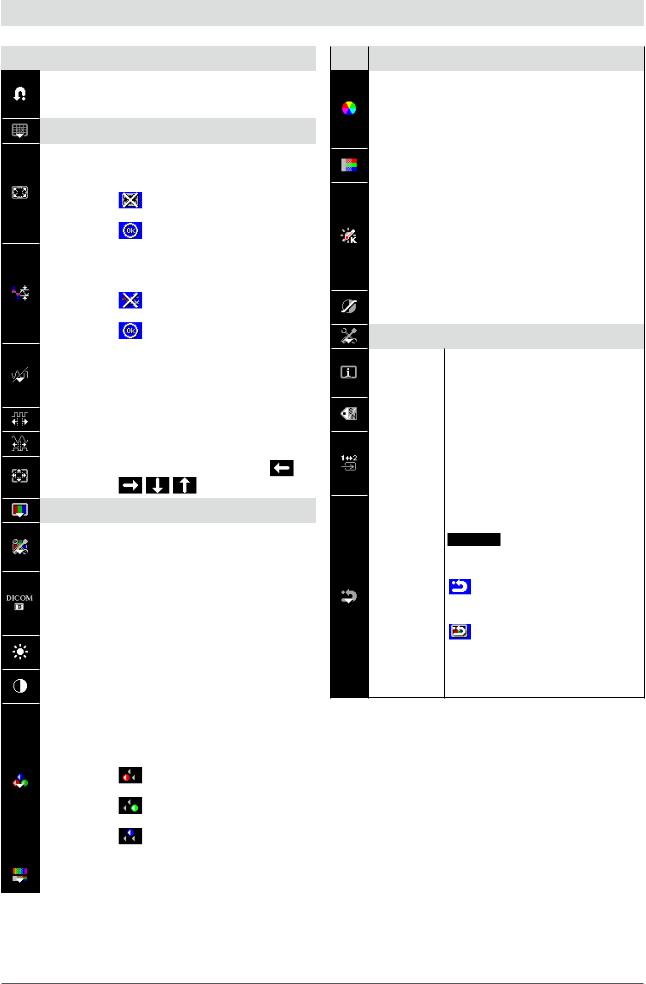
Adjustment menu icon list
Icon |
Function |
Overview |
|
|
|
|
|
Determines the setting. Selecting |
|
— |
the icon repeatedly allows you to |
|
|
close the adjustment menu. |
|
|
Analog |
|
|
|
|
|
Flickering, screen position, |
|
|
and screen size are adjusted |
|
AutoSize |
automatically. |
|
Returns to the pre-adjusted |
|
|
|
|
|
|
status. |
|
|
Determines the adjustment. |
|
|
|
|
|
Every color gradation (0 to 255) can |
|
|
be displayed by adjusting the signal |
|
AutoRange |
output level. |
|
|
Returns to the pre-adjusted |
|
|
status. |
|
|
Determines the adjustment. |
|
|
|
|
|
Performs advanced adjustment |
|
Manual |
when the automatic adjustment fails. |
|
The adjustments for clock, phase |
|
|
|
|
|
|
and position proceed in this order. |
|
Clock |
Eliminates vertical bars. |
|
|
|
|
Phase |
Removes flickering or blurring. |
|
|
|
|
Position |
Correct screen position with |
|
. |
|
|
|
|
|
|
|
|
|
Color |
|
|
|
|
|
Independent setting and saving of |
|
Color Menu |
color adjustment are available for |
|
|
each CAL Switch mode. |
|
|
Selects the best display mode easily |
|
Mode* |
according to monitor’s application. |
|
Each time you press the button, the |
|
|
|
|
|
|
mode is switched. |
|
Brightness |
Adjusts the screen brightness. |
|
Adjustable range: 0 to 100% |
|
|
|
|
|
Contrast |
Adjusts the contrast. |
|
Adjustable range: 0 to 100% |
|
|
|
|
|
|
Determines the mixing rate of red, |
|
|
green and blue, and adjust the color |
|
|
tone. |
|
|
Adjustable range: 0 to 100% |
|
Gain |
Allows you to determine the |
|
mixing rate of red. |
|
|
|
|
|
|
Allows you to determine the |
|
|
mixing rate of green. |
|
|
Allows you to determine the |
|
|
mixing rate of blue. |
|
Advanced |
Adjusts each function of hue and |
|
saturation. |
|
|
|
Icon Function |
Overview |
|
|
|
|
|
|
Adjusts the hue. If you set the hue |
|
|
to a high value, the image turns |
|
Hue |
greenish. If low, the image turns |
|
|
purplish. |
|
|
Adjustable range: -100 to 100 |
|
Saturation |
Adjusts the color saturation. |
|
Adjustable range: -100 to 100 |
|
|
|
|
|
|
Adjusts the color temperature. The |
|
|
gain preset values are set for each |
|
|
color temperature setting value. |
|
Temperature |
Adjustable range: Native, |
|
|
6500K-15000K (specified by every |
|
|
500K unit, including 9300K), User (at |
|
|
gain adjustment) |
|
Gamma |
Adjusts the gamma value. |
|
Adjustable range: 1.8, 2.0, 2.2 |
|
|
|
|
|
|
Tool |
|
|
|
|
|
Displays the input signal status |
|
Info1 |
(analog/digital), resolution, H/V |
|
|
frequency. |
|
Info2 |
Displays the model name, usage |
|
time and serial number. |
|
|
|
|
|
|
Sets to detect the input signal |
|
Input Signal |
automatically. The Enable/Disable |
|
setting is toggled by selecting the |
|
|
|
icon. |
|
|
Resets the adjustment values to the |
|
|
factory settings. |
Attention
•After resetting, you cannot undo the operation.
All : Resets all adjustments to Reset the default settings (factory
settings).
Color (DICOM*) : Only the adjustment values in the current CAL Switch mode will revert to the default settings (factory settings).
*Current CAL Switch mode is displayed.
Chapter 1 Overview and Features
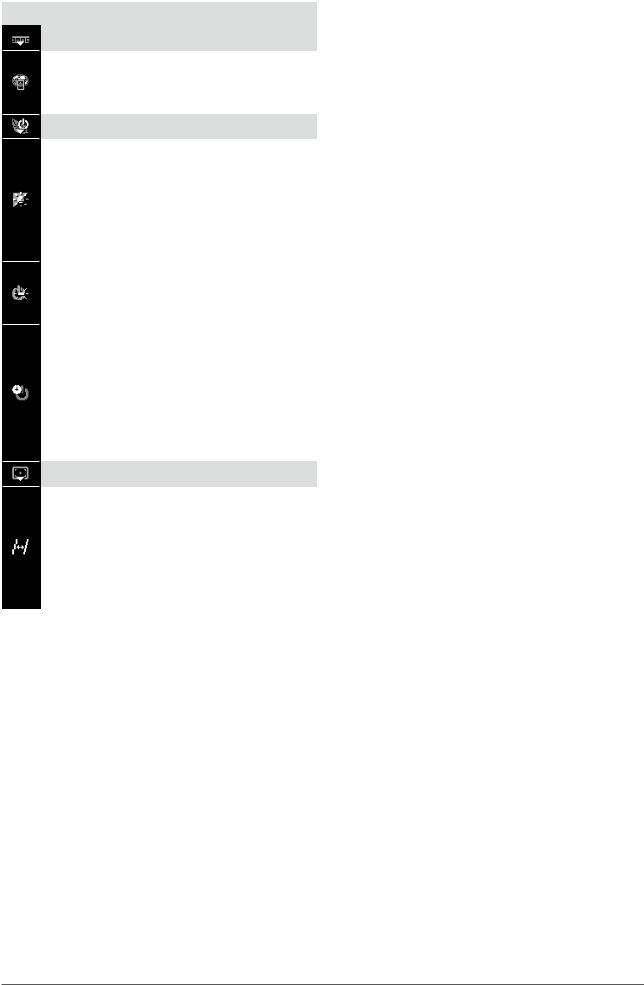
Icon |
Function |
Overview |
|
|
|
|
|
Settings |
|
|
|
|
|
Selects a language for the |
|
Language |
adjustment menu or displaying |
|
message. The language setting is |
|
|
|
|
|
|
toggled by selecting the icon. |
|
|
PowerSave |
|
|
|
|
|
The sensor on the front side of the |
|
|
monitor detects the environmental |
|
|
brightness to adjust the screen |
|
Auto |
brightness automatically and |
|
EcoView |
comfortably by using the Auto |
|
|
EcoView function. The Enable/ |
|
|
Disable setting is toggled by |
|
|
selecting the icon. |
|
|
Sets the power indicator (blue) ON/ |
|
Power LED |
OFF in the monitor ON condition. |
|
The On/Off setting is toggled by |
|
|
|
selecting the icon. |
|
|
Turns off the monitor automatically |
|
|
after a specified time has passed. |
|
|
This function serves to protect the |
|
|
monitor from after-images caused |
|
Off Timer |
when the same image is left |
|
|
displayed for a long time. Use this |
|
|
function when an image is displayed |
|
|
throughout the day. |
|
|
Adjustable range: Off, 1 to 23h |
|
|
Screen |
|
|
|
|
|
Emphasizes the outline of the image |
|
|
by emphasizing the color difference |
|
|
between the pixels composing the |
|
Sharpness |
image and to improve a sense of |
|
quality and materiality. Contrarily, |
|
|
|
this function allows you to show |
|
|
the image smoothly by blurring the |
|
|
outline of the image. |
10 Chapter 1 Overview and Features
Chapter 2 Settings and Adjustments
2-1 Utility Disk
An “EIZO LCD Utility Disk” (CD-ROM) is supplied with the monitor. The following table shows the disk contents and the overview of the application software programs.
● Disk contents and software overview
The disk includes application software programs for adjustment, and User’s Manual. Refer to “Readme.txt” file on the disk for software startup procedures or file access procedures.
Item |
Overview |
A “Readme.txt” file |
|
RadiCS LE (for Windows) |
RadiCS LE is quality control software used to calibrate the monitor and manage |
|
the calibration history. |
|
(A PC must be connected to the monitor with the supplied USB cable.) Refer to |
|
the description later. |
|
|
ScreenManager Pro for Medical |
A utility software program to control monitor adjustments from a PC using its |
(for Windows) |
mouse and keyboard. |
|
(A PC must be connected to the monitor with the supplied USB cable.) Refer to |
|
the description later. |
|
|
User’s Manual of this monitor (PDF file)
● To use RadiCS LE or ScreenManager Pro for Medical
Refer to the corresponding User's Manual on the CD-ROM disk in order to install and use the software. When using this software, you will need to connect a PC to the monitor with the supplied USB cable.
[Connection] |
|
|
(1) |
Connect the USB port (downstream) of a USB compatible PC (or other |
Upstream |
|
USB hub) and the monitor’s USB port (upstream) with the supplied |
|
|
|
|
|
USB cable. |
|
(2) |
The USB function is set up automatically upon connection of the USB |
|
|
cable. |
|
Chapter 2 Settings and Adjustments 11
2-2 Screen Adjustment
Digital Input
When digital signals are input, images are displayed correctly based on the preset data of the monitor. When performing the advanced adjustment, see “2-3 Color Adjustment” (page 15) and its subsequence pages.
Analog Input
The monitor screen adjustment is used to suppress flickering of the screen or adjust screen position and screen size correctly according to the PC to be used.
To use the monitor comfortably, adjust the screen when the monitor is set up for the first time or when the settings of the PC in use are updated. No adjustment is required when the image appears correctly.
The auto adjust function works in the following cases:
•When a signal is input into the monitor for the first time
•When the resolution or Vertical/Horizontal Frequency of input signals is changed
[Adjustment Procedure]
1 Perform the AutoSize adjustment.
●To adjust flickering, screen position, and screen size automatically [AutoSize]
(1)Press  .
.
The adjustment menu appears.
(2)Select  (Analog).
(3)Select  (AutoSize).
Flickering, screen position, and screen size are adjusted automatically.
(4)After confirming the screen message, select  (OK).
(OK).
If you select  (Undo), the monitor returns to the pre-adjusted status.
If the screen is not displayed correctly even after adjusting in step 1 above, perform the adjustments according to the procedures on the following pages. When the screen is displayed correctly, go to step 5 “To adjust color gradation automatically [AutoRange]”.
2 Prepare the display pattern for the analog display adjustment.
Download the “Screen adjustment pattern files” from our site: http://www.radiforce.com
Attention
•Wait 30 minutes or more from monitor power on before starting adjustments.
•Auto adjust function does not work for the images under the resolution of 800 × 600 (SVGA).
Attention
•This function works correctly when an image is fully displayed over the Windows or Macintosh display area. It does not work properly when an image is displayed only on a part of the screen (command prompt window, for example) or when a black background (wallpaper, etc.) is in use.
•This function does not work correctly with some graphics boards.
•“Auto in Progress” appears on the screen during auto adjustment.
NOTE
•For details and instructions on opening the “Screen adjustment pattern files”, refer to the “Readme.txt” file.
12 Chapter 2 Settings and Adjustments
3 |
Perform the AutoSize adjustment again with the analog screen |
|
|
|
adjustment pattern displayed. |
●To adjust flickering, screen position, and screen size automatically [AutoSize]
(1)Display Pattern 1 of the screen adjustment pattern files in full screen on the monitor.
(2)Press  .
.
The adjustment menu appears.
(3)Select  (Analog).
(4)Select  (AutoSize).
Flickering, screen position, and screen size are adjusted automatically.
(5)After confirming the screen message, select  (OK).
(OK).
If you select  (Undo), the monitor returns to the pre-adjusted status.
If the screen is not displayed correctly even after adjusting in step 3 above, perform the adjustments according to the procedures on the following pages. When the screen is displayed correctly, go to step 5 “To adjust color gradation automatically [AutoRange]”.
4 Perform advanced adjustments by using  (Manual) in the adjustment menu.
Select  (Manual) to adjust the clock, phase and position, in this order.
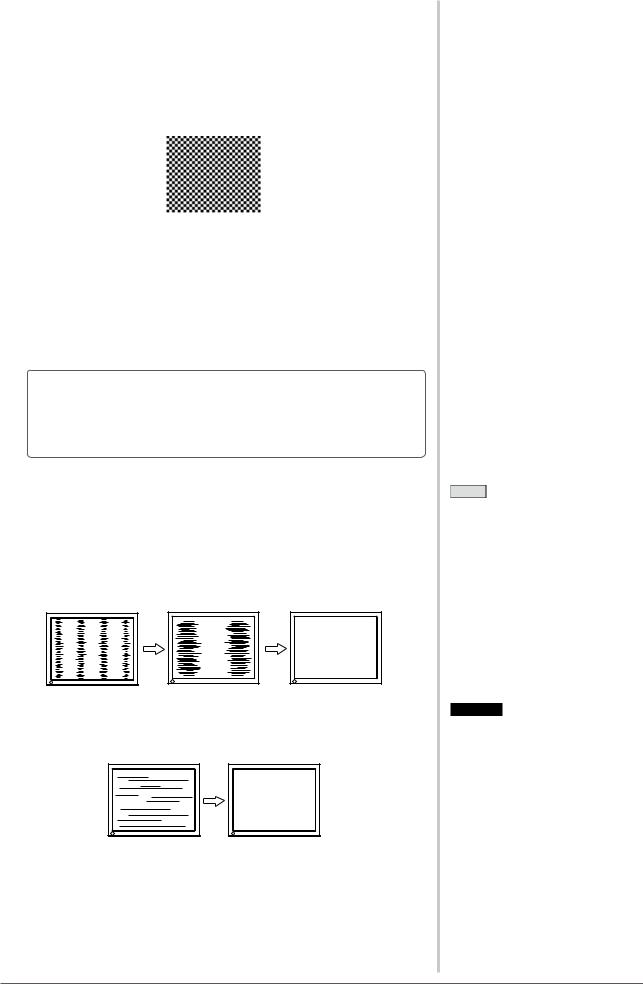
●To eliminate vertical bars [Clock]
(1)Adjust the clock with  or
or  of
of  (Clock) to eliminate vertical bars.
●To remove flickering or blurring [Phase]
(1)Adjust the phase with  or
or  of
of  (Phase) to remove flickering or blurring.
NOTE
•Press the control button slowly so as not to miss the adjustment point.
•When blurring, flickering or bars appear on the screen after adjustment, proceed to [Phase] to remove flickering or blurring.
Attention
•Flickering or blurring may not be eliminated depending on your PC or graphics board.
Chapter 2 Settings and Adjustments 13
Loading...