


Instructions for Use: ■Setup Manual
Important: Please read PRECAUTIONS, this Setup Manual and the User’s Manual (on the CD-ROM) carefully to familiarize yourself with safe and effective usage. Please retain this manual for future reference.
Gebrauchsanweisung: ■Installationshandbuch
Wichtig: Lesen Sie die VORSICHTSMASSNAHMEN, dieses Handbuch zur Einrichtung und das Benutzerhandbuch (auf der CD-ROM) aufmerksam durch, um sich mit der sicheren und effizienten Bedienung vertraut zu machen. Bewahren Sie dieses Handbuch zum späteren Nachschlagen auf.
Notice d’instruction: ■Manuel d’installation
Important : Veuillez lire attentivement les PRECAUTIONS, ce Manuel d’installation ainsi que le Manuel d’utilisation (inclus sur le CD-ROM) afin de vous familiariser avec ce produit et de l’utiliser efficacement et en toute sécurité. Veuillez conserver ce manuel pour référence ultérieure.
: ■
•El Manual de instalación en español se puede descargar del sitio: http://www.eizo.com
•Il Manuale di installazione in Italiano è disponibile per il download nel sito Web all’indirizzo: http://www.eizo.com
•Installationshandboken på svenska går att ladda ned från vår webbplats: http://www.eizo.com
•Μπορείτε να κάνετε λήψη του Εγχειριδίου εγκατάστασης στα Ελληνικά από τον ιστότοπό μας: http://www.eizo.com
•Руководство по установке на русском языке доступно для загрузки с нашего сайта по адресу: http://www.eizo.com
•• http://www.eizo.com
•Instalační příručka v češtině je dostupná ke stažení z našich stránek: http://www.eizo.com
•En installationsvejledning på dansk kan hentes fra vores websted: http://www.eizo.com
•Asennusopas suomeksi on ladattavissa osoitteesta: http://www.eizo.com
•: http://www.eizo.com
•De installatiehandleiding in het Nederlands kan worden gedownload van onze site: http://www.eizo.com
•Installasjonsveiledning på norsk kan lastes ned fra vårt område: http://www.eizo.com
•Podręcznik instalacji w języku polskim można pobrać z naszej witryny internetowej: http://www.eizo.com
•O Manual de instalação (em português) está disponível para download no nosso website: http://www.eizo.com
•Türkçe Kurulum Kılavuzu sitemizden indirilebilir: http://www.eizo.com
•http://www.eizo.com:
Français Deutsch English
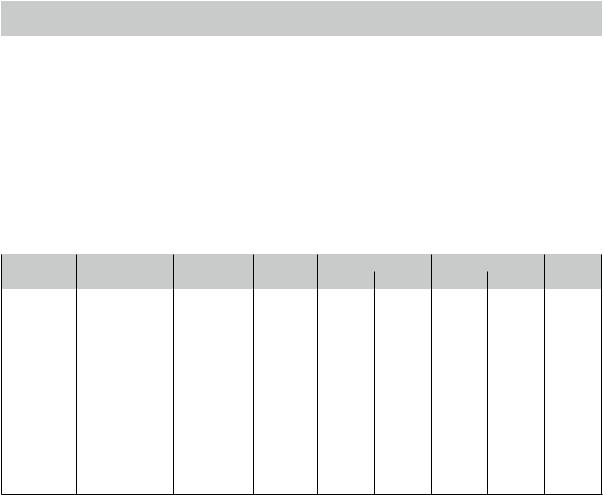
Compatible Resolutions
Kompatible Auflösungen Résolutions compatibles
The monitor supports the following resolutions. Der Monitor unterstützt die folgenden Auflösungen.
Ce moniteur prend en charge les résolutions suivantes.
DisplayPort |
|
|
|
|
|
|
|
|
√ : Supported |
||||
|
|
|
|
|
|
|
|
|
|
||||
|
|
|
|
|
|
|
|
|
|
|
|
|
|
|
Resolution |
|
|
Applicable |
vertical scan |
Dot Clock |
Single |
PbyP*1 |
|
PinP*1 |
|||
|
|
|
signal |
frequency |
Landscape |
Portrait |
Landscape |
Portrait |
|
Landscape |
|||
|
|
|
|
|
|
|
|||||||
|
720×400 |
|
|
VGA TEXT |
70 Hz |
|
|
√ |
√ |
√ |
√ |
|
√ |
|
640×480 |
|
|
VGA |
60 Hz |
|
|
√ |
√ |
√ |
√ |
|
√ |
|
800×600 |
|
|
VESA |
60 Hz |
|
|
√ |
√ |
√ |
√ |
|
√ |
|
1024×768 |
|
|
VESA |
60 Hz |
|
|
√ |
√ |
√ |
√ |
|
√ |
|
1200×1600 |
|
|
VESA |
60 Hz |
280 MHz |
- |
- |
√ |
- |
|
- |
|
|
1280×1024 |
|
|
VESA |
60 Hz |
√ |
√ |
√ |
√ |
|
√ |
||
|
|
|
(Max.) |
|
|||||||||
|
1280×1600 |
|
|
VESA CVT RB |
60 Hz |
- |
- |
√ |
- |
|
- |
||
|
|
|
|
|
|
||||||||
|
1600×1200 |
|
|
VESA |
60 Hz |
|
|
√ |
√ |
- |
√ |
|
√ |
|
1600×1280 |
|
|
VESA CVT RB |
60 Hz |
|
|
- |
- |
- |
√ |
|
- |
|
1600×2560 |
|
|
VESA CVT RB |
60 Hz |
|
|
- |
√ |
- |
- |
|
- |
|
2560×1600 |
|
|
VESA CVT RB |
60 Hz |
|
|
√ |
- |
- |
- |
|
√ |
DVI-1 / DVI-2 |
|
|
|
|
|
|
|
|
|
|
|||
|
|
|
|
|
|
|
|
|
|
|
|
||
|
Resolution |
Applicable |
vertical scan |
Dot Clock |
|
Single |
PbyP*1 |
|
PinP*1 |
||||
|
signal |
frequency |
|
Landscape |
Portrait |
Landscape |
Portrait |
|
Landscape |
||||
|
|
|
|
|
|
|
|||||||
720×400 |
|
|
VGA TEXT |
70 Hz |
|
|
√ |
√ |
√ |
√ |
|
√ |
|
|
640×480 |
|
|
VGA |
60 Hz |
|
|
√ |
√ |
√ |
√ |
|
√ |
|
800×600 |
|
|
VESA |
60 Hz |
|
|
√ |
√ |
√ |
√ |
|
√ |
|
1024×768 |
|
|
VESA |
60 Hz |
DVI-1 : |
|
√ |
√ |
√ |
√ |
|
√ |
|
1200×1600 |
|
|
VESA |
60 Hz |
|
- |
- |
√ |
- |
- |
||
|
|
280 MHz |
|
||||||||||
|
1280×1024 |
|
|
VESA |
60 Hz |
|
√ |
√ |
√ |
√ |
|
√ |
|
|
|
(Max.) |
|
|
|||||||||
|
1280×1600 |
|
|
VESA CVT RB |
60 Hz |
|
- |
- |
√ |
- |
- |
||
|
|
DVI-2 : |
|
||||||||||
|
1600×1200 |
|
|
VESA |
60 Hz |
|
√ |
√ |
- |
√ |
|
√*3 |
|
|
|
165 MHz |
|
|
|||||||||
|
1600×1280 |
|
|
VESA CVT RB |
60 Hz |
|
- |
- |
- |
√ |
- |
||
|
|
(Max.) |
|
||||||||||
1600×2560 |
|
|
VESA CVT RB |
60 Hz |
|
- |
√*3 |
- |
- |
- |
|||
|
|
|
|
||||||||||
|
1600×2560 |
|
|
Single Link |
30 Hz |
|
|
- |
√ |
- |
- |
- |
|
|
2560×1600 |
|
|
VESA CVT RB |
60 Hz |
|
|
√*3 |
- |
- |
- |
- |
|
|
2560×1600*2 |
|
|
VESA CVT RB |
30 Hz |
|
|
√ |
- |
- |
- |
|
√*3 |
*1 For details, refer to the User’s Manual (on the CD-ROM). The applicable signal for the sub screen (Sub) for “PinP” differs.
*1 Einzelheiten entnehmen Sie dem Benutzerhandbuch (auf der CD-ROM). Das geeignete Signal für den Nebenbildschirm (Neben) für „PinP“ ist unterschiedlich.
*1 Reportez-vous au Manuel d’utilisation (sur le CD-ROM) pour obtenir plus de détails. Le signal applicable pour le sous-écran (Sous) pour « PinP » diffère.
*1 CD-ROM “PinP”
*2 Single Link
*3 Only supported by DVI-1
*3 Nur von DVI-1 unterstützt
*3 Uniquement compatible avec DVI-1
*3 DVI-1
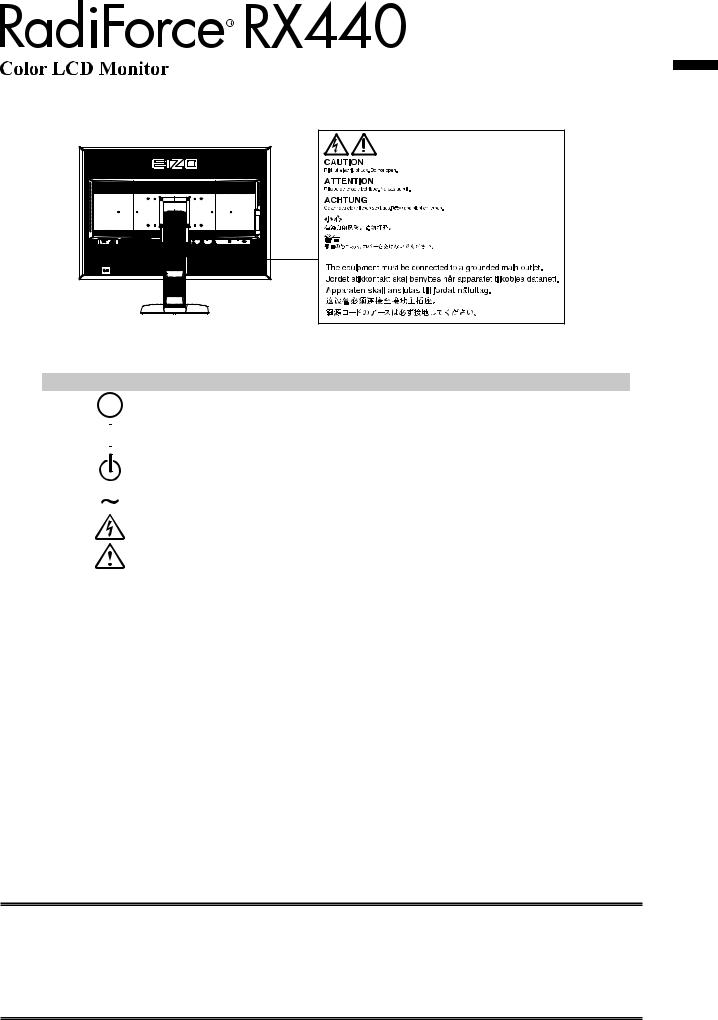
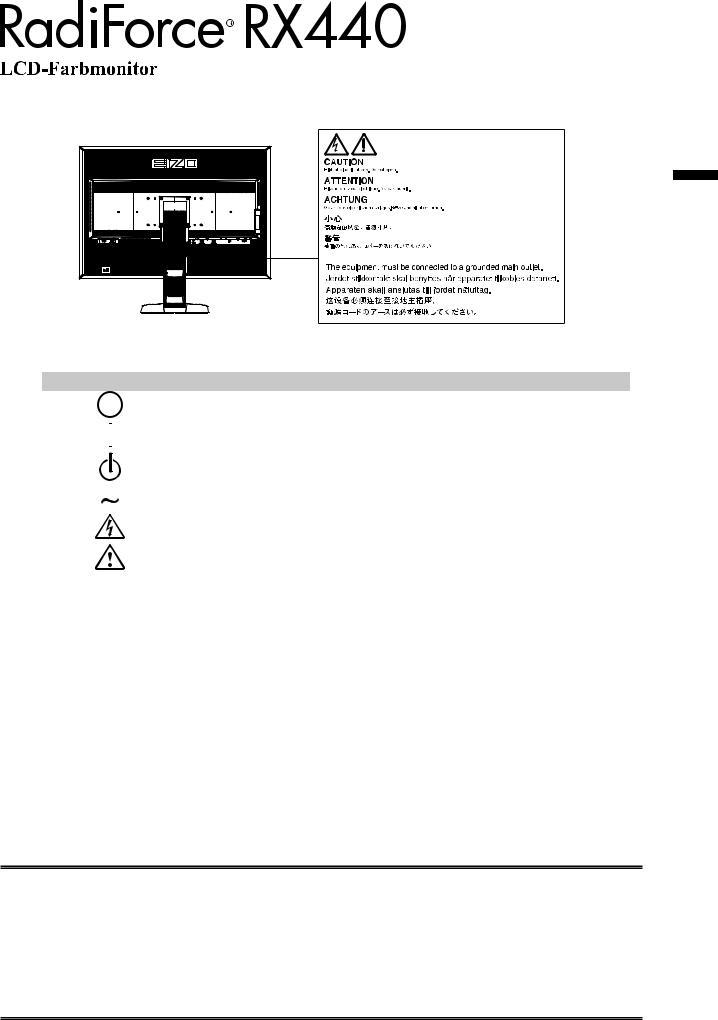
Location of the Caution Statements
Symbols on the unit
Symbol |
|
This symbol indicates |
|
|
|
Main Power Switch: |
Press to turn the monitor’s main power off. |
|
|
|
|
|
|
Main Power Switch: |
Press to turn the monitor’s main power on. |
|
|
||
|
|
|
|
|
|
Power button: |
Press to turn the monitor’s power on or off. |
|
|
|
|
|
|
Alternating current |
|
|
|
|
|
|
|
Alerting electrical hazard |
|
|
|
|
|
|
|
CAUTION: |
Refer to SAFETY SYMBOLS section in PRECAUTIONS. |
|
|
|
|
No part of this manual may be reproduced, stored in a retrieval system, or transmitted, in any form or by any means, electronic, mechanical, or otherwise, without the prior written permission of EIZO Corporation.
EIZO Corporation is under no obligation to hold any submitted material or information confidential unless prior arrangements are made pursuant to EIZO Corporation’s receipt of said information. Although every effort has been made to ensure that this manual provides up-to-date information, please note that EIZO monitor specifications are subject to change without notice.
English
1

Package Contents
Check that all the following items are included in the packaging box. If any items are missing or damaged, contact your local EIZO representative.
Note
• Please keep the packaging box and materials for future movement or transport of the monitor.
• |
Monitor |
• |
EIZO LCD Utility Disk (CD-ROM) |
• |
Power cord |
• |
Setup Manual (this manual) |
|
|
• PRECAUTIONS |
|
|
|
• |
VESA Mounting Screws: M4 × 12: 2 pcs. |
•Digital signal cable : DisplayPort - DisplayPort (PP300)
•Digital signal cable : DVI-D - DVI-D (Dual Link) (DD300DL)
•USB cable : UU300
Controls and Functions
8 |
Adjustment menu*1
|
18 |
|
19 |
7 |
17 |
|
|
|
|
|
|
|
|
|
20 |
1 |
2 |
3 |
4 |
5 |
6 |
9 |
10 |
11 |
12 13 14 15 16 |
1. |
Presence Sensor |
Detects the movement of a person in front of the monitor. |
2. |
button |
Switches the CAL Switch mode. |
3. |
button |
Cancels the setting/adjustment and exits the Adjustment menu. |
4. |
button |
Chooses and increases/decreases adjustment settings for advanced adjustment |
|
|
using the Adjustment menu. |
5. |
button |
Displays the Adjustment menu, determines an item on the menu screen, and saves |
|
|
values adjusted. |
6. |
button |
• Turns the power on or off. |
•Indicates the monitor’s operation status.
Green: Operating, Orange: Power saving mode, Off: Main power/power off
7.Ambient Light Sensor Measures the environmental illuminance.
8.Integrated Front Sensor Used for calibration and Grayscale Check.
(slide type)
9.Main power switch Turns the main power on or off.
10. |
Power connector |
Connects the power cord. |
11. |
PS/2 connector |
Used for maintenance. Do not use for other applications. This may cause the monitor |
|
|
to malfunction. |
12.Input signal connector DVI-D connector (DVI-2 : Single Link)
13.Input signal connector DVI-D connector (DVI-1 : Dual Link)
14. |
|
Input signal connector |
DisplayPort connector |
|||
15. |
|
USB upstream port |
Connects the USB cable to use the software that needs USB connection, or to use |
|||
|
|
|
|
|
|
USB Hub function. |
16. |
|
USB downstream port |
Connects a peripheral USB device. |
|||
17. |
|
Security lock slot |
Complies with Kensington’s MicroSaver security system. |
|||
18. |
|
|
|
|
mark |
Protective earth terminal |
|
|
|
|
|||
|
|
|
|
|||
19. |
|
Stand |
Used to adjust the height and angle of the monitor screen. |
|||
20. |
|
Cable holder |
Covers the monitor cables. |
|||
*1 |
|
For instructions for use, refer to the User’s Manual (on the CD-ROM). |
||||
2
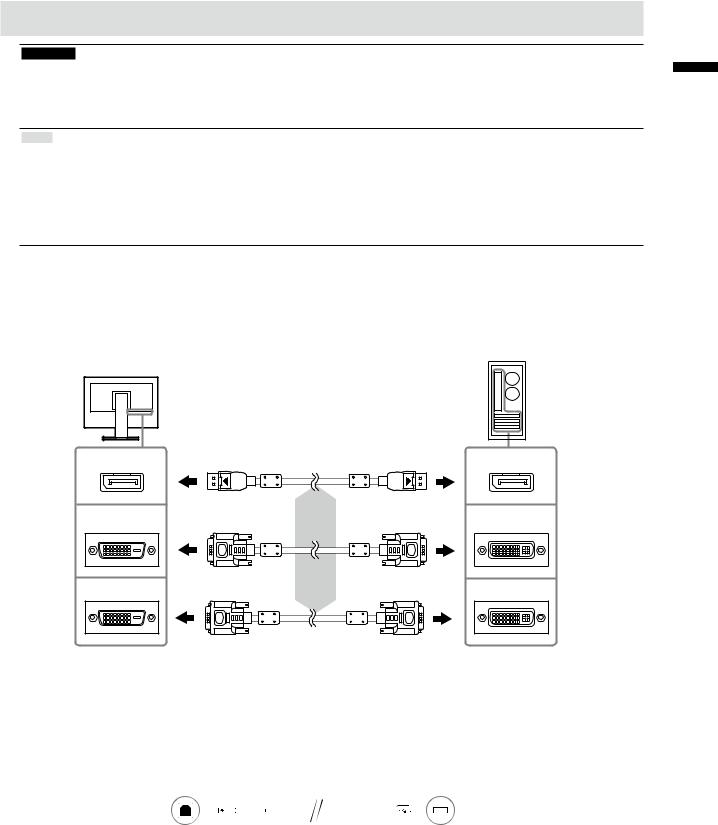
Connecting Cables
Attention
• Check that the monitor and the PC are powered off.
•When replacing the current monitor with this monitor, be sure to change the PC settings for resolution and vertical scan frequency to those that are available for this monitor. Refer to the compatible resolution table (back of cover page) before connecting the PC.
Note
•When connecting multiple PCs to this product, or displaying the images from two signals at the same time using one PC, refer to the User’s Manual (on the CD-ROM).
•When two signals are displayed at the same time using the “PinP” or “PbyP” functions, the following input signals are displayed on the “Main” and “Sub” screens. For details, refer to the User’s Manual (on the CD-ROM).
-Main: DisplayPort or DVI-1
-Sub: DVI-2
1.Connect the signal cables to the input signal connectors and PC.
Check the shape of the connectors, and connect the cables.
After connecting the signal cable, tighten the screws of the connectors to secure the coupling.
DisplayPort |
Digital connection |
|
DisplayPort |
|
(DisplayPort) |
|
|
|
|
Signal cable: DisplayPort - DisplayPort |
|
DVI-1 |
|
(supplied) |
DVI |
|
or |
||
|
|
|
|
|
Digital connection |
Signal cable: DVI-D - DVI-D(Dual Link) |
|
DVI-2 |
(DVI) |
(supplied) |
DVI |
|
Signal cable: DVI-D - DVI-D(Single Link) (option)
2.Plug the power cord into a power outlet and the power connector on the monitor.
3.Connect the USB cable when using RadiCS LE or ScreenManager Pro for Medical.
Connecting to the Monitor |
Connecting to a Computer |
||||||||
|
|
|
|
|
|
|
|
|
|
|
|
|
|
|
|
|
|
|
|
4.Press  to turn on the monitor.
The monitor’s power indicator lights up green.
5.Turn on the PC.
The screen image appears.
If an image does not appear, refer to “No picture” (page 6) for additional advice.
English
3
Attention
•Turn off the monitor and PC after using them.
•For the maximum power saving, it is recommended that the Power button be turned off. Turning off the main power switch or unplugging the power cord completely shuts off power supply to the monitor.
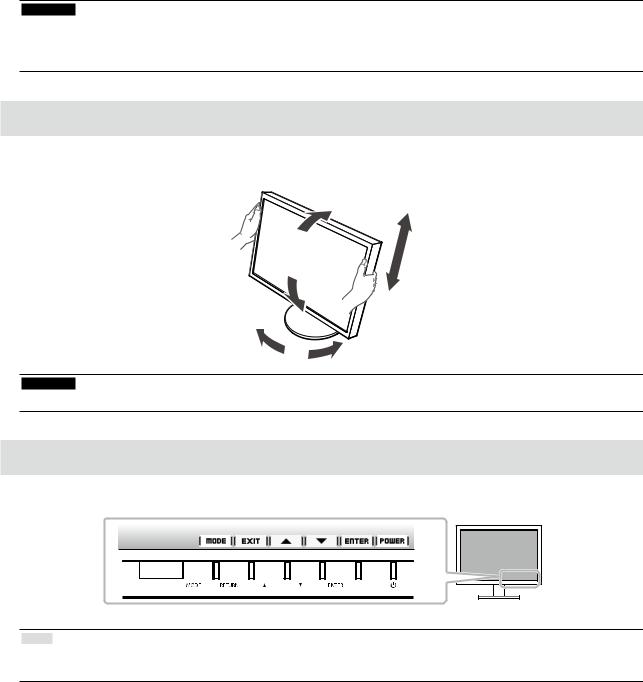
Adjusting the Screen Height and Angle
Hold left and right edge of the monitor with both hands, and adjust the screen height, tilt and swivel of the screen to the best condition for working.
Attention
• Be sure that the cables are correctly connected.
Showing Button Guide
Press the front buttons (except  button), the Button Guide appears above the button.
Note
•The Button Guide will continue to appear while the Adjustment menu or mode menu is showing.
•The Button Guide is displayed differently depending on the selected menu or status.
4

Selecting Display Mode
This function allows easy selection of a desired mode according to monitor application.
√: Calibration is available.
Mode |
Purpose |
|
1-DICOM |
Available to display in DICOM mode. |
√ |
2-Custom |
Available for the setting according to your preference. |
√ |
3-CAL1/4-CAL2/5-CAL3 |
Displays the screen adjusted by calibration software. |
√ |
6-Hybrid-γ |
Automatically identifies the display area for the monochrome and |
- |
|
color images on the same screen, and displays each set status. |
|
7-sRGB |
Suitable for color matching with sRGB compatible peripherals. |
- |
8-Text |
Suitable for displaying texts for word processing or spreadsheets. |
- |
9-ALT*1 |
Suitable for displaying the color with the brightness and grayscale |
- |
|
appropriate for the environmental illumination. |
|
*1 The items described above may not be displayed correctly depending on the usage environment. The quality of the monitor cannot be managed using this mode.
The mode menu appears.
Procedure
1.Press 
 .
.
The mode menu appears at the bottom left of the screen.
2.The mode among the list is highlighted in turn each time 
 is pressed.
You can switch the mode with or
or while the mode menu is displayed.
→1-DICOM←→2-Custom←→3-CAL1←→4-CAL2←→5-CAL3←→6-Hybrid-γ←→ 7-sRGB←→ 8-Text ←→ 9-ALT ←
Controlling Monitor Quality
The quality control software “RadiCS LE” (for Windows) is included with this monitor.
To calibrate the monitor and manage the calibration history, install RadiCS LE with reference to the RadiCS LE User's Manual (on the CD-ROM). Use the RadiCS SelfQC function and built-in Integrated Front Sensor to perform periodic calibration and Grayscale Check for the monitor independently. For details, refer to the User’s Manual (on the CDROM).
Attention
• Connect the monitor to the PC with a USB cable when using RadiCS LE.
Note
•To perform advanced quality control that conforms to medical standards, use the optional monitor quality control software kit “RadiCS UX1”.
English
5
No picture
If a problem still remains after applying the suggested remedies, contact your local EIZO representative.
|
Problem |
|
Possible cause and remedy |
1. |
No picture |
• |
Check whether the power cord is connected properly. |
• |
Power indicator does not light. |
• |
Turn the main power switch on. |
|
|
• |
Press . |
|
|
• |
Turn off the main power, and then turn it on again a few |
|
|
|
minutes later. |
• |
Power indicator is lighting green. |
• |
Increase “Brightness”, “Contrast”, or “Gain” in the |
|
|
|
Adjustment menu. |
• |
Power indicator is lighting orange. |
• |
Switch the input signal. For details, refer to the User’s |
|
|
|
Manual (on the CD-ROM). |
|
|
• |
Operate the mouse or keyboard. |
|
|
• |
Check whether the PC is turned on. |
|
|
• |
When Presence Sensor is set to “Auto” or “Manual”, the |
|
|
|
monitor may have shifted to the power saving mode. |
|
|
|
Come near to the monitor. |
• |
Power indicator flashes orange and green. |
• |
There is a problem in the device that uses DisplayPort |
|
|
|
connection. Solve the problem, turn off the monitor, and |
|
|
|
then turn it on again. Refer to the user’s manual of the |
|
|
|
device that uses DisplayPort connection for details. |
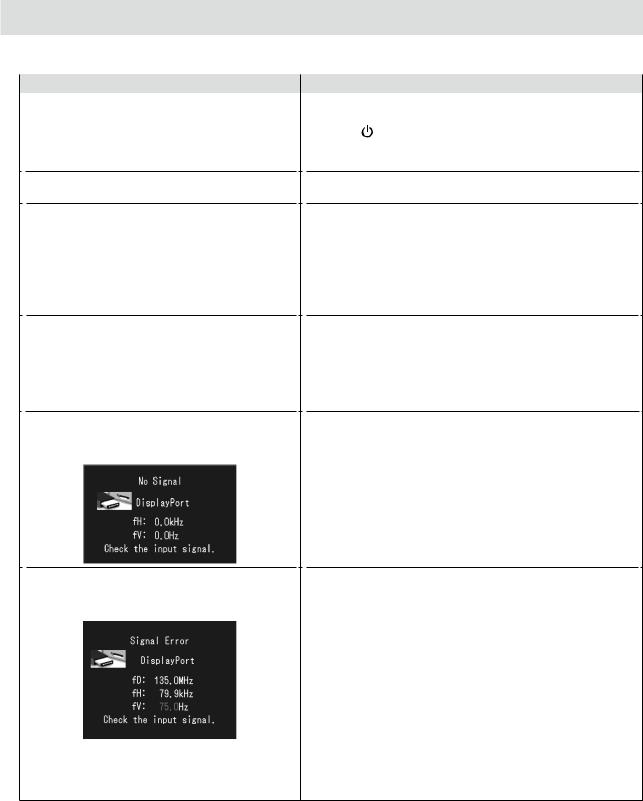
2. The message below appears. |
This message appears when the signal is not input correctly |
||
• |
This message appears when no signal is |
even when the monitor functions properly. |
|
• |
The message shown left may appear, because some PCs |
||
|
input. |
|
do not output the signal soon after power-on. |
|
Example: |
• |
Check whether the PC is turned on. |
|
|
• |
Check whether the signal cable is connected properly. |
|
|
• |
Switch the input signal. For details, refer to the User’s |
|
|
|
Manual (on the CD-ROM). |
• The message shows that the input signal is |
• |
Check whether the PC is configured to meet the resolution |
out of the specified frequency range. |
|
and vertical scan frequency requirements of the monitor |
Example: |
|
(see “Compatible Resolutions”). |
|
• |
Reboot the PC. |
|
• |
Select an appropriate display mode using the graphics |
|
|
board’s utility. Refer to the manual of the graphics board |
|
|
for details. |
fD: Dot Clock
fH: Horizontal Scan Frequency fV: Vertical scan frequency
6
Stelle der Warnungshinweise
Deutsch
Symbole am Gerät
Symbol |
|
Bedeutung |
|
|
|
Hauptnetz-Schalter: |
Drücken, um das Netzteil des Monitors auszuschalten. |
|
|
|
|
|
|
Hauptnetz-Schalter: |
Drücken, um das Netzteil des Monitors einzuschalten. |
|
|
||
|
|
|
|
|
|
Netzschalter: |
Drücken, um den Monitor einund auszuschalten. |
|
|
|
|
|
|
Wechselstrom |
|
|
|
|
|
|
|
Warnung vor elektrischem Schlag |
|
|
|
|
|
|
|
ACHTUNG: |
Informationen zu den SICHERHEITSSYMBOLEN finden |
|
|
Sie in den VORSICHTSMASSNAHMEN. |
|
|
|
|
|
Kein Teil dieses Handbuchs darf ohne die vorherige schriftliche Zustimmung von EIZO Corporation in irgendeiner Form oder mit irgendwelchen Mitteln – elektronisch, mechanisch oder auf andere Weise – reproduziert, in einem Suchsystem gespeichert oder übertragen werden.
EIZO Corporation ist in keiner Weise verpflichtet, zur Verfügung gestelltes Material oder Informationen vertraulich zu behandeln, es sei denn, es wurden mit EIZO Corporation beim Empfang der Informationen entsprechende Abmachungen getroffen. Obwohl größte Sorgfalt aufgewendet wurde, um zu gewährleisten, dass die Informationen in diesem Handbuch dem neuesten Stand entsprechen, ist zu beachten, dass die Spezifikationen der Monitore von EIZO ohne vorherige Ankündigung geändert werden können.
1
 Loading...