


Setup Manual
Important: Please read this Setup Manual and the User’s Manual stored on the CDROM carefully to familiarize yourself with safe and effective usage. Please retain this manual for future reference.
Installationshandbuch
Wichtig: Lesen Sie dieses Installationshandbuch und das Benutzerhandbuch (auf der CD-ROM) aufmerksam durch, um sich mit der sicheren und effizienten Bedienung vertraut zu machen. Bewahren Sie dieses Handbuch zum späteren Nachschlagen auf.
Manuel d’installation
Important : Veuillez lire attentivement ce manuel d’installation, ainsi que le manuel d’utilisation inclus sur le CD-ROM, pour vous familiariser avec une utilisation efficace et en toute sécurité. Veuillez conserver ce manuel pour référence ultérieure.
Manual de instalación
Importante: Lea detenidamente este Manual de instalación y el Manual del usuario (en el CD-ROM) para familiarizarse con las normas de seguridad y procedimientos de uso. Conserve este manual para consultas posteriores.
Manuale di installazione
Importante: si consiglia di leggere con attenzione il presente Manuale di installazione e il Manuale dell’utente (sul CD-ROM in dotazione) per acquisire le informazioni necessarie per un utilizzo sicuro ed efficace. Conservare il manuale per consultazioni future.
Installationshandboken
Viktigt: Läs den här installationshandboken och bruksanvisningen som finns på CDskivan noggrant så att du känner dig säker och får ett effektivt användande av produkten. Behåll manualen för framtida behov.
Εγχειρίδιο εγκατάστασης
Σημαντικό: Διαβάστε προσεκτικά αυτό το εγχειρίδιο εγκατάστασης και το εγχειρίδιο χρήσης που είναι αποθηκευμένο στο CD-ROM για να εξοικειωθείτε με την ασφαλή και αποτελεσματική χρήση της μονάδας. Διατηρήστε αυτό το εγχειρίδιο για μελλοντική χρήση.
Руководство по установке
Важно! Внимательно прочитайте настоящее Руководство по установке и Руководство пользователя на диске CD-ROM для получения сведений о безопасной и эффективной эксплуатации. Сохраните это руководство для справки.
Greece Svenska Italiano Español Français Deutsch English
Russia

Compatible Resolutions/Frequencies Kompatibla upplösningar/frekvenser KompatibleAuflösungen/Bildwiederholfrequenzen Συμβατές αναλύσεις/Συχνότητες Résolutions/Fréquences compatibles Поддерживаемые разрешения/частоты Frecuencias y resoluciones compatibles
Risoluzioni/Frequenze compatibili:
The monitor supports the following resolutions. |
Skärmen stöder följande upplösningar. |
|
||||
Der Monitor unterstützt die nachfolgend aufgeführtenAuflösungen. Η οθόνη υποστηρίζει τις παρακάτω αναλύσεις. |
||||||
Le moniteur est compatible avec les résolutions suivantes. Монитор поддерживает следующие разрешения. |
||||||
El monitor admite las siguientes resoluciones. |
|
|
||||
Il monitor supporta le seguenti risoluzioni. |
|
|
|
|||
Analog Input |
|
|
|
|
||
Resolution |
Frequency |
Remarks |
S2031W |
S2431W |
||
Dot Clock ~ 150 MHz |
Dot Clock 202.5 MHz |
|||||
|
|
|
|
|||
640 |
× 480 |
67 Hz |
Apple Macintosh |
|
|
|
640 |
× 480 |
~85 Hz |
VGA, VESA |
|
|
|
720 |
× 400 |
70 Hz |
VGA TEXT |
|
|
|
800 |
× 600 |
~85 Hz |
VESA |
|
|
|
832 |
× 624 |
75 Hz |
Apple Macintosh |
|
|
|
1024 |
× 768 |
~85 Hz |
VESA |
|
|
|
1152 |
× 864 |
75 Hz |
VESA |
|
|
|
1152 |
× 870 |
75 Hz |
Apple Macintosh |
|
|
|
1280 |
× 960 |
60 Hz |
VESA |
|
|
|
1280 |
× 960 |
75 Hz |
Apple Macintosh |
|
|
|
1280 |
× 1024 |
~85 Hz |
VESA |
(~ 75 Hz) |
|
|
1600 |
× 1200 |
~75 Hz |
VESA |
– |
|
|
*1 *3 1680 |
× 1050 |
60 Hz |
VESA CVT, VESA CVT RB |
|
|
|
*2 *3 1920 |
× 1200 |
60 Hz |
VESA CVT, VESA CVT RB |
– |
|
|
Digital Input |
|
|
|
|
||
Resolution |
Frequency |
Remarks |
S2031W |
S2431W |
||
Dot Clock ~ 120 MHz |
Dot Clock ~ 162 MHz |
|||||
|
|
|
|
|||
640 |
× 480 |
60 Hz |
VGA |
|
|
|
720 |
× 400 |
70 Hz |
VGA TEXT |
|
|
|
800 |
× 600 |
60 Hz |
VESA |
|
|
|
1024 |
× 768 |
60 Hz |
VESA |
|
|
|
1280 |
× 960 |
60 Hz |
VESA |
|
|
|
1280 |
× 1024 |
60 Hz |
VESA |
|
|
|
1600 |
× 1200 |
60 Hz |
VESA |
– |
|
|
*3 1680 |
× 1050 |
60 Hz |
VESA CVT |
– |
|
|
*1 *3 1680 |
× 1050 |
60 Hz |
VESA CVT RB |
|
|
|
*2 *3 1920 |
× 1200 |
60 Hz |
VESA CVT RB |
– |
|
|
*1 Recommended resolution (S2031W: Set this resolution) |
*2 |
Recommended resolution (S2431W: Set this resolution) |
|
*1 EmpfohleneAuflösung (S2031W: dieseAuflösung festlegen) |
*2 |
EmpfohleneAuflösung (S2431W: dieseAuflösung festlegen) |
|
*1 Résolutionrecommandée(S2031W:Réglezvotreappareilsurcetterésolution) |
*2 |
Résolutionrecommandée(S2431W:Réglezvotreappareilsurcetterésolution) |
|
*1 Resolución recomendada (S2031W: ajuste esta resolución) |
*2 |
Resolución recomendada (S2431W: ajuste esta resolución) |
|
*1 Risoluzione consigliata (S2031W: impostare questo valore di risoluzione) |
*2 |
Risoluzione consigliata (S2431W: impostare questo valore di risoluzione) |
|
*1 |
Rekommenderad upplösning (S2031W: Ställ in den här upplösningen) |
*2 |
Rekommenderad upplösning (S2431W: Ställ in den här upplösningen) |
*1 |
Προτεινόμενη ανάλυση (S2031W: Επιλέξτε αυτή την ανάλυση) |
*2 |
Προτεινόμενη ανάλυση (S2431W: Επιλέξτε αυτή την ανάλυση) |
*1 |
Рекомендованноеразрешение(S2031W:Установитеданноеразрешение) *2 |
Рекомендованноеразрешение(S2431W:Установитеданноеразрешение) |
|
*1 (S2031W: ) |
*2 (S2431W: ) |
||
*3 When displaying the wide format input signal, a graphics board in conformance with VESA CVT standard is required. *3 ZurAnzeige des Eingangssignals für das Breitbild ist eine Grafikkarte erforderlich, die dieAnforderungen des Standards VESACVT erfüllt. *3 Lors de l’affichage du signal d’entrée format large, une carte vidéo conforme à la norme VESA CVT est requise.
*3 Se necesita una tarjeta gráfica compatible con el estándar VESACVT para visualizar la señal de entrada con formato panorámico. *3 Per visualizzare il segnale di ingresso in formato ampio, è necessaria una scheda grafica conforme allo standard VESACVT.
*3 Vid visning med ingångssignalen för bredbildsformat, krävs ett grafikkort som uppfyller VESA CVT-standard.
*3 Όταν εμφανίζεται το σήμα εισόδου οθόνης μεγάλου μεγέθους, απαιτείται κάρτα γραφικών συμβατή με το πρότυπο VESACVT.
*3 Для отображения широкоформатного входного сигнала графическая карта должна соответствовать стандарту VESACVT.
*3 VESA CVT
Copyright© 2007 EIZO NANAO CORPORATION All rights reserved. Copyright© 2007 EIZO NANAO CORPORATION. Alle Rechte vorbehalten. Copyright© 2007 EIZO NANAO CORPORATION. Tous droits réservés. Copyright© 2007 EIZO NANAO CORPORATION Todos los derechos reservados. Copyright© 2007 EIZO NANAO CORPORATION Tutti i diritti riservati. Copyright© 2007 EIZO NANAO CORPORATION Med ensamrätt.
Copyright© 2007 EIZO NANAO CORPORATION Με την επιφύλαξη παντός δικαιώματος.
©EIZO NANAO CORPORATION, 2007. Все права защищены.
©2007 EIZO NANAO CORPORATION

Prior to use
Color LCD Monitor
SAFETY SYMBOLS
This manual uses the safety symbols below. They denote critical information. Please read them carefully.
WARNING |
CAUTION |
Failure to abide by the information in a WARNING |
Failure to abide by the information in a CAUTION |
may result in serious injury and can be life threatening. |
may result in moderate injury and/or property or |
|
product damage. |
Indicates a prohibited action. |
|
Indicates a mandatory action that must be followed. |
|
PRECAUTIONS
 WARNING
If the unit begins to emit smoke, smells like |
Use the enclosed power cord and connect to |
something is burning, or makes strange |
the standard power outlet of your country. |
noises, disconnect all power connections |
Be sure to remain within the rated voltage of the power |
immediately and contact your dealer for |
cord. Not doing so may result in fire or electric shock. |
advice. |
Power Supply: 100-120/200-240 Vac 50/60Hz |
Attempting to use a malfunctioning unit may result in |
|
fire, electric shock, or equipment damage. |
|
Keep small objects or liquids away from the |
Set the unit in an appropriate location. |
unit. |
Not doing so may result in fire, electric shock, or |
Small objects accidentally falling through the |
equipment damage. |
ventilation slots into the cabinet or spillage into the |
• Do not place outdoors. |
cabinet may result in fire, electric shock, or equipment |
• Do not place in the transportation system (ship, |
damage. If an object or liquid falls/spills into the |
aircraft, trains, automobiles, etc.). |
cabinet, unplug the unit immediately. Have the unit |
• Do not place in a dusty or humid environment. |
checked by a qualified service engineer before using it |
• Do not place in a location where the steam comes |
again. |
directly on the screen. |
|
• Do not place near heat generating devices or a |
|
humidifier. |
The equipment must be connected to a grounded main outlet.
Not doing so may result in fire or electric shock.
 CAUTION
Do not block the ventilation slots on the cabinet.
•Do not place any objects on the ventilation slots.
•Do not install the unit in a closed space.
•Do not use the unit laid down or upside down. Blocking the ventilation slots prevents proper airflow and may result in fire, electric shock, or equipment damage.
Use an easily accessible power outlet.
This will ensure that you can disconnect the power quickly in case of a problem.
About Setup Manual and User’s Manual
|
Setup Manual |
Describes basic information ranging from connection of the monitor to a |
|
||
|
(this manual) |
PC to using the monitor. |
|
|
|
|
User’s Manual |
Describes application information such as screen adjustments, settings, |
|
and specifications. |
|
|
(•PDF file on the CD-ROM*) |
|
|
|
|
|
|
|
*Installation of Adobe Reader is required.
• Product specifications vary with sales areas. Confirm that the manual is written in the language of the area of purchase.
1
English

English
Prior to use
Package Contents
Check that all the following items are included in the packaging box. If any items are missing or damaged, contact your local dealer.
NOTE
• Please keep the packaging box and materials for future movement or transport of the monitor.
□Monitor
□Power cord
□Digital signal cable (FD-C39)
□Analog signal cable (MD-C87)
□Stereo mini jack cable
□EIZO LCD Utility Disk (CD-ROM)
• User’s Manual
□Setup Manual (this manual)
□Limited warranty
□Recycling Information
□Mounting Screws (M4 x 12, 4 pcs)
□Cable holder (for EZ-UP stand)
□ EIZO USB cable (MD-C93)
Controls and Functions
Adjustment menu 


 (*ScreenManager ®)


1 |
2 |
3 |
4 |
5 |
6 |
7 |
8 |
|
14 |
15 |
|
|
|
9 |
16 |
|
[S2431W] |
[S2031W] |
|
10 |
11 12 |
13 |
13 |
12 11 |
10 |
1 |
Sensor |
Detects ambient brightness. BrightRegulator function (page 6). |
2 |
Volume control buttons |
Displays the volume adjustment menu to volume up or down. |
3Input Signal Selection button Switches input signals for display when two PCs are connected to the
|
|
monitor. |
4 |
Mode button |
Allows you to switch the display mode. |
5 |
Enter button |
Displays the Adjustment menu, determines an item on the menu screen, and |
|
|
saves values adjusted. |
6Control buttons (Left, Down, • Chooses an adjustment item or increases/decreases adjusted values for
|
Up, Right) |
advanced adjustments using the Adjustment menu (page 6). |
||
|
|
• or button: Displays the brightness adjustment window (page 6). |
||
7 |
Power button |
Turns the power on or off. |
|
|
8 |
Power indicator |
Indicates monitor’s operation status. |
|
|
|
|
Blue: Operating |
Orange: Power saving |
Off: Power off |
9 |
Security lock slot |
Complies with Kensington’s MicroSaver security system. |
||
10 |
Power connector |
Connects the power connector. |
|
|
11 |
Stereo mini jack |
Connects the stereo mini jack cable. |
|
|
12 |
Input signal connectors |
DVI-I Connector/D-Sub mini 15-pin connector |
|
|
13 |
USB port (Up) |
Connects the USB cable to use the ScreenManager Pro for LCD software |
||
|
|
(for Windows). For how to use it, refer to the User’s Manual on the CD-ROM. |
||
|
USB Port (Down) |
Connects a peripheral USB device. |
|
|
14 |
Stand |
Used to adjust the height and angle of the monitor screen. |
||
15 |
Cable holder |
Covers the monitor cables. |
|
|
16 |
Option speaker (i·Sound L3) |
Used to attach the option speaker (i·Sound L3). (May not allowed to attach |
||
|
mounting holes |
the option speaker depending on the stand type.) |
|
|
* ScreenManager ® is an EIZO’s nickname of theAdjustment menu. (For how to use ScreenManager, refer to the User’s Manual on the CD-ROM.)
2

Installation
Installation/storage of the monitor with EZ-UP stand
If you have purchased the monitor with EZ-UP stand, please perform the following procedures when installing and storing.
The stand of the monitor is locked with a lock metal fitting at the packing. Remove the lock metal fitting after placing the monitor on the desk or the stand may be unfolded suddenly. Keep the lock metal fitting for future movement or transportation of the monitor.
Installing the monitor
1 Lift the monitor screen in the arrow direction.
Lift it by holding the panel portion with both hands, until you may hear the “click”. If it clicks, the monitor stand lock is surely functioned to use the monitor.
2 Lower the monitor screen position, and remove the lock metal fitting.
1
2 |
Lock metal fitting |
|
|
Hinge |
Stand Base |
|
Attention
•Removing the lock metal fitting may allow the stand unfolding suddenly.
•Do not use the monitor when the EZ-UP stand is folded.
•After releasing the lock, take care not to catch your fingers when lowering the monitor. This may cause injury or damage the monitor.
Storage the monitor
1 Remove the cable holder.
2Lower the monitor screen position until the hinge of the stand touches the stand base, and attach the lock metal fitting.
Adjust the monitor angle so as the monitor screen not to touch the stand base.
3 Fall the monitor screen backward with keeping slide-up the “Unlock” knob.
When maximally tilting (25º) the monitor screen backward, the “Unlock” knob may be hard to be slid-up. Then, slightly tilt up the monitor to vertical direction and slide-up the “Unlock” knob.
“Unlock” knob
English
3

English
Installation
Connecting Cables
Attention
•When replacing the current monitor with a S2031W/S2431W monitor, be sure to change the PC settings for resolution and vertical frequency to those which are available for the S2031W/S2431W monitor referring to the resolution table (back of cover page) before connecting the PC.
NOTE
• When connecting two PCs to the monitor, refer to the User’s Manual on the CD-ROM.
1 Check that the monitor and the PC are powered off.
2 Connect the monitor to the PC with a signal cable that matches the connectors.
After connecting the cable connectors, tighten the screws of the connectors to secure the coupling.
CD player, etc |
|
|
Connectors on |
|
Connectors on |
the PC |
|
the monitor |
Audio output |
|
Audio input |
connector |
Stereo mini jack cable (supplied) |
connector |
DVI connector |
Signal cable FD-C39 (supplied) |
DVI-I connector |
|
Digital connection |
|
D-Sub mini 15-pin |
Signal cable MD-C87 (supplied) |
D-Sub mini 15-pin |
connector |
connector |
|
Analog connection
3 Plug the power cord into a power outlet and the Power connector on the monitor.
Covering the Monitor Cables
Cover the monitor cables with the cable holder.
Cable holder
Height adjustable stand |
EZ-UP stand |
4
Installation
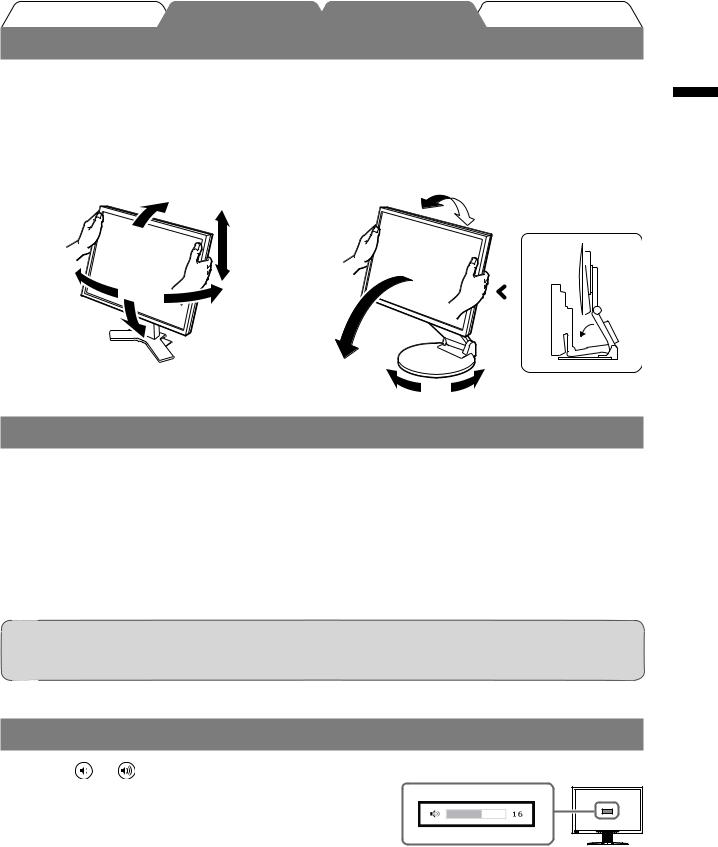
Adjusting the Screen Height and Angle
Hold left and right edge of the monitor with both hands, and adjust the screen height, tilt and swivel of the screen to the best condition for working.
Height adjustable stand |
EZ-UP stand |
||||
Hold left and right edge of the monitor with both hands to |
Hold the left and right edges of the monitor with both |
||||
adjust the screen up, down, left and right directions. |
hands and adjust the screen angle by moving them |
||||
|
upwards, downwards, or to the left or right. |
||||
|
|
|
|
|
|
|
|
|
|
|
|
|
|
|
|
|
|
Displaying the Screen
1 Press  to turn on the monitor.
The monitor’s Power indicator lights up blue.
2 Turn on the PC.
The screen image appears.
When turning on the monitor and PC for the first time with the analog signal, the Auto Adjustment function works to adjust the clock, phase, and display position automatically.
Attention
•Turn off the monitor and PC after using them. Unplugging the power cord completely shuts off power supply to the monitor.
Adjusting Speaker Volume
1 Press |
or . |
Speaker volume adjustment screen |
|
The speaker volume adjustment screen appears.
2 Adjust the speaker volume with  or
or  .
.
English
5

English
Setting/Adjustment
Selecting Display Mode
FineContrast allows you to select the best display mode easily according to monitor’s application. For details of FineContrast, refer to the User’s Manual on the CD-ROM.
FineContrast Mode
Custom |
Available for making desired setting. |
sRGB |
Suitable for color matching with sRGB compatible peripherals. |
Text |
Suitable for displaying texts for word processing or spreadsheets. |
Picture |
Suitable for displaying images such as photos or picture images. |
Movie |
Suitable for playing back animated images. |
1 Press  .
.
The FineContrast mode appears.
2Press  again while the FineContrast mode is displayed.
Each time you press the button, the mode is switched to the other mode. (Refer to the FineContrast Mode table.)
3 Press  at the desired mode.
The selected mode is set.
FineContrast mode name
Displays the current mode.
Adjusting Brightness
1 |
Press |
or |
. |
|
|
|
|
The brightness adjustment screen appears. |
|
Brightness adjustment screen |
|||
2 |
Adjust the brightness with |
or |
. |
|
||
|
Press |
to increase screen brightness or press |
to |
|||
|
decrease. |
|
|
|
|
|
3 |
Press |
at the desired brightness. |
|
|
||
|
The specified brightness is saved. |
|
|
|
||
NOTE
•Screen will be adjusted automatically to the appropriate brightness that accepted environment as the sensor on the lower side of the monitor detects the surrounding brightness with the BrightRegulator function.
For details, refer to the User’s Manual on the CD-ROM.
Performing Advanced Settings/Adjustments
Advanced adjustments for the screen or color |
Adjustment menu |
|
and various settings are available using the |
|
|
Adjustment menu. |
|
|
For details of each adjustment function, refer |
|
|
to the User’s Manual on the CD-ROM. |
|
|
|
At analog signal input |
At digital signal input |
The basic settings and adjustments are completed. For advanced settings/adjustments, refer to the User’s Manual on the CD-ROM.
6

Troubleshooting
No-Picture Problem
If no picture is displayed on the monitor even after the following remedial action is taken, contact your local dealer.
1. Check the Power indicator.
Symptom |
Status |
Possible cause and remedy |
No picture |
Power indicator does not light. |
Check whether the power cord is connected |
|
|
correctly. If the problem persists, turn off the |
|
|
monitor, and then turn it on again a few minutes |
|
|
later. |
|
|
Press . |
|
|
|
|
Power indicator is lighting blue. |
Set each RGB adjusting value in <Gain> to |
|
|
higher level. |
|
Power indicator is lighting |
Switch the input signal with . |
|
orange. |
|
|
Operate the mouse or keyboard. |
|
|
|
|
|
|
Check whether the PC is turned on. |
2. Check the error message on the screen.
These messages appear when the input signal is incorrect even if the monitor is functioning.
Symptom |
Status |
Possible cause and remedy |
|
No signal is input. |
The message shown left may appear, because |
|
|
some PCs do not output the signal soon after |
|
|
power-on. |
|
|
Check whether the PC is turned on. |
|
|
|
|
|
Check whether the signal cable is connected |
At analog signal input |
|
properly. |
|
|
Switch the input signal with . |
At digital signal input
The input signal is out of the |
Reboot the PC. |
|
specified frequency range. |
|
|
Select an appropriate display mode using the |
||
(Such signal frequency is |
||
graphics board’s utility software. Refer to the |
||
displayed in red.) |
||
manual of the graphics board for details. |
||
|
English
7

Memo
English
8
Vor der Benutzung 

LCD-Farbmonitor
SICHERHEITSSYMBOLE
In diesem Handbuch werden die unten dargestellten Sicherheitssymbole verwendet. Sie geben Hinweise auf äußerst wichtige Informationen. Bitte lesen Sie diese Informationen sorgfältig durch.
|
VORSICHT |
|
ACHTUNG |
|
|
Die Nichtbefolgung von unter VORSICHT angegebenen |
|
Die Nichbeachtung unterACHTUNG angegebener |
|
|
Anweisungen kann schwere Verletzungen oder sogar |
|
Informationen kann mittelschwere Verletzungen und/oder |
|
|
lebensbedrohende Situationen zur Folge haben. |
|
Schäden oder Veränderungen des Produkts zur Folge haben. |
|
|
Weist auf eine unerlaubte Vorgehensweise hin. |
|
||
|
|
|
||
|
Weist auf eine zwingend zu befolgende Vorgehensweise hin. |
|
||
|
|
|
|
|
VORSICHTSMASSNAHMEN |
|
|||
VORSICHT |
|
|||
|
|
|||
Wenn das Gerät Rauch entwickelt, verbrannt |
Verwenden Sie zum Anschließen an die |
|||
riecht oder merkwürdige Geräusche produziert, |
landesspezifische Standard-Netzspannung das |
|||
ziehen Sie sofort alle Netzkabel ab, und bitten |
beiliegende Netzkabel. |
|||
Sie Ihren Fachhändler um Rat. |
Stellen Sie sicher, dass die Nennspannung des |
|||
Der Versuch, mit einem fehlerhaften Gerät zu arbeiten, |
Netzkabels nicht überschritten wird. Andernfalls besteht |
|||
kann Feuer, einen elektrischen Schlag oder eine |
Brandund Stromschlaggefahr. |
|||
Beschädigung des Geräts verursachen. |
Stromversorgung: 100 - 120/200 - 240 Vac 50/60 Hz |
|||
Halten Sie Flüssigkeiten und kleine |
Stellen Sie das Gerät an einen geeigneten |
|||
Gegenstände vom Gerät fern. |
Platz. |
|||
Flüssigkeiten oder kleine Gegenstände können aus |
Andernfalls könnte das Gerät beschädigt werden, und |
|||
Versehen durch die Lüftungsschlitze in das Gehäuse |
es besteht Brandund Stromschlaggefahr. |
|||
gelangen und somit Feuer, einen elektrischen Schlag |
• Verwenden Sie das Gerät nicht im Freien. |
|||
oder eine Beschädigung des Geräts verursachen. Sollte |
• Geben Sie das Gerät nicht als Transportgut auf (per |
|||
Schiff, Flugzeug, Zug, Auto etc.). |
||||
ein Gegenstand oder eine Flüssigkeit in das Gehäuse |
||||
• Installieren Sie es nicht in staubiger oder feuchter |
||||
gelangt sein, ist sofort das Netzkabel des Geräts |
||||
Umgebung. |
||||
abzuziehen. Lassen Sie das Gerät in diesem Fall von |
||||
• Stellen Sie es nicht an einen Platz, an dem Licht direkt |
||||
einem qualifizierten Servicetechniker überprüfen, bevor |
||||
auf den Bildschirm fällt. |
||||
Sie wieder damit arbeiten. |
||||
• Stellen Sie es nicht in die Nähe eines Wärme |
||||
|
|
|
erzeugenden Geräts oder eines Luftbefeuchters. |
|
Das Gerät muss an eine ordnungsgemäß geerdete Steckdose angeschlossen werden.
Andernfalls besteht Brandund Stromschlaggefahr.
 ACHTUNG
Blockieren Sie die Lüftungsschlitze am Gehäuse nicht.
•Legen Sie keine Objekte auf die Lüftungsschlitze.
•Installieren Sie das Gerät nicht in einem engen Raum.
•Setzen Sie das Gerät nur in der korrekten Orientierung ein. Das Blockieren der Lüftungsschlitze führt dazu, dass die Luft nicht mehr zirkulieren und somit Feuer, ein elektrischer Schlag oder eine Beschädigung des Geräts verursacht werden kann.
Schließen Sie das Netzkabel an eine leicht zugängliche Steckdose an.
Damit stellen Sie sicher, dass Sie das Netzkabel im Notfall schnell abziehen können.
Über das Installationshandbuch und das Benutzerhandbuch
|
Installationshandbuch |
Informationen zum Verbinden des Monitors mit dem Computer und zur |
|
||
|
(das vorliegende Handbuch) |
Inbetriebnahme. |
|
||
|
|
|
|
Benutzerhandbuch |
Anwendungsinformationen, beispielsweise zu Bildschirmeinstellungen, |
|
(•PDF-Datei auf CD-ROM*) |
-justierungen und technischen Daten. |
|
|
|
*Erfordert die Installation von Adobe Reader.
•Die Produktspezifikationen variieren in den einzelnen Absatzgebieten. Überprüfen Sie, dass das Handbuch in der Sprache des jeweiligen Absatzgebietes geschrieben ist.
Deutsch
1

Deutsch
Vor der Benutzung 

Lieferumfang
Prüfen Sie, ob sich alle der folgenden Gegenstände in der Verpackung befinden. Sollte einer der Gegenstände fehlen oder beschädigt sein, wenden Sie sich an Ihren Fachhändler.
HINWEIS
• Heben Sie die Verpackung sowie die Verpackungsmaterialien für evtl. Transporte des Monitors gut auf.
□Monitor
□Netzkabel
□Digitales Signalkabel (FD-C39)
□Analoges Signalkabel (MD-C87)
□EIZO USB-Kabel (MD-C93)
□Stereo-Kabel mit Klinkenstecker
□CD-ROM mit EIZOs LCD Utility Disk
• Benutzerhandbuch
□Installationshandbuch (das vorliegende Handbuch)
□Beschränkte Garantie
□Informationen zum Thema Recycling
□Befestigungsschrauben (M4 x 12, 4 Stck.)
□Kabelhalterung (für EZ-UP-Fuß)
Bedienelemente und Funktionen
Justierungsmenü (*ScreenManager ®)


1 |
2 |
3 |
4 |
5 |
6 |
7 |
8 |
|
14 |
15 |
|
|
|
9 |
16 |
|
[S2431W] |
[S2031W] |
|
10 |
11 12 |
13 |
13 |
12 11 |
10 |
1 |
Sensor |
Erkennt die Umgebungshelligkeit. Funktion zur BrightRegulator (Seite 6). |
2Steuertasten für Lautstärke Zeigt das Menü für die Einstellung der Lautstärke zum Reduzieren bzw. Erhöhen der Lautstärke an.
3Taste zurAuswahl des Eingangssignals Schaltet zwischen den Signalen zweier angeschlossener Computer um.
4 |
Taste zur Modusauswahl |
Mithilfe dieser Taste wechseln Sie den Anzeigemodus. |
|
5 |
Eingabetaste |
Zeigt das Justierungsmenü an, wählt ein Element im Menübildschirm und |
|
|
|
speichert geänderte Werte. |
|
6 |
Steuertasten (Links, Unten, |
• Wählt ein Einstellungselement oder erhöht/reduziert justierte Werte |
|
|
Oben, Rechts) |
erweiterter Einstellungen mithilfe des Justierungsmenüs (Seite 6). |
|
|
|
• Taste oder |
: Zeigt den Bildschirm für die Helligkeitseinstellung an (Seite 6). |
7 |
Netzschalter |
Zum Einund Ausschalten. |
|
8 |
Betriebsanzeige |
Zeigt den Betriebsstatus des Monitors an. |
|
|
|
Blau: In Betrieb |
Orange: Energiesparmodus Aus: Hauptstromversorgung getrennt |
9Öffnung für Diebstahlsicherung Kompatibel mit dem Kensington MicroSaver-Sicherheitssystem.
10 |
Netzstecker |
Zum Anschließen an eine Netzsteckdose. |
11 |
Stereo Mini-Jack |
Anschluss des Stereo-Kabels mit Klinkenstecker. |
12 |
Signaleingänge |
DVI-I-Anschluss/15-poliger Mini-D-Sub-Anschluss |
13 |
USB-Anschluss (hinten) |
Anschluss des USB-Kabels bei der Verwendung von ScreenManager Pro für |
|
|
LCD-Software (für Windows). Informationen zur Verwendung der Software |
|
USB-Anschluss (seitlich) |
entnehmen Sie der Benutzerhandbuch auf der CD-ROM. |
|
Stellt eine Verbindung zu einem USB-Peripheriegerät her. |
|
14 |
Fuß |
Zum Einstellen der Höhe und Neigung des Bildschirms. |
15 |
Kabelabdeckung |
Verdeckt die Anschlusskabel. |
16 |
Befestigungslöcher für optionale |
Zum Befestigen der optionalen Lautsprecher (i•Sound L3). (Die optionalen Lautsprecher |
|
Lautsprecher (i•Sound L3) |
können je nach Art des Standfußes möglicherweise nicht angebracht werden.) |
*ScreenManager ® ist der Name des Justierungsmenüs von EIZO. (Informationen zur Verwendung von ScreenManager entnehmen Sie dem Benutzerhandbuch auf der CD-ROM.)
2

Vor der Benutzung |
Installation |
Einstellungen/Justierung |
Fehlerbeseitigung |
Installation/Lagerung des Monitors mit EZ-UP-Fuß
Gehen Sie bei einem Monitor mit EZ-UP-Fuß beim Aufstellen oder Lagern folgendermaßen vor:
Der Standfuß des Monitors ist für den Transport mit einer Metallbefestigung gesichert. Entfernen Sie die Metallbefestigung erst nach dem Aufstellen des Monitors auf dem Tisch, da der Fuß andernfalls plötzlich aufklappt. Bewahren Sie die Metallbefestigung auf, da Sie den Monitor möglicherweise an anderer Stelle aufstellen oder ihn erneut transportieren müssen.
Installieren des Monitors
1 Heben Sie den Bildschirm in Pfeilrichtung an.
Heben Sie ihn mit beiden Händen an, und lassen Sie ihn einrasten. Nach dem Einrasten ist der Monitorfuß sicher justiert, sodass der Monitor verwendet werden kann.
2 Senken Sie den Monitor ab, und entfernen Sie die Metallbefestigung.
1
2 |
Metallbefestigung |
Gelenk |
Standfläche des Fußes |
Hinweis
•Wird die Metallbefestigung entfernt, klappt der Standfuß u. U. auf.
•Verwenden Sie den Monitor nicht mit zusammengeklapptem EZ-UP-Fuß.
•Gehen Sie mit dem entriegelten Monitor vorsichtig um, damit der Monitor nicht herunterfällt bzw. Sie sich nicht die Finger einklemmen. Ansonsten wird der Monitor möglicherweise beschädigt oder Sie tragen Verletzungen davon.
Lagern des Monitors
1 Entfernen Sie die Kabelhalterung.
2Senken Sie den Monitor ab, bis das Gelenk des Standfußes die Standfläche berührt, und bringen Sie die Metallbefestigung an.
Stellen Sie den Monitorwinkel so ein, dass der Bildschirm die Standfläche nicht berührt.
3Kippen Sie den Bildschirm nach hinten, und halten Sie dabei den Knopf zum Entsperren nach oben geschoben.
Ist der Monitor ganz nach hinten gekippt (Winkel von 25º), kann der Knopf zum Entsperren möglicherweise nur schwer nach oben geschoben werden. Kippen Sie den Monitor leicht nach oben in die vertikale Position, und schieben Sie den Knopf zum Entsperren nach oben.
Deutsch
Knopf zurm Entsperren
3

Deutsch
Vor der Benutzung |
Installation |
Einstellungen/Justierung |
Fehlerbeseitigung |
Kabel anschließen
Hinweis
•Um einen bereits vorhandenen Monitor durch einen Monitor des Typs S2031W/S2431W zu ersetzen, stellen Sie die PC-Einstellungen für Auflösung und vertikale Bildwiederholfrequenz auf die für S2031W/ S2431W-Monitore verfügbaren Werte ein. Diese entnehmen Sie bitte der Auflösungstabelle (Rückseite
der ersten Seite), bevor Sie den Monitor anschließen.
HINWEIS
• Lesen Sie im Benutzerhandbuch auf der CD-ROM nach, wenn Sie zwei PCs an den Monitor anschließen möchten.
1 Stellen Sie sicher, dass Computer und Monitor ausgeschaltet sind.
2 Verbinden Sie Monitor und Computer mithilfe eines passenden Signalkabels.
Ziehen Sie nach dem Anschließen der Kabel die Schrauben der Verbinder an, um ein versehentliches Ausstecken zu verhindern.
CD-Player usw. |
|
Anschlüsse am |
|
PC |
|
Anschluss des |
|
Audioausgangs |
Stereokabel mit Klinkenstecker (mitgeliefert) |
DVI-Anschluss |
Signalkabel FD-C39 (mitgeliefert) |
|
Digitale Verbindung |
15-poliger Mini- |
Signalkabel MD-C87 (mitgeliefert) |
D-Sub-Anschluss |
|
Anschlüsse am Monitor
Anschluss des Audioeingangs
DVI-I-Anschluss
15-poliger Mini-
D-Sub-Anschluss
Analoge Verbindung
3Verbinden sie mithilfe des Netzkabels den Netzanschluss des Monitors mit einer Steckdose.
Abdecken der Monitorkabel
Decken Sie die Monitorkabel mit der Kabelhalterung ab.
|
Kabelhalterung |
Höhenverstellbarer Fuß |
EZ-UP-Fuß |
4

Vor der Benutzung |
Installation |
Einstellungen/Justierung |
Fehlerbeseitigung |
Höhe und Neigung des Bildschirms einstellen
Halten Sie den Monitor mit beiden Händen am linken und rechten Rand fest, und stellen Sie die für IhrenArbeitsplatz optimale Höhe, Neigung und Drehung des Bildschirms ein.
Höhenverstellbarer Fuß
Halten Sie den Monitor mit beiden Händen am linken und rechten Rand fest, und stellen Sie seine Höhe und seine horizontale Position ein.
EZ-UP-Fuß
Halten Sie den Monitor mit beiden Händen am linken und rechten Rand fest, um den Bildschirmwinkel anzupassen, indem Sie seine Höhe und seine horizontale Position einstellen.
Deutsch
Bild wiedergeben
1 Drücken Sie  , um den Monitor einzuschalten.
Die Betriebsanzeige des Monitors leuchtet auf (blau).
2 Schalten Sie den Computer ein.
Das Bild wird angezeigt.
Beim ersten Einschalten des Monitors und des PCs mit dem analogen Signal werden Uhr, Phase und Anzeigeposition von der automatischen Einstellung automatisch angepasst.
Hinweis
•Schalten Sie Computer und Monitor aus, wenn Sie sie nicht mehr benötigen. Wenn Sie das Netzkabel abziehen, wird die Stromzufuhr zum Monitor vollständig unterbrochen.
Lautstärke der Lautsprecher einstellen
1 Drücken Sie oder . |
Bildschirm zur Einstellung der Lautstärke |
Der Bildschirm zur Einstellung der Lautstärke wird angezeigt.
2 Stellen Sie die Lautstärke mit der Taste  oder
oder  ein.
ein.
5

Deutsch
Vor der Benutzung |
Installation |
Einstellungen/Justierung |
Fehlerbeseitigung |
Anzeigemodus auswählen
Mithilfe des Modus FineContrast können Sie den optimalen Anzeigemodus schnell und einfach wählen. Weitere Einzelheiten zu FineContrast entnehmen Sie dem Benutzerhandbuch auf der CD-ROM.
Modus FineContrast
Custom (Benutzerdefiniert) |
Zum wunschgemäßen Einstellen der Farben. |
sRGB |
Einstellung für Farbabgleich mit Peripheriegeräten, die sRGB unterstützen. |
Text |
Einstellung für Textverarbeitungen und Tabellenkalkulationen. |
Picture (Bild) |
Einstellung für Fotos und Bilder. |
Movie (Film) |
Einstellung für animierte Bilder. |
1 |
Drücken Sie . |
|
Der Modus „FineContrast“ wird angezeigt. |
2Drücken Sie erneut die Taste  , während der Modus „FineContrast“ angezeigt wird.
Bei jedem Drücken der Taste wechselt der Modus. (siehe Tabelle „FineContrast-Modus“.)
3Ist der gewünschte Modus eingestellt, drücken Sie  .
.
Dadurch wird die Einstellung gespeichert.
Name des FineContrast-Modus
Zeigt den aktuellen Modus an.
Bildschirmhelligkeit einstellen
1 |
Drücken Sie |
oder . |
|
|
Der Bildschirm zur Helligkeitseinstellung wird angezeigt. |
Bildschirm zur Helligkeitseinstellung |
|
2 Stellen Sie die Helligkeit mit der Taste  oder
oder  ein.
ein.
Drücken Sie zum Aufhellen des Bildschirms die Taste  ; zum Abdunkeln drücken Sie die Taste
  .
.
3Ist die gewünschte Helligkeit eingestellt, drücken Sie  .
.
Damit wird der eingestellte Wert gespeichert.
HINWEIS
•Die Bildschirmhelligkeit wird mithilfe des unten am Bildschirm angebrachten Sensors, der die Umgebungshelligkeit mit der Funktion zur BrightRegulator erkennt, automatisch an die Umgebung angepasst.
Einzelheiten entnehmen Sie dem Benutzerhandbuch auf der CD-ROM.
Erweiterte Einstellungen/Justierung vornehmen
Im Justierungsmenü können erweiterte Justierungen des Monitors und der Farben sowie verschiedene andere Einstellungen vorgenommen werden.
Weitere Einzelheiten zu den einzelnen Justierungsfunktionen entnehmen Sie dem Benutzerhandbuch auf der CD-ROM.
Justierungsmenü
Bei analogem Signaleingang |
Bei digitalem Signaleingang |
Die grundlegenden Einstellungen und Justierungen sind damit beendet. Weitere Einzelheiten zu erweiterten Einstellungen/Justierungen entnehmen Sie dem Benutzerhandbuch auf der CD-ROM.
6

Vor der Benutzung |
Installation |
Einstellungen/Justierung |
Fehlerbeseitigung |
Problem: Kein Bild
Wird auch nach dem Durchführen der nachfolgend vorgeschlagenen Lösungen kein Bild angezeigt, wenden Sie sich an Ihren Fachhändler.
1. Prüfen Sie den Status der Betriebsanzeige.
Symptom |
Status |
Mögl. Ursache und Lösung |
|
Kein Bild |
Betriebsanzeige: Aus. |
Prüfen Sie, ob das Netzkabel richtig eingesteckt |
|
|
|
ist. Besteht das Problem weiterhin, schalten Sie |
|
|
|
den Monitor aus und nach wenigen Minuten |
|
|
|
wieder ein. |
|
|
|
Drücken Sie . |
|
|
|
|
|
|
Betriebsanzeige leuchtet blau. |
Erhöhen Sie alle RGB-Justierungswerte unter |
|
|
|
<Gain-Einstellung>. |
|
|
Anzeigenstatus leuchtet |
Wechseln Sie durch Drücken der Taste |
den |
|
orange. |
Signaleingang. |
|
|
|
Bewegen Sie die Maus oder drücken Sie eine |
|
|
|
Taste. |
|
|
|
Prüfen Sie, ob der Computer eingeschaltet ist. |
|
2. Überprüfen Sie die Fehlermeldung auf dem Bildschirm.
Diese Meldungen werden angezeigt, wenn das Eingangssignal nicht ordnungsgemäß übertragen wird, der Monitor jedoch korrekt funktioniert.
Symptom |
Status |
Mögl. Ursache und Lösung |
|
Kein Signaleingang. |
Die links stehende Meldung wird angezeigt, |
|
|
wenn PCs das Signal nicht gleich nach dem |
|
|
Einschalten übertragen. |
|
|
Prüfen Sie, ob der Computer eingeschaltet ist. |
|
|
Prüfen Sie, ob das Signalkabel richtig |
Bei analogem Signaleingang |
|
eingesteckt ist. |
|
Wechseln Sie durch Drücken der Taste den |
|
|
|
|
|
|
Signaleingang. |
Bei digitalem Signaleingang
Das Eingangssignal befindet |
Starten Sie den PC neu. |
|
sich außerhalb des |
|
|
Wählen Sie mithilfe des zur Grafikkarte |
||
angegebenen |
||
gehörenden Dienstprogramms einen geeigneten |
||
Frequenzbereichs. |
||
Anzeigemodus. Weitere Informationen hierzu |
||
(Diese Signalfrequenz wird rot |
||
entnehmen Sie dem Handbuch der Grafikkarte. |
||
angezeigt.) |
||
|
Deutsch
7

Memo
Deutsch
8

Avant l’utilisation  Guide de dépannage
Moniteur couleur LCD
SYMBOLES DE SECURITE
Ce manuel utilise les symboles de sécurité présentés ci-dessous. Ils signalent des informations critiques. Veuillez les lire attentivement.
AVERTISSEMENT |
ATTENTION |
Le non respect des consignes données dans un message |
Le non respect des consignes données dans un message |
AVERTISSEMENT peut entraîner des blessures |
ATTENTION peut entraîner des blessures et/ou des |
sérieuses ou même la mort. |
dommages au matériel ou au produit. |
Indique une action interdite. |
|
Indique une action obligatoireà suivre. |
|
PRECAUTIONS
 AVERTISSEMENT
Si le moniteur fume, sent le brûlé ou émet des |
Utilisez le cordon secteur fourni pour le |
bruits anormaux, débranchez immédiatement |
branchement sur la prise secteur standard |
tous les cordons secteur et prenez contact |
dans votre pays. |
avec votre revendeur. |
Vérifiez la tension d’épreuve du cordon secteur. Tout |
Il peut être dangereux d’utiliser un moniteur au |
autre branchement peut présenter des risques d’incendie |
fonctionnement défectueux. |
ou de choc électrique. |
|
Alimentation : 100-120/200-240 VCA 50/60 Hz |
Eloignez les petits objets ou les liquides de l’appareil.
L’introduction accidentelle de petits objets ou de liquide dans les fentes de ventilation de la carrosserie peut entraîner un choc électrique, un incendie ou des dégâts à l’appareil. Si un objet tombe dans la carrosserie ou si du liquide se répand sur ou à l’intérieur de l’appareil, débranchez immédiatement le cordon secteur. Faites contrôler l’appareil par un technicien qualifié avant de l’utiliser à nouveau.
Choisissez bien l’emplacement du moniteur.
Il y a des risques de dégâts à l’appareil, d’incendie ou de choc électrique.
•Ne pas utiliser à l’extérieur.
•Ne pas utiliser dans des moyens de transport (bateau, avion, trains, automobiles, etc.).
•Ne pas installer l’appareil dans un environnement poussiéreux ou humide.
•Ne pas installer l’appareil à un endroit exposé directement à la vapeur d’eau.
•Ne pas placer l’appareil près des appareils de chauffage ou d’humidification.
L’appareil doit être relié à une prise avec terre.
Tout autre branchement peut présenter des risques d’incendie ou de choc électrique.
 ATTENTION
N’obstruez pas les fentes de ventilation de la carrosserie.
•Ne placez jamais d’objets sur les fentes de ventilation.
•N’installez pas le moniteur dans un espace confiné.
•N’utilisez pas le moniteur couché sur le côté ni à l’envers.
Toutes ces utilisations risquent d’obstruer les fentes de ventilation et d’empêcher une circulation d’air normale, et d’entraîner un incendie ou d’autres dégâts.
Utilisez une prise électrique facilement accessible.
Ceci vous permettra de débrancher rapidement l’appareil en cas de problème.
A propos du manuel d’installation et du manuel d’utilisation
|
Manuel d’installation |
Décrit les informations de base depuis la connexion du moniteur à |
|
||
|
(Ce manuel d’installation) |
l’ordinateur jusqu’à l’utilisation du moniteur. |
|
|
|
|
Manuel d’utilisation |
Décrit les informations d’application telles que les ajustages d’écran, les |
|
(•Fichier PDF inclus sur le |
|
|
réglages et les spécifications. |
|
|
CD-ROM*) |
|
Français
*Installation du logiciel Adobe Reader nécessaire. |
|
• Les caractéristiques techniques du produit varient en fonction des régions de commercialisation. Vérifiez que le manuel est bien |
|
écrit dans la langue de la région d’achat de l’appareil. |
1 |
|

Français
Avant l’utilisation  Guide de dépannage
Contenu de l’emballage
Vérifiez que tous les éléments indiqués ci-dessous sont inclus dans le carton d’emballage. Contactez votre revendeur local si l’un des éléments est manquant ou abîmé.
REMARQUE
• Veuillez conserver le carton et les matériaux d’emballage pour les réutiliser lors d’un déplacement ultérieur du moniteur.
□Moniteur
□Cordon d’alimentation
□Câble de signal numérique (FD-C39)
□Câble de signal analogique (MD-C87)
□Câble EIZO USB (MD-C93)
□Câble à mini-prise stéréo
□EIZO LCD Utility Disk (CD-ROM)
• Manuel d’utilisation
□Manuel d’installation (ce manuel)
□Garantie limitée
□Informations sur le recyclage
□Vis de montage (M4 x 12, 4 pièces)
□Enveloppe de câbles (pour pied EZ-UP)
Commandes et fonctions
Menu Ajustage (*ScreenManager ®)


1 |
2 |
3 |
4 |
5 |
6 |
7 |
8 |
|
14 |
15 |
|
|
|
9 |
16 |
|
[S2431W] |
[S2031W] |
|
10 |
11 12 |
13 |
13 |
12 11 |
10 |
1 Capteur |
Détecte la luminosité ambiante. Fonction BrightRegulator (page 6). |
2Touches de commande du volume Permet d’afficher le menu de réglage du volume pour augmenter ou diminuer le volume.
3Touche de sélection du signal d’entrée Pour commuter les signaux d’entrée de l’affichage lors de la connexion de 2 PC au moniteur.
4 |
Touche Mode |
Permet de changer le mode d’affichage. |
5 |
Touche de validation |
Pour afficher le menu Ajustage, pour sélectionner un élément de l’écran de |
|
|
menu et sauvegarder les valeurs ajustées. |
6 |
Touches de commande |
• Pour sélectionner un élément d’ajustage ou augmenter/diminuer les valeurs |
|
(Gauche, Bas, Haut, Droite) |
ajustées pour des ajustages avancés à l’aide du menu Ajustage (page 6). |
|
|
• Touche ou : Permet d’afficher l’écran de réglage de la luminosité (page 6). |
7 |
Touche d’alimentation |
Pour mettre sous/hors tension. |
8 |
Voyant d’alimentation |
Pour indiquer l’état de fonctionnement du moniteur. |
|
|
Bleu : En fonctionnement Orange : Economie d’énergie Eteint : Hors tension |
9Fente pour le verrouillage de sécurité Compatible avec le système de sécurité MicroSaver de Kensington.
10 |
Connecteur d’alimentation |
Permet de raccorder le connecteur d’alimentation. |
11 |
Mini-prise stéréo |
Permet de raccorder le câble à mini-prise stéréo. |
12 |
Connecteurs de signal d’entrée |
Connecteur DVI-I/Connecteur D-Sub mini à 15 broches |
13 |
Port USB (amont) |
Permet de raccorder le câble USB en cas d’utilisation de ScreenManager Pro for LCD (pour Windows). |
|
Port USB (aval) |
Consultez le manuel d’utilisation inclus sur le CD-ROM pour savoir comment utiliser ce logiciel. |
|
Permet de raccorder un périphérique USB. |
|
14 |
Pied |
Utilisé pour ajuster la hauteur et l’angle de l’écran du moniteur. |
15 |
Enveloppe de câbles |
Protège les câbles du moniteur. |
16Orifices de montage pour haut- Permettent de fixer les haut-parleurs en option (i•Sound L3). (Selon le type de pied, parleurs (i•Sound L3) en option il est possible qu’il ne soit pas possible de raccorder le haut-parleur en option.)
*ScreenManager® est un alias choisi par EIZO pour le menu Ajustage. (Consultez le manuel d’utilisation sur le CD-ROM si vous désirez de plus amples détails sur l’utilisation de ScreenManager.)
2
Avant l’utilisation |
Installation |
Réglage/Ajustage |
Guide de dépannage |
Installation/rangement du moniteur avec le pied EZ-UP
Si vous avez acheté un moniteur avec un pied EZ-UP, veuillez suivre les procédures d’installation et de rangement cidessous.
Le pied du moniteur est bloqué par un mécanisme de verrouillage métallique dans l’emballage. Installez d’abord le moniteur sur le bureau avant de retirer le mécanisme de verrouillage, car le pied pourrait se déplier brusquement. Conservez le mécanisme de verrouillage métallique pour tout déplacement ou transport ultérieur du moniteur.
Installation du moniteur
1 Relevez la partie écran du moniteur dans le sens de la flèche.
Maintenez l’écran des deux mains jusqu’au déclic de mise en place. Le déclic indique que le pied du moniteur est verrouillé, permettant un usage parfaitement sécurisé.
2 Abaissez l’écran du moniteur, puis retirez le mécanisme de verrouillage.
1
2 |
Mécanisme de |
verrouillage métallique |
|
Charnière |
Base du pied |
Attention
•Le retrait du mécanisme de verrouillage risque d’entraîner un déblocage soudain du pied.
•N’utilisez pas le moniteur lorsque le pied EZ-UP est replié.
•Une fois la sécurité déverrouillée, veillez à ne pas faire tomber le moniteur ou à ne pas vous pincer les doigts. Vous risqueriez de vous blesser ou d’endommager le moniteur.
Rangement du moniteur
1 Retirez l’enveloppe de câbles.
2Abaissez l’écran du moniteur jusqu’à ce que la charnière du pied touche la base du pied, puis fixez le mécanisme de verrouillage métallique.
Réglez l’angle du moniteur de sorte que l’écran ne touche pas la base du pied.
3 Abaissezrelevée. l’écran vers l’arrière en conservant le bouton de sécurité en position
Une fois l’écran incliné au maximum (25 º) vers l’arrière, le bouton de sécurité peut être difficile à relever. Dans ce cas, relevez légèrement le moniteur vers la verticale pour accéder au bouton de sécurité et le soulever.
Bouton de sécurité
Français
3

Français
Avant l’utilisation |
Installation |
Réglage/Ajustage |
Guide de dépannage |
Connexion des câbles
Attention
•Lors du remplacement du moniteur actuel par un moniteur S2031W/S2431W, veillez à modifier la résolution et la fréquence verticale du PC conformément aux réglages du S2031W/S2431W indiqués dans le tableau des résolutions (verso de la couverture) avant de connecter le PC.
REMARQUE
• Pour connecter deux PC au moniteur, consultez le Manuel d’utilisateur inclus sur le CD-ROM.
1 Vérifiez que le moniteur et le PC sont hors tension.
2Connectez le moniteur au PC à l’aide d’un câble de signal correspondant aux connecteurs.
Une fois que les connecteurs de câble sont connectés, serrez les vis des connecteurs pour assurer le couplage.
Lecteur CD, etc. |
|
Connecteurs de |
|
l’ordinateur |
|
Connecteur de |
|
sortie audio |
Câble à mini-prise stéréo (fourni) |
Connecteur DVI |
Câble de signal FD-C39 (fourni) |
|
Connexion numérique |
Connecteur D-Sub |
Câble de signal MD-C87 (fourni) |
mini à 15 broches |
|
Connecteurs du moniteur
Connecteur d’entrée audio
Connecteur DVI-I
Connecteur D-Sub
mini à 15 broches
Connexion analogique
3Branchez le cordon d’alimentation dans une prise secteur et dans le connecteur d’alimentation du moniteur.
Protection des câbles du moniteur
Protégez les câbles du moniteur à l’aide de l’enveloppe de câbles.
|
Enveloppe |
|
câbles |
Pied réglable en hauteur |
Pied EZ-UP |
4

Avant l’utilisation |
Installation |
Réglage/Ajustage |
Guide de dépannage |
Ajustage de la hauteur et de l’angle de l’écran
Placez vos mains des deux côtés du moniteur et réglez la hauteur, l’inclinaison et l’orientation de l’écran dans une position agréable et confortable pour travailler.
Pied réglable en hauteur
Pour régler la hauteur et la position latérale de l’écran, placez vos mains des deux côtés du moniteur.
Pied EZ-UP
Pour régler la hauteur et la position latérale de l’écran, déplacez le moniteur en le tenant par les deux côtés.
Français
Affichage de l’écran
1 Appuyez sur  pour mettre le moniteur sous tension.
Le voyant d’alimentation du moniteur s’éclaire en bleu.
2 Mettez le PC sous tension.
L’image affichée apparaît.
Lorsque vous mettez le moniteur et l’ordinateur sous tension pour la première fois avec le signal analogique, la fonction de réglage automatique règle l’horloge, la phase et la position d’affichage automatiquement.
Attention
•Mettez le moniteur et le PC hors tension lorsque vous ne les utilisez plus. L’alimentation du moniteur est coupée en débranchant le cordon d’alimentation.
Réglage du volume du haut-parleur
1 Appuyez sur ou . |
Ecran de réglage du volume du haut-parleur |
L’écran de réglage du volume du haut-parleur apparaît.
2 Réglez le volume du haut-parleur à l’aide de la touche  ou
ou  .
.
5
 Loading...